


Giannis20
Members
-
Joined
-
Last visited
Everything posted by Giannis20
-
-
So, in 2025 is there any solution for station logos ?
-
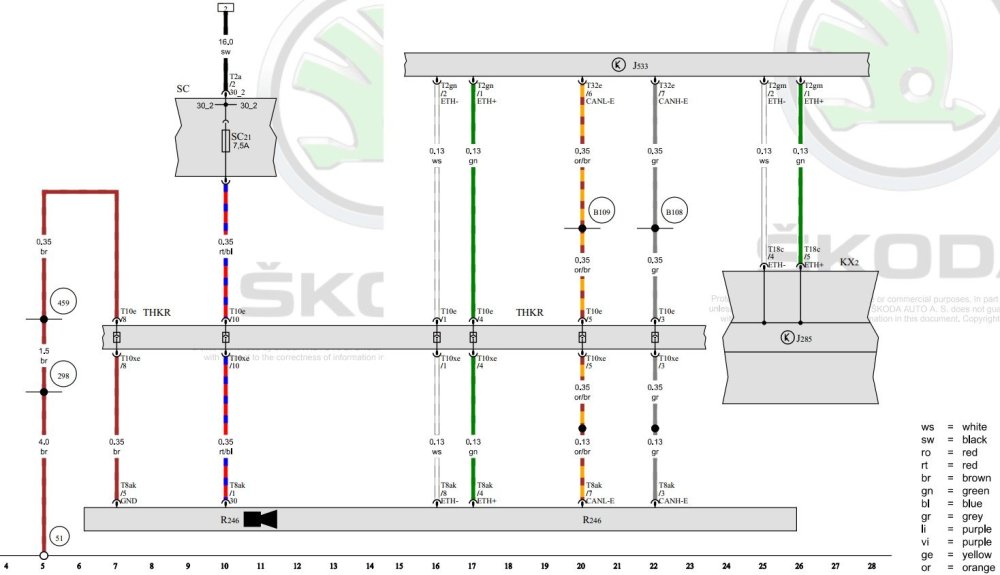
Unfortunately, there is no analysis for the codes, so we do not know when they occurred and under what conditions. Diagnostics now have the ability to work with the car's modules to read information, such as the time the error occurred, whether it was sporadic or continuous, whether the engine was running at that time, etc. There are really many codes in your list, which you have to look up one by one on the Internet if you want to have a picture of what happened to the car. After clearing the codes, was the error check done again?Those are the original places of the radars So, the first step for the installation, is to remove the rear bumper. To achieve this, one must first remove certain other things. 1st the luggage loading edge 2nd the taillights. It is not mandatory, but I recommend it so that the bumper can be easily removed from its clips and no damage is done. Now we are ready to remove the bumper. Pull the bumper outwards, disconnect the cable (if any) of the reversing sensors. I suggest putting a protective cloth, plastic or something else on the floor, so as not to scratch the paint. Done!!! (Note, in this photo it appears that the luggage side trims of the trunk have also been removed. This is necessary to do so that the wiring to the radar can pass through, I will show it in a next post)R246 is the rear view camera. J285 is the control unit for the Infotainment
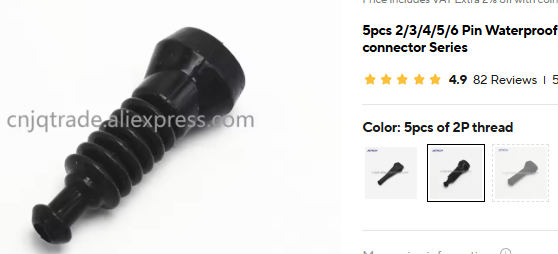
 I'm also looking for the Octavia but I haven't found it anywhere. I bought these LEDs for my other car (VW Polo 6c) from aliexpress and they are excellent.I don't remember to be honest. Either way, you need to make sure it stays still and doesn't make any noise. It's best to wedge it in.I am almost done with the materials. Here the most important. Left radar 2Q0907685H Right radar 2Q0907686H (master) Bracket on the left 5E6907456A Bracket on the right 5E6907457A Connectors for radars [2pcs] 1J0973714 and pins 000979038 Plastic nuts for brackets N91018901 [4pcs] I desided to do the 100% retrofit, so i bought mirror caps and the LED warning lights: Mirror caps Black Mirror Cover Kit with Indicator Holes 5E30722530C F9R LED warning lights for side mirrors Left 5E6949145 LED warning lights for side mirrors Right 5E6949146 I searched a lot to find the name (code) for the LED warning light connector. Finally i found it: Connectors for LED warning lights MX19002S51 [2pcs] And a pair of connectors, for the wiring inside the front doors: Connectors for door wiring to mirror: 1J0973119 [2pcs] & 1J0973332 [2pcs] Next step: The wiring (i desided to do it myself).This was the only point I didn't explain in my presentation. And that's because I thought the way I did it was particularly complicated. However, since many people have asked me through messages, here's what I did very briefly. I connected a wire to the 3rd connector of the comfort control module (BCM) at Pin 35. This is the + for the lighting system module. Then i program that pin to operate as parking light (standlicht in Deutch) This way it provides power whenever the lights come on and I get exactly the result I want.Actually there is an original part for this LED light. The code is: 3v0919173a But i don't think it is plug and play. This light has only 2 wires. so it is only emites one color (possible white)
 Well, if it is the same as mine, you can try the same application. I-AT Lamp is the name of the application. http://www.qrtransfer.com/hr_hc.htmlDid you order the exact same kit? or something similar? IF you ordered the same kit you should find a small booklet with a QR code with the app link.for the 1869Mine too. Perhaps the explanation given by 386ka is correct.
 Use this thread to share the photos. This way we can spread the knowledge to everyone. Otherwise, send me PM.There are no screws, only clips. Start pulling this out from behind with a plastic trim removal and be gently.Hello everyone, I have decided to retrofit Blind Spot Assist myself. I am currently gathering information and materials. I will share my efforts with you as they unfold. I don't know if I will succeed, so I haven't yet predicted 100% success. The information concerns material codes and the method of their installation. Finally of course there is the programming of the system which will be done by on-line connection to the VW servers. So, so far I have collected some materials. The schematic: The codes of the radars: The brackets for the radars To be continued...Yes it's the same. Also see this thread, it's in Russian language, use google translate. https://www.drive2.ru/l/687341278358149452/Hi, the 4-pin connector has a code: 4D0972704 the 2-pin connector has a code: 1J0971972I did the update. Everything is fine.Thank you so much for sharing the file.


Important Information
Welcome to BRISKODA. Please note the following important links Terms of Use. We have a comprehensive Privacy Policy. We have placed cookies on your device to help make this website better. You can adjust your cookie settings, otherwise we'll assume you're okay to continue.