sparky2
Members
-
Joined
-
Last visited
Everything posted by sparky2
-
Hi All,My Octavia Scout 4x4 2009 TDi needs some wheel alignment on a Hunter elite machine, trouble is the software on the machine says it has to disable some sensors which I presume is on the steering, so the question is would VCDS reset the sensors to the new values as the garage is asking if the machine alters the sensors I might have to go to a main dealer to reprogram the car.Will VCDS do the job ? Cheers Stuart
-
Hi All, my Octavia Scout 2009 TDi needs its tracking doing as tyres are wearing on the inside edge, with it being 4x4 what can they adjust on the chassis ?
-
You need to read the fault codes, we have a rapid 1.6 TDi CR and I think when our coil was flashing it was the EGR valve that req cleaning, I put a guide on here if you search the fault code.
-
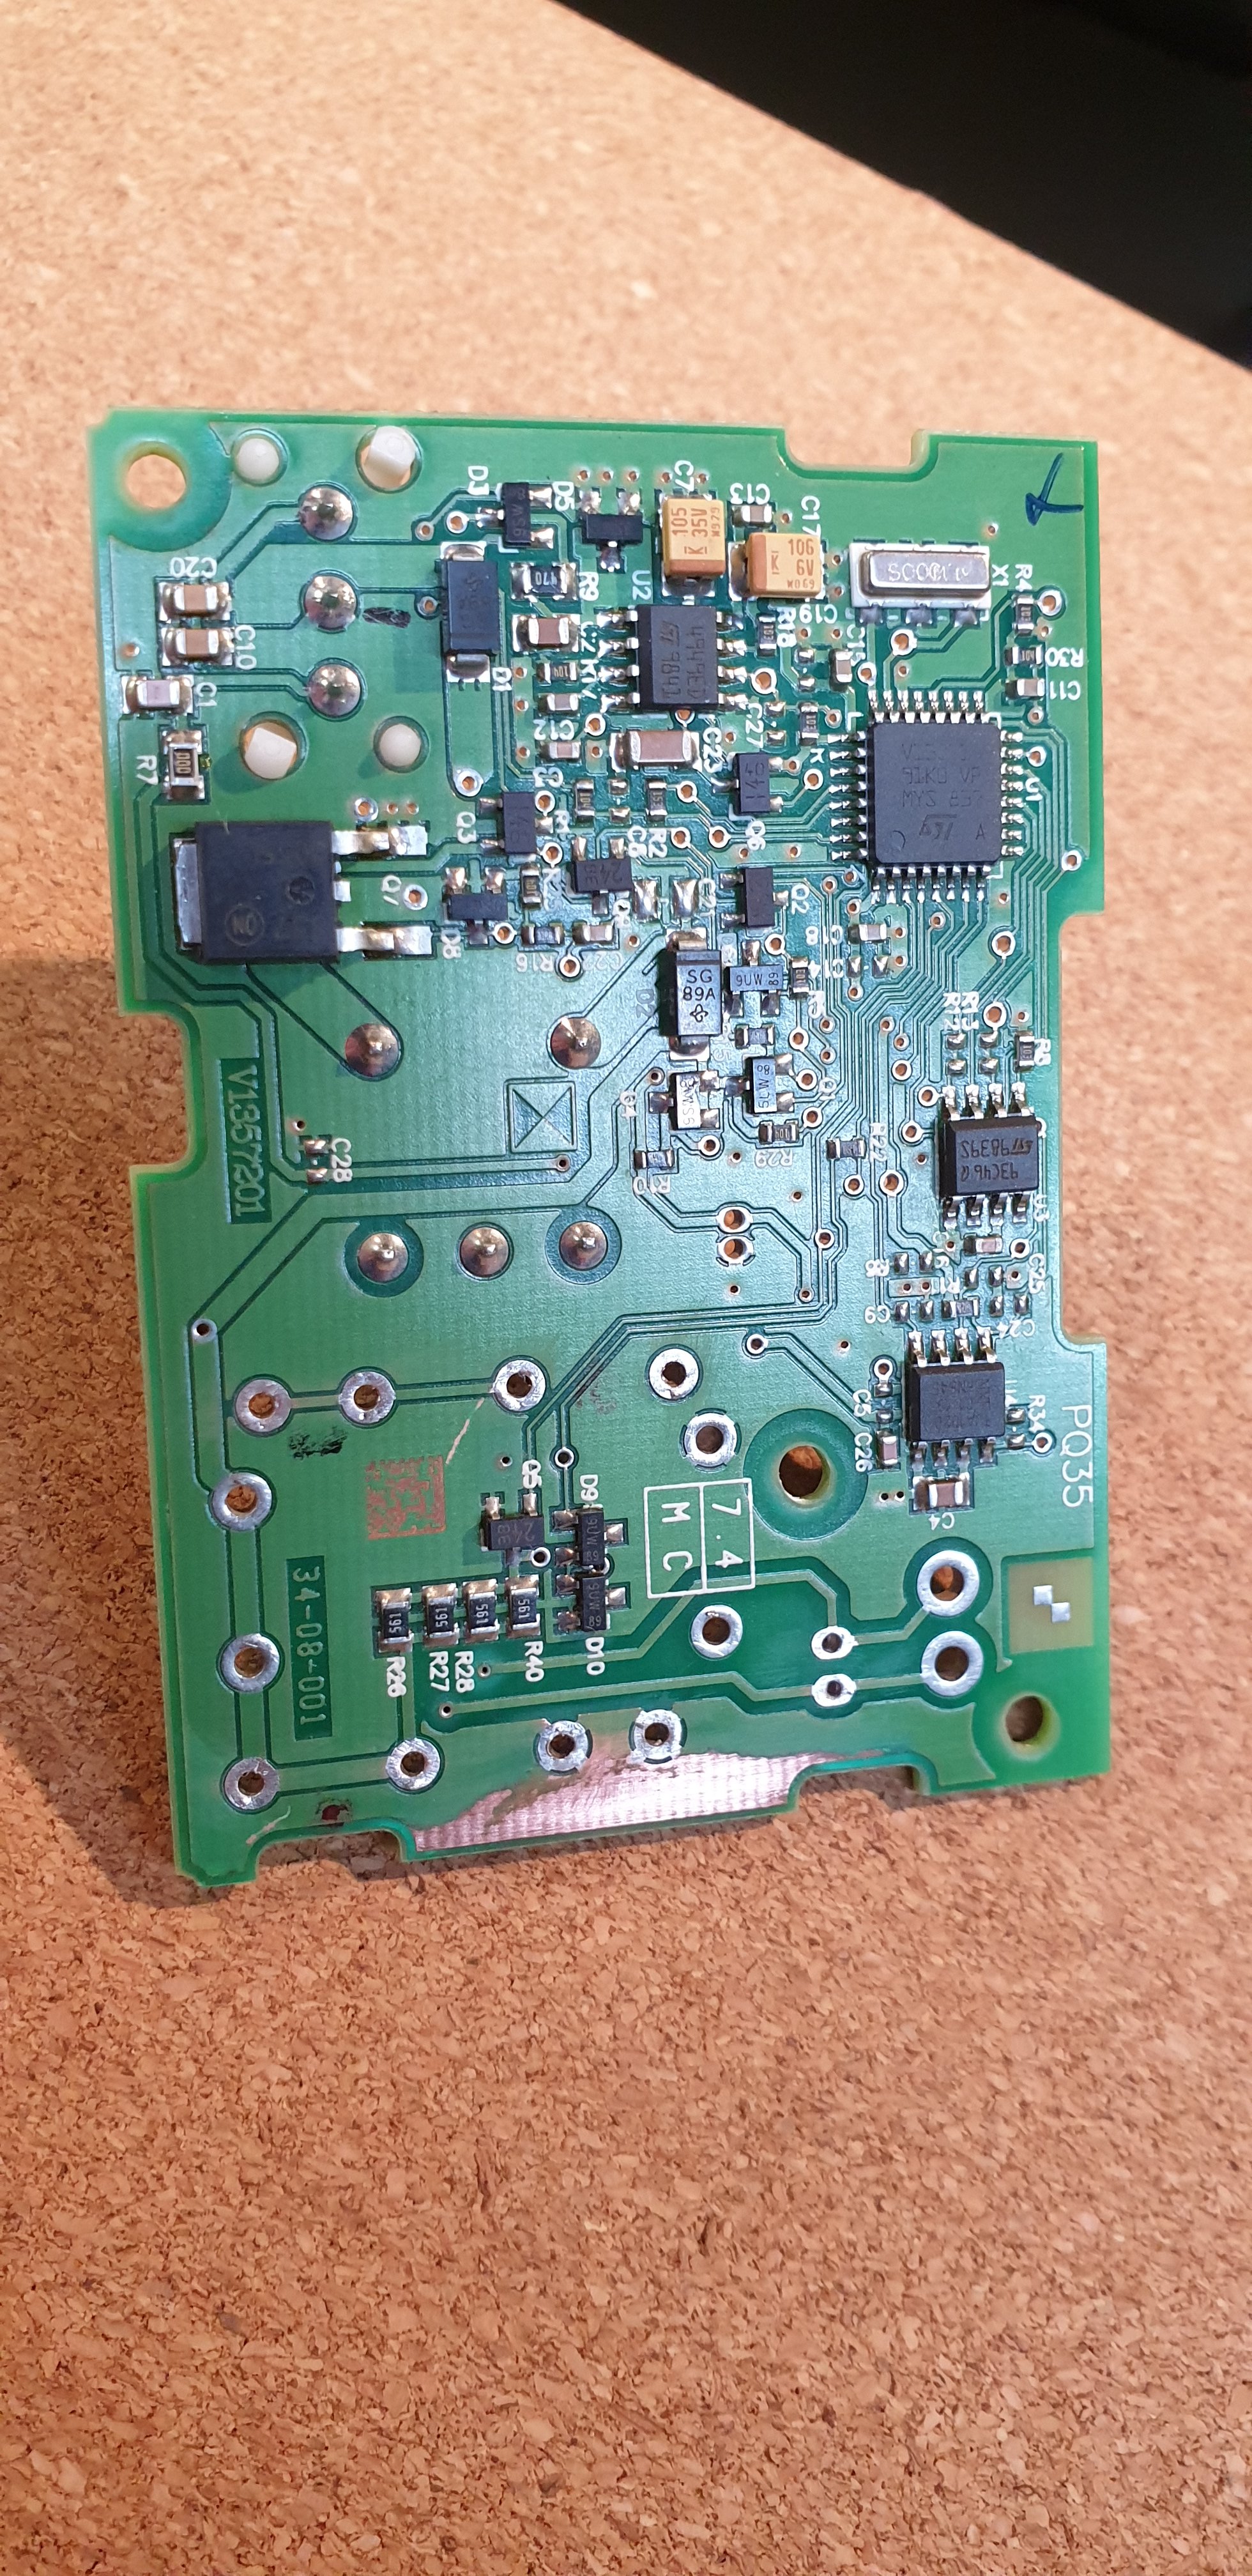
Component side of PCB

-
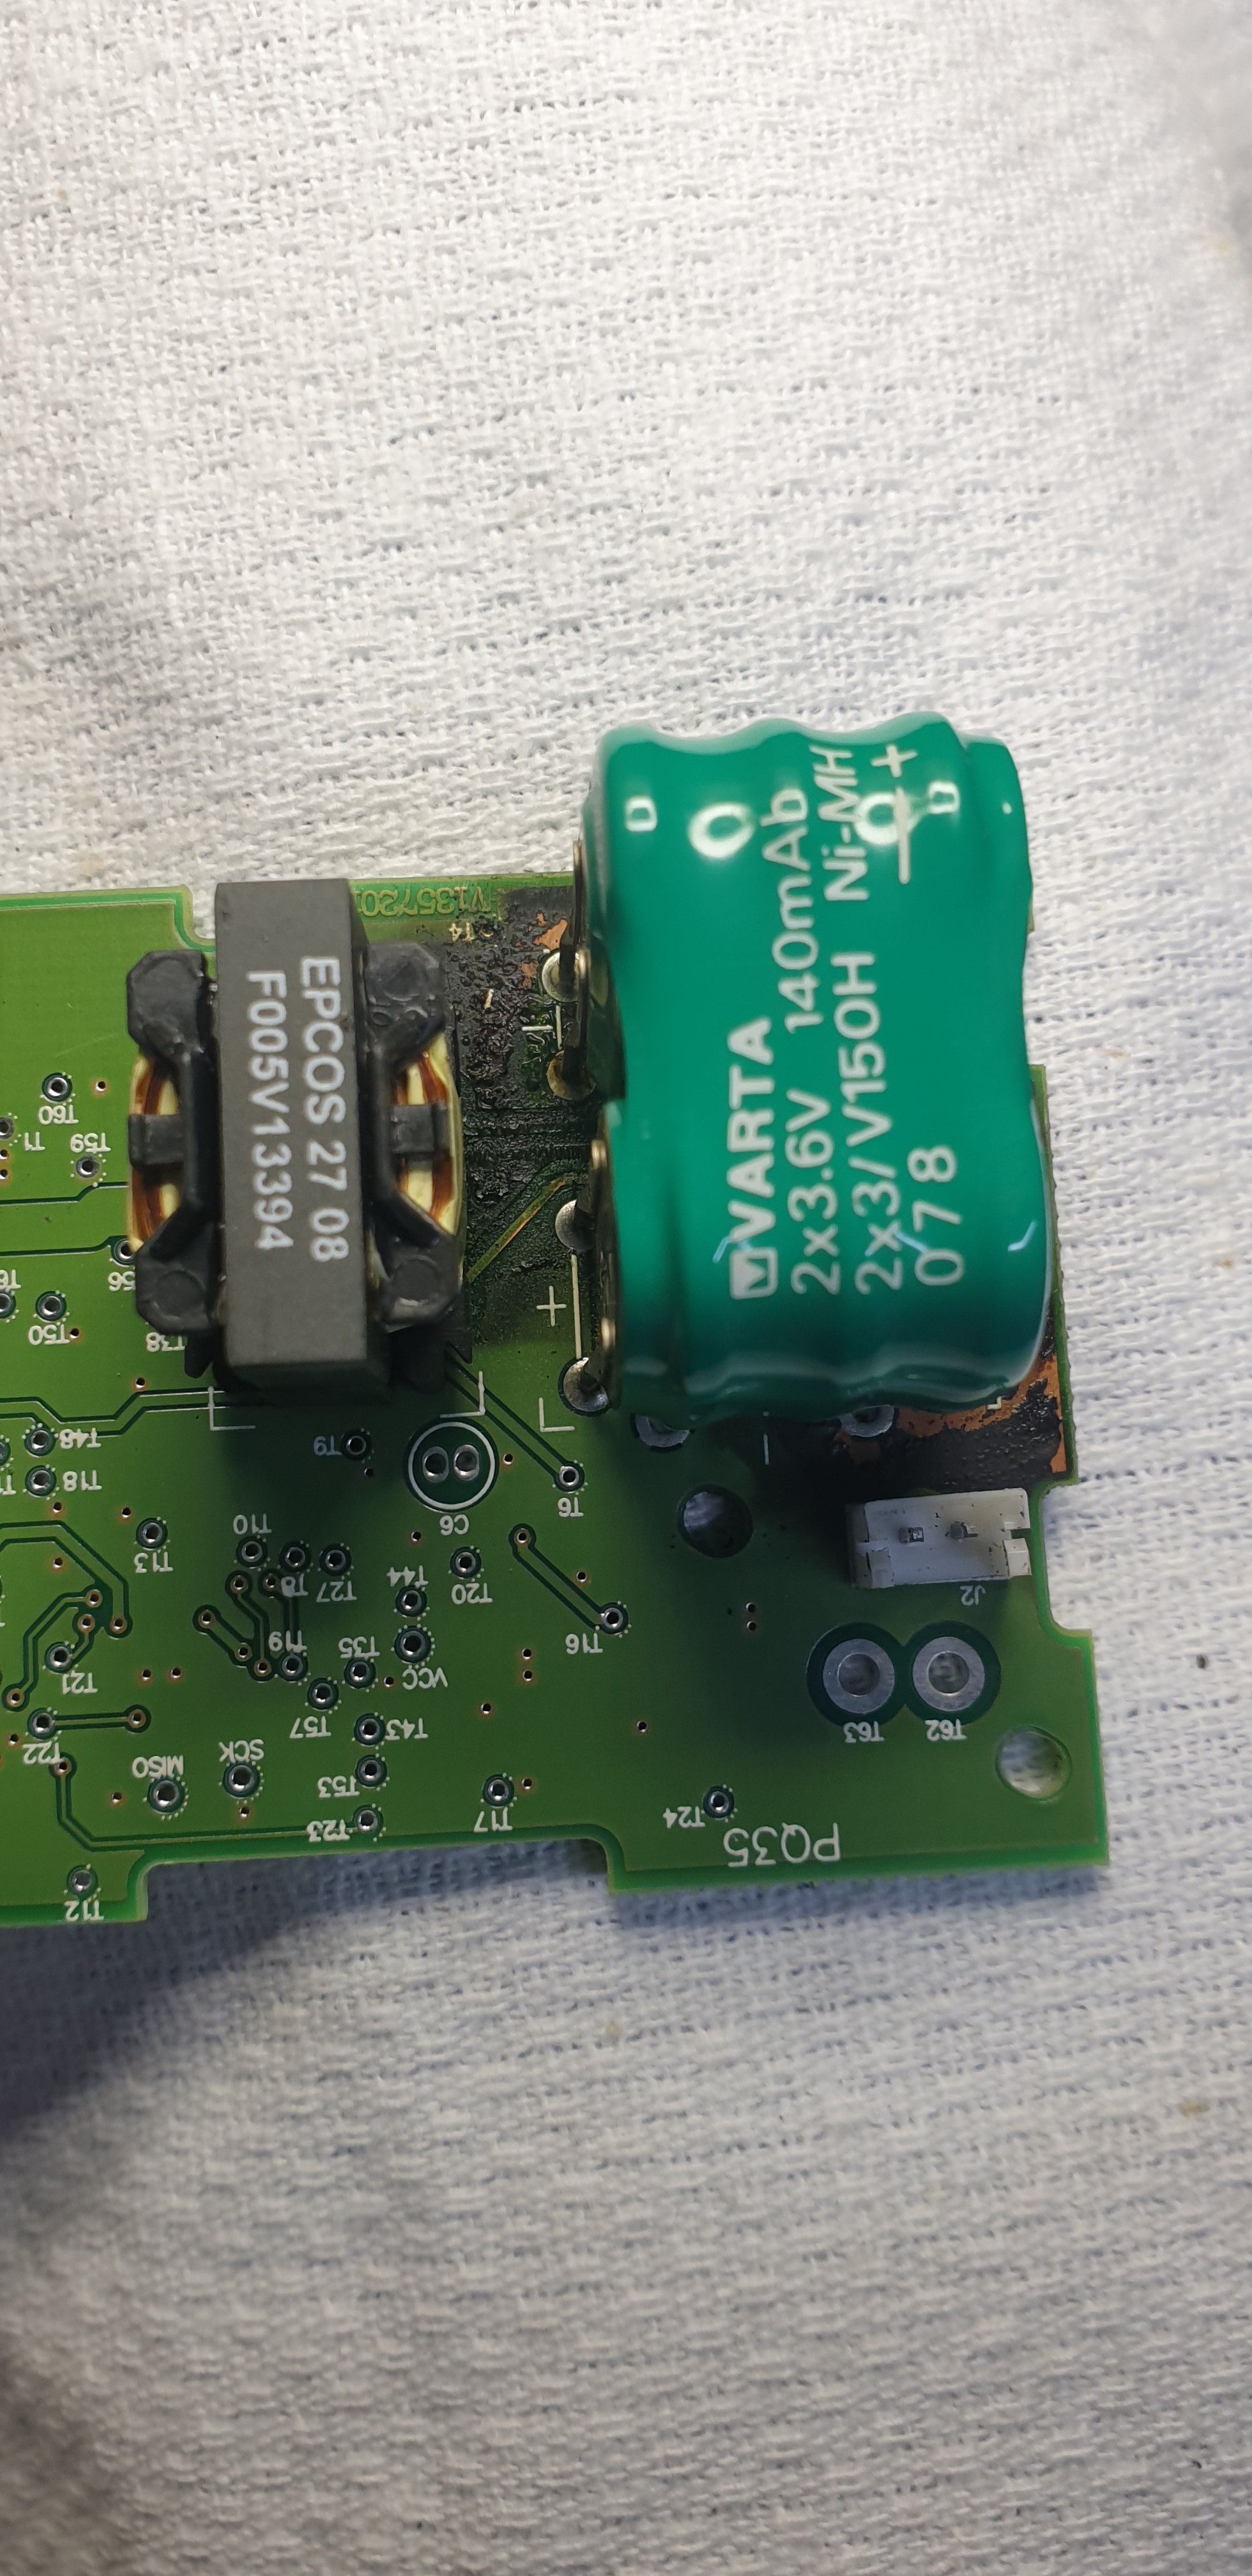
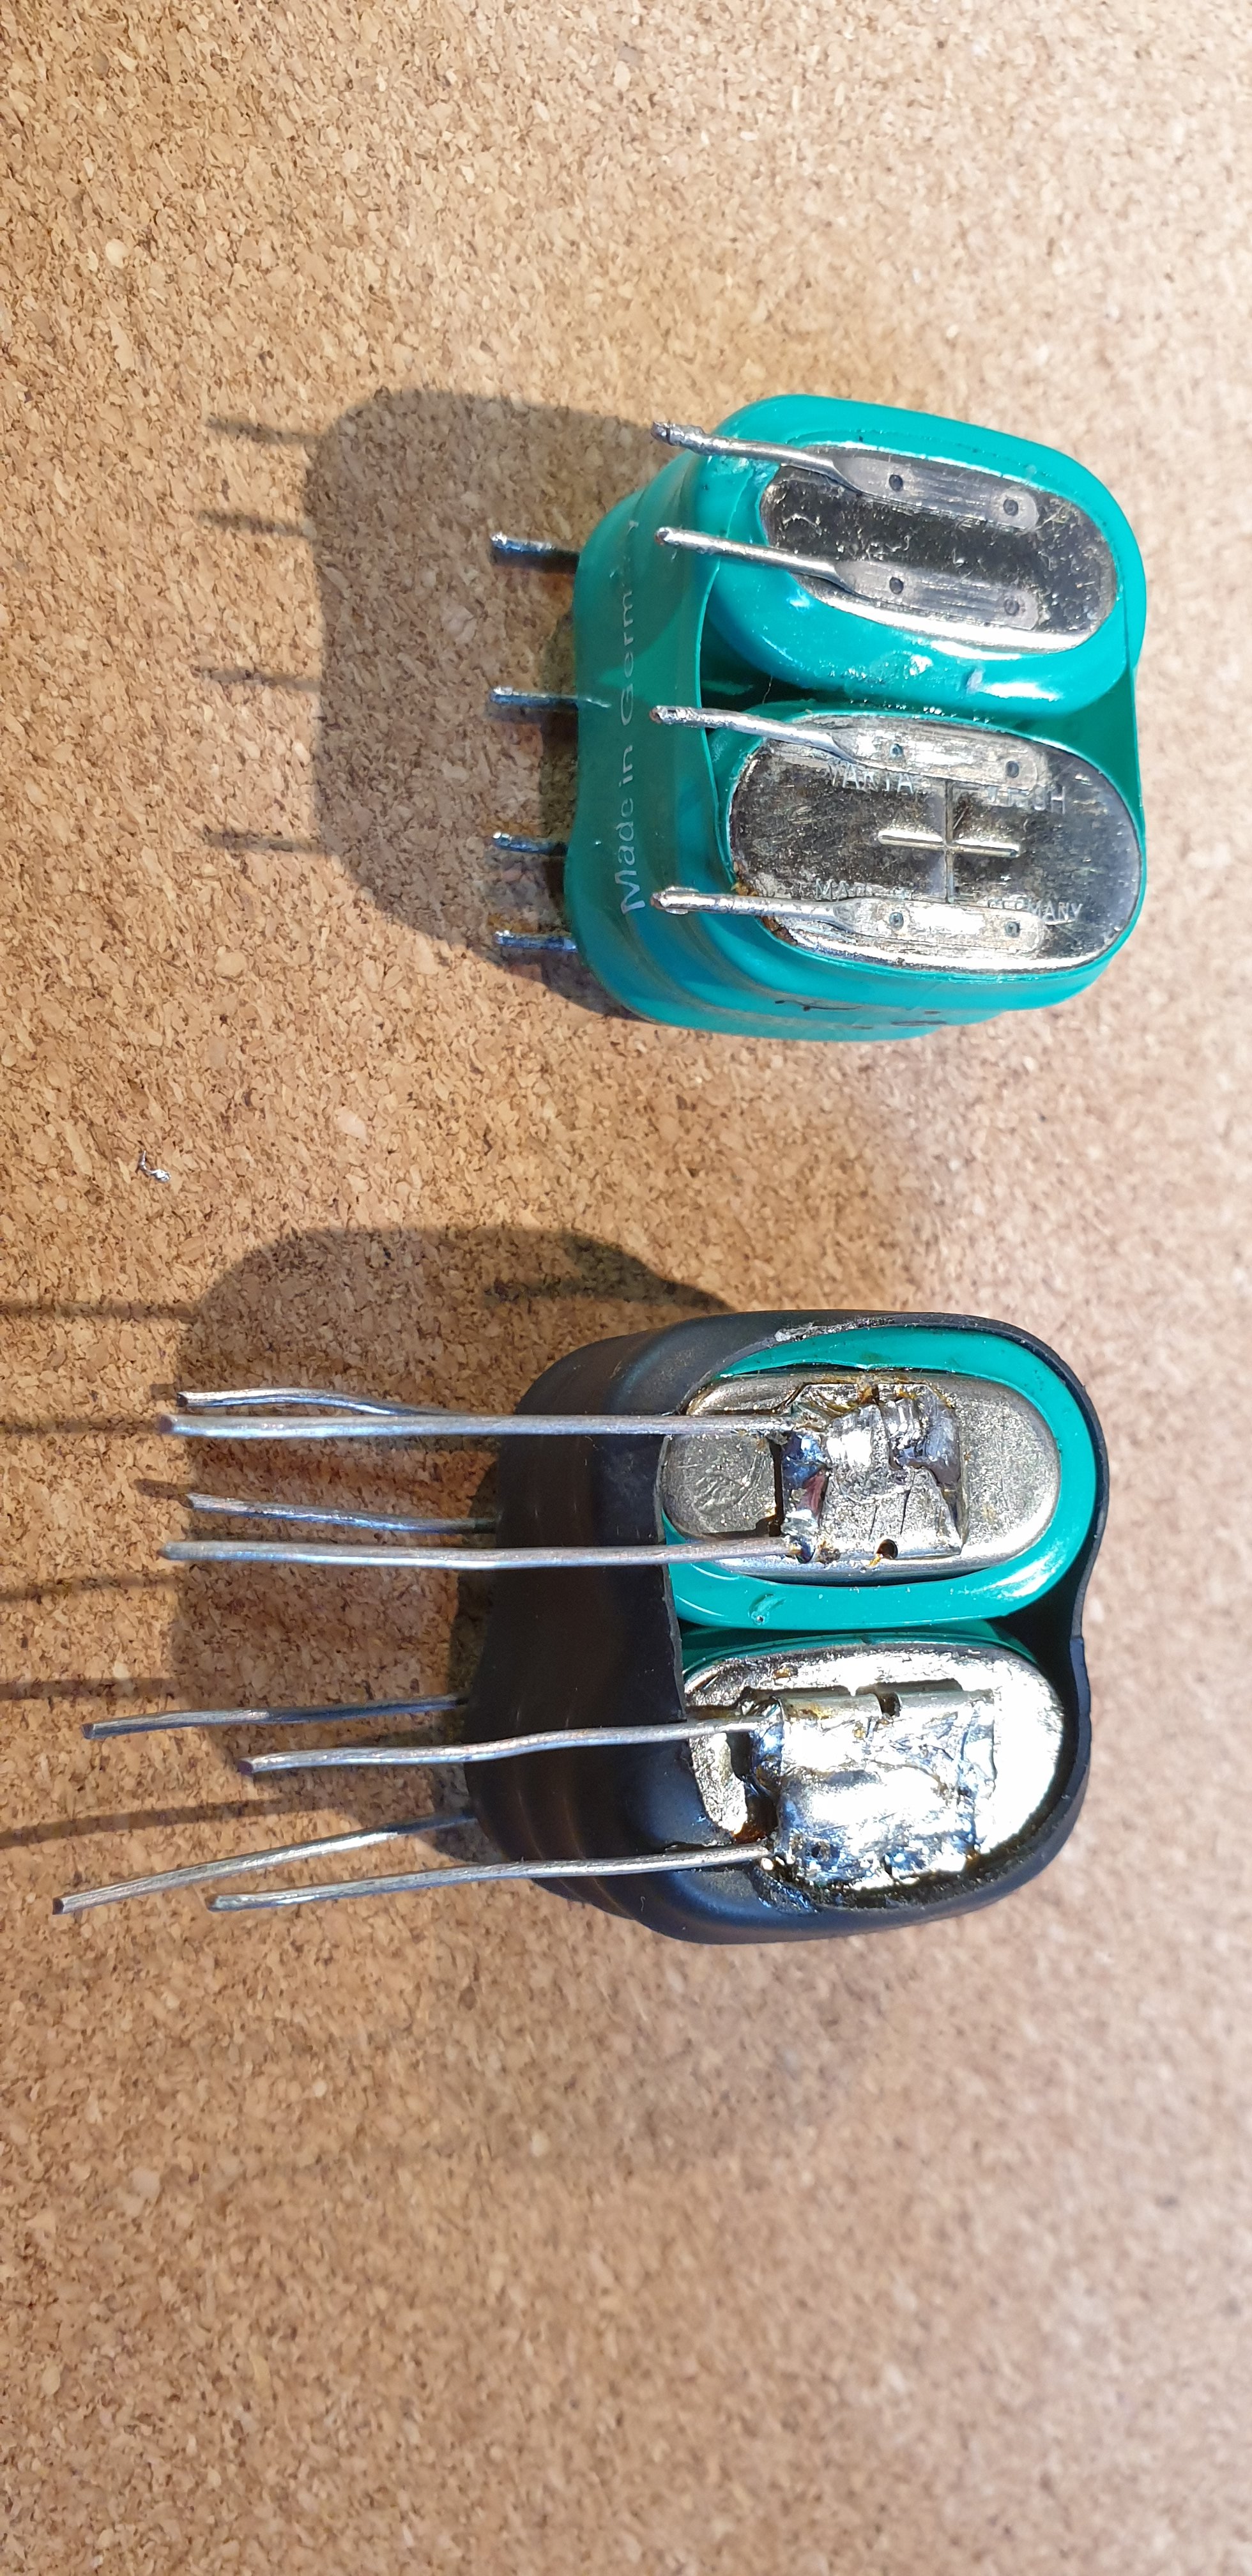
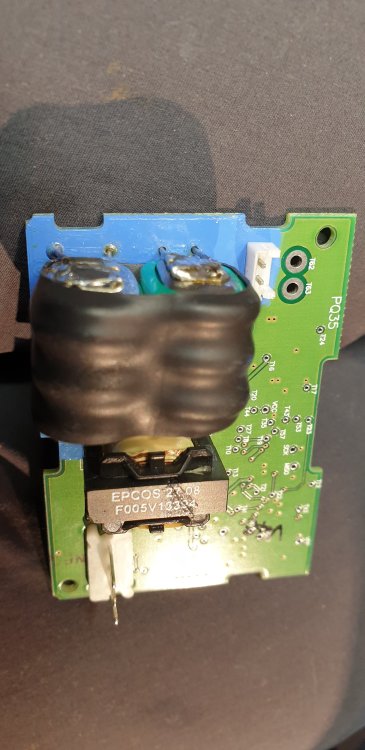
Hi All, VCDS pinged up low battery on the alarm siren (Bosch),and upon testing had a very low output noise, so I thought I would cut it open and have a look inside to see if it was the common problem of the batterys leaking. So cutting round the seam of the unit with a junior hacksaw it came apart, the batterys had leaked but on cleaning the PCB it hadn't damaged the copper tracks,this unit was different to my last one where the batterys leaked all over the components and rotted the tracks etc so a bin job ! This Bosch one was designed well as there was only a transformer and the batterys on one side of the PCB and components on the opposite side so not much to damage. I tried to find the correct edge mounted batterys,no chance,but found some normal Varta 3V150H ones so ordered them from buyabattery.co (£13.47 inc p+p for 2 ) then soldered some wires onto the ends so I could mount them on there side, and put a band of heatshrink round them to hold them together,cleaned the PCB and painted it for protection,fitted batterys and sprayed both sides of the PCB with silicon spray to keep damp at bay,cleaned the cut edges of the case with a cotton bud with meths and stuck it together with Dow Corning 3145 non corrosive sealant as I had some in stock, tested on car then refitted with metal case etc.


-
Hi All, I cut open the (bosch) H12 siren and the NI-MH rechargeable batterys had leaked, fortunately after unsoldering the batterys and cleaning the PCB it had not damaged the copper tracks and a couple of new batterys from buyabattery £13.50 for 2 (3V150 140ma) fixed the unit.I cleaned the PCB then repainted, it soldered wires onto the batterys, sprayed it with silicon, refixed case back together with some Dow Corning 3145 sealant as its non corrosive (normal silicon corrodes metal) will see it I can put a guide together.
-
Hi Micmac, this unit is second-hand from a golf as new ones are about £180 last time I looked, yeh I'm into electronics, the PCB looks OK so I'm hoping it's just the batterys that need replacing but just need to check that there's a charge there . I've found some details on it so will give it a check on the bench tomm.
-
Hi All, I am trying to fix my Alarm unit on my Ocy Scout, I've taken it apart and found a small leakage onto the PUB which doesn't look to have damaged the tracks, I'm in the process of checking out the batterys, unit number is 1K0951605C Bosch unit, so I then need to check if the batterys charge in the unit so does anybody have the pinouts for the 3 pins so I can power it up ?
-
Hi All,Update, changed the oil level/temp sensor in the bottom of the sump and alls OK 👌 just bought a cheap one off Amazon 1J0907660C reperio auto parts £16.99 !
-
Have a look at the gear linkage under the battery on top of the gearbox, I had it once when it wouldnt go into first gear, the fault was part of the linkage was worn and the selector cable popped off the end, I fixed it by putting a large selftapper screw with a washer on to stop it falling off the end, I did put a guide on Briskoda.
-
sorry but it was £20 from a scrap yard, and tempting fate it just pinged up siren fault !
-
it could be a break in the wiring at the hinge thats intermittant, you would have to remove the interior trim around the boot hatch (my scout has metal pull/press clips) so you can get to the motor to see if theres current there, you might have to do it from inside with the boot shut if opening the tailgate switches off the wiper,it could be fused seperatly. cheers Stuart
-
A brand new unit is about £180 and some dealers discount it on ebay, I fitted a second hand one from a scrap yard for £10 and its been OK for a couple of years, I checked the battery on mine and it tested fine but still acted up and eventually leaked.
-
I think it was showing 7 times. Like you say I will check the wiring, are there any weak slots in the loom, as I presume it's where it flexes ?
-
Thanks wino, does it matter how many fault accurances pop up with VCDS ? I suppose the best time to change it would be when I change the oil and filter ? I will rescan it in January just before it's MOT. Cheers Stuart
-
Hi All, just changed the battery on the car, as usual it pings up all types of 'faults' so I cleared them but a couple had stayed on, 053273 control module for instrument cluster, U1019 missing signal for oil level/temperature -intermittant, so is that looking like the module or an oil sensor (part numbers ?) and if so where are they ?, Also has 09- no faults found or DTCs not supported by controller or a communication error occurred, although it lists 4 subsystem parts etc, Happy Christmas to all Briskoda's cheers Stuart.
-
I would go to a scrap yard and pick-up a replacement switch or buy a new one, disconnect the battery and remove some dash from underneath and push it out from the back !
-
The fan is mounted behind the glove box and on our 2014 rapid it went noisy and it was the fan blade coming loose so tried gluing it back on which worked as it's only slightly noisy on full now.
-
Must admit I didn't notice when I drove it yesterday it's only because vcds flagged it up a couple of times, just ordered one so will wait for the postman. thanks for your help one again. Where do you get the part numbers from ?
-
Hi Wino, thanks for the reply with the number, I've seen one of your replys about the 2 joints underneath and found ours was under the starter motor,both connectors looked fine so I've ordered a wheel sensor after removing the disc and pads and cleaning ring and sensor, and after clearing DTCs it came on again ! Is the water temp sensor just for the indicator dial on the dash display or does the ECU use the info ? Cheers Stuart
-
So scanned car and showed 00290- ABS wheel sensor, 00597 - impulses deviation, 17664 - g62 engine coolant sensor, P1256 - intermittant, Checked fuse box top of battery all OK, checked control plug on alternator, checked 2 joints under starter motor, All OK so ordered a replacement sensor for rear nearside ABS, now the water temp sensor on right hand side near battery,without actually pulling it out does anybody know the part number and a cheap place to buy one ? Cheers Stuart
-
Probably the wire has broken at the door hinge with flexing, try soldering in an extra bit of wire to cover the break and use heatshink tubing to insulate the joints, to find out which cable has broken try bending each one to see if you can 'feel' the break, or solder a couple of sharp pins on 2 cables and buzz them out from either the plug or accross the bend in the cable with a continuity meter or buzzer using the pins to just pierce the insulation and then you save the cost of a loom ! cheers Stuart (ps the orange connector is probably for the airbags so disconnect the battery)
-
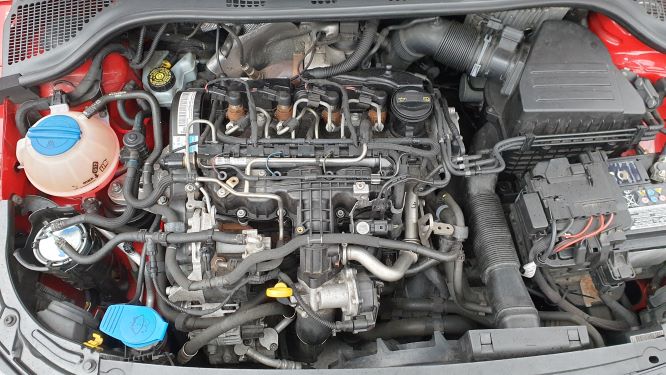
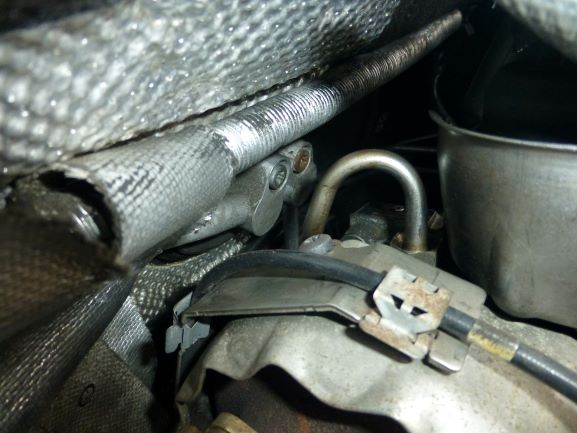
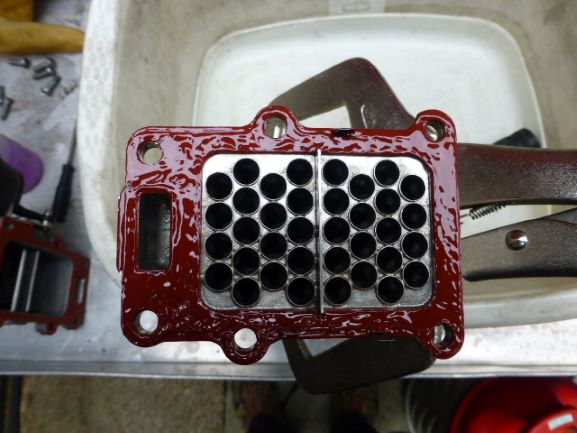
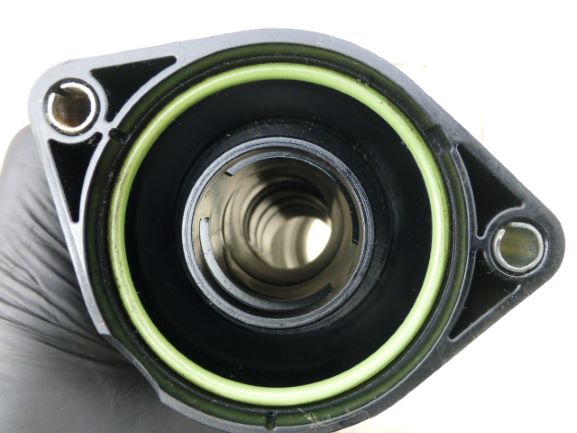
Before jacking up the car remove centre cap on offside front wheel and using a 36mm normal socket (not 4 wall drive) and extension bar for leverage loosen the main drive nut, Loosen road wheel bolts and jack up the car and support on axle stands with enough room to get under car, Remove wheel and plastic wheel arch liner (torx T20) and engine under tray, Remove plastic inner CV joint cover 2x16mm bolts, Disconnect negative lead off battery (good practice) and remove air cleaner cover (T20) filter (fiddly) turns to unlock from casing and inlet pipes etc, Remove bolt (T30) fixing casing, remove T30 bolt on turbo air inlet, unclip (squeeze) crankcase vent pipe and remove, Remove T30 bolt and turn turbo inlet pipe clockwise to disconnect hook fixing at rear of pipe, Disconnect large pipe at the bottom of the turbo 2x T30 bolts and jubilee clip on pipe where it changes from rubber to solid plastic and remove pipe for access to EGR plug and metal pipe fixing screws, Mark the edge of the inner drive shaft CV joint for later alignment and remove the 6x M8 spine bolts and spacers I turned the Nearside roadwheel with my foot so the shaft turned to aid removal of the bolts, Remove the main wheel driveshaft nut 36mm, Remove the 3x 16mm nuts holding the wishbone ball joint lower fixing and push down the wishbone to allow the driveshaft to be withdrawn and removed, Place a small plastic bag over the inner joint to cover the grease, Remove the silver heat cover over the EGR air actuator, Remove 2x 13mm nuts on the lower DPF fixing, Remove turbo outlet joint with a 5mm ball end alan key, open joint and save clamp and large sealing washer, You can now move the DPF over slightly to give better access underneath (be careful with flexible joint) Remove the metal pipe on the battery side, 2 bolts on each joint with metal washers (T30) top bolts accessed from above, Remove the righthand metal pipe and gaskets 2x T30 on the lower and 2x 12mm nuts on the top joint which is at exhaust temperature, On top of turbo loosen the nut on the small metal oil pipe using a small dumpy 17mm open ended spanner (tight space), Remove the oil pipe fixing bolt 13mm under the turbo and remove, Remove the T30 bolt halfway down the metal oil pipes holding them together, Unscrew small 'banjo' bolt (+2 metal washers) 17mm on the smaller metal oil pipe at the back of the engine and catch a small amount of oil with a rag and remove pipe up to turbo, Unscrew larger 'banjo' bolt 27mm on the larger oil pipe and again catch small amount of oil with a rag, Using a couple of long extension bars from below unscrew the 2 bolts (2x T40 or 10mm) under the turbo on the larger metal oil pipe and remove pipe, From above disconnect EGR electrical plug (can be fiddly), Under wheel arch disconnect with mole grips etc 2 water pipes feeding the EGR cooler with about 600ml antifreeze loss, Unplug air pipe on actuator (that had silver heat shield) Unscrew 4x T30 bolts fixing the EGR noting the 2 longer bolts are used at the battery end and lower the EGR and cooler, feeding rubber pipes around obstacle (pic upside down), The cooler splits in half after removing 6x T30 bolts, If you want to check the gears inside the EGR motor its fixed with T20 bolts. I cleaned out the heat exchanger and pipes with oven cleaner (99p 390ml from Home Bargains) and note that each 'core' of the exchanger has 3 lobes inside so I used about an 8mm brush with oven cleaner until it started coming out clear, There is a black plastic cover on one end of the EGR covering a cam that needed cleaning and oiling (note I had to refix it back in place with a bit of silicon), I jammed open the EGR motor spring loaded cam inside with a red plastic rawlplug so I could clean the actuator piston on the other side, I used some 'red' hermetite gasket seal when joining the cooler back together, I used new gaskets on the metal pipes and fitted a new 'large banjo' bolt which has 2 rubber gaskets, Check metal oil pipes are clear inside of any obstructions that restrict flow, I reused the smaller 'banjo' fixing but it looks like you can just buy the 2 metal washers and you could reuse the larger 'banjo' because if they leak oil you can change them from underneath, Refitting - work backwards and as I refitted the nuts and bolts I applied a smear of copperslip just in case it had to come off again, I also used a small syringe to put clean engine oil in the top turbo oil feed for initial lubrication, I also smeared a small amount of oil on the rubber inlet gaskets to aid seating, When replacing the driveshaft there is a rubber gasket on the inner joint which I transferred to the driveshaft and inserted the bolts through to hold the gasket in place and then using 2 or 3 extension bars from the wheel arch I could press the 6x M8 spline bolts into place after lining up the shaft marking, The new driveshaft hubnut is torqued to 50nm +45% when its down on the ground with the wheel fitted, Mine was an overnight job so I connected up the battery, locked the car with the central locking, then unlocked it once then disconnected the battery and then deadlocked the drivers door with the key. Its a nice dirty job as you can see, so the next job is to fit an oil crankcase catch can if I can find room in the engine bay. Cheers Stuart Parts used - 2 x Cans of oven cleaner (99p each home bargains) Wheel Hub Nut - 6Q0407396B Small Banjo Bolt - N0210719 + 2Xwashers N0138133 Large Banjo Bolt - WHT005635A (complete with 2 rubber washers ) Metal pipe Gaskets - 3x 03L131547N Metal pipe Gasket exhaust end - 04L131547S Gasket under turbo (smaller) - 03L145757Q
.JPG.b7e7b753854f4408f9424458a3c48141.JPG)
.JPG.ee871ae1f798ab0e5ac125c0c041b4b1.JPG)
.JPG.0673a07dd29c0f522caab73268c36a58.JPG)

.JPG.f5031b947951103c70829038ea182bea.JPG)

.JPG.8afb4da698d6a09bd76d3ef7ec4d50aa.JPG)
.JPG.2889983940e4ed9020a4661332ae04bb.JPG)
.JPG.07b3e0d3097abd7e8b37ee5cc318ddaf.JPG)
.JPG.e4621074a4bbc5c5a167147abbe2a4da.JPG)
.JPG.981913eec28f238d81a0747dcdc47a5e.JPG)
.JPG.4aaf4bc8ab8d9a513a10f99733dba290.JPG)
.JPG.1fcb2d6200b78fda2e58ecf3987e3e0e.JPG)
.JPG.2acbe9376a23243fa78eaa6372d77452.JPG)
.JPG.13d51f84603575be54fb133503f27721.JPG)
.JPG.a859318b4ff6f5587694a6d677b14307.JPG)
.JPG.524da455f94d32af16b1e9f4d180a9f5.JPG)
.JPG.bf665258b9710ba5719a7d221960cbca.JPG)
.JPG.4434abf67b3d0ece16b430e453cab083.JPG)
-
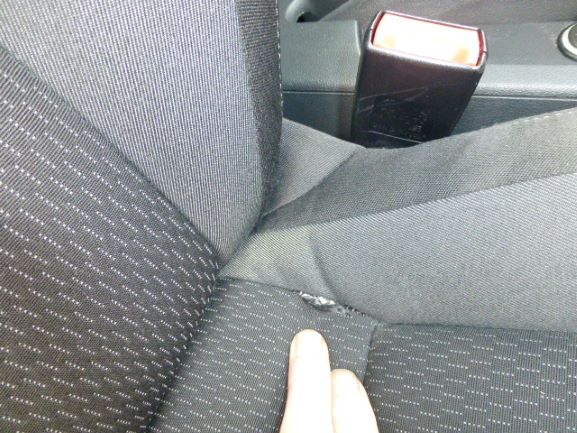
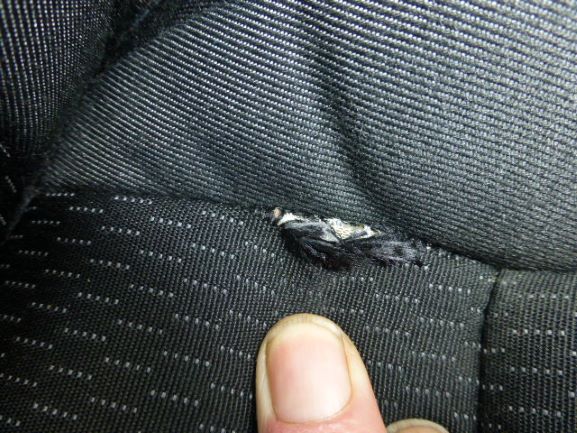
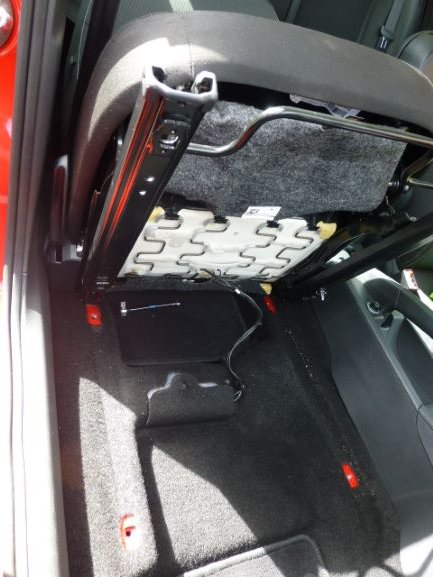
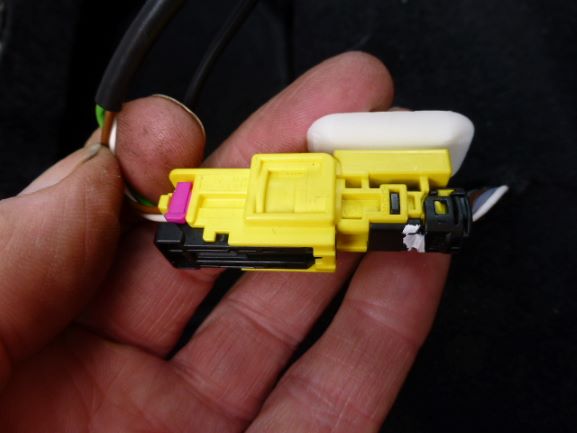
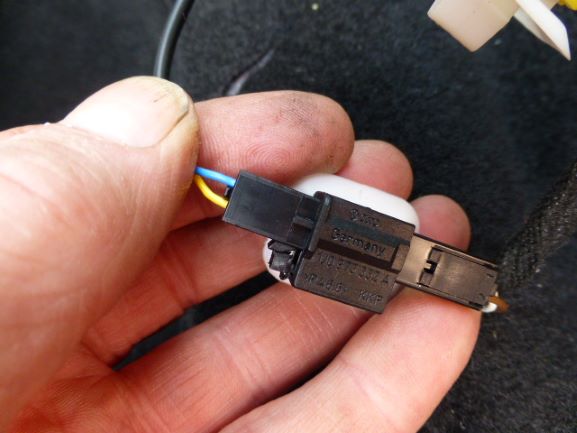
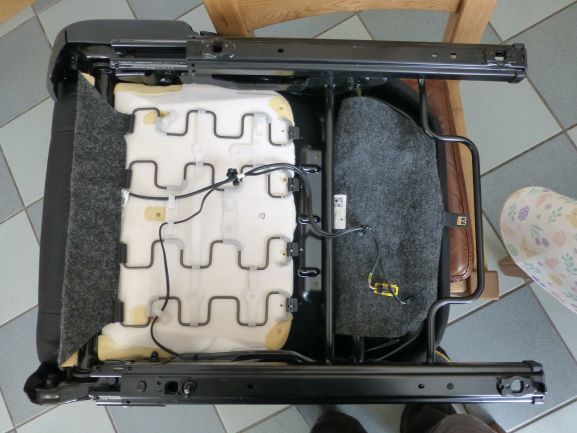
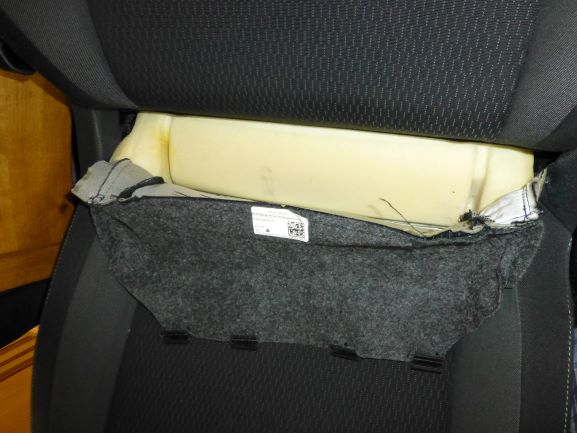
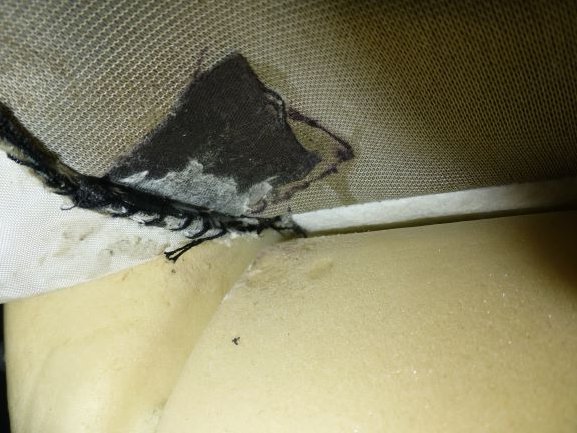
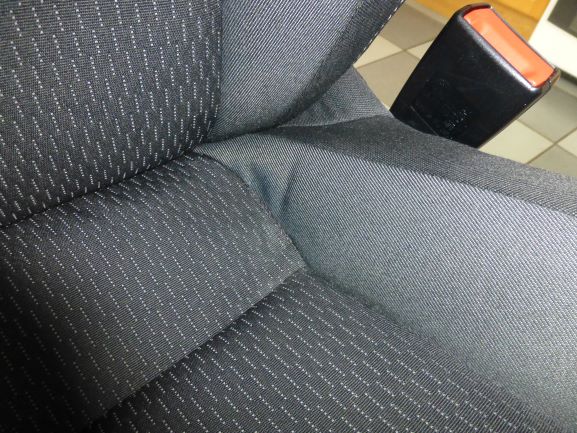
Hi, I managed to fix it at the weekend, disconnected the neg lead on the battery (airbag), removed the 4 torx screws, tipped the seat back unplugged the black seat belt sensor and the yellow connector for the seat airbag, took the whole seat into the house to have a look, the back of the seat base cloth goes round the back and is held in place with plastic hooks onto the springs so unclipped the cloth and pulled it back through the gap between the seat back, managed to pull enough forward to be able to work on the split, cut a small piece of black cloth and used some fabric glue to fix it down over the gap let it set and sewed it to the good side and it seems to be OK. The split was about an inch wide see pics -
-
Scott I have just removed the EGR and cooler on the 1.6 CAYB engine and I am just about to put a guide on Briskoda.