Leaderboard

.jpg.1006585dfe4e2977315b67c3d642e37b.jpg)


.thumb.jpg.9dd3f612ba7f13d10be5c518d3c8d255.jpg)

Popular Content
Showing content with the highest reputation on 06/05/20 in all areas
-
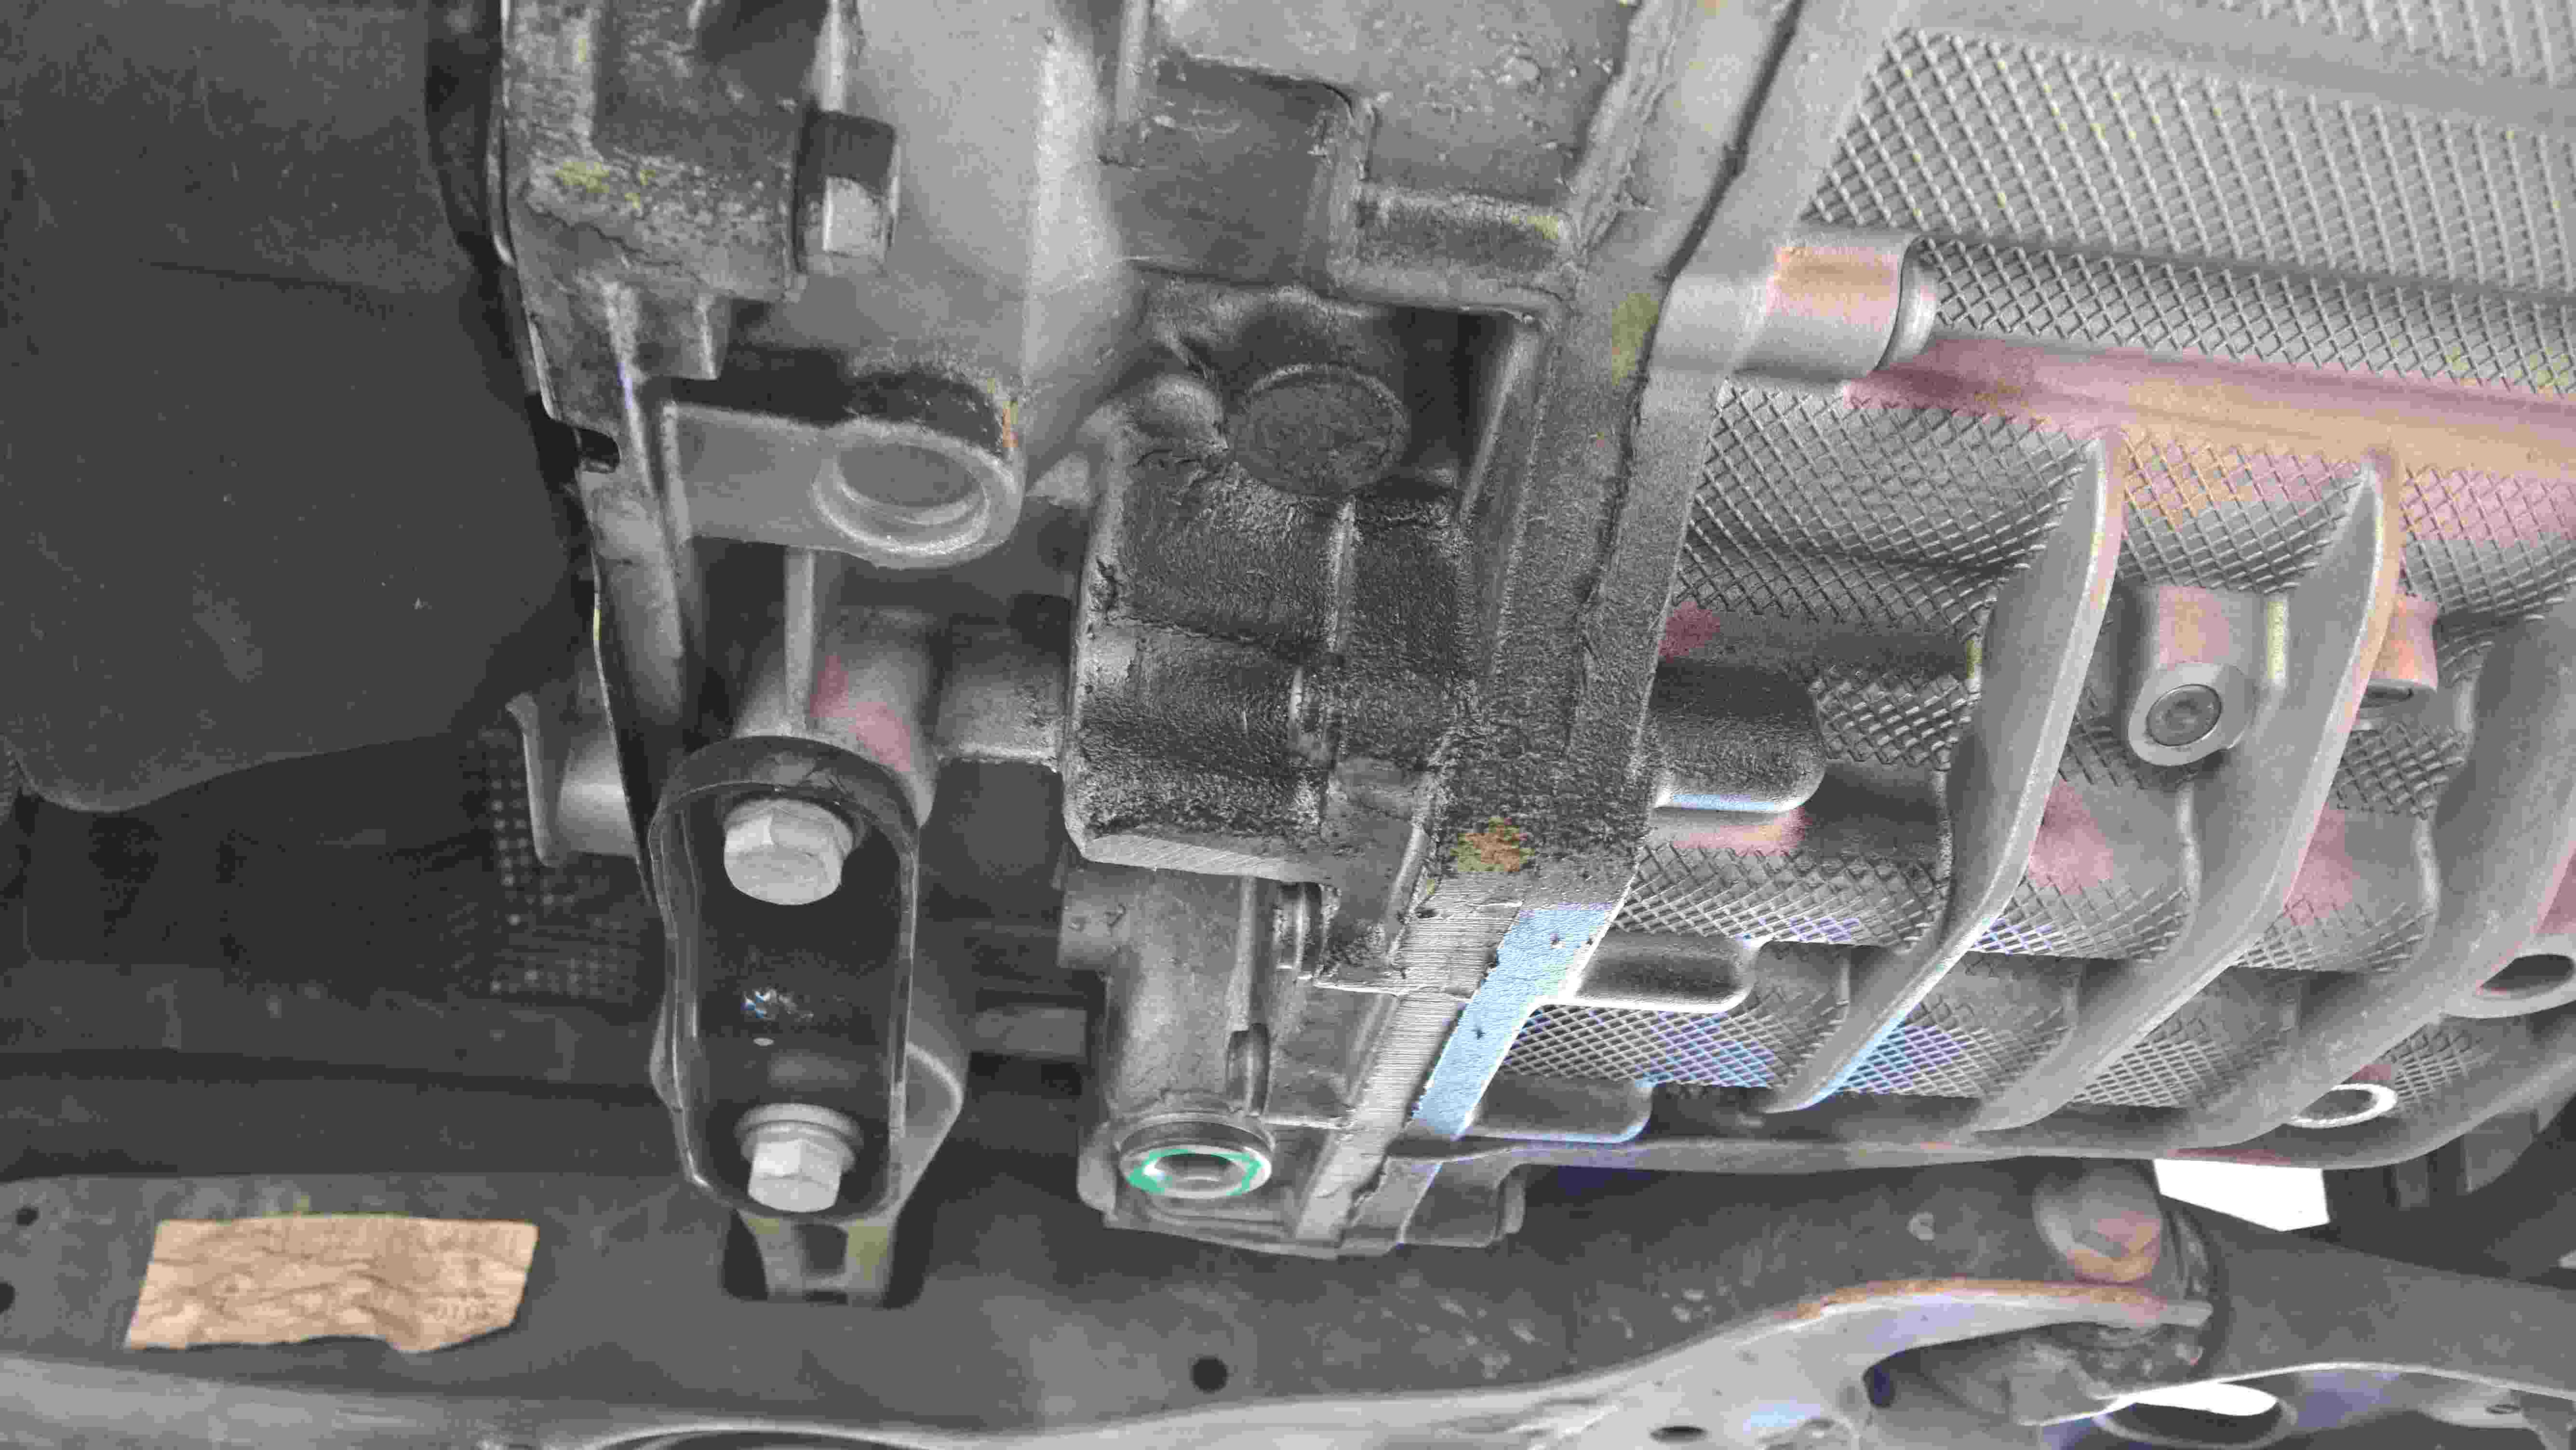
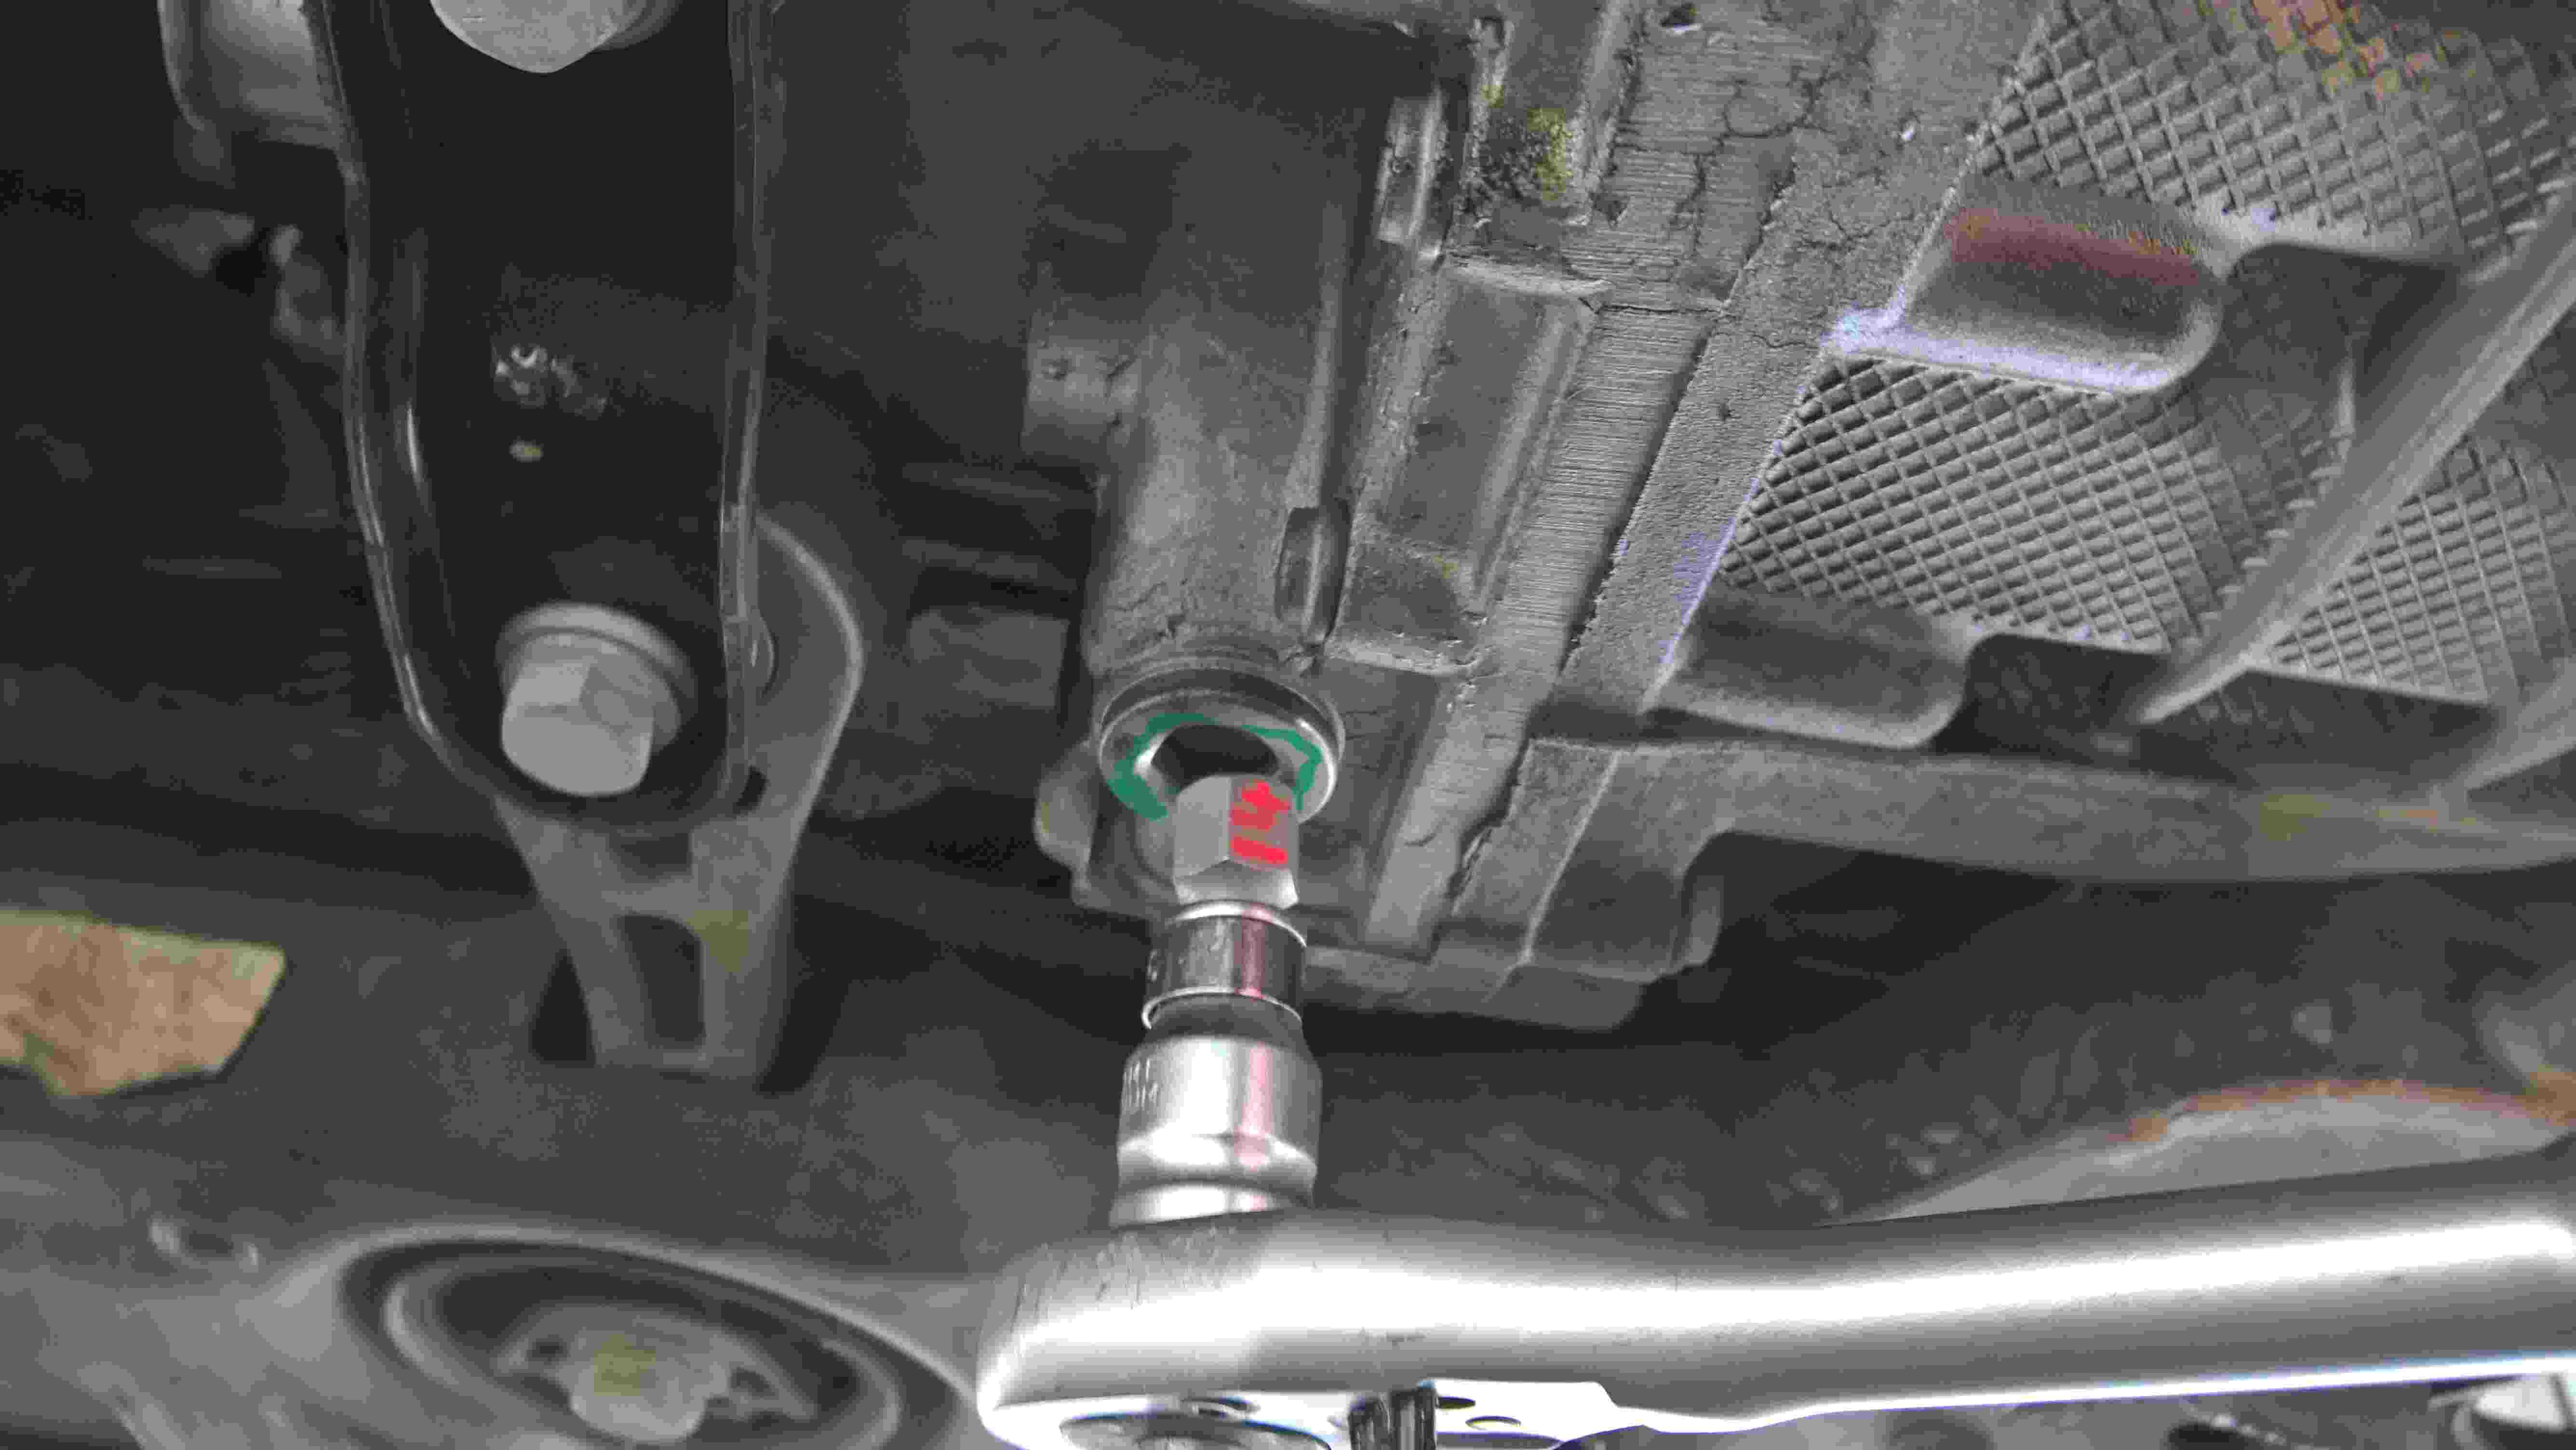
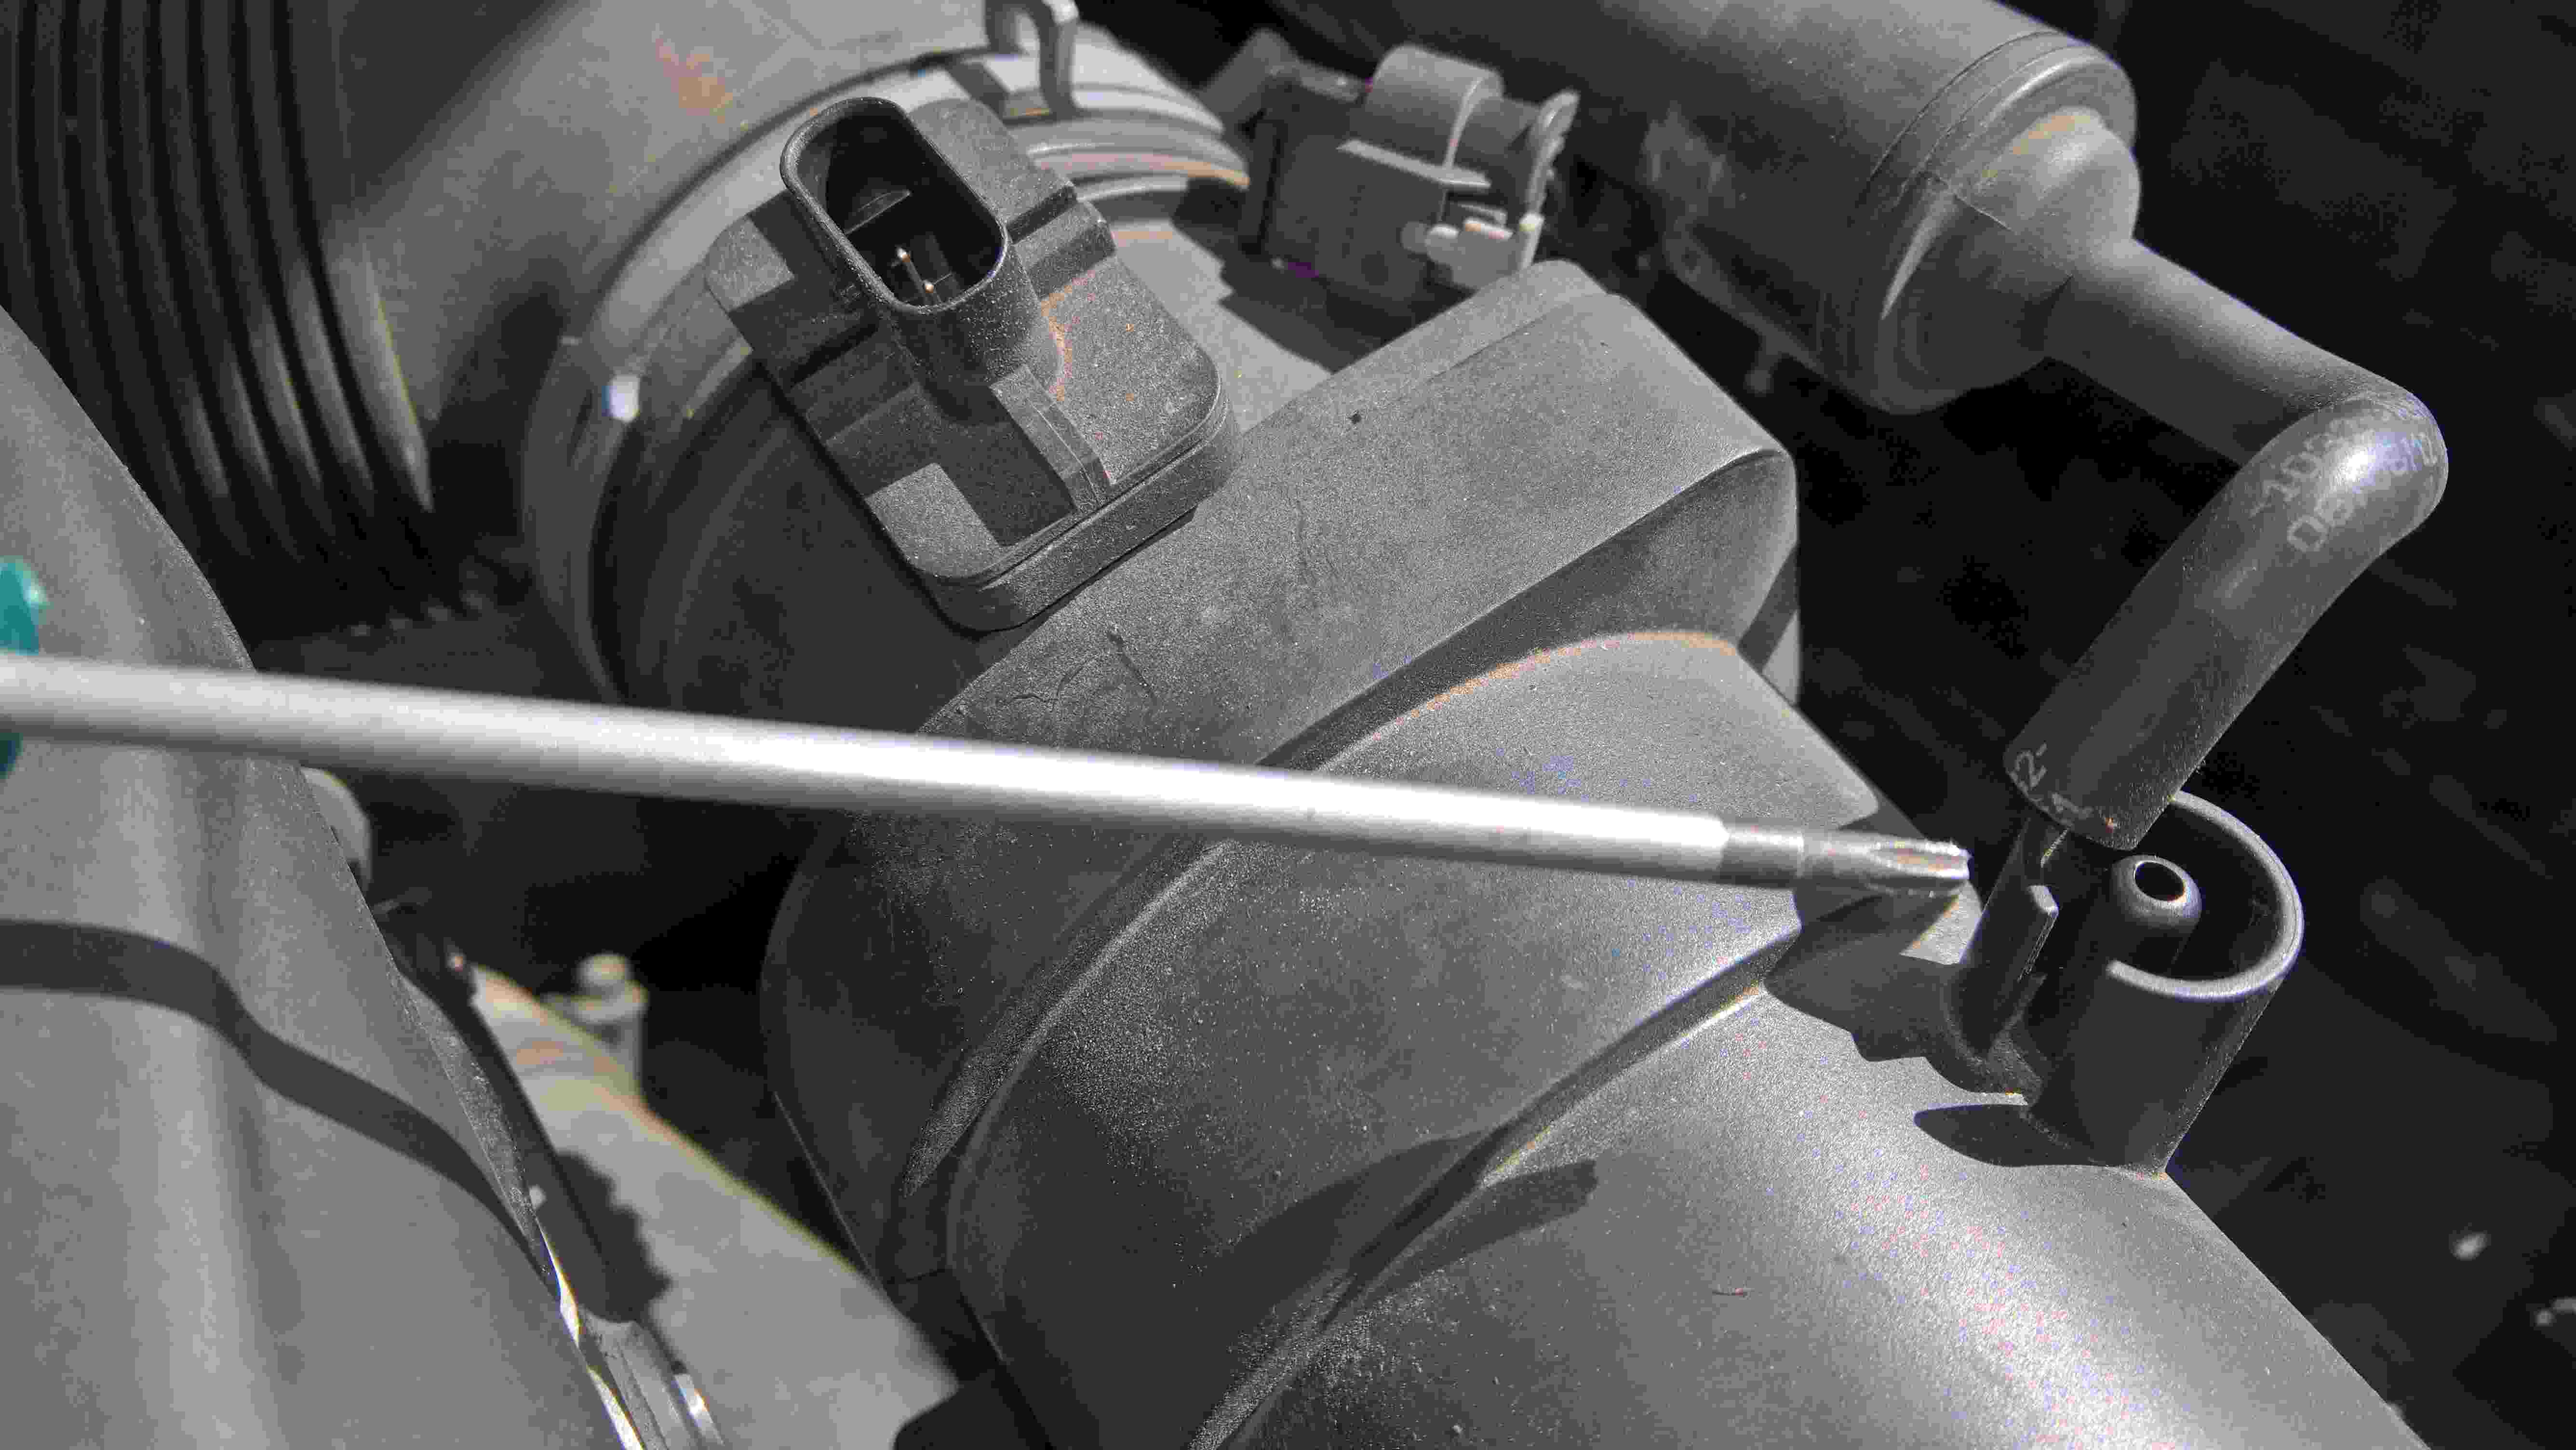
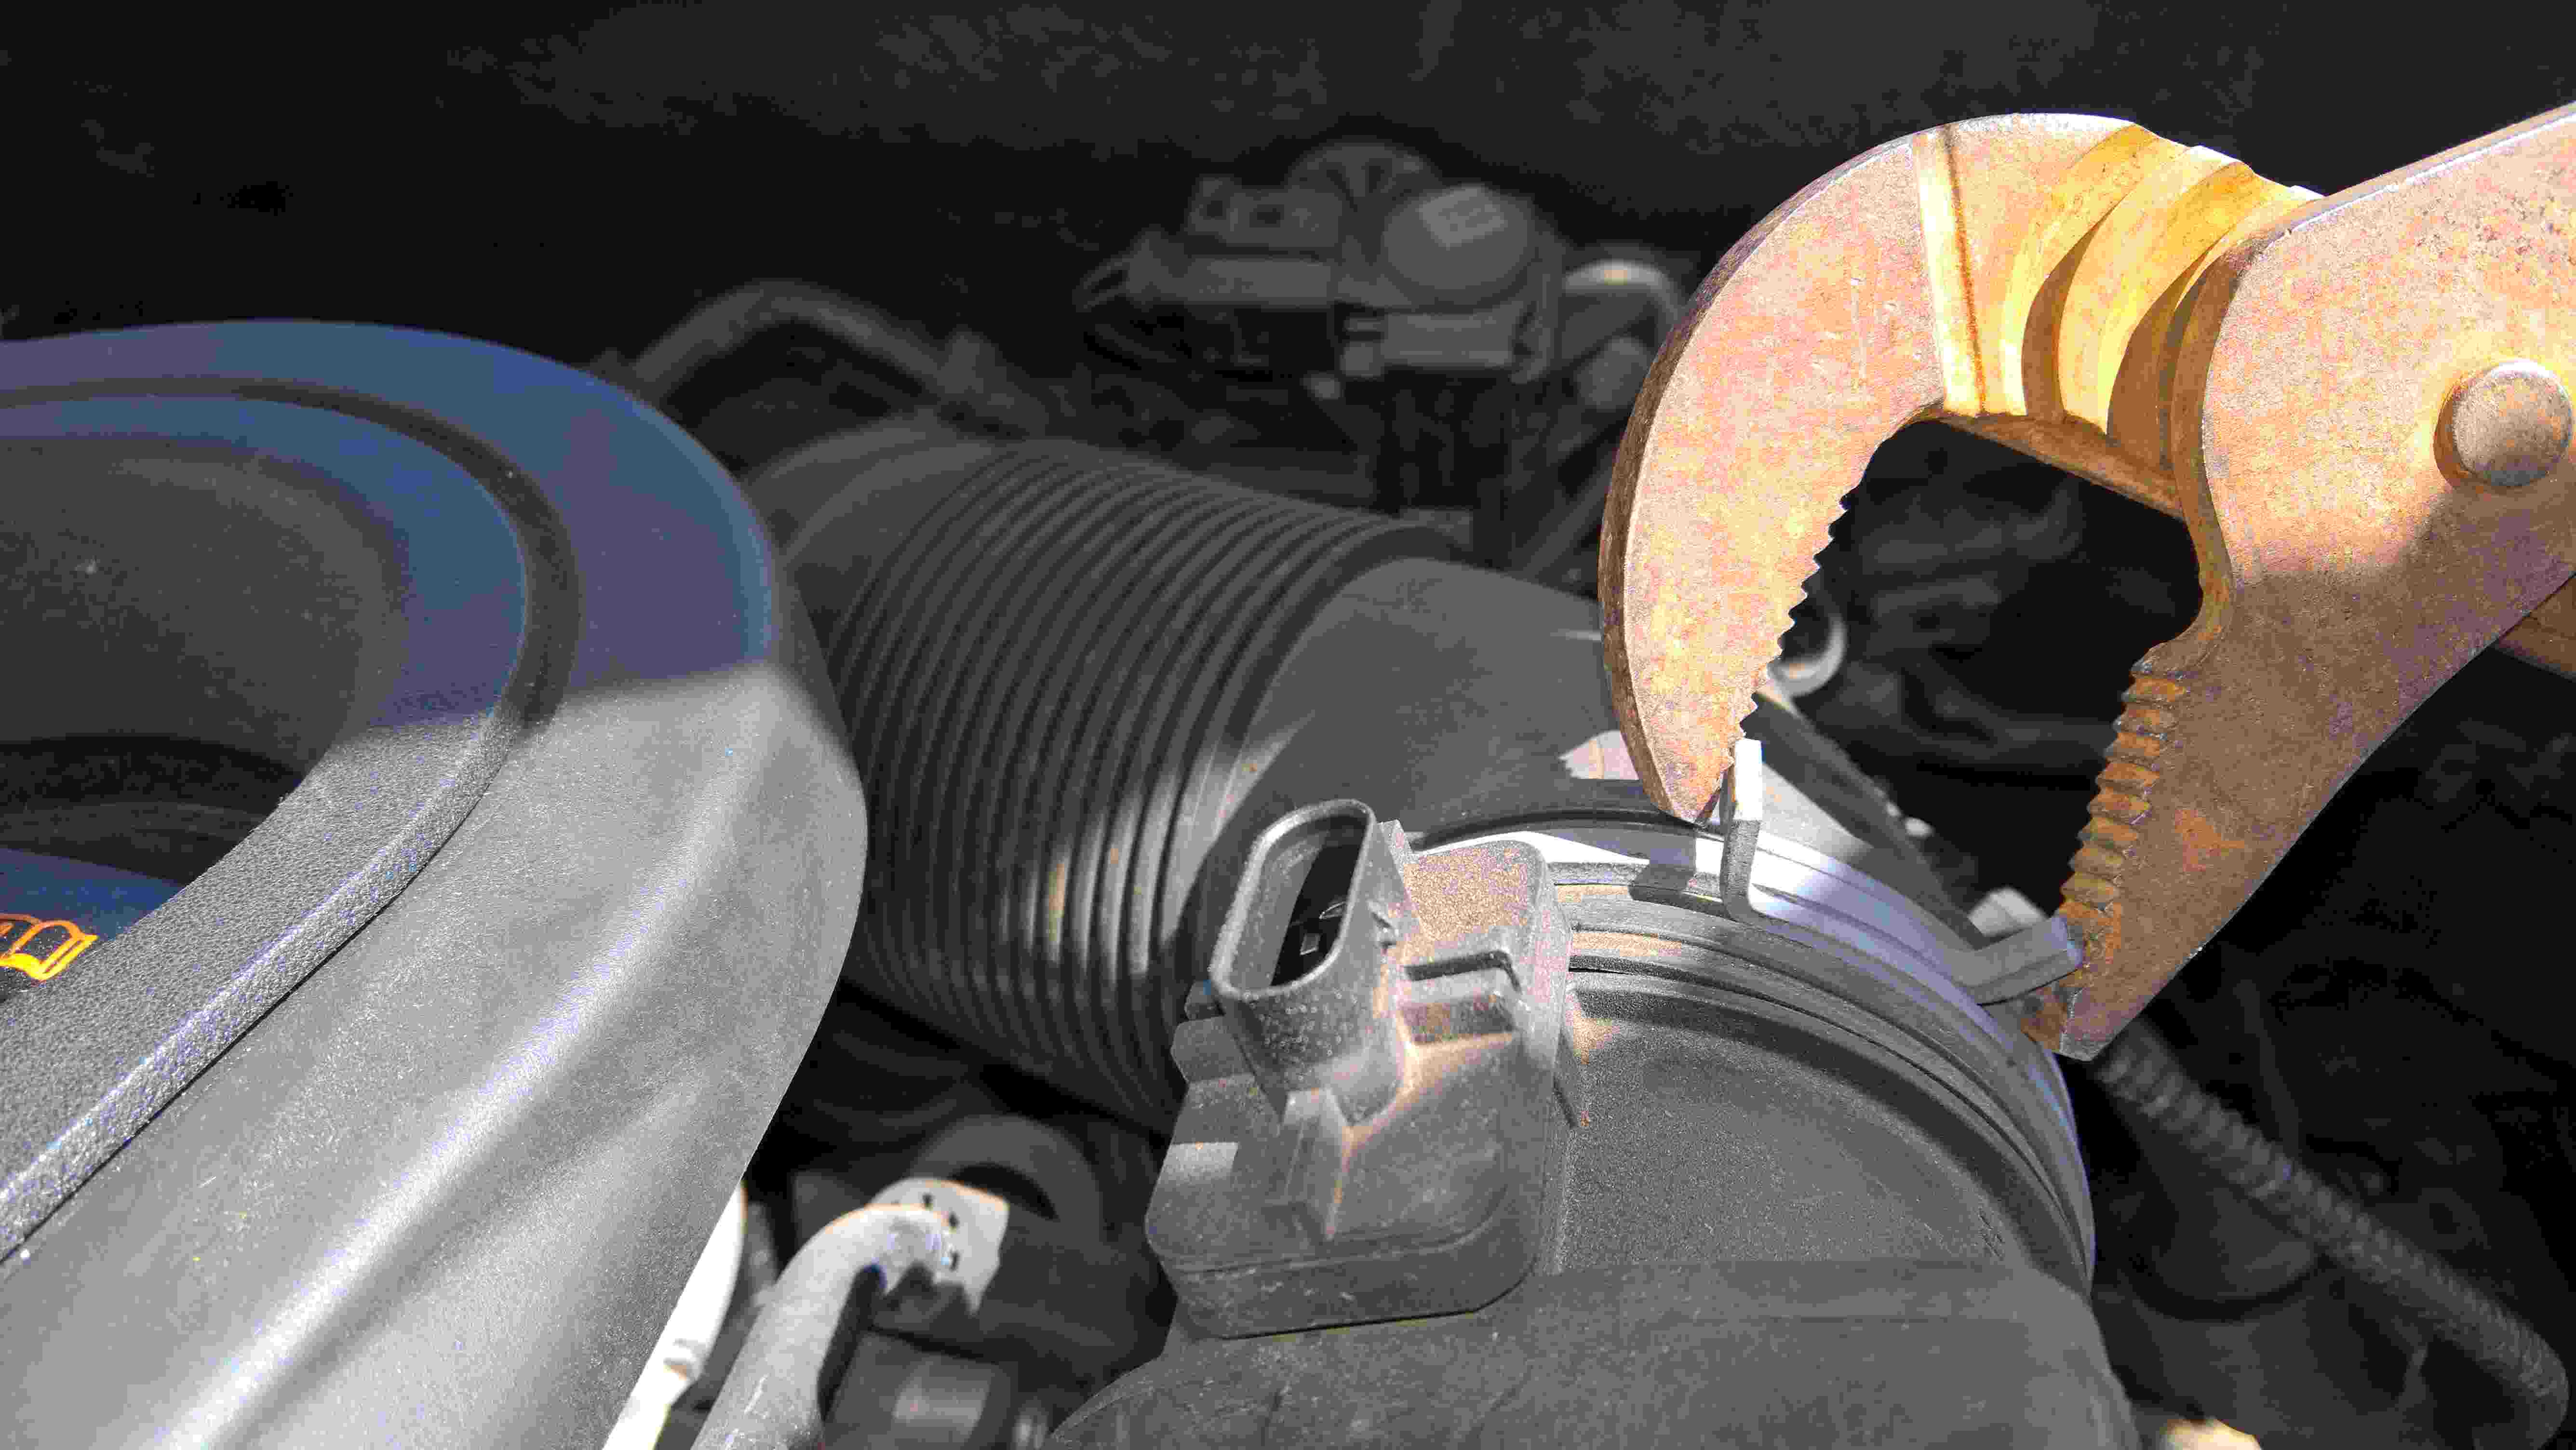
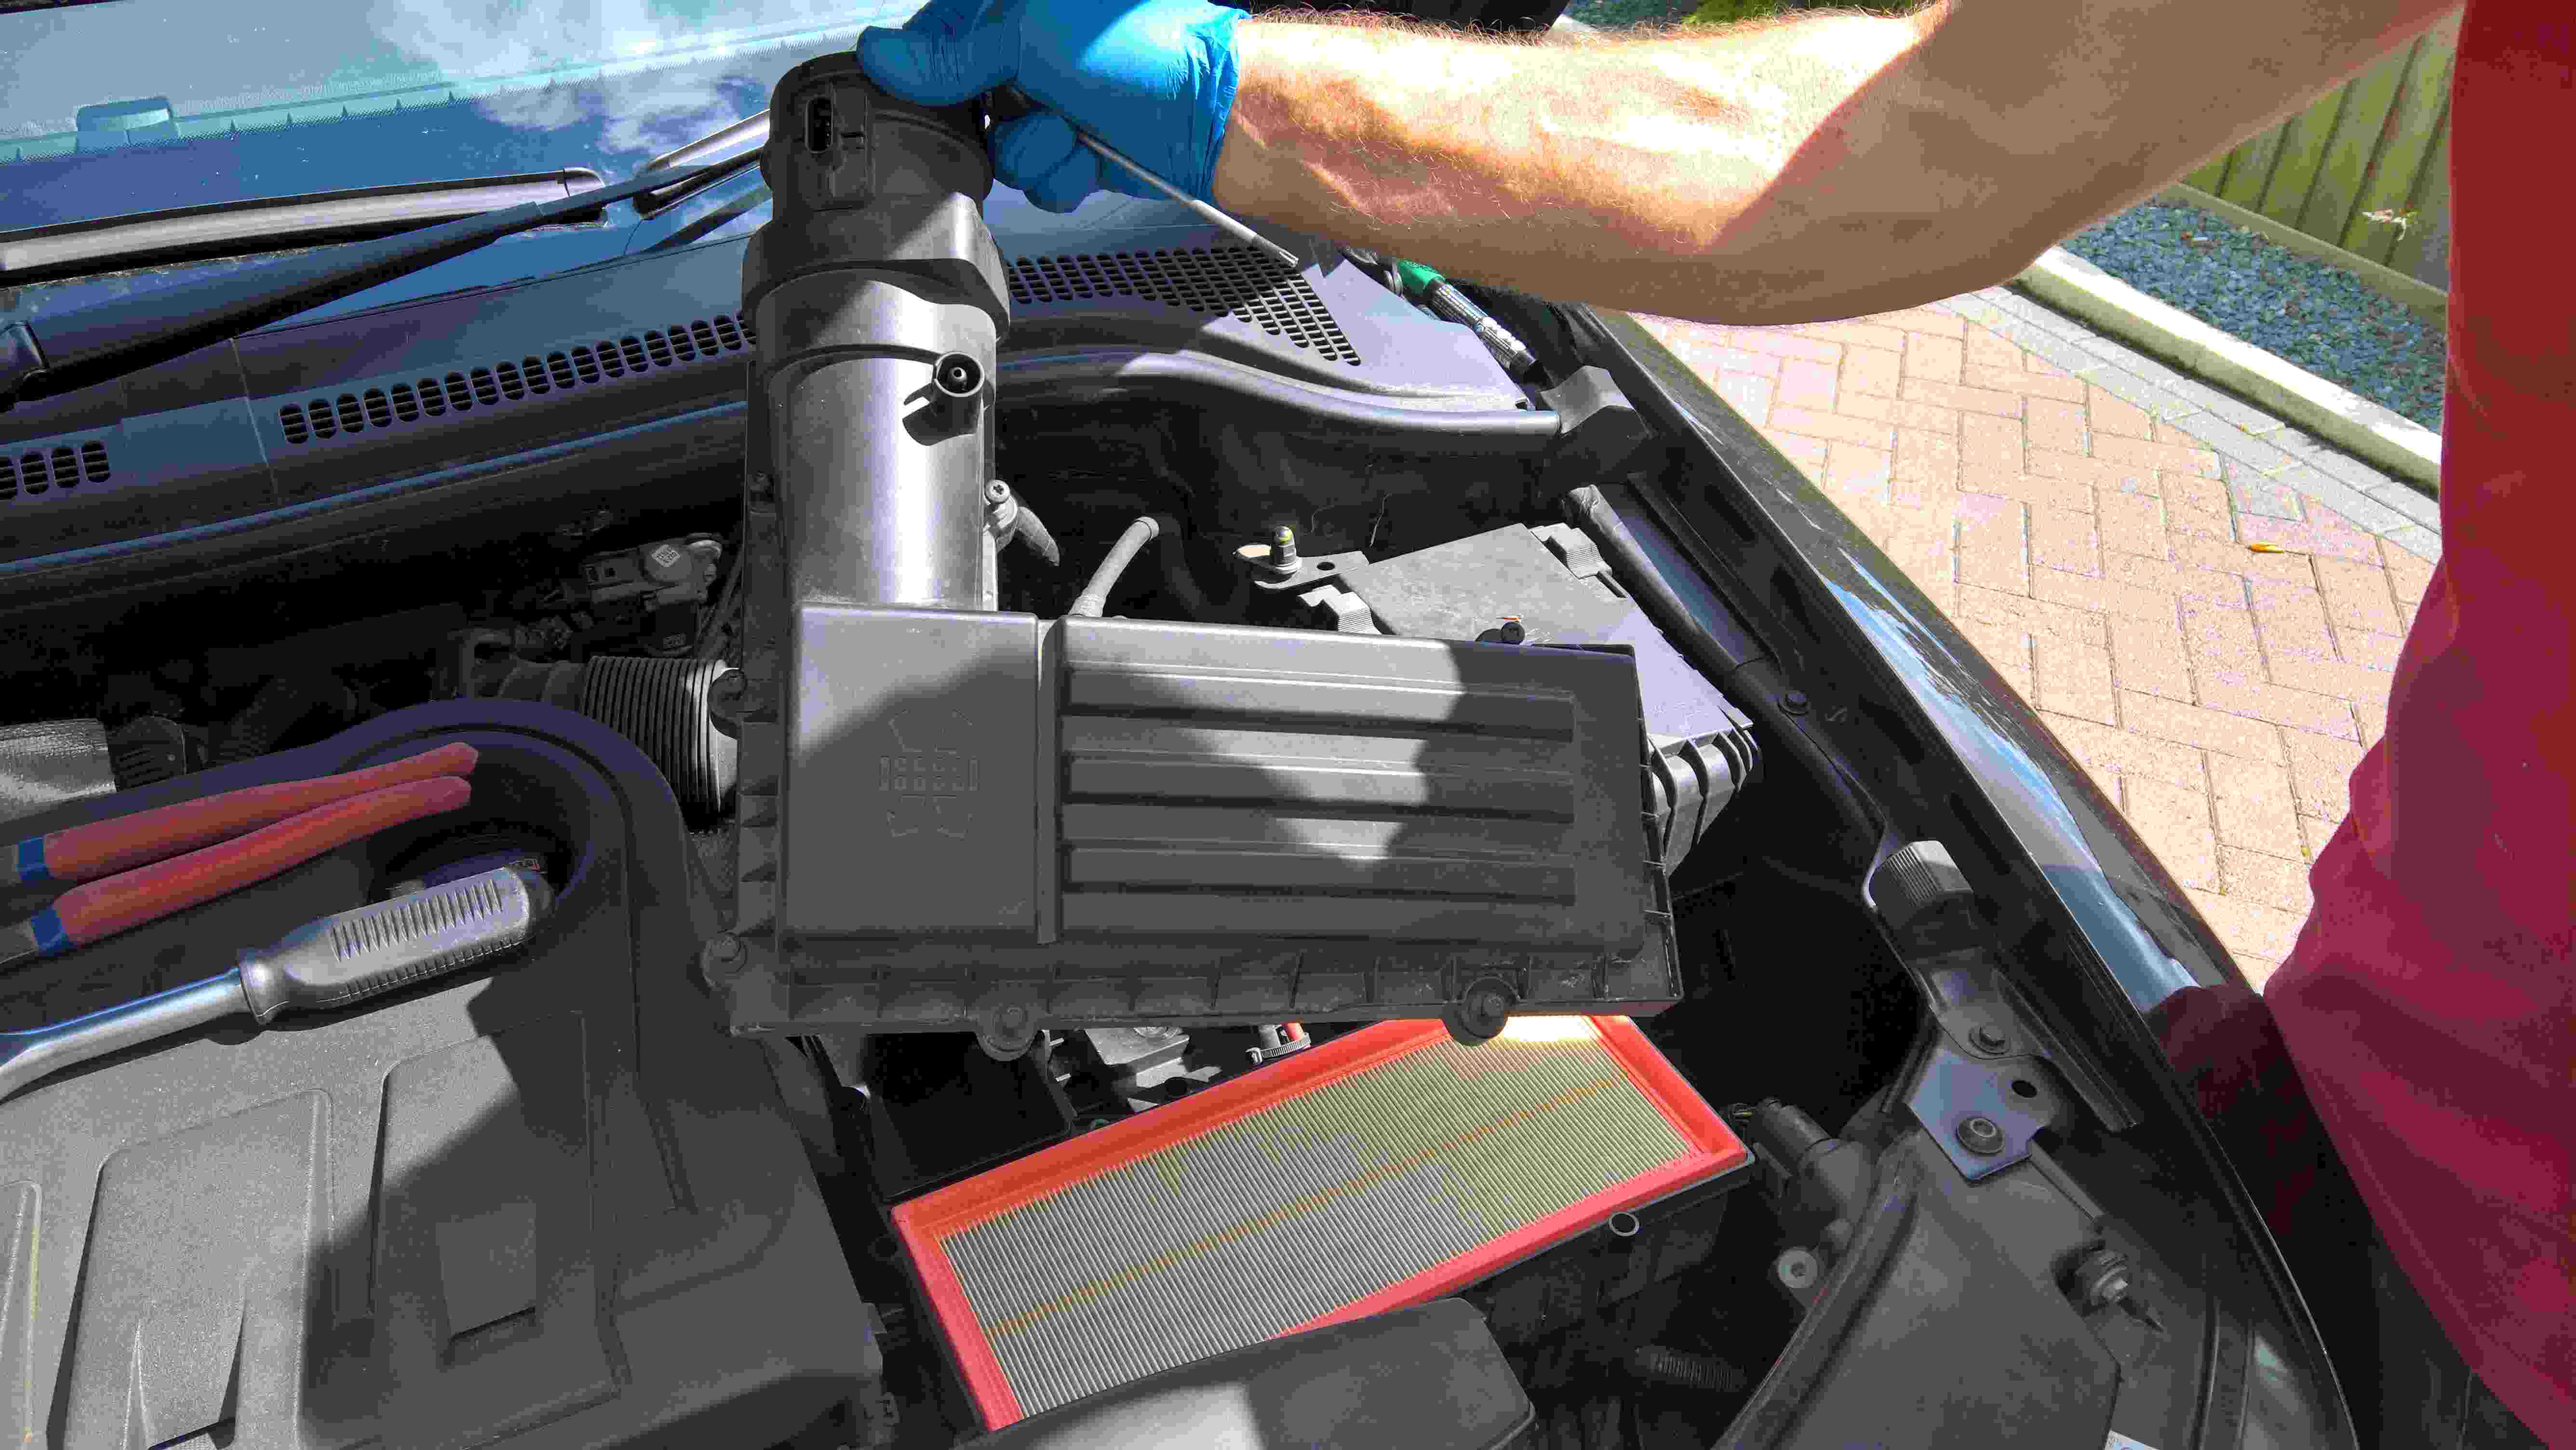
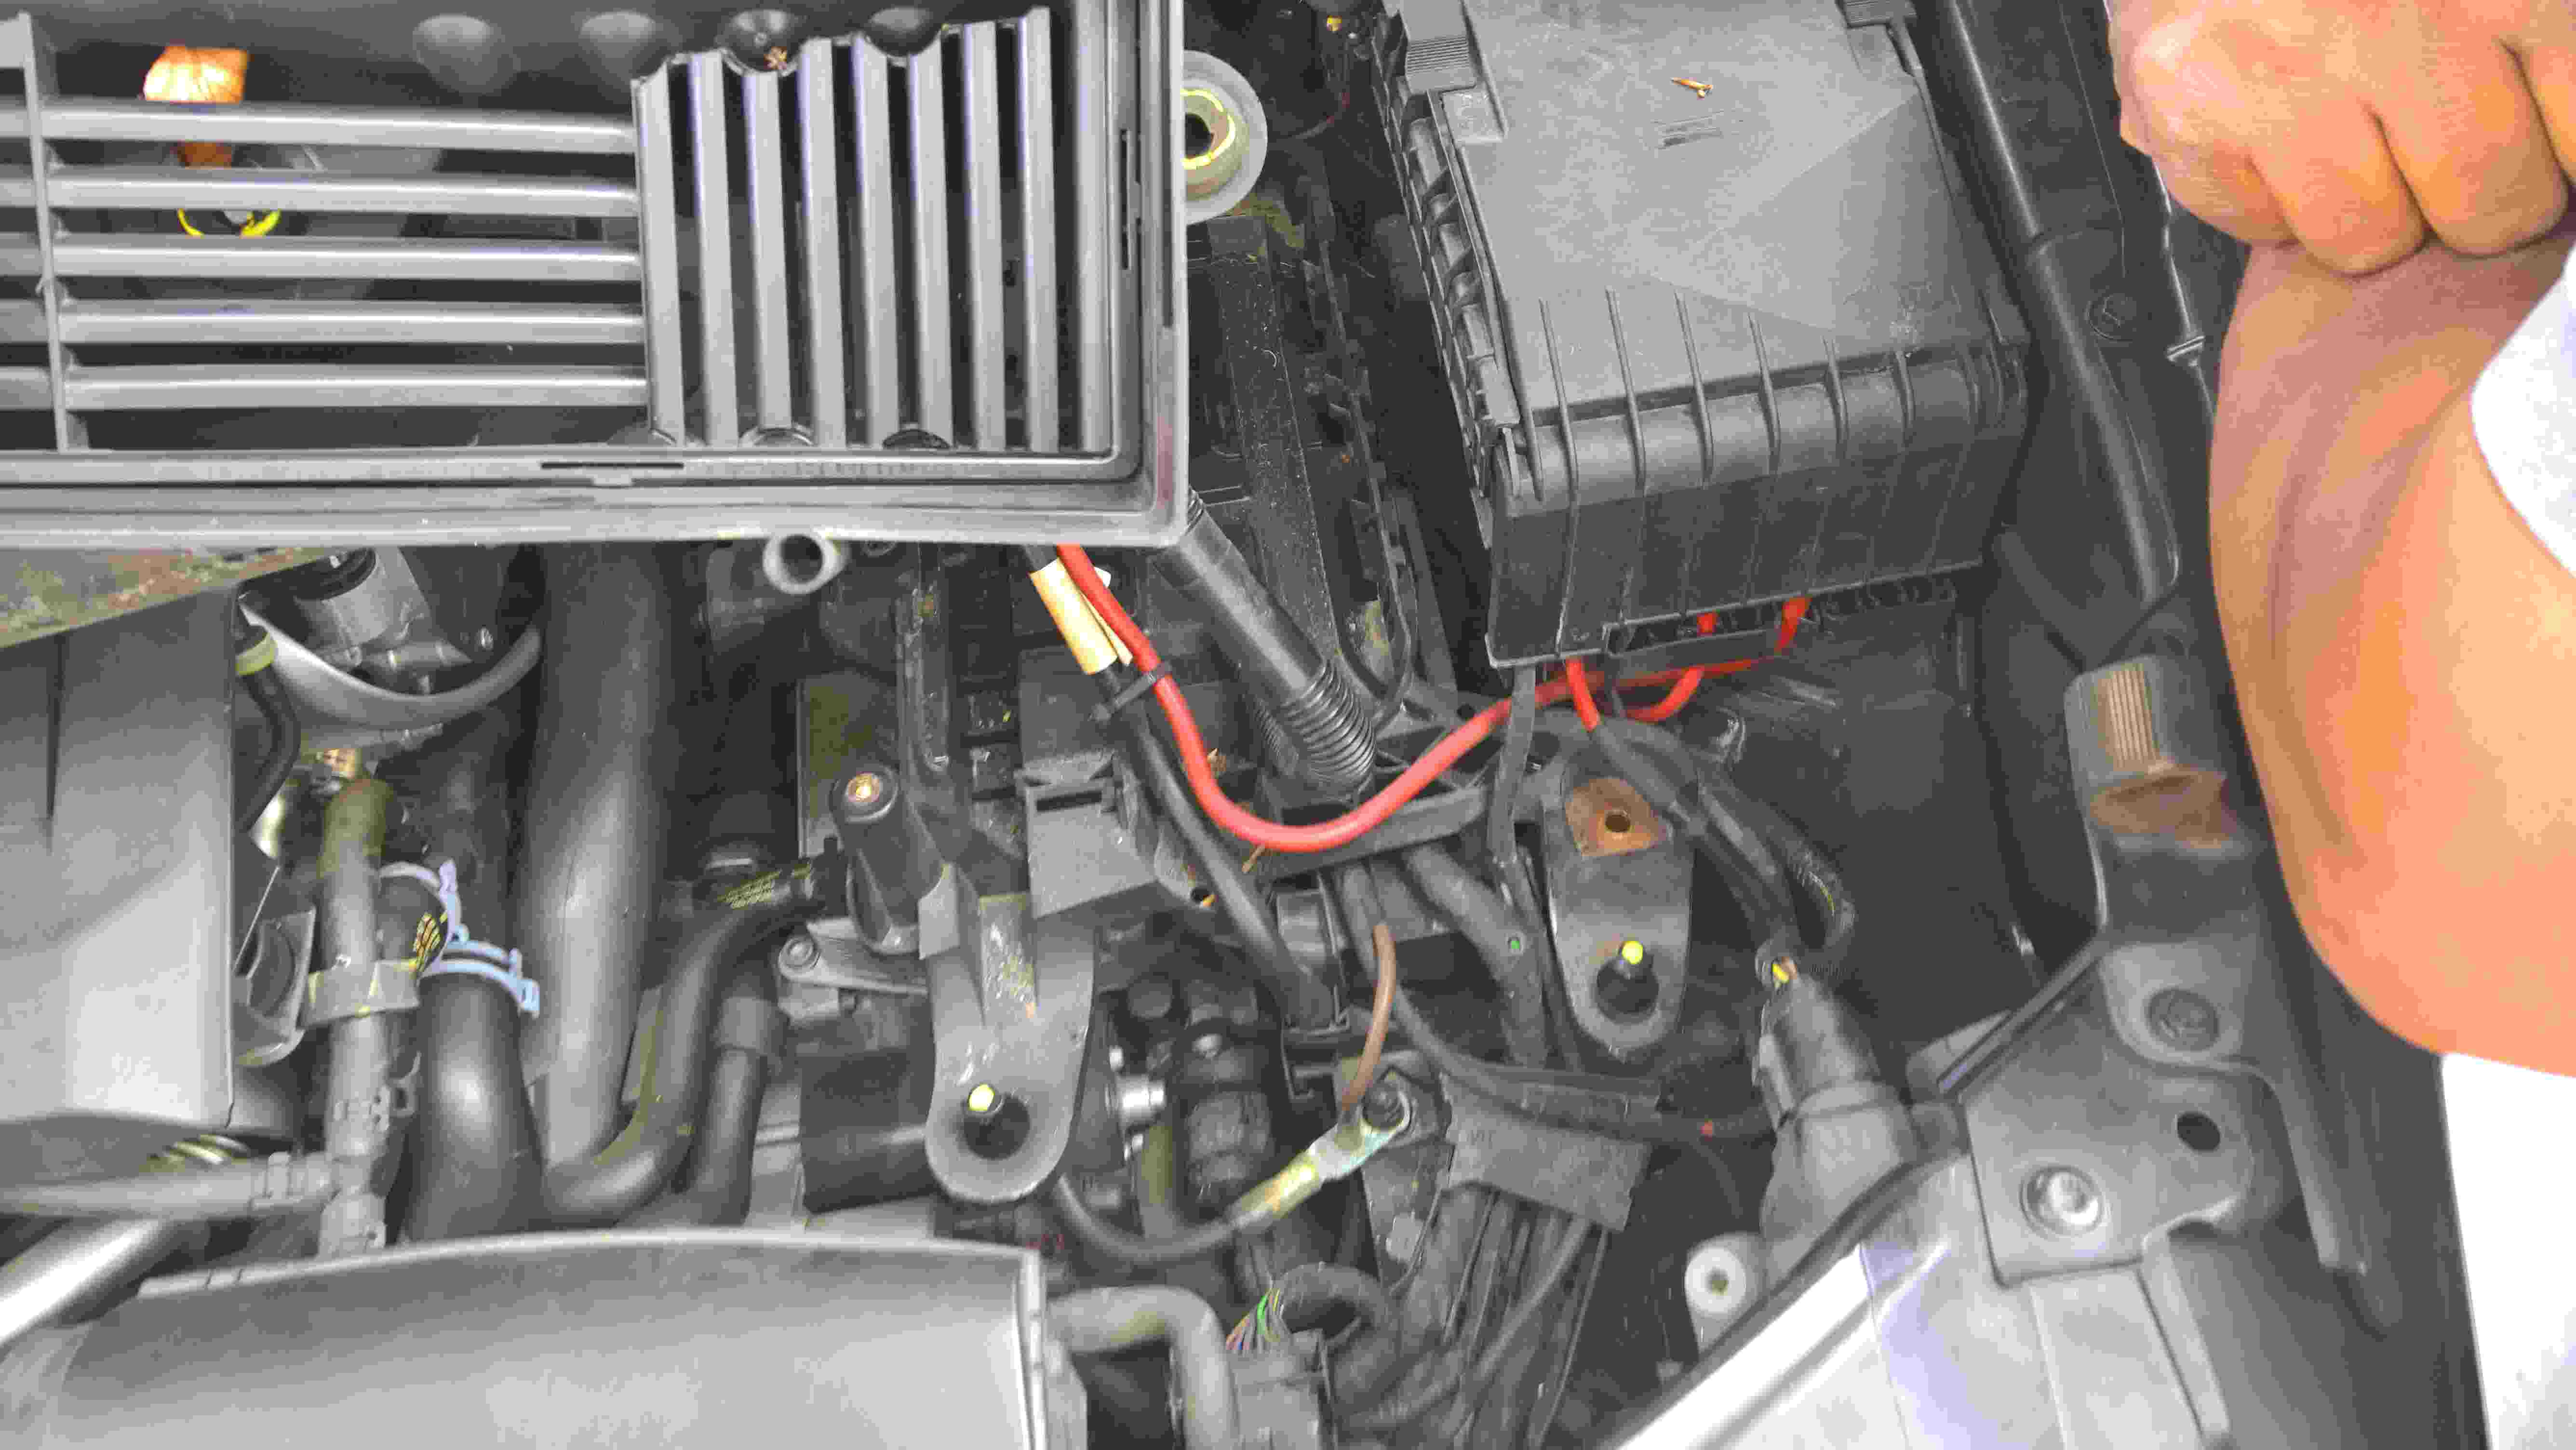
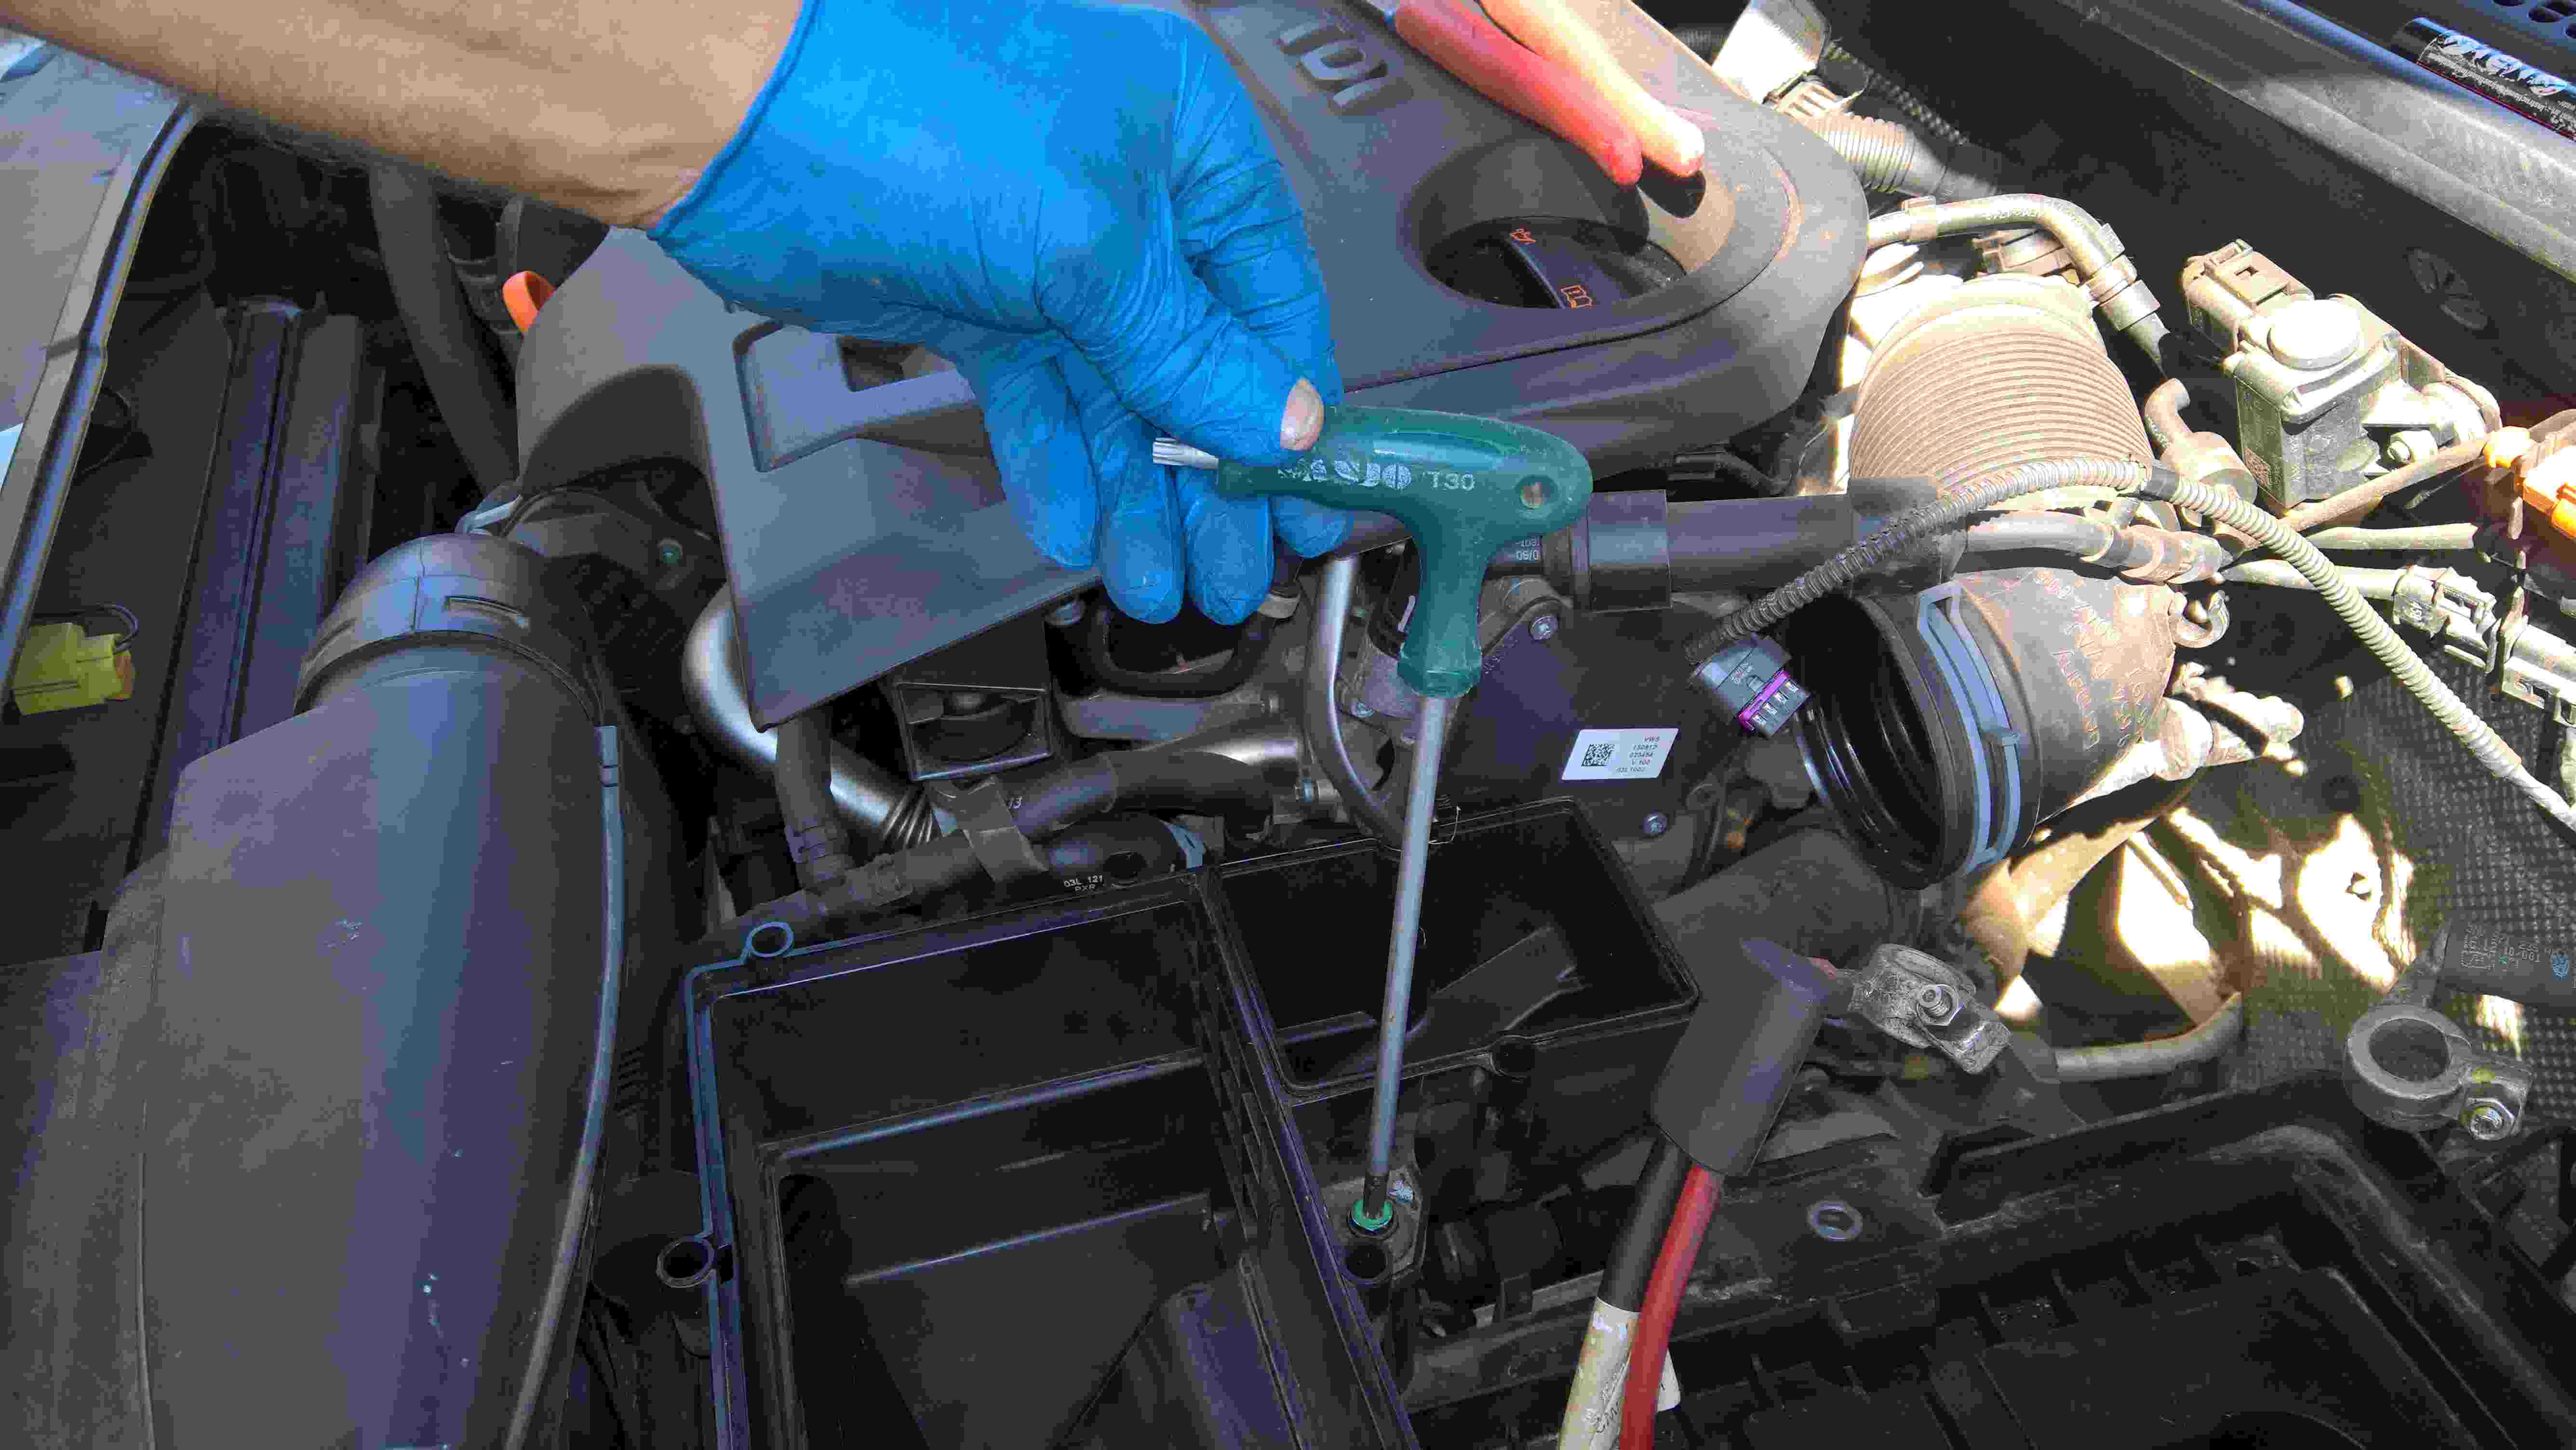
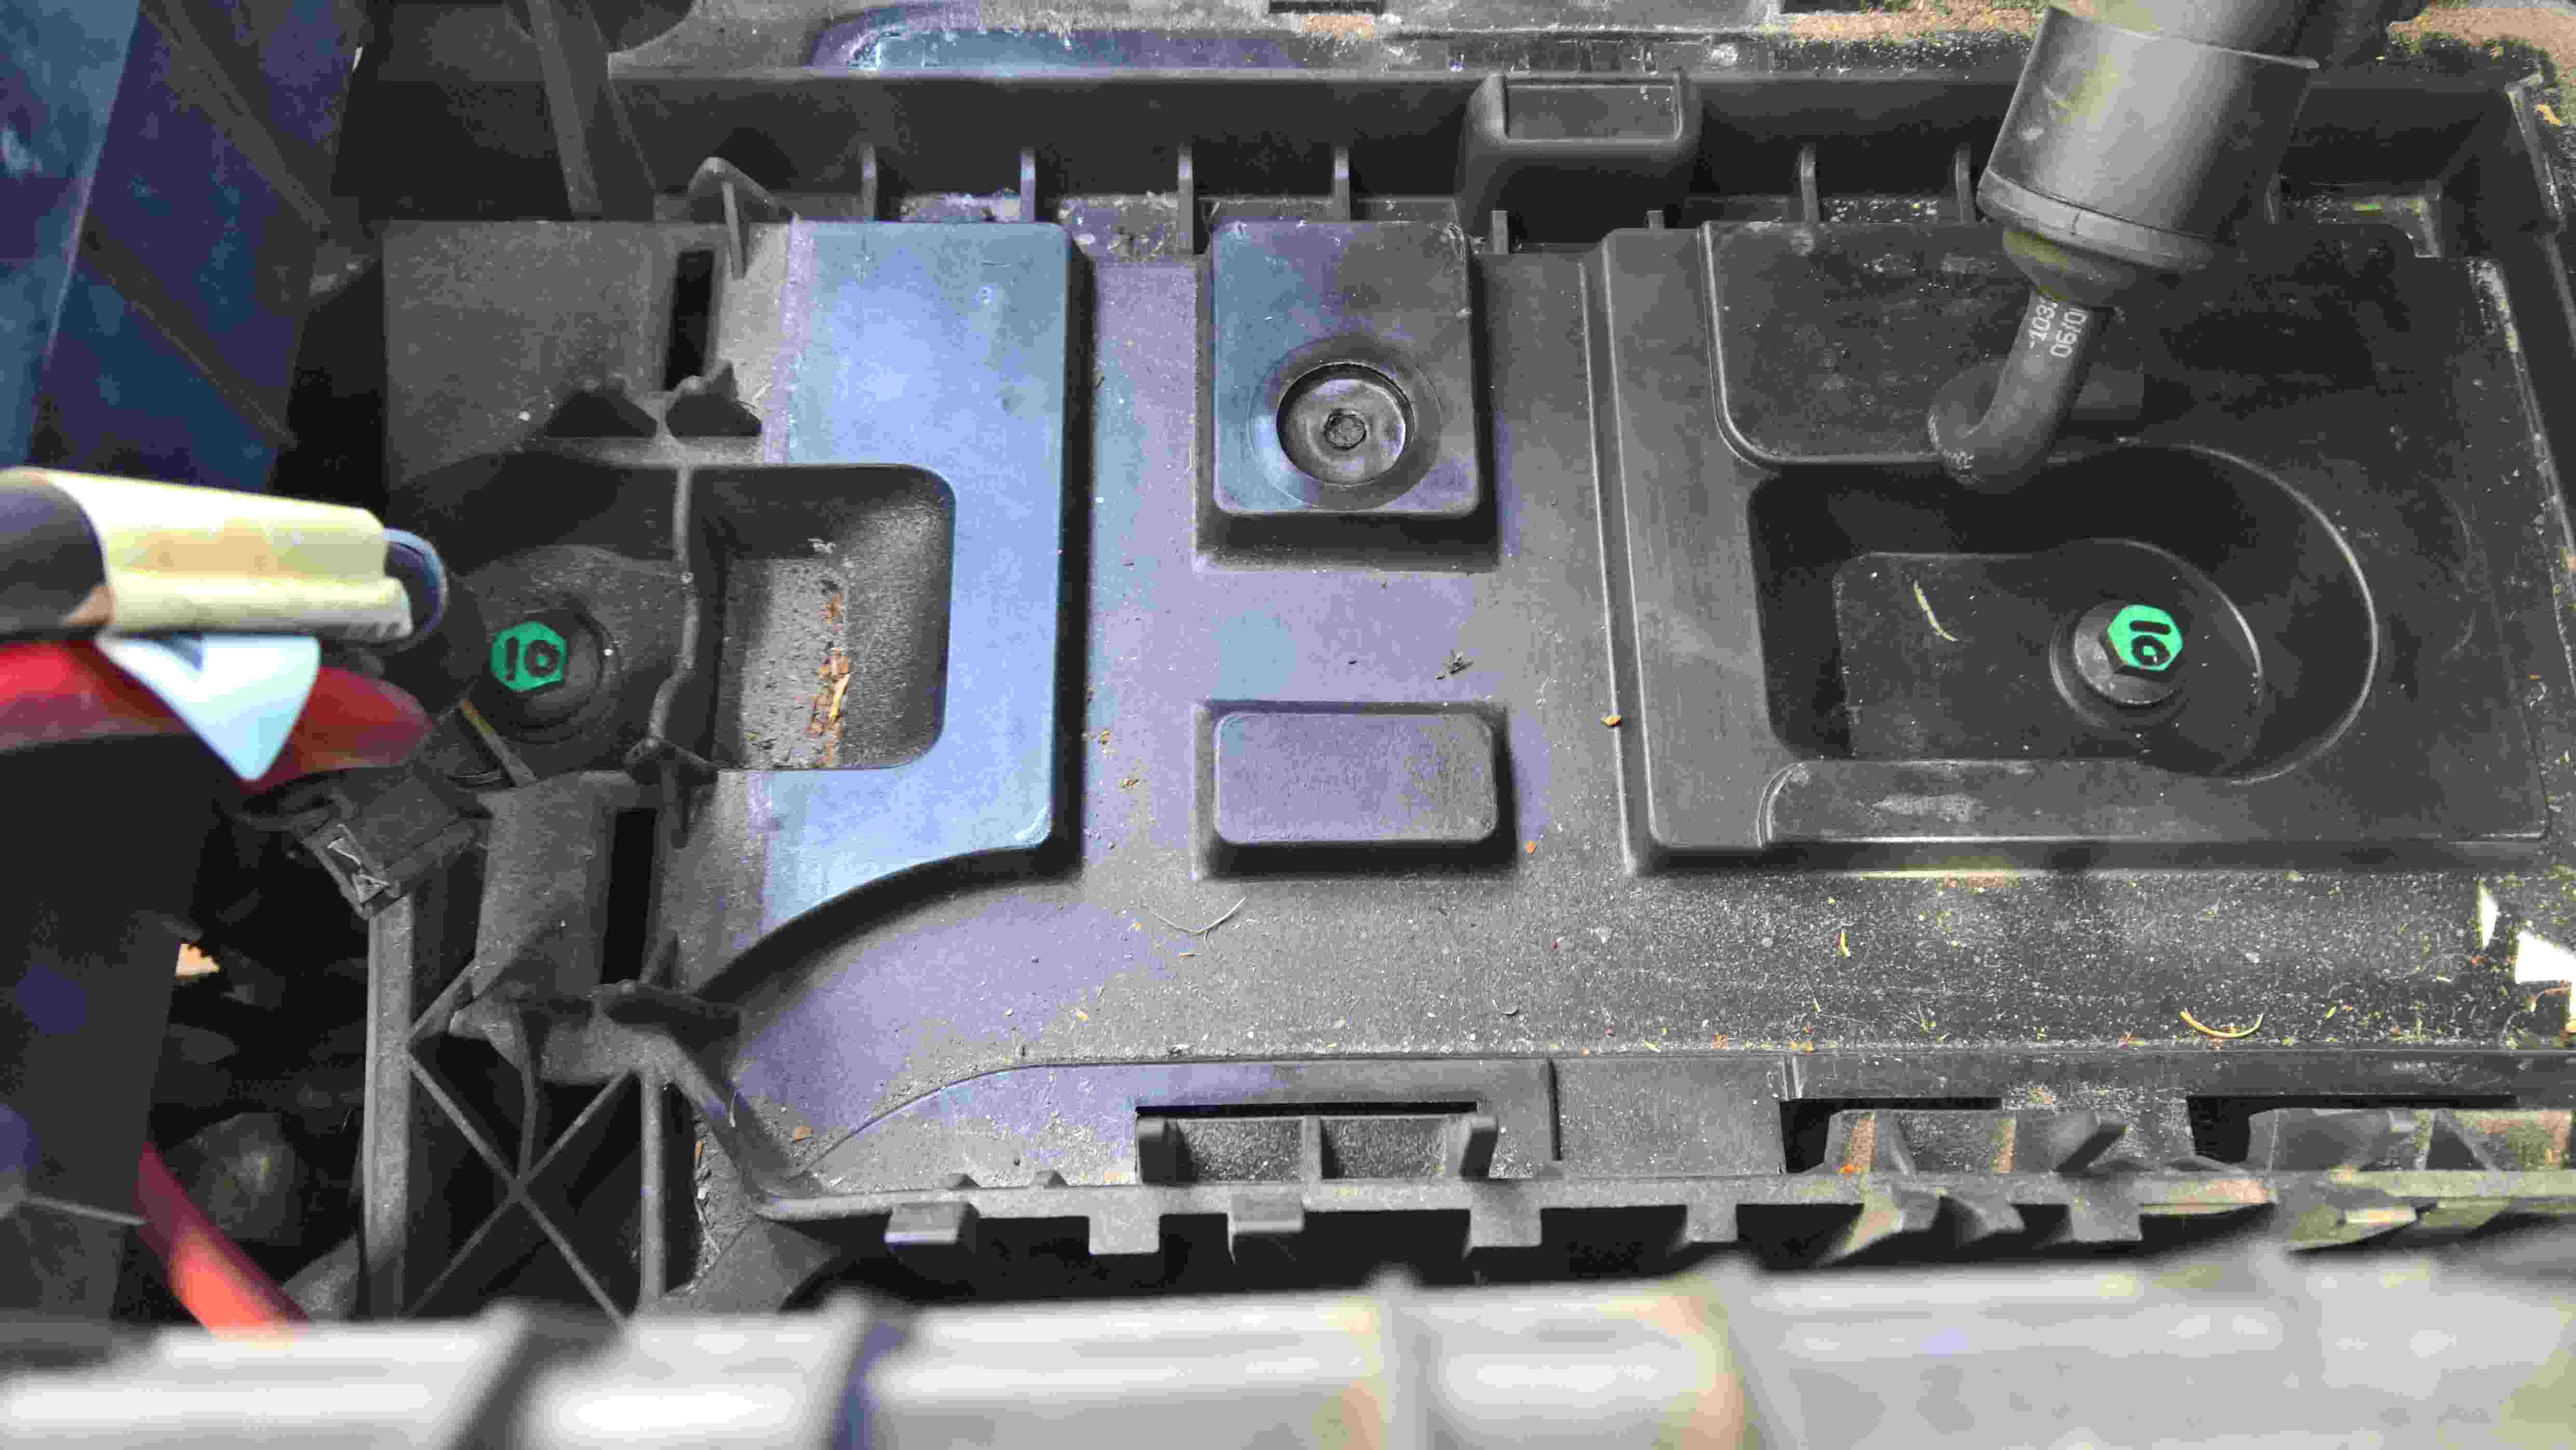
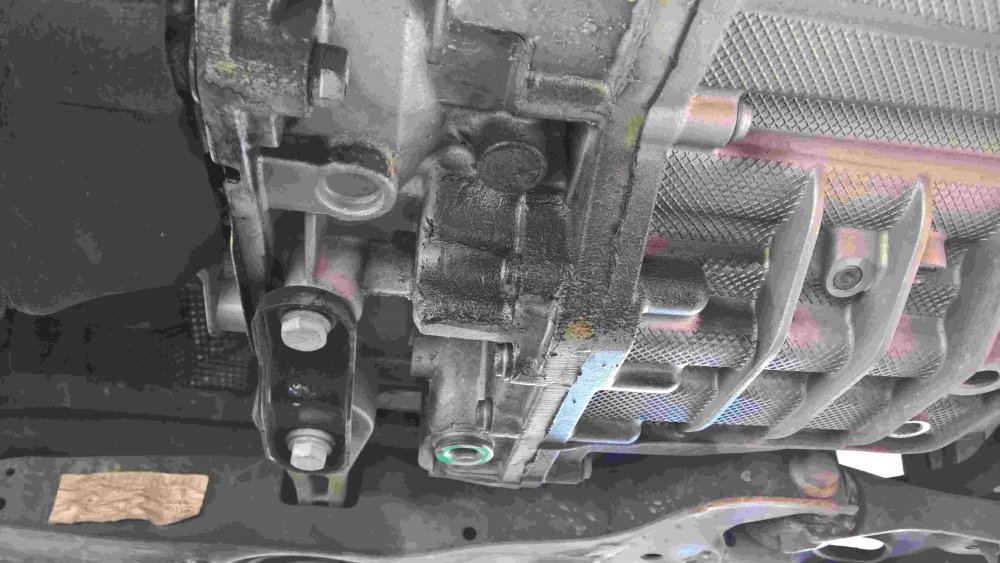
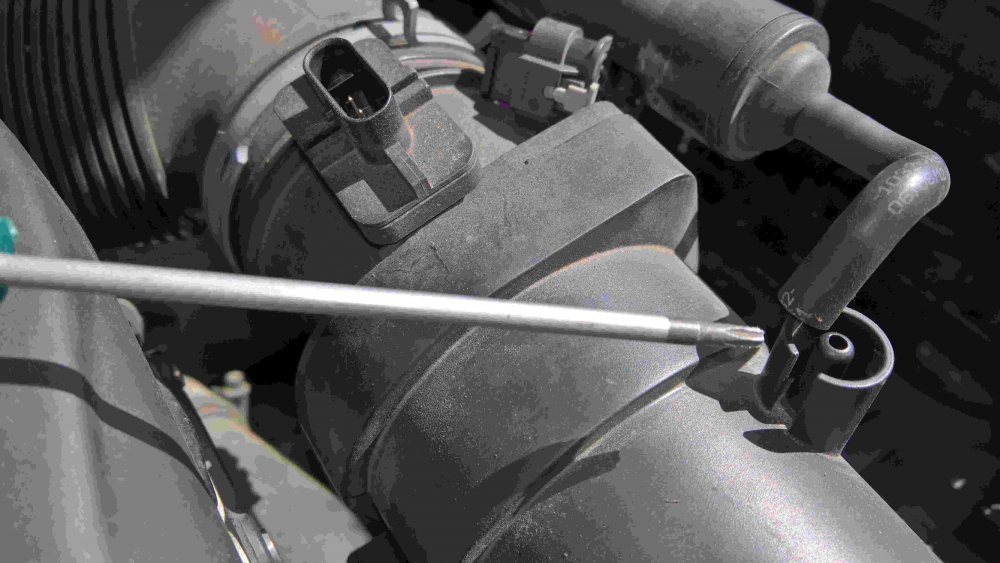
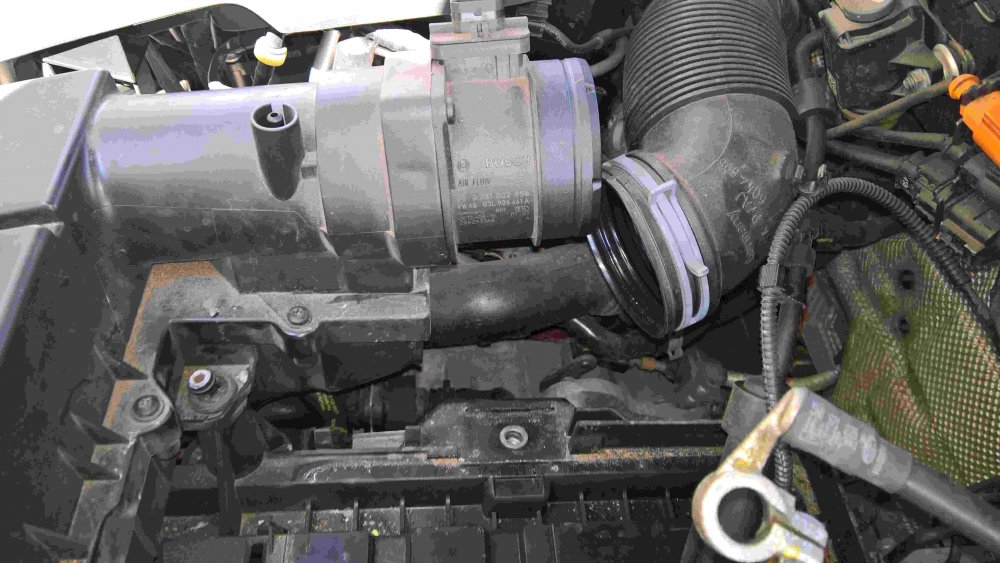
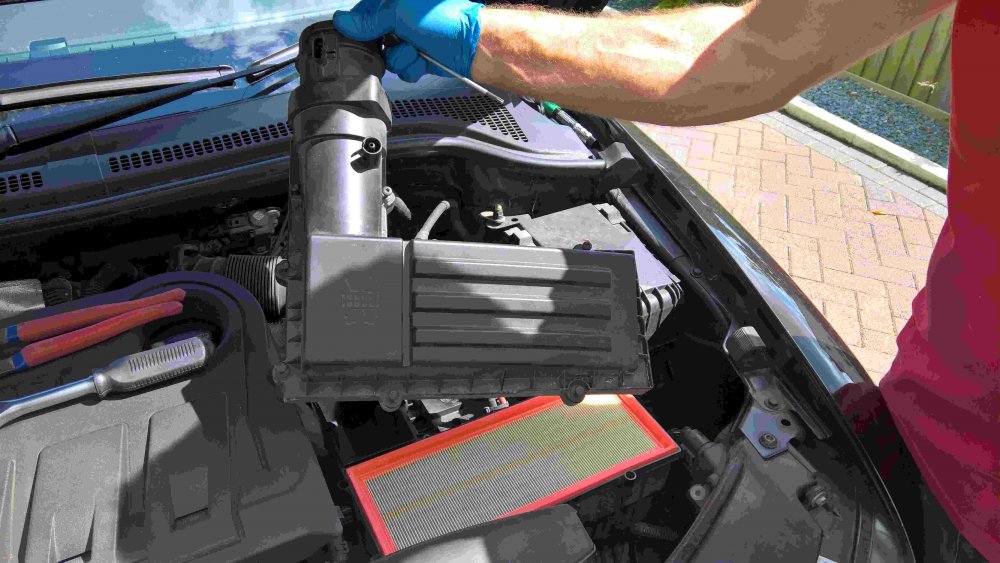
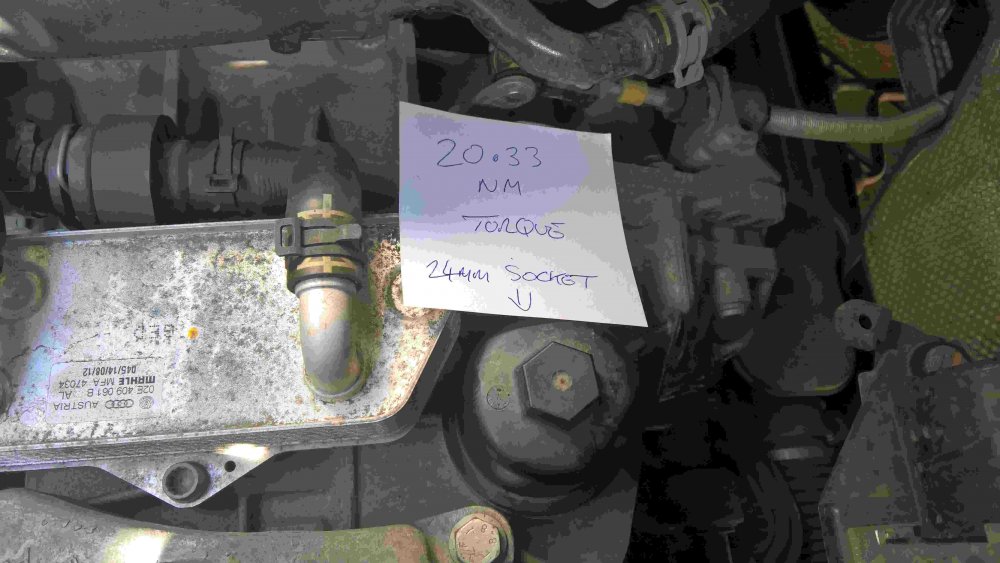
1 pointI have Now completed the first (40,000 mile) oil change on my 6 speed dsg box I will attach some pictures and information that may help others tempted to do the same though I have seen a recent post that stated they have been quoted £175 at a garage to do it so at that price it may not be worthwhile. For me there was little choice as Blade group will never get their hands on a vehicle of mine ever again. I purchased a " Sealey VS70095 Transmission Oil Filling System 3ltr instead of the vag6262 tool. " (use text between quotes to search) which cost me £69.49 (can be done cheaper without a pump but its slower) I purchased " 1 x Genuine VW DSG Gearbox Oil And Filter Kit (G052182A2, 02E305051C, N910845) from "Lancaster volkswagon" at a cost of £111.92 I already own Vcds (£270) So without going any further - if you can get it done for £175 then do it as even now I have the required equipment It will still cost £112 and a couple of hours of my precious snoozing time in another 40,000 miles time. Still interested...here we go then. I couldn't find an online video of a skoda superb dsg oil change but I did find a very good video of a vw model from a site covering their turbo diesel ( or was it "myturbodiesel" wink wink) search for this "How to change and drain the DSG transmission fluid in your VW w/ VAG6262" and select videos. The car needs to be level but there seems no where to measure the levelness of the superb so I measured the drive level and made blocks of wood to sit under three of the wheels. The oil would drain easier if warm but unless its the depths of winter I wouldn't worry about this too much, the oil is not very viscous. Step 1. jack one side of the car up slightly so that you can reach the furthest and middle of three TX45 screw that holds the engine drip tray up, remove those three tx45's and 8 TX20 (torx size 20) around the edge. (put the 11 screws in the tray and put it somewhere where you can trip over it and send the screws flying) Step 2 Identify the DSG box oil drain plug and slightly loosen it. do not remove it yet You need a size 14mm hex drive and a long ratchet or torque driver I have rung it here in green for you. (viewed from car front) Step 3. Lower the car, lift the bonnet and disconnect the battery . 2 @10mm Pull the battery fleece off (if fitted) Undo the battery retaining clamp. 1@13mm and remove the battery ( the battery tray has lips at the nearside edge so if leaning over the wing, lift and push away from you to disengage. Step 4 Remove the electrical connector from the air cleaner pipe and the smaller rubber pipe. The connector has a small grey peg at the side of it, pull this peg up slightly and then hold it against the connector as you pull it up. Step 5 remove the air inlet pipe from the air cleaner assembly Remove the top of the air filter box and take out the air filter. You now need to remove the lower part of the air filter housing, it is held down by two rubber push on nipples ( highlighted yellow on the 2nd picture below) and one TX30 screw (coloured green 1st pic below) and the air pipes. There is also a ribbed drain tube that goes down through the engine bay to the void in front of the wheel. it is connected to nothing so just pull it up and free. It will make sense when you do it yourself but it requires a yank upwards to lift the filter housing off the nipples and then twisting with the right hand side up in the air so that you can release the left hand U shaped tube. Step 6 Remove the battery tray, it has two 10mm bolts situated under where the battery would be (green and labelled here) and a 13mm bolt above the right hand rubber nipple for the air filter assy. In the picture above you can see the rust marks where this bolt was (just below the red wires) You can now see and easily get to the Dsg filter...It has a 24mm nut shape in the top of it and it is a one piece dome of plastic that is torqued up to 23NM. (My torque wrench starts at 48NM) As its unlikely you will have a torque wrench capable of measuring such a low value it would be wise to mark the top at say 6 o'clock and count the revolutions as you undo it. It is sealed with an O'ring so does not want to be overtightened. Clean around the filter case and then unscrew the cap, very little oil will spill if any at all. You will now see the filter which can be removed by pulling up, have a suitable container nearby to put it in as it is full of old oil. Put the new O'ring on to the cover, smear some oil around it and on the rubber gasket of the new filter and re fit both. Step 7 Re fit all the parts you have just removed apart from the engine tray and sump plug. Spend a moment looking down at the dsg filter cover and come to the conclusion that it should be possible (next time) to replace the filter without removing all this stuff, depends how strong your grip is but I will try that next time. Step 8 Drain and Fill By now the car has resettled after having been jacked up and as it is now back down you have limited room to work underneath, this is why you loosened the drain plug as it is too difficult to do later. Get a suitable container to drain the old oil into, I used an old 15kg tile adhesive bucket with an internal diameter of 280mm cut down to 130mm (the old oil filled to a height of 100mm) Put the container under the drain plug and ....blah blah blah Some oil will come out but not that much, not until you get your 8mm hex drive and undo the snorkel....let it drain.. then replace the snorkel. The VAG kit and the sealey have the correct size adapter to screw into the Dsg box and the sealey has a quick fit push connector and isolating valve so you waste less oil when passing the filling tube down through the engine. The sealey says it holds 3 litres, it either doesn't or my new bottles of oil were overfilled, not that important so just fill it up and pump it in. you need to keep adding oil until it spills back out through the snorkel ( you did re fit the snorkel didn't you?!) check for overspill at approx. 4.5 litres pumped in. Once it starts trickling back out you can connect the Vcds and start the car, as the video shows -pass through each selector position pausing for a few seconds and then back to park. as the oil warms it will expand and you will see more draining out , on Vcds select control modules, dsg automatic transmission and then measuring blocks and click the top left up arrow to get to block 19 , here you will see the dsg oil temp and when that reaches 35c you can turn off the engine andput the sump plug back in, torque up to 45nm Re fit engine tray and rejoice (hide those three extra bolts leftover...bound to be ok without them huh?)


 1 point
 -
**Updated March 2025** The latest firmware version is: 0480 for SOP4.x hardware. 0363 for SOP3.x hardware. 0253 for SOP2.x hardware. **UPDATED May 2021** **Updated Feb 2024** Minimum size of SD card is now 32G **Please note everything on here - is generally warranty effecting - break it and you'll need to pay to get it fixed** Dear all, I thought I would pen down my experience in terms of upgrading my firmware on my 2019 Octavia Scout. I have cleared me writing this piece with the Briskoda Moderators. I have always berated Skoda for the fact that there are firmware updates available to fix various silly niggles on the Entertainment system. I have a Amunsden system (Bolero with Sav Nat). You have to play silly games with your dealer, just so they can look to see if any of your MIB system faults are displayed as a known issues....which is the measure that they use. The point is that unless your car system is seriously glitchy, dealers won't generally touch the MIB system. I am an IT guy, and this kind of thinking (especially with the more modern connected systems) depresses me....the world is told to patch,patch,patch - but VW group choose not to do so unless absolutely necessary. I now understand why....because the MIB2.5 system upgrade that I managed to get hold of for my Scout - took over an hour to upgrade. Time is money in dealers and this is why when dealers do a firmware update, then charge it as a warranty claim. On my system, there were many many patches for 0475. The version of firmware provided by a member on this forum was for 0478. (May21) There are also different version of firmware available. This is an important thing to note: There are generally (for Bolaro and Amunsden) - different software strands: They are: SOP2.x, SOP3.x and SOP4.x - when you look at a firmware version, you will be presented with a version such as 0472 - this says that it is a SOP Version 4.x . You can only update SOP4.x strands with another SOP4.x strand. Therefore, if you have 0472, you can upgrade to 0478. If you have a SOP3.x - e.g. 0359, then you cannot safely upgrade to SOP4.x 0478 firmware. There are people on here who say they can do it, but this is a risky area and you risk bricking your hardware. Now some legal stuff - because Briskoda cannot officially endorse anything that you do to your car (its a forum for Skoda enthusiasts, not dubiously obtained software) and the fact that the forum doesn't want to be sued by VW Group for posting non-authorised/obtained software, all the dealings for firmware has to done behind the scenes. Its sad that way. The firmware files are generally quite large (my copy was about 3GB). So once you have found the appropriate thread for your MIB system (it could be a Bolero, Amunsden or Columbus system), whether it is a MIB, MIB2 or MIB2.5 system, and you have found the appropriate member who has access to the firmware, you will be asked to take a photo screenshot of the system information. You can find that in System Information in the MIB system under Menu and Settings. This information shows the VW part number and the current firmware level. Do not confuse this with the maps/nav version information. If you are brave enough to do the firmware update, my other caveat is that you need to know your way around a PC. I'm a linux guy (which helps), but a good technical expertise level is useful. You will need: The link to the downloaded software An 32GB SD Card - DOS partition and formatted in FAT32 (Linux land it is called vfat) Download the firmware image - it will have a filename similar to: MST2_EU_SK_ZR_P0478T.7z . Briefly, that equates to: MST2 = MIB2 or 2.5, EU_SK_ZR are all countries (its a Europe and Russia image) and P0478 is the firmware version. The file is given in this case in a 7zip format (highly compressed). I know there are Windows decompression tools available, but I use 7z command line - in this case "7z x MST2_EU_SK_ZR_P0478T.7z". Make you do this in a new directory (otherwise it write files all over the place in your current directory). You should also file scan the files to make sure there are no virus's. After a while, you end up with a directory full of files. You can safely move the .7z master file elsewhere. There will be a new directory created with the same name as the firmware. Go into this directory and copy the content onto your SD Card. This process will take about 30 minutes all told. Eject the SD and go to your car..... Now connect up the battery charger to your battery and start the charging process. Remember, if the MIB system detects voltage levels below 12V (I think it is 11.8V), it will not allow you to upgrade (or its a bad idea anyhow). Think of it doing an Android upgrade with low battery voltage - not advised. Get into the passenger seat, and go into the glove compartment. Remove your current SD cards in SD1 (and SD2 if you have that slot). Switch on the MIB system and insert your SD card with the firmware on it - into SD1. It must be SD1 slot only. With the MIB system on, press and HOLD the Menu button until you get some hidden menus appear. Top option is labelled firmware/updates. Select it (either press screen or use the right hand knob and press your selection). Select Upgrade as the option you need. The system will go away and read the SD Card and see if there is a firmware update available. If all is working well, the system will reboot and put itself into Emergency Update mode (Scary Screen). You will now right here find if your files are corrupted or not. First attempt at my upgrade....it didn't go well, because I use 7z e as opposed to 7z x flag to extract the files. Once that snafu had been fixed (and I stopped panicking) , and I had the files in the right order in the right directories, all started working. I had over 100 updates - these were mainly CPU related and firmware for the bluetooth modules etc. They take time to process....be patient. After about 60 minutes, the upgrades finishes and the radio reboots - once to ask you whether you want to downgrade your system to the previous firmware level (press cancel here). The system then completes and switches itself off. Leave it for about 60 seconds. After 60 seconds, switch it back on...(in my case, the Scout Logo appears) and the system boot up. All seemed to work well, but I had some minor niggles to content with. 1) The GPS module went AWOL for about 10 minutes, then came back to life. 2) I could not get Skoda Connect to work. Skoda Connect was an interesting one - and I fixed it an interesting manner. I ended up doing a car factory reset. Skoda Connect still didn't work. A quick check with the Skoda Connect app showed I was logged out, so re-registered the car with my login. The app showed all was well and re-registered, but still no Skoda Connect. I left it to do its thing....(got bored). Today - I had another look at the problem....I realised that because I re-registered the car, that all the personalisation options had gone back to factory reset. I had to go into Menu-> Personalisation and re-associate the car with my profile....Skoda Connect then started working correctly. I hope this is helpful for somebody to understand the process.1 point