Inex
Members
-
Joined
-
Last visited
-
It was a good guess - I found it to be true. Thanks!
-
Trying to figure out the service interval of my DSG but all I find is tables of DQ... gearboxes with some number. Nothing about UAX - even if I search the forum here.
-
So, new ballast and a brand new pair of nightbreakers came in and had them fitted over the weekend 👌 The car was equipped with standard Osrams before. I installed one bulb at a time so I would have the opportunity to drive in the night once with two different bulbs and tell the difference. The nightbreaker bulb is indeed brighter and from a distance it has a purple ish tint. As for the install, I spent 30 mins on the right side ballast by easily moving the fuel filter canister out of the way and an outrageous 1.5 hours on the right side bulb and almost 3 hours on the left side bulb... The right side bulb I managed to fit the metal clips back together via the tight gap behind the headlight. For the left side bulb I gave up after 2 hours of breaking my hand inside through the gap behind the headlight and decided to turn the wheel max left and remove the Inner Wheel arch plastic just enough to fit my hand through there only to realise it took 1 min to fit the bulb this way... I suppose you would remove the wheel normally but I do not have a jack stand or anything to lift the car so I gave this a try with success. There are in total about 16 torx screws you need to remove for this and this is for only half of the wheel arch. Nevertheless, it is possible and that's what I will be doing next time if need be.
-
Not yet... The headlight assembly seems totdry up quite easily be removing the rear caps and I have not had 1-2 continuous dry days yet. I plan to seal it before refitting the new parts.
-
Perfect then. I ordered a new set of nightbreakers and an identical ballast 💪
-
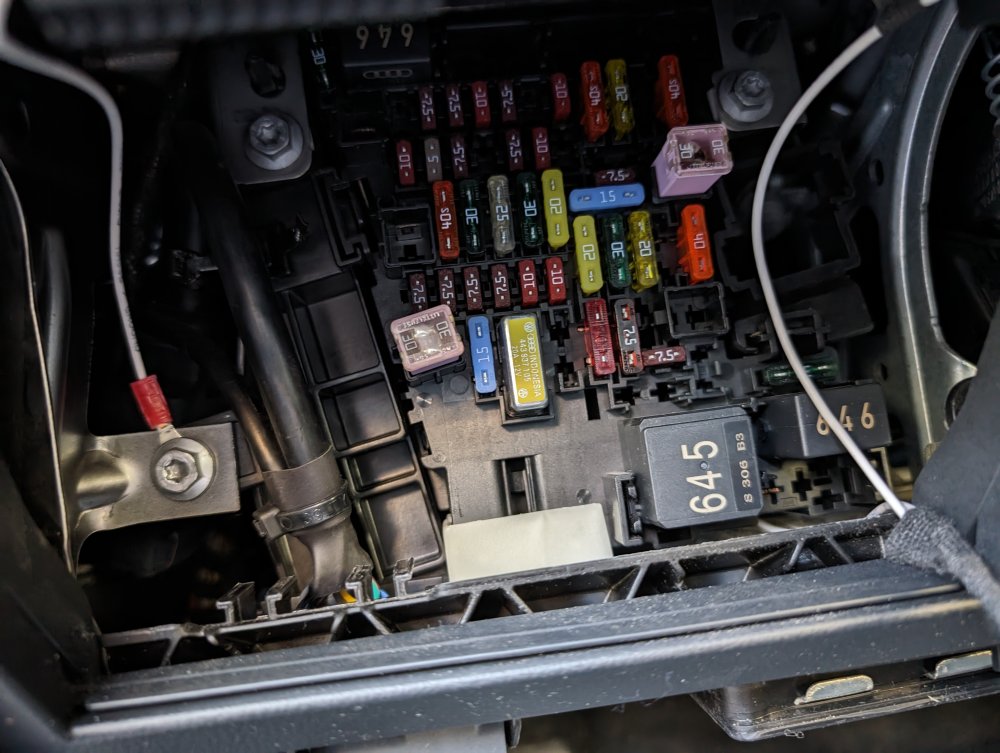
Okay, after putting some 2 hours into this: - checked the fuses (11 and 24) both are fine. It seems there are 3 variants of the fusebox for this vehicle... - removed the right side ballast and put it on the left with the good bulb > didn't work (need to detach the oil filter and move it out of the way to reach the screws) - removed the left side ballast, tried it on the right with the bad bulb first > didn't work (need to detach the ECU wiring harness from the frame to reach the screws) - tried the good bulb on the right with the good ballast > it worked! So I can rule out the headlight unit and its modules I've done done all this by disconnecting the battery every time I had to touch the ballasts. VCDS is on its way to me but I guess this calls for one new ballast and one bulb. Question is: will the new ballast and bulb combo on the right be brighter than the left? Will it trigger my OCD? 🤣
-
Thanks buddy. Good to know small details like that before jumping on it. Plan to take it all one at a time over the coming days when I have the chance. For the modules part it clearly requires a longer time before all that comes off and I manage to orient myself around them. Any idea if a bad ballast has the potential to burn a bulb? It would be ideal not to burn the second bulb when doing the swap around 😅
-
Yeah.... I plan to try to swap the ballasts around over the weekend to see if that indicates anything... Crossing my fingers it can be done without removing the headlight.
-
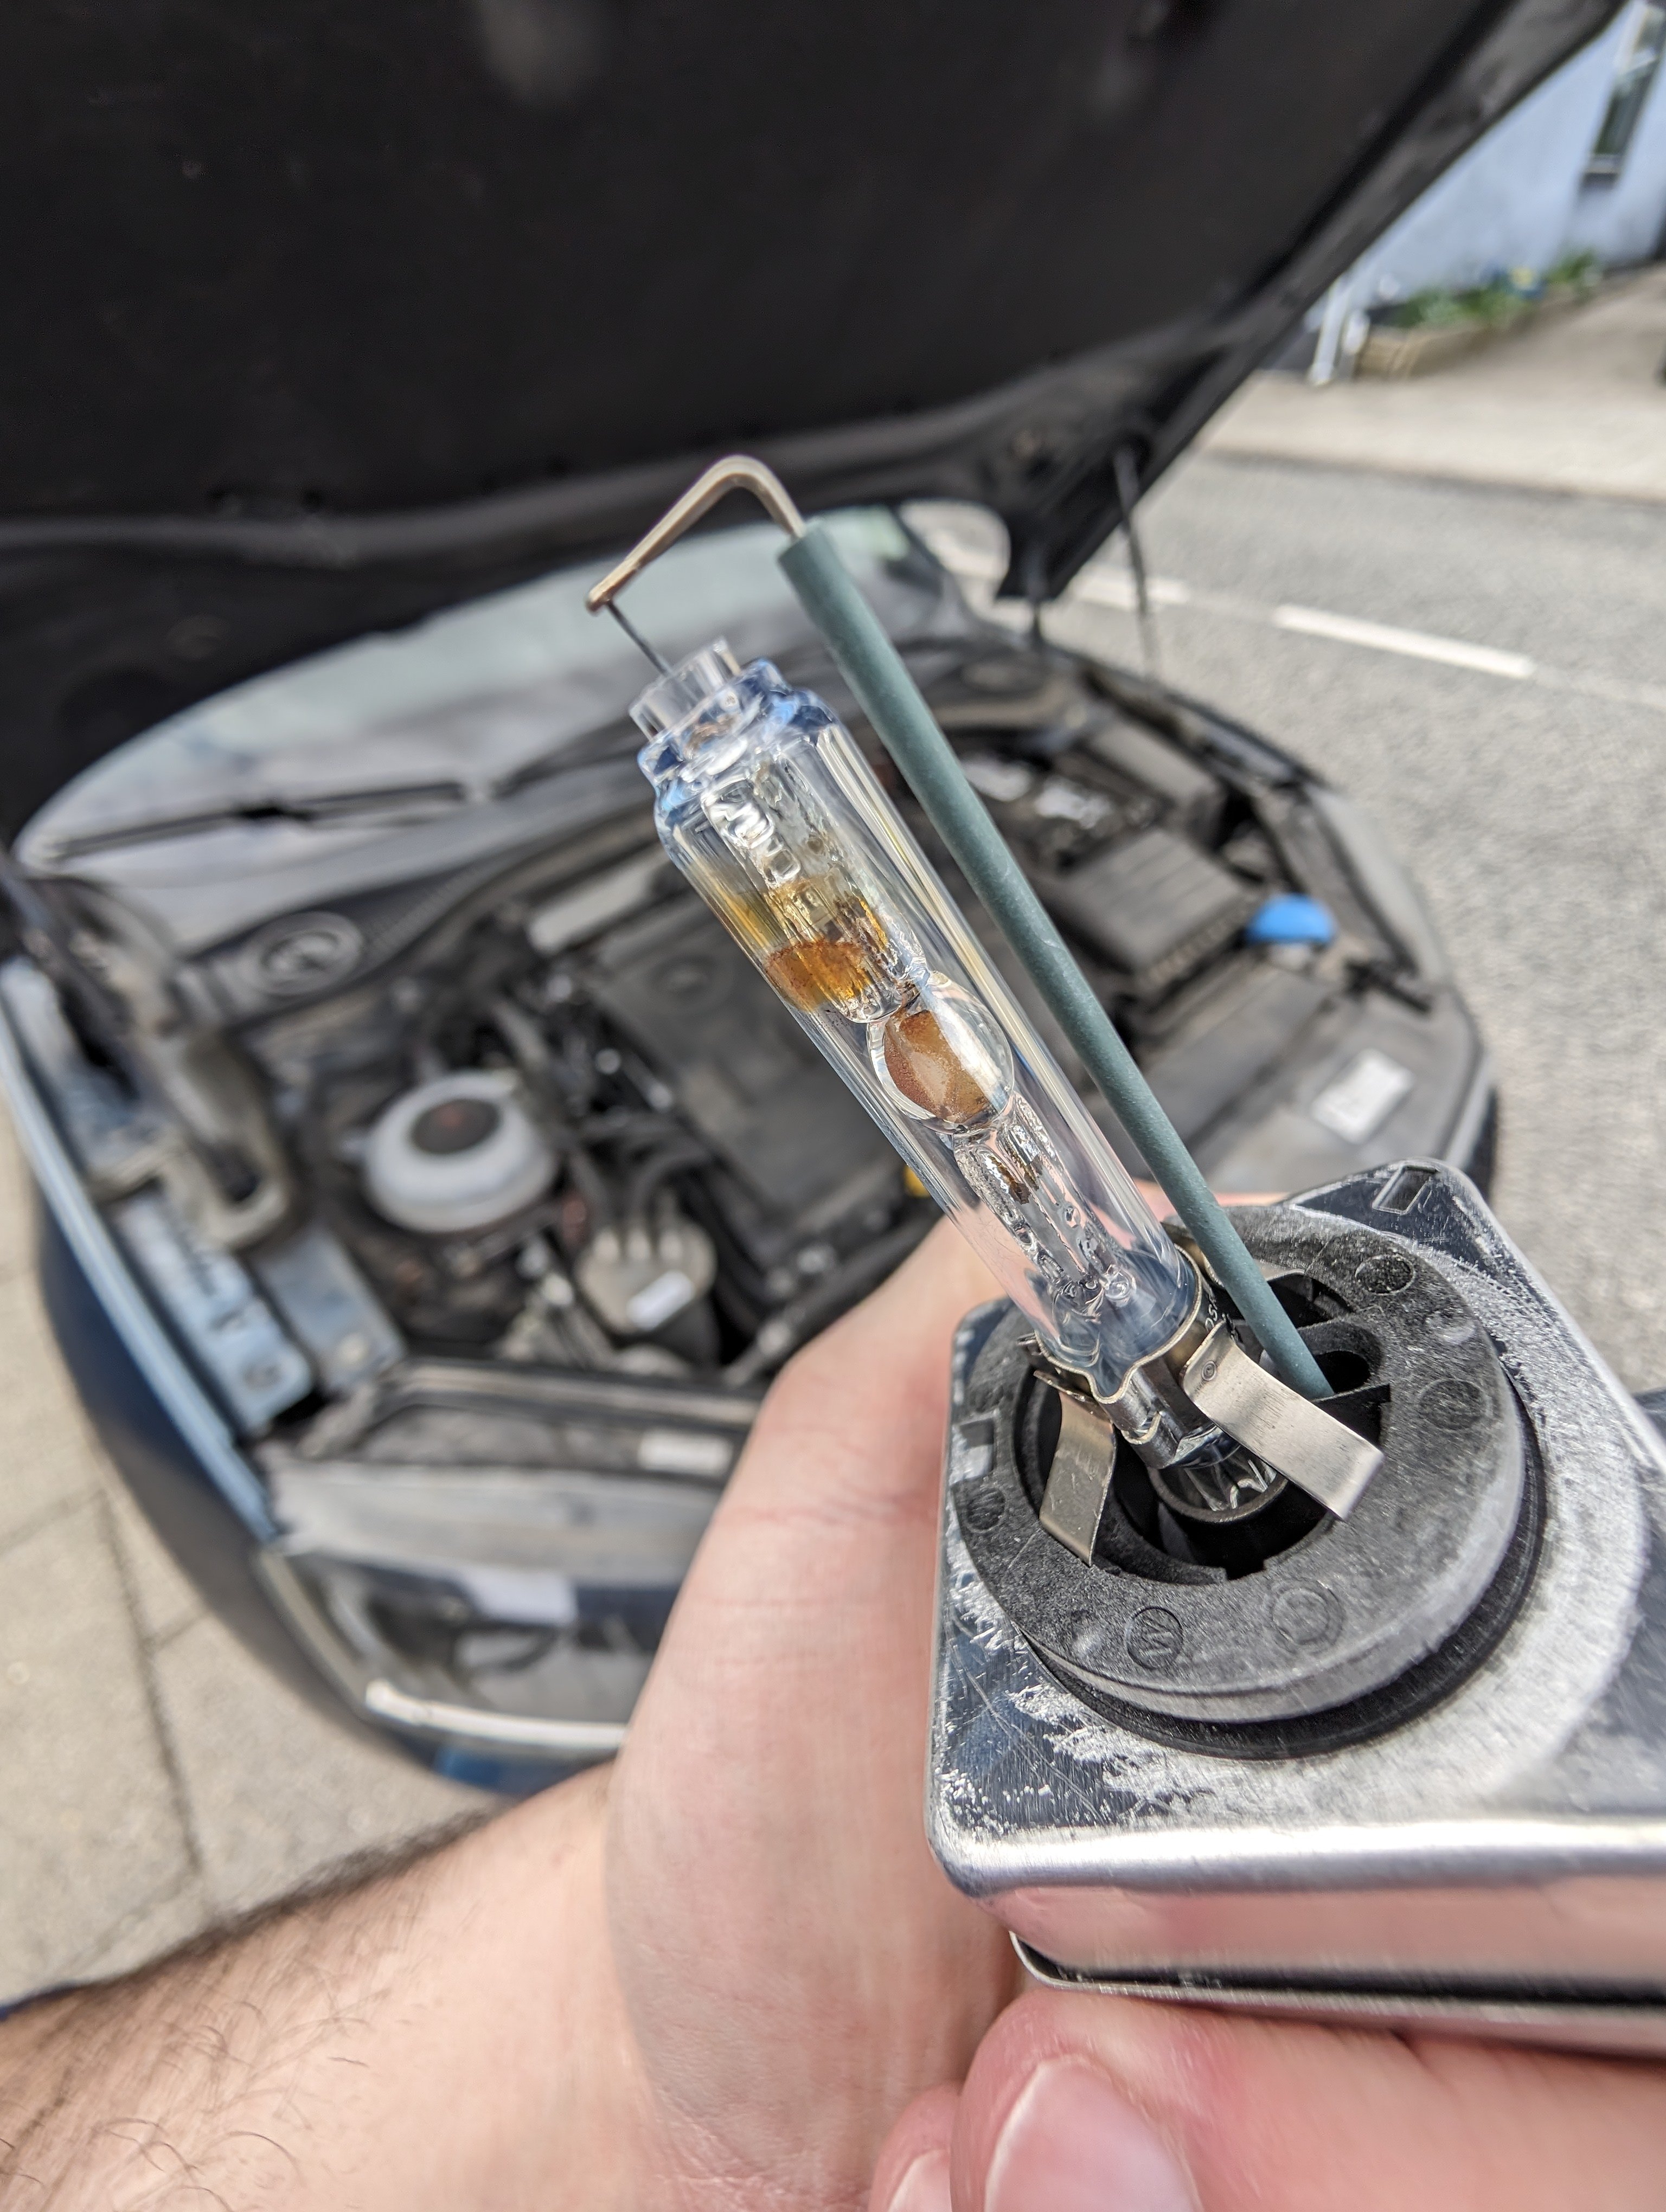
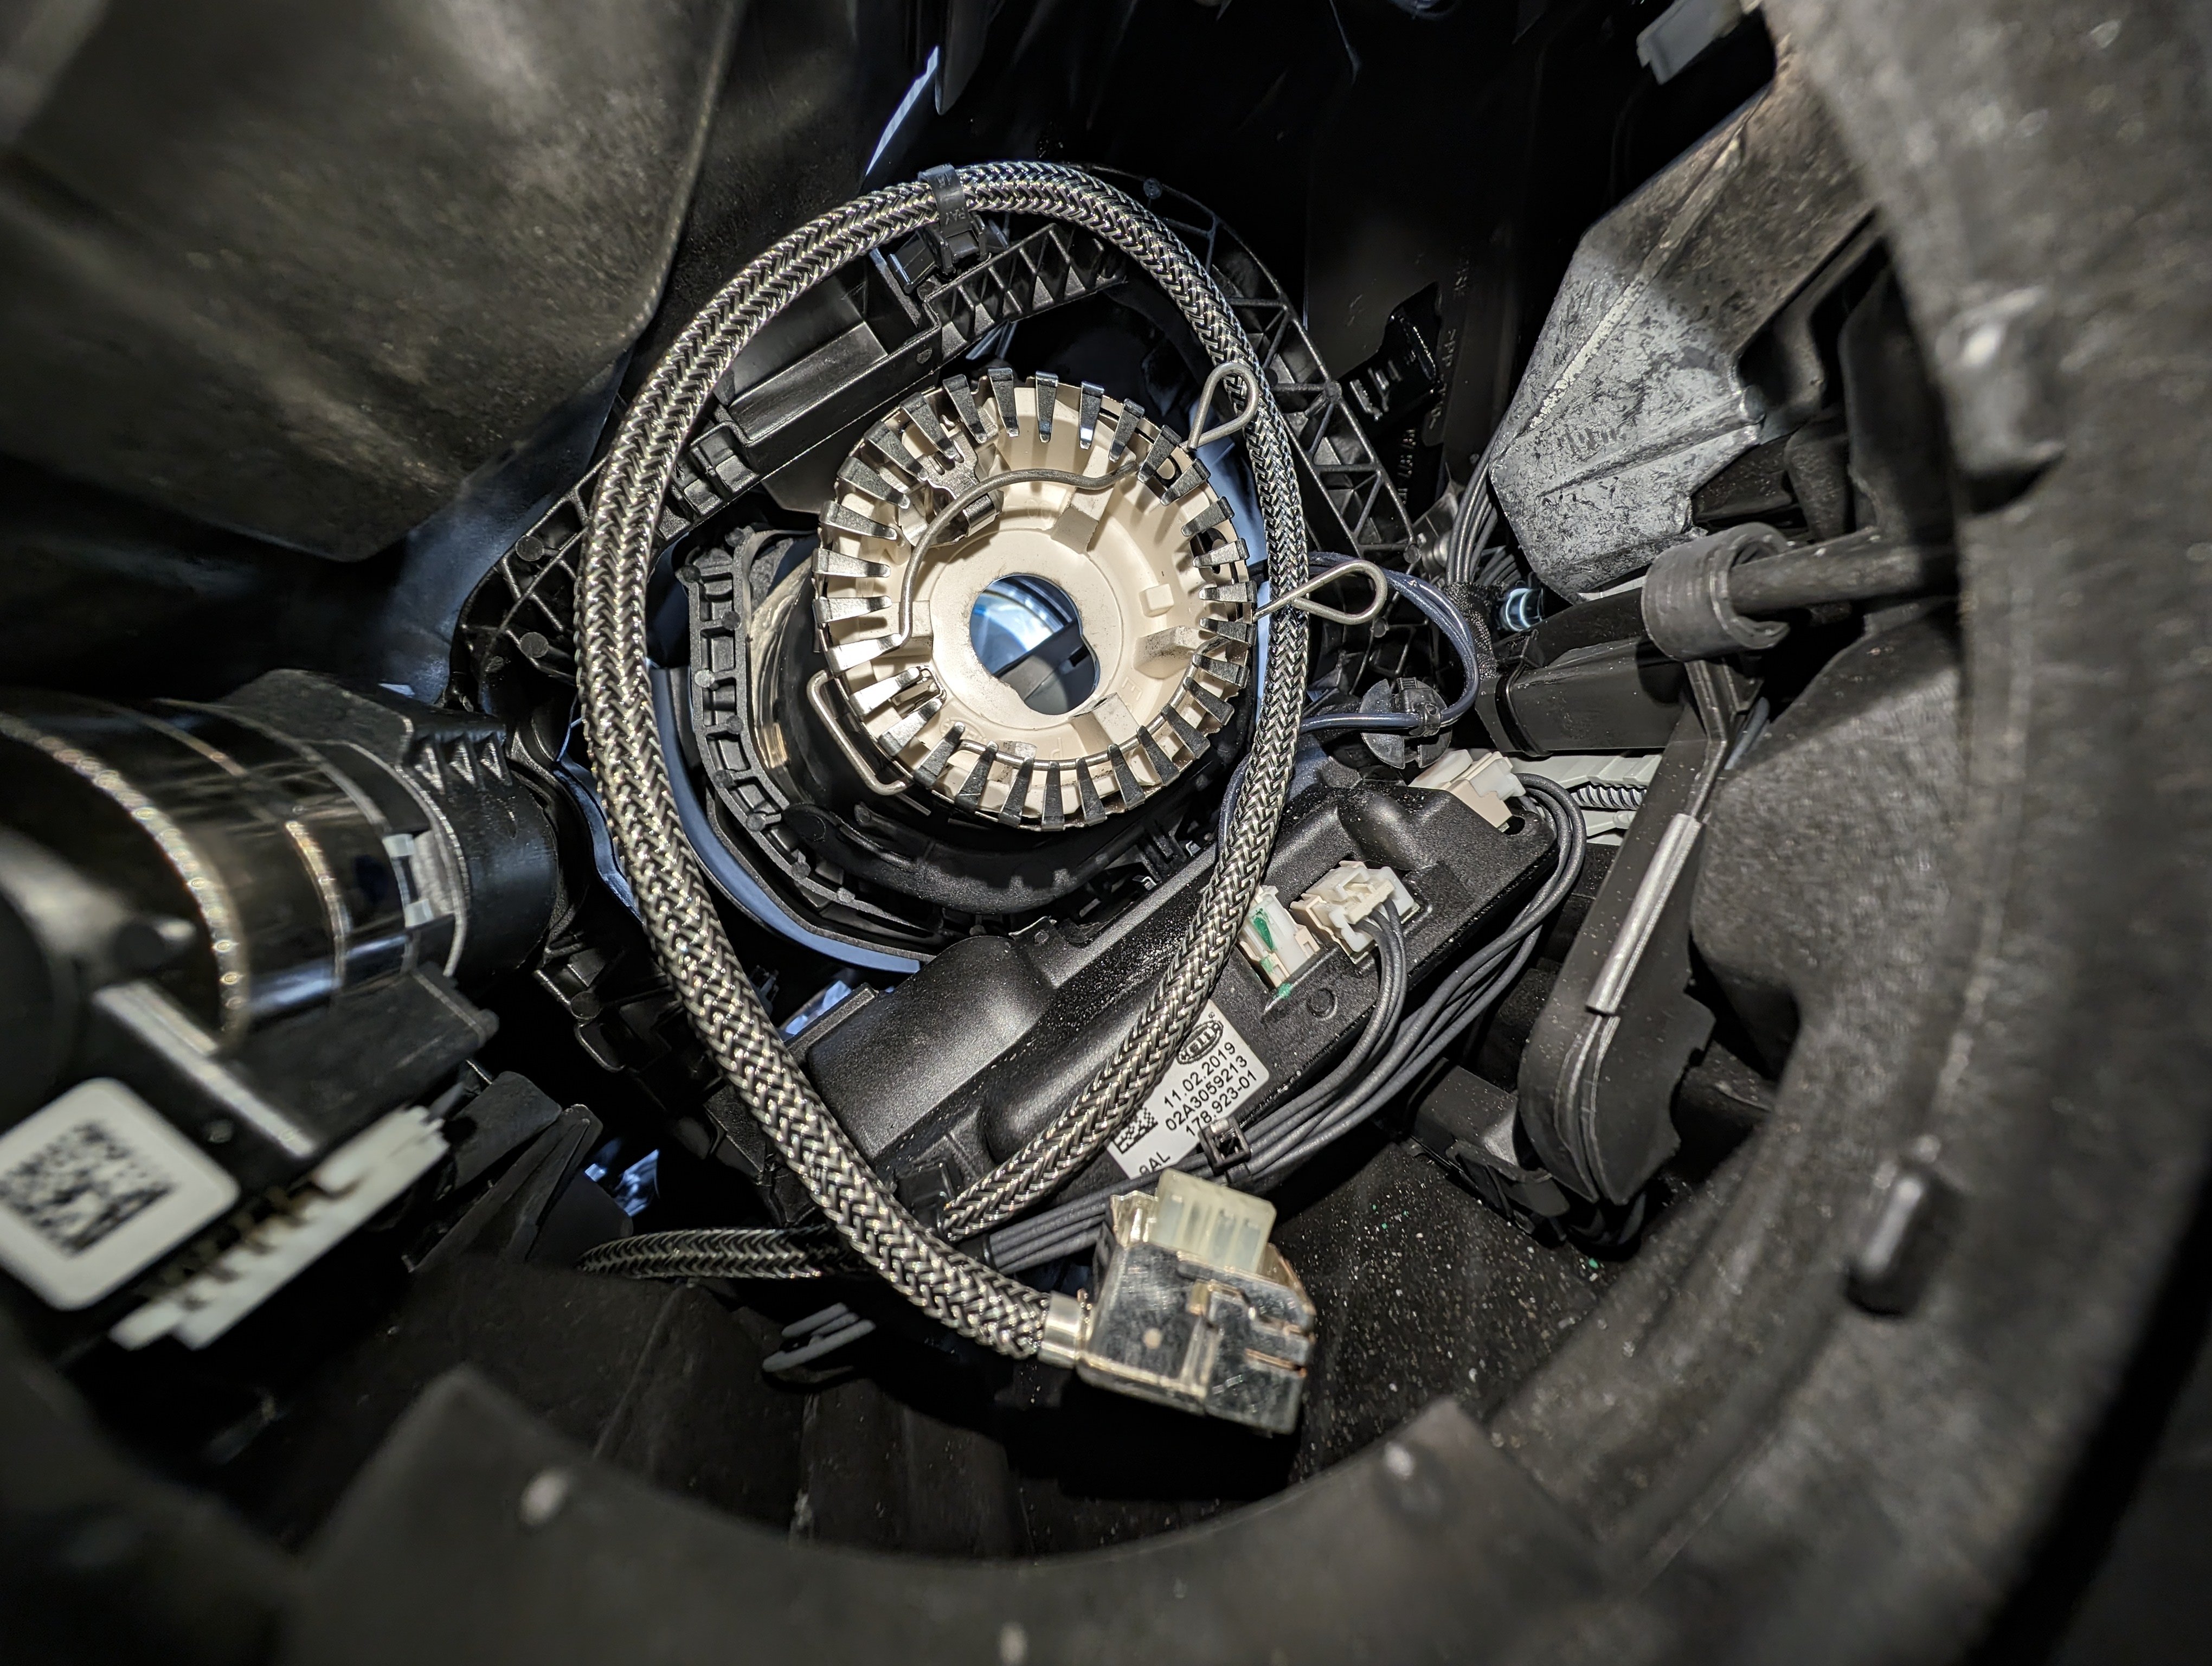
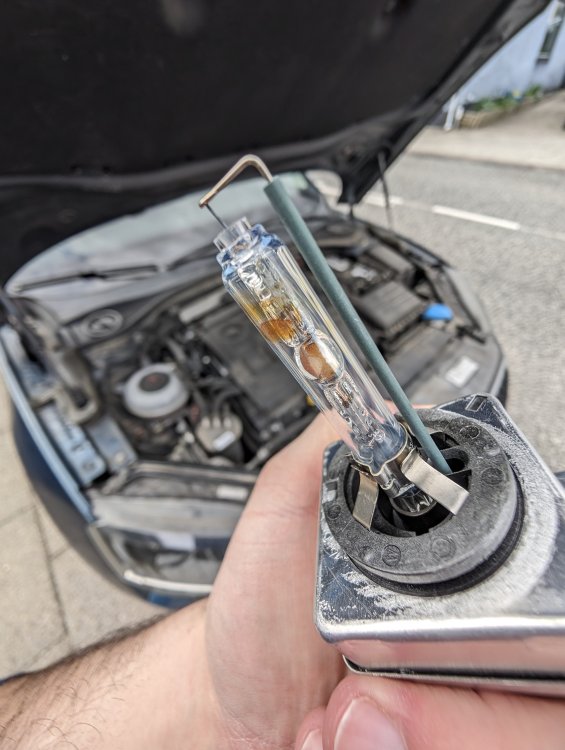
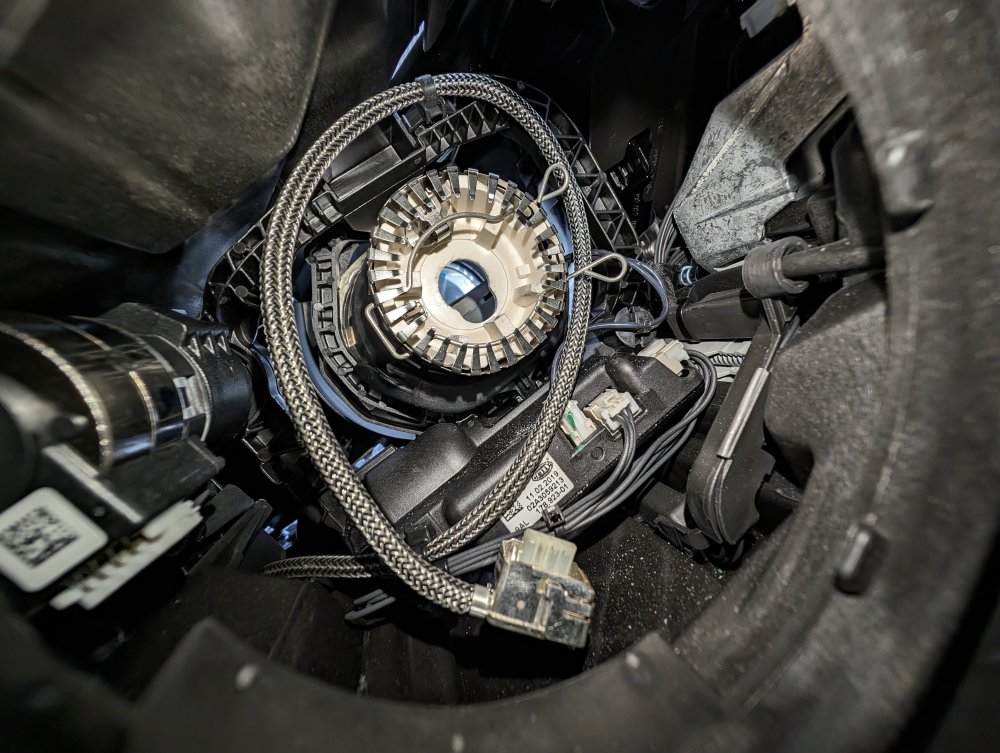
Hi all. Never had a xenon failure before so I'm not quite sure what I'm doing with this so here goes: Bought the car with a super small crack in the headlamp on the bottom part that's paralel with the pavement but still outside. It was all misted up. Finally a few days of sun have arrived and I had it sit in the sun and it almost entirely dried up. Overnight it all came back so a few days after I go on a 1k+ trip only to arrive and notice the xenon bulb was flickering on off in an irregular pattern. (No errors in the dash yet) Left it overnight, the next day that right xenon bulb does not even turn on so I was content it probably died. Meanwhile, I had the chance to leave the car in the sun with an open Bonet and an open headlight assembly so it vents out properly. Misting never came back (even after several rains and 3 weeks since) but my xenon bulb is still dead. Went to a store, bought the cheapest D3S and temporarily connected the plug to the bulb and left it hanging behind the headlight (didn't want to bother removing the old one yet). Turn the car on try both high and low beams and nothing... So I return the new bulb... A little upset at this point as I feel like it may be a more expensive fix... I get home, remove the faulty bulb and notice the ball inside is orange and yellowish. Probably burnt but I go ahead and connect it to the other hedlight the same way by leaving it hanging behind the assembly. Obviously it does not work. So if my old bulb is burnt, doesn't work and a new one doesn't work either, what could be the cause? (I don't have access to my vcds at the moment) Trying to anticipate a few things before I get my hands in it again. Just to be 100% sure, the bulb in the picture is dead, right? I also uploaded a picture of the inside, in case you can see anything wrong or out of the ordinary. 🤷♂️
-
You don't have to give up the flat bottom for this to work. There is a flat bottom version for the 3rd gen which works absolutely fine. Find my post somewhere on last months activity for the part number. It cost 720 eur but then again, nobody said this will be a cheap mod ✌️ good to hear the 4th gen also works but I am not a fan of mods that work only partly. Purpletom and Apretature's feedback on the topic was really helpful 💪
-
Most feedback I got from people is the MK4 is harder to code right and requires another 200 eur LIN adapter of some sort... Not worth the expense and greater risk of not fitting... I highly recommend picking something of the same generation as your car and figure out from people that already have it, what part numbers they have in the slip rings.
-
It does display if it's coded. I coded mine in a few days before I had good enough weather to fit the wheel.
-
I did. Sorry, forgot to update the reply here. The ACC module needed some sleep time. Upon waking again, it wrked
-
Summarizing the install here to hopefully help someone do this in the future on their Superb 3. The entire installation is based on @ApertureS' wonderful and informative guide for the Octavia. I will try to fill in with some details that may be useful for those who like like to have everything planned out in advance such as myself. I've listed the required parts just above, quote below: Motivation: - I initially bought a steering wheel off an Octavia 4 and I discovered the install would require a new airbag and a special LIN adapter for the scroll wheels to work so after having been through that hurdle, I decided to tone down my expectations and just stick to a wheel matching this car's generation to ensure minimum compatibility issues. Additionally, I had a hard time finding a heated steering wheel which was also flat bottom, had white stitching, had DSG paddles and was not in a terrible state so I splurged on the new OEM one. This one also allowed me to reuse my airbag as Skoda seems to have changed the models at some point (fortunately, being an early 2019 model, I had the latest one (which is flatter on the top) - I found a Superb 3 owner online who had the heated steering wheel equipped from the factory so I asked him to check what clock spring he had. Combining that information with what ApertureS mentioned in his guide, I decided to go with the one ending in 569C as it was proof enough they would work. - Got the Kufatec adapter to make things a little easier. Process: 1.VCDS backup Take a VCDS backup of the coding on your Address 08: Auto HVAC and your Address 16: Steering wheel and do a full auto scan to ensure you know what errors are new and which ones are old. My old steering wheel coding was 6014. 2. The power feed I have replaced the clock spring before on my old O2 so I was quite confident that part of the installation would be easy so I focused my attention on how to wire the new circuit. I only started taking things apart after having managed to plug the terminal in the fuse box as I knew this would be the hardest part due to very tight spacing behind the fuse box. Inspecting the fuse box I found a few that had battery feeds that led nowhere (missing equipment of some sort I suppose) one of which being fuse 47, normally used for the rear wiper, which I don't have. The fuse was ignition switched and led nowhere so I figured I stick the Kufatec terminal in there. I tried removing or dislocating the fusebox slightly with no luck... I found a guide on how to do it on a seat but it seems it is further secured on the Superb and moreover it's wrapped around more plastics and bolts that were in the way... the fuse box would not budge so the only way in was through the back... Thankfully, Purpletom had a really good tip to help with finding the right way in from the back of the fusebox - many thanks @Purpletom for this once again - it did ease things up a lot! The ground wire got hooked up to one of the securing bolts around the fuse box and the new circuit was secured with a 10A fuse (similarly to how Skoda does it in the factory - 10A fuse on the top right of the fuse box on port 2) I got the info off a guy who had a factory fitted hsw. 3. Clock spring and new wheel Removing the old bits: - turn the wheel 90 degrees right, pop the airbag from the back. - turn the wheel 90 degrees left, pop the second latch off and free the airbag. - straighten the steering wheel and disconnect the battery - give it a few minutes for safety. - lift the airbag, lift the white tab on the yellow plug and pop it out. - push the black tab on the left that connects to the steering wheel controls and push that out as well. Set the airbag aside. - Check the size of the securing bolt.... To my surprise mine was a 8.8.... I only had a 10.2 that would fit my old Octavia... Don't ask how I found the right size... This is something you can easily check before the installation by just popping out the airbag without disconnecting it. - Unscrew the bolt and remove the steering wheel. - Release the steering wheel adjustment and pull down as far as it goes then towards you as far as it comes. - Use plastic prying tools to release the top plastic cover. - Unscrew the 2 bolts securing the bottom plastic trim that are in plain sight and the 3rd one on the bottom side of the steering column - The clock spring is secured by 3 small torx bits, remove them. - Unplug the stalk connectors , airbag and steering wheel controls form the clock spring and remove the thing completely. (try not to spin it around if you plan to sell it onwards after this) Refitting the new parts: - Put the new clock spring in place and secure it with the 3 torx screws. - Connect the Kufatec T16 plug to the car's T16 plug then the Kufatec T14 plug to the clock spring - Connect the rest of the plugs to the clock spring and release by removing the red securing tab - place the bottom plastic trim over the steering column agian carefully, be mindful of the start button and how the plastics fit together and secure it with the 3 screws. - push the top plastic trim back into place nicely (first slide it in the back then click it down in place. - Place the new steering wheel on top, make sure the line markers align and screw the nut back in to secure the entire thing together. - connect the airbag to the steering wheel controls on the left. - connect the airbag to the main slipring and push the white tab back in. - push the airbag back into its place. At this point you are ready to reconnect the battery and enjoy a marvelous sight of errors, beeps and flaws. Code the new steering wheel according to this: Code your new steering wheel controller the same way as your old one. Clear all errors and see which ones come back. In my case it was the start/stop system error (with no VCDS error) and ACC error every time I push the acc stalk (with one error in the Address 13: Auto Dist. Reg) Give the car a few hours of sleep (I gave it 5 hours or so) Apparently, the ACC module goes in some sort of sleep a few hours after the car shuts down... The long hours of sleep will let the car also figure out you installed the same battery and not a new one and your start/stop system error will also disappear. Take it for a drive and test all the systems that presented errors after the retrofit: - Park assist - Lane assist - Front assist - ACC - Hill assist - Start/Stop - and of course... the heated steering wheel. Park it up agian, clear the errors wit VCDS again and at this point, you should have the same amount of errors as you had before the retrofit. I hope I covered everything here - the forum won't allow for more than 10MB of pics so I will stick to a single picture upload. Happy to help people in the future with details I may have missed when you find this relic post.
-
After having spent my evening looking for possible solutions, I came across an advice from someone doing this sort of stuff in Romania and they suggested the ACC module goes into some sort of coodldown/sleep a few hours after the car shuts down. After some 4 hours of searching I went out again and lo and behold, all errors were gone so I pulled out the vcds and cleared the remaining error codes, took a 10 min drive to test the start stop and acc and they both work perfectly. Ran another full scan after the drive with no new errors anymore 🥰🥰🥰 will write a full post tomorrow to summarize the experience.