rbhelle
Members
-
Joined
-
Last visited
Everything posted by rbhelle
-
Mostly it stays on 90 degrees in the display meter. But when temperatures reaches below -16 degrees celcius, I notice that the gauge moves from 90 degree mark down to maybe 75 mark when rolling down a hill. Moves straight up again when accelerator is active. Its just the way these engines are constructed. How do I know the temp? I use OBD 11 live data to check coolant temp.
-
Well, I would do them all. It is still a wild guess what is draining battery. If you know that you have noticed it after you installed something lately, maybe that will guide you. If nothing is done...well, do them all :-)
-
I would say that it should not be more than 200-300 mA (0,2-0,3A) if car is in deep sleep mode. Precondition before test is conducted: all doors closed. Open bonnet, use key to lock car. Wait 30-60min to be sure that car enters deep sleep mode. Then use clamp amperemeter on the positive cable and measure. If value is above approx 0,4-1A, well, open doors and lock car again. Or use a screwdriver to engage door locks to a "locked" position. Wait 30-60min and this time, have someone take out fuse by fuse and see when clamp amperemeter drainage drops to normal value (from 0A to 0,3A).
-
Well, you should try it. I have a pretty cheap one. UNI-T UT203R is mine. Search for it, not an expensive one, but does the job. Measure DCA between 0,04-400A. I paid 45 Gbp.
-
Oh, buy yourself a clamp Amperemeter and use around the positive cable. Then remove fuse by fuse to see when a amp drop/increase happens. Then you know what drains your power.
-
Your temp sensor reports short to ground, so check the wiring.
-
Well, when it comes to VW Skoda Audi dault codes I am not convinced...sometimes things just happen without a probable cause. But yeah, it should flag a code of some sort. Would be wise to just disconnect all temp sensor and measure them. Or maybe check for leaks og any pins broken etc. It is at least free of charge 😅
-
Did the same to my car 2 months ago. 200'km on it and went with TRW front suspension for bad road package and Sachs rear suspensions meant for heightened suspension cars. Came out as a totally different car. I mean, totally different! So, this is a cheap and good "upgrade".
-
Yes, both fault codes can be caused by the same error. Likely vacum hoses, n75 or in worst case, failure of turbo van valve (more time consuming repair)
-
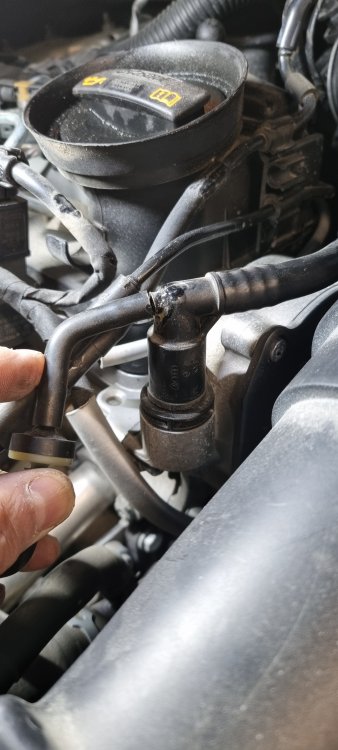
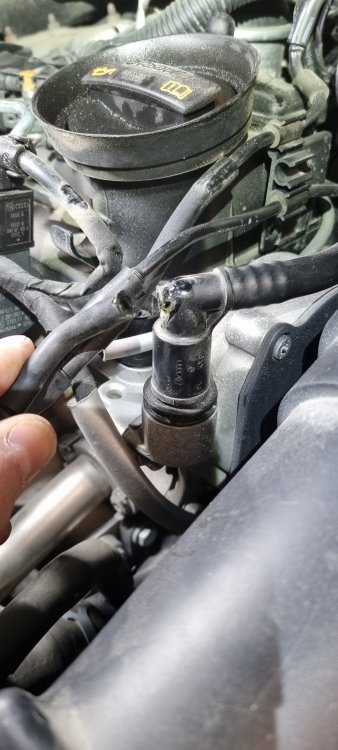
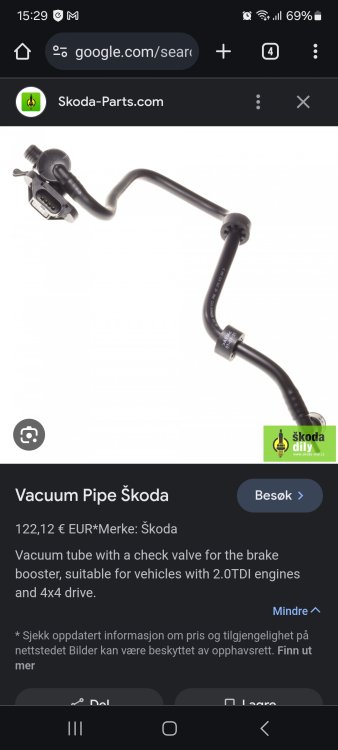
Had same fault code 1 week ago. P2563, with MIL engine and blinking glpw plug symbol. Got home to check for vacum leaks through vane turbo rod, to n75 valve and of course all turbo intake hoses, clamps etc. Found out that a non return vacum brake booster hose had a disconnected hose. A part had been broken off and to my surprise, this had happened before. Because the small hose intake had been glued before. See my picture. So I just superglied it back on and tried to se if that emergency fix worked. And it did, at least until I can order a new non return valve brake booster hose from dealership. Partnr for my 6spd dsg, 4x4, 2.0tdi engine is 3T0 612 041D. The pipe is connected directly to vacumpump in engine and to brake booster housing. The small vacum hose notch almost directly connected into vacumpump that was broken went to another vacum hose. I bet you will locate it in your engine bay.
-
Get it scanned woth a decent obd reader. Preferably vcds or obd eleven or something more advanced than a 50 quid scanner. Sounds like wiring issue through door or also door module lock i failing. Last one is pretty easy fix for a diy, but takes time. Door lock module is probably around 70-120 quid.
-
Thank you. Helpful and according to how my lights actually behave.
-
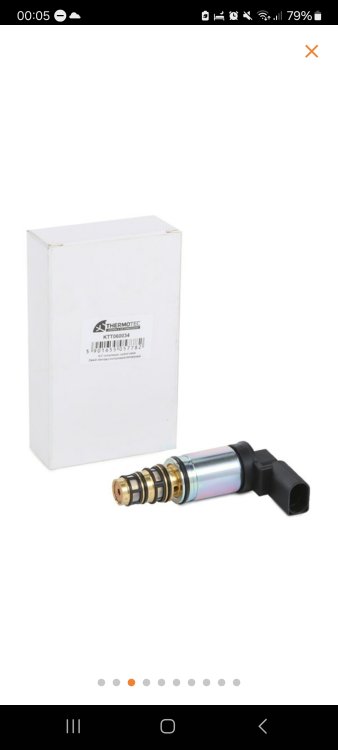
You sure its not this little fella that has met its eol? Ac regulating valve.
-
No mate, oil was not as good as new oil. Luckily, I did not drain the haldex, but the rear diff axl oil 😀 But, yeah, have heard abouth them draining the wrong one 😅
-
Was my initila thought as well. But metal grinding particles in fuel filter and then end up in hpfp is a expensive repair....Damn his car just got expensive....
-
Er ikke bare tempsensoren din som kortsluter og dermed ikke klarer lese av korrekt temp? Da vil den stoppe av sikkerhetsmessige grunner.
-
Should fit as long as it is same OE partsnumber. I guess it is a Sanden PXE16 compressor. Many VW Golf, passat and skoda uses that one or similar. Same bolt ons.
-
Oh, I forgot, after tis operation, you should adapt the throttle valve via basic settings again. Key ignition "ON" but do not start the engine (engine NOT running). Do NOT touch the accelerator at all when doing this basic setting. Choose module 01 Engine Basic settings From drop down menu, choose "throttle valve alignment" - Then GO! Wait for confirmation "Finished correctly". After that, click "Stop" and wait another 30sec until you end basic settings via "Done Go back". Same procedure via OBD 11 and VCDS. I guess you need similar coding tool.
-
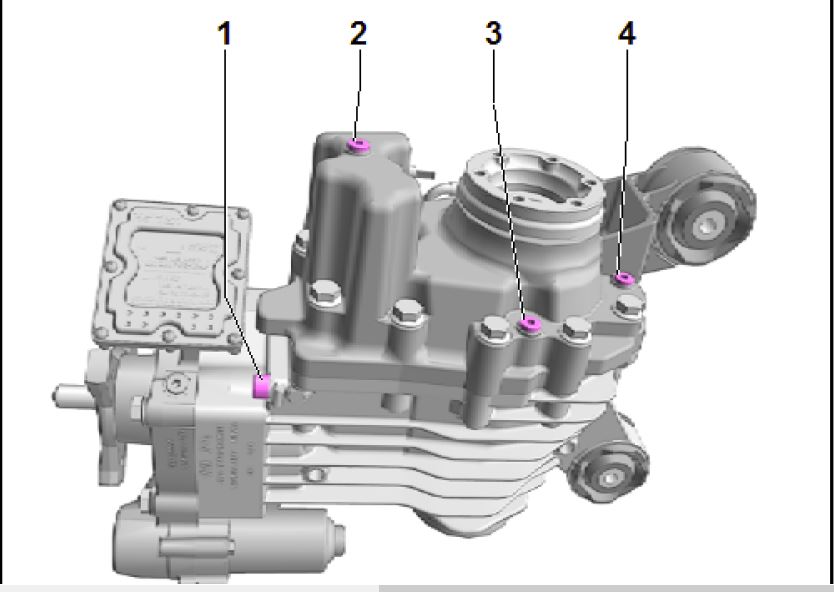
2011 Superb, 4x4 haldex 4, DSG DQ 250 gearbox MTZ, engine CFFB. Rear diff oil: Manufacturers specs are G052 145 (75W-85 API GL-5). BUT, this oil is primarily choosed by VAG since it gives a bit better mpg due to is viscosity (thinner). For endurance, I use G052 911 (wich is 75W-90 API GL-5). It is marginally thicker, but gives more lubrication. Tools needed: 5mm HEX pipe ratchet bucket some kind of oil pump etc. Get the car up, should e level when raised. Identify the fill and drain plug on you axle. Beware, do not mix up the haldex fill and drain plug. I would say that it is not easily mixed up, but have heard about some garages that actually drained the haldex oil instead... Undo the fill plug with hex key before you undo the drain plug. It should drain approx 0,8-0,9 ltr of axle oil. Torque the drain plug to 15NM. Manual says to replace it, but I didn`t replace it, it worked fine. Use a pump with a 6mm hose to fill through the fill hole until it drips out in a steady flow. Close and torque to 15NM. Job done. Picture layout: Drain plug haldex oil (do NOT loosen) Fill plug haldex oil (do NOT loosen) Drain plug axle oil rear differential (5mm hex) Fill plug axle oil rear differential (5mm hex)
-
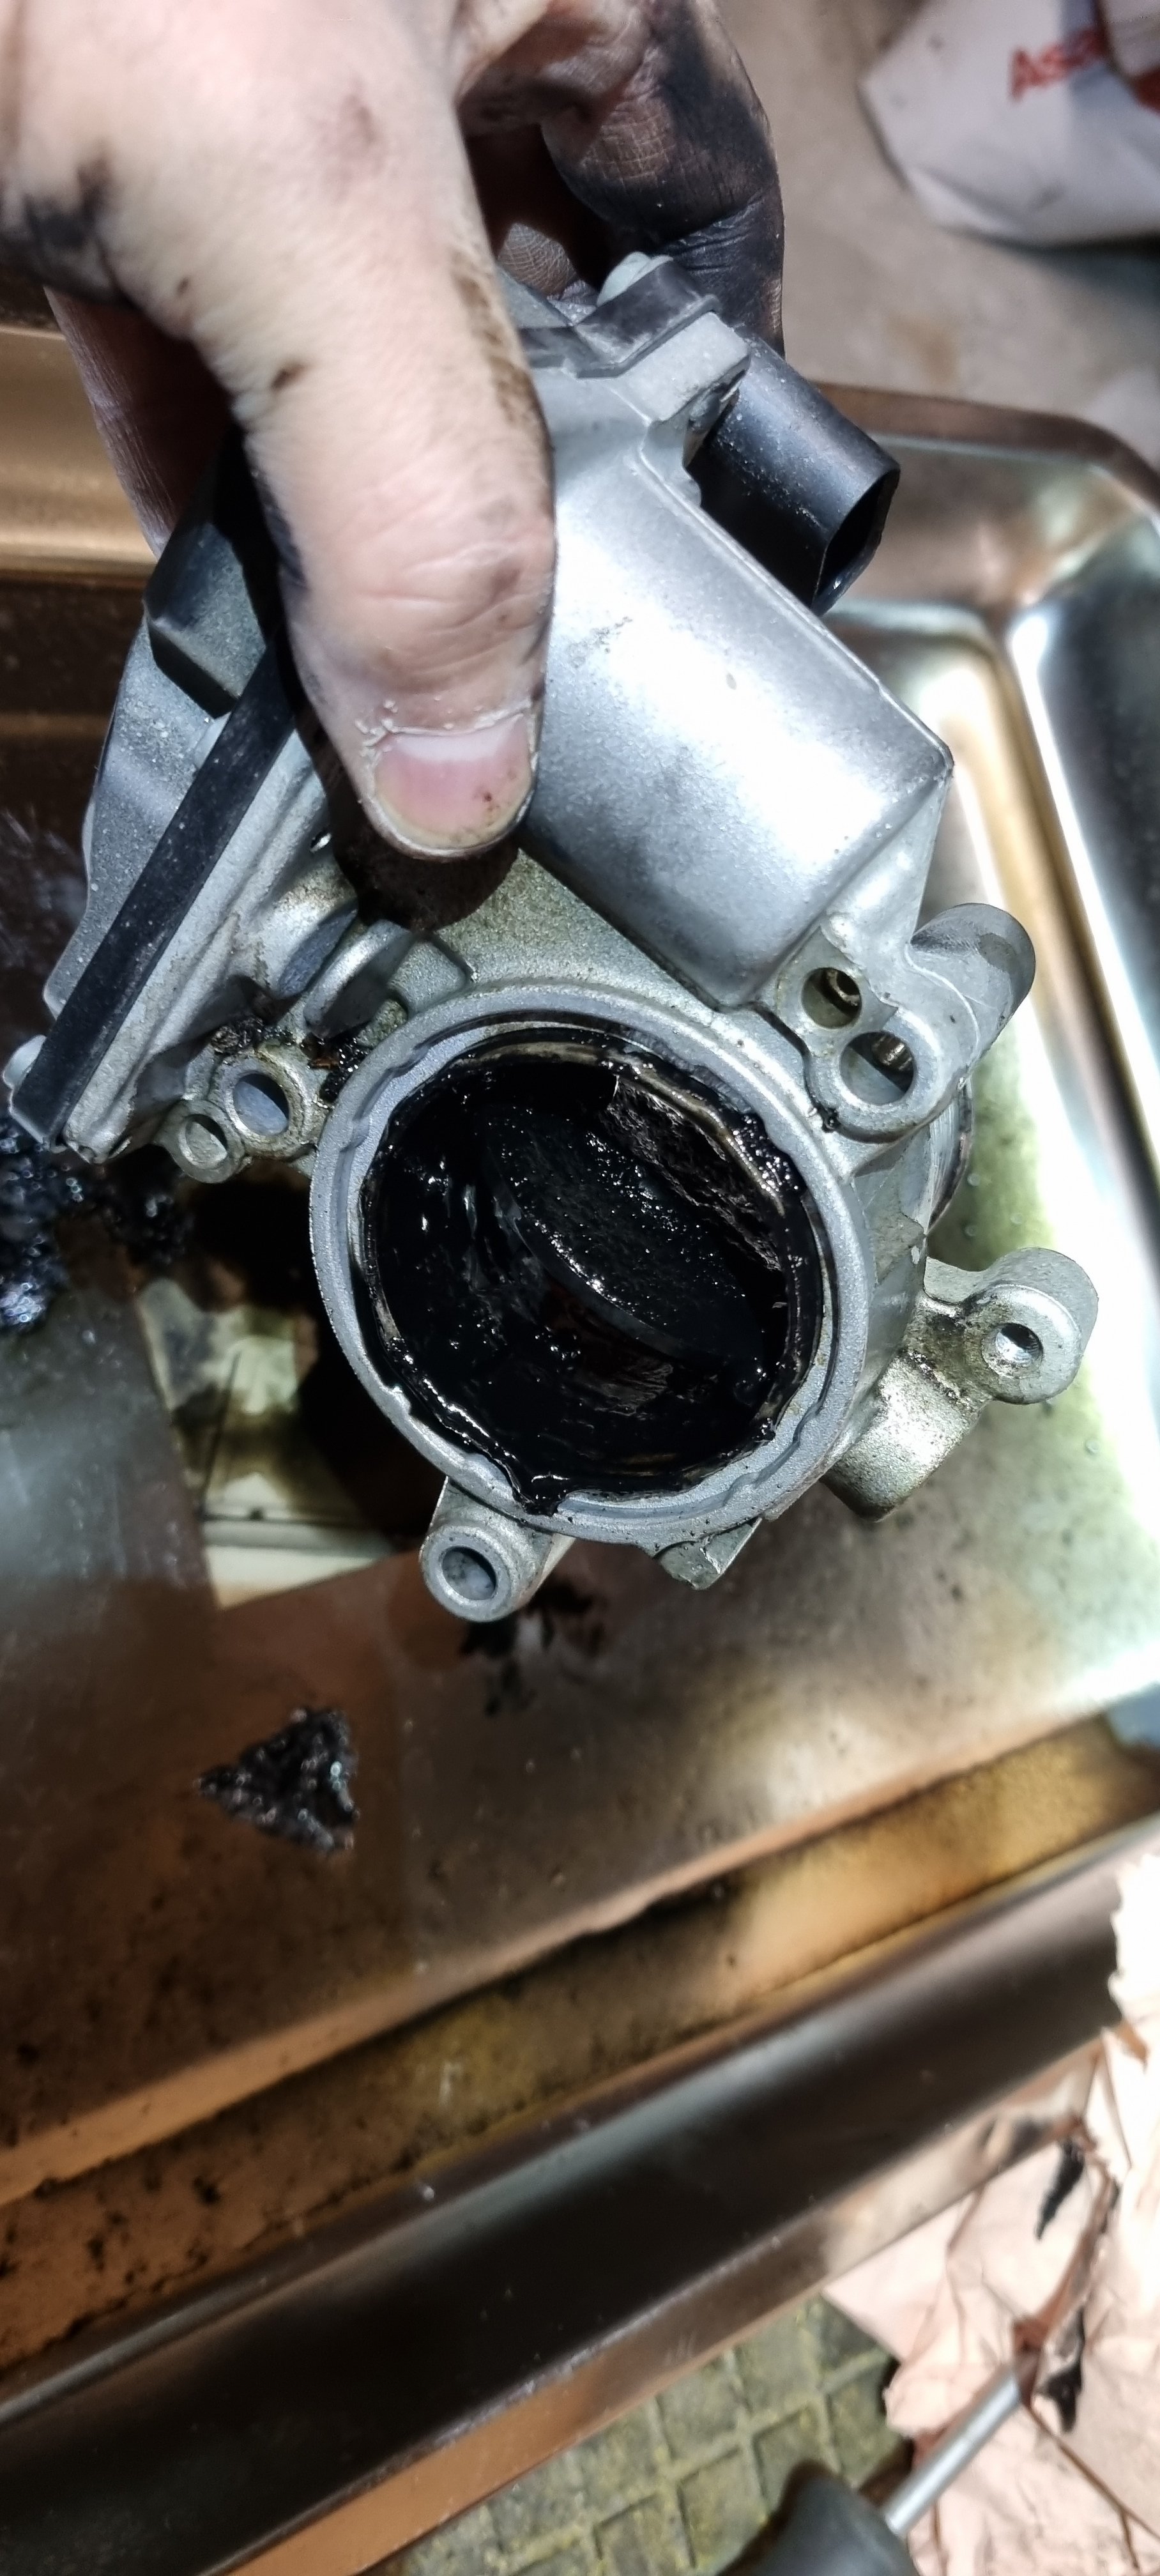
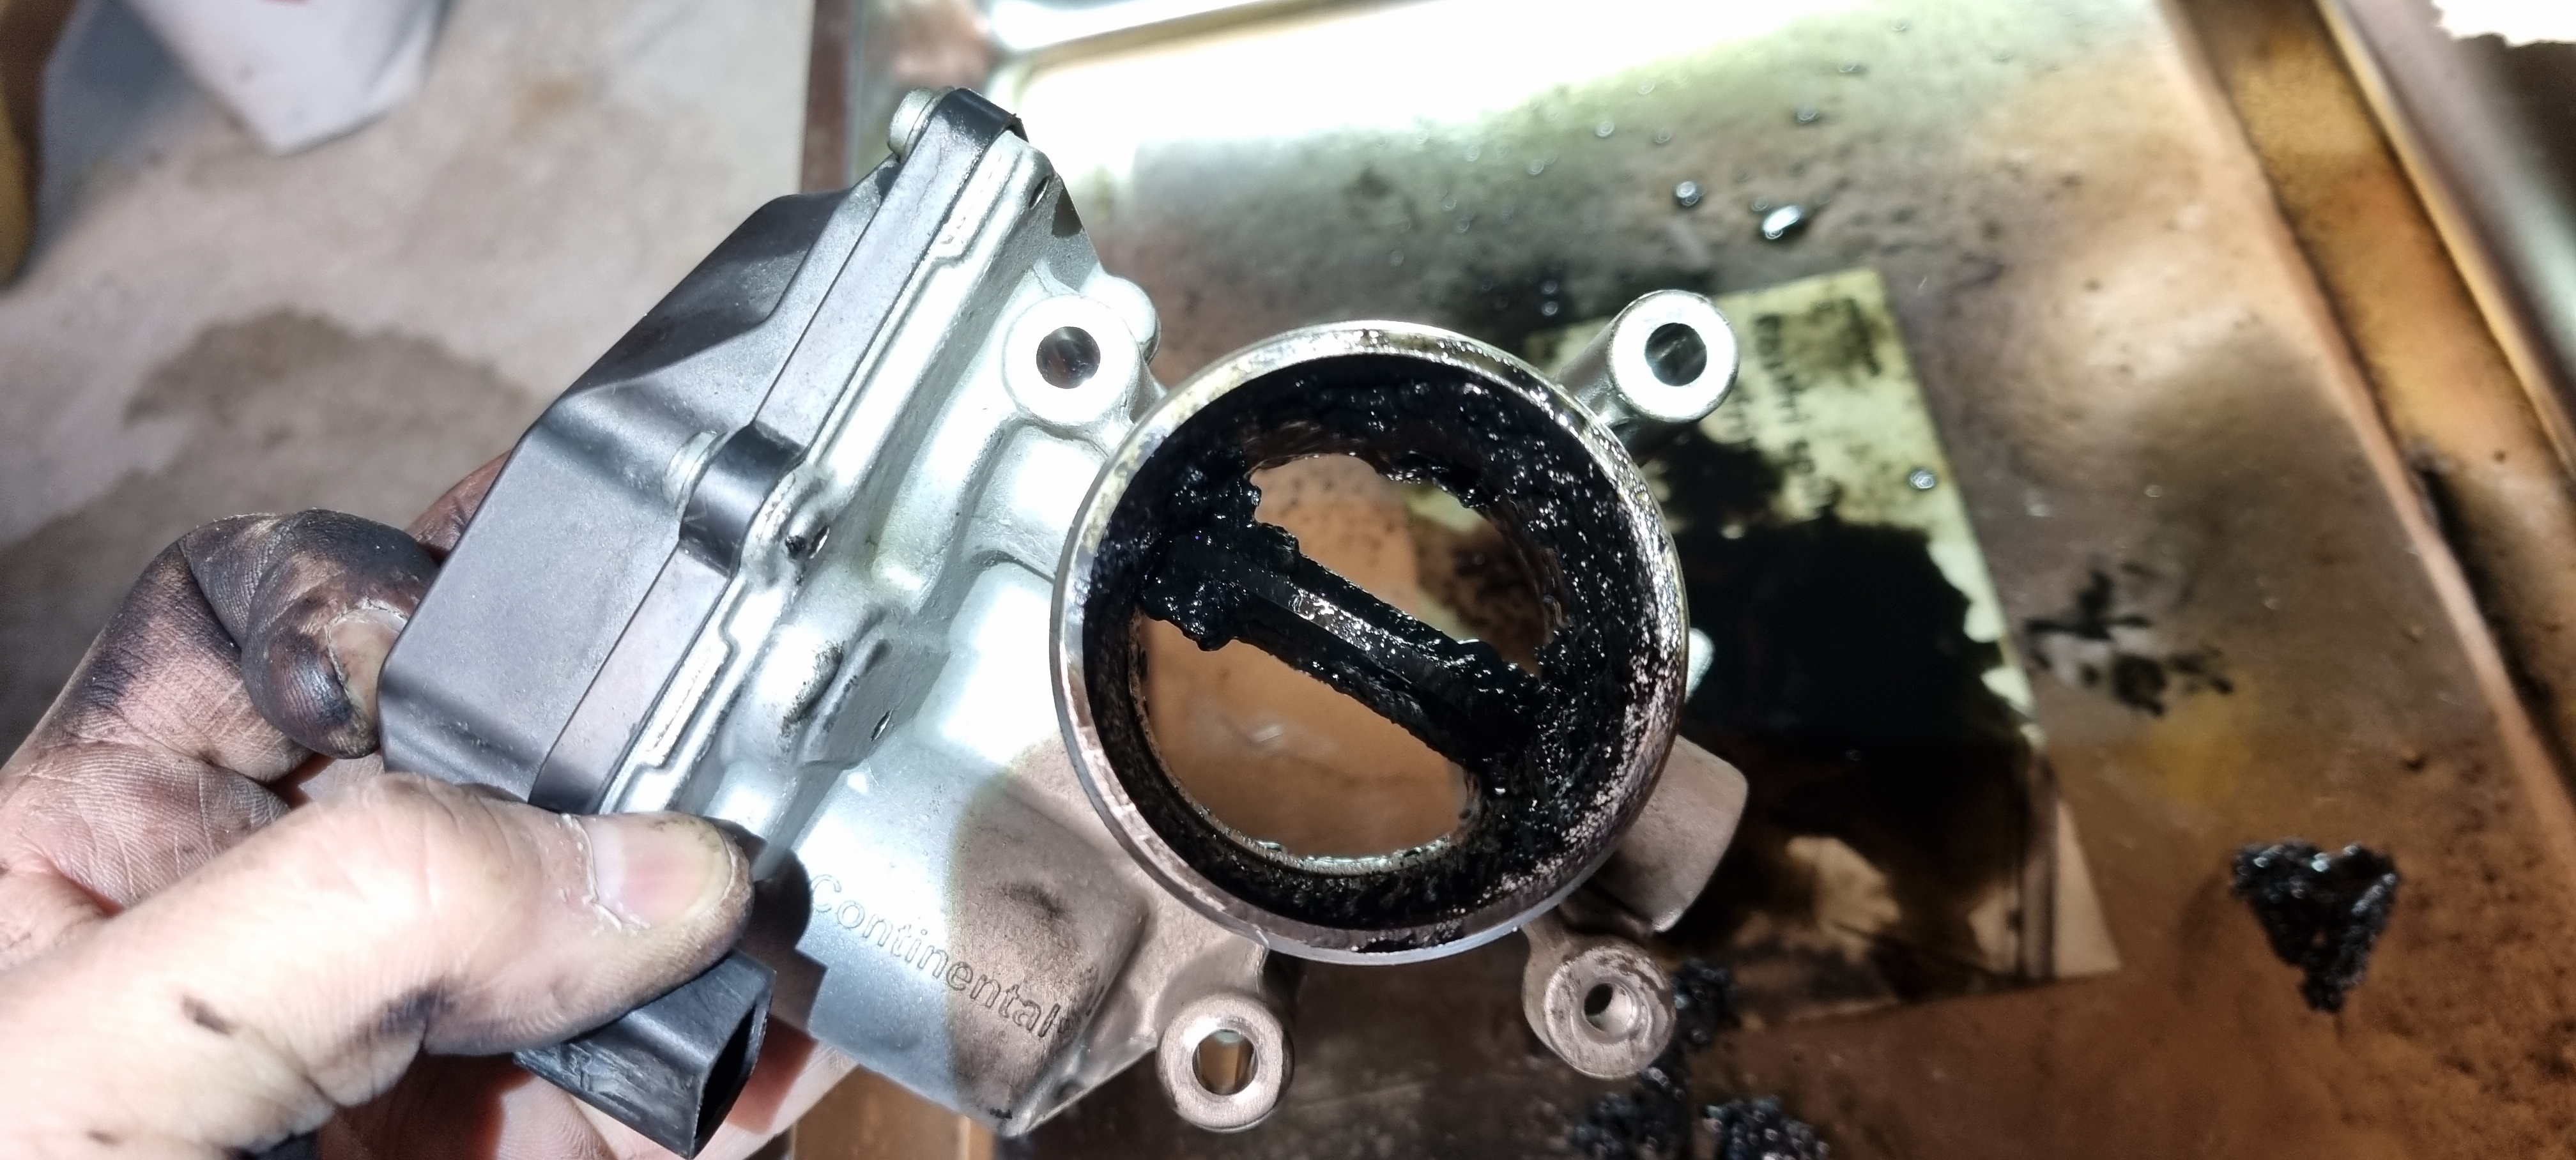
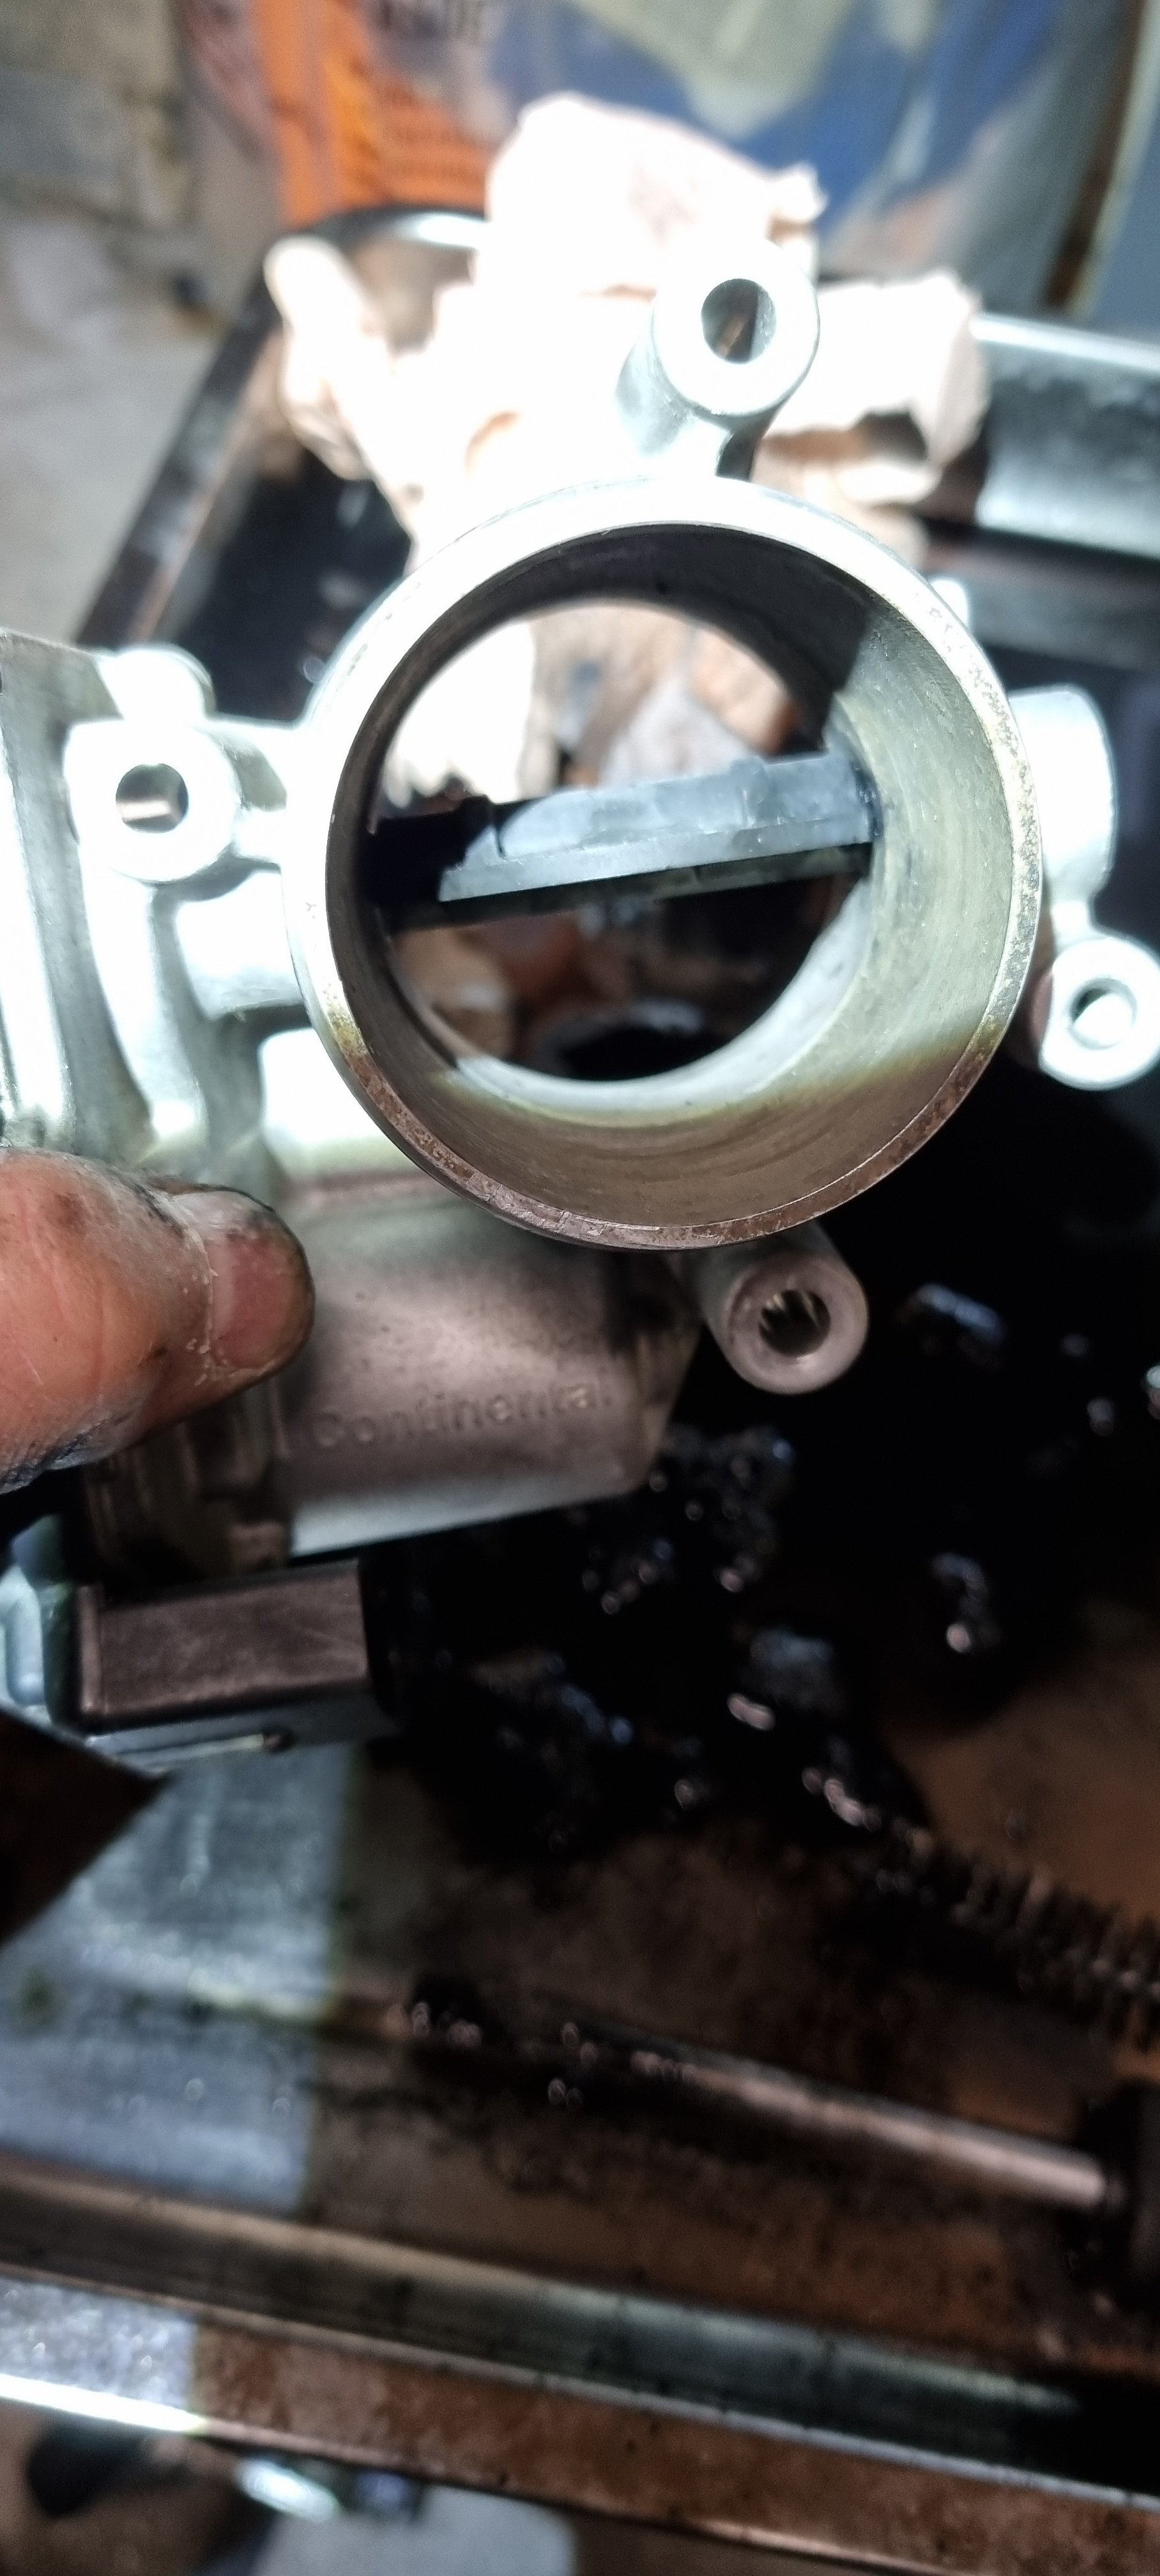
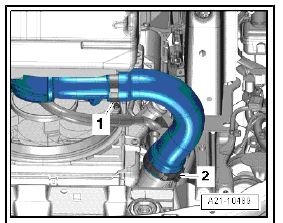
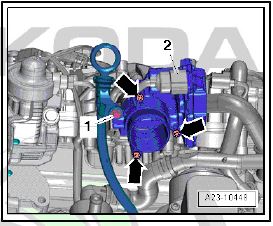
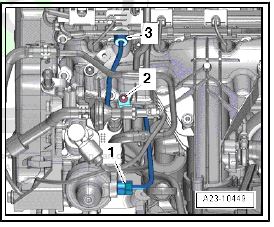
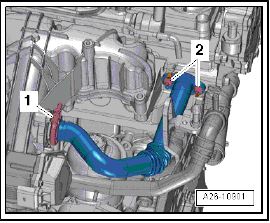
2011 Superb, 2.0tdi, CFFB 4x4 with DSG DQ250. 212 800km / 133 000miles on the clock. Just did the maintenance of the valve, did not mod the EGR pipe intake on the manifold. Didn`t have the time, but will do this later on. Tools needed: 7mm pipe for hose clamps, can also use a flat iron screwdriver (but I hate those) 10mm pipe 5mm hex bit T30 pipe with off-set extenders I preferrably used a small/medium sized 1/4" ratchet with adapter for 3/8" pipes since the space is limited. First is to disconnect electrical connectors to throttle body. Then use 7mm pipe to undo both hose clamps on the short charge hose between intake and throttle body. Use a flat screwdriver or a hose pick tool to break loose the hoses in both ends. Pry them, wiggle and use some force to get both ends disconnected. It wil give you a whole lot more space to work with. Cover up the lower intake with some paper/gloves or anything to stop you from fumbling a bolt or nut "down there". Next is to loosen the high pressure fuel pipe to hpfp, it is 2x T30 screws. Will probably give you more leverage when disconnecting the EGR pipe. Then you undo the 10mm bolt clamped to the oil dipstick and push the dipstick a bit to the side. Well, continue with ratchet and finde the 3x T30 screws on the throttle body, one is easily accessed from plane sight, the second one is best seen under the EGR pipe and the third you just have to guess and feel your way under the throttle body. Remove the throttle body, if it is stuck use a flat screwdriver to loosen. Remember to also take out the rubber seal ring (orange). I clean the body with screwdriver, brushes and brake cleaner. Be gentle to avoid damage. Next is to remove connecting EGR pipe form engine to manifold. Should be farely easy removal. Use long extension with off-set in order to reach the 2x T30 bolts from engine, be careful not to loose them. Then use the 5mm hex to disconnect the pipe from the pipe adapter stuck into the manifold. It is clamped, so maybe use a bit of force and bend the clamp til you can remove the pipe. Now undo the last two T30 screws connecting the pipe adaoter with hole to the manifold intake. I guess this is farely clogged if you car has done a lot of miles in cold environment without letting the enige reach its working temp. Now, you can of course modify you EGR connecting adapter pipe so it will face its opening against the engine instead of facing towards the thottle valve body. To do this you need to cut/file a small notch opposite side of where the notch is originally. There is another "how-to" concerning this mod on this page. If you do this maintenance, I guess you will have one less fault code that can occur when it ifts you the worst. I would say that every car that is used as a daily driver with short runtimes (engine not up to sufficient operating temp over longer periods), should have this done the sooner the better.


-
You will find them on ross tech site, under Octavia. And also ou can use a lot of codings meant for VV Passat 3c
-
It should point towards the engine. But before you do the mod, the adapter pipe is only cut out to fit one way, which is away from engine/manifold intake and towards the throttle flaps. So, when you have modded, make sure the opening is facing towards engine/manifold
-
If you buy OBD Eleven, you can check last time regen was done. Also during driving regen can be detected if temp sensors 1, 3 and 4 goes up to 550+ celcius temp during driving under normal throttle load. OBD Eleven Pro is the scanner I would recommend or even better; the VCDS Unlimited. I have both and use them every other time, depending what I need to have coded og monitored.
-
It is supposed to re-center when speeds above 50-55km/h, approx 32-35mph. Sounds quite normal operation if you ask me. They should be wide below approx 32mph and centric above.
-