gianthotdog
Members-
Posts
346 -
Joined
-
Last visited
Content Type
Profiles
Forums
Gallery
Shop
Events
Downloads
Everything posted by gianthotdog
-
I always measure what I've taken out then use this as the starting point for what goes back in. Always check the dipstick Before I drain to ensure I'm under the full line line. would never use a suction method to remove the oil. I feel that it would never remove all the old oil? if there is a plug to remove all the old oil that is perfectly situated at the lowest point in the sump I can't understand why you would not use it? Gravity is such a tool, why fight against it? it takes minutes to remove the under tray and then drain the oil, even just using basic car ramps.
- 6 replies
-
- 1
-

-
- oil change
- oil extractor
-
(and 1 more)
Tagged with:
-
Fitting a rear battery (in boot)
gianthotdog replied to snowathlete's topic in Skoda Superb Mk II (2008-2015)
Is it really necessary to fit a second battery? are you trying to crack a walnut with a sledgehammer? -
Fitting a rear battery (in boot)
gianthotdog replied to snowathlete's topic in Skoda Superb Mk II (2008-2015)
Why do you want to fit a battery in the rear? -
Your picture is the right side of the flap motor housing. The three screws you need to undo are on the front. Try not to drop anything and be careful with the spring that is on the motor arm this video is very useful, it gave me the confidence to do the job myself. you can only do it this way if you have the metal intake manifold. I believe if you have the black plastic intake you have to remove it to do the job?? hope this helps and saves you a few pounds.
-
This pic you show is the throttle valve or anti shudder valve. It sits below the egr valve. It is not the intake manifold flap position sensor. this sensor is up a little on the right next to the head. mine had the Same code as yours and fitting the bracket was simple and has worked perfectly for over a year now. it is an easy fix as long as your intake is the aluminium one and not the black plastic one.
-
Ive just had mine off as I replaced the egr valve as the throttle position valve is attached to the egr. when the valve is off the car it should be open. If the one you are putting back on is open then I think int might work?
-
Buying a high mileage DSG 170bhp
gianthotdog replied to Scottandbobbie's topic in Skoda Superb Mk II (2008-2015)
If it S1 B1 then it is a pretty easy fix. I did a brief how to on here a few months back. Mine went at approx 170k. sensor and socket to remove were about £70 on eBay. the sensor has been fine since, no EML light -
This is a straightforward fix. i did the s1 b1 lambda sensor replacement on my superb a few months back. It is almost identical to the yeti under the bonnet (my wife has a yeti 2.0tdi 170 CFJA engine, my superb is 2.0tdi CBBB) sensor was £69, sensor socket was £5-6, took me 20 minutes. Code cleared after approx 30 miles of driving. It's not been back since. i did a little write up on superb forum about it with a few pics. hope this helps, let me know?
-
There are two sensors. One pre cat (the one I changed, sensor 1 bank 1) then one post cat accessed from under the car. i thought about cleaning but decided to buy a new one as only £69. These sensors are very sensitive and I'm not sure cleaning a sensor that has become faulty or reached the end of its life is beneficial. I'm not sure how old your sensor is etc.. my engine light went off after about 50 miles of driving and approx 3 start ups. It has stayed off for about 1500miles now, fingers crossed.
-
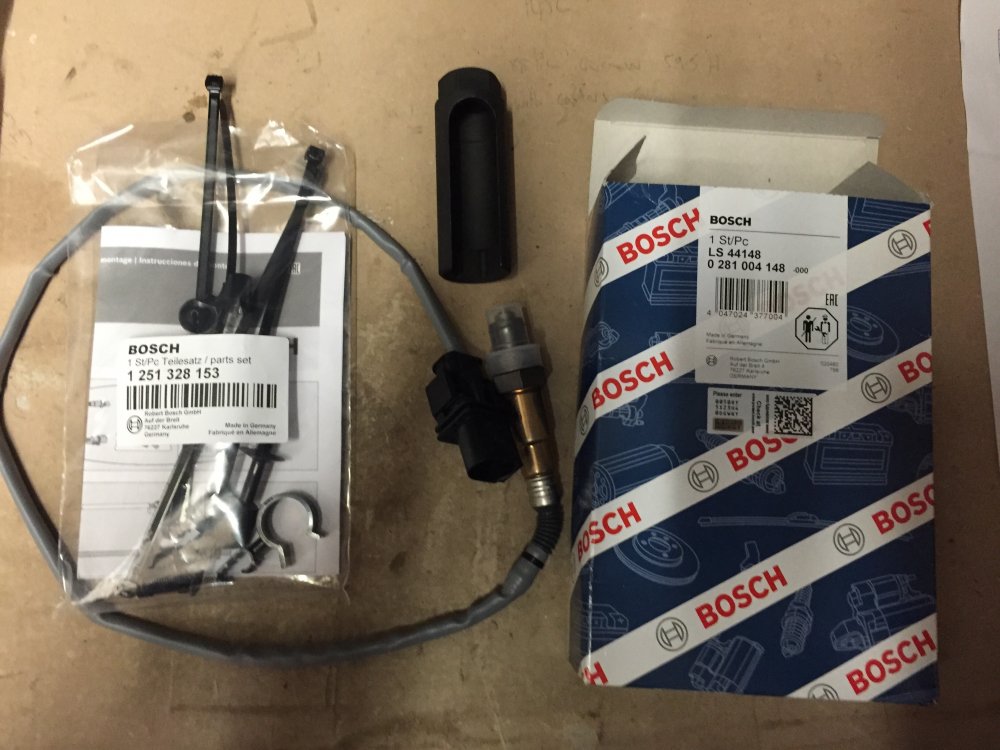
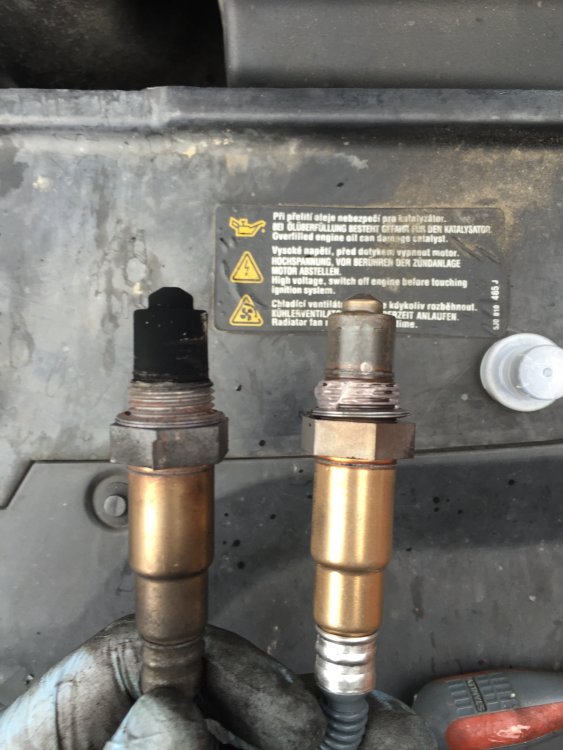
Engine light came on recently and scan showed P2196 08598. Relates to first Lambda sensor in the engine bay at the manifold. Bought the correct sensor off eBay for £69 (Bosch) and changed earlier today. I had to buy a lambda sensor removal socket which was £6, also off eBay. There were some second hand sensors on eBay ranging from £25-45, with new only £69 I opted for this. Pretty straight forward. Hardest part wash undoing the electrical connector from the old sensor and threading the new one through the back of the engine bay in the clips. The old sensor was a little stubborn coming out but nothing too hard. Came out fairly quickly with nice firm controlled use of a 3/8" ratchet and short extension bar to give a bit more clearance. Took a few pics that could help somebody down the line. I'm no mechanic but always willing to have a go myself. If it helps somebody else save time and money I will be happy. The socket enables you to get it over the lambda sensor with the wire connectors attached. Simply un clip the heat sheild from around the wires near the sensor and you are ready to remove the sensor. My my car is a 58 170 elegance with 167k on it.
-
£65 to check if firmware is even available?
gianthotdog replied to TheGadge's topic in Skoda Superb Mk II (2008-2015)
Do what IT say when you call them with a problem... Turn everything off and then on again, the try and connect again. £65 from the dealer to tell you nothing would be the same as burning £65 over a bin!!! -
Look at the price from the dealer for the parts. Its ts always a good start point.
-
Decided to change the rear discs and pads today on my superb. Bought the parts a few weeks back and been putting it off. Jacked the car up one side at a time, used two axle stands along with the Jack to create a stable and safe car to work under. All went smoothly after nearly giving up with the caliper carrier bolts. They are a real pain to get off. The two bolts are are not only hard to get to but so tight they felt like they were welded on!! They require an M14 triple square bit to remove them, they are not HEX bolts. My 18v impact wrench was having no use. Had to use penetrating spray and lots of elbow grease. I actually used my foot to press on my ratchet to get enough force onto the bolts on the near side. I lay down and pushed until I heard the sound of the bolt cracking loose. It sounded so good. On the the off side I got the top one loose with a hammer and my wratchet. The bottom one need my wratchet with a cheater bar which consisted of my jack handle over the wratchet handle. All sounds fairly straightforward however access is very limited when using just a trolley Jack and stands. With a car lift I think it would be a very easy job. It would remove all the access problem and allow a long beaker bar to be used. Defo also need a caliper wind back tool to get the piston back in to the caliper. I've heard of people making tools etc but I can't see how they would work efficiently after doing it myself today. It requires quite a bit of turning force to get the piston back in. Re greased the slider pins, cleaned the hub, put a tiny amount of copper slip on rear of pads and all is good. I would definitely do it again myself. If if one person reading this decides to have ago themselves I will be happy!!
-
Superb door electrics have failed
gianthotdog replied to Goldenwonder's topic in Skoda Superb Mk II (2008-2015)
I think there is a master controller in both front doors. Drivers side doors are controlled by controller in drivers front. Passenger side doors controlled by control module in passenger front. mine did this recently. Solved with new loom in front passenger door. -
How old is the battery?
-
Don't cut your bars down. I don't think the end caps will fit back on plus you are rendering your bars worthless if you need to sell on. Wing bars are the best bars. I've had the black square and the aero oval ones. The wing bars are genuinely silent. If you couple with a good sleek box then you will not hear any wind resistance. I have a spirit thule 780 box with wing bars and you don't notice it is on the roof when driving. use common sense when spacing the bars apart. Further apart equals less strain on box mountings and roof rails and a little more stability.
-
I love being quoted and corrected in red. It's like being at school. what do you think to the picture of my disc Tilt? Do you think it could be helpful to the OP? what do you think to the suggestion of Scott78 swapping his discs over to see if the problem follows the disc or not? when I say "it's almost like the inside of the disc is trying to get out" I mean the heat spots look like the internal vents have basically cooked and are trying to burst out from within the disc itself.
-
The only way you can tell if a disk is warped is by measuring it's run out I think. I'm not a technician I must say. however visual inspection is a good place to start. If the disc is a blueish colour or has spots on then a high chance it's time to change. The tolerances on the disc/pad surface is so tight that the slightest anomaly will create so much friction and heat. its all time and money vs just putting new on. New are only approx £90 a pair? I I would defo try swapping the discs over? Good process of elimination? this is a photo of my warped disc. Pretty obvious when you look at it? The inside of the disc is almost trying to get out that is what causes the spots. These are actually slightly raised on the disc, hence the wobble.
-
A binding caliper and hot disc is a recipe for a warped disc. cant see how a binding caliper won't damage the disc. Due to the problem not going after a new caliper I would seriously look for damage to the disc. It starts with a very minimal wheel wobble and over time develops into a very bad wobble. Checking the discs is easy with your eyes through the rim, or Jack it up and have the wheel off and compare it to the other side visually. you could swap the discs over. If the problem appears on the other side you know it is prob a warped disc?? the OP ended with "any help appreciated". im trying to help as I've had this problem myself.
-
Did the binding caliper not damage the disc? Were there any hot spots on the disc? If so then you have basically got a warped disc. Some people say warping discs is a myth however I use the term loosely for a "damaged disc". The excessive heating with the binding caliper will have subjected the disc to temperatures beyond its limit. I think a new set of discs and pads along with the new caliper may have been best practice.


