


Leaderboard
-

moley
Resident Member9Points10,195Posts -

xman
Resident Member7Points7,537Posts -
kev17
Finding my way6Points18Posts -

john999boy
Honorary6Points11,233Posts


Popular Content
Showing content with the highest reputation on 15/12/19 in all areas
-
After seeing so many people doing it the wrong way, I decided to make my own video1 point
-
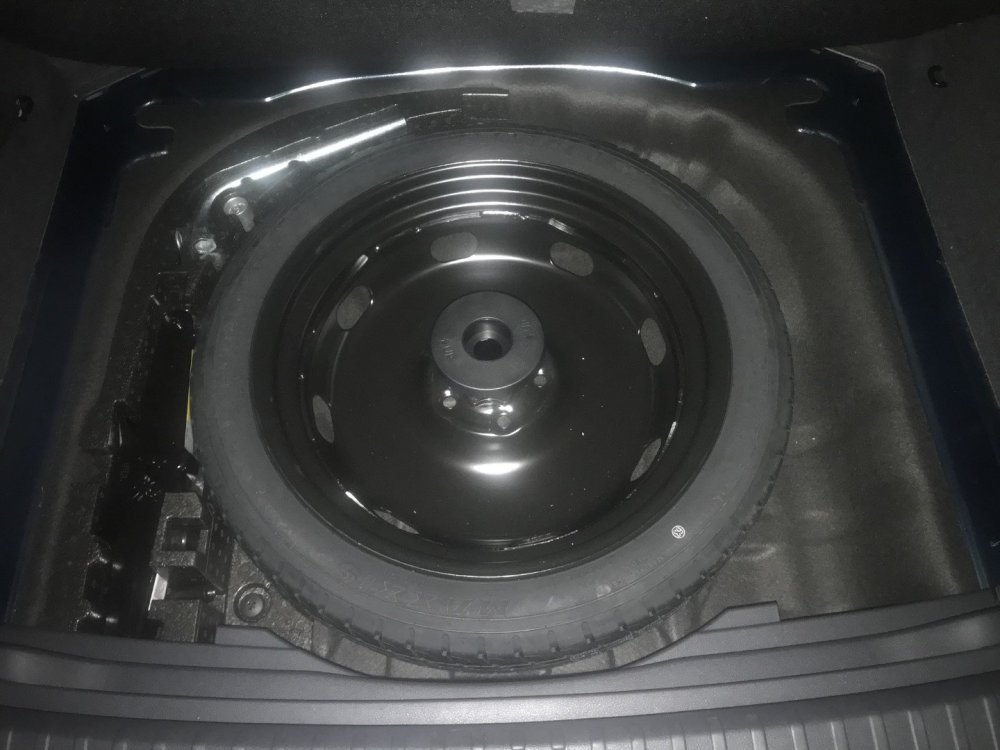
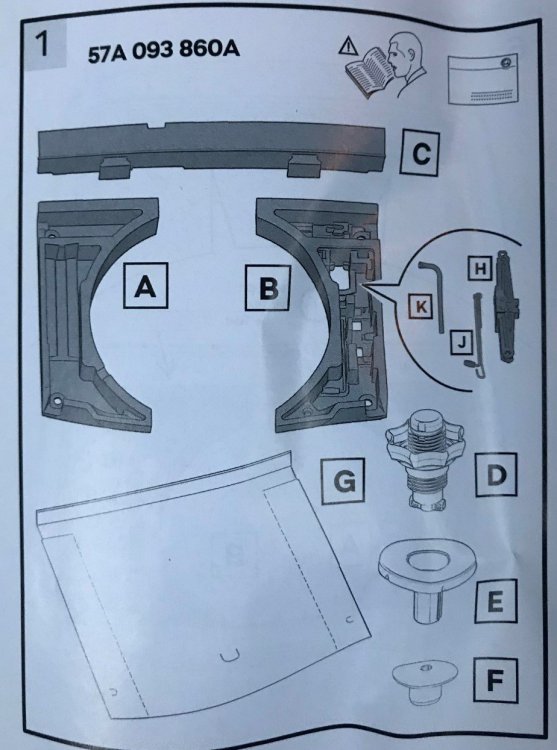
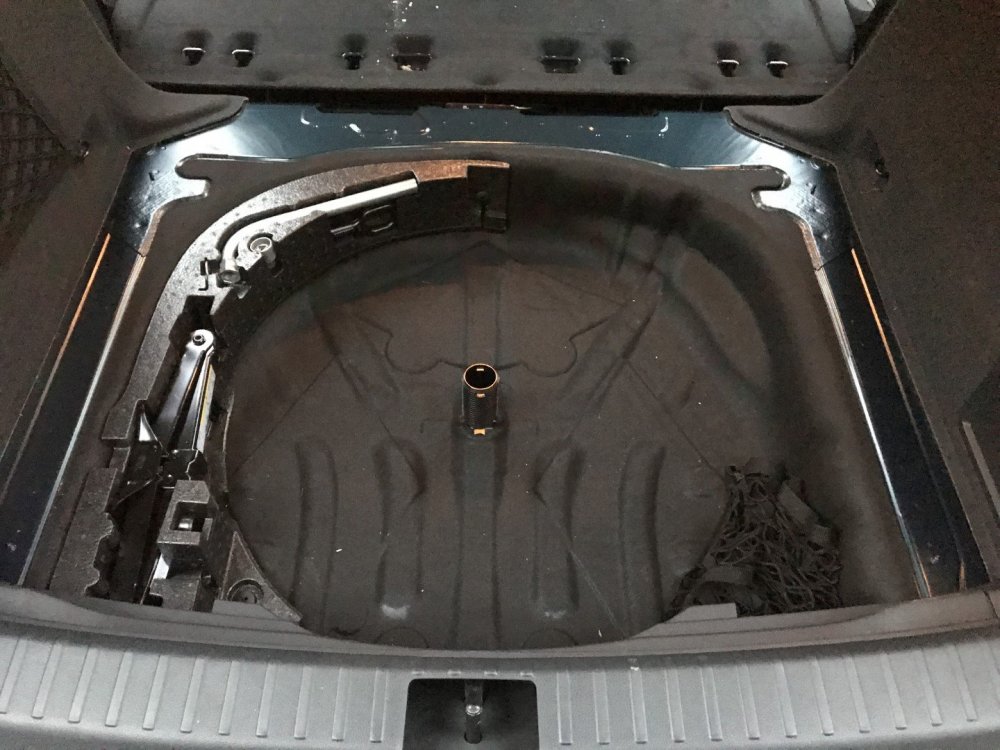
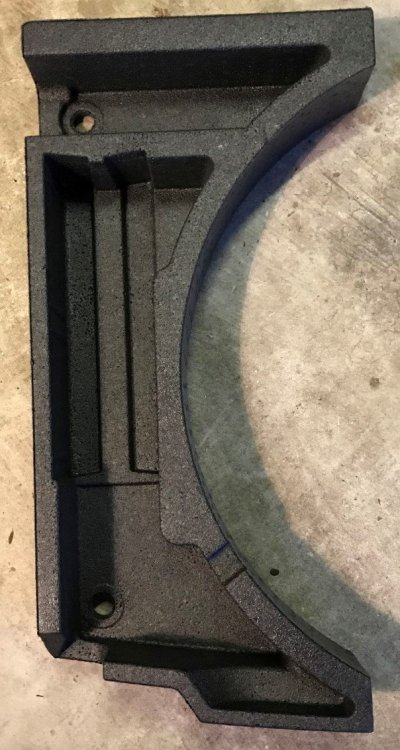
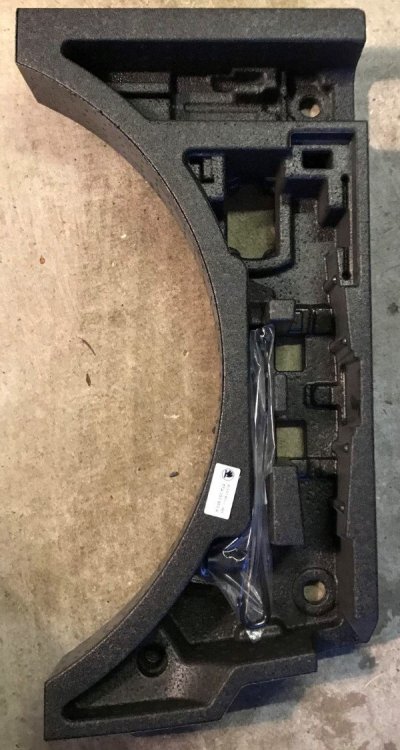
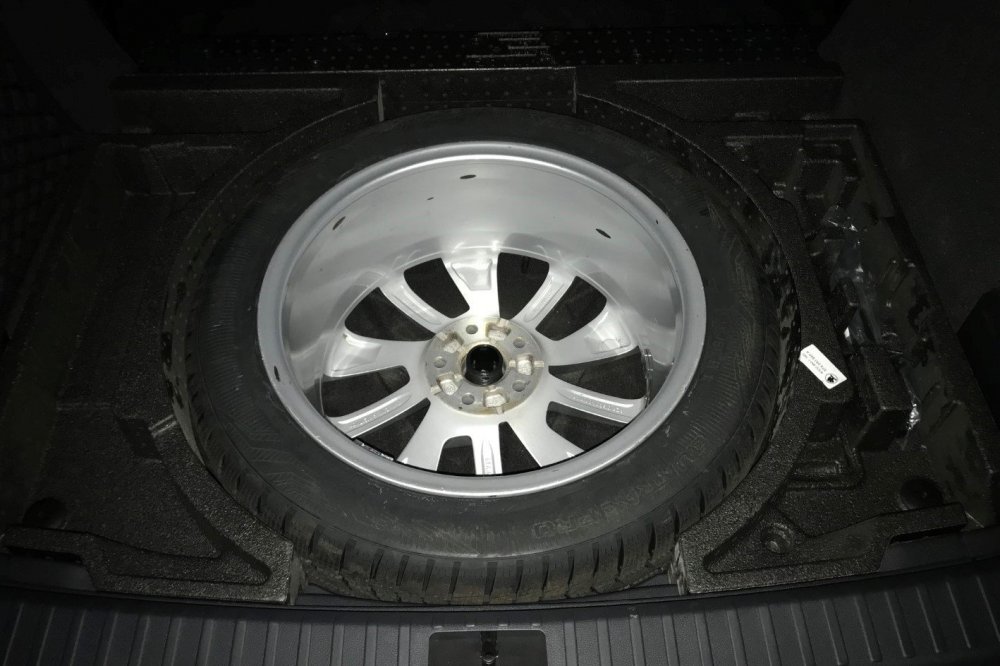
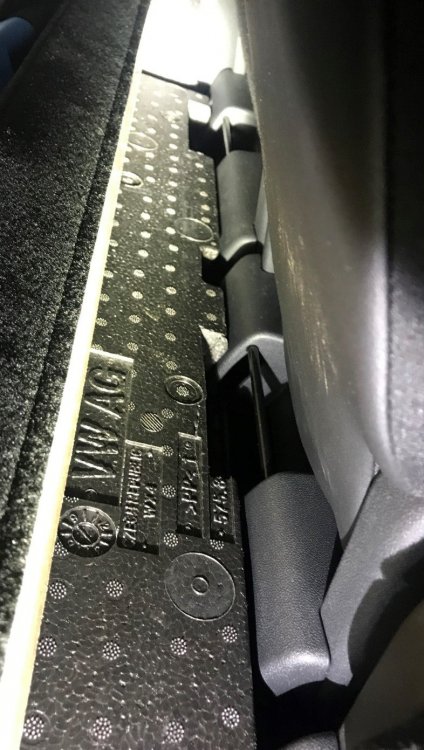
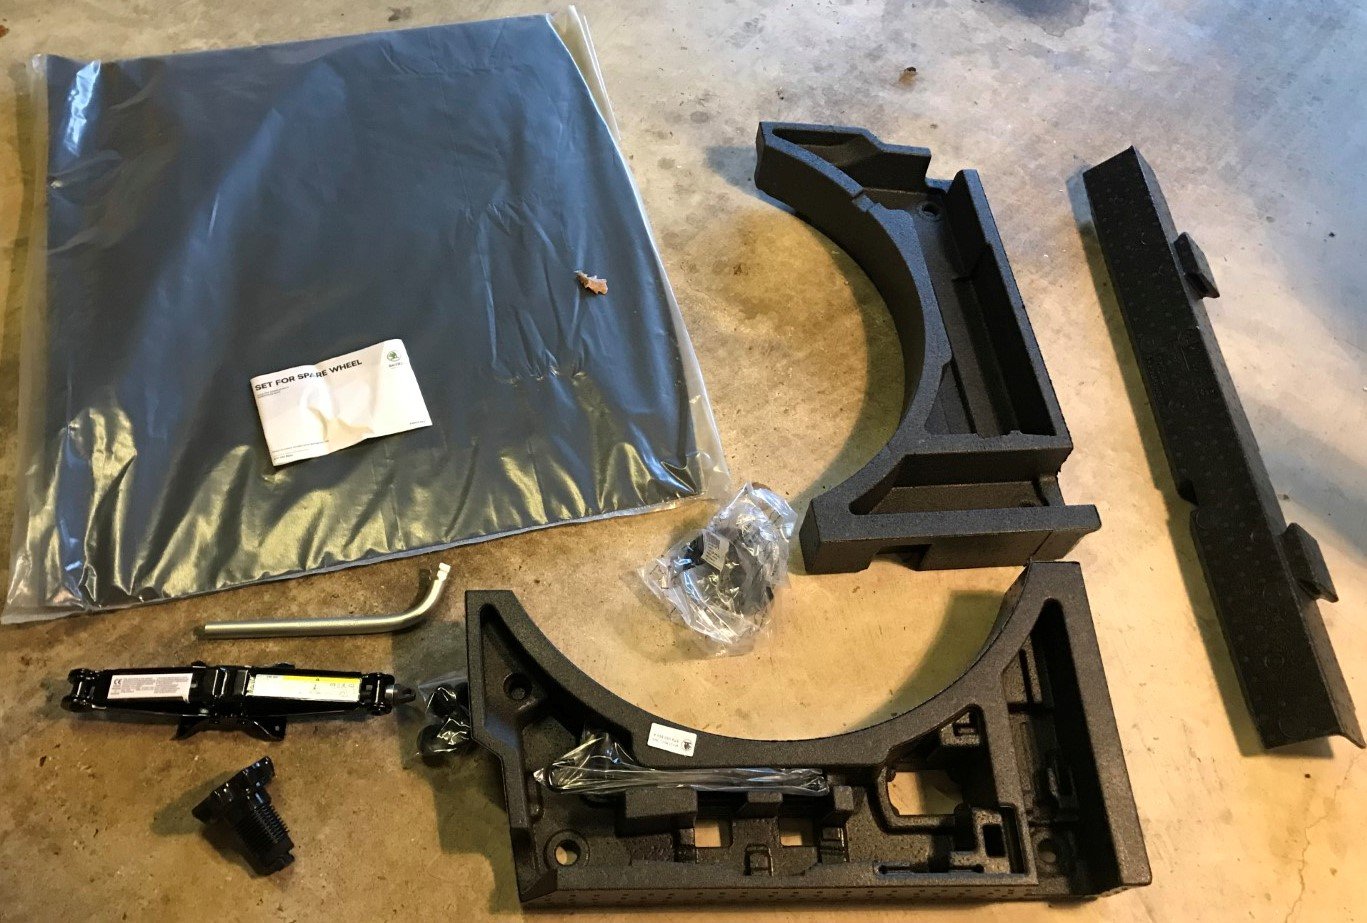
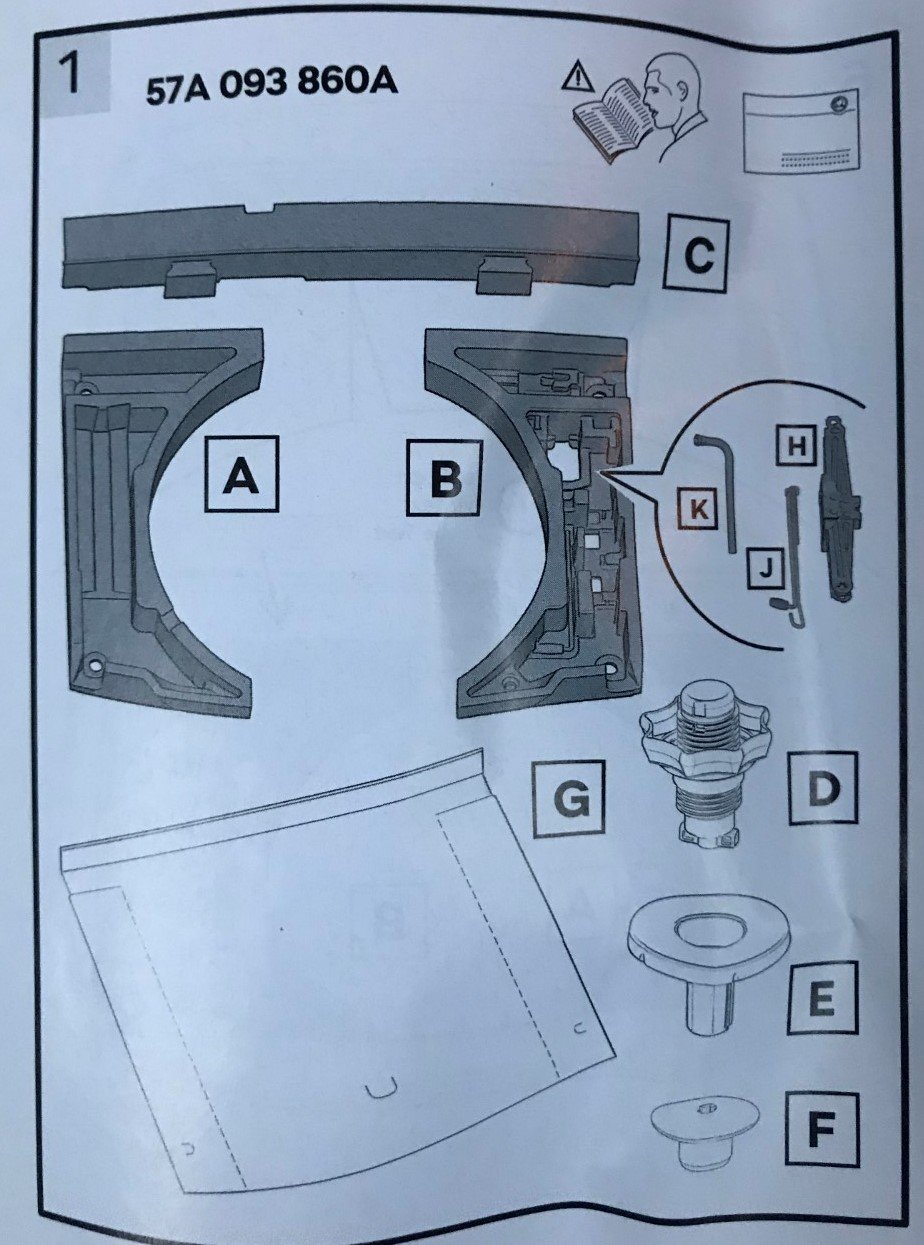
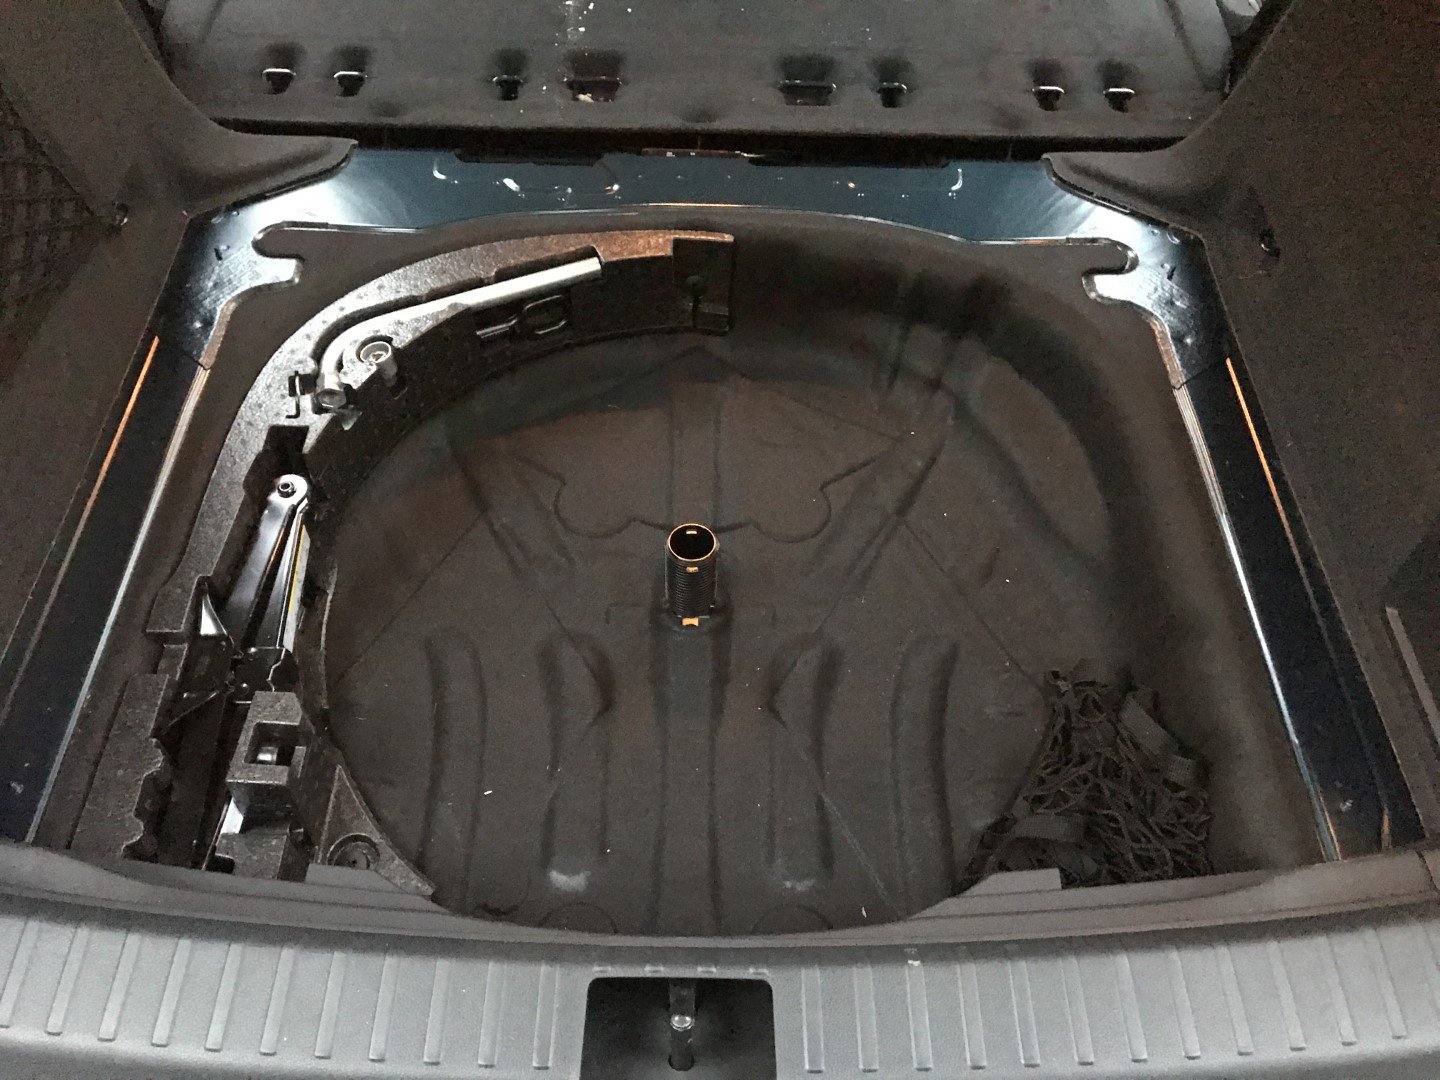
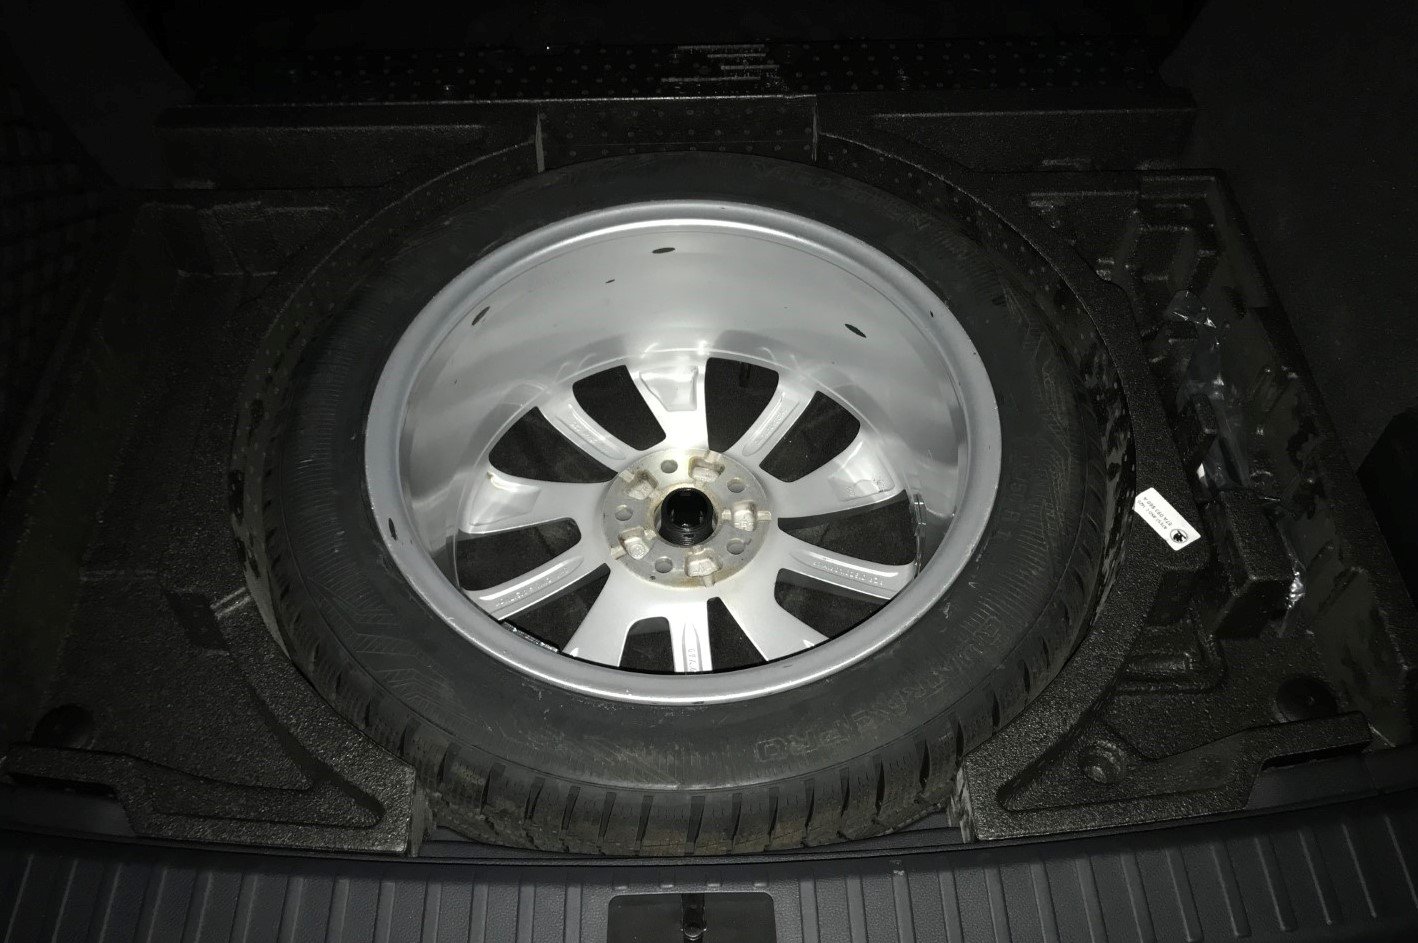
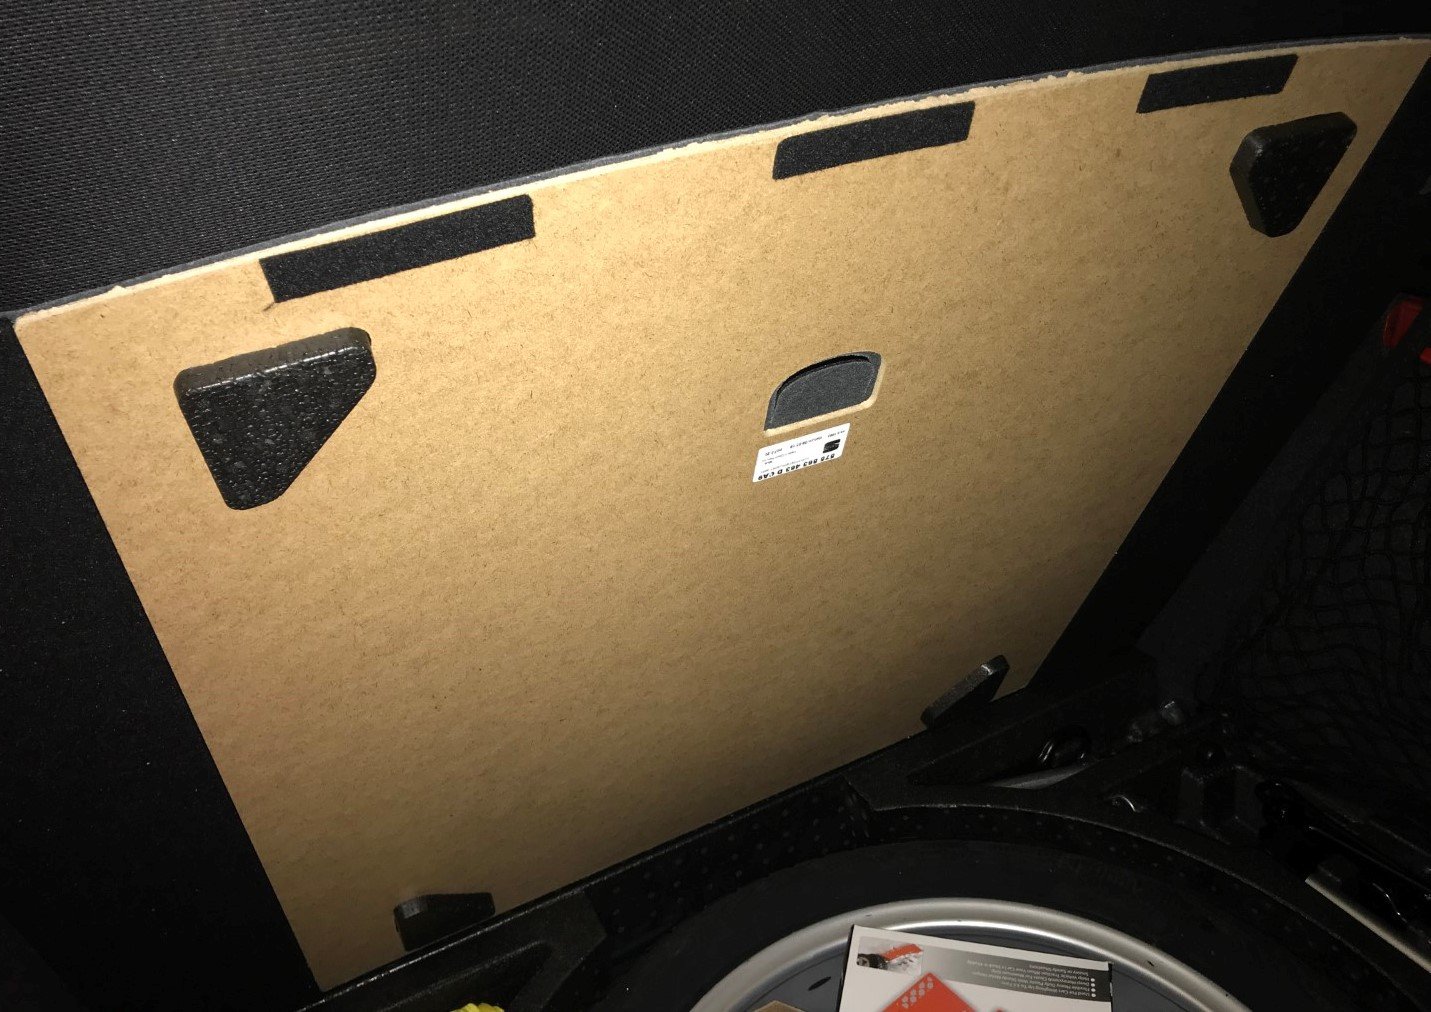
I've just finished converting the boot space of my UK-spec 2-wheel drive Karoq SE-L trim from a space saver spare wheel to a full-size share wheel. I thought I'd put some photos here, in case anybody else is thinking of doing something similar. When I bought our Karoq SE-L earlier this year, I wanted to order a full-size spare wheel, but it wasn't an option. The only option was a space-saver spare wheel. But I read on various forums that it's possible to fit the boot kit for a full-size spare, it just needs a bit of simple cutting of a polystyrene piece, which indeed turned out to be true. I think this is only a problem if your Karoq has the VarioFlex seats, because there is a handle on each seat which is inaccessible if you don't cut off some of this polystyrene. The UK model of SE-L trim comes with VarioFlex seats as standard, and 18" Braga style alloy wheels. The Skoda part number for this boot kit for full-sized spare wheel is 57A 093 860A. I paid £77.50 + VAT from my local Skoda dealer. It's a very big box! In photo number 01, you can see the original space-saver spare wheel in place. In photo number 02, you can see the contents of the kit, laid out on my garage floor. In photo number 03, you can see the main page of the instruction manual, showing all the different pieces . The original boot cover needs to be unclipped. You just need to lift up the VarioFlex seats to locate some plastic clips. Twist these plastic clips then pull them out. Then pull up the material which goes underneath the seats, so you can lift out the boot cover from off the pins. You can then put back the material which goes under the seats and put the clips back in place, because the new boot cover is not held down by these pins at all. In photo number 04, you can see the boot well with the old skinny wheel and the old boot floor removed. This photo was taken before I removed the old polystyrene insert. You can see that there is a plastic tubular piece in the centre, which stops the wheel from moving around. I thought that the kit for the full size wheel would have a taller plastic piece to support the boot floor at a higher level, due to the extra height from the full-size wheel, but it doesn't. The new kit came with exactly the same plastic part which was there already, so I just left the original one in place. In photo number 05, you can see the polystyrene piece which sits along the full width of the boot space, between the seat backs and the spare wheel. The two protrusions which you can see enable it to interlock with the two other polystyrene pieces. This polystyrene piece shows a VW part number of 575 863 496 A. In photo number 06, you can see the polystyrene piece which sits to the left of the spare wheel. It shows a VW part number of 575 863 495 E. In photo number 07, you can see the polystyrene piece which sits to the right of the spare wheel. It shows a VW part number of 575 863 496 J. This is the part which holds the jack, brace, and locking wheel nut etc. in place. There are some plastic clips which hold down the right and left polystyrene pieces ( 2 clips each). They attach to some protrusions in the metal underneath. You actually need a large Torx screwdriver to properly screw them on, but I didn't have one, so I just screwed them finger tight. From what I could see in the instruction manual, it looks like you get a tool to screw them down with the official spare wheel, but I didn't buy the official spare wheel. I bought a 2nd hand Braga alloy wheel from eBay, which is absolutely identical to the 4 other wheels. In photo number 08, you can see my full-size 18" Braga wheel sitting in the cavity, after the polystyrene pieces have all been put in place. After I took this photo, I still had to screw down the plastic cap which goes on top of the tubular part in the centre of the wheel, to hold the wheel firmly in place. The Skoda boot kit comes with a jack and a wheel brace, which go in the right-hand polystyrene piece. The brace looked identical to the one which I already had, but the jack was very slightly different (the base of it was a slightly different width). There is space to put other tools in the cavity in the left-hand polystyrene piece, and I also put loads of other tools etc. in the cavity in the centre of the spare wheel. In photo number 09, you can see along the rear of the VarioFlex seats , where I had to make a cutout in the polystyrene piece behind the handle of each seat. I also removed a thin slither of polystyrene along the fully length, just to stop it interfering with the seats when they are lifted up and put back down. In photo number 10, you can see the new boot floor which comes as part of the kit. It actually has a Seat part number on it, which is 575 863 463 D CA9. It has some triangular-shaped dense foam pieces in the corners, to hold it in place correctly. Overall, I think this Skoda boot kit for the full-size spare wheel is pretty good value. You get a lot of stuff for £77.50 + VAT. If you already have a space-saver spare wheel, you actually end up with some bits which you don't really need. For example, you'll get an additional wheel brace and jack, and an additional plastic part which screws the wheel down to the boot floor. If you're able to get the pieces individually, the ones which you really need, if you already have a space-saver spare wheel and jack etc., are the three VW polystyrene part numbers 575 863 496 A, 575 863 495 E, 575 863 496 J, plus the Seat boot floor part number 575 863 463 D CA9. I hope that this is helpful to some people out there.


 1 point
 -
1 point1 pointThis is a simple procedure that anyone can do as long as you have access to axle stands, ramps, car lift etc. I'm writing this guide to pull together all the tools needed and steps required to carry this out. This was my first time and I spent more time going back and forth looking for sockets etc than actually doing the work! Required: torx head screw driver (screws that hold plastic under tray) 14mm socket (bolts that the under tray) 1/2" drive preferred 13mm socket (drain nut on oil filter housing) <<< this might actually be 12mm, I'm going by memory. But you need to use a 1/4" drive, 1/2" socket in same size doesn't fit. 32mm socket (to open the actual filter housing) 1/2" drive required 19mm socket (to open the drain plug on the sump) 1/2" drive 1/2" and 1/4" extender bars (to reach the oil filter housing) New oil (I used 5w30 fully synthetic) Oil filter Container to catch old oil (minimum 5L in size). Funnel for container (I used a wide mouthed bucket to catch mine so didn't need a funnel) Old clothes / overalls (the oil WILL splash no matter how careful your are) Optional: cable ties to hold back wires and pipes cardboard or sheets to catch oil spills rubber or latex gloves kitchen roll/blue roll Small hook or pick set (like this: https://www.halfords.com/workshop-tools/garage-equipment/garage-essentials/rolson-4-piece-pick-hook-set) Scissors Step 1. Get the car raised up. I used a set of ramps. If the car is cold, let it run for a few minute to heat the oil a little. This will make it flow out faster. Step 2. Remove the under tray. Get underneath with your torx screwdriver. The plastic under tray has 3 bolts at the bottom (towards the middle of the car), and 4 at the top (towards the front of the car, 2 on left and 2 on the right). The torx screws are located along the side of the tray (3 on each side) and 3 along the top (between the 2 sets of bolts on left and right). 9 screws in total. Mine had less as some must have been lost during previous work. Set the screws safely aside and grab your ratchet and 14mm socket. First, loosen all the bolts and then proceed to remove them. When you're down to the final 2 bolts, use your arm to press up against the weight of the tray, otherwise it might fall and possibly snap at the last bolt or might just hit you instead. Set the bolts aside for later. Step 3. Replace the oil filter. The oil filter is located towards the front of the engine, just behind the fan. Look up from underneath and you should see this: I used cable ties to pull the wires and rubber pipe out of the way so I could get better access. Then I grabbed my 1/4" ratchet, extender bar and the 12mm or 13mm socket. Put down your cardboard or rags and grab your oil collection container. Open up the small drain bolt in the center and catch all the oil that comes out. Next grab your 1/2" ratchet, extender bar and 32mm socket. Open up the oil filter casing, catch the oil and then pull out the old filter. Your new filter should have 2 rubber rings, one tiny and one large. The tiny one is to replace the ring on the drain plug, and the large one replaces the ring on the filter housing. Do this now, and use some kitchen roll to clean them up a bit, especially the treads etc. I couldn't get the old rubber rings off, so had to use a small hook tool to grab underneath. Insert your new filter into the housing, then replace the drain plug on the housing. Now screw the housing on using your hand, tighten with the 32mm socket. I didn't use a torque wrench, just went until it was lightly tightened. IMPORTANT: If you used cable ties to hold back wires and pipes, grab some scissors and cut the cables ties now. I forgot, finished the job and replaced the under tray and then had to take it off again! The cable ties / wires etc could possibly foul the radiator fan and cause some trouble. Step 4. Drain the old oil Pop your bonnet and open the oil filler cap. Grab your cardboard or rags, 1/2" ratchet, 19mm socket, and container for the old oil, slide back towards the middle of the car to find the sump and drain plug. You should this: Loosen the bolt with the socket and then open it the rest of the way by hand, have your container ready as this is gonna fly out fast. Once all the oil has drained, replace the sump bolt and tighten with the ratchet (not super tight!) Dispose of the waste oil at your local recycling center. Step 5. Replace the under tray and fill with new oil. I put the bolts in first, by hand and then tightened them up with the 14mm socket. Then put the screws back in. Now fill up with new oil. I think the 2.0L Octavia TDI takes 4.6L of oil, but don't quote me on that. I bought a 5L of oil, filled it with 4L, let it sit for a few minutes and checked the dip stick, then topped up a little, let it sit, checked the dip stick again. I think I used just under 4.5L. Don't forget to replace the oil filler cap once you've filled it with new oil. And you're done! Put away the tools, get the car off the ramps / axle stands / whatever and get cleaned up. If I've missed anything out or made any grave mistakes, let me know. I changed my oil and filter yesterday. Was going to do the fuel filter too but had got the wrong one. Will get it changed next week.1 point


Important Information
Welcome to BRISKODA. Please note the following important links Terms of Use. We have a comprehensive Privacy Policy. We have placed cookies on your device to help make this website better. You can adjust your cookie settings, otherwise we'll assume you're okay to continue.