


Leaderboard
-
mrgf
Resident Member15Points3,583Posts -
Breezy_Pete
Sponsor12Points24,189Posts -
UrbanPanzer
Members12Points1,800Posts -
Fawnrush
Finding my way9Points24Posts


Popular Content
Showing content with the highest reputation on 26/07/20 in all areas
-
3 pointsI don’t know how to do it, and I would guess there is a safety/legal issue with disconnecting or disabling the handle especially as your car is a taxi. I have to use taxis a lot and the mind boggles that anyone would try and get in the front with the current global pandemic...... In all seriousness I would get a blow up doll, large teddy bear or shop window dummy, put a mask (officially approved face covering, not gimp😬) on it and strap it into the front passenger seat. Or pile a load of stuff on the front seat so it’s obvious it can’t be sat in. Tape over the outside handle with Duck tape in a big cross, just in case they don’t spot whatever is strapped in the front.3 points
-
3 pointsAbout 7 weeks and 3000 miles into owning the 2.0 diesel L&K combi and the question is do I like it? well, do bears poo in the woods? I haven't used all of the functions available yet, adaptive cruise is very good in the 50 mph average speed camera roadworks on the motorways , but I turned off the lane assist as the state of UK roads it tried to steer the car all over the place at times. It's big, but doesn't feel like it. It's comfortable and drives well. MPG is about the same or slightly better then my old 1.6 diesel Octavia combi. I should have got one of these years ago.3 points
-
Hi all The Superb Mk3 AWD is fitted with a 5th generation Haldex. Regarding VAG Group, and Skoda in particular, it also equips: Octavia 3, Superb 2, Karoq, Kodiaq. It may also apply to Scala and Kamiq, unless they're equipped with 6th generation. I actually don't know for these latter. Since I have limited trust in garages in my neighborhood and because I like 'DIYing' on my car, I've decided to change the oil of my Haldex system on my own. If one follows Skoda recommendations, workshop manuals (see cardiagn.com) only mention a simple oil replacement every 3 years and that's it! But when you start diving into documentations or in youtube videos about 5th gen Haldex, you can notice that the oil pump has an intern strainer, which trends to get really dirty, whereas it's never cleaned ! Hence, here is this humble tutorial ! I apologize, if there are any vocabulary issues... I'm French. Firstly, here are all elements, that we're going to look at: #13 : Bleeder screw (M10x30) - P/N N 910 827 01 (tightening torque 38 Nm for Superb Mk3, but on other VAG model it may be 32Nm - Have a look to the workshop manual corresponding to your car. See cardiagn.com) #14 : Filler screw (M10x1x10) - P/N N 902 818 02 (tightening torque 15 Nm) #3 : Retaining screw (M6X35) for the Haldex Control Unit - P/N N 105 540 05 (tightening torque 9,5 Nm) #11 : Retaining screw (M6X35) for the Haldex hydraulic pump - P/N N 105 540 05 (tightening torque 9,5 Nm) #9 : O-rings for the pump - P/N 0CQ 598 305 (⚠️Note : This P/N is a kit, which includes both O-rings, but also both retaining screw #11! Don't by these screws twice!) Gear Oil : According to ifinterface.com: P/N G 065 175 A2 or According to what dealer sold me: P/N G 60 175 A2 - 850 ml (~29.9 fl oz) By the way, don't forget to check that the oil can actually contains 850ml through the gauge on the side of the can. Indeed, just for the short story, the oil can I had bought only contained 750ml, though brand new and still crimped . I had to go back to the dealer to exchange the oil can. The requested volume for the maintenance operation is usually around 700-720 ml (24.6-25.3 fl oz), thus it leaves little room for error (and even less if the can is not filled correctly). The total bill was ~75 € for all parts (without screws #3, which you don't need to change). - Difficulty : 2 - Time needed : 1h30 approx. - Number of person needed : 1 - Necessary tools : ¤ Screws #3 and #11 : Torx T30 or 10mm Hex socket, if you don't have Torx ¤ Screw #13 : 8mm Hex ¤ Screw #14 : 5 mm Hex ¤ For Hydraulic pump strainer screws : Torx T10 ¤ Ratchet or classic wrenches for disassembly ¤ Torque wrench(es) to apply specified torques: (9,5 / 15 / 38 Nm) ¤ Short and intermediate extensions for ratchet or torque wrenches to enable easier access to screws ¤ A small flat screwdriver ¤ Oil drip tray ¤ Rags ¤ 1 wooden toothpick ¤ Lifting means ¤ Syringe for oil filling Dealing with the syringe, I've bought this one for 20-25€ on Amazon. It makes the job perfectly! Step #0 : Preparation You need to lift the car high enough to get under the car and to get enough space to move your arms comfortably. In my case, 370mm (~14.5") of ground clearance were enough. Note: Though you've lifted the car, it needs to remain horizontal to make a proper filling with right oil level (see step 5). If this case, I had to compensate the natural slope of the ground. Step #1 : Oil draining Start with the filler screw (#14 / blue square) removal for more safety. Indeed, if it's stuck, you won't be "snooked", with a completely empty Haldex oil tank and no way to refill it. Once you've removed the filler screw. Don't get rid of it immediately. You'll need it again temporarily for Step #4! Now, you can remove the bleeder screw (#13 / red circle). There's no difficulty to remove these 2 screws. There are 2 good news for this step: - The drain screw is long enough, so that you won't get surprised, when the thread gets totally disengaged from the housing. - Even if the drain screw has an horizontal axis, there's only a small quantity of oil, and since it is very fluid, it flows well vertically from the edge of the hole. Little chance of getting trapped with the oil, which flows suddenly and farther than the drip tray. Phew! However, it takes several minutes to really let all the oil drain: Step #2 : Hydraulic pump removal Whereas oil is still dripping, start removing 2 retaining screws (#3) for the Haldex Control Unit. They are quite easy to access with a small 1/4'" ratchet. After that, you can rotate the Haldex Control Unit, to bring the connectors on the top upside down. This simple operation will help you saving a huuuuuuge amount of time ! But this tip is explained / told nowhere!!! Otherwise, you will have to disconnect the pump connector 'blind'... And if you do this operation for the first time, You hardly understand how to proceed. Decency leads me to shut up the time that I spent trying to remove this µ%£$@&# connector before I changed my mind on the operating process. Pump connector before Control Unit removal : Once the 2 retaining screws of the Control Unit have been removed, you can easily access to the connector: Now simply insert a small screwdriver in the notch (red circle) and push in the arrow direction. Very simple... Then, you need to unclip the black plastic wire protection, which keeps the pump wiring away from the propeller shaft. It's clipped in 2 locations on each side of the shaft, You just need to pinch the 2 lugs at their end to make them go back through the hole in the housing. Left side (Control Unit side) : The upper red circle in the mirror shows what you hardly see in the lower dotted circle... It's clearly the circled part, that has to be pinched and then pushed/pulled in the arrow direction. Right side (pump side), just proceed the same way : The pump wire is now fully free. You can now remove the 2 retaining screws (#11) of the hydraulic pump (#10). Very easy too. Warning from this point, it will be 'Apocalypse pump' ! Please keep children and sensitive souls away from following pictures! Pull in the pump axis direction, while rotating it around its axis in one direction and then the other to ease the removal. Be very careful, when the pump is about to get out completely, not to strike the contact surface of the housing, nor to strike the pump strainer. FYI, the strainer is not sold alone. It's sold with the pump, which approximately costs 180-200 € (w/o VAT) ! And there, under your dumbfounded eyes , here is the sinister spectacle that awaits you: A strainer almost entirely clogged with sh**t! And the pump housing is not even better... FYI, this Haldex is only 2.5 years old and has only 45000 km (~28000 mi) on the clock. And considering the way I use my car, I don't think the Haldex faces a heavy duty use. Therefore, as I already mentioned somewhere on this forum, one can only notice that the oil replacement process in the maintenance manual for the Haldex 5th generation is clearly incomplete ! By the way, look at this video below from ~28 mn, you'll see the impact of the strainer cleaning on the pump demand signal ... It's clearly a proof that w/o a strainer cleaning, the pump unnecessarily faces severe conditions and that sooner or latter there's a risk of pump failure... Step #3 : Pump cleaning and reassembly Since the pump is now removed, you need to remove the strainer. Use a Torx T10 for both screws: Then wipe the pump dry with a rag, being careful not to get the dirt into the ports. Fort the strainer, a cleaning with some white spirit and a soft paintbrush. But be careful, not to brush to hard to avoid tearing the strainer mesh, which is very thin!!! Eventually, a simple soaking in a small glass of white wine ... sorry , I mean... White Spirit should help removing most of the dirt and finishing finely with the paintbrush. Let the strainer dry, while you remove both O-rings around the pump, using a wooden toothpick as a lever. It will avoid hurting the grooves. You can now, clean the area between both grooves with white spirit. Once everything is clean, you can mount the strainer back onto the pump. Be careful ⚠️ ! I didn't find any information about their tightening torque. Thus be sure to tighten enough to firmly place the strainer on the pump body (to make a good seal against dirt), but not too hard to avoid risks of cracking the plastic. Shall I remind you the price of the pump, just in case ?!? Now, pour some drops of fresh oil in a small container. By the way, FYI : Haldex used Oil 2.5 years old & 28000 mi on the clock / Haldex fresh oil Put few oil drops on both O-rings to lubricate them and install them onto the pump. Keep using the wooden toothpick if needed. The pump is now ready to be mounted back onto the car : Now, you can clean the housing with rags before putting the pump back in place: Don't forget the bearing surface, where the threads of the retaining screws are located. Here you can see some dirt left, that I removed right after taking the picture... You can now put the pump back into the housing. Be careful, not to pinch both O-rings . Once there's only 5-6mm (1/5 -1/4") between bearing surfaces of the pump and the housing, it gets a bit harder to push in by hand. This is probably caused by O-rings, which may act as a slight "bead" to efficiently seal. You now realize how clever it is, to lubricate both O-rings to prevent them from rolling inside out and to make this operation even more difficult. When the pump stops into the housing, you can put 2 retaining screws back in place (#3 - tightening torque = 9,5 mm) Put the black palstic pump wire protection in the correction position and clip it into both holes. Be careful, you still work 'blind' (unless you have a small mirror) . Reconnect the pump connector on the Haldex Control Unit and rotate the Haldex in its normal position. Watch out to rotate the Control Unit in the correct direction not to twist unnecessarily the pump wire. Put both retaining screws to fix the control unit (#3 - tightening torque = 9,5 Nm). For the lower screw, the propeller shaft flector is slightly in the way and leads you to put the bit with a small angle. But you can still manage to have enough grip with the bit to tighten. You can now install the new bleeder screw (#13 - tightening torque = 38 Nm). Step #4 : Oil filling According to the workshop manual, the filling shall be performed with an oil temperature between 20°C and 40°C (68°F / 104°F). If the ambient temperature is to low, put the oil can in a bucket filled with hot water for a while to bring the oil at the right temperature. You can now inject fresh oil in the filling hole (see blue square, on the 5th picture) with the syringe. You have to fill with oil, until it overflows. This should be approximately 650ml (~22 fl oz). Put the OLD filler screw back in place temporarily and tight it slightly. Yes, you've been told to keep it upon removal at step #1! Do you remember? ! Etape 5 : Oil level adjustment and ending Start the engine and let it run for ~1mn, to let the hydraulic pump fill with oil correctly. Shut the engine down, then remove the old filler screw again (#14 / still the blue square on the 5th picture ). Top up with oil until it overflows again, and you can put the new filler screw to finalize the operation (#14 - tightening torque 15 Nm). That's it! Fresh oil! Clean pump strainer! Happy Skoda owner! ... You can put the car back onto the floor now ! Now it's up to you!2 points
-
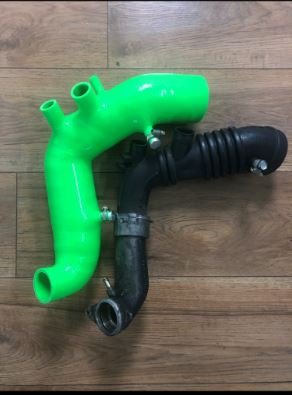
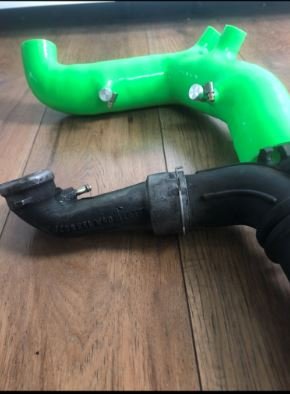
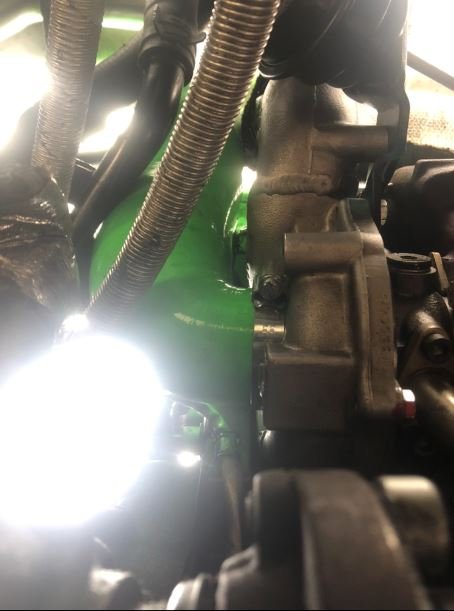
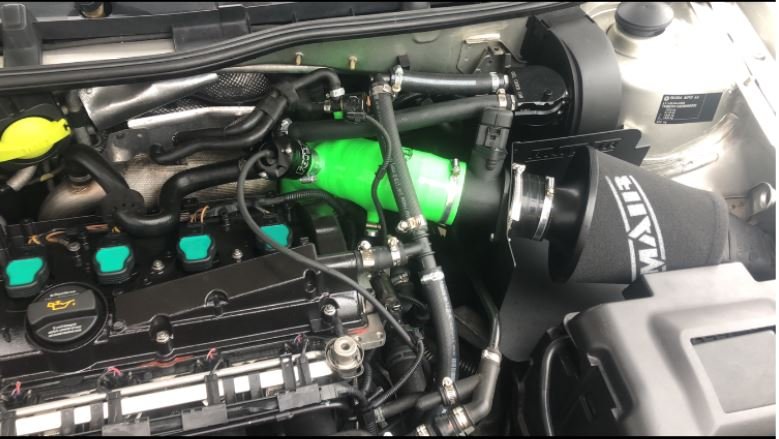
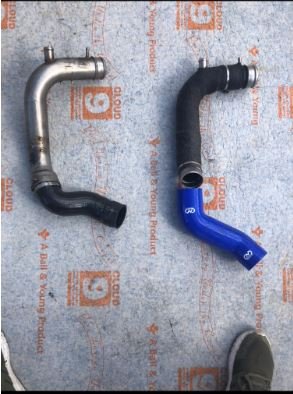
2 pointsOver the weekend i installed my SFS Oversized TIP. Pricey product but what i will say the CM TIP that came with my uprated Turbo felt more stronger then the SFS one so dont understand why people have knocked their product. What i mean by 'Stronger' is I could squeeze the main body of the TIP easier with the SFS compared to the CM Tip and looking at the CM TIP there are more layers of Silicone compared to the SFS one. I chose to install the SFS pipe simply on the basis of what i have read on various forums being a 'better product' and I like the Kawasaki Green colour too. Took me 2.5hours to install the SFS TIP that was with two people me underneath the car and my friend over the engine bay. Coolant pipe i had to bend quite a bit to allow TIP elbow to pass. Makes more swooshing sounds but didnt notice any performance gains but saying that the following day I removed my AUQ boost pipe with the poor design coupling and replaced with an AGU boost pipe which i heat wrapped and used a CM silicone boost pipe that links the pipe to the pancake pipe. Used proper hose clamps, secured well. Took car out after this and 'WOW' real improvement in the car accelerating throughout the rev range.
 2 points
 -
I have figured it out. It was a problem with Google Assistant. I had this linked to my old (Free) Spotify Account. So in summary, Waze was fine, Google Maps was fine and Spotify was fine. Although just to note that you can link Waze & Google Maps from the Spotify app. Thank you for trying to help.2 points
-
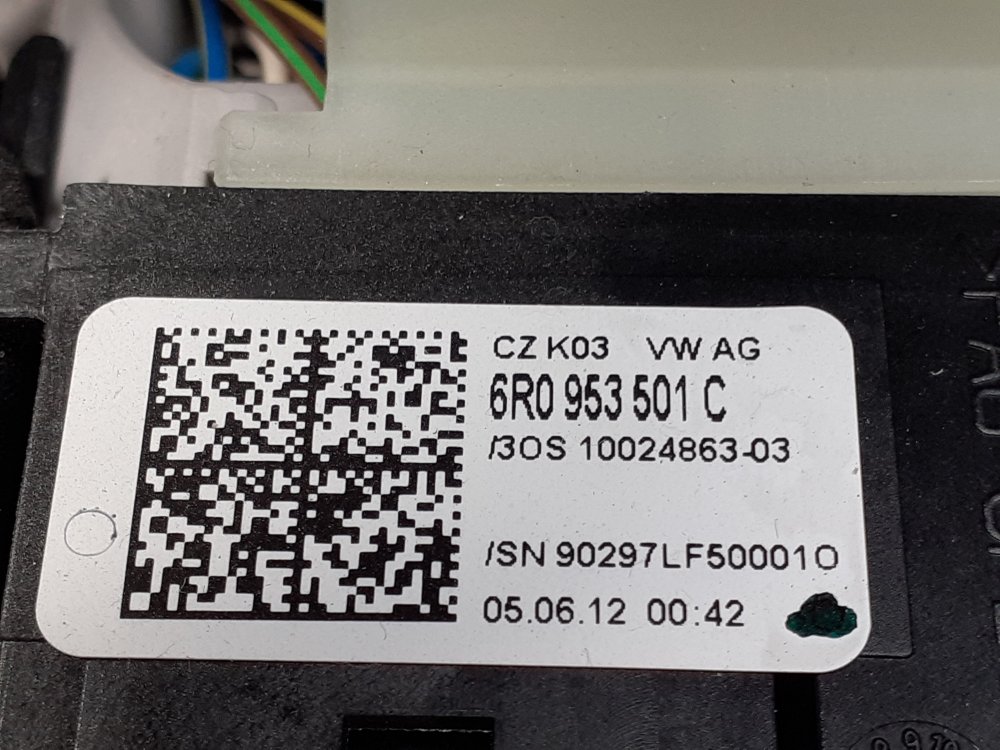
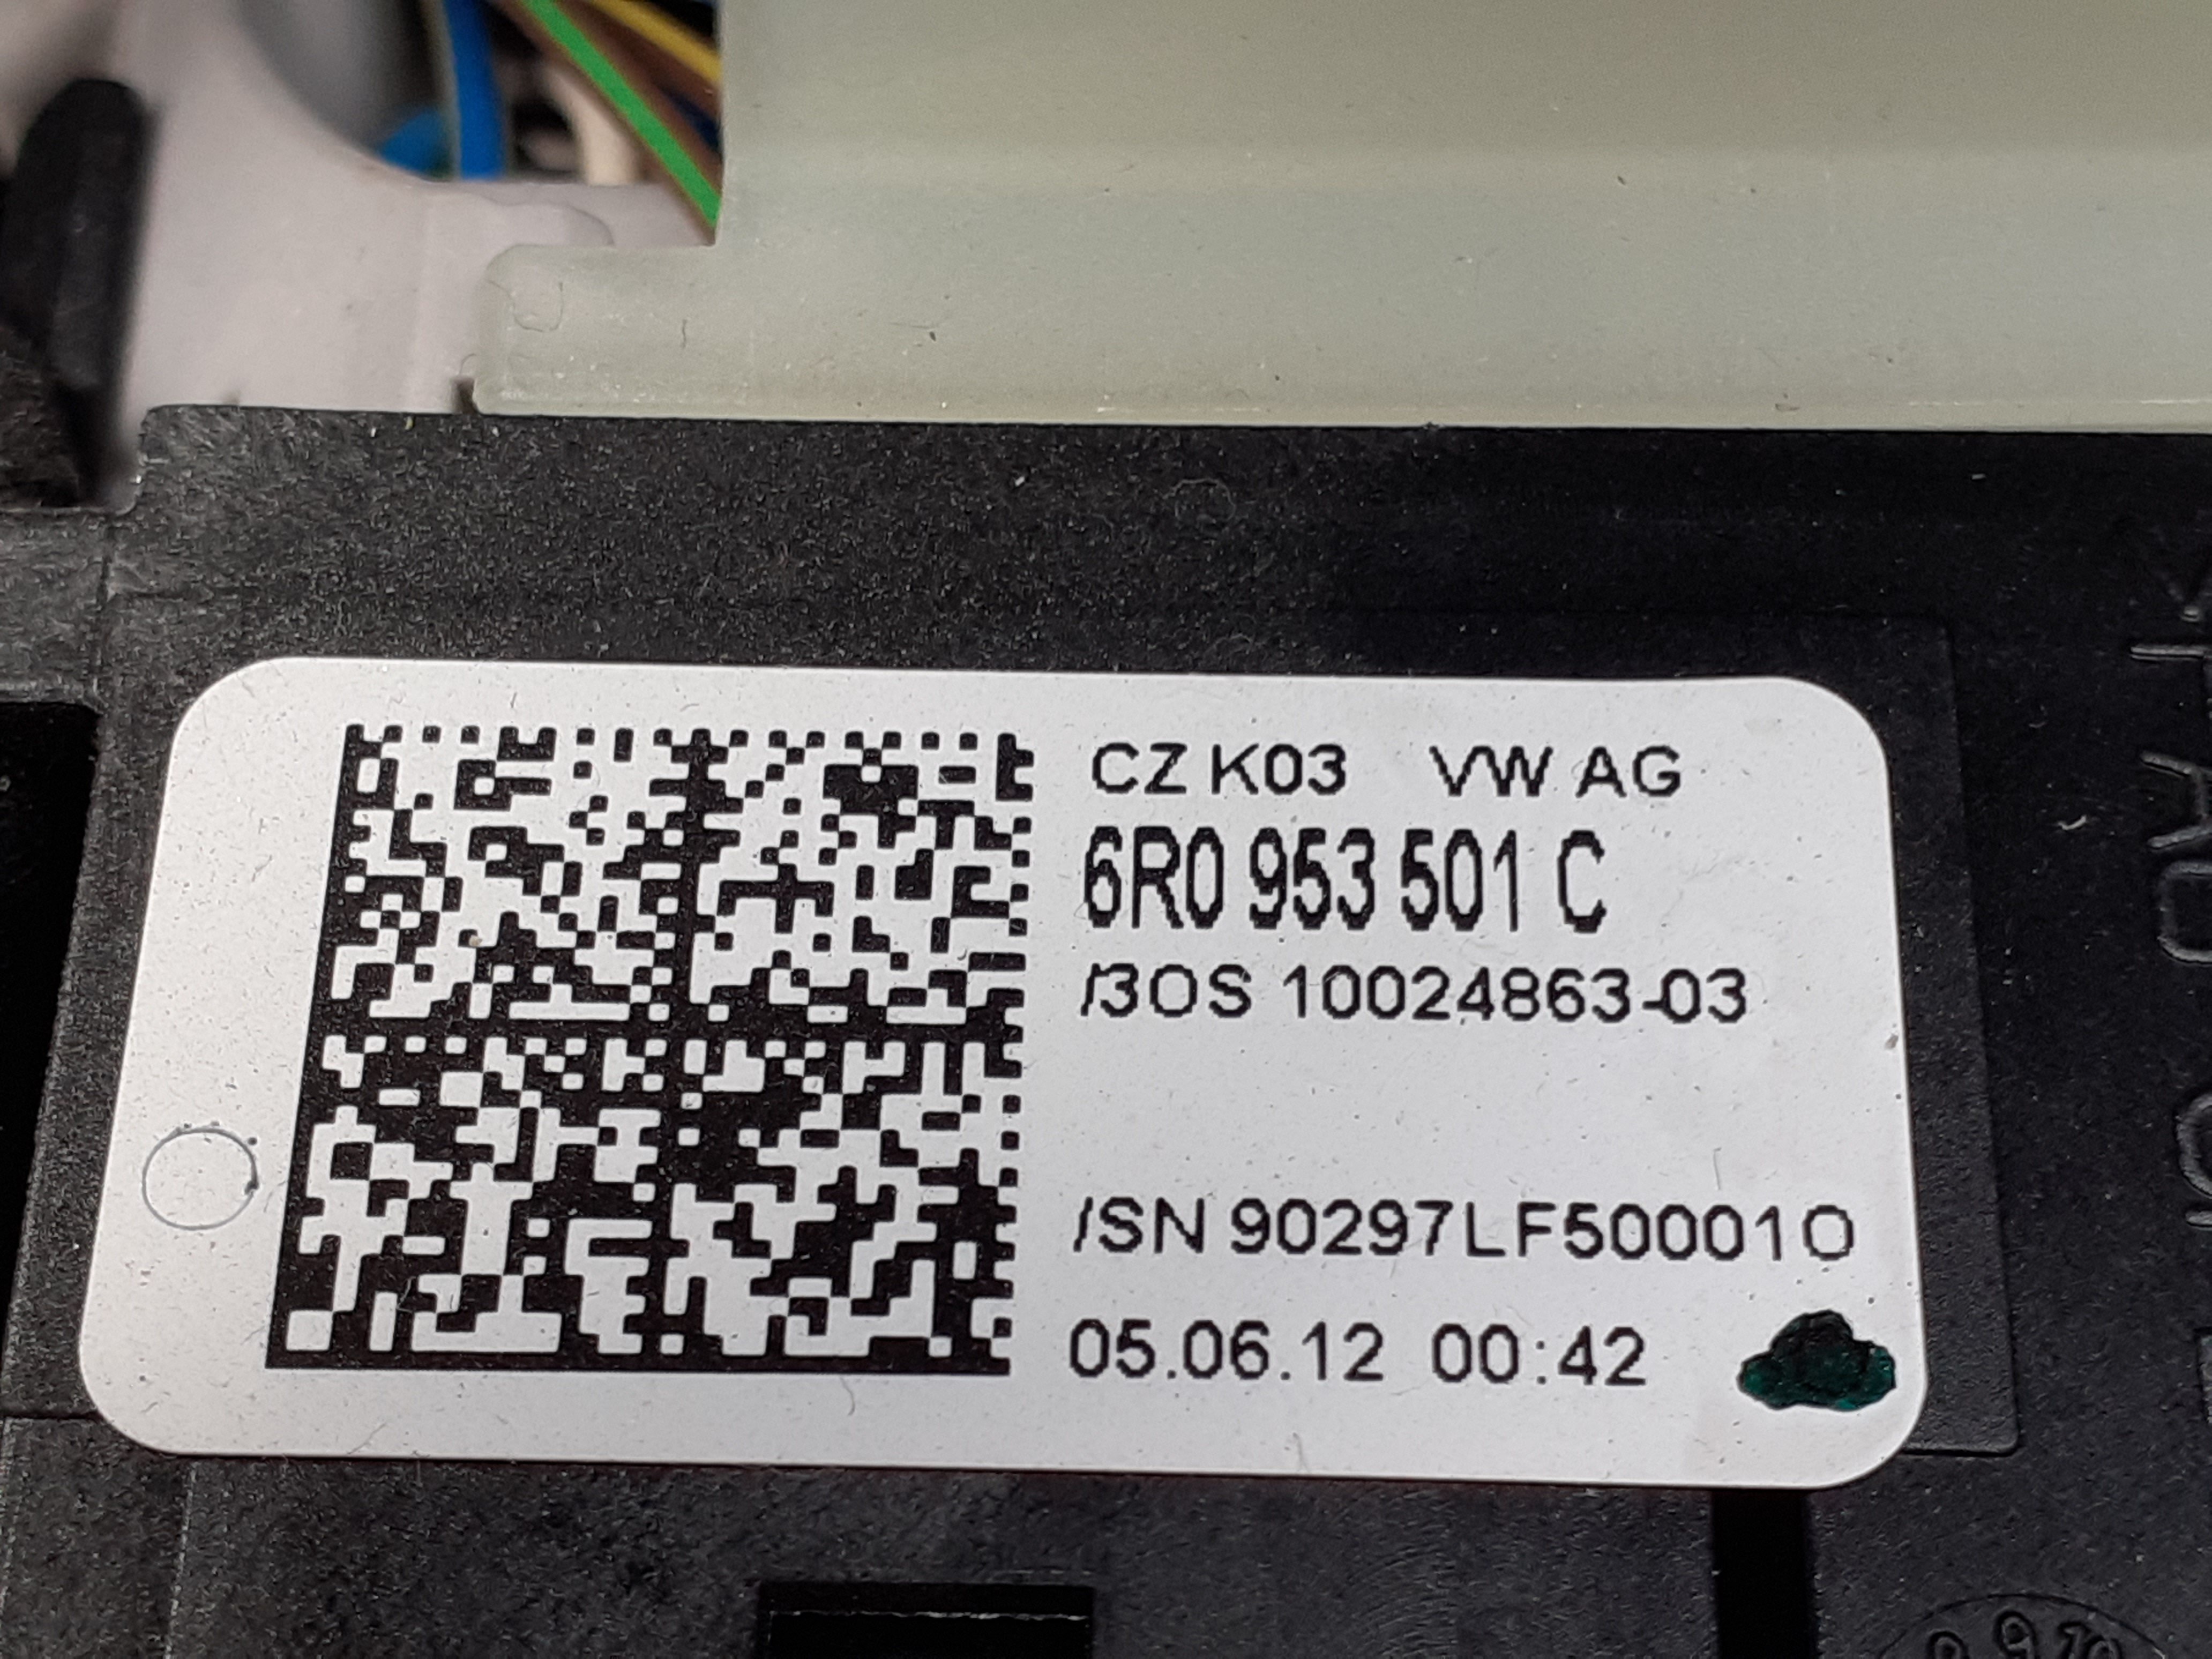
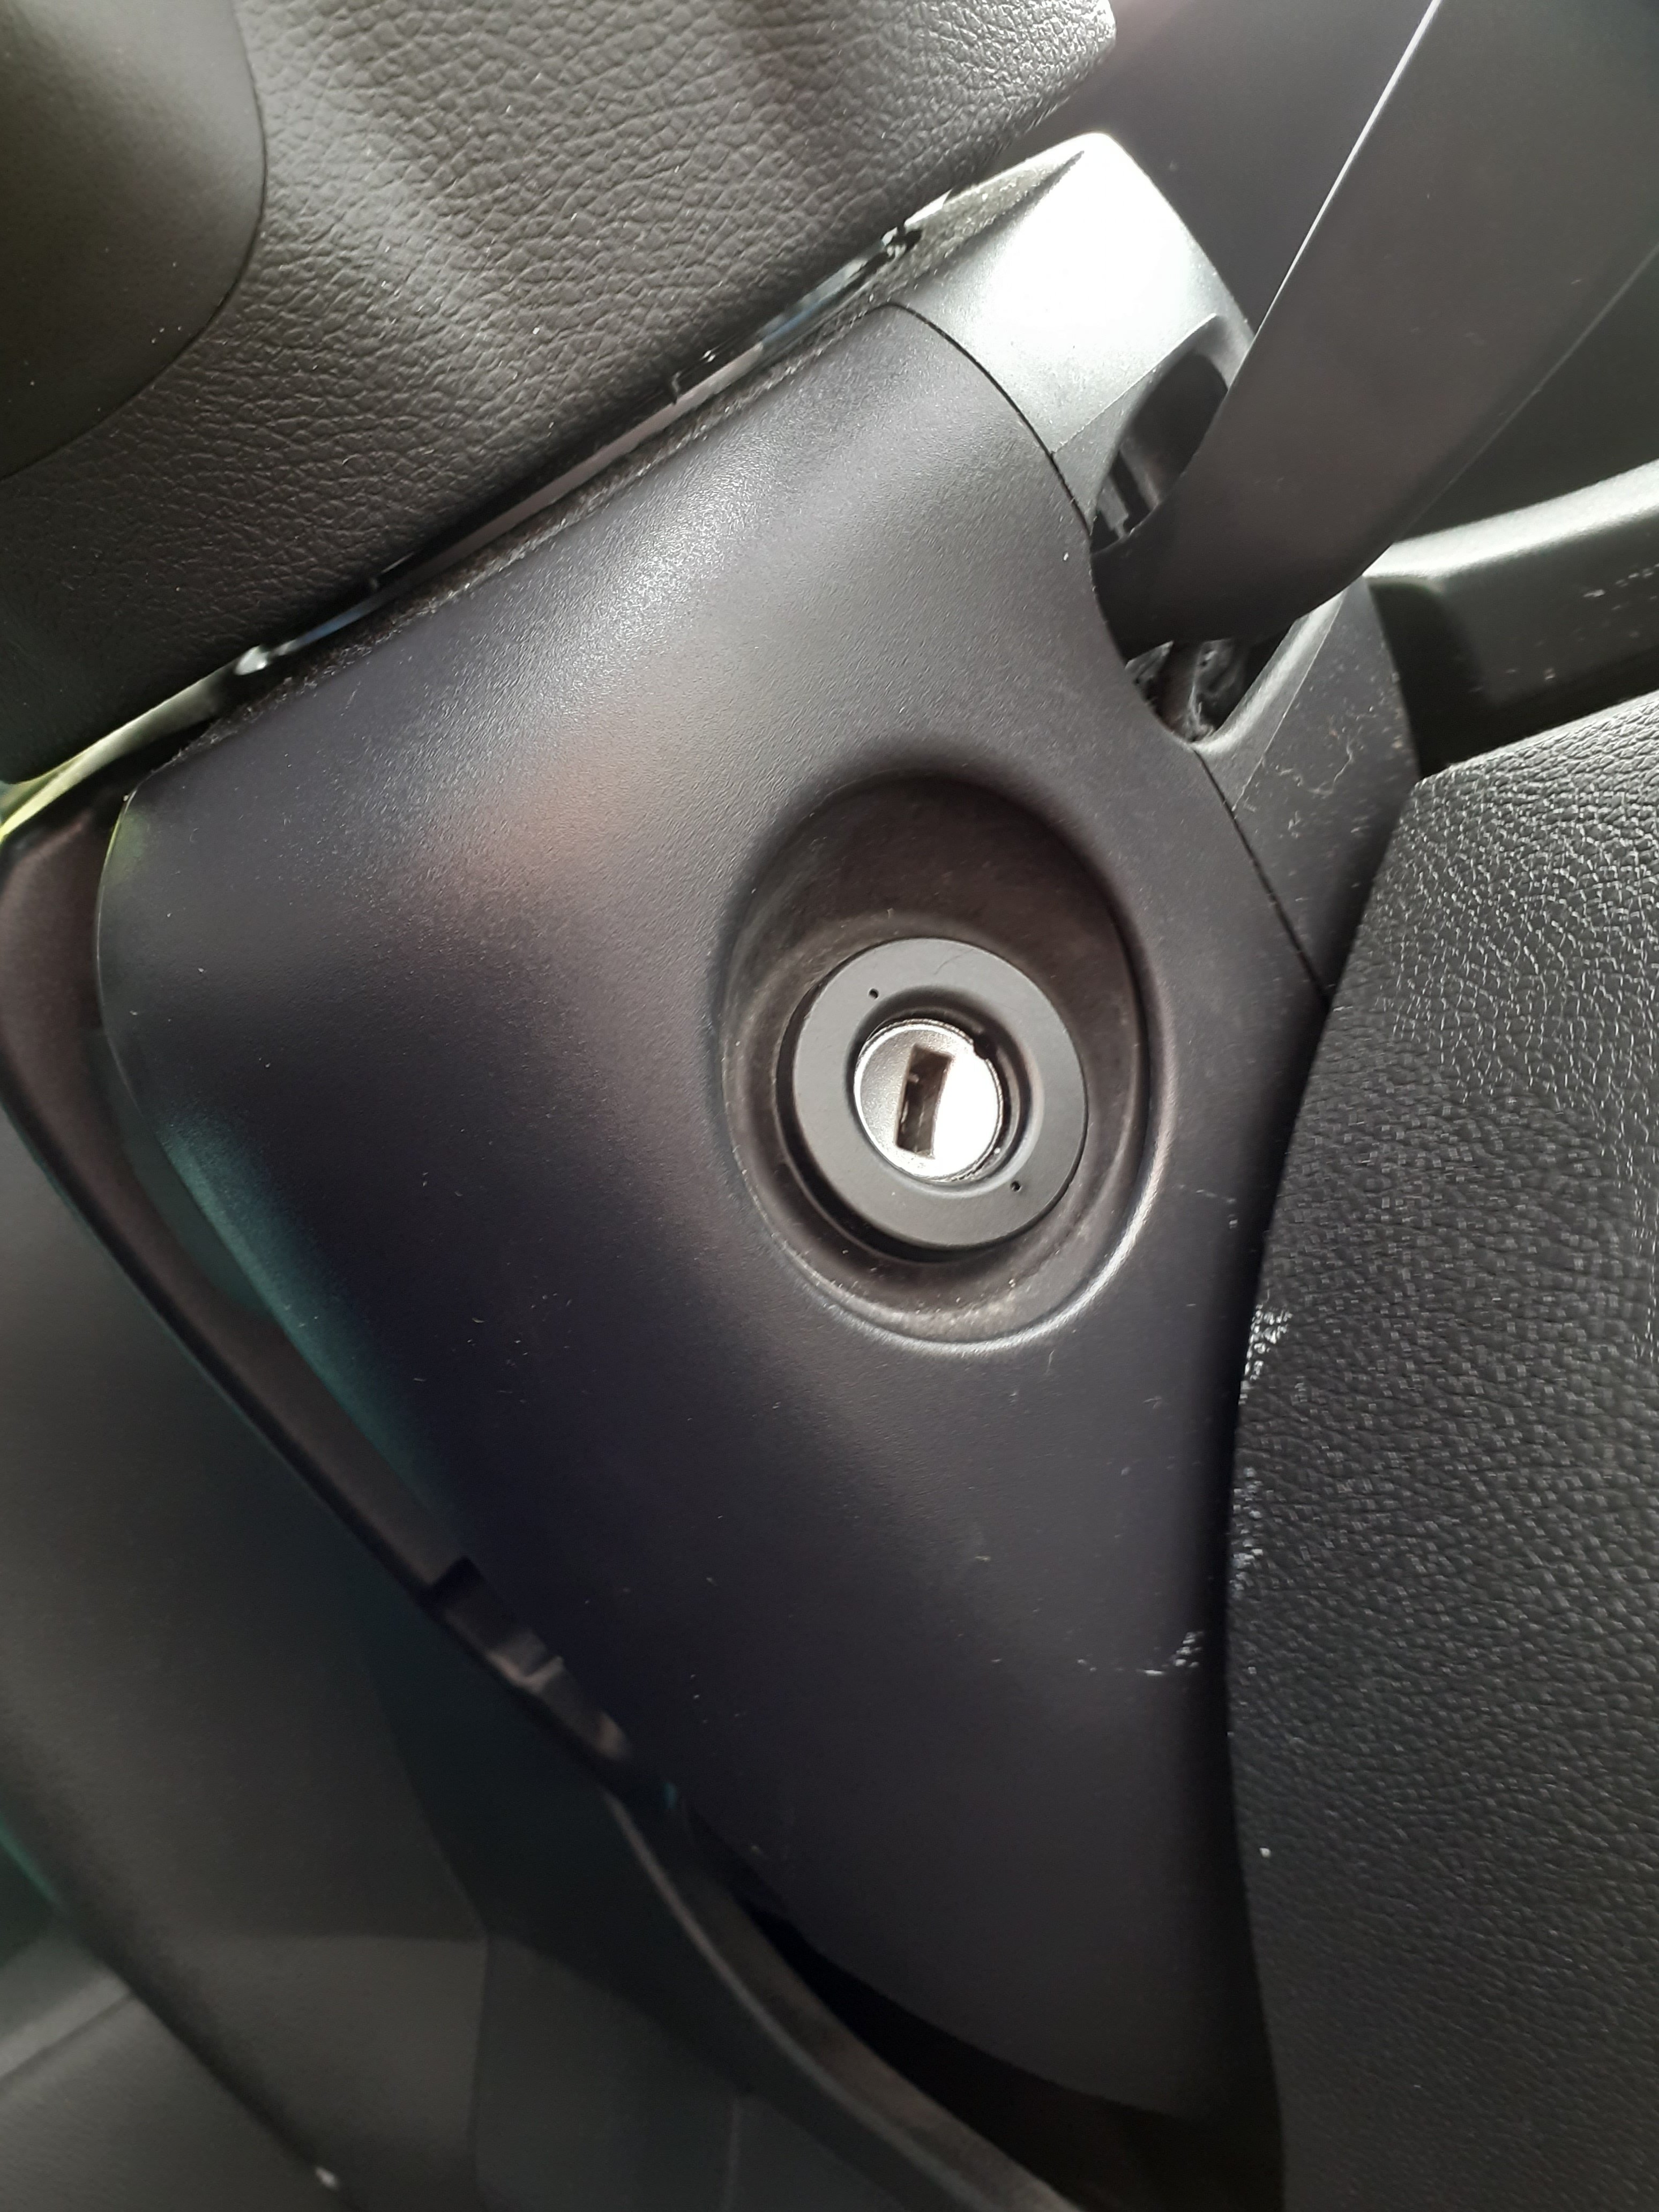
Oh Happy day! 😃 to my complete and utter shock a few squirts of contact cleaner fixed the problem!! Full beam without without vast expense, and no further headache all round! What a relief. Anyway as promised for the record here's a pic of the part under the cowl. I huge thanks to all of you for you patience and help, removing the cowl allowed better access for the spray, a component I'd never have guessed could by removed so easily, furthermore it has has also provided a pic of the part number which also appears to claim it was made after the car was sold (06/2012) , again yet another anomaly. I didn't mention but when I bought the car (Oct 2019) DVLA had it listed as a diesel, the seller sorted that out. A Skoda dealer gave a ball park figure of £300 to fix this issue, it makes you wonder how many poor souls needless;ly replace the whole unit. That said the contact cleaner has probably dissolved years worth of lubricant that should be in the switch, so longer term I might get a problem on that stalk.
 2 points
 -
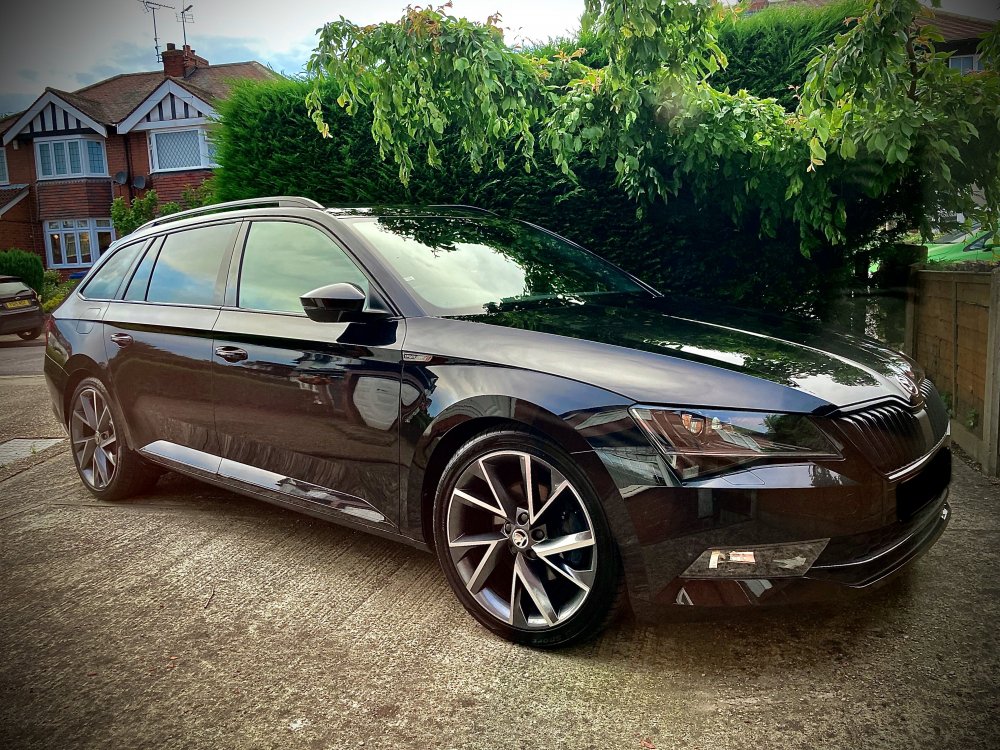
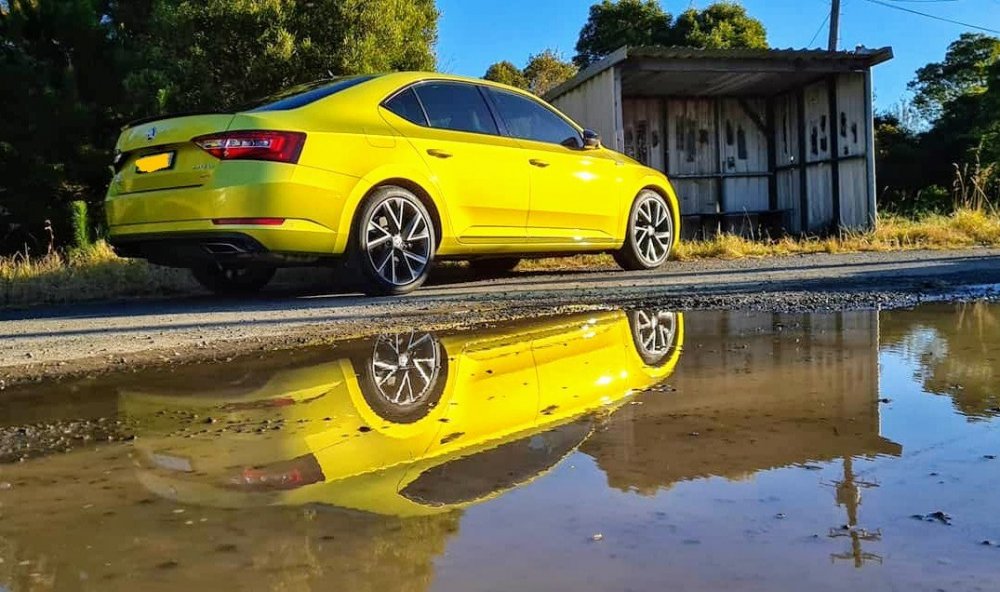
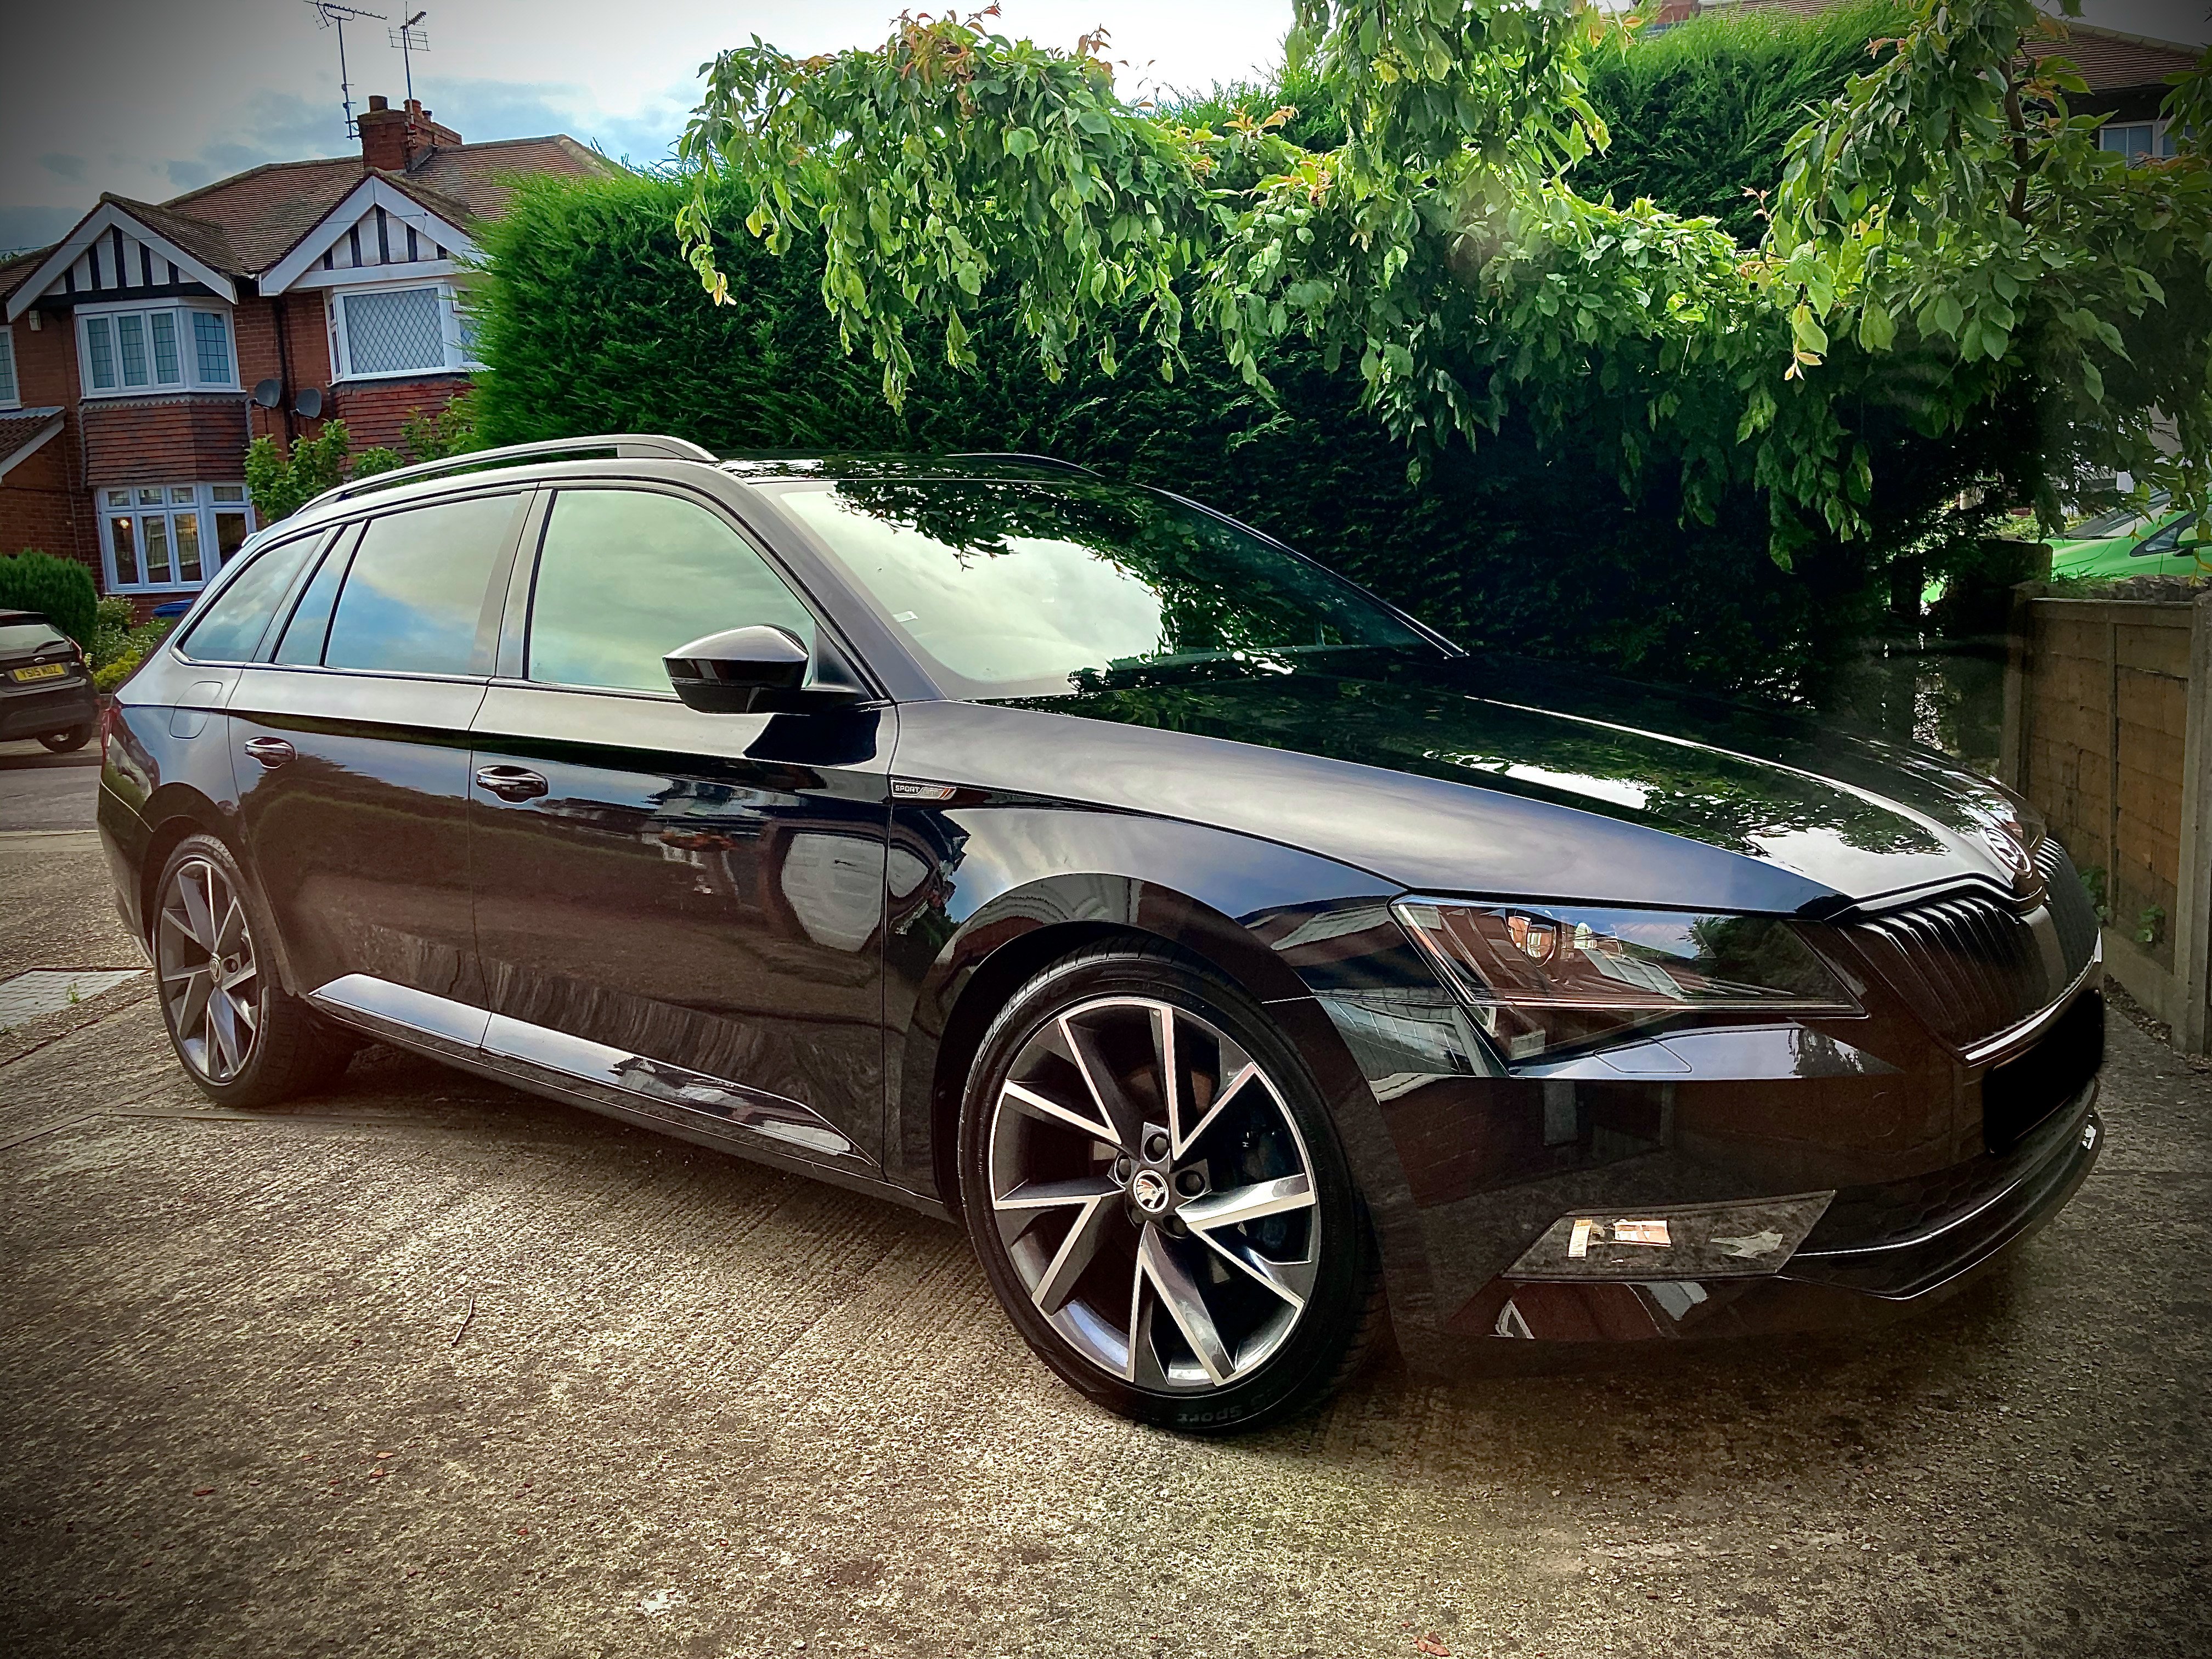
2 pointsPicked my 2018 Superb Sportline Estate up a couple of days ago... already love it!
 2 points
 -
2 pointsUV light exposure and heat from weather and usage will account for most of the age-related degradation when fitted to a vehicle. All of these should be absent until the tyre is fitted. So not a biggie.2 points
-
Hi, My wife and I have a 2.0L diesel Yeti SE L bought in 2016. Our mileage is around 6,000 per year but until the virus we used to do a decent run of 50 miles or so each week which kept the car in good order and prevented sooting of the exhaust; it's the Adblue model. Now the Yeti is just used for very local supermarket trips and as the virus lockdown got into about the third week the exhaust icon lit up on the dashboard? I opened a police chatline and was granted permission to take the Yeti for a drive long enough to clear the exhaust on condition I didn't stop anywhere or take a passenger. Now still mostly used for the supermarkets we have a run in the countryside of 20 miles once each week. We've got our diesel Yeti and we love it; being bought new we know it hasn't been abused; it's excellent on fuel and road tax at only £30 per year; servicing might cost a bit more than servicing a petrol Yeti but we don't care. In January 2018 we had four new Michelin Cross Climate tyres fitted and since then it hasn't snowed. I'll never forget our wonderful government about 8 years ago condemning petrol cars as being dirty and price of diesel was reduced to encourage a swap to diesel; with diesels now promoted petrol cars were traded in so we certainly won't be parting with our lovely Yeti. We don't want an electric car either because we feel to buy electric cars is is heading the way white goods have gone; once the battery is no longer serviceable will such cars too become disposable items? Electric isn't clean it has to be generated and if everyone changed to electric the power grid couldn't cope; during heavy winter we lose power? If everyone went for electric cars could we trust our government to keep electricity prices as they are; I certainly wouldn't; I could see a new high tax tariff being introduced. I'm just biased because the only person I trust is my wife. Had brand new Yeti's still been manufactured we'd already have traded in a year ago but we wouldn't trade in our Yeti against a second hand Yeti. We could easily afford to buy a brand new Yeti but Skoda let faithful Yeti owners down; we'll keep our Yeti unless it starts to cost a lot for repairs then might swap to a Duster these not having lots of electronics to go wrong. I can well understand your caution because to get it wrong could prove expensive. Good luck. Kind regards, Colin.2 points
-
2 pointsCommon sense & responsability for your own actions seems to have all but dissapeared in this modern litigious its always someone elses fault world. Before cars were overspecced in every way very few vehicles cooling systems could cope with towing a laden caravan up hills on a hot summers day, the drivers would keep a close eye on their temperature guages and on the holiday routes there would be parking areas before, half way up and at the top of the big long hills. Those who knew their cars limitations would stop for a picnic allowing the engine to cool before climbing, others would stop half way when they saw the temp guage needle start climbing, those who stopped at the top usually had steam coming out.2 points
-
I would definitely advise looking at the part number on ones existing part before ordering anything, if it's visible just by popping off that top cowling. There are still other part numbers for the part in the ETKA pages for earlier years, 2009/10/11, so a tricky one to get right 'in theory' without looking at the specific car. Mentioning that for the OP @Fawnrush's benefit. Some will probable be interchangeable, but I wouldn't gamble on it.2 points
-
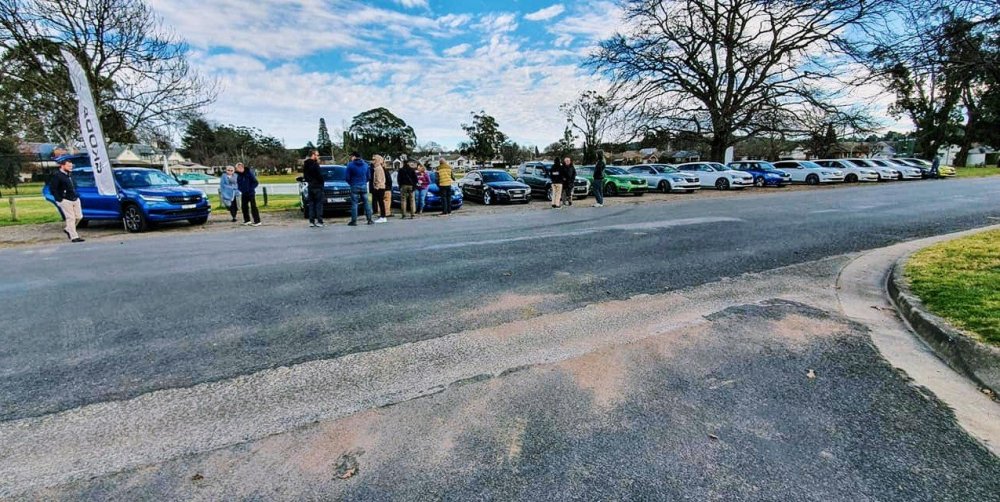
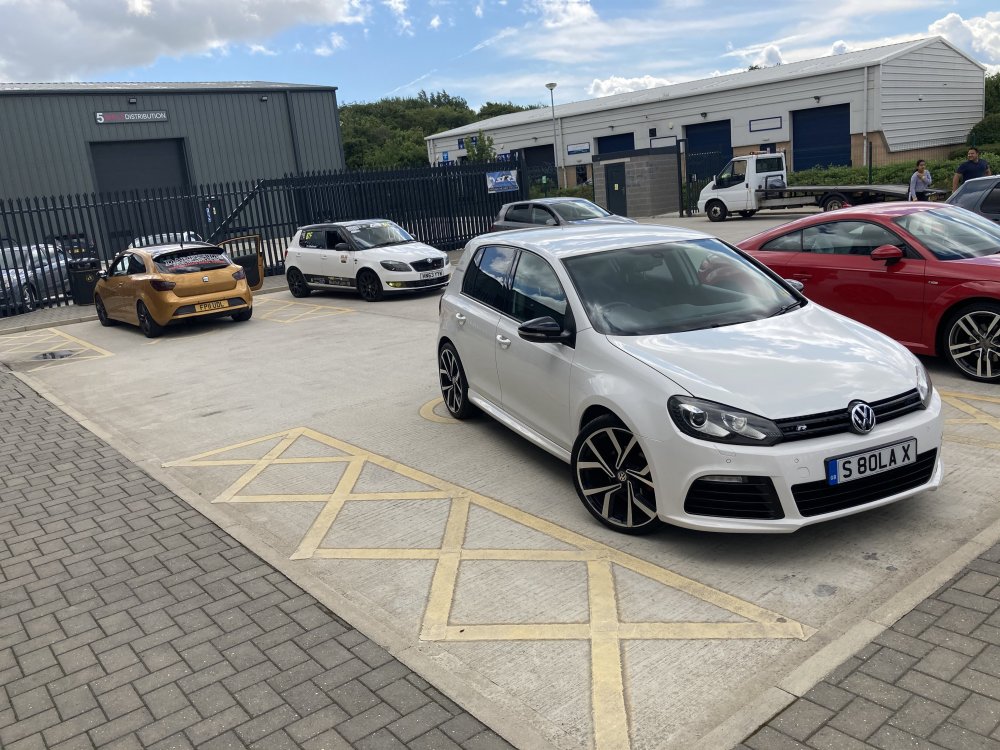
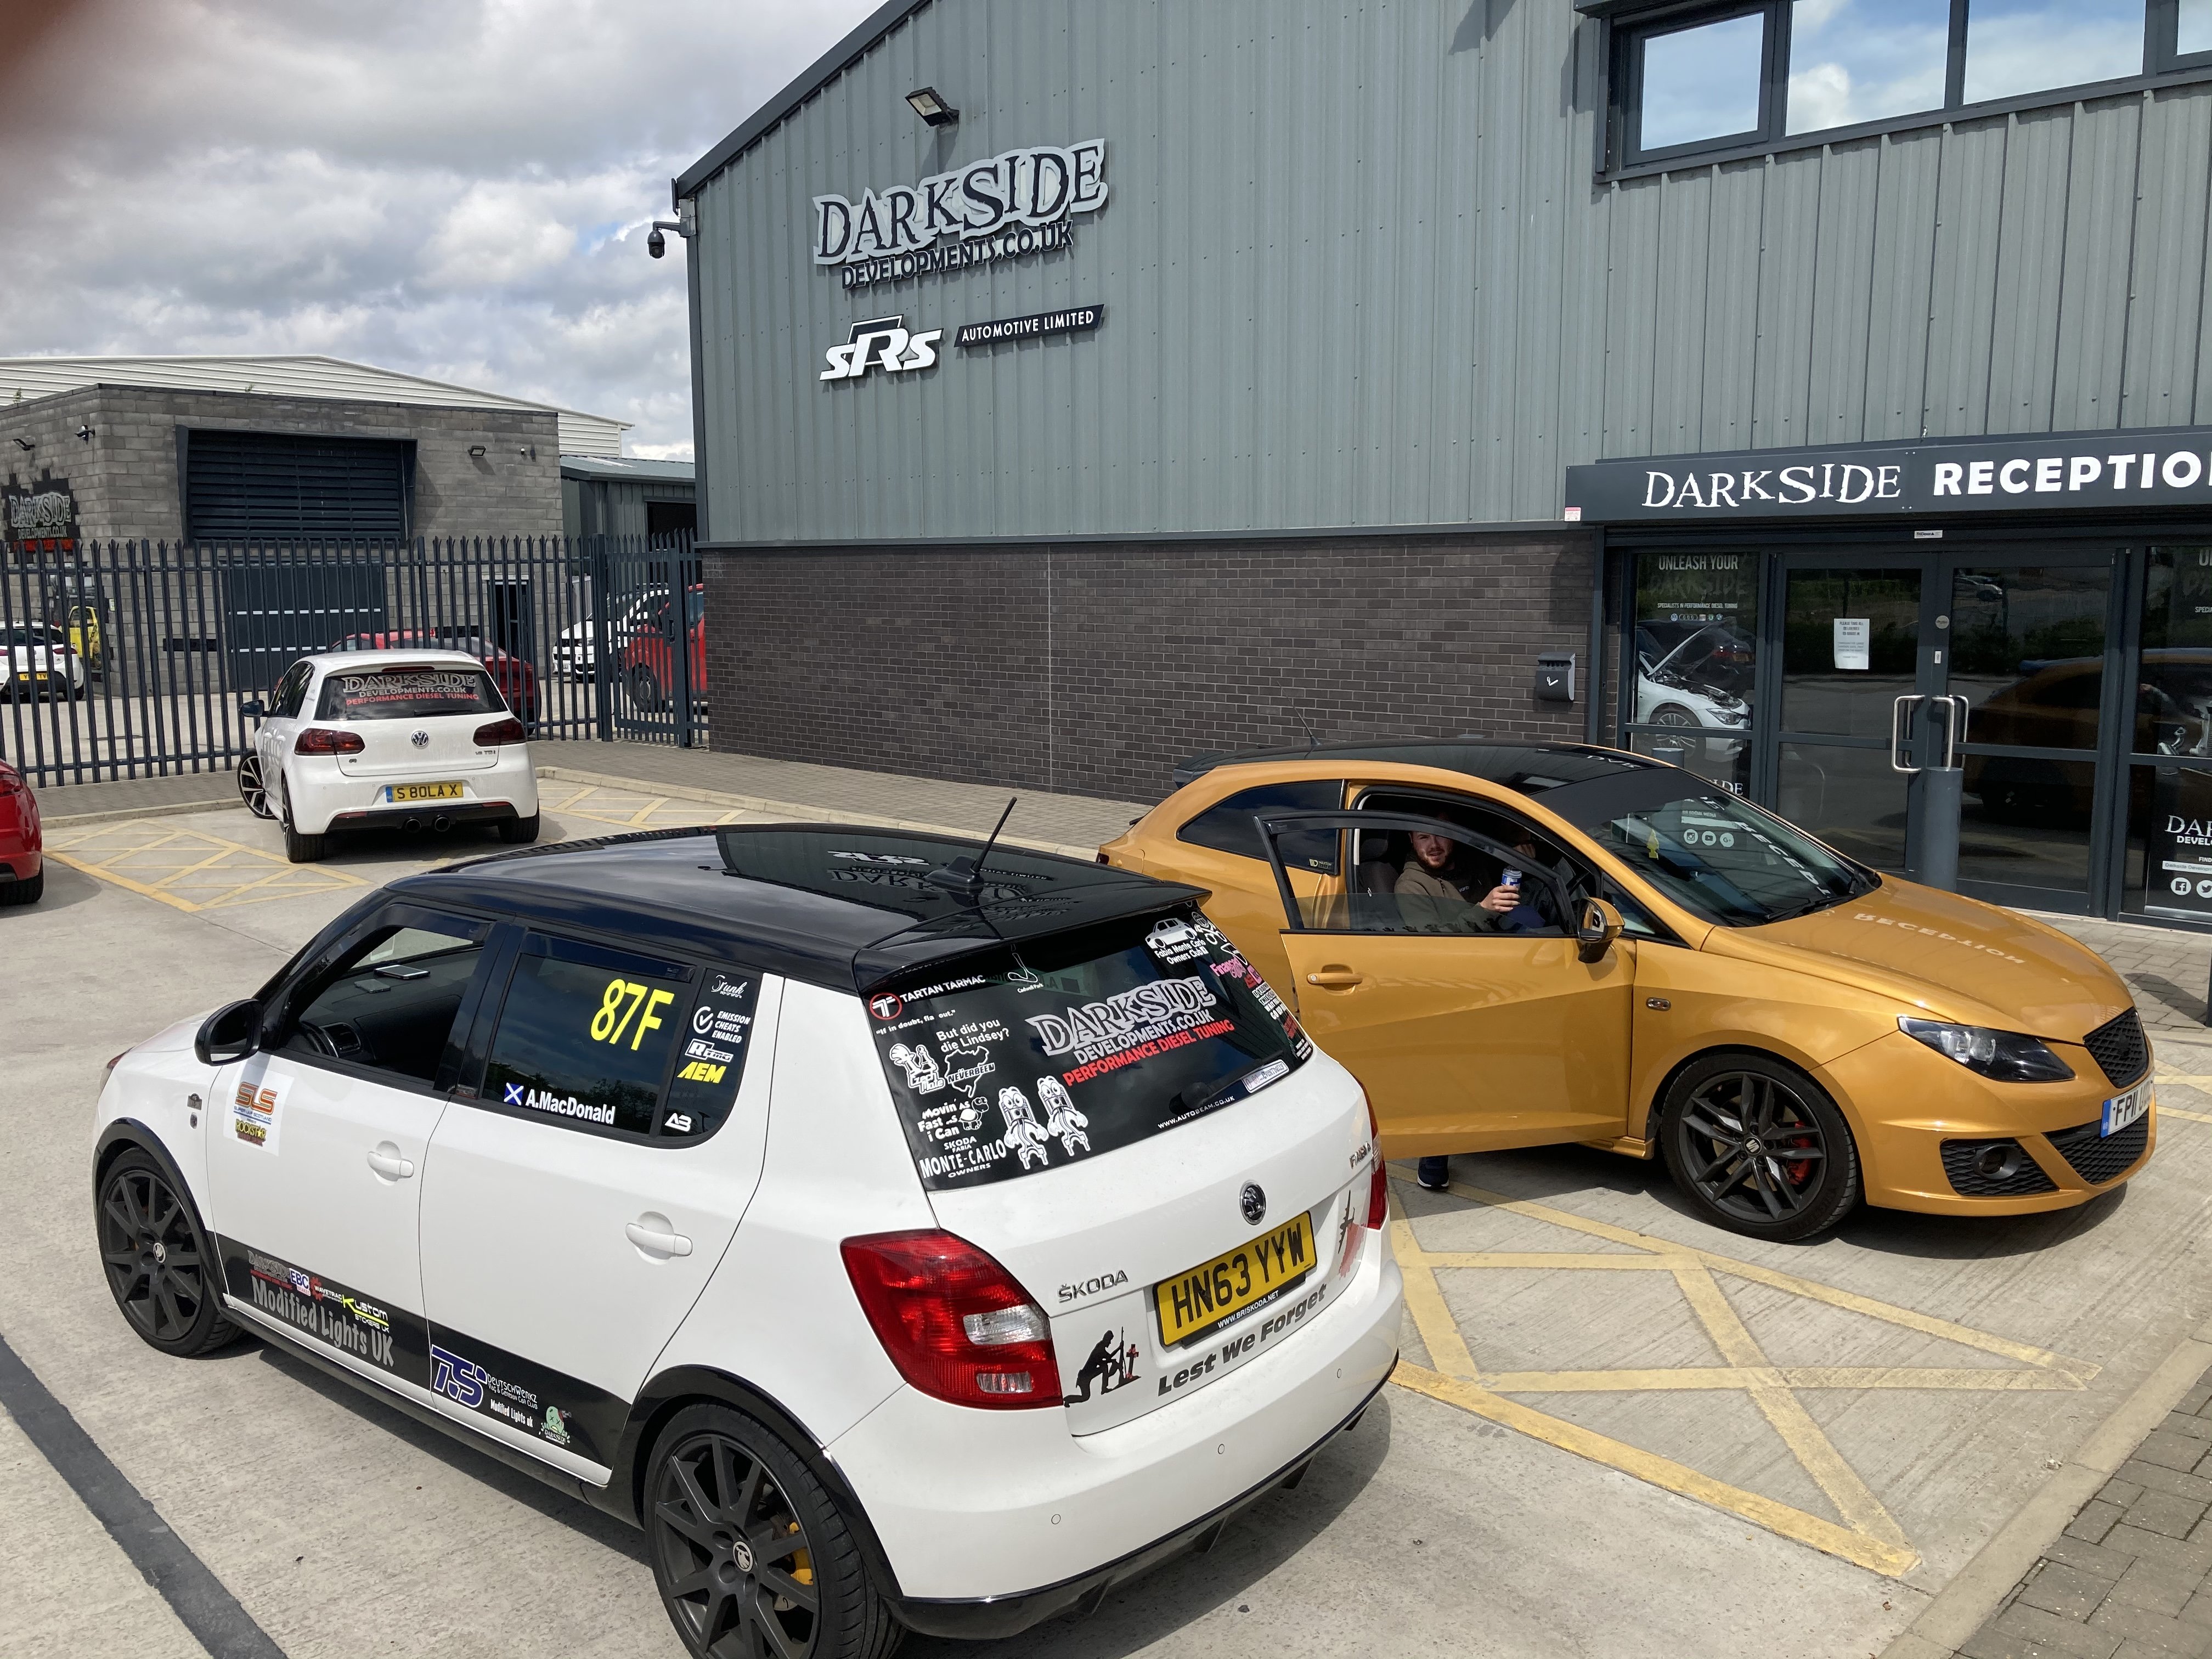
2 pointsHad a Skoda meet up last weekend. Was a great turnout n great weather. I think for the first time the Superbs dominated, with only 2 Octavias present. We also had Kodiaqs, Fabias, a Scala and a Yeti. I'm pleased with the way Gandalf looks now. 🙂
.thumb.jpg.08a56521d27065eee03780f2f636526f.jpg)
.thumb.jpg.715e48969ee3748d1cae58b7b56ac349.jpg)
.thumb.jpg.c918843d353c441e413d4ccada10bf97.jpg)
 2 points
 -
1 pointIf the dished section is filling up with fuel then the rust has perforated, if the leak is further down then it will be the sealing O ring damaged. If the top plate is intact now is the time to use some rust convertor and protective paint, a job I must also do.1 point
-
1 pointGo on their website. I think you may find they already have software for the 180. The delay is due to the GPF and new ECU on the 1901 point
-
1 pointHows the ride on the 40mm drop mate? Iv got the stock 18s on and will probs not change to 19s as I want a comfy ride but want the lowered look. Them H+R springs good? Its either them or the Eibach pro springs 20f/10r which ill pick from. Cheers1 point
-
1 pointI tried one of my pairs of multi led boot light units today and blow me down no strange issues with MFD boot open warning when glove box opened with ignition on . If an overhead light was left on and the car locked no alarm sounding issues or flashing exterior lights and the car shut down the interior lights after a short period . The only thing I have changed since the problematic instal is replacing all the incandescent interior light bulbs with a mixture of led lamps of various types depending on which would fit . The glovebox light unit is the most picky, liking incandescent shape clones e.g. osram ! The overhead light units accept many shapes. I wonder why everything is ok now?1 point
-
Hi everybody, thanks for the relevant replies, but I think we are going a wee bit off topic here. Can anyone give me pros and cons of manual or DSG 1.2 SE L, or should I just stick with what I have. I really appreciate the depth of knowledge and expertise in this forum, with me not being so mechanically/technically minded.1 point
-
1 pointI've taken the plunge and ordered a Karoq Sportline 1.5 in Meteor Grey. Wait time being 14 weeks! Will Kodiaq 20 inch wheels fit in the with any issues? 😁1 point
-
1 point
-
1 point
-
Pretty sure you don't have a telephone baseplate so the error when you code it isn't surprising. I've never seen a flash file to upgrade a 5N0 035 730 D module either. I'd probably replace the module for a HFP or combined HFP/rSAP module as HFP tends to be less problematic1 point
-
Think I'd be much more worried at the woeful 3 star euroNCAP rating .... 3 stars in this day and age 🤢.... sure I read somewhere the duster is really a Renault Clio Mk1 platform .... its cheap for a reason, and not just because its built in Romania.1 point
-
It won't be the MAP sensor anyway, I'd be looking for an air leak, switching on the aircon simply tells the ECU to increase the idle to compensate for the additional parasitic load which is done with the throttle body servo motor plus additional fuel injected. I think yours is leaning off excessively.1 point
-
@newbie69 You're welcome! Once you have read it, feel free to ask questions or to make some feedbacks. I've also written a tutorial to change the brake fluid for a french Skoda forum... May be I'll translate it in English, if it can help some Superb owner over here... 😁1 point
-
Colin, modern electronics are extremely reliable and unlikely to go wrong compared to the emission control equipment and other mechanical parts of modern cars. The Duster is noisy and uncomfortable and built to a price. Looking at reviews it is certainly not the most reliable vehicle either. Compared to cars in my youth modern vehicles are infinitely more reliable. Austin Allegro & Morris Marina come to mind!!1 point
-
Before getting our current Yeti (petrol), I had Octavias. Originally 2.0ltr diesel, but then changed to the 1.4 petrol due to lower miles. Going back to a petrol engine after years of diesels was a real revelation. In real world driving there was hardly any difference between the 2.0 ltr diesel and the 1.4 turbo petrol other than I kept thinking the engine had stopped as it was soooo quiet compared to the diesel. The petrol was almost as tractable as the diesel and was quite happy to tootle around at similar low revs. (OK the diesel was marginally better going up steep hills fully loaded). Also managed to get very similar mpg out of the petrol, (44+mpg). Last year I considered changing from my current 1.4 Yeti AWD to a 1.2 as I no longer really need an awd 1.4 and I wanted an auto, so I took a 1.2 dsg for a spin. Loved the auto box and well impressed by the performance of the 1.2 petrol engine so I would also recommend changing from the 2.0ltr diesel if you are not doing the miles and still want to keep the practicality of a Yeti...1 point
-
1 point
-
1 pointYeah, like I say it was a quick visual inspection rather than a full on test. Bulbs would have been the next thing to swap had the fuse not done the trick. luckily all is well now....I can go out at night again 😂1 point
-
1 point
-
1 point
-
1 pointIt should be. Are you intending to fit by yourself? You’d need to source an 8k OPS controller, panel Push button, buzzer plus the loom, sensors, sensor holders and an OEM hole cutter for the bumper (I have one of these I no longer need). Somewhere like cars-equipment or car-systems sell kits. If you don’t want to do it yourself, there’s a place in Coventry that will retro-fit (http://poollretrofits.com/seat_optical_parking_sensors_front_rear_retrofit/) for £580+VAT for a Seat Leon FR, a VRS isn’t going to be much different.1 point
-
1 pointThanks, I will have a look into it. 😁 Unfortunately mine was the ex-demo so couldn't pick options. 😞1 point
-
1 pointIn Skoda's case bigger is often better and if you are 6 feet tall or more it is certainly a more comfortable place to be even compared to a spacious Octavia and the quality is equally good considering what you get for the price compared to smaller rivals. Once you've experienced the space of a Superb it is hard to drive anything less practical.1 point
-
1 point1. Aerodynamics of the liftback are little better than those of the estate. We did drag raced few times equally equiped cars and after certain speed liftback goes little ahead due to better coefficient. Tested with petrol vRS and regular diesels. Equal gears as well DSG vs DSG, manual vs manual. 2. Liftback has better look to my eyes 3. Sound isolation in every estate is worse than sedans due to the tunneling sound effect 4. Octavia has very big boot but relatively low weight capacity. Meaning if you don't transport paper boxes or something that requires space vs weight then it's more likely to hit the weight limit first rather than the volume limit. 5. Main advantage of the estate is the additional head room above the back seats1 point
-
It seems that there are differing units for cars with or without MFD features. I saw a seller in Germany advertising the same part number as I posted earlier, wanting around the mid £60's, for the part and they said "For cruise control cars and MFD cars only". (Paraphrasing). I am sorry to say, I think the one I posted first of all has been sold now, though. Was a bargain at the price! Looking at a few variants, apart from functions like cruise (Major) And MFD (Major) Some differences seem to be down to the writing/graphics on the stalks. Different cars throughout the VW range may use different images for lights and different type face so to speak, for the writing. This may be why there are so many variants, along with what was also called satin black. (Thought that was norm)!1 point
-
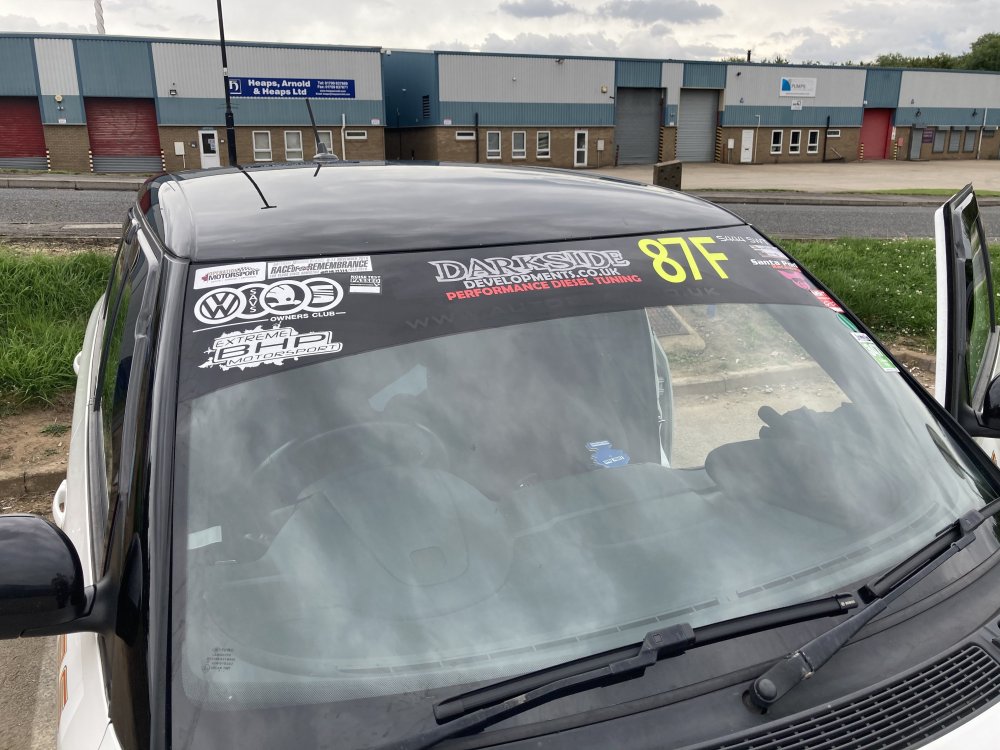
Morning at Darkside catching up with folks and having a map tweak and some stickers


 1 point
 -
1 point
-
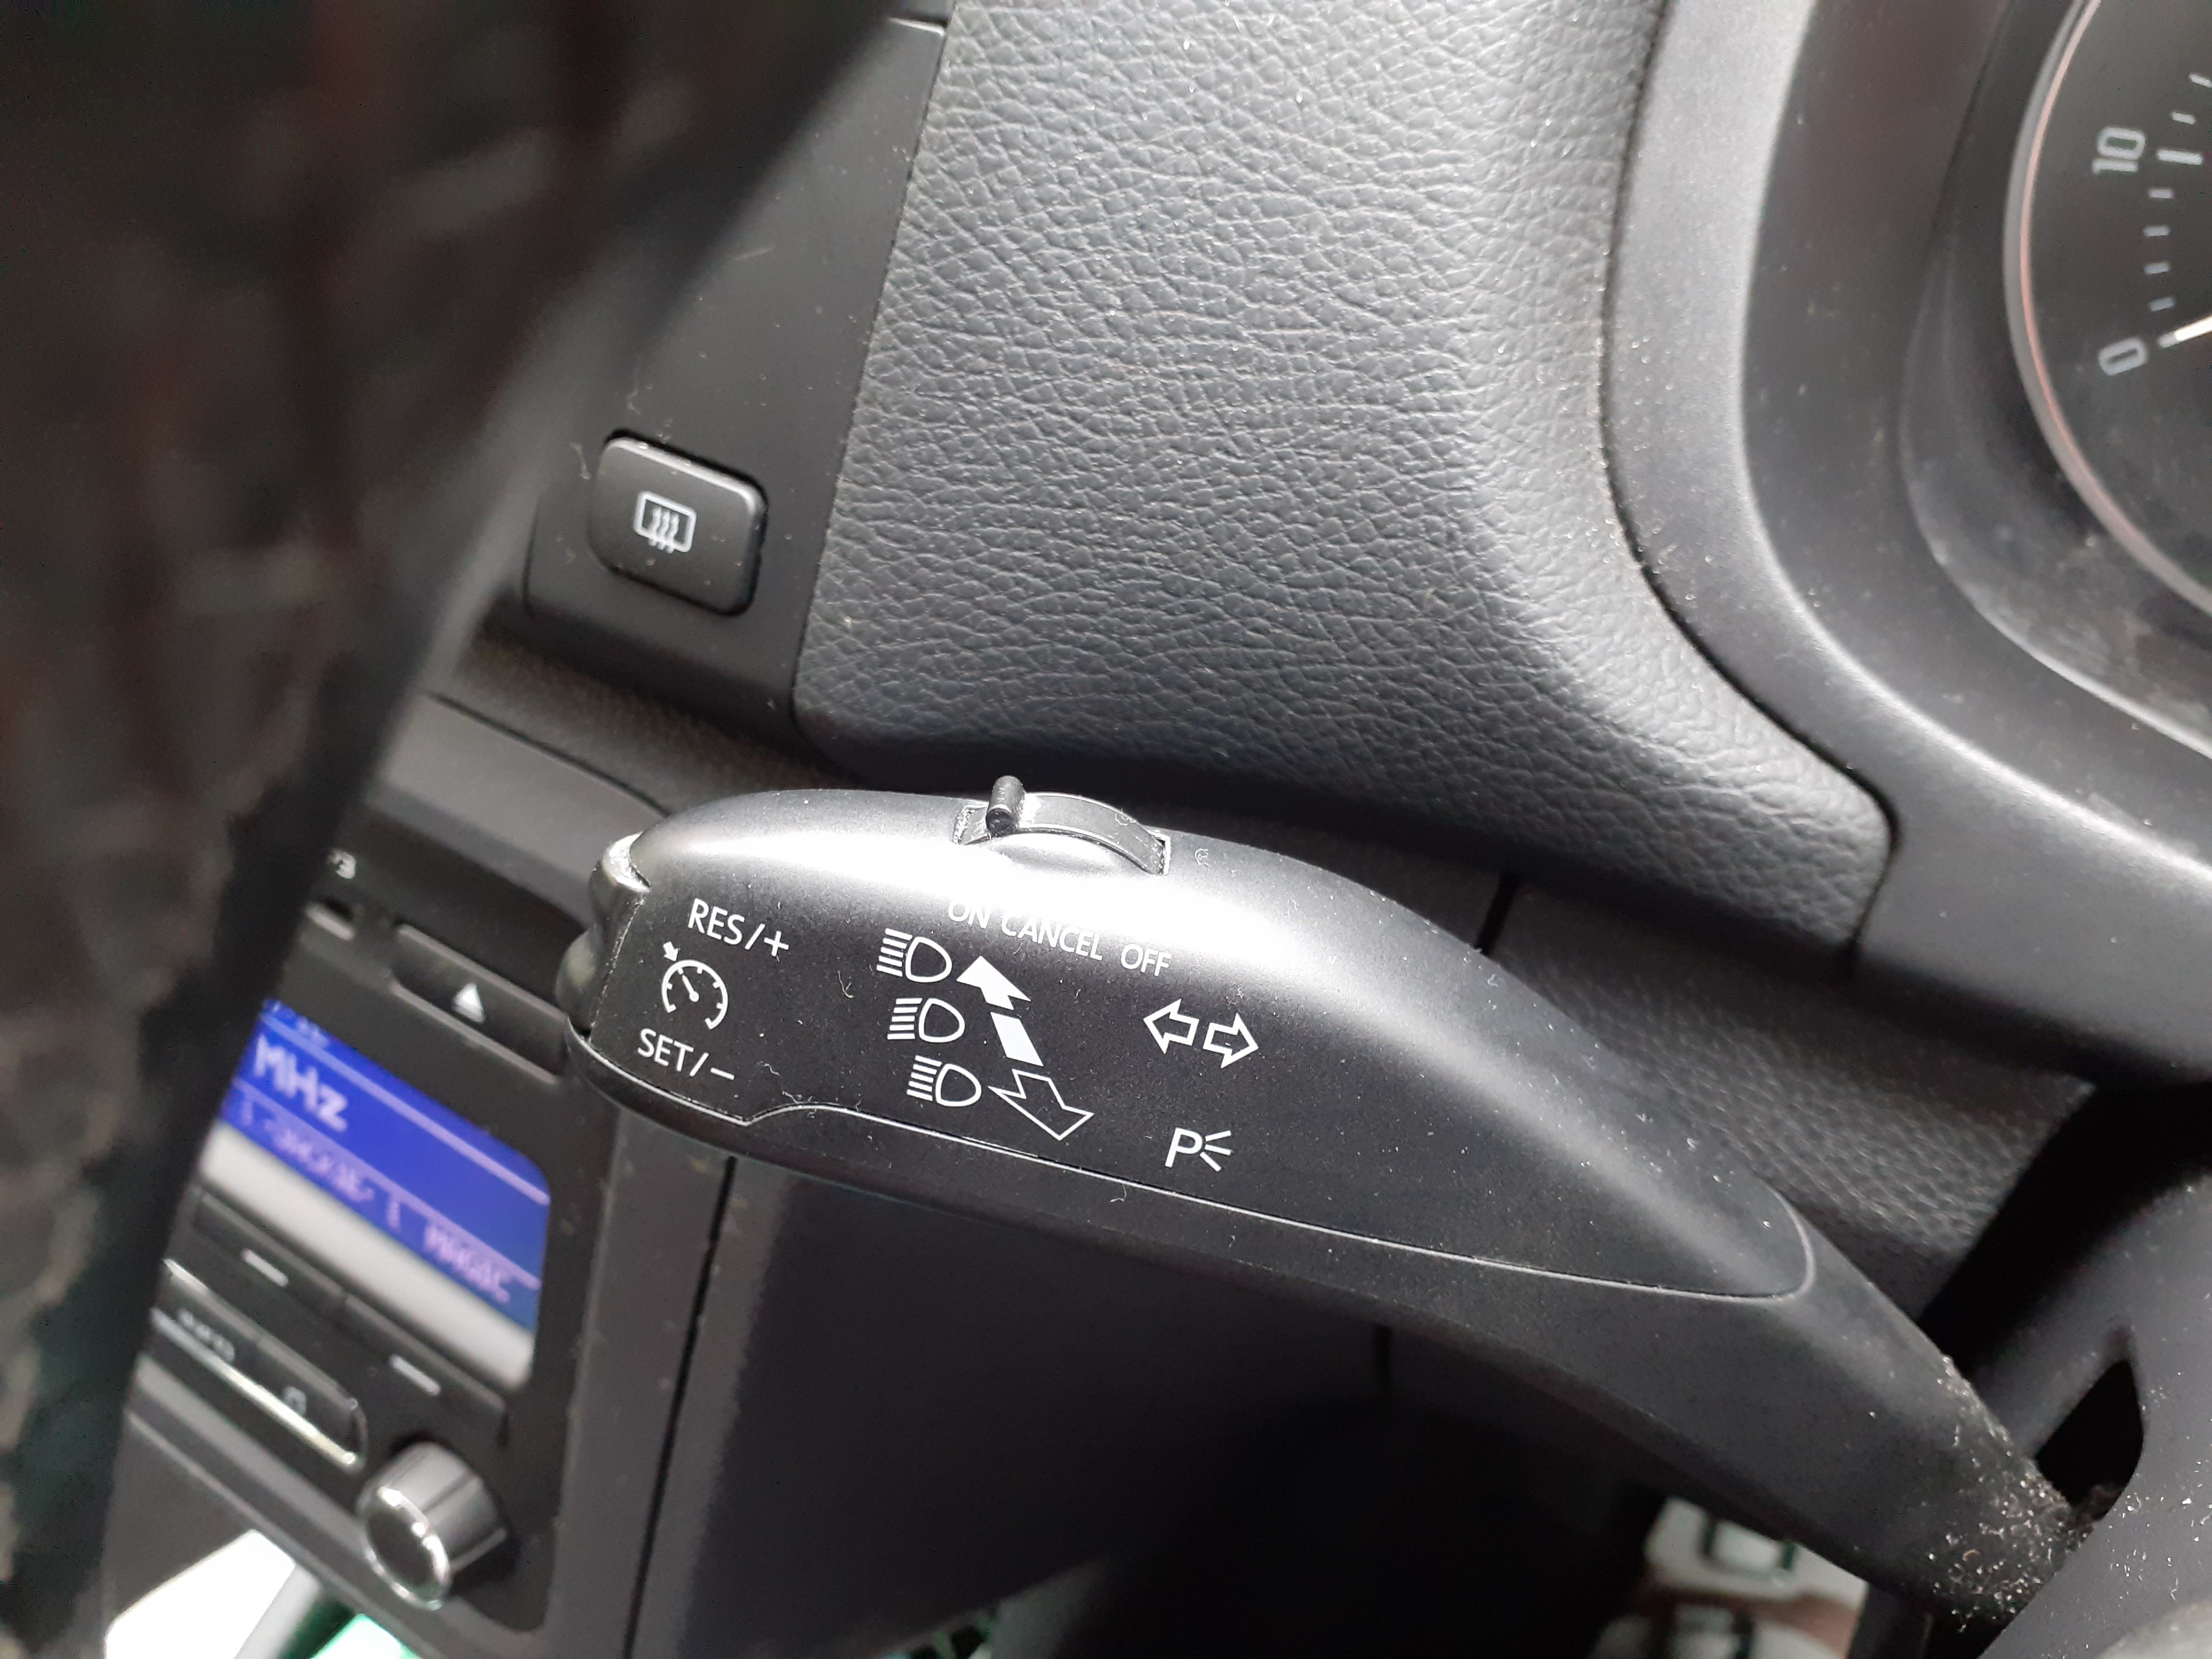
So I believe he has cruise control. I don't think there is anything specific to it being an estate, though, regarding headlight stalks, etc. Mainly, you need to know if cruise is on the new ones. I am unsure even if maxi dot makes a difference but on a standard dash setting, you have the little trip computer stuff on the right, along with wiper controls, on the left you have signals, headlight main/dipped/flash and then, additionally, cruise functions. Quick question to Wino, if he knows, can the standard non-cruise stalks be swapped for cruise, along with any necessary additional wiring or if it more complicated then that? I am wondering if it then needs coding, etc. (Would it be plug and play to a local loom socket or is there much more wiring, through to say, the ECU, along with extra coding via VCDS). I have wondered this for some time but never looked it up, along with swapping the steering wheel for a M/F one, to operate the audio controls to a small degree. I might post these questions anyway, soon.1 point
-
firstly, i had original front assist radar, then i have sent an autoscan to them, they checked and said that; don't need change radar, just you should fit acc stalks. In addition, I must mention that my radar part number: sw: 2Q0907572Q hw: 2Q0907572M H03. they connected with teamviewer to my laptop and said plug diagnostic device. Unfortunately, I have not seen anything, since all the process are on their side. If you need help activate codes, you can talk with them, trust me, fascinated.1 point
-
1 pointyes you "could" do that, but you would also have to have some kind of "indicator" that its on.......and goes off with the main light switch..........."imo" not worth the hassle. slightly diff numbers across the VAG range..... So you can either tell us what you have ref cruise yes/no / maxidot display yes/no etc etc..............or post a picture of BOTH stalks so we can see. And when the car was built / registered.1 pointhttps://www.gov.uk/guidance/mot-inspection-manual-for-private-passenger-and-light-commercial-vehicles/4-lamps-reflectors-and-electrical-equipment Everything relating to lights should be in that section. Section 4.1.3. Switching is probably where you need to look. Probably easier to fix the fault properly than to rig up some legal workaround.1 pointAnother update on the Audi. Finally got both rear springs and shocks replaced a couple of weeks ago, transformed the feel of the back end. Now on 103K miles, mileage has continued to be piled on even throughout the full covid-19 lockdown. Finally the car is all sorted, and will need to go through an MOT at the end of August, hopefully all will be good for that. The cambelt / water pump is next on my hit list, last changed in 2013, but it has not done many miles since.1 pointah sorry for link. https://www.instagram.com/vagretrofit and stalks part number is : 5Q1953521AG or 5Q1953521DH, i can not find AG and used DH version.1 pointFawn rush, I have never counted but it looks standard. It might also feed the flap. As they are just one filament, the flick from dipped to high, moves the flap/shield up or down. Hard to spot, easier to hear if someone flicks the switch whilst you looking are in the engine bay. Fred,66, That may be good or just misleading. Both, replacing of the stalk is a bit of work. Steering wheel, airbag, clock springl plastic shroud all need to come off, I believe.1 point1 pointAfter 2010, the projector lights changed so you may have two bulbs, Fred66. For you, it is just possible a fuse (Doubt it as left and right ought to use seperate ones though) Could be blown or Bizarrely, both headlight bulbs. Check inside the light units for two sets of H7 bulbs, take out one at a time and examine them. Obvious blown bulbs- great... Hard to know or look sound, after refitting , swap the two per headlight around on both units. If the problem remains exactly the same, it shouldn't be a bulb issue. If the mains work, flash doesn't, bulbs need renewing. I may be wide of the mark but worth a look. The problem is, usually, the flash and the main will be exactly the same bulb, with dipped being a different one. Try it anyway. If access is ok, it will only cost you ten-fifteen mins of your time.1 pointNot sure the ease of removing the stalk, the switch is easier then you'd think. Push in, twist clockwise quarter/half turn, pull out, if memory serves me right. New they are quite pricey but anything from a fiver up, on eBay. Be sure to get the correct matching one as some have front fogs, some don't. some have large rear plug, others have small rear plugs.1 pointJust put some phillips H7 and still no joy. If I push the stalk ever so lightly they come on. Sound like the relay makes a clunking noise 20200721_190746_s01.mp41 pointIts seem to only have 1 space for H7 bulbs per light. Its 2010 model. And the previous owner has installed these lights. If I pull the stick towards me they only come on if the light switch is on. If i push the stick both dip and main beam disappear leaving the just side lights Check fuses and they all seem OK. Can't check the motor on the light as my son is now at work
 1 point


Important Information
Welcome to BRISKODA. Please note the following important links Terms of Use. We have a comprehensive Privacy Policy. We have placed cookies on your device to help make this website better. You can adjust your cookie settings, otherwise we'll assume you're okay to continue.