
JGrindel
Members
-
Joined
-
Last visited
Everything posted by JGrindel
-
aftermarket sensors run on their own system. Power, ground, signal wire (from reversing light) they won’t cause any errors if fitted correctly.
-
Video guide on someone fixing this issue. https://youtu.be/w4CWH5p5VWM
-
They are bonded on using automotive body sealant, so very strong. you could try and run some fishing line underneath it and run back and forth like you would to de badge a car. I’ve never done it with a spoiler though.
-
-------------------------------------------------------------------------------------------- Sources -------------------------------------------------------------------------------------------- https://obdeleven.proboards.com/thread/175/coding-adaptations @wirer - https://wirer.sk/ He has some awesome guides on all things retrofits for the NJ Fabia. Well worth a look Unlock and lock beep https://www.vwroc.com/forums/topic/14420-vcds-alarm-chirp-on-lockunlock/
-
Any additions you have found and wish to have them added to the list please drop me a message and I can add them
-
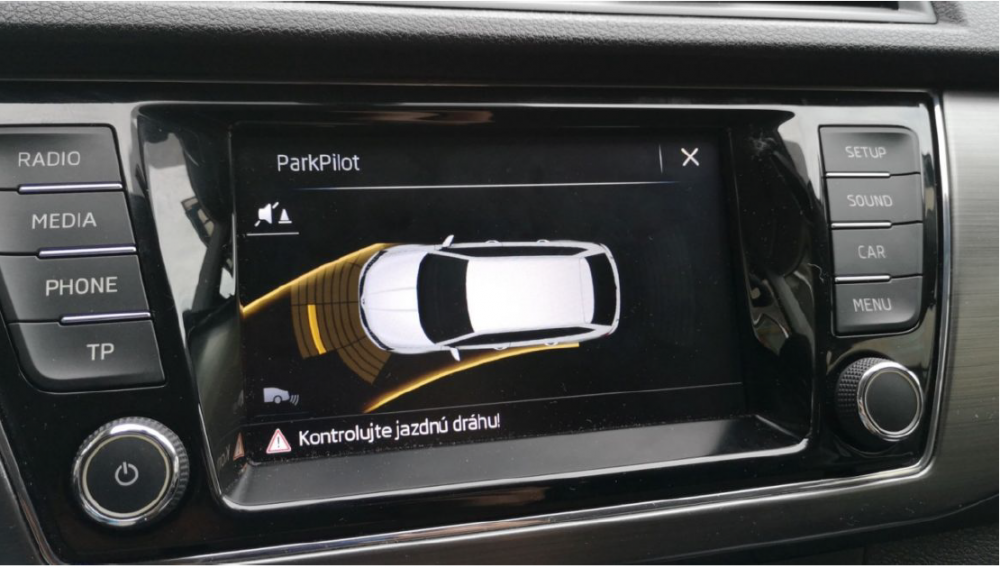
Updated Adaptations and Coding list for the FABIA NJ 2015 > VCDS / OBD11 / Carista ***all adaptations are done at your own risk, and Briskoda will not be held responsible for any problems that could occur. Always keep a copy of your auto scan / backup before attempting any coding*** ***Carista doesn't have a backup feature so please take care to make changes slowly and one at a time*** CARISTA This is a cheap OBD2 dongle which allows limited adaptations to your vehicle via their iOS and Android Apps. listed below are the known common adaptions that you can enable via the app - More info on this device and the full list of customisations that it offers for the Fabia NJ can be found here - https://caristaapp.com/vehicles/skoda/fabia/nj *They mention you can activate opening of windows on long hold of the button on the key. This will not work on this model of Fabia due to the limited wiring / design of the window assembly in the door. *Some users have mentioned they have been able to activate Hill Hold Assist using Carista, personally this feature wasn't available on 3 different Fabias that I used. From my findings on here its hit and miss if you will get access to this customisations. It's also not listed as one of the customisations on their website - Needle Staging - Unlock and Lock Chirp - Seat Belt Warning ***(This is not advised as wearing seatbelts is for your own safety) - Chime / ding when key left in ignition - Refuel quantity in MFD - Cornering light activation ***(must have fog lights fitted to car) - Auto Lock doors when moving - Bolero start up screen change - Change auto light sensitivity ***(must have light assist installed) - Hill Hold Assist ***(this isnt mentioned on the Carista website but users have been able to change it, others haven't) VCDS / OBDEleven OBDEleven is an iOS and Android OBD2 Dongle that allows more in-depth adaptations and customisation via their pre installed 'apps' or via Long Coding in the relevant modules for the car for your vehicle via your phone. ------------------------------------------------------------------------------------------- Instrument cluster / MFD ------------------------------------------------------------------------------------------- NEEDLE STAGING - ECU17 (Instruments) - Coding - Byte 1 - Bit 0: enabled (Default: disabled) -------------------------------------------------------------------------------------------- LAP TIMER - ECU17 (Instruments) - Coding - Byte 1 - Bit 3: enabled (Default: disabled) -------------------------------------------------------------------------------------------- REFUEL QUANTITY - ECU17 (Instruments) - Coding - Byte 10 - Bit 4: enabled (Default: disabled) -------------------------------------------------------------------------------------------- Infotainment -------------------------------------------------------------------------------------------- BOLERO SPLASH SCREEN - ECU5F (Information electronics) - Coding - Byte 18 Logo Bit 0 Bit 1 Bit 2 Skoda (Default) disabled disabled disabled RS enabled disabled disabled L&K enabled enabled disabled Monte Carlo enabled enabled enabled Scout disabled enabled disabled Greenline disabled disabled enabled Big thanks to @yankarinRG for finding this out -------------------------------------------------------------------------------------------- Change 'Auto Light' sensitivity in radio Module 09 Adaptations 10 Assistance_lighting_sensitivity_adjustable = Present / available (Default 'Not Present' 'not available') Thanks to @wirer for this -------------------------------------------------------------------------------------------- Enable the Service Mode of the wipers in the radio Module 09 Adaptations 10 (12)-Windshield Wiper-Menuesteuerung Frontwischer = Active (Default 'Not Active') Thanks to @wirer for this -------------------------------------------------------------------------------------------- ABS -------------------------------------------------------------------------------------------- HILL HOLD CONTROL - ECU03 (Brakes) - Coding - Byte 22 - Bit 0: enabled (Default: disabled) ***Activating this will cause the car to throw a few errors, turn car ignition off, remove key, then re insert the key and turn the ignition back on. You will see the errors are no longer there. If they remain, reverse the coding to deactivate Hill Hold*** -------------------------------------------------------------------------------------------- Lights -------------------------------------------------------------------------------------------- LED DRL DIM WHEN USING INDICATORS - ECU09 (Central electronics) - Adaptations -----Left----- - "Leuchte2SL VLB22 " - "Lichtfunktion C 2" - Set "BlinkenlinksRampe" (Default: "Blinken links aktiv") -----Right---- - "Leuchte3SL VRB36" - "Lichtfunktion C 3" - Set "BlinkenrechtsRampe" (Default: "Blinken rechts aktiv") Thanks to @yankarinRG for sharing this -------------------------------------------------------------------------------------------- STATIC CORNERING LIGHTS THROUGH FOG LIGHTS - ECU09 (Central electronics) - Adaptations -----Left----- - "Leuchte12NL LB40" - "Lichtfunktion B 12" - Set "Abbiegelicht links" (Default: "nichts") -----Right---- - "Leuchte13NL RB3" - "Lichtfunktion B 13" - Set "Abbiegelicht rechts" (Default: "nichts") -------------------------------------------------------------------------------------------- Coming home/Leaving home for cars without Fog Lights (Using DRL's) - ECU09 (Central electronics) - Adaptations -----Left----- - Leuchte 6 ABL LB44 - Light function C6 - Set "Coming Home / Leaving Home active" - Dimming C6 - Set "0" - Dimming direction CD6 - Set "minimize" -----Right----- - Leuchte 7 ABL RB5 - Light function C7 - Set "Coming Home / Leaving Home active" - Dimming C7 - Set "0" - Dimming direction CD7 - Set "minimize" ***If you have problems with low beams (flashing on and off), then you should do the tweaks in "Leuchte 12NL LB40" and "Leuchte 13NL RB3" instead of "Leuchte 6 ABL LB44" and "Leuchte 7 ABL RB5"*** -------------------------------------------------------------------------------------------- Alternative coming home/leaving home for cars without light sensor I'm not sure, if the lightfunction is named Umfeldbeleuchtung or Umfeldlicht Controller 09 security access: 31347 Adaption Leuchte2SL Lichtfunktion G2 = Umfeldbeleuchtung Dimmwert GH2 = 10 Leuchte3SL Lichtfunktion G3 = umfeldbeleuchtung Dimmwert GH3 = 10 Leuchte4TFL Lichtfunktion E4 = Umfeldbeleuchtung Dimmwert EF4 = 127 Leuchte5TFL Lichtfunktion E5 = Umfeldbeleuchtung Dimmwert EF5 = 127 Leuchte20BR Lichtfunktion E20 = Umfeldbeleuchtung Dimmwert EF20 = 18 Leuchte21BR Lichtfunktion E21 = Umfeldbeleuchtung Dimmwert EF21 = 18 Leuchte23SL Lichtfunktion C23 = Umfeldbeleuchtung Dimmwert CD23 = 100 Leuchte24SL Lichtfunktion C24 = Umfeldbeleuchtung Dimmwert CD24 = 100 Leuchte25KZL Lichtfunktion B25 = Umfeldbeleuchtung Thanks to @djduese for this -------------------------------------------------------------------------------------------- Dimming of number plate lights when opening boot Controller 09 Security access: 31347 Adaptation 10 Leuchte25KZL HA60 Light_Function_E_25 = 'Heckdeckel Offen' (Default 'Nicht Aktiv') Dimming_Direction_EF_25 = minimise (Default 'maximise') Dimming_EF_25 = 10% (Defualt '0%') ***you can choose any value from 0%-100%, this will define the brightness of the bulb once boot is opened*** -------------------------------------------------------------------------------------------- Turn on mirror amber light with interior light Controller 09 Security access: 31347 Adaptation 10 Leuchte16BLK SLC11 Light_Function_G_16 = Innenlicht (Default 'Nicht Aktiv') Dimming_GH_16 = 100% (Default '0%') Leuchte17BLK SR A72 Light_Function_G_17 = Innenlicht (Default 'Nicht Aktiv') Dimming_GH_17 = 100% (Default '0%') -------------------------------------------------------------------------------------------- Emergency Break/Flashing Lights Select Control unit 09 (Central Electrics) Control unit Long Coding Byte 16 Bit 1 Activate Bit 2 Activate -------------------------------------------------------------------------------------------- Activation of Coming Home/Leaving Home Select Control unit 09 (Central Electrics) Control unit Long Coding Byte 10 Bit 1-Bit 2 Activate -------------------------------------------------------------------------------------------- Activating Fog Lights after Retrofit /Leuchte12NL LB40 Type of Load 12 (lasttype) Nicht Aktiv --> Allgemein Scheinwerfer Light function A12 (Lichtfunktion A12) Nitch Aktiv --> Nebellicht Links Dimming AB 12 (Change value) 0 --> 100 Leuchte13NL RB3 Type of Load 13 (lasttype) Nitch Aktiv --> Allgemein Scheinwerfer Light function A12 (Lichtfunktion A13) Nitch Aktiv --> Nebellicht Rechts Dimming AB 13 (Change value) 0 --> 100 Thanks to @JGrindel and @langers2k for this -------------------------------------------------------------------------------------------- Lighthouse call with fog lights (in addition with high beam) Control unit 09 (central electrics) Adaptation Leuchte12NL LB40 ---> Light_Function_B_12 ---> Lichthupe Leuchte13NL RB3 ---> Light_Function_B_13 ---> Lichthupe Thanks to parigot47 from the OBDEleven Forum for this -------------------------------------------------------------------------------------------- Wipers -------------------------------------------------------------------------------------------- Activation of Tear Wipe on front windscreen Method 1 (Didn't work for me personally) Select Control unit 09 (Central Electrics) Control unit Long Coding Byte 14 Bit 4 Activate -------------------------------------------------------------------------------------------- Method 2 (VCDS) Controller 09 Adaptation 10 (15)-Windshield wiper-Traenenwischen Front Status = Active (Default 'Not Active') Thanks to @wirer for this -------------------------------------------------------------------------------------------- Method 2 (OBDEleven) 09 Central Electrics Adaptations Traenenwischen Front Status = Active (Default 'Not Active') -------------------------------------------------------------------------------------------- Activation of Tear Wipe on front windscreen Controller 09 Adaptation 10 (4)-Rear Window Wiper-Traenenwischen Heck = Active (Default 'Not Active') Thanks to @wirer for this -------------------------------------------------------------------------------------------- Disabling Rear Wipe in Rear Drive Select Control unit 09 (Central Electrics) Control unit Long Coding Byte 14 Bit 3 DeActivate -------------------------------------------------------------------------------------------- OPS / Parking Sensors -------------------------------------------------------------------------------------------- Parking Sensor Trajectory Module 10 - Park/Steer. Assist - Coding 07 - Long coding Byte 1 - Bit 4 Limited Operation active / enabled check (from 0 to 1) Byte 1 - Bit 5 Vehicle Path Display active / enabled check (from 0 to 1) Thanks to @wirer for this -------------------------------------------------------------------------------------------- Central Locking -------------------------------------------------------------------------------------------- Unlocking Door when Stop the Car Select Control unit 09 (Central Electrics) Control unit Long Coding Byte 0 Bit 3 Activate -------------------------------------------------------------------------------------------- Locking Door up to 15 km/h Select Control unit 09 (Central Electrics) Control unit Long Coding Byte 0 Bit 4 Activate -------------------------------------------------------------------------------------------- Locking Door After 30 sec Select Control unit 09 (Central Electrics) Control unit Long Coding Byte 4 Bit 5 DeActivate -------------------------------------------------------------------------------------------- Lock Acknowlegde with Horn Select Control unit 09 (Central Electrics) Control unit Long Coding Byte 5 Bit 1-Bit 4-Bit 7 Activate -------------------------------------------------------------------------------------------- Lock and Unlock beep / chirp Select Control Unit 09 (Central Electrics) Adaptations Acknowledgement Signals Akustische Rueckmeldung entriegen = Active (Default 'Not Active') Akustische Rueckmeldung verriegeln = Active (Default 'Not Active') Menuesteurung akustische Rueckmeldung = Active (Default 'Not Active') (this activates a check box within the cars settings allowing you to turn the beep/chirp on and off without coding) Akustische Ruechmeldung global = Active (Default 'Not Active') -------------------------------------------------------------------------------------------- Start / Stop -------------------------------------------------------------------------------------------- Disabling start-stop system ***Please carry out any modifications and coding AT YOUR OWN RISK!!!. I will not be held responsible for any damage of the vehicle and I am just giving you the steps*** 1. Enter 19-CAN Gateway 2. Click on Coding-07 3. Click on Long Coding Helper 4. Change Byte 3, Bit 2-3 (Drop down menu) from 04 Start/Stop System with Recuperation installed [PR-7L6] to 08 Start/Stop System NOT installed [PR-7L3] 5.Change Byte 4, Bit 0 to 0 6.Change Byte 15, Bit 0 to 0 7. Click on Exit - top left hand corner 8. Click on Do it! Voila you are done! Thanks to @kickdown for this -------------------------------------------------------------------------------------------- THANK YOU TO ALL THOSE WHO FOUND THESE CODING ADAPTATIONS OUT OVER THE YEARS @wirer @djduese @yankarinRG @langers2k @kickdown -------------------------------------------------------------------------------------------- Links to devices mentioned within this thread Carista OBD2 - https://amzn.to/3mHTX2Z OBDEleven - https://amzn.to/32aylmA VCDS - https://store.ross-tech.com/shop/cat/vcds/ -------------------------------------------------------------------------------------------- ***JGrindel is a participant in the Amazon Services LLC Associates Program, I get commissions for purchases made through the Amazon links in this post***
-
If you can live with extra postage times heres some a little cheaper. FABIA - https://www.aliexpress.com/item/1005002292816763.html?spm=a2g0s.12269583.0.0.7fcc76a5sR3Gnc SKODA - https://www.aliexpress.com/item/1005002292711099.html?spm=a2g0s.12269583.0.0.418b13b8m3eSxS
-
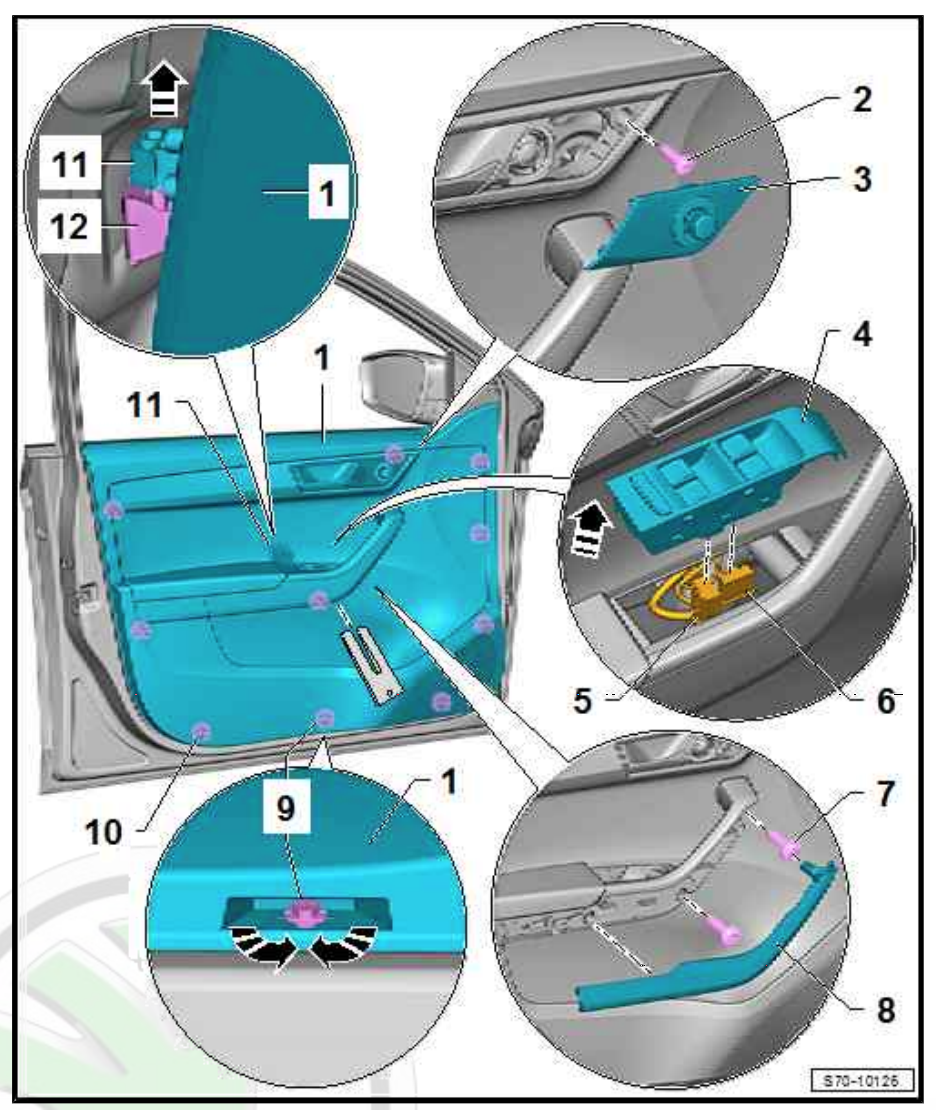
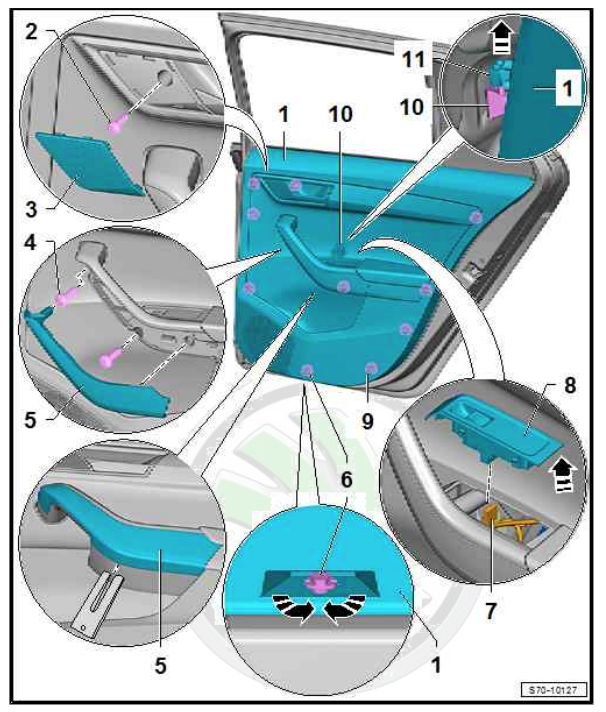
They just lift up and unclip, use a plastic trim removal tool as to not damage the plastic of the door card I have added both front and rear guides for you.


-
I second this. - I had 1 rim that constantly deflated over a few days, I kept pumping it up every other day and didn't bother me. 3 tyres later still the same but I got a bottle of water in a spray bottle and sprayed it around the rim. Found out that it was from my valve stem but since this had been replaced multiple times I found it was down to corrosion on the metal causing it not to seal.
-
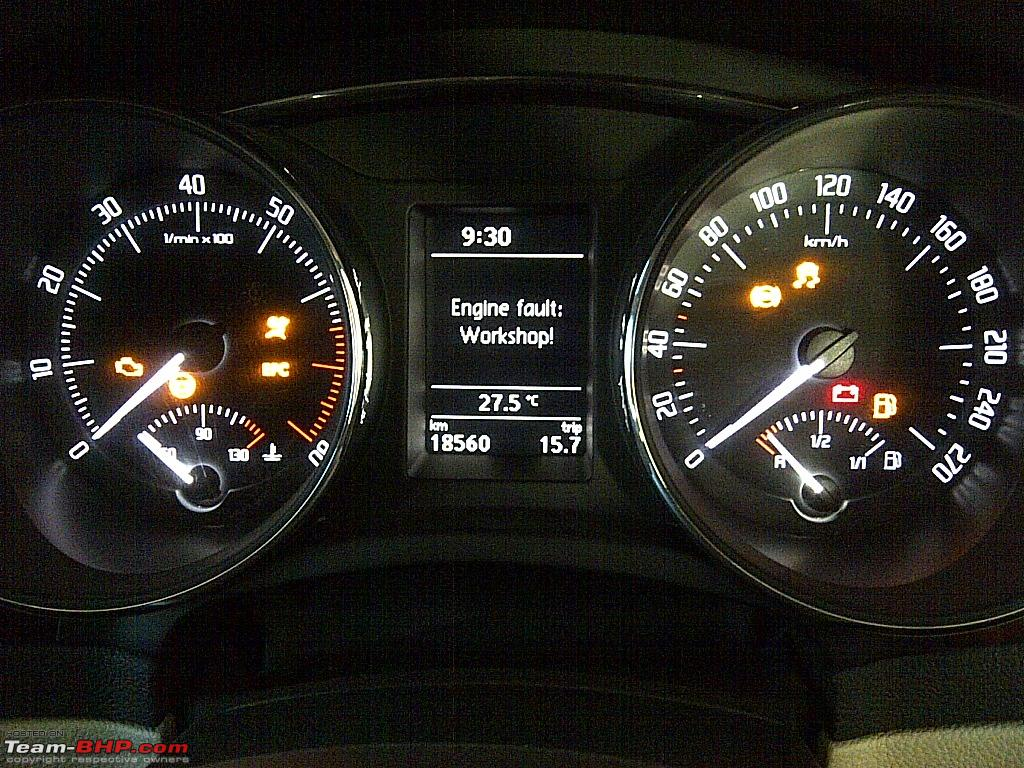
Is your car a 2013 Fabia? - This is the Mk3 (2015+) forum page. But you're fault looks like an EGR Failure. You will need to get it booked into the garage.
-
Finding the red interior complete without an airbag deployment is rare in itself. This black interior is rare even factory fitted let alone striped out at a breakers yard.
-
Where they able to target the blower motor and see if they could get it to spin up via the diagnostics? - But what they have already found doesn't look promising and you most likely will end up with dash out job needed.
-
Any decent diagnostic software will be able to target the blower motor and activate it to see if it spins up.
-
The maxi-dot saying - workshop usually means a fault. did it look like this?

-
Just so you are away the 1.2tsi is belt driven with a separate water pump on the opposite side of the engine run by its own belt. Enjoy your new car!
-
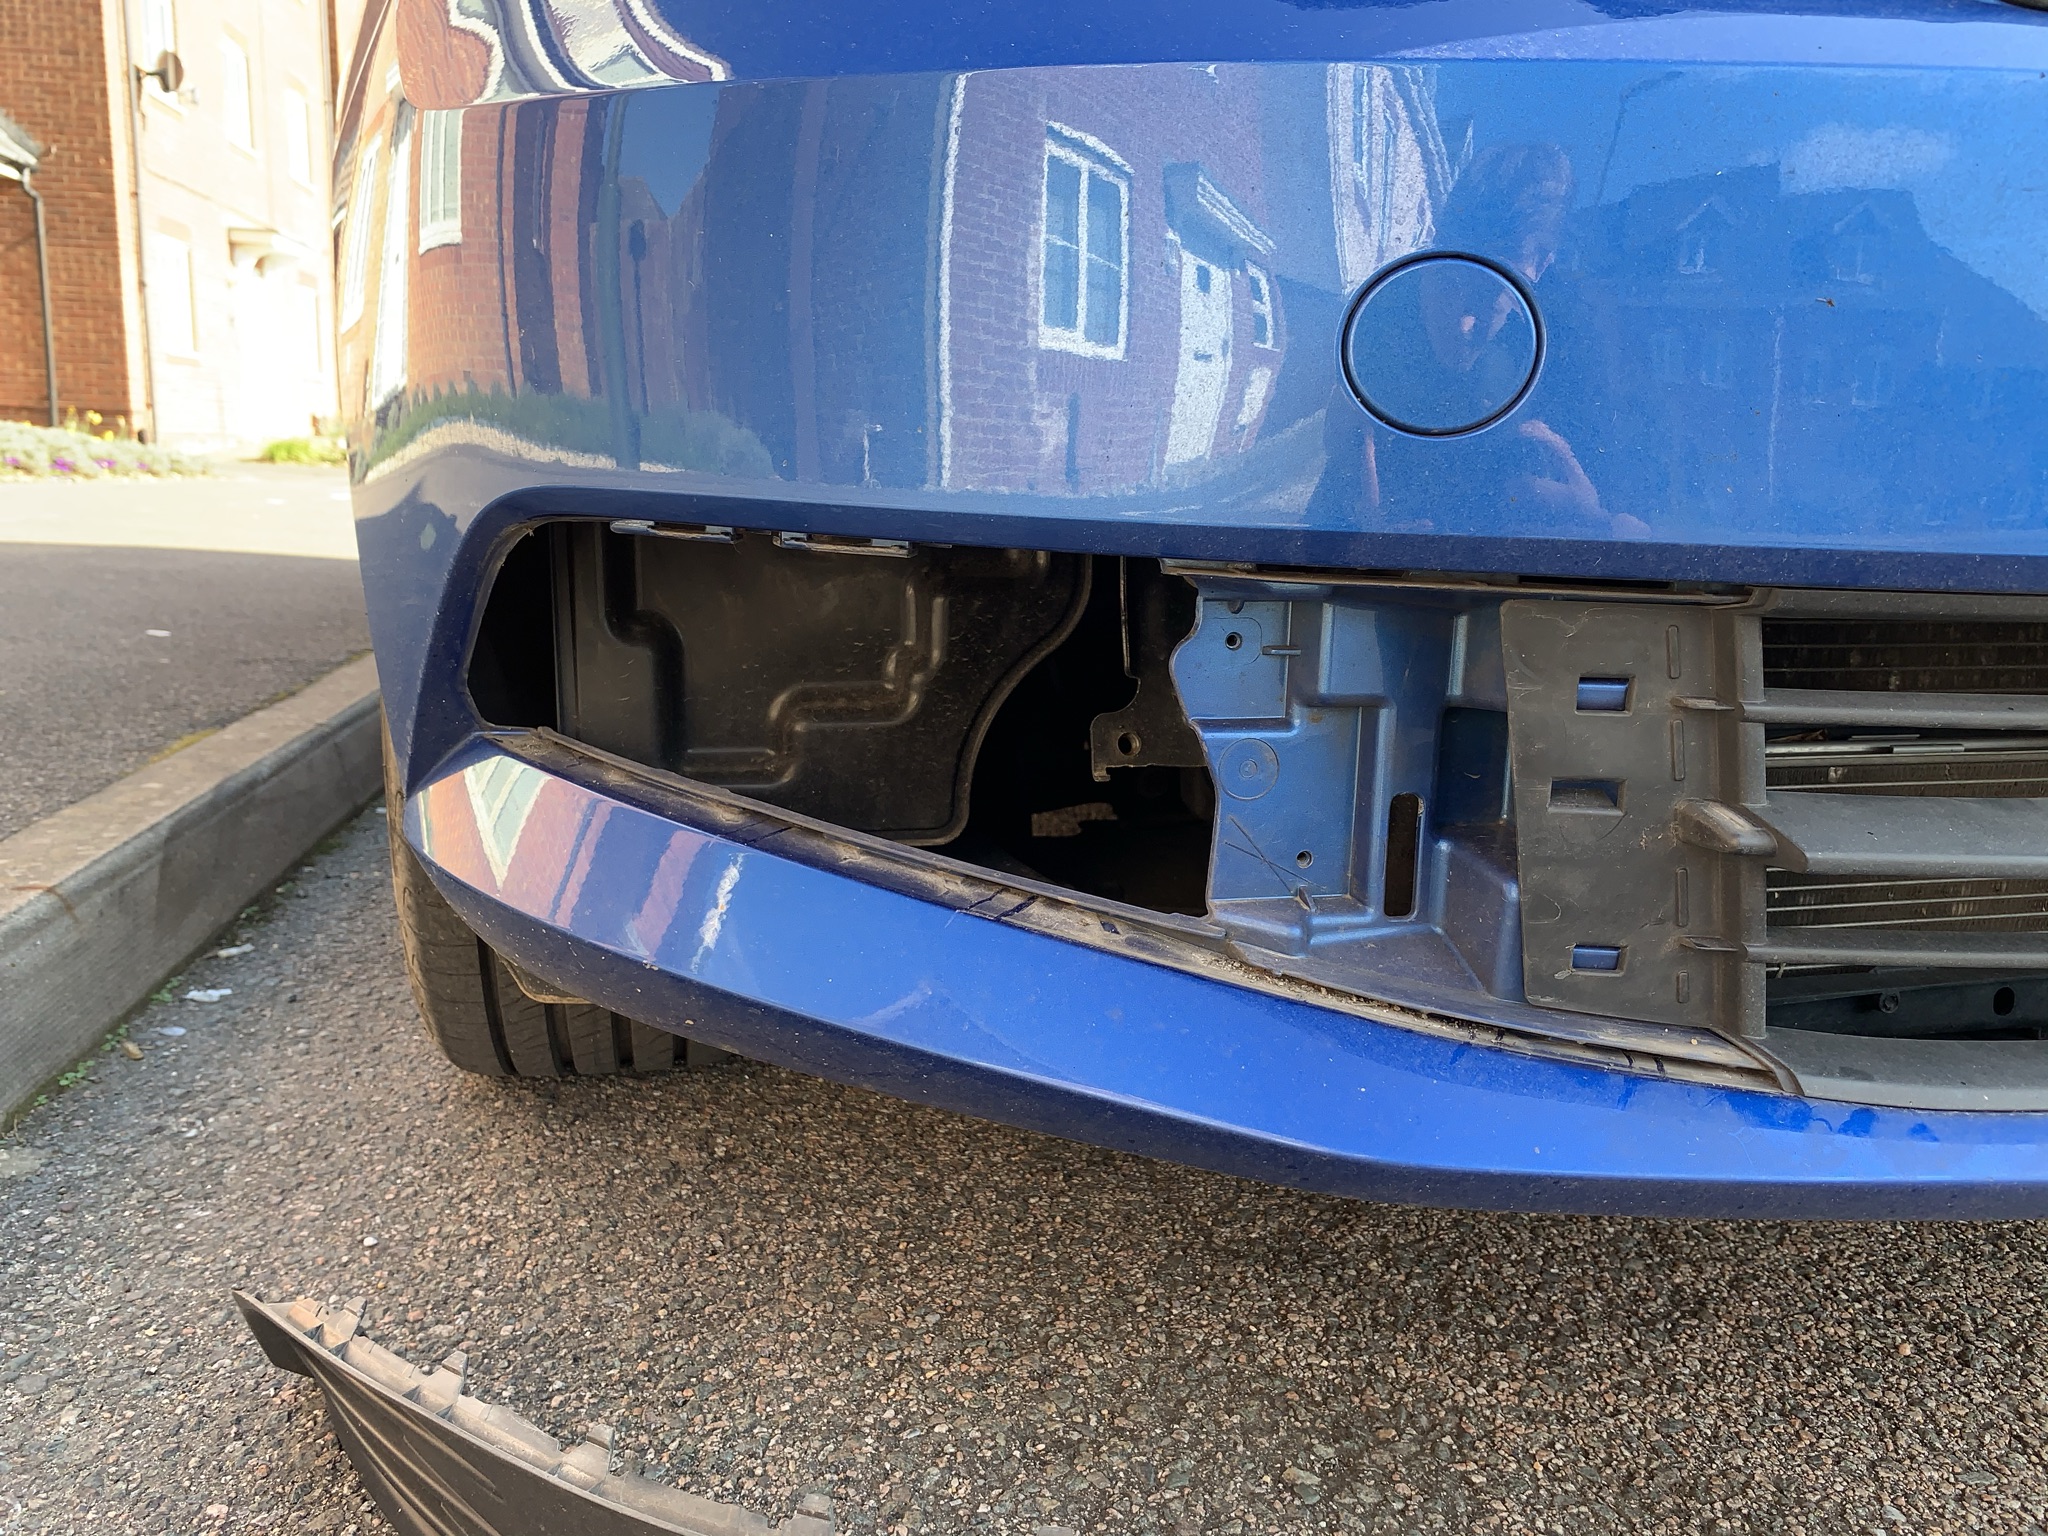
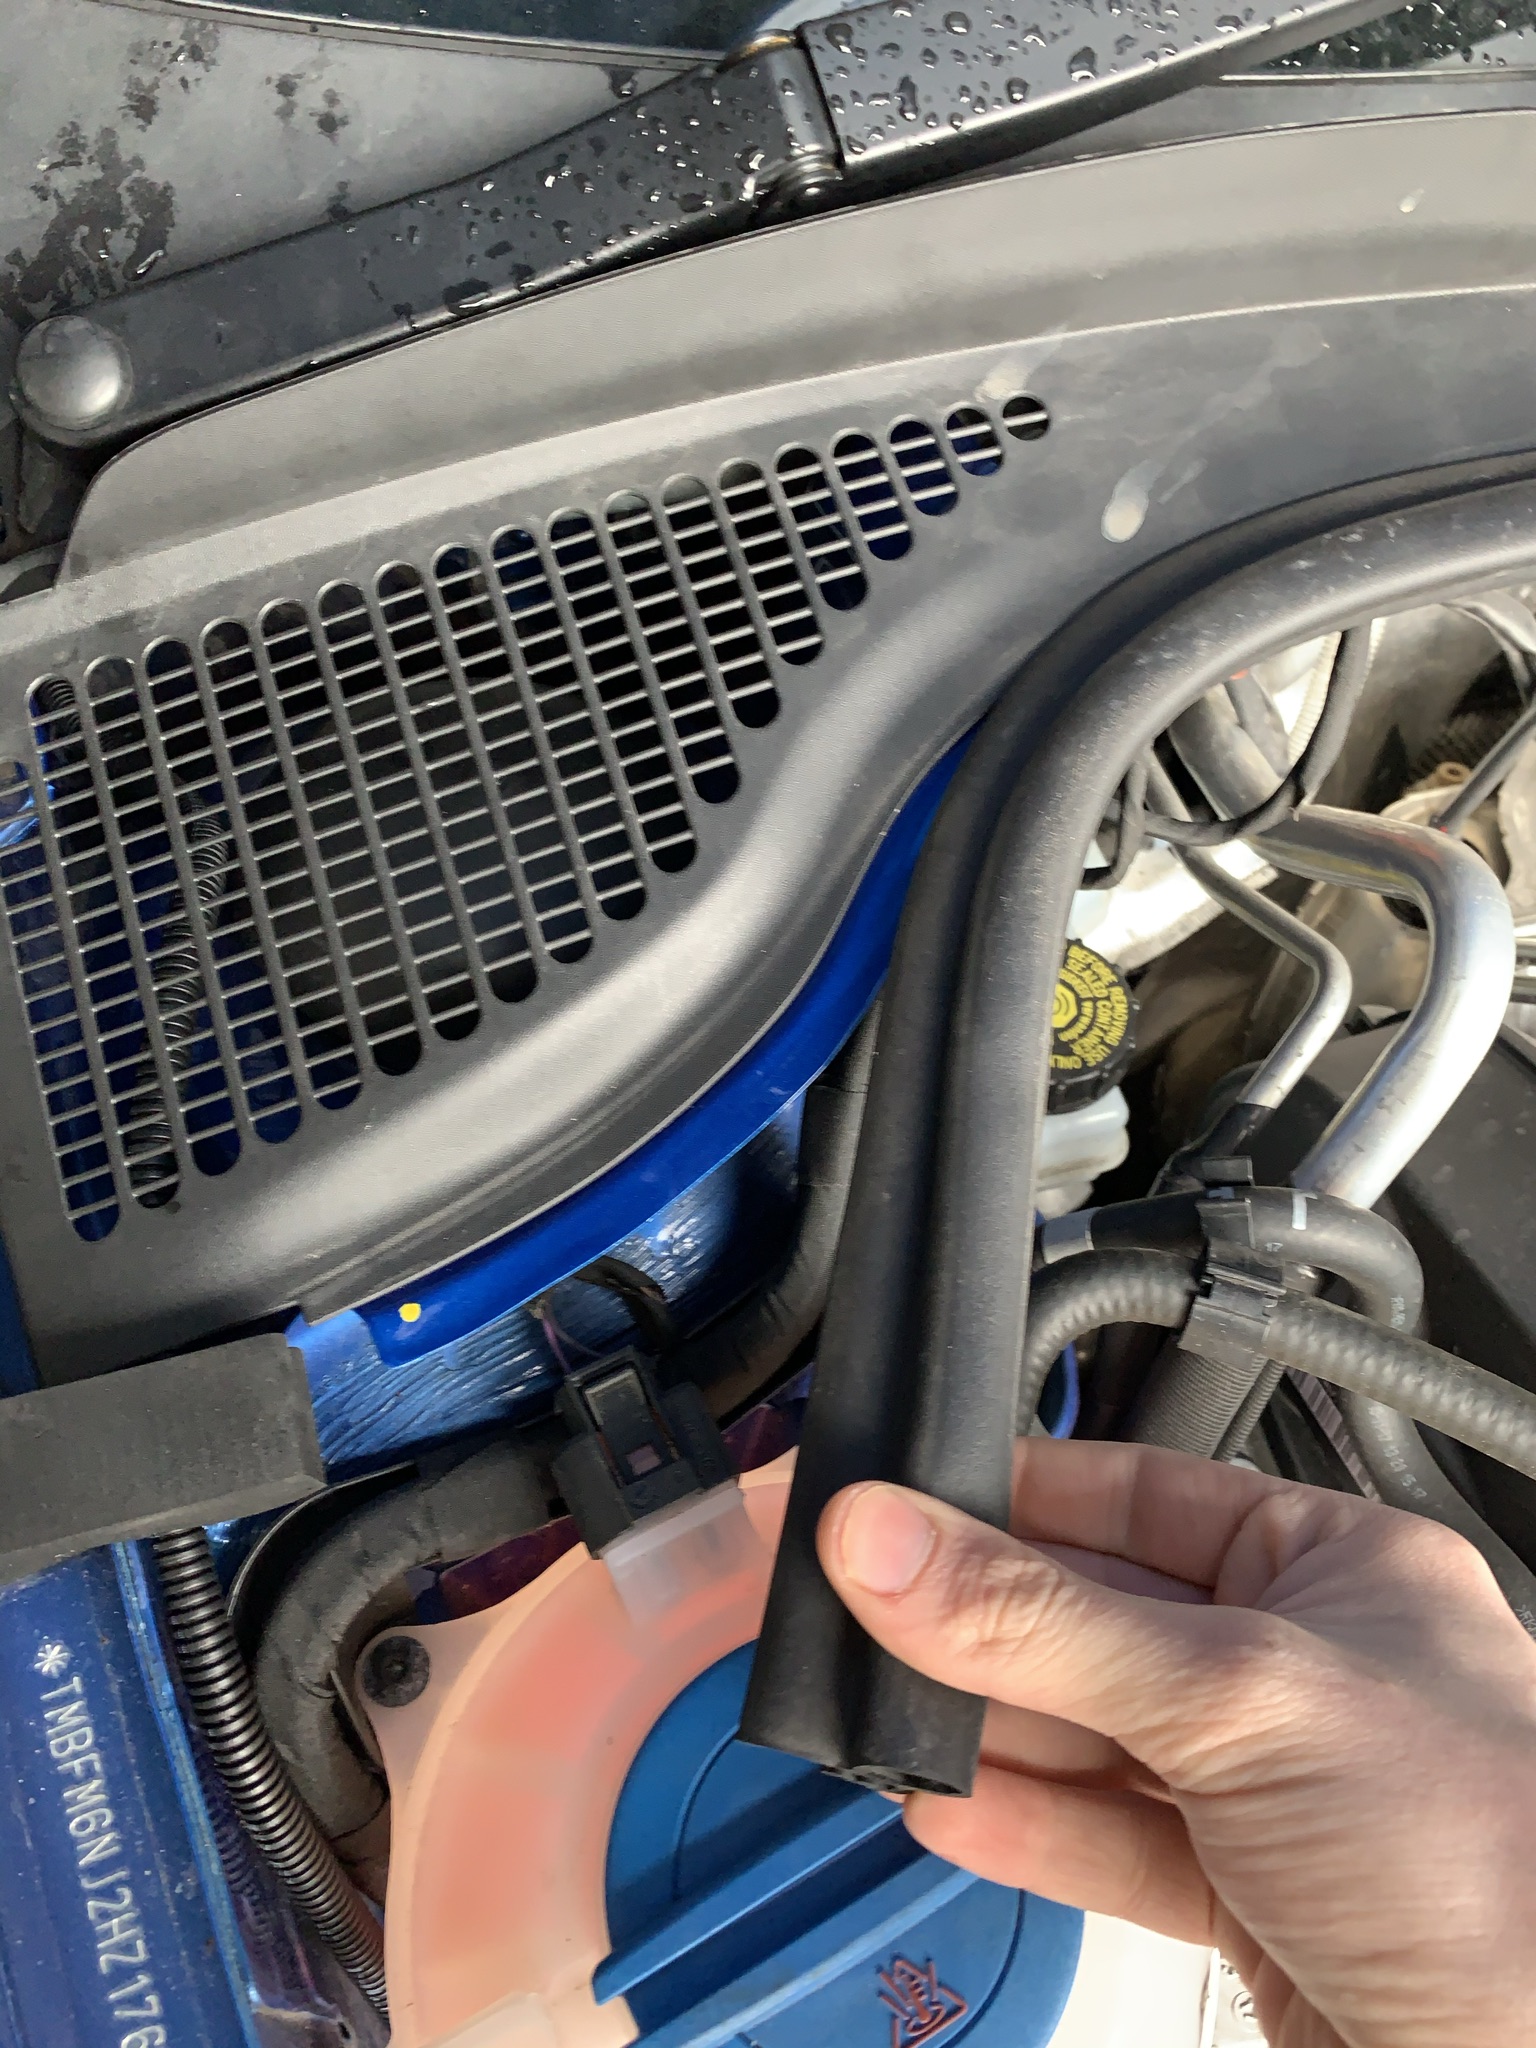
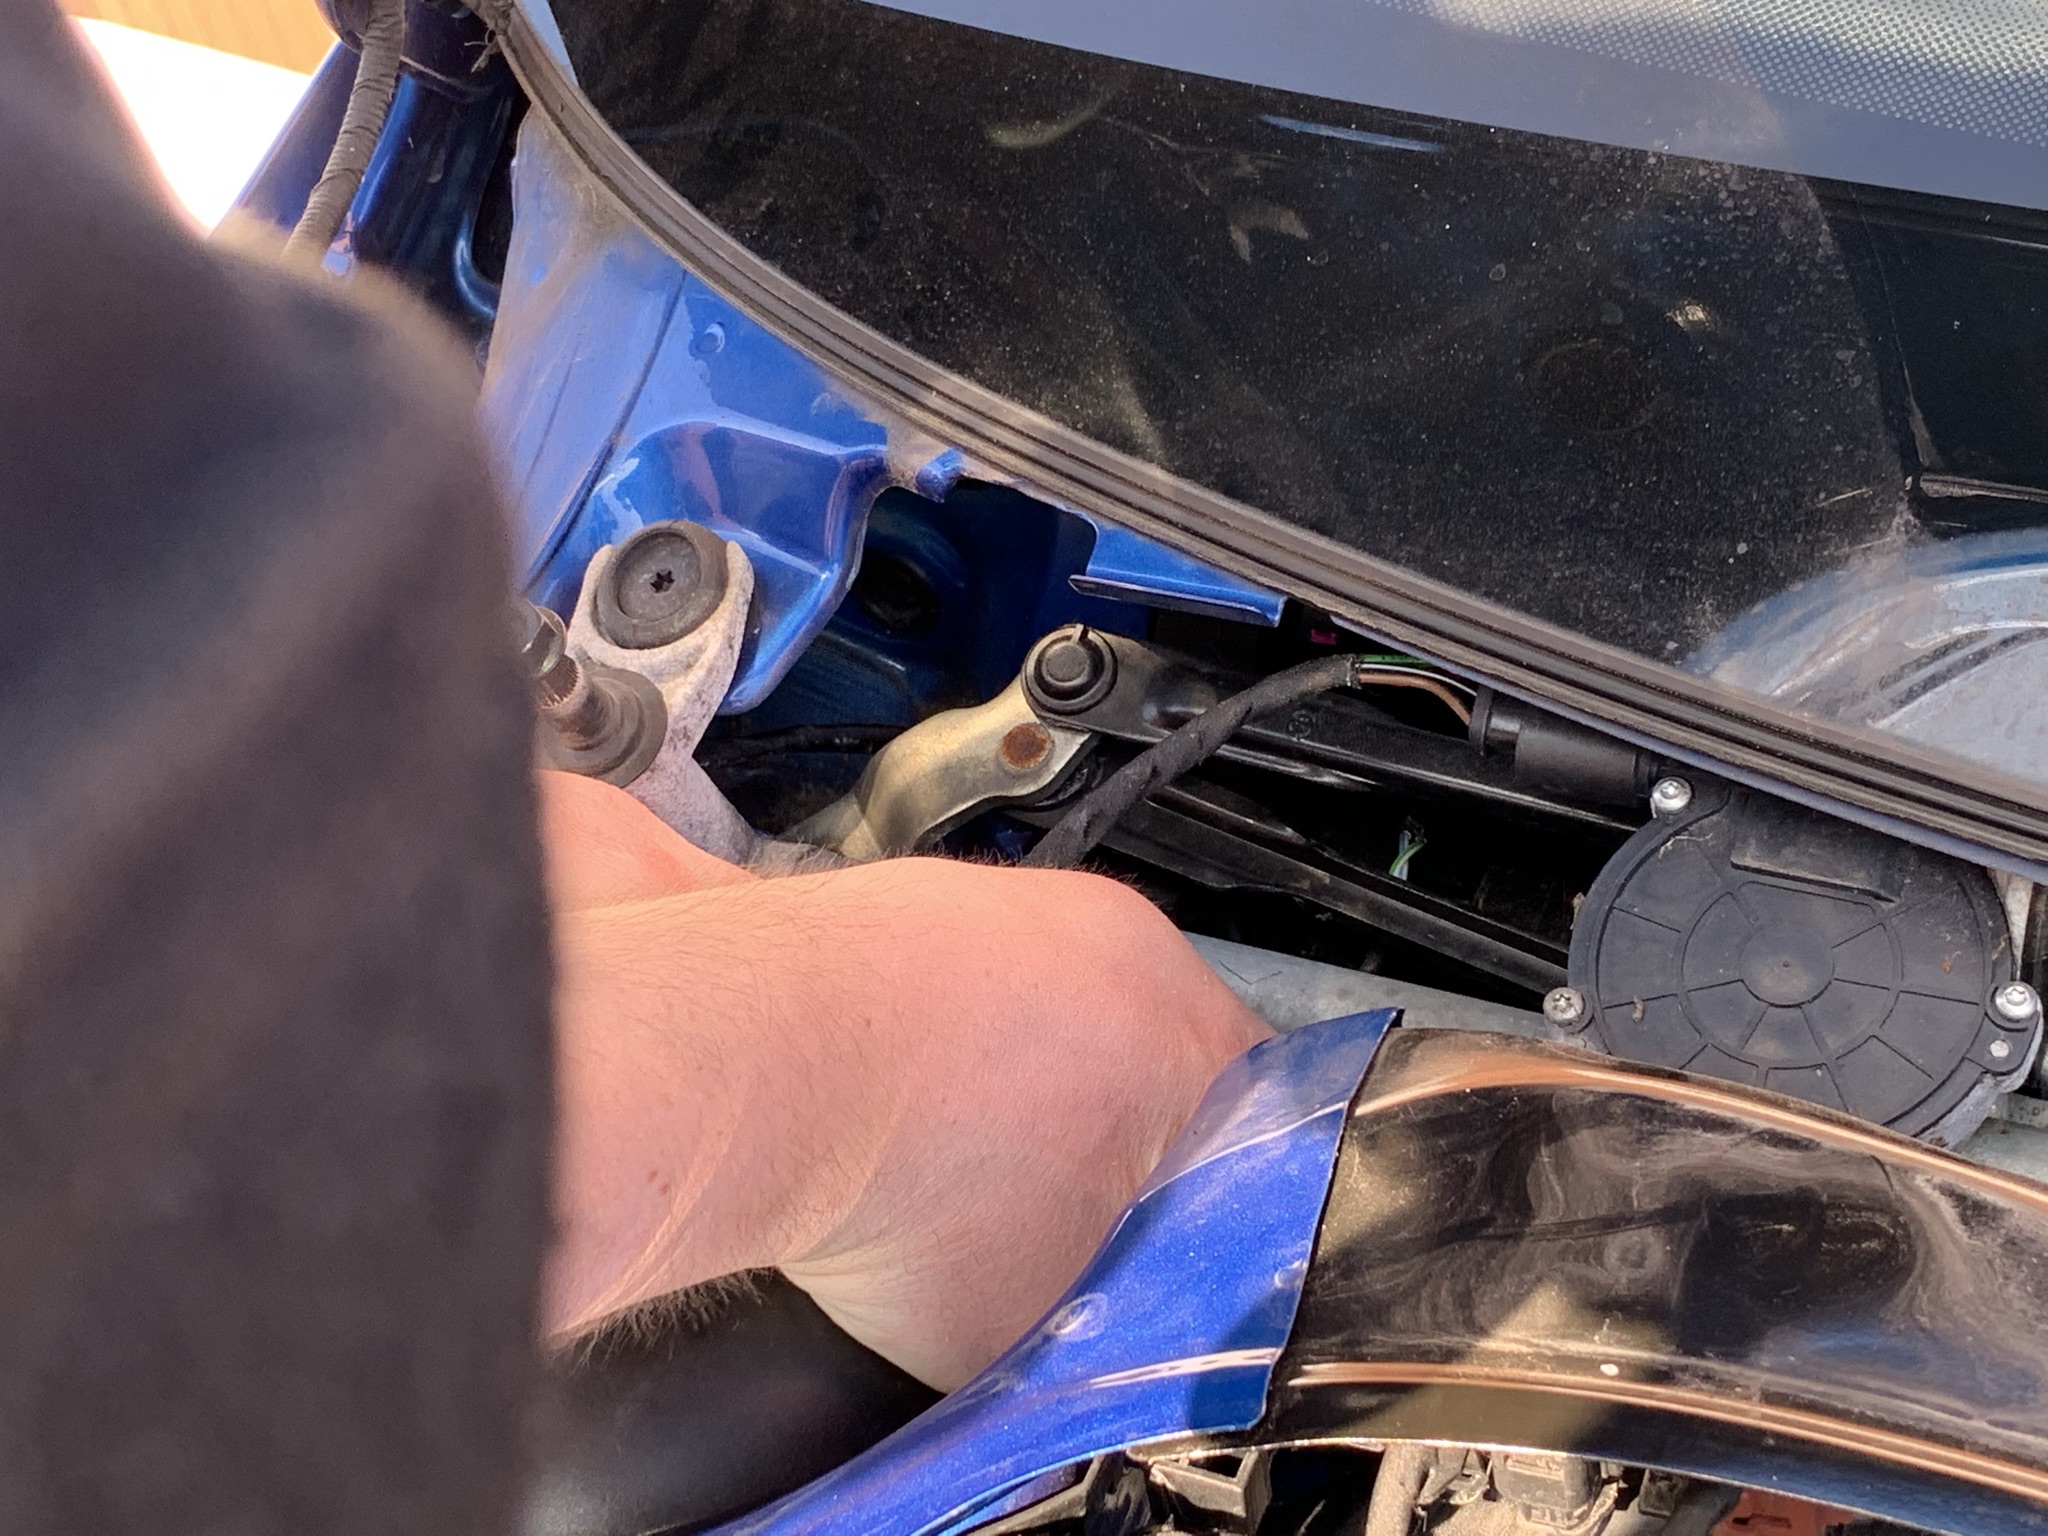
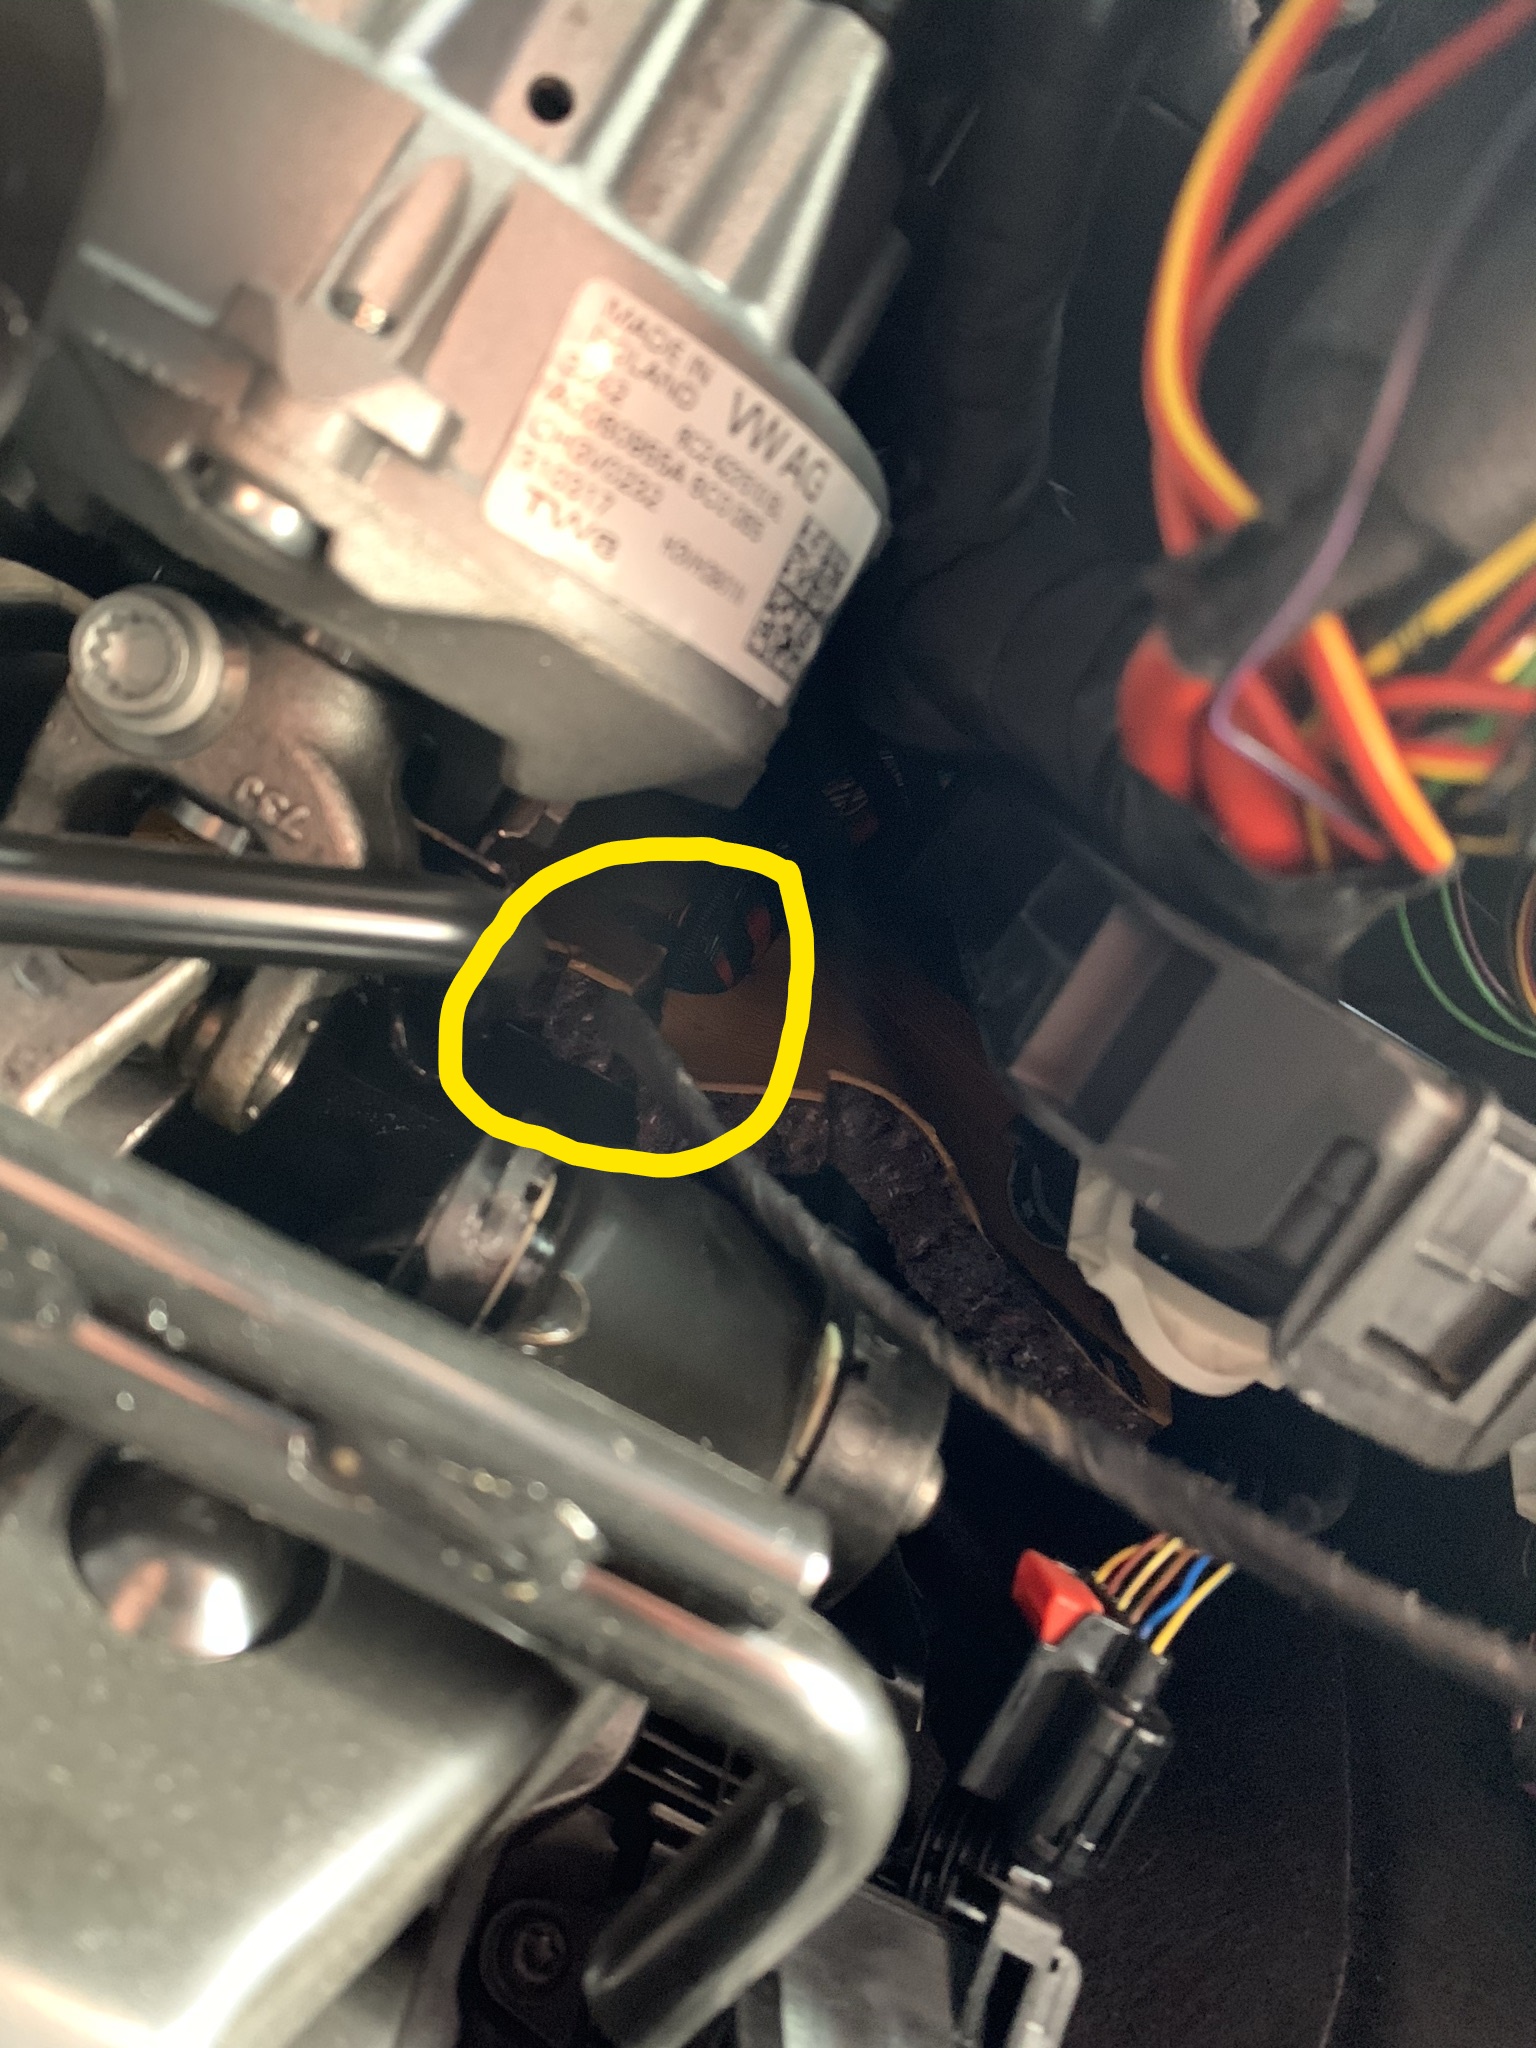
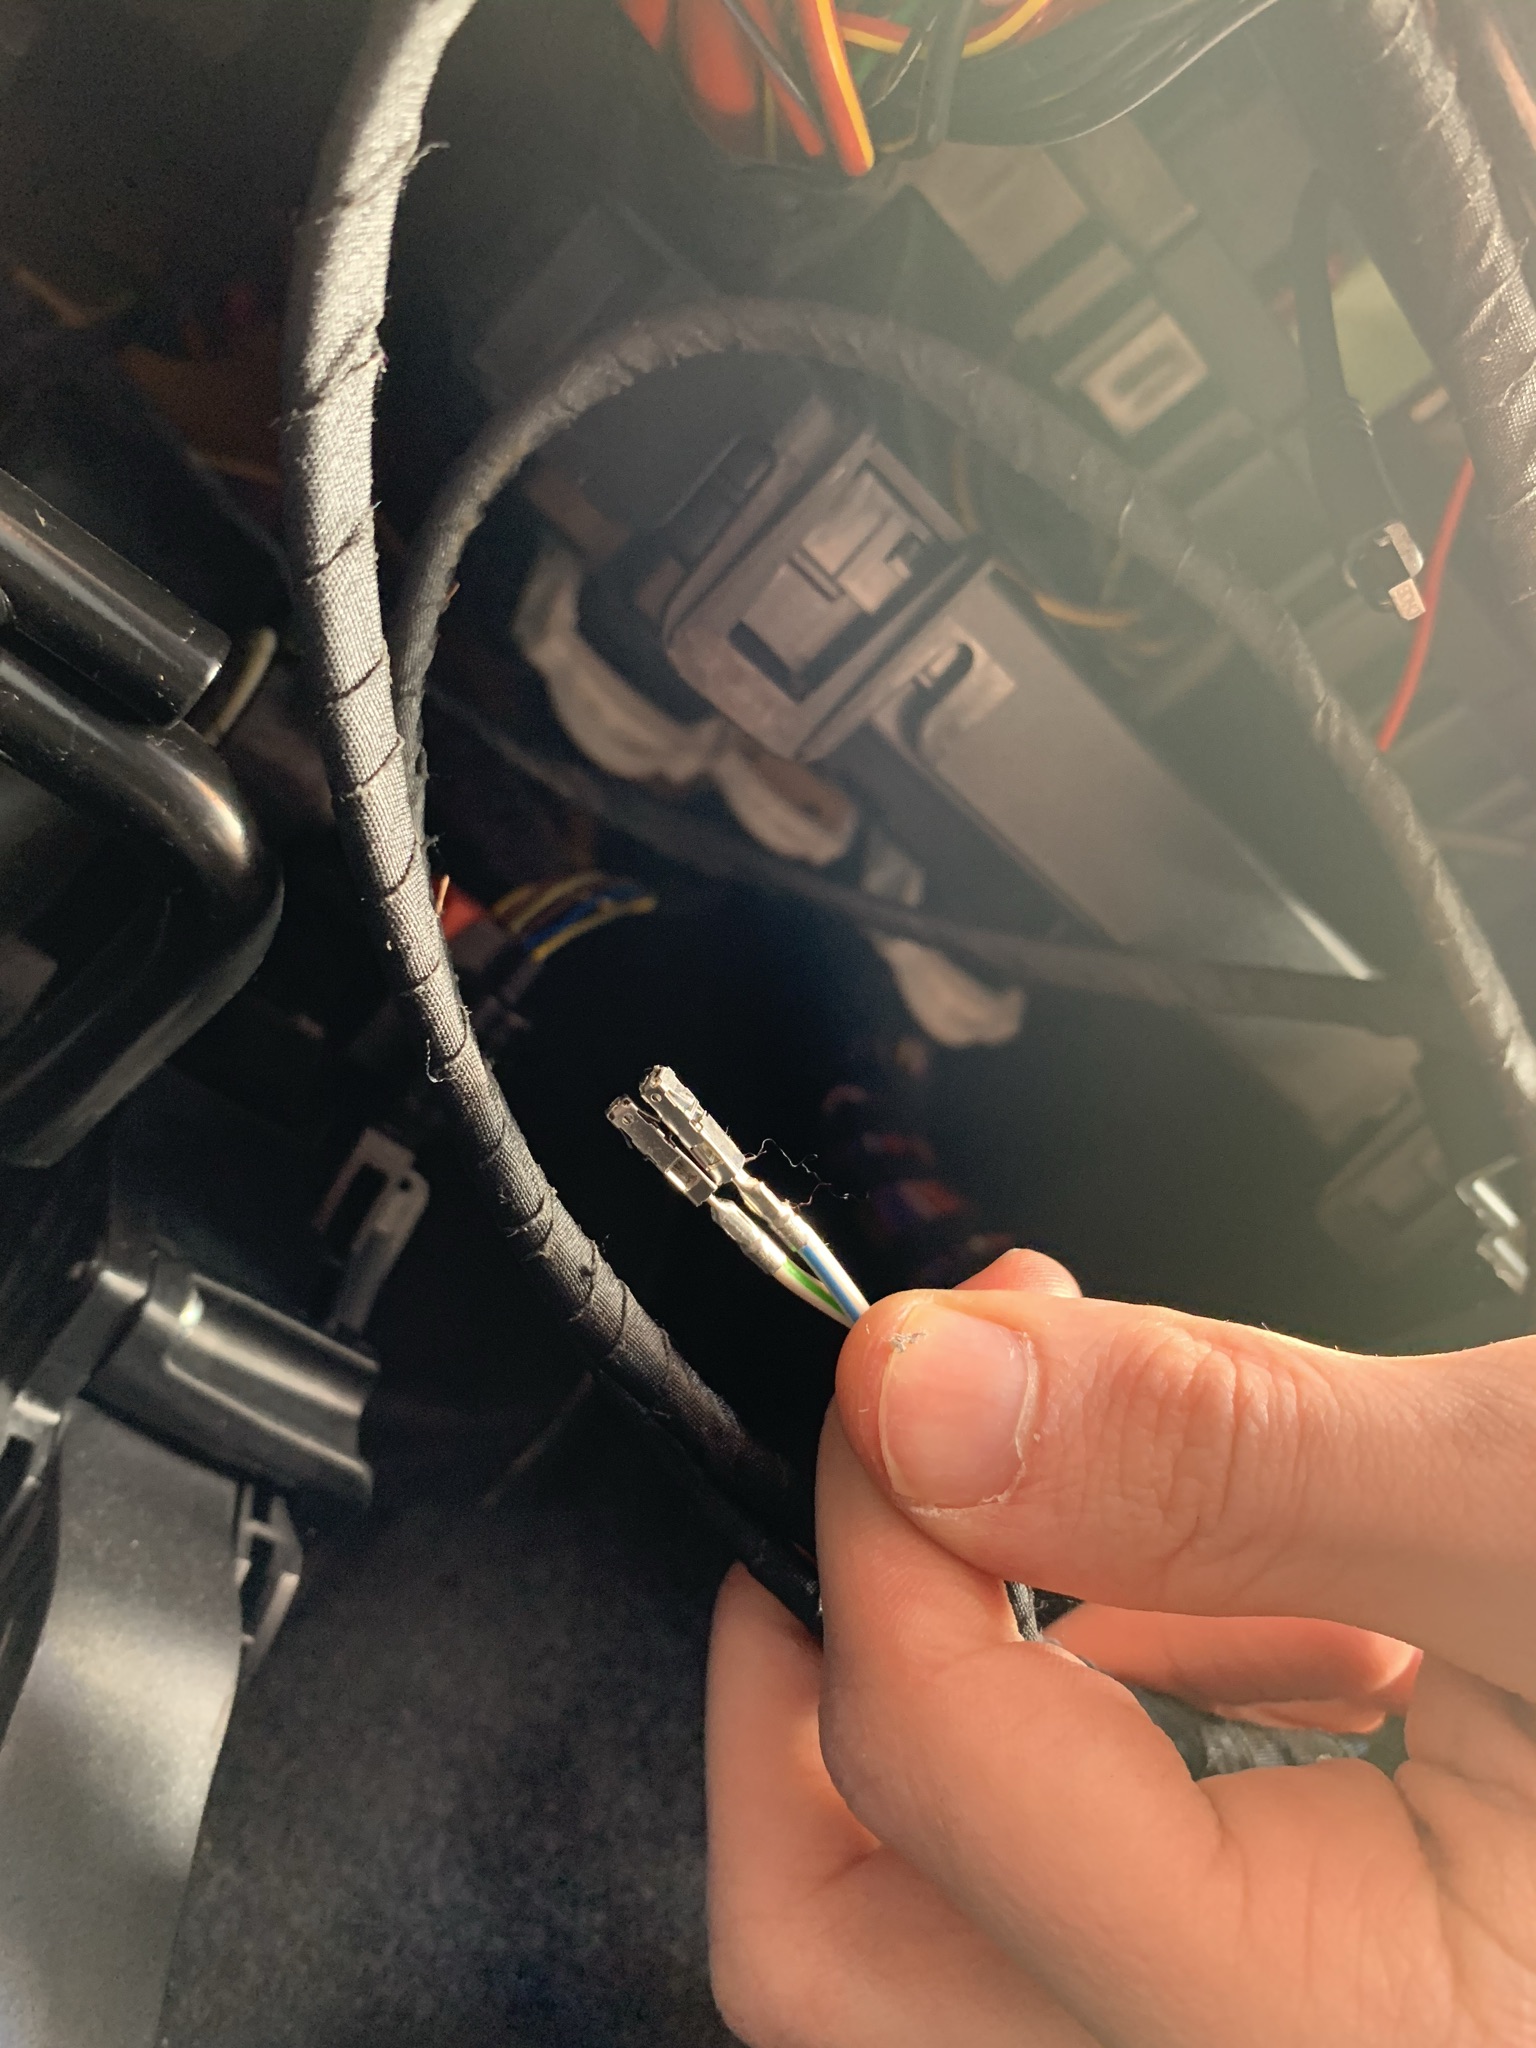
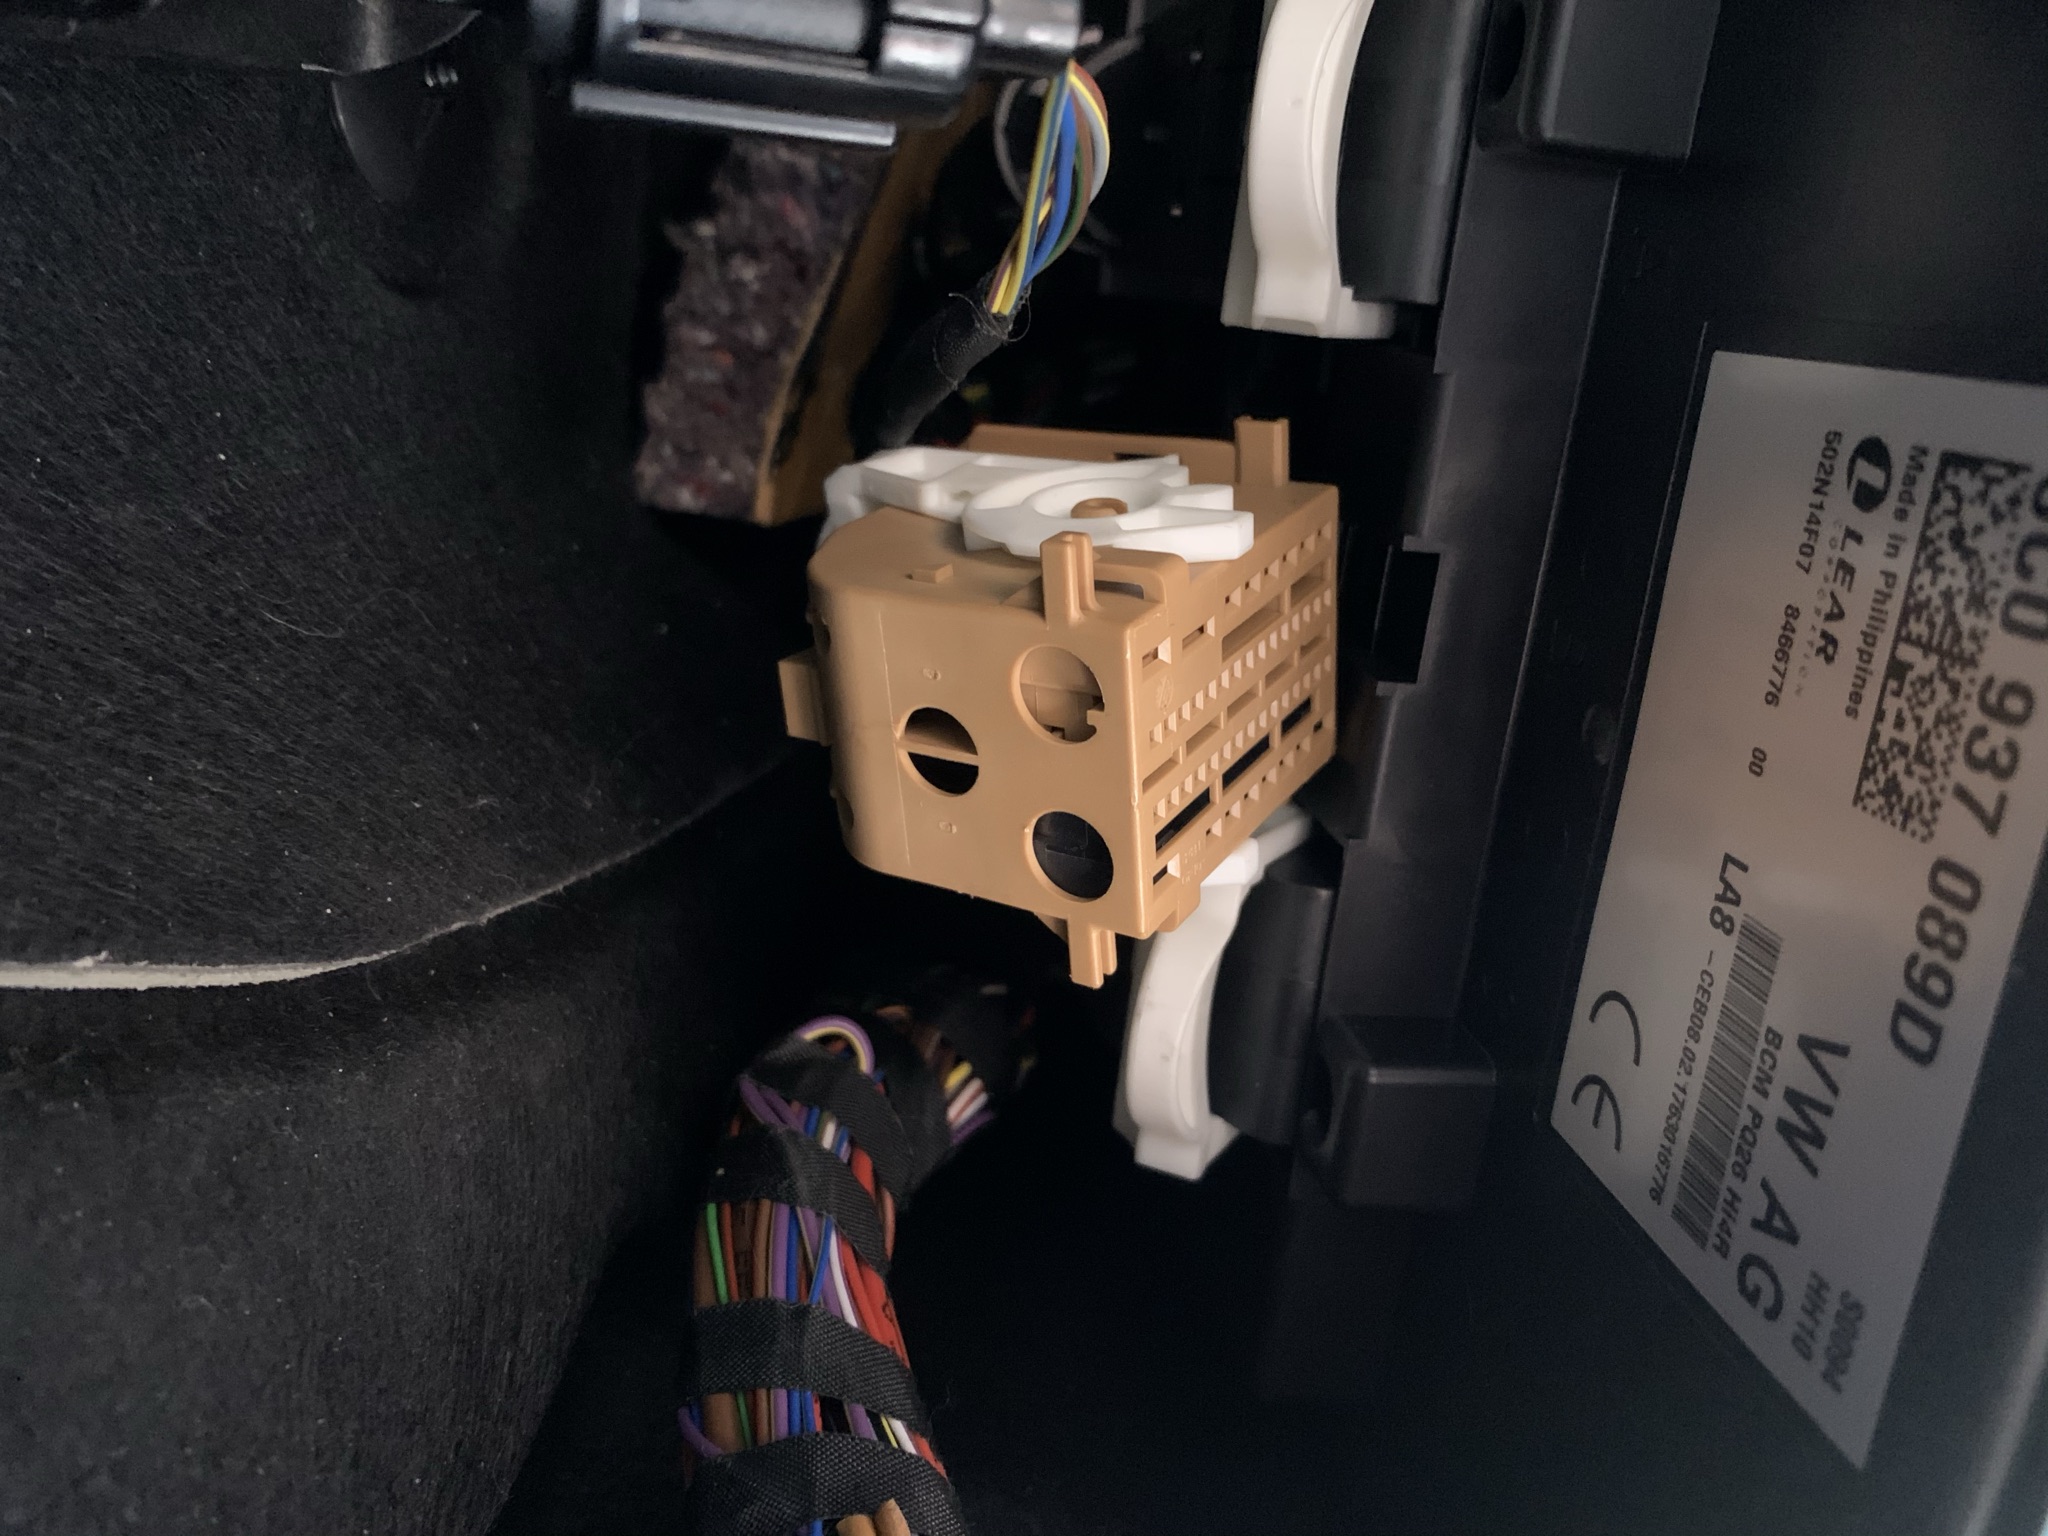
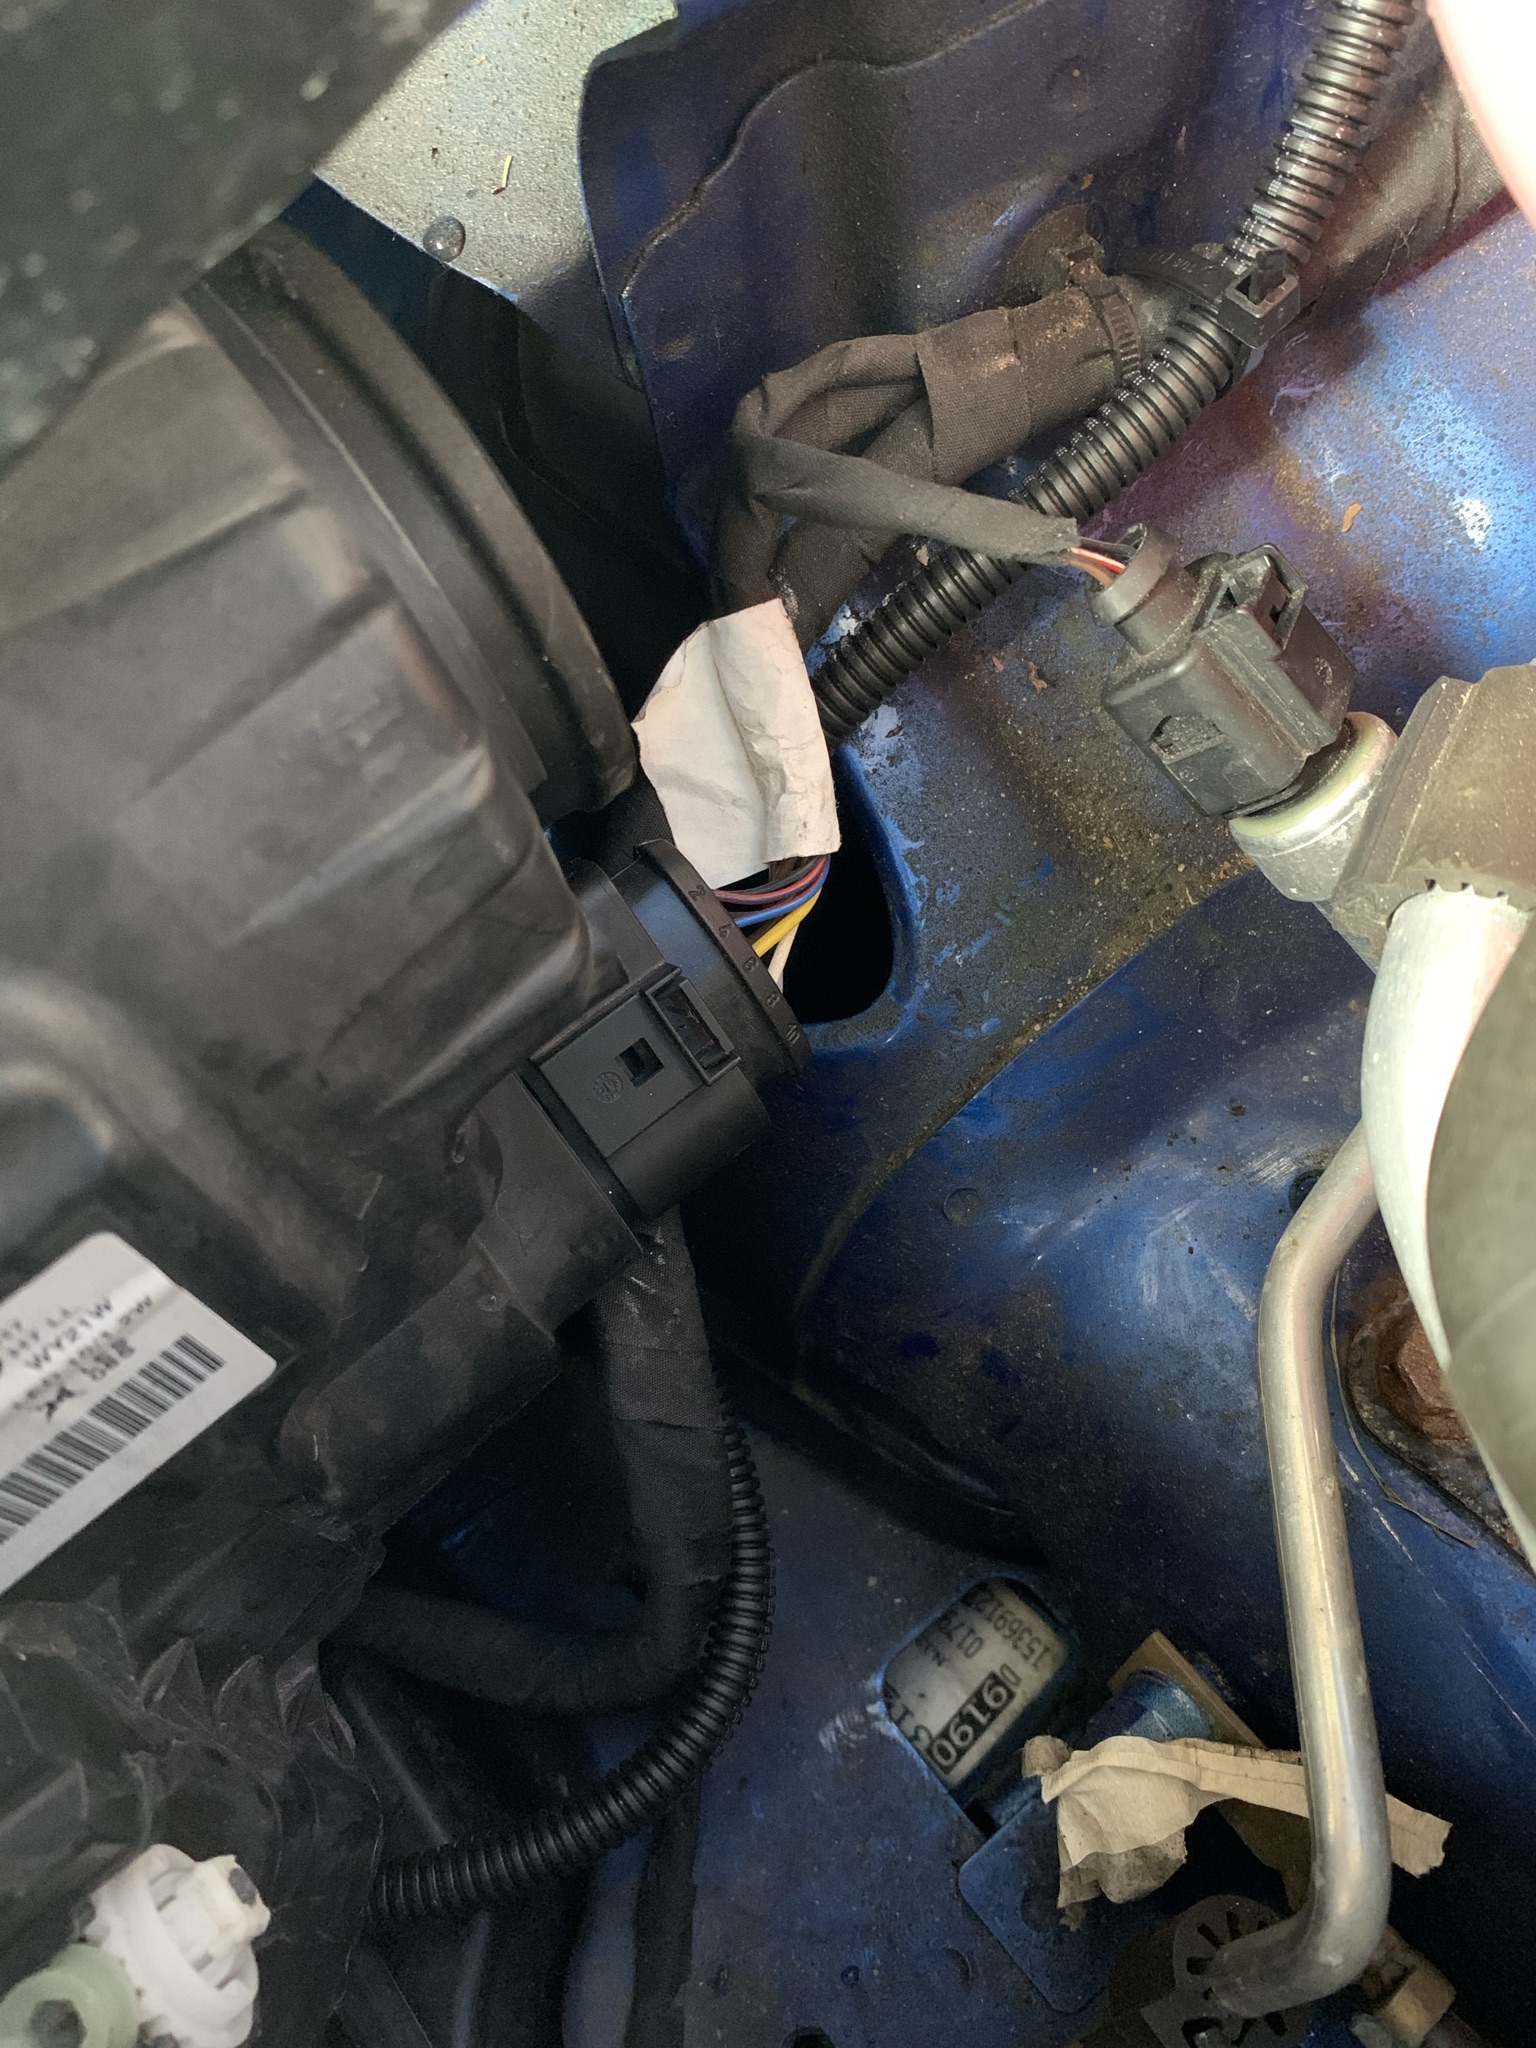
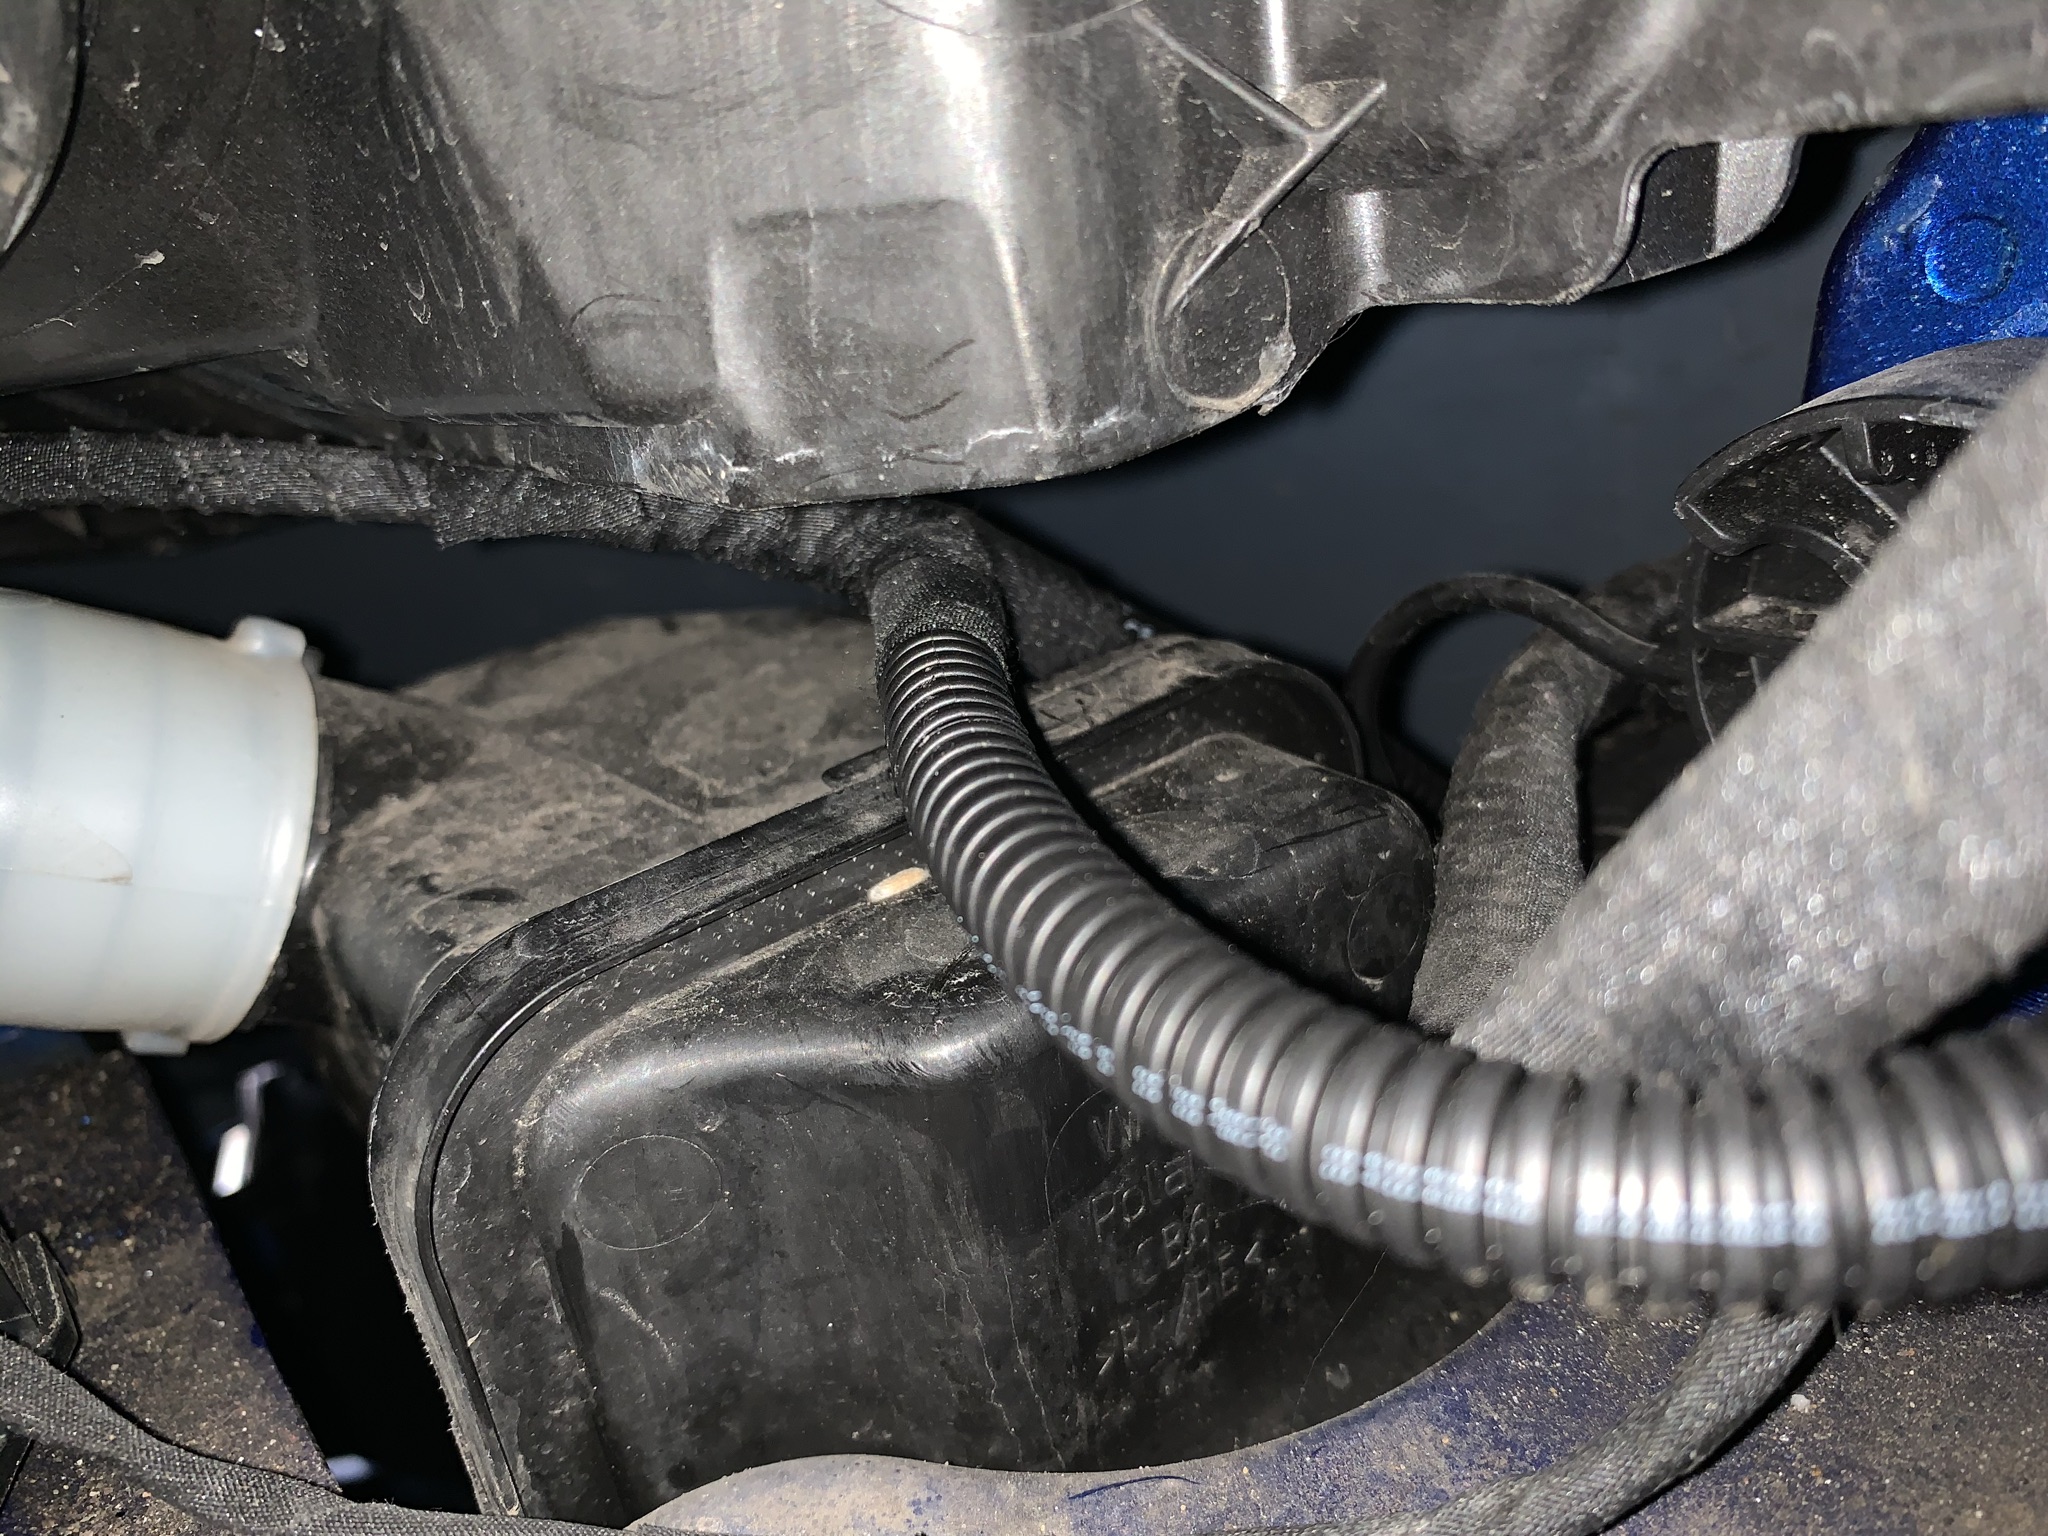
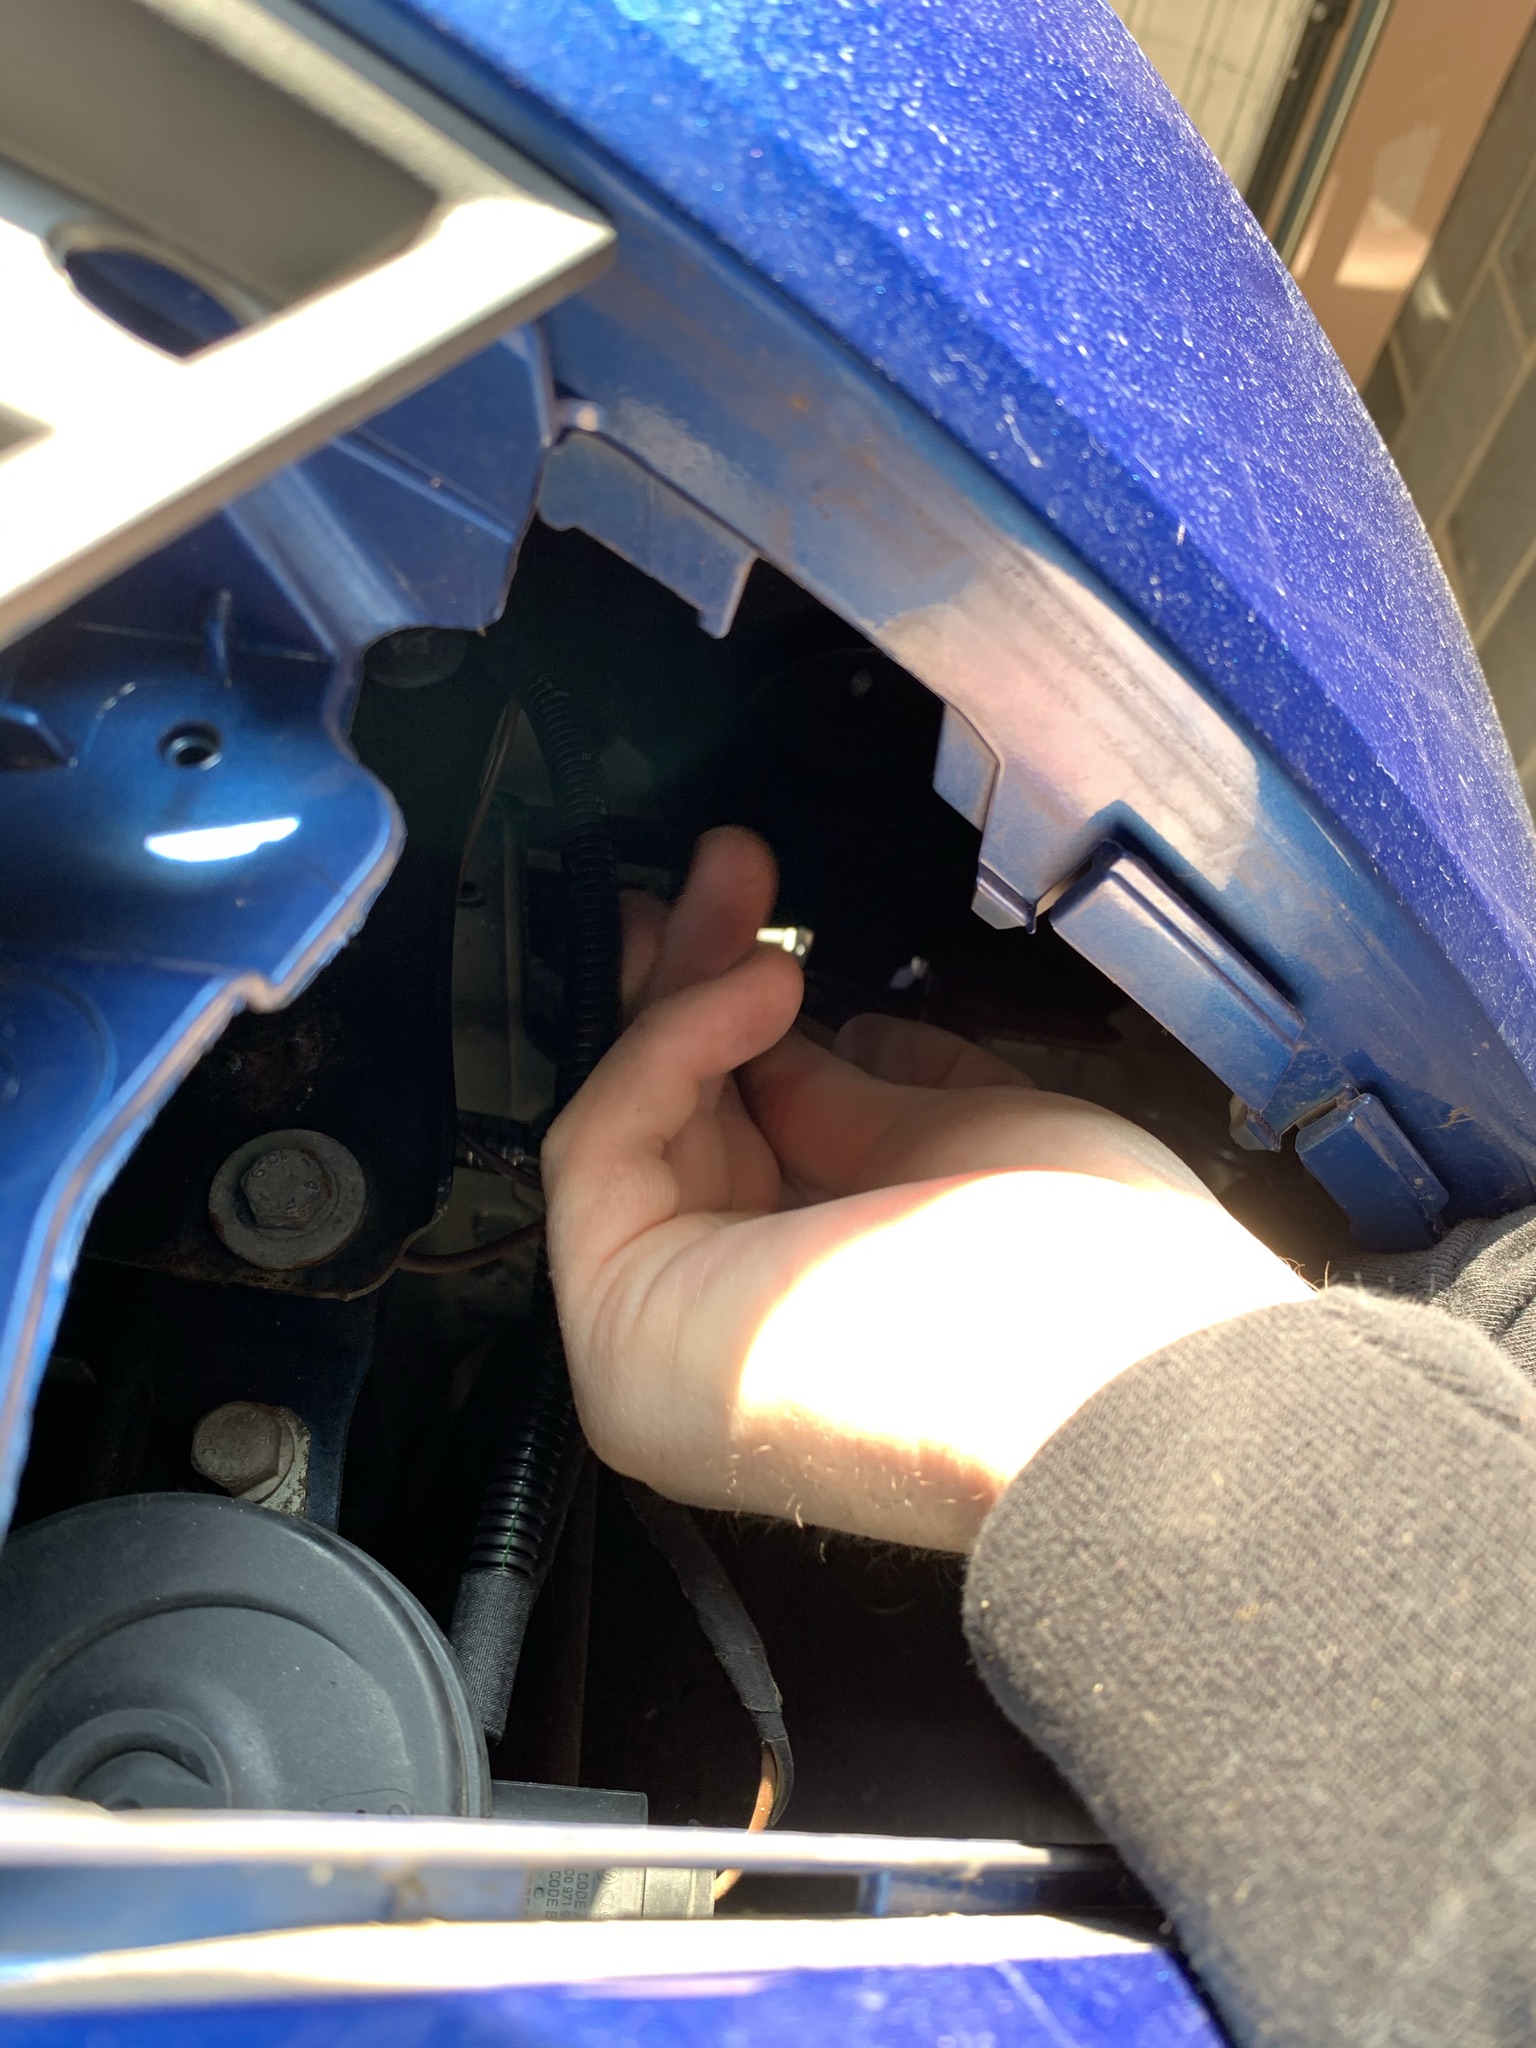
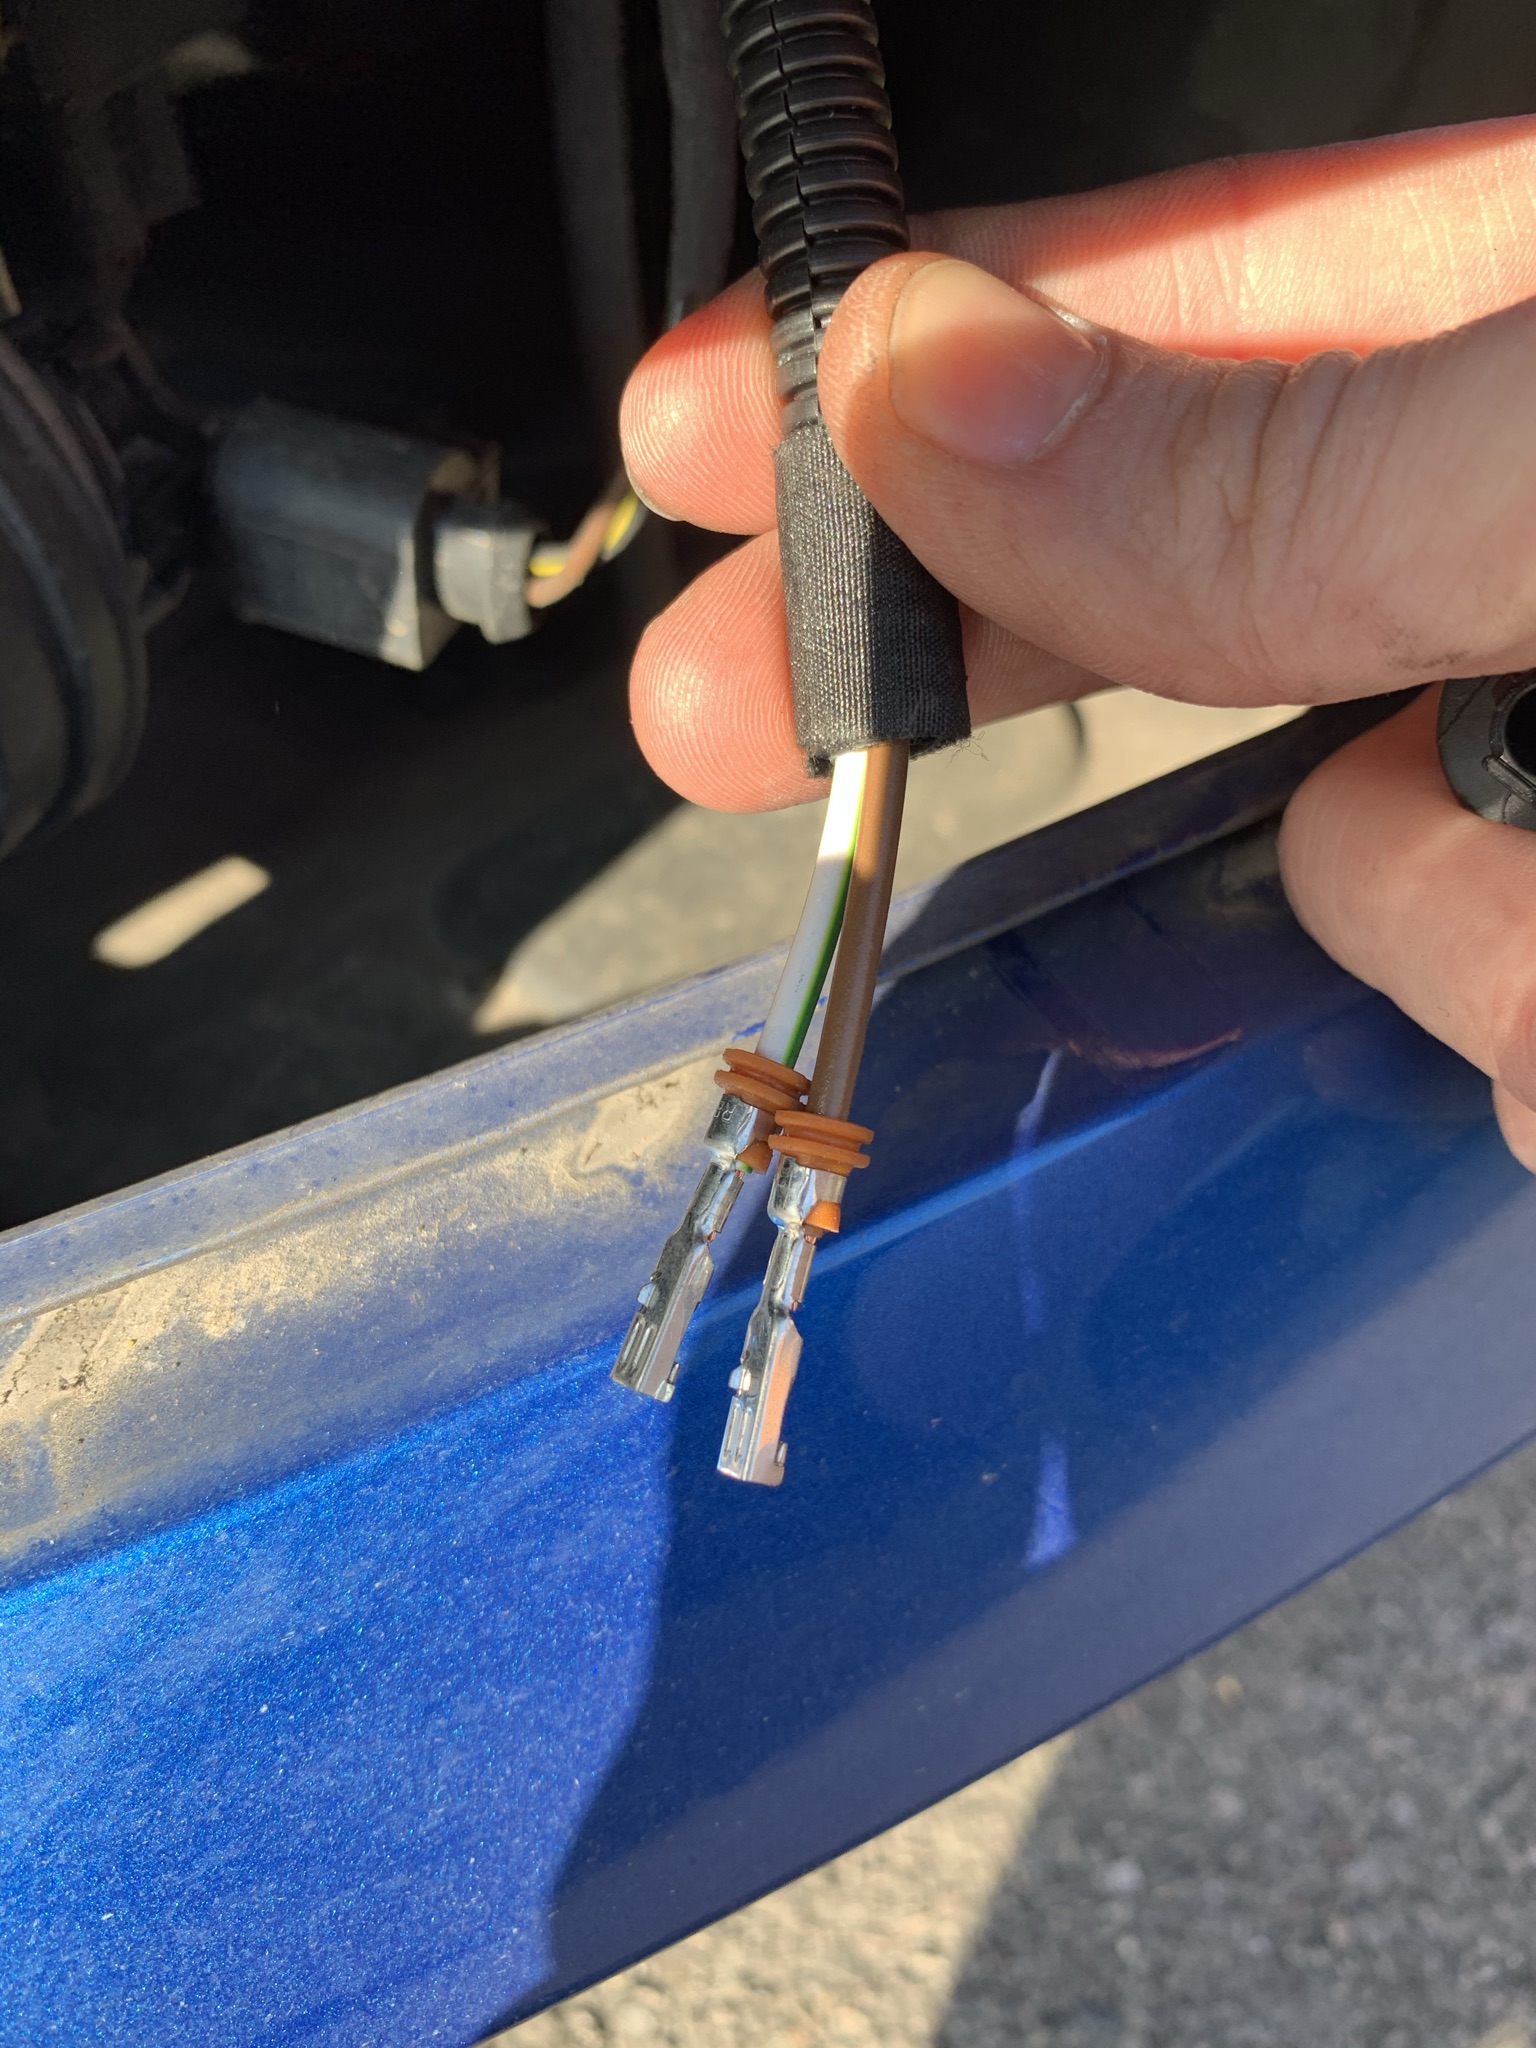
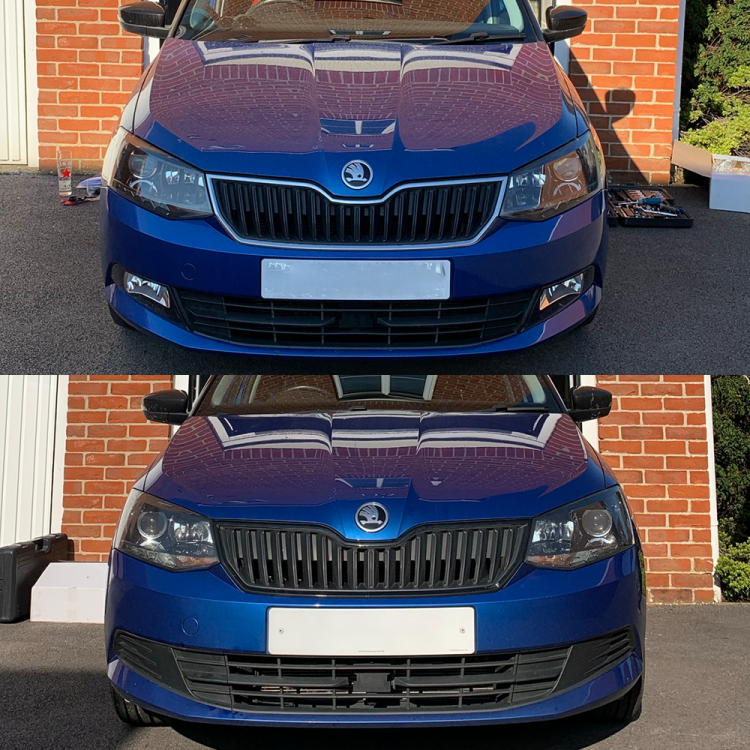
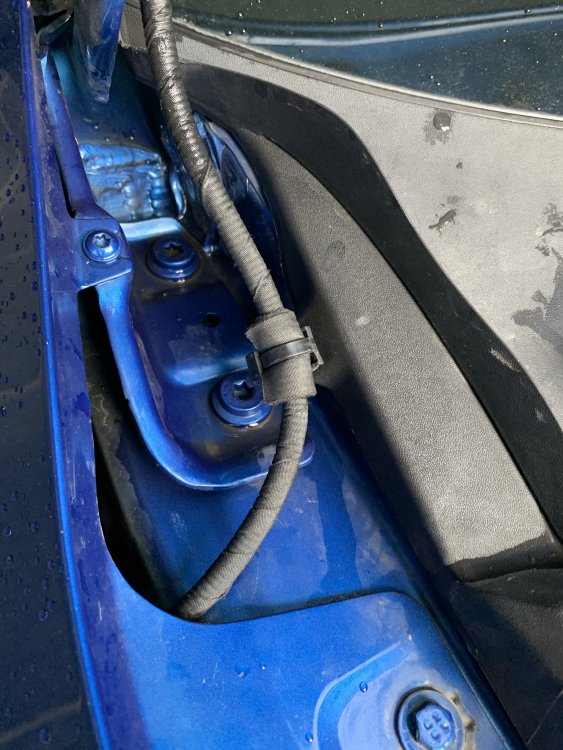
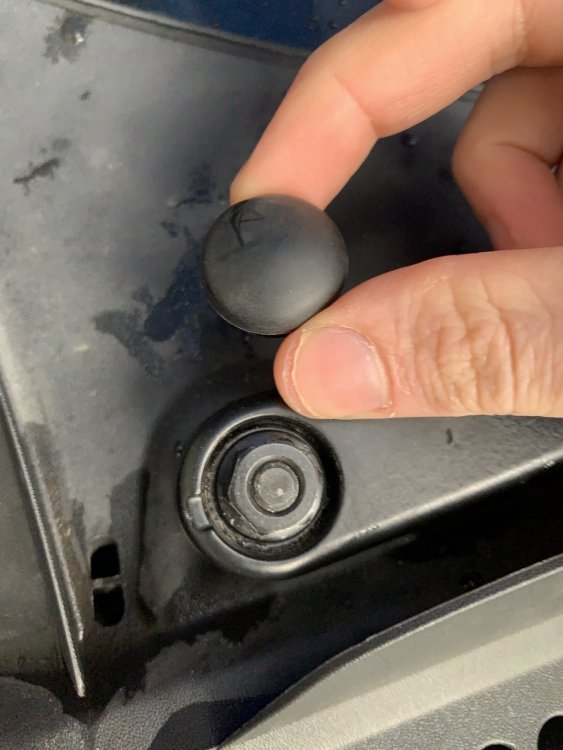
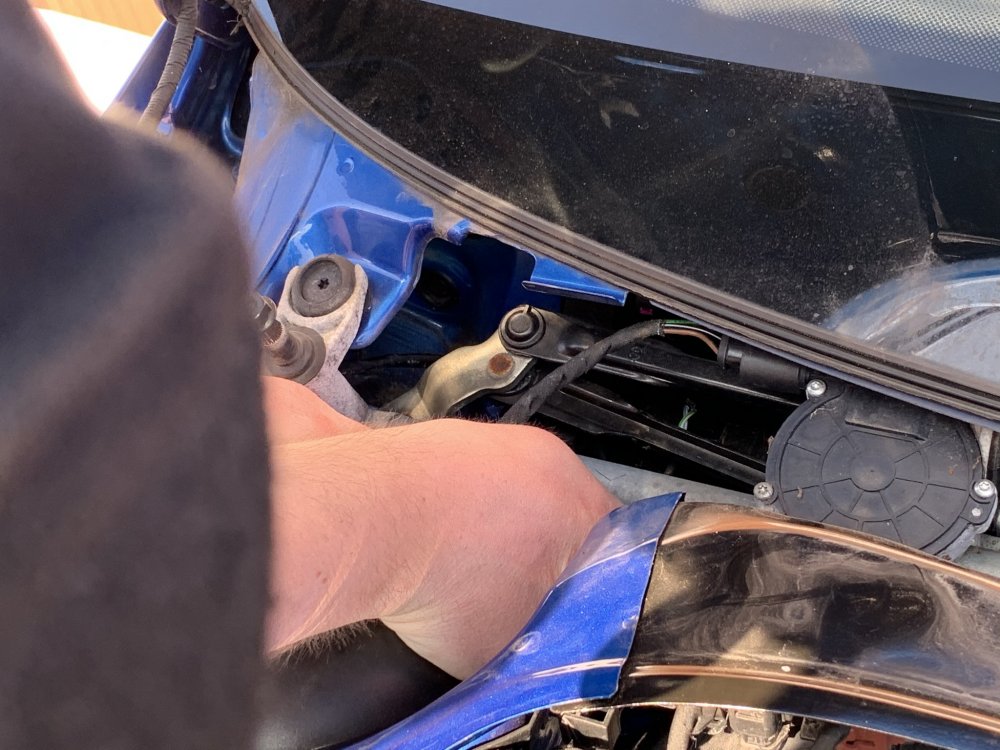
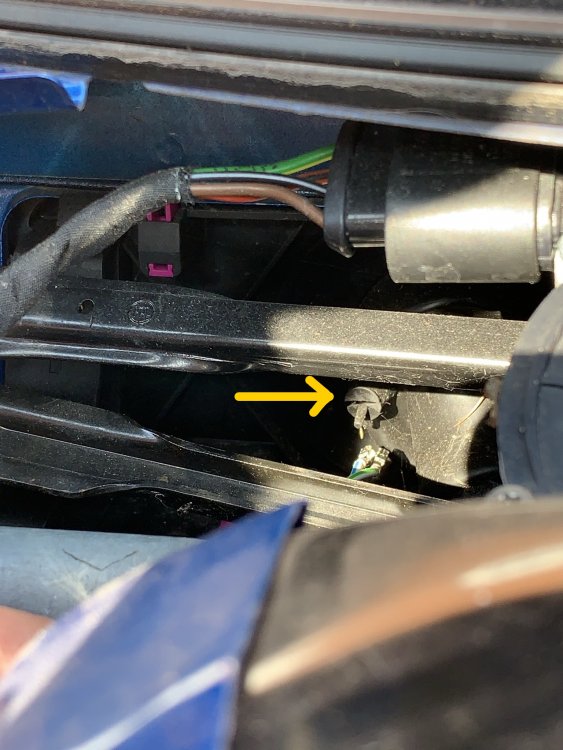
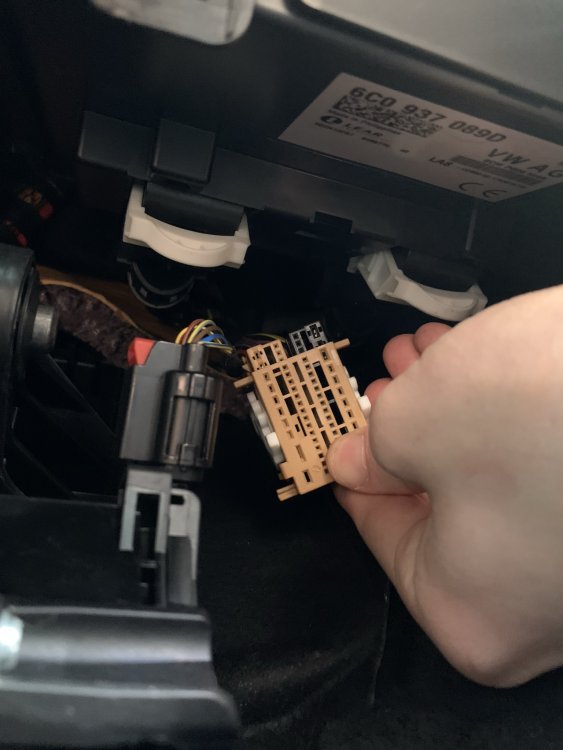
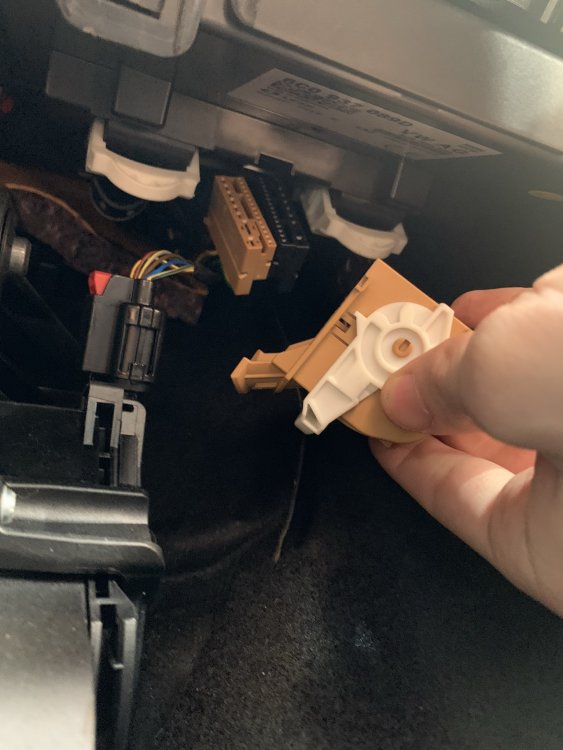
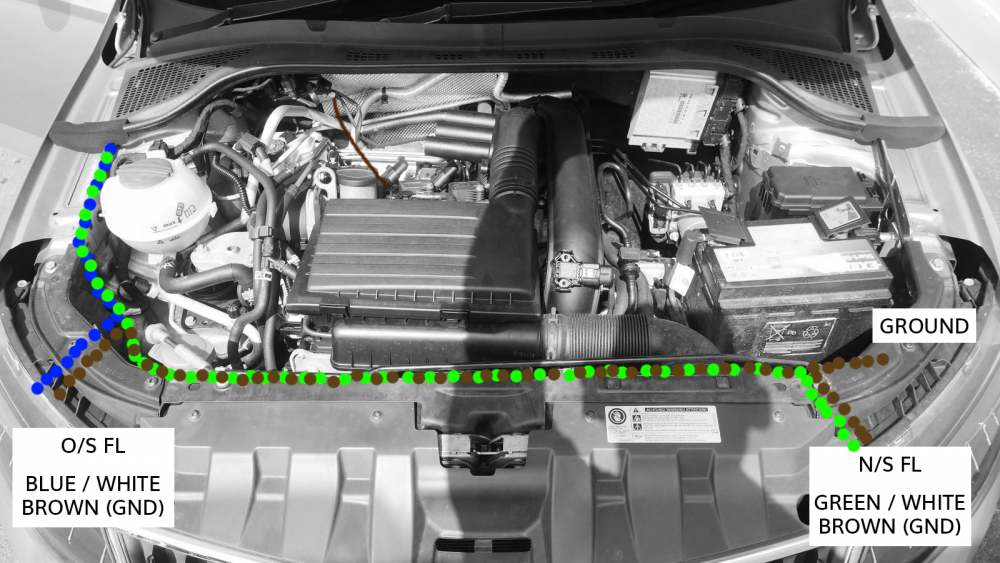
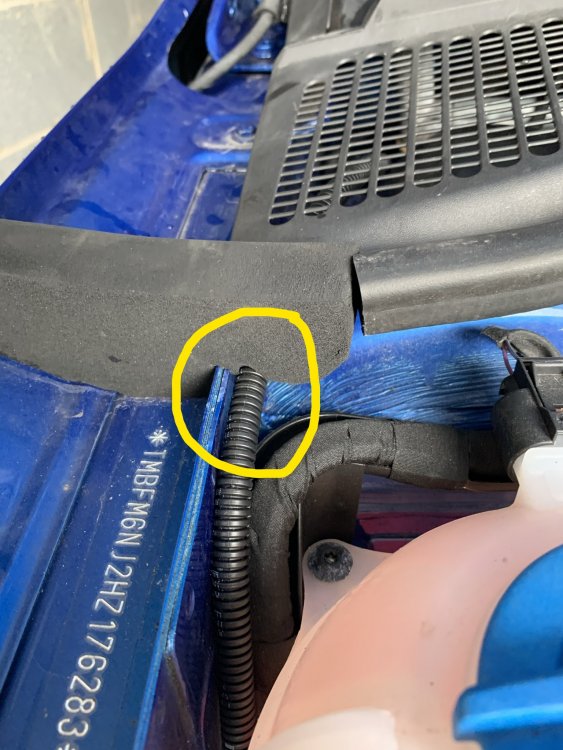
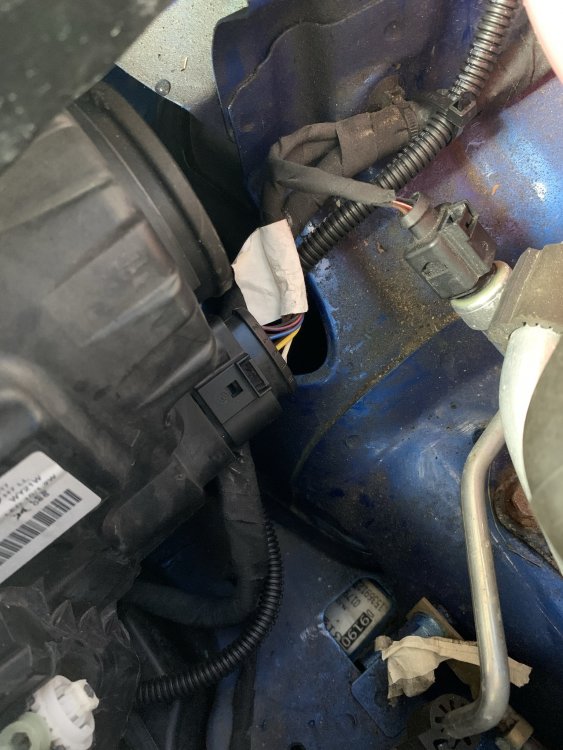
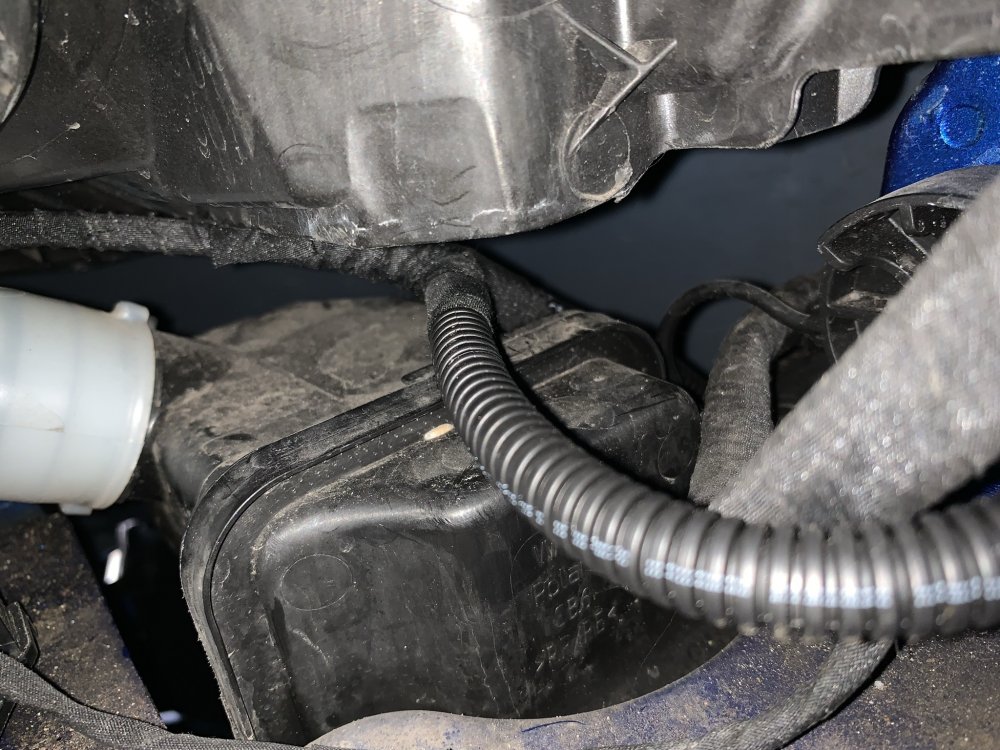
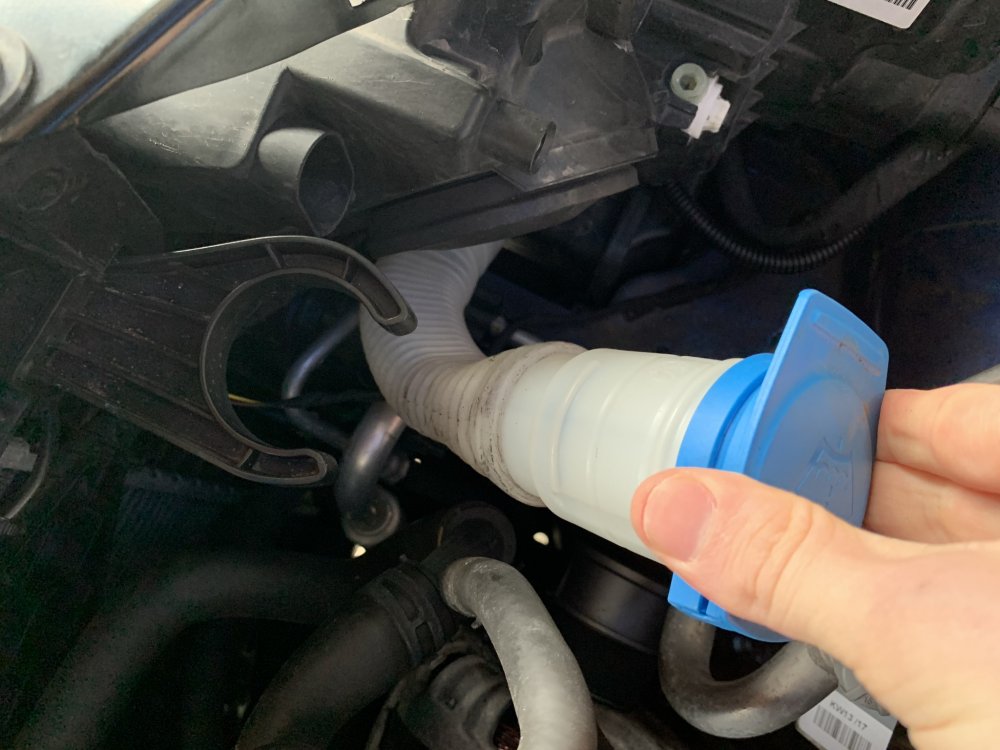
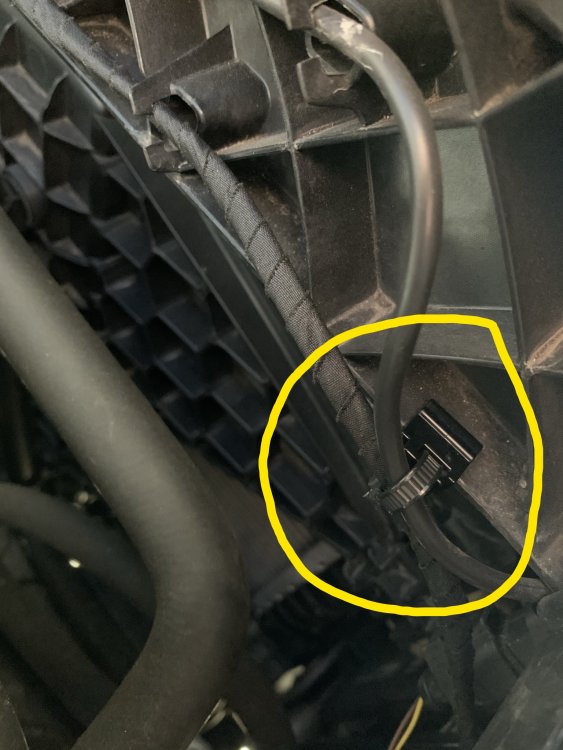
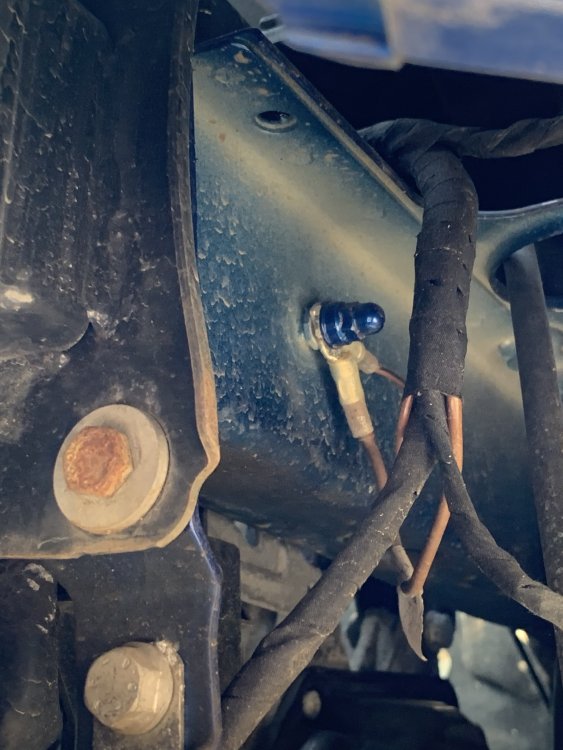
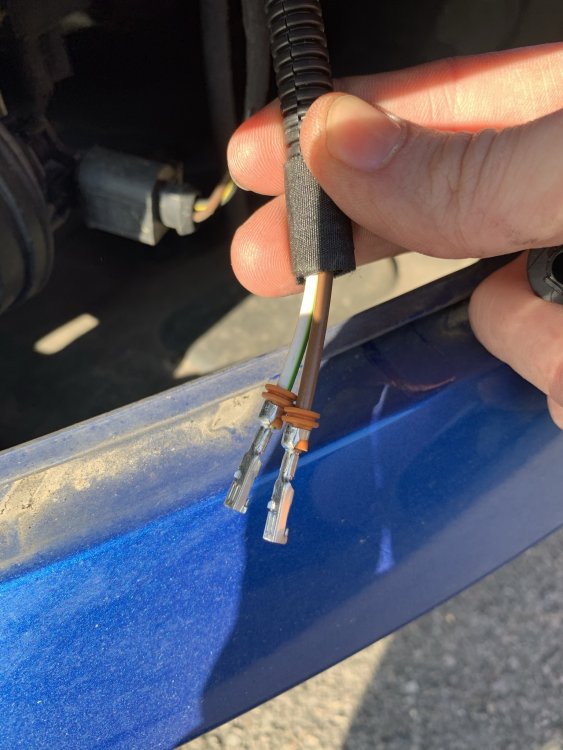
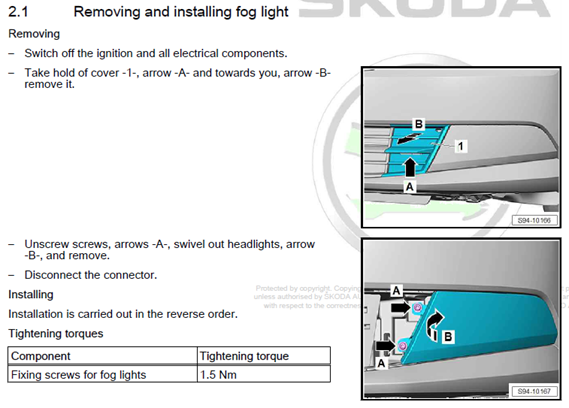
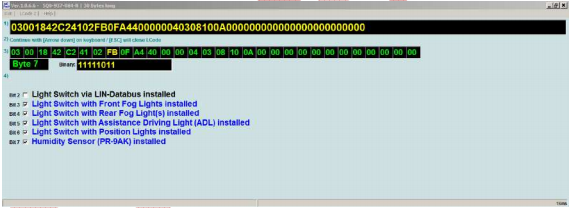
FABIA NJ 2015+ FRONT FOG LIGHT RETROFIT GUIDE After looking around on this forum there wasn't any guide or info on retrofitting fog lights into the Fabia III (NJ) - The only posts I could find on here was this post back from 2017. I went to order the kit mentioned in that post. (6V0 052 186) But its discontinued. TPS and Skoda both said this item was not available even from 'Germany' I did some googling and found two sights selling the kit. (NOT UK) Link 1 - https://www.skoda-parts.com/spare-part/6v0052186-retrofit-kit-halogen-fog-lamp-oe-24655.html (I ordered mine from here and didn't encounter any import fees post Brexit) (NO LONGER AVAILABLE) The Skoda Kit has been discontinued so moving forward you will most likely need to source the parts yourself or purchase a pre made wiring loom off a site like AliExpress. The kit came with instructions but for LHD and only for the kit itself so I decided to produce a guide for RHD vehicles with pictures to help, also the guide lists all of the Part Numbers needed to make your own kit up if you cant source a Skoda kit. **If making your own kit you will need to build the wiring loom yourself and measure out the distances of wire needed as I used the pre made loom in the kit, I have included a basic wiring diagram for this) I would estimate around 5m of each wire would be more than enough to produce a wiring loom*** ******************************************************************************************************************************************************************************************************************************* ***THIS IS A GUIDE AND YOU DO THIS RETROFIT AT YOUR OWN RISK, I WILL NOT BE HELD RESPONSIBLE FOR ANY DAMAGE CAUSED DURING INSTALATION OR CODING. PROFFESIONAL INSTALATION AND CODING BY A REPUTABLE GARAGE OR MECHANIC IS ALWAYS ADVISED*** PARTS NEEDED 6V0 052 186 – Front Fog Light Kit (Discontinued but can be found in Europe) Here Is a list of the individual parts found in the fog light retrofit kit (Since I used the Skoda made kit my wiring loom was premade, I wont be able to help you make it but I have included all the parts + diagram below to build your own, Green wire is for the left N/S fog, Blue wire is for the Right O/S fog and Brown is for ground) · Left fog light – 6V0 941 699 · Left trim for fog light – 6V0 853 665 (9B9) · Right fog light – 6V0 941 700 · Right trim for fog light – 6V0 853 666 (9B9) · 4 x hexagon socket head panel bolt – N 10412804 · 2 x Halogen bulb – N 10529501 (H8 12v 35w Bulb) · 2 x Bulb plugs - 3D0 941 165 A (Some come with pre-installed wire tails) · 4 x pins for bulb plugs - 000 979 244 E (With seals) · This is repair wire so you will need to solder the pins onto new wire as this is only repair wire. · 1 x crimp hoop for ground strap (8.5mm and up) · 2 x pins to connect to BCM - 000979025E. · Felt tape and 7mm polypropylene solid conduit to protect the wires. · Cable ties · Trim clip cable tie - 3D0 971 838 E · Silicone sealant · Green / White wire · Blue / White wire · Brown wire As well as the kit you will need a new rotary light switch. Rotary light switch with fog light (Auto model) – 5E0 941 431 D / Rotary light switch with fog light - 5E0 941 431 F This will only work on cars with BCM Control Units – 6C0.937.087 - 6C0.937.088 - 6C0.937.089 If you have BCM model 6C0.937.085 then you will need to order higher series of BCM control unit with Part Number 6C0.937.089 from ETKA (TPS or Local Dealer) *** YOU WILL NEED TO RECODE THE MODULE. I AM NOT RESPONSIBLE OR HAVE THE KNOWLEDGE ON HOW TO RECODE A BCM SO PLEASE DON’T ASK*** *************************************************************************************************************************************************** INSTALL Firstly, open bonnet and disconnect the battery. Remove lower grill blanking covers in the bumper where the fog lights are going to be installed. Remove wiper arms and water tray / plenum cover. You will need to use a flat head screwdriver to remove the washer jets wiring from the side of the water tray Behind the wiper mech you will see a rubber grommet with a nipple and a tab on it. Cut a slit in this rubber nipple for the two BCM wires to be passed through. (Do this first so you then know you have enough wire to plug into the BCM. (You will need to use the silicone sealant to reseal this hole once installation is complete to stop water ingress. Make sure to pass the wires underneath the wiper mechanism so that the wires do not get in the way of the wiper mechanism. There is a plastic ring to the left of the wiring that you can pass it through that keeps it neat. Once you feed the wires through you will see the wires appearing through the foam duct above the driver’s pedals. (I had a friend push the wires through till I was able to grab them and pull them through myself. Picture bellow with the circle around it is where the wires will come through. Pull through around 25cm of wire. Once you have pulled the wires through you need to remove T46B (Brown middle plug) from J519 (BCM) Lift the white tab up and the brown plug will slide out. Once unplugged you will need to remove the black and brown plugs from the brown plug. They have small little clips that hold them in place on the outer edge of the clip. On the inner plugs they will have the numbers for the relevant pin holes. Plug the corresponding wires into the corresponding pins. Green / White Wire --> BCM Plug B / Pin 40 Blue / White Wire --> BCM Plug B / Pin 3 To reconnect brown plug, do the reverse of removal. *************************************************************************************************************************************************** WIRING INSTALL - ENGINE BAY Here is a diagram to show you how the wires are run through the engine bay. This is a diagram for making your own loom, use plenty of cloth tape / conduit to protect the wires. The ground wire is the only one that will need a split to go to each light. Green and blue can be one continuous wire Run the wiring loom down the left hand side of the engine bay (looking at windscreen) under the foam, tuck down the side following the existing wiring harness, towards the front O/S headlight Cable tie the wiring loom to the existing loom by the AC sensor and headlight plug. (not tight as to allow the harness to move freely until installation is complete) I found that removing the headlight plug allowed me to tuck the harness under the light. This is where the wiring loom tees off to the O/S fog light and the remaining wires run over the radiator to the N/S fog light. Unclip the washer fluid neck and runt the wires behind it. Use 3D0 971 838 E to secure the wiring to the trim pieces / radiator and use existing wiring securing points along the way. I used a total of 3 cable ties across the radiator. Run the wires underneath the top radiator hose towards the N/S chassis leg. Where you pass the wires over the leg down towards the N/S fog light. Connect the grounding loop over the existing grounding strap found on the outer edge of the chassis leg, access this through the empty fog light hole In the bumper. You should now have two sets of wires dangling in the open areas of the bumper. Ground sound (N/S) you will have a Green/White + Brown and O/S Blue/White + Brown. Plug the wires / pins into the 3D0 941 165 A plugs. N/S – Left hand fog light · Green/White Wire – PIN 1 · Brown Wire – PIN 2 O/S – Right hand fog light · Blue/White Wire – PIN 1 · Brown Wire – PIN 2 Once the plugs are built on both sides you can plug them into the H8 Bulb located on the back of the fog light. Seat the fog light into the bumper and secure using the two hexagonal fixing bolts - N 10412804 Then place the new grill and push into place, this takes some force. Go round and fully secure your cable ties. Use your silicone sealant if you have not already to seal up the rubber grommet behind the wiper mech before re installing the water tray and wipers. Before you close the bonnet, move into the cabin, and remove the old light switch by pushing in the light switch dial and twisting clockwise, this will release the switch and you will then be able to pull it out and swap in the new switch. – do the reverse for install. Now reconnect the battery ready for coding. *************************************************************************************************************************************************** CODING Once in your preferred diagnostic software navigate to 09 Central Electrics. OBD11 – Long Coding, Tab 2 (little family) scroll down till you see ‘Light Switch with front fog lights’ click on this and change the following – Not Installed --> Installed – Swipe to write. ***If someone could confirm this - I believe the long coding to activate light switch with front fog lights is as follows - 09 CE – Long Coding, long coding helper – Byte 7 bit 3*** Photo from @wirer's VCDS Guide. (Thank You) Once you have told the car the light switch has been installed, you will see that when you pull out the fog light switch the front fog light symbol appears in the dash cluster. Navigate to the Adaptations and locate both the following. Once found change only the settings listed below. /// Leuchte12NL LB40 /// Type of Load 12 (lasttype) Nicht Aktiv --> Allgemein Scheinwerfer Light function A12 (Lichtfunktion A12) Nitch Aktiv --> Nebellicht Links Dimming AB 12 (Change value) 0 --> 100 /// Leuchte13NL RB3 /// Type of Load 13 (lasttype) Nitch Aktiv --> Allgemein Scheinwerfer Light function A12 (Lichtfunktion A13) Nitch Aktiv --> Nebellicht Rechts Dimming AB 13 (Change value) 0 --> 100 INSTALL COMPLETE *************************************************************************************************************************************************** To activate static cornering fog lights, do the following Adaptation for SCF sourced from Briskoda - ECU09 (Central electronics) - Adaptations //-----Left-----// - "Leuchte12NL LB40" - "Lichtfunktion B 12" - Set "Abbiegelicht links" (Default: "nichts") //-----Right----// - "Leuchte13NL RB3" - "Lichtfunktion B 13" - Set "Abbiegelicht rechts" (Default: "nichts") *************************************************************************************************************************************************** Credits: Thank you to @langers2k for helping me with the coding. Thank you to @wirer for your guides online. *************************************************************************************************************************************************** If you liked this guide please give it a thumbs up and any questions feel free to ask bellow.


-
OSRAM Nightbreaker Lasers! Best OEM replacement, LED are more hassle than they are worth.
-
USB or SD card will work. SD card slot is located inside the glove box on the right side
-
Monte carlo is a Fabia III, the manual does all models not just the monte. Otherwise it would cost skoda extreme amounts of money to produce a manual for every individual car and spec.
-
Had this on my first car (Fiesta) the resistors kept popping then eventually the fan failed and would squeal at you constantly when on! - This is good advice
-
Glad they are going to sort it under warranty for you
-
The monte is a lovely car, but personally the red accents put me off as well. I also didn't go for a 6 speed. I do long journeys in my 1.2tsi 5 speed 90 and its fine! The engines map to the same power anyway so after warranty is out you can remap the car to 130+bhp.
-
I am writing a guide as we speak, all fitted and coded in, cornering fogs also activated! Better order this quick as its last in stock!!! I didn't pay any duties on import either. - https://www.skoda-parts.com/spare-part/6v0052186-retrofit-kit-halogen-fog-lamp-oe-24655.html
-
Hi All, So I have just installed the Skoda front fog light retrofit (6V0 052 186) on my colour edition 2017. I am awaiting a new light switch in the post (5E0 941 431 D). Once that has arrived I can tell the BCM (09 CE) that 'light rotary with fog light' is installed (ODBEleven just has NO / YES, currently its NO) But I also need to tell the BCM that the fog lights are installed. Does anyone know what Byte and Bit I need to change on long coding to activate or any help in general for 'checking' the front fogs being installed. current long code for 09 CE is - 0F 00 08 50 42 05 09 73 03 A0 40 80 B1 07 13 08 00 00 D9 00 D6 01 35 00 00 00 00 00 00 00 BCM model - 6C0 937 089 I have ODBEleven Pro. TIA Also attached is whole car readout. Fabia CE 2017 - Whole Scan.rtf
-
That is correct yes - Kit comes with instruction booklet on where to run the cables etc.