


ApertureS
Resident Member
-
Joined
-
Last visited
Everything posted by ApertureS
-
That will be part of the motor - keep note there are different kinds, I believe 4 and 6 wire ones depending on if it’s memory or not.
-
When you say checked the power and ground and they were fine, what do you mean? What method was used? what results were you expecting? what results did you get? In what state was the car when tested? As it’s a voltage code I’d be looking more into this in detail. The yellow/green wire is a LIN network back to the engine ecu.
-
Try pushing the tailgate shut further than it is, then pressing unlock button. Sometimes this will release it, but if not you may have to get the inner panel off and start breaking the latch till it releases sadly
-
That’s normal, just where the hinge is for the 1/3rd 2/3rd split. Small piece of black trim over the hinge top and bottom to cover it but the cut out bit is normal yes
-
So ive got a intermittent fault on the front left level sensor still.... This is causing a AFS headlight fault and them to point at the floor. I believe there is 2 possible causes for this, either ive still messed up the wiring for it and its being fed wrong... or because ive fed it with 12V instead of the required 5V i may have burnt it out.... I assumed it was just a resistor with a wiper arm that adjusts the voltage from 0-5V across the resistor, but im now being told its a Hall sensor that puts out a signal, not a voltage variation. Will have to confirm this next week when a new battery for the laptop arrives. EDIT: Definitely not a wiper resistor setup, and is a lot more involved - very good chance ive cooked the sensor by giving it 12v instead of 5v... Ill preemptively order up a new one i think as theres good odds on it being that.
-
With gateway 3Q0907530AC, do you have any fault codes stored in 19 now? And what dataset did you use?
-
It will do this when there are fault codes stored in certain modules of the car that may effect the blind spot assist. Youll need to clear all modules of faults first then post a full fault scan afterwards of what comes back. The blind spot will stay on even after ignition cycles unless there are faults stored.
-
Well to start with, the wiring is completely different as its all done via BUS and not via 12v individual wires, you need a different 4B module, possibly a different BCM and you also need the windscreen camera depending on headlight type. Youll need ODIS or VCP to upload the correct datasets and remove immo block on the new BCM, VCDS is not able to do any of this. There is a massive amount more to this than just fitting headlights and changing a few adaptations.
-
I personally dont line the marks up as not all manufacturers put the dots/lines on the tyre. How do you know your wheels havent need balancing if you havent had a machine to test them? The way i generally do it is mount the tyre and put on the balancer - if the wheel wants more than around 120g of weight i tend to turn the tyre through 180 degrees and recheck, it generally drops a huge amount and ends up with less than 60g combined.
-
You haven't actually told us what the fault code is? The control module is bolted to the rear diff. It does need coding and adapting to work correctly yes.
-
Ridex are definetely not an OEM part.... OE = original equipment (genuine parts) OEM = original equipment manufacturer (same company that make the genuine part, just without the vehicle brand printed on it) Never have i seen Ridex make a manufacturer part and they are generally the cheapest of the cheap for a reason. Go for a known brand - bosch, febi, mann, mahle for example.... Also a proper service is a lot more than just changing some oil and filters.... inspection of components that are worn and wearing is a big part of it as well.
-
The difference is, if your live data is showing nothing for the exahust temp sensor then it would either be not fitted or throwing a fault. Whereas an intermittent power loss could be any number of things. The EGT sensors are also used for post combustion gas treatment whether thats EGR, DPF or SCR.
-
Do you have a fault code for it? If not, your car isnt supposed to have one.
-
£1000 is that for the parts and labour or just parts? As the pipe is priced at £270
-
Normal in colder weather you get a creaking when going over bumps. can be either the rear bushes or the anti roll bar bushes that cause it
-
I did try and take a look, it looks like what they call the noise bushings are different which is the rubber bit that sticks from the inner bush to the outside edge. Surprisingly it’s bigger and closer to touching, I thought if these were the cause of the noise they would be made smaller. but the manual specifically calls for them to be filled with grease once fitted (we will see how long that lasts and if they start to squeak again)
-
The arms have a small line - almost looks like someone has run a saw blade across it gently. The triangle lines up with this. Torque wrench wise I have a 2x 1/4 inch, 3/8 and 2x 1/2 and these allow me to cover all torque settings from 0.8Nm-320Nm for the angles there is no need to mess with any angle gauges or anything, just torque the bolt, mark the bolt head and the bit that doesn’t move and do the math, a 1/2 turn is 180 degrees, 1/4 is 90, 1/8 is 45 degrees. Or even a flat of the bolt to the next flat is 60 degrees. If you want to be very specific you could mark the start and end point but after years of doing it, can generally do it by feel now.
-
So it depends what radio you have if it supports it. The usb hub in question will work but the plugs are as follows: 2x usb ports (data and power) 1x usb port (power only) 1x to infotainment 1x multiplug with power, ground and a 5v switched feed If you didn’t want to do it properly but instead easy, you can take the power from the 12v socket, the 5v switched from the dedicated supply to the front usb socket for faster charging, and the ground from the 12v socket too. That means you only need the 2x new LVDS cables and a short bit of wiring. The usb sockets need to be charged to ‘dumb’ ones whereas the one currently fitted is a hub in itself to allow CarPlay and such. the dumb ones are simply a usb port that goes to the hub and this controls all of that now. The coding is straight forward and is literally enable the second connection - usb in coding.
-
I can tell you with 100% certainty that the air that blows into the arm rest box is regulated by the rear temperature. So depending on if you have 2 or 3 zone climate will determine if the passenger or rear climate controls it. There is no dedicated cold air feed to the arm rest whereas the glovebox has a feed from after the evaporator core but before the heating element.
-
Probably what the factory robot uses to fit and align the pedal assembly
-
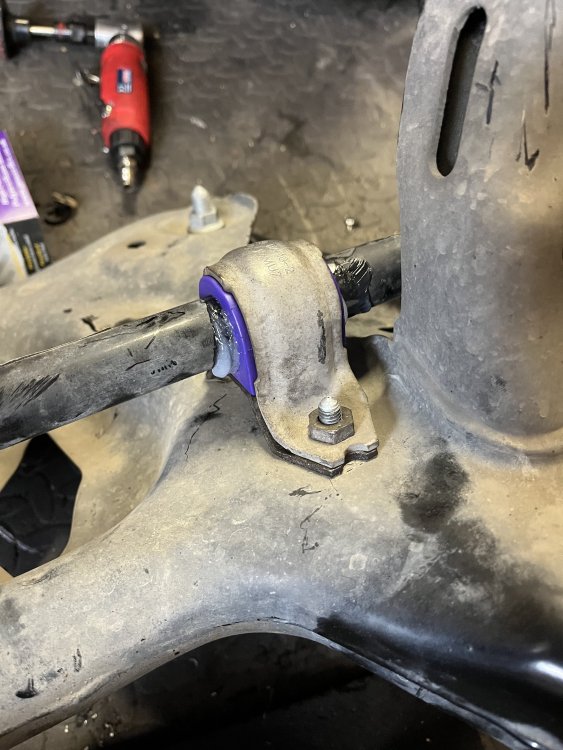
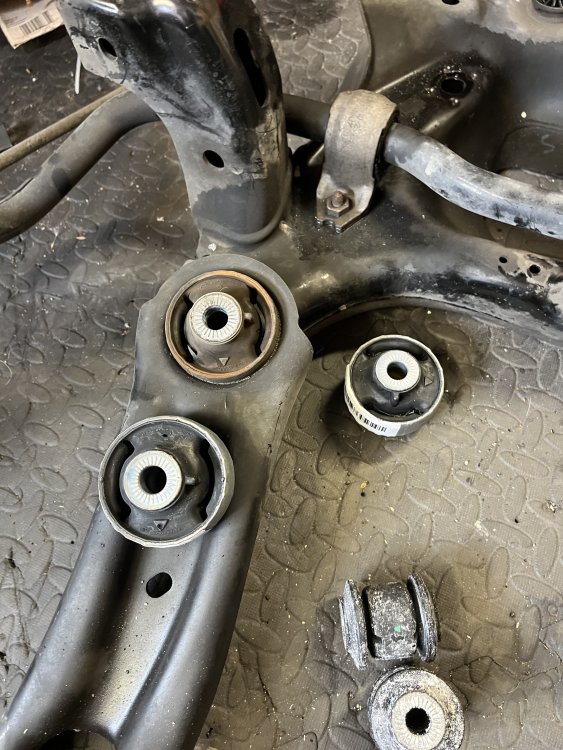
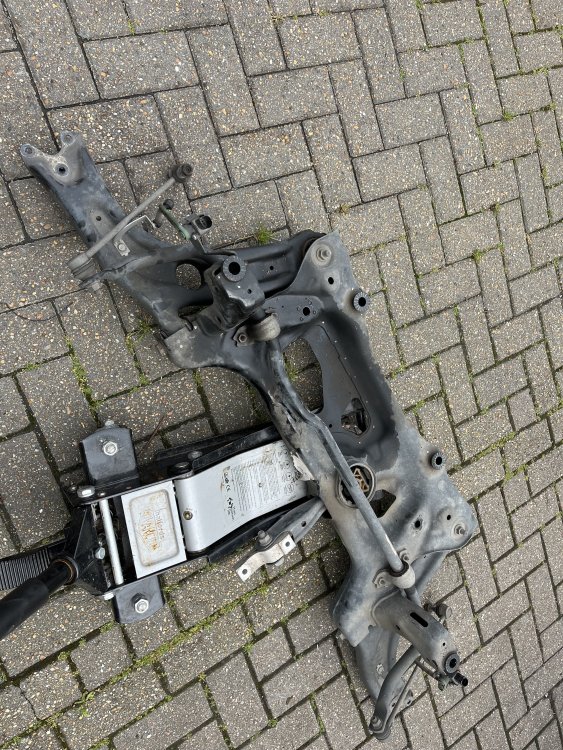
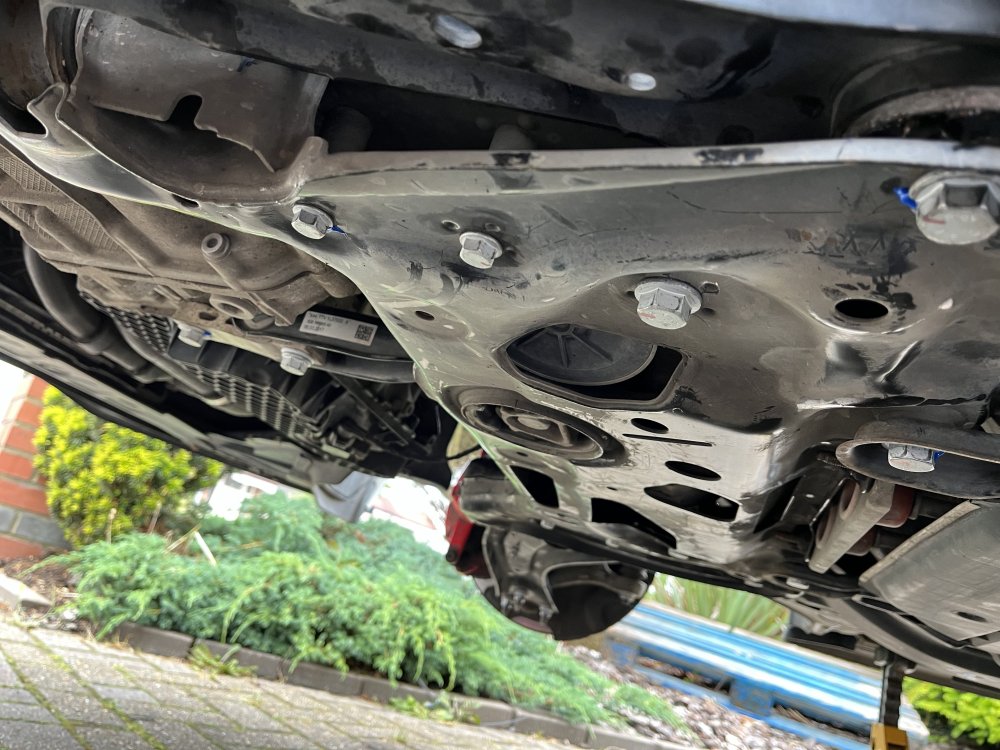
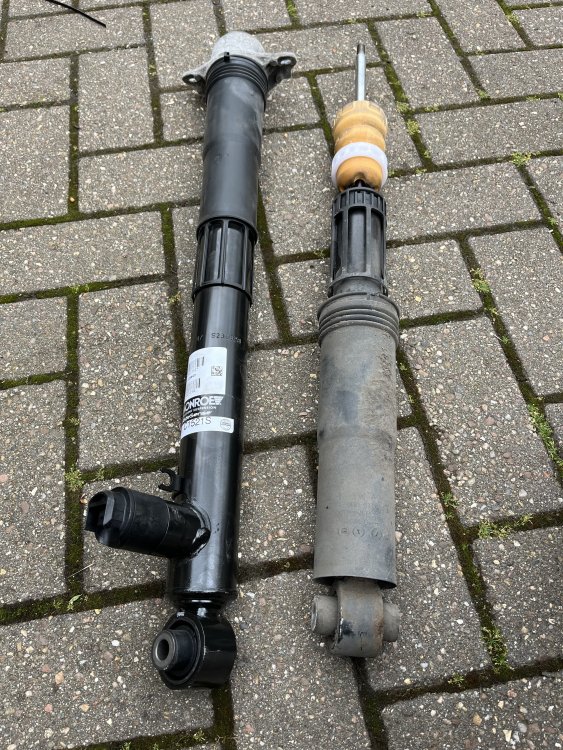
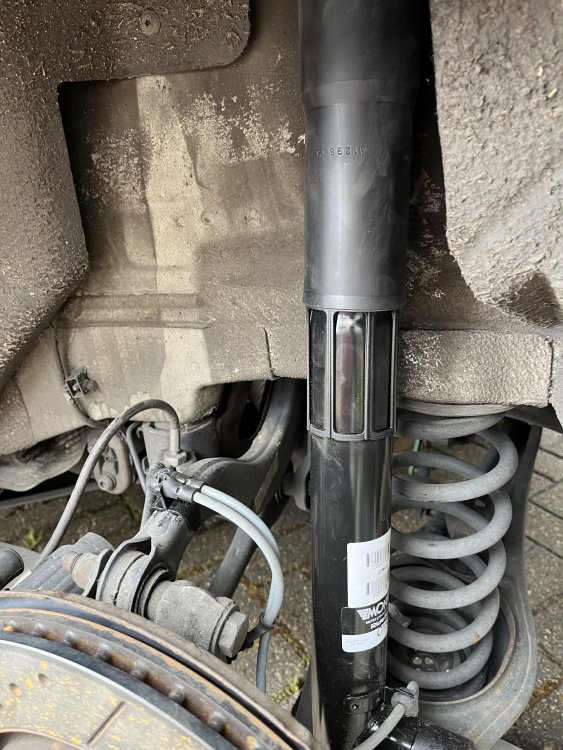
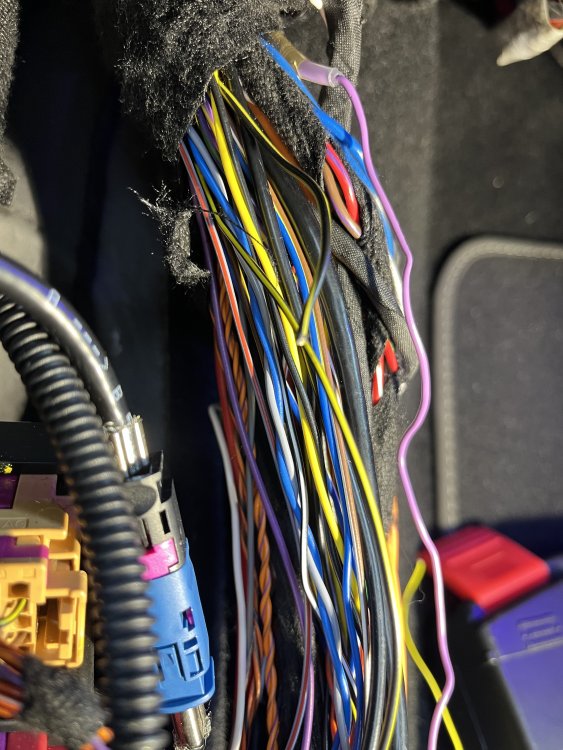
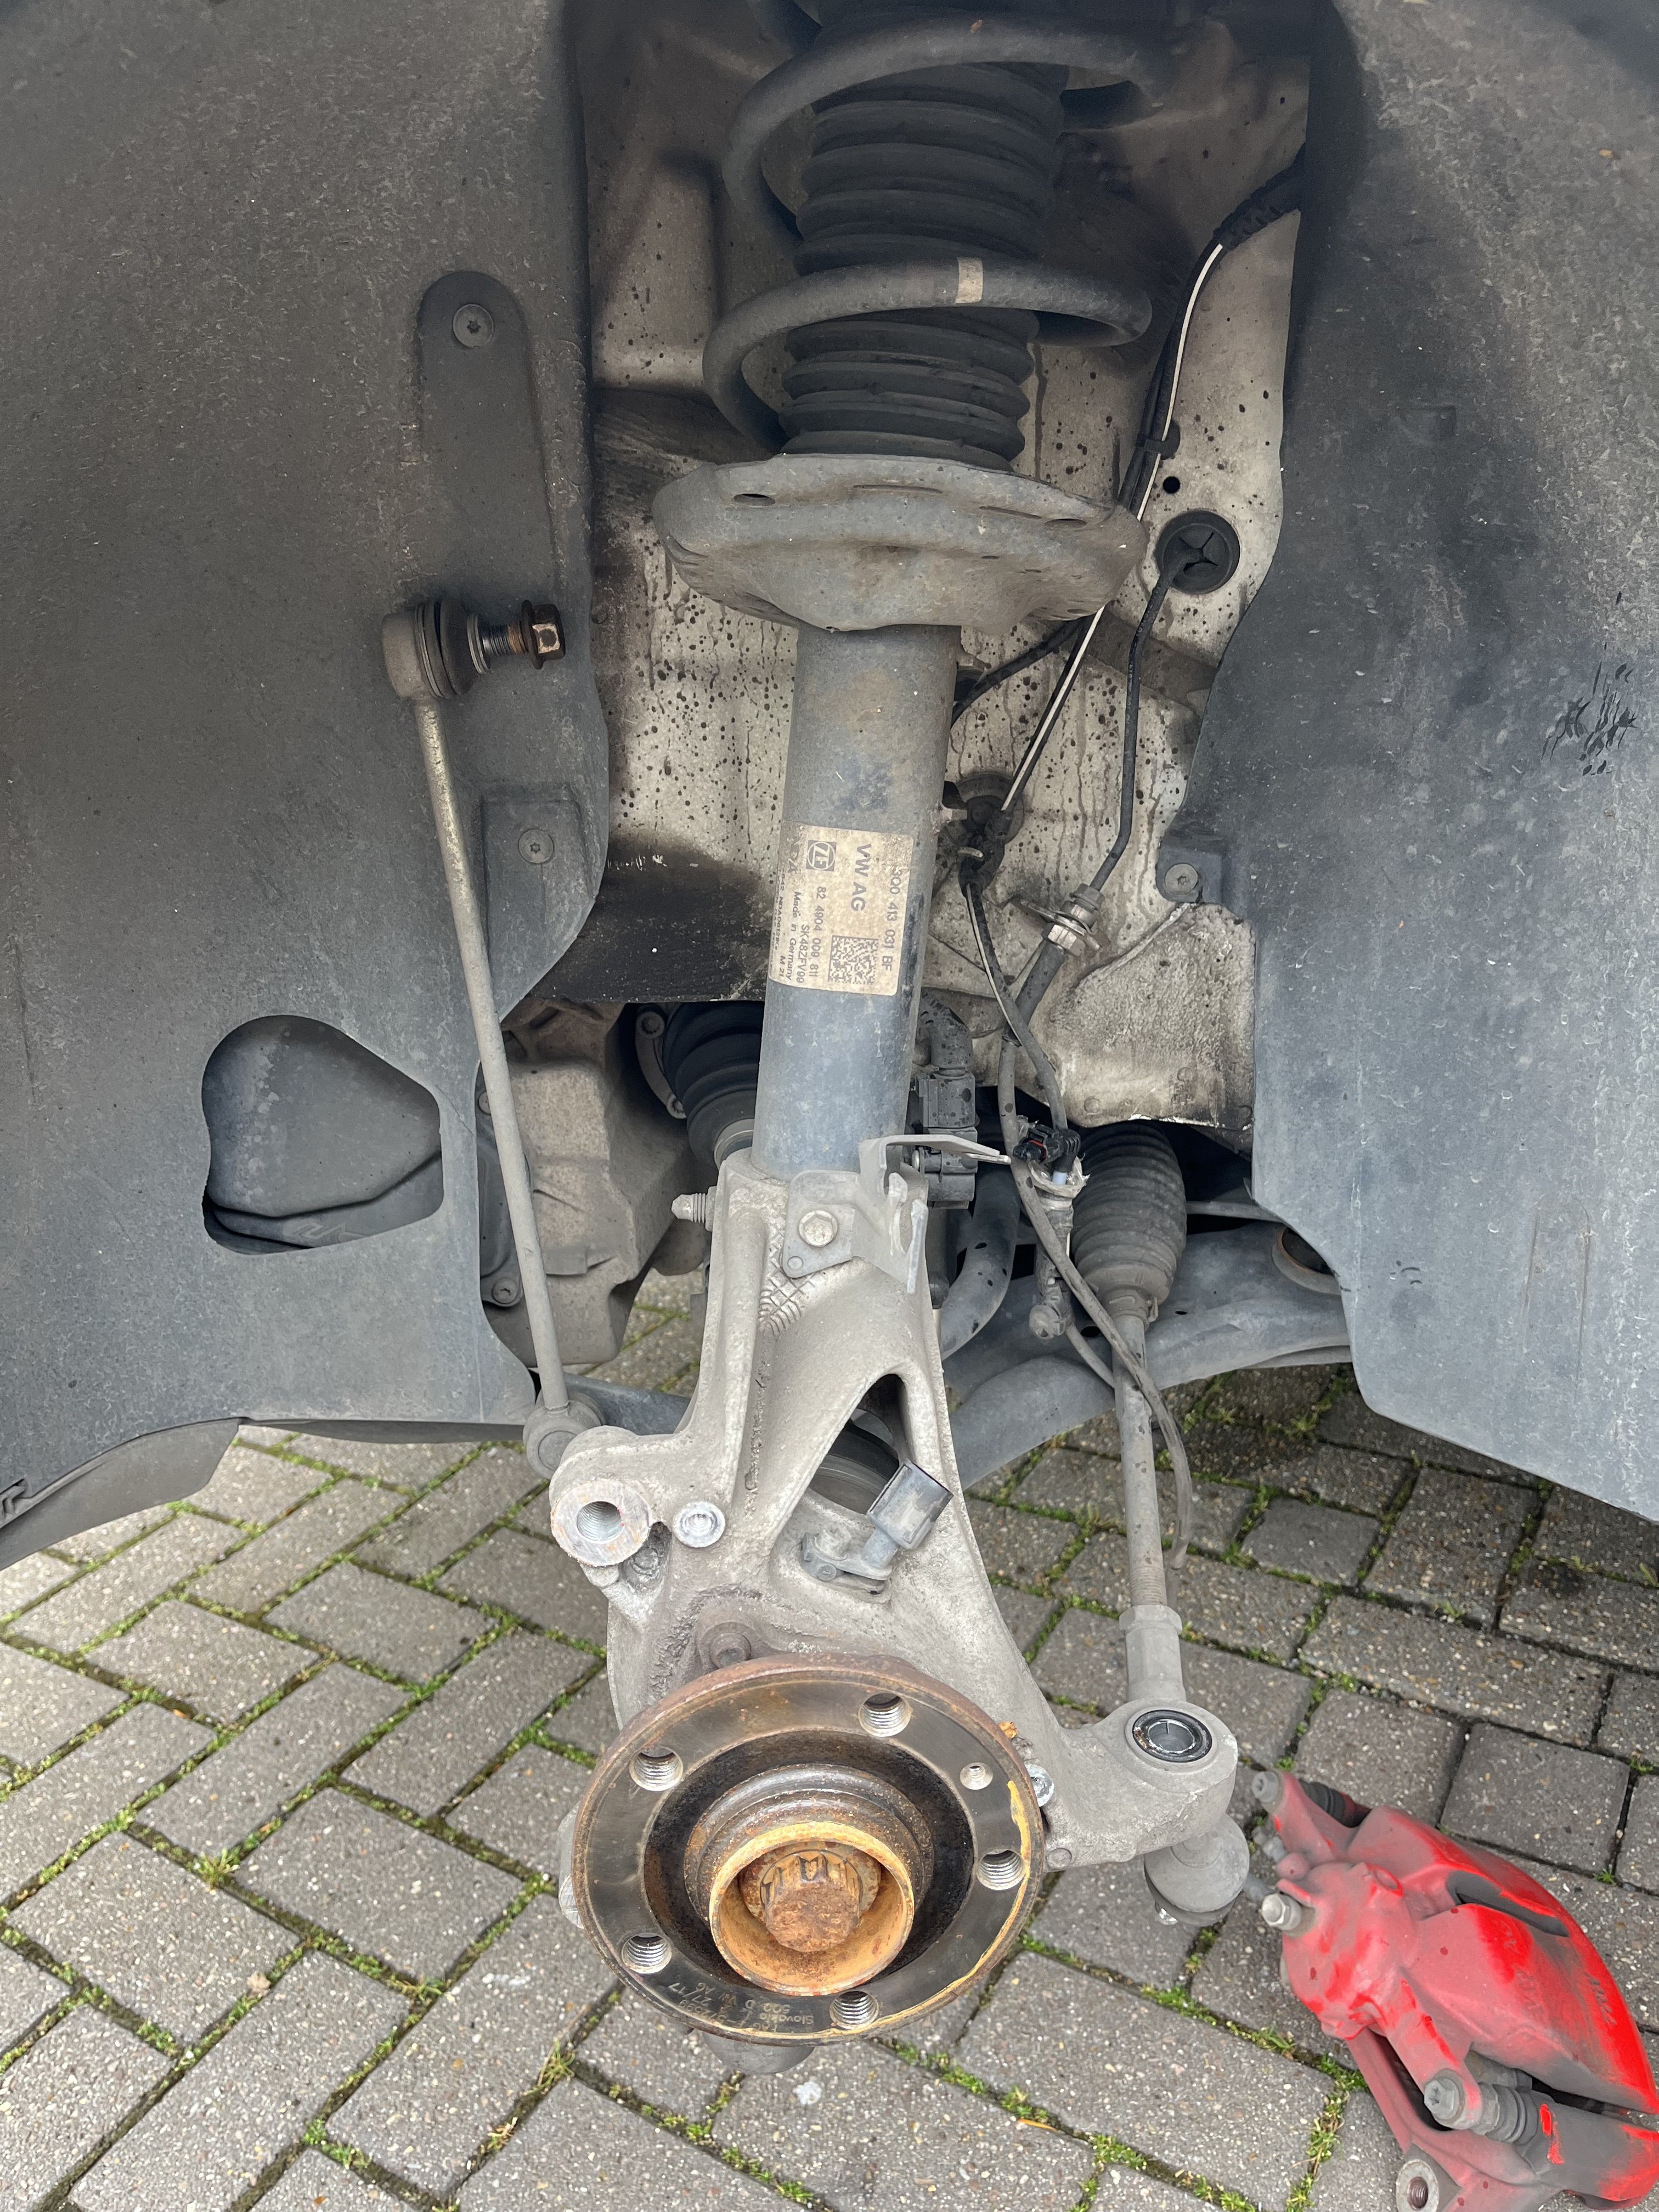
So i took the week off work to put a big dent in things! Webasto parking heater - Finally got the basic settings to run through on this and got it to run without cutting off. The remote was then very very easy to pair with ODIS and took 30 seconds. I now have a fully working parking heater and ventilation setup! So on cold days/mornings I can either press the remote to start it up, or set a time on the dashboard that i want to depart and the heater will boot up and get the interior nice and warm! And being summer now, i have the ventilate option - which instead of heating the interior will turn the blowers on to remove all the hot air in the cabin before you are even in the vehicle. Webasto signed off fully and a rough guide on the coding will be along shortly. Areaview/360 camera - no further updates on calibration yet sadly, still trying to find time. The DCC and suspension work - probably what a lot of you have been waiting for. Before picture of the front strut. Now as all the wiring had been done and can be seen wrapped up in the photo above, it was just a job of physically doing the suspension work. The new monroe strut fitted up with all new top mounts and bump stops. As everything is being done by the book, all new hardware was required, and for all this work it was roughly 60 nuts and bolts. (The blue goo in the picture above is a wax visual indicator I put on all critical bolts to see if they ever come loose). Whilst we are still on the front of the car, it was time to get all the front bushes changed to finally get rid of the known creaking issue over bumps. 3 sets of bushes were changed here: Front lower arm inserts - fitted with genuine rubber bushes - no signs of wear on old ones Front lower arm puck inserts - fitted with genuine newest revision rubber bushes - old ones were creaking and a known issue for this Anti roll bar bushes - can only be purchased as a complete anti roll bar so polybush fitted instead - also a known creaking issue. So far, no noises at all from the front anymore! After this we moved onto the back - much more straightforward, 3 bolts for each strut and they were out. New bump stops and guards fitted but top mounts reused as ive never seen one of these fail. Straight forward fitting and done both rears in around 20 minutes. After this, all the hardware is fitted and the car was all fitted back up and all coding was carried out. (Im still working out some nacks with the coding so wont post it just yet) But.... we ran in to a fault code for the front left level sensor reading short to positive, so it was time to start diagnosing. Rather than pull the front wheel i decided to go from the NSF footwell where the multiplug is for both front sensors. 3 wires to each sensor, a ground, a 5v feed, a signal. On the 5v feed i was getting 12 VOLTS, not ideal. So the boot was stripped out to access the DCC module incase I had wired it incorrectly and after disconnecting the DCC plug in the boot, there was still 12V on this wire.... some head scratching commenced and a conclusion was made, and i remembered my earlier post The wire for the DCC level sensor is a 0.5mm black with yellow trace, one of the wires going to the phonebox amplifier is.... you guessed it, a 0.5mm black with yellow trace. Both wires ran alongside eachother in the passenger footwell and were very easily cut and swapped around. This is the huge upside to me doing all these jobs using original wire colours, routing, plugs, pin outs and wiring diagrams. It means that tracing faults is no different to any other factory fitted car, and more-so, if someone else had to diagnose the fault, they could follow all OE documentation. So not only did this cure the DCC fault, it cured the phonebox fault also. The final part of the DCC is the calibration which i will cover in more detail - but basically leave all 4 wheels hanging off the ground at maximum travel, and press calibrate. I will post all of my used suspension torque settings - THESE ARE SPECIFIC TO MY CAR AND MAY NOT BE THE SAME AS YOUR REQUIRED SPECS - PLEASE FIND THE CORRECT ONES FOR YOUR CAR AND DONT BLINDLY USE THESE These are all posted in Nm+Angle format. Front Subframe Main 70+180 Subframe small 50+90 Steering Rack 70+90 Steering rack end 20+90 Steering rack to column 20+90 Anti roll bar 20+180 Anti roll bar links 80 Lower arm to ball joint 40+45 Lower arm forward 70+180 Lower arm rear 70+180 Hub to shock pinch bolt 70+180 Driveshaft 200+90 Shock to upper mount 60 Shock mount to body 20+90 Brake carrier 200 Dogleg to subframe 130+90 Dogleg forward 50+90 Dogleg rear 50+90 Rear Shock to lower arm 70+180 Shock to upper mount Shock mount to body 50+45 Upper eccentric bolt 95 Lower eccentric bolt 95 Wheel torque 140 There will still be more updates to come as things are fully completed as well as all coding required and such.

.thumb.JPEG.296521ec97952af7fde54a6ce49e19e0.JPEG)
.thumb.JPEG.232ea84d5163d13038955427cd7183fc.JPEG)
-
Ive had the seats stripped down to their individual components and cant say ive ever seen that part - could it be from something not car related?
-
Welcome to the forum, if you can supply me your reg I can give you a definitive answer. as I’m on my phone I can’t be sure of if you have your car details in your profile so can’t check. Older 1.0 engines had the water pump driven by the belt, newer 1.0/1.2 engines have the water pump driven by the opposite end of the exhaust camshaft. the water pump belt does not need changing on these newer setups but the normal cambelt does. Take note that if you have a much much newer 1.0/1.2/1.4 with ACT (active cylinder technology) don’t expect much change from £1000 for a belt change.
-
Drop me a PM if you want it, if youre only in watford then im only down the road for you
-
Ive got a brand new 16" spare for a superb for sale if youre interested? Looking for £40 - brand new conti tyre fitted also.


.JPEG.4b9e6b44f51e23abb666719964a20da7.JPEG)
.JPEG.19779bc42963901b79a0c0119f0cbbb7.JPEG)


