ApertureS
Resident Member
-
Joined
-
Last visited
Everything posted by ApertureS
-
TURN IT OFF ASAP Do not start it until the camshaft pulleys have been checked. There is a known issue where the bolts come loose on the camshaft pulley covers. Best case - bolt falls out and goes elsewhere. Worst case - bolt jams somewhere and causes the timing to jump and destroy the engine
-
Spot on, that will work perfectly being from a 2021 onwards car means it’s fairly new still so I’d get that at half the price of new.
-
No difference, just newer revisions of the same part. Ive listed them oldest to newest for you
-
The tow bar release is entirely mechanical so no coding would ever fix that. youll need to check if the cable that goes from the handle is moving the small gearbox then the next cable to the actual tow bar. the led colour is just a micro switch to tell you green means it’s locked either stowed or securely out. and red means it’s not secure in either of these positions
-
I’m a bit confused here as I think you may be getting the terms confused, there are 5 separate systems at play for the climate control system, could you specify which one you think is the problem and the symptoms you are getting. Air blower and filter - the variable blower fan and pollen filter Air conditioning - complete heat exchanger system including the evaporator core which almost freezes the air to clean and dry it Fluid heating system - this uses engine coolant to heat the cooled air to the correct temperate as decided by the climate control ecu Electric heating system - (not fitted to all) uses a large electric resistor to heat the air when coolant isn’t at temperature Ventilation system - uses electric stepper motors to adjust flaps to direct the air where required and requested
-
The android head units are shockingly bad you loose access to all the car features and settings that can be adjusted, you also cause a massive amount of fault codes that will stay in the car. Why do you want that as opposed to a probable mib2 or an upgrade to mib2.5?
-
So the link you provided has the following compatible part numbers: - It also doesnt have the child lock function - safelock is something else. OE 5E0839016 — VW OE 5K0837350B — VW OE 5TA 839 016 K — VW OE 5E0839016B — VW OE 5TA 839 016 P — VW OE 5G4839016 — VW OE 5G4839016C — VW OE 5NA839016 — VW OE 5NA839016B — VW OE 5NA839016D — VW OE 5TA 839 016 D — VW / AUDI / SKODA / SEAT / VAG Whereas the parts catalogue for your car lists the following as compatible for the rear right: 5TA839016H 5TA839016N 5TA839016T So id say that it is the incorrect part, but fault codes will also need clearing after replacing it with the correct one.
-
Have you got the link to the one you purchased? and have you got your vin number, ill check if you ordered the correct one.
-
So the current outstanding jobs as follows: Calibrate areaview - will try and do this in the next few weeks Check the coolant leak repair - will check this later today Possible alarm fault - the car alarm seems to go off in heavy rain - im guessing related to the KESSY door handles probably, but will look into this further. Ambient lighting fault - I get a sporadic code relating to the ambient lighting LINbus having a fault that will need looking into further. Since then ive done the following - I wasnt a fan of the plastic liner in the sunglasses holder scratching my glasses, so i went to hobbycraft and got an adhesive lined felt sheet for £1. Cut to size and fitted in place. I also preped the new Canton grills for the front doors. For door cards with the grills - they are £450 each new. I managed to find the wrong door cards, but the right grills. So these were purchased for £50 for the pair and the grills removed. Only issue is, all the tabs broke off. The solution - 3D print some new tabs and then epoxy them into place Now just to cut the door cards and fit these in place. I really should get some black PLA so it blends in better!
-
What was wrong with the old one? Did you buy a new or used part? Was it genuine or aftermarket? Was the part number compared to the old one? Have the fault codes been cleared? Has the live data been checked?
-
Date of registration doesnt always correlate with date of production. Technically there is a possibility of it being a early model just registered late. If you have the VIN i can check the production date.
-
If you press them individually it also child locks the rear windows though. Or do you mean child locks the window without the door?
-
Not too sure what you mean When the electronic child lock is engaged on either or both rear doors it prevents the rear interior door handle from working, disables the rear window switch and turns off the small LED in the interior door handle.
-
It is not a case of just changing out a window switch. Ive carried it out as seen here: You need to run a few new wires from the front door module to the switch pack. You then need new rear door modules and new rear door locks and new wiring to go between them. The door modules need the correct datasets and coding adding to them also.
-
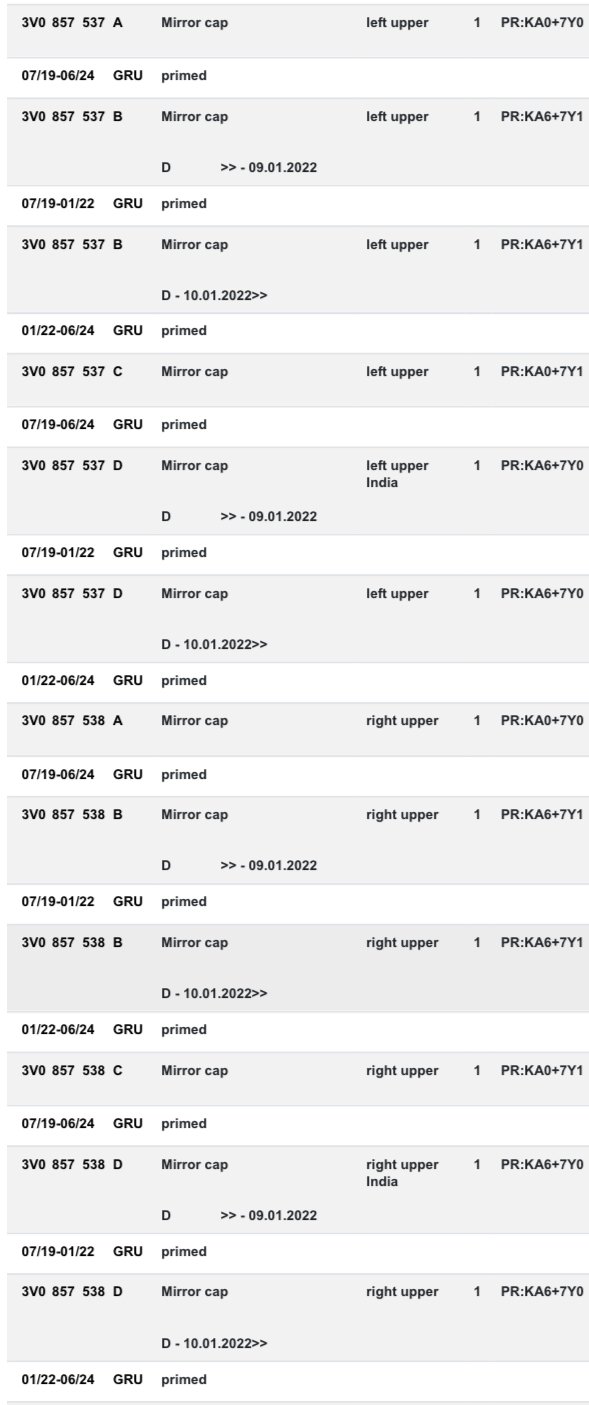
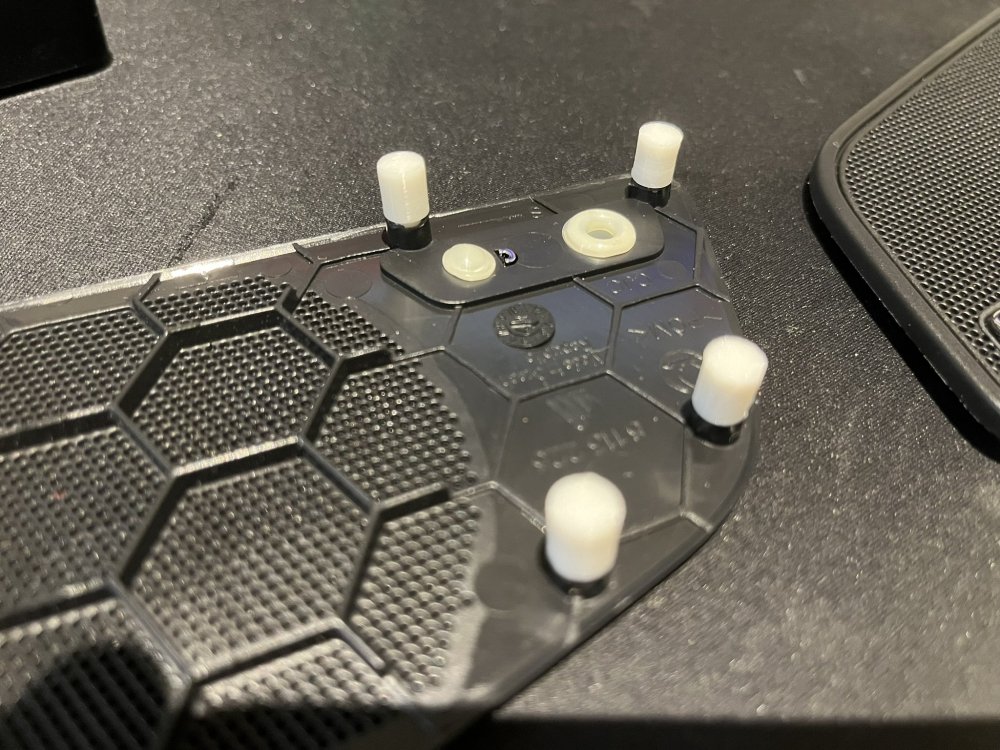
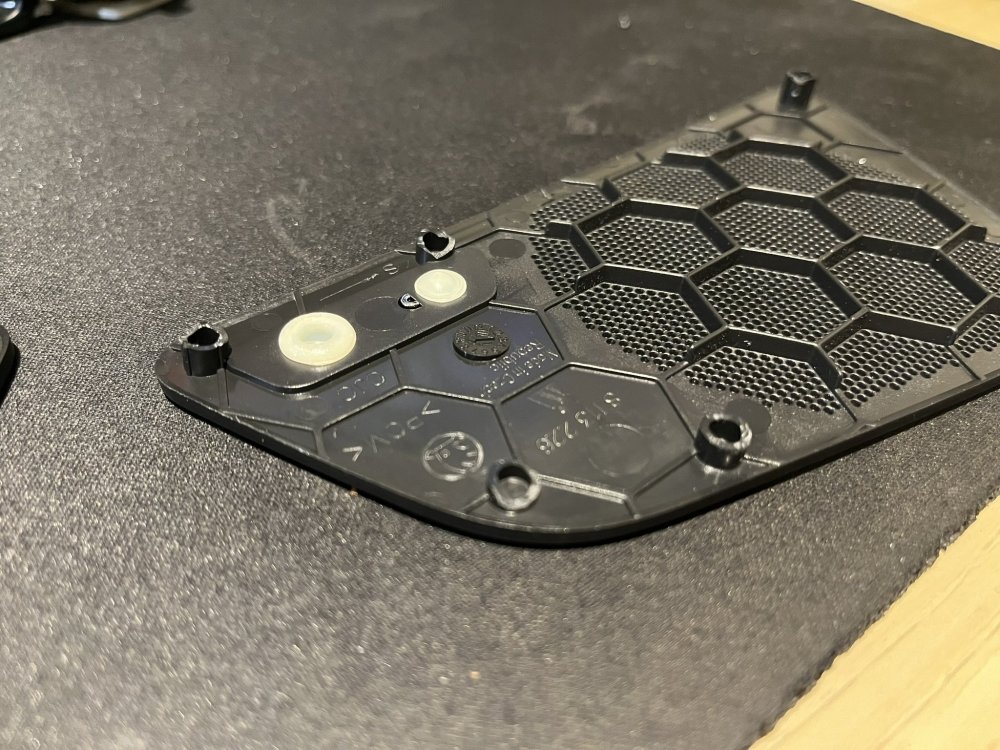
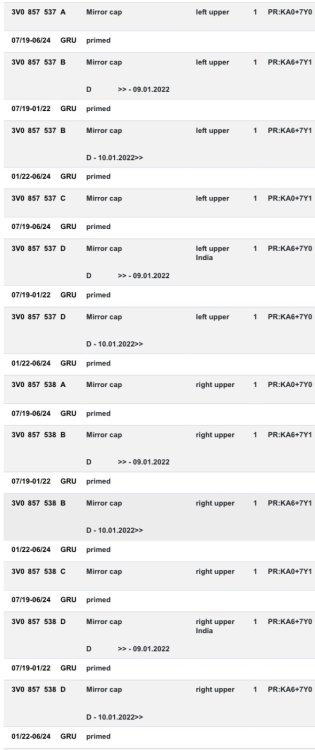
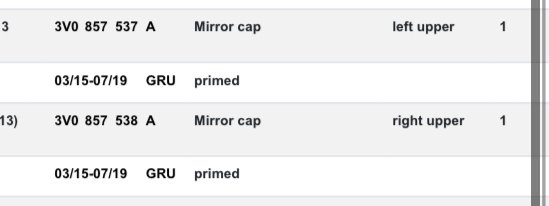
Here is all wing mirror cover part numbers from 2015-2024 the pr codes on the right show what they are for KA0 is no cameras KA6 is areaview 7Y0 is without blind spot 7Y1 is with blind spot The 3VD part number is China market specific and although a lot of parts do fit, they’re mirrors must be different
-
Hi there, im not able to help you further unless the questions are fully answered. We arent in front of the car so can only assist based off what you tell us which is why the questions need answering in detail. You cant post a fairly obscure post and expect people to point you to the answers without knowing all the details.
-
Did you swap to this BCM or was it factory fit in your car?
-
Facelift wing mirrors are the same, the only time they change is if the car has areaview cameras, then the internals change.
-
Why were all these parts changed? Had they failed or had a point of failure been noted on them? What checks were made to check actual oil pressure? Has the oil pressure sensor been checked? When were the parts replaced? Is the oil level good? Was the filter changed and inspected? Was the turbo feed changed? Have big end bearings been checked or the oil checked for swarf? What engine are we talking about? If a TDI, was the oil pump belt replaced?
-
So a little update on the coolant leak - So for the parking heater, a hose is removed from the heater matrix and this now goes to the electronic water pump, then parking heater, then back to the other end which goes into the heater matrix. As shown in this diagram Now, for the LHD cars this is formed from a metal pipe with brackets and such. This pipe does not work on RHD cars as we have the steering column in the way. So I had to make my own pipe using 19mm coolant hose and some fittings. To join the fittings to the hose as space was quite limited I used Stepless 1-ear hose clamps as photographed below These seemed to work just fine and the right size was used. But after a few months I developed a very slow coolant leak, roughly 1 litre every month and I noticed a small spot of coolant below each of these clamps. Checking on each of the clamps I noticed that the ears had expanded and almost stretched out allowing coolant to pass the fittings when under pressure. The leak then continued to roughly 1 litre a week and at this point I have decided to investigate further, A few of these clamps had almost loosened fully to the point the only thing holding the hose on was the barb on the fitting. I can only put this down to the fact that the heat cycles caused the pipe and fittings to expand and this in turn caused the ear clamps to loosen and not return due to their rigid nature. I then pulled all the hoses from the car for a full rework (quite a lot of work as they run below the vacuum assist and behind the engine very close) At this point I decided there were 2 methods to resolve this; Worm type hose clamps or Constant tension hose clamps Wanting to keep to the OE style and as the name suggests, these constant tension clamps provide the same tension when expanded and then shrink back down after providing a perfect seal always. An example of this constant tension / spring band hose clamps looks as follows: Now these are all fitted and the coolant system refilled and ran up to pressure for 1 hour, so far, no drips or wet spots. But we will monitor this closely and see what happens in the coming months! Being what I believe is the first RHD MQB car with a OE parking heater fitted, we are bound to have teething problems! (To rule out any manufacturer defects, all parts used were Mikalor brand, and the clamps were crimped with ear clamp pliers)
-
The file you have is a firmware file, not a dataset. youve also posted a 5Q0 number which cannot be modified in the same way as newer 3Q0XQ onwards datasets can and is not compatible with the FPA editor
-
Need to be more specific about what you’re after? Datasets for gateway are near enough vin specific, so what exactly are you after and trying to do? If you want your cars dataset this can be done through odis or certain websites, if you are looking for a random superb dataset that matches your version then you’ll need to post up what version, software and hardware you have
-
No looms on any modern VAG car are made to fit all. Every single loom is made by VIN or it has only a small choice to pick from depending on variants. But there wont be any loose plugs anywhere sorry, this applies to all VAG cars. The car you are seeing spec'd with blind spot and lane assist will of been built with that and have its loom made for that from the factory. There are official methods to chop and join wires that do not void warranty, but they would not cover the retrofitting of additional parts and wires, so yes technically it would void the warranty for any parts that are touched.
-
So I just realised we are long overdue an update! So the level sensor was fitted and the fault codes cleared and have not returned. but the issue was, the headlights kept moving through their full range of movements. So I ran the headlamp basic setting procedure again and this time, they stayed still.... I have been using them for the last 2/3 weeks with no issues!!! So that seems to be fixed. So I think because the basic settings were done with a dodgy sensor, it was trying to find that dodgy reading still. So onto the list of whats left to do, and whats next: Fit rear bumper brackets to help tighten up the gaps under rear lights Still have to calibrate the areaview, honestly havent had time Work out if there is anyway of auto swapping between front and rear cams when going from reverse to drive Fit a small piece of trim between the rear bench seats The next big issue is, I have a very very slow coolant leak - as in 1 litre over 3/4 weeks. Now this could be a few things as its only appeared since I started touching stuff; The custom piping I have made is very slowly leaking for the parking heater The parking heater has an internal leak (used it without issue since so doubt this) It is coincidence and there is a different part of the car leaking Either way, its a pain to find as its so small, will consider putting a UV dye in the coolant to monitor it. Now for whats next on the list of possible mods: 10 way massage seats - Having driven the new Audi A8 recently and range rovers they offer a lovely pnemuatic massage function which involves a small air pump and manifold that inflates and deflates bladders under the fabric. Whereas the OE massage function is simply the lumbar support moving, This is 10 individual bladders. This is only an idea so far and if I was to attempt it, I would give it a go on the back seats first as its less critical if all goes wrong. As its not technically OE it would be slightly moving away from the spec Ventilated rear seats - the rear seats dont offer any ventilation and of course there is no option for this with the control panel and if I really wanted to fit this it would be a massive job. First id have to strip the control panel and fit a second row of blue LEDs that are controlled by a different circuit board. Then id have to tap into the control panel LIN outputs and work out what buttons output what messages and mimic this on a custom circuit board to simply do the heated side of things. I would then have to experiment to find out what signals the 4B module (which has outputs made for rear seat ventilation, as its basically a BCM expansion) would expect to turn on its ventilated outputs and what feedback to send back to the custom module. It is all possible and the fitting of the actual ventilated parts is the easy bit. It would mean pulling out my signal sniffer and making custom surface mount circuit boards again. Could be interesting.... Sunroof - this idea is still in the back of my mind and if and when I do decide to get the paint touched up on the roof and surrounding areas it wouldnt be the biggest job. The old roof is cut off to the sills, the new roof is bonded on with glue as per the OE instructions and then around 15 spot welds on the front and back faces. The biggest expense in tooling is the special laser weld grinding tool (£450) and the spot welder can be rented for around £100 for the weekend. After this all parts including the panel, second hand sunroof (from 2023 car) and the adhesive come to roughly £1000. But again, this wouldnt be considered for a long time yet.
-
There is an indent on the inside of the valance that shows exactly where it needs to be cut.