


ApertureS
Resident Member
-
Joined
-
Last visited
Everything posted by ApertureS
-
It is something I offer done quite a few for people now. feel free to message me with the link in my signature
-
Spot on. front is easy, rear involves lots more removal.
-
That to me indicates either a damaged wire or unplugged connector. or the camera has completely failed. first thing I’d be doing is checking the connectors are all in: back of the camera in front grill left side chassis leg connector left side lower a pillar in car control unit under right seat if all of these are okay then next would be continuity tests for the wiring, which need very small pins and go as follows pin 1 to pin 4 pin 4 to pin 1 pin 2 to pin 3 pin 3 to pin 2 and these are pin outs at the camera connector and at the control unit connector.
-
If you have a 3Q0 camera, yes, if you have a 2Q0/2QD camera, no sorry.
-
If I was you, I’d throw these in the bin immediately. The metal that these are made out of causes them to corrode to the point they weld themselves to the stems meaning they need cutting off and replacing. Just a heads up from multiple tries of different brands and multiple having to be cut off. (joys of galvanic corrosion)
-
A slight change in part number does not equate to a slight change in part! Not in the slightest! The first 3 digits are the compatible car 565 for kodiaq, 3V0/3V5/3V9 for different superb body types. The whole point of the MQB platform is cross compatible parts so if they did fit they would keep the same part number. Please don’t fit a non compatible set of roof bars, no one wants a crash from roof bars and it’s load flying off.
-
The module you have posted a picture of is the tow bar module. The PDC control unit is to the right of the accelerator pedal. Small black box. But even just finding the box wont help you fix it without the scan first. Youll need to post a full auto scan for us to help you, not just snipits. Plugging in a reverse camera will have no effect.... Honestly youll need to help us to help you by providing a full scan. You have said no comms with the PDC module, but you havent said where this is being reported or anything.
-
If we are being pedantic, the 55/4B multi function control module does communicate with all other modules on its network using canbus. But.... when talking to its slave modules (left and right headlight) it uses a different protocol. Then the individual headlight control unit (sub system 20 and 21) these then do the functions including current monitoring and light fault monitoring.
-
Hope you arent footing the bill for the throttle pedal? If they want to guess the faulty parts then thats on them to pay for in my opinion.
-
Never understood why people call it canbus error free/monitoring. There is no canbus involved at all, its simply open circuit and current monitoring. Sending a halogen or xenon bulb a canbus signal would mean absolutely nothing and wouldnt do anything.
-
The one way valve in the pump has failed. replace the washer fluid pump and all will be working again.
-
Sorry no alternative that is plug and play and of that quality. People fit aftermarket cameras but they are often poor quality and require all new wiring to be ran front to rear.
-
Where possible avoid the ‘one click’ options as they aren’t always compatible and people have messed up their modules before from it. they also don’t tell you what was exactly touched so reverting it isn’t always easy.
-
Are we talking genuine camera or an aftermarket? If genuine, it will need coding and calibrating to the vehicle If you supply the vin I can source you a camera or supply the part numbers
-
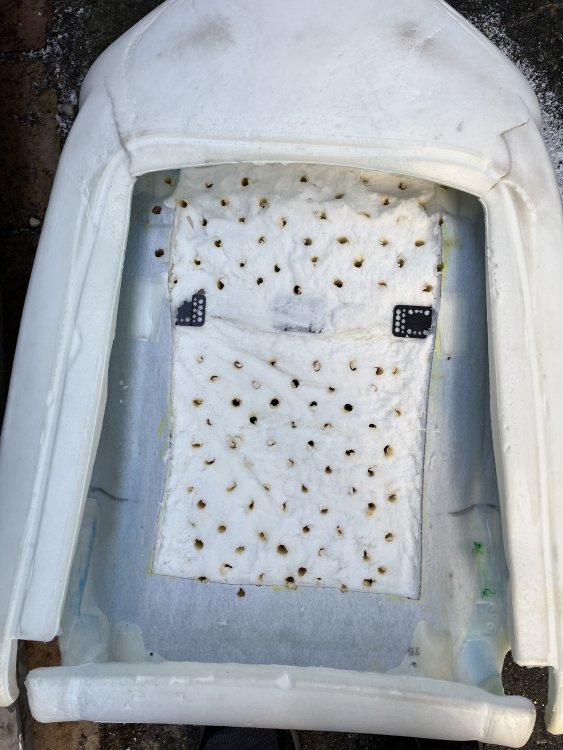
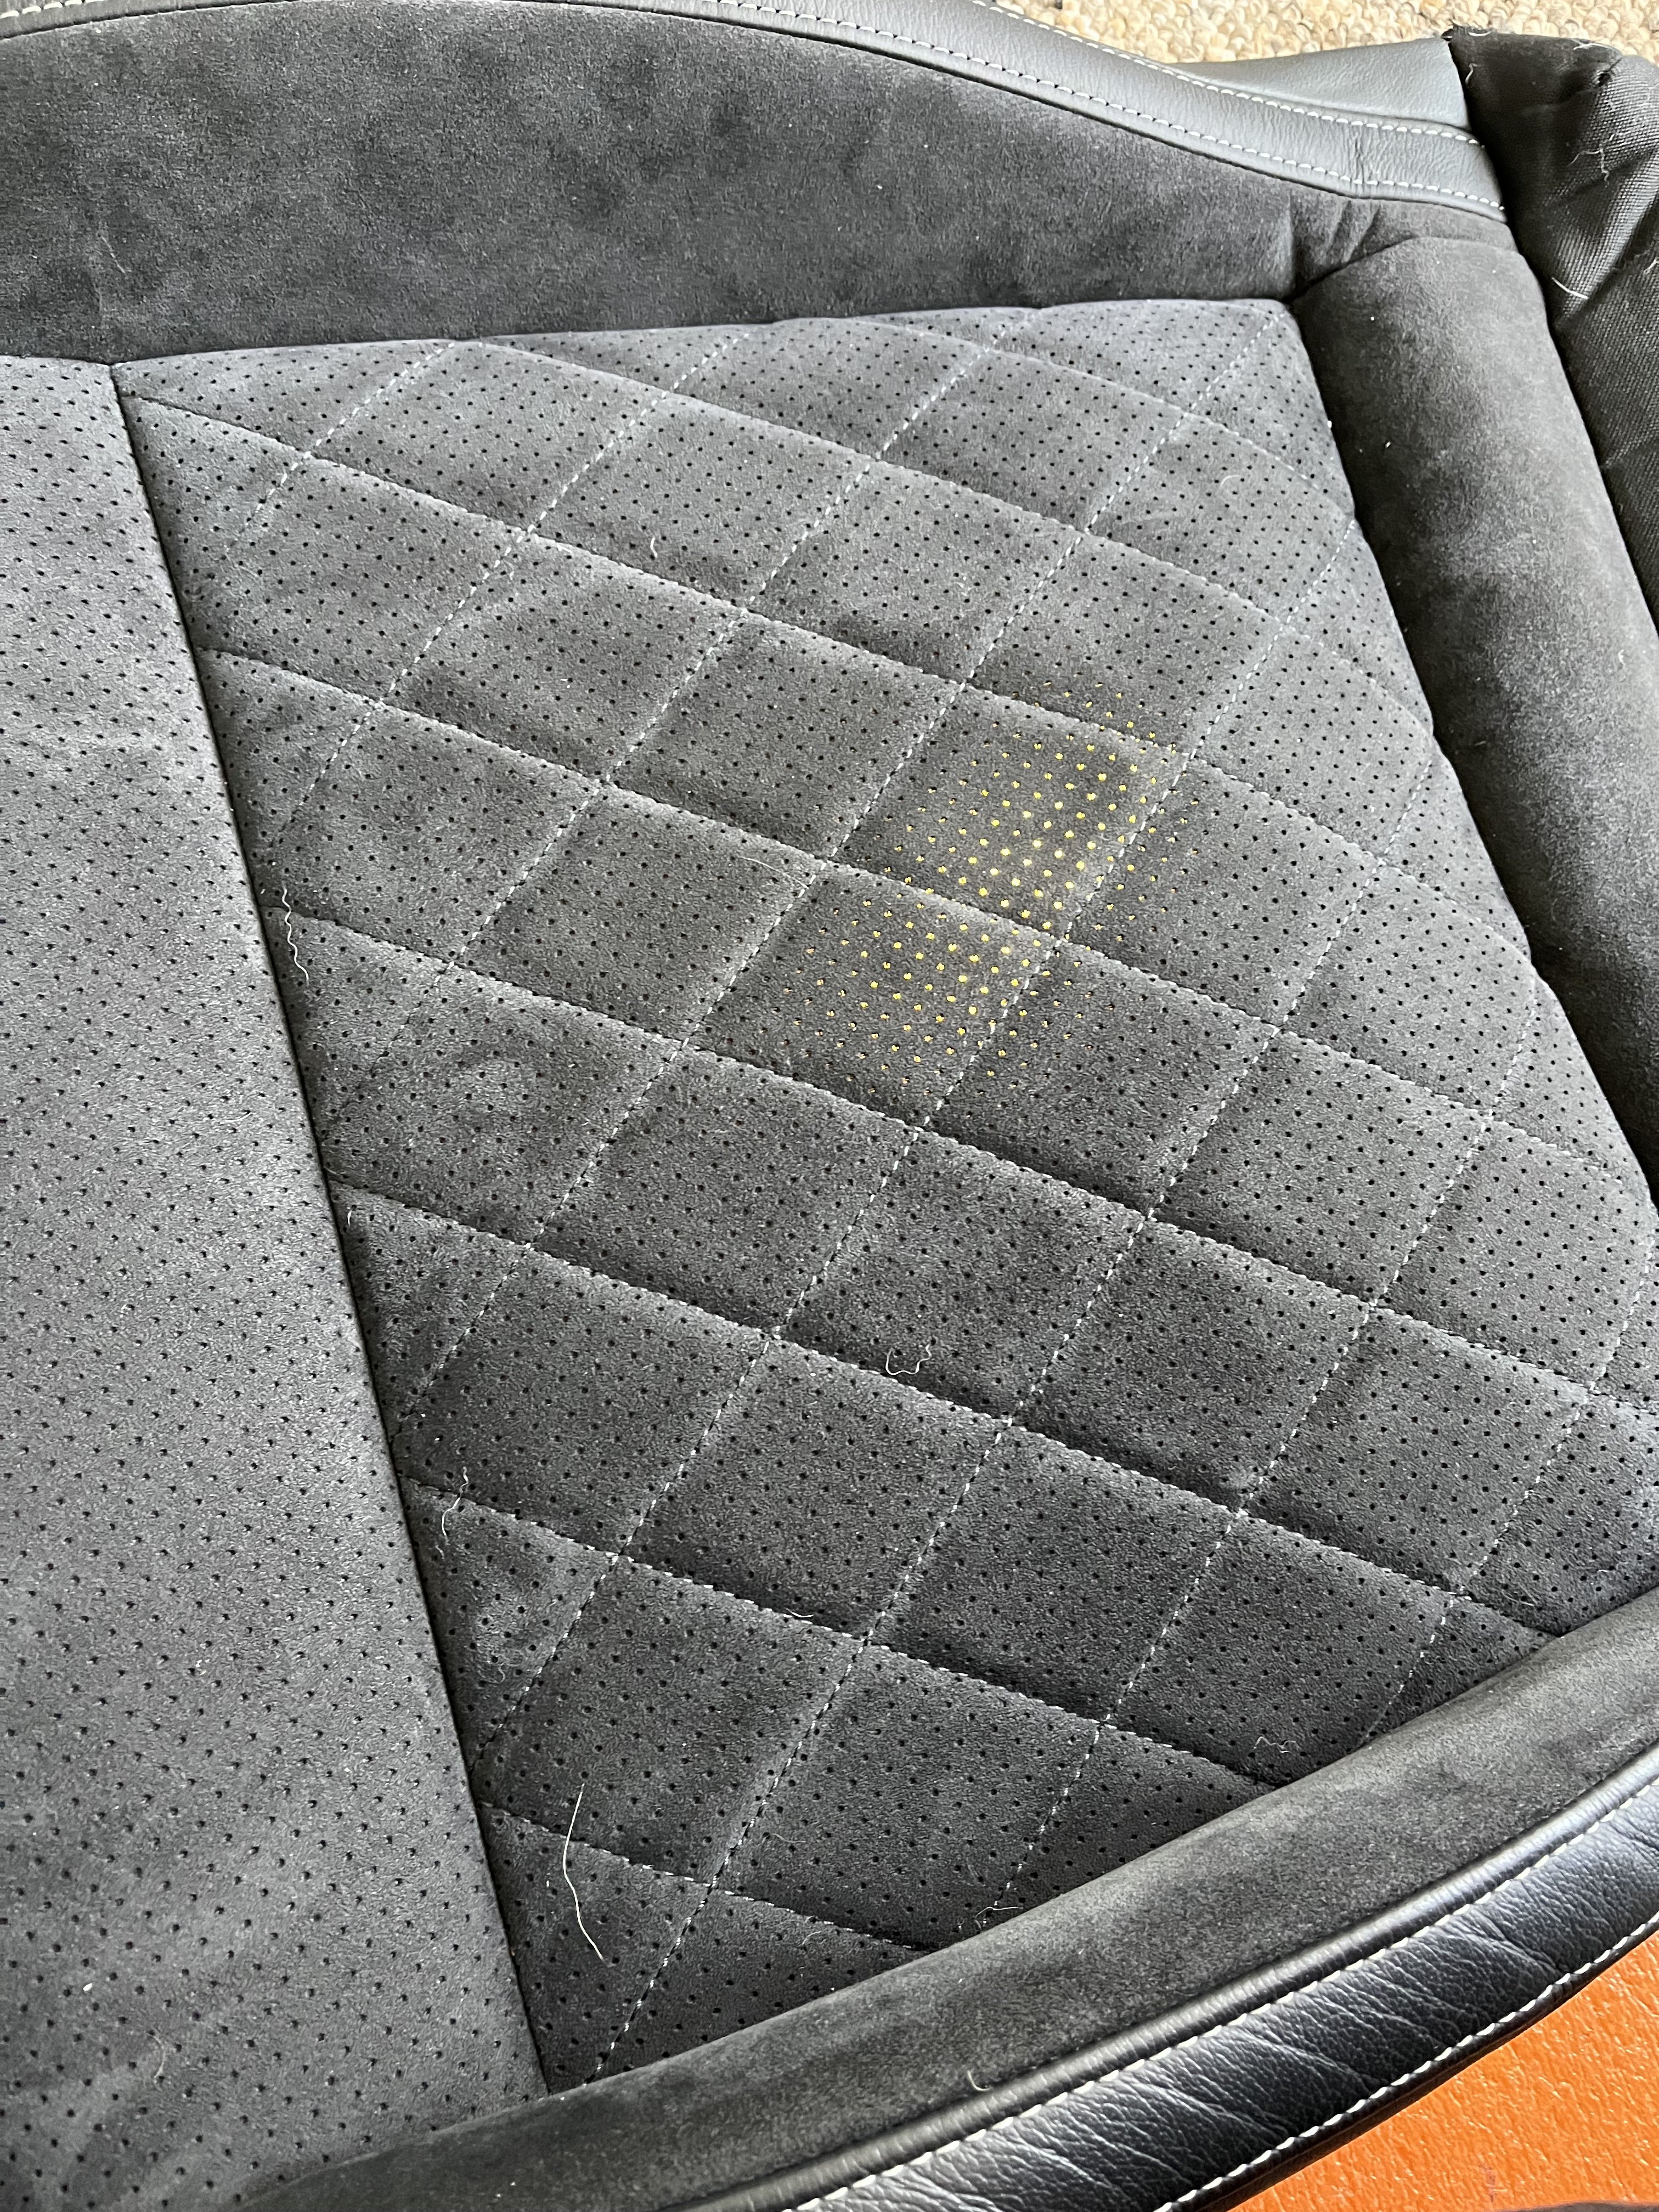
Yeah the issue with the leather seats is there is no holes whereas the ventilated leather is full of holes. In your case you might be better off finding some pre ventilated seats as I don’t know about you but a single hole out of place on the perforations would drive me crazy
-
Check live data for the pedal position sensor 1 and 2, also do the same for throttle body. See which one isn’t moving in sync with the other. do it with ignition on, engine off. FAULT_TSK_IRREV_FAIL Will prevent ACC from working as there is an engine fault that can cause ACC to stop working so this fault will block it until the throttle fault is fixed.
-
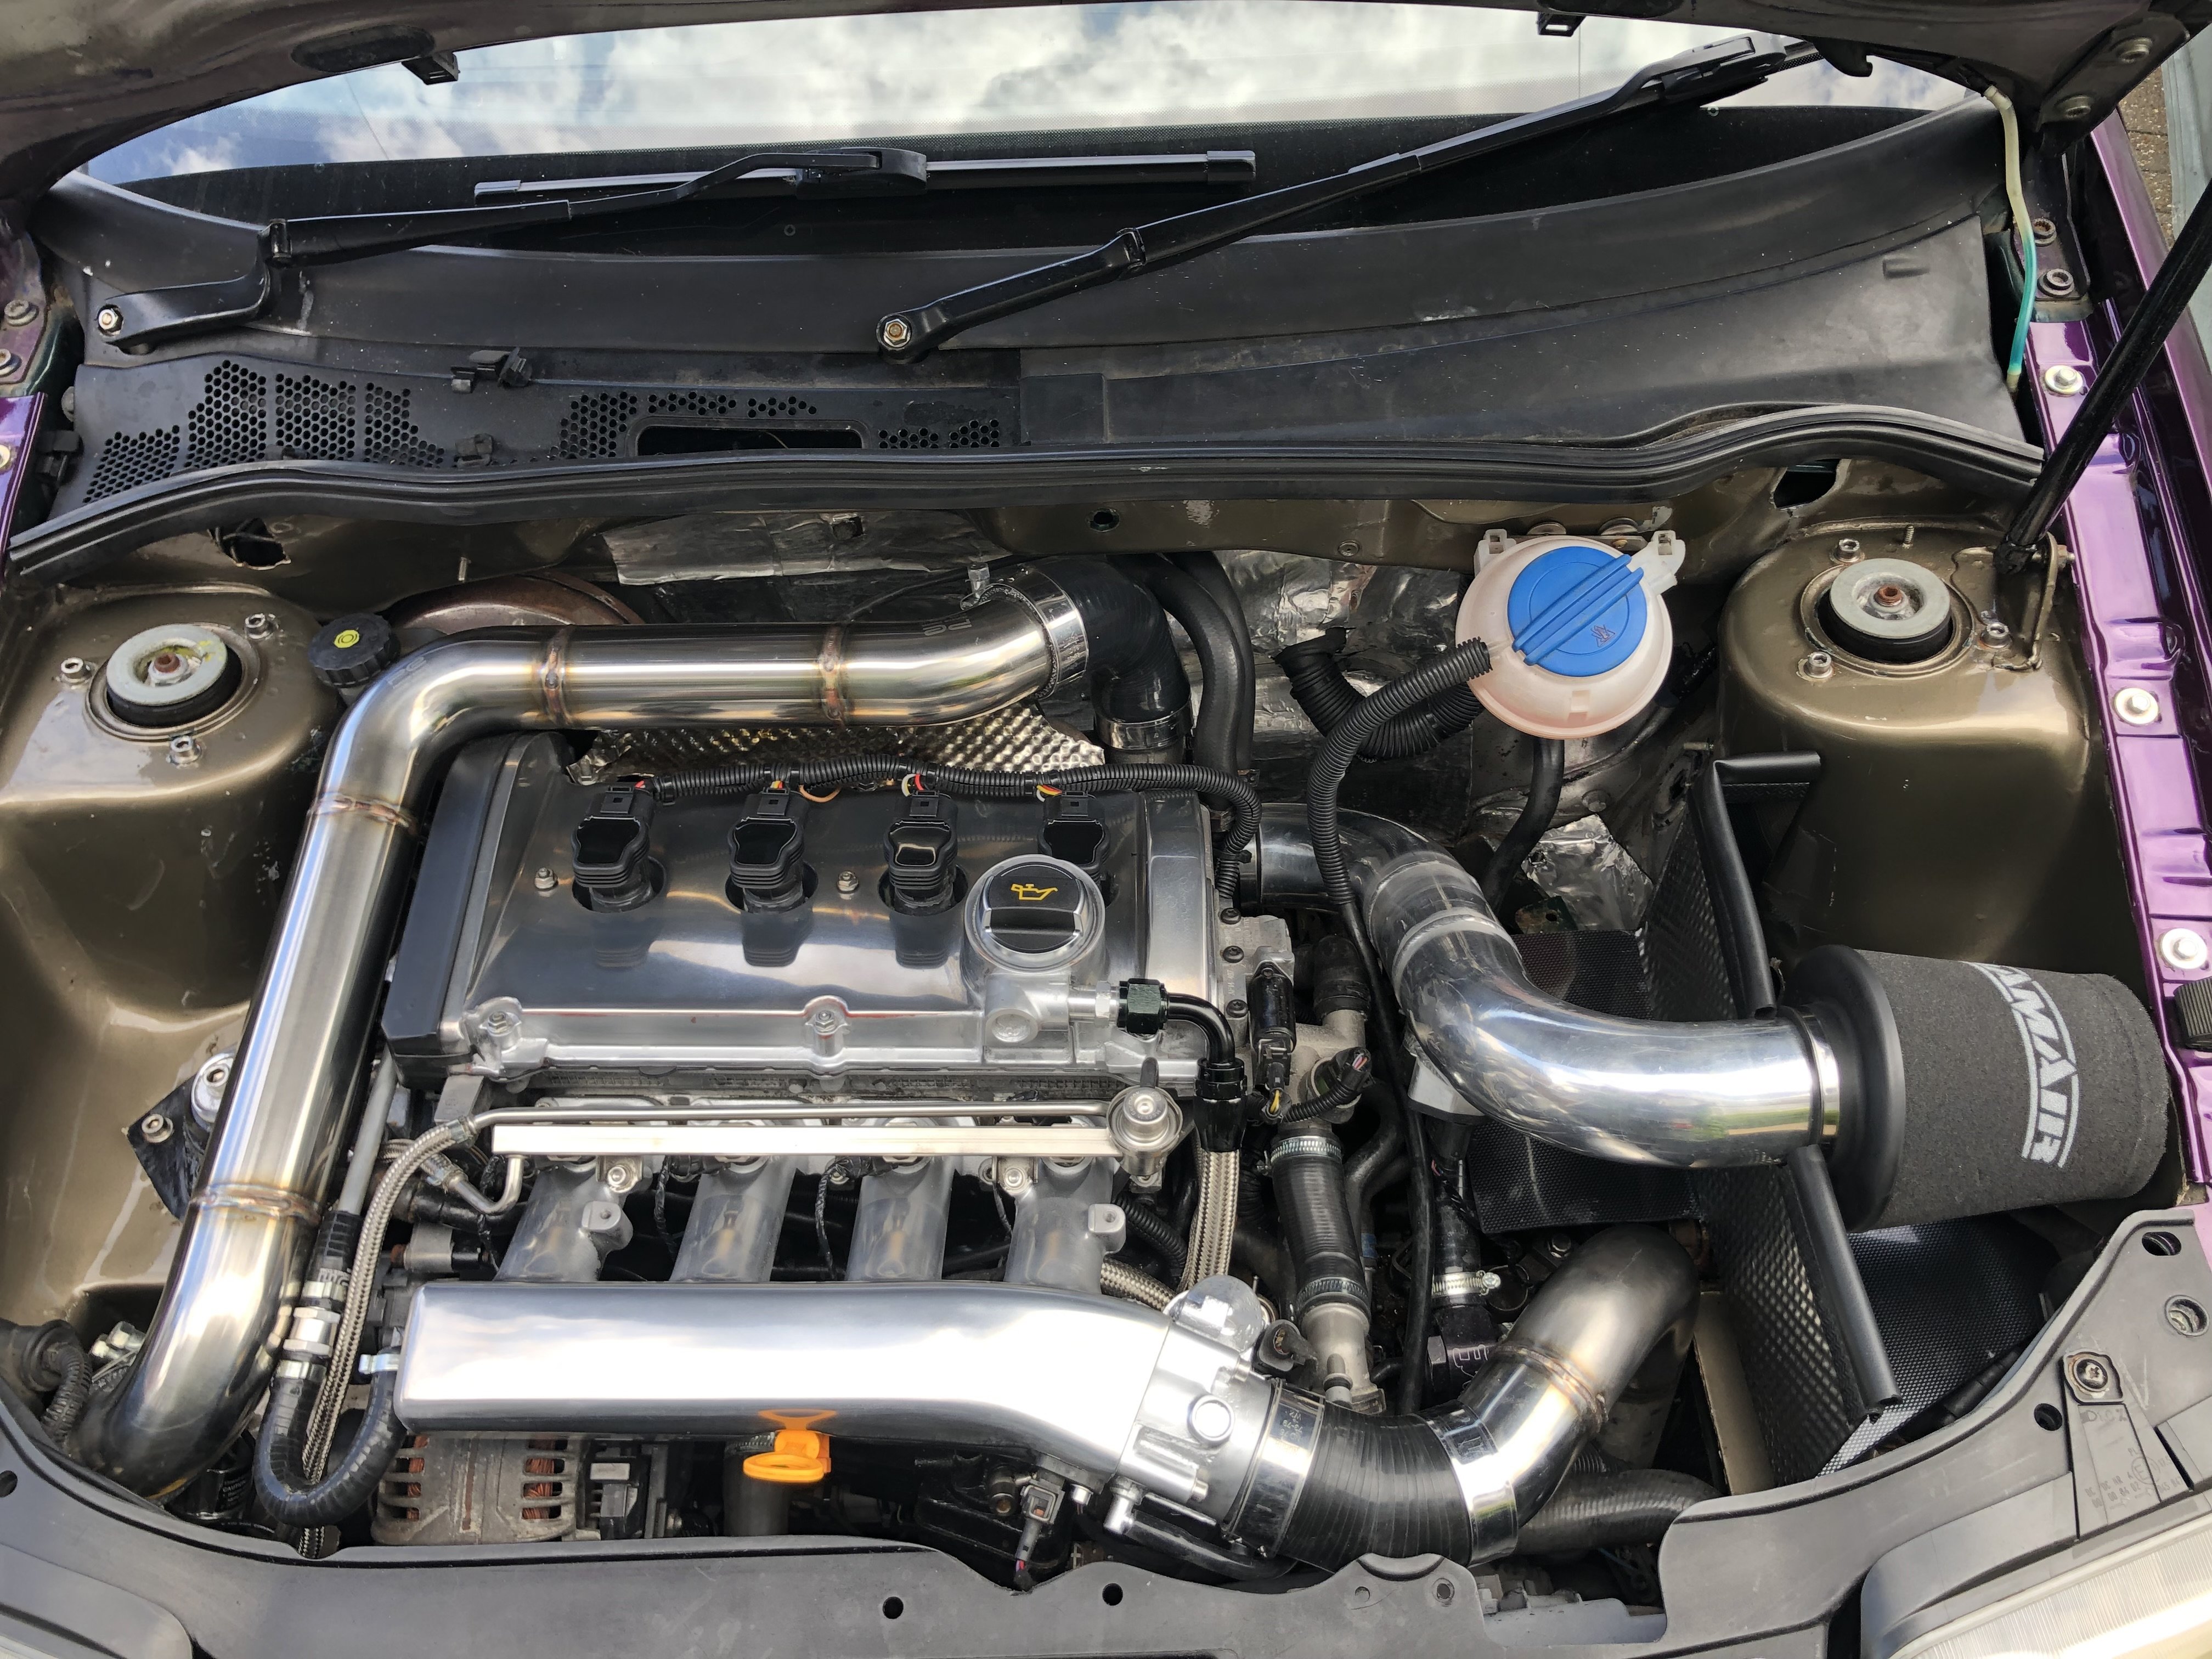
Definitely not the usual build, done and dusted with the days of performance cars My 2000 VW Polo with a 1.8T engine fitted as well as caged and a whole bunch of other mods - running 350bhp, was a great car whilst it lasted!
-
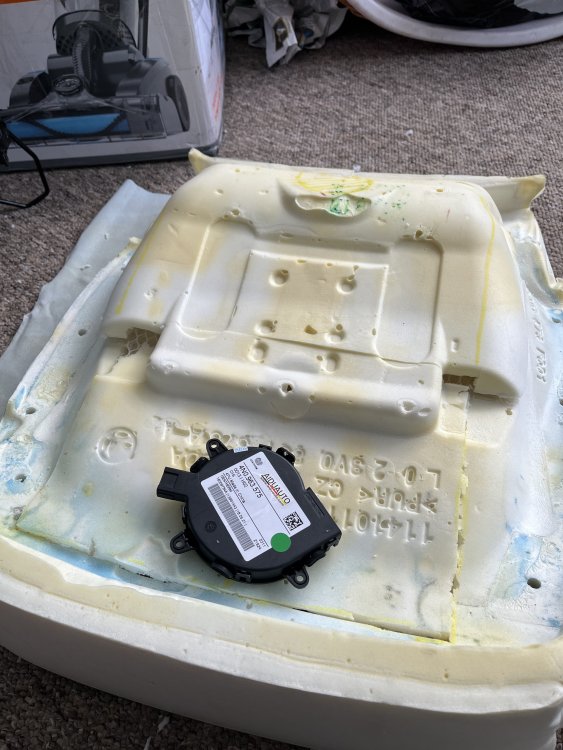
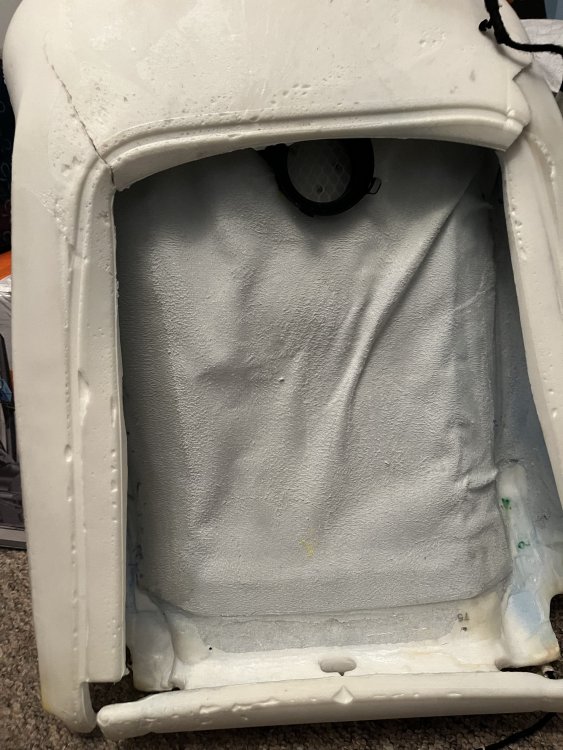
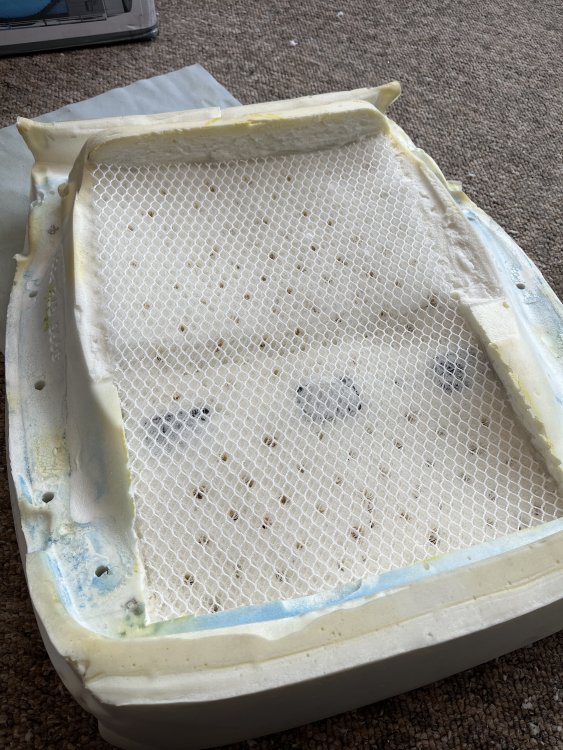
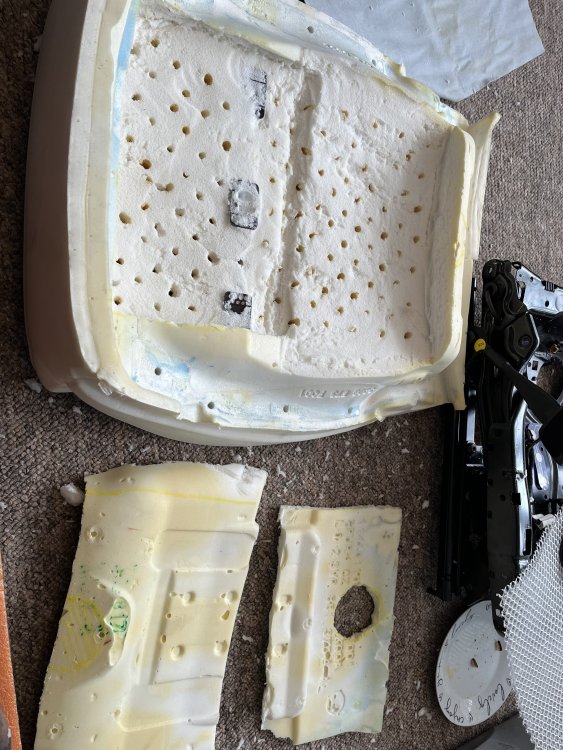
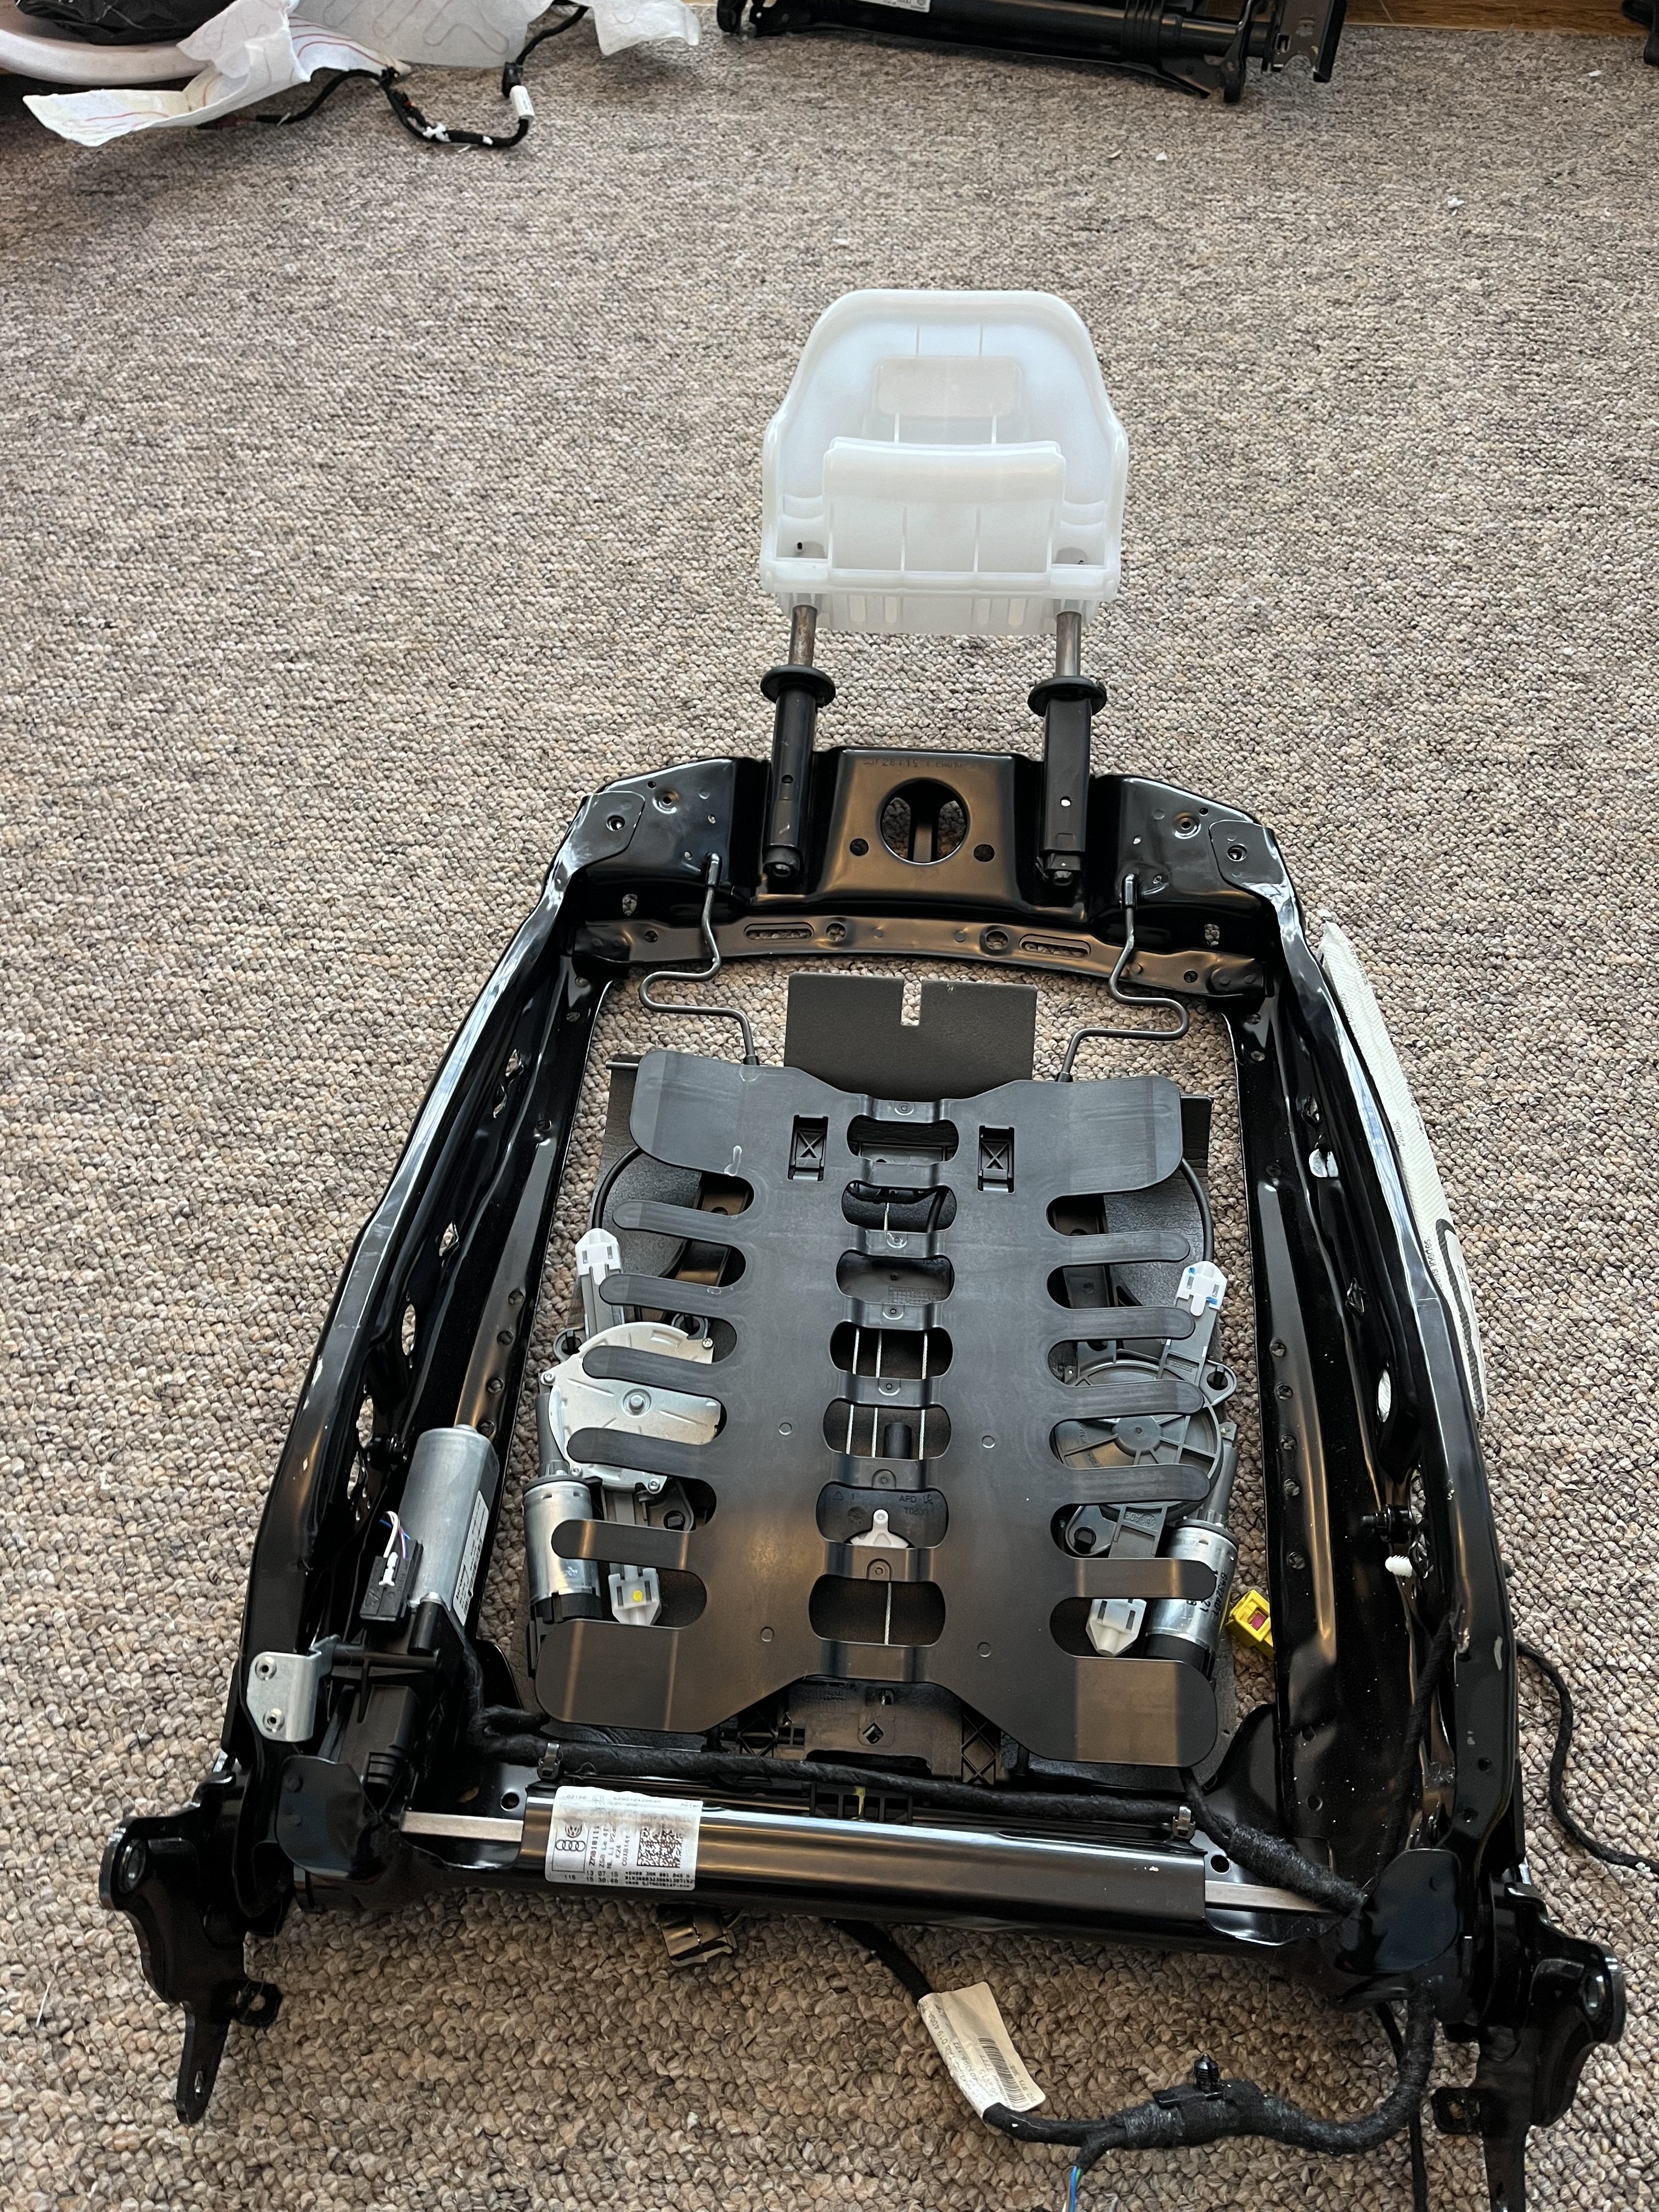
So little bit of a side line now... and something I am 99.9% hasnt been done before... Ventilated Sportline Seats So this was an all new project and going in blind! So a bit of theory behind it first: On the superb, all seat frames are near enough the same, then the difference between the leather and sportline seats is the foam insides and the headrest. There are no ventilated parts for the sportline and the ones built into the leather seat foam are far from the right shape, so it meant starting from scratch. Also something to note - the fans suck air through the seat, not blow air onto you. The parts that were needed for this: 4x Fans Wiring Plugs Terminals Diffuser sheet Isolator sheet Fan mounting Now the fans, wiring and terminals are easy to source but the sheets and mountings are actually built into the seat foam and cant be purchased separately. I then found a company that sold me all 4 diffuser and isolator sheets and some mountings that would work. Now we are in business! There are 2 fans per seat, and they are wired exactly the same (almost) and controlled by LIN. Each seat gets a power on pin 1, a LIN on pin 3 and a ground on pin 2. Pins 4-6 are then grounded differently depending on the fans position and this is how the LIN knows what each seat fan is doing and where it is. Thats the wiring out of the way, next the physical mounting of everything: So this is a cross section of how it currently looks: Yellow is the solid seat foam Red is the heated seat element Black is the seat fabric itself. And this is how it ended up looking: Yellow is the seat foam which now has holes going through it completely, indicated by the brown lines Red is the heated seat element which is porous so needed no modification Black is the seat fabric, again it was porous and luckily no modification needed. Blue is the diffuser sheet - which is a semi rigid sheet that is full of holes allowing the air to distribute fully across all the holes, even with a persons weight pushing on them. Green is the isolator sheet - this is what seals the area to allow the only air being sucked it to be from the front of the seat, via the holes in the foam. Brown circle is the fan. And now some photos of it all - the parts and strip down first: A rough marking of the fan location and the foam being cut The seat base to show the 2 circle holes where the fan could possibly mount The fan, mounting, diffuser sheet and isolator sheet Decided on mounting the fan is the forward seat base hole A torch behind the fabric to show the holes are require permiable, so air wont have an issue. Next is the actual building of it all: Seat back wired up and fully ready to refit, fan installed Seat base foam cut, very roughly before sanding it flat to give a better finish Diffuser mat laid in the cut out All the holes, and the foam pieces ready to fit back on top at the end to maintain its shape Diffuser mat glued in place and trimmed to fit perfectly. A sportline seat base - the head rest is what gives it its shape, very odd design Back of the sportline foam before i began cutting The cut out for the diffuser foam. The holes - drilling these is pointless - i heated up a piece of rebar and melted the holes through - a drill just pushes the foam out the way. Diffuser, isolator and fan mount fitted. And some photos of the controls now fully working! And all of that, took 2 whole days for a single seat! Next is the drivers seat! It did get me thinking though.... the 4B module often refered to as the headlight control module, is actually a multi function control module and it has a lot of other odd options too - almost like extra pins for the BCM. But anyway, it has functions on there for rear seat ventilation too... just a thought. But that would mean a completely custom rear temperature control panel, intercept and inject LIN and canbus signals through my own controller... but yeah, just a thought.


.thumb.JPEG.1eda153e5420610da4a09f6add412007.JPEG)
.thumb.JPEG.3f535d008a0609ab0e45de6326ee64ee.JPEG)
.thumb.JPEG.9eb752d0f320ce80b47da7730e7e0434.JPEG)

.thumb.JPEG.f0e6e8c77895a086ae6acdd366a8bce6.JPEG)
.thumb.JPEG.0d4ddf7308d48e68cfc43988c2a109db.JPEG)

.thumb.JPEG.78ac1d9106869455a0b90b3a0df6a980.JPEG)
.thumb.JPEG.e1fc11465f65d124261cfb1609147241.JPEG)
.thumb.JPEG.4af5443d00b21f2b904769e4979f0b11.JPEG)
.thumb.JPEG.29d0cc7011881ea87a2e4ba30f2adacd.JPEG)
.thumb.JPEG.9ea21b68a559c5b30091ed51b8cd4a6e.JPEG)
-
The trim piece with the LED strip incorporated can be had new for around £150, you’ll need the replacement metal rivet caps to fit it after drilling out the OE plastic ones. Fairly straight forward process
-
Who carried out the work? if the garage has done the clutch packs and software update. They NEED to carry out the static adaptions and ideally the dynamic ones… also as it’s a dry clutch gearbox, did they correctly shim the clutches with the correct tools?
-
Same as numskull said, the way VAG works is software updates are only required to fix faults, if you haven’t got any apparent faults then there is generally no need to update.
-
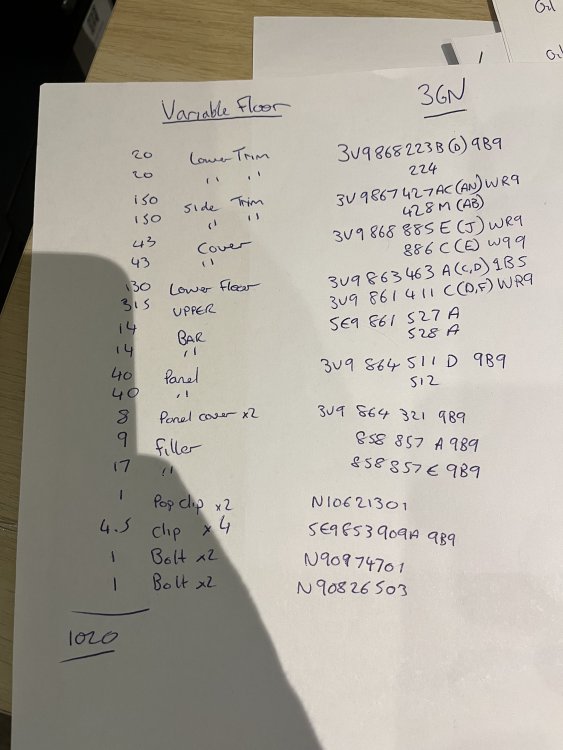
The complete parts list looks something like this (Its not to be taken for fact or anything else as I havent verified it at all) plus things vary by vehicle spec and year. But basically for all new sides, floors, all fixings, other panels, flaps and such was £1020 As you can see, the upper floor alone is £315, lower is £130 and the side pieces with flaps comes to around £450.... not cheap at all!
-
Don’t tempt me! I already priced this up with new parts around £1000 so hoping to find a car being broken for parts to take them all off! the new price is just a bit too much for me!
-
I’m really glad it came in handy for someone and made a massive difference. crazy how that tiny sensor has such an effect on the controls!
-
Got any photos for us? I too am intrigued to see what belt has frayed and jumped a tooth? Seen as the 2.0 petrol vrs engine is chain driven as far as I’m aware.


.JPEG.15b4eabbb10934e8f03ba7a3dfea1906.JPEG)
.JPEG.ecefbc48ad92761f8dc409cf93a2f518.JPEG)
.JPEG.9072784187efb2c27b76bf0b50904909.JPEG)


.JPEG.da21bc5f3e5ec875fae59b5a1c24ff81.JPEG)
.JPEG.822ac8b2288da466195ea369214bcebb.JPEG)


.JPEG.25075646f5a326749574e53dea2764d7.JPEG)
.JPEG.454f0c4e485fbe9b99adec0044885cb5.JPEG)
.JPEG.e608340ec4983bfb9819f94f42fcbcf9.JPEG)
.JPEG.dba0acebab906098a072986f2f8856ba.JPEG)
.JPEG.665fb69c5759c2a1bede3d28833758a6.JPEG)

