


Derbyshirebod
Members
-
Joined
-
Last visited
Everything posted by Derbyshirebod
-
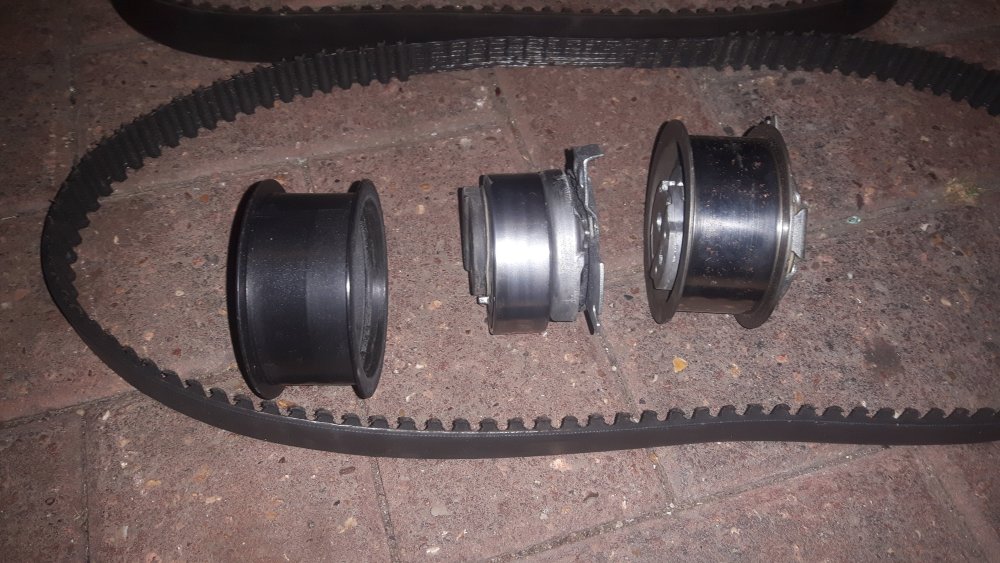
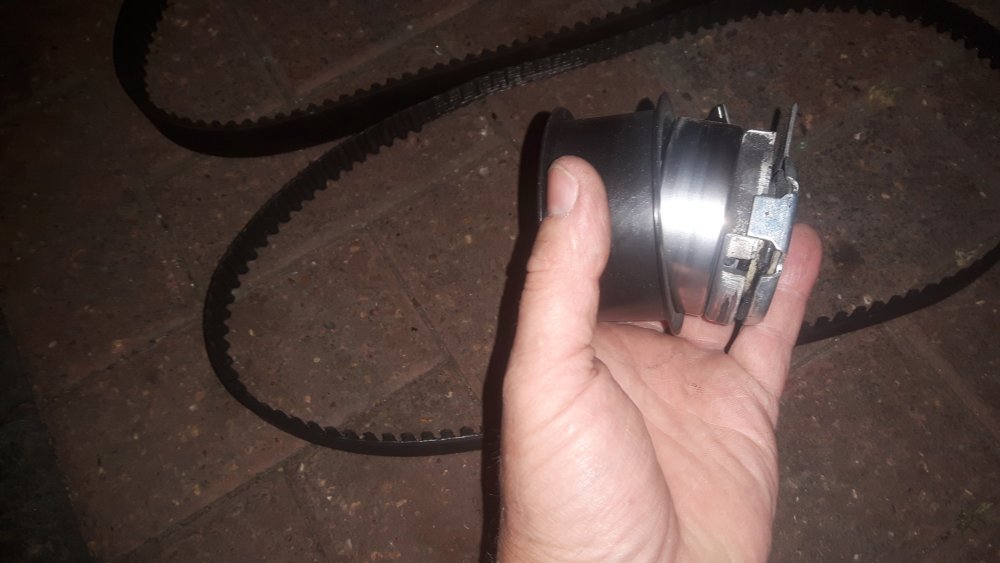
Well I think you've been most unlucky though are you 100% certain that the engine is actually goosed?? Has it been properly inspected? Maybe not all is lost? As others have mentioned the reasons for so called cam belt failure can be many and varied. I'm surprised that no one else appears to have suggested that this might be salvageable for the cost of a replacement timing belt? If there has been no valve to piston contact? Then re-timing the engine and fitting a new timing belt with the other associated parts it's going to run again! That's a much less bitter pill to swallow. I don't think you're likely to get much joy getting it repaired FOC from where you bought it? It doesn't matter how often you have your car serviced oil & filters, brake pads, tyres etc changed none of that impacts on how long a cam belt will last! As others have said the reasons for a timing belt failing are numerous so to say the "timing belt has gone" doesn't really explain what's happened and it might no be as catastrophic as a side of the road diagnosis initially suggests. Twice in the last 5 years I've had VW TDi engine powered Seats come to a grinding halt due to a failure of the timing belt system and luckily in both instances the engine timing had only jumped far enough to stop the engine running but not gone far enough to let the valves collide with the pistons. One was a Seat Toledo 1.9 TDi PD engine the water pump bearing failed allowing the timing belt to become slack and jump several teeth until the engine lost it's timing and stopped running but didn't go far enough to allow the valves to collide with the pistons. The other was a Seat Ibiza 1.4 TDi PD I bought with around 100,000 miles IIRC I changed the cam belt on getting the car ran it for about 18 months before giving it to my son about 2 years later he broke down with cam belt failure. When I took the top cam belt cover off I could see the belt was about half the width it should be and it's edges all frayed. On removing the lower cam belt cover I found the cam belt tensioner outer plastic pulley had become un-bonded was loose on the metal inner pulley! The tensioner outer plastic pulley had been moving from side to side and had trepanned a hole in the cover! and allowed the belt to wear on either side until it must have become jammed and ripping off around 16 teeth off the belt! As I carefully turned the engine by hand to set the cam shaft and crank shaft back to their TDC settings. I'd not moved the engine very far maybe only another 3 or 4 belt teeth I started to feel some resistance as the valves and pistons started to come into contact! So I backed the crank shaft off, at this point I realised that there was a good chance there was no engine damage. For some reason I'd kept the old cam belt and tensioner which was a completely metal roller and a safer design IMO. With the engine re-timed and the old belt and tensioner re-installed the engine fired up straight away and ran like nothing had ever happened. So I went and bought a new cam belt kit for the car. I'd never buy another timing belt kit with a plastic bonded outer tensioner wheel and since then I've read of other people having the same issue. I personally believe that it's not just Skoda who has some ridiculously high service intervals especially for cam belts. I think it's just a sales ploy to make servicing costs look attractively low and indeed many cars will go on to do galactic mileages with few problems. From my own personal experience more than around 70,000 miles or 4 years I think you're running on borrowed time. I personally think that removing the upper cam belt cover for a visual inspection is a waste of time! You really can't see anything unless the belt is contaminated with oil or fuel or visibly damaged. Though how many mechanics would actually turn an engine over by hand two full engine cycles to check the full circumference of the timing belt? And it would have to be done by two people, one turning the engine over and the other checking the timing belt as it moves by Generally cracking occurs on the inside teeth side of the. I've seen a cam belt that literally pulled in two with no apparent reason? No seized water pump or rollers. I'll hear someone say ooh it was probably a low quality belt. As far as I'm aware there are only 4 factories globally who can produce cam belts so I assume that the quality are probably much of a muchness? And they will all be making belts for the major manufacturers. I'm not aware that there has been any revolutionary advancements in timing belt design or manufacture? Cam belts don't last forever they wear out and have rubber in them which means they age with heat and light. Though yes I concede there probably are cam belt kits out there with low quality rollers, tensioners, water pumps so it doesn't matter how good the condition of the cam belt is if one of these other components fail. It's usually considered good practice to change all these parts when the cam belt is changed. I bought a high mileage 2012 Superb MK2 last September with 181,000 on the clock. The service record wasn't complete but did show what must have been its 1st cam belt change in September 2017 when it was 5 years old with a mileage of 107,433. So it had been changed as per Skoda's suggested service interval of 5 years or 145,000 miles which ever comes 1st. So by that reckoning the next cam belt change interval was a year away and should have been September 2022. For the sakes of £70 I bought a Gates cam belt and water pump kit and changed it. All the old parts appeared to be in good condition no noticeable noise or play in any of the rollers or water pump and the VW logo was still just visible on the cam belt. Some of you might argue that they'd save their money and they'd expect a cam belt to last to the manufactures suggested service interval. Okay that's your choice but what will you have saved if the cam belt does fail prematurely to the suggested service interval? I'd sooner try and avoid the aggravation of it failing and have some peace of mind

-
https://www.towbarexpress.co.uk/skoda-superb-detachable-swan-neck-towbar-superb-hatchback-estate-3v/?gclid=EAIaIQobChMIot7Nvebr9QIVF41oCR161QxLEAQYASABEgJuC_D_BwE
-
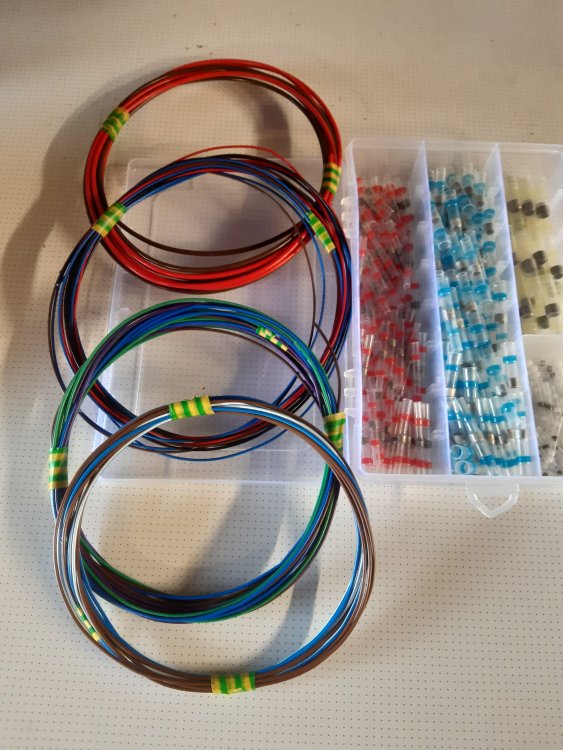
Those are exactly the same as I've bought to repair my broken door wiring.
-
Very simple a factory fitted system is expensive! You've clearly not checked the prices out! Paying £630 with universal electrics or + £218 for vehicle specific wiring for a towbar to be put on a £1800 car quite simple maths really when I can put a new detachble towbar on my car for less than £150 is a bit of a now brainer really! The reason this thread was started by the OP would seem he's caused the problem by fitting after market LED's in his rear light clusters not realising it caused a problem until he tried using the towbar 😳 I wonder would there not have been a similar issue with the towbar electrics had an OEM controler been used 🤔
-
Boing! said Zebedee ! He was French wasn't he! 😅😅
-
I guess it depends what tools you have in your arsenal. I've got a reasonably sized compressor and air impact gun with spring compressors attached I've undone difficult piston damper nuts with it when I've been struggling.
-
I've just bought a box of those for when I repair my broken door loom wiring which is going to fine for straight joins. Though I'm not sure how good they would be bodging 2 wires into one side of the connector? You'd have to use a bigger size connector than the wire you're splicing into so one side of the connector with the single wire would have to shrink down considerably more than the other side with 2 wires. Would that also affect the soldered joint ?
-
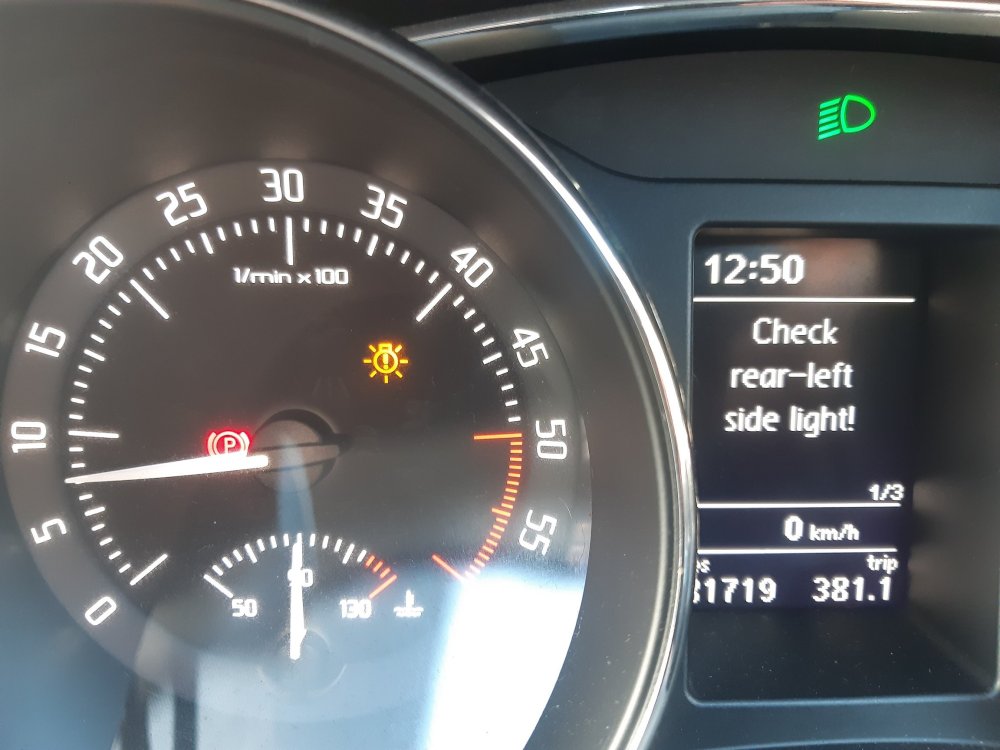
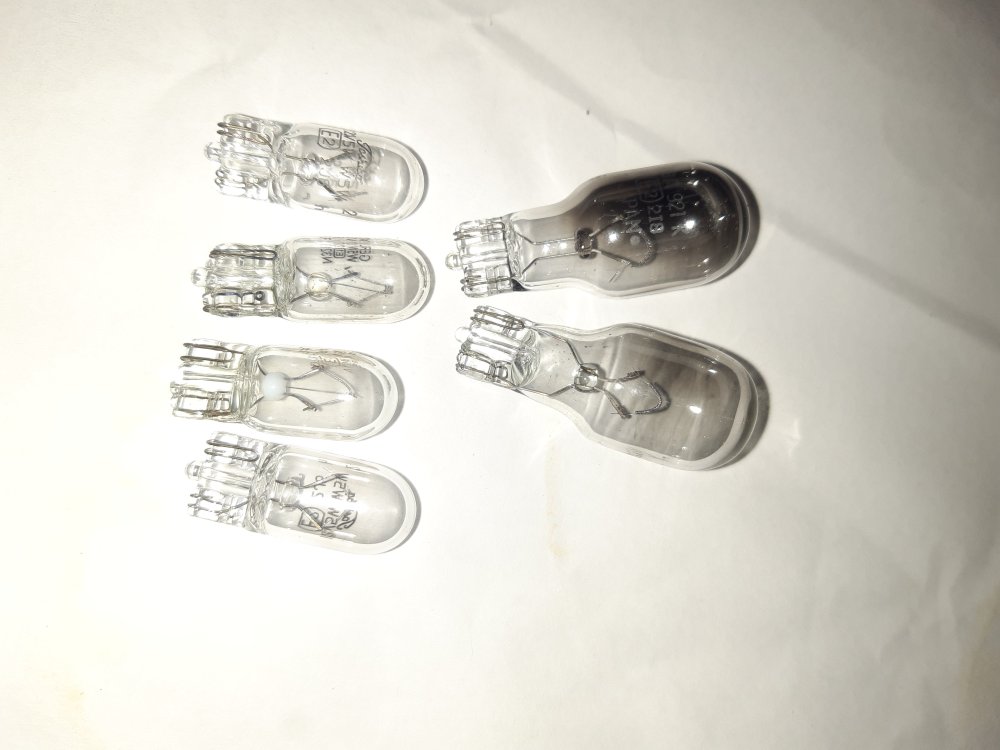
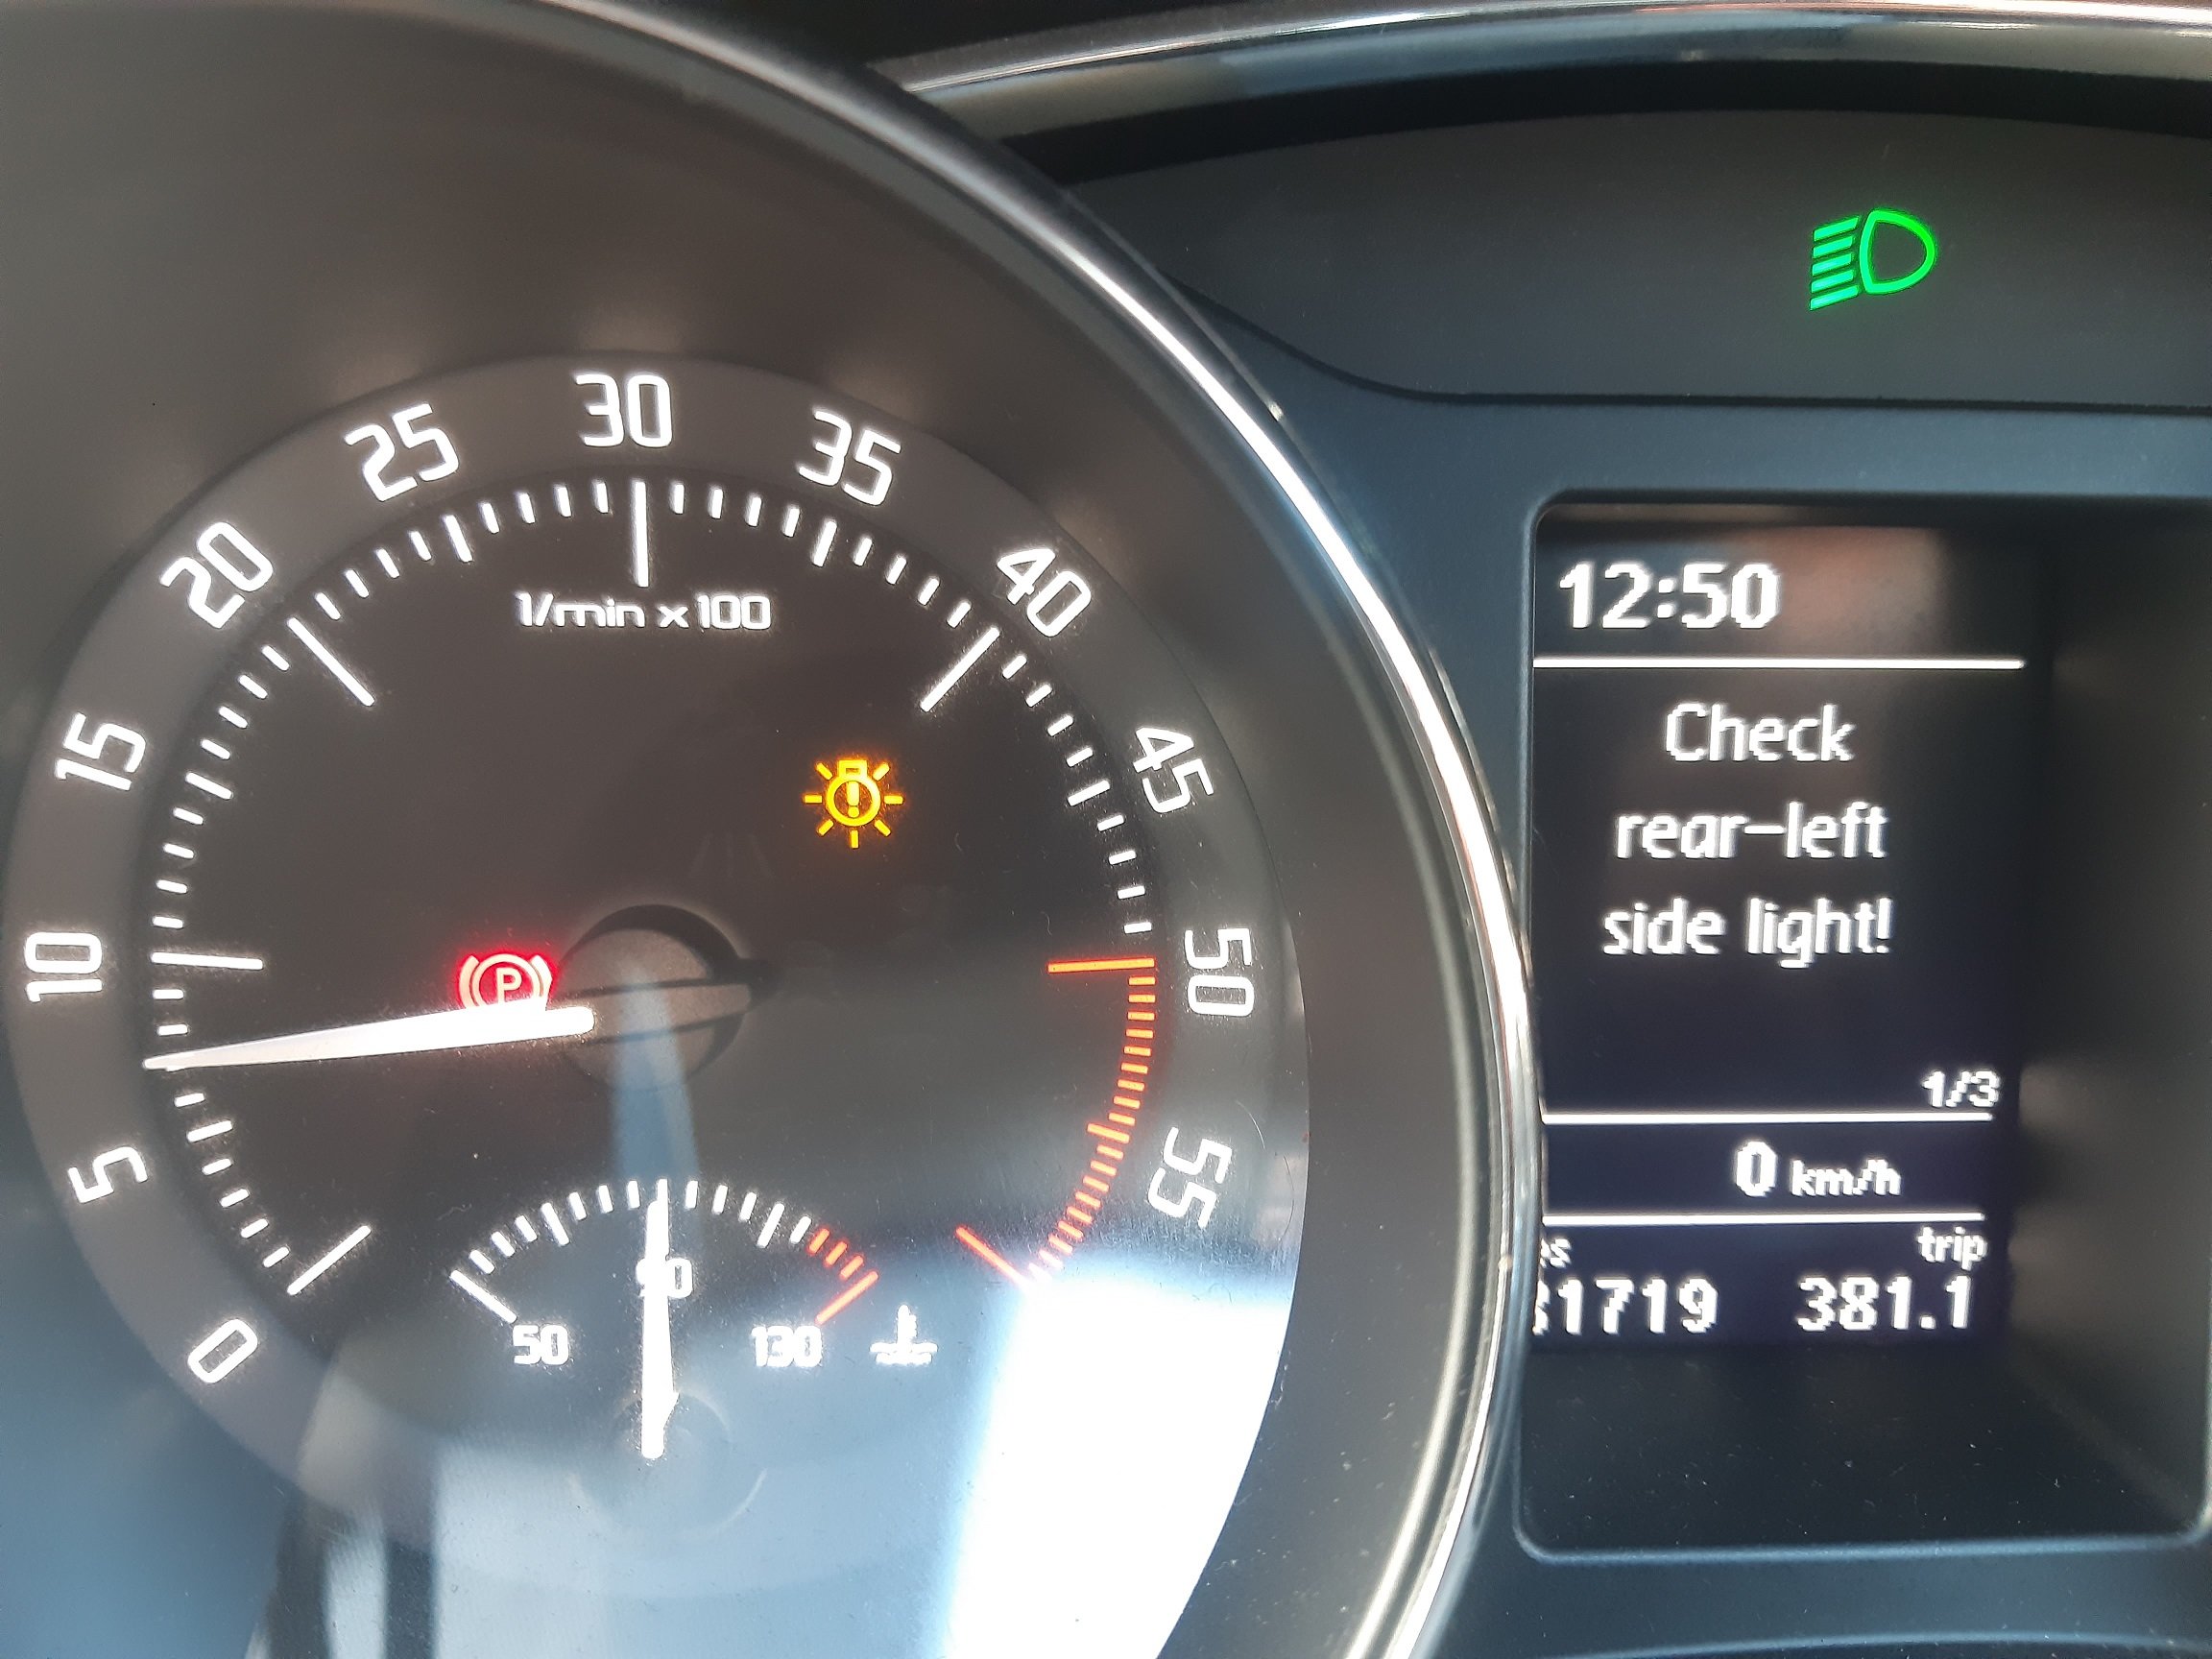
Hey you can't beat learning the hard way! :-) I had a similar painfully experience after fitting my tow bar and I was getting rear tail light warning messages on the dashboard. It wasn't anything to do with the tow bar wiring! But as DEL80Y suggested replacing the old bulbs sorted my problem :-)
-
£50 is rather more than I'm willing to pay! 2 new front gas struts only cost me £61.95. If I have to ever change another I'll just use my deep cranked 13/16" ring spanner again! :-)
-
There's not really that many alternatives other than to cut and solder. It's not like these particular connections are subject to the elements. Agreed they are cheap and nasty.
-
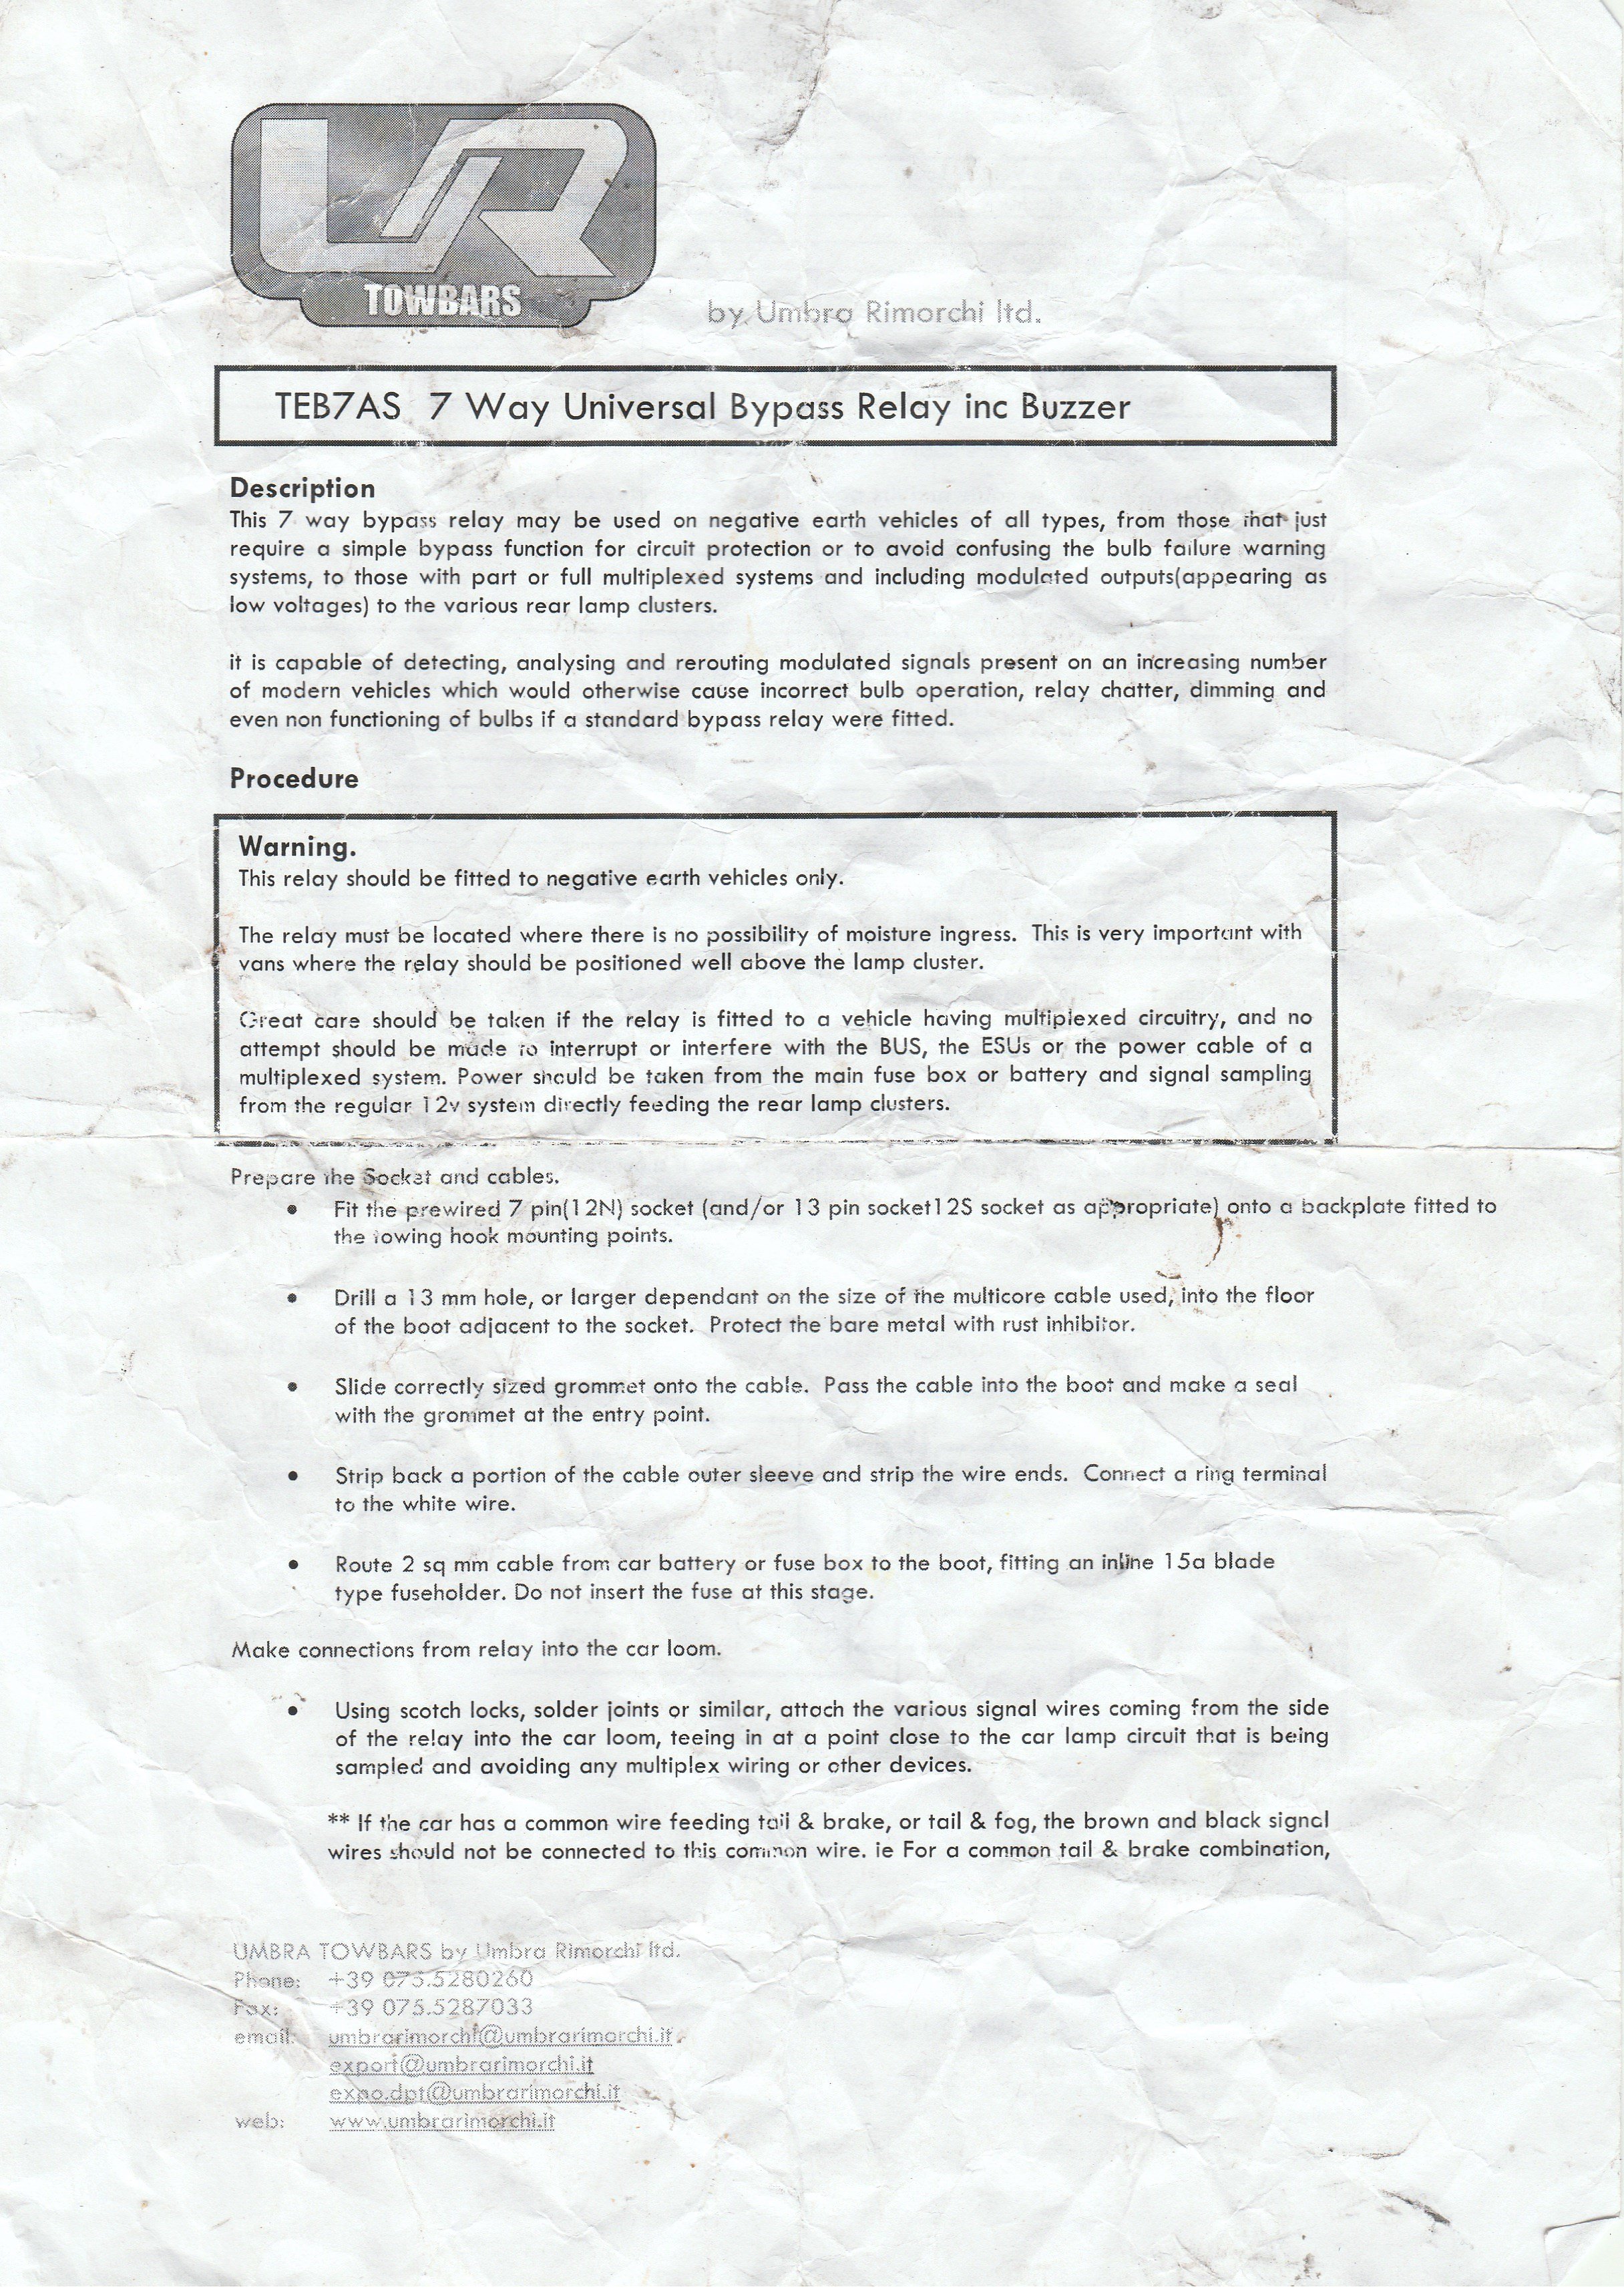
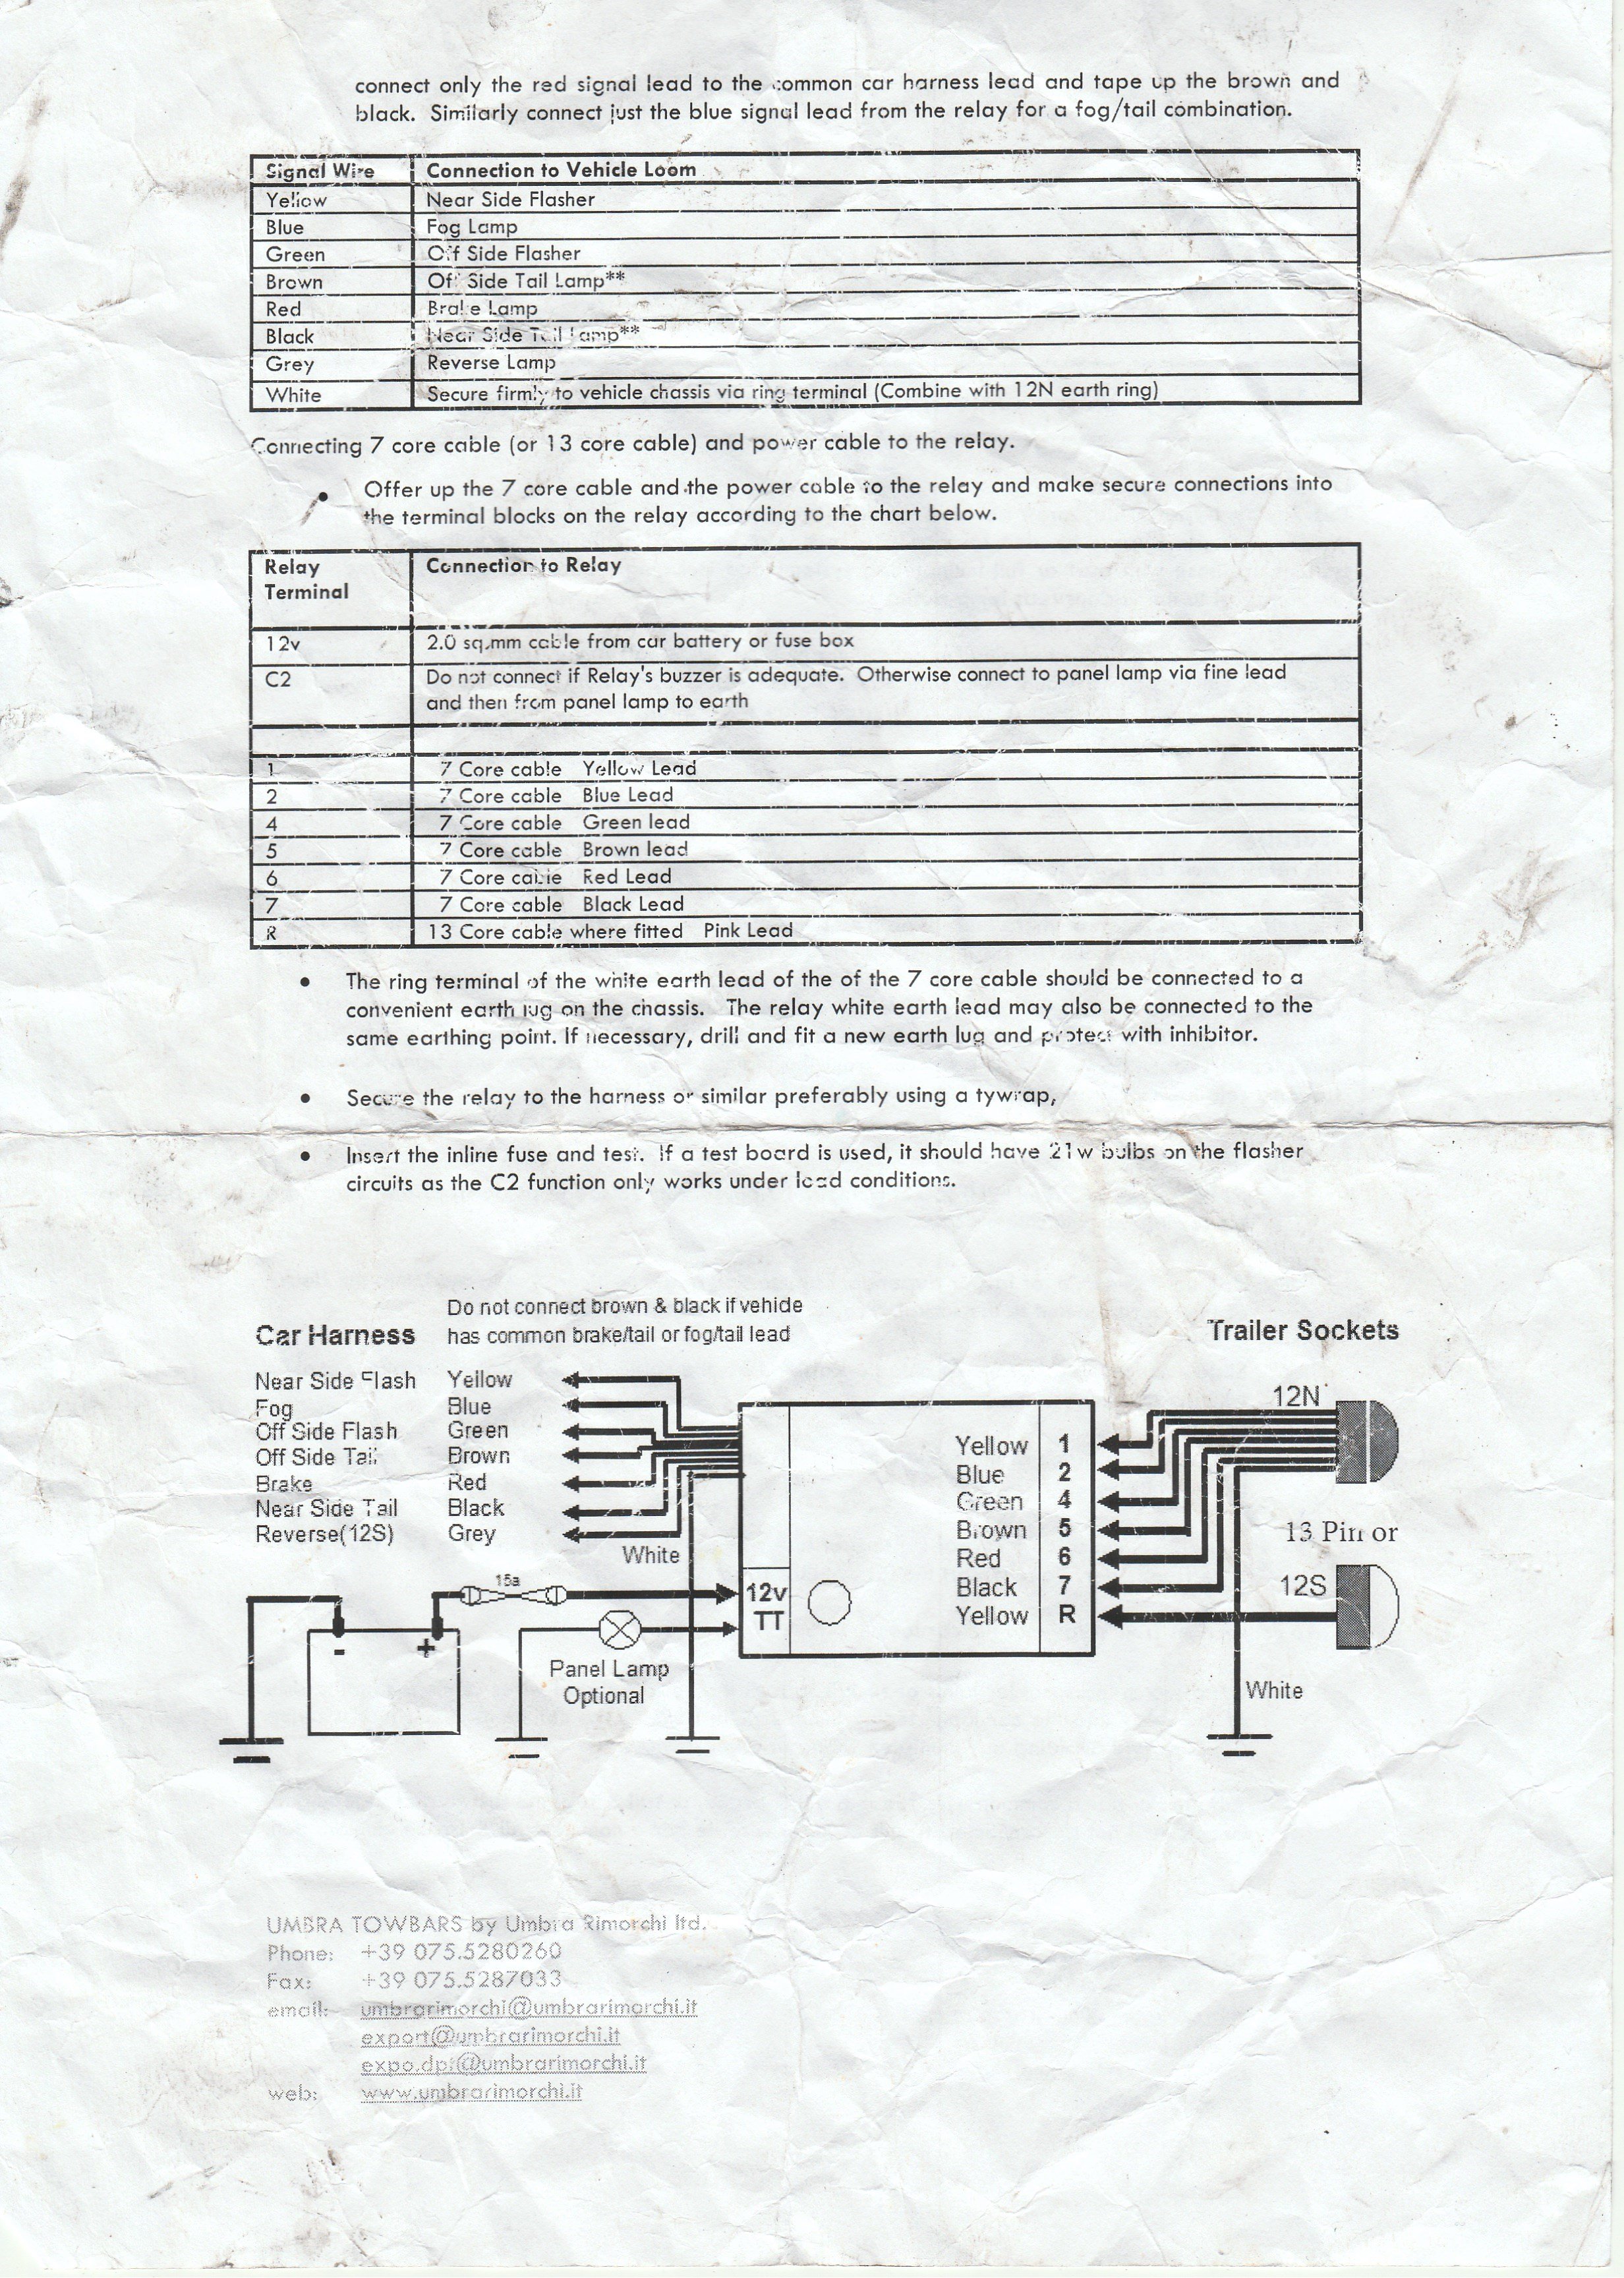
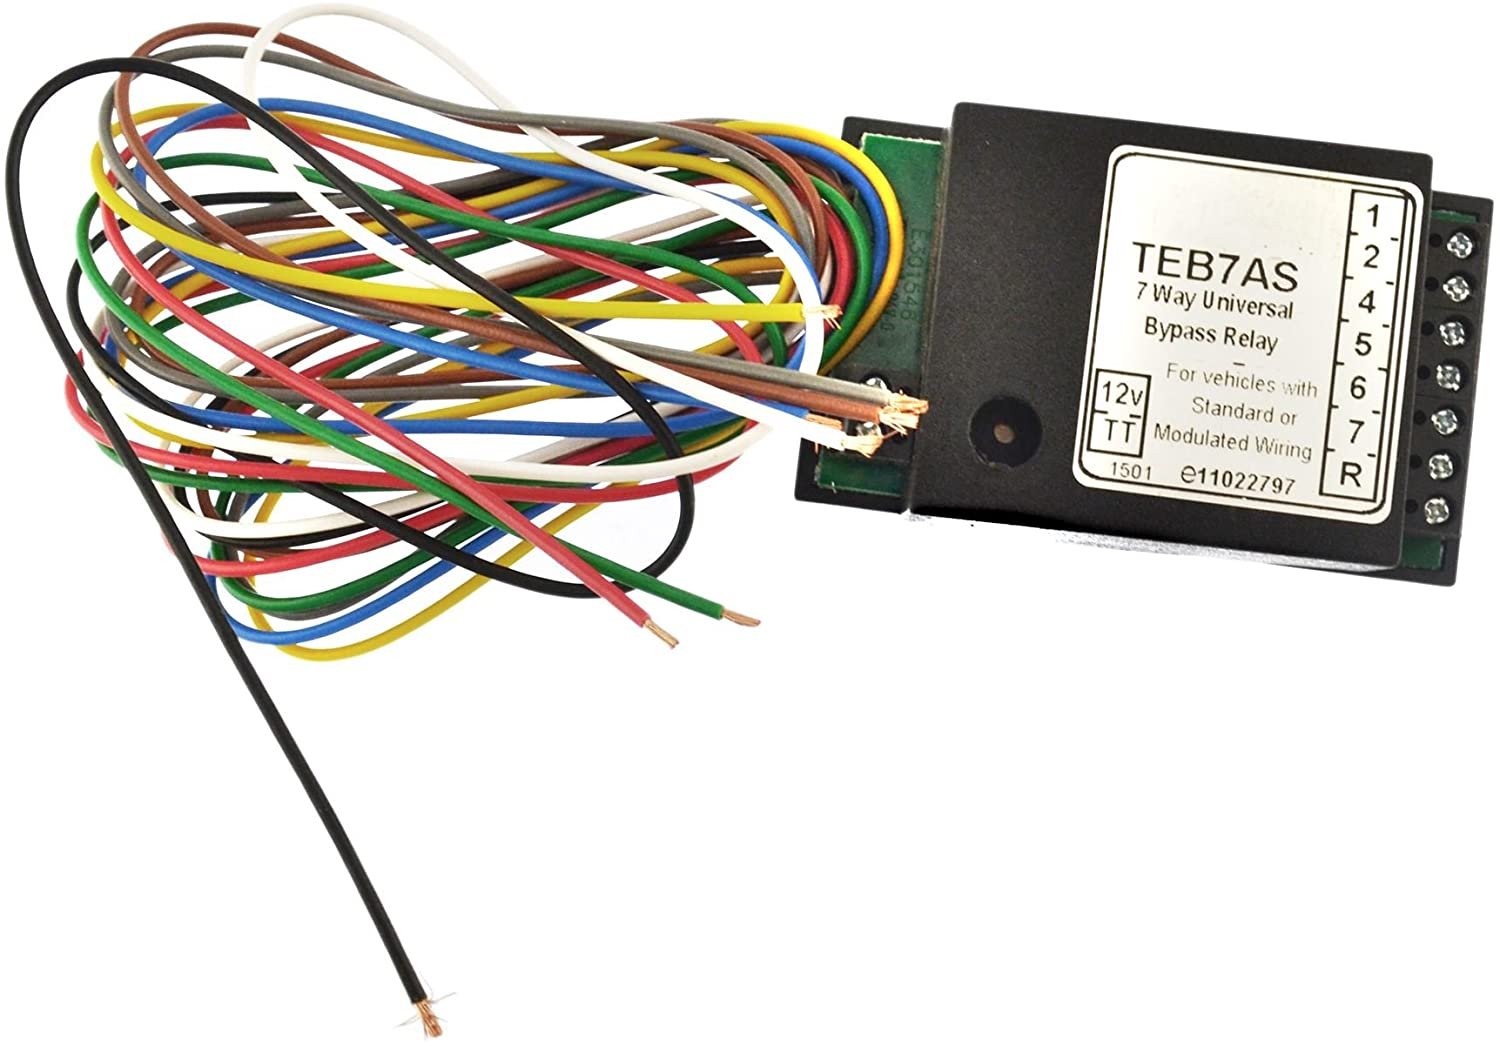
Yes the exact same bypass relay as I have. Though if you've not got the grey wire from the bypass relay connected to the cars blue wire to the reverse bulb then the trailer reverse lights won't work. Not that many trailers have reversing lights. The way the relay works is quite simple really. With only the common red wire from the brake circuit when the car side lights are on then it detects the reduced voltage and only supplies a current to the trailer board side light circuit. When it detects the higher voltage when the brakes are applied it only supplies a current to the trailer board brake light circuit. When the relay detects the higher combined voltage from both brake and side light circuits the relay then supplies a current to both the trailer board brake and side light circuits. This is a much better system than the old way of splicing into the cars wiring loom and there isn't a voltage drop as the bypass relay has it's own voltage supply so you don't get dim or flickering bulbs on the trailer board lights. I don't see why you think taking a feed from the back of the auxiliary socket is a problem? That's what J.R and I have both done. The auxiliary socket circuit is protected by it's own fuse in the car fuse box. As long as you've used LED ERROR FREE CANBUS BULBs in your rear light clusters I think you should be okay? Otherwise I think you would have been getting bulb warnings on the dashboard? As in the photo. But yes maybe a good idea to put the original bulbs back in and see if the trailer board side light do work correctly before splashing out on a new relay ! Which are about £30. BTW I did say disassembling the boot cover panels was a PITA ! 😅😅
-
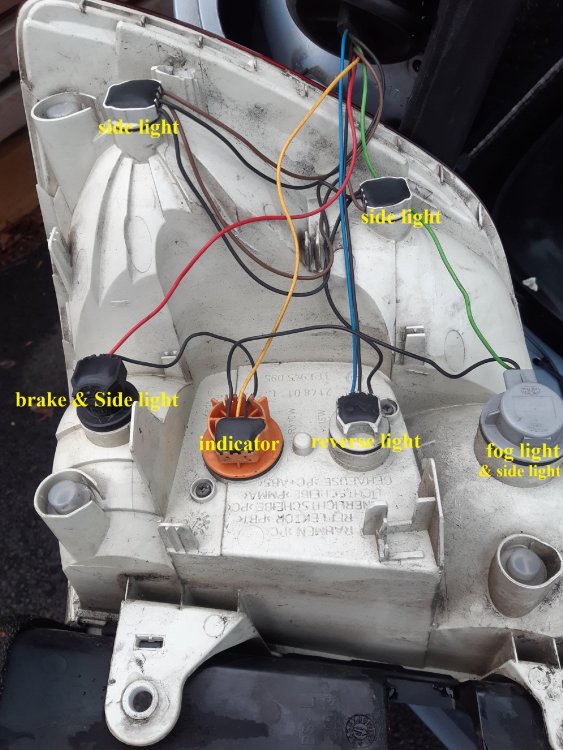
Yes J.R that's exactly it! As you said the brake light and fog lamp bulbs are both single filament and work as side lights with a reduced voltage. When the brakes are applied the relay must detect the higher voltage and in turn supplies a voltage to just the trailer brake light circuit. When the relay detects the lower voltage for the side lights, the relay the supplies a voltage to just the trailer side light circuit. In the 1st photo you can see I've got the side lights on, though the 501 12v 5w 4th side light bulb isn't in view. Initially I found it confusing and that's why I wondered had I wired up the tow bar wiring incorrectly? Though I hadn't! In the 2nd photo are the side light bulbs I replaced when I was having all the problems with the dash board bulb warning messages which resolved the problem. The larger bulbs are the common side light/brake light bulbs. I didn't replace the fog light bulbs. The TEB7AS Universal Bypass Relay seems to be fairly popular and I assume they can all be wired the way I have mine wired? Though the link I 1st posted didn't say anything about only connecting the brake light common wire to the relay. Hence why I scanned and uploaded the instructions I received with my TEB7AS bypass relay.

-
DrCorbyLee, those look good! I've not seen those sort of sockets before and being Laser brand probably reasonably priced 🤔 Though I'm not a mechanic and I don't change front coil springs or dampers that frequently and can do it easily enough with the tools I have so not inclined to buy any 🤔 YET! 😉
-
You're not the only one at the mercy of the weather 😊 as I've no longer got a garage to work in! 😊 I've got repairs to carry out to the door wiring, I have all the stuff I need but trying to solder in a gale and intermittent rain isn't my idea of fun! lol Not that it's going to apply to you as it's been done already, the drivers side indicator wire will need to have a spur taken off it and taken over to the passenger side of the car to connect to the bypass relay. All the other wires that have to be connected to the relay run along behind the lower boot panel. The bypass relay needs a + feed which I took off the auxiliary socket on the left hand side of the boot instead of running a + feed all the way from the front of the car. I've been looking but doesn't look like I took any photos of where I put my bypass relay? I've placed it directly under the upper boot panel under the grill to make sure it's easily audible. I found a photo of the harness to loom connection and you can see the wiring colours have changed. You'll be able to see looking at the connection which colours wires should be connected to the bypass relay without the need to start opening up the loom to look. I had a lot of pain and grief with my rear lights after installing my tow-bar. Though in the end it turned out to be nothing to do with the tow-bar wiring! DEL80Y and J.R. were most helpful 😊 Others have helped me so I think it's only right to share what I now know if it can make someone else's life easier!
-
So what was the outcome ?
-
I've been thinking are you sure this white smoke is not just normal condensation coming from the exhaust until the engine has started to warm up?🤔
-
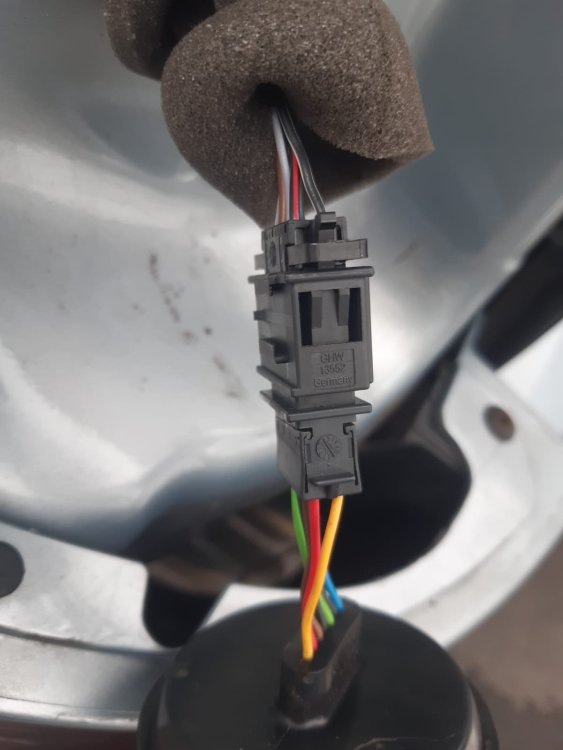
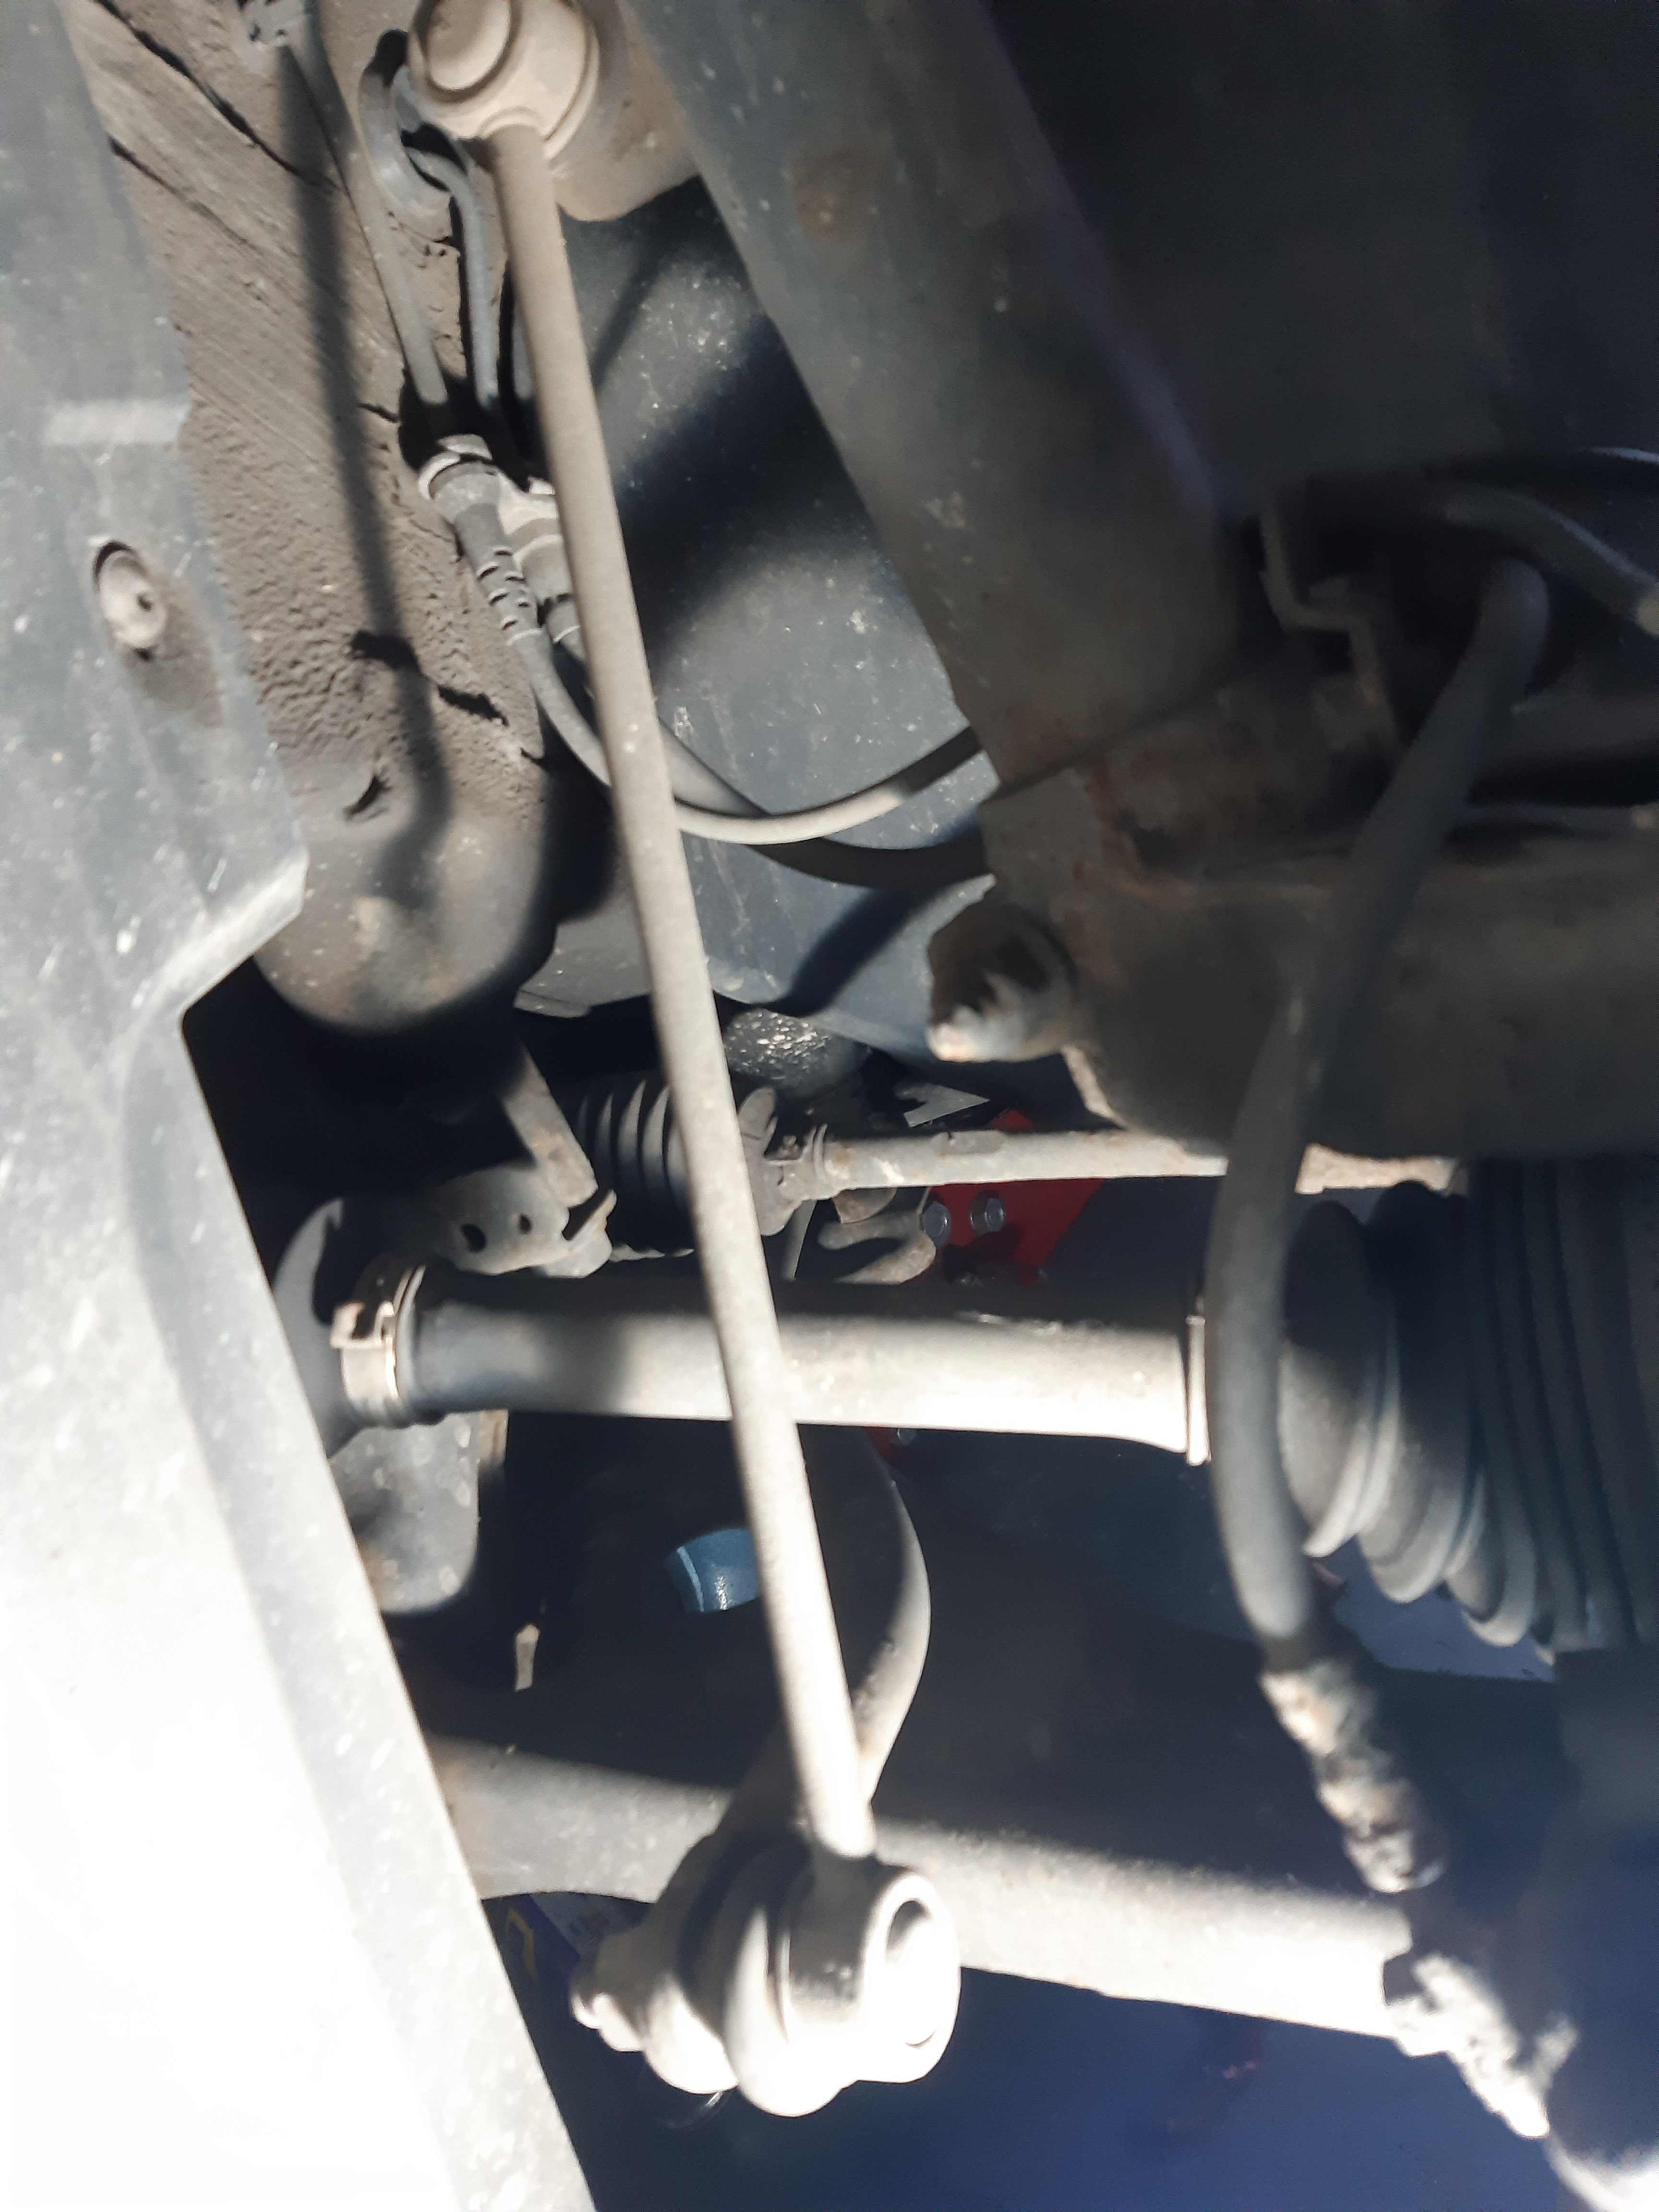
If you get to the point of trying to find what wire does what this might help a little? Photo of the N/S light cluster of my 2012 Superb Estate. The wiring colours change at the plug where the light harness connects to the main loom I can't remember what the main loom wire colours where now . The two black wires you can see going into the car in the photo merge into one at the plug and join into 3 earth wires which are all joined at one point and split back into 3. The brake and fog light bulbs also double up as side light bulbs so there are 4 side light bulbs in each rear light cluster which caused me some confusion! The red & green wires are the common feed wires for the brake & tail lights and fog & tail lights and the wires that should be connected by pass relay.
-
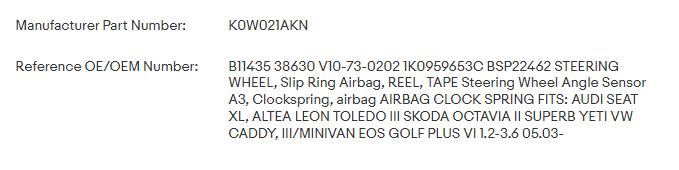
This is an aftermarket part but it also quotes OEM number which looks to fit various different models.
-
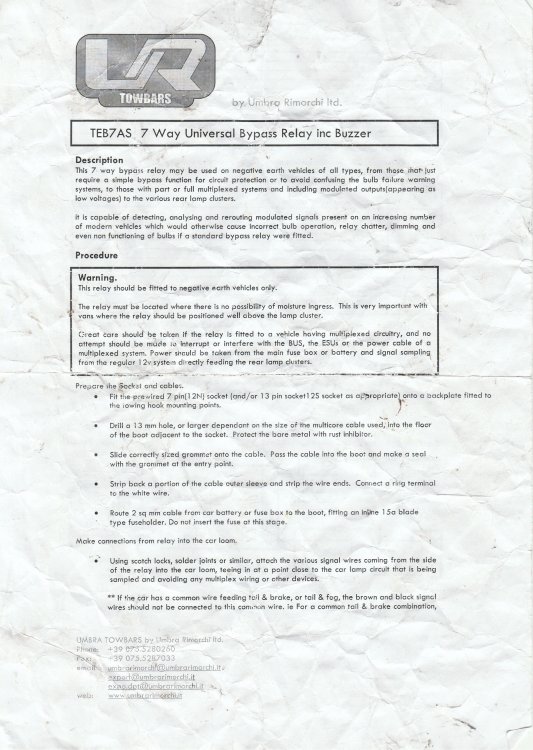
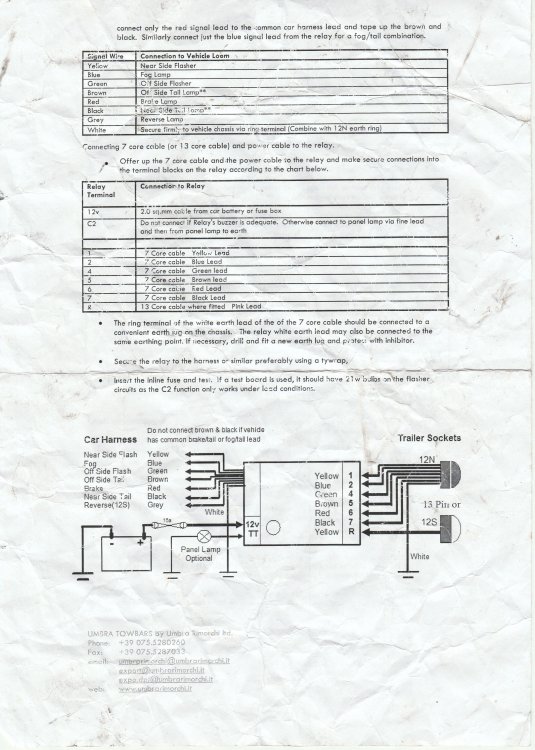
The link to the wiring instructions in my last post are slightly different to the instructions that came with the same bypass relay I got with my tow-bar, which I've scanned and attached. My instructions tell you not to connect the tail light circuits to the bypass relay where you have a common brake & tail light feed which you do on the MK2 Superb. So make sure that the black & brown side light wires going into to the relay haven't been connected. Assuming you have this kind of relay?
-
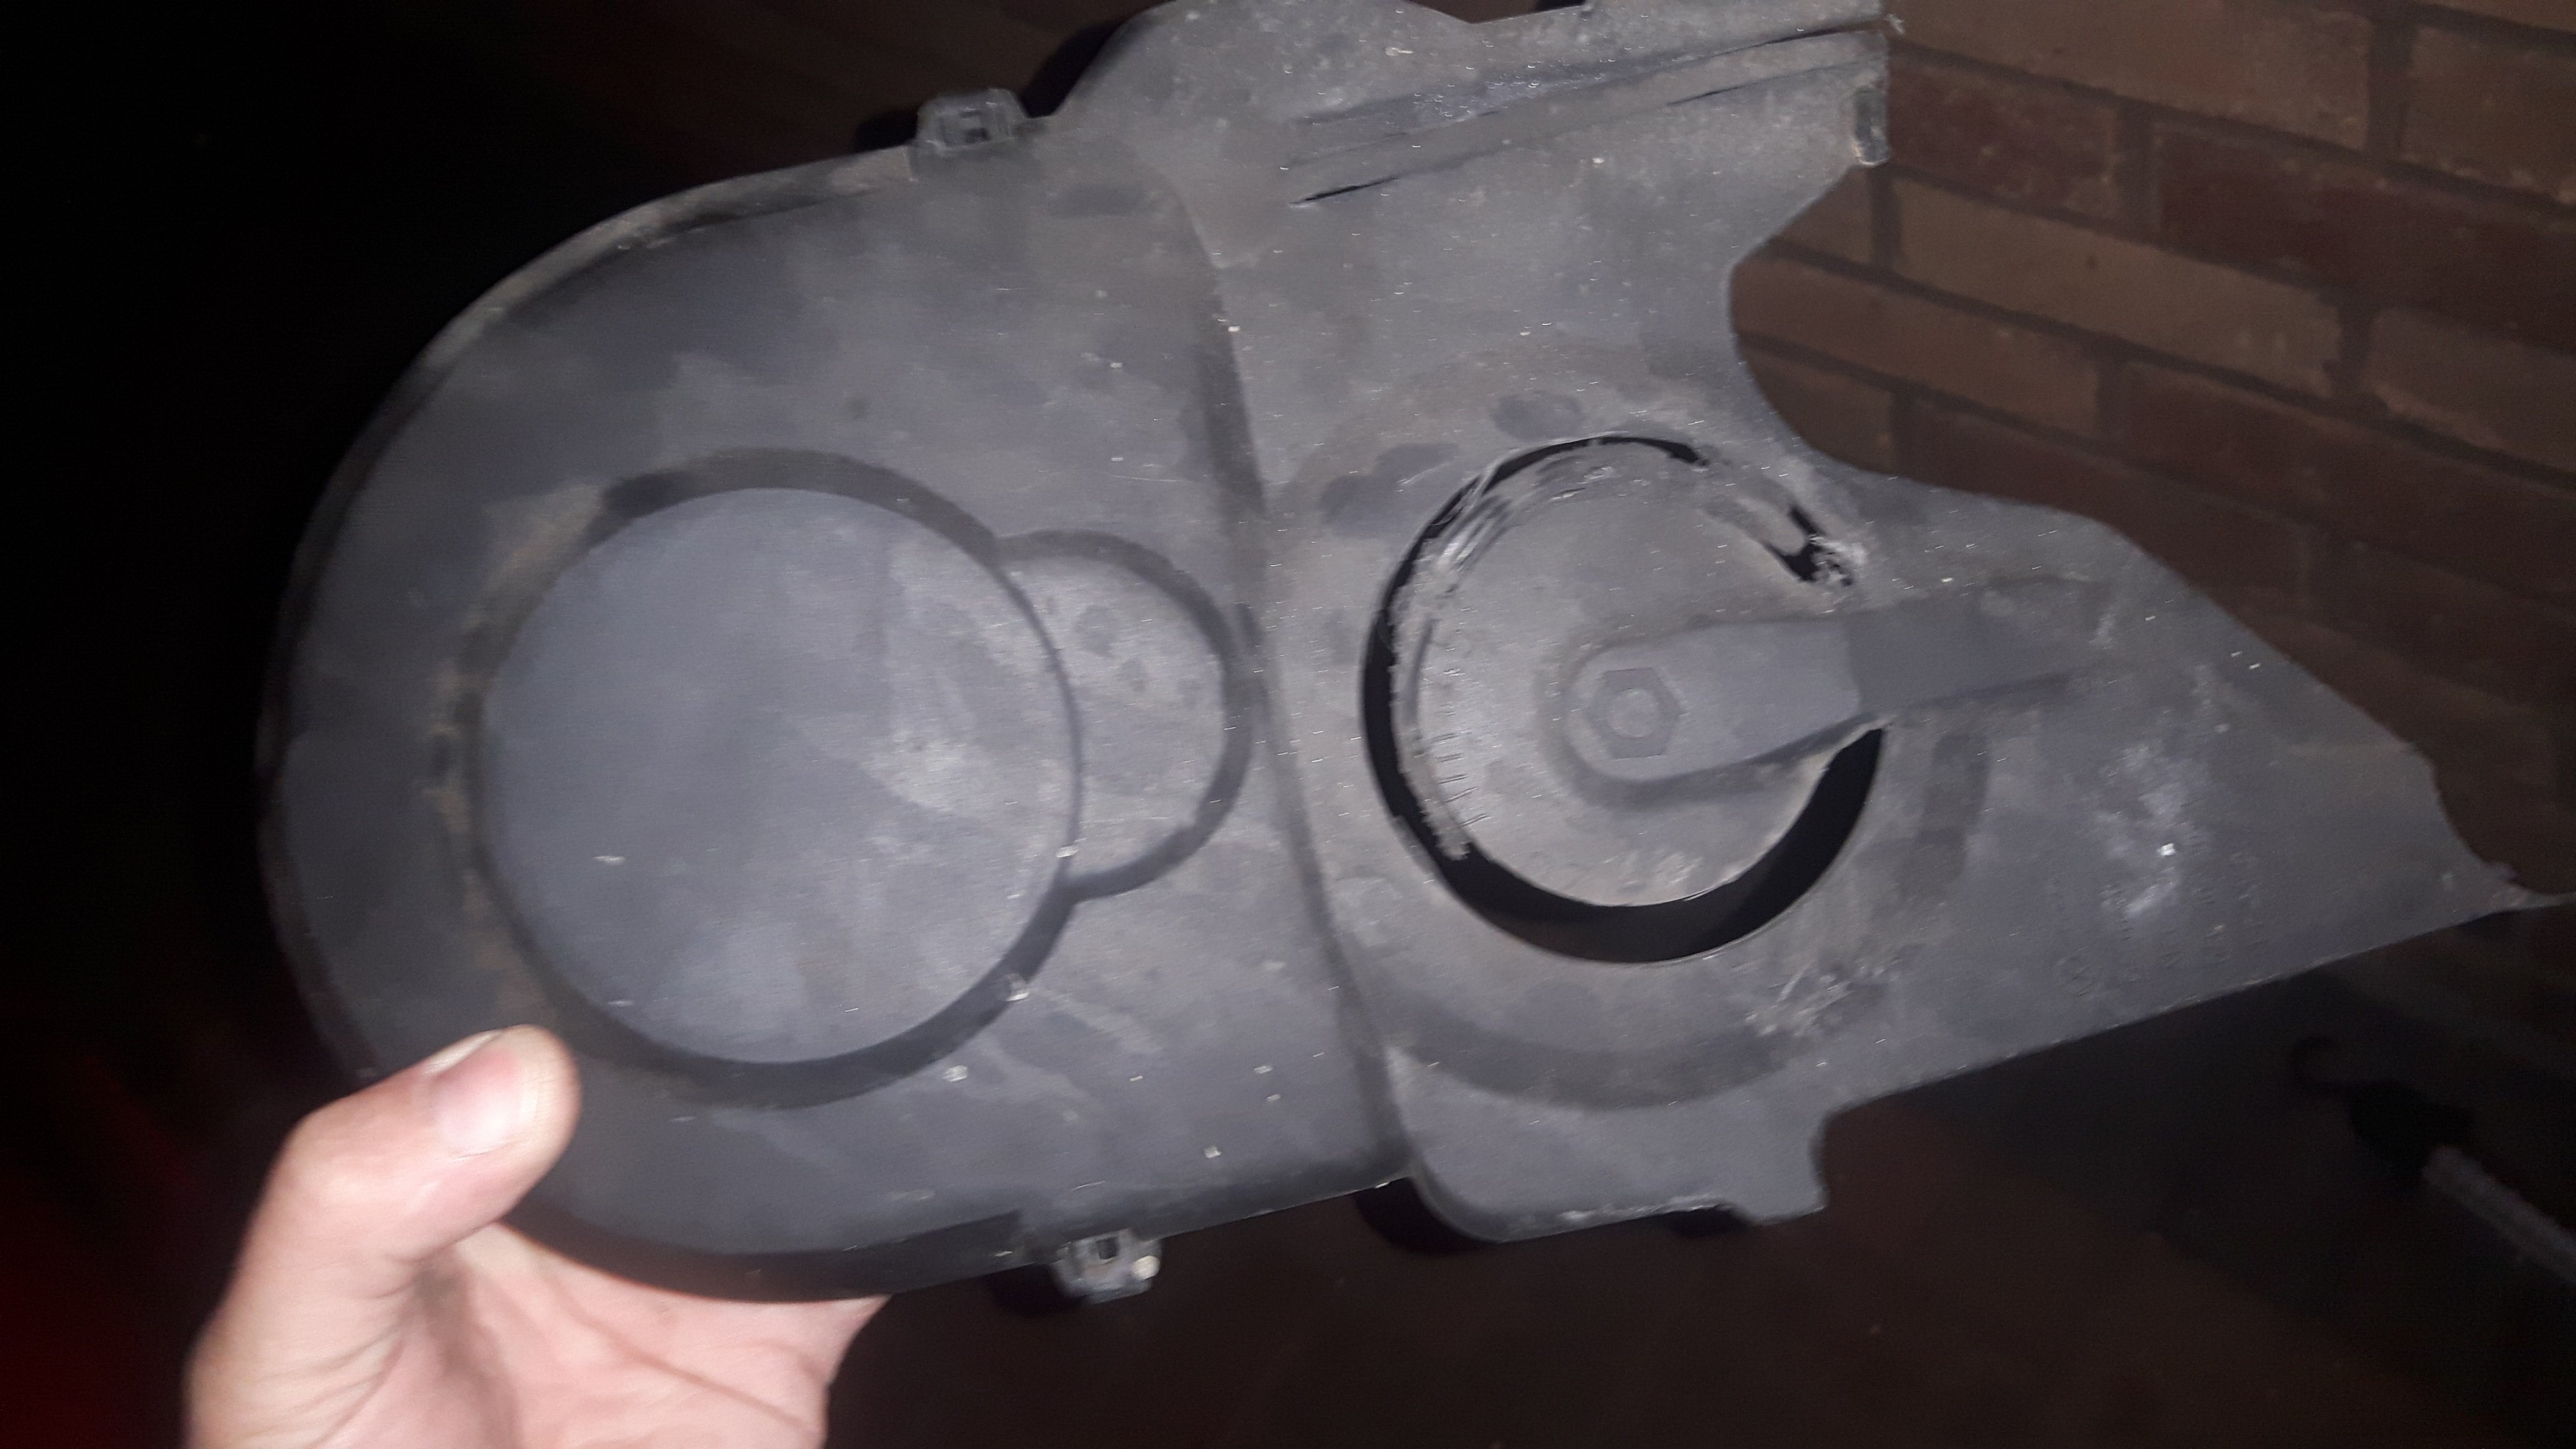
It's a PITA having to take the rear panels out! I know as I've recently fitted a tow-bar to my 2012 Superb Estate. You will have to remove the plastic panel that goes across the boot floor below the tailgate and the piece of trim that goes up the LH boot opening. Remove the LH aluminium rail in the boot. The upper D pillar trim. You might get away with leaving the C pillar trim in place. Remove the outer LH side seat panel it needs pushing into the car and the lugs are easily broken if you don't push in the correct direction! Then you can remove the panel that runs across the bottom of the rear side window. You need to remove the 3 boot luggage hooks to reveal the 3 torx headed screws hidden behind them and all the rest of the screws holding the panel before finally being able to lift the boot side panel up and out! Unless you have an OEM controller you won't be able to use VCDS to connect to the tow-bar electrics. I'd agree with J.R that you've probably got a universal bypass relay fitted. I say that because you've said you can hear an audible warning from the boot. I might be wrong but if you had an OEM system then I assume you'd probably only have a dashboard warning ⚠️ light for the trailer indicators and no audible warning? As a lot of people find an audible warning some what irritating. So if it is a 7 way universal bypass relay you have in your car then I'd be inclined to think that it is probably faulty ? As it only requires a single feed from the common brake & side light feed and you say the trailer brake lights are working correctly then the relay is probably be wired correctly. The relay knows when to supply current to the side lights or brake lights or both. The fog lights on the car also have a common fog & tail light feed and as you say the trailer fog light works then it seems the tow-bar electrics have been correctly connected. The Brown & Black wires feeding into the universal bypass relay shouldn't be connected. http://www.thomson-caravans.co.uk/advice/caravanadvice/pdf/teb7as.pdf I've made several assumptions so please excuse me if the above is a load of B******s! 😉

-
This car has a common tail & brake light feed. J.R. If as you suspect a 7 way universal bypass relay has been fitted then neither of the side light circuits will have been connected to the relay as all is needed is the common brake feed connecting to the bypass relay.
-
-
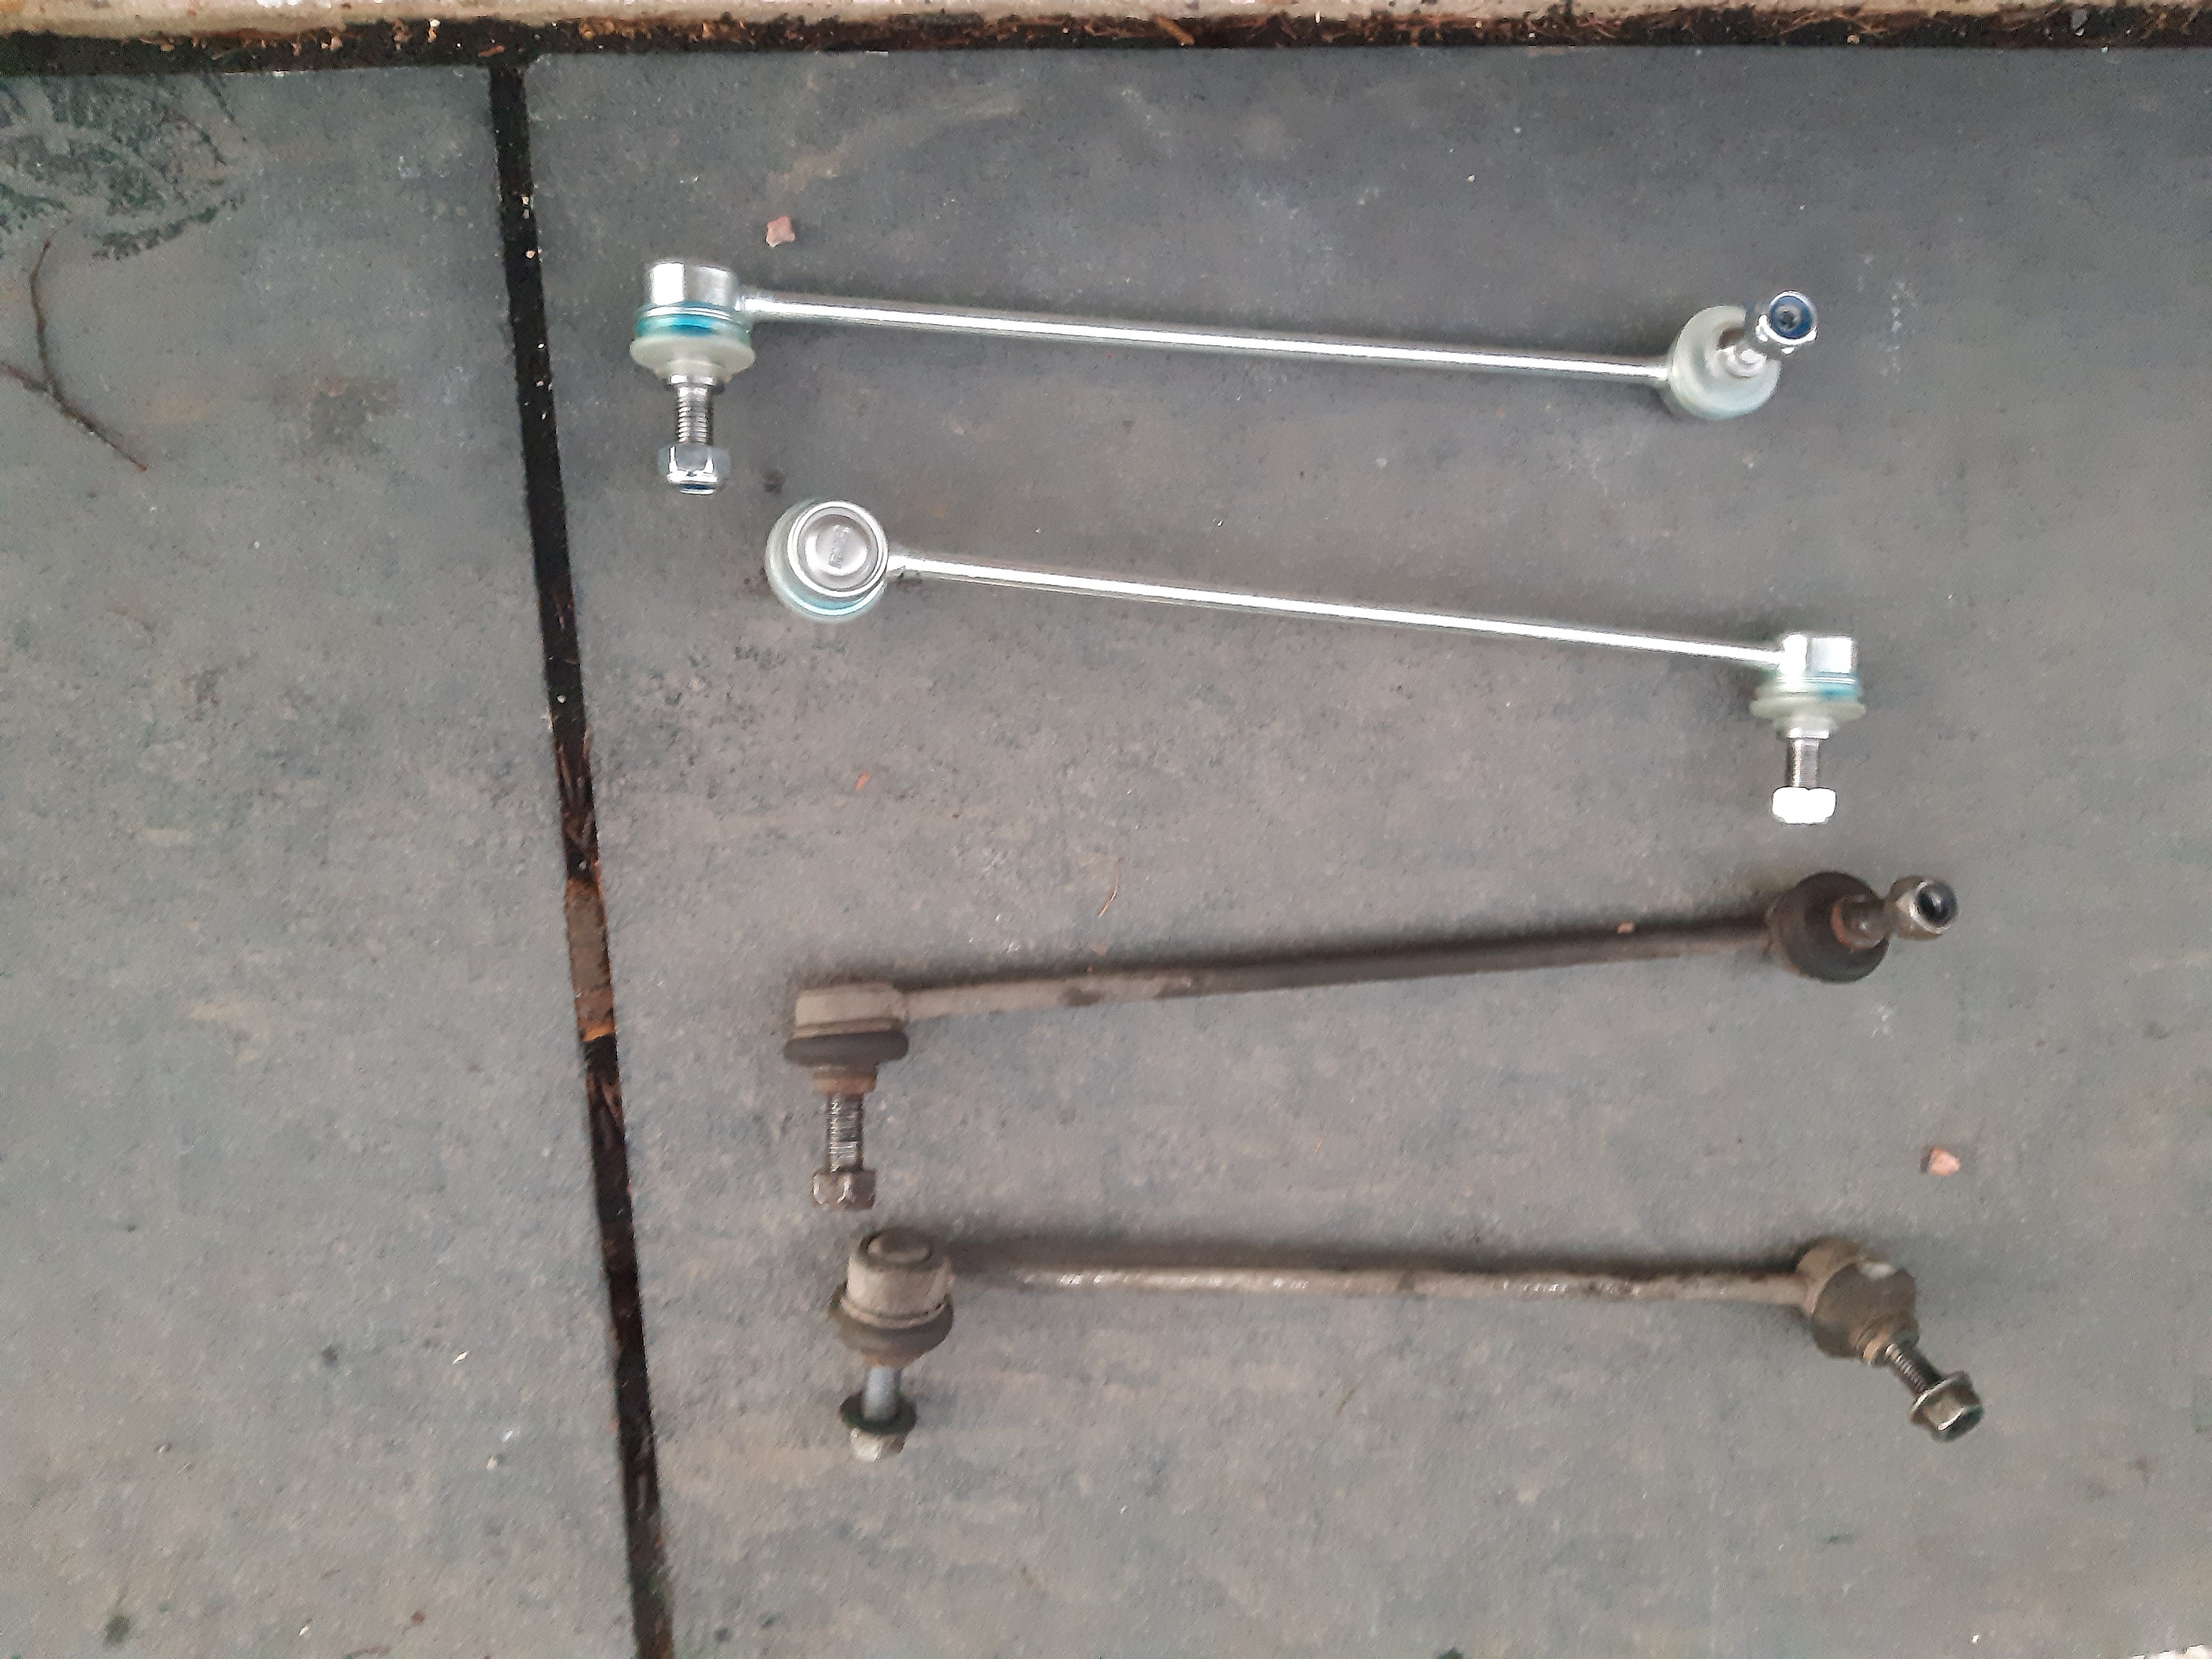
I wonder if it's a Superb 4x4 thing? :-) Not the same part but when I recently ordered a front coil spring giving my registration I later then started getting emails to say they'd sent the wrong spring when if fact it was the correct one !!!!
-
I don't think any of those torque settings are particularly critical. I recently changed both my front springs & dampers and didn't use a torque wrench. Though the strut pinch bolts have to be done up tight! The Haynes Superb II online manual doesn't list any torque setting for the turbo. The front strut torque settings are as follows: Strut top mounting bolts 15Nm + 90° X 3 Strut lower Pinch bolt 70Nm + 90° Lower ball joint 60Nm though you don't have to undo this to change the damper Piston rod nut 60Nm, the piston rod has to be stopped from turning using an allen key while tightening the nut with a 21mm deep cranked ring spanner. It's very unlikely you'll have a specialised crow foot type spanner to use a torque wrench https://www.ebay.co.uk/itm/313846673443?hash=item4912b83023:g:1gEAAOSwkXZh7rmw I'm not even sure you'd get on the piston nut with that?


Important Information
Welcome to BRISKODA. Please note the following important links Terms of Use. We have a comprehensive Privacy Policy. We have placed cookies on your device to help make this website better. You can adjust your cookie settings, otherwise we'll assume you're okay to continue.