


Breezy_Pete
Sponsor
-
Joined
-
Last visited
Everything posted by Breezy_Pete
-
Check the brake servo vacuum hose for cracks at terminations of hose sections.
-
The genuine sump plug has a 6mm hex key fitting in my experience, and only requires a replacement copper washer, not the whole thing; unless the hex recess is chewed up by prior clumsiness. Fuel filter you're more likely to create a problem than improve things so I'd leave that alone. You can usually pick up genuine engine air filters on ebay for £10 to save having one come all the way from Berlin, or wherever Autodoc are shipping from lately.
-
Do you have the same size wheels and tyres in all 4 corners?
-
No problem. Coilpacks are possibly the most vulnerable parts on these engines, so consider buying a spare, and a handheld code-reader. Keep both in the glovebox then you have a fair chance of re-mobilising yourself if you ever break down due to a failure of one. If you're not DIY-minded and have breakdown cover, it might save a bunch of time by the side of the road if you have a spare ready to be fitted for you.
-
Leave it alone for the next 100k miles, but keep the oil clean and correct spec.
-
He got it going already Joe:
-
Have you got the correct type of wheel bolts to go with the alloys?
-
The thread title conveys every possible piece of info to identify the engine Ken. The receiver for the radio remote on a Fabia is within the Central Convenience control unit. A bit of sheet metal standing up from the PCB if I remember right.
-
Very nice work on the mats!
-
Bit odd that there's no Bosch logo anywhere on that label? Almost looks a tad 'homemade'?
-
You can find out the full car data (far more info than the sticker) for a small fee at erWin Skoda.
-
5th row down, fifth from left? Photo?
-
-
Just cut the corner of the mat so it doesn't block the vent.
-
Strip fuse no. 5 in the battery fuse compartment also worth checking with regard to 00706. Blade fuses no. 8 and 11 are also worth checking while you are there, under the plastic cover beyond strip fuse no. 6. Both fan-related. Recirculation faults will be irrelevant and not worth fixing. 00819 and 00898 may be broken wires, look at the two-way brown connector pair on the bracket in front of the gearbox for the 00898 fault, and the high pressure sensor just in front of the coolant expansion tank for the other. The G65 high pressure sensor sometimes has corrosion damage to its connection pins, and the mating sockets of the loom connector, so carefully disconnect and examine that connector for a look. Check youtube for tips on disconnecting VW-type connectors if you aren't familiar with the technique.
-
Well there's a coincidence. Long head tendon? Busted mine back in November. No repair though, too old to bother and it seems to have reattached itself somewhere/somehow.
-
Maybe, or you could just get a magnifying glass and a fine pointy thing and lever the loose contacts carefully inwards towards each other.
-
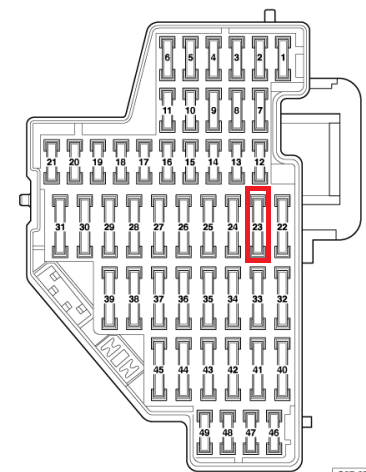
No, fuse 23, 30A. Take a photo of the one I'm describing. Is there not a couple of rows of mini-blades, then some of full size, then a bottom row of minis? I'm talking about the first/top row of full size.Can you confirm that in the cabin fusebox, top row of full size blade fuses, 2nd from right is intact?Yep, but only once the pressure is about twice as high as for low speed.No, the radiator thermoswitch only triggers the fan according to coolant temperature, which isn't necessarily going to be what you need, cos that may not get hot enough for any fan action. The A/C-related fan action is triggered by the Climatronic unit reading the refrigerant pressure using the sensor in the high pressure pipework. The fan control module has two sets of inputs, from radiator thermoswitch and from Climatronic module, either or both can make the fans go at either speed. I don't know exactly what sep was thinking but possibly swapping low and high speed wires at the connector going to the fan itself?You haven't quite understood me right. Doing nothing is what would potentially make the A/C work worse than it should, and possibly leak faster even after you get the refrigerant level right. Sep's advising some sort of workaround whereby the fan would run at full speed when low speed is requested, I think, by swapping wires around. Looking at the price of new fans on ebay, I'd be tempted to carry on with your scrapyard search. Not every one will have failed, even though I think it's a very common fault. Just to repeat, fixing the fan situation won't get the A/C working on its own, so maybe you're better off taking it to get regassed first, that way they'll find out if there's a 'show-stopper' that we haven't identified, like a big hole in something. I think the fan part number you need is 6Q0959455N, a few options here: 6q0959455n | eBayYou're close. Brown wire at pin 3 is the earth for both speeds, so battery negative to that pin, then put +12V direct on the middle pin (2) for low speed, move it to pin 1 for full power. You'll get a bit of a spark when you make the + connections, and obviously make sure no fingers are in the way. Edit, don't be too surprised if you find other fans with the same fault with low speed non-functional.With both the climatronic self-test and the thermoswitch connector bridging failing to get the low speed of the fan working, I'd say it's pretty conclusive that the resistor within the fan has burnt out. You've heard the relevant relay clicking in response to the bridging, so the only other thing that could stop it working is if the fuse was bust. You've checked that I seem to remember. I would think the fan would be OK to replace separately to any other bits, can you post a photo of how it's mounted? Usually on a plastic tripod thing which screws onto the radiator/fan shroud with three T30 torx screws. Unplug the wiring at a connection near the bottom corner of the rad. Take that whole tripod with fan out and then the fan unbolts from the tripod bit from the other side. Watch the torx bit goes fully into the screw heads before you apply force, the screws are often quite rusty and tear up easily. There is a repair you can do by wiring in an external resistor, instead of replacing the fan, but it needs a bit of effort with wiring and metalwork. Much cheaper solution though.


Important Information
Welcome to BRISKODA. Please note the following important links Terms of Use. We have a comprehensive Privacy Policy. We have placed cookies on your device to help make this website better. You can adjust your cookie settings, otherwise we'll assume you're okay to continue.