


Breezy_Pete
Sponsor
-
Joined
-
Last visited
Everything posted by Breezy_Pete
-
I'm still puzzling over this. That connector includes the main earth to that unit, so is probably a bit like switching your computer off and on again. As the heart of the CAN bus system it probably fans out and resets other modules too, but the window motor modules aren't on the CAN bus. The only connections to that Voltage Control unit from the window motor modules are the two 'door open switch' wires that come from the microswitches in the door locks via the window modules. So it might be that something to do with the door open switch has got that unit and/or the window motor module in a muddle? There is also CAN bus connectivity between that voltage control unit and the Central Convenience unit (that looks after door locking stuff and radio remote control), and the central convenience unit has a direct wired connection to each of the window modules. I think this connection may be to do with being able to raise/lower windows by holding down the lock or unlock buttons on the remote, but not sure. Does Roomster or Fabia Mk2 have that function? @Bertie90 I'm also curious about the difference(s) between the circuit boards inside the passenger and drivers side window motor modules. I've only got a drivers side one to look at, do you have a photo of a passenger side one? The actual circuit board. I think some of the photos in this thread may be of the passenger side one from your Roomster, but I want to be sure I know what I'm looking at, rather than assuming. Everyone says the drivers side is the 'master' unit, so it would be nice if there was some obvious difference, like a simpler circuit board with fewer bits fitted or something on the passenger one, so you could tell just by looking at one.
-
Ah I see what you mean, vertically below engine ECU I think. Be careful disconnecting, I seem to remember someone saying that the cable latch is tricky or unintuitive or something. Never undone one personally.
-
Just came across something interesting and hopefully relevant to the motor rotation direction in a youtube video about window motors. Check out what he does and says at about the 17 minute mark here: Electric window motor bench test, strip & fix #1423 - YouTube Rather than having swapped the rotors between passenger and drivers side, you may have put both motor covers on the opposite way to how they were? I will bench test this at home later. Thinking about it, it must be the relative orientations of brushpack and cover that matter, and I can't remember whether or not the brushpack can fit into the cover either way round. Wish I had one in front of me now.
-
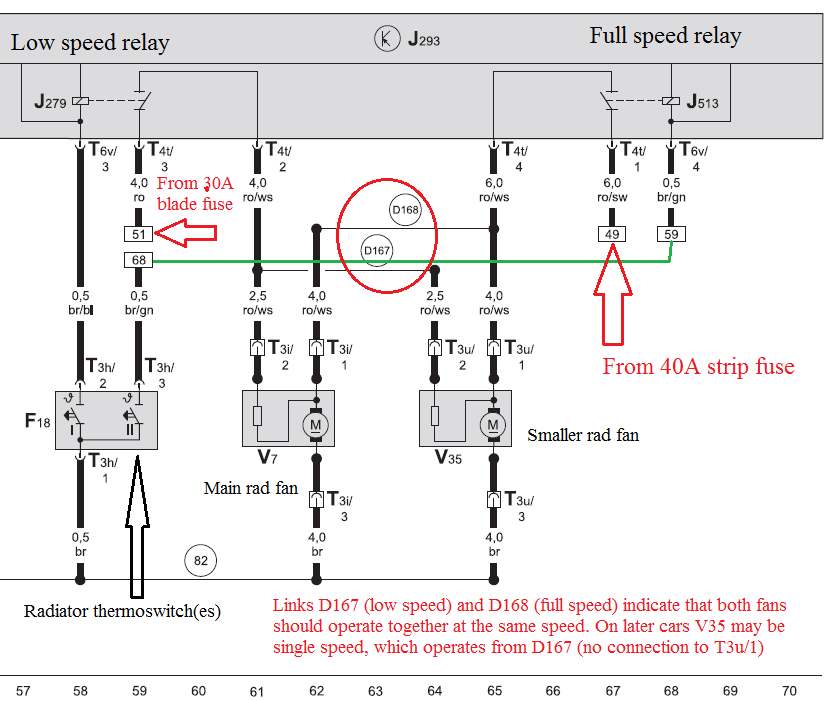
Yes, access is not easy. Be careful not to damage the connector latch when releasing it, also. Does your A/C work? Because when you switch that on, it should cause the fans to come on after a short time (depending on ambient temperature). There are two sets of control inputs to the fan control module, the ones from the thermoswitch shown in the diagram above, and another pair of wires from the A/C control module that work the same way. (They go to pins 5 and 6 of the 6-way connector at the fan control module).Just above where the fan connectors are, about 100mm higher. There are three fuses you should check; strip fuse #5 in the battery fuseholder is the 40A one in that diagram. Blade fuse #8 is the 30A fuse (under cover next to the strip fuses). Blade fuse #11 is a 5A fuse going to the radiator fan control unit (J293) that isn't shown in the diagram.Unplugging the radiator fan thermoswitch (F18) connector and bridging terminals of the loom connector is a nice way to test the system. There are three wires to that (quite thin as they are just carrying relay coil currents, not fan currents). Brown to brown/blue should bring on the fan(s) at low speed, brown to brown/green (with ignition switched on) should invoke full speed operation. Have you checked the relevant fuses? The below diagram may help you visualise the system:
 Does the car have A/c or not?No problem at all.Yeah it was a rubbish initial bush design, and awkward to replace them; worst of both worlds. Fraid I don't know anything about compatibility with 2014 A1 stuff; someone will hopefully know.Assuming it's the loom connector with the broken part, buy a replacement housing (part number will be somewhere on the existing one), de-pin the old housing and push the pins into the new one.Only the first year or so of mk2s had the same wishbone style as mk1.It's a bloody disgrace that anyone should have to be inconvenienced or fork out a penny of their own cash to sort out this dangerous fault. Car manufacturers being what they are though, we probably have to wait for someone to die in a fireball in one of these cars before a recall occurs. Disgusts me.Don't think so; just 280mm front discs 3-bolt, any other size 4-bolt, as far as I could see.Belt toothed belt; toothed belt guard - Fabia(FAB) [EUROPA 2013 year] (7zap.com) And no, I don't know what the suggested replacement interval might be.Is that a Mk1/1U or mk2/1Z?What car and what year? You've posted in the Mk2 Fabia subforum, but your profile says Octavia 1.9tdi?This morning, before you start the engine, pop the bonnet and unscrew the lid of the expansion tank. Listen for any hiss of escaping pressure. Tell us if you hear anything or not.Unfortunately, the front brake PR code is rarely given on the build sticker.Great news. To be honest, your description of the fault and what you'd tried already went a long way to pinpointing the likely problem area.Do you know what diameter your front brake discs are? May seem like a random question but it seems to be relevant, judging by this page: wishbone; wheel bearing housing; anti-roll bar; D ... - Yeti(YET) [EUROPA 2010 year] (7zap.com) The 280mm set-up (PR code 1ZF) appears to be the only one with the 3-bolt bearing.Good manners cost nothing. It's a shame you couldn't afford it, and just moved straight onto the next 'take'. Good luck.Cheers fella.Hacksaw or nut splitter.Common problem, caused I think by the OEM ones having a 5.5mm Allen recess rather than the 5 or 6mm that people try. Cut it off and replace.


Important Information
Welcome to BRISKODA. Please note the following important links Terms of Use. We have a comprehensive Privacy Policy. We have placed cookies on your device to help make this website better. You can adjust your cookie settings, otherwise we'll assume you're okay to continue.