Everything posted by Breezy_Pete
-
If you take the window motor off, the beige cog can be taken off it, put into the door and used to manually lower or raise the glass, perhaps with some pliers to help turn it. Loom repair kits are typically for the single-connector later cars, rather than mk1 Fabia?
-
-
@VenomVrs What are you measuring with? Voltage regulators are controlled differently in start/stop cars, and AGM batteries may be charged at higher voltages than conventional ones. Dave is showing max charging voltages per cell for these batteries at different temperatures. Multiply by 6 to get voltage between battery posts.
-
Yes, make sure the brown wires at both switch pack and lock module are really earthing, but I think the lock one must be OK cos the 'door open' signal relies on it. Backlight in switchpack relies on the same earth as the up/down switches, so do check backlight operation once the daylight goes a bit, later.
-
How so? The two wires that are black with blue stripe are permanent 12V, the wire that is brown with red stripe is only live when key is in ignition.
-
https://www.briskoda.net/forums/topic/196288-oem-wiring-loom-colours-pins-for-stereos/
-
No idea on diagnostics for these systems, nor what readings are to be considered normal range. Could try searching web with your engine code as one search input (DFGA). Part numbers that come up are 04L907807AM, superseded by 04L907807EE for one of them. And 04L907807ES, superseded by 04L907807EG for the other. Both of the current parts retail at £493 + VAT in the UK. @ApertureS probably knows stuff about this system. There will be a Self Study Programme about SCR systems available via erWin, I imagine.
-
-
If you've got a battery charger I'd stick that on it just in case you have taken too much out of it.
-
-
You didn't disconnect the battery at any point? Loose terminal?
-
Maybe take the light switch out again and see if there's any sign of a wire getting trapped and damaged? Not going to be easy at night.
-
On a mk2 Fabia, I would be checking for broken wires in the rubber boot that contains wiring going into the driver's door.
-
They deserve some sort of punishment, really.
-
Wow! Amazing behaviour from that technician.
-
-
What measurements/specific pollutants are being measured to generate those numbers, please Graham? Link to the site?
-
No, that would be an oil smell, not a petrol smell. I really think this injector rail problem is likely to be what is happening here. There are many reports of it, as you'll see if you skim through the linked thread. A number of other threads also cover the same problem.
-
Have a read here, and consider not driving the car until confirmed or dismissed as the cause: https://www.briskoda.net/forums/topic/468348-fuel-leak/
-
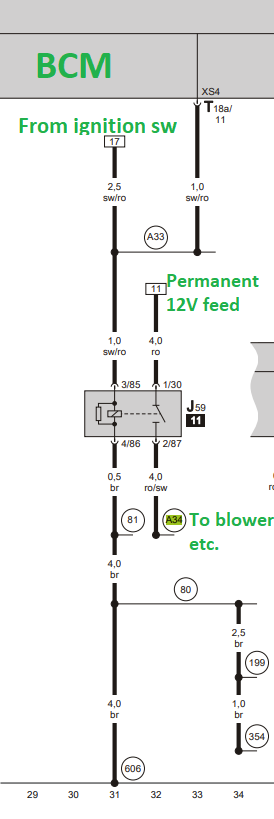
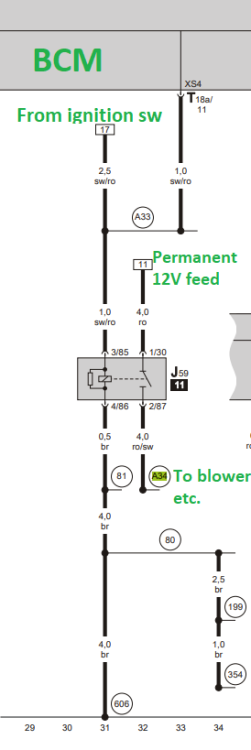
Relay part number is 7M0 951 253A, that was superseded by 4H0 951 253. Only other possibility is that the ignition switch and/or BCM are not giving the relay the coil current to switch it on. It should be possible to measure in the socket that the relay fits in, what voltage is on the connection that relay pin 85 goes into, when ignition is switched to the point where all the dash cluster self test stuff starts happening. It should go up to 12V and energise that relay. This is the relevant circuit:
-
That burning was after it came loose and touched the mounting area I think. So not the resistor's fault.
-
Think it'll have "18" written on the top of it in big font.
-
Don't think you could test much without a multimeter. If you let me know your reg number or VIN, I can look up the part number of the relay ahead of you getting eyeballs on it.
-
Skoda Fabia Dashboard ( 99 - 07 Right Lower)
-
The relay panel is roughly in front of your right knee when you're sitting in driver's seat (on RHD car). Lower dash trim on that side has to come out to access it, unfortunately. I think the relay holder has numbered positions, but it's second from left on bottom row.