ApertureS
Resident Member
-
Joined
-
Last visited
Everything posted by ApertureS
-
Just because you have done it many many times doesn't mean its safe nor the correct way to do things. Most suspension and subframe bolts are called torque to yield bolts meaning after tightening they stretch so only get one use. Now you are lucky if you reuse the bolt and it snaps when you tighten it down - lucky why? Well because the unlucky option is that it tightens down beyond its yield limits and when you go to do a strenuous maneuver it sheers off and causes a crash. Nothing to do with lack of experience (especially with quite a few years in the trade) more to do with keeping everyone safe by doing a job properly and having the knowledge to do it correctly. Which is why a forum is only as good as the information shared on it and why its imperative you give people correct and safe advice.
-
Terrible terrible idea. Bolts are single use only and youll end up needing to replace about 6 expensive bolts vs just undoing 1.
-
https://cardiagn.com/skoda-superb-iii-heating-air-conditioning/ page 83 on the PDF.
-
As requested @wertok
-
have you tried the flap adaptation method? Simply ignition on and hold the AC button and the Recirculation button. All lights on the panel will flash for about 30 seconds. Restart car after Clear codes and report back.
-
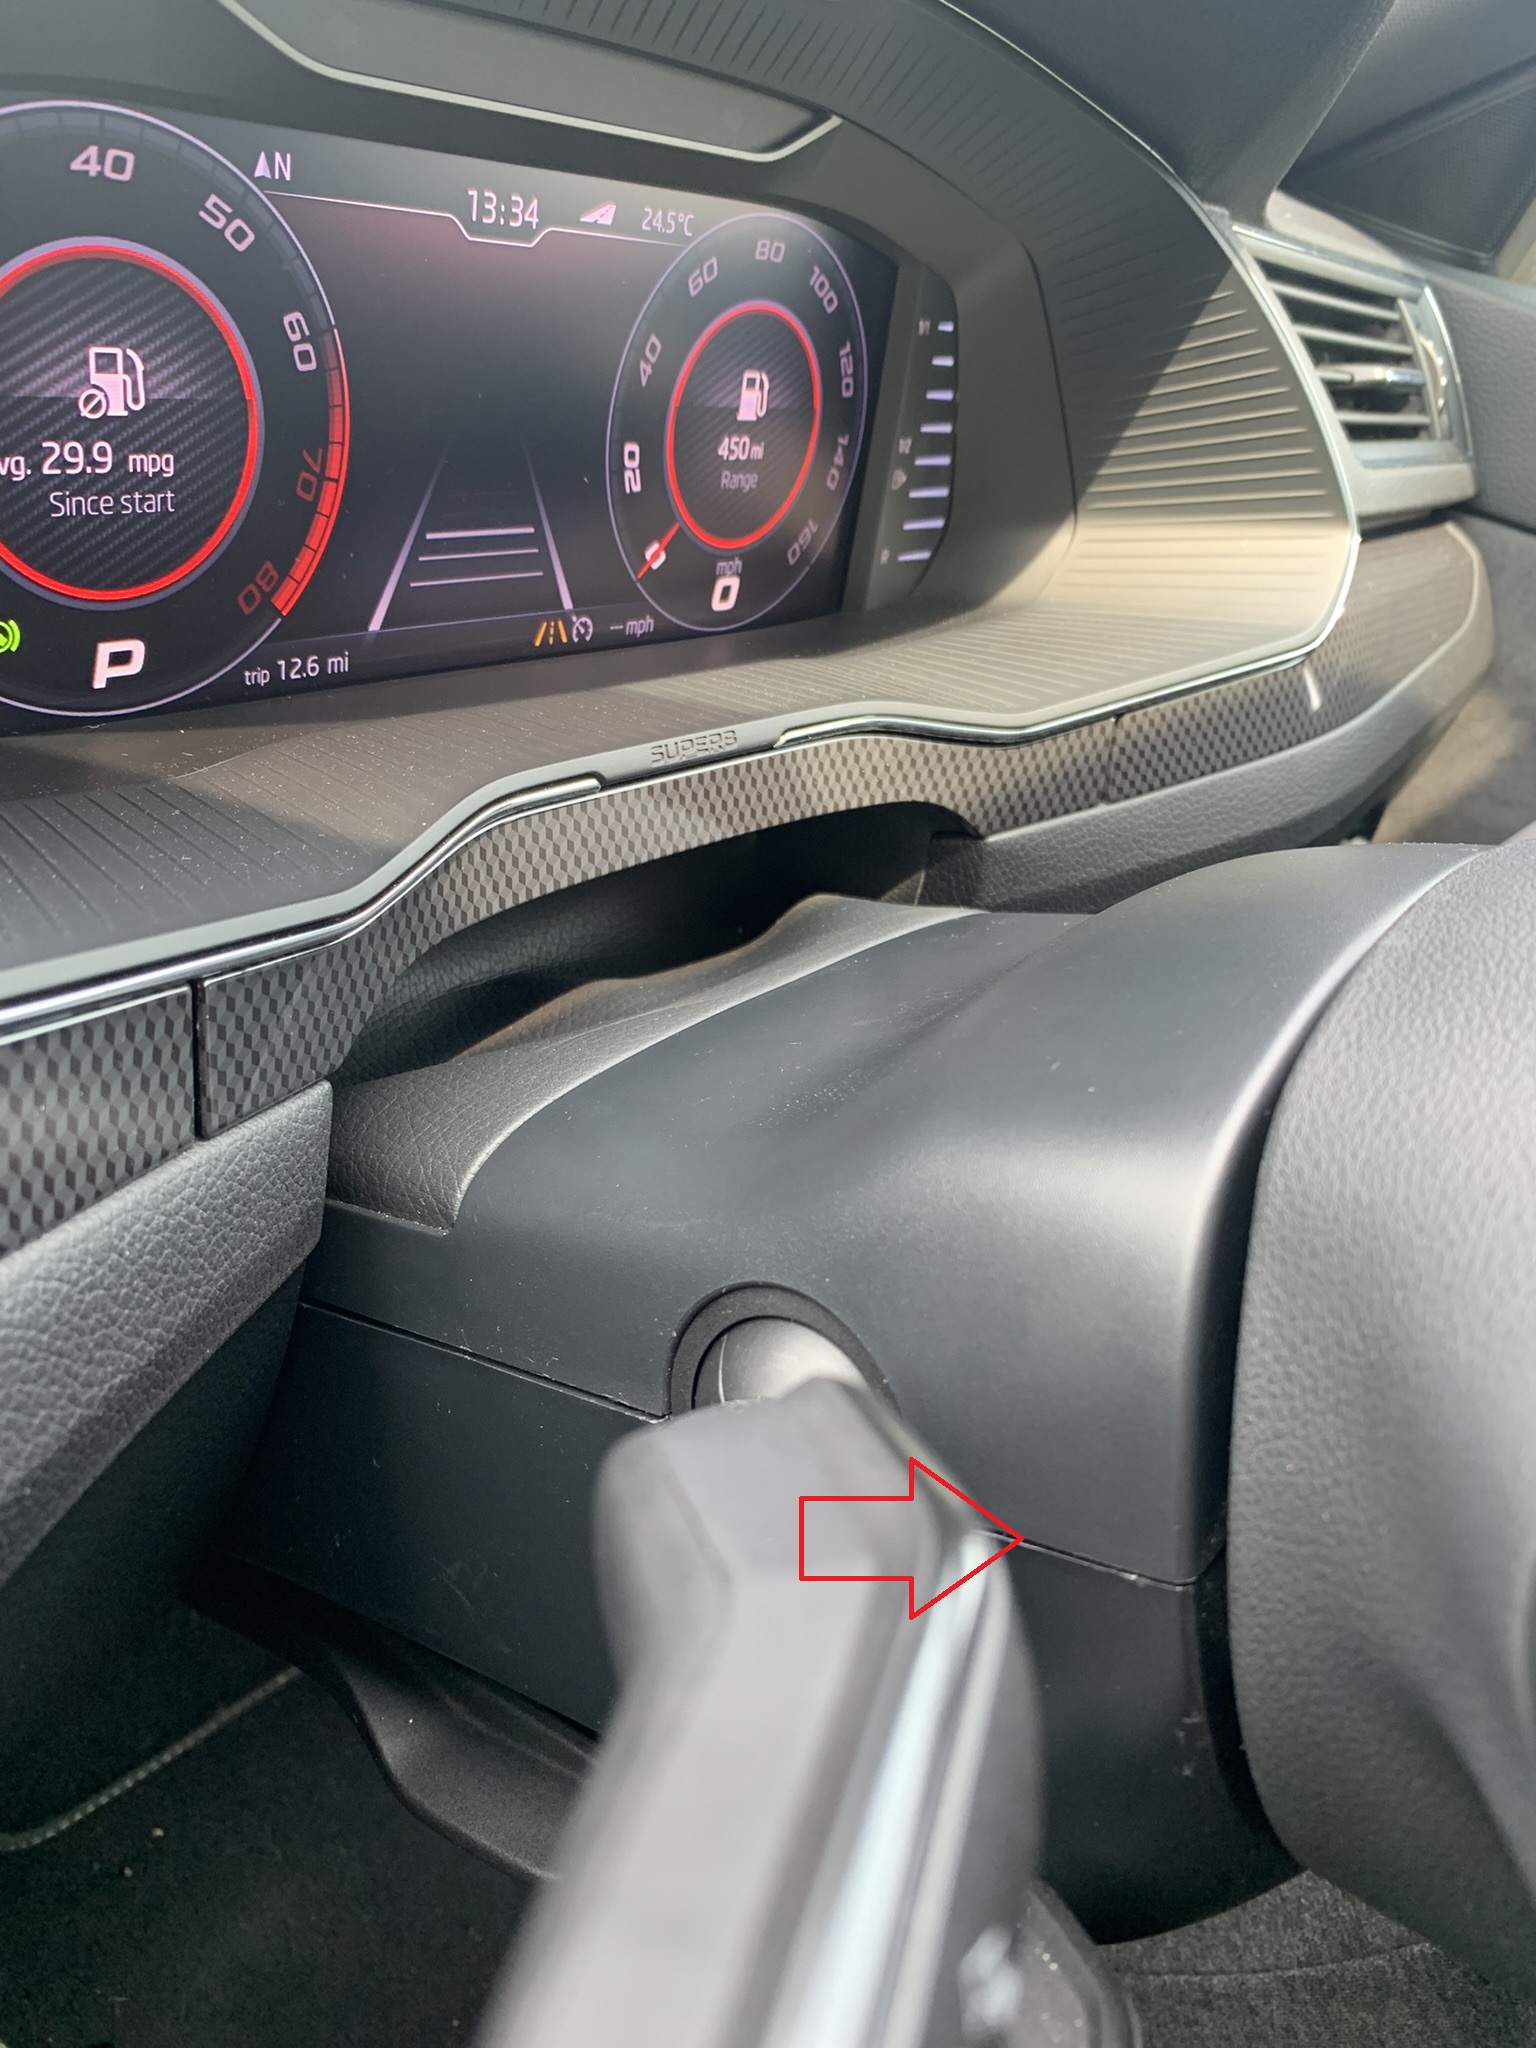
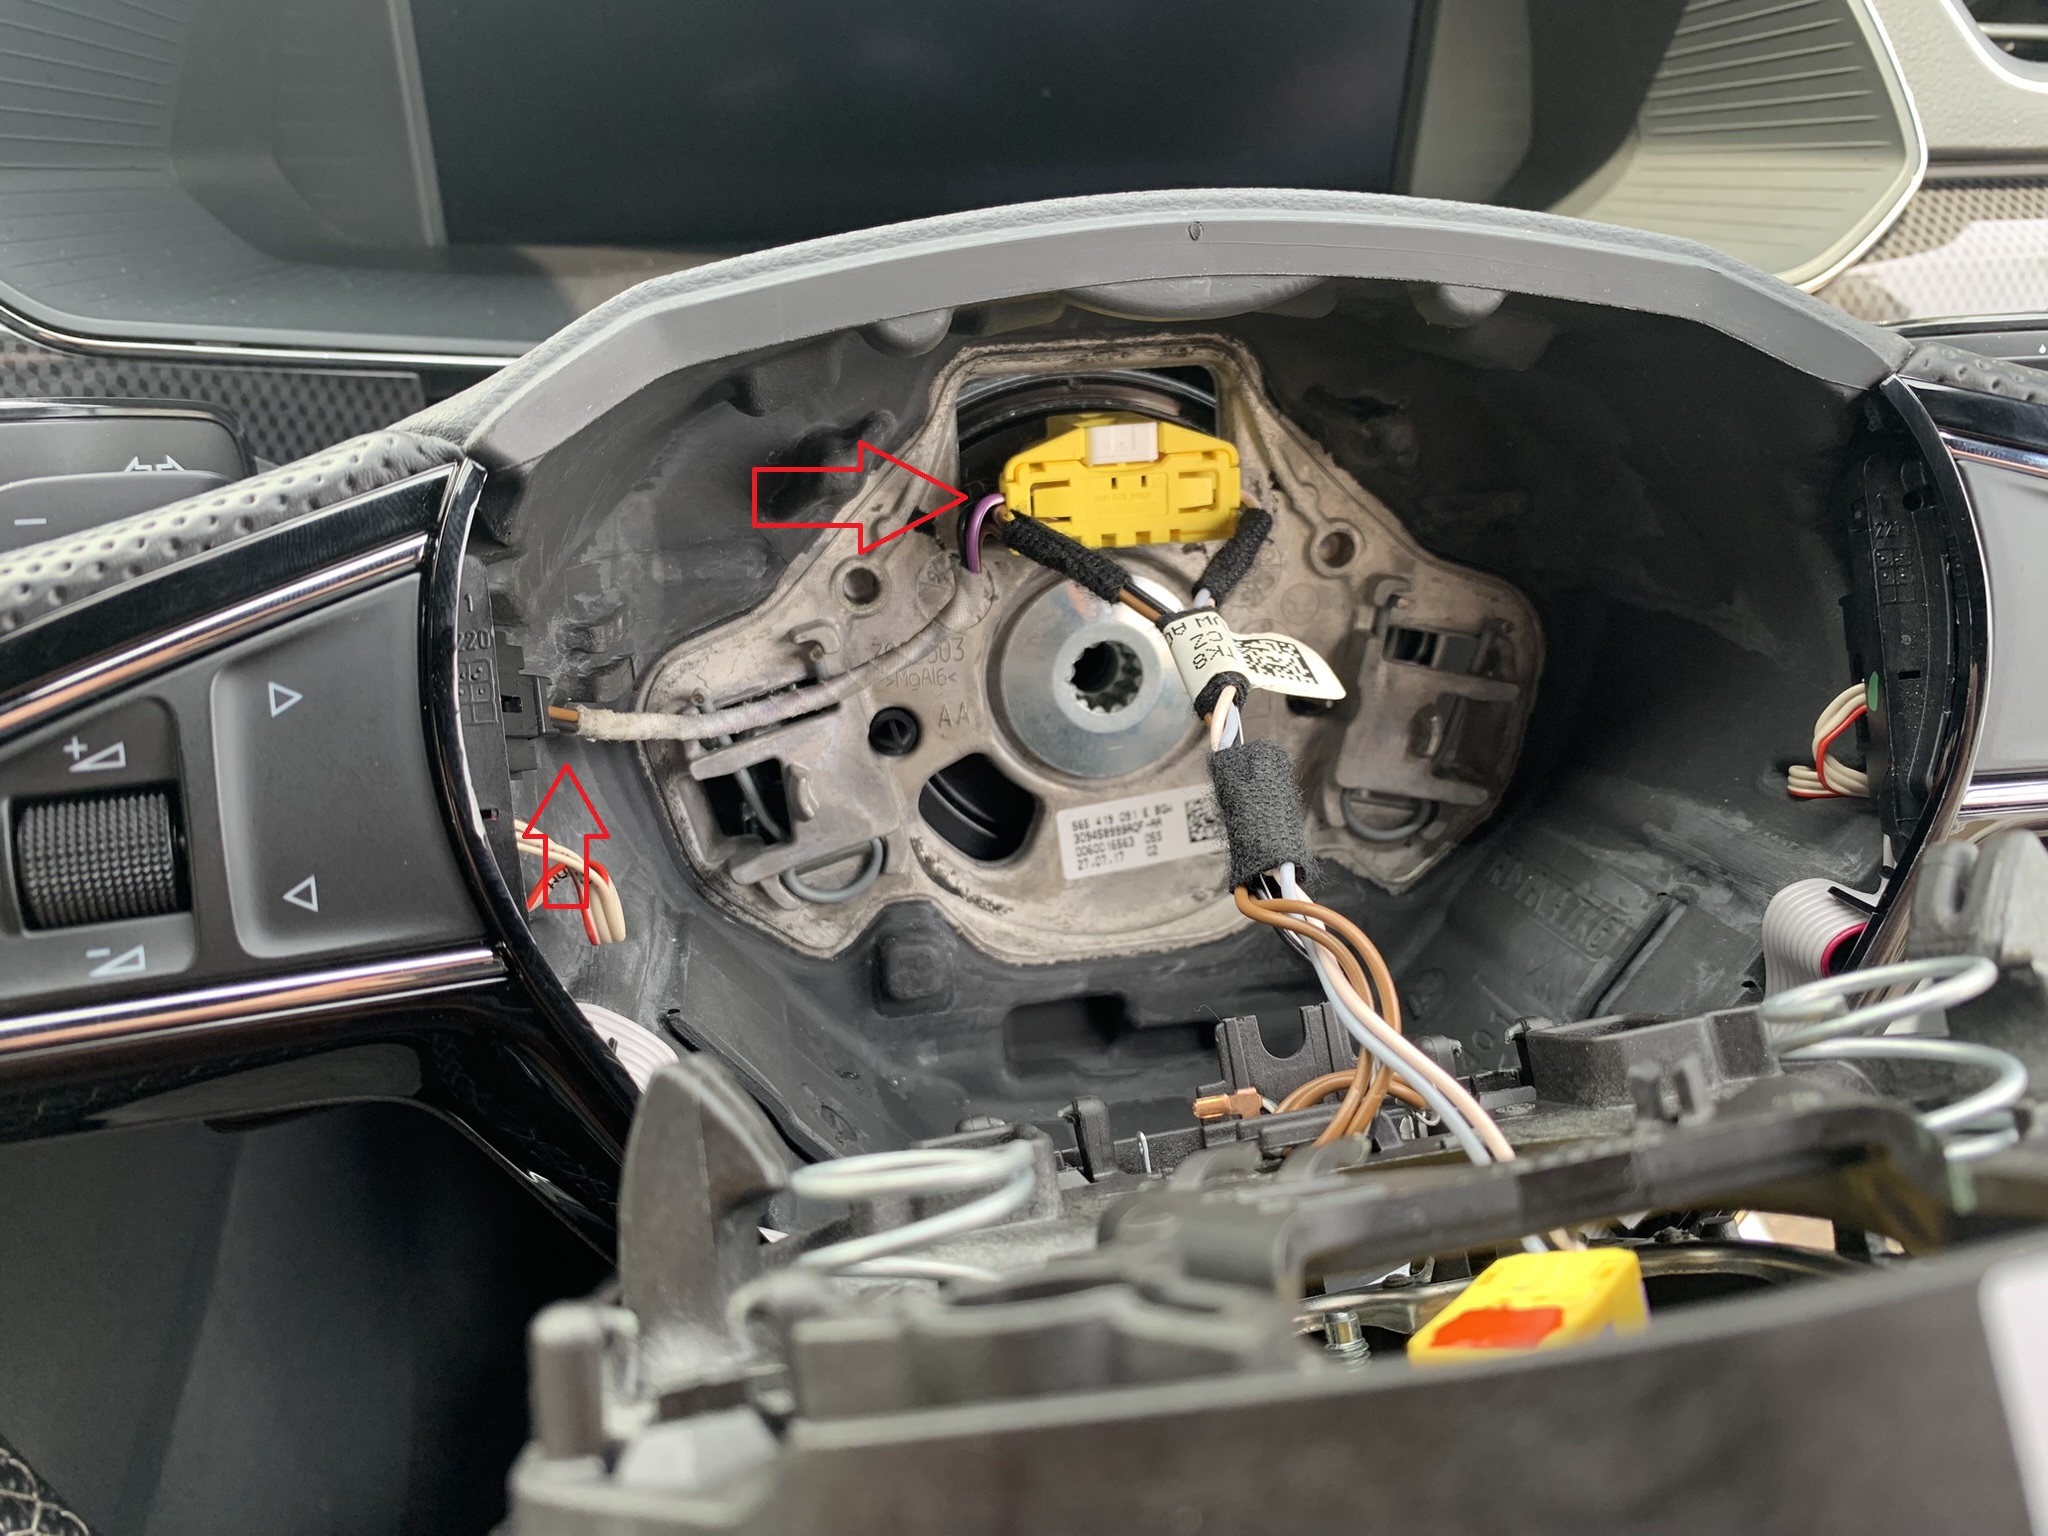
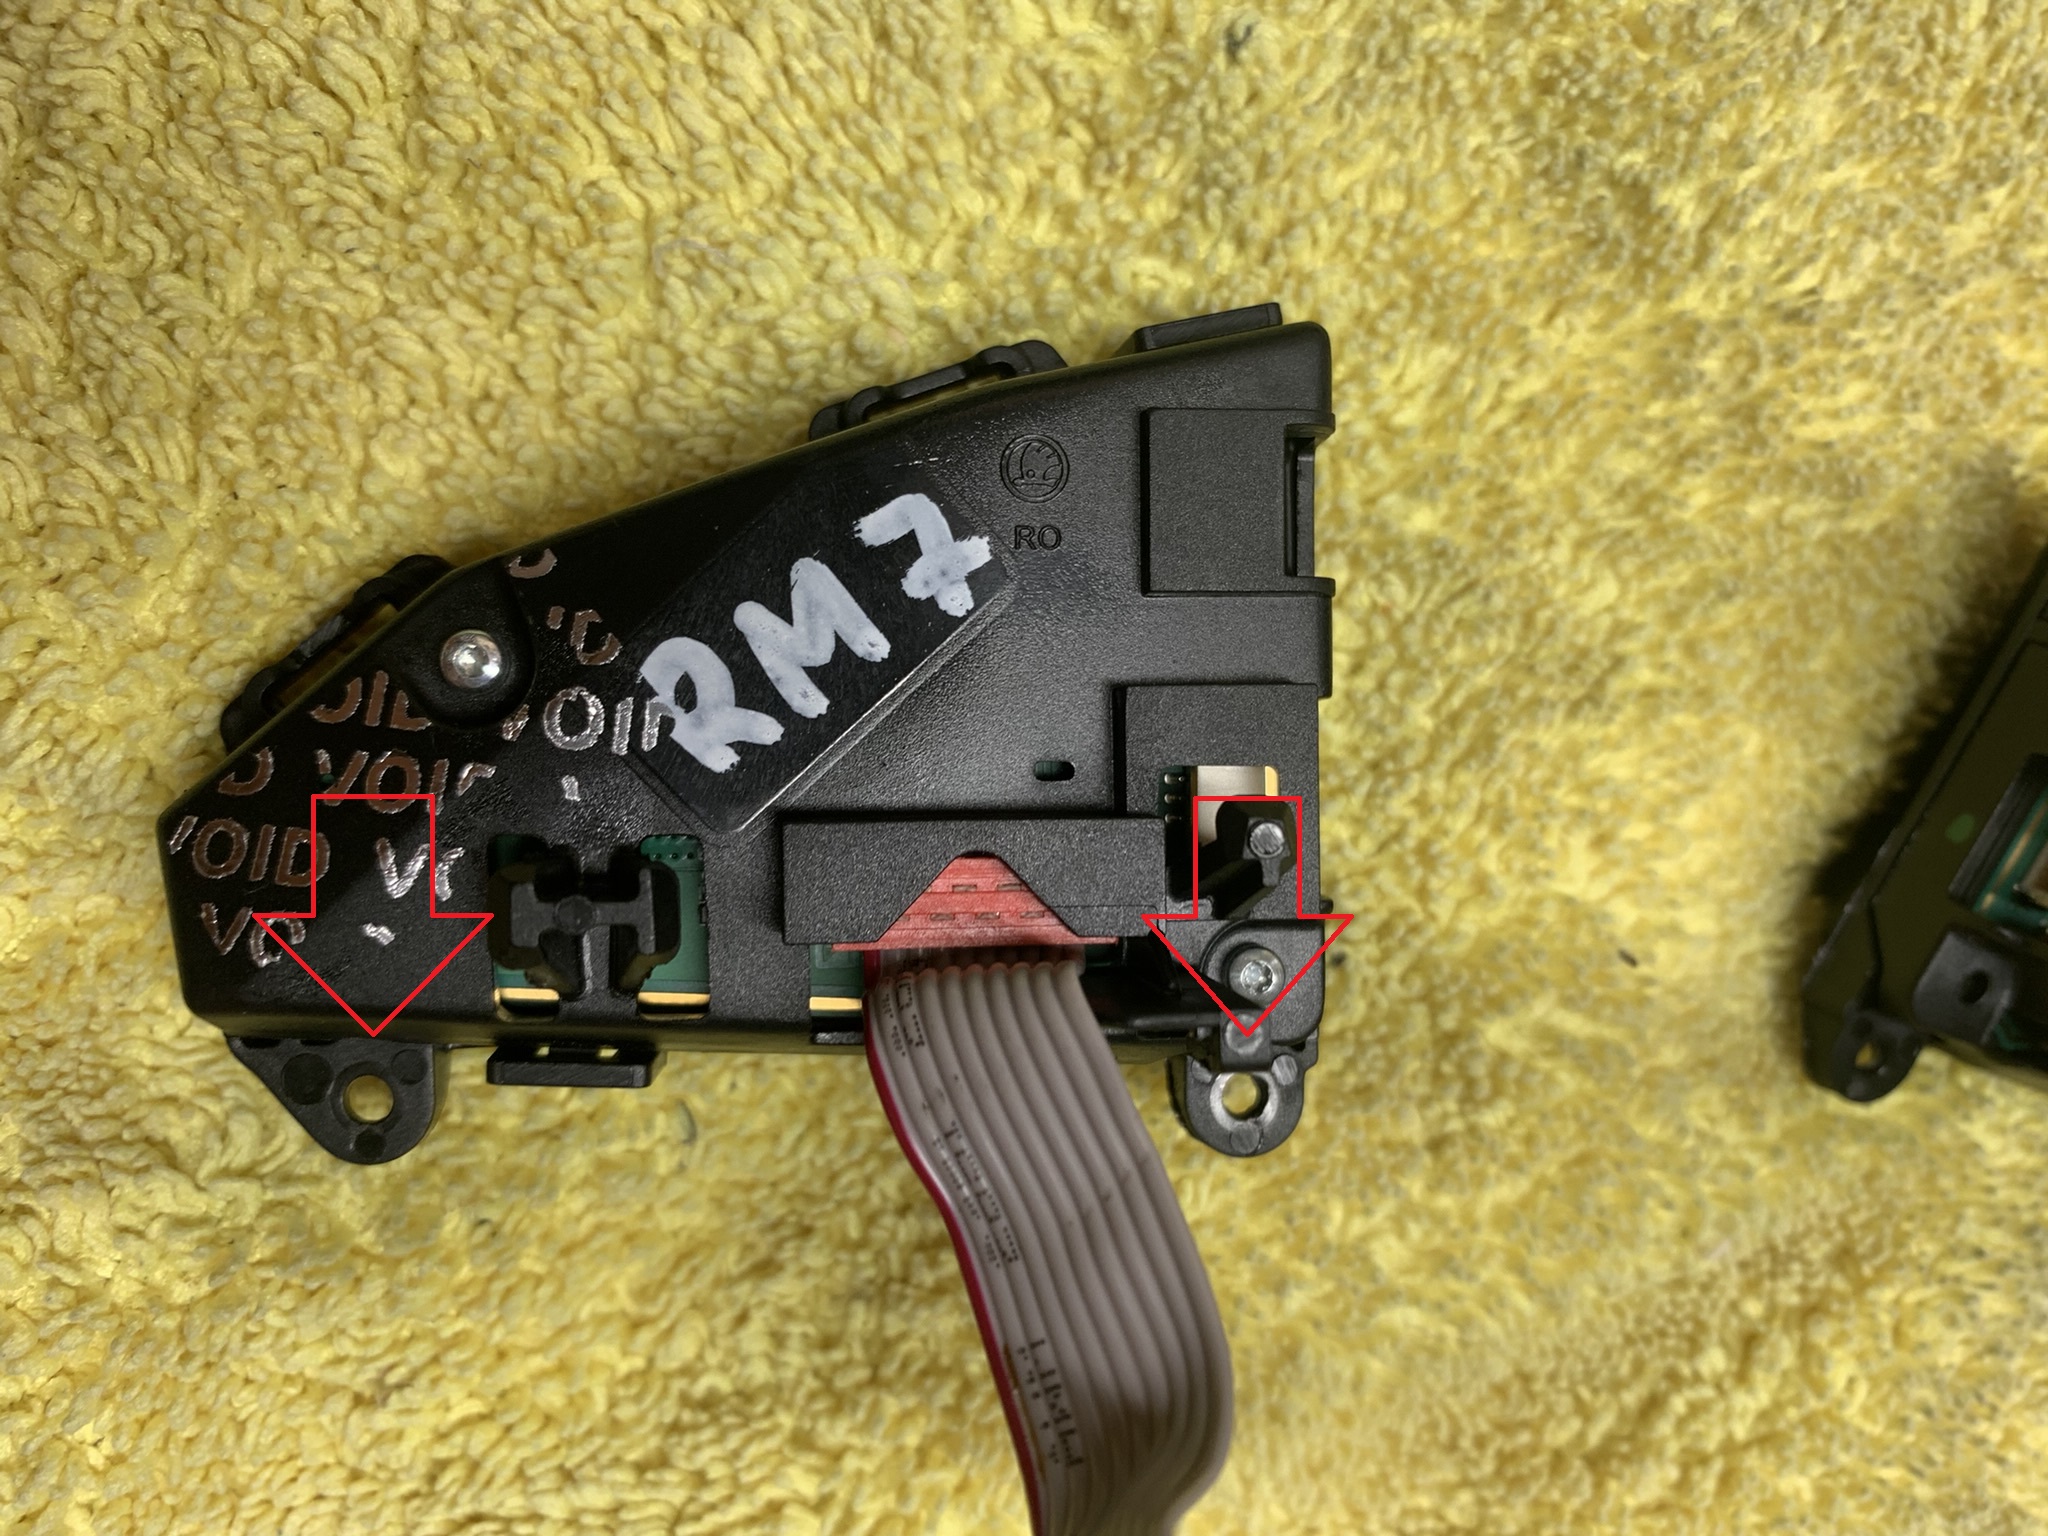
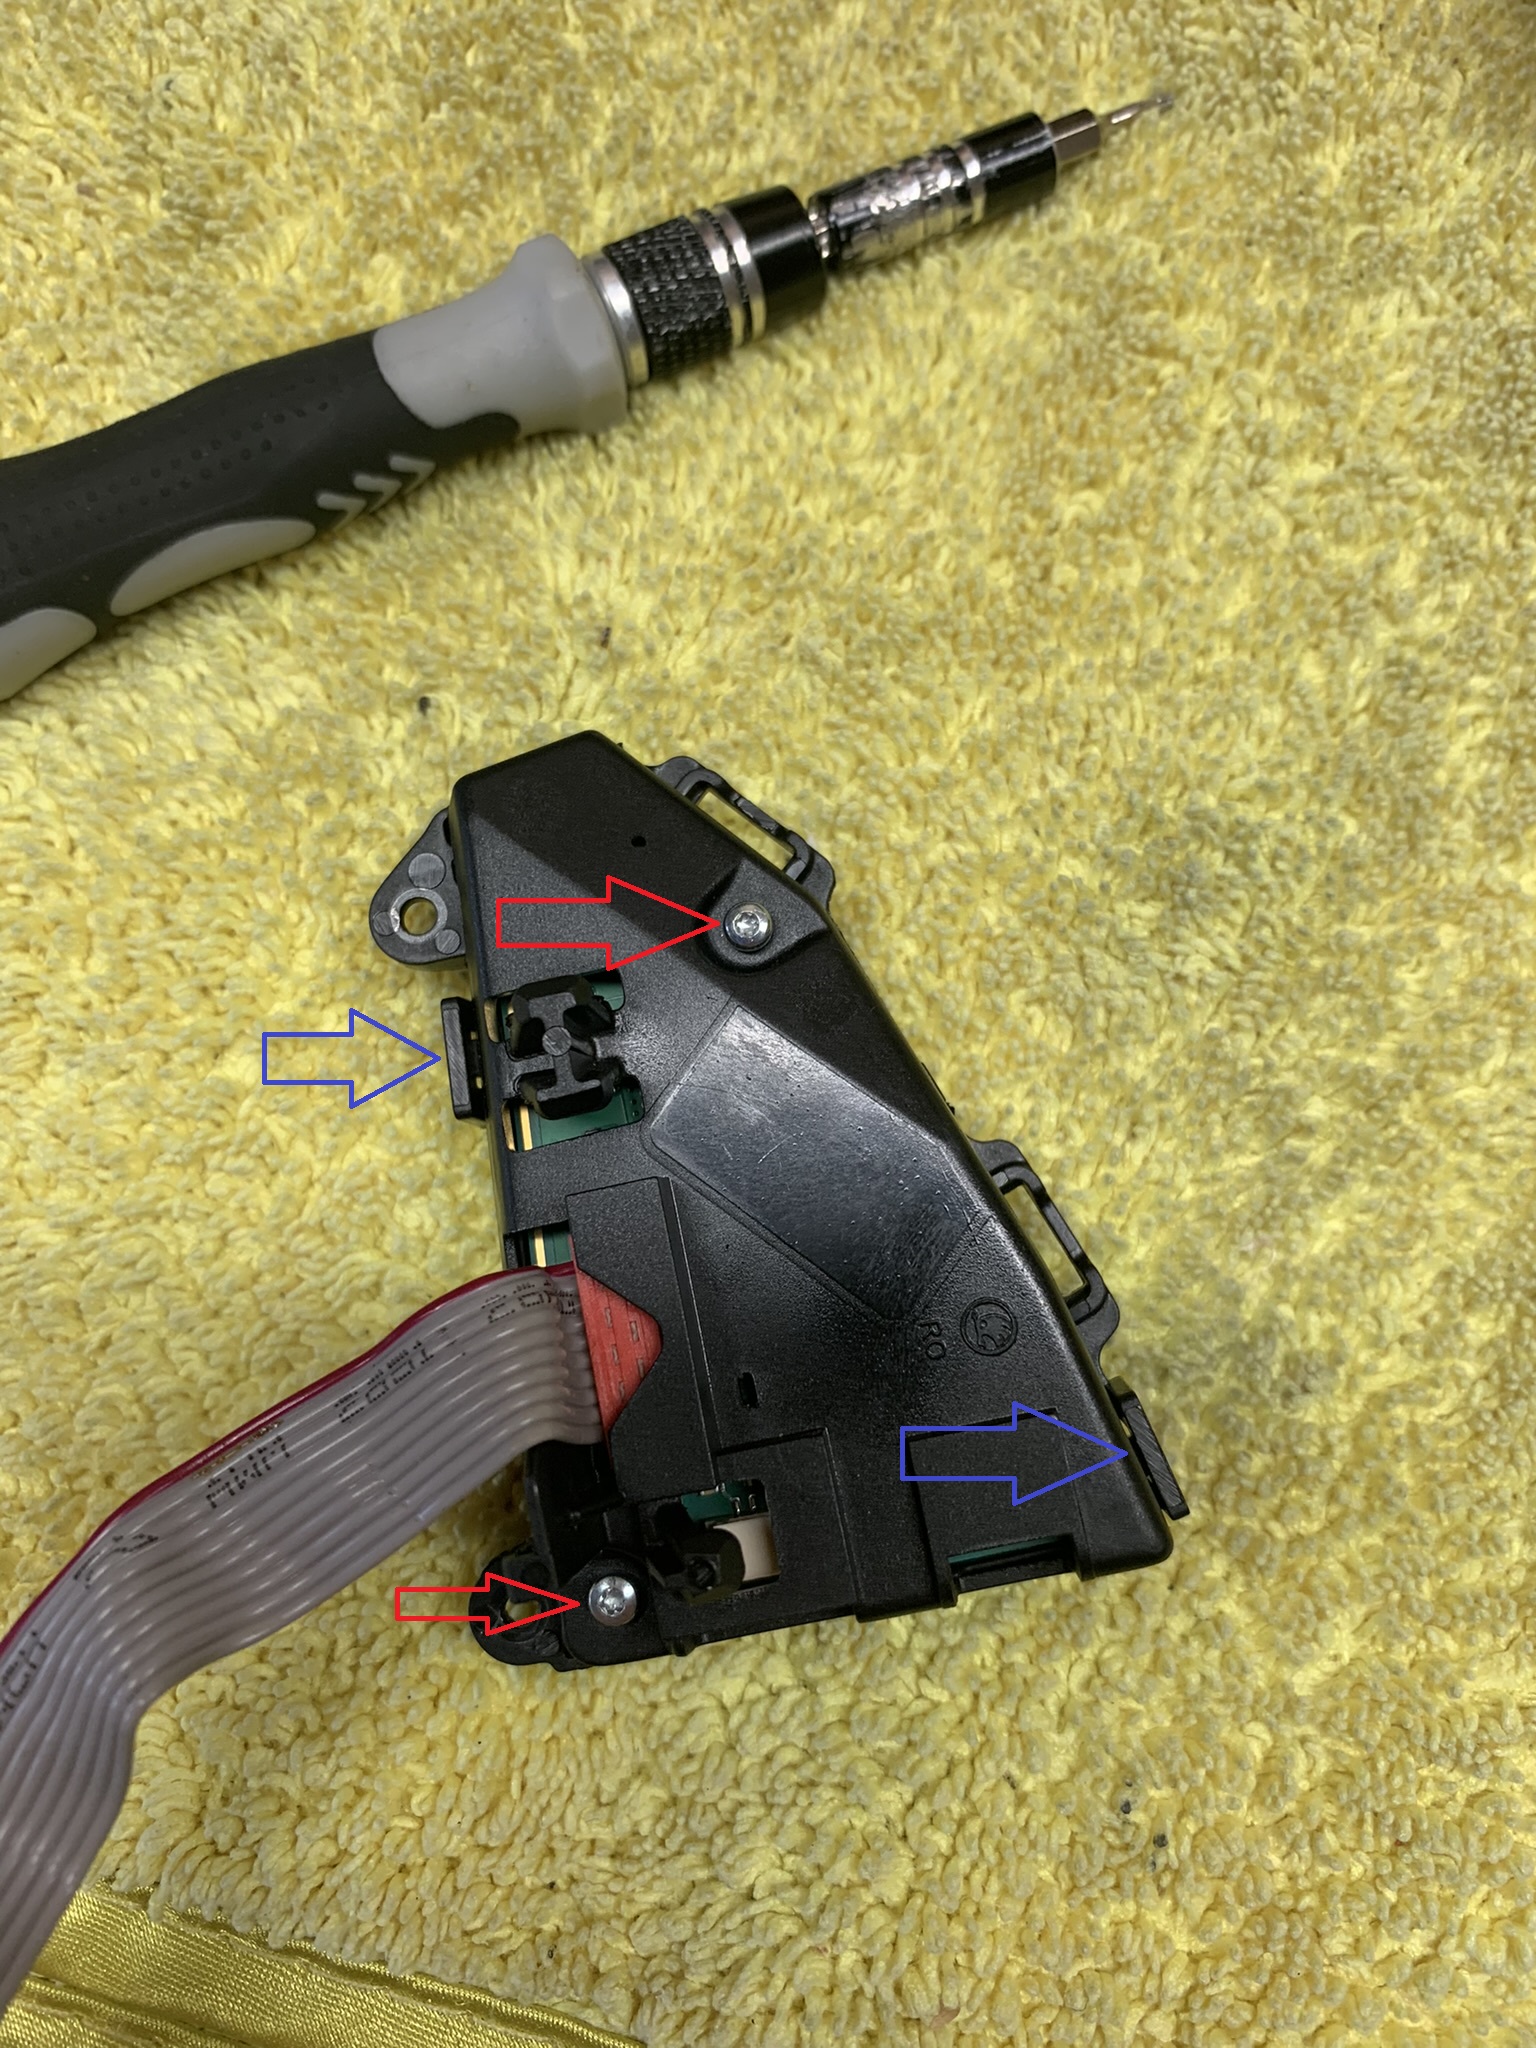
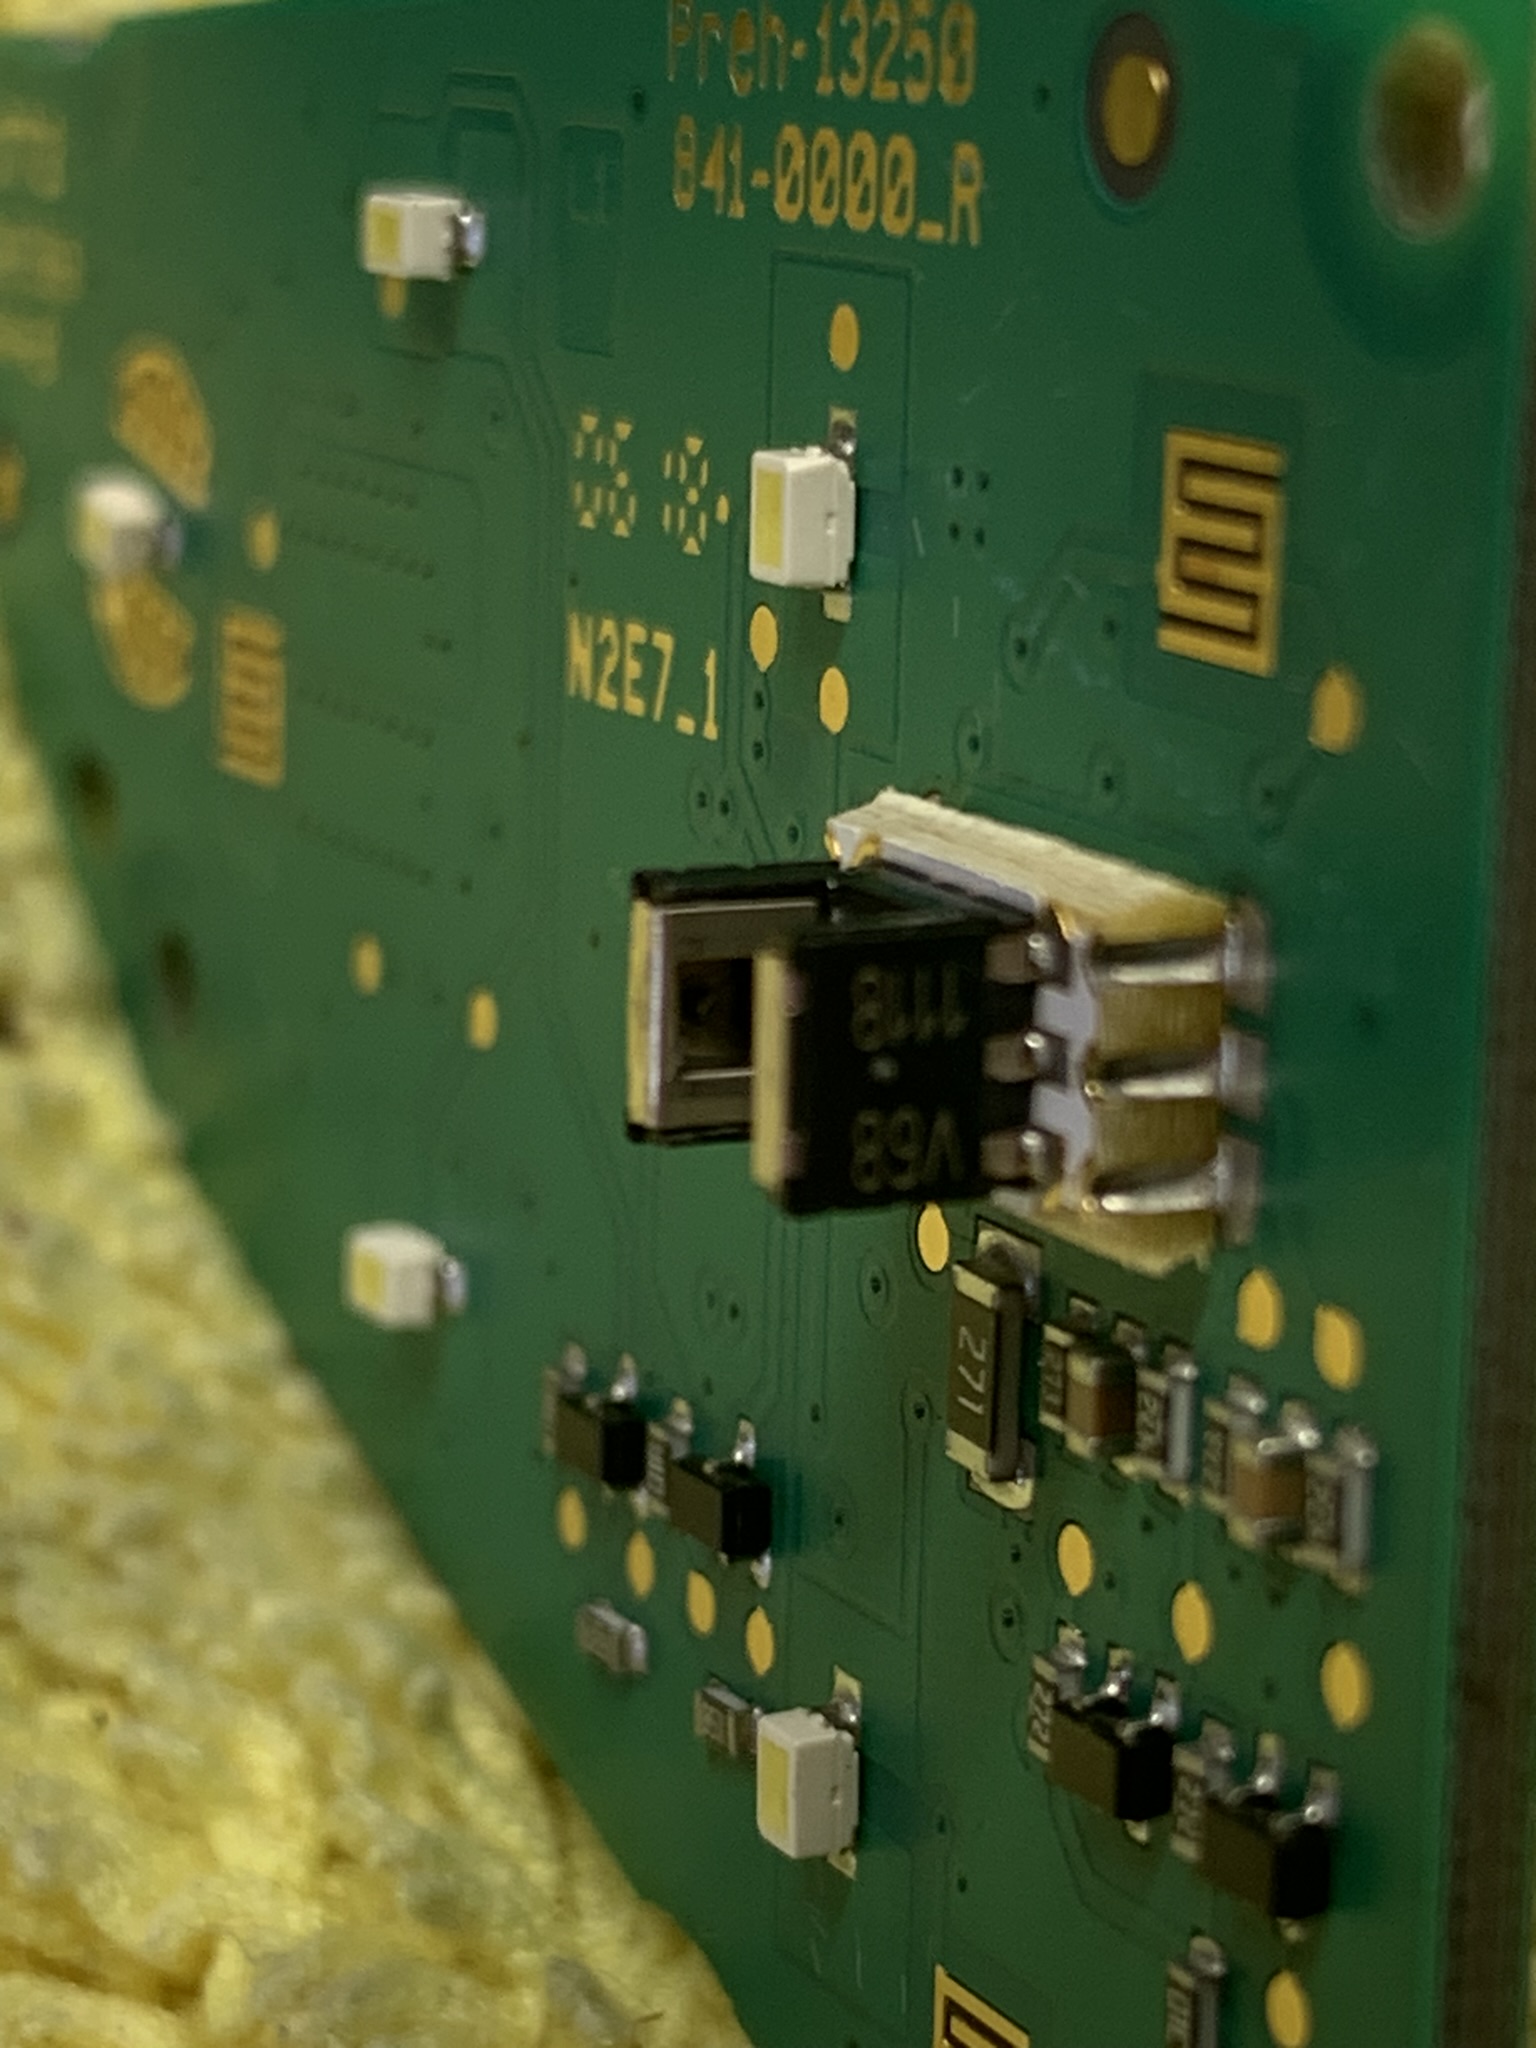
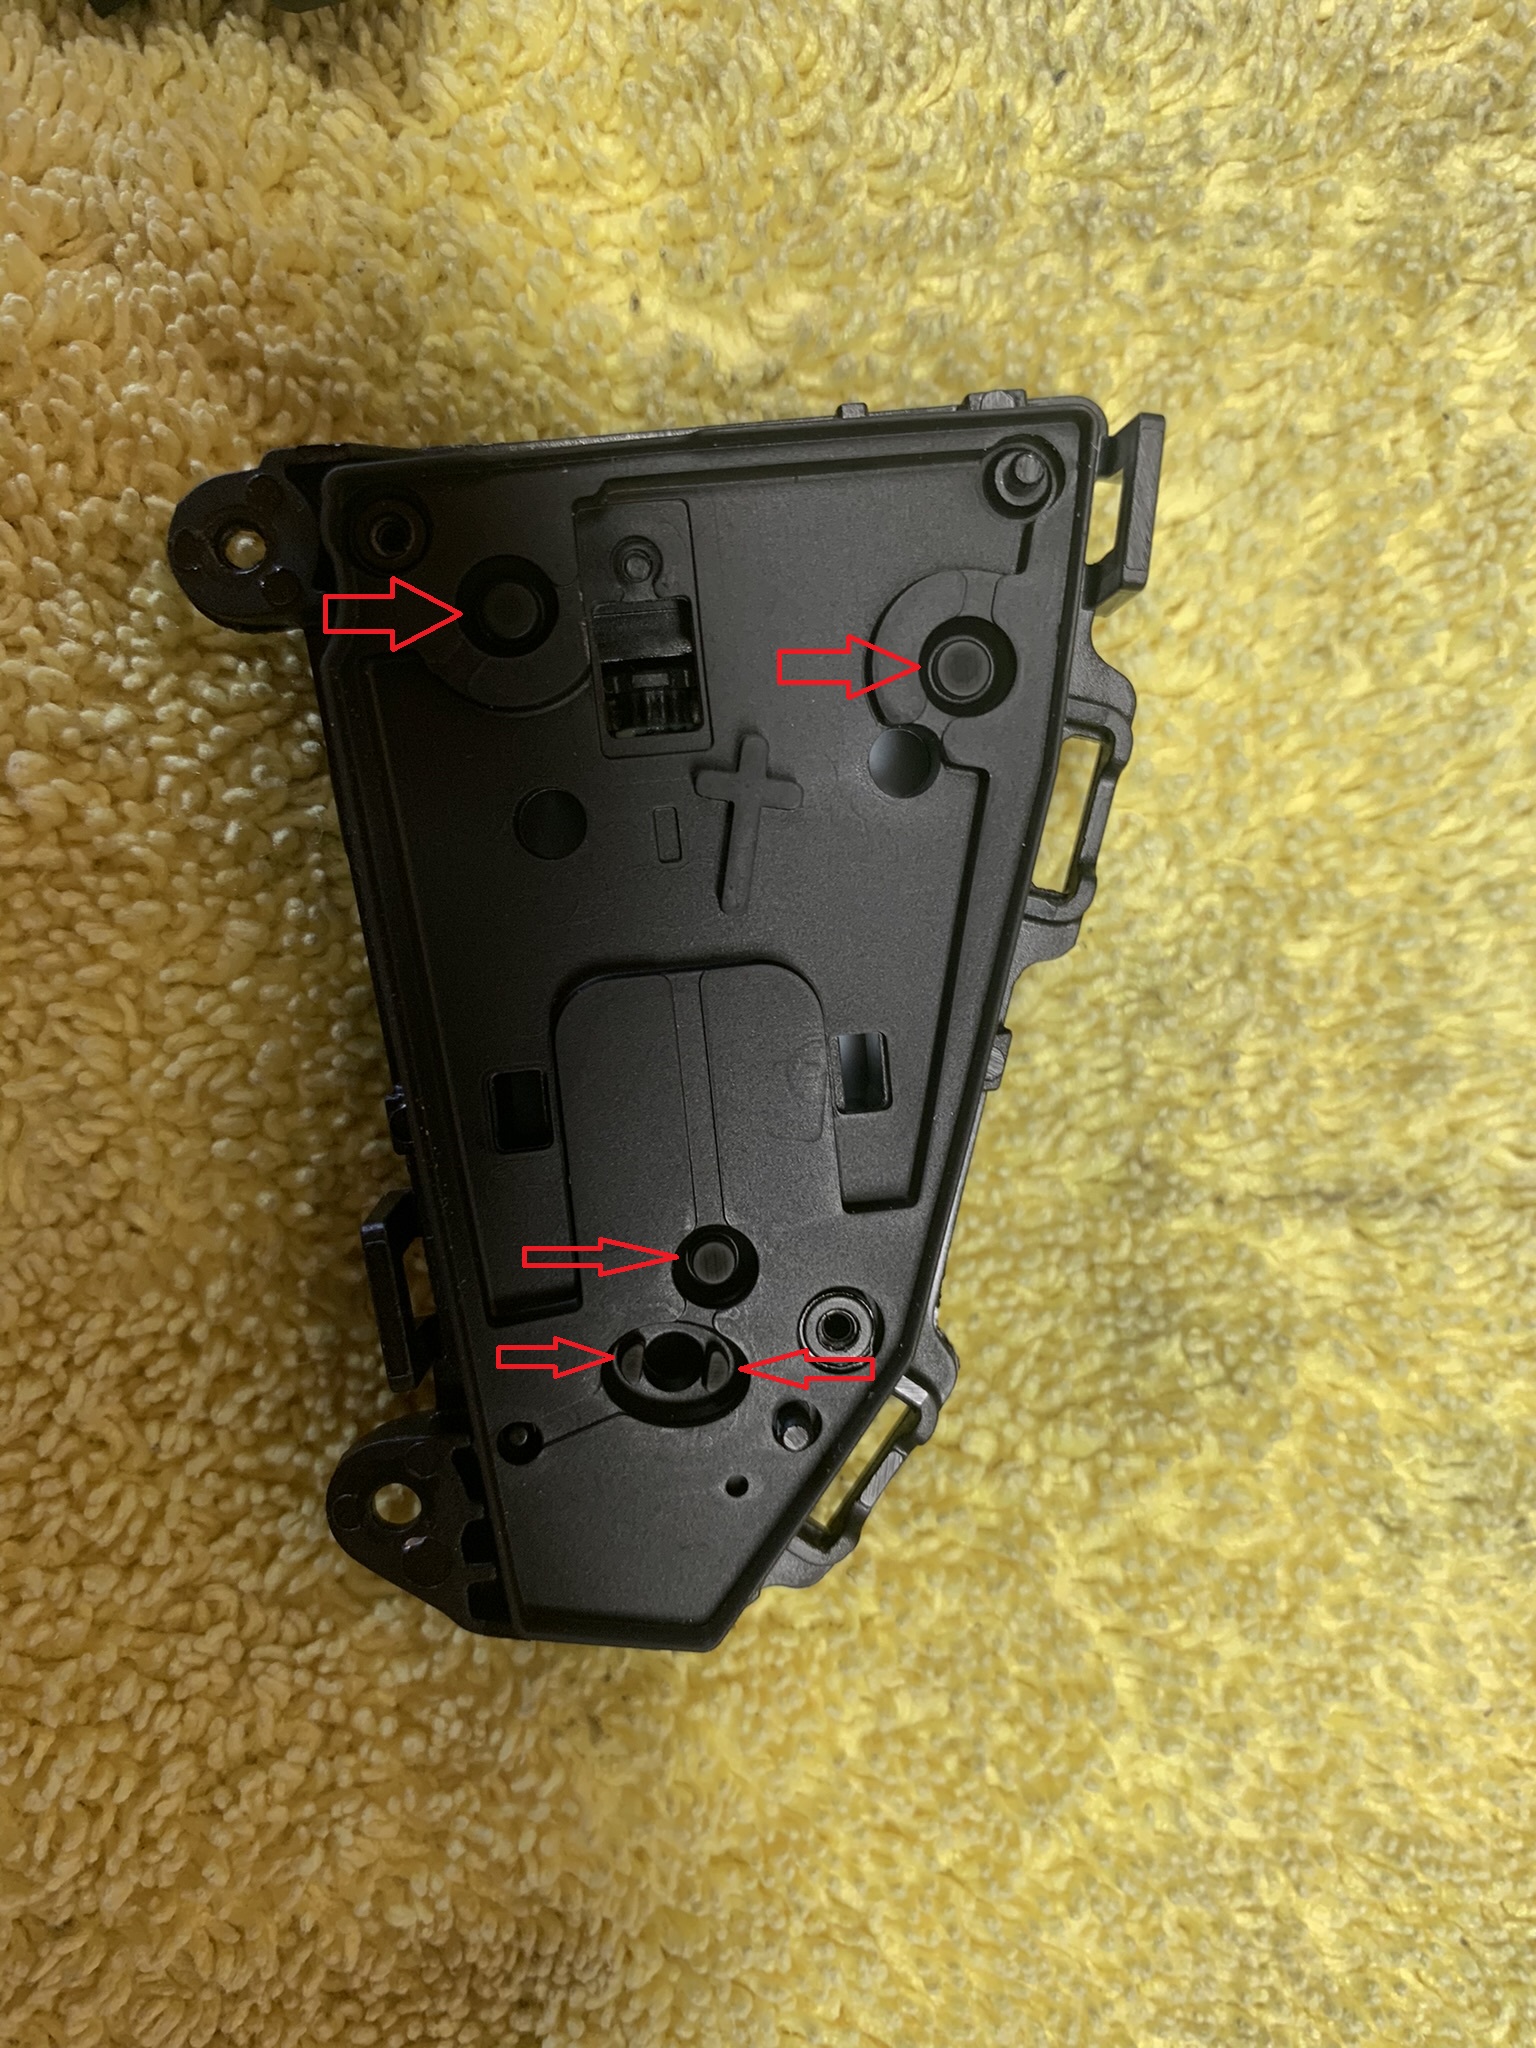
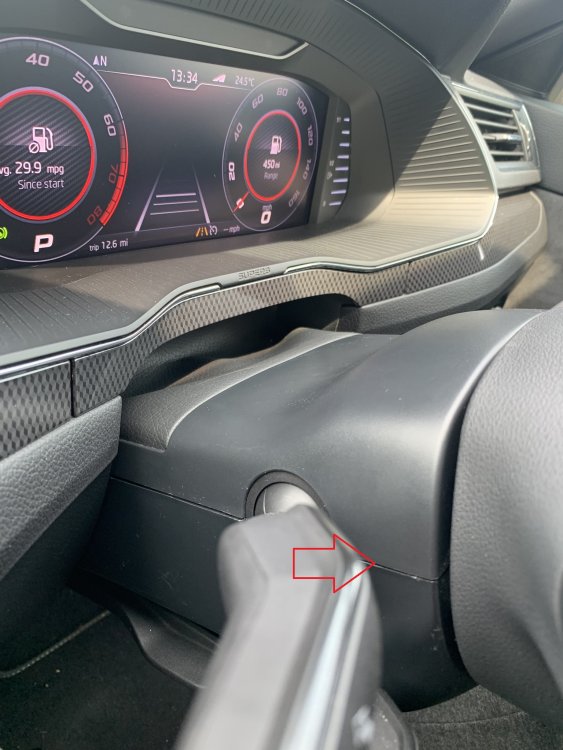
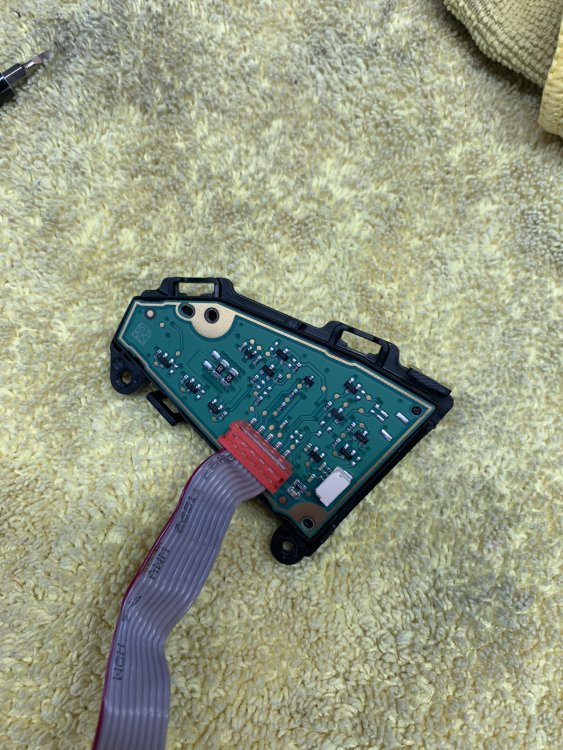
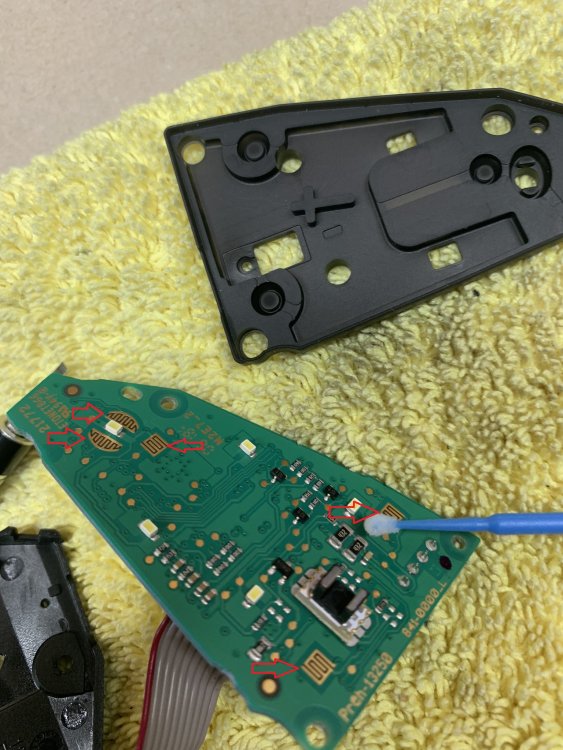
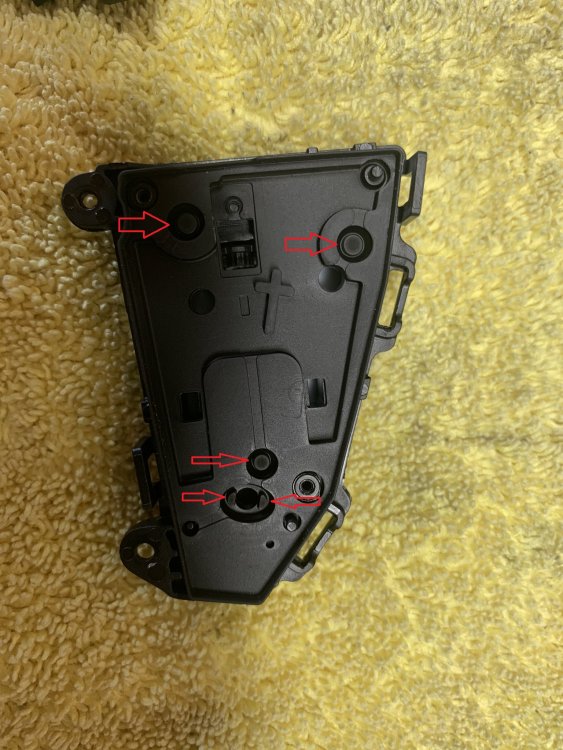
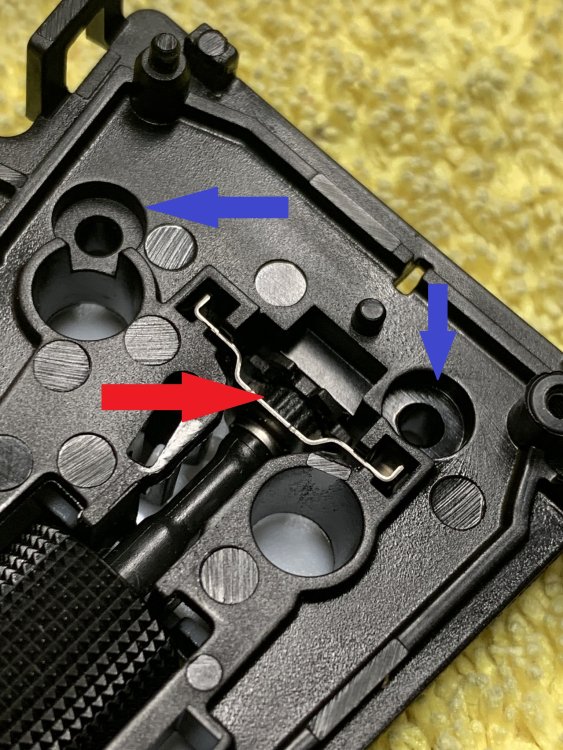
So a fairly common problem along the MQB platform such as golf, octavia, superb and such is the steering wheel control thumb wheels either become intermittent or in my case, they would operate on their own randomly. Heres a guide to fix it: Cause: As the thumb wheels rotate anything that is on your hands ends up behind the wheel and gunks up the internal switch sensors and mainly the hall sensor which causes the fault. Tools required: Plastic trim removal tools Flat head screwdrivers Small picks Small mirror Torx screwdrivers T30, T25, T6 Contact cleaner Small brushes for cleaning such as makeup brushes 10mm spanner The first part is actually removing the steering wheel controls from the steering wheel. As we are working with airbags here you will have to disconnect the battery - take note if you have a keyless car to turn off the steering lock before disconnecting the battery. Allow the car to sit for 10 minutes to discharge anything in the airbag system for safety. Next you will be removing the upper steering wheel trim above the indicator and wiper stalks, this is done by simply pulling up on the trim closest to the steering wheel end. In the photo below indicated with a red arrow. Once this is done just flap it out the way towards the instrument cluster. We now how to remove the airbag itself. First adjust the steering rake all the way closest to you and down to give room behind the steering wheel. Turn the steering wheel 90 degrees in either direction so a spoke is facing straight up. I was unable to photograph this as its so awkward to get to, but using a small mirror and flat screwdriver look into the back of the steering wheel you will see a metal clip that needs pushing into the centre of the steering wheel till that side of the airbag pops out. Rotate the steering wheel 180 degrees the other way and pop this clip out too. Disconnect the 2 plugs for the airbag and steering wheel control and put the airbag aside. Now if you have DSG there will be 2 very small white plugs going into the backs of each side of steering controls, simply disconnect these. The steering controls can now be removed by using gentle force and the trim tools and will come out complete with the black trim as well, be careful not to damage any of the clips as you pull it out, there are no screws but be careful. Now you have the steering controls off the car the hard part is done. Turn them over on a soft surface as to not damage them. And remove the 2 small screws on each side to separatex the controls from the actual black trim and making sure to remove with the ribbon cable and not damage the cable. Put the black trim aside. Now we have the controls on their own and the following must be repeated for both sides! Undo the 2 tiny screws with a red arrow and also pop the clips open for the 2 blue arrows Slide the back cover down the ribbon cable and out the way to expose the circuit board so it looks like below Now lift the circuit board out of the plastic housing to expose the front face of the circuit board, we will start with the circuit board cleaning first, get some of your contact cleaner (if its a spray, spray some into the lid to have a small bowl of liquid to dip your makeup brushes in) and you are going to wipe clean all of the arrowed parts shown (even if they dont look dirty!) Next the thumb wheel sensor itself needs a clean, be very very gentle here, the components can be damaged if you are rough. You are going to use a clean brush with contact cleaner to clean inside this sensor, both sides on the inside faces where you can see the hole, and the opposite face too. This is the circuit board clean now. Next is the contact pads and thumb wheel itself. First for the contact pads give them the same treatment as above on the arrowed parts Then pull this rubber cover off to expose the inside of the back of the control face. Be careful and take note of the small plastic 'plungers' that will fall out and need to go back in the holes arrowed blue below. The arrowed red section is the sensor pickup for the thumb wheel and where build up mainly occurs. This needs a very thorough clean with contact cleaner and the makeup brush as you rotate the thumb wheel to get every side of it. The small cut outs in this little pickup wheel need to be free from everything, including any lint or build up. Once this is done, repeat the whole procedure for the other side. Now you can start rebuilding everything. Place the 2 plungers in the hole and put the rubber cover back over the top the right way up. Rest the circuit board back down on top making sure to locate it correctly. Refit the plastic cover and the 2 screws per side. Once both sides are done, refit to the plastic trim piece and clip it back onto your steering wheel gently with light pressure to push the locating pins back into place. Dont forget to reattach the DSG paddle plugs and then refit your airbag plug and steering control plug before refitting the airbag into the steering wheel - push the airbag till you hear the click of both sides of the clips re-engaging. Refit the trim piece behind the steering wheel now starting closest to the dashboard this time. Reconnect the battery now and start the car. You will have a dashboard full of errors at this point - dont panic - just slowly turn the steering wheel lock to lock twice then restart the car again, all errors should be gone. Congrats - you are done, hard work paid off and saved yourself the price of a new set of controls at £250!!!


-
Fairly straight forward but long winded. remove all grab handles using SPECIAL tool. remove front overhead light unit Remove a b c (d) pillar trims Remove the few small clips that hold it in place and the tops of the door and tailgate seals and it should drop down and of course - slide it out the boot, have 2 people as if you bend it if will never look the same!
-
There are no benefits to doing it on a working system at all. not necessarily ‘stops’ but it was the easiest word to describe it. A closed feedback loop to find out what happens when you do X Y and Z basically
-
It’s a manual method to activate the AC run in procedure. Basically it learns the end stops of the bypass solenoid and monitors the pressure of the AC system so it knows exactly what to set the solenoid to so it can achieve exact pressures. There is also the flap relearn procedure which is; ignition on, engine off hold ac and recirculate button till the panel starts flashing all the flaps will move and learn positions when it stops flashing cycle ignition
-
Start the car. press and hold the AC and rear defrost button for a few seconds till they all light up. Leave it like this for 2 minutes then restart the car. fault should now clear.
-
It sounds like the RAC man is waffling to be honest. A battery is simply a storage device. If it isnt maintained or used you get sulfation on the battery plates, this reduces the surface area and causes the battery to loose its holding capacity. Nothing more, nothing less. An alternator is there to recharge that battery - simply starting the car and leaving it to idle will charge a battery, modern alternators do not just rush a huge amount of current into the battery, they are made to monitor the batteries charge level and supply what is required and not much more (reducing engine load and saving on emissions). Yes you can use a battery charger on a 'deep cycle charge routine' which slowly charges the battery to break down any sulfation, but honestly - ive never had to do that in all my years of working on cars. Generally if the battery is that far gone, it wont last much longer anyway.
-
Driving the car makes no difference to leaving it running! Modern alternators are capable of putting out a high charge rate at idle, you dont need to blast anything
-
On the MQB platform there is no OEM method of programming one without the other (at least for keyless entry that is) the procedure does both in the same session.
-
I am going to be writing a guide and uploading it to the forum on sunday about how to clean and repair the steering controls to fix this issue if you wanted to wait till then?
-
From the photos the sidelight looks like a 382 bulb the headlight looks like a H7. Take note that as the side light is used as a dimmable bulb you will struggle to find a suitable LED replacement - most will just flicker constantly. Also take note that fitting an LED headlight bulb in a non approved housing is illegal and also an instant MOT fail.
-
No! Terrible idea, when you’re going down the motorway with a roof box or such and the wind pushes it off the car and into the car behind, well, I hope your insurance is good 😂
-
Have you tried clearing the code and retesting? If not, I’d assume the sensor in the strut has failed so it’s not able to self regulate its position
-
With the 235/40R19 wheel, you obviously have to trim that bit of trim. But does the boot floor sit proud at all or is everything perfect?
-
The power and ground are from the door modules themselves. The LIN is from the BCM. You will need to remove the door card and check for power, ground and the LIN signal, if they are there, then the actual module in the LED strip has failed.
-
That’s because they aren’t on AliExpress, You need to find a second hand set or buy new.
-
Chances are more likely they just changed the wrong one in the first place!
-
Im not saying they dont, seems like the usual read a fault code and change the first thing that pops up. They need to be held more accountable for it and the car thrown back at them and fixed at their expense.
-
A scan tool of any kind is only as good as the training of the person using it. Just cause it may have a fault code for a water pump doesn’t mean the water pump is at fault. There are so many things it could be that a scan tool would not tell you about. Also, why haven’t you taken it back to the garage if they’ve charged you to fix something and haven’t done so.
-
You have to access it from below which means removing the complete centre console section. https://cardiagn.com/skoda-superb-iii-general-body-repairs-interior/
-
The centre pin is the feed to the cigarette lighter - the upper pin is for always live, the very bottom pin is for switched live. You dont want to be messing around with what you are saying to do as you are backfeeding an entire Terminal 15 or Terminal 30 circuit which can cause big issues... There is not a whole lot of room to run the wires but there is more than enough to run them easily by running over the top and back down. The fusebox is extremely easy to access and takes around 10 seconds to unclip the slow release and the 2 upper clips to drop the glovebox door and expose it fully. And there are many many ground points in the area and the glovebox light is not one of them, you have the entire metal dashboard frame with around 3 big bolts and a few smaller torx screw mounting points all in the glovebox area and the A pillar area. Its no different on a MK3 - run wires down the A pillar (properly!! and not over the airbag) remove the dash end piece and flap the glovebox down to find and attach to the suitable grounds and fuse.