Breezy_Pete
Sponsor
-
Joined
-
Last visited
Everything posted by Breezy_Pete
-
That's why I checked with the VIN. Get them to do same if you like. It came back as the suffix AG part number for me. The 1.2 engines got a mixture of 256mm and 239mm, with no obvious rhyme nor reason.
-
I can't remember where the front washer feed runs, but they never seem to have trouble. Rear wiper is the one coming through bulkhead, which is a very common problem when people fill up with not enough concentration of fluid, and freezing makes the push-fit joint pop apart, like what you've experienced.
-
Tailgate feed. It's a push fit with the other bit that will be nearby.
-
Best bet is to unplug the connector from the radiator thermoswitch and link contacts of that plug with a bit of wire. The incoming is the plain red wire, low speed outgoing wire is red/white, full speed is red/yellow. It's the condenser at the front of the car BTW, evaporator is the bit in the cabin. Ignition probably doesn't need to be on for low speed, but probably does for full speed, so may as well switch it on for all testing. Both fans should do the same. Fan action via G65 refrigerant pressure sensor is 9 bar for low speed, 16 bar for full speed on models I'm familiar with, doubt there would be much variation.
-
https://www.ebay.co.uk/itm/155691767813
-
There's one on ebay (search that part number) with a shiny-looking hub that may be a good bet. Just checked with VIN (given in listing) and it is the right one, despite two different part numbers being listed in the description. Whereabouts are you?
-
Can't tell from the pics, usually you can spot bits of the part number but that's so corroded I can't make anything out. The part number you're looking for is 6Q0 407 255 AG
-
Bonnet switch is for alarm function rather than safety-related, I think. Our Fabia lacks an alarm, and a bonnet switch.
-
The wires will go direct to the ABS module, but without car details I can't tell you which pin numbers. There are a few different sets of circuit info over the years of mk2 production, and a few different versions of ABS system in each.
-
Manual gearbox? If so, perhaps the reverse sensor or a wire going to it is broken?
-
Intermittent wiper non-function is sometimes caused by the bonnet/hood not being properly closed. I don't know if any Fabia in 2008 had automatic wipers.
-
I don't see a contradiction between this and what the RAC said, personally; but carry on telling me I'm wrong if it makes you happy, I've said all I want to on the subject now. 👍
-
@incem hasn't visited the forum since the day he posted this thread, so not sure they'll be along to update, but you never know. If so , knowing what year the car was might be useful, please. 67-plate? Think that's what the registration plate says, now that I look? I wonder if this started at/near the DPF pressure sensor? Seen a few reports of burnt out ones of those on here. Early versions had gas piped from both before and after the DPF, later ones omitted the post-DPF connection, leaving it open to atmosphere in the engine bay. Perhaps the combination of an active regen and a pipe taking gases from just after that 'chimney fire' back towards plastic-housed components...?
-
From an RAC webpage (Crit'Air clean air stickers - need to know for driving in France | RAC Drive) "The system was introduced by the French government as a way to reduce harmful vehicle emissions in areas where air quality is poorest, such as larger towns and cities. [My underlining] So it's about emissions that are harmful to humans who breathe them in densely populated areas. CO2 related to quantity of fuel used is a completely different problem.
-
You are probably thinking that climate change (CO2) emissions and urban air quality emissions are the same thing. They aren't. All internal combustion engines produce about the same amount of CO2 as each other, per litre of fuel burnt. That's the climate change issue. Very big differences exist between cars/engines as to how much NOx and particulates they produce. That's the urban air quality issue. Not really related to each other.
-
Looks similar to me, but not easy to desolder and clear the holes. Needs a bit of skill and suitable equipment. Photos of relay contacts:

-
No and no. Relay type on older BCMs is written in that thread too. I would not fit a relay that had been used before, cost is only a few Euro for new relay.
-
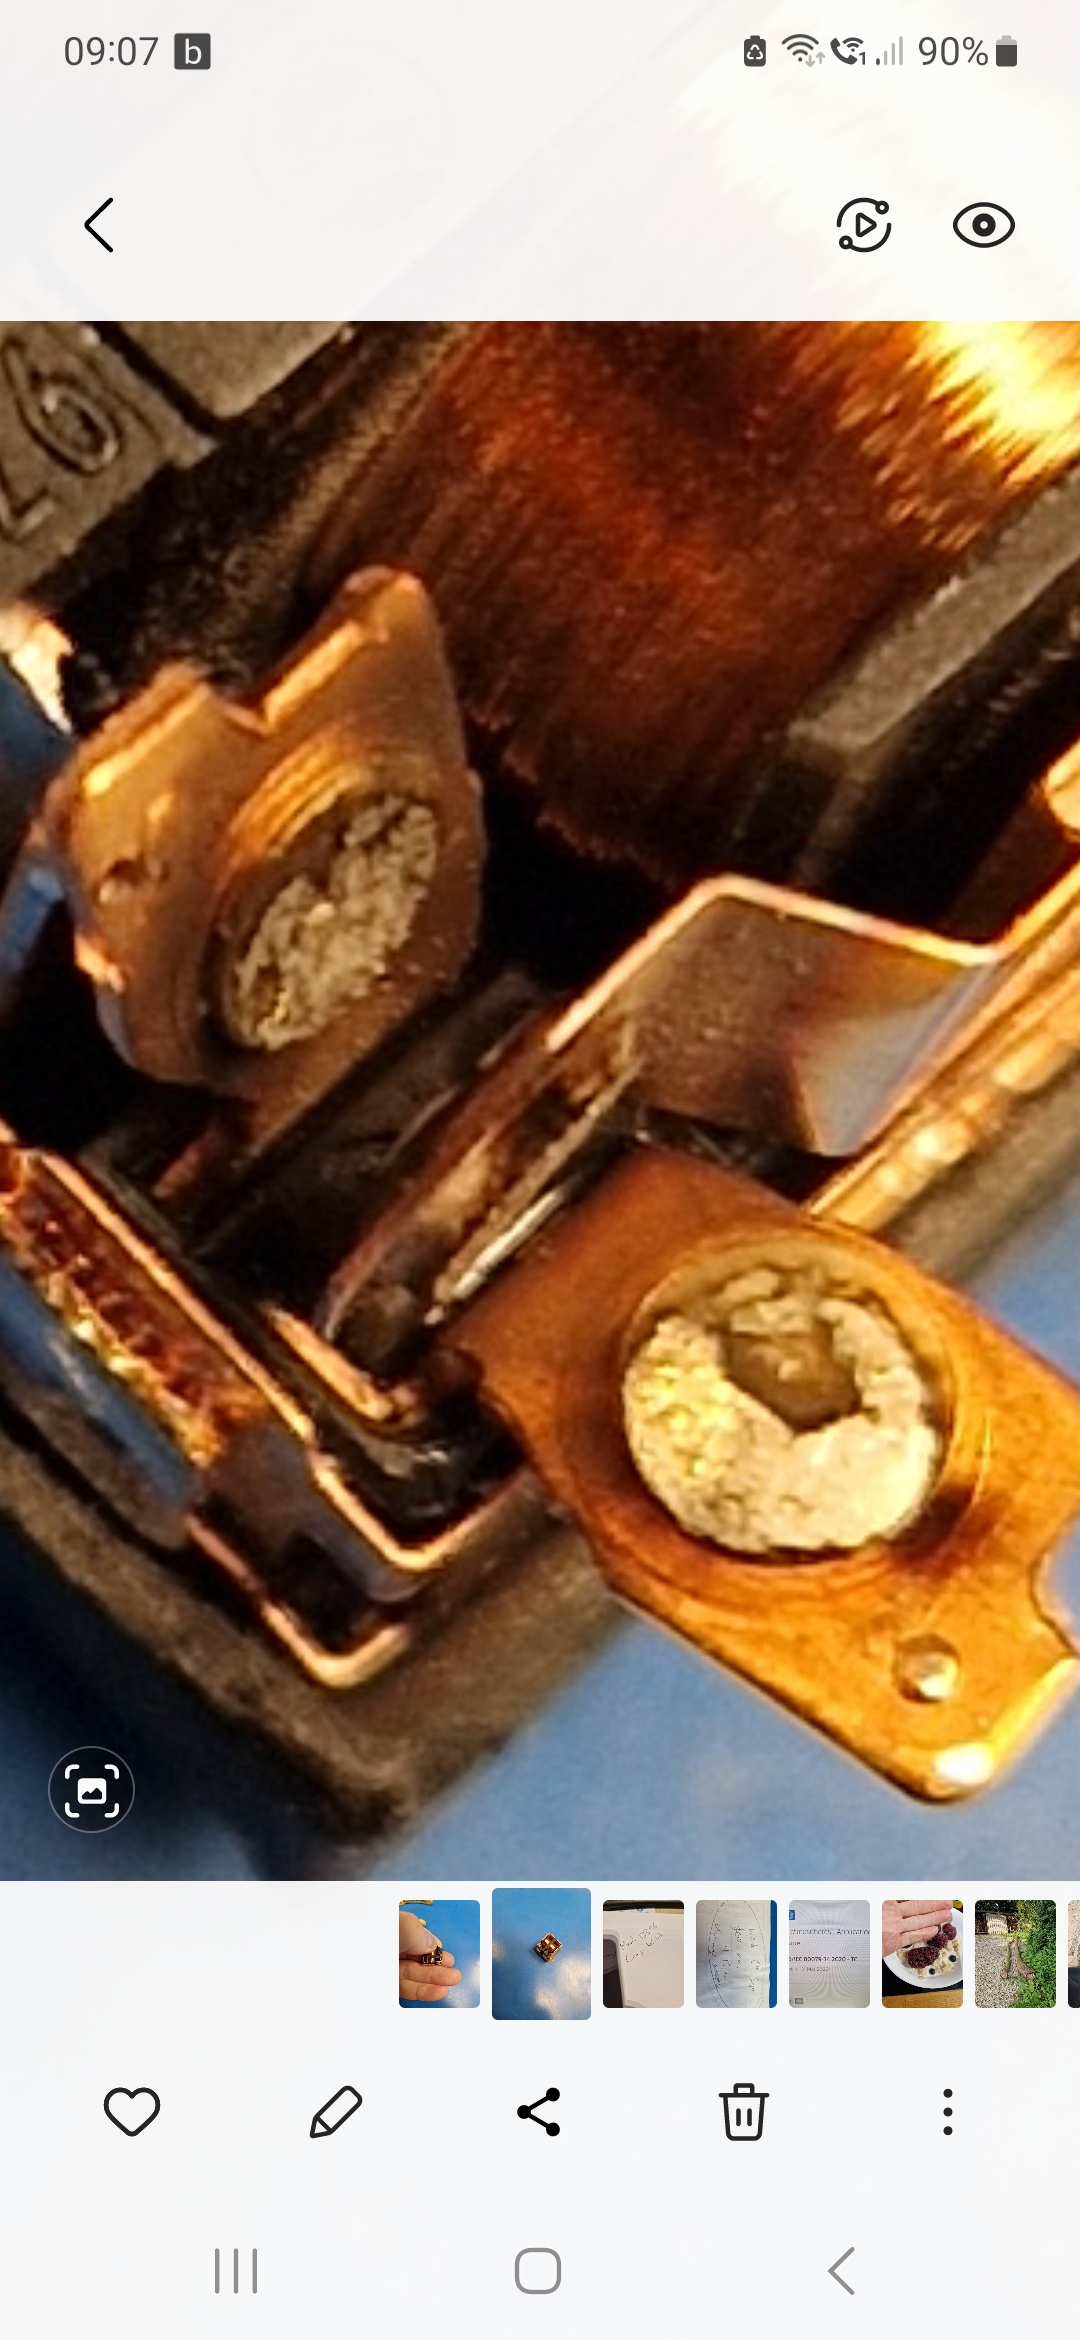
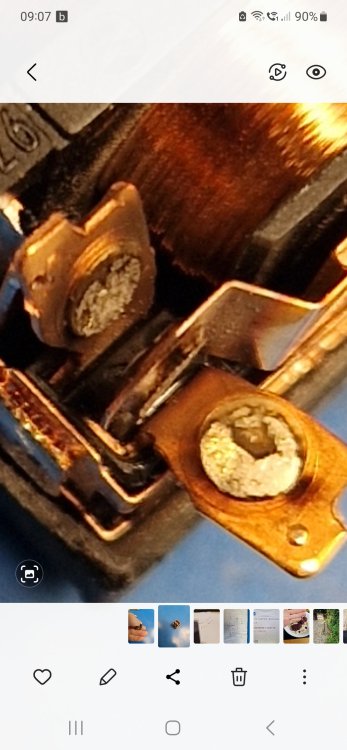
Relay replacement possible as an alternative to BCM replacement, see here: Wiper relay replacement - Skoda Fabia Guides - BRISKODA The relay part number for the suffix-F version in mk2 Fabia is Omron G8NW-2U 12V If you cut open the relay, you tend to find one set of contacts that has badly burnt. I did one yesterday as it happens, will try to photograph relay damage.
-
Printed all along the rigid bits 6Q2...
-
Worth checking the fans too, even though you've probably found the coolant loss problem. If original there's a strong chance the low speed functions are 'history'.
-
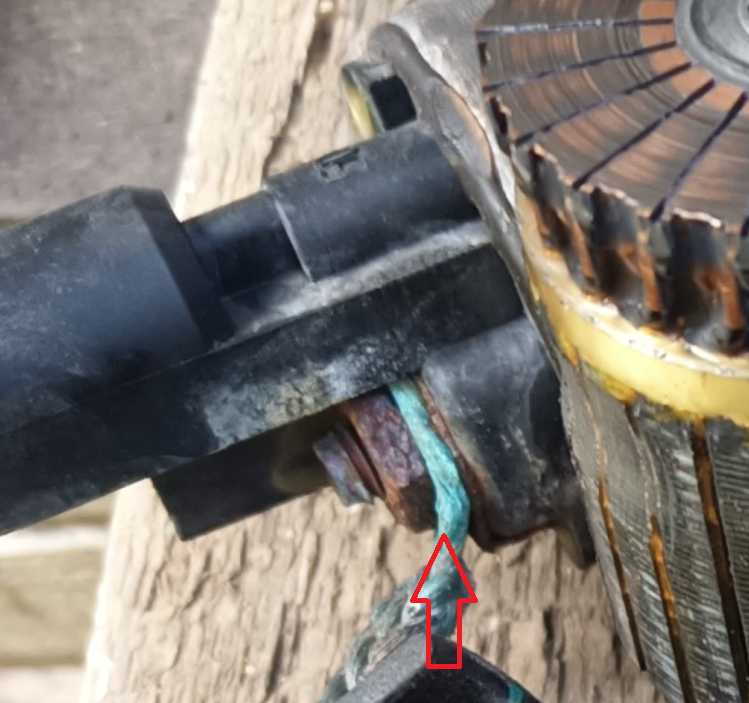
Makes a nice change. Any old replacement motor should be fine, it's not a taxing application. Looking at your pics now that I'm on a big screen, I'd be surprised if the problem actually wasn't the arrowed connection (or lack of).
-
Any sign of damage to the solenoid wire? They often start to fail near the cable entry of the connector.
-
Radiator thermoswitch. Not sure on your wiring, but if you have thickish wires, red to red/white should bring both fans on at low speed. Red to red/yellow should be full speed, but probably needs ignition to be on.
-
06H 103 495 AJ, replaced 06H 103 495 AD On 1st Jan 2017.
-
Message me with VIN.