


Breezy_Pete
Sponsor
-
Joined
-
Last visited
Everything posted by Breezy_Pete
-
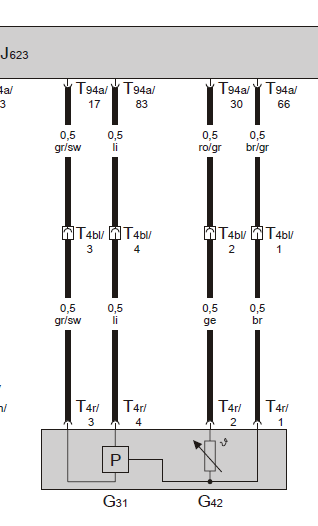
Hi Loek. I can't really add anything that I haven't said above; circuit section is shown below, T4bl is described as "4-pin connector, in the holder on the gearbox (black)".
-
-
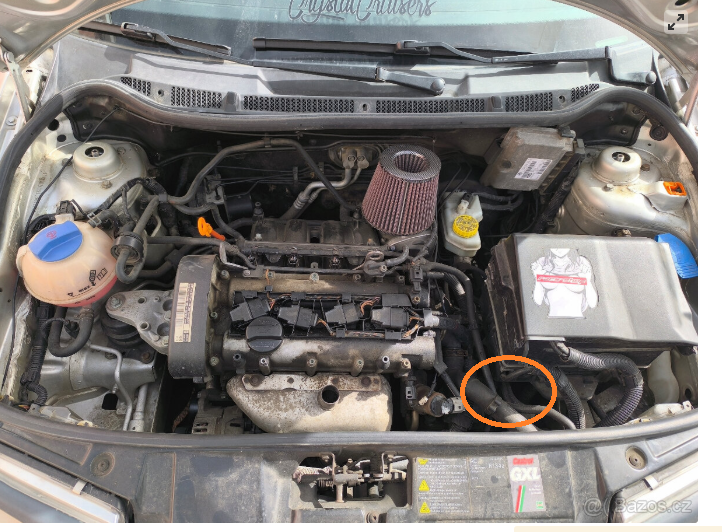
OK, a 1.4 16V petrol. Yours probably has a combined engine cover/air filter rather than the silly cone filter in this image, and it may be easier to see where you need to if you remove that engine cover, but that may not be necessary. Look vertically downward, preferably with a torch, in the area where the orange ring is, trying to see something similar to the image I posted above, possibly with a wire floating around loose.
-
-
-
-
-
It might be that there is a setting somewhere that has accidentally been switched to 'don't display washer reservoir low level warning'? I know in some much earlier Skodas you can change the coding (with VCDS) of the instrument cluster to include/exclude such warning info. That sort of software switching is presumably possible via user interface on current models?
-
I don't see anything in the PR code list that really gives a clue one way or the other, although it does say without headlight washers, which might be one reason for omission. Parts list suggests 5E3 955 448 A for the reservoir bottle, which appears to include the level sensor as standard. Pics in an ebay listing for that PN show it just to the right of the washer pump motor connector on the rear-facing side. Taking a few screws out of the front part of the NSF wheel arch liner may give enough visibilty to check presence/absence. Example listing/pics: https://www.ebay.co.uk/itm/376100484562
-
@andypollard, if you let me know your VIN I may be able to find out if your car was built with this level sensing or not.
-
Given that a new genuine cooler is lots of cash, and even a pattern part is over a hundred, I'd be tempted to raid scrapyards/ebay for a 2nd hand 03L131512B and try your luck. Probably DIY fit-able? Then do a coolant drain and flush and see if that clears stuff out.
-
Sorry, think I've misunderstood that. You mean the heater matrix seems clogged?
-
I guess the soot is coming from the leaking cooler, out of the now open coolant connections? Maybe good to get a replacement on there soonish to eliminate that. Trying to think of a safe way of blanking them off, but hot exhaust gases will need something metallic and robust.
-
If that's what you've bypassed and it's now OK, then you've done a good diagnostic test with a good outcome. No problem driving the car like it is until you can get a new cooler on there, I believe.
-
@VanhireBoys it does have a cooler. Shown as item 7 here: https://www.lllparts.co.uk/catalogs/skoda/CZ/SUP/632/1/131/131080
-
Replied with gen numbers. Image of genuine item here, not like what @Murdockman is describing. They were only used in very early mk2s up to some time in 2008 I seem to remember. Front left wishbone Fabia Ibiza Roomster 6R0407151E New genuine Skoda part | Deutsche Parts
-
If you share the VIN or reg with me, I can look up the genuine part number(s). Alternatively, ringing either of those suppliers with VIN or reg to hand will probably yield the same or better results (because genuine part number doesn't necessarily lead you to the correct ECP/GSF part number). Their screens have a better look-up than the public websites, I understand.
-
Guide pin thread is M9 x 1.25mm pitch I think.
-
Lots of stuff to move out of the way to create an exit/entry path, presumably?
-
Private message sent. 🙂
-
The wire going to the strip fuse goes only to the alternator output stud, I would expect. Let me know reg or VIN and I can look up the circuit diagram if you wish. The two other wires are excitation (blue usually) and field monitor. First helps the alternator 'boot up' when first rotated by supplying a small current to the brushes. Second is a signal telling the engine ECU how much of its capability the alt is supplying, moment by moment.
-
Doesn't matter at all without a BMM, although a slight safety gain by making last connection of jumpleads away from battery and any hydrogen it may have emitted.
-
Pre-stop/start and fancy batts and alts Graham, I think.
-
How odd. Was the OEM replacement alt an identical part number (including suffix letter) to the original factory one? What is that part number? Refurbed by? Can't see how it can 'alternate' (sorry!) between having a current drain and not, depending on disconnection of battery etc. I guess it's a fairly high mileage car, for the original alt to have failed?
-
Yes, that's correct about SA5. Not sure about heated seat fusing, might use thermal (self-resetting, bi-metallic strip) fuses. Can check tomorrow.


