


Everything posted by Breezy_Pete
-
The relay panel is roughly in front of your right knee when you're sitting in driver's seat (on RHD car). Lower dash trim on that side has to come out to access it, unfortunately. I think the relay holder has numbered positions, but it's second from left on bottom row.
-
Fuse 68, presumably the one you replaced, is fed by the load reduction relay in position 11 of the relay carrier. A few other things get a feed from that relay, including the electric mirror adjustment and electric windows, do they also not work at the moment?
-
And what a brilliantly done video that is (a sequence of annotated still pictures really, and all the better for it). I'd have to recommend minimal or zero audio volume though.
-
Good work, and thanks for adding the photos and video.
-
I think i have to leave you to make some progress on this without my help, it's taking too much of my time, sorry.
-
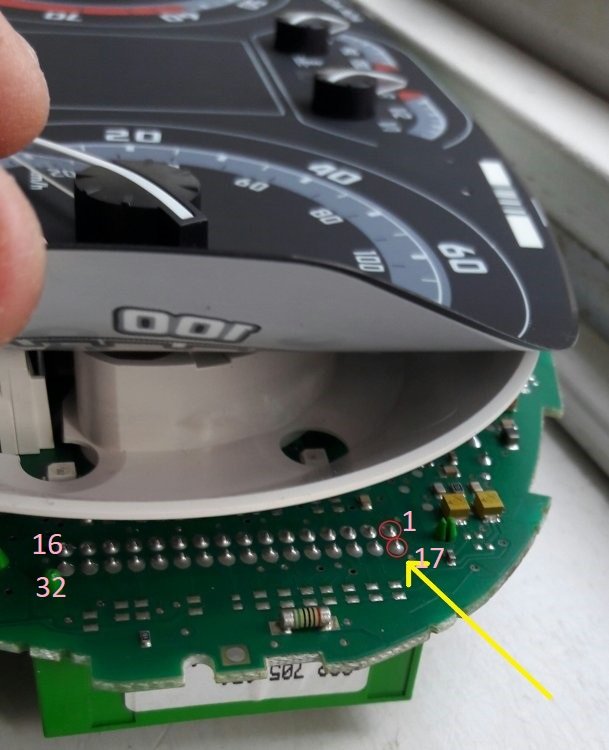
Yes, the engine ECU and its connectors are in the engine bay, as I said in the first sentence of what you just quoted! Don't do anything there, it's OK. Go back to the wiring diagram supplied by Jocko, and look at the bottom right side of it. It shows the fuel gauge sensor at the fuel pump, the wires from it, and their destinations at the dash panel insert (instrument cluster, in front of steering wheel). These connections sometimes go bad between the male part of the connector and the circuit board. The fuel gauge ones are pins 15 and 32, just about accessible without taking all the needles off. I've numbered the connections in this image. If you have a soldering iron you could try carefully re-melting joints No.15 and No.32. Ignore the yellow arrow on the picture, that was to show the immobiliser connections. I am not sure what voltage is to be expected on these. I don't think that the gauge not showing fuel level will affect the relay or ECU function.
-
The fact that terminal 86 goes to 12V means the connection to engine ECU (yes, connector in engine bay) is good. Maybe the relay is bad, or maybe the engine ECU is not commanding control of that output (taking that connection to 0V when it wants fuel pump to run). Trying a replacement (new, ideally) relay is probably easiest way to decide which of these things is happening.
-
Like your style with the dowels. I made a support beam. Clumsy affair but it did the job. Dumped it when I moved house recently, so if I ever need one again I think I'll invest in a 'real' one.
-
Sorry, just realised. Before you try that stuff with terminal 86 at position 14, refit the ECU in relay in position 13.
-
So there is nothing wrong with the wiring to the fuel pump relay terminals 30 and 85. See what the voltage is at terminal 86 also, please, on position 14, the fuel pump relay socket when ignition is switched on. That should be connected to pin 26 at your engine ECU, and I expect that to sit at 12V approx, when ECU is not trying to run the fuel pump, and be at 0V any time it is trying to. Monitor the voltage before, during and after ignition is switched on.
-
Does the courtesy light and lights left on warning work OK when triggered (or not) by opening the driver's door?
-
May be worth a deliberate battery disconnect/reconnect, with a minute between the two, if the battery is now fully charged. This will do a clean reboot of all modules that have permanent power connections, I think (which includes the window modules and the central convenience control unit that looks after the C/L). The lock signals don't go via the window motors on this generation of system, so I can't see any obvious reason why a window motor problem would have a knock-on effect on the central locking. Does the backlighting work OK on your driver's door switch unit? That relies on an earth which is also crucial for all the window switch functions. Might have to wait 'til dusk to see clearly. I presume the car has remote central locking, not just key in door? If so, is that working or not? When you unlock via key in driver's door, do any doors other than driver's unlock?
-
Yep, I bought myself one of these in case I ever have to go there again: https://www.ebay.co.uk/itm/314719915154
-
Good thinking. 👍 Doubt that would have any downside.
-
@mazzy960 your VIN brings up part number 03L 905 061K for the pressure sensing glow plug. This was superseded on March 1st 2023 by 03L 905 061L. (£138 + VAT at Skoda)
-
When putting things back together, please make sure you put the correct bolt back in at the rear of the dogbone mount. 61mm long, not 65mm like some of the others between engine and gearbox. Too long and you dent/kill the steering rack.
-
Yep, that offfside drive flange is a pain if left in. Good work though, and glad the problem is clear and readily fixed.
-
I don't know much about the CAN-based pre-facelift units, but can have a look at circuits and have a think about this for you, most likely tomorrow. I'd hazard a guess that this may be a wire problem, rather than a module one.
-
That's an odd one. As far as I know, there shouldn't be a mode where the rear wiper runs continuously, except as part of the wash/wipe cycle, so I suspect the problem may be internal to the rear wiper motor/module. For what it's worth, the control connections for the rear wiper functions are in parallel with the wires going to the washer motor at the reservoir bottle, which you will have been near to in nearside wing when doing gearbox removal/refit, I guess? May be worth eyeballing for damage or rubbing of wiring on metalwork somewhere. A wealth of info about everything for mk1 Fabia, including circuits, can be found here: MK1 Fabia workshop manuals - SKODA Fabia - BRISKODA
-
Exterior color / Paint Code D9 / F6C
-
I can look it up with the VIN, I think.
-
Hi Goz, and welcome.
-
TPS, dealership, LLL parts (probably too slow) or an ebay seller called "VAGbolts" are probably your best options. If you literally just mean the ones that connect bellhousing to engine, I wouldn't bother replacing, just re-use. More important to consider replacing the vertical gearbox mounting bolts I'd suggest. Also, super-important to be aware that the rear dogbone mount bolt is 61mm long, compared to a few of the other bolts of same thread that are 65mm long. If you mix them all up and put a 65mm one back in there by mistake, you're going to bugger up your steering rack.
-
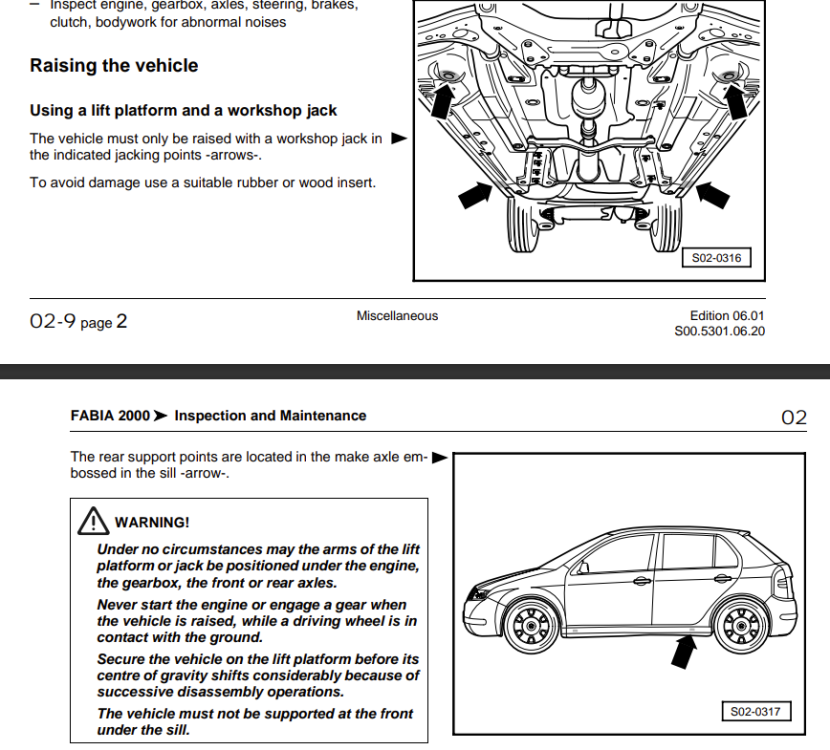
FWIW this is what the official Skoda maintenance manual says for raising Mk1 Fabia with lift or 'workshop jack': Doesn't say anything about axles stand positions, because official workshops probably don't use those often. There's a bit of a non-sensical translation at one point - "in the make axle"; but the arrows may be useful. On other models, near the front of the longitudinal box section is suggested, and I happily use that for stands, as well as console bush housings. Some trim levels have plastic covers over the underside that shroud the box sections though, and jacking or axle stands onto the plastic cover won't go well. I fitted the Audi TT jacking things on ours, and on my Polo, but they're hard/expensive to source these days. The front ones fit to those points shown in the diagram, the rear ones just inboard of the sills from the arrows. I'll add some pics of those on the Polo later, if I get out at lunchtime
-
Take a sander to the shoes and see if problem diminishes or vanishes with minimal material removal. Or just reuse the old drum.


