Breezy_Pete
Sponsor
-
Joined
-
Last visited
Everything posted by Breezy_Pete
-
Probably just some folks not spotting that the file has landed in their download folder, and that they need to open it from there; at a guess.
-
Typically mounted on the side of the fuel pump assembly, with the float arm coupled more or less directly onto the wiper. If it's a petrol engine, opening the tank is quite hazardous, and not usually very easy without the right tool to undo the locking ring.
-
Opened fine for me as it was.
-
Shown as a simple potentiometer on the wiring diagrams.
-
-
If you only have one console to change, just undo what's holding it on, and take it off. No need to move the subframe at all IIRC. I didn't send you any manual, I just showed you where to find it on this forum.
-
I think the fixing bolts they're referring to are actually special things that fit within the 17mm holes of the console. They are designed to maintain the position of the console relative to the chassis holes. I think they're only any use if you're dropping the whole assembly, both consoles and subframe, all as one unit. I guess you're not doing that, so forget those locating tools and just make sure the car isn't twisted, as I think I've already mentioned, and try very hard to fit the new console in the same position as the old one, despite the very big clearance of the bolts in these 17mm holes in the consoles. Do this by noting the clean/dirty paint areas that the original console will have made on the chassis. Maybe add some spray paint of your own to enhance the contrast.
-
I'll message you in a sec, but it looks like there are some retaining tabs each side which you have to get at from behind, via where the fuse box is fitted, then it goes 'out' inwards, towards front of the car (unless I'm reading it wrongly).
-
Please supply reg or VIN to enable proper look-up of PNs.
-
Nice one John, thanks for the part number. Could be still available, at first glance. 😀 Edit: ^ Not according to Fish Bros in Swindon, tried to order yesterday. LLL parts are showing it at nearly £40 plus no doubt a good chunk of postage cos of the length of the thing. Will have to make something instead.
-
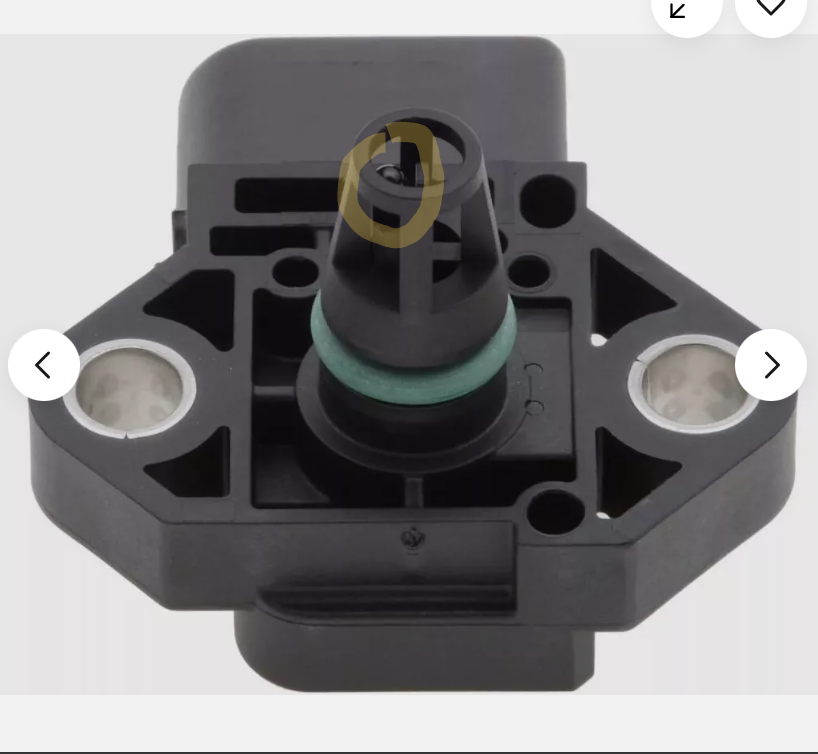
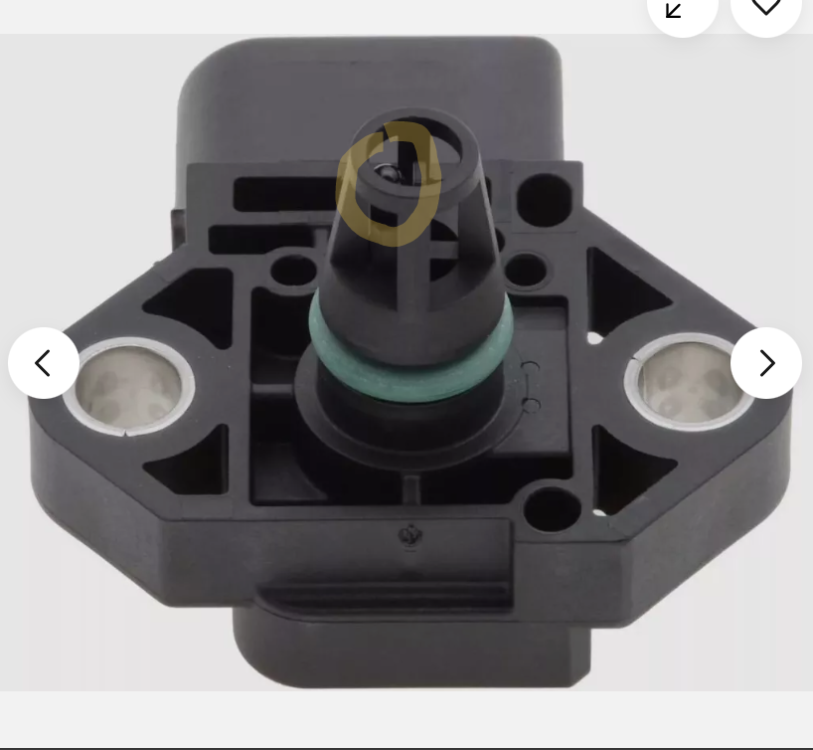
IAT sensor is co-packaged with the MAP sensor. It's the little black bit that sticks out the front. Most people think they're cleaning the MAP sensor when they're actually cleaning the temp sensor. Pressure sensing bit is deeper behind that. Ringed in yellow here:
-
-
-
According to partslink24, the 893E and 893F are both superseded by 893H, so I guess that makes all of those interchangeable. The -H was dropped in Feb '22, the others much earlier. The 891F was dropped in Sept '23. Not much help, sorry.
-
Match the final 8 characters of your VIN against the various ones quoted (after 6y-) against each of the pressure hose part numbers. If unsure, pop those characters here and I'll help.
-
Think it's this diagram actually, all UK systems are TRW, I believe. Obviously the ones labelled rhd, with part numbers starting 6Q2. All unavailable new AFAIK, sadly. https://www.lllparts.co.uk/catalogs/skoda/ALL/FAB/453/4/423/423050
-
-
Good thought. It's a belt. Two actually, a small one that joins the two cam sprockets, and one from crank to cam. See, e.g. For Skoda Fabia 6Y5 1.4 16V Genuine Gates Timing Cam Belt | eBay UK Not sure what's the best way to check the timing correlation.
-
That thin brown from battery negative is shown for Roomster May 2007 onward. It is routed from elsewhere (not battery neg) from May 2008 onward though, so I guess maybe this car is later than that. Cars with this later arrangement have a brown/green wire instead of plain brown. Strangely our 2012 Roomster has the thin wire to batt negative clamp, so they appear to have reverted to this arrangement later. It terminates at pin 8 of the connector that goes into XS4 on the BCM. Another wire that may be relevant is a permanent supply from battery fusebox fuse #11 ( 5 Amp) to XS4 pin 5 (thin red wire).
-
The other end goes to the BCM, same connector as the blue exciter wire I think. Will tell you pin number tomorrow.
-
Hi, and yes, should be no problem to repair that. I'll send you a private message with contact info. 👍
-
Is the thin brown wire that connects to the negative battery clamp still connected?
-
Yes. I will think about this situation overnight, and look at circuit diagrams tomorrow. It seems like you have done a very thorough investigation already, so I'm not sure I can suggest much.
-
EGR would be just to the right of the green oil pressure switch if there was one. Your car has not got one. Have you searched for problems with automatic mk1 fabias in this forum? I think there have been a few discussions in the last few years. Search using engine code (BKY?) and automatic as search terms, I suggest. Maybe using an external search engine rather than the forum's own.
-
Switch to a mk1 or mk2 Fabia?