Leaderboard
-
Lady Elanore
FREEDOM17Points24,875Posts -
Stonekeeper
Resident Member16Points2,844Posts -

Lee01
FREEDOM15Points36,164Posts -
.jpg.1006585dfe4e2977315b67c3d642e37b.jpg)
Guest_
FREEDOM13Points83,824Posts


.thumb.jpg.9dd3f612ba7f13d10be5c518d3c8d255.jpg)

Popular Content
Showing content with the highest reputation on 29/10/23 in Posts
-
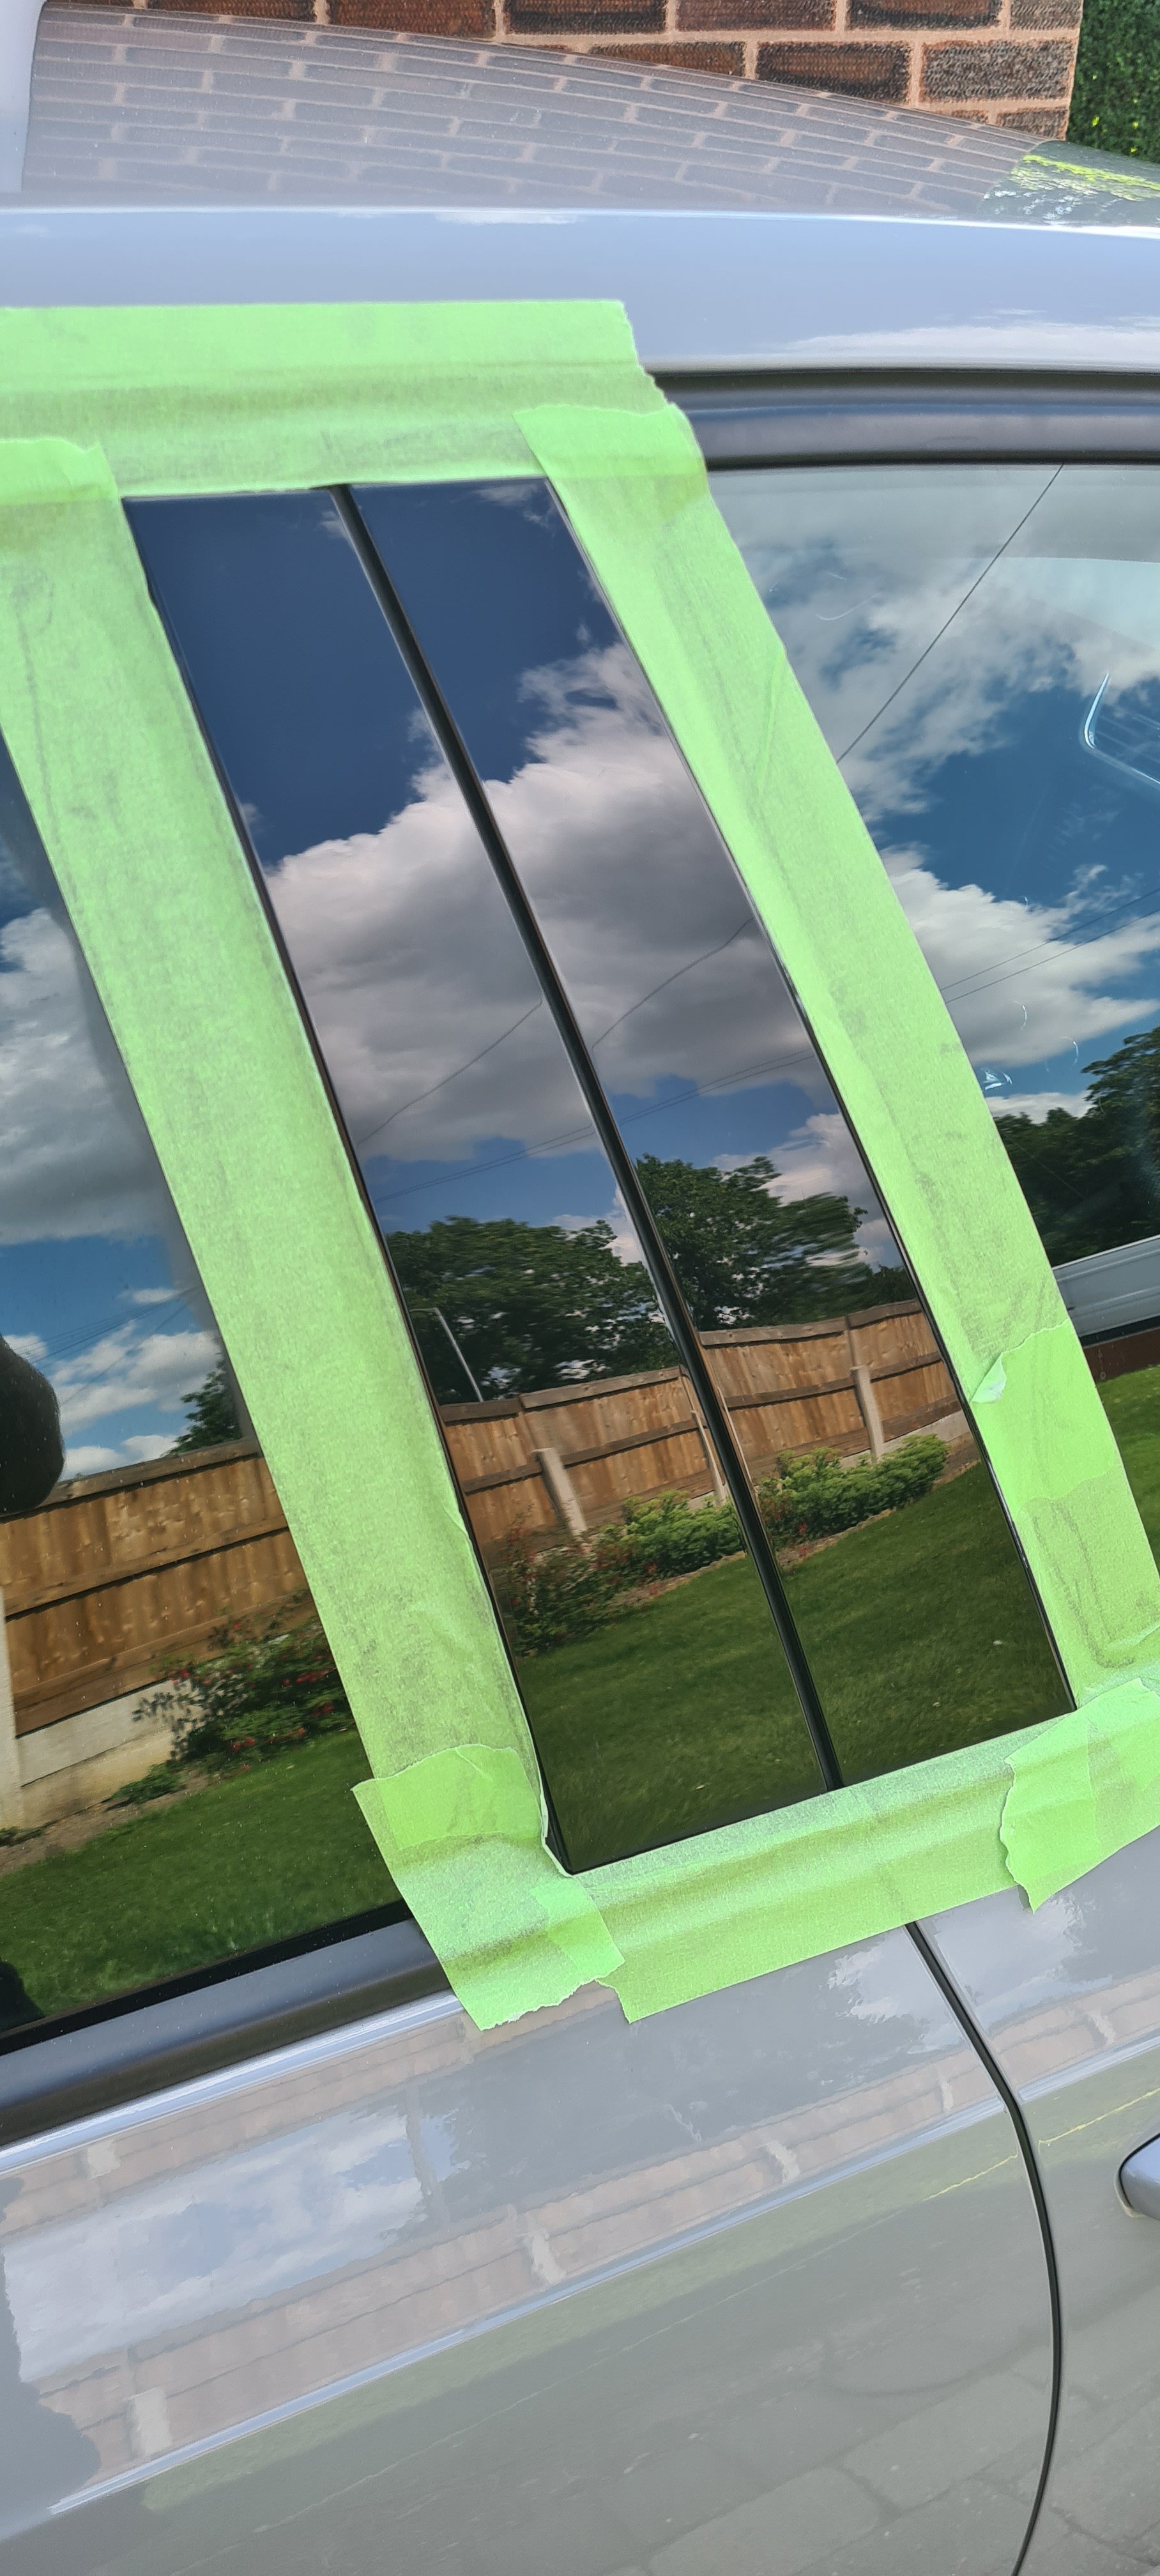
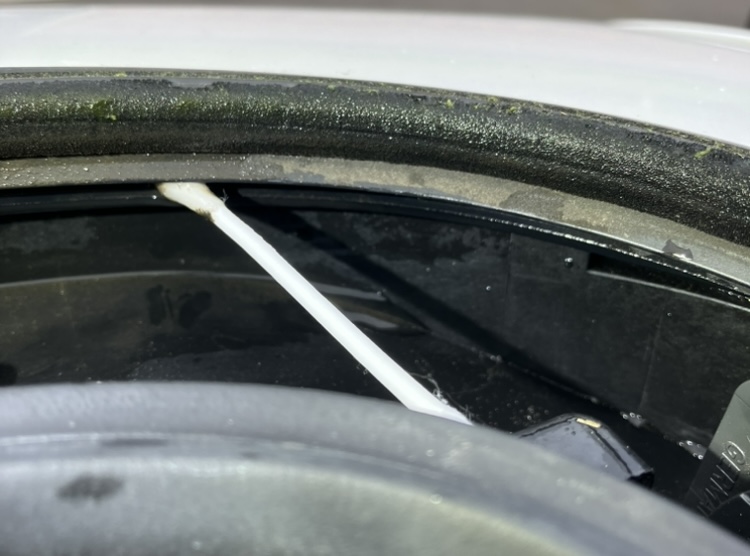
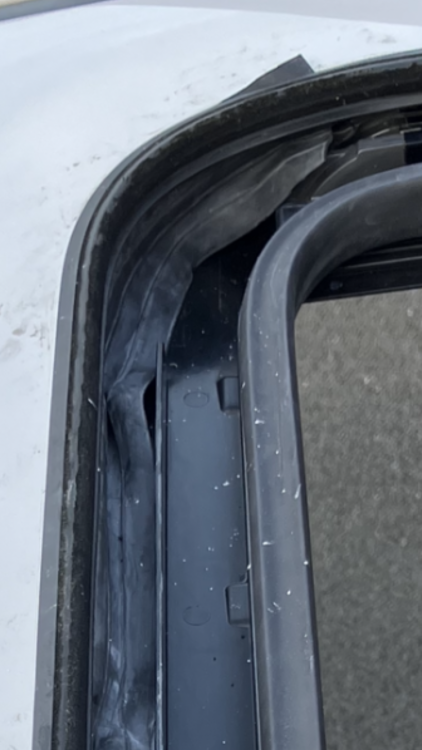
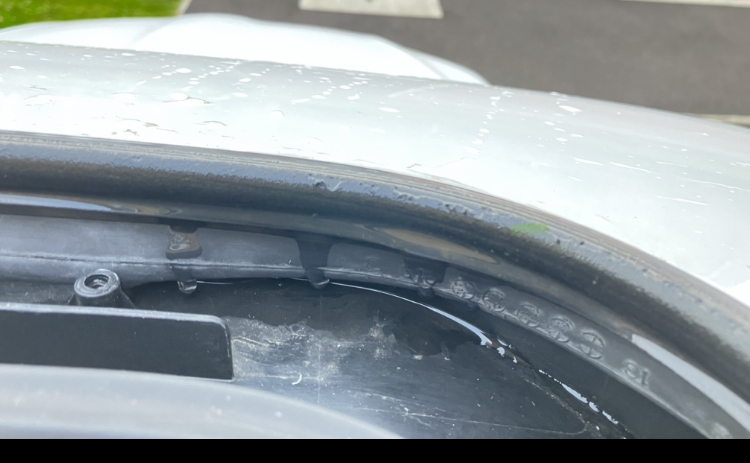
I have taken a different approach to a repair, which has shown to be somewhat effective under controlled conditions - cheap, and not a drop of Captain Tolleys in sight. After some head scratching, I managed to remove the headlining and clean up the roof channels on both sides. Although I saw a drop of water on the underside of the cassette a few days ago, it was only one drop and I wanted further convincing where the leak location was. How a single drop translated to a flooded floor pan did not add up. I dammed both the OSF drain hole on the cassette and the front lateral section and filled the front corner with water so the plastic-aluminium joint was fully submerged. There was no indication of a leak from the jointed section. As others have suggested the frame is weak and can flex when pushed from beneath, I applied a little pressure to the overlap from below but still nothing. I’ve been puzzled by the irregularity others have described trying to correlate rainfall (or lack thereof) with leaking. It would seem if that jointed section is fully under water, it will never see more water than that, has minor hydrostatic head pressure and should leak. Given it doesn’t, Are we really looking at the right point of ingress? Anyway, I continued to slowly pour water into the dammed corner until it finally poured into the cabin. Thankfully I had prepared the seat for this as it was free flowing. Water exited from the usual place others have highlighted - the rectangular slot and opening above the worm drive (image below). Considering I thought the corner I had dammed was enclosed plastic, I was curious as to the communication to the holes below. There is a huge gap between the outer sunroof seal and the plastic front tray where the cotton bud is inserted (image). Water can obviously pass through here very easily and is more in line with what I expected to see given the depth of water in my footwell. The plastic tray should never be that full though, and since the drains flow well enough. I remained puzzled as to how it entered the cabin. Finally with the roof closed, and the headlining out, whilst wetting the front of the sunroof, I managed to see water pouring in. It came down the gap with the cotton bud inserted, not the joint everyone has tried to seal with Captain Tolleys. When wetting the roof, there was ingress at the front (and possibly rear) aspects of the outer sunroof seal. When water passes the seal, it should run into the plastic tray and down the tubes. No prizes for guessing where it actually goes… There is a skirt on the same seal similar to a shower screen seal, which is supposed to guide the water into the tray. However it sits forward of the tray with no overlap. Water passing the seal of the closed roof is capable and does flow directly through the rectangular slots in the first image (there are two slots per side but only one is shown here). Since I found a leak which flows into the car with the roof closed, when a relatively small volume was sprayed over it, I think it was reasonable cause to fix that and ignore the plastic-aluminium joint. Considering the size of the gap, there’s no way you’d seal it up. This needed a different approach. I was thinking roof tiles. Not literally, just the principal. To give the water a helping hand into the tray. Since I wanted my roof tile to have no - to minimal interference with the operation of the roof, it needed to be ultra thin yet water proof. Off I went to buy a bicycle tyre. £4. I was thinking narrowest but largest diameter, so a road bike/racing tyre. I sectioned the valve out, then gutted the remain tube so it opened flat. I inserted this under the sunroof seal, lapping it over the lip of the metalwork and into the plastic tray. Although the gaps I was trying to bridge were only at lateral aspects and whilst the factory seal overlapped much better in the central position (above the rear view mirror), I decided to fit a full length of rubber as it would be less likely to move around than two independent sections. Given the amount of excess sitting in the gully, I cut it in two so I had two long strips. That would allow the wind buffer to fit back and not trap water on the underside of the tyre. I neatened the ends so the didn’t interfere with the guide rails and opened and closed the roof a number of times. There was no movement which might lead to it moving out of position. Time to test the water - literally Sunroof closed, I gave the area a proper soaking with a specific focus on the entry points of the roof seal I’d found earlier. Nothing came into the car but a trickle was exiting at the designed exit points behind the doors. This was encouraging. Opening the roof again revealed additional trickles on the rear facing aspect of the tyre. This is the water that would ultimately find its way into the car during any rainfall. I’ll keep the headlining out for a while to check on progress but there was nothing following the evening rain that followed. So, if you have tried sealing the OP’s suggested joint area and had no success, give this technique a whirl and let me know how you get on. It’s about as a cheap a fix as you could ask for (about 1,000 times cheaper than main dealer!) and doesn’t actually need the headlining removing. I have cleaned and dried the OP’s joint too and will add some Tolley’s as I have seen moisture in the joint. A note on drying the area, I found using a pick and paper tissue to soak the water out of the joints works really well. The smaller the piece of tissue the better. If it’s double ply, separate it. Aim for an area of tissue about the size of your little finger nail then poke it in. Remove it and repeat. It’s surprising how much continues to come out which corroborates what everyone has remarked upon whilst adding Tolleys to the joint. Weti
 5 points
 -
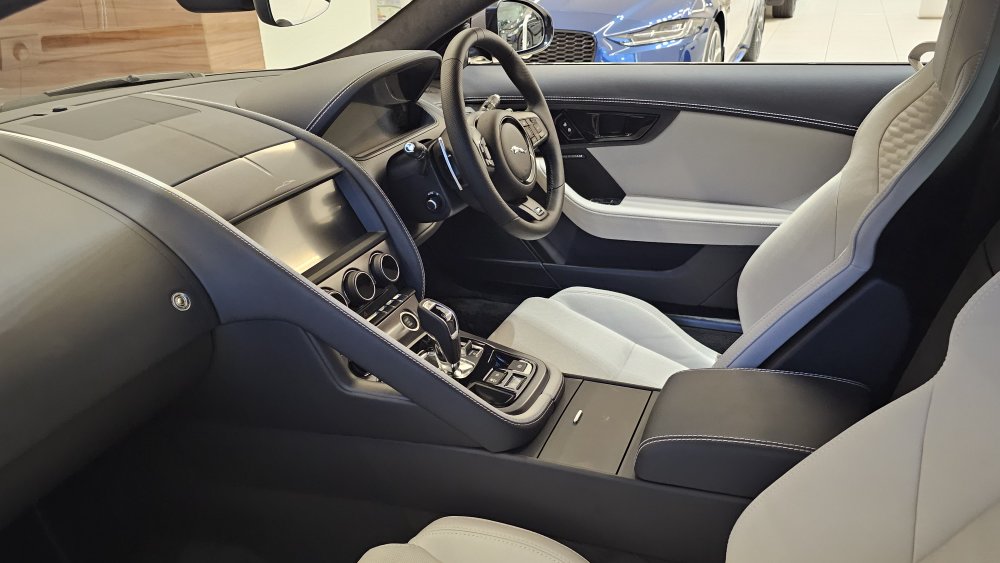
4 pointsThis is because the tech in the jaguar is a couple of generations old. Jag didn't want to invest in the F Type as sales were too low, so Android auto etc still need a cable, the interior is not as well-made as the BMWs the central screen looks like it came from a car 10 years ago - which it more or less has. It has lots of buttons, which I like though, as once their position in memorised you can activate many functions without taking your attention from the road. There is no way around it, the F type is a bit prehistoric, but like all the best dinosaurs, they are brilliant and who doesn't love a big dinosaur (Greta Thunberg not included)4 points
-
Winterwheels got mounted today along with the rubbercarpets inside. Washed and waxed the car, polished the rims because they where a bit scratched and finished it off with paint protection and tireshine.4 points
-
4 pointsMy choice would be too leave her where she is happy. I don't see much that is desirable in all the features that you quote.4 points
-
3 pointsAquaplaning. It might cope with a bit of water, once in it, but hitting deeper water from a wet or dry road and not knowing how deep or the camber of the road is slow down time. But then the OP knows that now so might well check tyre pressures, or change tyres but still need to slow down. & no CC or ACC when there is adverse weather / road conditions. Is it something weird to get rain or winter all the time. Maybe a driver who is learning or just in their first year might get caught out, but surely not experienced drivers. Soon we get the cars steaming up, freezing inside, what windscreen wash, my locks are freezing, how do i open the filler flap threads?3 points
-
3 pointsSwitch on Auto Hold. Press the footbrake. Make sure the wee green light is on the dash and the light is illuminated on the electric parking brake. You should only need to do that step a couple of times to familiarise yourself with the process to ensure that the parking brake is engaged, Leave the gear selector in D. When the lights change press the accelerator and drive off.3 points
-
3 pointsSomeone at work asked how much the M3 had cost me, so I did quick calculations, just on the monthlies of my PCP. I haven't included my sizable deposit for the first example for the following reason. I've used the equity in my PCP cars for many, many years and I've been fortunate to have bought mostly wisely (lucky) in this regard, so the equity in my PCP has been going up for years when I sell the car on. The first car in this series, I think I put a £3k deposit down, which eventually turned into huge equity for my M4 (several cars later) and i had £10.3k in my M3. Basically I sell the car/part-ex and put the equity straight into the next car as a deposit. When my 'silly car' buying series comes to an end (this will probably be the last) I may have some equity, I may not, but in theory I should get back the £3k I initially put into these cars all those years ago and include the equivalent of the inflation that's been going on since then ie I'll get my deposit back, so I haven't actually spent anything in that part of the deal. It's a bit like Mike Brewers 'Trading up' series, where he takes a cheap car and any profit he gets from the sale he puts into the next one and so the value of the motors go up Anyhoo, so here are two versions of the M3s monthly payments, if I take into account the equity part of the car that in theory I could have kept and simply not bought another car after the M3, ie if I stopped buying silly cars and just kept my little Peugeot, then the M3 would have cost me £125 a month Or....... about £350 a month if I put my equity figure into the calculation, but remove the initial £3k, plus an adjustment for inflation. It's all a bit rough and ready, but it's in the ballpark. Many of the much cheaper cars I've had on PCPs have probably cost around the same overall. I suspect the Jaaag will not hold its value too well though, as it has such a voracious appetite for dinosaur juice and Greta Thunberg has a hit squad looking for them. It does look as though the bubble has finally burst for second-hand values on certain types of car. It was known it would come, but I think the motor trade has been a bit shocked at the severity of it, there are a lot of now overpriced cars sitting on forecourts, which owe the dealers a lot of dosh. Btw, I've not taken the insurance into account with the above figures, as until this year (2 months ago) the M3 was about the same as the Peugeot! I suppose you could say the road tax was a little higher and fuel cost were more, but I didn't do huge mileage in the M3 and when I used it for work I get to claim mileage back from my company Also, it should be remembered that BMWs have a two year service schedule, so they aren't 'quite' as expensive as you might think...they still aren't cheap, sadly. Overall, I didn't get through any consumables while the M3 was in my car, although the tyres didn't look brand new any more3 points
-
3 pointsProbably a gamble to catch the last of the old school buyers. There's not many cars left these days like the Octavia/Superb and especially as a Combi. Everyone is pushing the SuV route, but I can't understand why anyone would prefer a big SuV over a nice estate car.3 points
-
2 pointsYes please. Although no rush. I pick the car up on Tuesday afternoon take it home (the long way around), park up and then leave it until next week Have to work to pay for the petrol I miss the proper car parts of old Top Gear 😞2 points
-
2 pointsOlder cars used fixed vane compressors and a clutch - so the compressor was either off or fully on - but for several years cars have used variable vane compressors which only use as much energy as needed. In my book that's a significant move on in technology, and fuel saving.2 points
-
2 pointsAnd this appeals to me in a way that touch screens never will...2 points
-
2 pointsF Type is a very aesthetically pleasing car. more so than the m3 tbh, even if it doesnt have the performance ztats to match it. sometimes looks win...2 points
-
2 pointsI altered the first post a little with the inclusion of a few words in Italics But perhaps this is clearer? So the car I've just done the deal on had a huge deposit going into it. This came from the equity that I had in my M3 PCP deal, once the finance was settled. You can then look at the cost of the new car deal in a few different ways. One is that I have surprisingly low monthly payments for a pretty expensive car (they are still not cheap, at least for me), another way of looking at it is, yes the monthlies aren't that high (considering the sticker price of the Jag), but I also put a huge deposit into the deal, so in reality if you consider that deposit figure in with the monthly payment figures then I'm paying an awful lot per month for the car. But, I look at it like this. Several cars ago, I put £3k into a PCP for a new vehicle, this by luck, more so than my good judgment turned out to give me enough equity at the 'end of the finance agreement/point of sale' to recoup my initial £3k back and a little more than I expected. It is the same with all PCPs, you hope that your equity is slightly more than the settlement figure, this gives you a deposit to put down o a new car. In fact, that literally was part of the spiel I was taught to use when selling PCPs. But as several cars in a row have increased this equity part, I've just chucked it all back into the next car as a deposit, so i actually never get my hands on the cash between one car and the next. To sum that up, I've sort of forgotten about that initial £3k I used many years ago and just move from one car to another, letting the equity of the previous car do a lot of the heavy lifting on the finance of the new car. It's obviously ignoring that £3k investment, but it is my version of 'Man Maths' (woman maths?) That gives the £125 figure for the M3 once I consider that I got £10.3k in equity from the sale. ie total monthly payments minus the equity released, divided by the number of payments. A slightly more honest way of looking at the finance is to take into account the £3k initial deposit (the seed money if you like), which is still tied up in successive car deals, when you factor that into the monthly payments a more truthful figure of what the car is costing you emerges. I worked out that figure and also inflation adjusted £3k over the time it has been invested in several cars (I've never taken any cash out from the equity released in my car sales) and it gives a higher figure. £350 a month. ie total monthly payments, minus equity released once the initial £3k (plus inflation) has been removed, all divided by the number of monthly payments. This higher figure mentioned Of course this is all because I have a huge amount of luck with car sales and surprisingly the Covid era helped this enormously and I suspect now that things are becoming a bit more sensible, deals will become more prevalent and used prices will continue to drop, so the Jag may have no equity in it at the end, potentially meaning that it was quite expensive to run after all. Nobody knows. Will the F Type become a classic as they "don't make em like that any more"? Or will it be lemon consigned to the dustbin because of emissions, petrol costs and general hatred towards the I.C.E. ? Time will tell, I guess. But the upshot of my good fortune has been that I have been able to just about afford to get into a silly car, possibly for the last time before retirement, but I've been smiled upon by the gods of motoring....I think... (assuming the F type doesn't turn out to be one of Jags often quoted "lemons")2 points
-
2 pointsYou can ease the brake pedal (not have it fully pressed down), just ahead of going, sort of tells the car to get ready so won't be a delay when you want to move. You can also do this, or wiggle steering wheel if using start-stop to make car ready to go. The front radar will also restart it if car in front moves off2 points
-
2 pointsI imagine his mum being happy in one of these, but probably because I have quite happy memories of one.
 2 points
 -
2 pointsWide tyres. Anything can aquaplane even with wet weather tyres and all season / winter / snow tyres might make no difference. Old Fiests, Micra, Picanto etc on 175 / 185 tyres might just plough through water logged roads even though light cars.2 points
-
2 pointsShe would probably appreciate the simplicity, reliability and relative finesse of a first generation Felicia.2 points
-
These guys are excellent, however I felt they were expensive. https://www.vw-retrofit.co.uk/ A cheaper solution might to be replace the wife for one who does not require heated seats. 😋2 points
-
2 pointsThat's also the effect of "Auto Hold" usage, it doesn't necessarily mean the driver has his foot on the brake. Using this function will keep the brake lights on as long as it is engaged and there's actually no need to switch to Neutral or Park and apply the parking-brake. The clutch will be completely disengaged while on Auto Hold, so that's not affected either...2 points
-
2 pointsFacebook has killed a lot of forums IMO. A shame really as Facebook can't organise discussions in the way a forum can and you'll get dozens of posts asking the same thing whereas on a forum all one has to do is find the relevant section. I saw this posted the other day but it's not new.
 2 points
 -
I'm sure these days a faulty glow plug will throw an EML because of the emissions implications of them not working pre and post starting, not 100% though. With it being a 1.6 I would have a total stab in the dark at one or more injectors being faulty although I advise getting a diagnosis rather than firing the parts cannon at it.2 points
-
2 pointsI might leave the keys in the Beemer, as it has GAP insurance...I just need a way to figure out how I could claim I wasn't a total pillock and left the keys in the car As it stands I've shoehorned the car in on my drive and jammed another car across the front of it. Only got to last another 4 days. Can't believe how much cheaper the Jag is to insure, though. It's actually cheaper than my Peugeot 3008. I think Direct Line might have made a mistake, will have to chase it up when I get a day off.

 2 points
 -
The key word there is option, that's the price DIFFERENCE between the base spec radio and the Columbus upgrade not the full price of the Columbus - so many people make this mistake.2 points
-
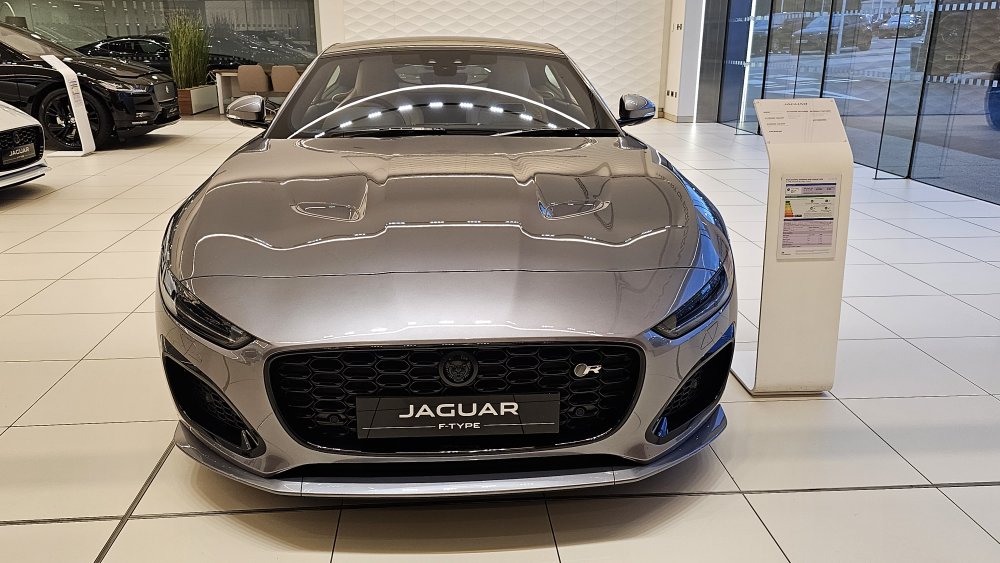
1 pointThat Is very lovely looking thing! It really shows the likes of BMW how design should be done1 point
-
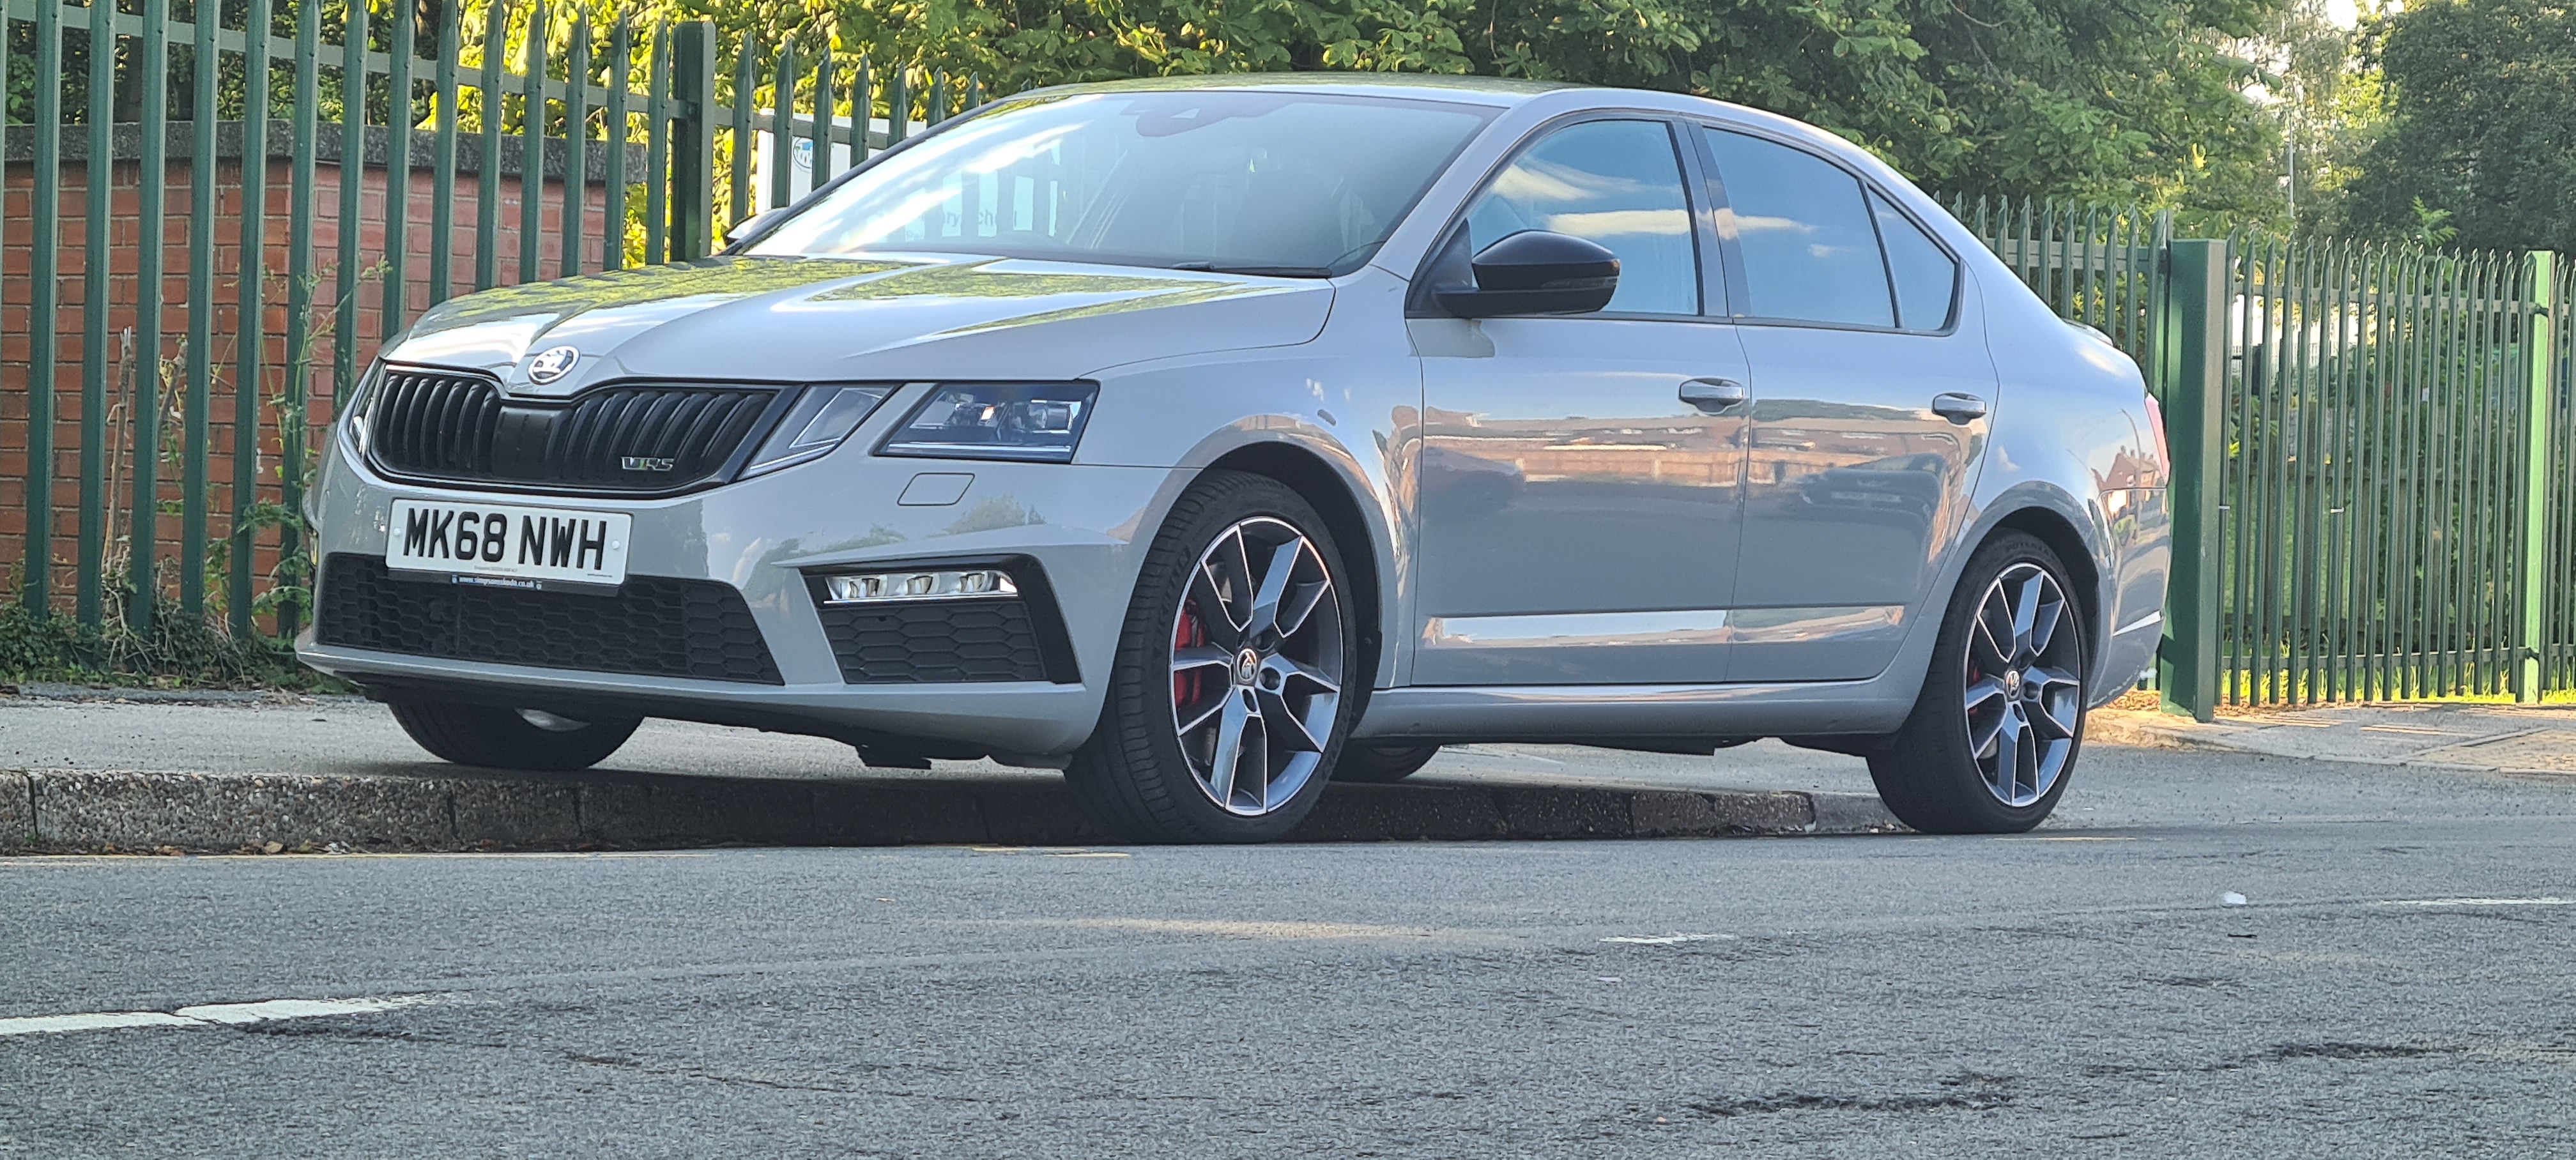
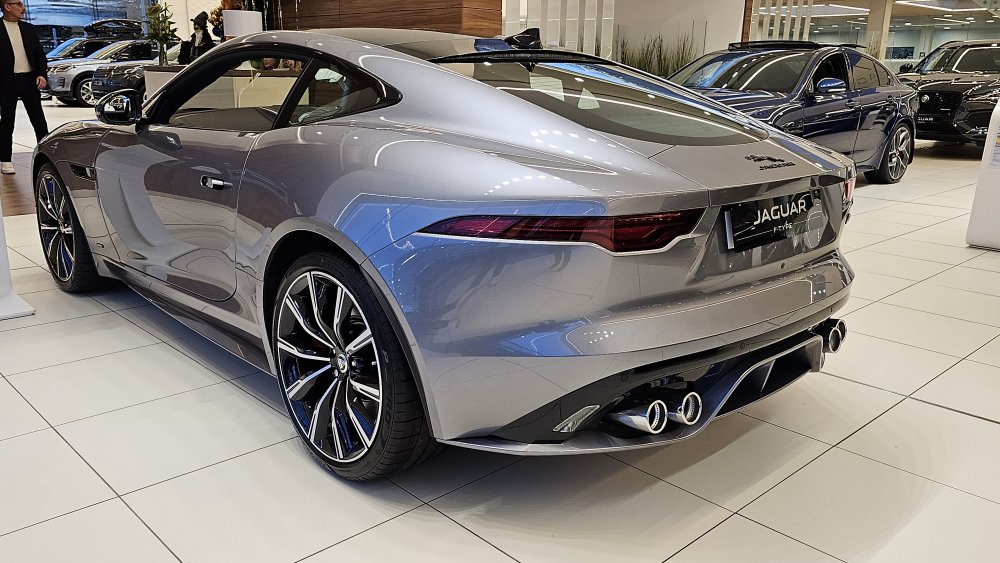
1 pointThat Jag is glorious. Beautiful lines. Brings back memories of that episode of Top Gear when Clarkson was driving either a Jag or Aston Martin bemoaning the death of such cars, a fine piece of filming. Just looked it up, TG s13 episode 7, he was driving the AM Vantage v121 point
-
1 pointLow Rolling Resistance is achieved by a harder compound which has less grip. Personally I studiously avoid any tyre labelled as "eco" because I'd rather have grip and protect my life and property.1 point
-
1 pointIt's not just snow and ice that's the issue. Setting aside the issue of the 'Eco' low rolling resistance tyres which have very poor grip in most conditions, any 'summer' tyre will lose its performance under 7 deg C. I've been using Dunlop D5 Winter Sport on several previous Tiguans and our current Karoq. With AWD and winter tyres, they're pretty much unstoppable, unless you want them to be, in anything less than snow deeper than the underside of the car. On the Yeti, for the first time ever, I've been using Michelin CrossClimate. I can't recommend those enough. They've been great in all conditions, even for an old hooligan like me.1 point
-
1 pointThe problem is if you're going to change tyres for the winter you either need two sets of wheels with somewhere to store the spare set or use the winter tyres all year round which isn't ideal the rest of the year. If you live somewhere where you often get bad snow and ice and it's not always gritted then sure but for most people I think it's better just to drive more carefully in poor weather.1 point
-
1 pointNot true, the tyres the cars are delivered with are Eco biased tyres optimised for WTLP test temperatures (about +23c), much warmer than UK average. Generally in the wet the winter tyres will outperform the summer tyres below about +10c (yes might be nearer +4c in complete dry), but in UK get rain below about +10c more like 6-8 months a year. We don't get warm tropical rain.1 point
-
If you're in a long queue maybe put it in park and handbrake, but generally just keep your foot on the brake, as most traffic lights change fairly quickly unless of course your local knowledge tells you otherwise. Stoke crossroads and Ladymead in Guildford are two exceptions I know where you can wait between 2 and 3 minutes before you get a green, if you miss a green, so I put it in Park and handbrake on.1 point
-
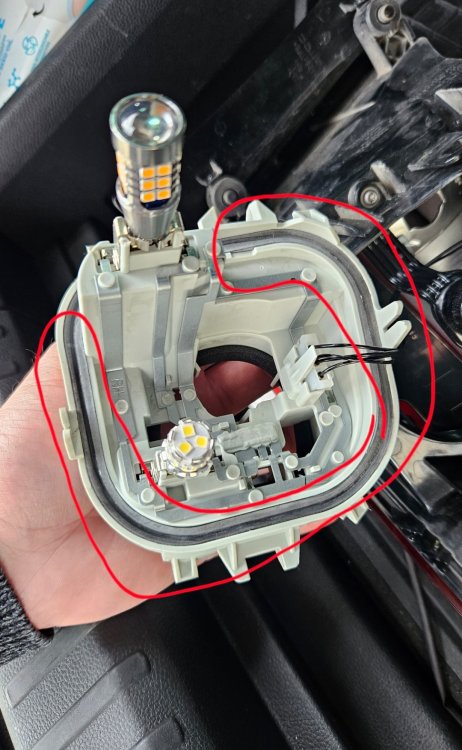
I had removed the tail light, dry it with a hair dryer, put it back and now everything is fine. The seal was a bit missplaced, I think that was the issue. It's been almost 2 weeks now, the weather was rainy but no condensation appeared.
 1 point
 -
Good, you can cancel the dealer appointment now then and save some money 💰1 point
-
Well done. Check beams are vertically aligned by viewing on a garage door or similar. Lots of cars drive around with one lamp pointing skyward cos they swapped a bulb and didn't completely nail the refitting. Did it myself once, oncoming cars flashing me clued me in.1 point
-
1 pointThink you’ll find modern ac systems only have a marginal effect on fuel economy. With every car I’ve had with climate control I’ve set the temp at 20° ac on and auto and never had the need to touch the control again. The benefit being at a comfortable temp, and no steamed up windows in the cooler months far outweigh the minimal amount of fuel used.1 point
-
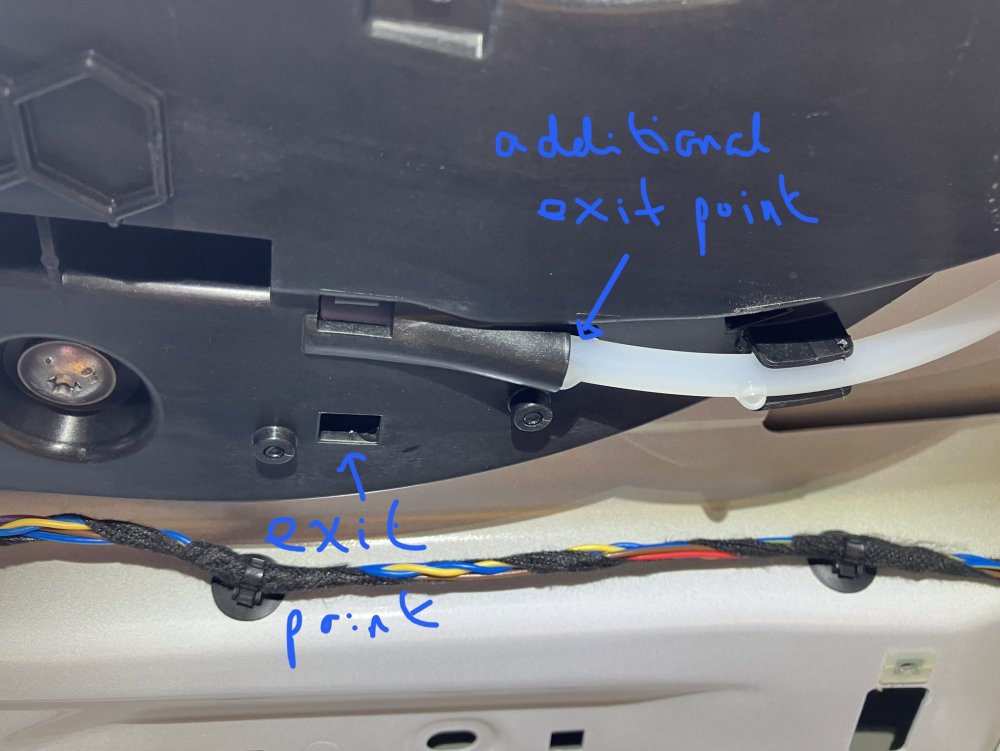
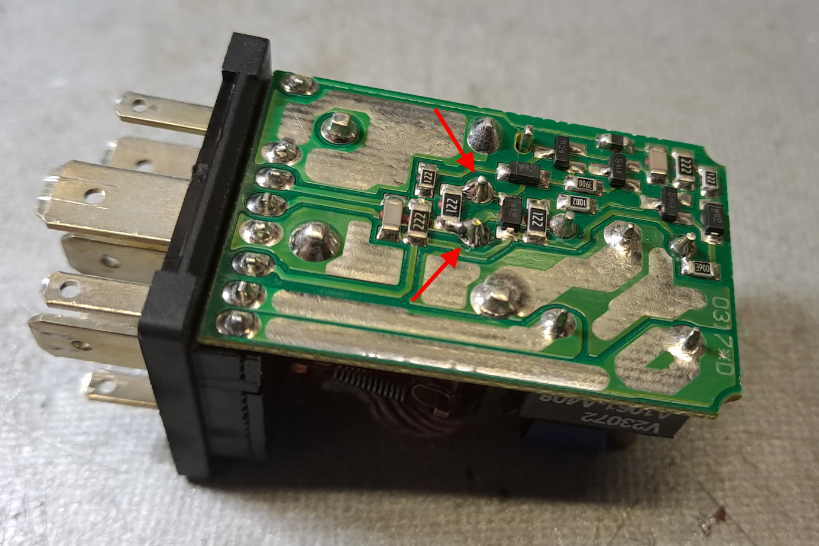
Problem solved ! I hate when there's no follow up on threads. And especially because there are other threads on the forum with exactly the same problem as mine - but without any follow up how it was soved - I will below write a detailed "how to fix it". On these MkII models there is a relay numbered "484" that does the complete DRL function. It's the same type of relay as I linked to above. Sadly the relays are located inside the dash panel, but if you have small/thin hands/arms it's possible to reach the relays from below without disassemble a lot (ask a child...). Remove the foam above the pedals. It has no screws, but be careful not to break it. Remove the cover on side of the dashboard on drivers side (mostly to get a better view, not possible to reach the relay from here) Remove the light switch: In "0", push in the knob some mm and turn it slightly to the right, This will release the locks and the switch unit can then be pulled out. Remove the connector from switch (push the locking tabs on its sides) and route the connector to the dashboard side opening to free up the hole Now you can see the relay "484". With a long tool it may be possible to take it out through the light switch hole, otherwise you need to grab it from below, Remove the cover of the relay (two snap lockings, quite easy) Inspect the PCB for suspect and/or cracked soldering, In our car I think it was the signals to one relay coil that was interrupted by a crack. May be barely visible (looks like a ring in the soldering). Re-solder all suspected pads. In the picture the suspected/cracked pins are already re-soldered: Re-assemble the relay, put it in place again and connect the light switch connector to the light switch again. Test the car with light switch in position "0" - side/parking light should be activated with ignition on, and after staring the engine the dipped beam should light up. If everything works, re-assemble the rest of the panels and covers. You have now saved a lot of money 🙂

 1 point
 -
1 point
-
Heated windscreen button would be the blank above the menu button. No button = no heated windscreen.1 point
-
Do you have a button for heated windscreen.1 point
-
1 pointIndeed it was. Imagine the claim to be over 100k or there abouts. My car the other car plus his injury claim. Waiting to hear back from police about what is happening possibly careless ban fine or dangerous driving which in Scotland is a ban resit test unlimited fine and jail(highly unlikely). Or might even be dropped don't know in limbo. Can still drive just now although no confidence. My friend asked if I wanted a shot of his car I was eager jamp in the driver's seat then I froze flashed back to what I can remember happened and got out. The whole experience is made me a better person tho. Staying at my mum's the now for help and support. Been good as she's never fully understood me(ADHD) thought I was rude compulsive and quick to temper (I do have a serious temper I snap see red and no one is calming me down till I do so myself worst thing anyone can do is tell me to) not proud of that at all but it's who I am. Since started taking my ADHD meds everyday it helps me focus level headed calm not as compulsive. Mum's finally got me and agrees with me taking them now as before she said it would change me make me like a zombie. Its like having 2 of me unmedicated and medicated. I had 14 years NCB protected so will still have them. First crash never been in bother for driving with the police never been charged for driving had plenty other charges just not for driving. Again sorry about the length of the post I feel it's good to get all this out. Thanks guys1 point
-
1 pointThe left side is no longer available from Skoda, I checked in to get one and was informed that due to the age of the car 07 plate that part is no longer available. I tried VW dealer locally I got the same response, if your not bothered use the same part number and forget the colour code at the end {47H} they can get them in, I waited 2 days and they are actually chaper than some of the robbers on ebay. The part number on my invoice is W6Q0885643A7. THE COST WAS £4.65 +VAT £5.58 inc VAT.1 point
-
1 pointCrikey, that's more than a bit forensic!!! A couple of months ago my car was cased at 4 oclock in the morning, by a young scummer on a bike, riding up to my car and calling someone to discuss it. It scared me quite a bit if I'm honest, so I took a couple of extra security options and hoped that was enough. Anyhoo a couple of weeks ago while I was at a pretty low point, another young sod on a bike did exactly the same. Face covered, of course and you can't make out the bike properly. It made me think I might bail out of the M3 no car is worth someone breaking into your house and putting a knife to your throat and ask for the keys plus any additional security measures that need to be defeated. I've also just lost my mother and it made me think, life is for the living and there's no second lap of the track, so even though I have had to find some money to complete the deal (PCP) and it's not something I can easily afford, I thought, just do it! So..... I started to look at something less nickable and noticed that the bubble on certain types of cars had just burst. My M3 lost £3.5k in its book value in the last week!! So after much browsing, visiting, emailing and phoning around I got an amazing offer on one of the last unregistered V8 F Types left in the county (very good part ex value too, which surprised me and the dealer ). It has the dreaded white interior, which is a nightmare if I use the car for work, as I wear black jeans and sometimes I jump in the car to get out of the rain. You can imagine what happens with a soaked pair of black jeans on white seats. But it was a compromise worth taking for that engine and those looks. So, the deal has been done and the M3 is going next week (hopefully to a dealer, not a burglar). The Jaaaag certainly won't compete with the M3 in terms of performance, as the Beemer is an astonishing cross-country weapon if the road is reasonably wide. The tech on the F Type is at least one division lower than the M3, possibly two, the sound system isn't as good (well the one in the doors isn't, not the one under the bonnet of course), build quality isn't as good and the engineering doesn't seem anywhere near as classy. I lose 2 doors and half a boot volume, as well as economy goes a bit South. Also, my insurance goes down by 33%, so hopefully I am right and people don't nick Jags as much? But... those looks and that engine1 point
-
1 pointkeyfob batteries can fail with no warning, only £1 for a new battery once a year1 point
-
Larry transitioned to Laura when my car went in to have the 1941 update applied. Bet that was a shock for him.1 point
-
1 pointI'd seriously consider some Michelin Cross Climates - you can sometimes get them on offer under £100 per corner offer great dry, wet and cold weather grip for 30k miles on top of the pennines1 point
-
I'd change the entire belt kit, and the water pump. Neither the belt tensioner nor the water pump usually survives that mileage, and you need to change the belt to change either of them...1 point
-
1 pointTry getting VAG to acknowledge that !! I struggled at first & after 7 or 8 months intermittent "playing" with it managed to get some of the basics to reveal their secrets. I now usually use Waze + Android Auto for detailed, accurate information (but see below). The car has the wireless charging facility but my mobile doesn't - hence a USBc to USBmicro cable. The phone is held in a Brodit holder to the left of the gear lever. I've been able to input destinations to both the built-in unit & Waze, and generally display the built-in unit mapping (which, perhaps oddly, I prefer to the Waze graphics) but with Waze running in the background. Waze, of course, broadcasts any traffic announcements as usual. I find Waze instructions, guidance etc. to be very good. Several threads on this forum & others (inc. Facebook group(s)) would suggest that VAG couldn't give a sh** (what you said above!) - they've got your money so why should they bother?1 point
-
1 pointI tackled the engine bay and exterior in a single day, which just so happened to be the hottest day of the year at the time. Car was fully safe washed, fallout remover applied,tar and glue remover applied followed by clay bar. Out came the masking tape, and polishing could begin. From what I remember it was a good 8hrs+ on the exterior that day. With polishing done, it was time to get the wax down, shuffling the car around the drive to find shade and not bake the wax on 😬 Finished result was pretty good for "primer" grey.

 1 point
 -
I forgot I posted this and only came back to it earlier this week. In short - thank you very much. I had a Carista dongle I bought ages ago so subscribed to the app for a month and changed the setting today. It drives like a different car. Feels like it’s got about 30 extra horsepower.1 point
-
I've been on Octopus Agile for about month, on some days when there is excess renewable generation the cost per kWh at some times is even negative (i.e. Octopus pay you for using electricity!).1 point


.thumb.jpg.f83a46b9b3c0d976b9dbffbb523c9874.jpg)