Leaderboard
-
Lady Elanore
FREEDOM43Points24,877Posts -

Lee01
FREEDOM11Points36,174Posts -
skomaz
FREEDOM10Points11,089Posts -

Kenny R
FREEDOM9Points4,778Posts

.thumb.jpg.9dd3f612ba7f13d10be5c518d3c8d255.jpg)


Popular Content
Showing content with the highest reputation on 27/01/24 in Posts
-
The TPMS system doesn't measure direct pressures, only the difference in pressures between tyres via the ABS sensors, so if all tyres are down on pressure by a similar amount it won't register an issue. I can't comment re the rattle but it's likely just two dash parts knocking together so maybe just needs some packing between them.3 points
-
On two occasions I have done 100,000 miles on a set of pads and over 10 years motoring. I have never changed pads until they are worn down and have never experienced a pad or brake shoe failure.2 points
-
Nothing that huge can be called a mini!!!2 points
-
2 points
-
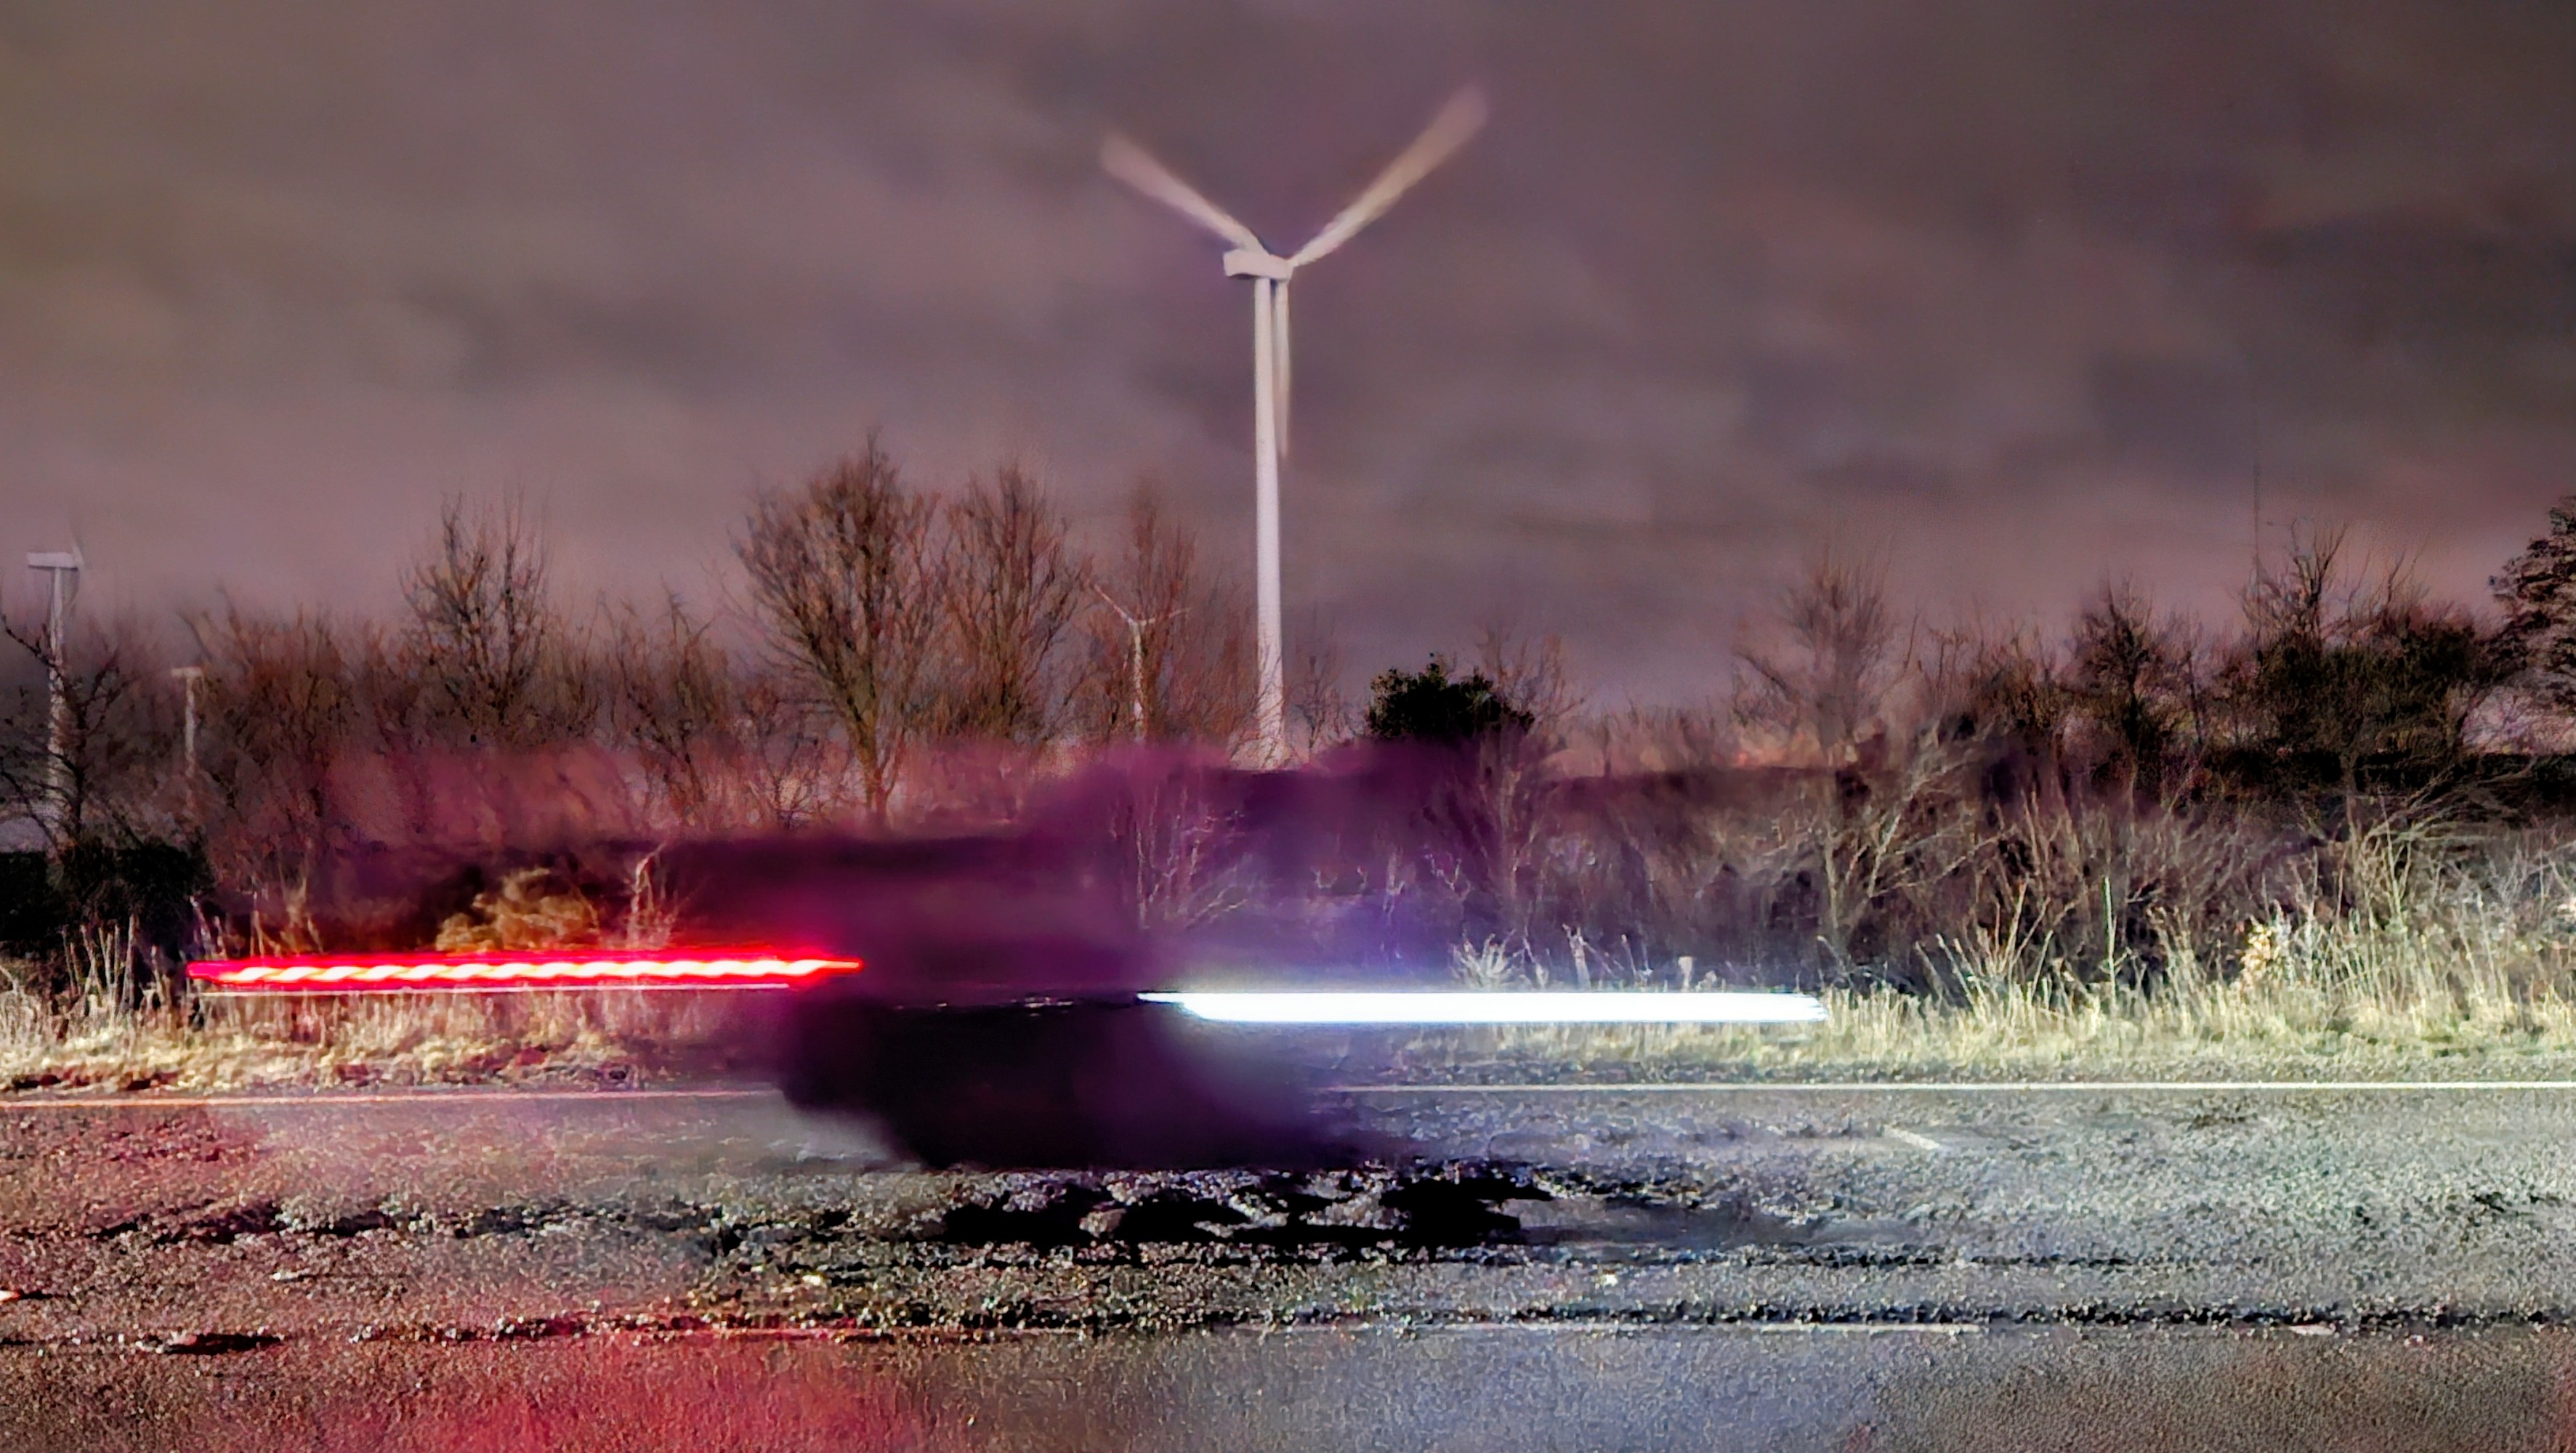
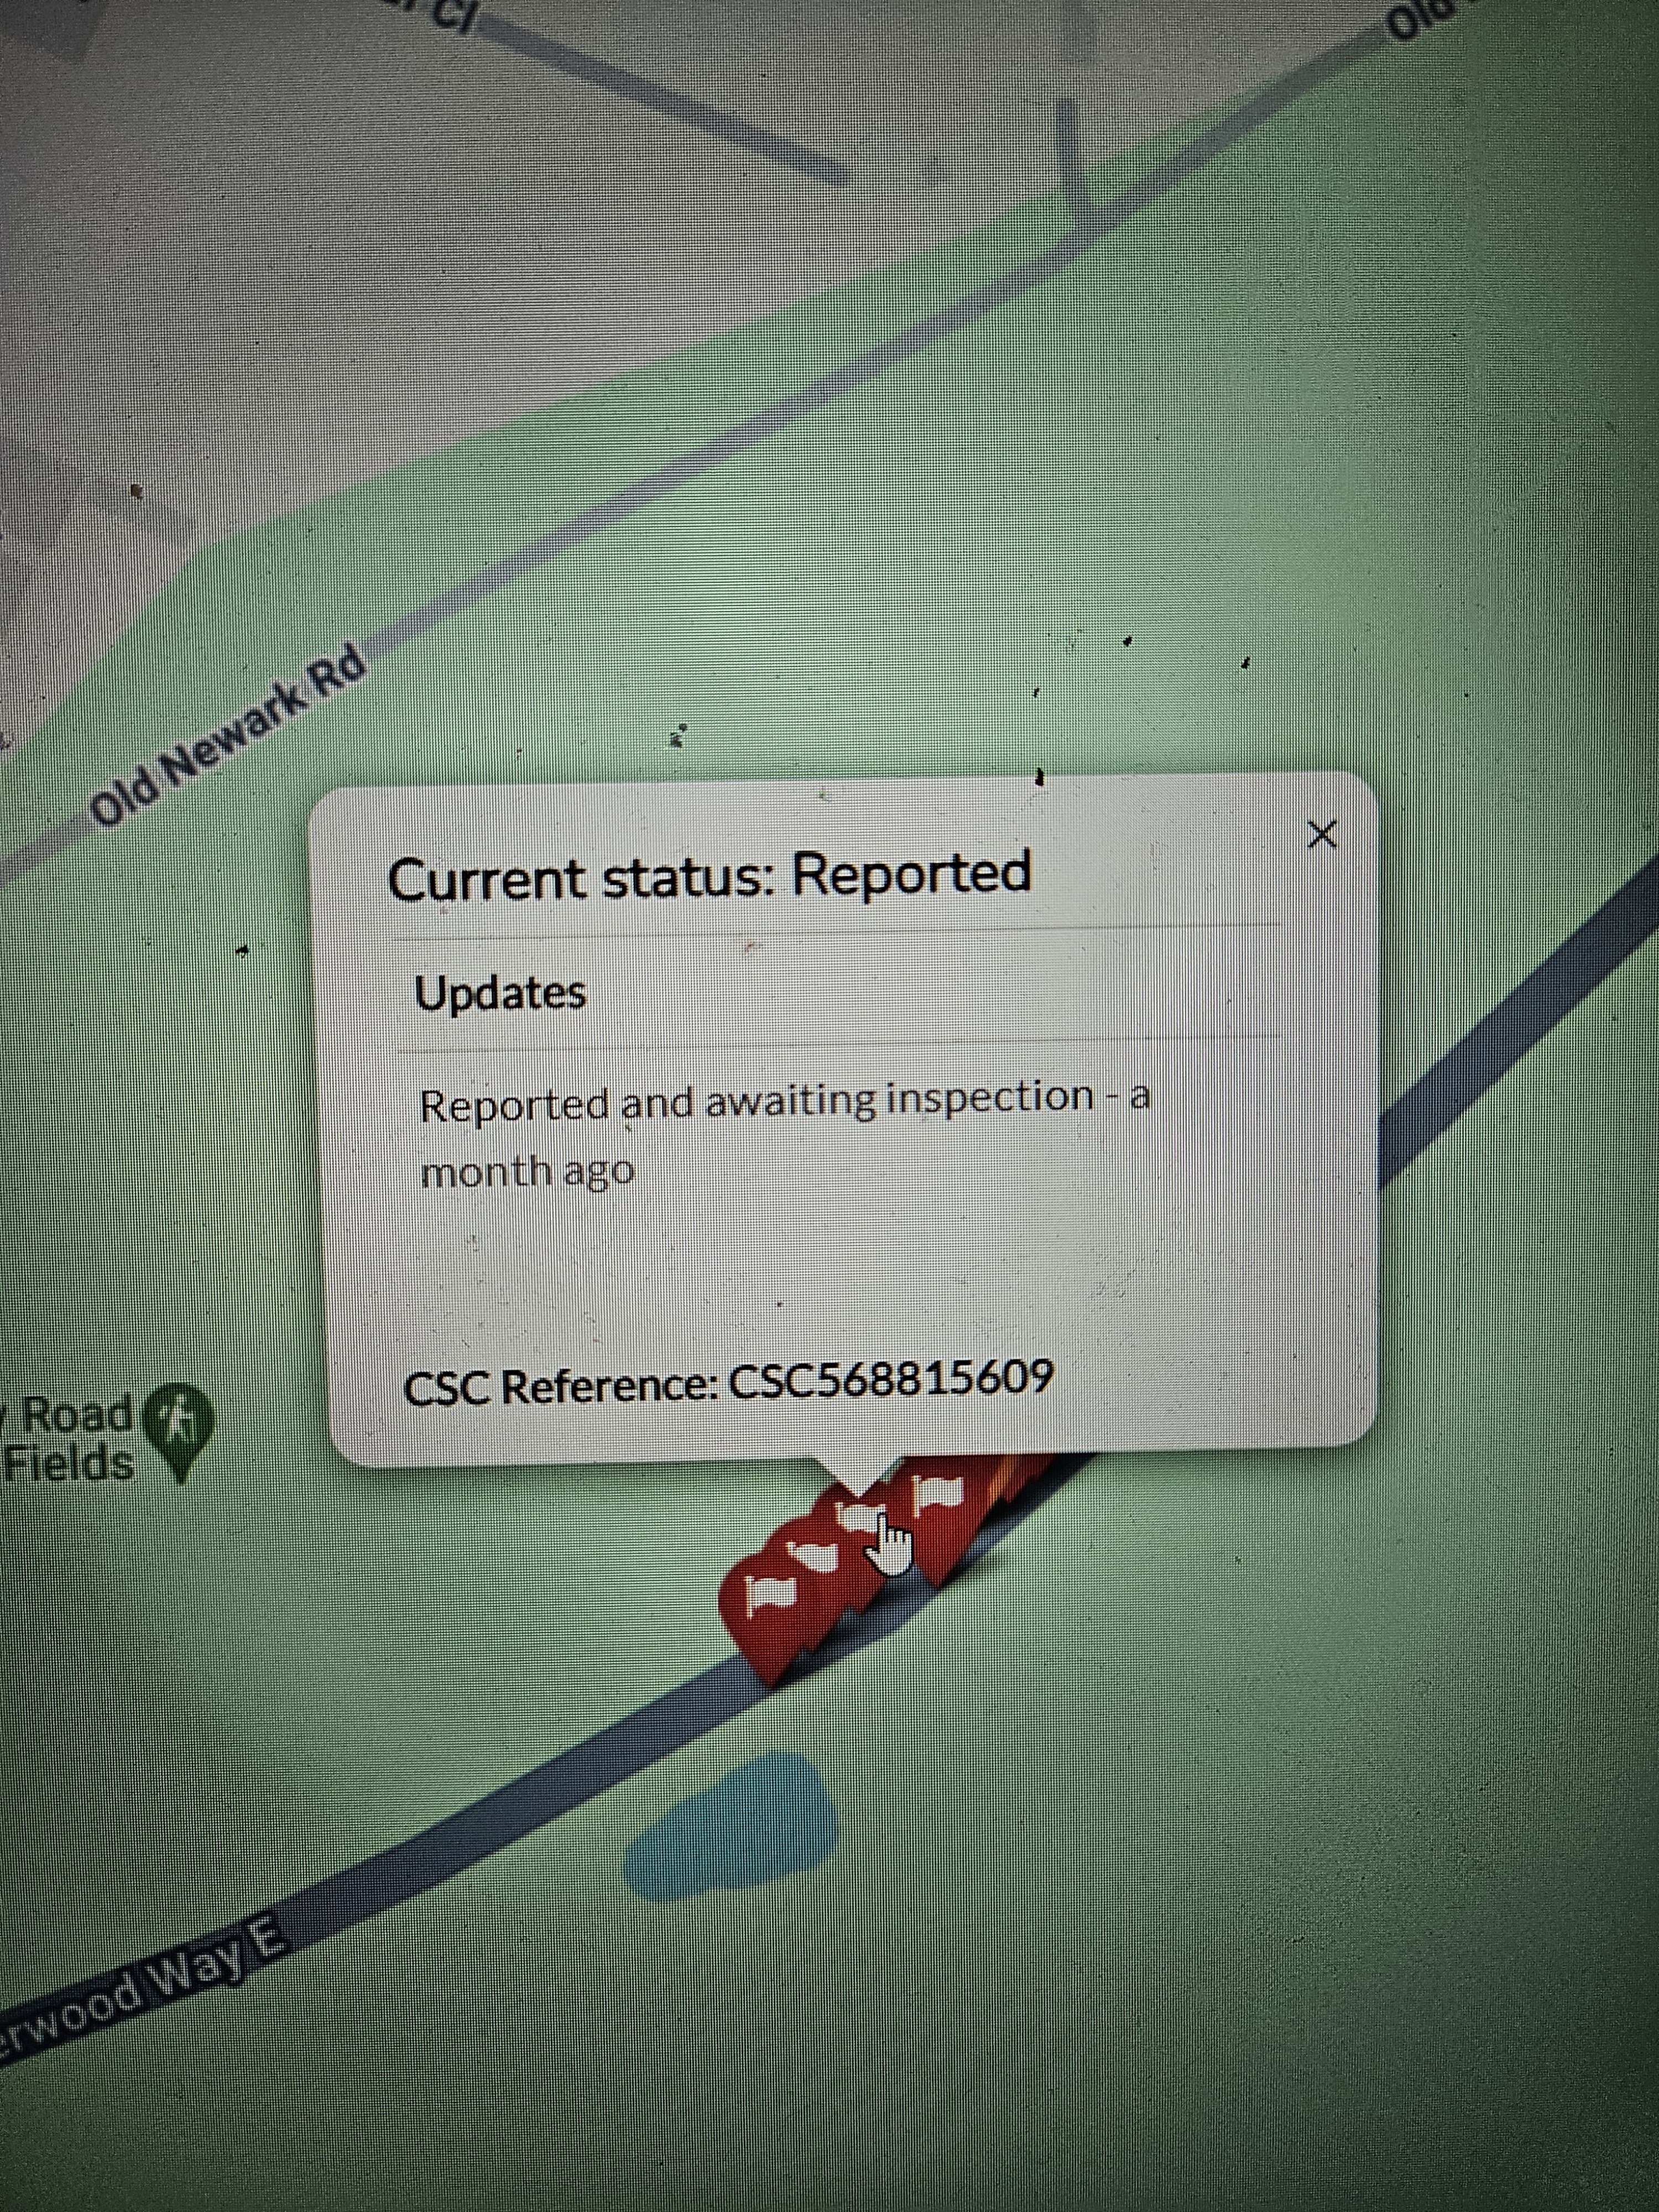
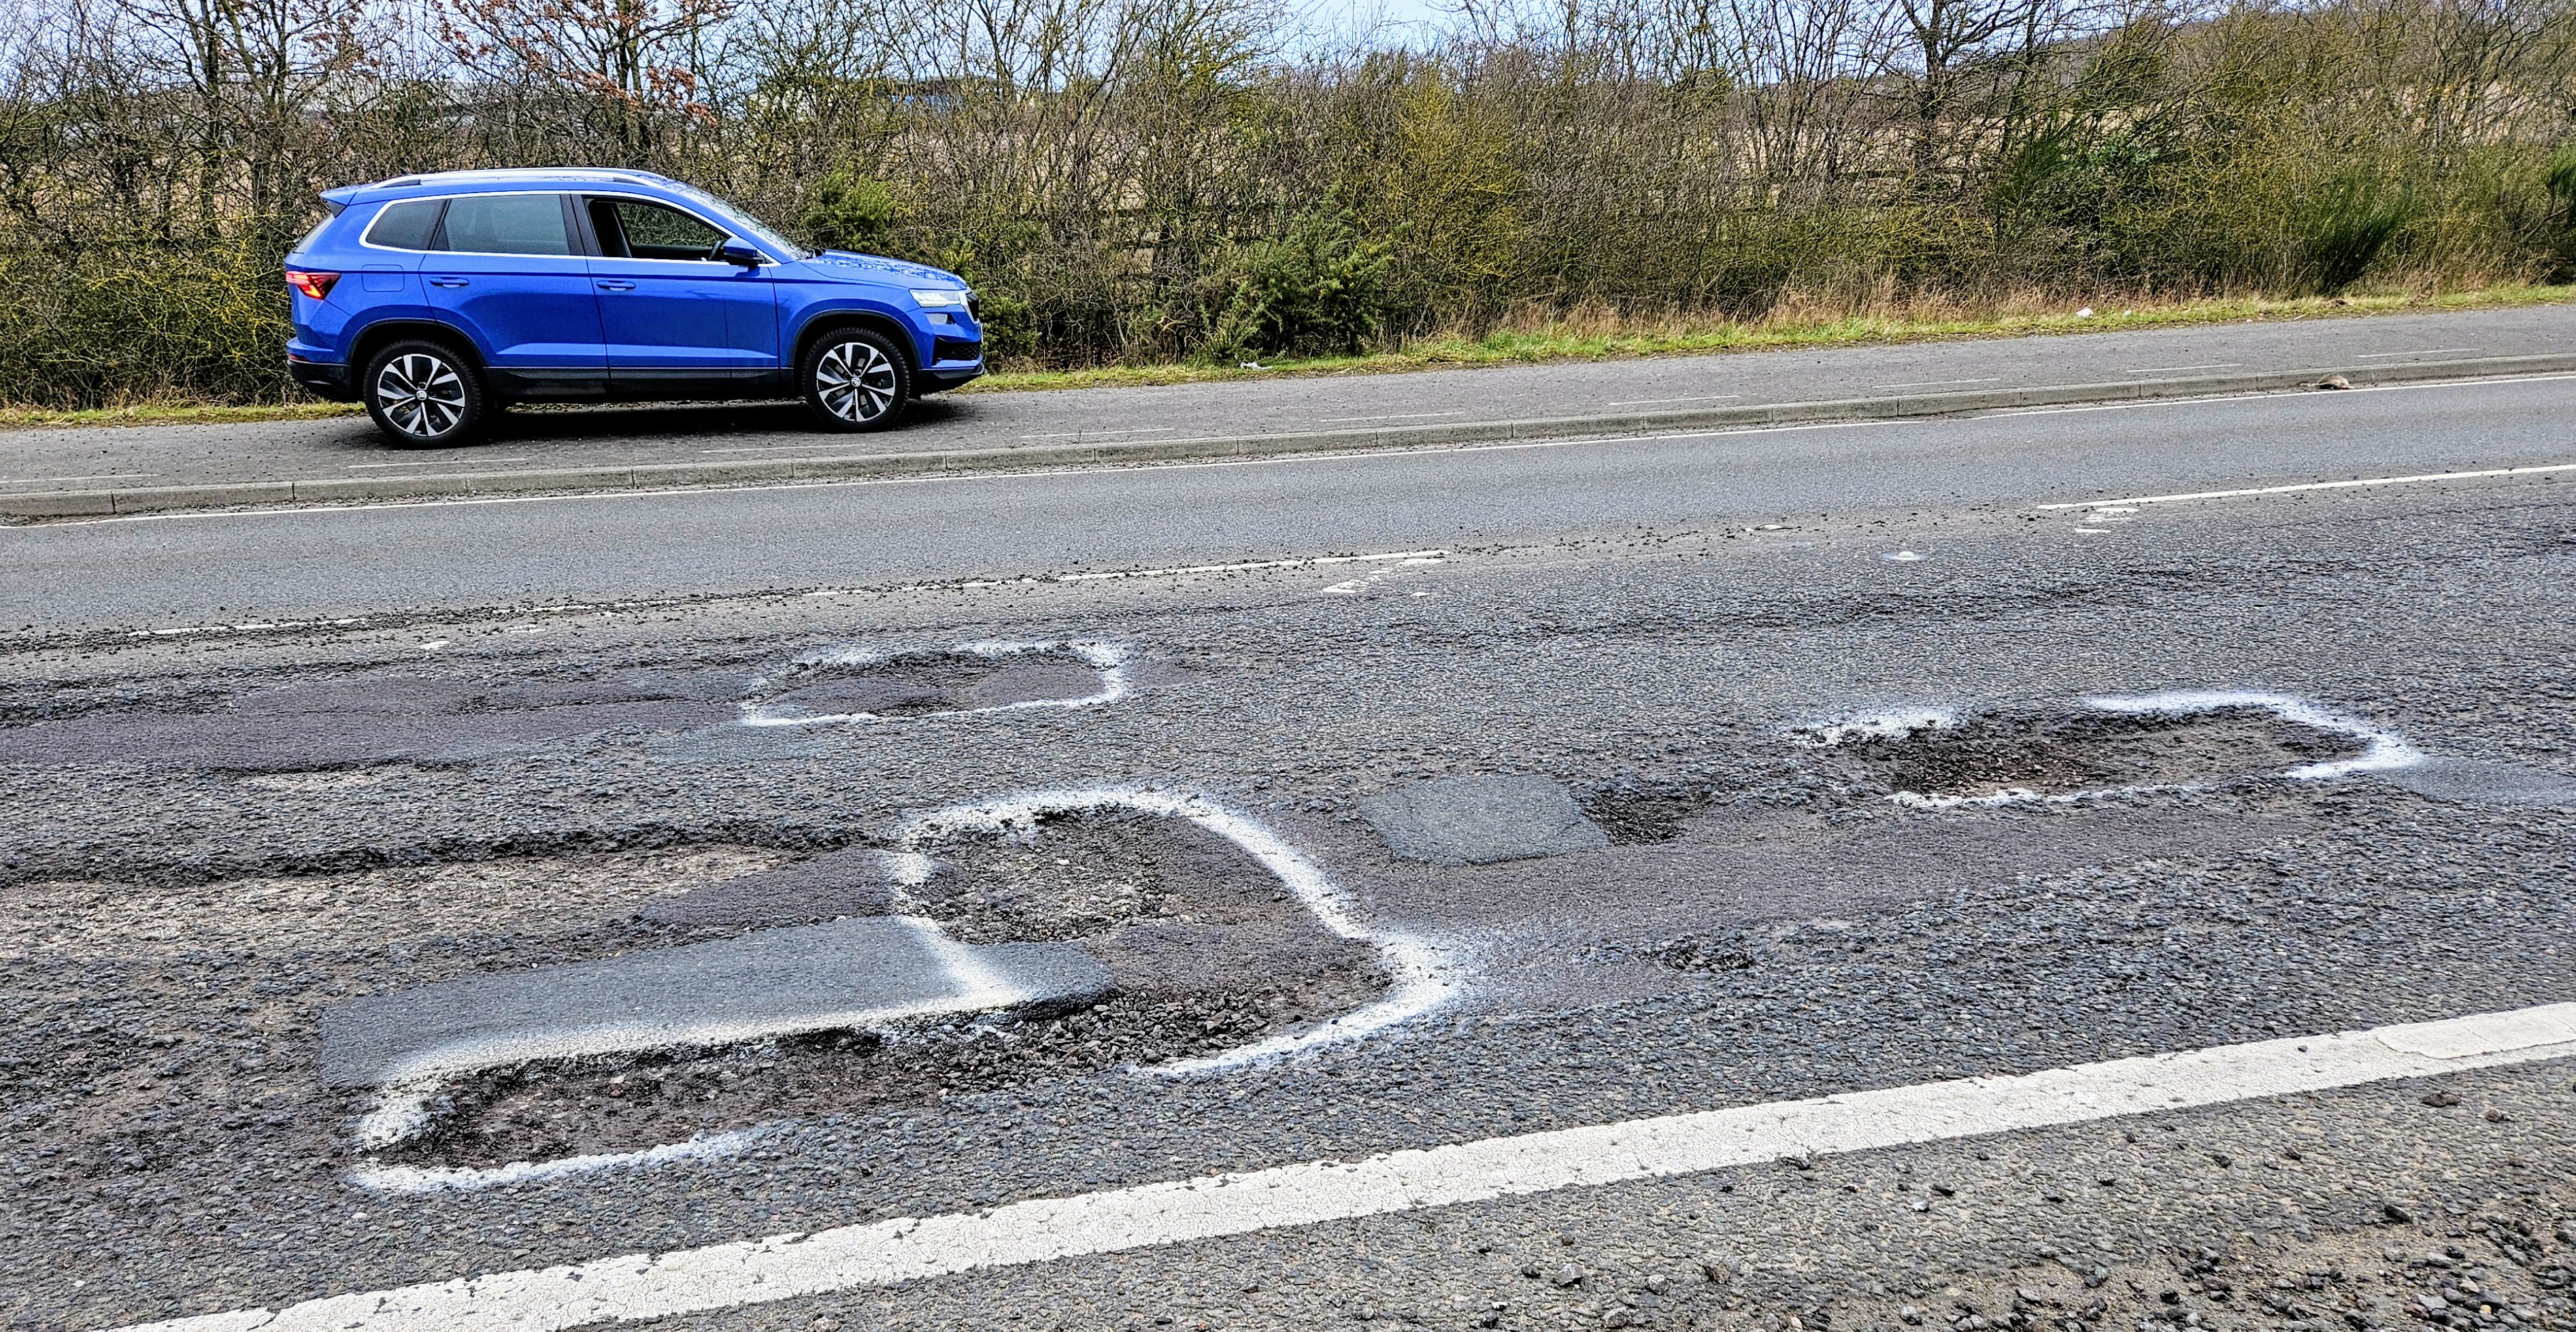
2 pointsSorry to perpetuate thread drift, but thought I'd mention my recent pot hole experience. I hit this whilst driving on Friday (in the dark) and cycled back to take a closer look. Given the implications of what might happen if you unsuspectingly came across in the dark (on motorbike/bicycle) I opted to report to the local council, only to find numerous previous numerous reports, the earliest of which dated back 1 month!! The website reported 'awaiting inspection'. Given this is a major/ high speed road I emailed the local councillor, but am yet to receive any response. In the meantime I headed back in daylight this morning and see it's now been outlined in paint, presumably as a precursor to an imminent (? temporary) repair?


 2 points
 -
2 points
-
2 points+1 to remove the A-pillar trim and run the dashcam wiring along the existing wiring loom. It is easy to tuck it under the A-pillar trim and just run it down to the side of the glovebox fuse panel, but that will likely fowl the curtain airbags from deploying properly. The A-pillar trim is a pain in the behind to get back in but it's the proper method. This is mine, in the process of cable tieing the dashcam wiring to the existing wiring loom next to the windscreen, away from the airbag (white).
 2 points
 -
2 points
-
2 pointsTo me, a safe way to route the wire (or video cable if a dual dashcam) along A-pillar is to remove the trim and then to fix the wire/cable to existing harnesses with tie wraps. This way it can't cause an issue if airbag needs to deploy.2 points
-
Hi all The Superb Mk3 AWD is fitted with a 5th generation Haldex. Regarding VAG Group, and Skoda in particular, it also equips: Octavia 3, Superb 2, Karoq, Kodiaq. It may also apply to Scala and Kamiq, unless they're equipped with 6th generation. I actually don't know for these latter. Since I have limited trust in garages in my neighborhood and because I like 'DIYing' on my car, I've decided to change the oil of my Haldex system on my own. If one follows Skoda recommendations, workshop manuals (see cardiagn.com) only mention a simple oil replacement every 3 years and that's it! But when you start diving into documentations or in youtube videos about 5th gen Haldex, you can notice that the oil pump has an intern strainer, which trends to get really dirty, whereas it's never cleaned ! Hence, here is this humble tutorial ! I apologize, if there are any vocabulary issues... I'm French. Firstly, here are all elements, that we're going to look at: #13 : Bleeder screw (M10x30) - P/N N 910 827 01 (tightening torque 38 Nm for Superb Mk3, but on other VAG model it may be 32Nm - Have a look to the workshop manual corresponding to your car. See cardiagn.com) #14 : Filler screw (M10x1x10) - P/N N 902 818 02 (tightening torque 15 Nm) #3 : Retaining screw (M6X35) for the Haldex Control Unit - P/N N 105 540 05 (tightening torque 9,5 Nm) #11 : Retaining screw (M6X35) for the Haldex hydraulic pump - P/N N 105 540 05 (tightening torque 9,5 Nm) #9 : O-rings for the pump - P/N 0CQ 598 305 (⚠️Note : This P/N is a kit, which includes both O-rings, but also both retaining screw #11! Don't by these screws twice!) Gear Oil : According to ifinterface.com: P/N G 065 175 A2 or According to what dealer sold me: P/N G 60 175 A2 - 850 ml (~29.9 fl oz) By the way, don't forget to check that the oil can actually contains 850ml through the gauge on the side of the can. Indeed, just for the short story, the oil can I had bought only contained 750ml, though brand new and still crimped . I had to go back to the dealer to exchange the oil can. The requested volume for the maintenance operation is usually around 700-720 ml (24.6-25.3 fl oz), thus it leaves little room for error (and even less if the can is not filled correctly). The total bill was ~75 € for all parts (without screws #3, which you don't need to change). - Difficulty : 2 - Time needed : 1h30 approx. - Number of person needed : 1 - Necessary tools : ¤ Screws #3 and #11 : Torx T30 or 10mm Hex socket, if you don't have Torx ¤ Screw #13 : 8mm Hex ¤ Screw #14 : 5 mm Hex ¤ For Hydraulic pump strainer screws : Torx T10 ¤ Ratchet or classic wrenches for disassembly ¤ Torque wrench(es) to apply specified torques: (9,5 / 15 / 38 Nm) ¤ Short and intermediate extensions for ratchet or torque wrenches to enable easier access to screws ¤ A small flat screwdriver ¤ Oil drip tray ¤ Rags ¤ 1 wooden toothpick ¤ Lifting means ¤ Syringe for oil filling Dealing with the syringe, I've bought this one for 20-25€ on Amazon. It makes the job perfectly! Step #0 : Preparation You need to lift the car high enough to get under the car and to get enough space to move your arms comfortably. In my case, 370mm (~14.5") of ground clearance were enough. Note: Though you've lifted the car, it needs to remain horizontal to make a proper filling with right oil level (see step 5). If this case, I had to compensate the natural slope of the ground. Step #1 : Oil draining Start with the filler screw (#14 / blue square) removal for more safety. Indeed, if it's stuck, you won't be "snooked", with a completely empty Haldex oil tank and no way to refill it. Once you've removed the filler screw. Don't get rid of it immediately. You'll need it again temporarily for Step #4! Now, you can remove the bleeder screw (#13 / red circle). There's no difficulty to remove these 2 screws. There are 2 good news for this step: - The drain screw is long enough, so that you won't get surprised, when the thread gets totally disengaged from the housing. - Even if the drain screw has an horizontal axis, there's only a small quantity of oil, and since it is very fluid, it flows well vertically from the edge of the hole. Little chance of getting trapped with the oil, which flows suddenly and farther than the drip tray. Phew! However, it takes several minutes to really let all the oil drain: Step #2 : Hydraulic pump removal Whereas oil is still dripping, start removing 2 retaining screws (#3) for the Haldex Control Unit. They are quite easy to access with a small 1/4'" ratchet. After that, you can rotate the Haldex Control Unit, to bring the connectors on the top upside down. This simple operation will help you saving a huuuuuuge amount of time ! But this tip is explained / told nowhere!!! Otherwise, you will have to disconnect the pump connector 'blind'... And if you do this operation for the first time, You hardly understand how to proceed. Decency leads me to shut up the time that I spent trying to remove this µ%£$@&# connector before I changed my mind on the operating process. Pump connector before Control Unit removal : Once the 2 retaining screws of the Control Unit have been removed, you can easily access to the connector: Now simply insert a small screwdriver in the notch (red circle) and push in the arrow direction. Very simple... Then, you need to unclip the black plastic wire protection, which keeps the pump wiring away from the propeller shaft. It's clipped in 2 locations on each side of the shaft, You just need to pinch the 2 lugs at their end to make them go back through the hole in the housing. Left side (Control Unit side) : The upper red circle in the mirror shows what you hardly see in the lower dotted circle... It's clearly the circled part, that has to be pinched and then pushed/pulled in the arrow direction. Right side (pump side), just proceed the same way : The pump wire is now fully free. You can now remove the 2 retaining screws (#11) of the hydraulic pump (#10). Very easy too. Warning from this point, it will be 'Apocalypse pump' ! Please keep children and sensitive souls away from following pictures! Pull in the pump axis direction, while rotating it around its axis in one direction and then the other to ease the removal. Be very careful, when the pump is about to get out completely, not to strike the contact surface of the housing, nor to strike the pump strainer. FYI, the strainer is not sold alone. It's sold with the pump, which approximately costs 180-200 € (w/o VAT) ! And there, under your dumbfounded eyes , here is the sinister spectacle that awaits you: A strainer almost entirely clogged with sh**t! And the pump housing is not even better... FYI, this Haldex is only 2.5 years old and has only 45000 km (~28000 mi) on the clock. And considering the way I use my car, I don't think the Haldex faces a heavy duty use. Therefore, as I already mentioned somewhere on this forum, one can only notice that the oil replacement process in the maintenance manual for the Haldex 5th generation is clearly incomplete ! By the way, look at this video below from ~28 mn, you'll see the impact of the strainer cleaning on the pump demand signal ... It's clearly a proof that w/o a strainer cleaning, the pump unnecessarily faces severe conditions and that sooner or latter there's a risk of pump failure... Step #3 : Pump cleaning and reassembly Since the pump is now removed, you need to remove the strainer. Use a Torx T10 for both screws: Then wipe the pump dry with a rag, being careful not to get the dirt into the ports. Fort the strainer, a cleaning with some white spirit and a soft paintbrush. But be careful, not to brush to hard to avoid tearing the strainer mesh, which is very thin!!! Eventually, a simple soaking in a small glass of white wine ... sorry , I mean... White Spirit should help removing most of the dirt and finishing finely with the paintbrush. Let the strainer dry, while you remove both O-rings around the pump, using a wooden toothpick as a lever. It will avoid hurting the grooves. You can now, clean the area between both grooves with white spirit. Once everything is clean, you can mount the strainer back onto the pump. Be careful ⚠️ ! I didn't find any information about their tightening torque. Thus be sure to tighten enough to firmly place the strainer on the pump body (to make a good seal against dirt), but not too hard to avoid risks of cracking the plastic. Shall I remind you the price of the pump, just in case ?!? Now, pour some drops of fresh oil in a small container. By the way, FYI : Haldex used Oil 2.5 years old & 28000 mi on the clock / Haldex fresh oil Put few oil drops on both O-rings to lubricate them and install them onto the pump. Keep using the wooden toothpick if needed. The pump is now ready to be mounted back onto the car : Now, you can clean the housing with rags before putting the pump back in place: Don't forget the bearing surface, where the threads of the retaining screws are located. Here you can see some dirt left, that I removed right after taking the picture... You can now put the pump back into the housing. Be careful, not to pinch both O-rings . Once there's only 5-6mm (1/5 -1/4") between bearing surfaces of the pump and the housing, it gets a bit harder to push in by hand. This is probably caused by O-rings, which may act as a slight "bead" to efficiently seal. You now realize how clever it is, to lubricate both O-rings to prevent them from rolling inside out and to make this operation even more difficult. When the pump stops into the housing, you can put 2 retaining screws back in place (#3 - tightening torque = 9,5 mm) Put the black palstic pump wire protection in the correction position and clip it into both holes. Be careful, you still work 'blind' (unless you have a small mirror) . Reconnect the pump connector on the Haldex Control Unit and rotate the Haldex in its normal position. Watch out to rotate the Control Unit in the correct direction not to twist unnecessarily the pump wire. Put both retaining screws to fix the control unit (#3 - tightening torque = 9,5 Nm). For the lower screw, the propeller shaft flector is slightly in the way and leads you to put the bit with a small angle. But you can still manage to have enough grip with the bit to tighten. You can now install the new bleeder screw (#13 - tightening torque = 38 Nm). Step #4 : Oil filling According to the workshop manual, the filling shall be performed with an oil temperature between 20°C and 40°C (68°F / 104°F). If the ambient temperature is to low, put the oil can in a bucket filled with hot water for a while to bring the oil at the right temperature. You can now inject fresh oil in the filling hole (see blue square, on the 5th picture) with the syringe. You have to fill with oil, until it overflows. This should be approximately 650ml (~22 fl oz). Put the OLD filler screw back in place temporarily and tight it slightly. Yes, you've been told to keep it upon removal at step #1! Do you remember? ! Etape 5 : Oil level adjustment and ending Start the engine and let it run for ~1mn, to let the hydraulic pump fill with oil correctly. Shut the engine down, then remove the old filler screw again (#14 / still the blue square on the 5th picture ). Top up with oil until it overflows again, and you can put the new filler screw to finalize the operation (#14 - tightening torque 15 Nm). That's it! Fresh oil! Clean pump strainer! Happy Skoda owner! ... You can put the car back onto the floor now ! Now it's up to you!1 point
-
No it could be me getting it wrong. I think I was thinking of a mk2 estate... But I guess it could still be the case for a mk 3 estate. Best bet is to find the workshop manuals which should be a sticky post somewhere in the Fabia mk 3 section.1 point
-
1 pointHello everyone, just saying hello! Cast your minds back to roughly 1973 or 4 when I encountered Skoda for the first time at a garage where I pumped petrol to support me in college ( remember when garages actually served fuel?!) anyway this particular garage was the first in the area and must have been one of the first in the uk to sell Skodas but they also sold Moskvitchs alongside the Skoda (was it a Skoda 110?) anyway, these cars seemed remarkable to the public, notjust because theywere cheap, but because they came with a very full toolkit, which was amazing in those days. Anyway, fast forward 50 or so years and I'm about to take delivery of a 2023 Superb estate so hello to everyone and thanks for having me.. now off to post my first question elsewhere.........1 point
-
1 point@Gizmo Stars - how useful for me ??? - i can't notice improvement or changes NOK - doesn't work or adds err1 point
-
I'm pretty certain the third rear brake light can't just be popped out. If you do a search on here there are instructions somewhere and I believe it involves taking a cover off on the inside skin of the rear hatch and then sliding a retaining plate across and only then can the light be removed from the outside.1 point
-
1 point
-
It's also rather miserable that the following day they didn't swap the courtesy car to one that was clean from temporary dirty one. The rather casual approach to finding time with a trained tech is rather insulting too1 point
-
thanks silver1011. I'll get one and have it sprayed.1 point
-
Coolant & Oil. & electricity.1 point
-
Thank you for the message. Do you have to open a bolt somewhere or would it be enough to stick in a thin plastic stick to pull the third brake light out?1 point
-
Over winter I've been getting about 750(ish) miles to a tank before topping up. That said, that's local running around and a bit of motorway. Worst tank I had was about 650 miles just after I installed a tuning & pedal boxes and was just having fun Honestly no clue what my tank capacity is, I just fill it up when required. I do tend to brim it too. Ideally, I'd like to warm up the car, fill up and hit the motorway on my next long trip to see if 1000 is possible.1 point
-
Hi colleagues Thanks for this thread. I was having the same issue - coolant warning messages coming on from cold when outside temperature low but then not coming on when engine warmed up or when milder outside. I have added a small (tiny) amount of water and have had no recurrence of messages. Thanks again - much appreciated1 point
-
In 'Huge numbers'. So it must be so!1 point
-
1 point
-
So you are saying that catastrophic brake failure is relatively common and to be expected after 3 years? I think not. Virtually no one changes their pads until they are 80-90% worn or fails an MOT. I have never seen this before, I am surprised the pad even managed to leave the caliper area. The consequences were alarming. I don't want replacement pads, I would like Bosch to investigate the failure in their Quality control. And not close their eyes to this problem like Boeing did. Before someone gets seriously injured or even dies.1 point
-
In theory you should always go thru your insurance where you pay the excess for the claim to proceed. If the claim turns out to be non-fault then your insurance should refund that money. ( they then claim it off the 3rd party blah, blah blah - but that's not your concern ). I've been in a few situations where the 3rd party have offered to repair the damage without involving the insurance. That of course could void your insurance and in theory, it's illegal, but the reality is it's sometimesit's the best solution for everyone. It only applies to very minor damage tho ( you forfeit any guarantee ). In my experience, if the repair is below the excess then it's benefitial not to go thru insurance because even if it's a non-fault claim, there are pitfalls. When searching for insurance, you normally have to disclose any claim, fault or not, up to 5yr after the accident. I've played around with the systems over the years and obtained two quotes - one declaring the non-fault claim, and one ignoring it. ( obviously always declared it when acually taking out insurance ). I have never seen a rise in the policy cost because of a non-fault claim, but what I have seen is some insurers excluding you from obtaining a quote. Not sure if it's still the case, but Esure used to be one of those who'd say 'sorry, cannot obtain a quote' even if it was only a non-fault claim. So potantially you could be loosing out on a cheaper quote in the following 5 years from the date of the accident by declaring a non-fault accident. I agree, it's wrong, but there are so many other things wrong with insurance in general. Hope that helps.1 point
-
I had not appreciated you had written that proviso. That is not a sudden deflation, the system does detect slow punctures.1 point
-
Pads have never been rivetted nor even brake shoes for decades now. Age and corrosion are usually the enemy, I have had maybe 4 instances of it, two on brand new parts, the others through age and being worn right down to the last of the friction material. I have a scraping noise from a rear wheel at present which might be a pad on the limit. I will check it before next driving which could be a few days away.1 point
-
This is the issue with dealerships, if its not written on a bit of paper, they have no idea how to do it! A bit of common sense from a mechanic says to undo the 2 bolts and it just pops out, but like you said, not a standard procedure so they wont do it1 point
-
An electronic handbrake is still an emergency brake. when the car is moving and you hold the E-brake, it will lock the rear brakes on and release them the moment you let go of the button. Regarding the pads - Brembo are just as bad to be honest! Eurocarparts have a funny way of getting their parts and often sell the cheapest stuff in a rebranded bosch, although normally thats Luk and Brembo, never seen it with Bosch. I hope youve reported it to Bosch/ECP for them to investigate.1 point
-
Fortunate too that car has a conventional handbrake and not electric parking brakes as thats what I had to use to stop the car. As the car had no brakes, I couldnt drive it to a garage for repair, so was forced to change the pads myself at home. Not what I wanted to do at my age and this time of year. Fitted Brembo pads from GSF.1 point
-
Thanks Kenny. I've been all over google and ebay, but to no avail. Maybe I should upgrade to black caps on each side?!1 point
-
Door mirrors, apart from the upgrade to black sport mirrors , are usually supplied in primer. If you’re looking for a direct easy fix then looking on eBay or Google car breakers.1 point
-
It has been a while since I posted this topic. Updating: I booked time for replacement, quite costly for such a small problem (though important). While waiting I used a piece of plastic to push away the metal part so I could lock the seat belt. It got easier each day. After a few days it was enough to push the red button to get the part to lock down and after some more days I tried without pushing the release button - and it worked. Now the function is restored to normal, all by itself... I suspect, that the grey plastic part broke to pieces and fell down into the mechanism, blocking proper function. After a while it seemes to have been pulverized... Funny.1 point
-
@J.R. I seen to remember that the Higher rate DLA mobility component was £57.45 a week in 2016 (£2,987.40 a year) when I got the Alhambra and no Advance Payment and I paid £200 for the Sunset tint. (benefits go up in April.) I could have had the top of the range 184 ps with everything for £650 advance payment but I wanted 16" rims, no motors in back doors, no leather, no roof rails and no chrome. Near £10,000 for 3 years lease, includes insurance, servicing, including AdBlue, MOT and no VED to pay. Dealers and Mobility want you to take the Top of the Range. Better residuals likely. I wanted the basic because the cheaper and lighter model was actually more fuel efficient than the Official figures showed. I borrowed a 184 ps for a week. As with probably all manufacturers they do not announce the cheapest model being better in fuel. It actually came better specced than it showed in the brochures. There was the increase in 2017 and 2018 to the benefits which was paid to Motability.
 1 point
 -
1 pointIt's also potentially the cap to the header tank failing. Might be worth changing it out for a new cap to see if that stops it blowing coolant out of the overflow.1 point
-
1 pointCould be blown head gasket, leak in egr cooler as above or charge air cooler, or at worst a cracked cylinder head... If there's definitely no leaks visible on the outside of the engine, or no coolant/oil mixing then it's getting into the exhaust gas from one of the coolers, or a gasket fault from water jacket to exhaust, or a crack inside a cylinder to the exhaust manifold... Buy a sniff check kit from Amazon/eBay and let it run at temperature for a while, a small leak will show eventually if you have one! I had a hairline crack in number 2 cylinder on my VRS TDI and would need to refill the expansion tank every few hundred miles, it never overheated but would blow the exhaust gas temperature sensor in the manifold overy so often, I lived with it for almost a year!1 point
-
Last angle looks like that Smart #1 thing. No more round lights!? That's not a mini!1 point
-
It is worth noting that many VAG owners have reported that the: "One-Click Apps – pre-made car coding applications designed to simplify your customization journey" can and will also change totally unrelated and unnecessary coding on some controllers / cars, please bear this in mind and use at your own risk, personally I would ALWAYS recommend you do the physical coding manually yourself (after a little research in what to change). Myself and several other VCDS owners have had requests to try and revert coding done with these Apps.1 point
-
1 point
-
Yes, David - it's all working as it should. The initial weirdness where it wouldn't play my audiobook unless it was physically connected has vanished. It now boots up straight into CarPlay - exactly what I was hoping it would do 👍 I liked it so much, I've fitted one in my Audi 😆1 point
-
1 point
-
the B201A has no manifestation you are up to date with SW. The MIB is functioning correct. Do not try to do other updates!!!!1 point
-
1 pointI'm really confused. What does any of the above have to do with people joining or leaving the forum? Shouldn't this be in the the Karoq or tyres section?1 point
-
1 pointHi Rayjan. I have a superb so the size of my tyres are the factory recommended 235/40/r19 so relatively low profile. I used to suffer from road noise and any size pot hole or surface deviation caused a horrible loud crashing sound through the car ( when fitted with the original OEM Bridgestone ) Changed to 235/40/r19 XL Y CrossClimate 2 and the ride quality and stability is light years better . Its only on very poor surfaces that you are aware of any road noise. I my opinion these tyres are far more sturdy than the Bridgestone and protect the rims better. I know Michelin have now bought out a SUV option but if I was you I would also compare them to the original XL ones to see what is different. Good luck with your decision I hope it works out as well for you as it has for me1 point
-
1 pointMichelin don't make any such claims about XL being better at protecting your rims than SL.1 point
-
1 pointIf you go to Crossclimate 2 consider the higher speed rating ( Y IIRC ) as they are rated XL load also so should help with protecting your rims.1 point
-
900 miles to the last tank, mostly motorway. I'm now determined to do a trip and attempt to get 1000 miles1 point
-
Remember the mk3 Superb weighs less than the mk2 and as a result the 150 is pretty much the equivalent of the older 170, and if the mpg is a concern (hence the reason for your post?) then the 150 is definitely the one to go for. I certainly wouldn't discount it until you've tried it, technology has moved on since your mk2 was produced.1 point
-
1 point
-
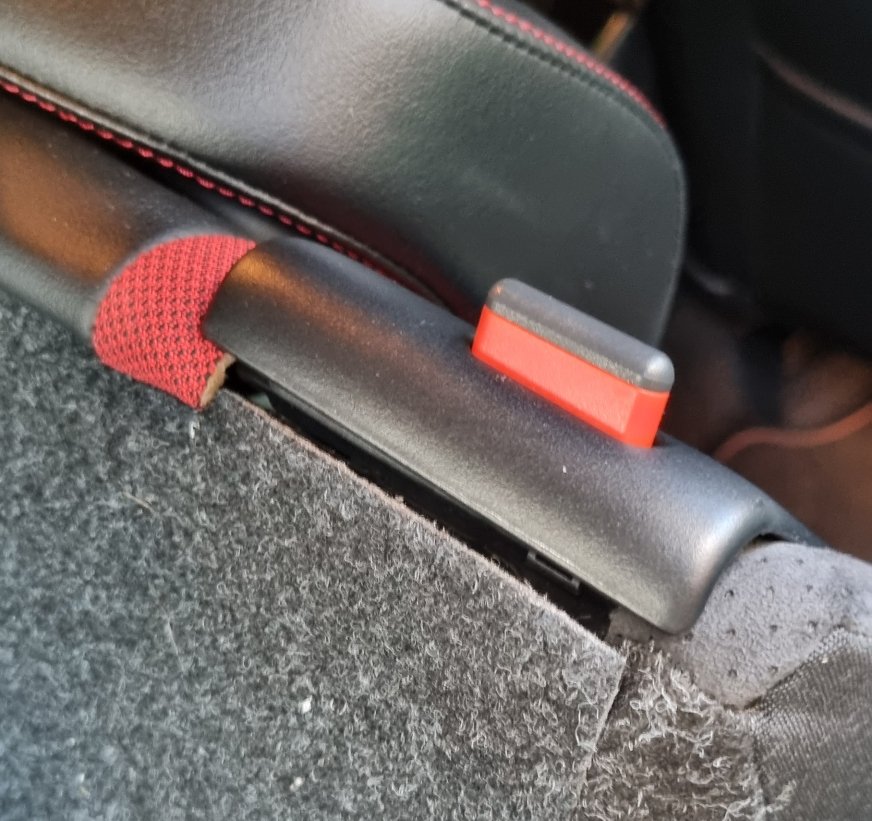
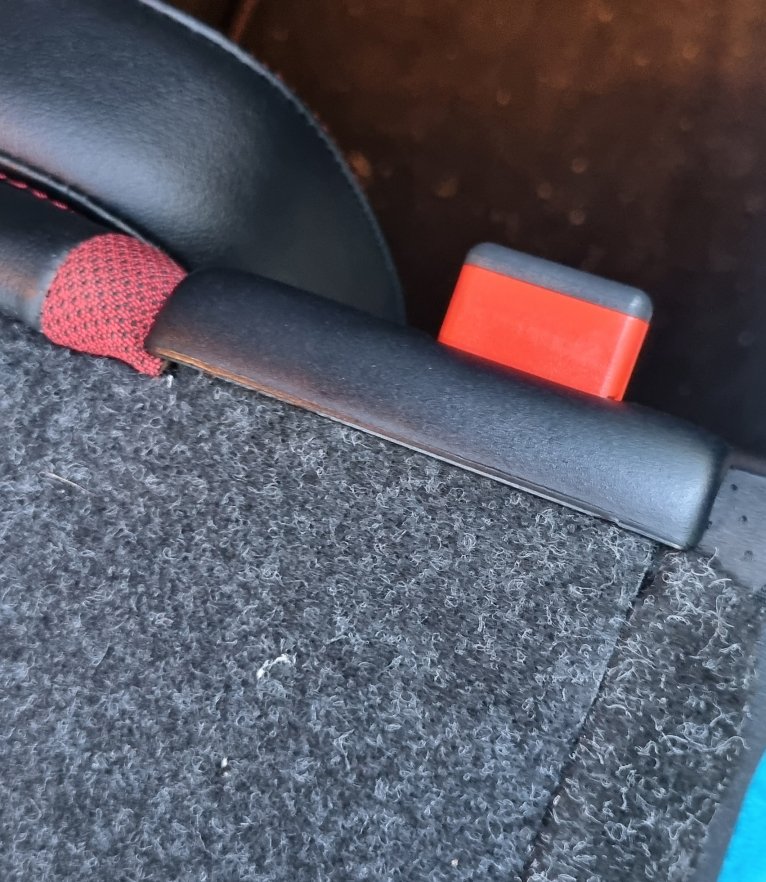
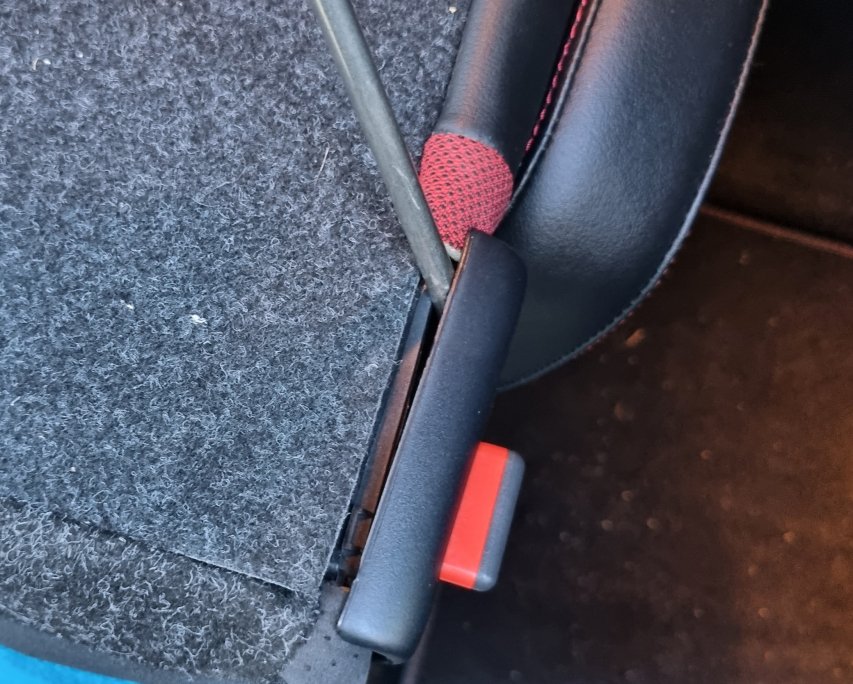
sorry for bumping this old thread but its what brought me here and the info was a bit sparse so i thought i'd add a little detail for prosperity 🙂 so i noticed this same problem when i had the seats down, the little red tab for the seat release was stuck up and the cover partially popped off, neither could be pressed back down. seat could still lock into place and unlock without any looseness. i read the posts here that recommended some grease but if felt more like it was locked out of place/caught on something than sliding poorly. i tried to pry the cover off by hand but it wasnt going anywhere, couldnt see any tabs so i took a screwdriver, stuck it as far down as it would go, hoping it would cross paths with as many tabs as possible (if there were more than one), pried upwards, heard a loud crack went to do the other side but as i pulled the seat up, the tab dropped back into place. wasnt sure if it worked but tried the cover anyway and what do you know, it slotted back in place with no effort at all and the front bit that i pried up clicked back into place. i was going to take it all apart just to see what was getting stuck but it was over and done so quickly (literally 2min with half that trying to use my fingers) i figured id just take the win 😃 from the way the cover was up and couldnt be pushed down, it seems if the seat is down and the cover is knocked off (wouldnt be uncommon if youre sliding in something with a flat bottom and decent weight), part of the mech for the tab gets dislodged and it stays up. so the key is to lift the cover while the seat is upright and let whatever its stuck on to be freed up. hope that helps someone 🙂


 1 point
.thumb.jpg.f83a46b9b3c0d976b9dbffbb523c9874.jpg)