


aubrey
Members
-
Joined
-
Last visited
Everything posted by aubrey
-
In fact thinking back now I had to do two programming actions. One was to pair up the lock/unlock for the doors, the other was the immobiliser pairing to allow the key to start the car.
-
I did this on my Roomster but Skoda gave you the immobiliser module logon key codes back in 2007. You program the car to the key, not the other way round. Now the security key codes to log onto the immobiliser module in your vehicle are only known on VWs system and must be done using the dealer tool. The dealer OBD tool can network link and request the logon key codes from the VW Database. Even the dealer themselves do not know those keys, it is all hidden and controlled within the dealers OBD systems. Programming the key itself I believe you can only do once. The little immobiliser bean in the key is a one time programmable item, but you can buy new ones, search for ID48 Transponder Chip and you'll see the item I mean. They are blank and ready for that once allowed programming. Systems may of moved on from those days.
-
My Yeti was 11mm. But am I missing something here, what size spanner ? Whatever size fits, I often make a look at guess, often close but I just grap the next size up or down as necessary. Do that with spanners and sockets to use the one that fits. I must be misunderstanding the question.
-
In that photo it does appear to have a similar sealing loop to an electric meter. That red sealing tab on the wire loop.
-
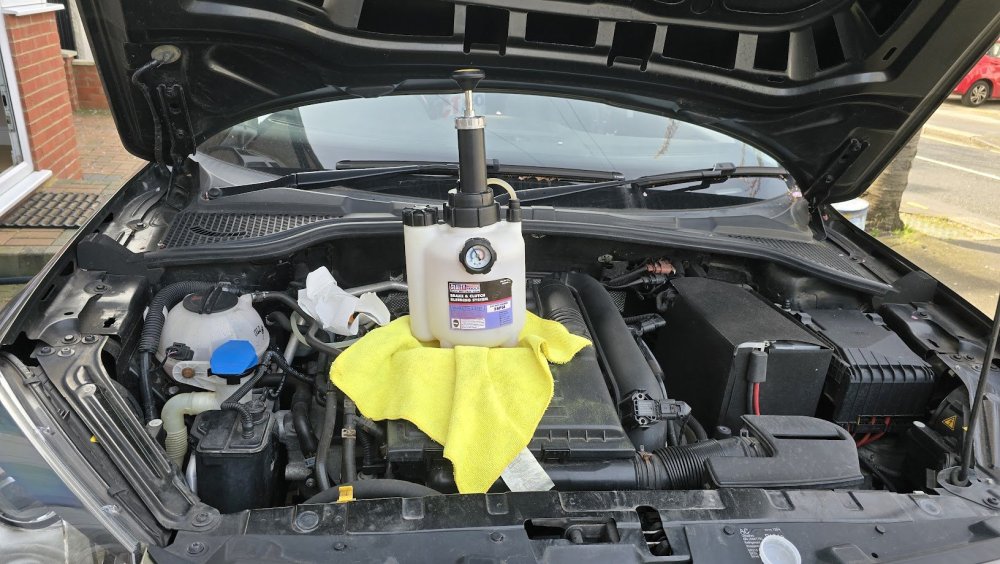
Yeah, I just looked up this photo https://cdn.skoda-storyboard.com/2019/09/superb-iv-engine-2560x1707.jpg So there are 2 coolent reservoirs
-
I had similar on my old Roomster after I swapped the coolent. A big air bubble came out and made the reservoir drop. So in my case it was just a top up. So what did your temp gauge show ? Does the heater run hot and is the coolent reservoir still above Min ? They are all the obvious things to comment on. Is it an EV from reading the comments ?
-
Can't see you really bleeding it wrong then. Sure you'd of blead at least 100mm through. Bet it came through clear and bubble free too Found this on the forum if of any relevance ? https://www.briskoda.net/forums/topic/506462-problems-bleeding-clutch/?do=findComment&comment=5687192
-
Are you using a pressure bleeder ?
-
Where is it exactly ? I may change it on mine sometime. I'm imagining just under a rear seal having done it on a Fabia2, but could you confirm location ?
-
DSG clutches work in reverse to manual clutches. They get pushed by the mechatronics to engage as opposed to disengage. That's done so they fail safe. Far better to have no drive on hydraulic failure than both shafts and hence 2 gears both engaged together. Therefore with your foot on the brake the clutch packs are as disengaged as they are in neutral and the gearbox side won't be turning either as the vehicle wouldn't be moving Add stop start to that and the engine flywheel side wouldn't be turning either.
-
Understand what your saying and I think I do similar sometimes. I was told once having the vehicle in P is a great way to damage the gearbox if someone bumps into you, no idea how true that is but if it broke the pawl in the DSG box I can get the thinking.
-
The only time I change to P is when the car is fully stopped, handbrake on and then I move to P as I switch off the engine. P (Park) engages a lock on the gearbox, you never want to do that with any momentum of the vehicle as you could damage the gearbox. The keys won't remove if not in P. So vehicle stopped, handbrake on and a direct single move from D to P. I don't pause at N, just move direct. I have never noticed any clonk.
-
-
@tetley Why not just whip the wheel off and measure the discs and confirm the pad shape too ? I've never got the wrong bits doing that and comparing against specs & photos on ECP.
-
The car itself does not take anywhere near 4L, it just gets wasted and pumped though as part the procedure. The procedure is you hook up a pressure bleeder with a good amount of fluid, mines a 2.5L one but I often have to add a little more at the end. You have both front wheels off and at least 1L bottle on each tubed to the bleed nipple with an 11mm Spanner Ready. Start with both bleed nipples shut. You simply follow what VCDS Says. Mines the ESP MK60EC1 H46 0175 ECU btw, it could be different on others. My old Roomster for example had the ABS 8.0 front H05 0002 and that needed access to all 4 bleed nipples. On VCDS go into Module ABS, Basic Settings and on the drop down list it has Brake Bleeding This will Repeat 10 Times, it tells you what to do on the screen. I may have the sequence muddled a bit but something like : Press and hold brake pedal, you hear the ABS motor kick in and the brake pedal try to push back on you, hold it in place with a firm foot hold (it's a fairly strong push back) Open both front bleed nipples Pump brake pedal 10 times Close both front bleed nipples When you've done that 10 times it say pre-bleed complete. I also recall half way though another message appears but is basically the above repeated 10 times. I then bleed 300ml out of each rear wheel nipple to complete the overall brake bleed task. I did a search on good old YouTube and there are quite a few examples i.e.
-
If I can add a few more points 1) Take a wheel off, measure the disc diameter and look at the pad shape. Often there are a few variants of brakes for a vehicle. Looking at the ped specs you can confirm diameter match and recognise the pad shape and any side ears flanges on the pads. 2) Front Pads you just need to push the piston back, but the rears you need to wind clockwise as they get pushed back. You need a tool for this. I have a cheap set that I've used on many vehicles e.g. https://amzn.eu/d/b0HdhL8 3) Push the caliper piston back and fluid will rise and probably Overflow from the master cylinder reservoir. So you take off the reservoir lid, watch the level and suck out with a syringe some to stop overflow. 4) Buy a little tube of brake grease. Then when you've opened the caliper and cleaned it (wire brush) you smear a little on the sliding part, obviously not the disc/pad surfaces. Some calipers you even replace other hardware. 4) you need a 7mm Allenkey socket, not always in socket sets 5) a torque wrench is useful to know you tightened back correctly 6) have some new brake fluid just top back up the reservoir once all done and pedal pressed to seat the new pads. Is there nobody you know that has done this who can help you ? It's really not hard but if you've never done it before then it's helps to have a knowing friend. If you lived near me I'd help you for example. At the very least watch some YouTube videos and digest what they're doing Ideally one on your vehicle and caliper type
-
Always what I use on the Yeti. Agreed they are the way to do it. Sometimes I do the ABS Bleed procedure too using VCDS but that no doubt really is unnecessary, but with both front nipples accessible makes little difference other than needing 4L of Fluid.
-
I believe the correct fluid to be the LV Low Viscosity ESP type VW 501.14 However I'm certainly not worried about the fact I used Dot 5.1. I live in London and that's not subject to extremely low temperatures. Maybe next time I'll use the LV type. The Comma Dot 5.1 I used is speced at 850 cST at -40°C, not much higher than the 700 cST of their DOT 4 ESP and as said London's doesn't get that cold.
-
Swapped my front discs and pads on Saturday. I was surprised that there is no front pad wear sensor. None on the original pads and no wiring. So I just chopped the cable off the replacement pads and fitted them without. But I thought odd why no wear sensor ? I had it on my old Roomster.
-
So they have a pressure bleeder all hooked up and they can't be bothered to access the clutch bleed nipple. Exactly why I always do this myself. Maybe this is a time thing due to access, I've often had to remove items to get to the clutch bleed nipple. Some are fragile plastic and if they broke that on a concentric slave cylinder it's big remedial work. Coupled with clutches don't work under the heat load of brakes so I bet it's not so necessary. I always do the clutch too myself as an extra half hour or hour is not a personal issue, for a garage that would be different. Interesting question and I'm interested in other answers.
-
5.1 does mix, (5.0 can't just to confuse things) This is an interesting doc I found on the web that mentions Dot 4 ESP, that does seem different with esp use at lower temperatures. I never even knew about it before looking up on your post. https://www.partinfo.co.uk/docs/9295
-
I've always used good quality Dot 5.1
-
You could try putting your reg number into https://www.tayna.co.uk/
-
I'd be suspicious of the charging if immediately after a good run it couldn't start. Even bad batteries would immediately start the vehicle. I note you did say no warning light was up while driving though. At the very least can you confirm the voltage on the battery when the engine is running, is it 13.5 to 14.5 volts. How old is the battery ? Has it been sluggish, slow turn over, with starting for a while ? Maybe I'm just being too cautious and not just immediately blaming the battery. Edit: just reread you say a couple of days after a long run. OK, in that case I would blame the battery. I've read lots of comments if you swap the same type of battery and Ah rating then coding is not so important. Get it done if you can but don't sweat too much if a similar like for like battery swap.
-
Its actually better to just take the wire up, behind the left hand A Pillar Trim. Everybody assumes you have to go up the right hand A Pillar Trim. It is simple to route a cable underneath the dash board and if you go up the left hand side then the middle piece won't be an obstacle. The end result being neater. Yes you are correct that you can't get a cable across that centre piece, at least I couldn't on my Yeti. That's why I just went up the left hand A Pillar.


