
vindaloo
Resident Member
-
Joined
-
Last visited
Everything posted by vindaloo
-
You'll know when the dash starts buzzing to the muzak. Pro'ly between the radio and the cubby. PS, Velcro.
-
Suggest that the trim has to go on before the radio cage and radio is installed. Pulling off the side trims and heater controls cover helps. The radio bezel cover clips on last. https://www.dynamicsounds.co.uk/connects2-ct24sk01-skoda-fabia-car-cd-stereo-fascia-surround-panel.html Suggest that this one is always shown upside down. That trim bit should cover above the radio surely.
-
It's not an airflow issue, it's fitting the pipes. Fabia crash bar is a huge multipart thing. Ibizas is a simple steel "C" in comparison. Can take an angle grinder to the Fabia bar or fit an Ibiza one.
-
You'll have to chop the Fabia bumper bar or fit an Ibiza one. Minor faffing with plastics to get the brackets to fit. Possibly some issues if you have headlamp washers.
-
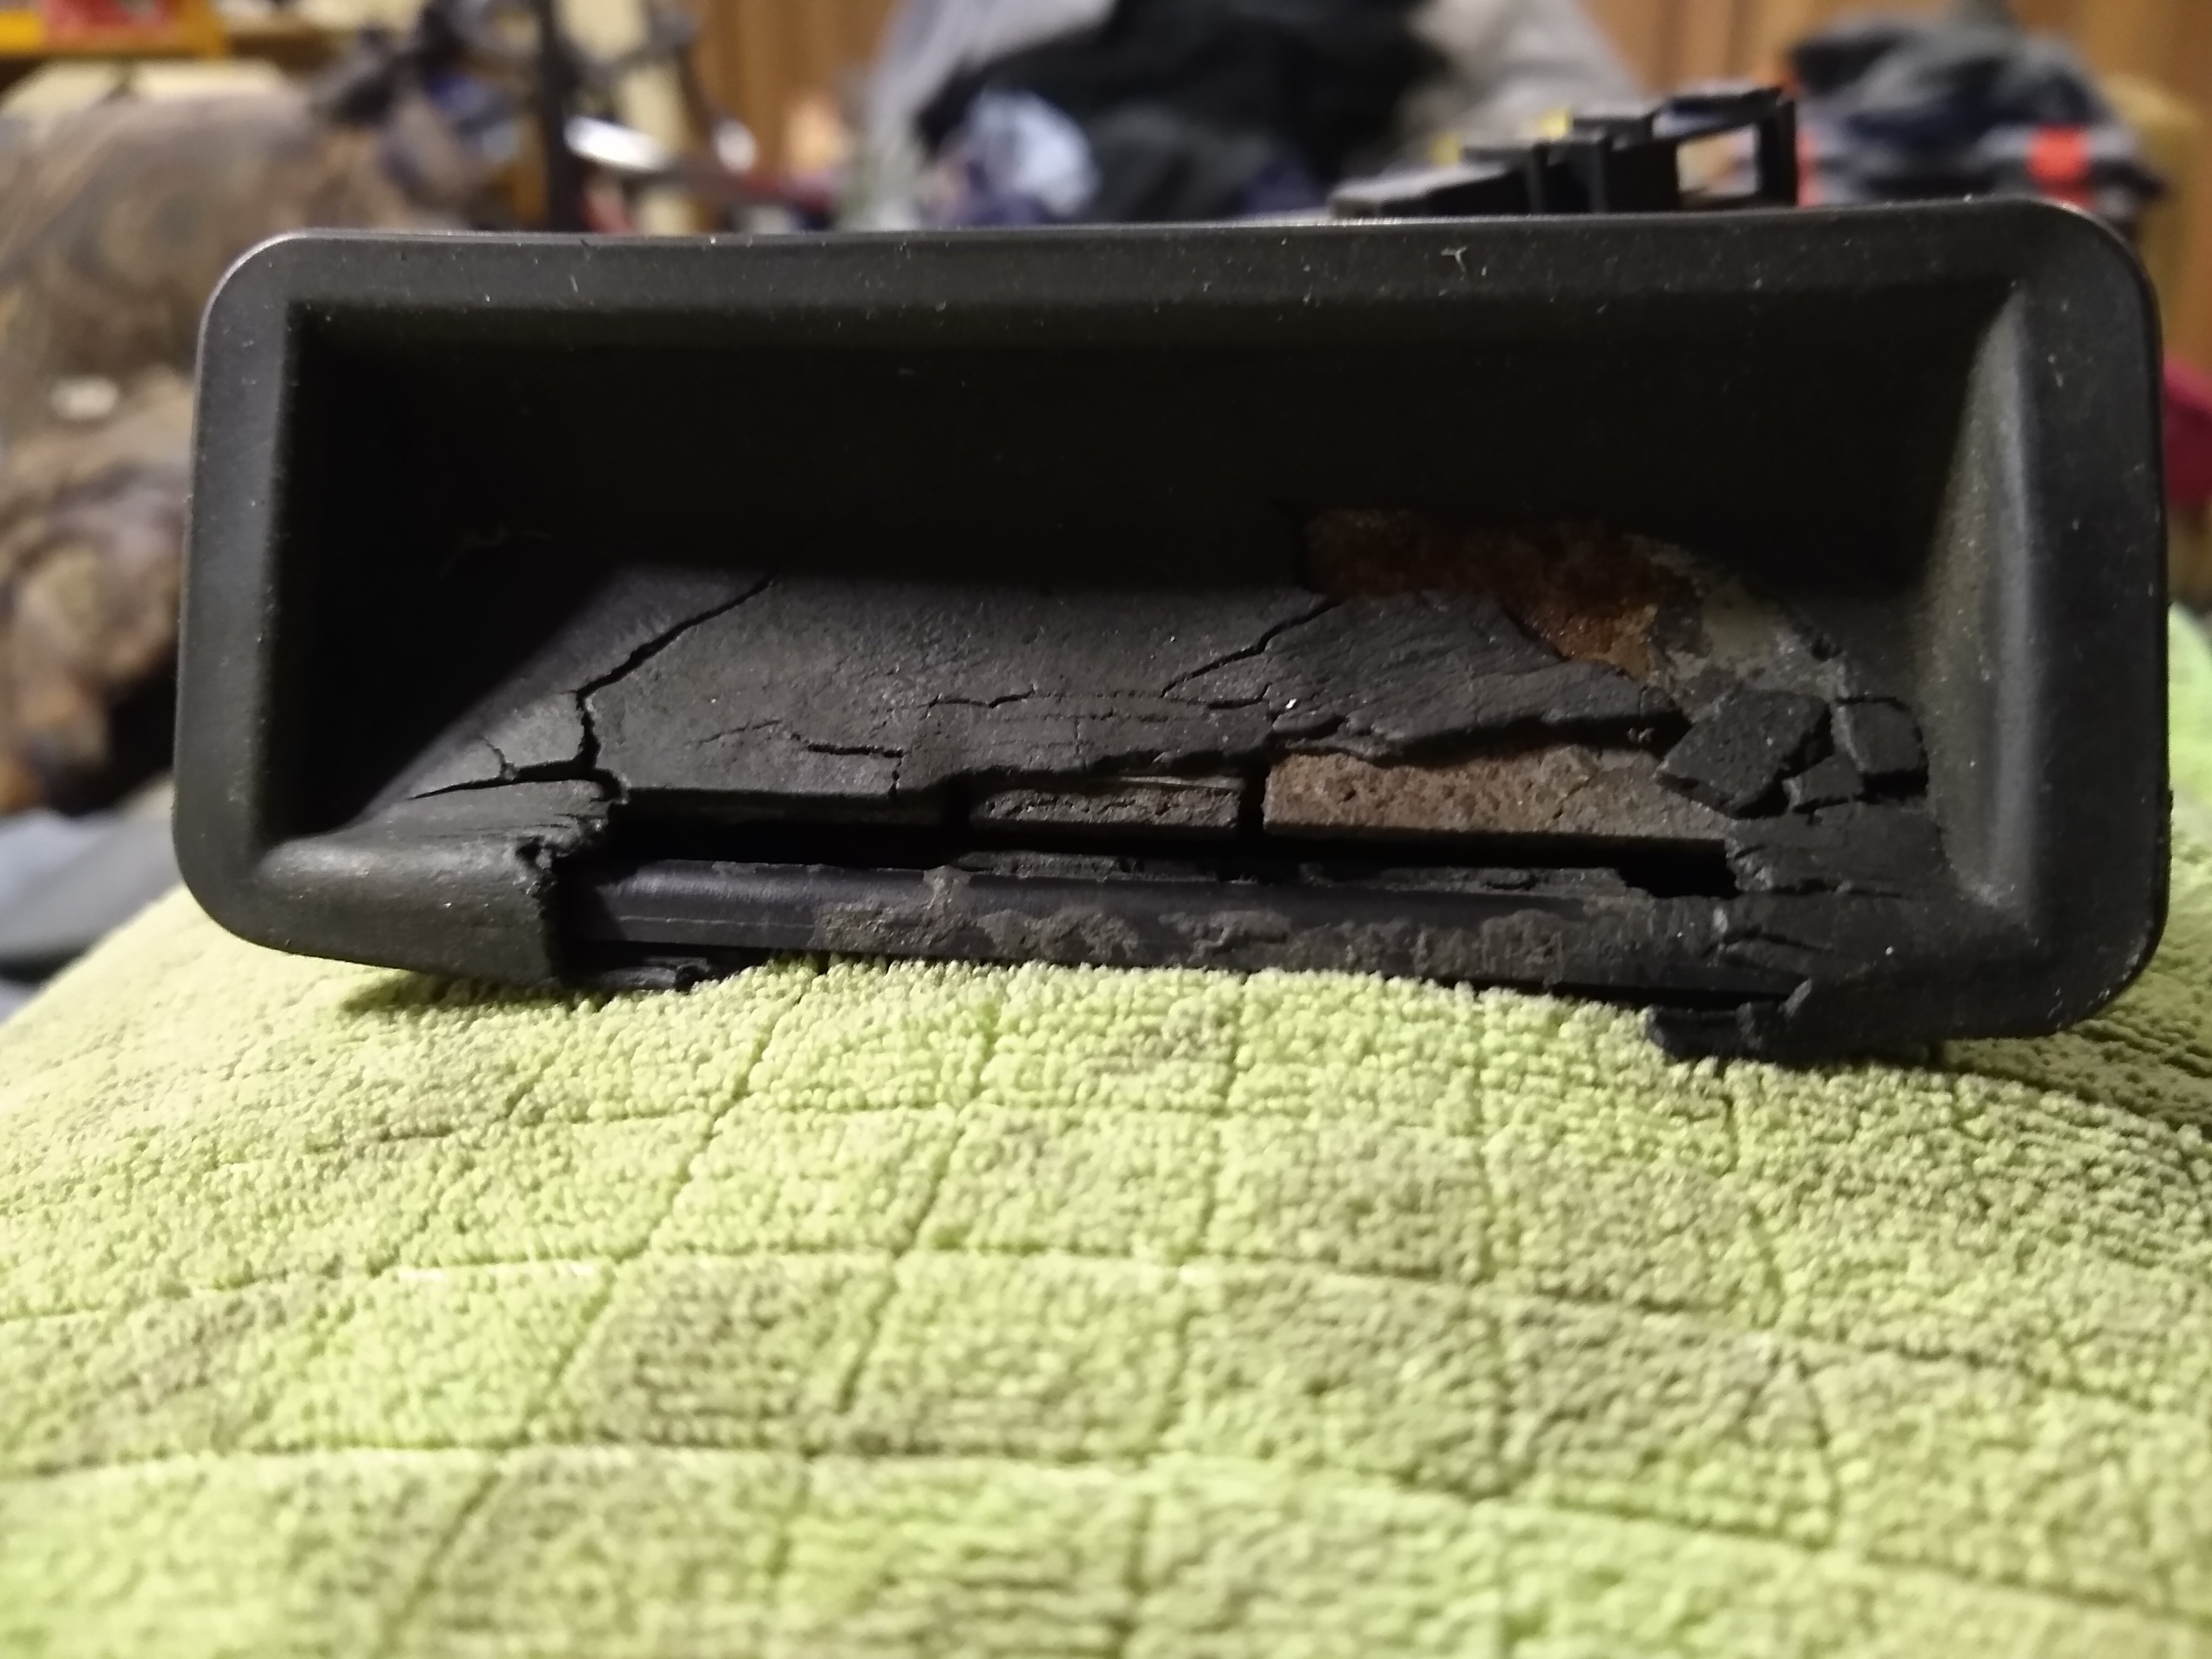
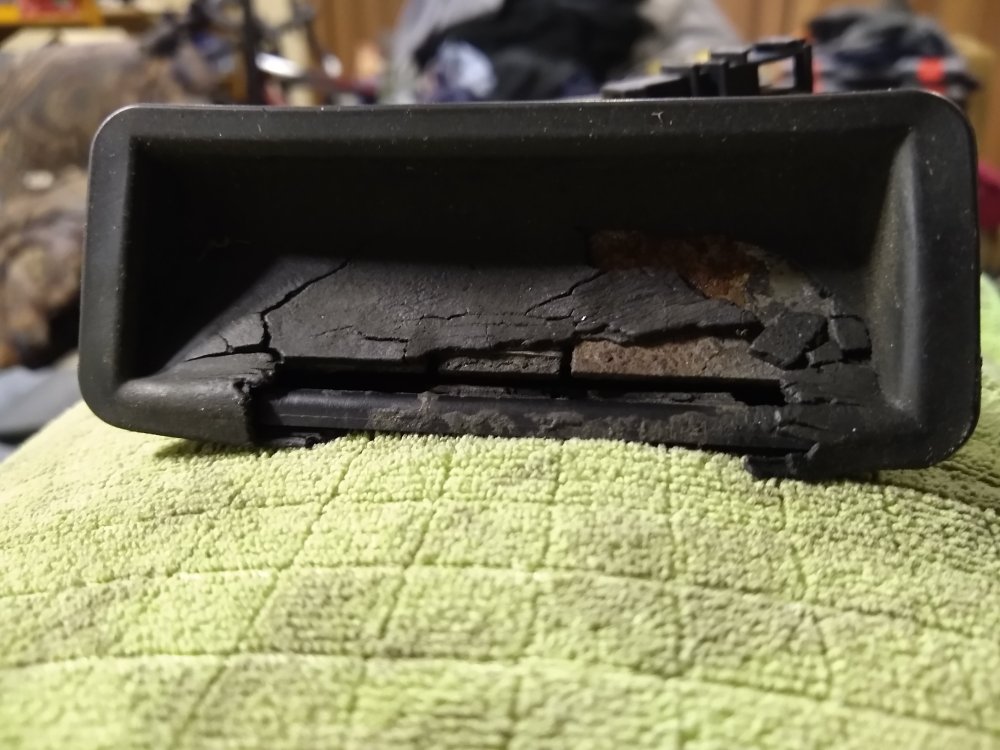
Replaced this crumbly rear hatch release handle/button with a new one. Got it off Aliexpress. https://www.aliexpress.com/item/4001286216876.html?spm=a2g0s.9042311.0.0.41814c4d21lbKv Plus delivery and taxes, came to a "convenient" £14.99 or so. Ordered 27th November, arrived 14th December. Quality wise it's identical to the one that came off. Casing shape, potting of wiring etc. A little cheaper than some on eBay and far cheaper than genuine Skoda parts on eBay. Used HatBoyHarvey's Youtube videos on removing/refitting the trim and removing/fitting the handle. Find or make a pry tool. I used a breaker/nail puller wrapped in cardboard. One very minor foible, the connector wiring (handle side) was zip-tied to the main loom, so a small cutter pliers was needed to free it. A not so minor foible was trying to realign all those blasted steel spring clips to put the trim back on the hatch. It looked impossible so I just started whacking them in. Somehow, once a few were in, they all started behaving.
-
In theory.... You've done a whole light unit replacement with a unit suitable for Xenon gas discharge lighting. So it won't fail the wrong bulb in the wrong headlamp test. In reality you'd have to walk the tester through it if they fail the car on that. Halogen and HID headlamps are easily identified from each other so it should be obvious. The existing manual headlight control will suffice but it must work. There's no requirement for headlamp washers to be fitted. If fitted, they may be tested (car is pre-2009 so it's a crap shoot). But they MUST work if they're tested. ^^^All that goes out the crapper if there's a MOT testers note requiring self levelling and washers. Northern Ireland people get treated much more harshly. They have their own version of VOSA and the MOT lot and their own DOT-NI.... Or whatever it's called these days.
-
If head scratching ensues. This might help.
-
Could still be the plugs. Could also be cam timing. Plugs don't really contribute much when the engine is warmer. Cam timing can be critical for providing grunt but prove troublesome in colder times. If it's retarded a touch that might be contributing. Injector problem might also cause this sort of thing.
-
I used 6mm or 8mm caravan/motorhome joint mastic. Horribly sticky and a pain to clean off old degraded foam seal beforehand. Seems a lot better than the foam seals though.
-
Get an OBD2 reader on it. At least buy a ELM327 and pair it with your smart phone. Autoexpress tested a bunch of OBD2 readers earlier this year. https://www.autoexpress.co.uk/product-group-tests/352913/best-obd-readers-2020 Best option would be to find a helpful forum member with VAGCOM or VCDS who is close enough and wants to help out. There used to be a map....
-
Could be almost anything. Does it smoke heavily when it does this? Do the brakes get red steaming hot? What happens if you drop to 4th gear?
-
-
Short answer.... If you open the door and there's water sitting on top of the door seal as you look down, it's leaking. If you can't fix it now, at least make "curtains" of plastic or bubble wrap, attached to the outside of the door bins and going under the door. That'll collect a lot of the leaking and shove it back outside.
-
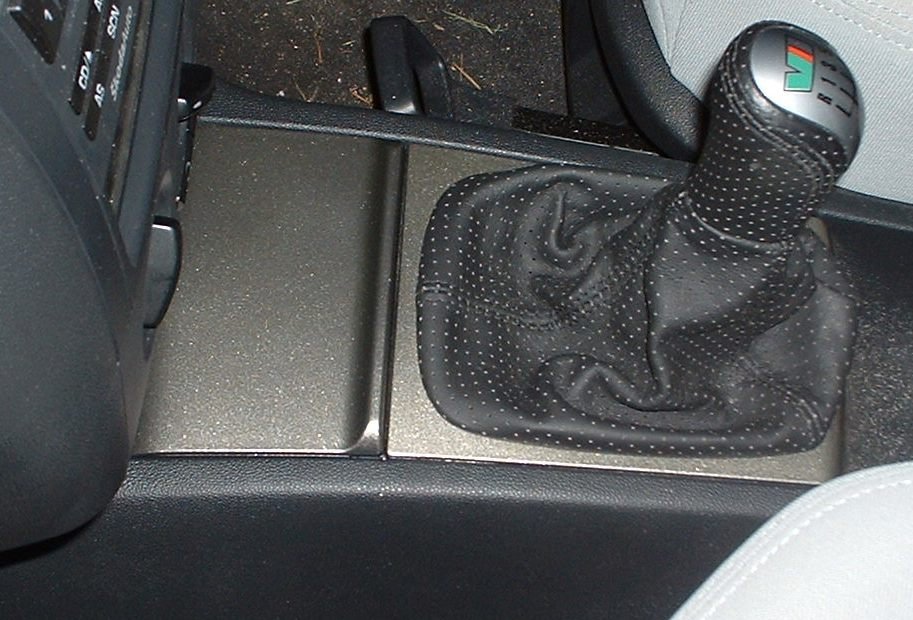
Chrome knobs. http://www.kopacek.com/Skoda/FABIA/Fabia-I-air-vent-CHROME-buttons-COMPLETE Would also suggest spraying some of the numerous grey (but oh-so-slightly-different-colours) plastics body colour or piano black. Ash tray lid is easy. Heater controls surround is too. But you'll lose the "instructions" on the panel and possibly some lighting. I went a bit OTT and sprayed the front of the CD Tuner, and all the trim around the area. Bit of an amateur job. Wish I'd paid to get the ASR and rear heater switches done professionally, at the least.
-
The outer casing of the backbox is mild steel. It has no structural function. It's there to reduce noise. It can be removed or mostly removed and cleaned up with no penalty. As long as you don't cut or otherwise damage the inner stainless steel box in doing so. EDIT: There's a seam along the top you need to be a little careful around.
-
A short term help for the leaky door carriers is to make "curtains" out of old plastic bags or similar. Looks like someone already had that on yours at some point due to the tape gunk left on the rear door cubbies.
-
Up under the slam panel, more or less in front of the alternator and oil dip stick. There's a springy galvanised clip under there. No idea A couple of clips tie the wiring I think, the bonnet release cable outer. https://workshop-manuals.com/skoda/fabia-mk1/vehicle_electrics/electrical_system/lights_lamps_switches_outside/headlight_xenon_light/removing_and_installing_ignition-high_voltage_unit/ HTH
-
Will you get a permit to avoid paying the whole silly ULEZ expansion?
-
The "bogan" or "shade tree mechanic" or "bodger" variant is to use zip ties or strapping around the entire air box including lid. To force the whole thing shut. I must have had mine replaced at some point because I had the same problem. I don't now. So at some service or other it was replaced.
-
Reads like a stuck or intermittently stuck switch. Dismantle slightly and spray electrical contact cleaner into the switches... Then work the switches a few times each. Alternator...
-
It look close enough for government work. It may be a tad higher but your photo angle would exaggerate the gap slightly anyway. Assuming the bump stops and shock covers are standard. If you price the standard shocks on eBay, they're £30-£50 a PAIR. Replacements for my Eibach pro-kit cost £190 a pair. If you need the car swapping out the shocks for standard to get it through MOT seems sensible. Mine, shortly after purchase new in 2005.
-
Coolant or fuel temperature sensors?
-
It's not plug and play. It looks like a reasonable kit though. A big discount over the price on their website. They state "some trimming of the crash bar and front bumper required". You'll need a friendly mechanic who owns an angle grinder.
-
Check your earthing points. There's one on the wing near the battery. Have a look on the forum for two wiring faults. The starter motor "signal" wire. And alternator sense wire(s). J.
-
I'll try T cut then. Not really a solution but for MOT, Autoglym Super Resin Polish or similar, will reduce cloudiness a tad. Need a polish with "fillers" rather than "cutters".