


Breezy_Pete
Sponsor
-
Joined
-
Last visited
Everything posted by Breezy_Pete
-
Check with VCDS or similarly capable interrogator what the temperature seen by engine ECU really is. Might be that someone has had gauge needles off and mispositioned on replacement. Easily done. Oil temp readout may give some clues if available and VCDS isn't; though it will not be directly equivalent.
-
Are you typing the third character as a letter "Oh" rather than a zero by any chance?
-
Good morning and welcome.
-
Bolt should be 61mm long, bet someone put a 65mm gearbox to block bolt in by mistake while doing a clutch change. Hacksaw?
-
Is that damage from a too-long dogbone rear bolt? Is that the bottom side? Can't quite work out orientation.
-
232mm according to Skoda, but I doubt the difference is meaningful. LLLParts
-
Here, thoroughly emphasised for you:
-
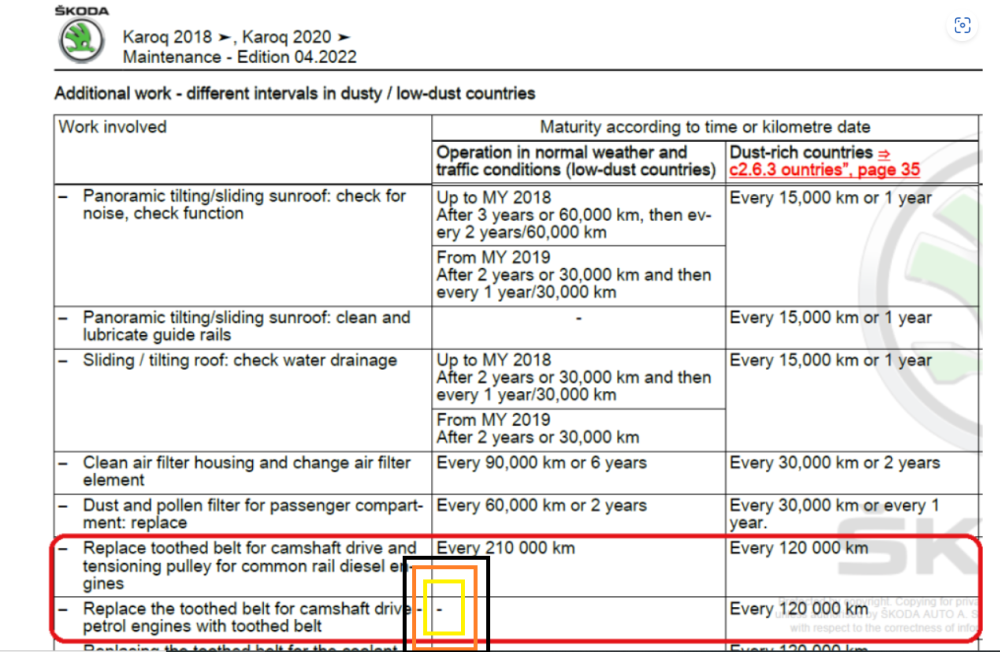
You clearly failed to use the link I provided to actually look at the post @DBSurrey meant. The one where there's a table of intervals in Skoda's own info, with a - (dash) against the interval for petrol 1.5s in non-dusty countries, meaning no interval specified.
-
Link to that post, for convenience of viewing: https://www.briskoda.net/forums/topic/510175-karoq-cam-belt-change-start-saving-now/?do=findComment&comment=5731337
-
Carrier bolts are M12 x 1.5 pitch according to etka, item 3 https://www.lllparts.co.uk/catalogs/skoda/CZ/FAB/225/6/615/615026
-
Ideally you'd swap the fuel injector from cylinder 3 with one of the others to see if the fault follows it, but I'd be tempted to go straight to a compression test if you have a tester.
-
Measure the voltage across battery terminals with engine running. Edit: and get an assistant to rev the engine while you're measuring to see if it varies with rpm (shouldn't much at all). Sometimes if the voltage regulator on the alternator goes faulty you get higher than permissible voltage. This tends to kill bulbs very fast.
-
It's not so much getting it past the subframe as clearing the back corner of the engine. More critical on the way back in than the way out, to be honest, when you're trying not to injure the fingers of your new clutch with the end of the input shaft as you try to line everything up. There's a steel gasket between the block and bellhousing that tends to catch the drive flange as you try to wriggle the gearbox in or out, part 26 here LLLParts
-
There isn't such a fuse. The switch wires direct to pin 21 of the 32-way connector at the instrument cluster, the other side going to earth/chassis. You should be able to simulate the handbrake being off by either shorting these wires together or just leaving the connector unplugged from the switch.
-
Yes, 17mm male hex tool for fill and drain plugs.
-
Not sure about the clip. Hinging the front left corner of the car (lock carrier frame) forward a bit sounds useful in terms of creating more room for the box to move forward away from the subframe as it comes out. Removing offside drive flange also gives better manoeuvre room for getting box in/out. Are you completely removing nearside driveshaft? I left the outer end attached and found it kept getting in the way, so I will completely remove next time.
-
In my opinion the crappest bit is that the bellows goes more or less straight across from door to A-pillar. On mk1 Fabia there's a significant vertical offset/dogleg to it, which means the loom is twisted more than it's bent as the door moves, causing much slower degradation.
-
You've not let anyone down, you've solved a problem. 🙂 You may even have done me a favour by encouraging me to make a brief video showing how quick and easy it is to completely remove front doors on these cars. Remind me in the summer please someone. 😊
-
Don't throw out the old ones...Jandrcvjoints Reviews | Read Customer Service Reviews of jandrcvjoints.co.uk (trustpilot.com)
-
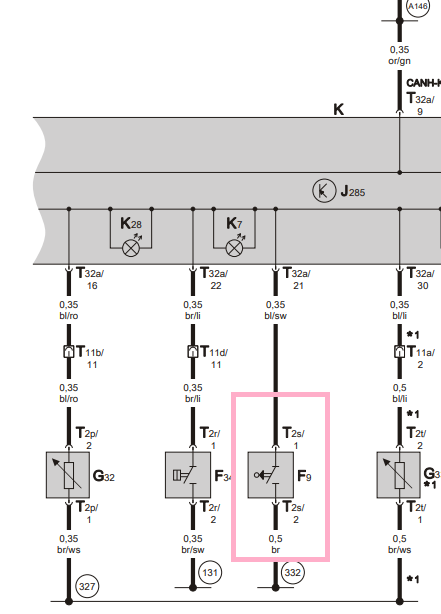
Red/white feed to the cabin fan switch at the back of the heater/aircon controls may be your best bet. Right at the top of this diagram.
-
Occam's razor says 'it's a fair cop'.
-
The location of that oil suggests just overflow during oil change refilling. Easily done if pouring is too fast because there's a baffle that stops it going in easily/rapidly.
-
See edit to that post too.
-
For the wires that only have cracked insulation, I would do nothing more than a quick wrap round with a couple of laps of insulation tape. No point at all in cutting/remaking the copper which probably isn't damaged. For the ones that are really busted, I'd get the door off and on a bench for easy access, then strip back about 5mm of insulation from each broken end, find other bits of wire of similar cross-sectional area about 30mm long, strip back 5mm from each end of that, then tin all the ends and solder that extra bit to bridge and extend each of the broken originals, with a little (10mm long) heatshrink sleeving over each 5mm long solder joint. All the fuss about solder joints not being ideal is a bit over-fussy IMHO.
-
Looks to be the same as mk1, dead easy. Just needs an assistant to help with weight of door as it comes off and goes back on, particularly the latter so one person can focus on getting the hinges to drop back on their dowels. https://workshop-manuals.com/skoda/fabia-mk2/body/body_work/front_door_central_locking/front_door/removing_and_installing_the_door/


