


Everything posted by Breezy_Pete
-
The bit about non-OE batteries not being able to be coded sounds like a blatant lie. Doubt coding would change the situation though. Find a local VCDS owner to do it for you if you want. Quick, easy job I believe, Battery voltage as measured by you, and seemingly confirmed by them does not seem low enough to cause legitimate warnings, I expect there's a minor but irritating fault with the battery management system that they wish to avoid fixing at their cost under warranty.
-
Perhaps the OP can look at the service code on their boot floor sticker?
-
UK market Fabias may not have been supplied on variable service in 2008 root, but other markets probably were. Mk1s could be on variable in other markets. See this ETKA page for year 2000 Fabia for example, first section of table engine oil; for models without extended servicing... - Fabia(FAB) [EUROPA 2000 year] (7zap.com)
-
Always more satisfying to repair rather than replace, in my opinion.
-
Your top photo almost shows the part number I think? towards the top of the image, just a bit too unfocussed to read.
-
Here's the parts list page where it's shown as the last item 1: door handle, exterior - Fabia(FAB) [EUROPA 2006 year] (7zap.com)
-
When I click on that link it says "you bought this item" and I bought it for the missus's 2005 Fabia to swap out while I was replacing the regulator panel earlier this year, so I would say it's just their info about what cars it will fit that's wrong.
-
Yep 3B2837016R Do you mean the wire bit that the black plastic door pin sits on is the only broken bit? I'd be tempted to do without.
-
Crash sensor will be the thing in the door.
-
Worth mentioning perhaps that there's a knack to removing the bonnet release lever that isn't intuitive while in the footwell. I've got some pics somewhere but from memory there's a collar that slides out from behind the lever which frees it. Lower/inner A pillar trim needs this removing before you can extract.
-
Ooh, very recent. That suggests the window regulator mech may have failed on the original panel, and the previous owner fitted a genuine new replacement. Possibly forgetting to re-connect the lock before rivetting it on? That would be a bad feeling. 😆
-
You'd need massive ones if you wanted to use the original holes, if you drill new holes you can use whatever size screws you like.
-
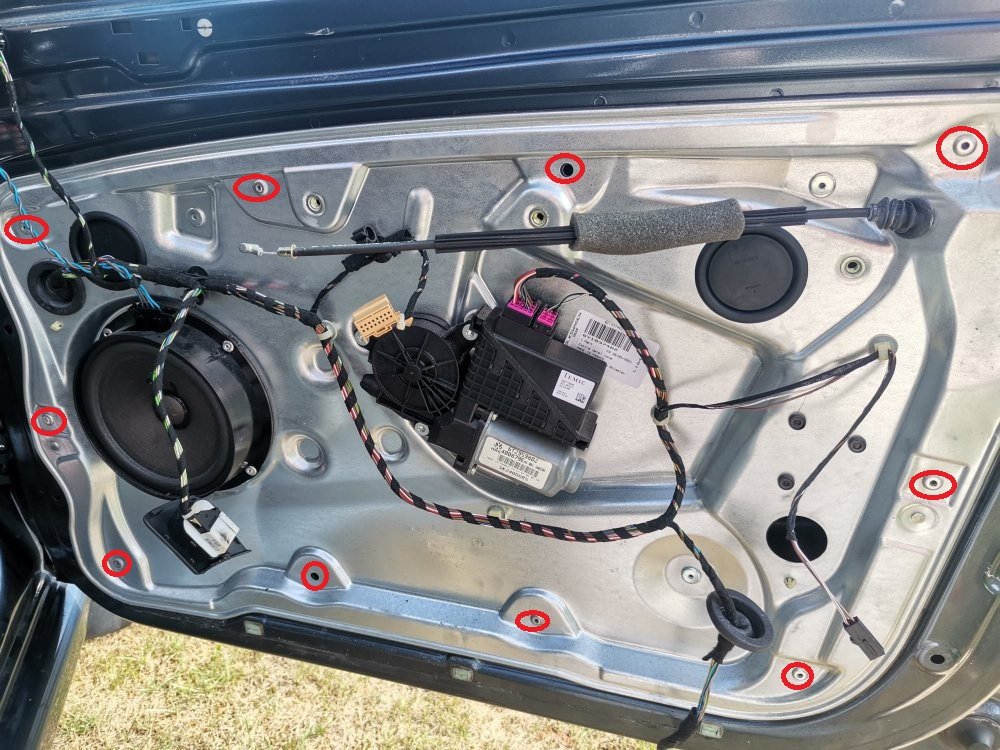
See edit above about date on panel, that may affect decisions about what to replace. These are the ten rivet positions:
-
Rivets are part number N91078801. They are big enough to be beyond the capability of most pliers-style riveters, so lazy-tongs or pneumatic type necessary really. People have been known to use rivnuts to convert to screw-fitting, or even drill holes alongside the original biguns then use self tappers to remount. It's a job to know how much to change while the panel's off, lock? window mech?, especially if rivetting back on. I see you have two rivets missing, on a diagonal either side of the window motor, there are supposed to be ten in total around the perimeter. See if you can see a date on that sticker on the steel panel, just near the window motor, to see if it's as old as the car or not. The missing rivets suggests it has been removed at some point. The panel almost looks a bit too clean to be the factory original?
-
Oh, I see. ☹️
-
Clip on that connector is often broken during removal as it's hard to see and reach, plus people not realising there's a technique to releasing these (push connector on while releasing latch until click is heard, then pull off). May be a case of getting an intact connector and splicing it onto the existing wires.
-
Skoda-parts.com seem to be suggesting that Elring are an OE supplier: Valve Stem Seal Elring 036109675A (skoda-parts.com)
-
It could be worse, check this bargain out, spotted while searching ebay for 036109675A after finding that genuine ones from LLL parts are £6+ each: x8 Valve Stem Seal Ring Inlet Exhaust FOR VW POLO 86bhp IV 1.4 02-06 9N AXU | eBay Don't see his hand being bitten off for those 8! 🤣
-
Will be slightly easier access without the white frame in place, and you'll want to get that off anyway to refit the rubber to it properly before refitting both together. Connector should be removable with white frame in place though.
-
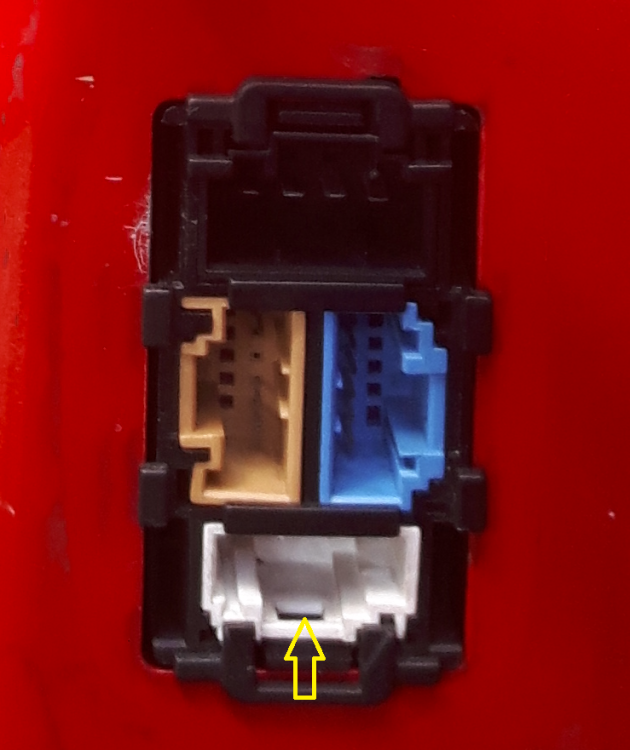
A view of the door connectors with loom side all unplugged, white frame removed. Yellow arrow shows where the latch locks into from the white loom connector. Door removal is pretty easy once all four connectors and door check strap are removed, by the way, if it might be useful.
-
Knowing how the car's wiring has been messed with, definitely.
-
Problem with lock wiring is that it goes through the metal inner carrier panel, no access to unplug from lock without unrivetting that panel. You could 'pin-stab' the motor wires as close as poss to the door lock, on the accessible side of that panel, and buzz through to the white connector, taping up after?
-
There's a latch in the middle of the bottom edge of the white loom connector that needs pushing upwards, then grab all of that connectors wires and gently easy out.
-
What's that mini-blade fuse doing between two blade fuses bottom right, position 45 I think, for radio?! Fuse 11, where the top bodge wire goes is needed for correct function of electric mirrors and electric windows. Ignition switched. Looks like that wire may be on the supply side of the fuse, so unprotected by it. Not easy to see from that pic exactly where the other bodge wire is going, but if into the right hand side of one of those blade fuses in the right hand column that's a permanent live I think, so a dangerous fire-risk bodge, as is the whole area.
-
Bit hard to see in that pic, but is that the violet/yellow going into the white connector? Was its blue/yellow neighbour definitely intact? Those are the motor drive wires. Did you unplug the white connector and check for corrosion on pins?


