


Leaderboard
-
Lady Elanore
FREEDOM8Points25,111Posts -
Evolution13
Resident Member6Points3,266Posts -
Gaz
FREEDOM6Points7,910Posts -
33q
FREEDOMLite4Points1,071Posts



Popular Content
Showing content with the highest reputation on 19/10/26 in Posts
-
4 days ago left home fully charged, and did 160 miles and had 5 miles range left. £3.50 Temp about 10 degrees C and some rain. Windy . Today fully charged after paying £26. 0-3 degrees max. Used 65% of battery in 68 miles. There was a diversion of an extra 10 miles because of a crash. Just put in a charge to 52% to get home. Showing 100 miles range. Still 3 degrees C. I will see how much left to 75 miles. Some 70 mph, then the rest will be an average of under 50 mph. Cold weather and all season tyres. PS EDIT, never went above 5 degrees C. 67 miles driven and 10 miles left showing.2 points
-
2 pointsRecently moved from 2018 Golf GTE Advance (their top spec trim for the GTE) to a 2019 Occy vRS 245 DSG. Very happy with it. Its lighter than the GTE but feels heavier and more.. Grounded, in a good way. Got a couple of things I'm going to miss from the GTE, namely fuel economy but we aren't comparing apples to apples here with these two. Virtual Cockpit, although I had it set on large Rev counter and Speedo 99% of the time so using similar setup but obviously they are real dials now so no great loss. The vRS is a lot better is many more ways so I've no regrets. Don't have to worry about charging at work and paying £3 a day for that and paying for the Premium petrol at tesco's.. Done a few tweaks now, Scandinavian DRL for the rears, stripey leds on with DRL at the front, blower level being shown on auto, turned the hideous sound acktor thing off.. That was hideous, made me feel like I was in a 1990s Scooby and not in a good way... Changed interior lights with drive modes so normal is blue, Eco is green and Sport is red. Paired phone to it, setup so when the phone connects by Bluetooth, the phone fires up a a wifi hotspot which the radio connects to. Totally useless as I use Android Auto via a USB dongle to give it to me via wireless. Also loaded up logo's for the radio stations. No idea why I've got to do this, absolutely inexcusable. Had to chuckle, previous owner pinched the Skoda umbrella.... But left in the spare wheel, a very large Swiss army knife.. Googled it an its the top spec one and worth about £80 so I can find it in my heart to forgive them... 😂 Think thats about all for now. For some reason there isn't a huge amount of info on the 2019 Mk3.5 on youtube, I suspect maybe something to do with the timing and COVID... Don't think I'll get this remapped, I've had several remapped cars before and whilst great fun and I know engine and gearbox can easily handle a stage 1 remap, there is that constant niggle in the back of the mind that something will go wrong due to the map and ultimately, I only really used it and got the benefit from it when pulling away from the lights.. That extra 150kg of battery over the rear axle did not help the handling on the twisties! Also, my insurance has gone up by £250 so don't want it going up even more due to remap. Any thoughts, opinions, idea's greatly received and appreciated.2 points
-
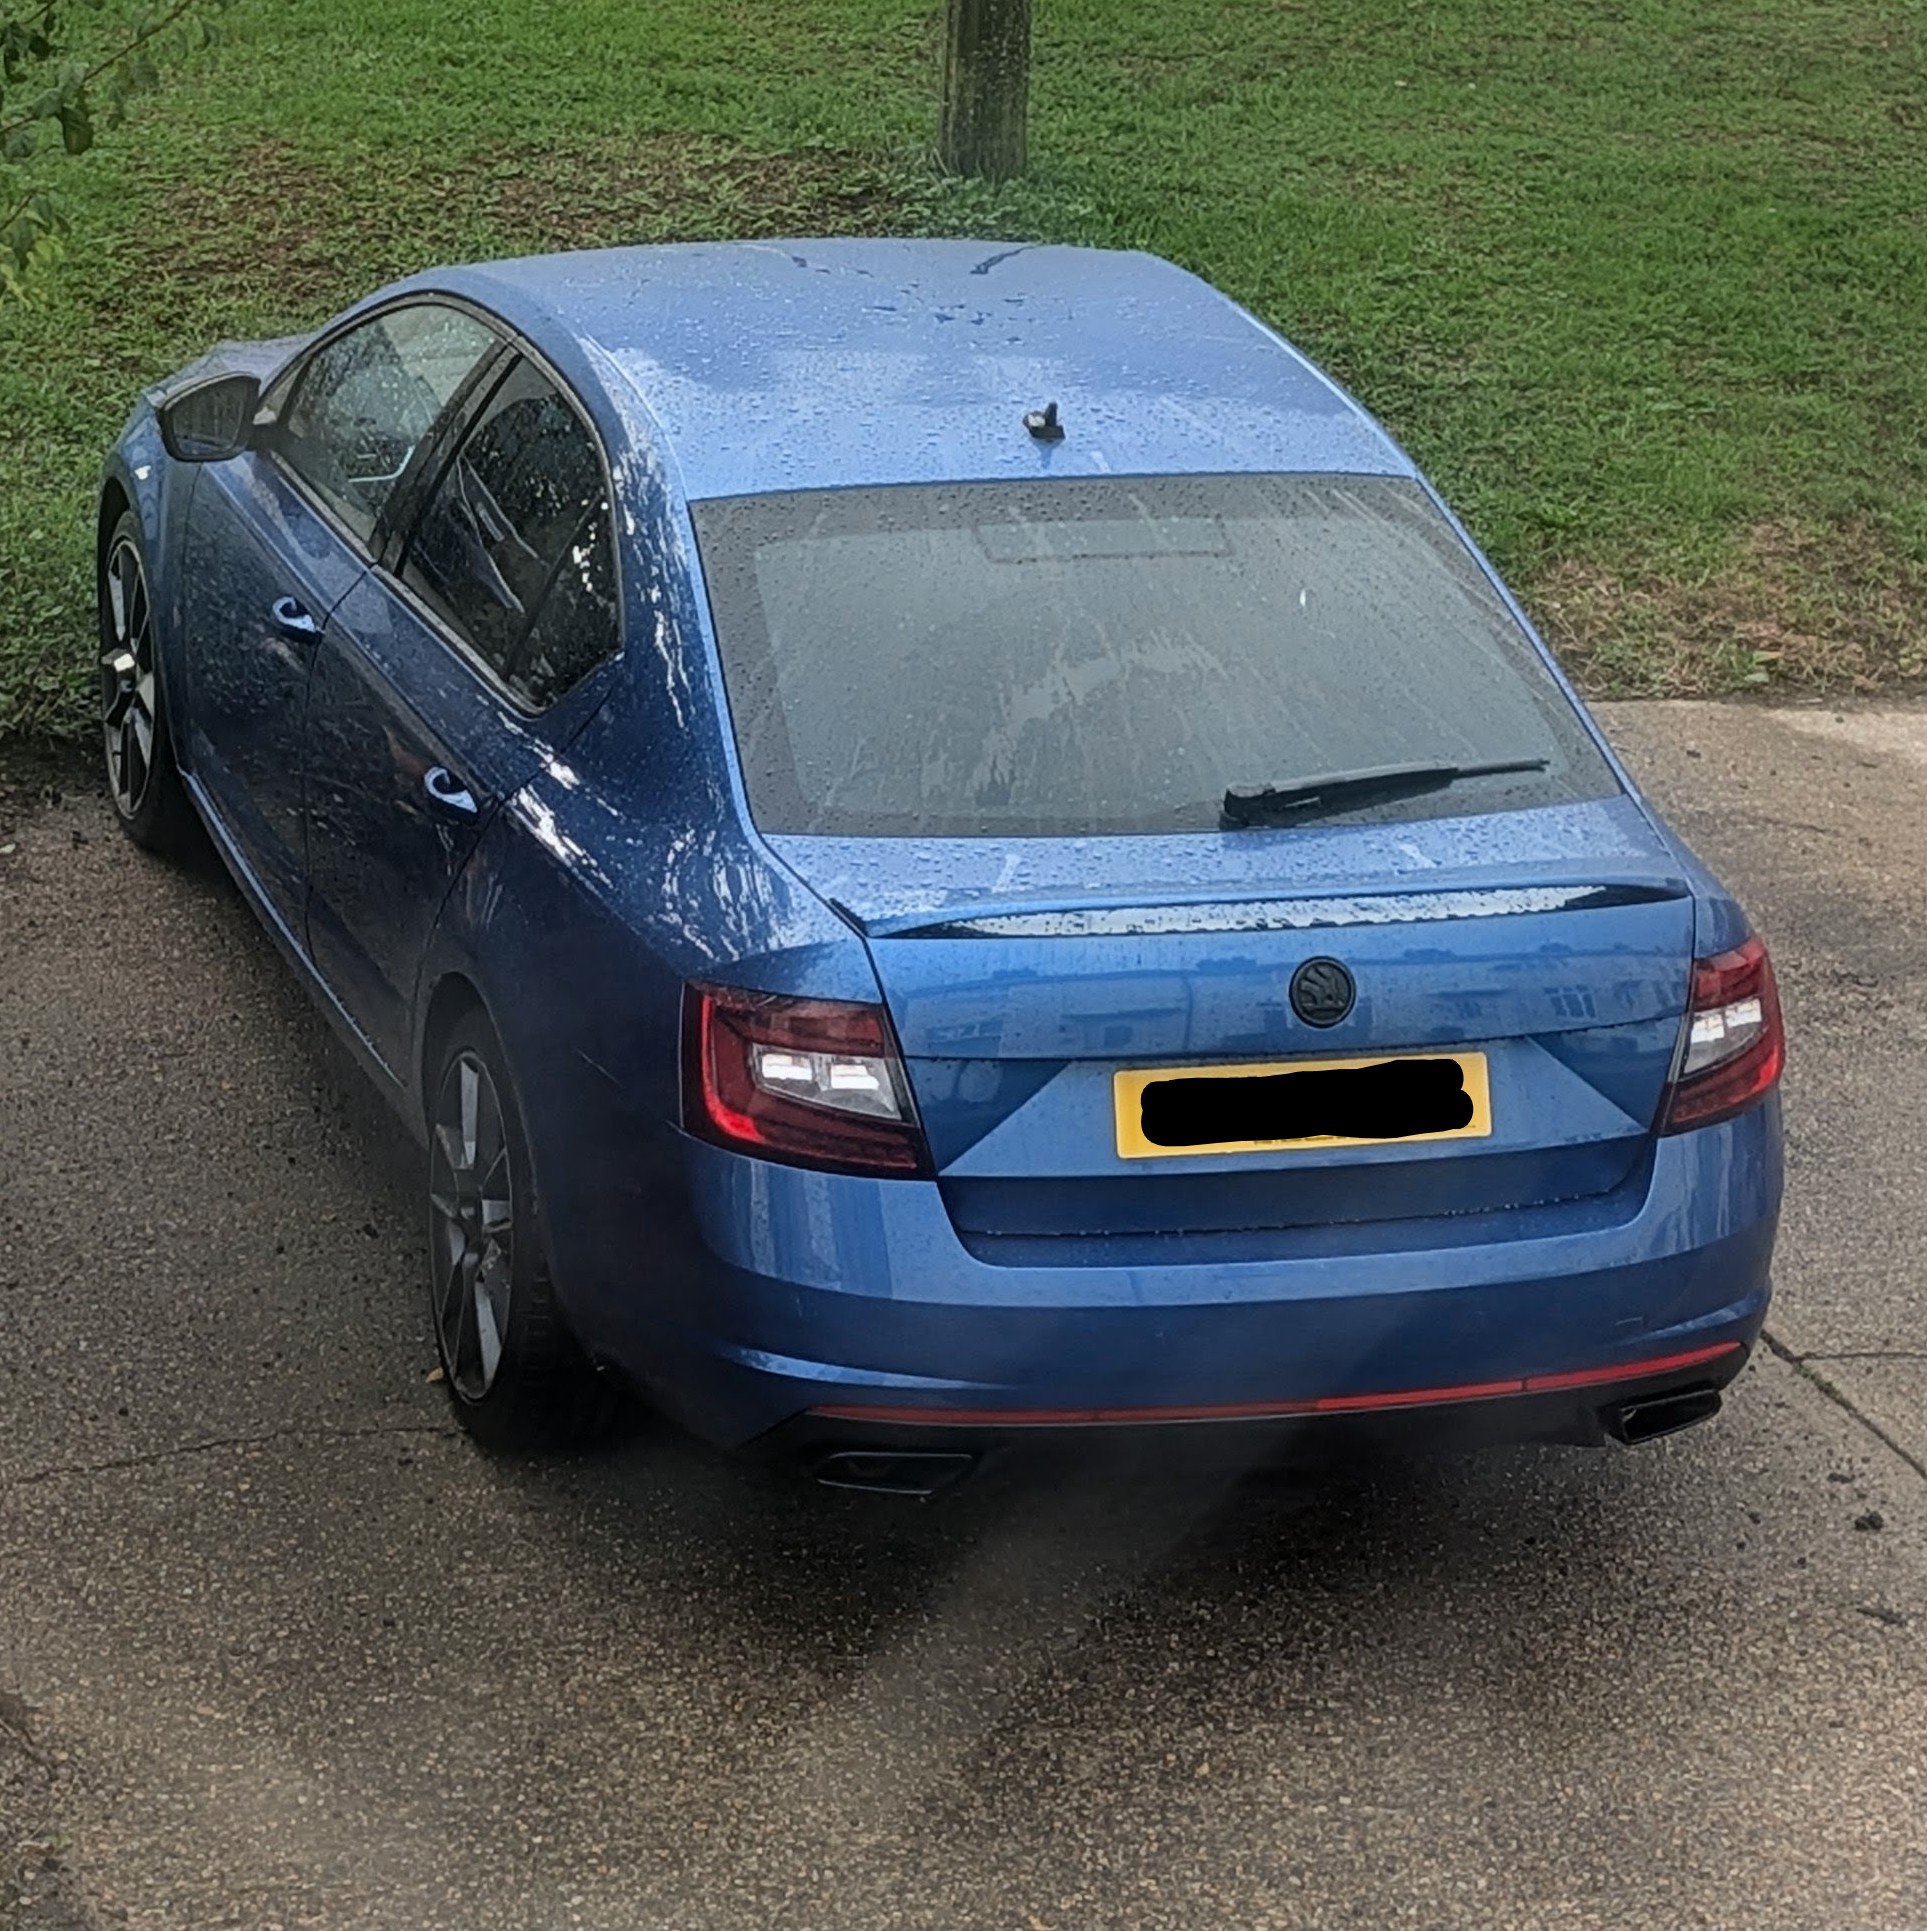
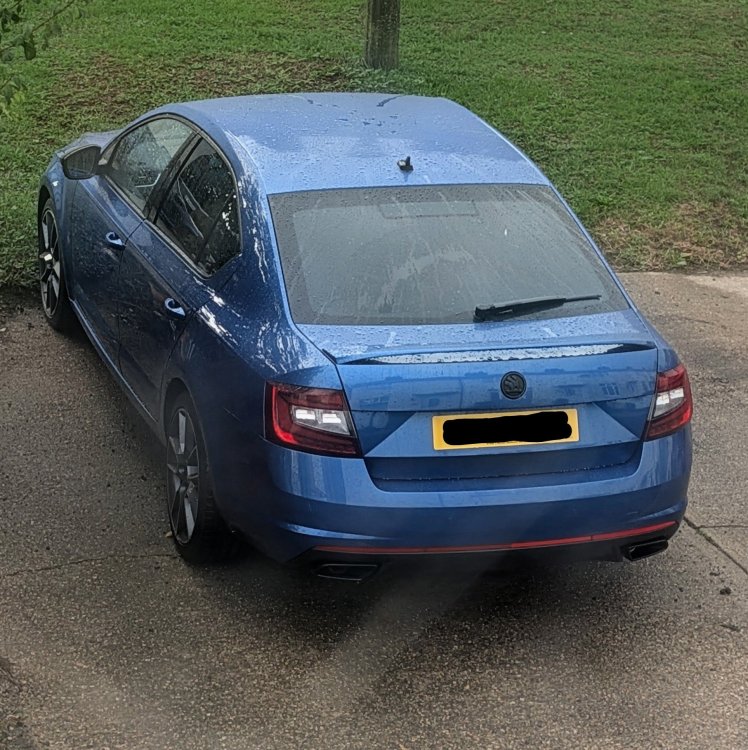
2 pointsRemote Working day today, so I get to sooth my mind with little glances out of the window at the new Whip....😍
 2 points
-
2 pointsNot sure what it's known as but there was a distinct beam of sunlight straight up from where the sun had set a few moments earlier
 2 points
-
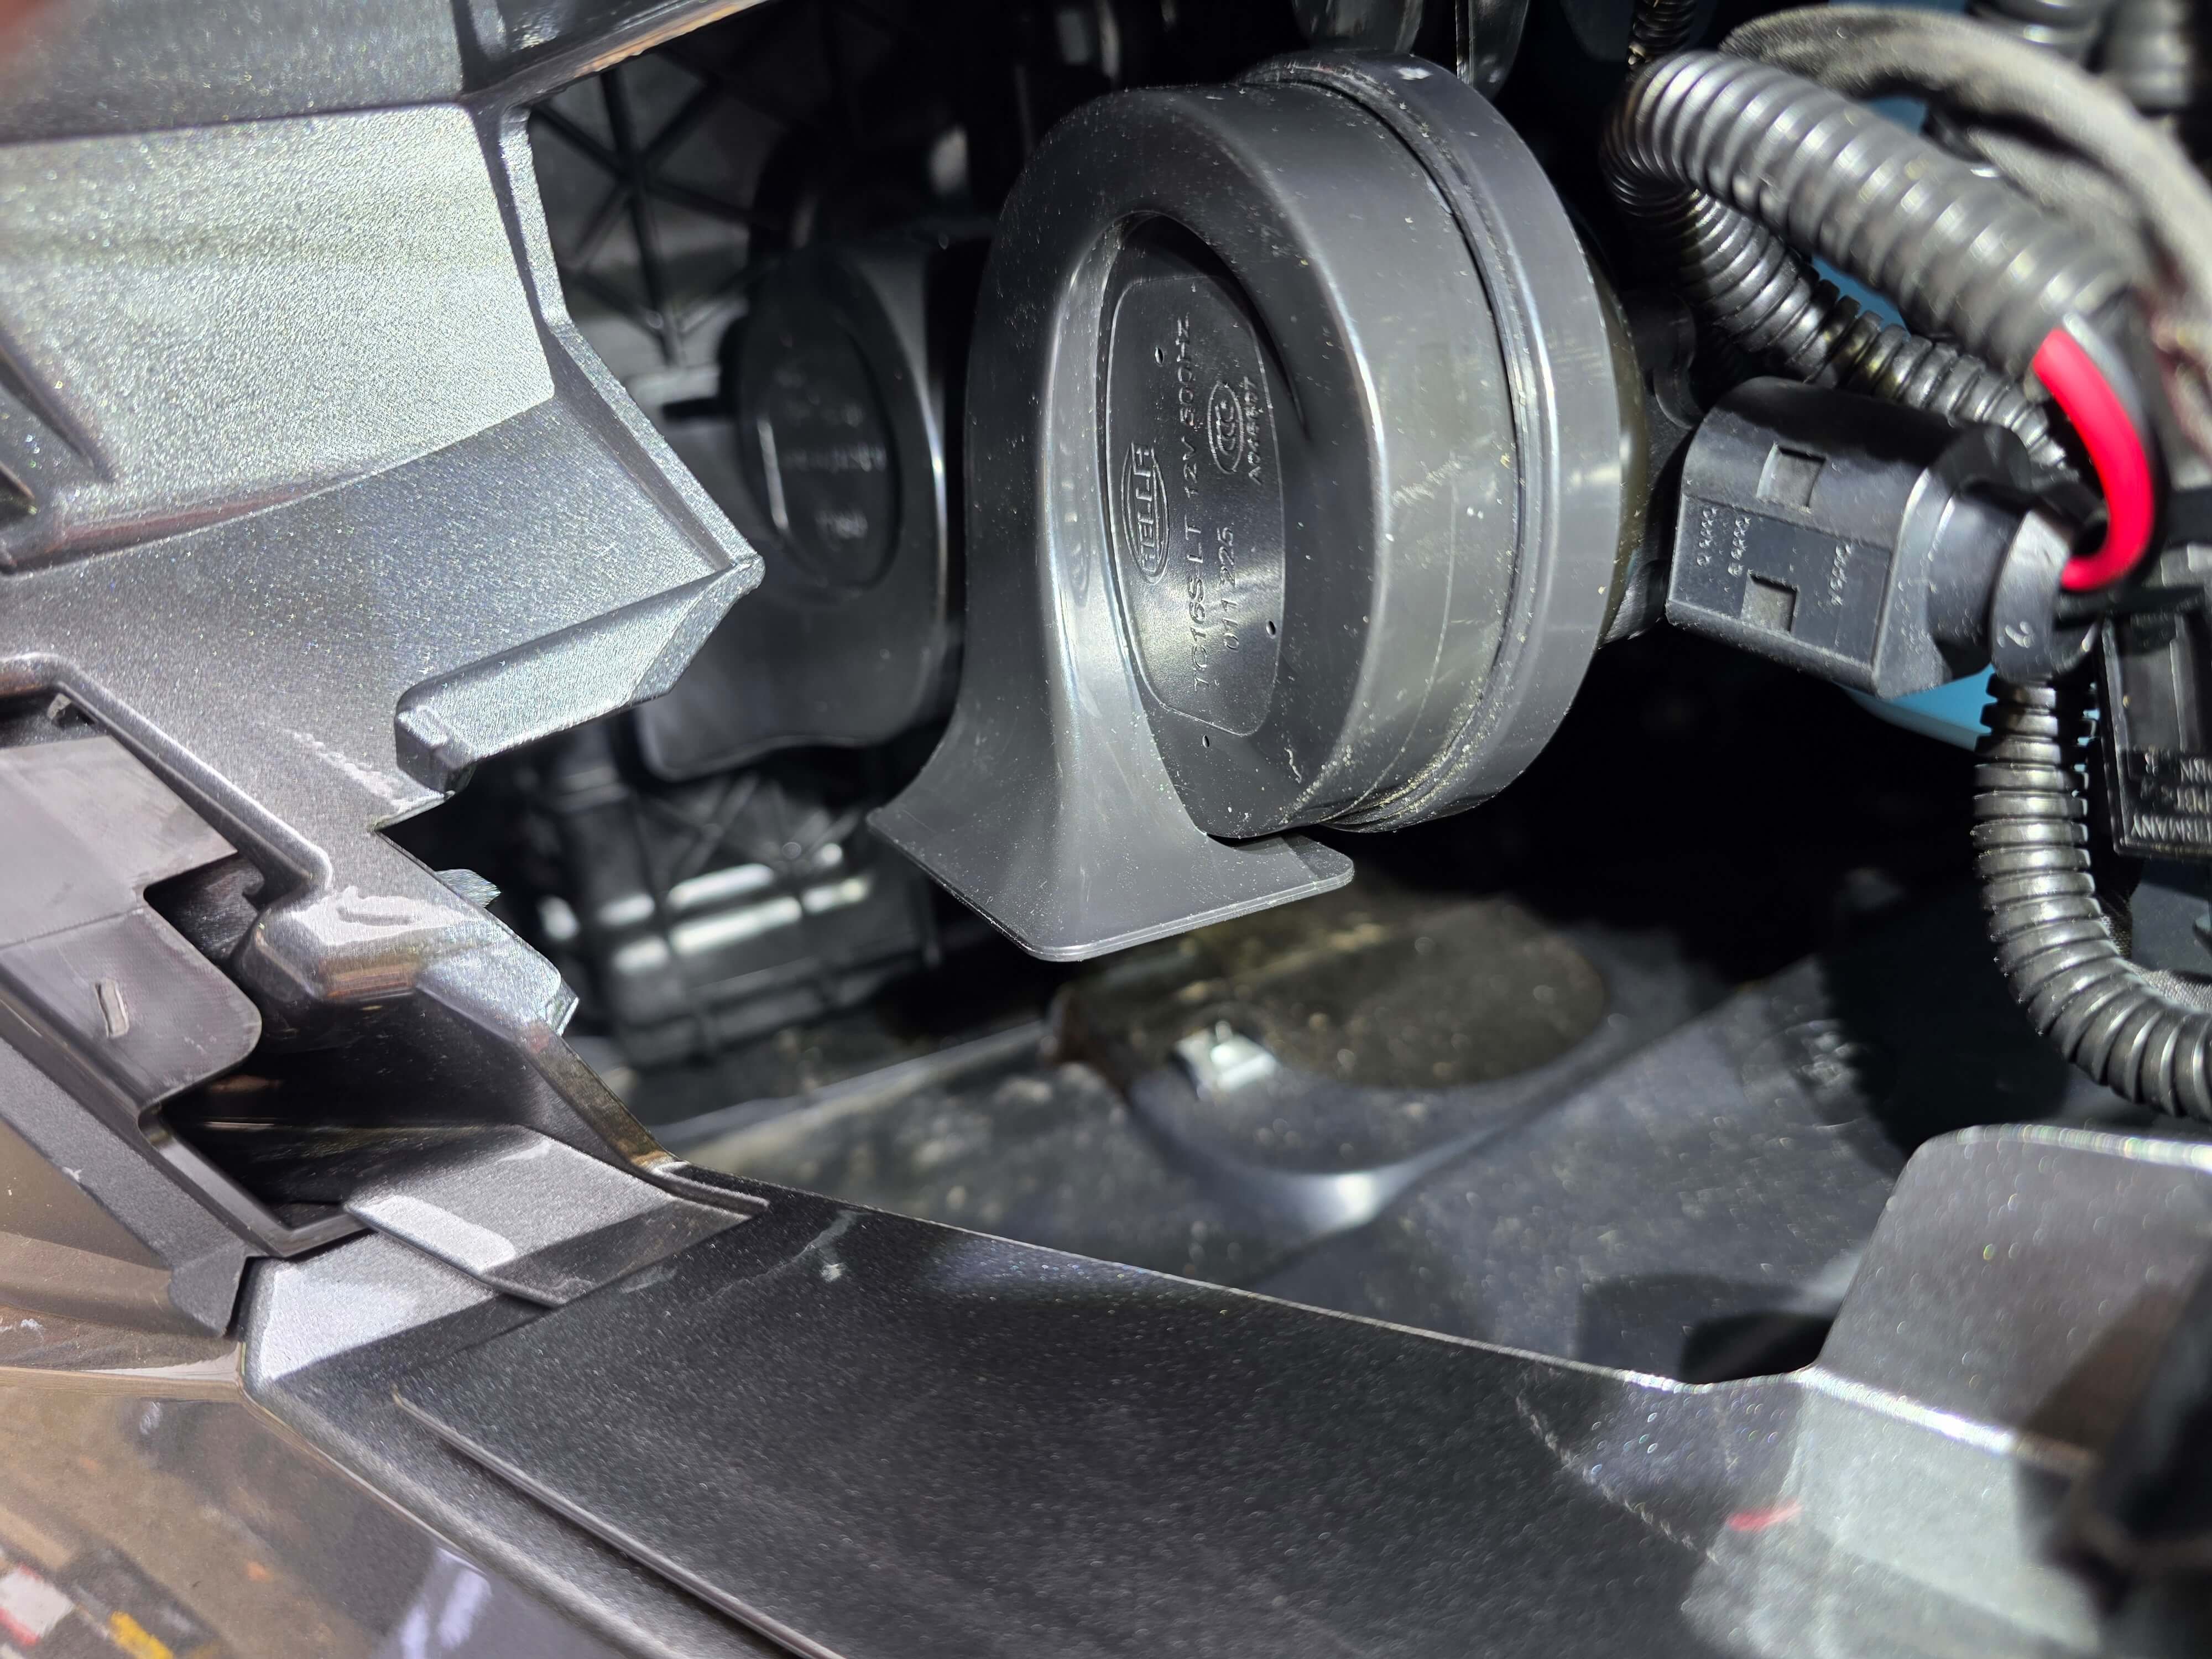
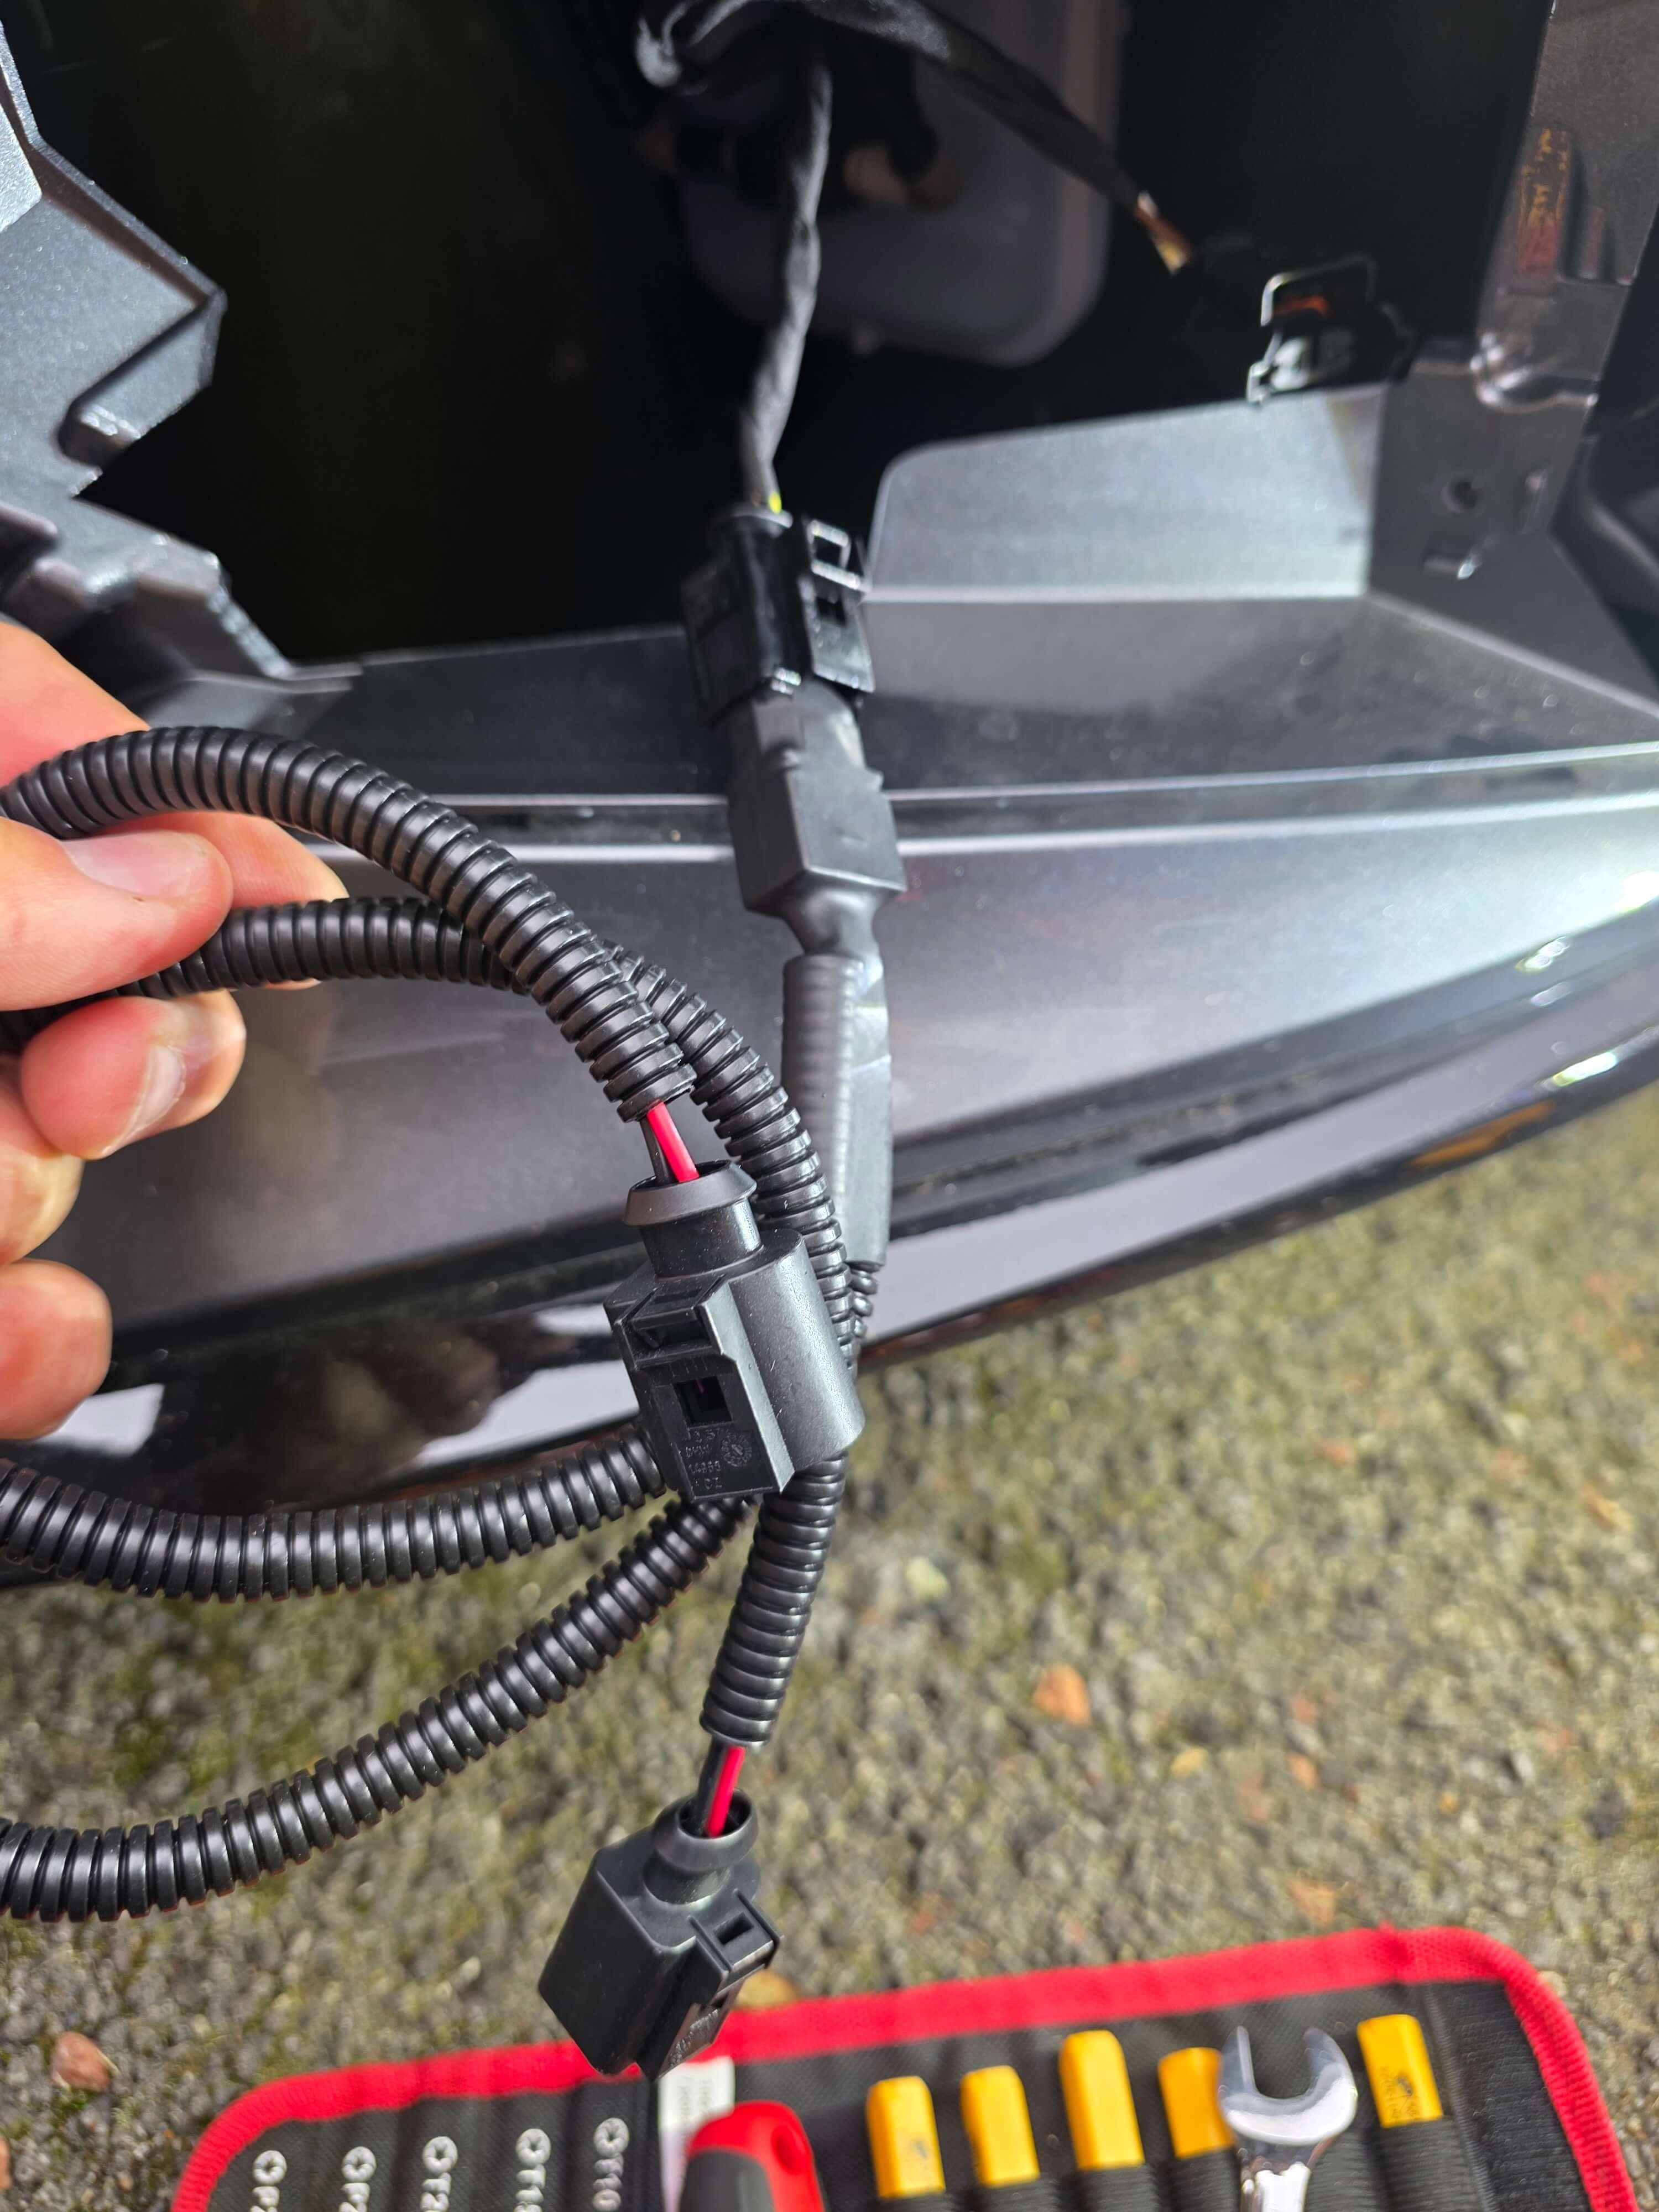
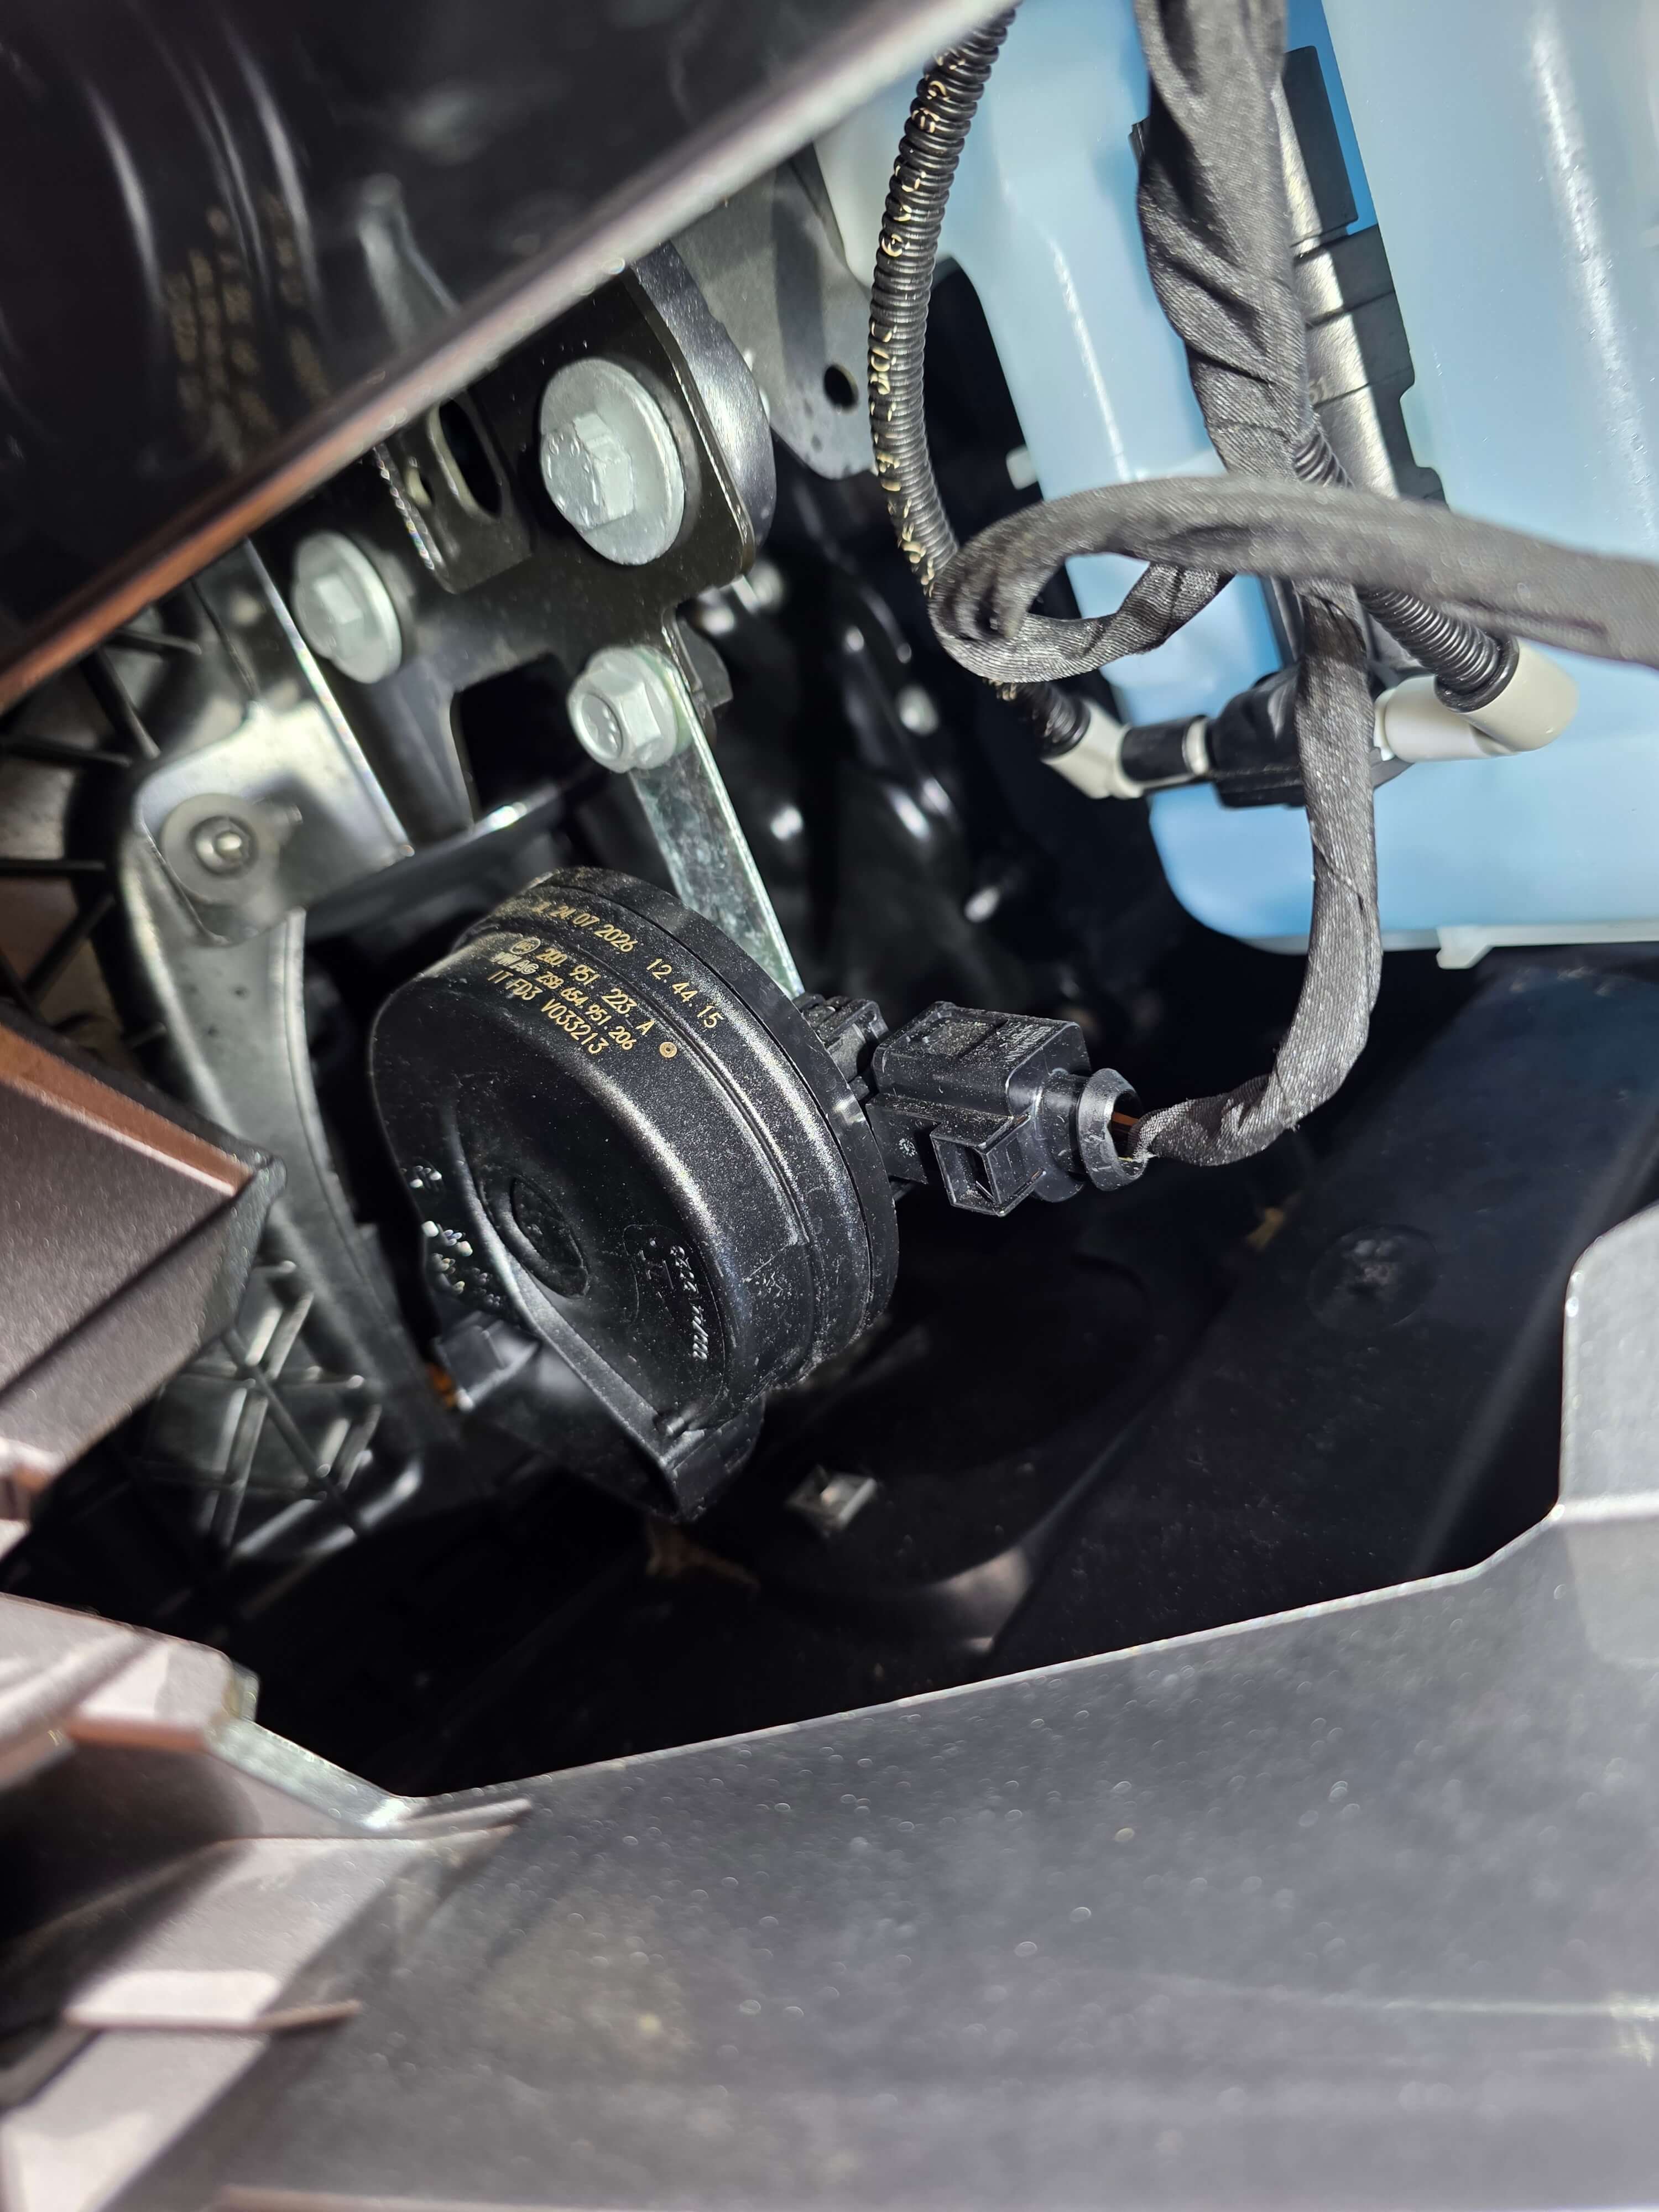
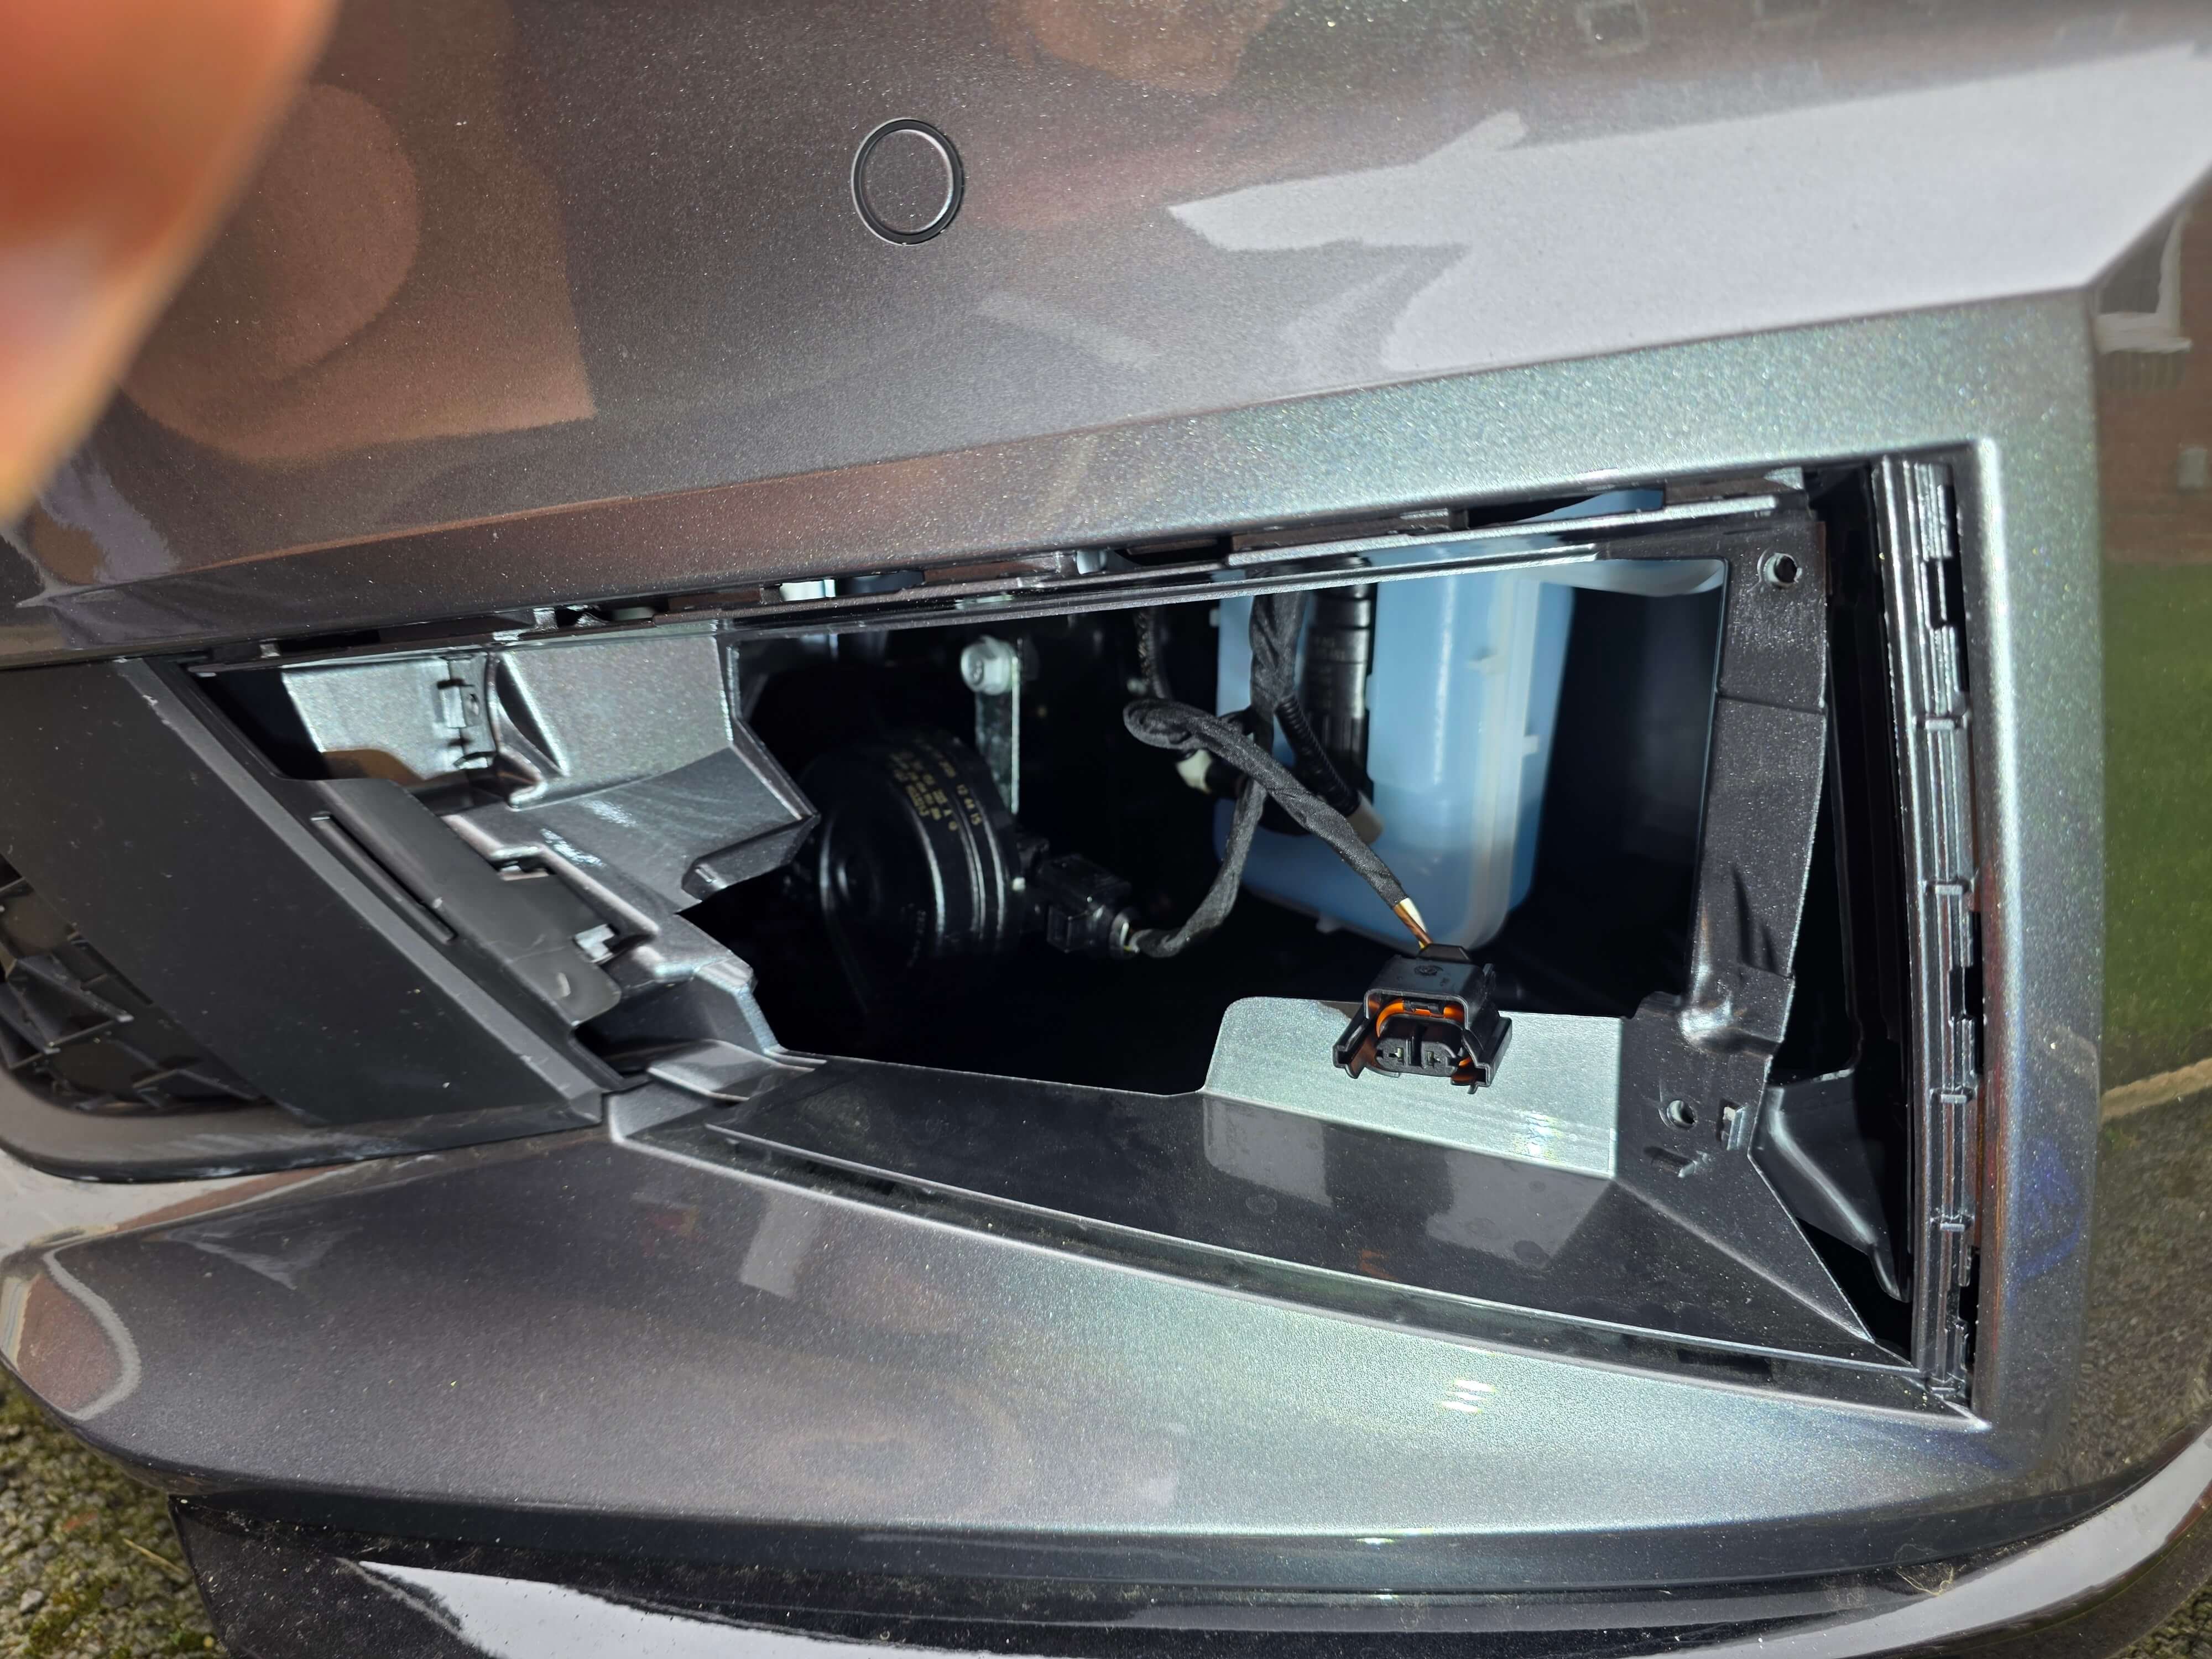
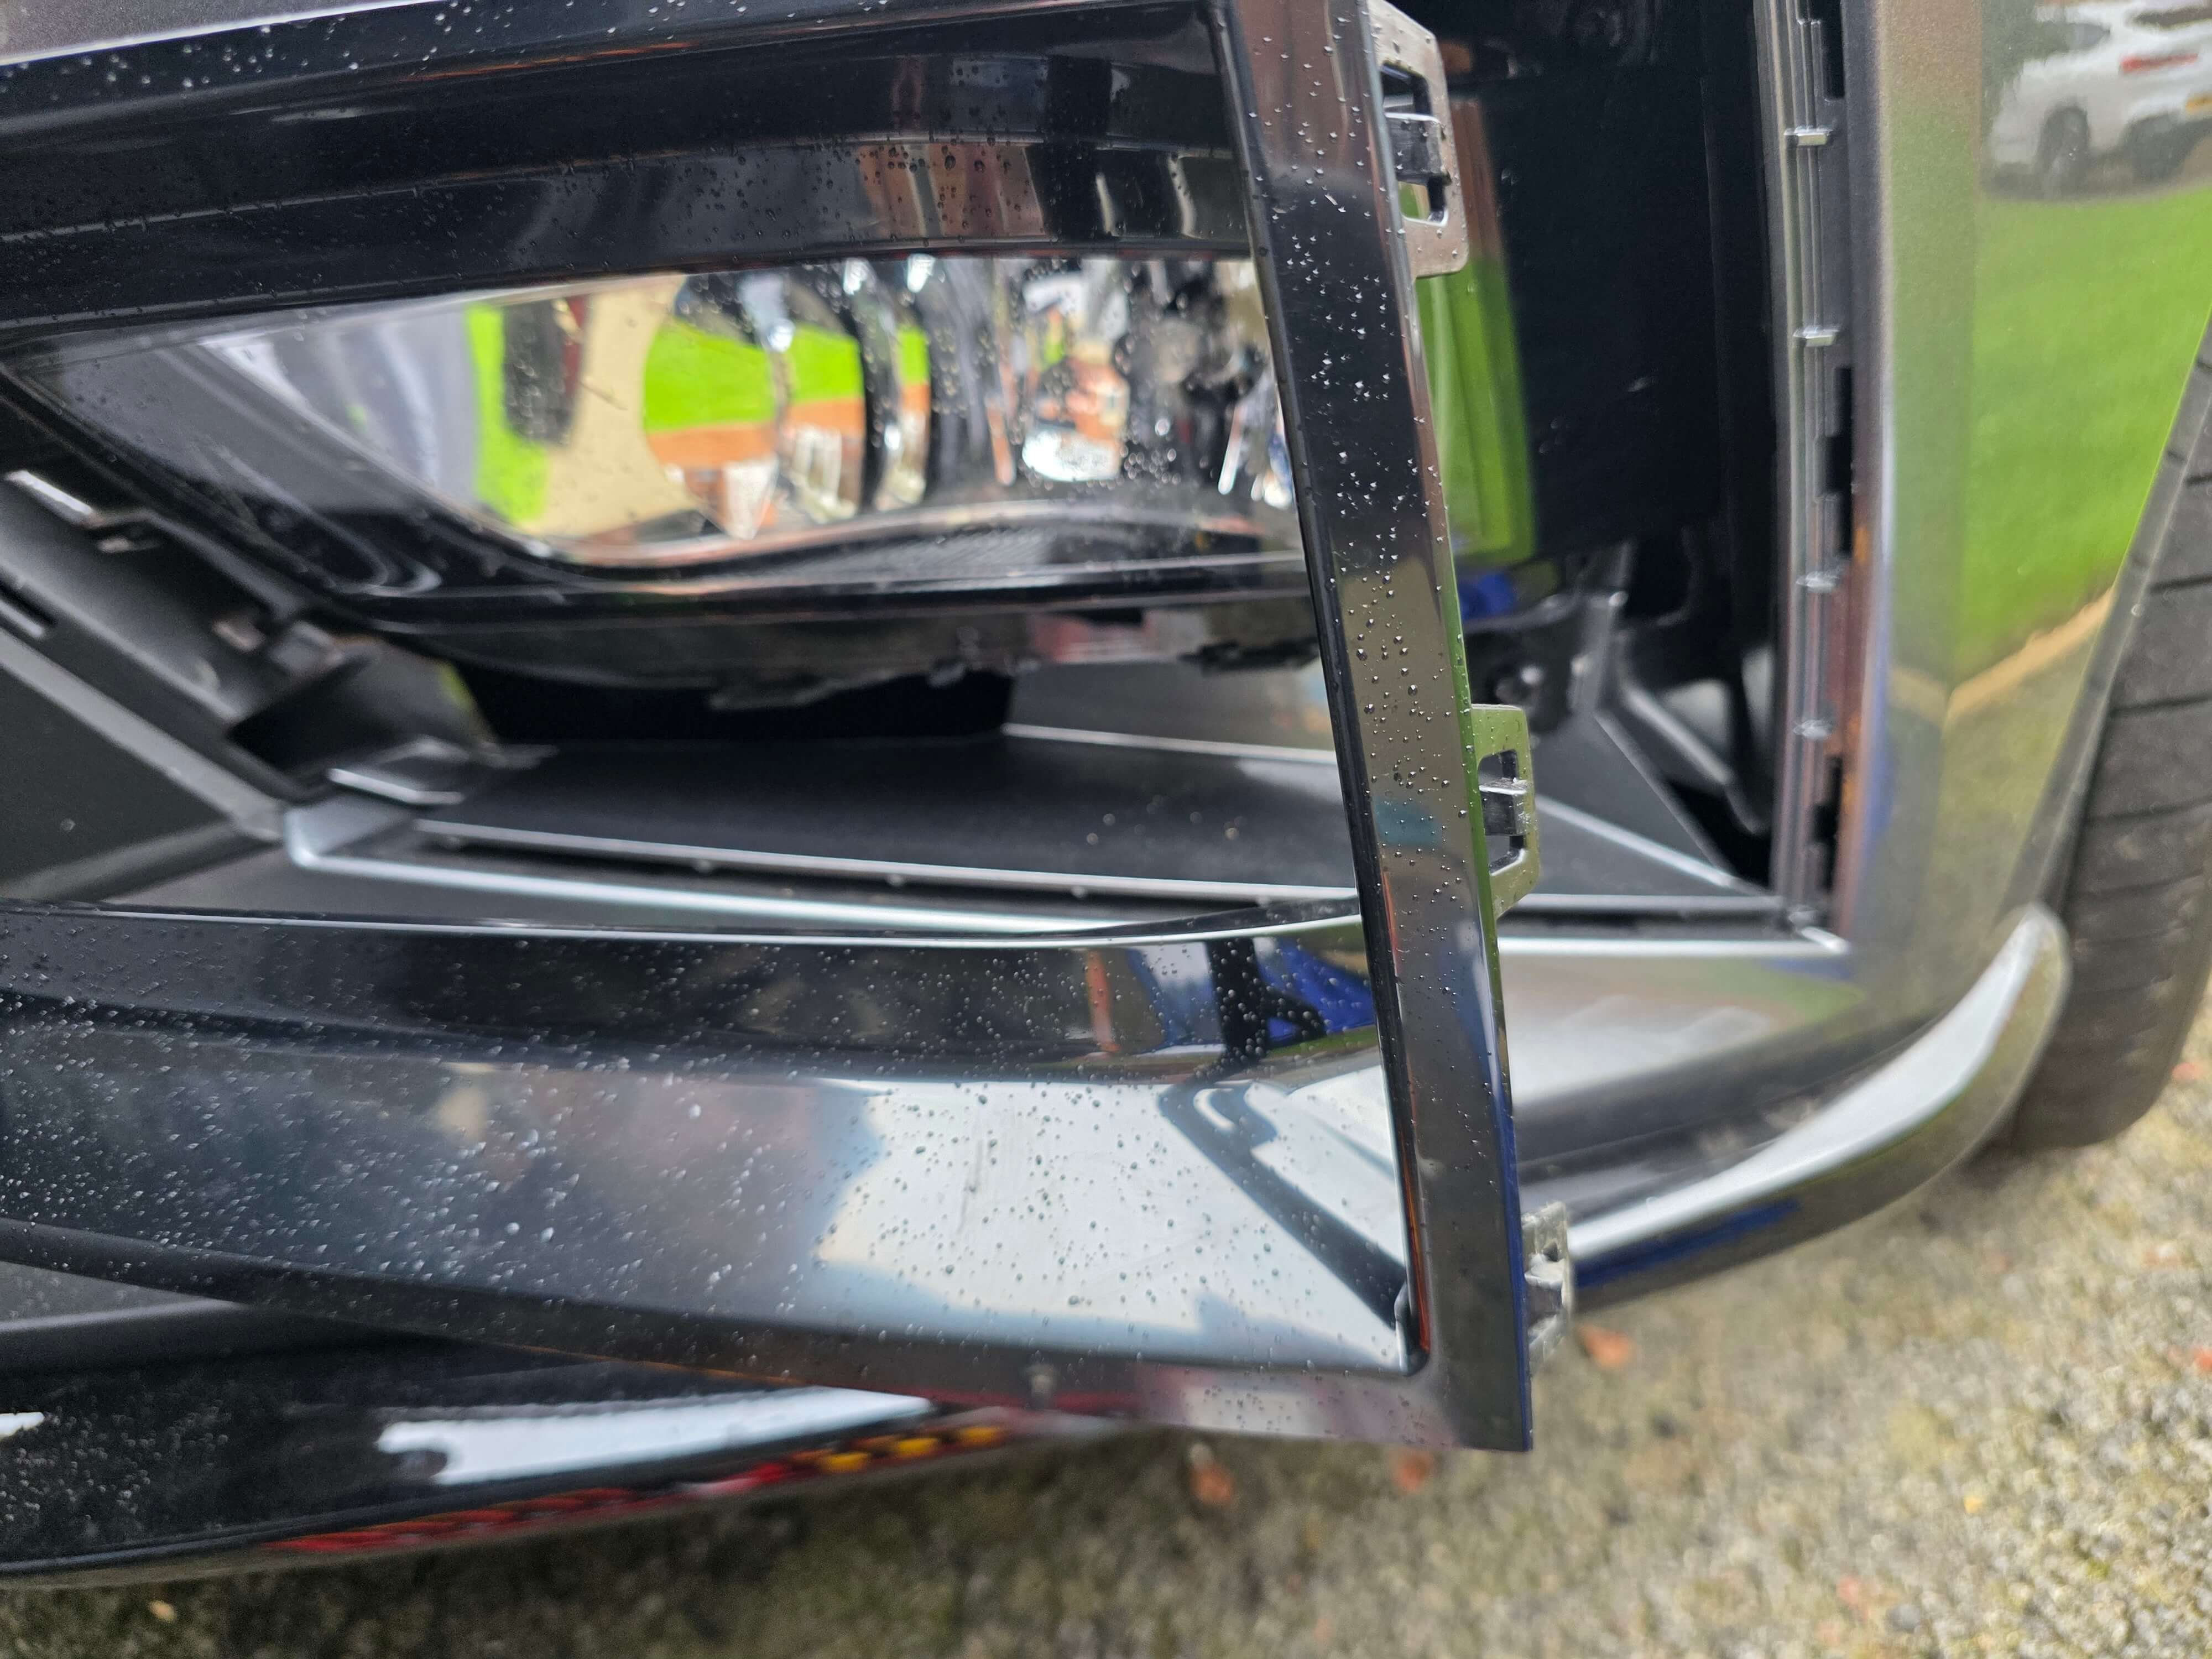
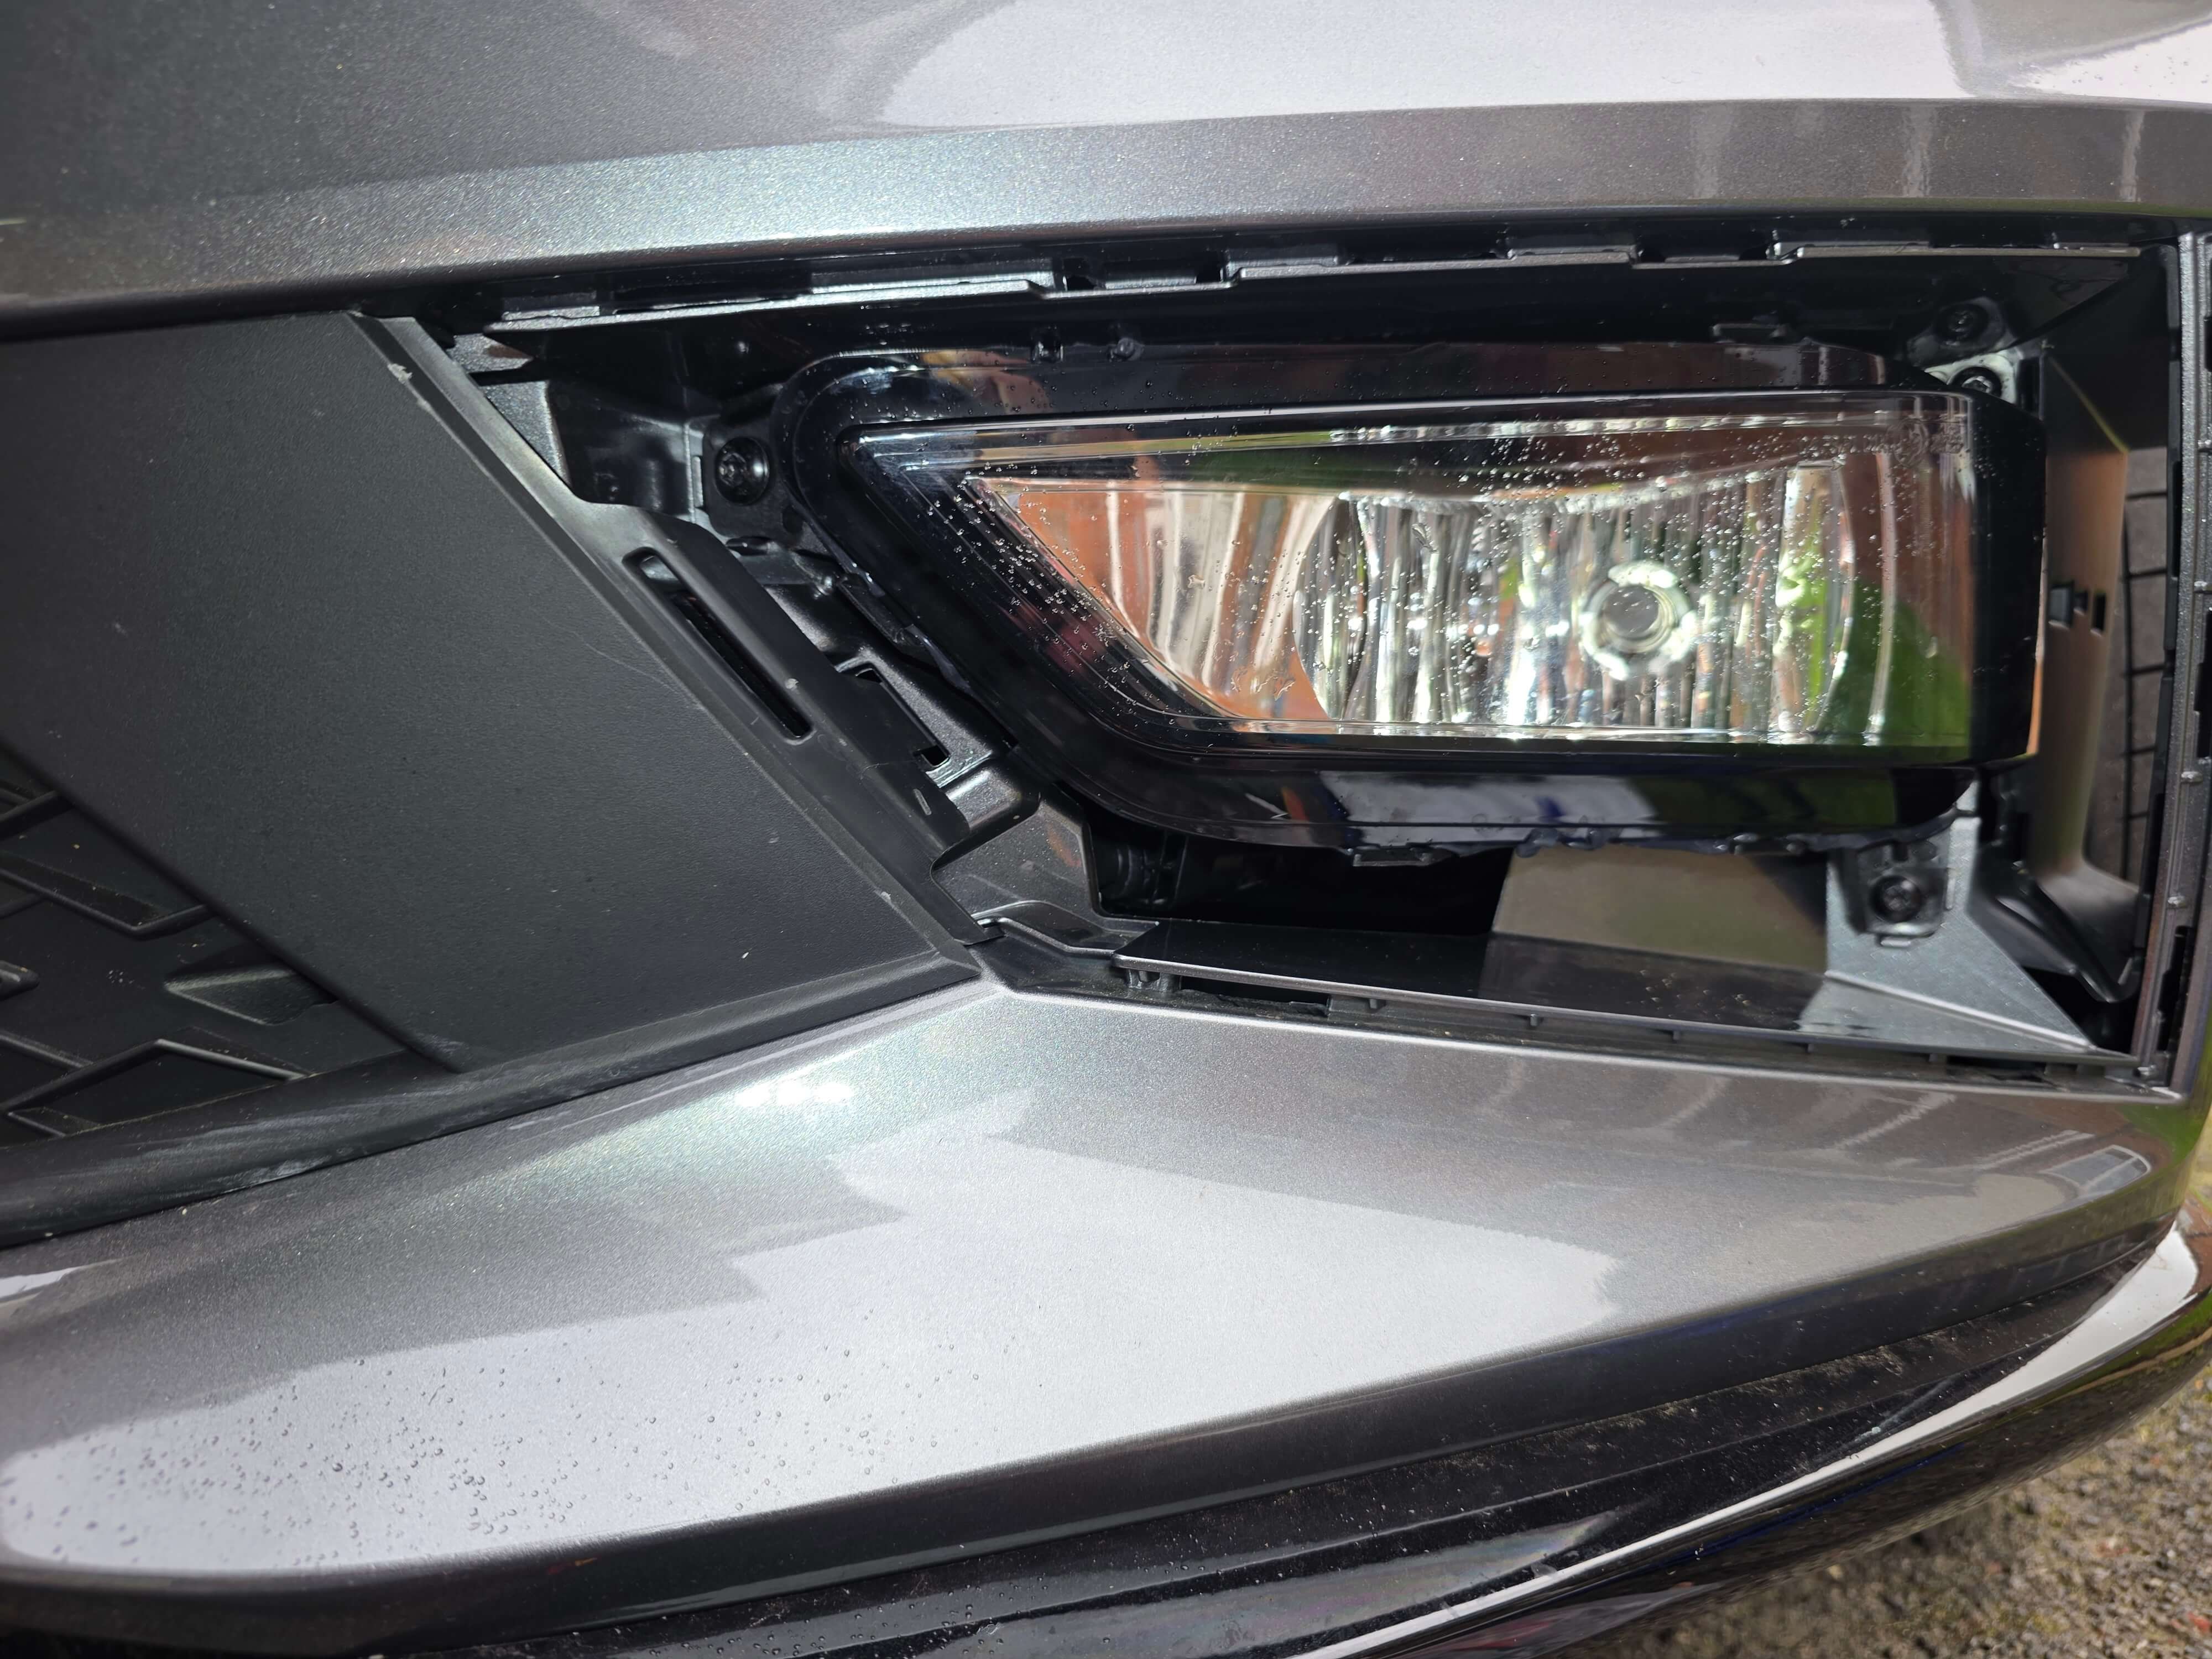
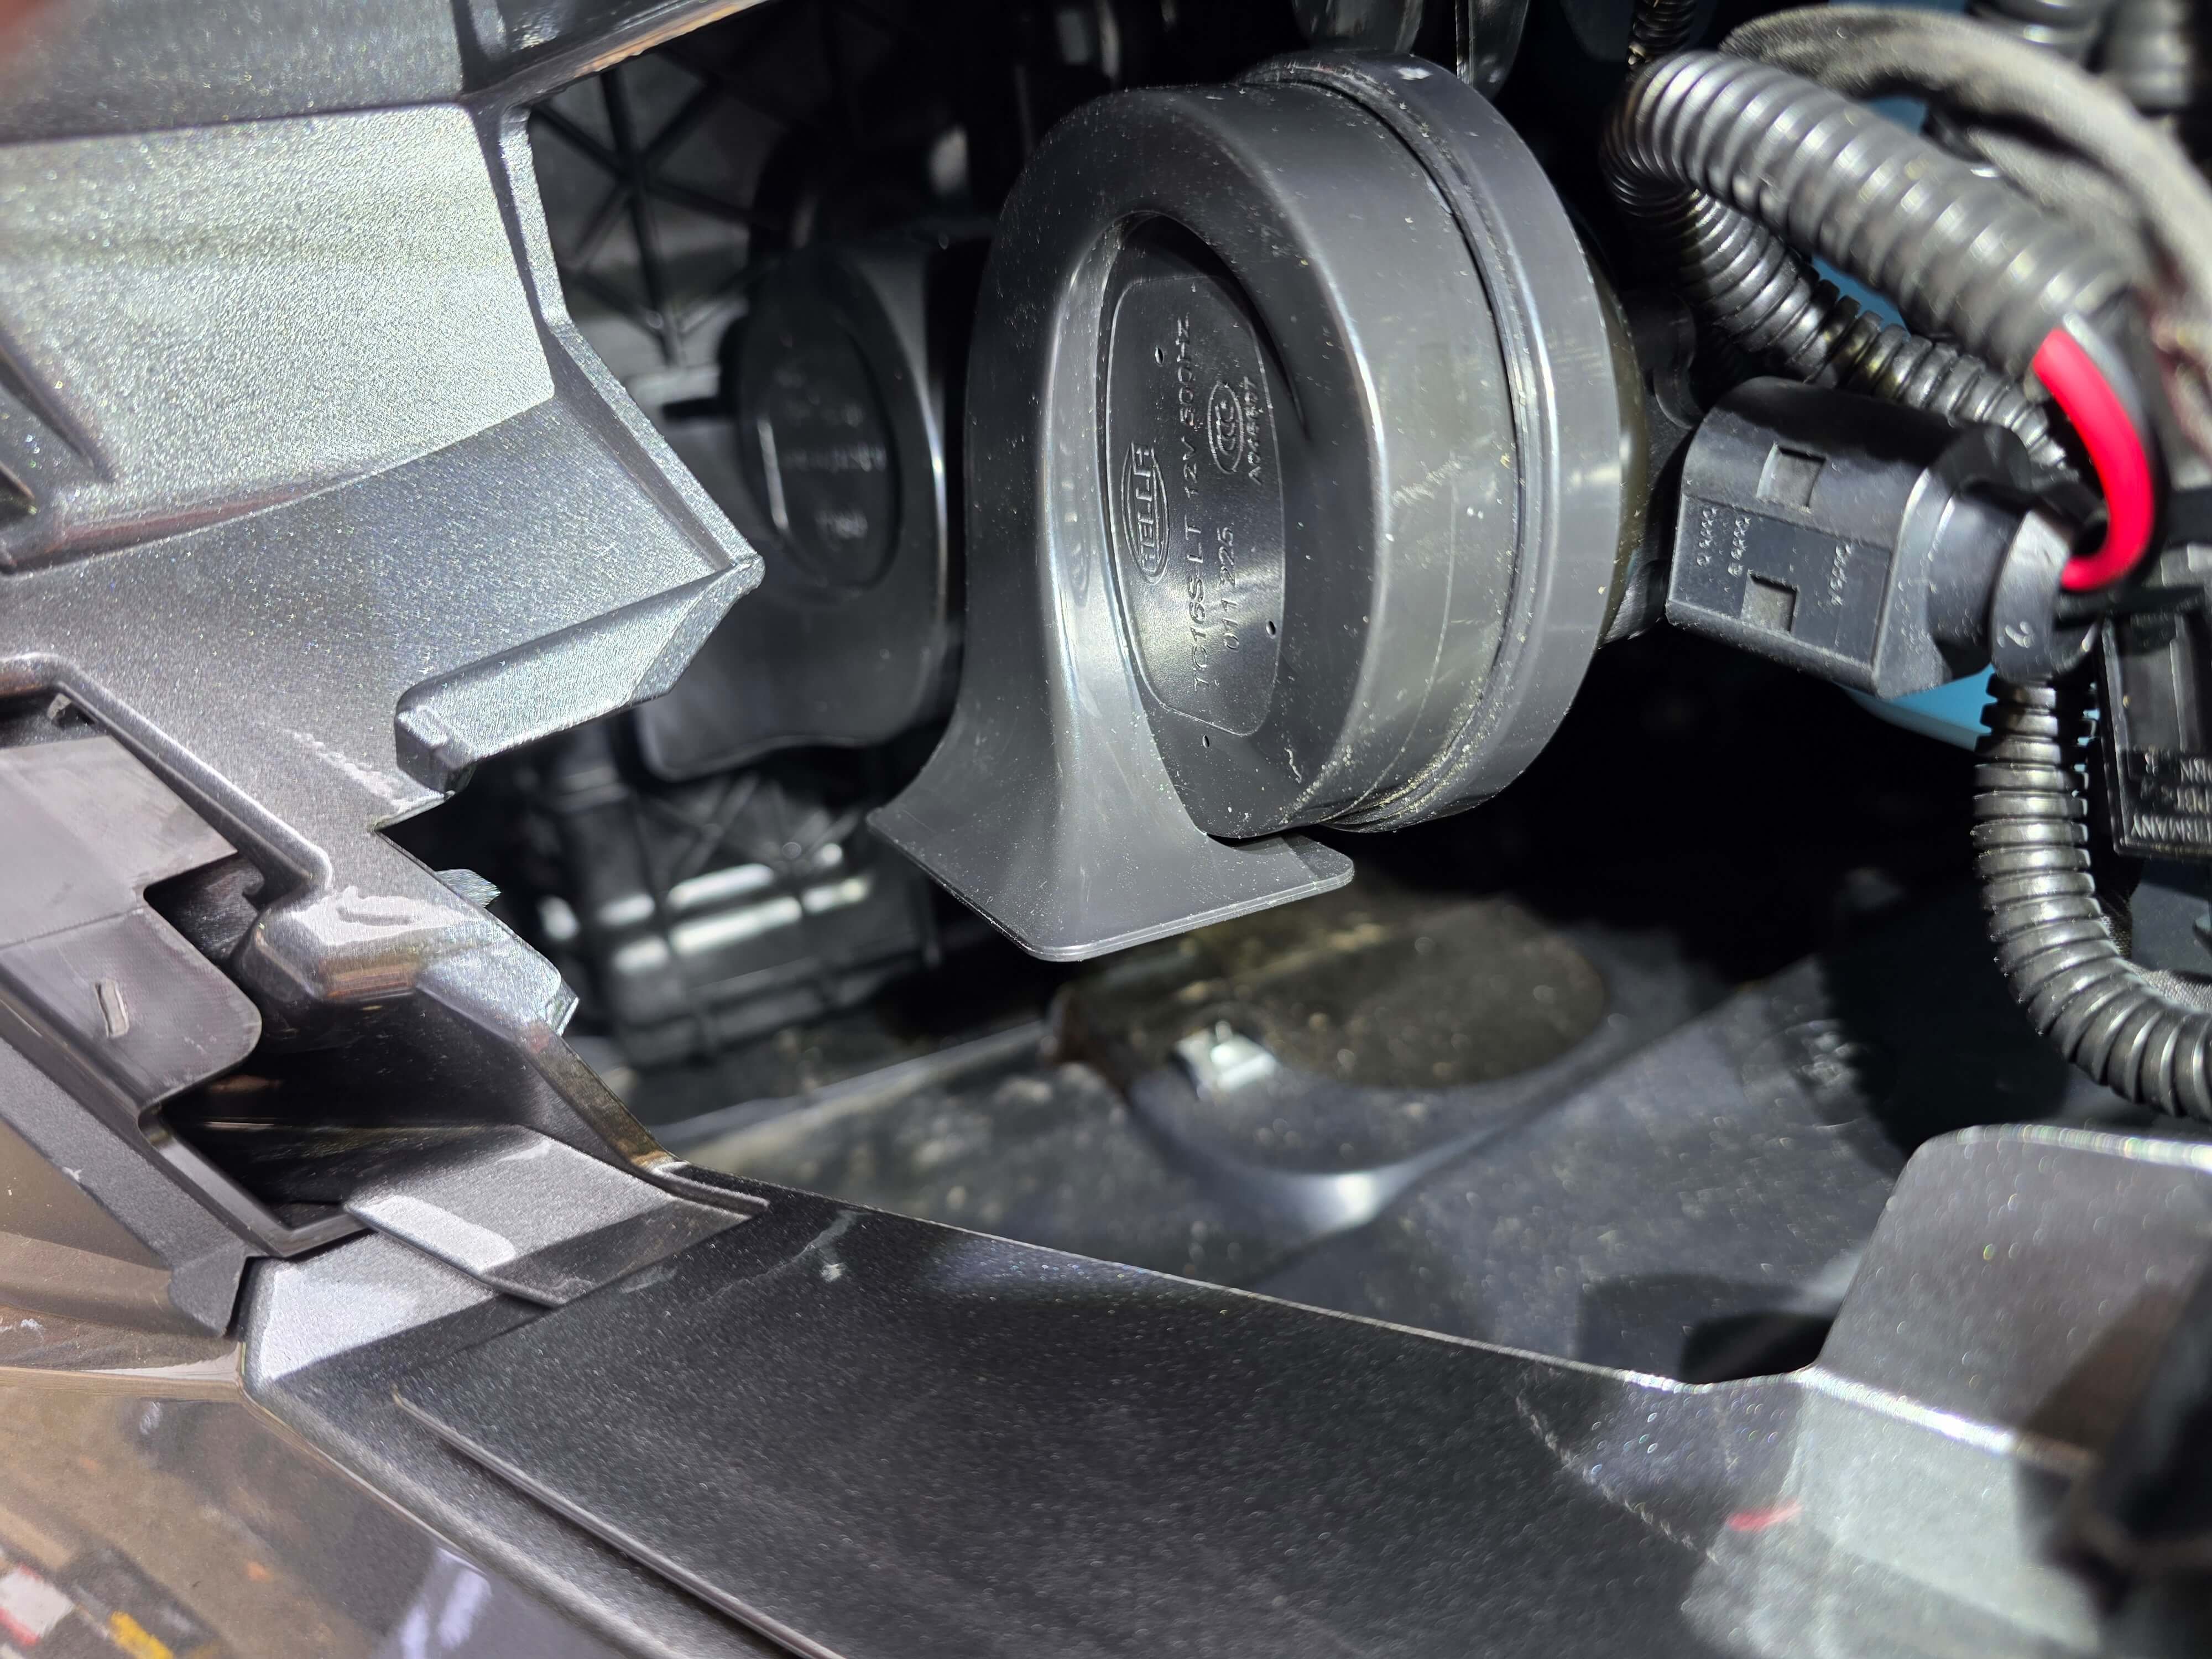
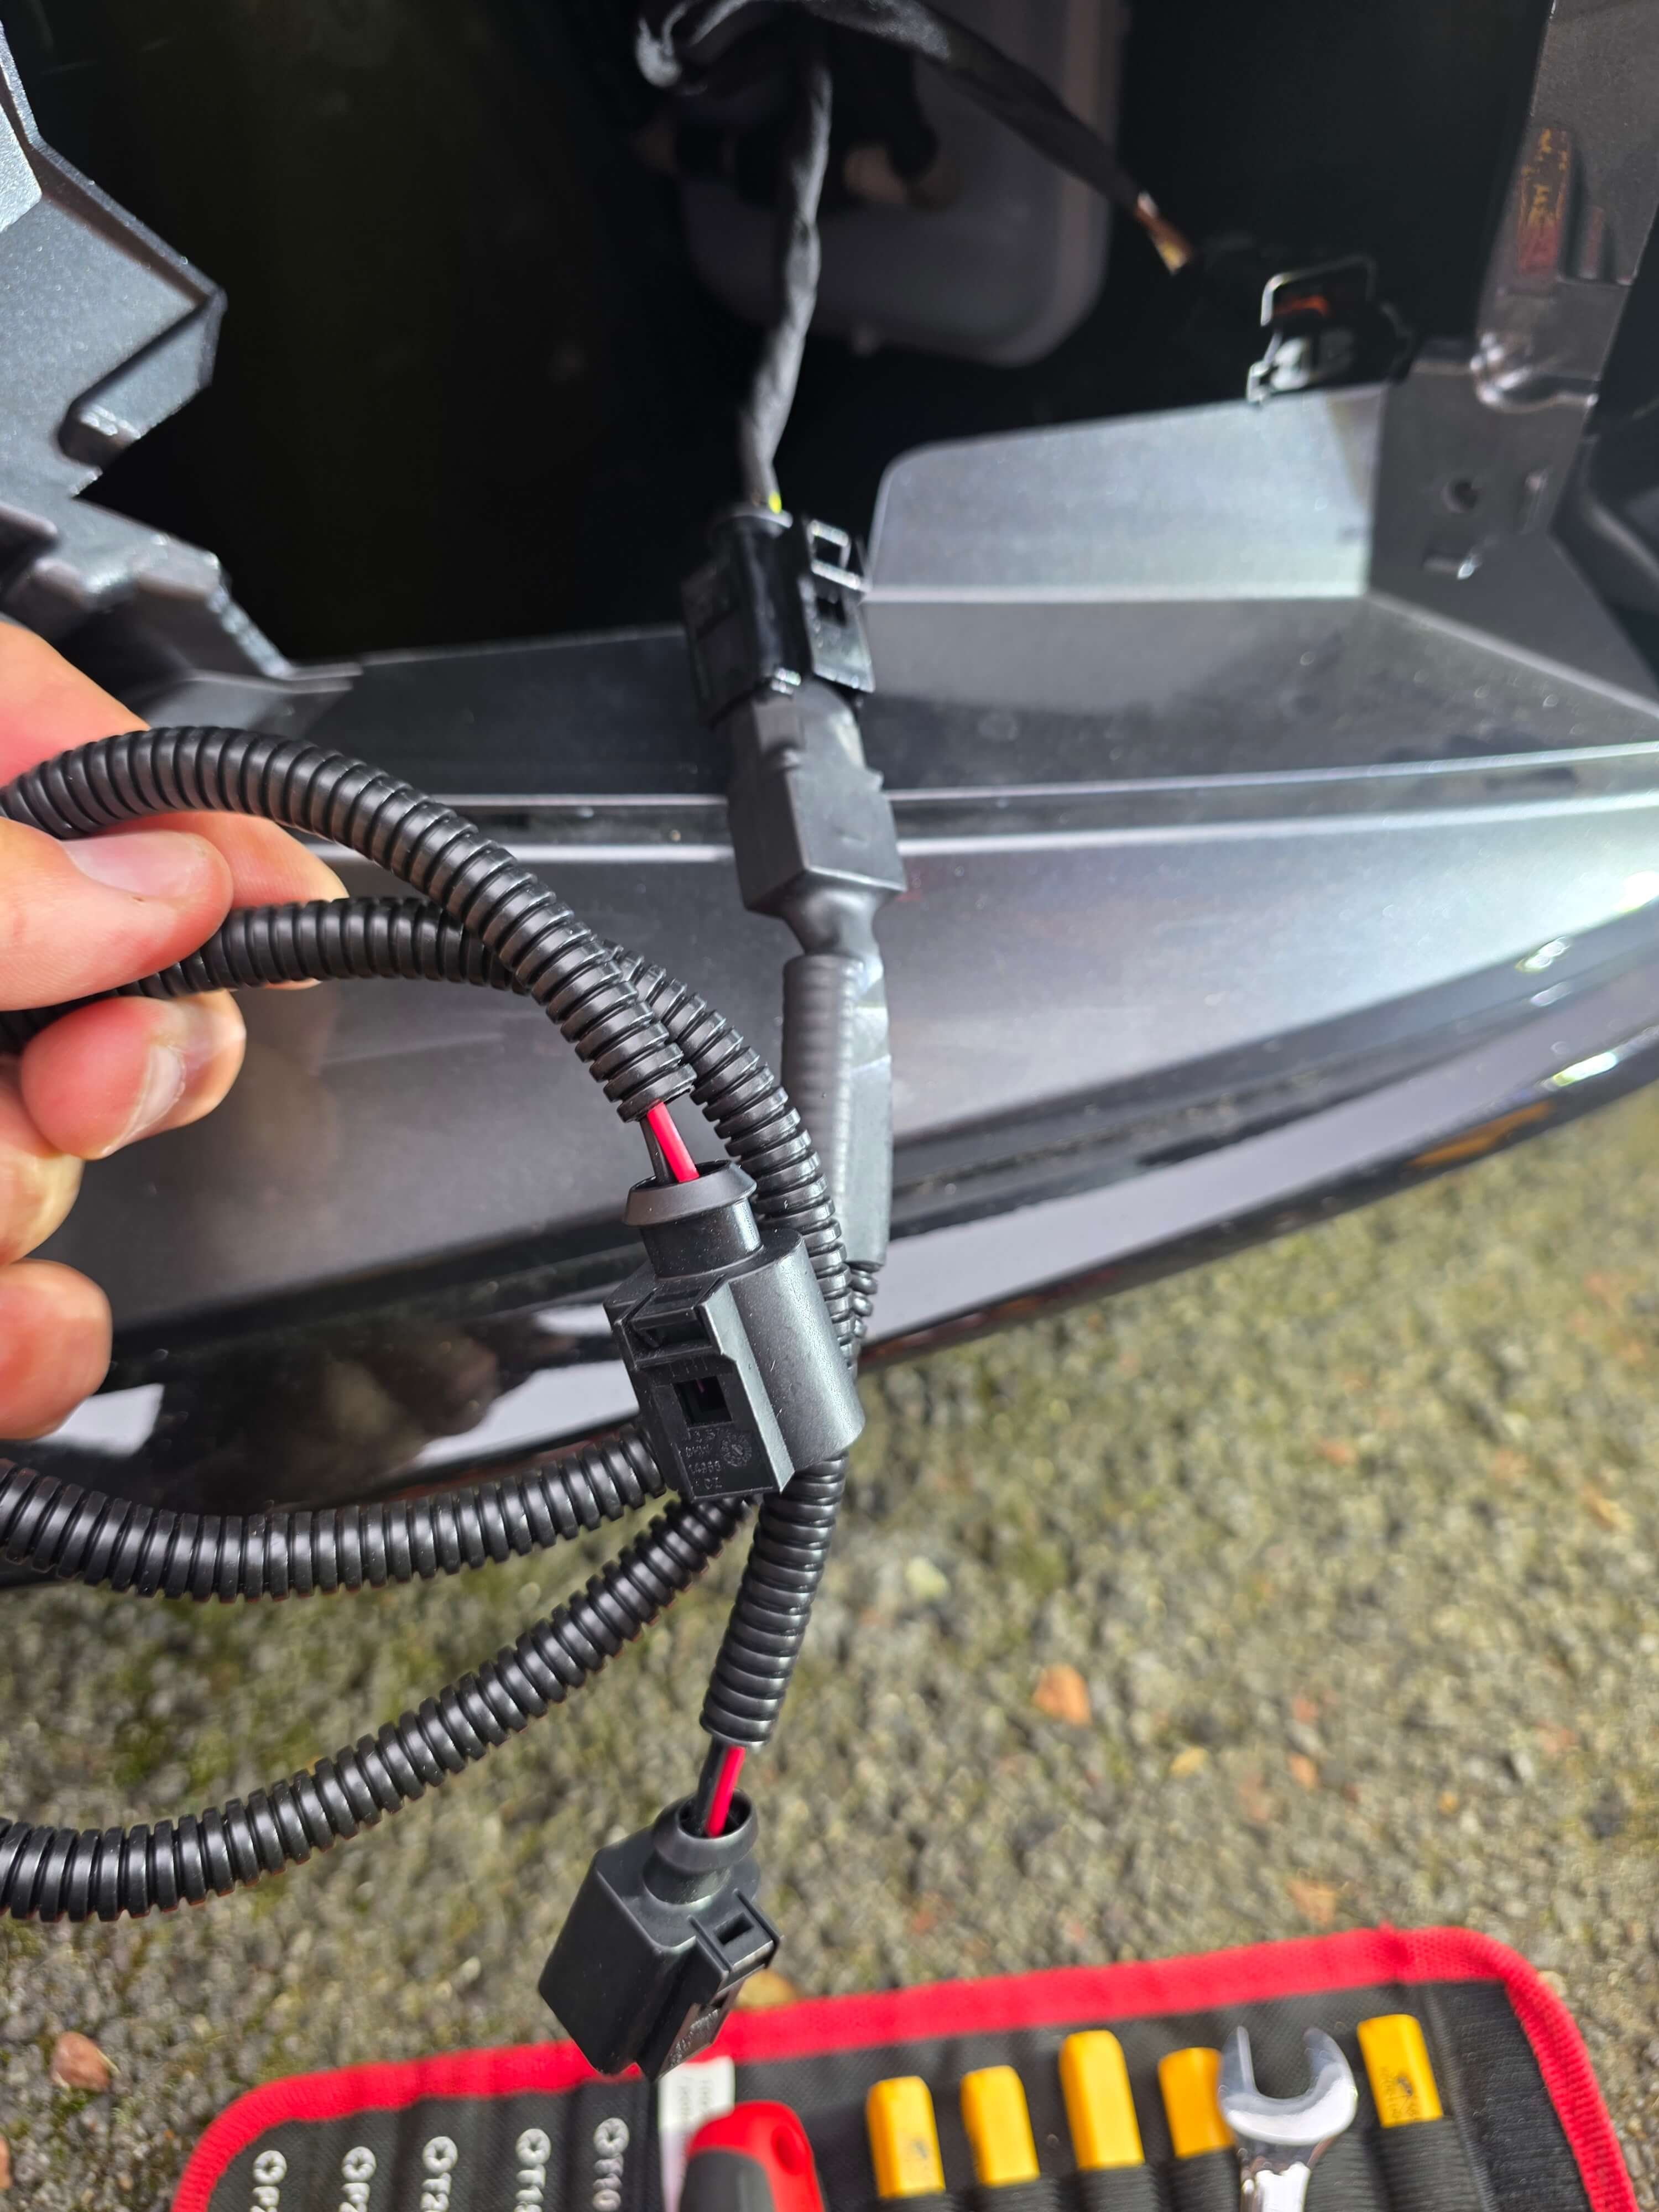
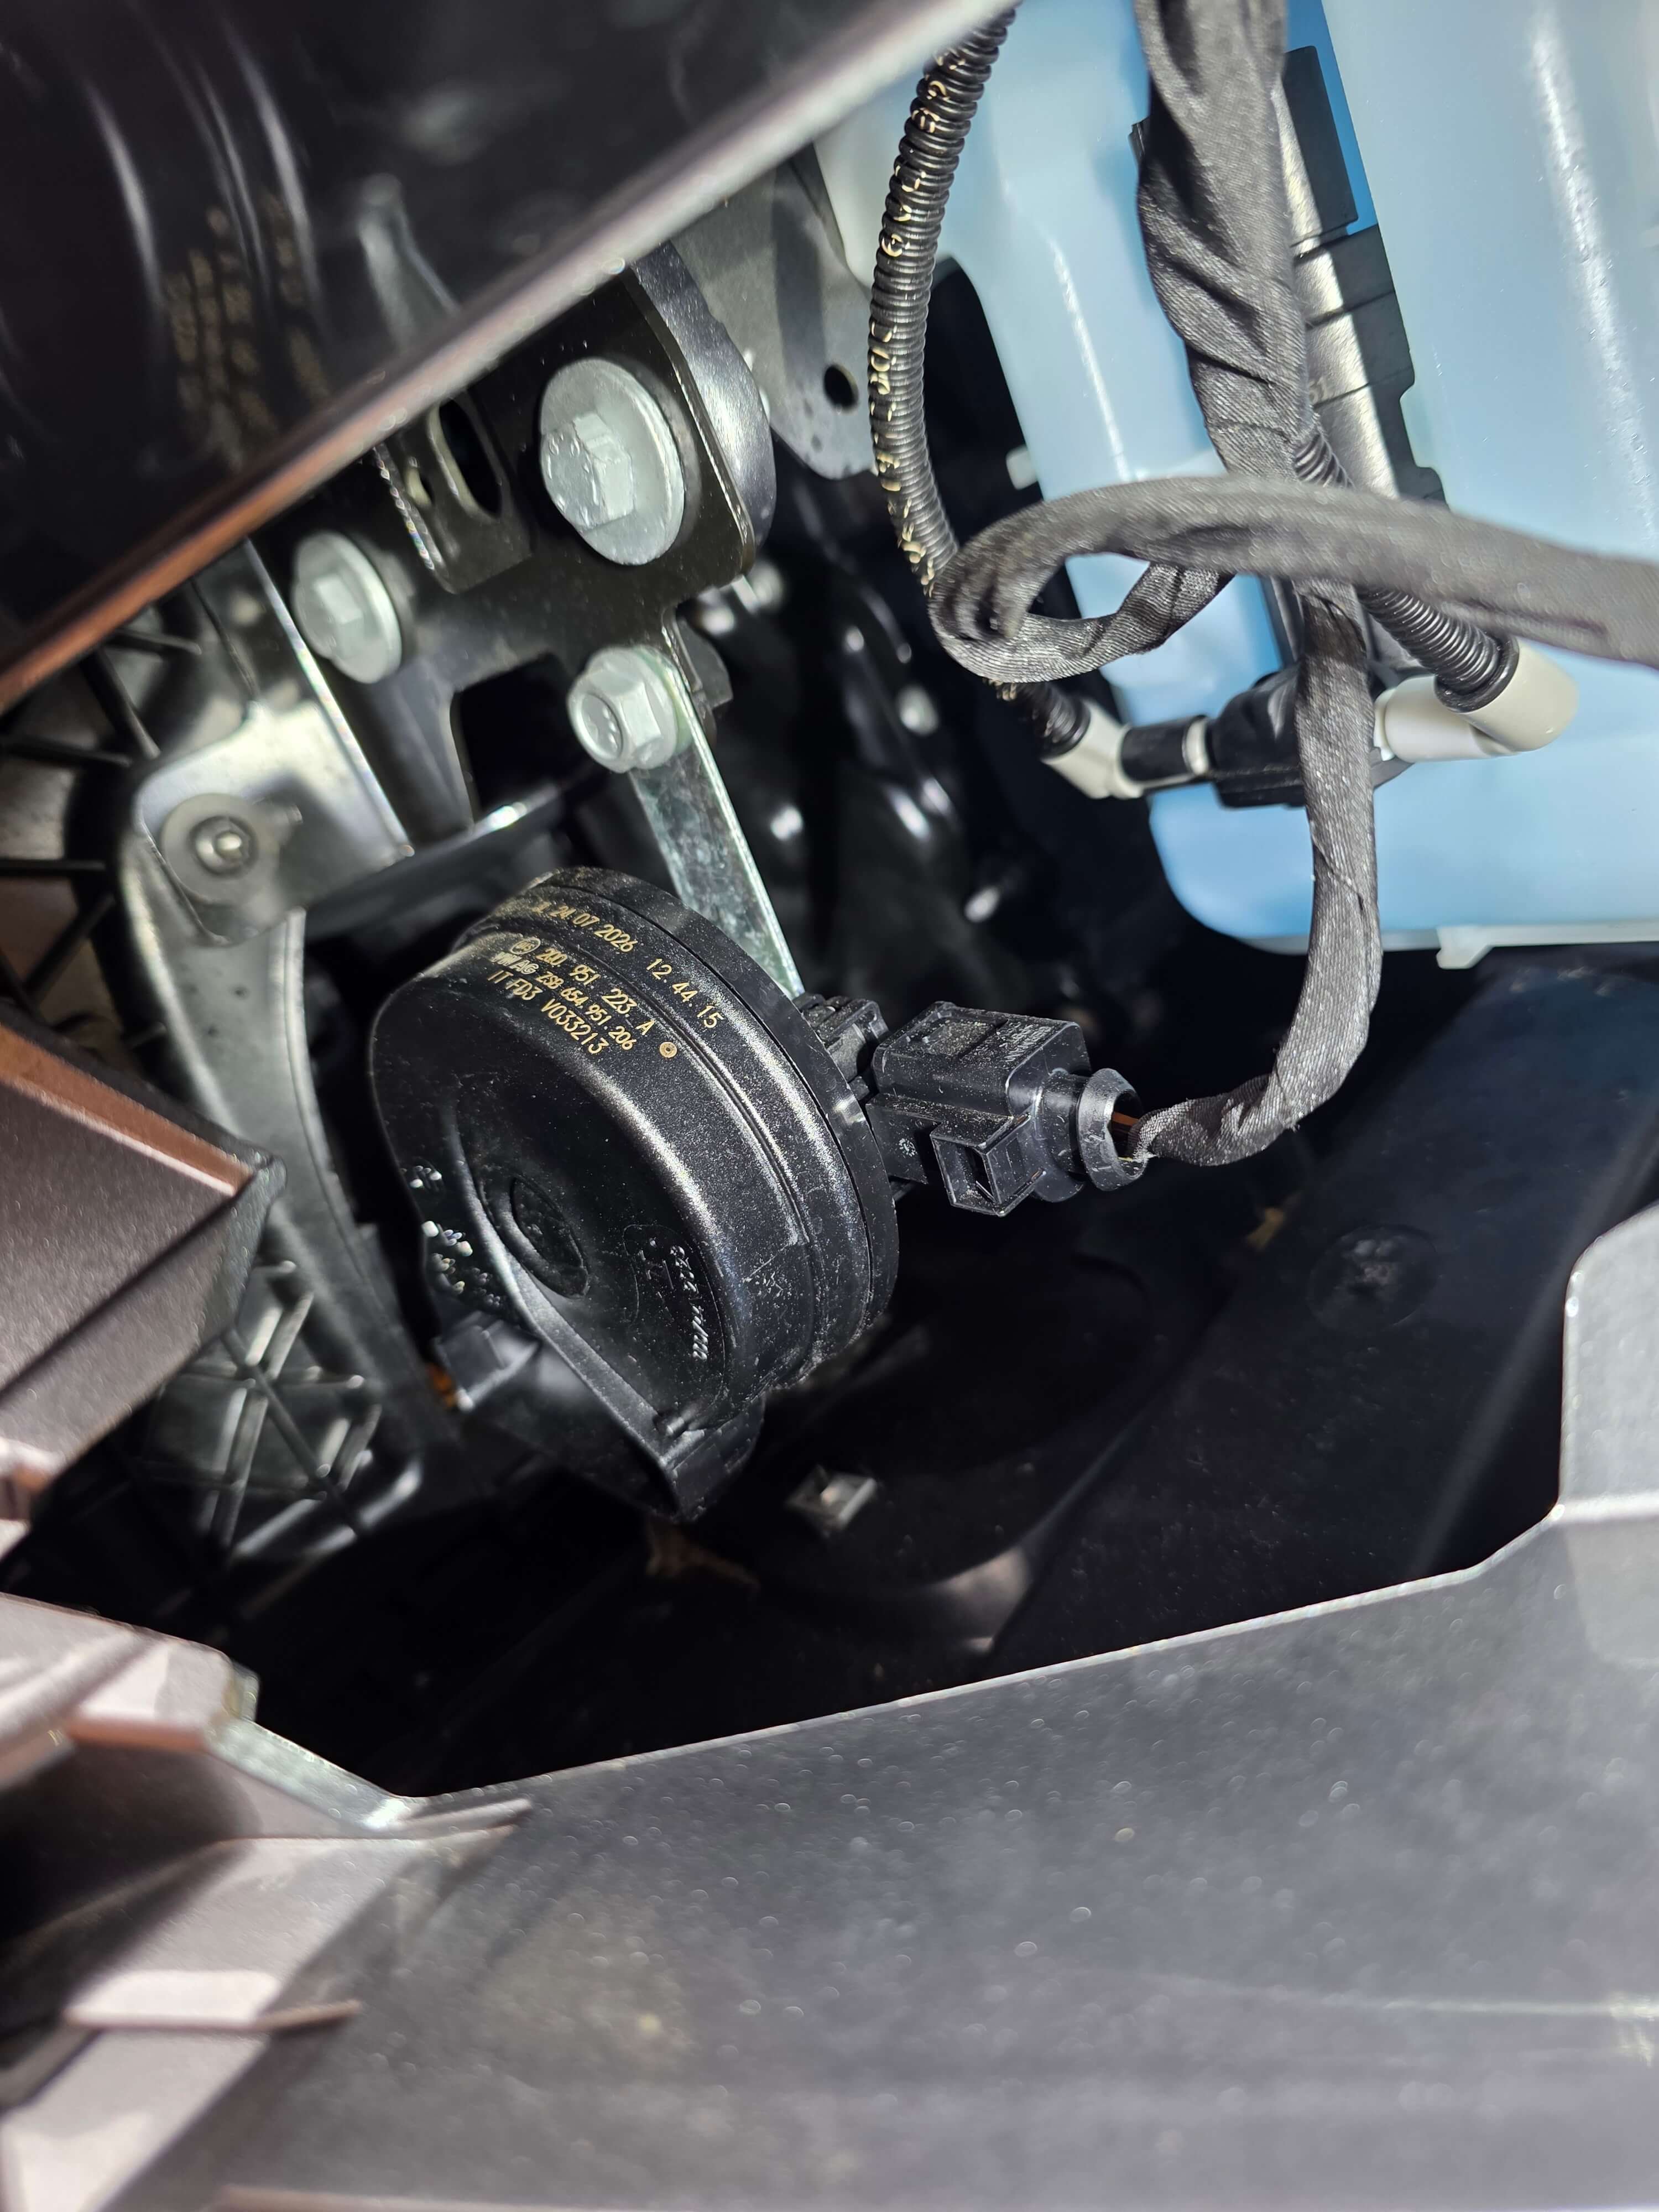
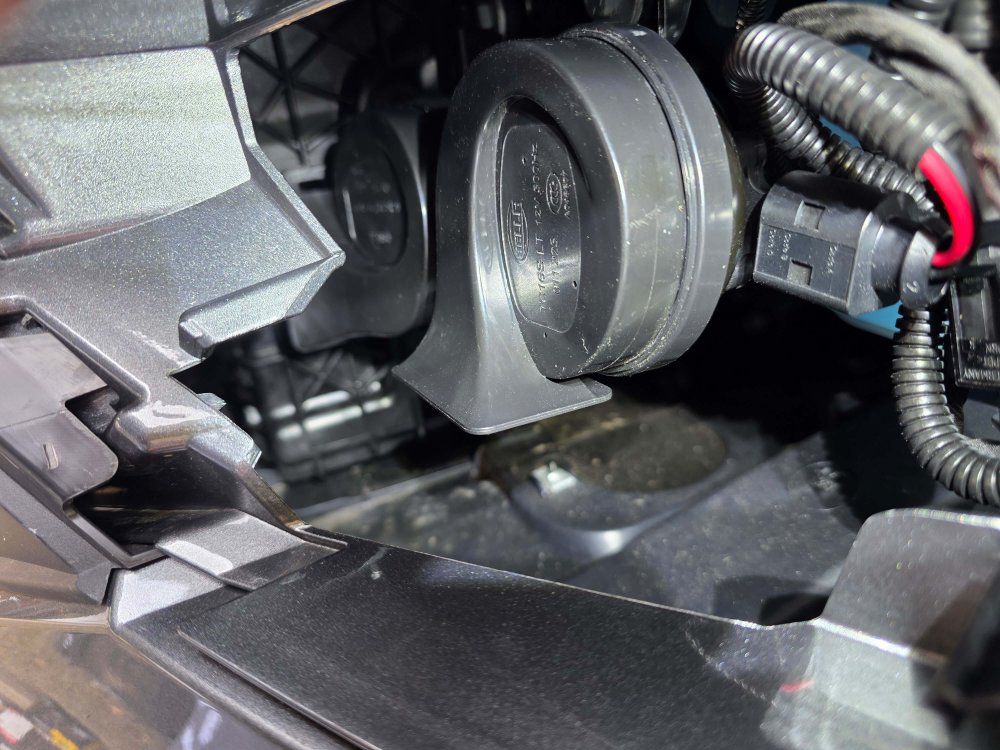
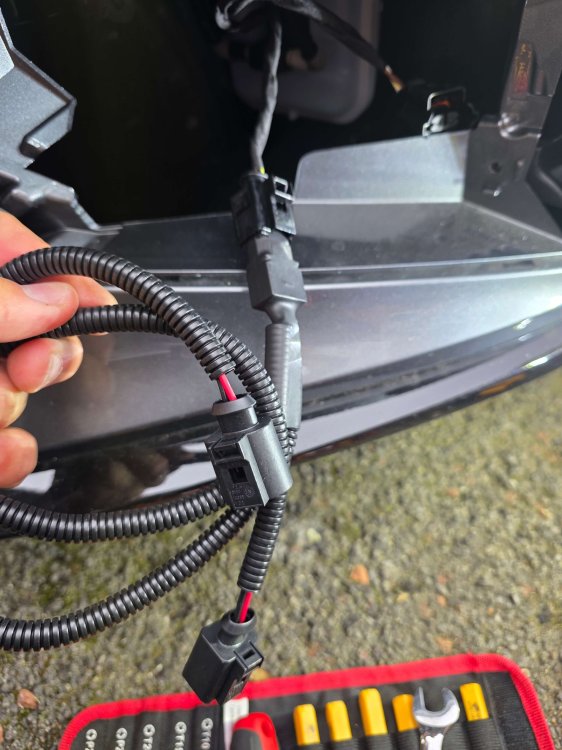
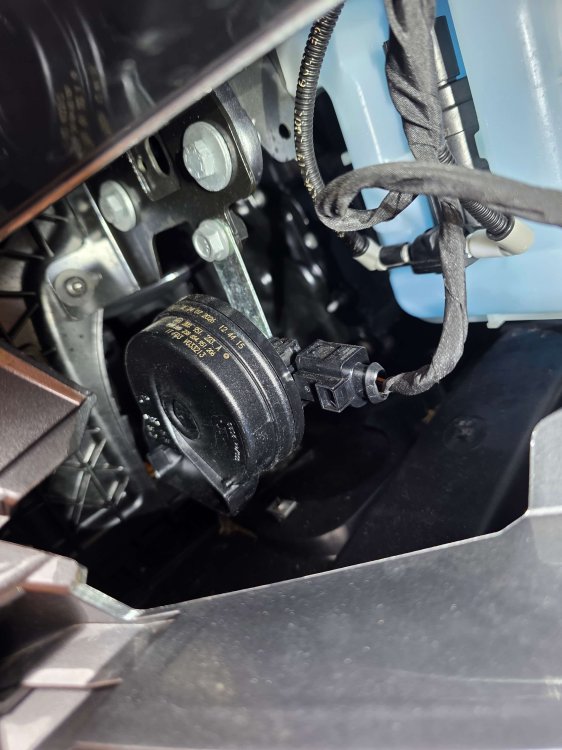
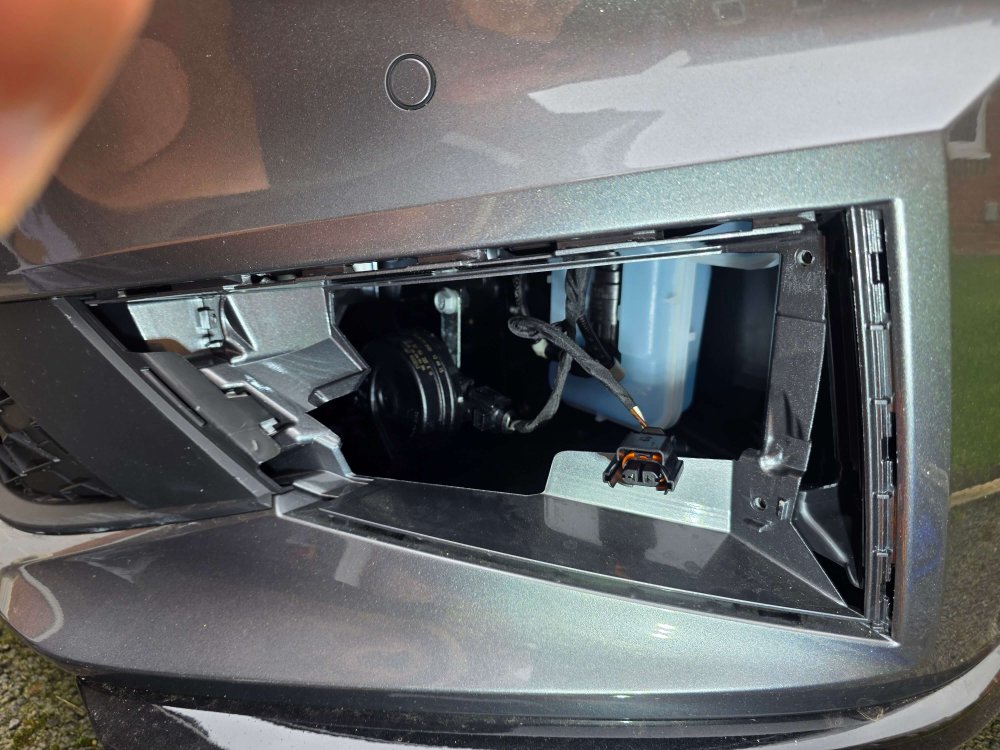
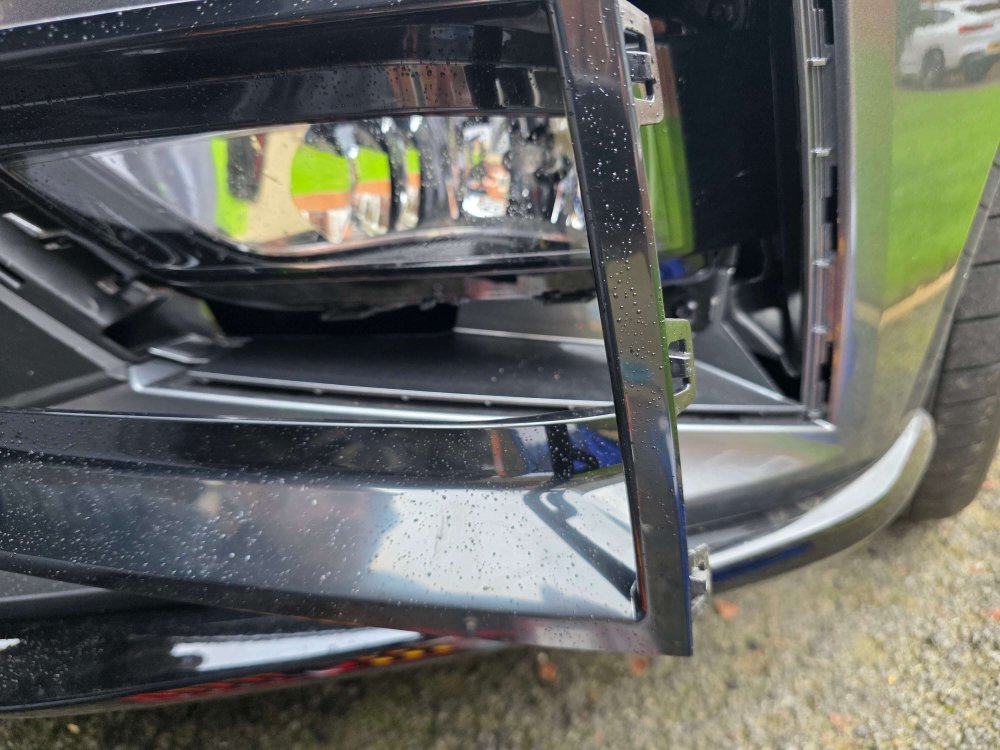
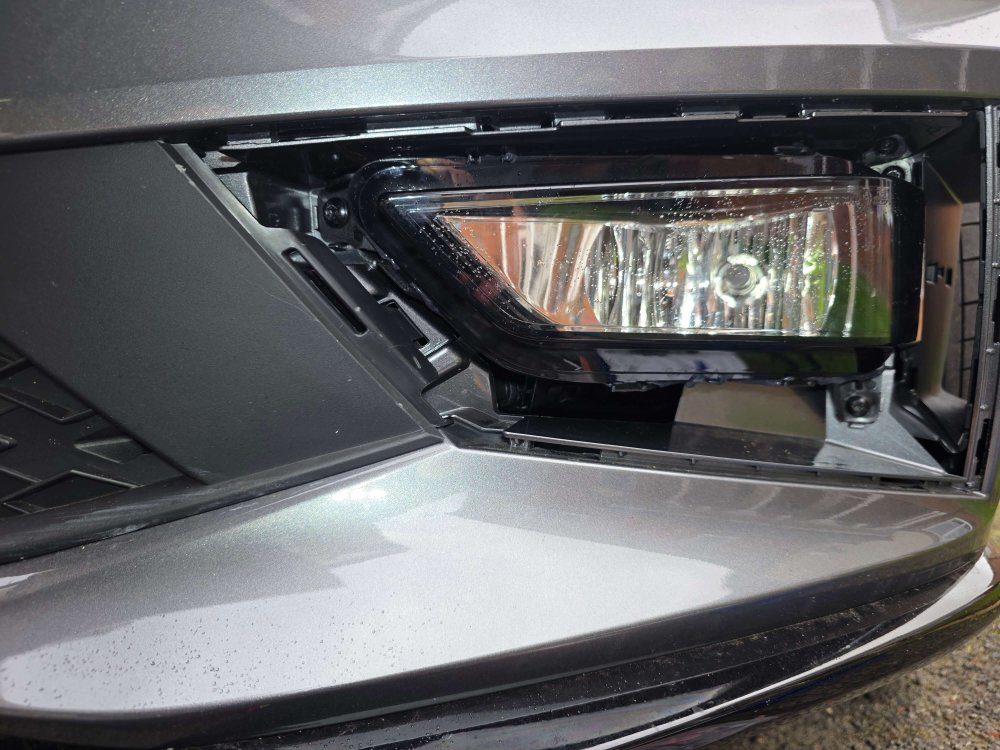
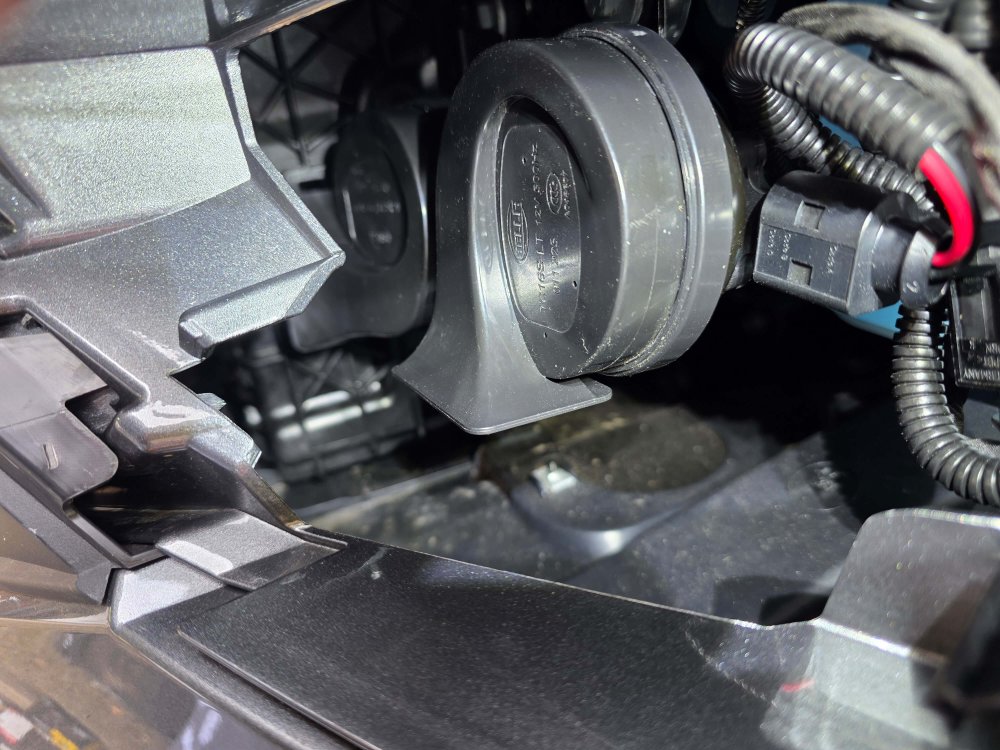
Took delivery of the car a few weeks ago and couldn't believe how pathetic the horn was. Ended up ordering a twin Hella kit with splitter wire included and looked for some guidance on best way to replace the roadrunner sound installed. Mostly worked it out myself but thought I could help others. Firstly, it's located behind the bumper on the nearside (UK model) and the easiest way is to remove the fog light. Use a trim removal tool and gently prise the trim around the light out from the bumper, starting nearest to the centre of the car. Prise the rest of it out working towards the wheel, be careful with the last part as the clips on this bit pull towards the front of the car. Then remove the 3 torx bolts (T25) from the fog light and pull the light out, remove the wire connection and place it out of the way. The original horn is clearly visible in the gap. This can be removed with a 13mm socket and the wire disconnected. Clip the splitter wire into the original harness, plug in the new horns and test to make sure they work! Bolt the bracket to each new horn and mount with the original 13mm bolt through both of the new brackets. Make sure they are positioned out of the way so that your fog light has room to go back in and cable tie the new wires out of the way so they can't jiggle about. Replace the light by plugging it back in and tightening the 3 screws to hold it in place. Push the trim back into place and test that fog light and horns still work. Hope this helps, took me around half an hour.
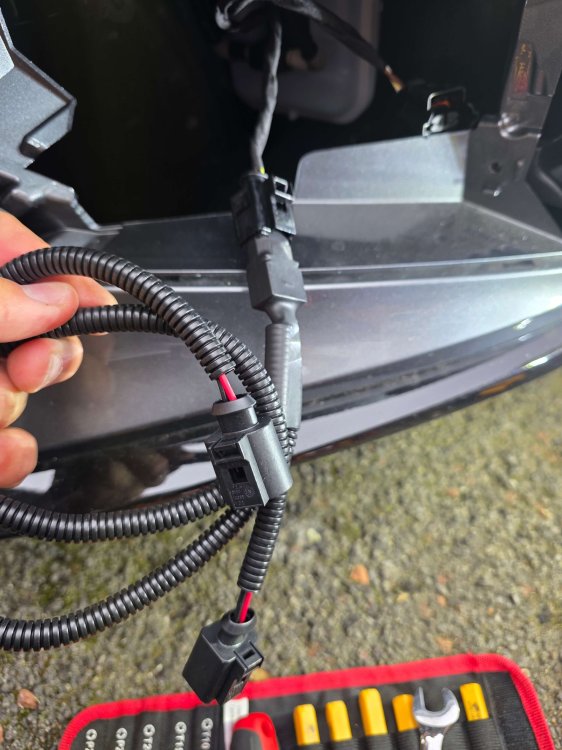
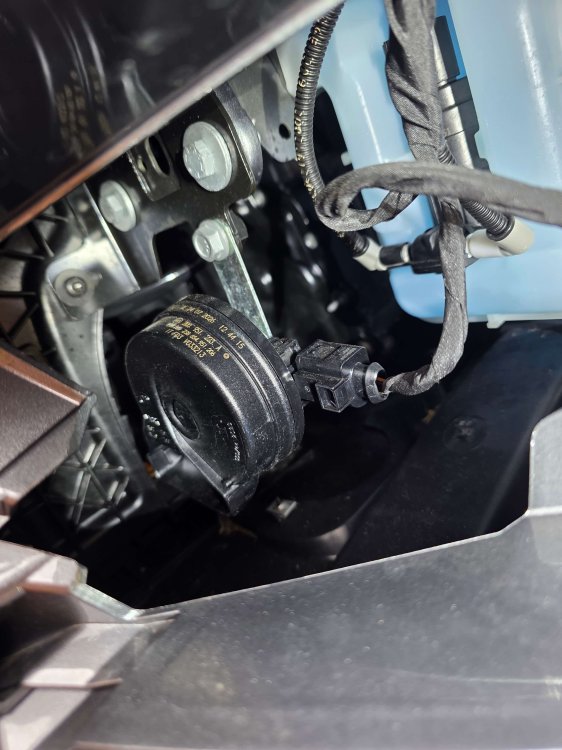 1 point
-
1 pointHi, new to the forum, but I have been lurking for a while. My parents decided to get a new car when the Opel Corsa couldn't hold all our stuff for a driving holiday. I was about 4 or 5 then. The got a used Skoda Fabia estate MK1. They liked it so much that when Skoda announced MK2 and they didn't like the look of that they jumped on getting a new MK1. The only thing wrong with that was the colour. It was way too dark than what we actually wanted when ordering it. That eventually became the car I learned to drive on. In the midst of getting my lisence, my parents bought a new MK3 Fabia Estate. This is now my car, and I love it. Best regards, Chris1 point
-
I think the slave cylinder is the external type with the small cc petrol versions so very easy/cheap to replace. It should be visible sitting on top of gearbox.1 point
-
1 pointYet another update. I’ve now had confirmation from Skoda Digital Support, saying they have made software changes. They asked me send a route as guest and then change to primary user, when I did this the route arrived immediately I was primary user.1 point
-
1 pointI would go with someone like Racingline mate as they will not push the car beyond what it’s happy with. They have a map for that engine as the wrote it on my Octavia 184 2013 car. Well a company called shark did and he is now the software director for Racingline. They should still have the files.1 point
-
I did this many years ago when my wife got her first MK3 I think, Fiesta, then I transferred it to her next Fiesta. Our older daughter bought a new SEAT Ibiza 1.4 SC in 2009 - and it had only one horn, sounded very "nasty", probably stopped me using the horn when I looked after that car for a couple or so years later on.1 point
-
1 pointI've had several school days over the past week! Thanks for your input anyway.1 point
-
The Fabia Mk4's single horn's performance was previously criticised here last year https://www.briskoda.net/forums/topic/530845-feeble-horn/#comment-5926126 The standard horn's sound quality and output don't concern me enough to bother swapping it for something more tuneful/savage, but it's useful (for me) to learn exactly what's involved in removing a foglight just in case a bulb-replacement should ever be needed.1 point
-
1 pointI've adjusted the cable at the gearbox end. Happy days all is well. I have an automatic back. UP down, auto, paddles etc. OK I still need to retrieve my socket and extension but I can see it and it is out of harms way.1 point
-
Should be 312mm vented front discs, 300mm solid (non-vented) rear discs. Plenty of places claim to provide the right options while offering all different options so check that. Have you checked the quick checks? Feel the wheels after a drive (carefully) - extra hot (hence the care) or cold will be a sticking caliper (stuck on or stuck off respectively). Stuck on means it’s on a bit but won’t move more to brake. Check brake fluid level. Perhaps have them bled too to make sure there’s no air in the system.1 point
-
I'd never even heard of them till now. Just had a quick read and I think I'd have still gone with the standard ones. I'm a gentle cruiser these days :)1 point
-
1 pointThey don't come as standard on the mk4, well maybe on the VRS model they do but not below as far as I'm aware (I have SE L which doesn't have one) They were an available option though I believe so some mk4 hatch's will have them1 point
-
1 pointAgreed. The battery needs changing and I need to make sure I charge it. Amazingly the battery Seems well capable of starting the car.1 point
-
1 pointThe shift is definitely cable. You can see it move when pulling the shift lever. I have had a first go at adjusting it but the **** socket extension dropped in into somewhere….. we’ve all been there. Finished lunch so I’m back out to have another go. This time with the extensions taped together. I’m 99% certain I’ve found the problem but getting onto the bolt and pulling the cable etc presents a minor challenge!1 point
-
My wife had a cold run to the borders yesterday, was getting about 3.6m/kWh. As we've only had the car in good weather so far it's quite the hit from the 4.2 we've been getting. Still the previous ID.4 would have been around 3.4 m/kWh in similar conditions.....1 point
-
1 point
-
They really do look genuine 👍 But, was it an option offered by Skoda? I can't see any mention of it in any literature. Yeah, the absence of the rear parking sensors is odd, with the car being an Elegance model they should be standard. Looks like an aftermarket rear sensor has been installed.1 point
-
Yet another example of an "Italian Tune" being the solution.1 point
-
1 pointThat's the problem, with the clutches disengaged there's no engine braking - so the only way to decelerate is by using the brakes, which means you use the brakes more as you're using them from a higher speed. Since I measured no improvement in mpg in Eco all Eco did was increase brake usage, and hence wear and cost. So for me Eco was increasing my running costs, with no reduction in CO2 emissions and an increase in PM2.5 emissions from greater brake usage. Kinda makes Eco not really Eco?1 point
-
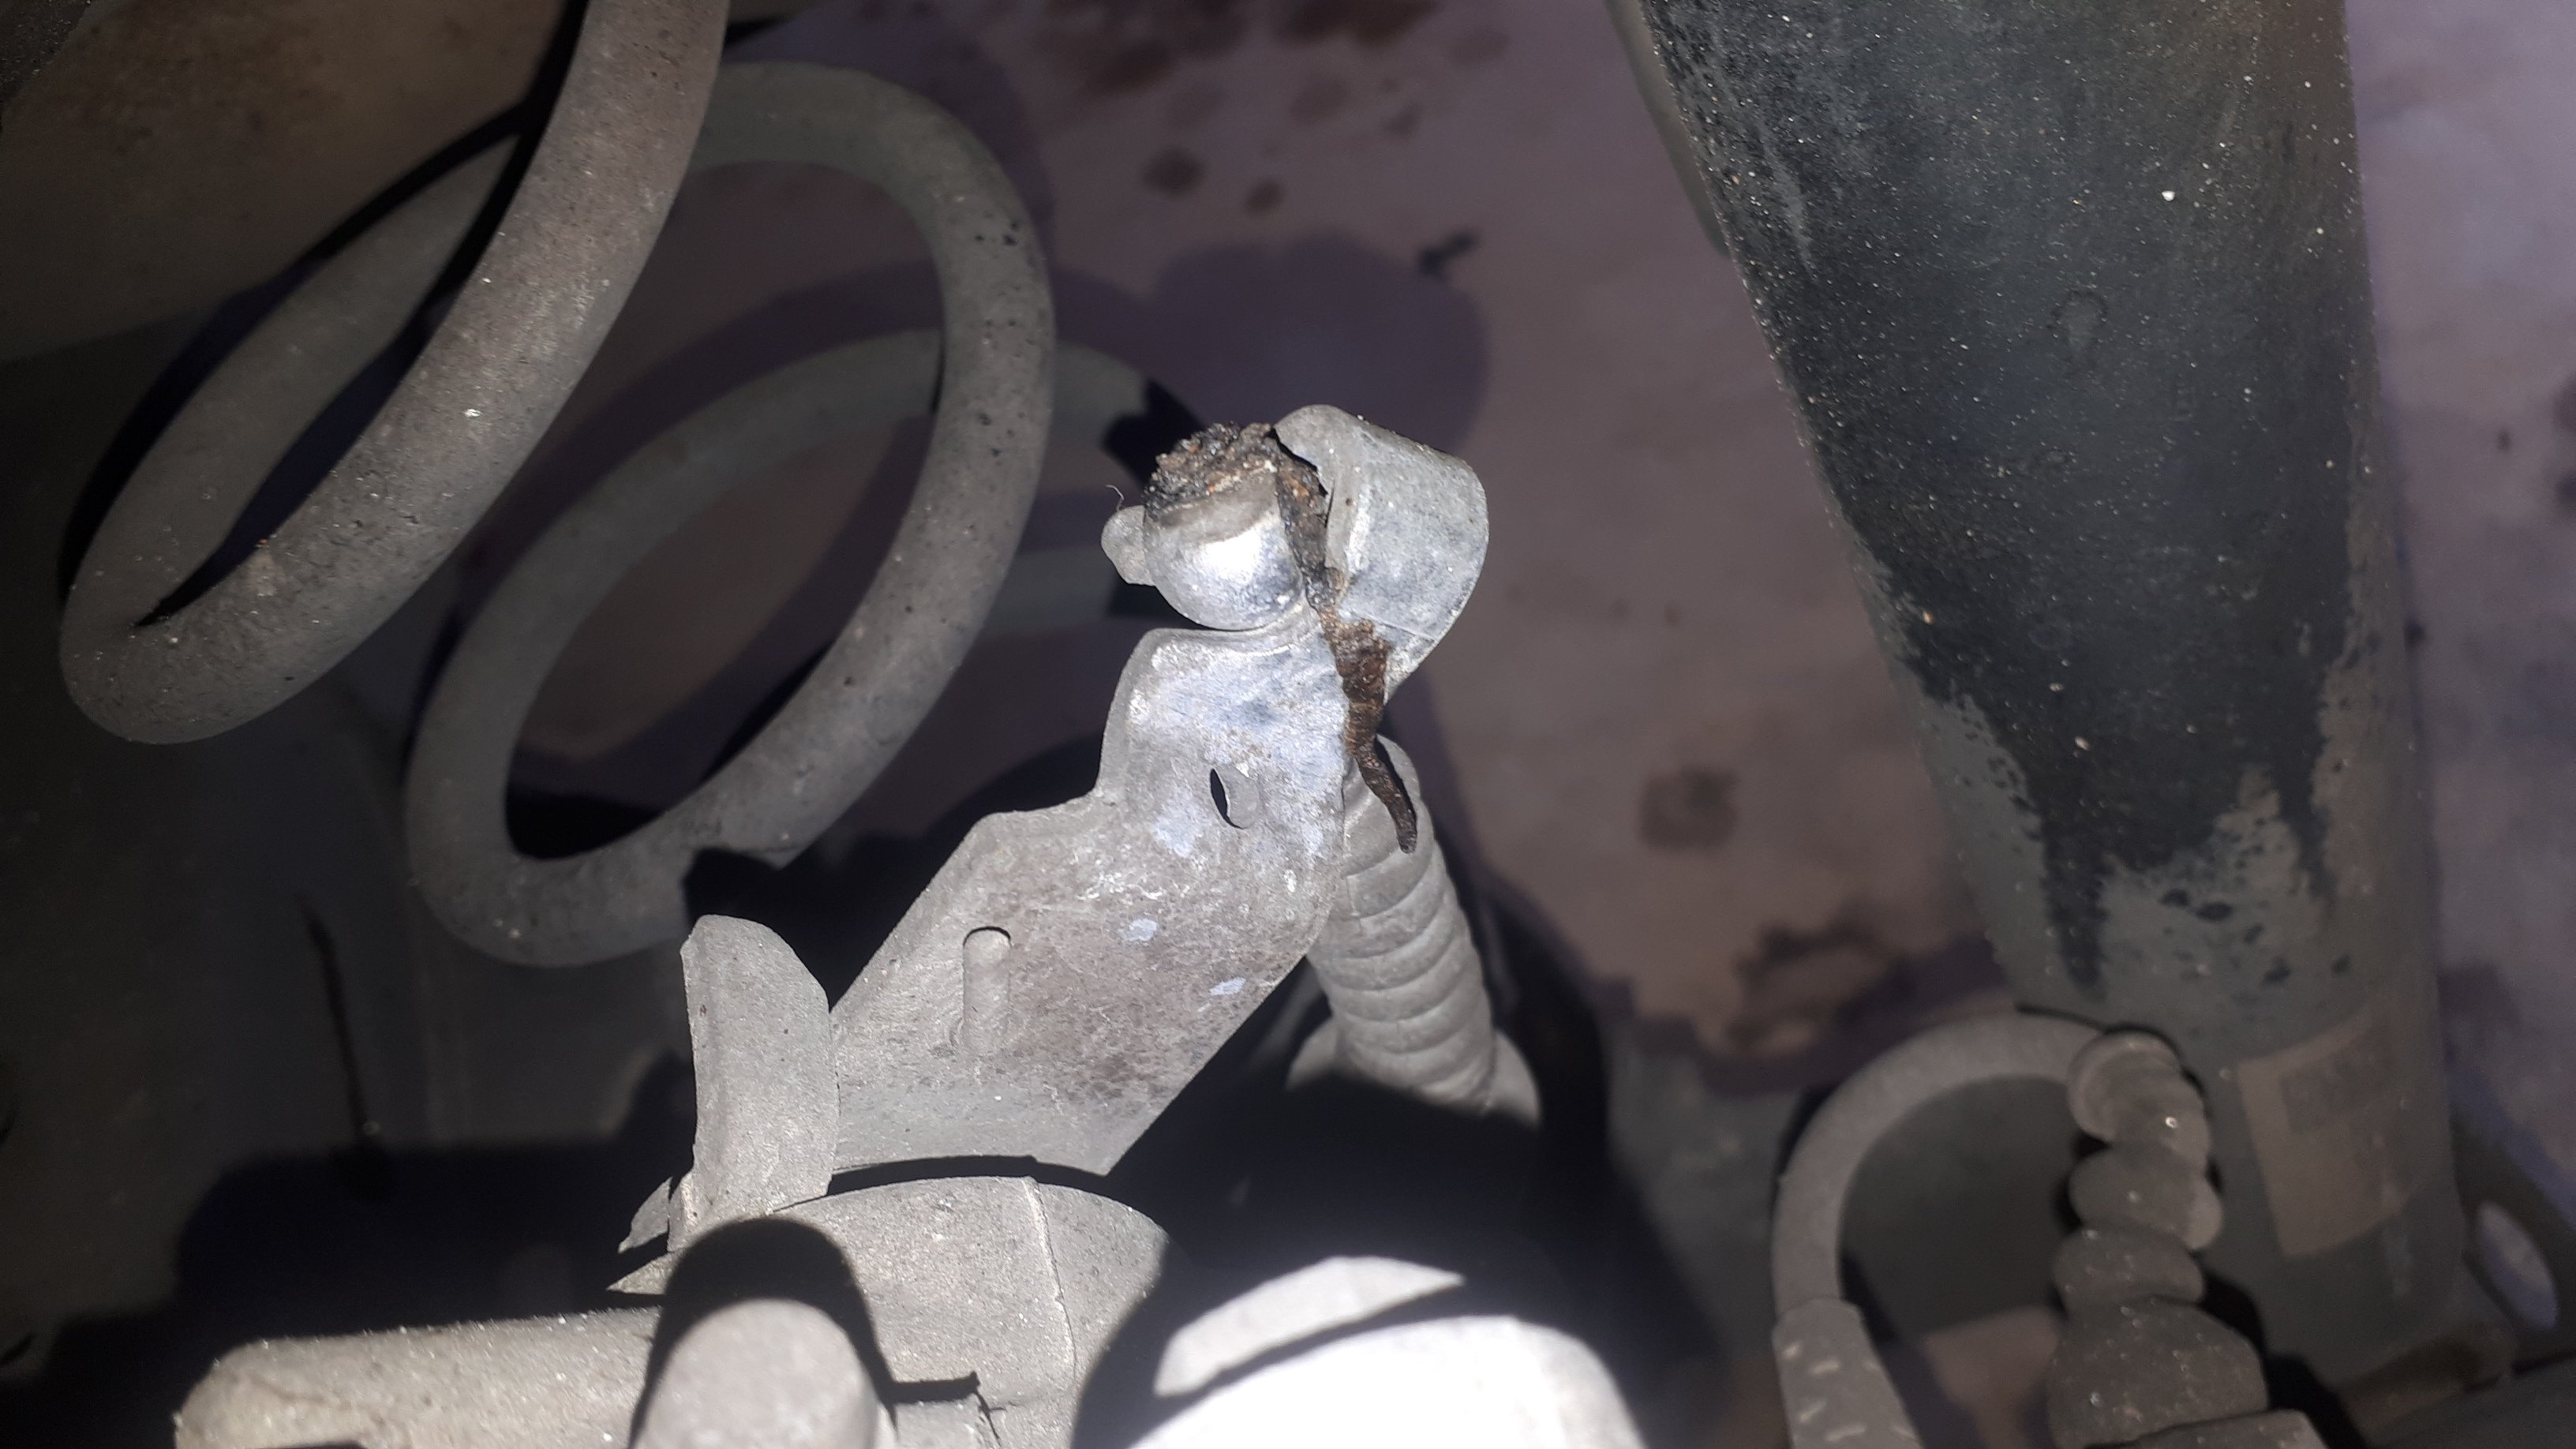
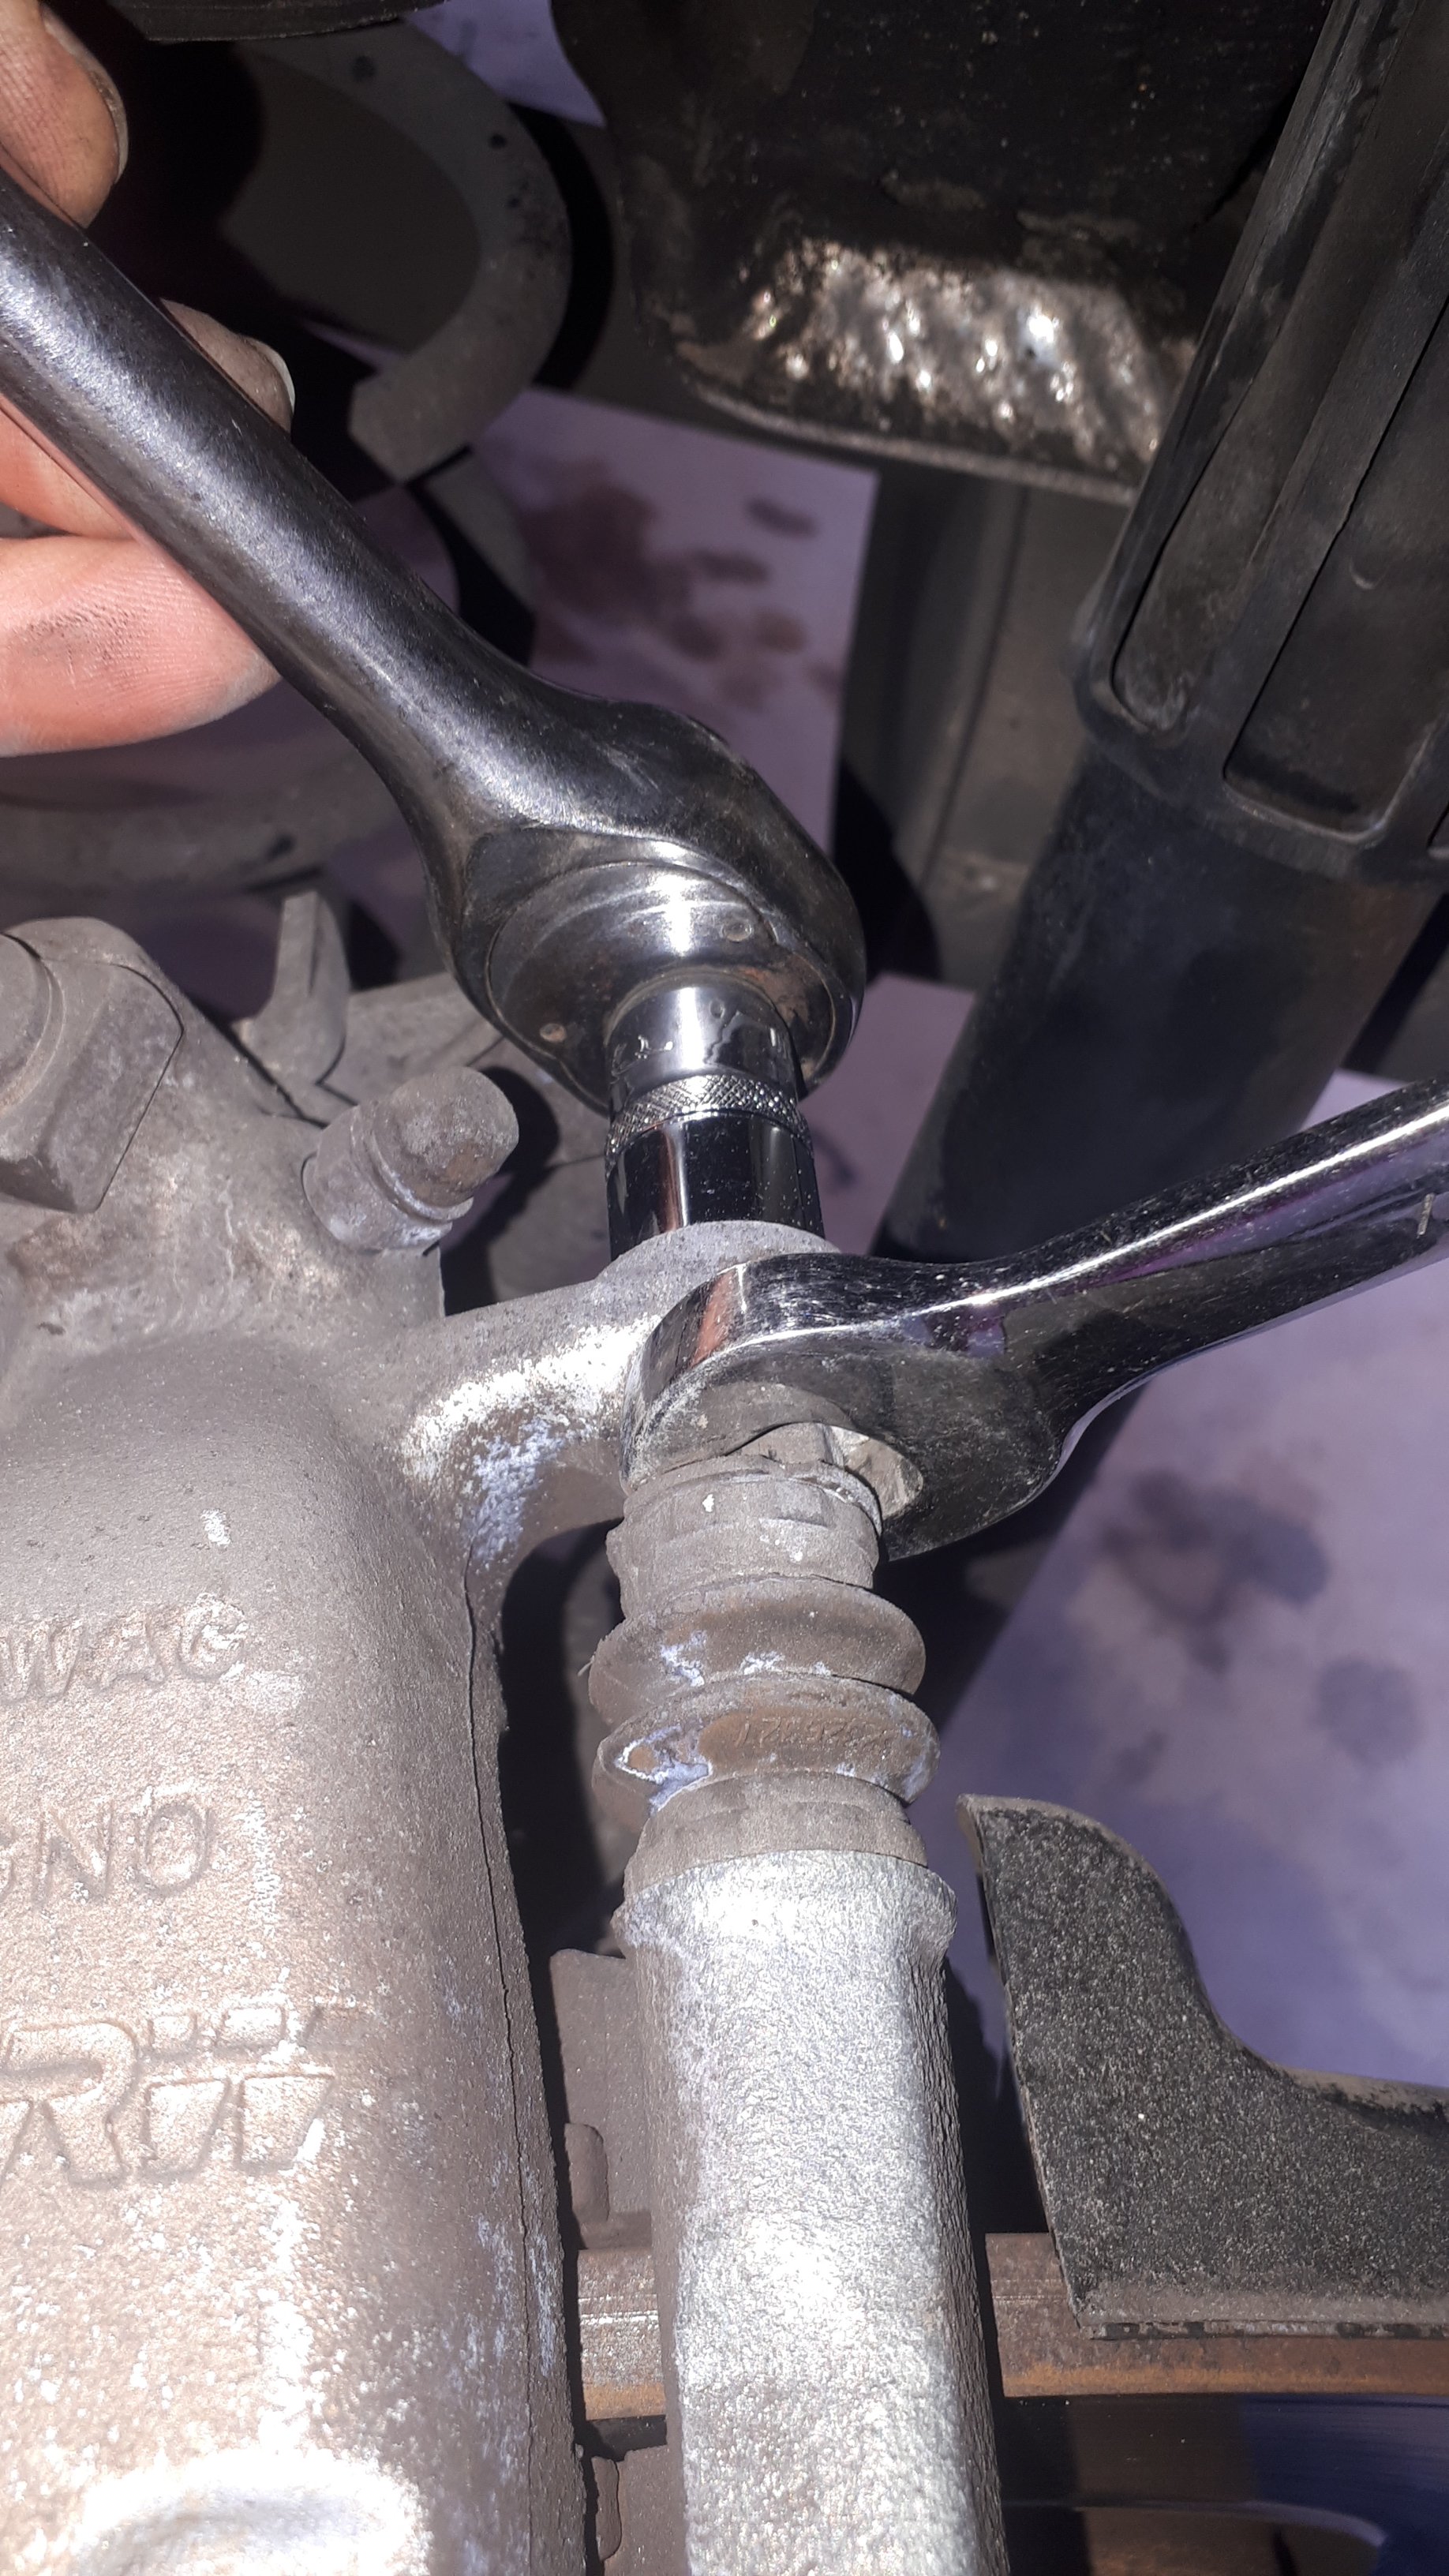
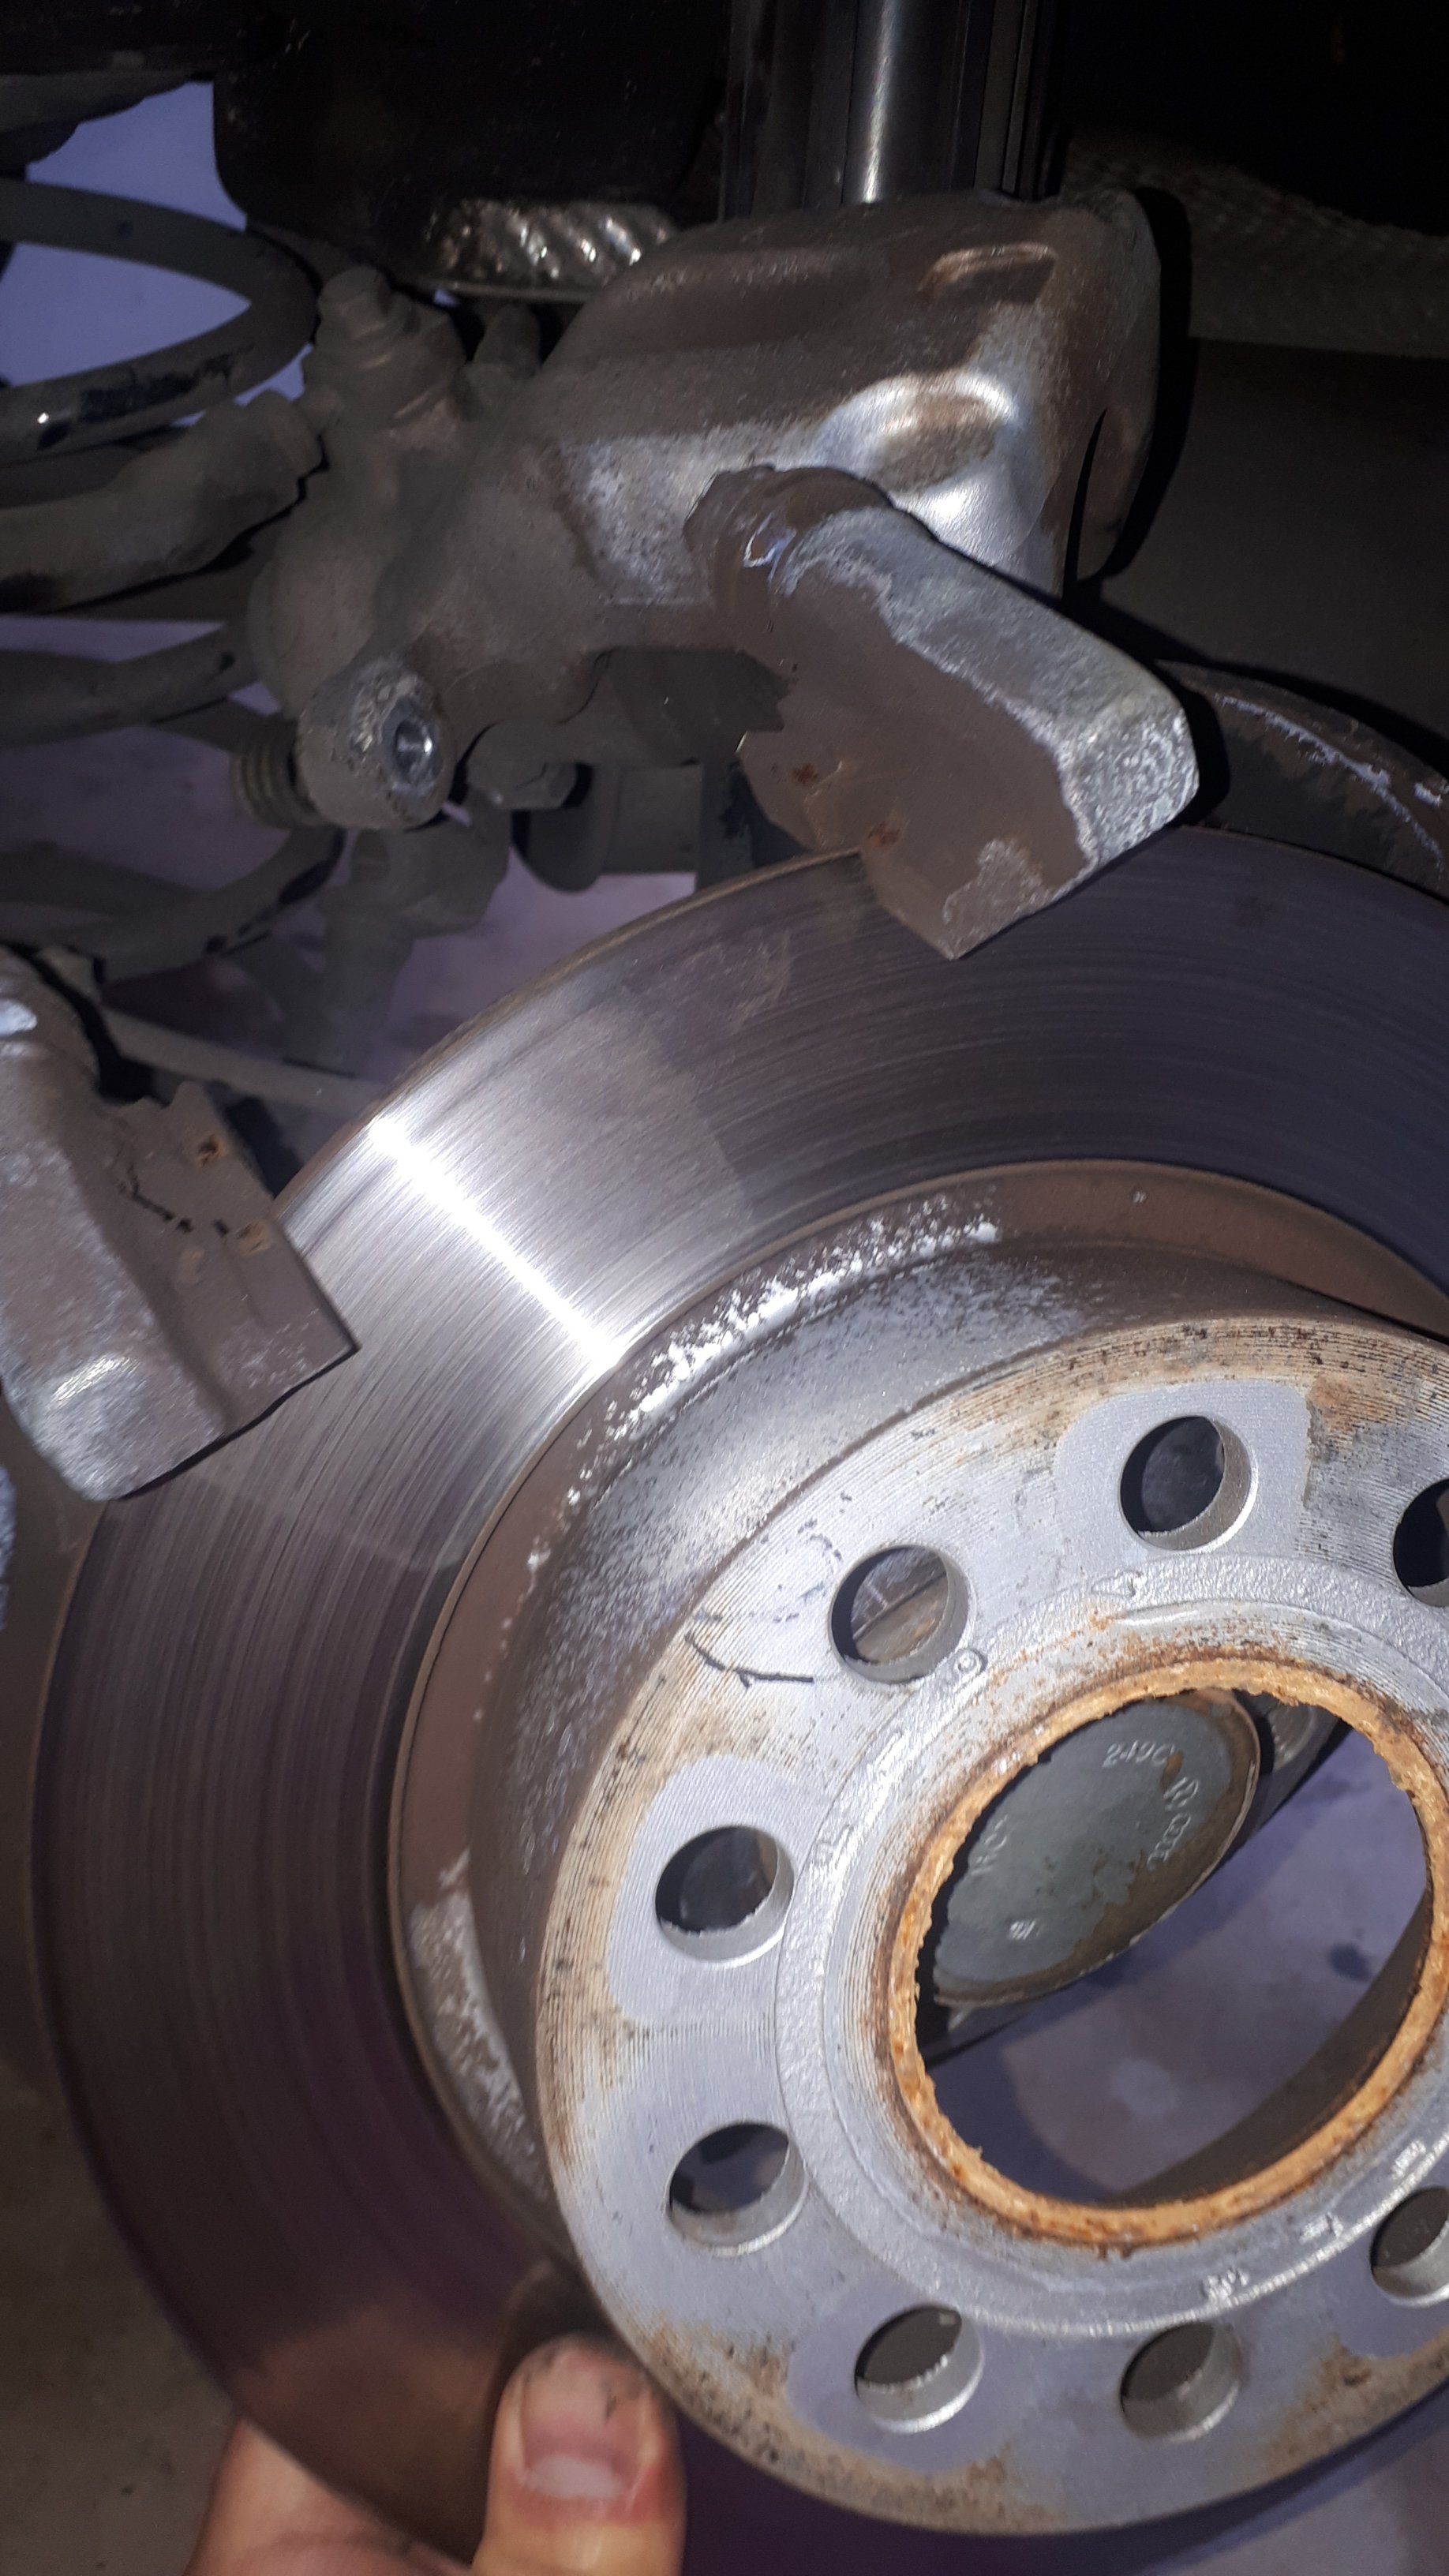
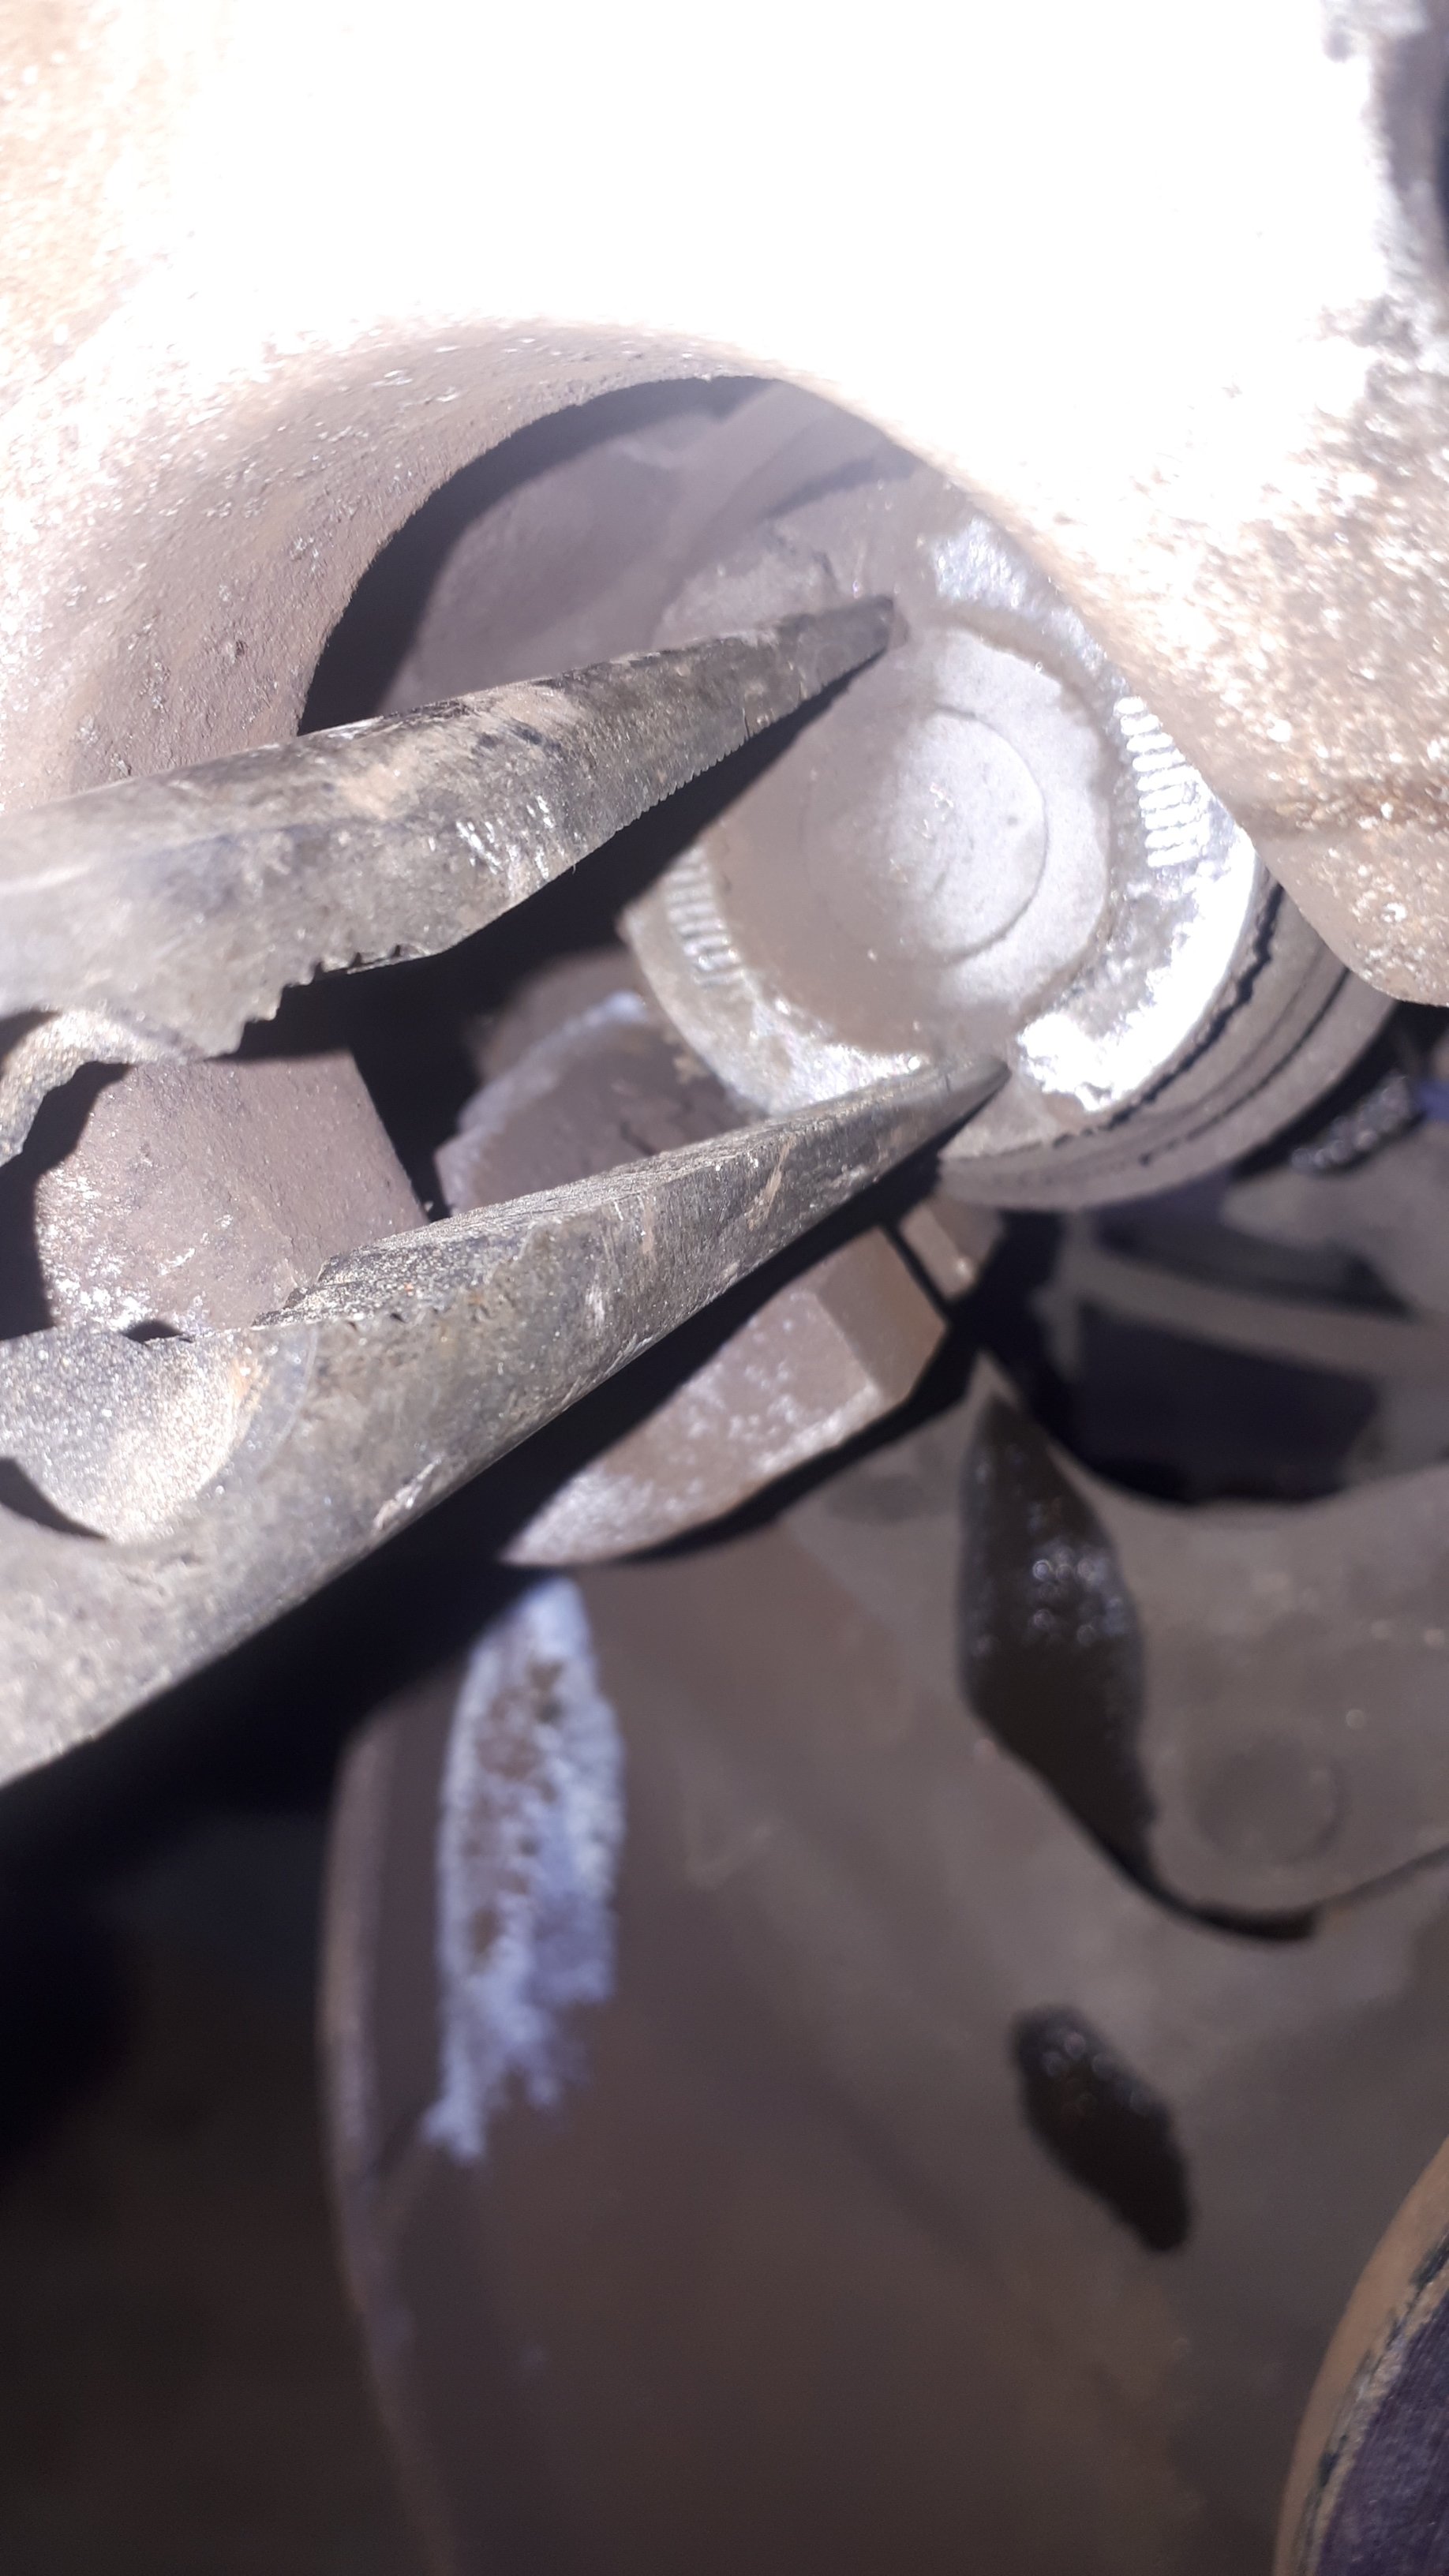
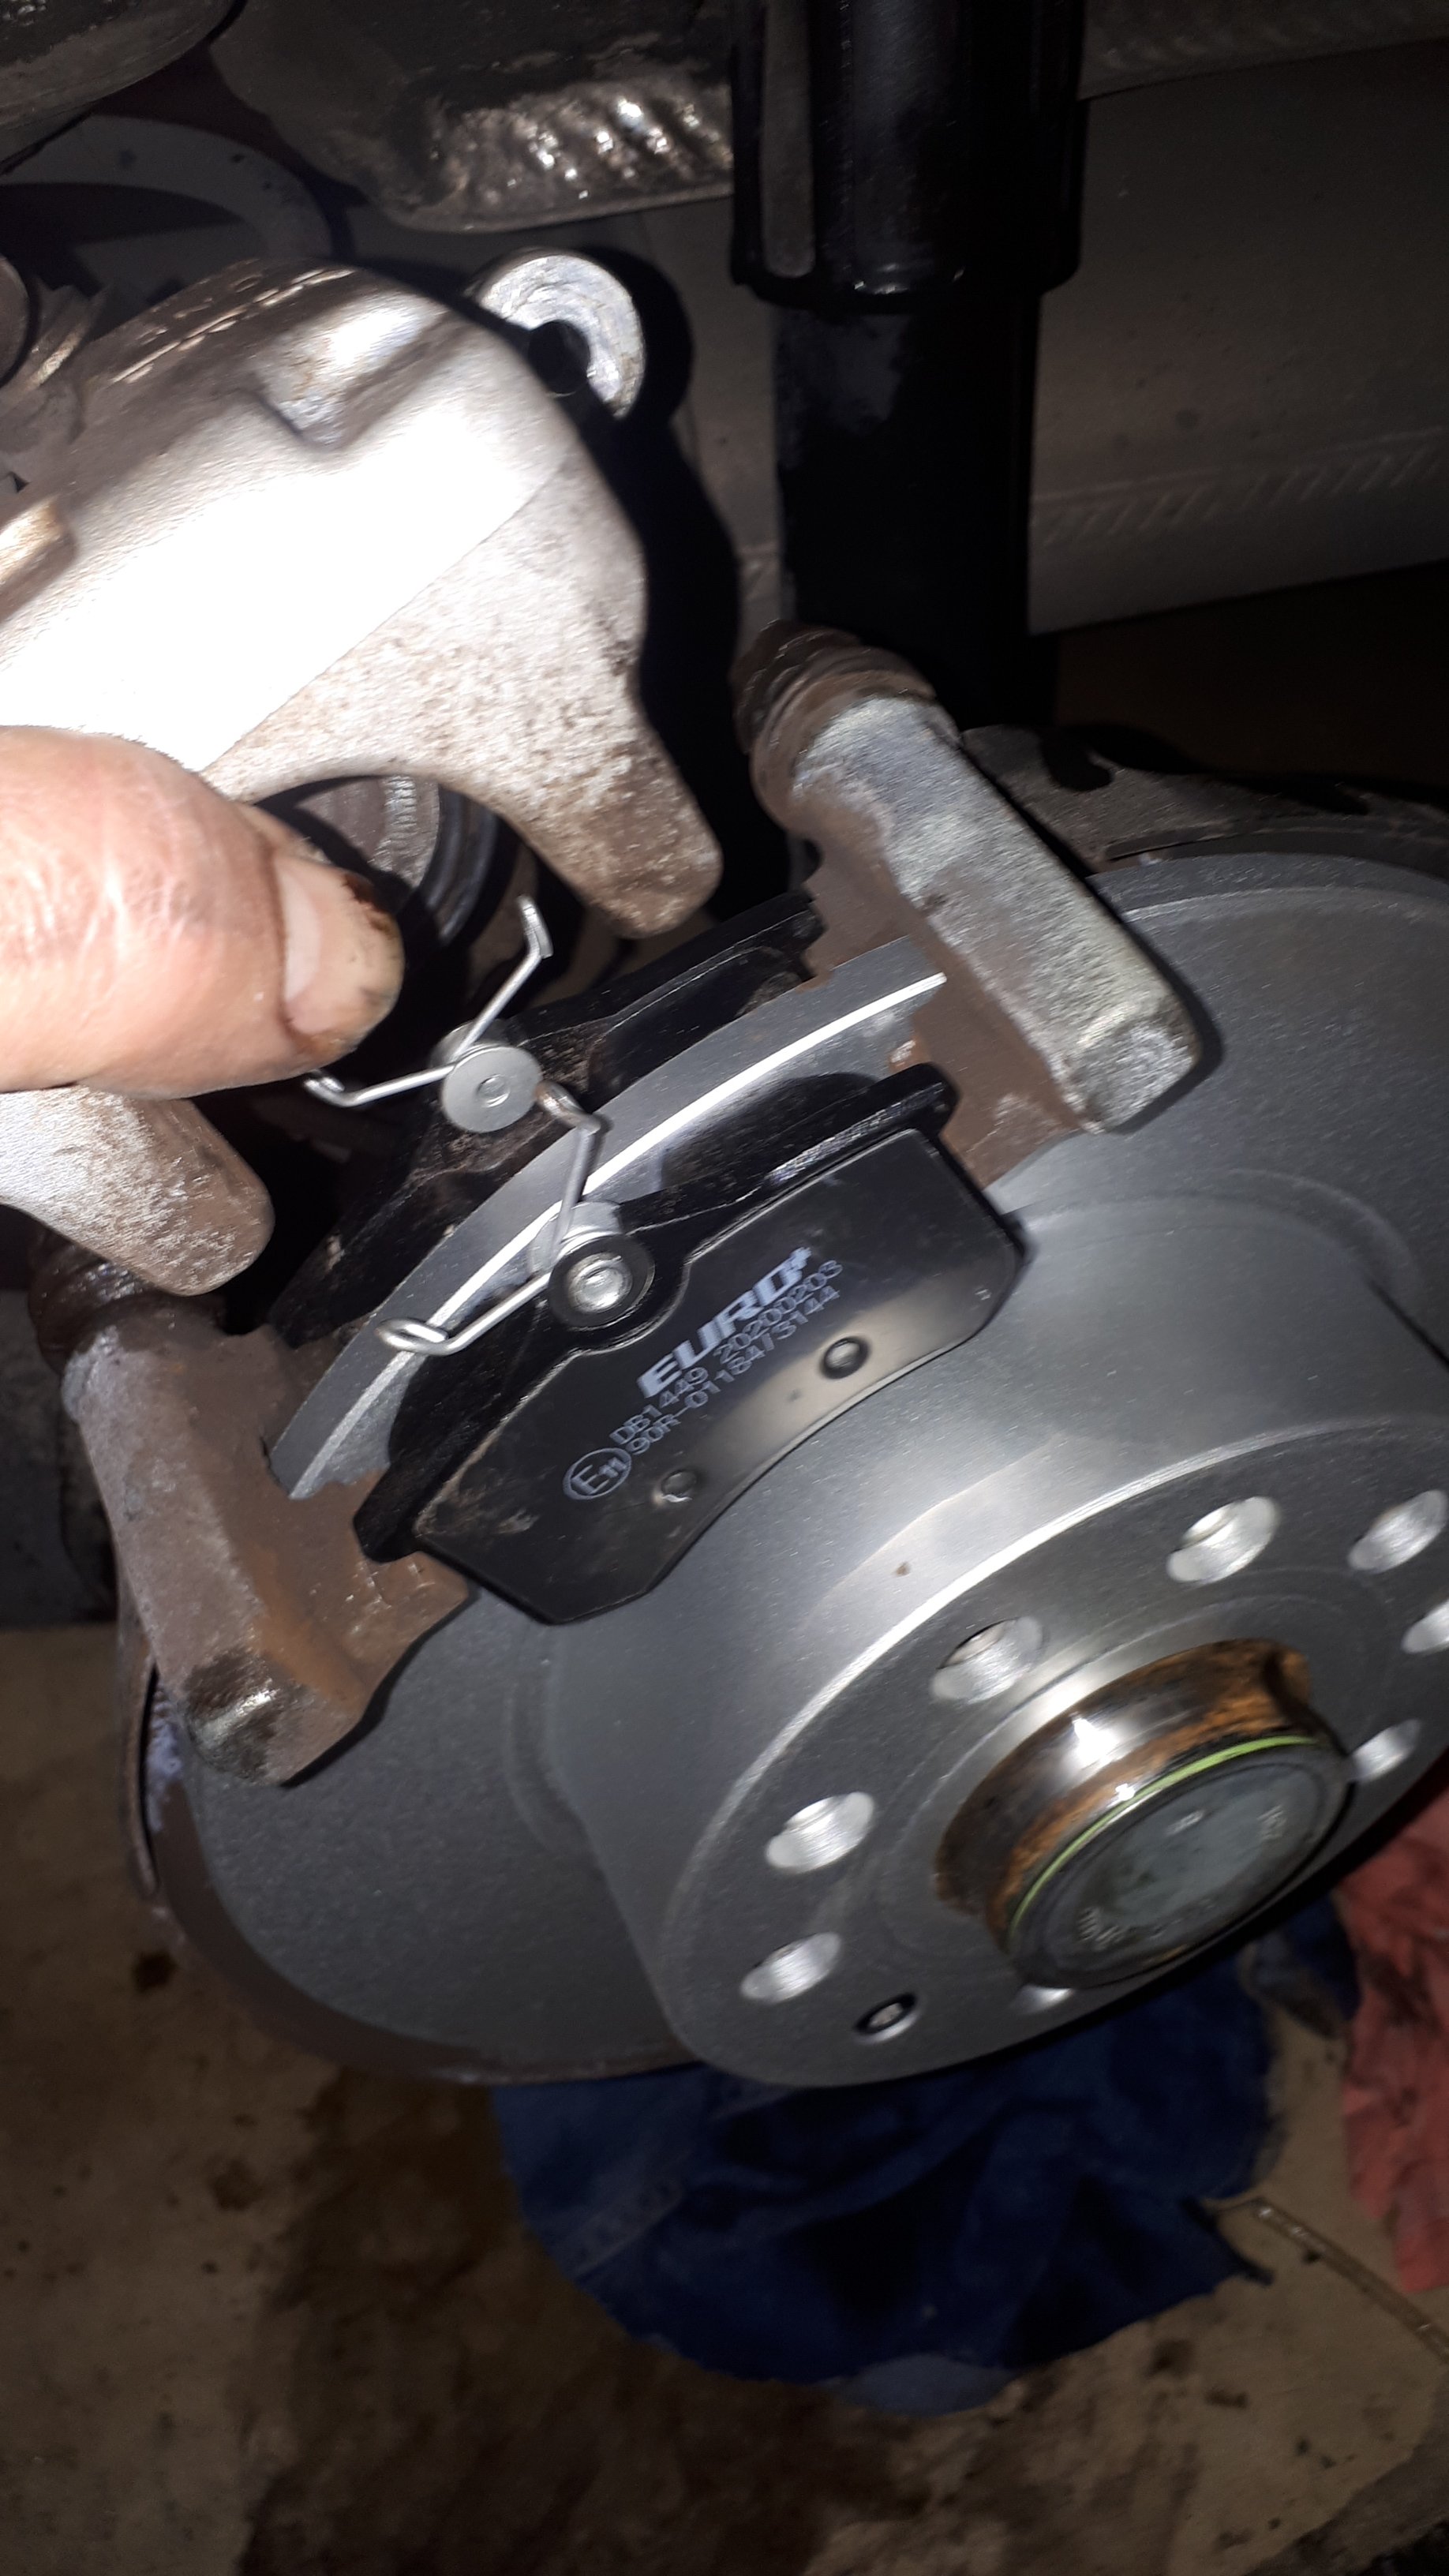
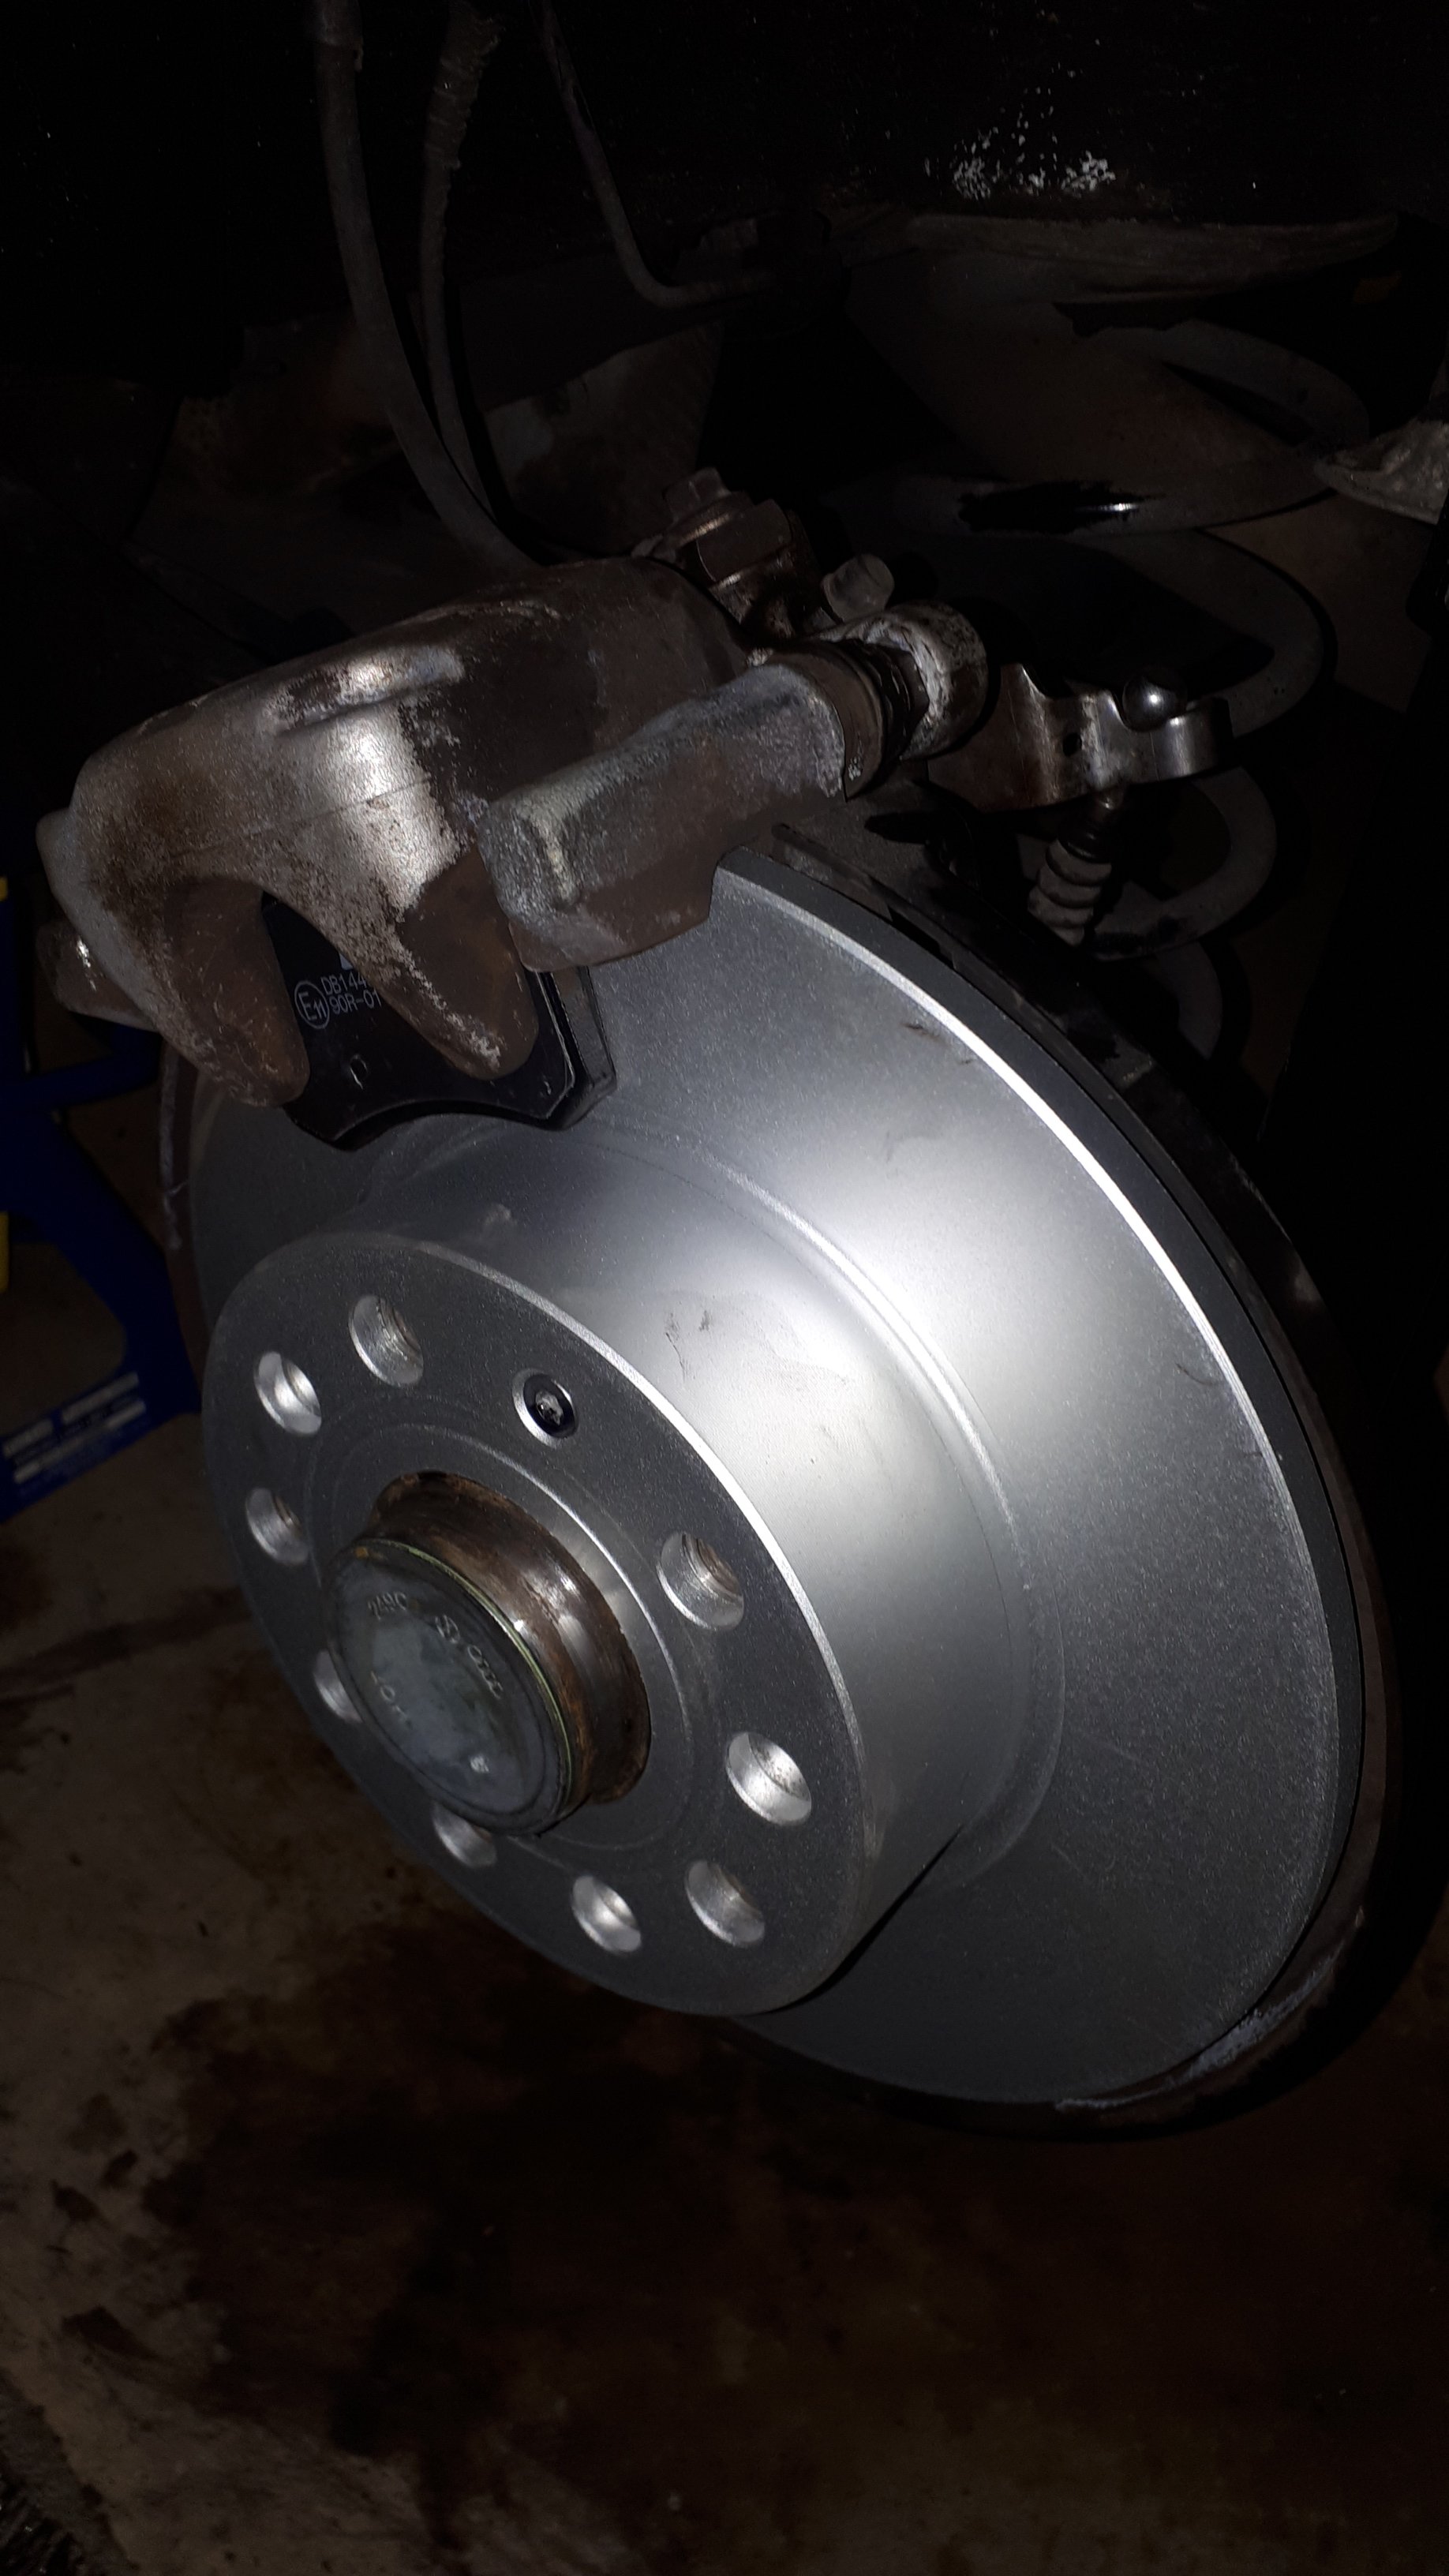
I spent the day swapping the rear pads and rotors on my 2015 1.4TSI Estate and thought I would put a little write up on here. 1KD Rear Brakes Rear Rotor DBA2811 253mm Rear Pads DB1449 Tools: Wheel Chocks (block of wood or brick) Jack 2x Jack Stands Lug cap removal tool Tire Iron Brake Cleaner 11mm (optional), 13mm, 15mm Wrench T30 Torx Key Rubber Mallet or block of wood and small hammer Wire Brush Needle-Nose Pliers or socket adapter or piston pressing tool Brake Bleeder hose and tray (optional) 1. Park car on a firm, level surface. 2. Chock the front wheels. Put an auto transmission in "Park", leave a manual in gear. Release the park brake. 3. Jack up rear of car slightly to take weight off rear wheel. 4. Remove lug caps (if present), then loosen the lugs. 5. Raise rear wheel completely off the ground, place jack stand under a strong, stable point, and lower car onto the stand. Ensure the car is stable. 6. Remove the lugs and the rear wheel. 7. Repeat steps 3-6 on the other side. Work on one side at a time. That way if you have any questions you can reference the other side. 8. Open the hood and loosen (but don't remove) the brake fluid reservoir cap. You want to leave the cap on top to prevent any debris or water from falling into the reservoir. 9. Check the fluid level. It should be about halfway between Min & Max. The level will rise as you install the new pads and you do not want it to overflow. If it is near Max, you may have to remove some with a clean, dry syringe or medicine dropper, or pump a small amount out of a bleed screw. 10. Spray the brake caliper down with brake cleaner to settle any dust. Do not use air. You don't want to risk breathing the dust. 11. Disconnect the park brake cable from the rear of the caliper by pressing the lever down and pulling the cable ball out of its cradle. 12. Use a 13mm wrench or socket, and a 15mm wrench to remove the bolt at the back of the two caliper sliders. The 15mm nut is quite narrow so it may be difficult to get the wrench fully on it, but as it loosens there will be more room. 13. Once the slider bolts have been removed you should be able to pull the caliper up (may have to wiggle it a little). Do not let the caliper fall or stress the rubber brake line. It could easily damage the line resulting in potential failure. 14. You can now remove the old brake pads. If you plan to reuse the old rotor, skip ahead to step 19. 15. To remove the rotor, use a T30 torx wrench to remove the small retainer screw. It should come loose easily. 16. Use a rubber mallet and/or block of wood and small hammer to gently tap the rotor off the hub. Using a hammer directly on the rotor could cause cracks resulting in failure if you plan to reuse to old rotors. 17. Once the rotor is loose, you should be able to pull it off without removing the caliper carrier. 18. Use brake cleaner and a wire brush to clean and smooth the hub face. A dirty face can result in a misaligned rotor resulting in warping, pulsing, and poor performance. 19. Now you need to retract the caliper piston back into the caliper to create enough clearance for the new, thicker pads. On front calipers you can usually just use a clamp to press it in, but on rear calipers you need to twist the piston clockwise while pressing it in. There are tools you can buy to make this faster and easier (a ratchet adaptor, or a special tool just for twisting and pressing rear pistons), but I just used a set of needle-nose pliers inserted into the two recesses of the caliper piston. It may take a while before the piston retracts (I have spent more than an hour on one piston). If it doesn't seem to be retracting, opening the bleed screw with an 11mm wrench can help relieve pressure (attach a length of hose draining into a pan to avoid a mess). I have also found that turning the piston counter-clockwise for half to a full turn can help free it up. 20. Now that the piston is retracted, you can install the new rotor and secure it with the T30 set screw. 21. Install the new pads into the caliper carrier firm against the rotor. 22. Slide the caliper over the pads (you may have to wiggle it a little or give it a thump). Line up the caliper and reinsert the caliper slide bolts. Tighten them firmly with the 13mm and 15mm wrench. 23. Reattach the hand brake cable. 24. Inspect your work against the other side to ensure everything is back in the right place. Spin the rotor to be sure it moves freely (light rubbing from the pads is fine). 25. If everything looks good, repeat steps 10-24 on the other side. 26. Now that you have new pads and rotors installed, apply the hand brake, mount the wheel back on the hub and tighten the lugs in a starfish pattern. Double check to be sure all the lugs are evenly tightened. 27. Jack the car up and remove the jack stands. 28. Take the car for a spin around the block. Accelerate to a moderate speed, check that traffic is clear, and brake firmly to a stop (not a panic stop, but firm). Do this a few times forward and a few times in reverse to bed the brakes while listening for grinding or squealing, and feeling for pulsation, shaking, or pulling. 29. Visually inspect the brakes to be sure everything is still in place and there are no signs of uneven braking. 30. Get yourself a beer or vice of your choice and bask in the glow of a job well done.
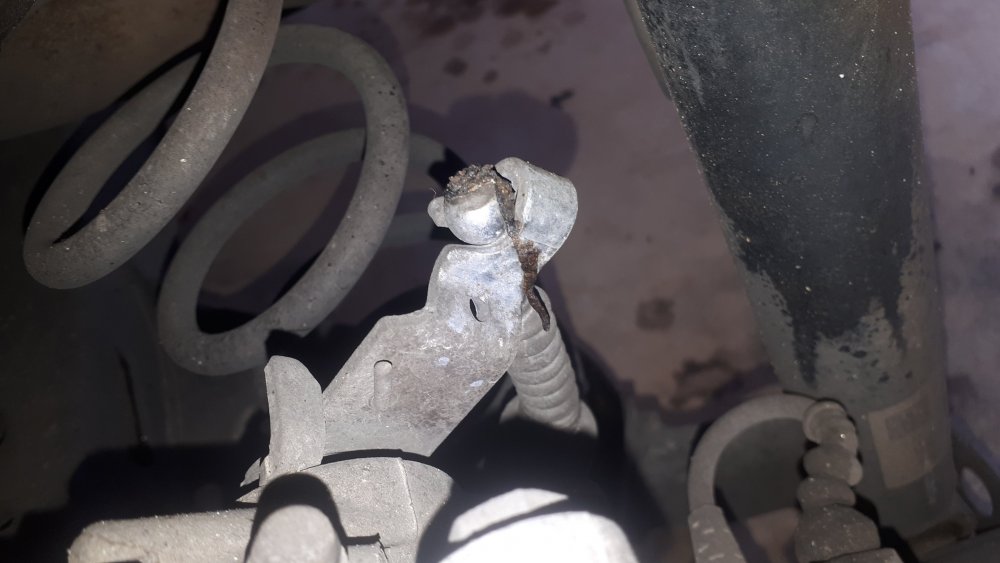
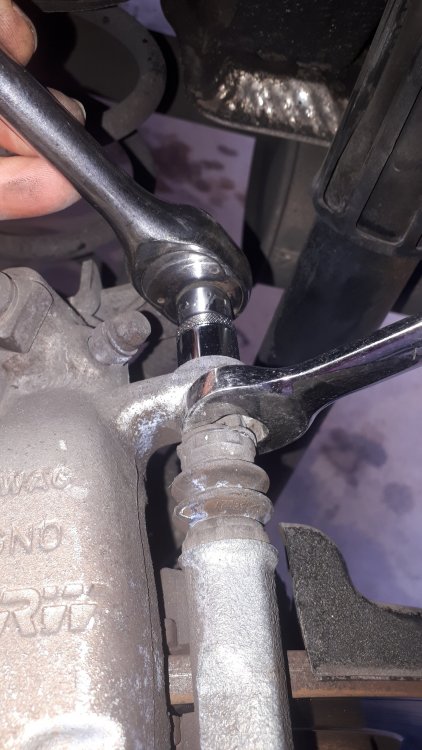
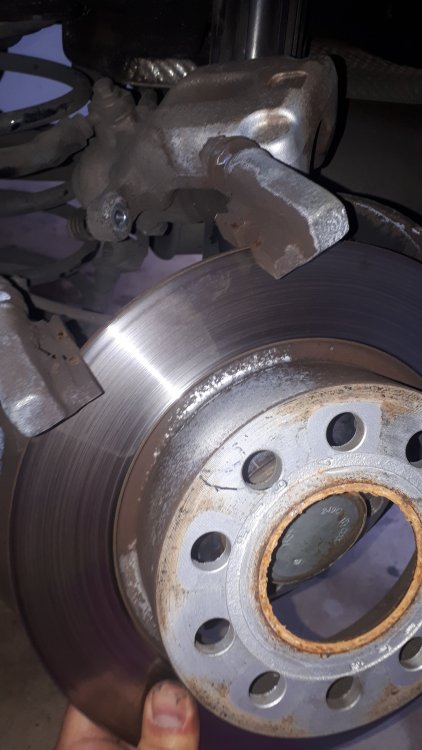
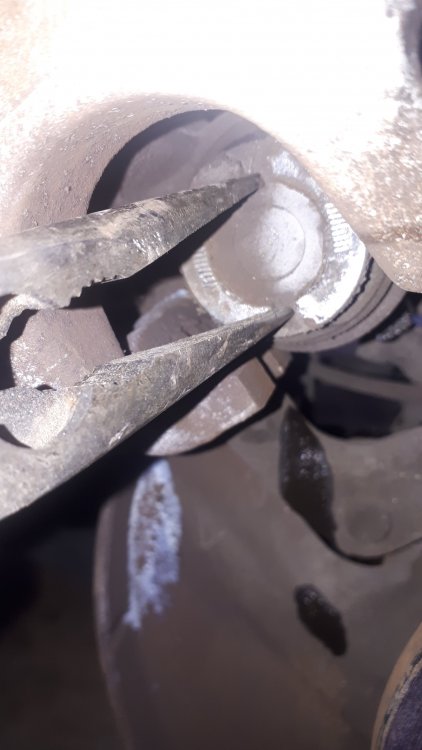
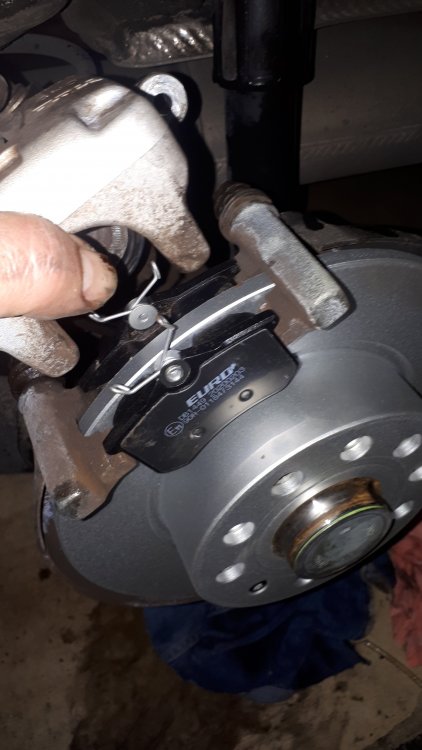
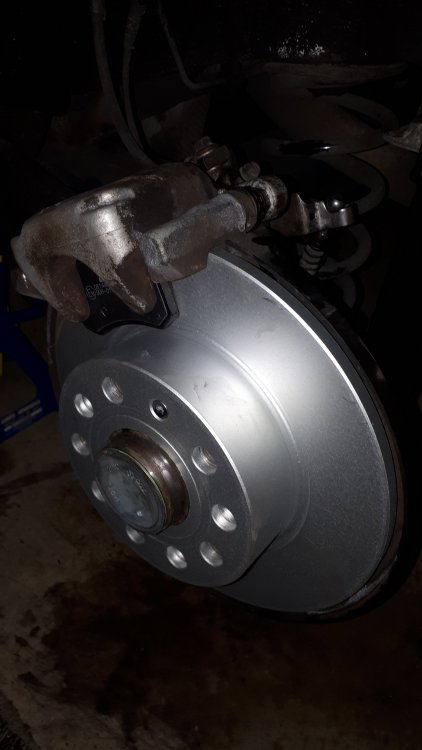 1 point
-
everything is better than factory 30000kms change. my oil is always light brown, no matter what. nothing to clog filter.1 point
-
me too . i buyed 20 litres of Shell helix ultra 0w30 AV-L for good price and changing oil with filter on 9000 kms - 12 months, and between that i change only oil in half that period.1 point
-
1 pointIt may appear in the centre display only when needed. Found this online My sons mk1 is more basic and has an oil warning light in dash with a really annoying very loud chime every time a warning appears including low on fuel. Everytime it gets low on fuel you think something major has happend. Alasdair1 point
-
1 point
-
1 pointGalvanic action (galvanisation is the protecting of components with zinc) occurs when two chemically dissimilar metals touch, while exposed to the electrolytes in water, sweat, or anything else. That’s why you often see rusty gym equipment. In fact, the exact same type of metal or alloy can be electrochemically dissimilar, depending on conditions, their makeup, etc, meaning that a steel subframe bolt can and will chemically interact with a steel subframe.1 point
-
An Italian tune up is often all that used sales cars get that have been sitting about not getting proper runs much. No harm done as long as engine up to heat, nice fresh fuel in, a fresh air filter, the spark plugs and coils are good and no poor condition liable to cause misfires or failures under a high load.1 point
-
Ill send you a pm with the link to the files.1 point
-
Good strategy with twice per year, close to mine because I usually drive 8000km less than 12 months so it is actually twice to change within 12 months! I do the traditional method and filter change always because mine is located in easy spot in both cars.1 point
-
I change mine twice a year and only change the filter on the third change because taking that under cover off on the drive is a tricky job if not on a ramp. I use a vacuum pump for oil changes when not changing the oil filter It's so easy.1 point
-
1 pointI stopped using Eco mode as the lack of engine braking when coasting meant I was using the brakes more - it made no measurable difference to mpg but used more brakes, so it seems to me like Eco mode will increase running costs without decreasing emissions?1 point
-
That is a really interesting find. Good to see that the odd rarity still crops up. Looking at that I would say that they are genuine as they match the factory seat stitching for a pre facelift. As far as I'm aware the Edition 100 was based on the facelift and the seat stitching style was different between the two. Odd that the car doesn't appear to have rear parking sensors which I'm certain was standard on the elegance.1 point
-
A perfect outcome. Well done. Well worth the prep and planning involved.1 point
-
1 pointIve just replied to your post on the Facebook Group. Now I see it a dry clutch DQ20, so my comment about DQ250 is no applicable, if you have TSR and ACC is this a 2024 or later car - in which case take it to the dealer, its still under warranty, still has roadside assistance.1 point
-
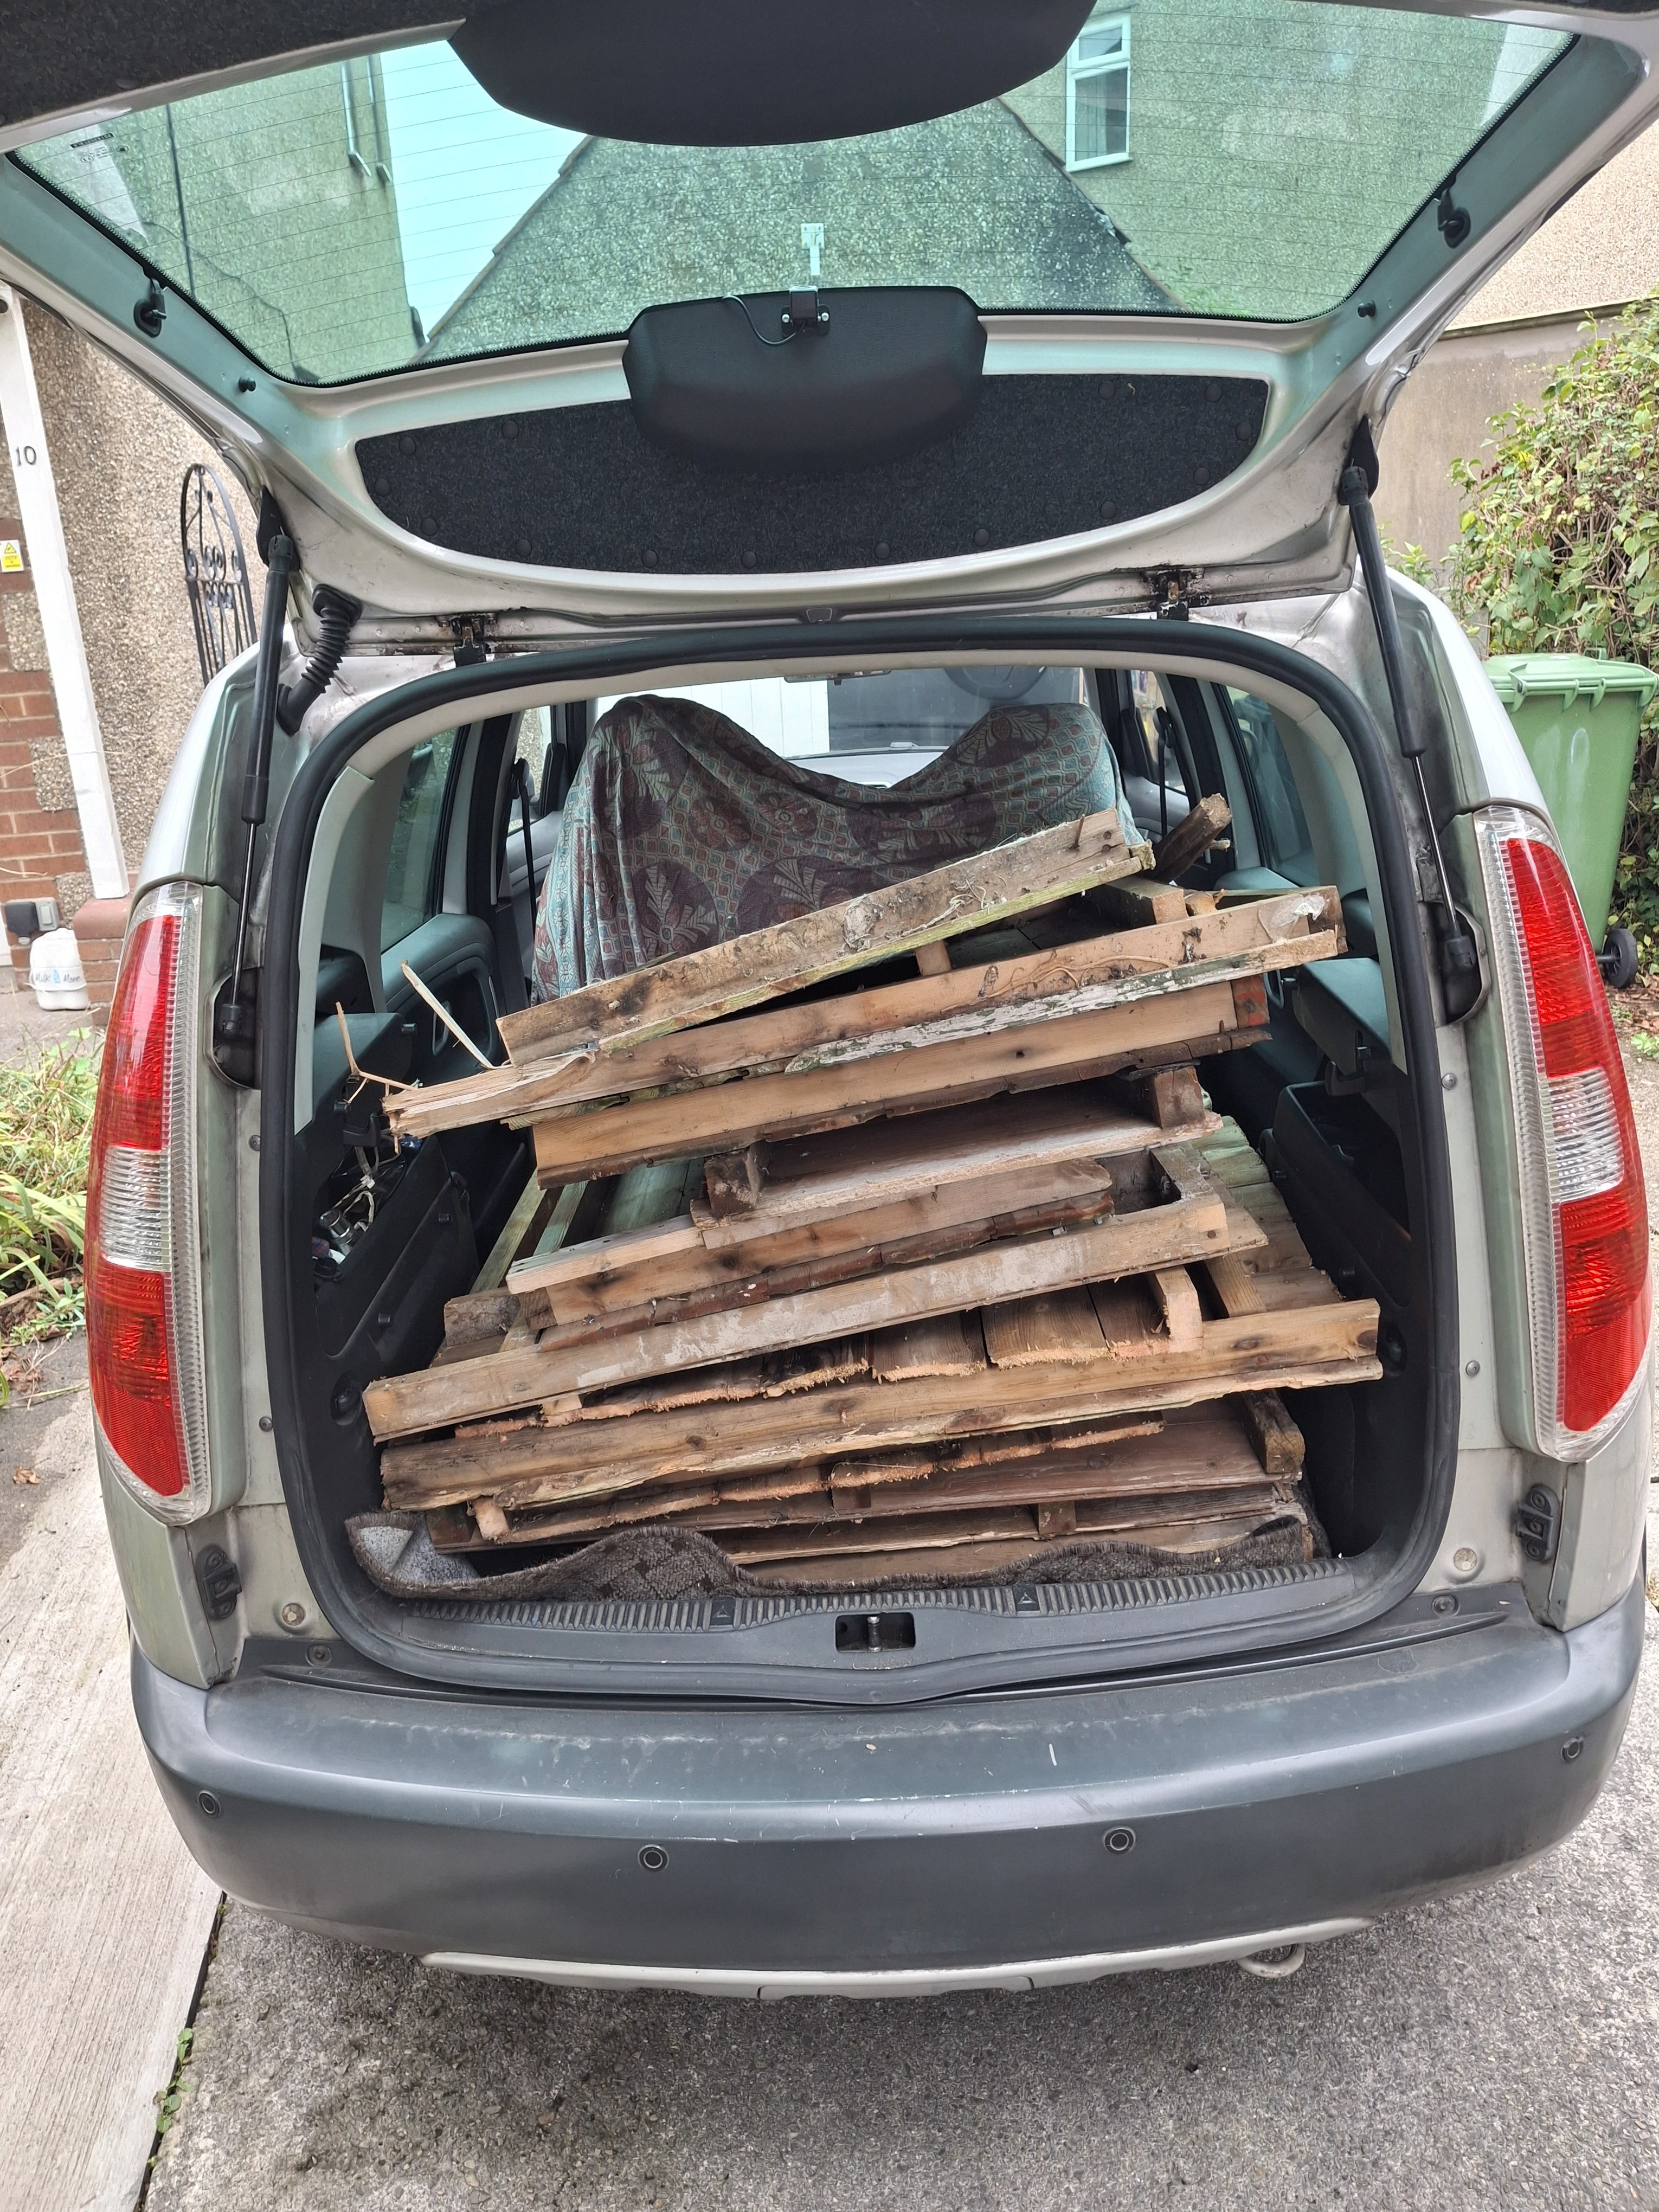
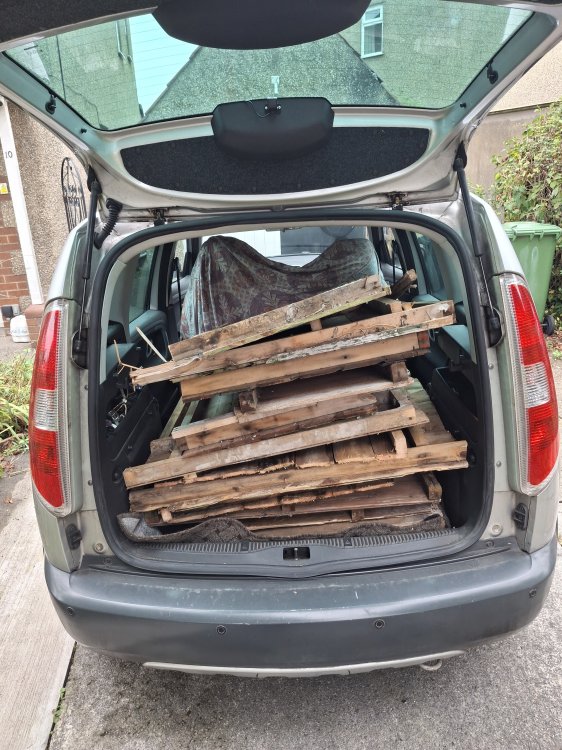
1 pointYes demolished old 8 x 6 shed and thought about hiring a skip, but no 3 trips to the local tip and its all gone Good old Roomster.
 1 point
-
1 point
-
1 point