


Everything posted by Breezy_Pete
-
Good shout!
-
Try 30 minutes, and how are you measuring the current?
-
His car may have a fault! Wait for others to look at theirs and see what they see. Must be a mk2 made before March 2010 to be relevant, I think
-
If you send me your VIN by private message, I can find the exact date your car was built, and tell you what fuse 22 covers with reference to wiring diagrams accordingly.
-
I don't think it's necessarily a fault, on our Mk1 and my 9N Polo all that info is displayed 24/7/365. LCD displays take miniscule amounts of current, only really taking any at all when the digits change, most of which aren't doing when the car is parked.
-
If it was a Fabia, I'd say you should check the relevant strip fuse in the fuseholder on the battery. That's nearly always cracked when such faults show on Fabias, a nice cheap and easy fix. Photograph said fuseholder (if there is one on a mk1 Octavia) if unsure of what to look at/for.
-
I very much doubt the caster changed at any point during this 'knock of a kerb'. Far more likely that your alignment operator didn't use the right model data, or that the Skoda data itself is incorrect versus reality. The angular difference between how yours is and the spec range is tiny, around a quarter of one degree of angle outside spec. In my head there's no way that could transform the steering feel. And unless your kerb impact was frontal/symmetrical/both front wheels at once, no way it could affect both sides. Doesn't need to be Skoda, any garage can look for such things for you, probably in minutes on a ramp.
-
So unlikely that I can't bring myself to try to look it up, sorry. You would need the engine code of each specific engine as a starting point.
-
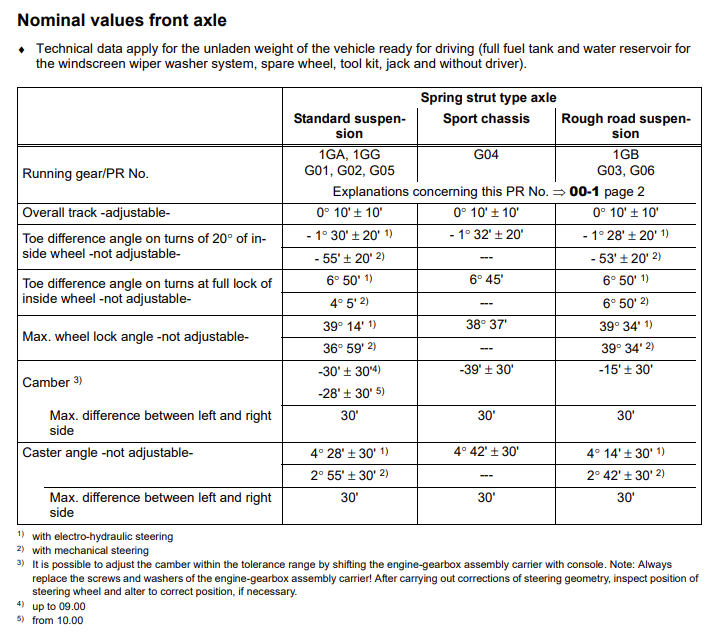
You could probably find the relevant document yourself on erWin Skoda, but it would cost you some money to gain access for an hour. There are a selection of the official workshop information pdfs in the guides section, but not the relevant one, I think which would be called something like 'Kamiq - Chassis' and have a table something like this (example of table for mk1 Fabia NOT the correct info for your car):
-
I doubt it. Ask your friendly local Skoda dealer if they can look up the specification for your car's caster angle. Don't expect much co-operation, but you just never know..
-
Not sure on physical location, probably close to where one of the driveshafts emerges. Circuit diagrams say it is wired with a yellow and a white wire from the automatic gearbox control unit J217. It is an automatic transmission car, right?
-
With the symmetry of the caster numbers, and the reported one-sided impact, it seems most likely to me that their 'normal range' caster figures are simply not correct for your car. Unfortunately, I don't have reference material to look confirm or reject this idea. The loose/baggy steering feel seems more likely due to a damaged suspension bush, or bent component, than a caster problem.
-
This is what happens with my TB at ignition on, if I just leave it without turning the key further to crank. 20230618_152810.mp4
-
That genuine one on ebay has been relisted at same low starting price, with offers engine speed sensor for vw part no 030957147AA | eBay ?
-
@Brissy, engine code is an identifier of the precise variety of engine in a given car. Not the same as fault code, which is what you seem to be asking about. I would recommend asking in the more relevant section of the forum, here: Diagnostics & VCDS - BRISKODA
-
Photo showing exact location would allow parts catalogue look-up.
-
Ebay item no. 332866808161 appears to be a rear right from a Fabia, but you might need a friend in the North to collect and post on. 263196812291 is a rear left from a Fabia, with free postage. Probably worth going through each of those sellers items to see if they have t'other side too.
-
Check or re-check fuse 52 (15 Amp) for the ignition circuit. I'll try to check out what my throttle body does with just ignition on, and maybe make a vid of it during a start-up. Did you adapt the ECU to the new TB with VCDS after fitting? I'll see if I can read off cranking speed on my BBY Polo too, by disabling start-up, perhaps by removing some fuse or other.
-
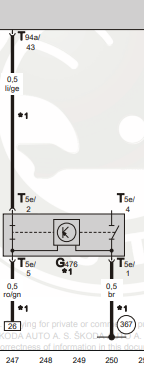
@CzechPassat, good work, well done. @J.R. the circuit diagram that includes this Hall effect sensor on the clutch master cylinder shows it like this, which I think is meant to show a 'virtual' normally closed switch controlled indirectly by the hall sensor and associated electronics. There's also a normally open switch not used in this application. Rectangular box with 26 inside is a fused 12V feed, connection other side of NC switch is to engine ECU.
-
@TMB may have a photo as he has a very similar engine, but if you trace the black plastic pipe back from the brake servo (big black round thing on back wall of engine bay) you'll come across a one-way valve that will resemble the one pictured, to some extent.
-
Check for cracked solder joints of the green 32-way connector of the instrument cluster; pin 23 is where the pressure switch connects to/through. If you have any other questions after checking that, please start your own thread in the Mk1 Fabia sub-forum, rather than further hijacking Marcusjohn's thread. 🙂
-
The A/C condenser is the thing that sits in front of the engine coolant radiator. The A/C evaporator is the thing in the cabin that gets cold. Just cabin-side of where the refrigerant pipes go through the firewall. The thing under the driver's seat is probably a diesel fuel cooler. The evaporator drain is visible in the first two photos you posted, 8* in the first 5 in the close-up second photo, adjacent to the pipes going to the heater matrix. Find it under a flap of sound insulation (shown as item 1 in your second picture), and as described in that linked thread. The condensed water is probably running from this drain, around the body metalwork to a low point near the fuel cooler, then falling to the ground.
-
Photo of the fuses as described/shown by TMB might save you a load of cash replacing something that isn't the problem. Whereabouts are you James?
-
Duplicated colours are usually slightly different thicknesses.
-
Bosch or NGK/NTK for lambda sensors is probably safe. Not sure about MAF, OEM may well be Bosch, see if there is a Bosch part number on it.


