


Breezy_Pete
Sponsor
-
Joined
-
Last visited
Everything posted by Breezy_Pete
-
No, it's just a (very) little air filter.
-
Yes, it should latch on and generate its own field current once it starts charging. Yes, probably normal for revs to be limited out of gear, not moving.
-
It's known as DFM, Digital Field Monitor. It informs the engine ECU how hard the alternator is being worked, as a percentage of its maximum capability at any given engine revs. It being broken would not have the same effect on the warning light. That other wire changes colour at the 4-way connector from brown/red to violet/green before heading onward to ECU. The blue wire goes onward, still blue into the cabin, to the BCM (Onboard supply control unit).
-
There's an intermediate connector pair between the two-way connector at the alternator and the final destination of the two wires. It's a 4-pin plug/socket pair 'front left in engine compartment'. That's left as experienced sitting in the car facing forward, so on the right side of the engine bay if you are standing in front of the car looking in. I would try to locate and inspect that connector pair before necessarily blaming the alternator connector, you may find a broken blue wire there instead.
-
Latch was probably broken when removing from old alt. Not a warning light bulb, it's an LED; but the wire that excites the alt, the blue one in that two-way connector, helps the alternator 'boot up' when engine is starting. It indirectly results in the warning light coming on, or not doing. Yes, if the blue wire is not connecting to the alt, either at the plug or somewhere on route to it, the warning light will not work. Generally, a burst of revs (2500, say) will start the alternator charging, even without the blue wire being intact, so try that as evidence that the replacement alternator is itself OK.
-
I'll send you a message. 🙂
-
@JonLongstaff are you selling or scrapping?
-
I'm seeing belt. A difference as significant as a change of timing mechanicals would surely result in a different engine code, I'd imagine.
-
-
Undo item 28 bolts: Car Parts Catalog - LLLParts
-
Can you unbolt the bracket that attaches it all to the side of the head, so you can work on the bench/in the vice?
-
Is it the metal pipe that won't come off, or the EGR itself? If metal pipe is off, is the outer metal gasket off too? Remembering now that I moved that outer gasket along threads to the end, but left it on to hold studs parallel while freeing the valve body.
-
A decade since I did the one on our Fabia, but I seem to remember that the studs had become a bit non-parallel over time. Think I somehow squeezed them together, or pushed them apart at the ends to square them up, then prize the thing off. Might be corroded on with white aluminium oxide jamming everything up too. Heat will probably help.
-
-
-
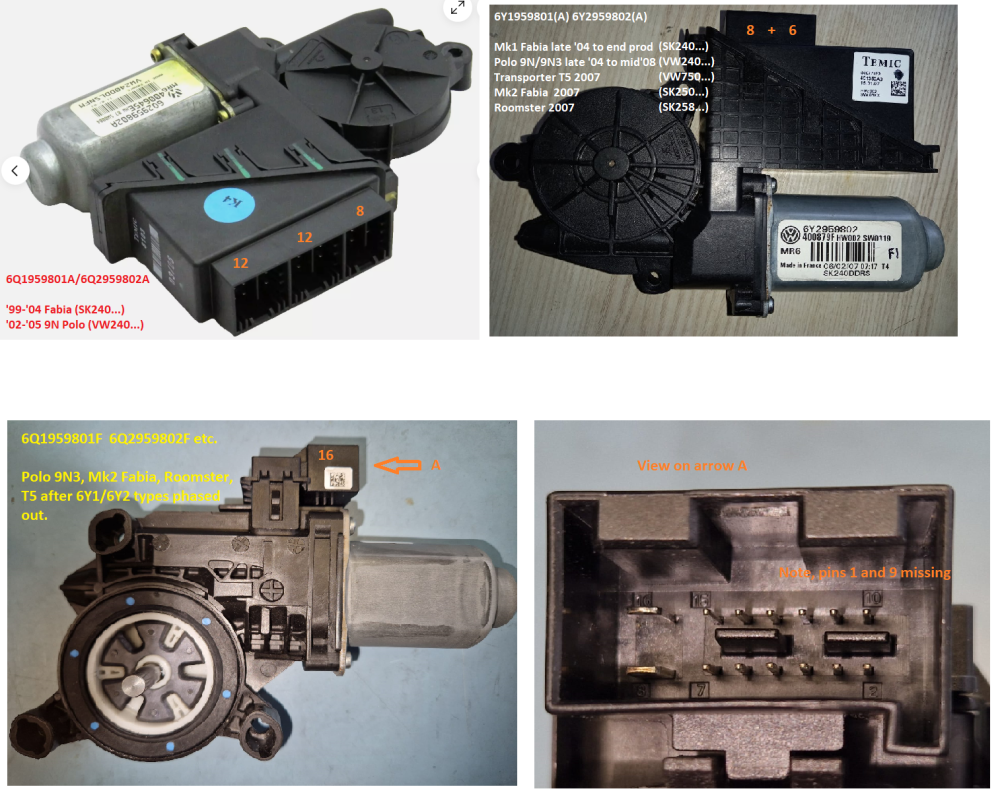
Hello @langhede , that's a good question, but the answer depends on which 6Q1959801 you mean. The crucial information is contained in the letter after the core 9-character part number. Older Mk1 Fabias (pre-facelift) used 6Q1959801A in LHD cars, 6Q2959802A in RHD. Mk2 Fabias, from around 2008, went back to a 6Q... part number, but this time the end letter is F/G/H/J. The 6Q1959801A and 6Q2959802A have three connectors, in contrast to the two on a 6Y... motor. They are involved in mirror control, the reason for the third connector. They also use two-wire CAN for communication connected to the convenience bus. The 6Y...motors use LIN, single-wire comms with (only) their passenger side counterpart (and rear motors if fitted). No involvement in mirror control. The later ones (2008> approx), 6Q....F, etc, use a single 16-way connector. Also LIN-connected only to other window motors. No involvement in mirror control. I will try to add some photos later today, when I have some more time. Edit: see below. Note: the character sequences I've written in brackets relate the last line of the part number labels to the model that they are from/for. If you mismatch these, despite having matched the main VW group part number, correct function isn't guaranteed. Numbers in orange are the number of ways in each loom connector, not all will have wires in. I also have some advice on pitfalls to avoid if trying to purchase on the secondhand market, which I will do as a separate post later. Executive summary: beware of sellers who over-generalise applicability, and especially any that seem to have scratched out characters on the part number label.
-
I would look what prices I could find for 2nd hand genuine too though.
-
This is probably your cheapest route to new genuine- https://www.lllparts.co.uk/product/1K0906627B/vag-pressure-converter-1k0906627b
-
-
Hiya Poopy, welcome to Briskoda. Please do contribute to this post at some point. 😁 https://www.briskoda.net/forums/topic/220601-what-made-you-choose-your-username/page/17/#comment-5925982
-
A tool that you may need, and may not have, is a 9mm 12-sided socket. This is for the M7 screws that hold the clutch pressure plate to the flywheel. I can lend you one if you want to get in touch (and I can find the one I bought!).
-
@ords's part number is correct for your VIN - 06K109121B. £24.80 + VAT at Skoda.
-
Reg or VIN would help me to help.
-
Stop buying throttle bodies. That isn't the problem, you've already shown that by trying another.
-
No. It goes from the brake servo (big round black thing on the wall at the back of the engine bay), to the intake manifold just below the throttle body. You will see it better with the engine top cover removed, I think. As I said above, they tend to crack at the junctions of the hard plastic sections. Look with your eyes, but also feel with fingertips, because they often crack on the underside.


