varaderoguy
Resident Member
-
Joined
-
Last visited
Everything posted by varaderoguy
-
Sounds like an earthing fault. Are there any faults reported (reported on the CANBUS network) - with any error codes?
-
https://www.ebay.co.uk/itm/324026062902?chn=ps&norover=1&mkevt=1&mkrid=710-134428-41853-0&mkcid=2&itemid=324026062902&targetid=1140163973729&device=c&mktype=pla&googleloc=1007329&poi=&campaignid=12126090633&mkgroupid=117623829555&rlsatarget=aud-381667280803:pla-1140163973729&abcId=9300481&merchantid=114956368&gclid=CjwKCAiAm-2BBhANEiwAe7eyFBps-cb3nC7SFSWNv7xHMXrIIsC_tI7pN8rRQTay54AUcl-ToU2jshoCv9wQAvD_BwE Trim clips
-
Oh - you need the assistance of @SashaGracewho is a past master in dismantling and reassembling them in double-quick time. Sasha - can you give @Combi_Bobsome pointers?
-
You could do worse that spend out on an hour's worth of Skoda erwin. You can download the workshop manual for your car from there and check any TPI's as well.
-
The upload photos, you need to support the website. 5 ukp per year will give you photo upload facilities. Search ways to support Briskoda from the front page of the website. https://www.briskoda.net/forums/subscriptions/
-
You need to become a Freedom Lite member to do that.
-
Folks, If you are interested, please see this article I have just written about upgrading your MIB2.5 system to a Columbus system:
-
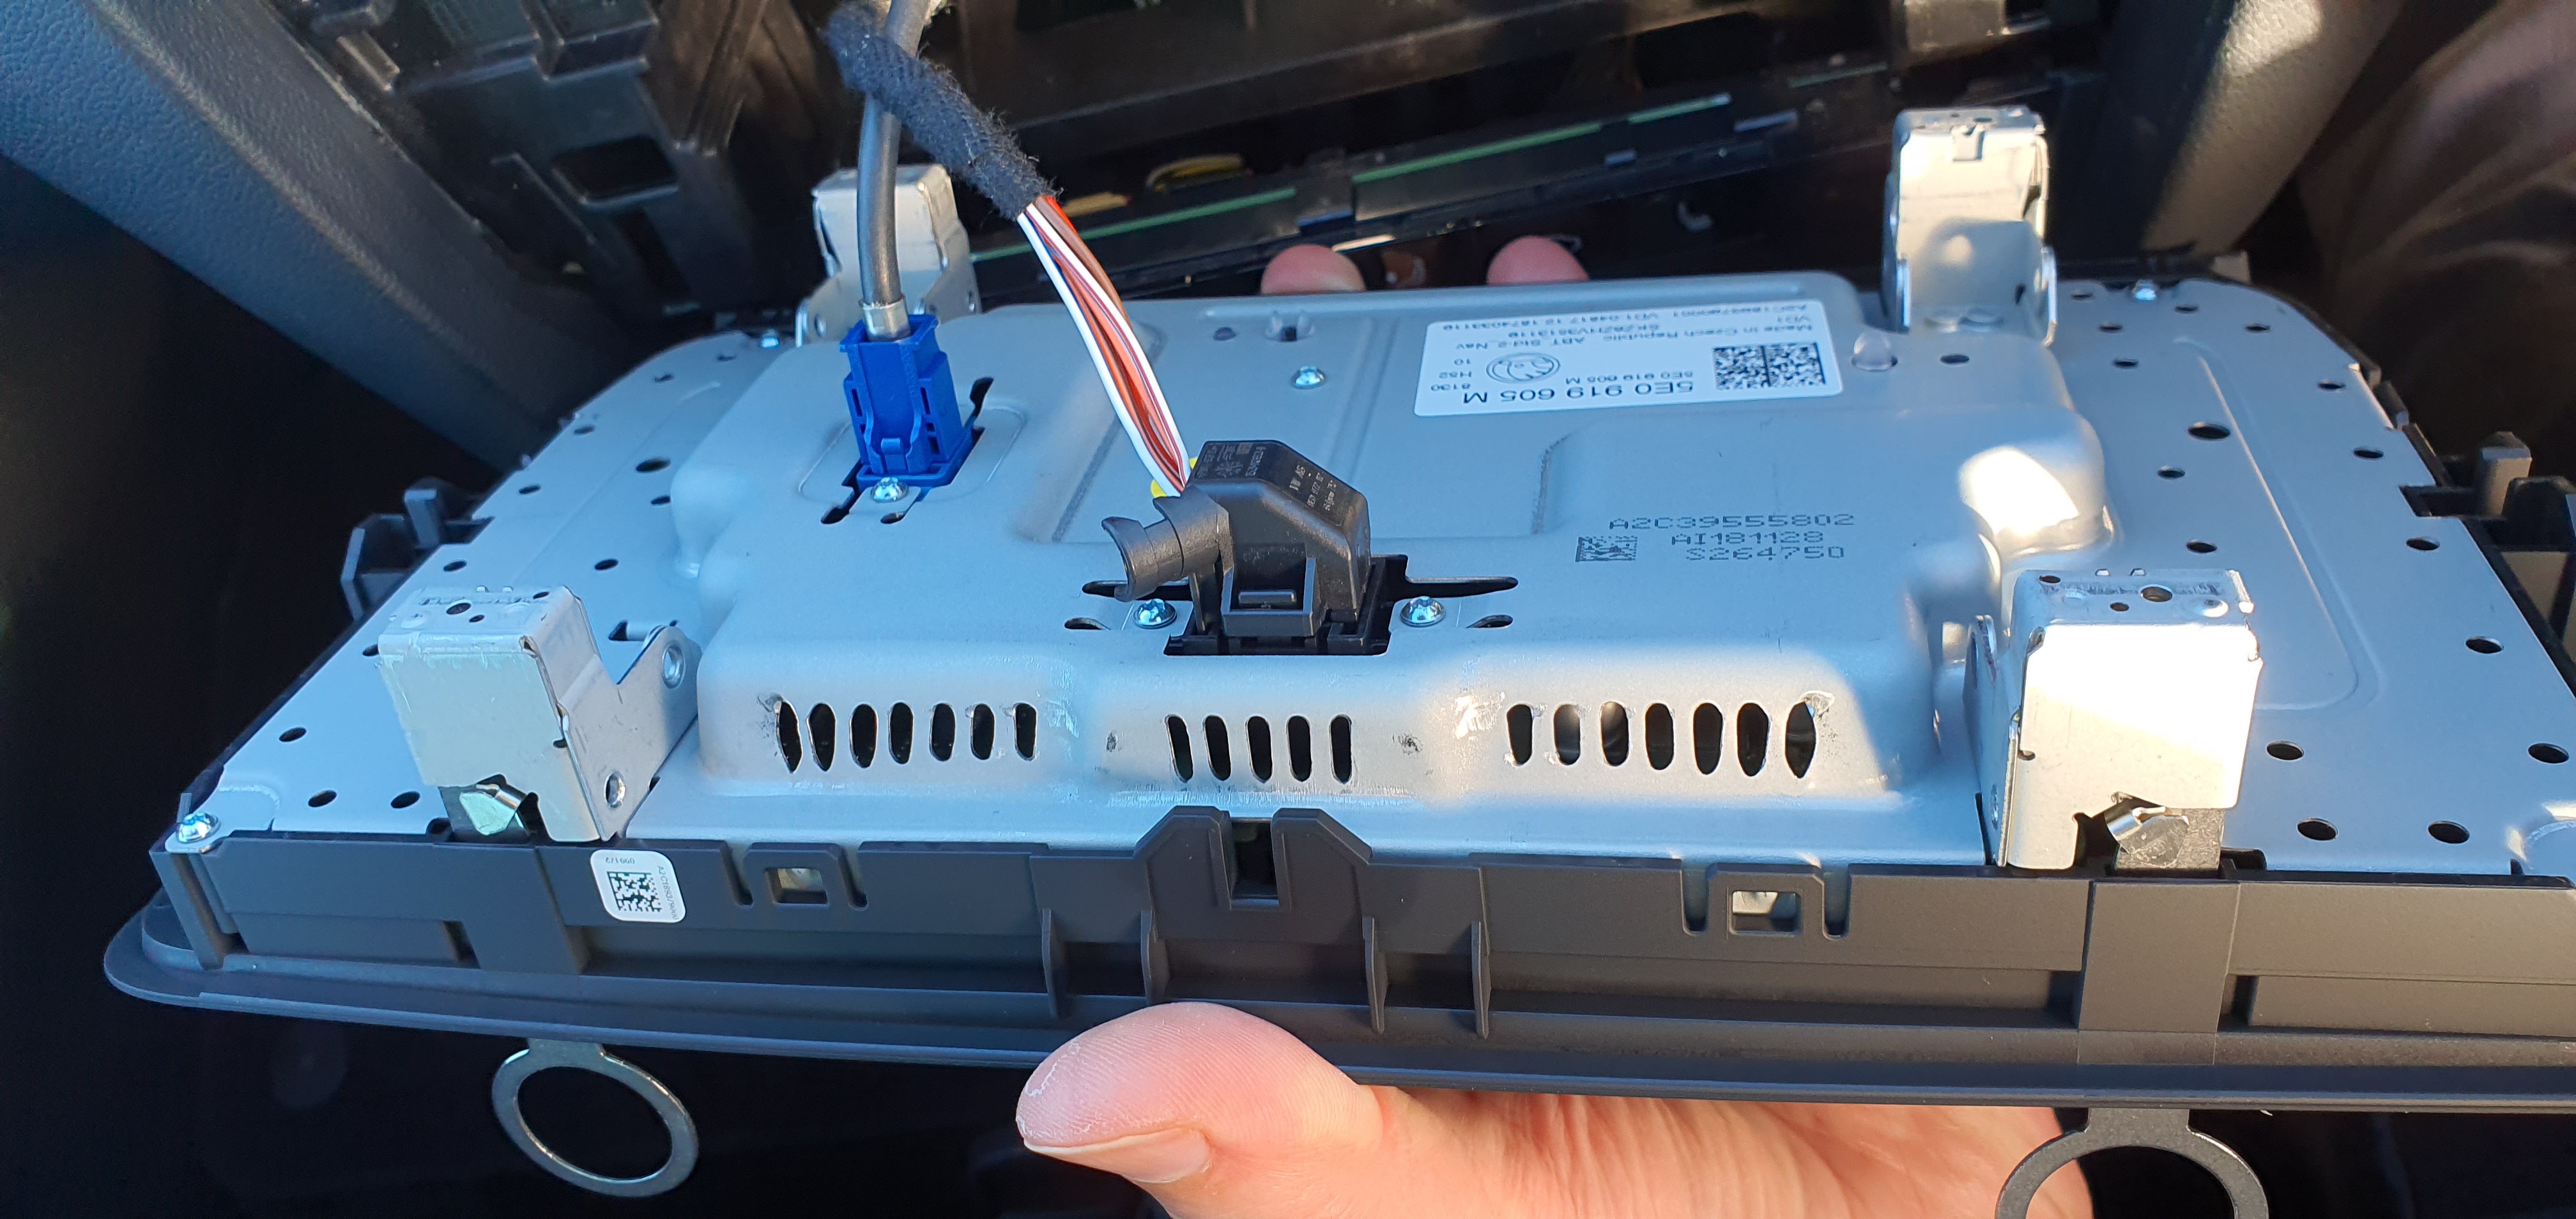
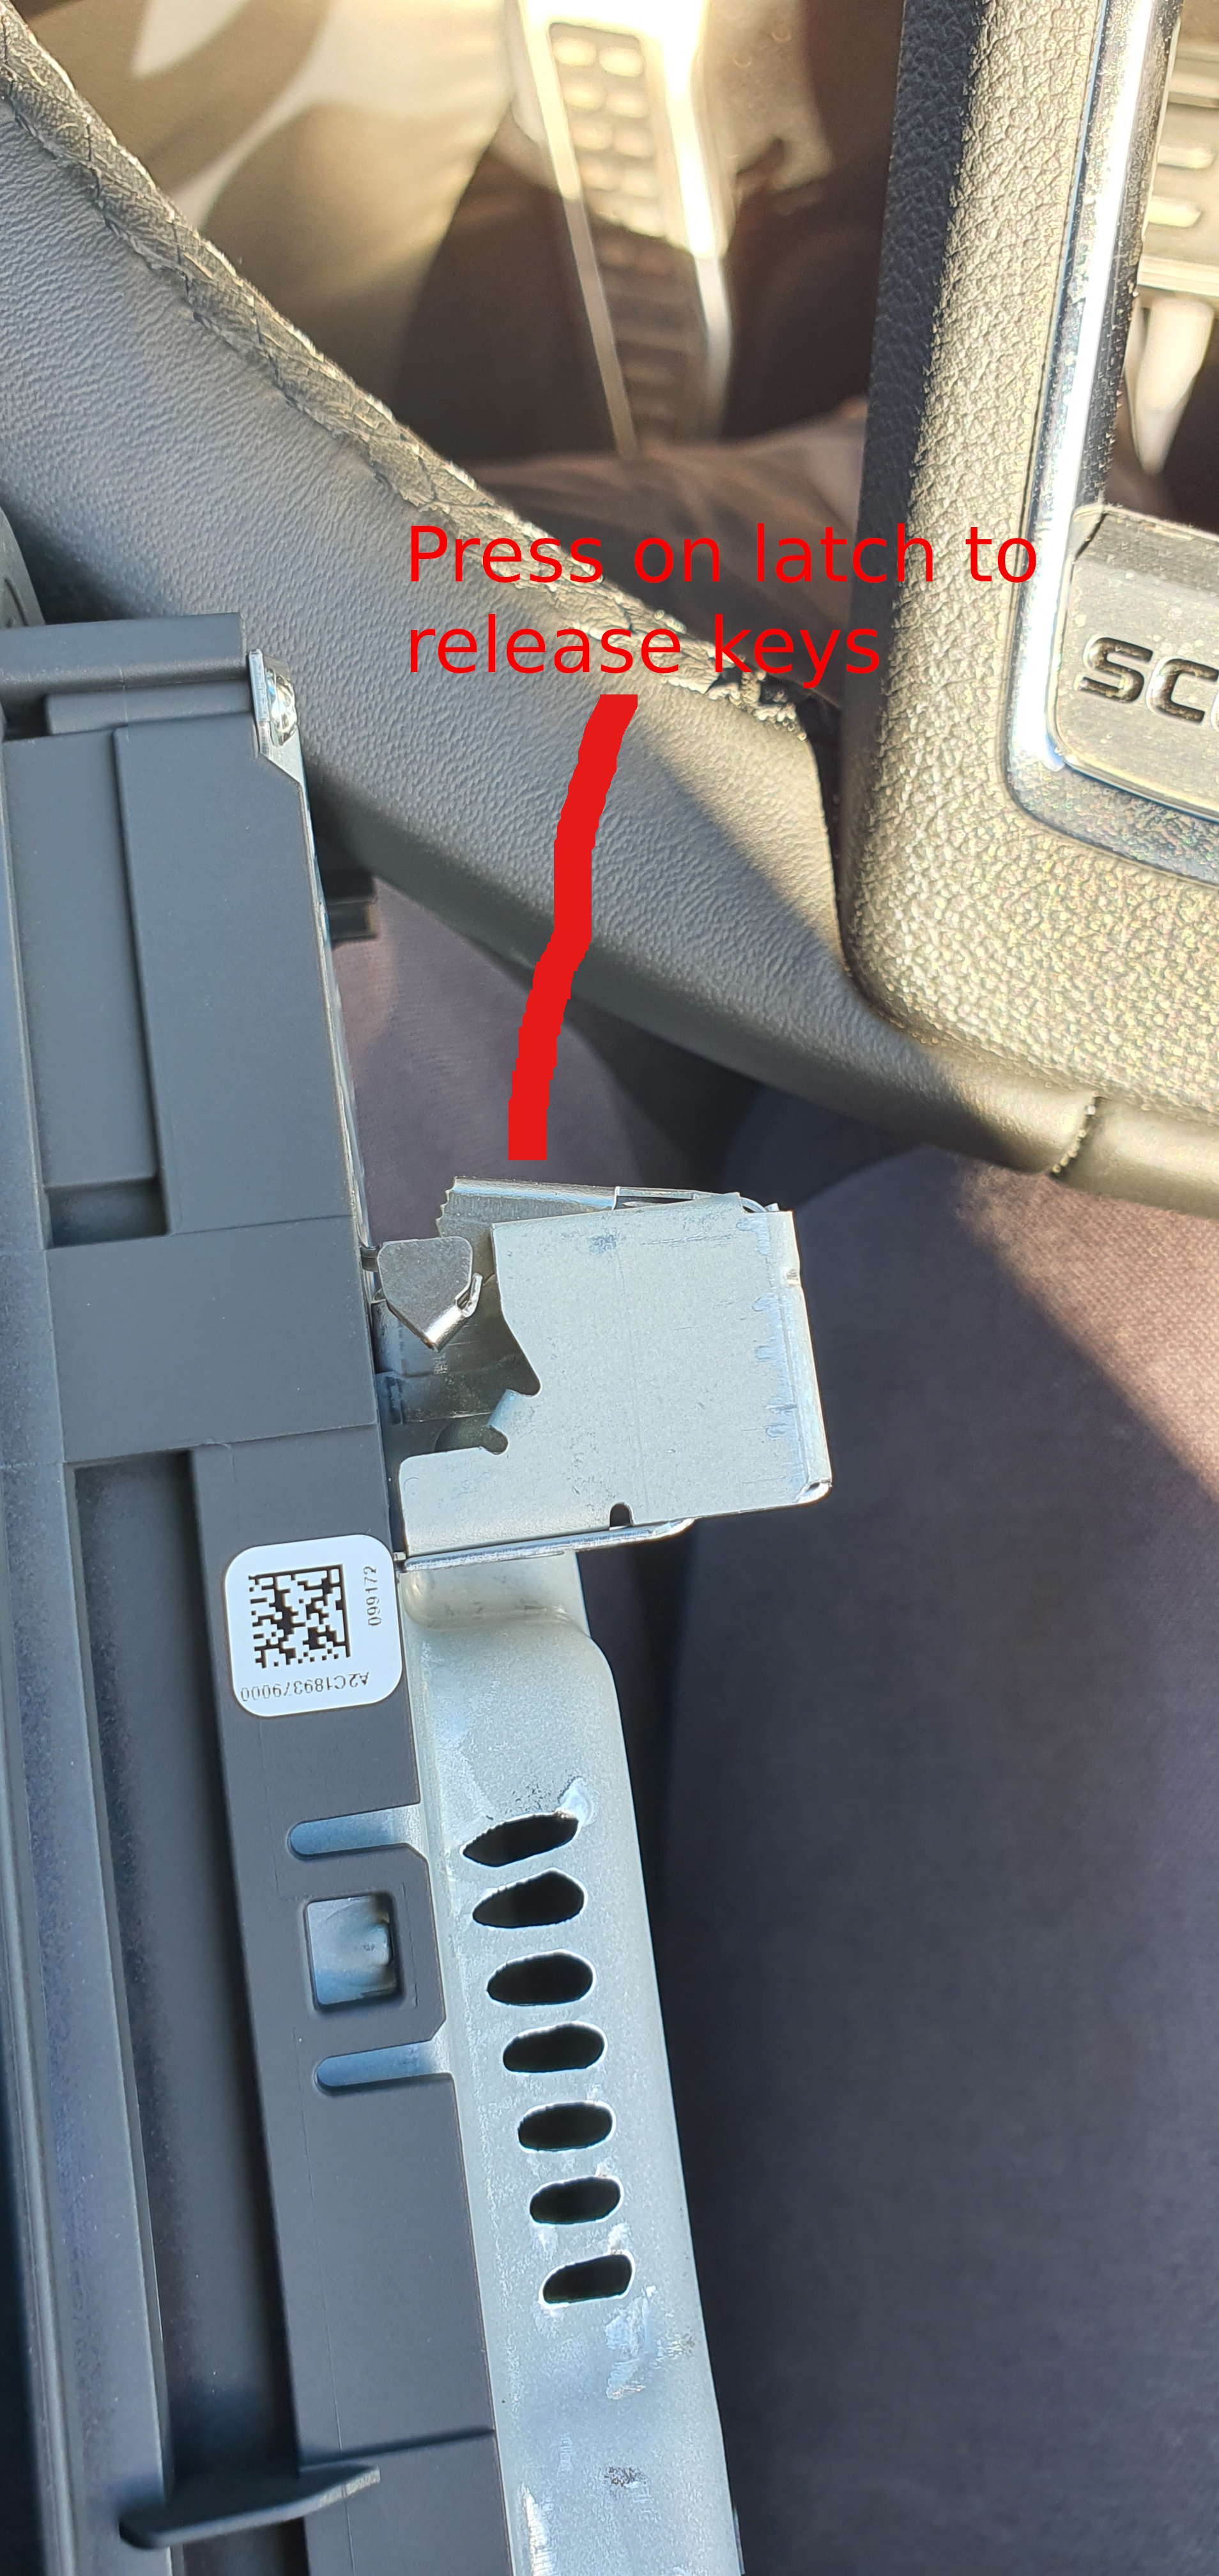
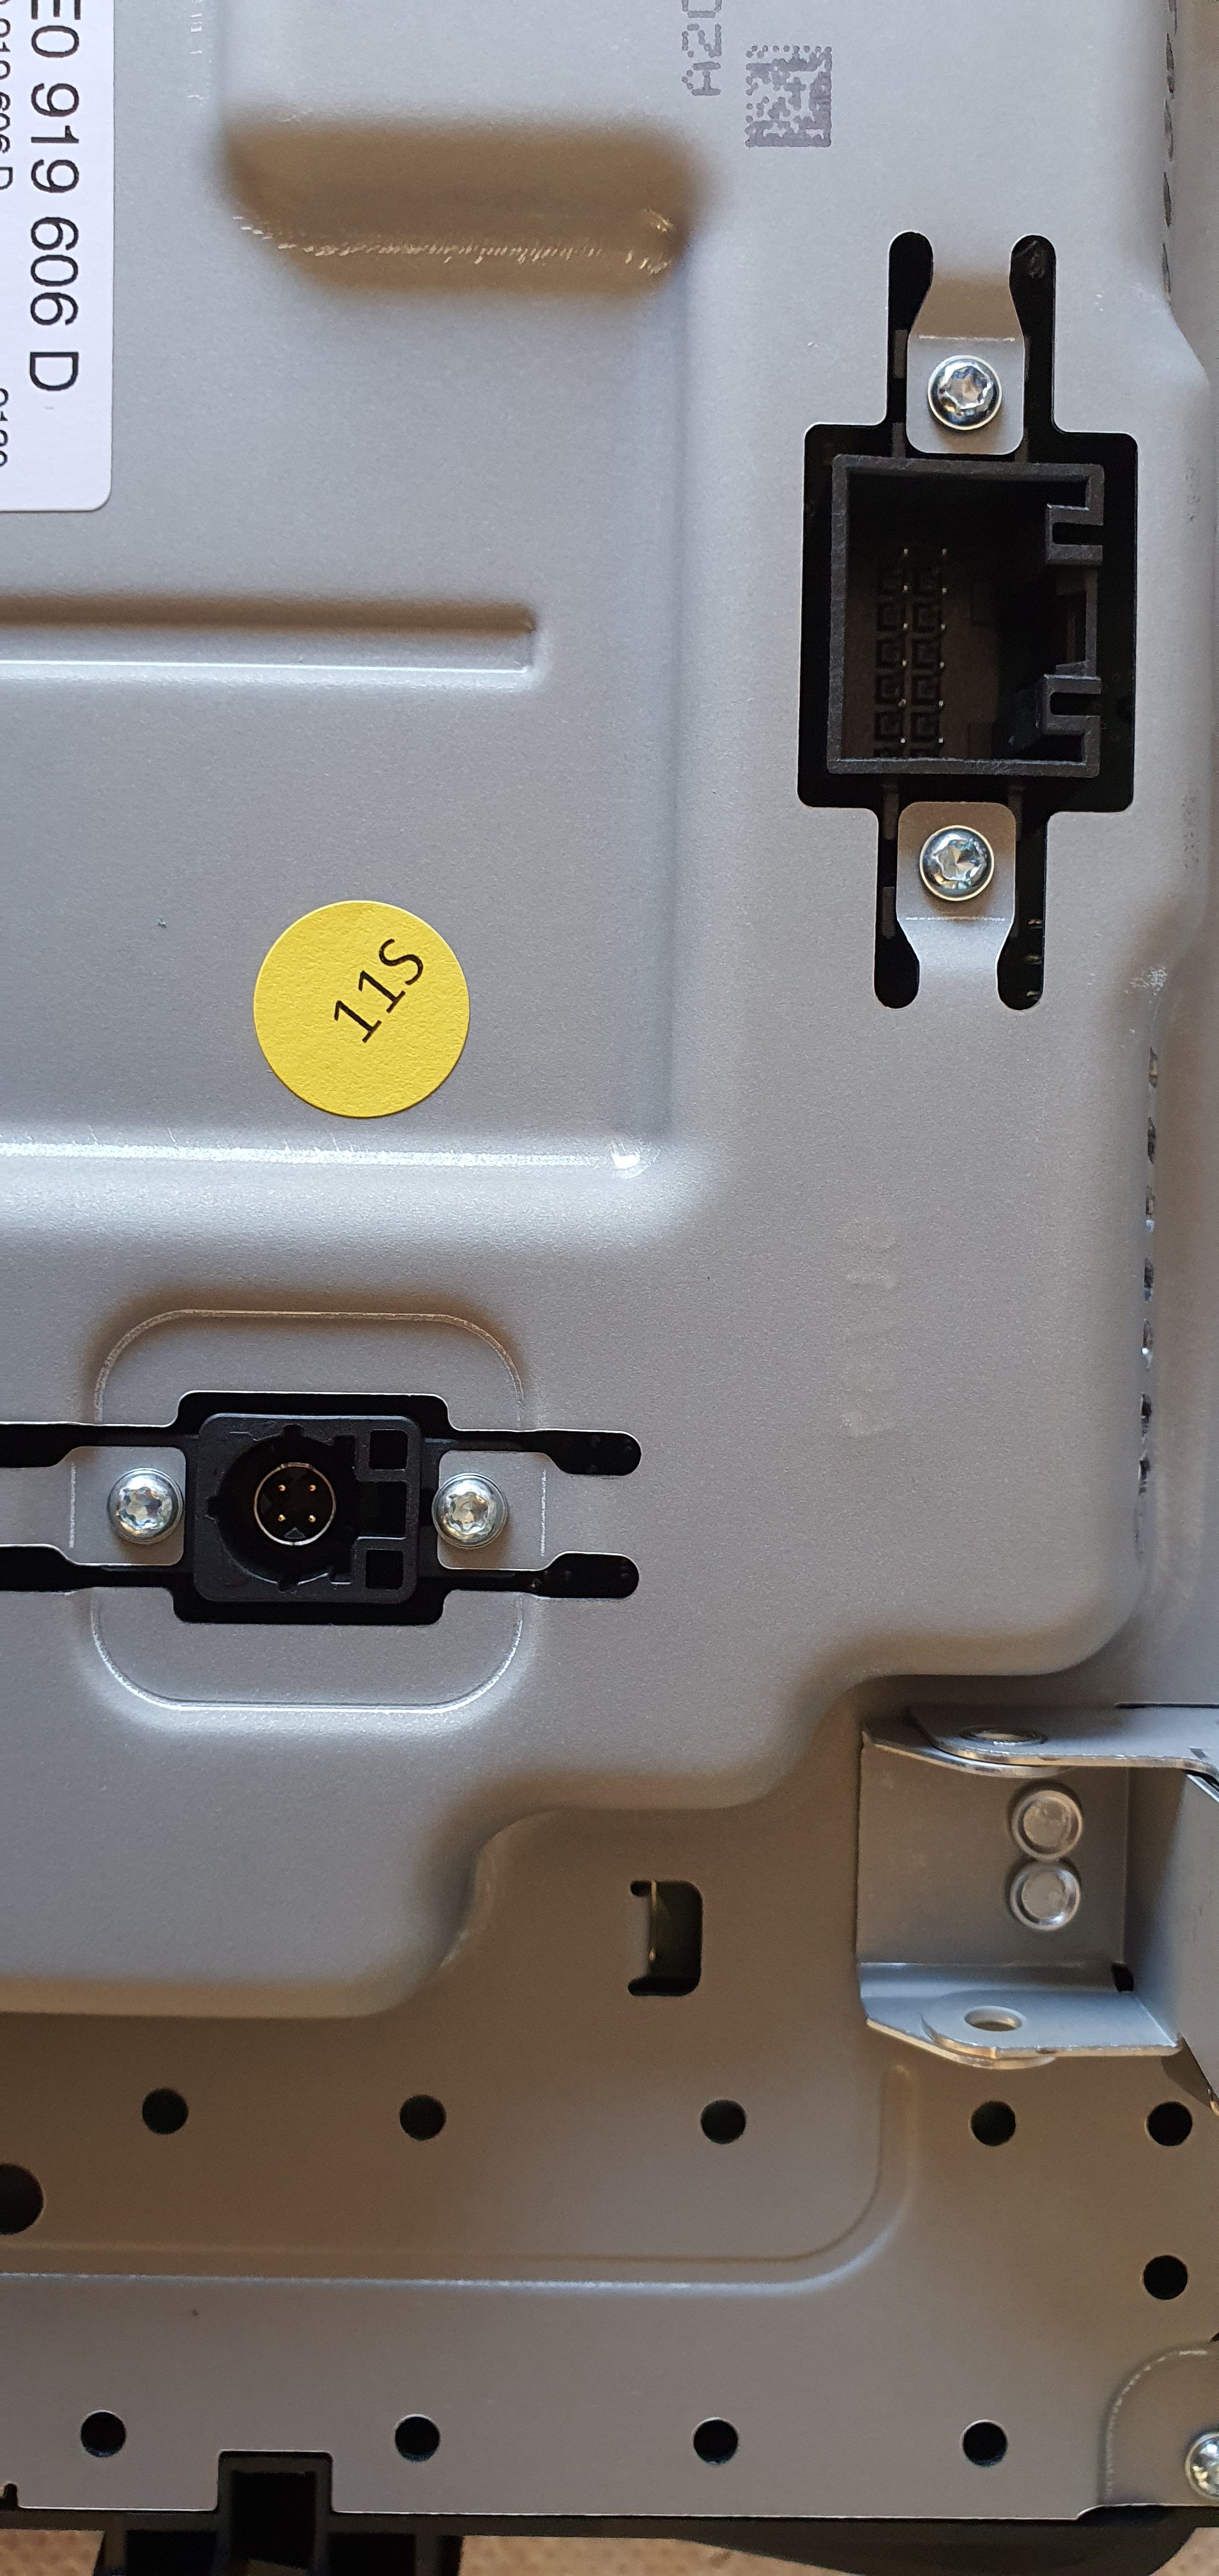
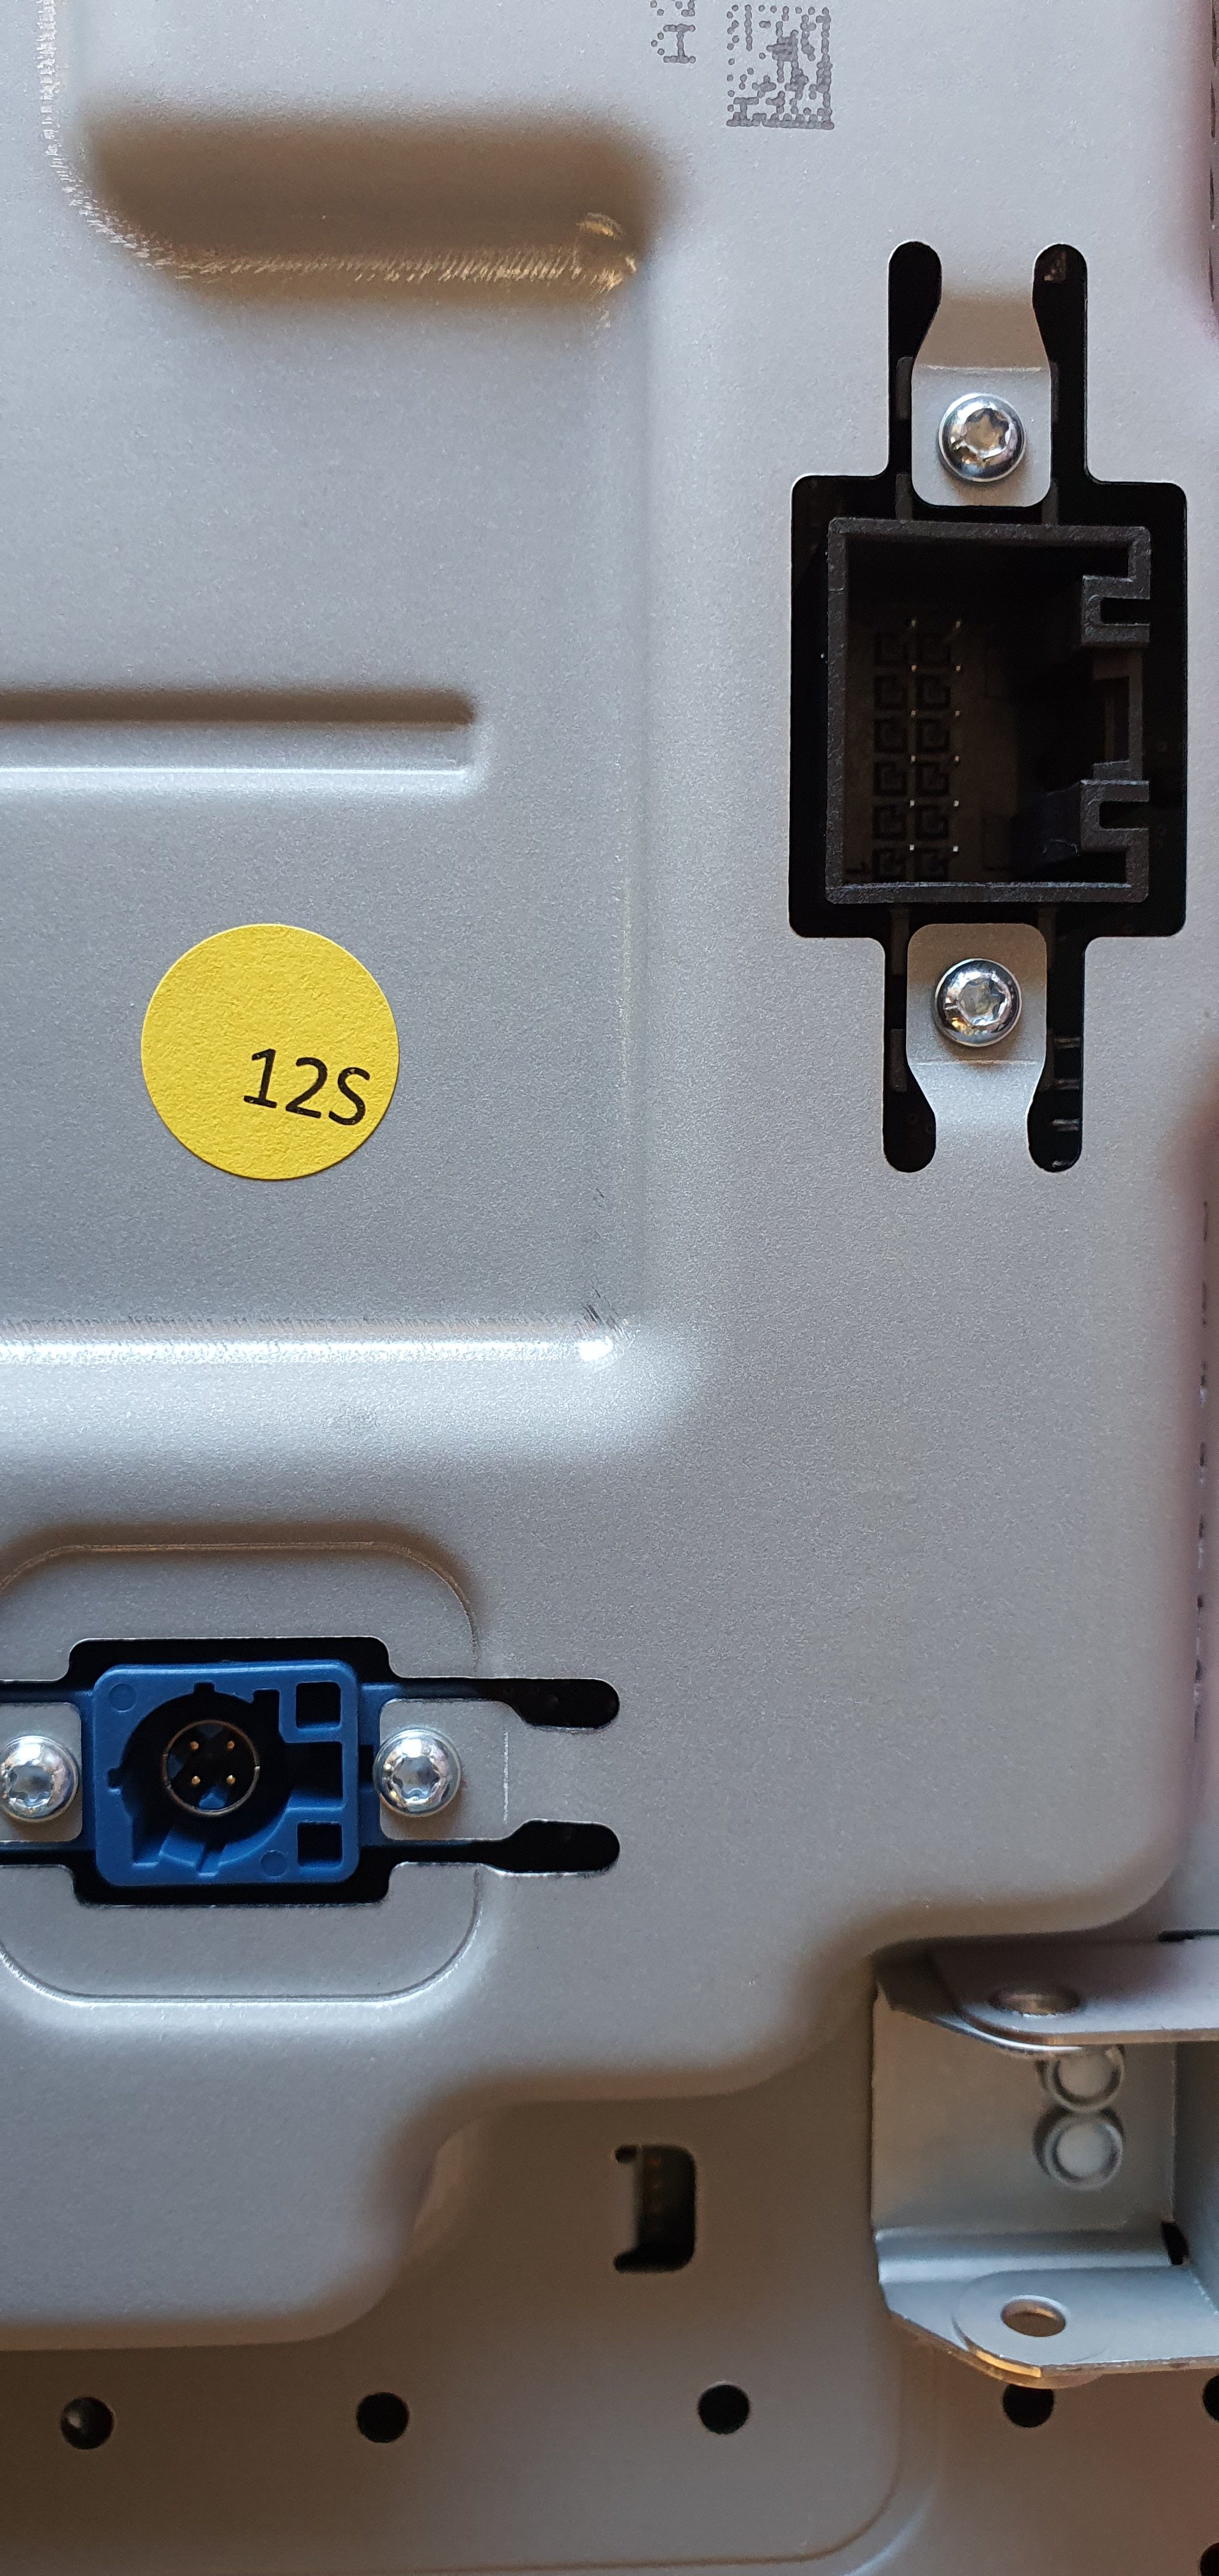
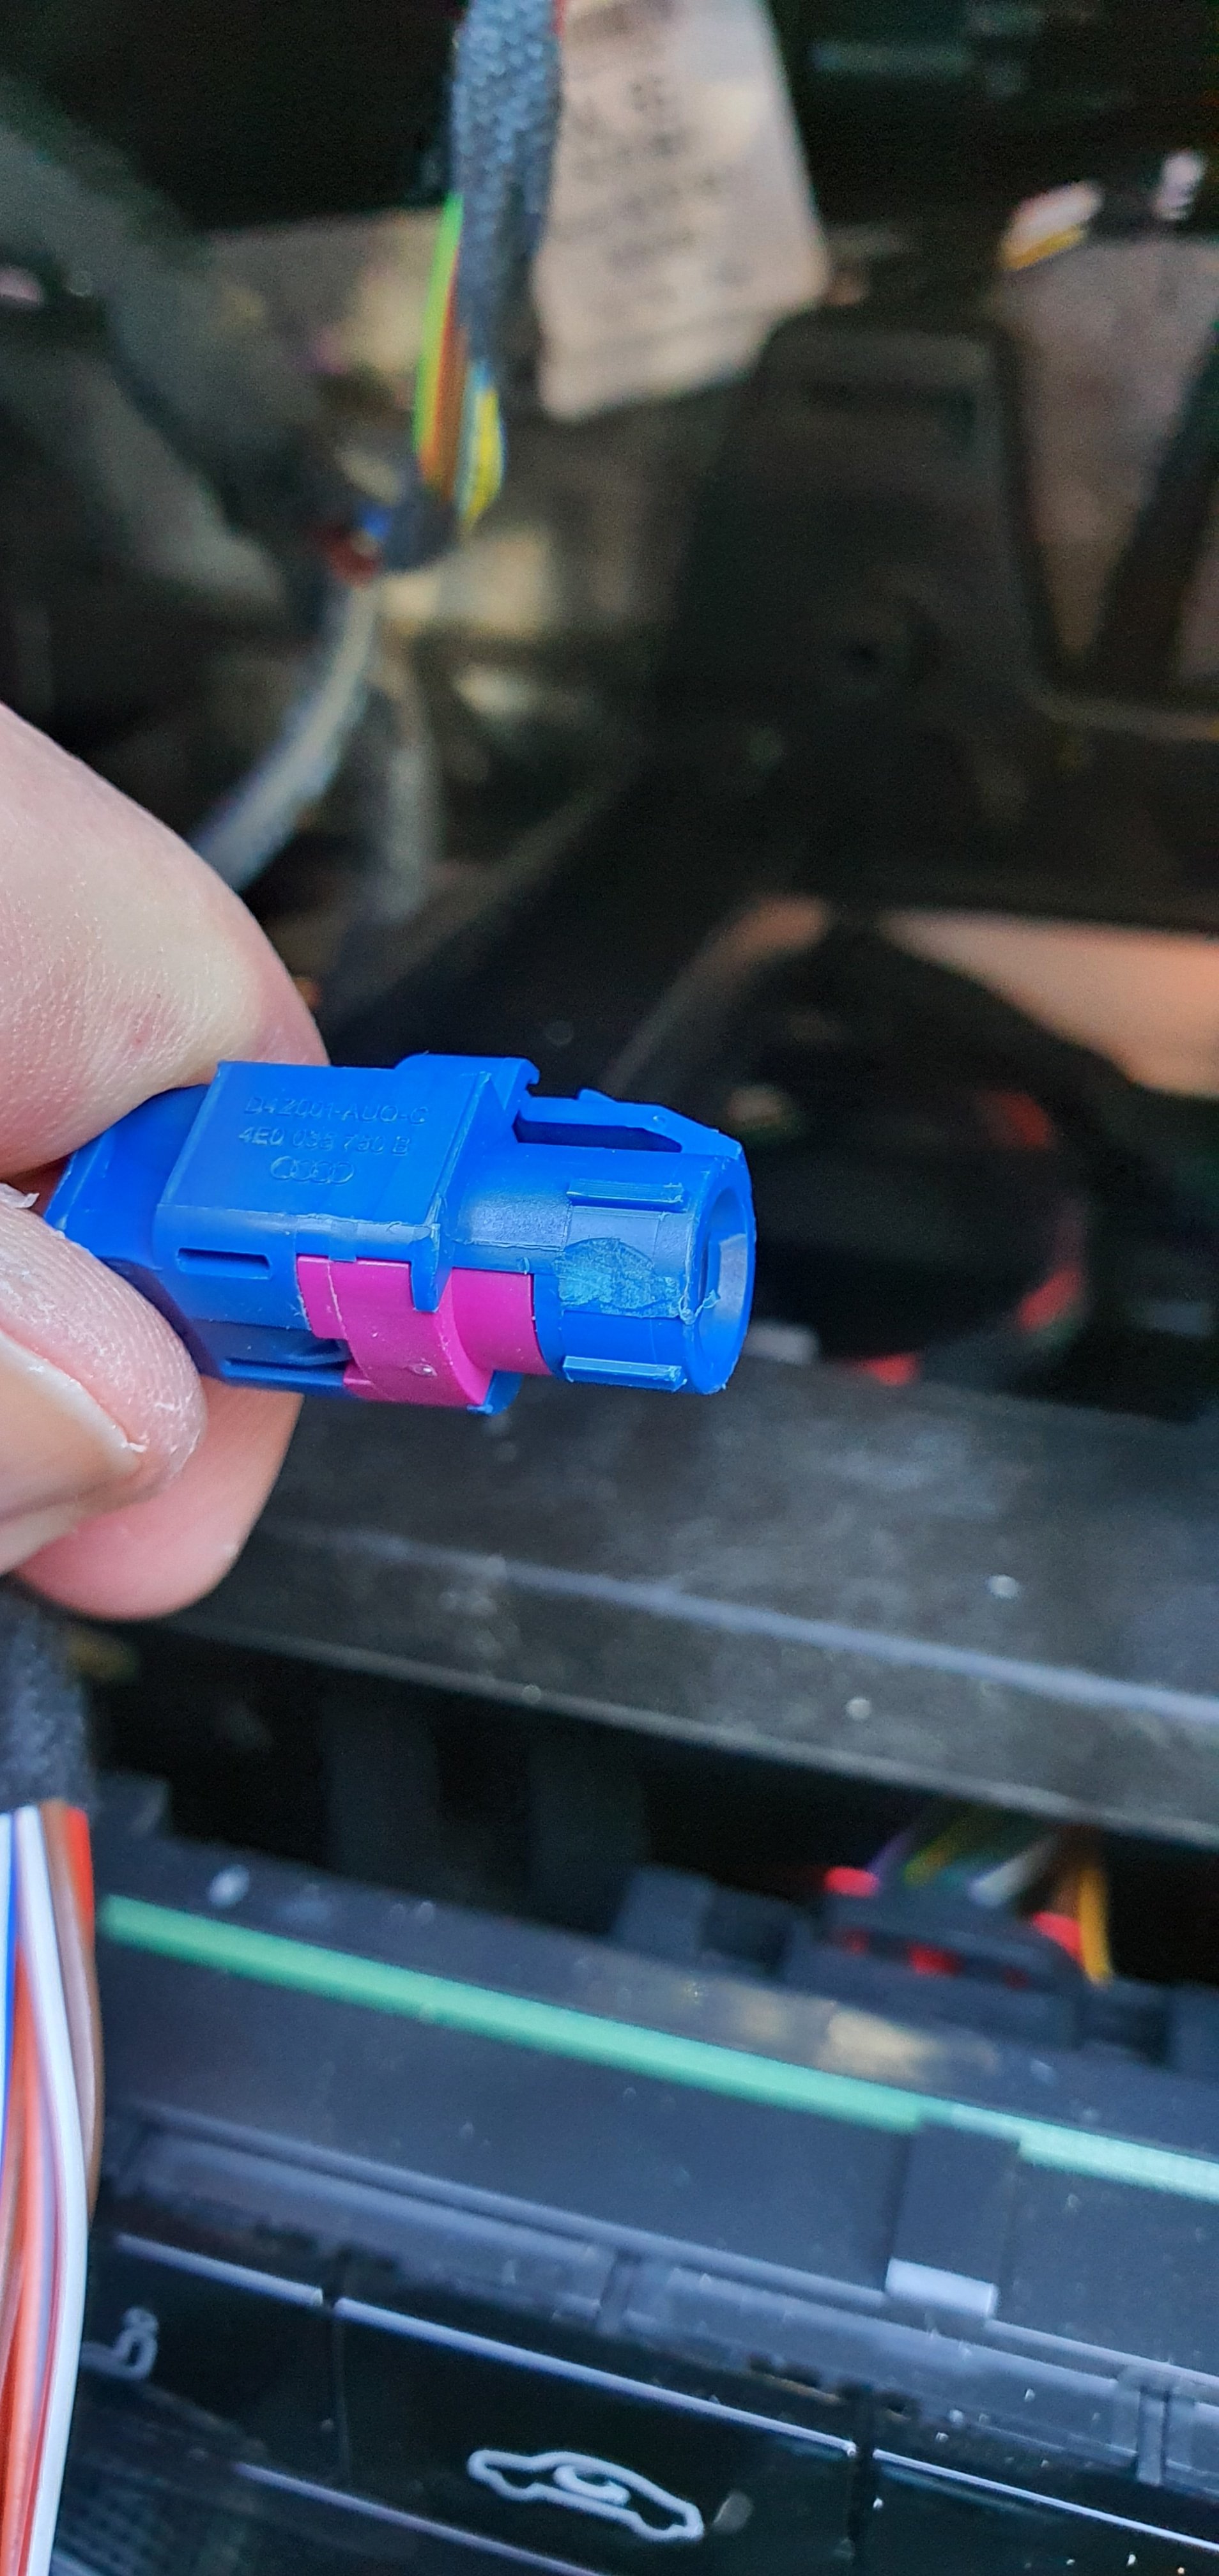
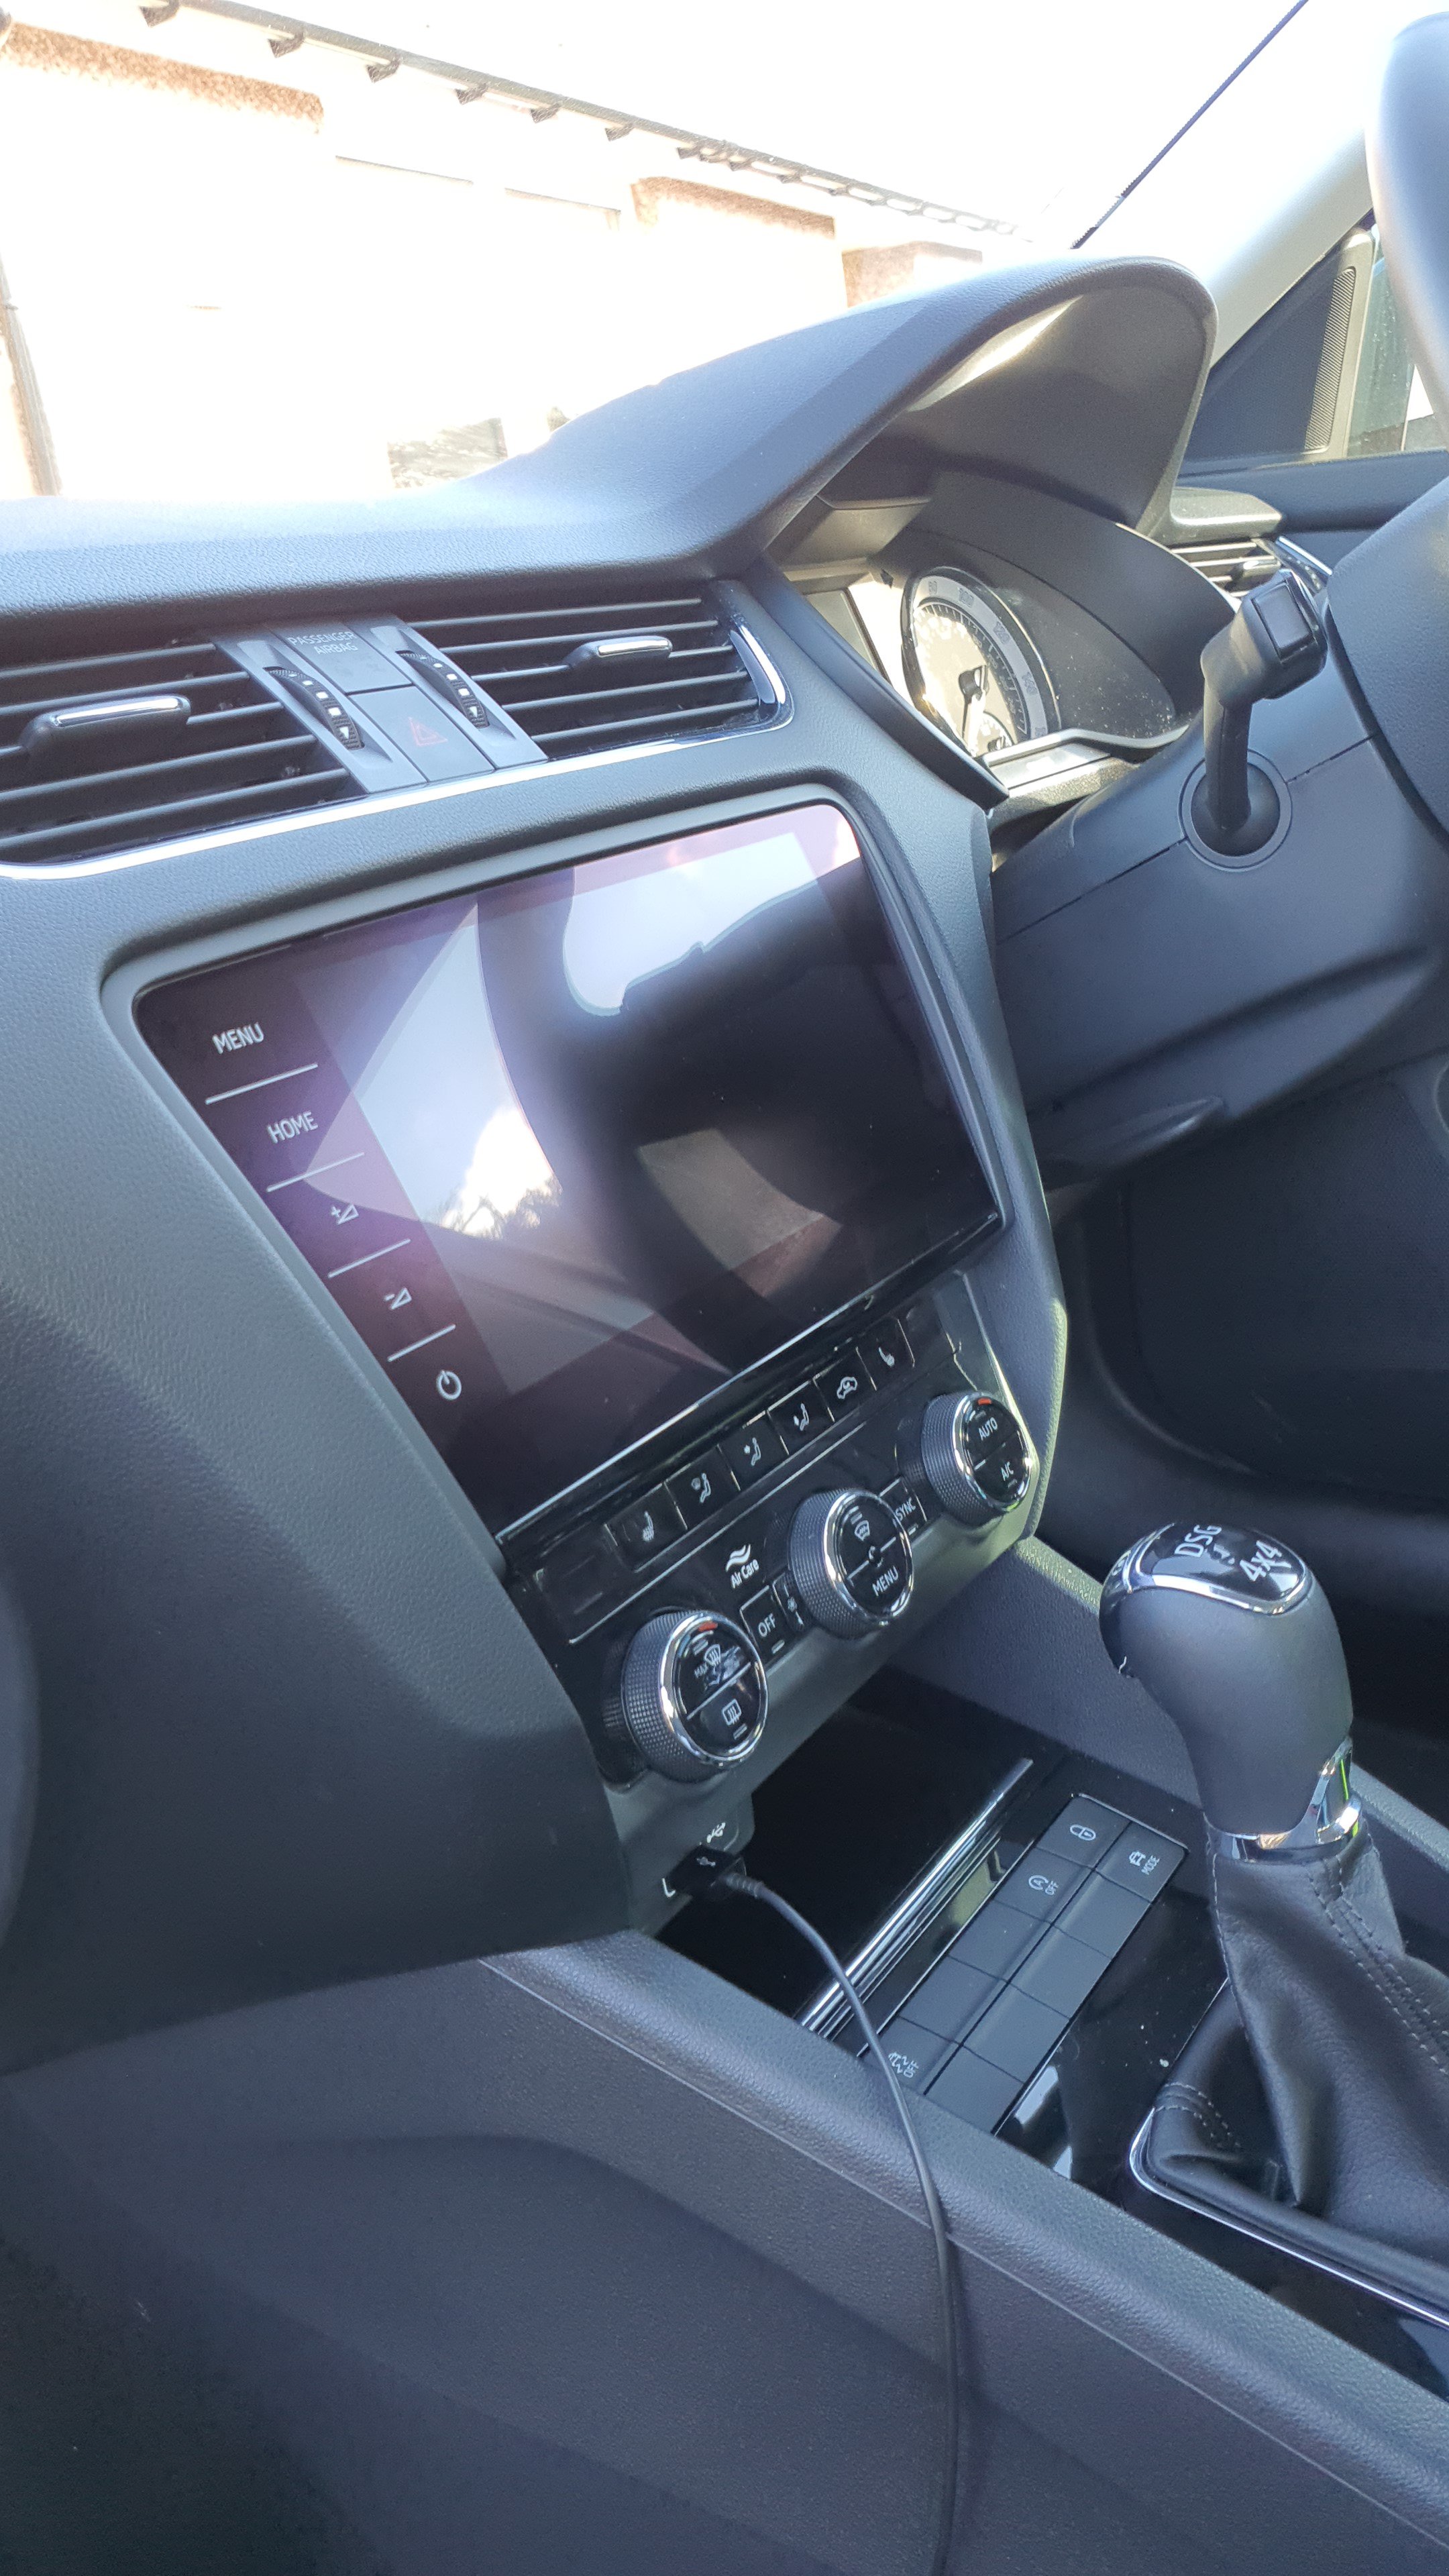
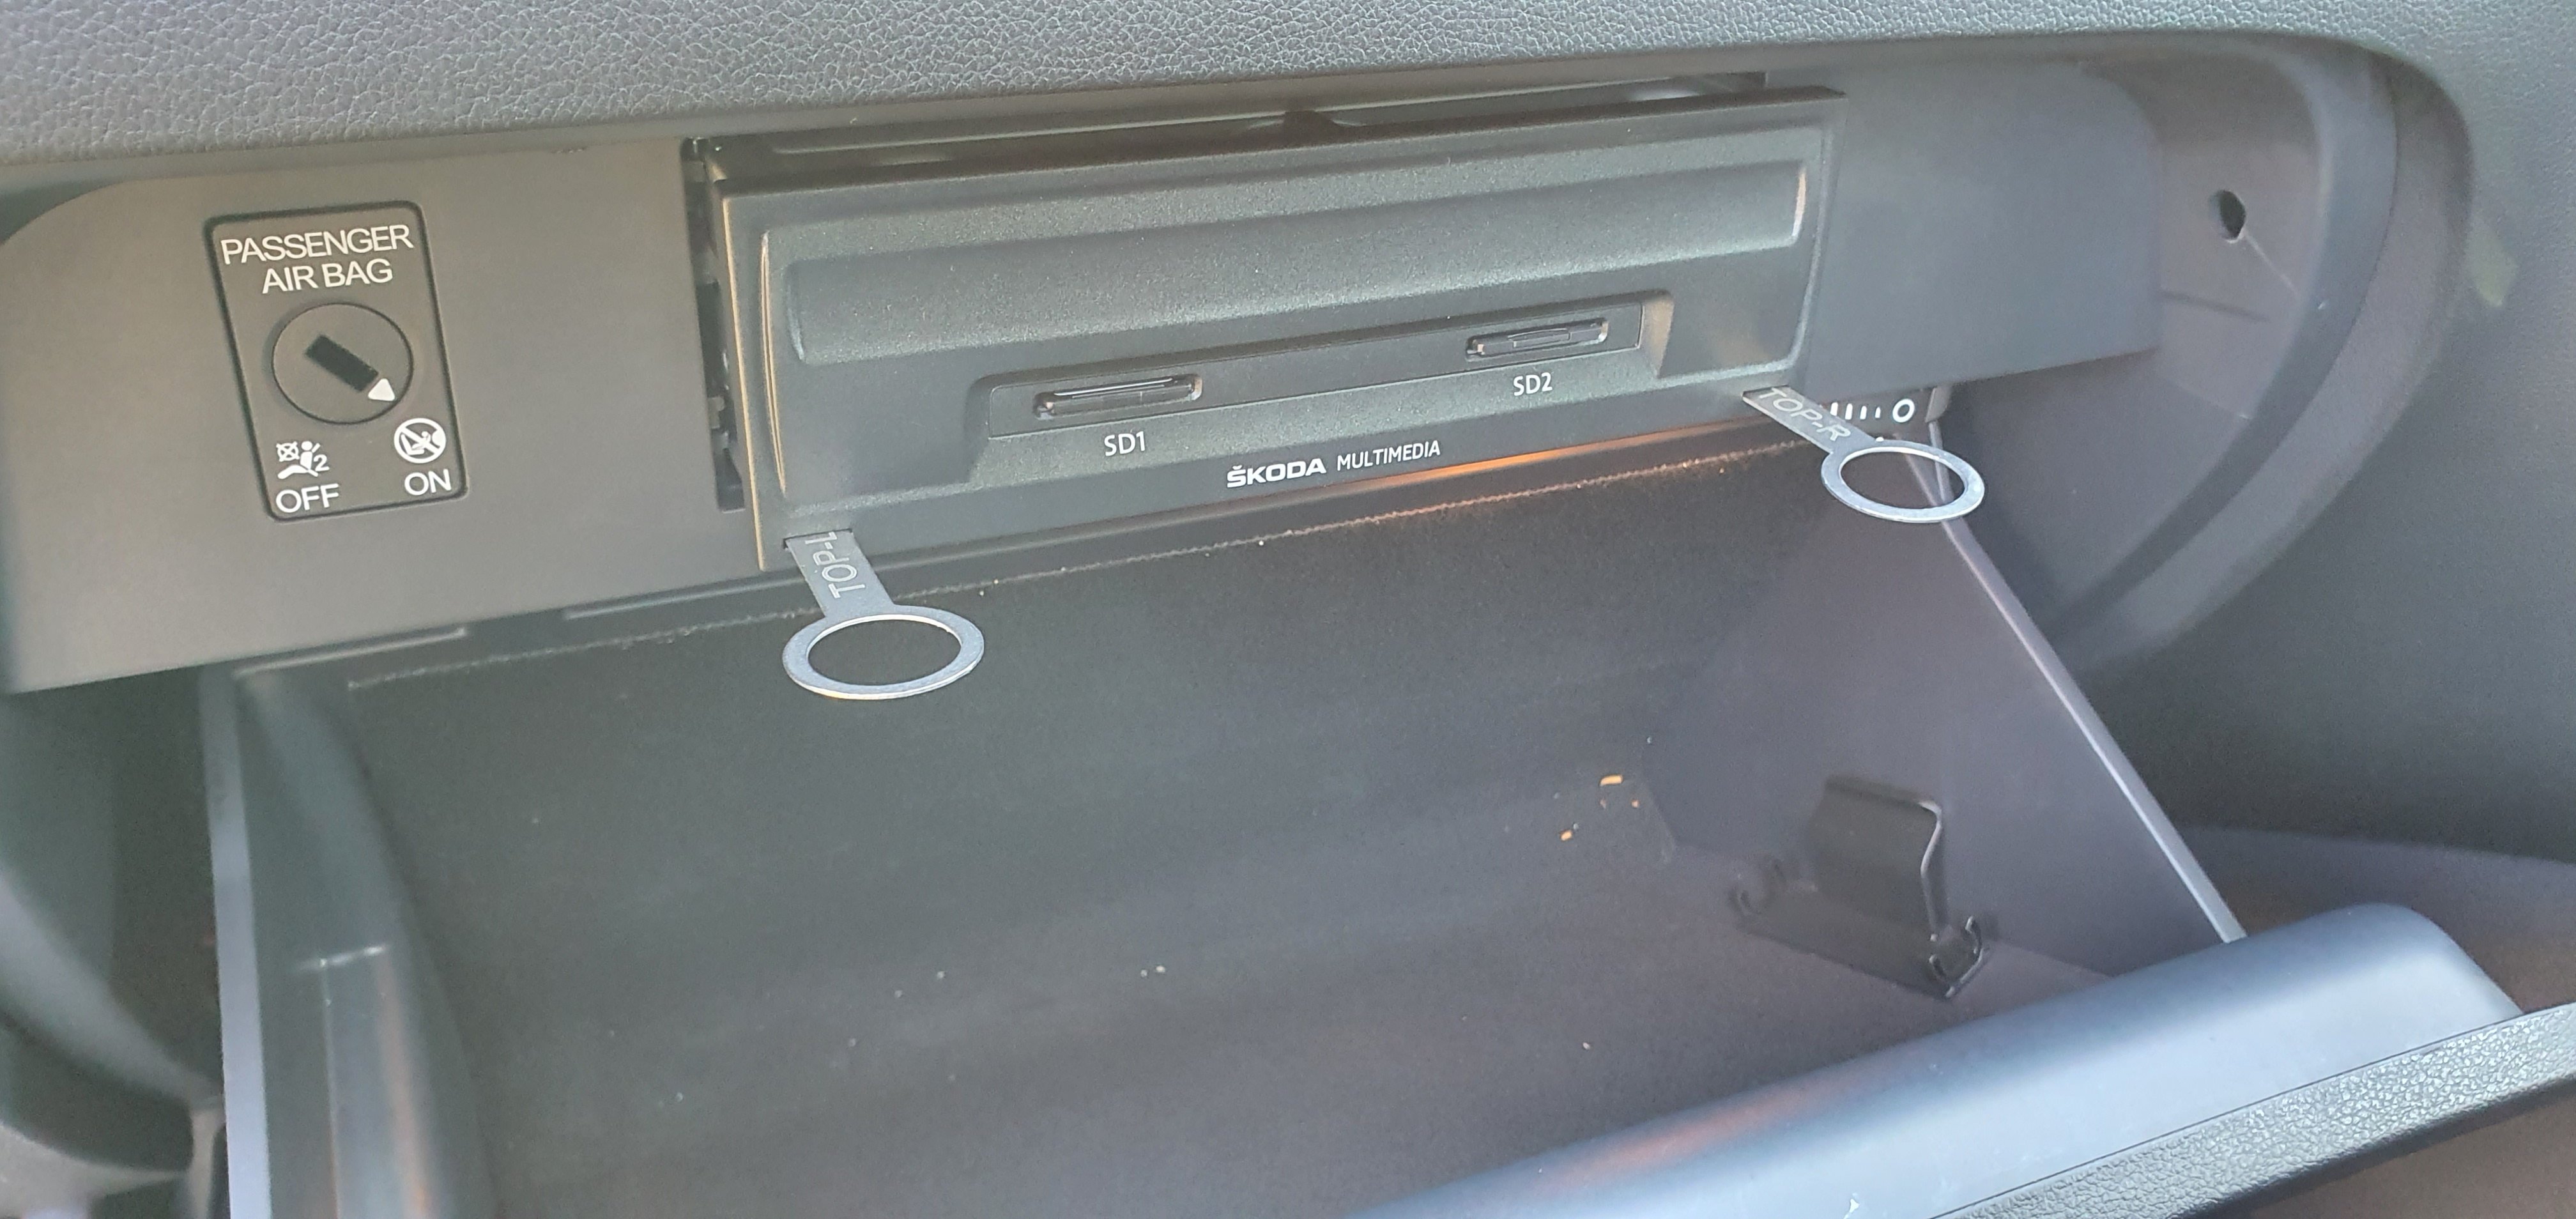
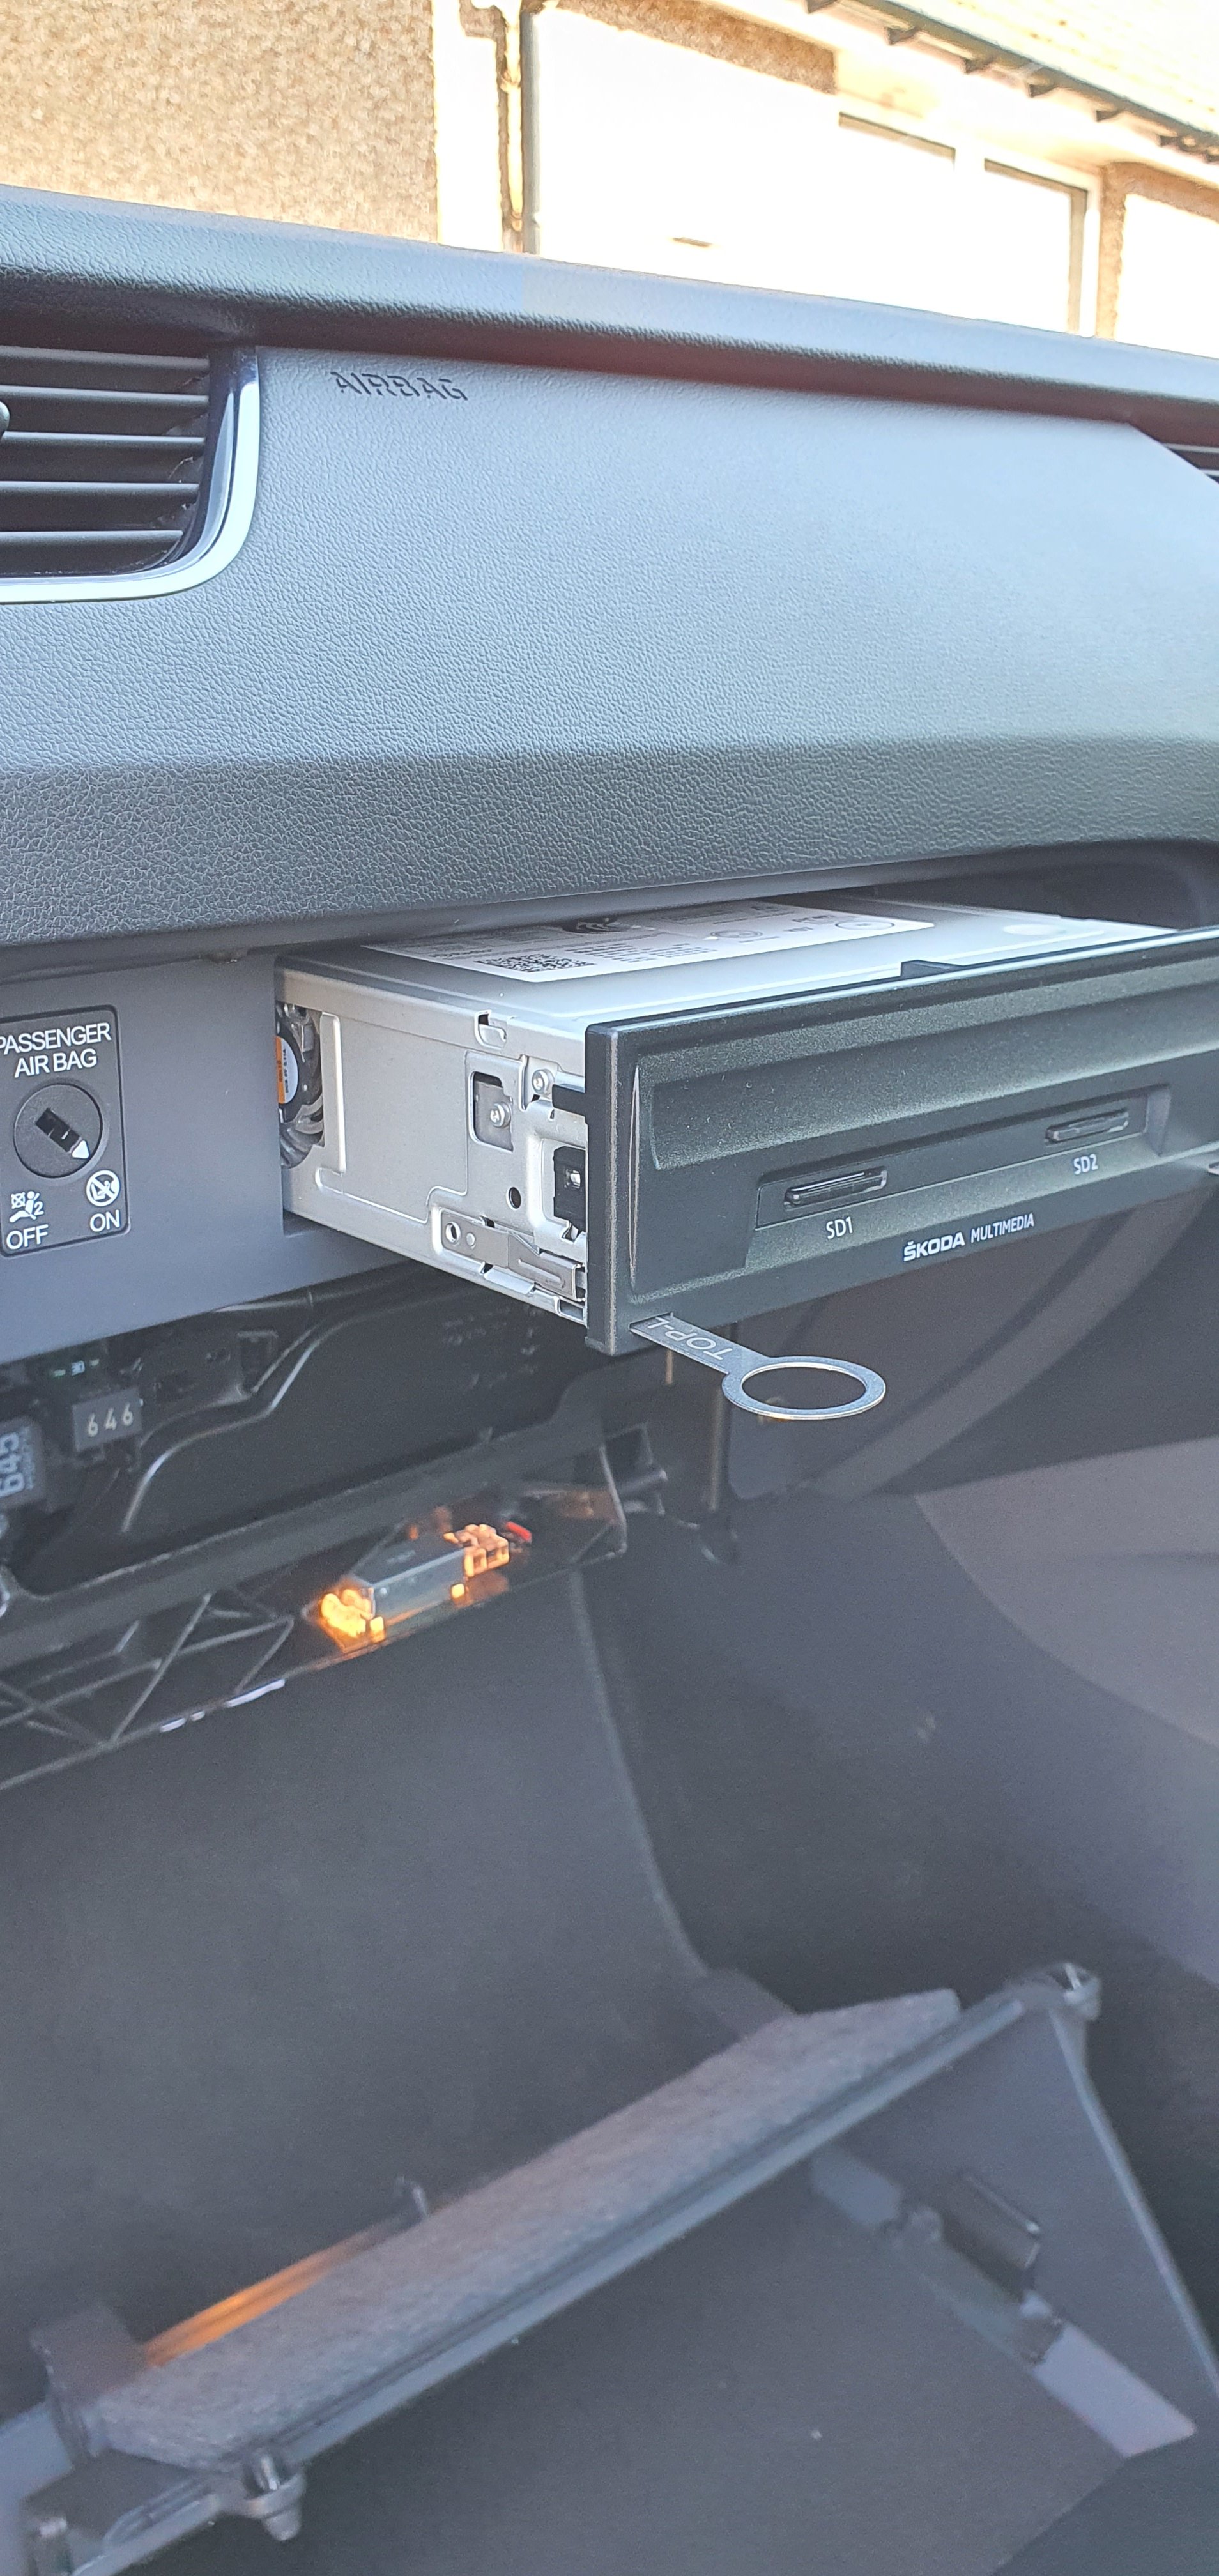
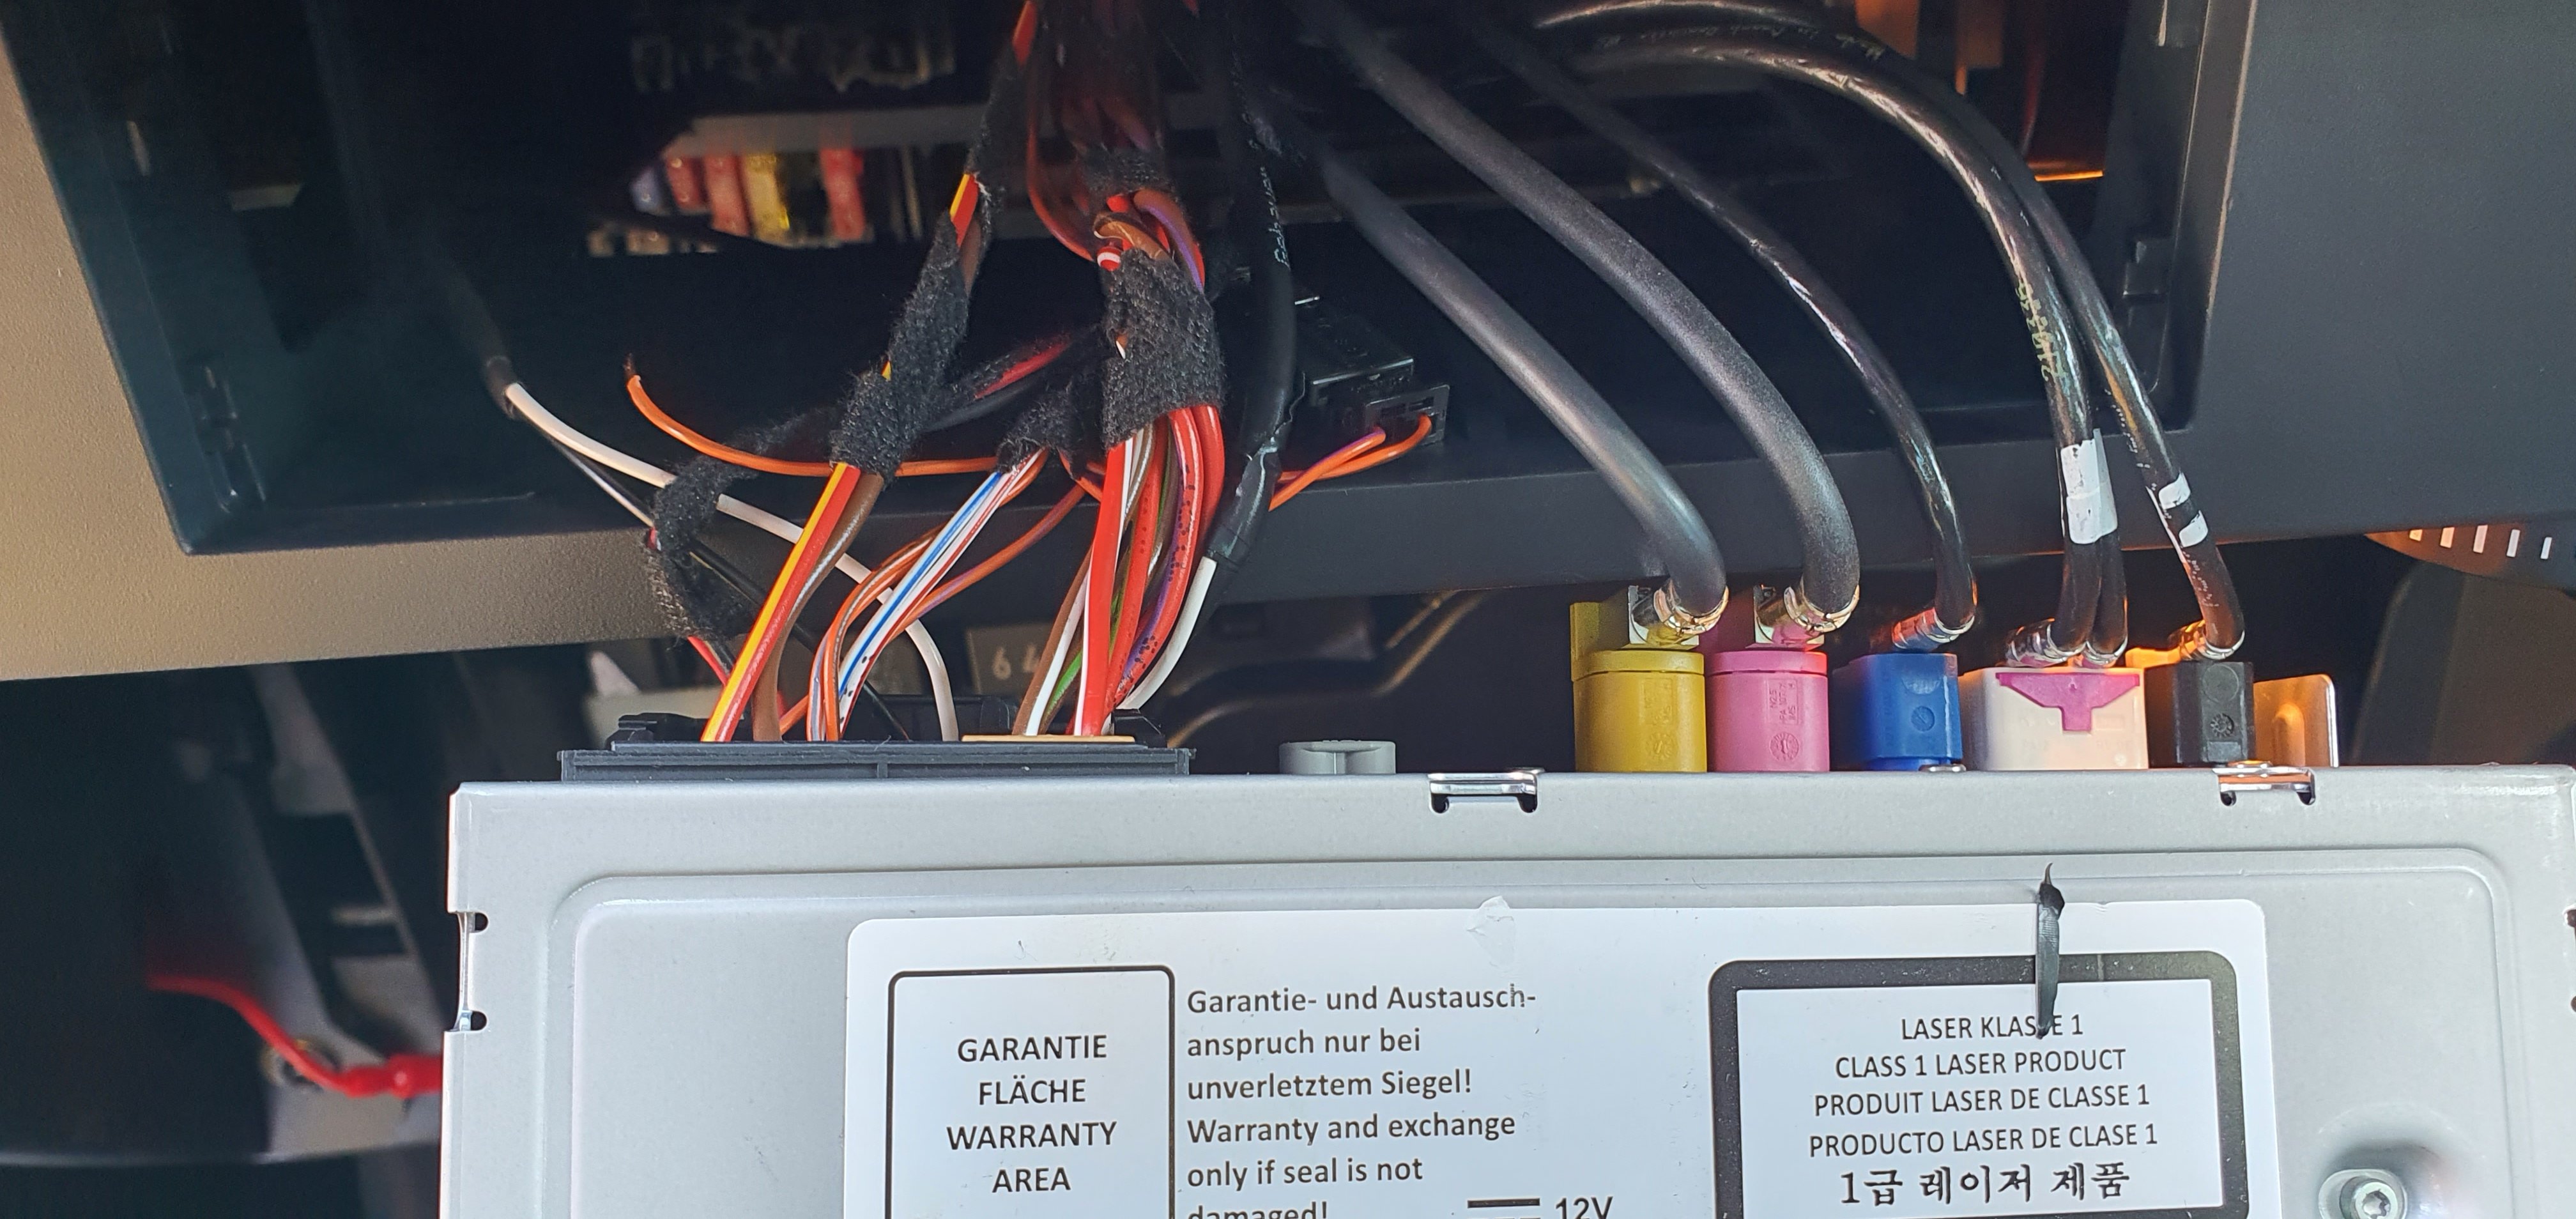
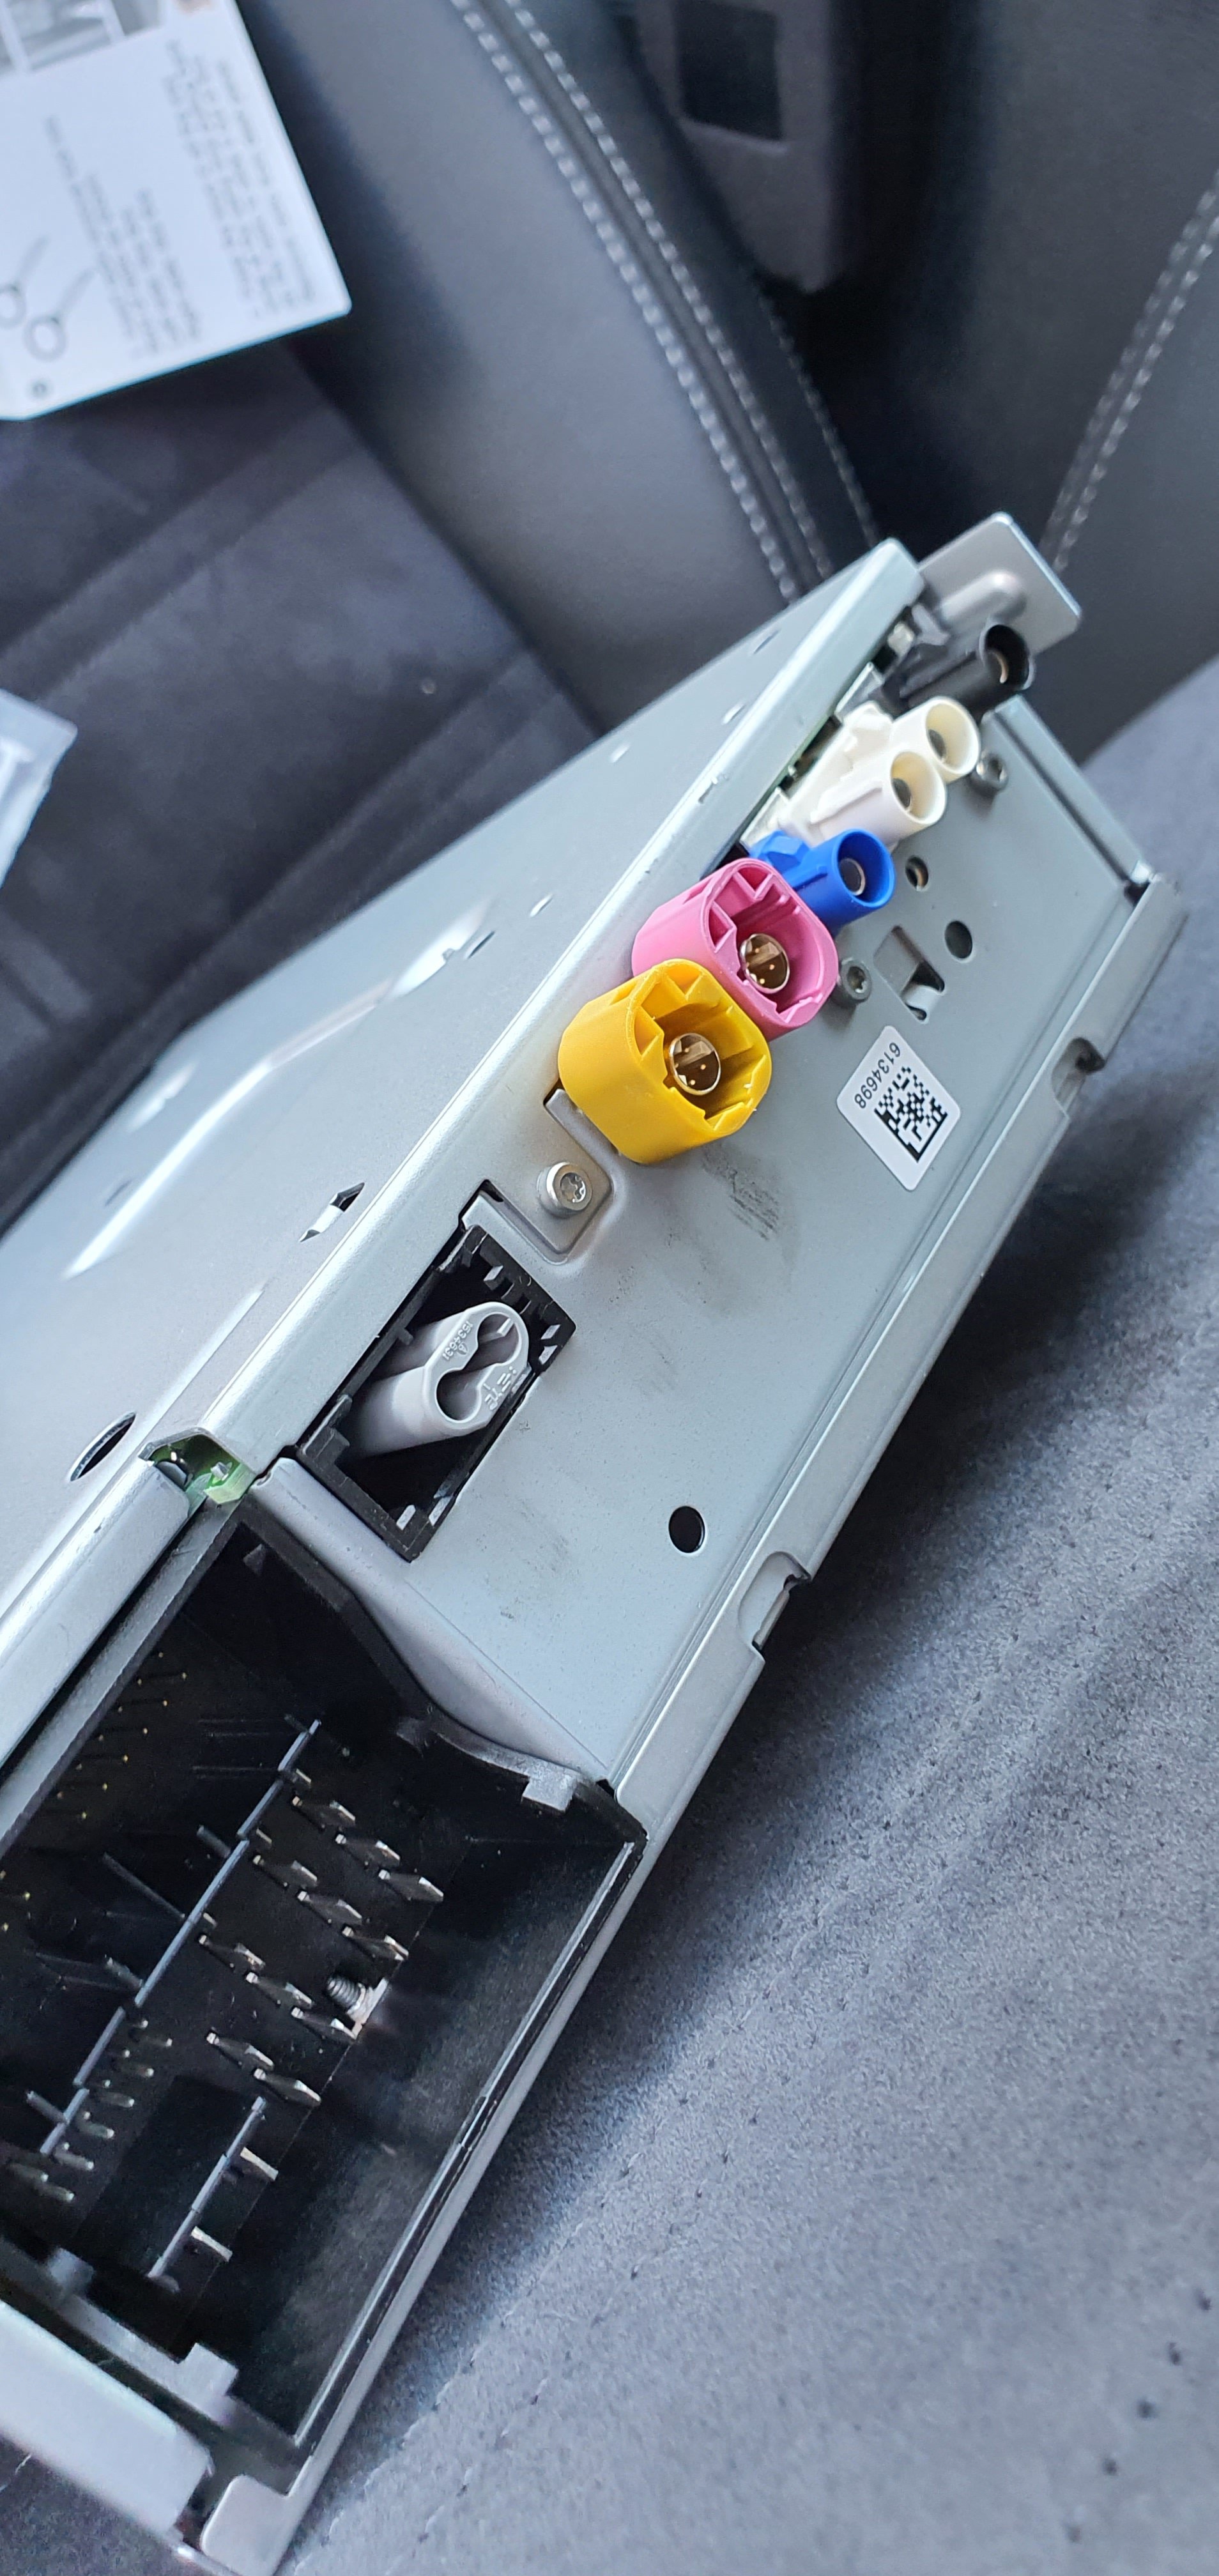
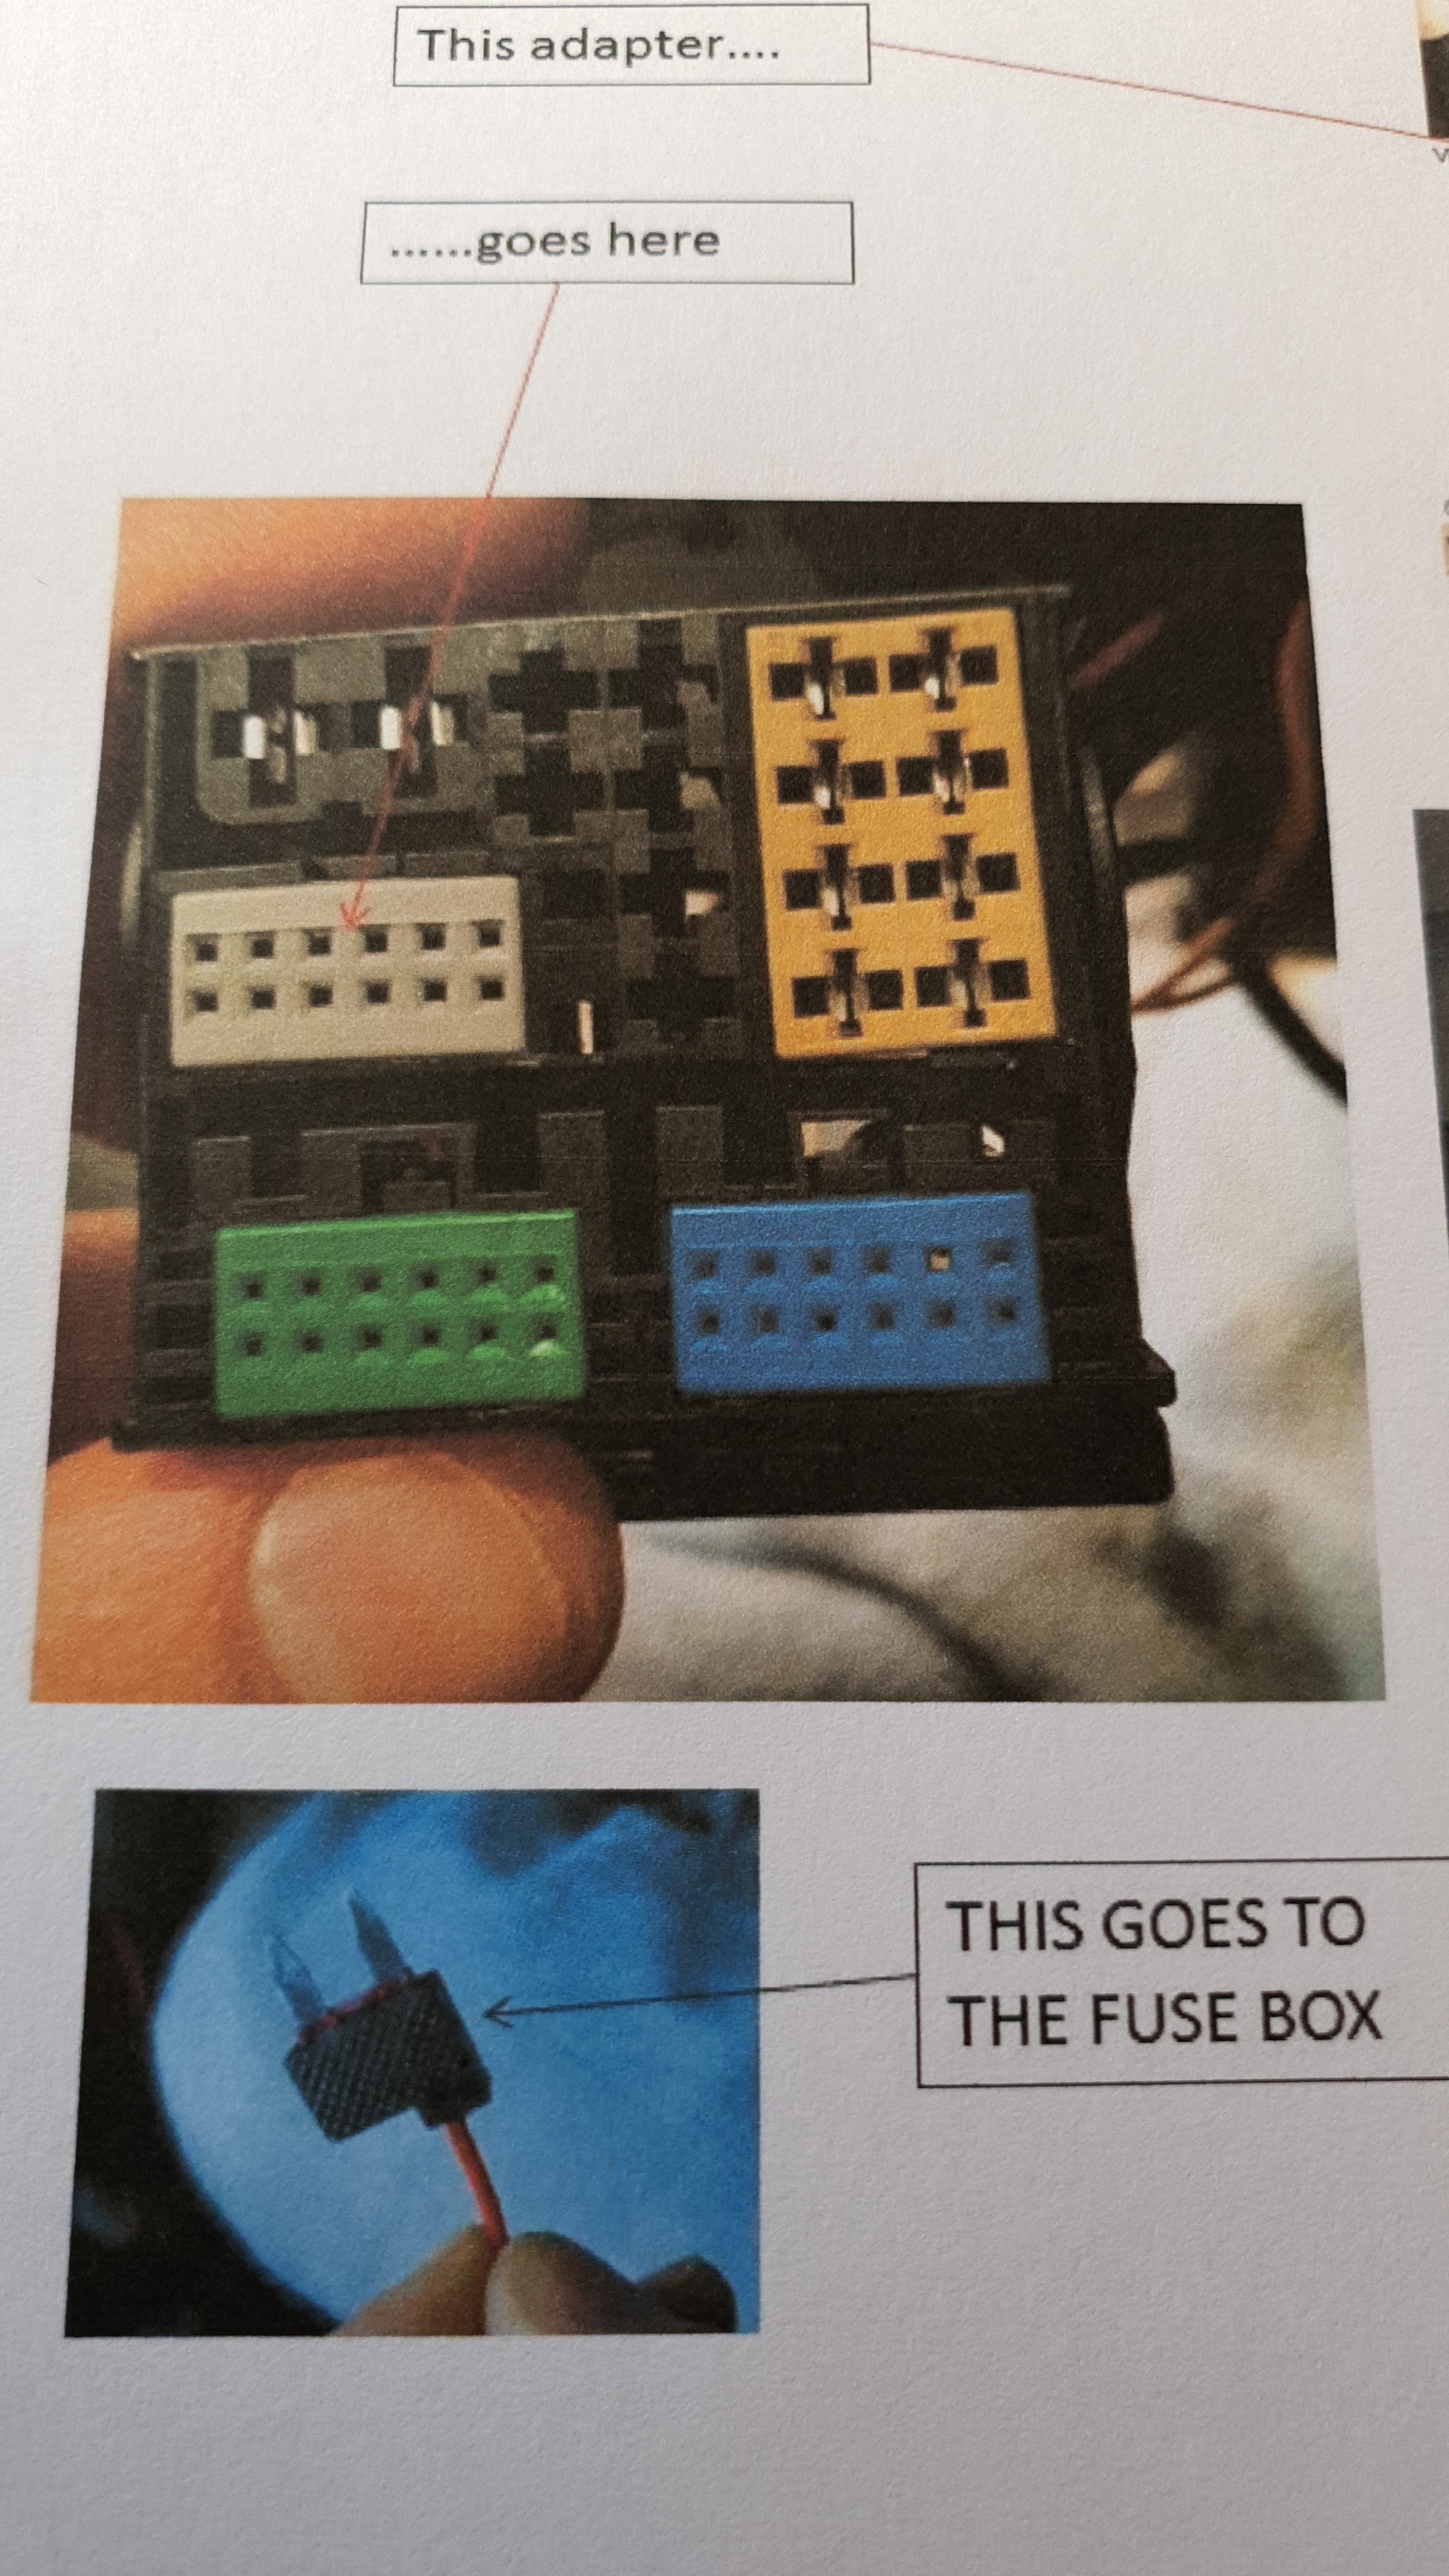
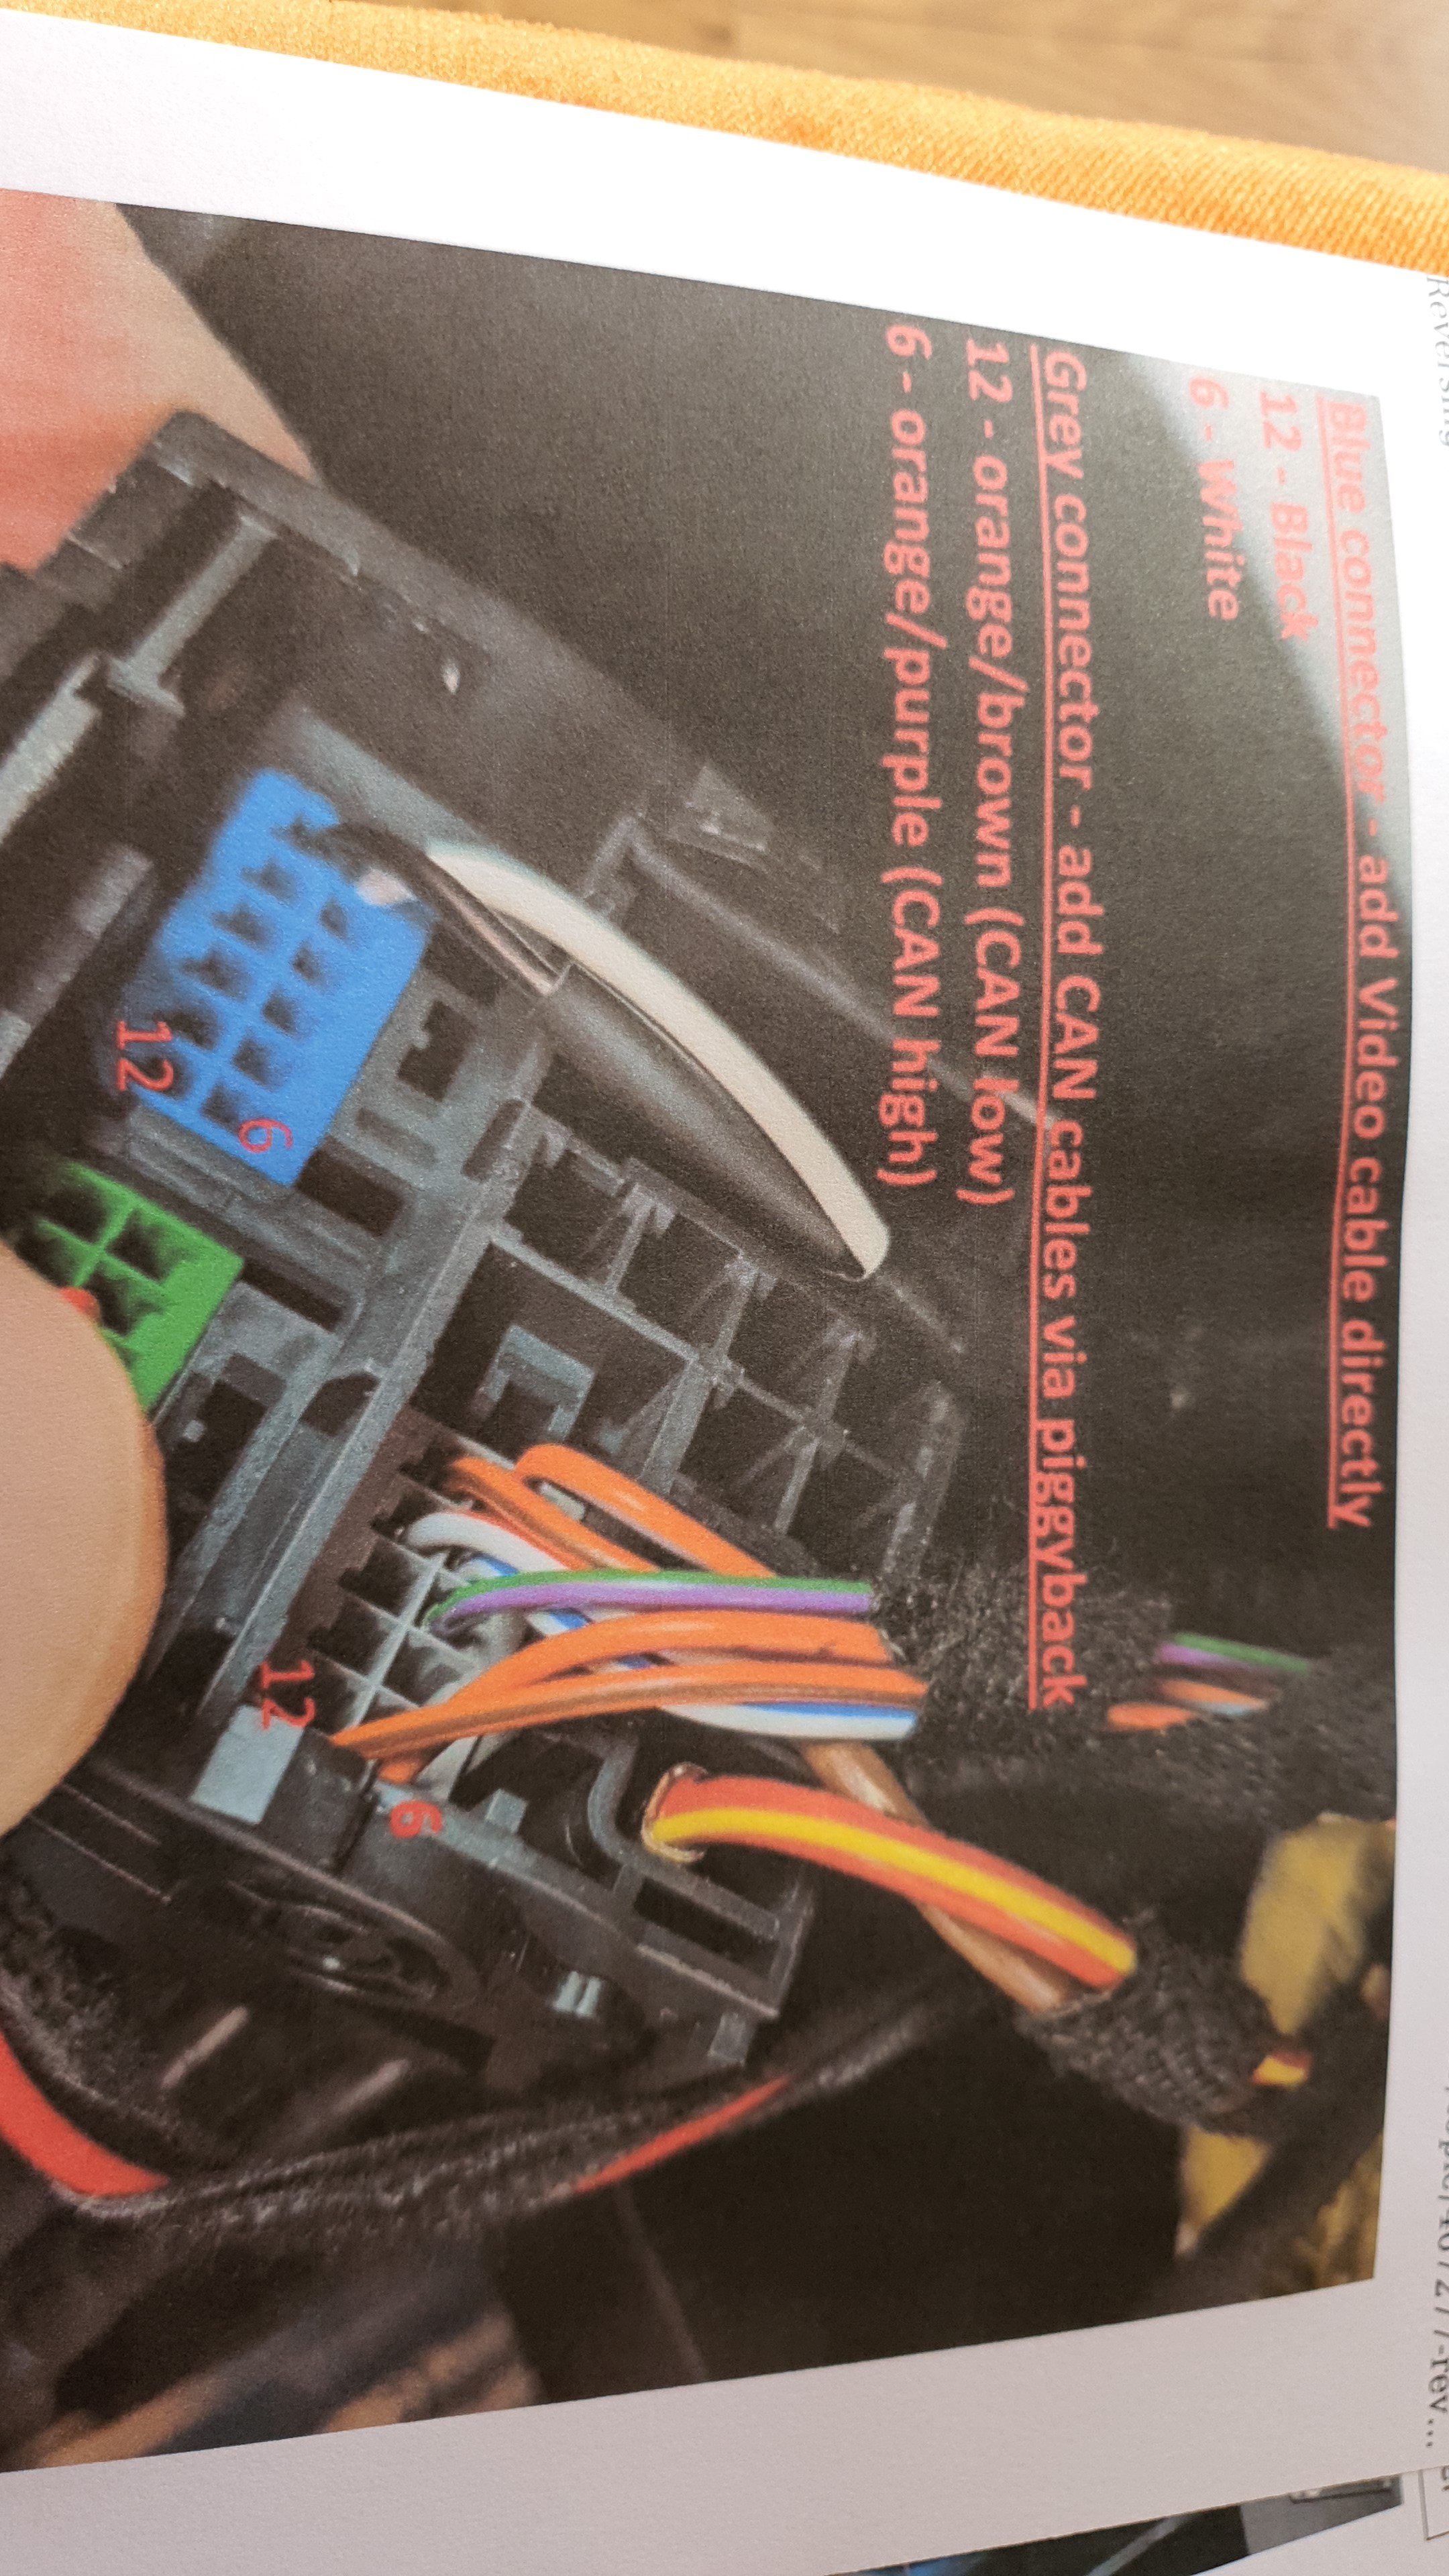
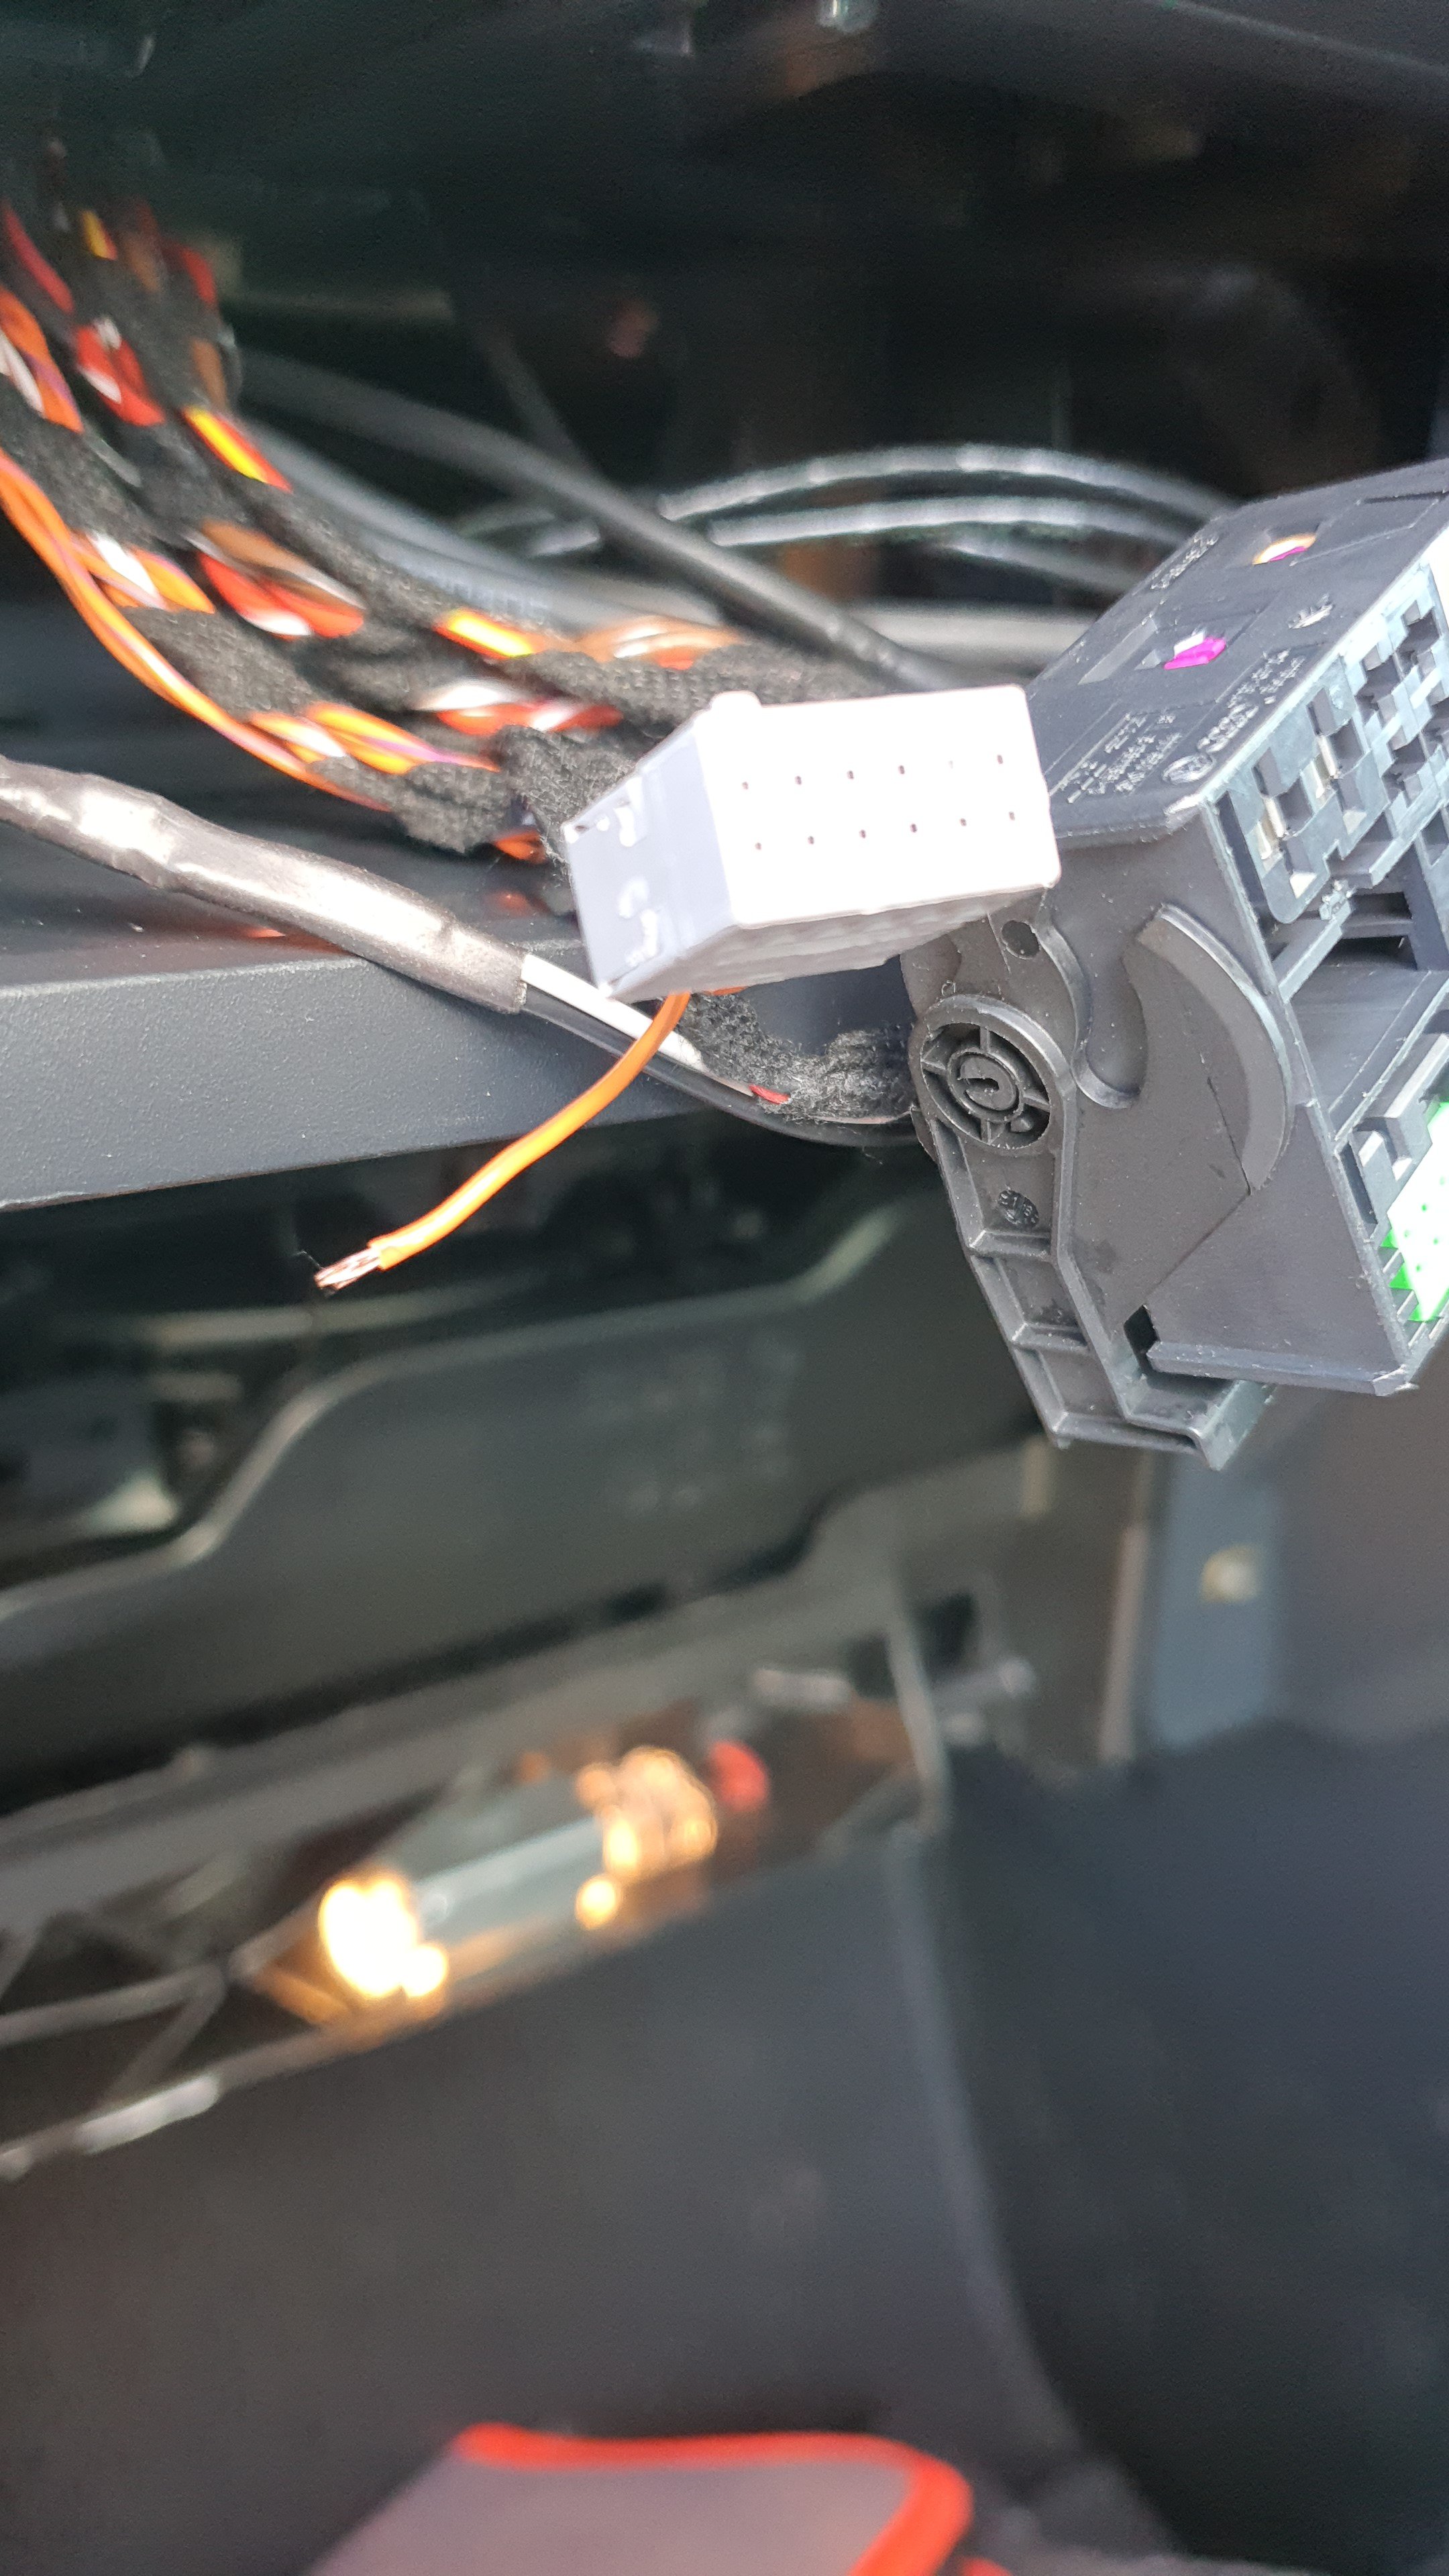
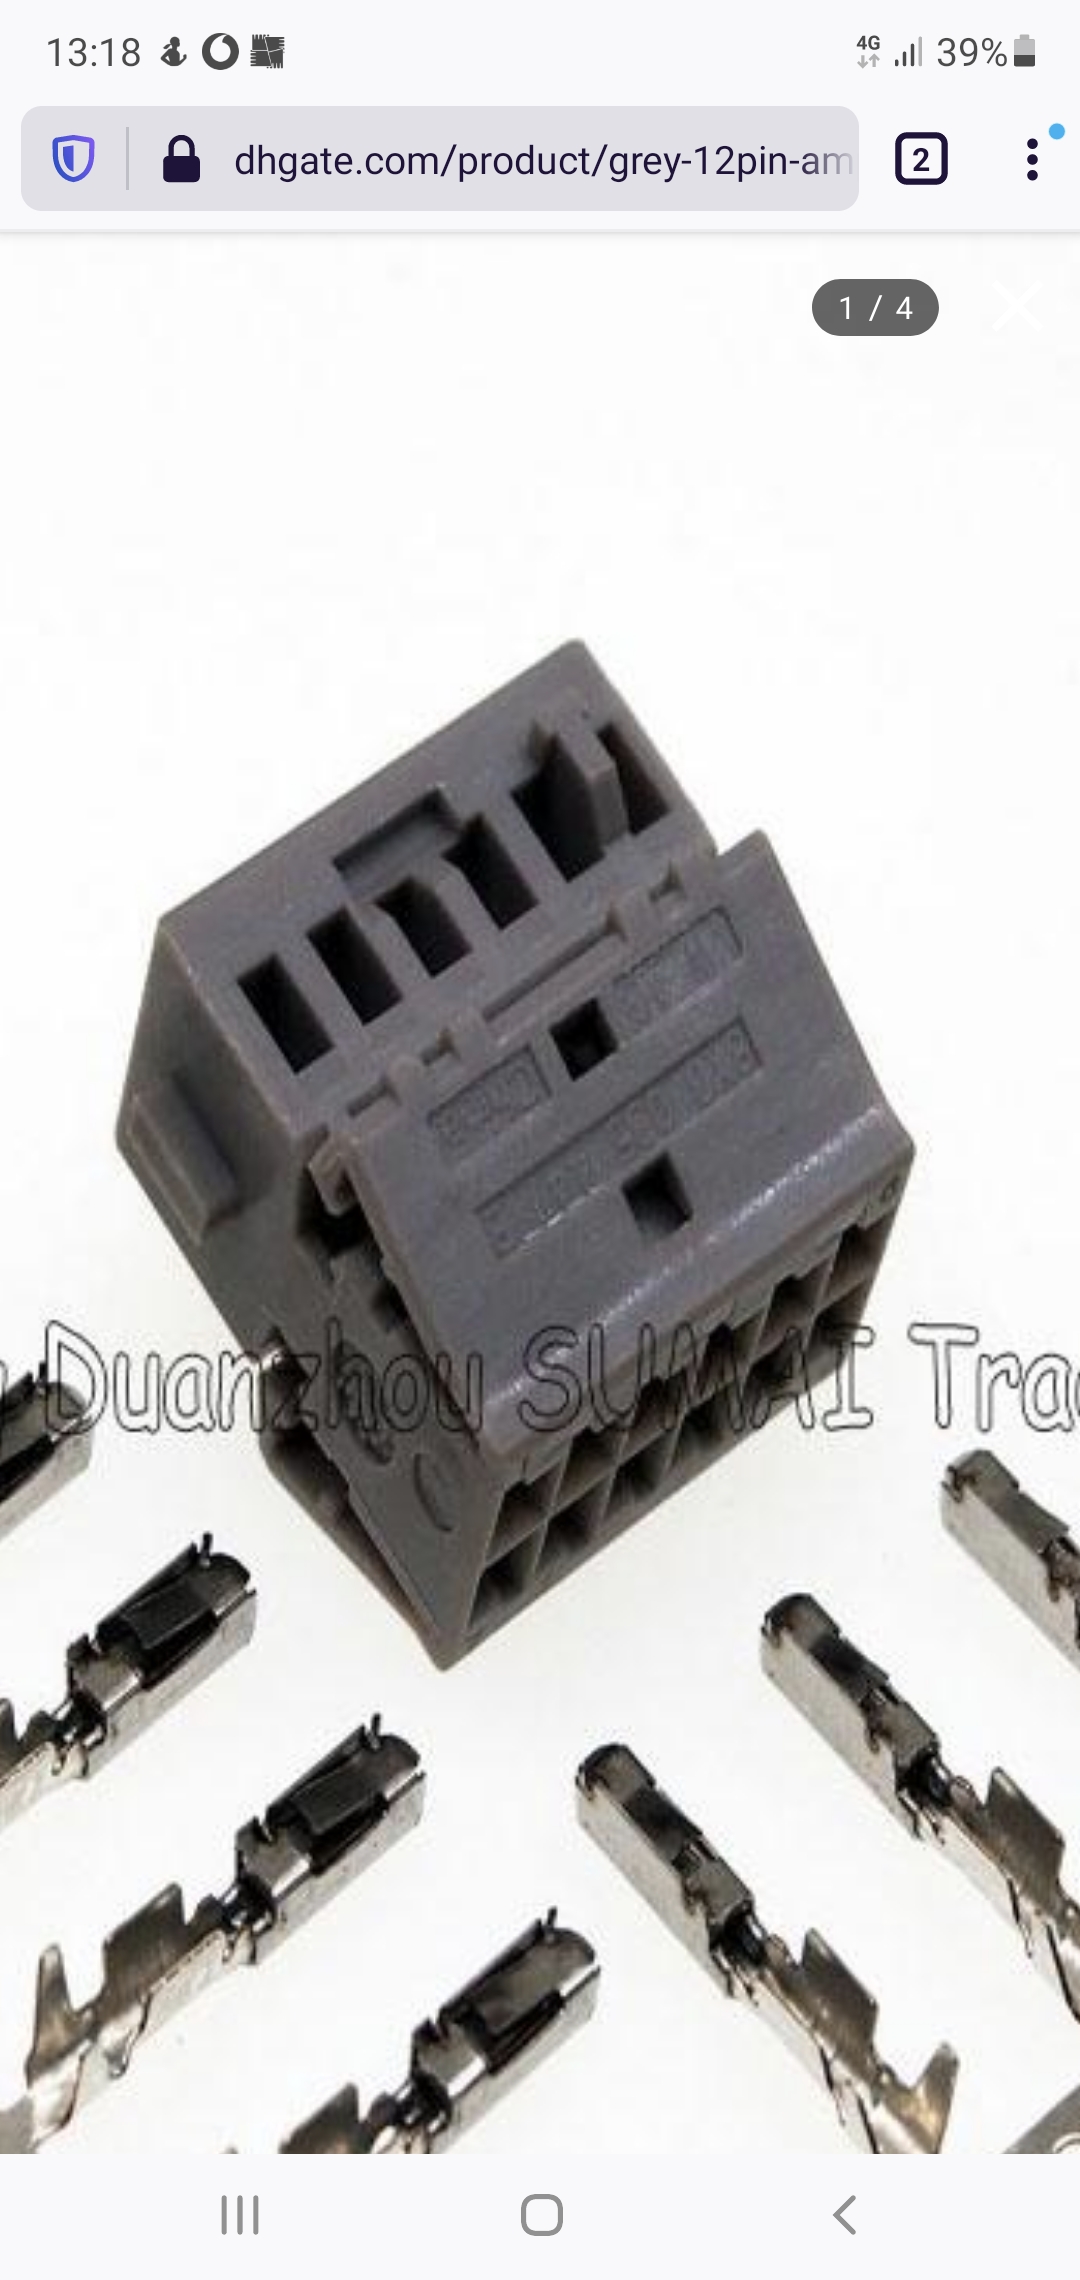
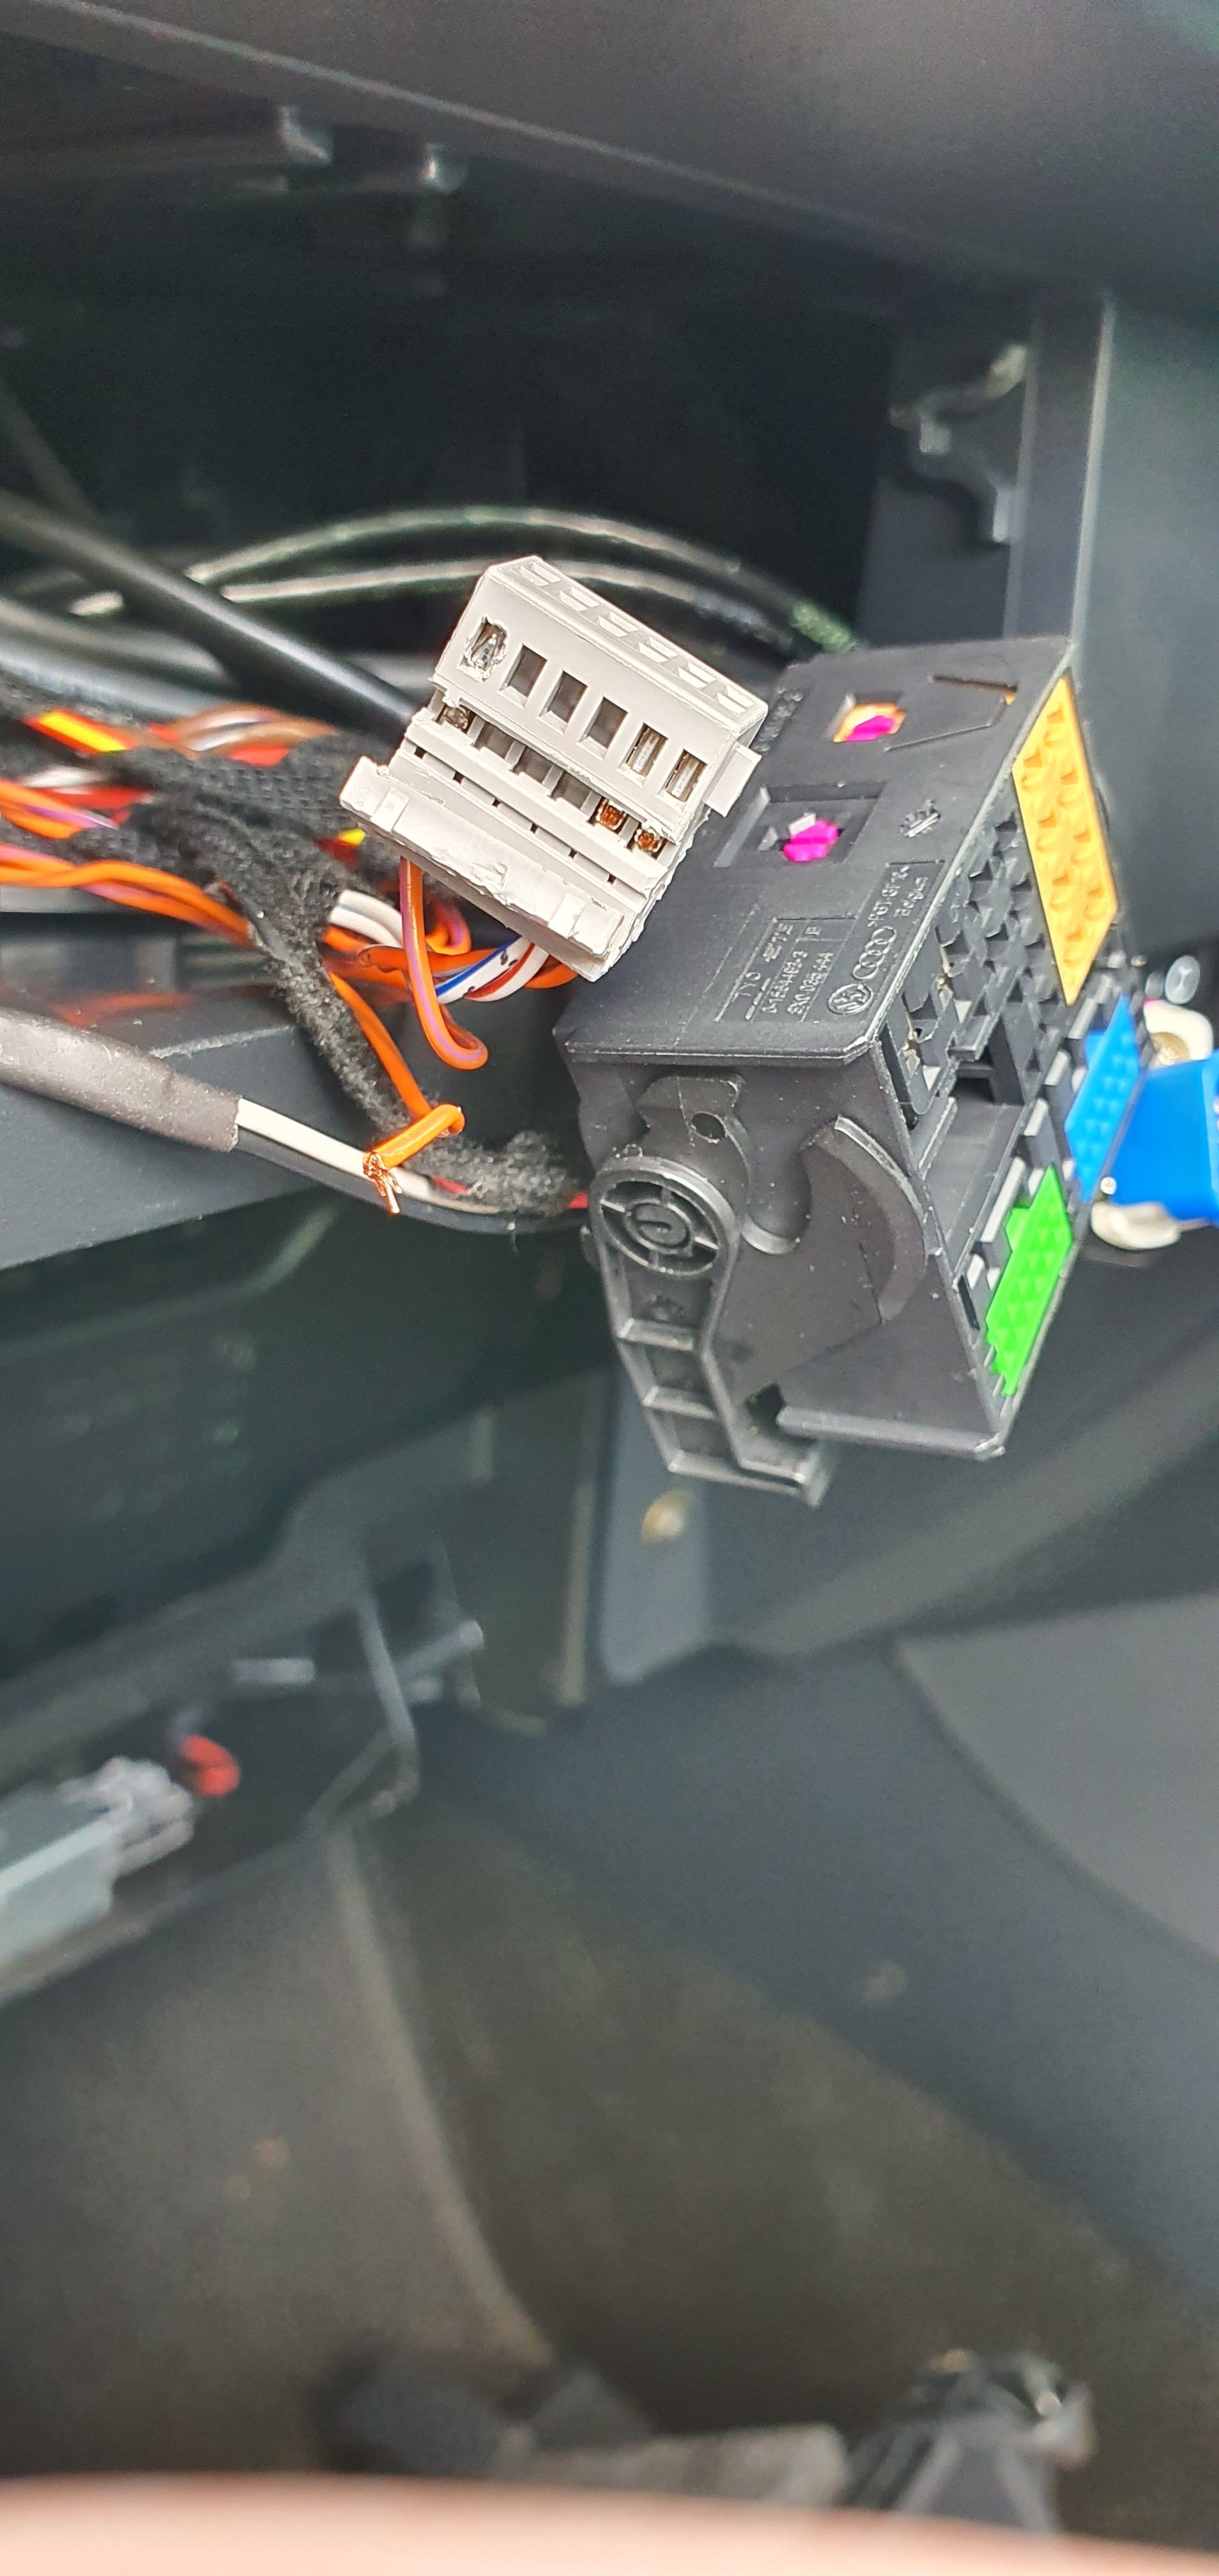
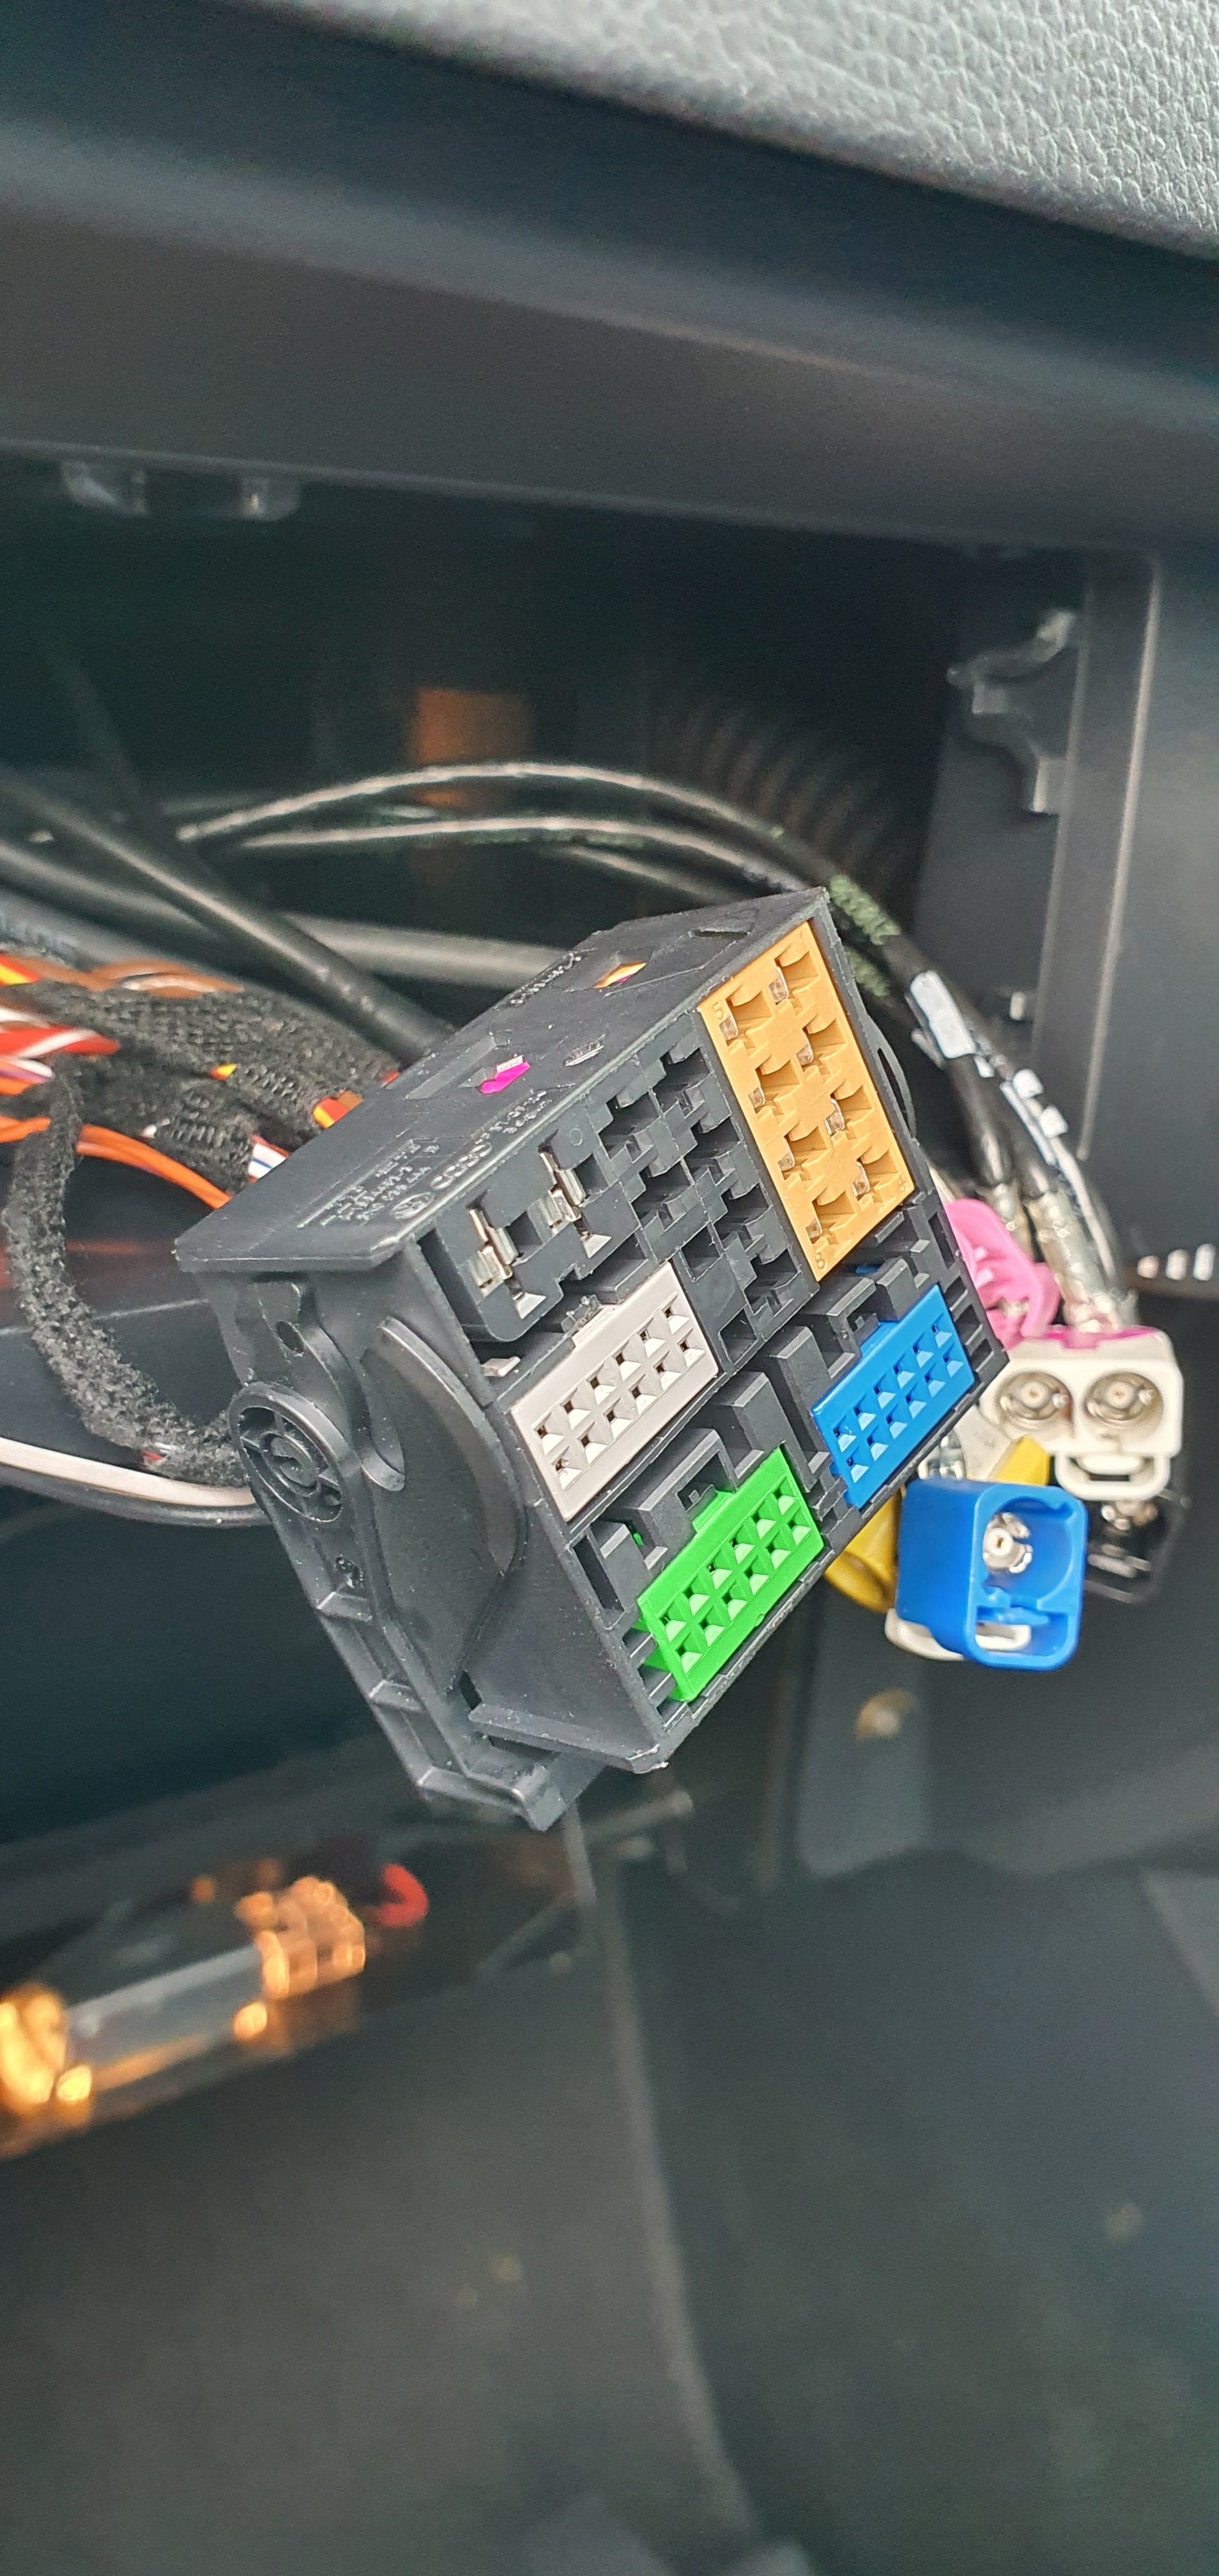
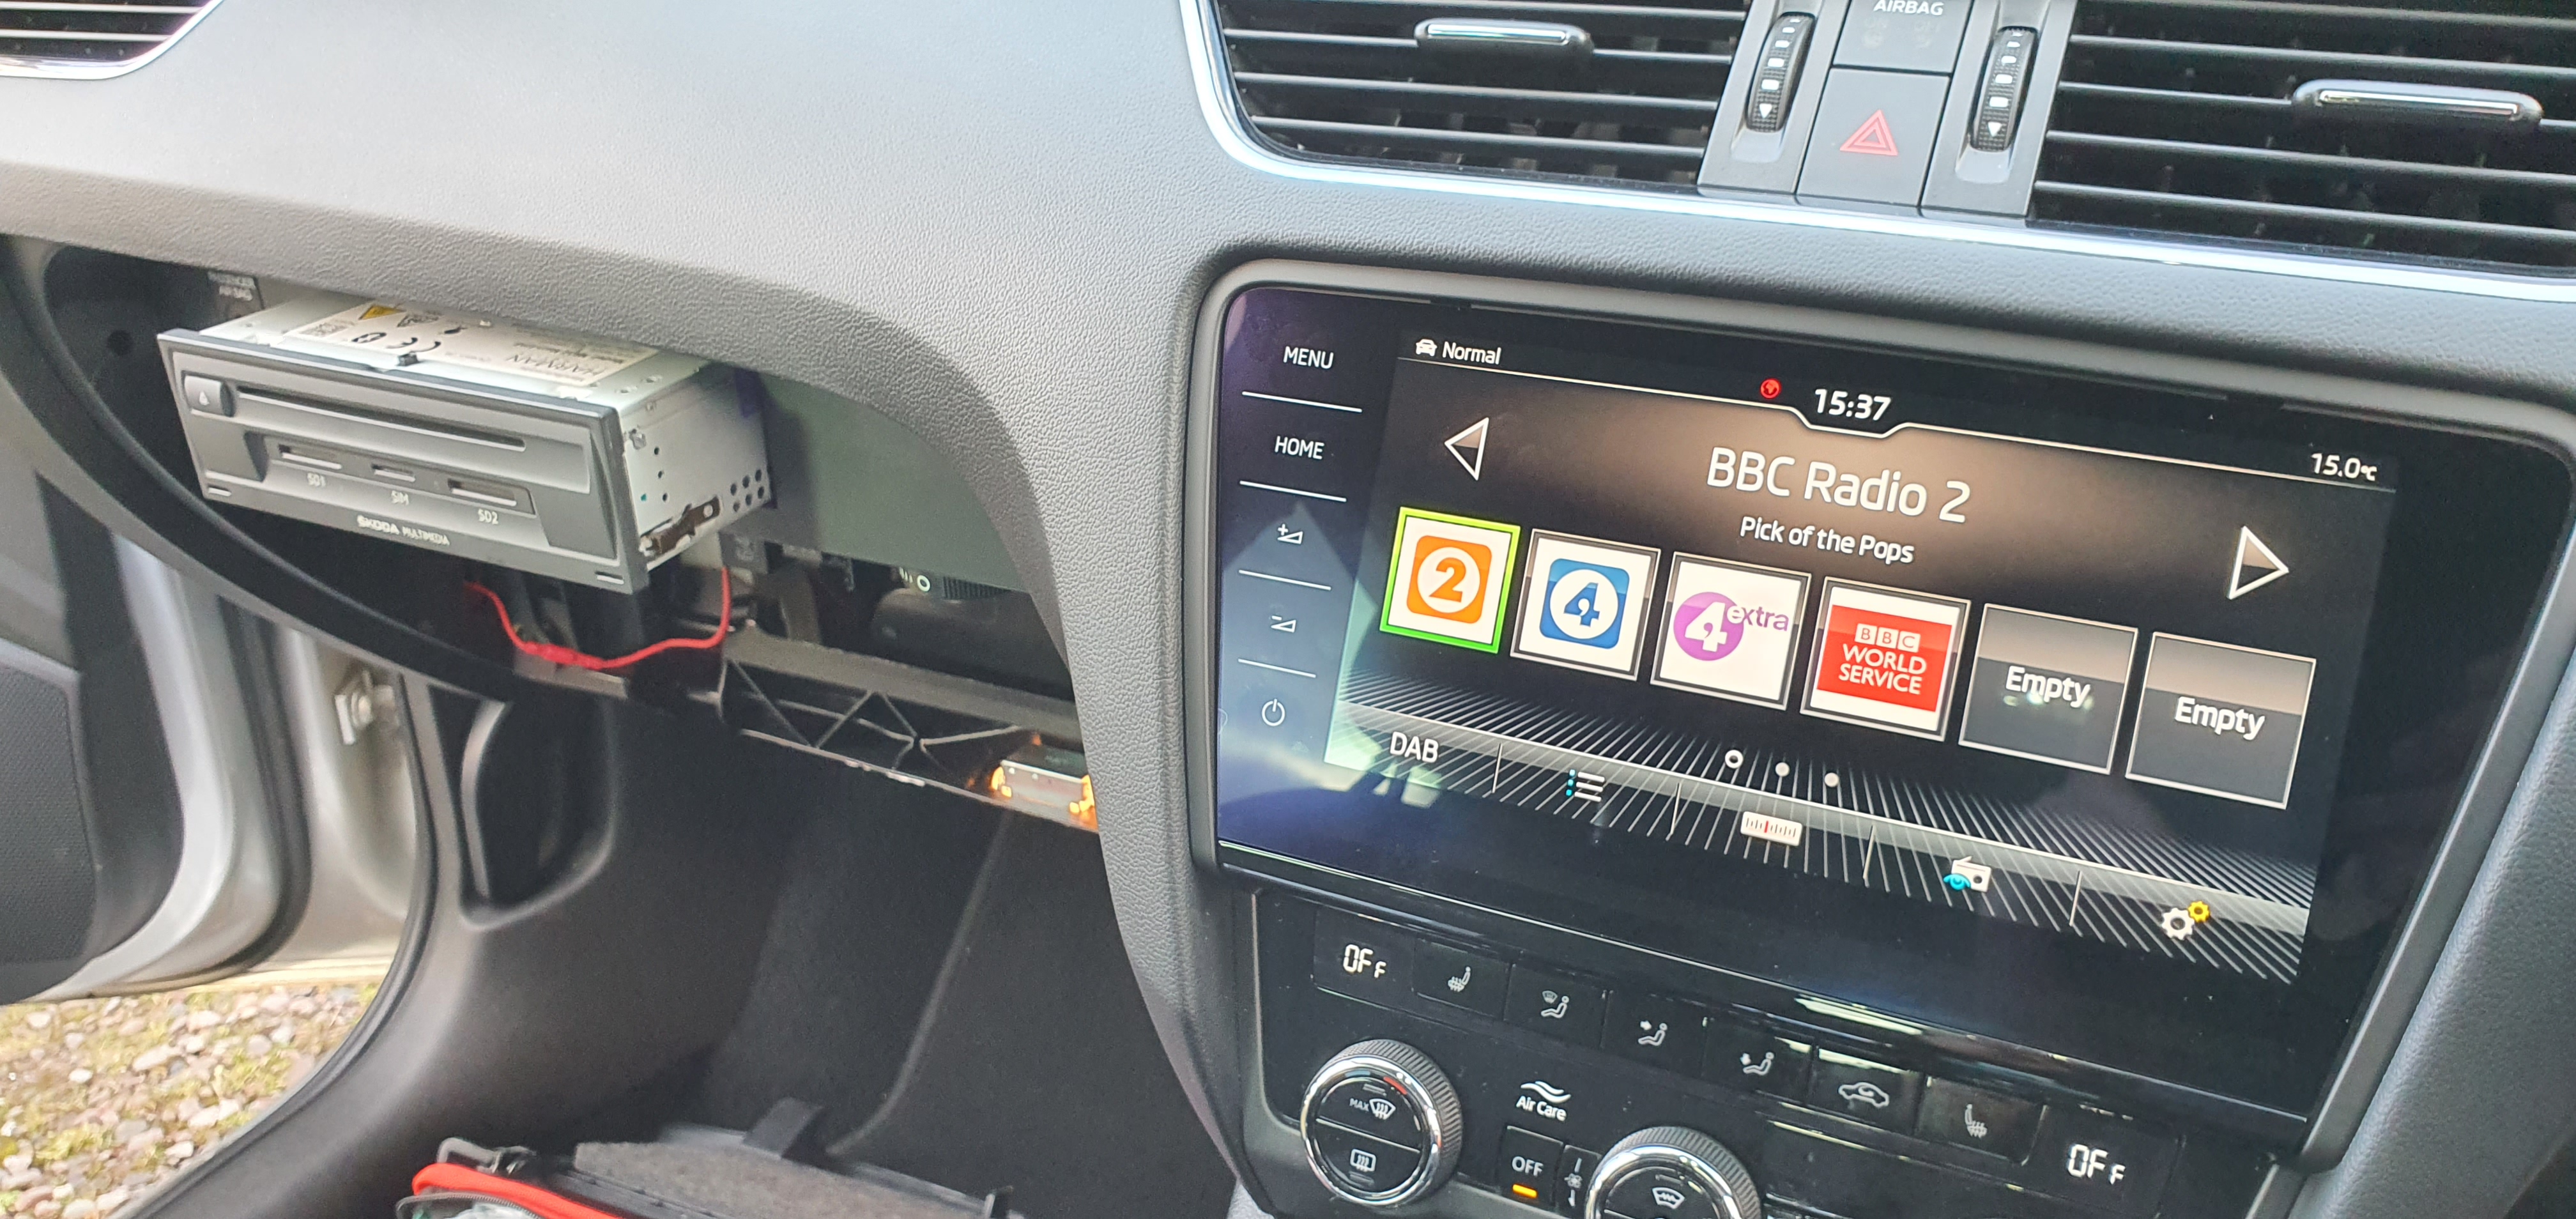
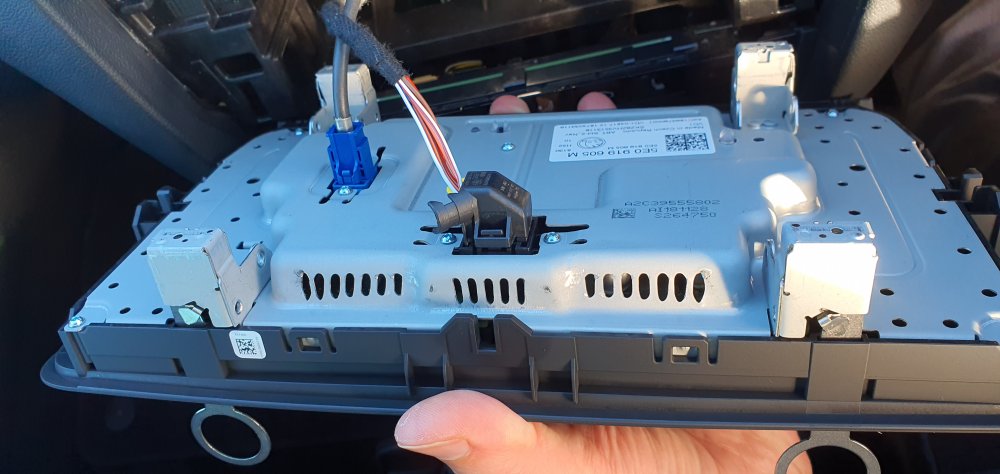
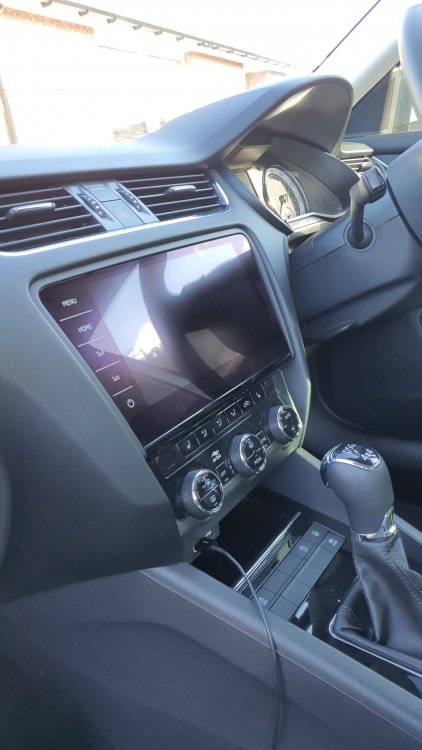
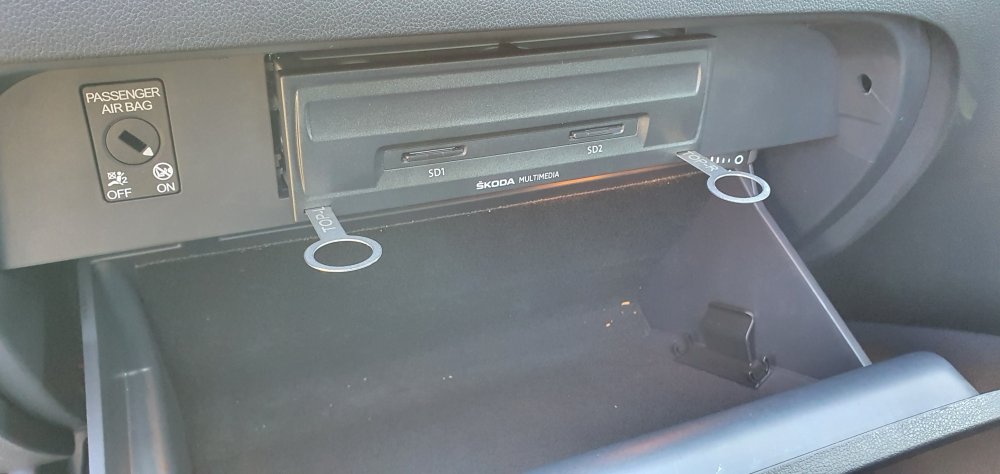
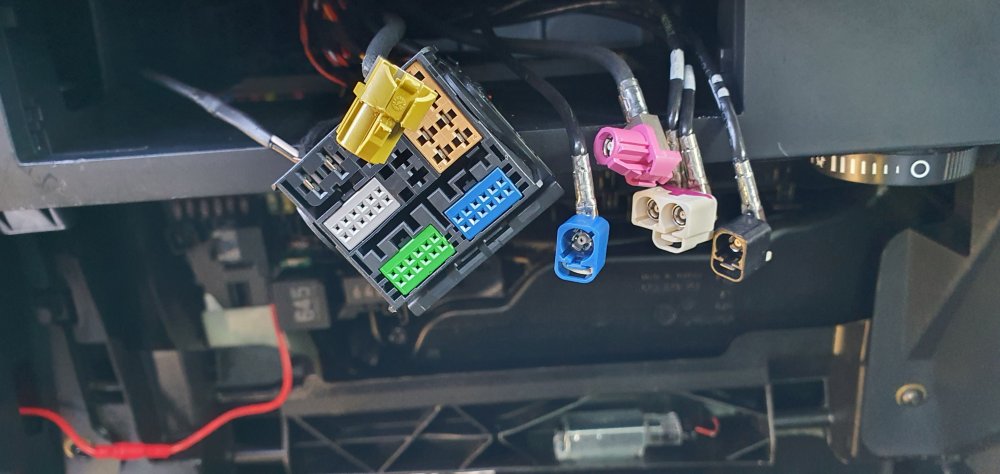
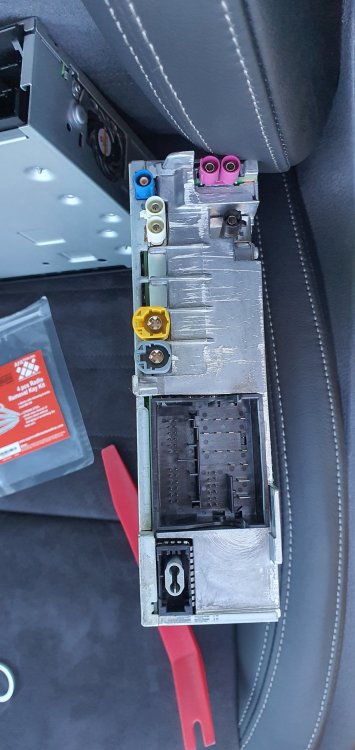
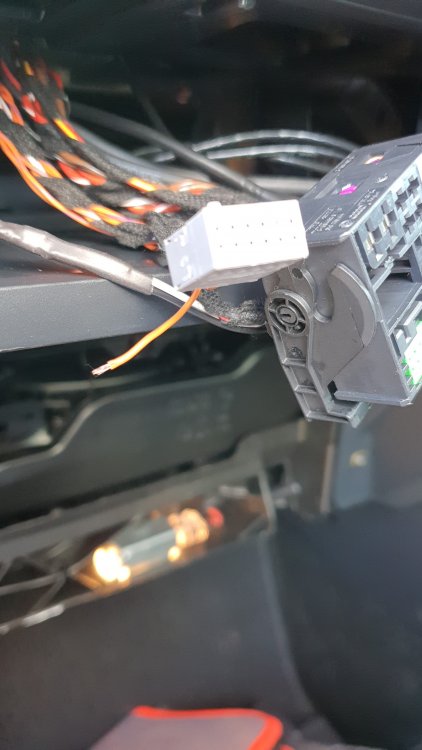
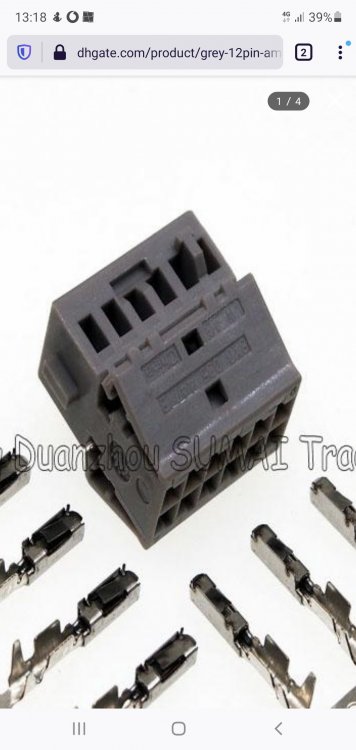
Dear all, I promised that I would do an article for Briskoda (with photos) - showing what I needed to do to do the upgrade the screen and the MIB unit itself. I've got photos where necessary. My Car is a 2019 Octavia Scout with many options - I'm trying to give @SashaGracea run for her money in terms of car upgrades! I also want to thank her for being on the end of a messaging service to help me through when it went slightly wrong at one point. I'll also tag @pab567who provided some of the items. My car already has an Amunsden MIB2.5 system - with Navigation; not a bad system, but wanted the nicer Columbus system. You will need: 3V0035021B - Reworked Columbus MIB2.5 system (was originally an MIB2 system from @pab567). You can enquire with him for any price. This MIB system will need to have Content Protection removed and have been configured for your car. 5E0919606D-BIO - 9.2" inch screen for the Columbus system (revision H53 in my case) - purchased from Horton Skoda in Lincoln - £707 for the screen VCDS system - version 20.12 and the appropriate VCDS dongle Tool kit - I used my computer / small electronics tool kit which came in useful Radio Removal Keys x 4 Small sharp knife Paper-clip - straightened The Screen I tackled the screen first - seemingly being the easiest. There are four release slots. The top at the top of the screen as easy to see - the two at the bottom need fingernails. At the very bottom of the screen, there is a plastic seam. Get your nails inbetween the seam and gently pull down - the plastic bottom piece will drop slightly - showing the bottom 2 slots. My radio removal keys say - top left and top right. Put a top left in the top left slot and the next top left into the bottom left slots. Put the top right into the top right and the next top right into the bottom right slot. You want to push home until you hear a 'click'. All 4 keys are engaged and connected in. The screen should just pull out (pull straight directly towards you). You will now be presented with two cables at the back of the screen. To disengage the two connectors at the back of the screen, press the release tag on the black connector and push the release tag on the top of the blue connector. Carefully put this screen to one side. To disenage the keys from the Screen, press and outer side of the locking mechanism. We need to do some minor modifications on one of the connectors. If you look at the back of the Columbus screen vs the Amunsden Screen, you will notice that the one connector is BLUE and the other is BLACK. Columbus Screen Amunsden Screen You will need to modify the connector slightly with your sharp penknife. It involves one side tab of the Blue connector to make it fit. This photo shows the blue connector post modification with my Swiss Army Knife. Now the Blue Connector will fit into the black socket and the Black Multiway connector will also connect up as previously. Insert the screen back into the slot - no keys are needed- it just clicks into place. THE MIB Headunit In the Glove Box, you will need to take out the Glove box completely. This will become obvious soon, because you will need to gently release the MIB cable loom at; this cannot be done with the glove box installed. An overview is unclip from the bottom, unclip the soft-touch lever arm on the left hand side and gently drop out the glove-box. There are better instructions elsewhere on Briskoda or on Youtube. You will need two radio removal keys for this at the bottom of the MIB system. (ignore the fact that I hadn't removed the glovebox at this point - hasn't realised you needed access to the loom at the back of the MIB unit). VERY VERY gently pull out the MIB unit. You will need to get your head under the back of the glove-box area and you will realise that the cables are tightly bundled into the back of the dashboard. Its feeling where the loom is and gently unbundling it and you pull out the MIB Amunsden system. There are multiple connectors on the back of the Head unit; ....and then it went wrong Some background here - the lovely Sasha had retrofitted a reversing camera into my car, so there were already modifications to the loom; I gently removed the MIB headunit and discovered that I had broken a wire. Did you spot the problem in the previous picture - have a look again on the left hand side and you will see an orange wire that is dangling loose. I continued though - because I figured out I would have to try and fix it (which I did). To remove the Black, White/Pink & Blue connectors, you need to pull the locking tabs out (my blue tab lock fell apart and went under the seat, but was easy to reinsert). The Pink and Yellow connectors - finger nail / Spugger time - gently tease them out until they come apart. DO NOT BE FORCEFUL - patience required. Finally, the big black DIN connector unlatches at the bottom of the connector. Post Removal of Headunit Its worth examining the back of each MIB Headunit now. Amunsden Columbus The only attachment I moved across - was for the fibre optic port. This is the grey Oval connector - which I put onto the back of the Columbus system. In terms of socket colours, here is a table of what is what: Amunsden -> Columbus Black -> Black White double -> White Double Blue -> Blue Yellow -> Yellow Pink -> Grey - you need to perform the same wizardy with the connector and remove one tab part of the connector (with your pen knife)- same as you did for the blue connector for the screen Black DIN -> Black DIN Fixing the Wire Do you remember that orange wire; turns out this was the Orange/Brown wire for the Can LOW connection on the Gray part of the DIN connector. It is Wire 12 that needed to go back in and be reattached: To take out the grey connector, you unlatch it gently using a small screw driver from the main black DIN connector. Speaking with Sasha, trying to figure out what to do, I had to try and get the pin out from the connector. Trying to look at this connector (its called a AMP connector), it took me a while to figure out how to get the connector apart - then I found this photo on a chinese auction website: I therefore got a screw driver into the side of the wayward connection and levered up. It popped open. I then used the paperclip to push back AMP/TE connector pin - back far enough - to allow it to show its rear connector. The pin is designed to be a one-way fit with a metal latch to stop it coming out of the connector block. I got just enough space to gently open up the rear of the pin, put the orange/brown wire back in and reattach. I put the connector back into the DIN block this this: I then started putting all of the connectors onto the back of the headunit. I gently push back the headunit into its slot - making sure the wiring loom at the back was not caught up - and then held my breath: IT WORKED!!!!!! Modification to be performed by VCDS There are two things that need to be enabled: Skoda Surround & the Reversing Camera. Skoda Surround settings are: Module 5F, Byte 11 and change to Hex 04 Reversing Camera setting: Module 5F - Adaptions (you need to put in the security code 20103) - Car Function List BAP Gen 2 - VPSx0B - Enable Things that are broken The MIB system doesn't have any online connectivity - this is where I throw this open to Briskoda folk to possibly assist. I've now lost Skoda Connect functionality - and I cannot get the MIB Headunit to connect its WAN connection to my phone. I think the WAN function on a Columbus works differently to an Amunsden. On my old Amunsden, you linked up to your mobile via a Wireless Hotspot; this doesn't seem to happen on the Columbus and therefore I cannot go online. As my car already had Skoda Connect, I am assuming that the Car will be registered in the VW Database backend, so it should connect up. If it helps, I do also have a Carstick that I can try. I also want advice on how I can get the SIM card slot to work. What hardware do I need to make this work properly? This posting is now open for comments:


-
I know this is a MK2 Octavia section, but you can definately active up the second fog light via VCDS on a MK3 - no hassles.
-
Firstly, we need to see what you already have - you also might want to consider moving this thread to the Audio Electronics and Security section. Press and hold the MENU button, go to Software Versions and send us a screenshot, then we can possibly advise.
-
Scooting through erwin yesterday - I noticed there is a TPI associated with the TDI engines that I have - and what to do if your matrix gets blocked. It didn't mention any warranty reclaims, but did show the technician how to clean out the system. I went onto erwin this AM, but suprisingly, they are doing an outage for 48hrs, so my scheduled fee for access would have run out by then :-(
-
Agreed - the mechanism gets stiff. I use a dab of Lithium spray to keep all these items working properly. You should also do your door hinges whilst you are there too.
-
Nope - reset it. The resetting also seems to be a bit querky in its functionality. An additional reset after 100 miles seems to fix the issue.
-
Its a half-arsed system that is better than no system warning. Ive had more false positive errors than I care to remember. Usually the system tells me 100 miles after I have changed a tyre (due to puncture or replacement). However I duly check my tyre pressures and press reset expecting miracles to occur in terms of tyre protection. Ever the optimist.
-
Depends on the SE in question. Some do and some don't; most probably won't have that option. The other way to go is to look at SE-L seating which looks like a Scout seat and is somewhere in between a standard and a VRS seat in terms of support. Most pf those SE-L seats have the airbag option included.
-
Take a photo of what you have - then we can advise what your system can achieve. Basically you have a MK1 audio entertainment system - called MIB1. What you are purchasing is an MIB2 (also known as an MIB2.5 system) - which gives you additional functionality that you don't have at the moment. An MIB1 system can do Mirrorlink - which will give you basic system mirroring of your mobile phone onto your existing system [assuming your current system is capable]. For you to use either Apple Carplay [it sounds like you have an Apple phone] or Android Auto, you will need to upgrade to an MIB2 system - which is what the ebay link you showed at the top does. The information I've given you - is around the different versions of MIB1 and MIB2 systems there are. If you *just* want additional radio functionality and the Apple Carplay, then the ebay item is perfectly fine and will work for you. There are some additional cavaats that need to be addressed, because unless the seller has specifically tailored the ebay item to your car's specifications, it won't be a simple upgrade. You need to find somebody with a VCDS system to integrate the new MIB2 system into your car. IF you are still stuck, I'll happily PM you my phone number and we can chat about it there.
-
Arh - well, welcome to the world of MIB systems for Skoda MK3's.... Basically, there are three types: Swing (super-basic) - generally only found on cars from your era, but never found on a VRS. Bolaro (basic) - has mirror link, car-play, android auto etc Amunsden (better) - all of the functions of Bolaro plus Sat Nav Columbus (best) - biggest display, super 3d maps, internal HD and functionality to go with a virtual cockpit if you ever feel like upgrading. More can be found out on the ICE, In-Car Radio and Security section of this forum.
-
Interesting - actually what is being sold there - is a Amunsden MIB2.5 system - with a Bolaro Screen (which will work). The only difference being you don't have a NAV button. You will also need an external GPS module (can be found on ebay for less than 10UKP) unless your current car has a shark-fin GPS receiver.
-
Alternatively, you could go for standard seats from a scrapped SE spec. They are generally supportive, more plyable and good all round seats.
-
You need a set of Radio Removal Keys. On the screen, the top left and top right slots are visable. On the bottom (for the Bolaro, Amunsden and Columbus) - you need to get in there gingerly with your fingernail and the curved piece at the bottom of the screen and pull down gently. The bottom plastic will seperate and show the bottom two slots for the screen. Are you planning just a screen update or are you going for an MIB2 upgrade as well? Depending on how desperate you are, I will eventually have my old Amunsden (Bolaro with Sat Nav) - Screen and MIB2.5 system available, but it will need to be Component Protection removed and re-coded (with correct parameters for your car) by pab567. Reversing camera - yes, can be fitted on Bolaro and upwards. The genuine OEM ones are nicer because they have turning grid on them, but as @SashaGracecorrectly pointed out, really any chinese units will do (but they do have to be NTSC output, instead of PAL). Cheap units won't have working reversing grid or self-cleaning functionality.
-
What battery did you use? Was it a proper branded Duracell or Panasonic battery - and did you use a CR2025 or CR2032? Does you car also have KESSY? I have heard about these intermittent recognition issues and sadly from memory, it usually involved a trip to the dealer to rectify [involving removing and then re-adding the keyfob to the car].
-
Folks - the bluetooth modules needs the engine running prior to connecting to your phone.
-
Nope....most important thing is the service history...is that complete? On non-FL models, the waterpump and cambelt needs to be done (you said cambelt had been done...but waterpump??). What engine are you looking at?
-
That could be as simple as the clutch return spring for the pedal stretching and clicking (lubrication reqd). However, if you are getting the noise from a running engine at idle, then could be potentially either the clutch or thrust plate or even the dual mass flywheel springs playing up. Whats the car, engine, age and mileage? An audio or video recording would help...
-
...and then there is the engine upgrade (at least chipped to get the 282bhp out of TDI block).... that's a twin turbo kit, plus dropping it even LOWER than it is already.... 😁😋🤭