Leaderboard
-
MikeTheThinker
FREEDOM21Points8,484Posts -
.jpg.1006585dfe4e2977315b67c3d642e37b.jpg)
Guest_
FREEDOM18Points83,824Posts -
Gaz
FREEDOM11Points7,748Posts -

Lofty
FREEDOM9Points1,676Posts


Popular Content
Showing content with the highest reputation on 12/07/23 in Posts
-
The Fabia has been out and about, attended the Oddly titled "Wheels on Wednesday" car meet on Sunday (go figure) in Worcestershire last weekend. It's the furthest it's been driven in many years so i'm still nervous when driving it, listening for every noise and sniffing for every smell. Car drove fine of course and was parked up in amongst the Hot (???) hatch section. Got a fair bit of interest but to many it's just a clean Fabia with yellow wheels. The many small details take a while to see and appreciate. I have a few jobs to do on her now though. The steering tie rods need changing as there is slight play in them, so I have new genuine TPS supplied parts to go on, and then I'm going to give the entire car a thorough spanner check to make sure everything is tight. This is more for my own peace of mind as anything else. Once I have done the tie rods, I'll take it for a front wheel alignment as well, even though I think it's pretty close as it is, it'll need doing to be sure. Then it's just a case of more miles on it. Done 75 so far, so that's 7.5% run in now.4 points
-
JayEmm makes some very good points about the current driving licence. It centres about the very young and inexperienced getting into electric cars that can, at least in a straight line, accelerate faster than a supercar. He compares car to bike licence and talks about how that is a superior licence in its methodology. Anyhoo it's through provoking.3 points
-
I should have bought this when you had it for sale Trev, was soooooo tempted to have it alongside the yellow peril.3 points
-
3 pointsAbsolutely it’s a safety measure and even though I turn mine off I get why some don’t. I’ve had a lot of heat on here by saying that the system is not dangerous and I stand by it. And yes, driving through heavy traffic/red lights etc at speed gives a pretty similar rush to the best theme park ride you’ve ever been on🙂3 points
-
3 points
-
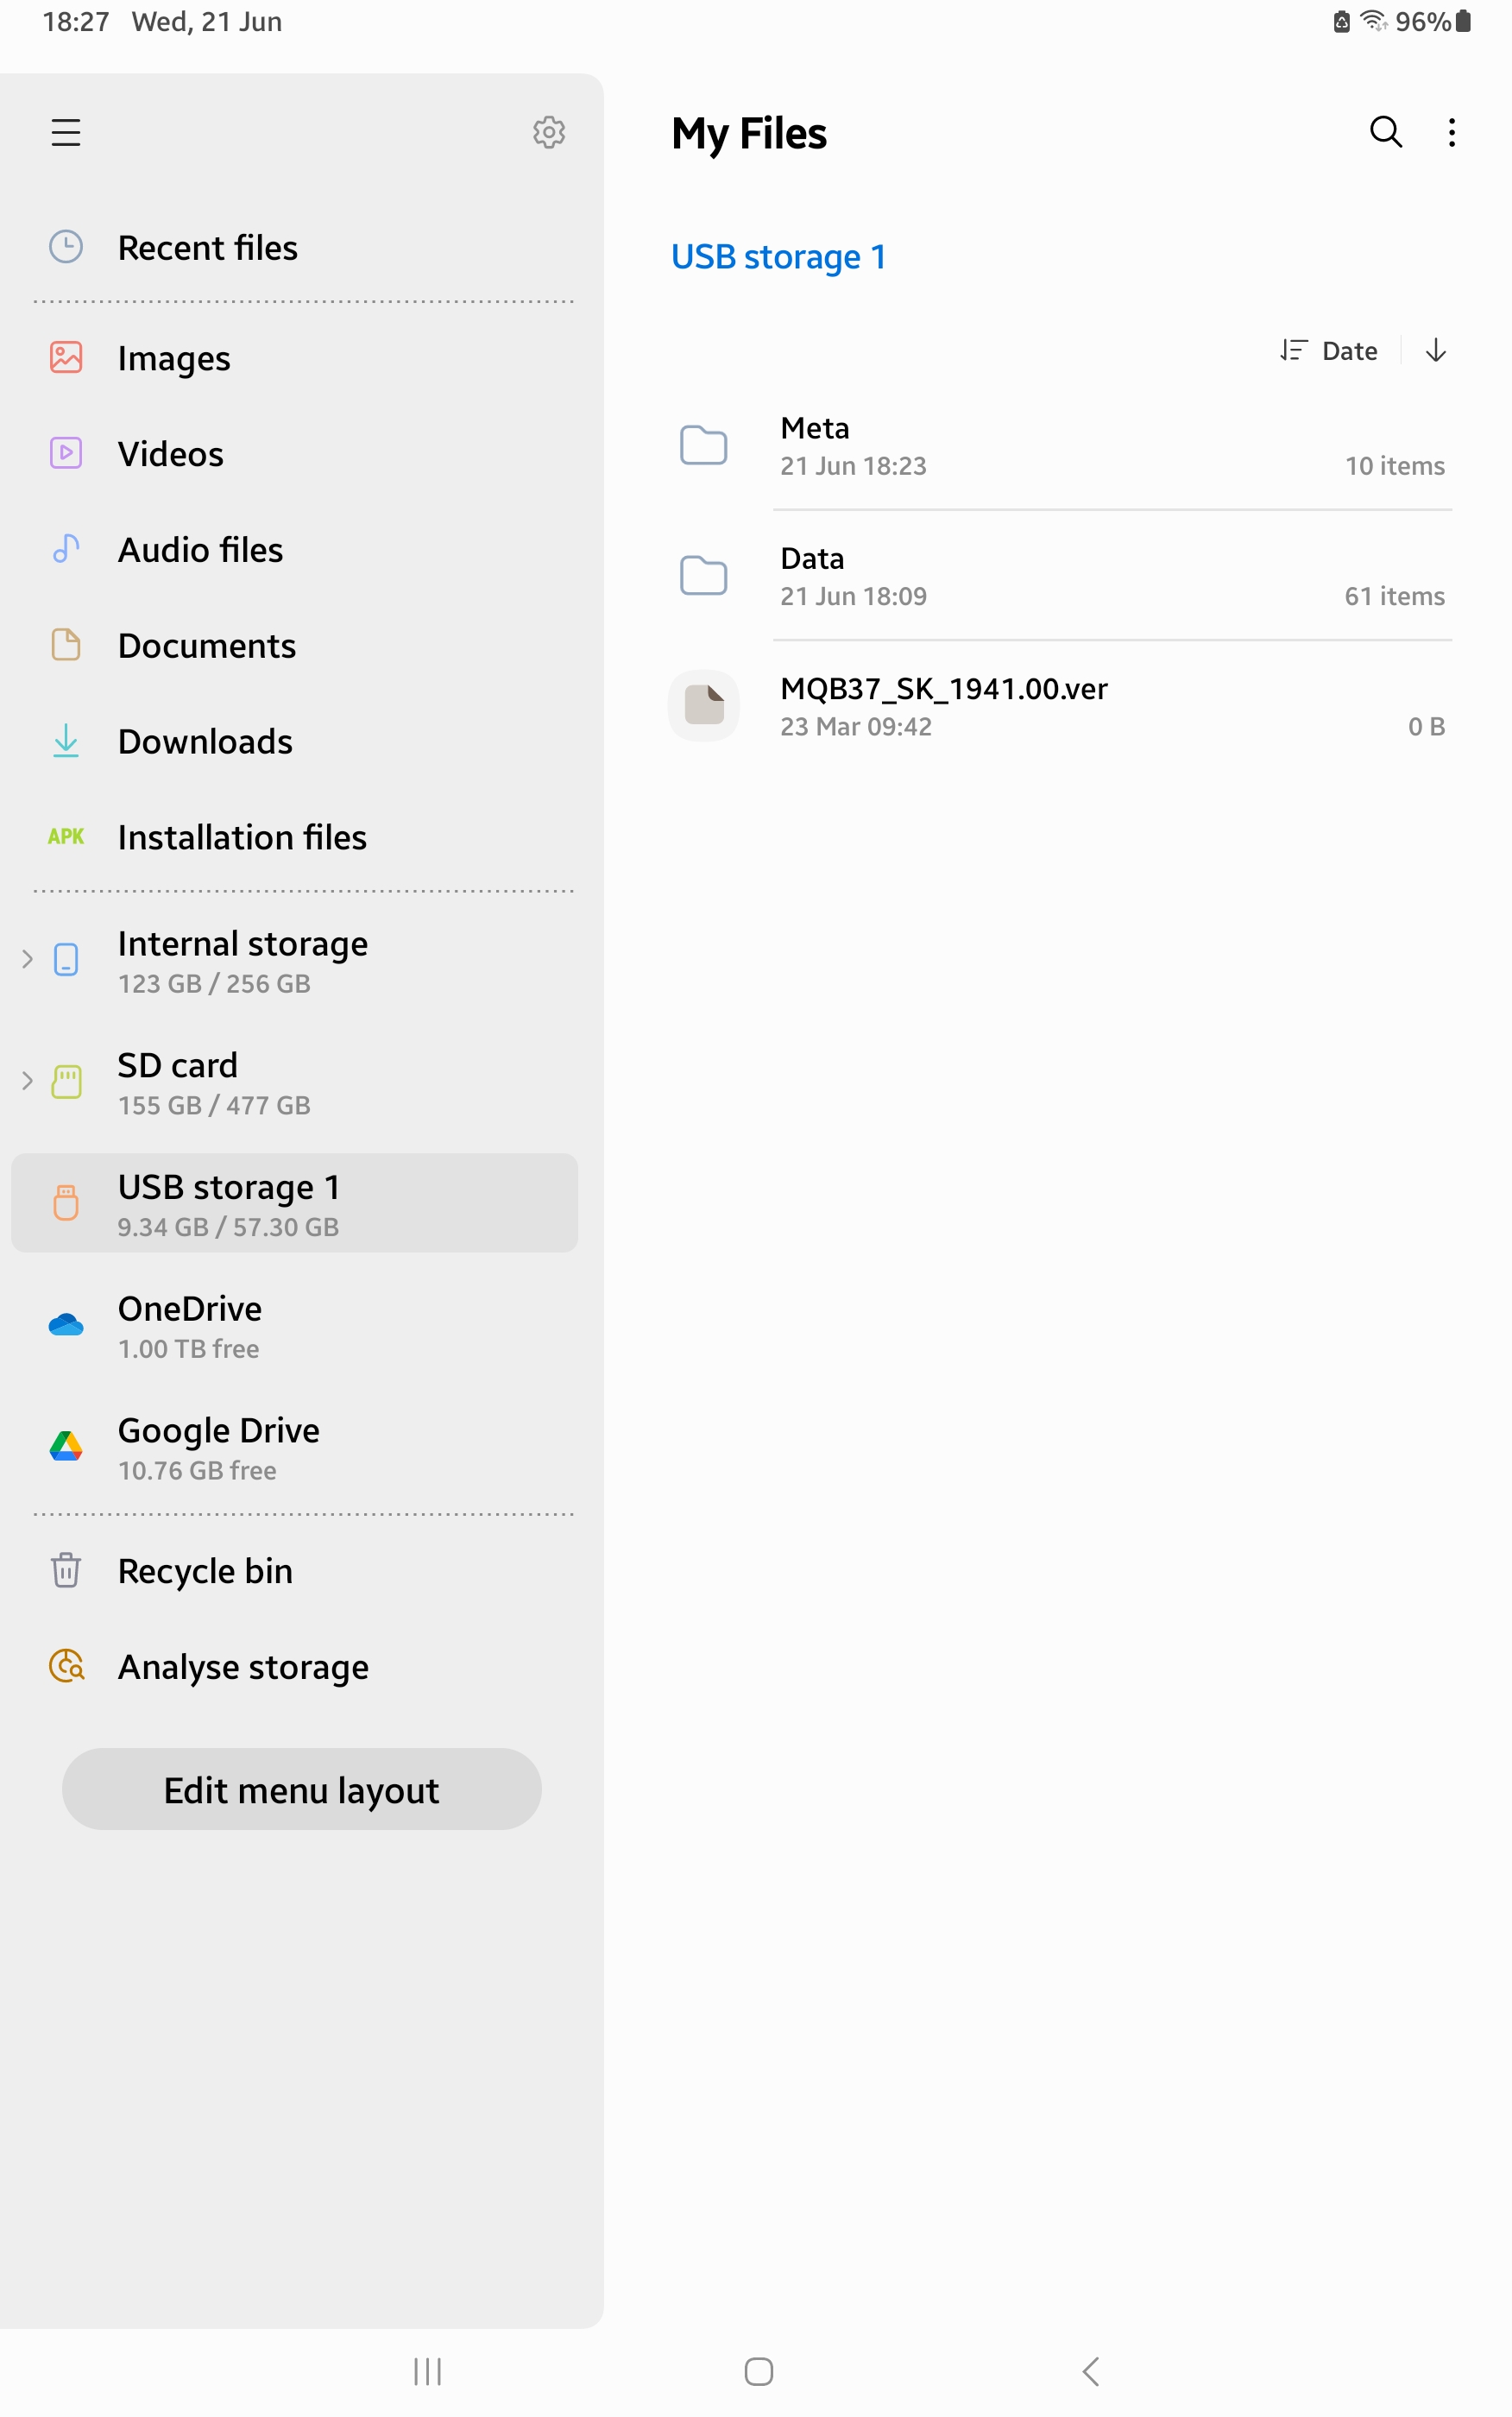
Right. All you do is create a temporary folder on your PC or Tablet for example MIB3 UG. Then find the zip file and then right click on it or press and hold on it, so the menu appears and it should offer you the opportunity to Extract here or elsewhere, tell it to extract the files to MIB3 UG folder and let it get on with it. When it has finished, format a usb memory stick so it's completely empty, then go to the folder MIB3 UG open it and copy the 2 folders and other file directly onto the memory stick. When it has finished copying the files to the memory stick it should look something like this... THERE MUST BE NO OTHER FILES THAN THIS. Once your memory stick looks like this, remove it and take it to the car. Insert it into a USB port, press and hold the menu button for about 10 seconds and the update menu will appear. At this point it's vital that you have a full or very well charged car battery or a battery charger attached so that the car doesn't shutdown halfway through the process. Ignition needs to be ON, the Engine needs to be OFF (NOT RUNNING)! DO NOT START IT DURING THE PROCESS. Here's a video that shows you what to do, albeit in German, you'll get the English version! If you watch it carefully you'll get the gist of what to do. UNDER NO CIRCUMSTANCES MUST THE PROCESS BE STOPPED ONCE IT HAS STARTED OTHERWISE YOU'LL MORE THAN LIKELY NEED A NEW INFOTAINMENT SYSTEM.
 2 points
 -
2 points
-
@UrbanPanzer Thanks all. I connected the car to VCDS today and the cornering lights option was enabled, I disabled it and no more bulb out warning light.2 points
-
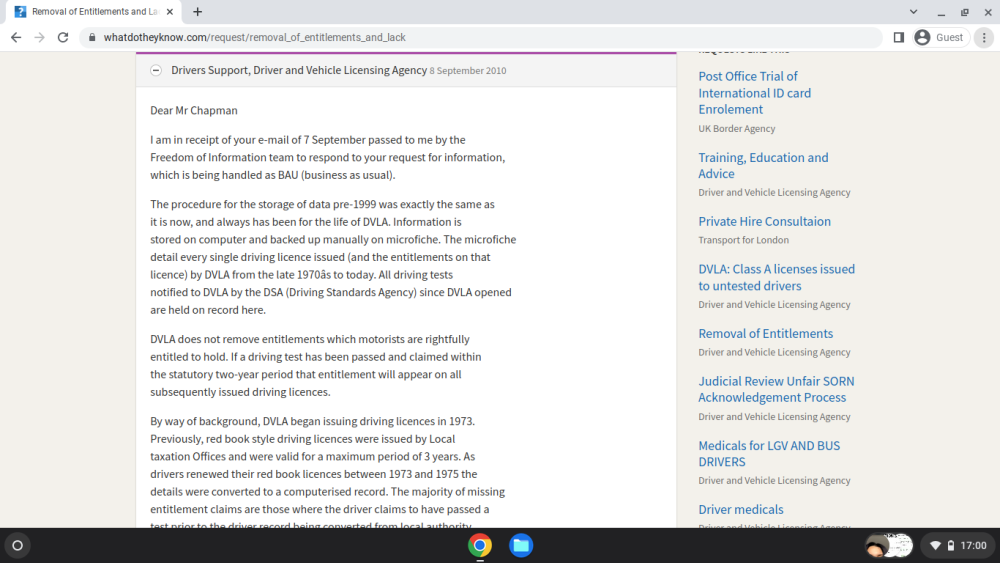
Many in the UK lost 'Motor Cycle' rights having passed their test when the DVLA Swansea had a fire a couple of decades back, and HGV licences were coc-cked up. My Mum liked to remind my Dad that he had not ever passed a driving test, unlike her. Wartime it was not necessary. They were in prescribed work and my Dads family were Carters & Hauliers and they all drove lorries, busses etc. Found my mums licence just this week. (Change of address from Banffshire to Angus.)


 2 points
 -
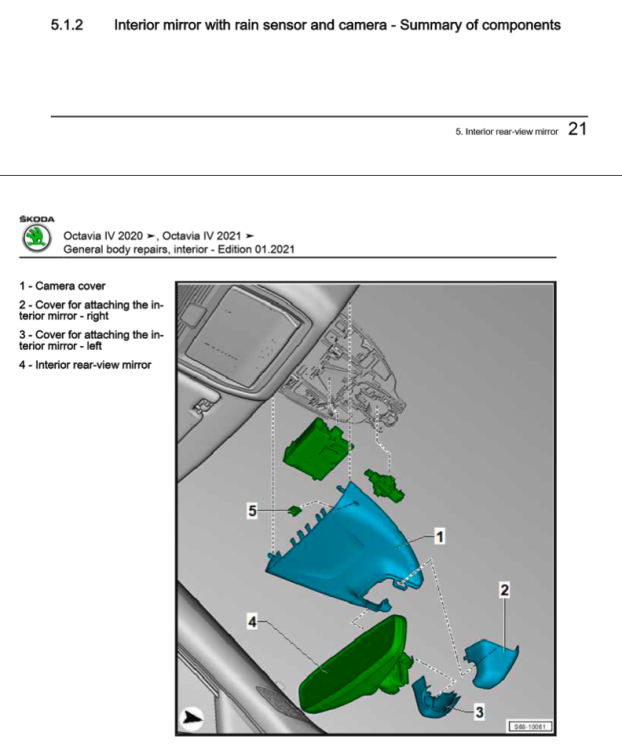
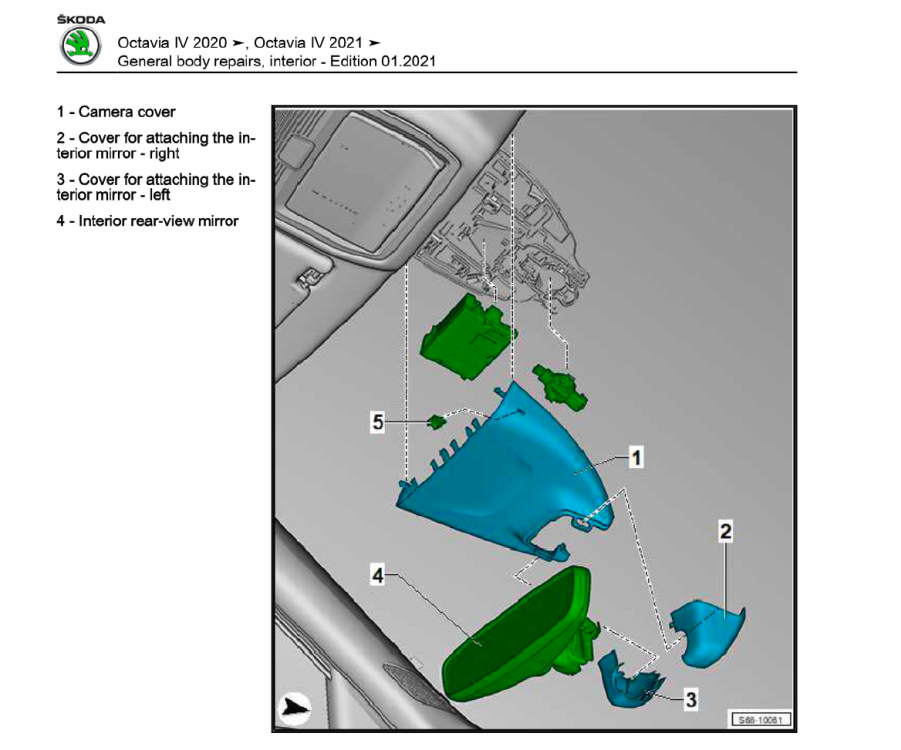
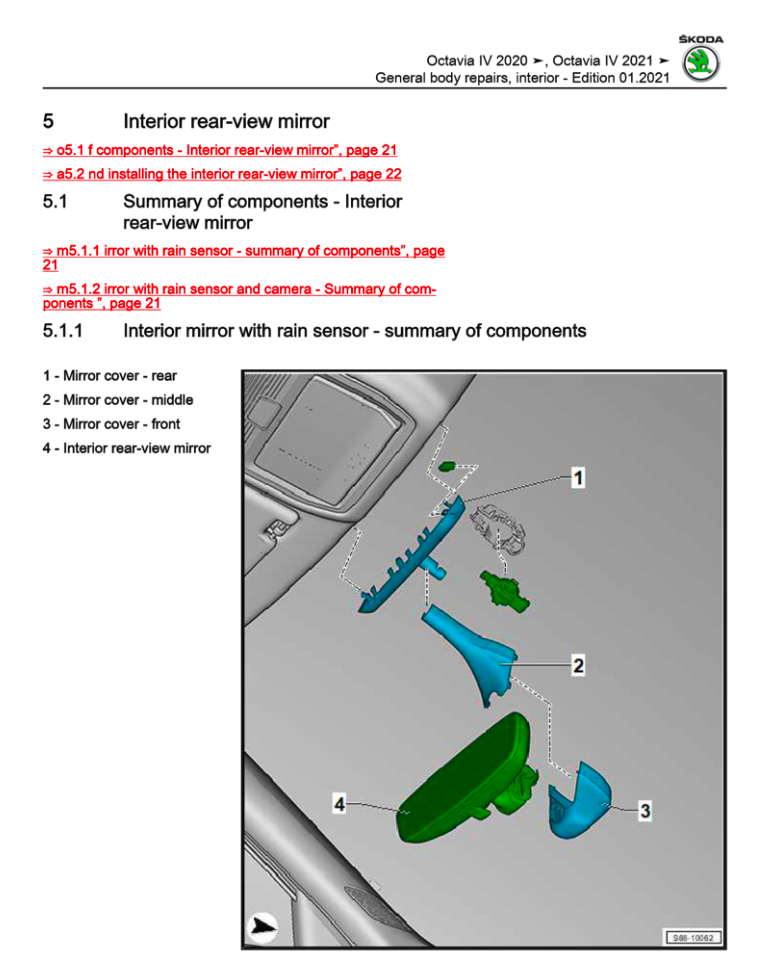
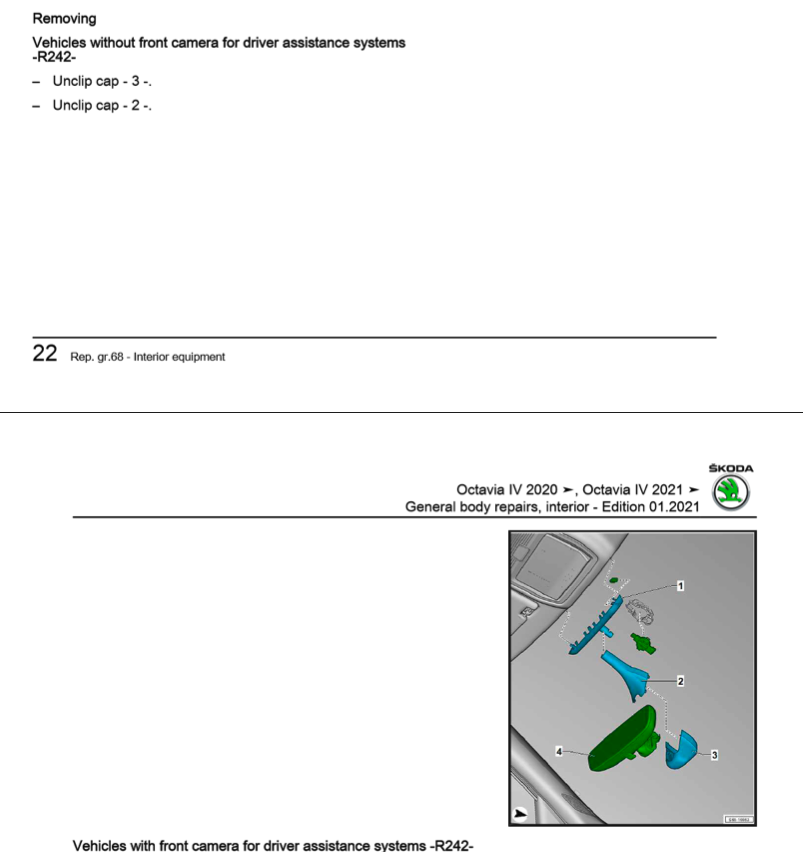
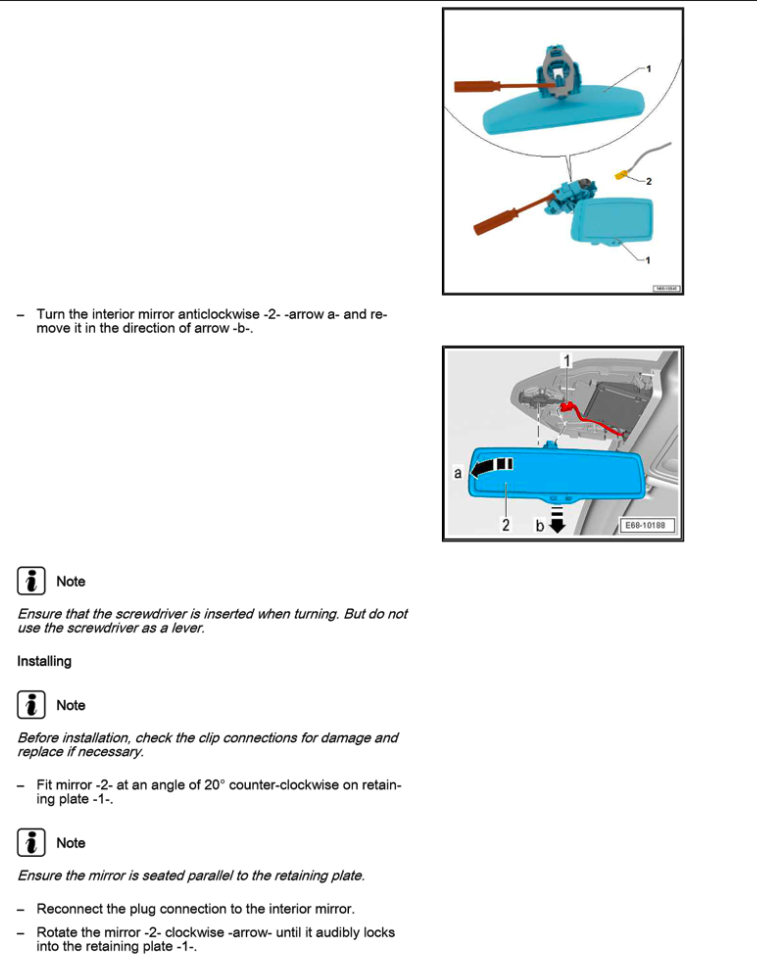
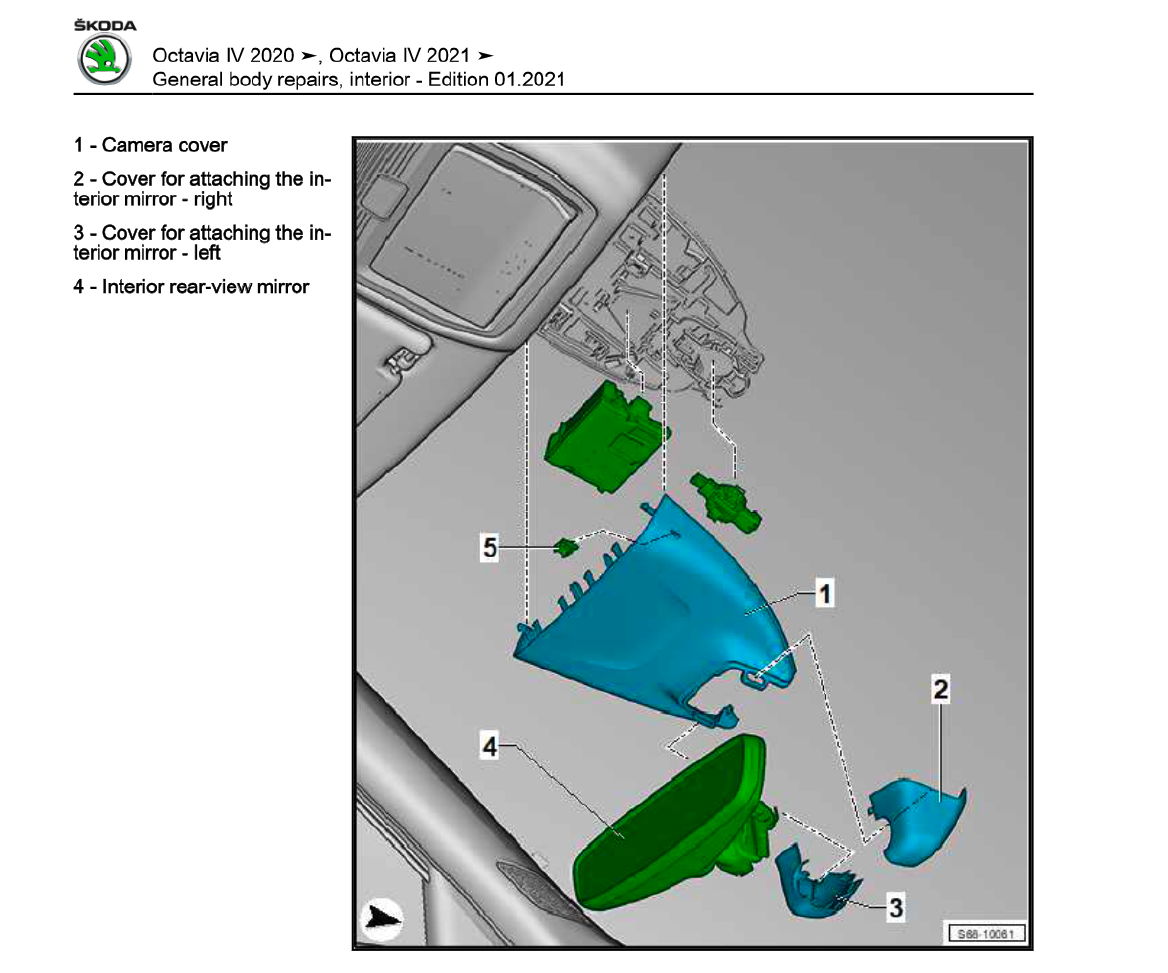
2 pointsOk, in case mirror cover is the problem, I'll also add the sequence for that:


 2 points
 -
2 pointsThe other possibility is that they reset it with one cold (new) tyre, and three warm ones. So the tyre pressures may be differing due to temperature. Leftfield but possible. Perhaps try another reset now. If it does nothing else it’ll at least eliminate temperature differences as being causative. Gaz2 points
-
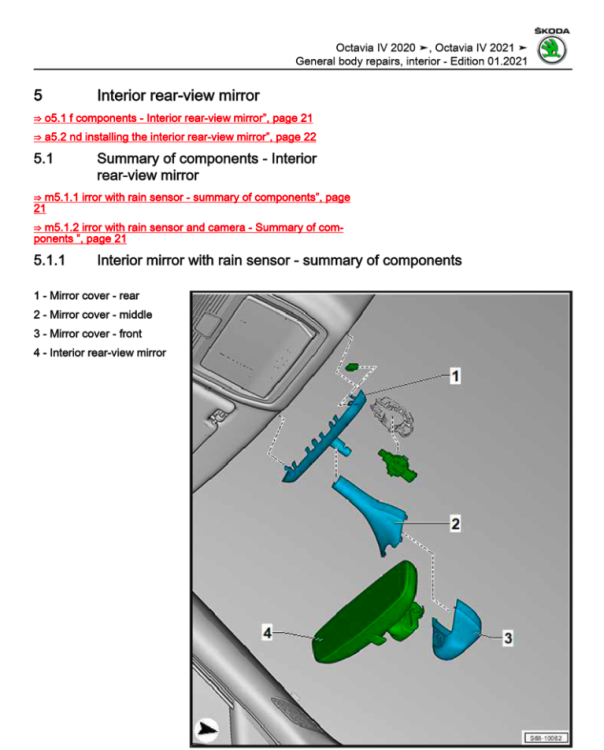
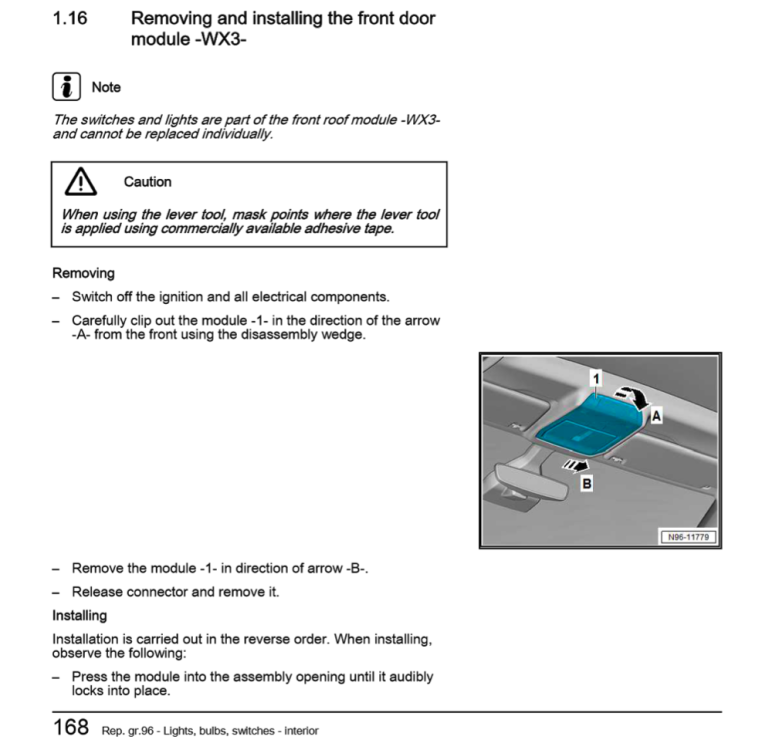
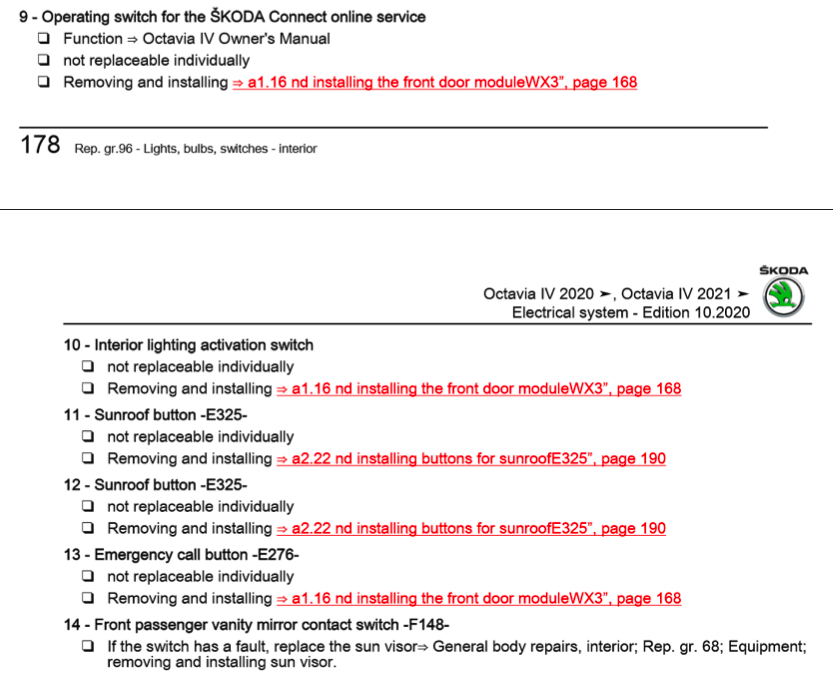
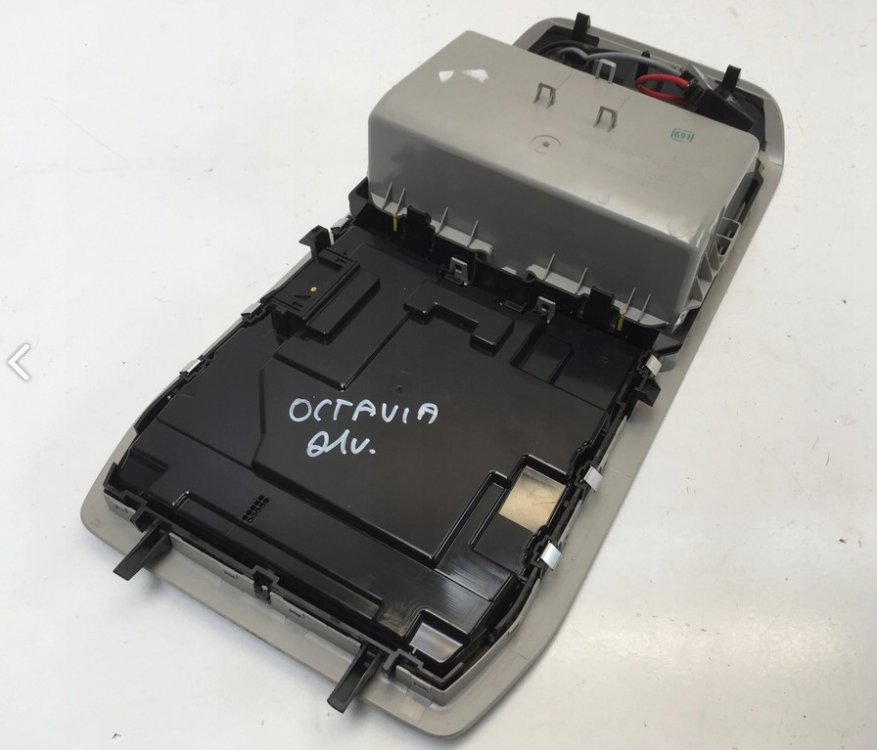
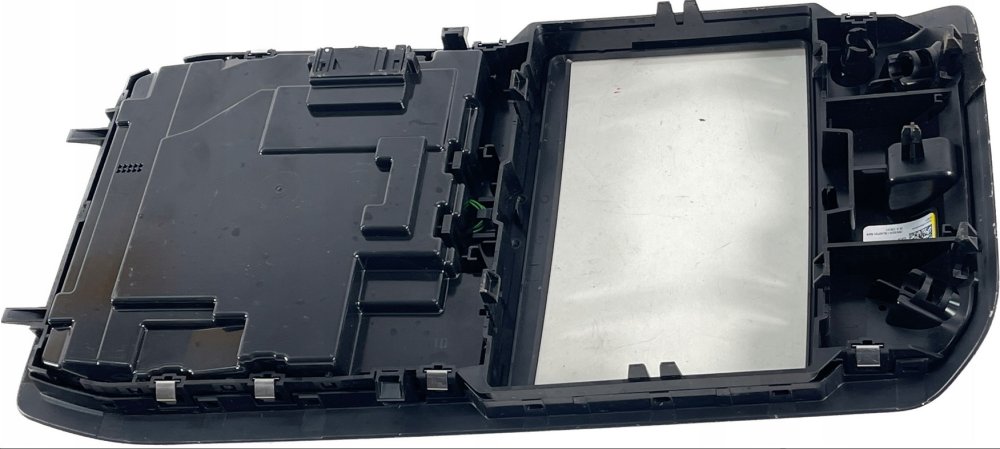
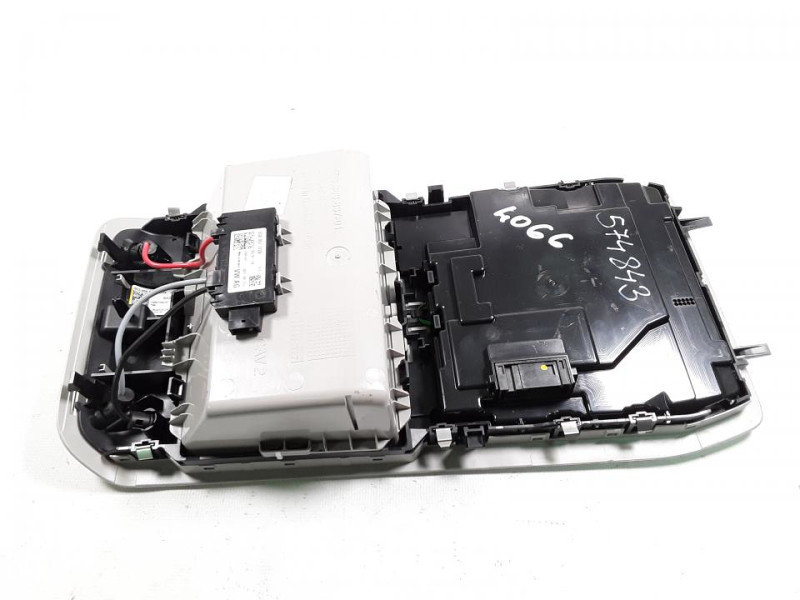
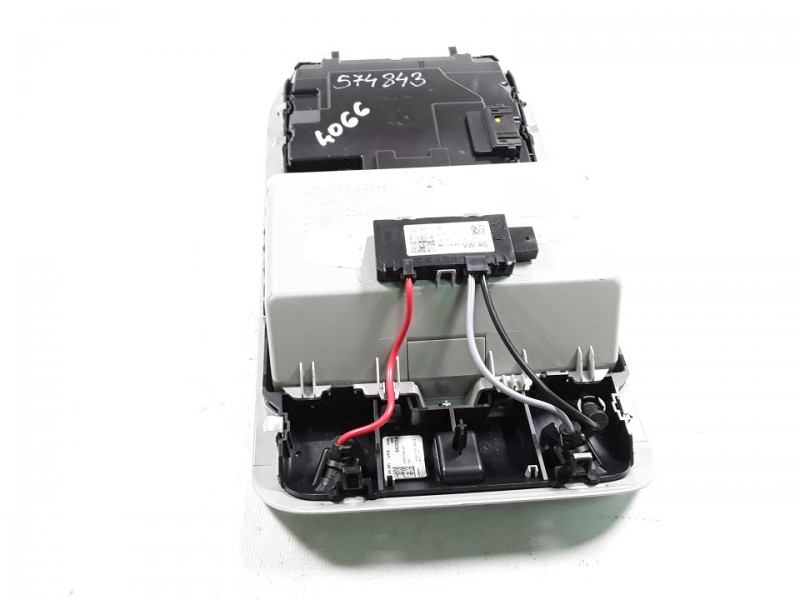
2 pointsAttaching in case it helps... L.E.: Unbelievable!!! (at least for me) The ENTIRE "front door module" as they call it - is a single unit. The Manual says none of the components (4 to 13) are individually replaceable... 🤕

 2 points
 -
2 pointsWithout the trim, left is 1J0 201 655 F and right is 1J0 201 656 E, with the trim left is 1J0 201 653 J 1J0 201 654 F. The OE bolts are N 019 530 8.2 points
-
2 pointsDrop us a PM with your reg and we should be able to answer your questions. Damian @ DPM Performance2 points
-
Been on 1941 now for a week, not a single reboot. Done at a dealer, on warranty, did it in about an hour. They were ok doing it, I just complained about daily reboots with 1896.2 points
-
2 pointsHaven't we all done this in various guises and it works temporarily and then starts playing up again?2 points
-
VAG group cards have a specific CID (card identification number) on them that the device checks. You can't change this by formatting or copying the maps onto the card. you can buy SD cards with the correct CID on them from Aliexpress and some old SD cards can have the CID modified by specific software. The easiest way is to use your existing genuine card or buy a genuine card from eBay with old maps. I bought a genuine 16gb Skoda card with 2017 maps on it for £12 inc. postage from eBay, just big enough to hold the V12 maps downloaded, it means I can have patched old maps with TMC working or 2023/2024 maps by just swapping the cards over.2 points
-
2 pointsHmmmm, I’ve no experience of petrol particulate filters. Plus ISTR the fuel spec is for gow the engine is tuned, it might not be as smooth with a lower grade. I’m assuming you’re in somewhere like Aus or Canada that has 91 RON. If it was me I’d still try the dilute down approach, I wouldn’t have thought one load of lower grade fuel would be catastrophic, the advice could point to long term woes if you kept putting in the cheap juice. Mind you, siphoning it out would give you several years of lawnmower petrol! But someone will hopefully be along that actually knows about such things. 👍2 points
-
2 pointsDo you have to take it out? Couldn’t you just run it down, say 1/4 tank at a time and gradually enrich the fuel in the tank? Even if that means using the highest octane fuel you can get. It’s not like you put diesel in.2 points
-
2 pointsTen years in the ambulance service, last 3 years single crewed on a rapid response car plus a spell teaching blue light driving.2 points
-
2 pointsFirstly, my reply was intended to play down the whole “stop/start” phenomenon and was supposed to reassure people that for it to work so many variables have to be right…..that was all. I don’t appreciate semi aggressive responses for comments I made that meant no harm or offence. And no, I DONT profess to know the ins and outs of a system that is as random as stop/start BUT I’ve had enough cars with this system to know that it’ll work when everything is right and won’t when it’s not. So, to protect yourself from offence (when none was meant) just don’t read my posts in future, simple as that. I was once told that you’ll never win an argument with a fool, so let’s leave it there and may our paths never cross on here again. Have an amazing day👍2 points
-
Another question for the OP. Does the car have the all singing & dancing "coded" towbar electrics? If so then maybe the fact that it is detecting a trailer attached (by the insertion of the lighting socket) is for some reason triggering this anomaly, almost certainly in conjunction with something else misbehaving. I suggest that you try towing a similar weight but for the test do not connect the lighting plug, if the problem does not manifest then we will be one step closer to nailing it down.2 points
-
Sounds like you've been unlucky - from 2006 until 2016 I had an Audi RS4 Avant (4.2 V8) but retirement meant I needed something more sensible and since then I've had a couple of Mk3 Octavias (a 1.4TSI Elegance estate and a 1.8TSI L&K hatch) and had fewer build quality issues than I had with the RS4.2 points
-
Hi all The Superb Mk3 AWD is fitted with a 5th generation Haldex. Regarding VAG Group, and Skoda in particular, it also equips: Octavia 3, Superb 2, Karoq, Kodiaq. It may also apply to Scala and Kamiq, unless they're equipped with 6th generation. I actually don't know for these latter. Since I have limited trust in garages in my neighborhood and because I like 'DIYing' on my car, I've decided to change the oil of my Haldex system on my own. If one follows Skoda recommendations, workshop manuals (see cardiagn.com) only mention a simple oil replacement every 3 years and that's it! But when you start diving into documentations or in youtube videos about 5th gen Haldex, you can notice that the oil pump has an intern strainer, which trends to get really dirty, whereas it's never cleaned ! Hence, here is this humble tutorial ! I apologize, if there are any vocabulary issues... I'm French. Firstly, here are all elements, that we're going to look at: #13 : Bleeder screw (M10x30) - P/N N 910 827 01 (tightening torque 38 Nm for Superb Mk3, but on other VAG model it may be 32Nm - Have a look to the workshop manual corresponding to your car. See cardiagn.com) #14 : Filler screw (M10x1x10) - P/N N 902 818 02 (tightening torque 15 Nm) #3 : Retaining screw (M6X35) for the Haldex Control Unit - P/N N 105 540 05 (tightening torque 9,5 Nm) #11 : Retaining screw (M6X35) for the Haldex hydraulic pump - P/N N 105 540 05 (tightening torque 9,5 Nm) #9 : O-rings for the pump - P/N 0CQ 598 305 (⚠️Note : This P/N is a kit, which includes both O-rings, but also both retaining screw #11! Don't by these screws twice!) Gear Oil : According to ifinterface.com: P/N G 065 175 A2 or According to what dealer sold me: P/N G 60 175 A2 - 850 ml (~29.9 fl oz) By the way, don't forget to check that the oil can actually contains 850ml through the gauge on the side of the can. Indeed, just for the short story, the oil can I had bought only contained 750ml, though brand new and still crimped . I had to go back to the dealer to exchange the oil can. The requested volume for the maintenance operation is usually around 700-720 ml (24.6-25.3 fl oz), thus it leaves little room for error (and even less if the can is not filled correctly). The total bill was ~75 € for all parts (without screws #3, which you don't need to change). - Difficulty : 2 - Time needed : 1h30 approx. - Number of person needed : 1 - Necessary tools : ¤ Screws #3 and #11 : Torx T30 or 10mm Hex socket, if you don't have Torx ¤ Screw #13 : 8mm Hex ¤ Screw #14 : 5 mm Hex ¤ For Hydraulic pump strainer screws : Torx T10 ¤ Ratchet or classic wrenches for disassembly ¤ Torque wrench(es) to apply specified torques: (9,5 / 15 / 38 Nm) ¤ Short and intermediate extensions for ratchet or torque wrenches to enable easier access to screws ¤ A small flat screwdriver ¤ Oil drip tray ¤ Rags ¤ 1 wooden toothpick ¤ Lifting means ¤ Syringe for oil filling Dealing with the syringe, I've bought this one for 20-25€ on Amazon. It makes the job perfectly! Step #0 : Preparation You need to lift the car high enough to get under the car and to get enough space to move your arms comfortably. In my case, 370mm (~14.5") of ground clearance were enough. Note: Though you've lifted the car, it needs to remain horizontal to make a proper filling with right oil level (see step 5). If this case, I had to compensate the natural slope of the ground. Step #1 : Oil draining Start with the filler screw (#14 / blue square) removal for more safety. Indeed, if it's stuck, you won't be "snooked", with a completely empty Haldex oil tank and no way to refill it. Once you've removed the filler screw. Don't get rid of it immediately. You'll need it again temporarily for Step #4! Now, you can remove the bleeder screw (#13 / red circle). There's no difficulty to remove these 2 screws. There are 2 good news for this step: - The drain screw is long enough, so that you won't get surprised, when the thread gets totally disengaged from the housing. - Even if the drain screw has an horizontal axis, there's only a small quantity of oil, and since it is very fluid, it flows well vertically from the edge of the hole. Little chance of getting trapped with the oil, which flows suddenly and farther than the drip tray. Phew! However, it takes several minutes to really let all the oil drain: Step #2 : Hydraulic pump removal Whereas oil is still dripping, start removing 2 retaining screws (#3) for the Haldex Control Unit. They are quite easy to access with a small 1/4'" ratchet. After that, you can rotate the Haldex Control Unit, to bring the connectors on the top upside down. This simple operation will help you saving a huuuuuuge amount of time ! But this tip is explained / told nowhere!!! Otherwise, you will have to disconnect the pump connector 'blind'... And if you do this operation for the first time, You hardly understand how to proceed. Decency leads me to shut up the time that I spent trying to remove this µ%£$@&# connector before I changed my mind on the operating process. Pump connector before Control Unit removal : Once the 2 retaining screws of the Control Unit have been removed, you can easily access to the connector: Now simply insert a small screwdriver in the notch (red circle) and push in the arrow direction. Very simple... Then, you need to unclip the black plastic wire protection, which keeps the pump wiring away from the propeller shaft. It's clipped in 2 locations on each side of the shaft, You just need to pinch the 2 lugs at their end to make them go back through the hole in the housing. Left side (Control Unit side) : The upper red circle in the mirror shows what you hardly see in the lower dotted circle... It's clearly the circled part, that has to be pinched and then pushed/pulled in the arrow direction. Right side (pump side), just proceed the same way : The pump wire is now fully free. You can now remove the 2 retaining screws (#11) of the hydraulic pump (#10). Very easy too. Warning from this point, it will be 'Apocalypse pump' ! Please keep children and sensitive souls away from following pictures! Pull in the pump axis direction, while rotating it around its axis in one direction and then the other to ease the removal. Be very careful, when the pump is about to get out completely, not to strike the contact surface of the housing, nor to strike the pump strainer. FYI, the strainer is not sold alone. It's sold with the pump, which approximately costs 180-200 € (w/o VAT) ! And there, under your dumbfounded eyes , here is the sinister spectacle that awaits you: A strainer almost entirely clogged with sh**t! And the pump housing is not even better... FYI, this Haldex is only 2.5 years old and has only 45000 km (~28000 mi) on the clock. And considering the way I use my car, I don't think the Haldex faces a heavy duty use. Therefore, as I already mentioned somewhere on this forum, one can only notice that the oil replacement process in the maintenance manual for the Haldex 5th generation is clearly incomplete ! By the way, look at this video below from ~28 mn, you'll see the impact of the strainer cleaning on the pump demand signal ... It's clearly a proof that w/o a strainer cleaning, the pump unnecessarily faces severe conditions and that sooner or latter there's a risk of pump failure... Step #3 : Pump cleaning and reassembly Since the pump is now removed, you need to remove the strainer. Use a Torx T10 for both screws: Then wipe the pump dry with a rag, being careful not to get the dirt into the ports. Fort the strainer, a cleaning with some white spirit and a soft paintbrush. But be careful, not to brush to hard to avoid tearing the strainer mesh, which is very thin!!! Eventually, a simple soaking in a small glass of white wine ... sorry , I mean... White Spirit should help removing most of the dirt and finishing finely with the paintbrush. Let the strainer dry, while you remove both O-rings around the pump, using a wooden toothpick as a lever. It will avoid hurting the grooves. You can now, clean the area between both grooves with white spirit. Once everything is clean, you can mount the strainer back onto the pump. Be careful ⚠️ ! I didn't find any information about their tightening torque. Thus be sure to tighten enough to firmly place the strainer on the pump body (to make a good seal against dirt), but not too hard to avoid risks of cracking the plastic. Shall I remind you the price of the pump, just in case ?!? Now, pour some drops of fresh oil in a small container. By the way, FYI : Haldex used Oil 2.5 years old & 28000 mi on the clock / Haldex fresh oil Put few oil drops on both O-rings to lubricate them and install them onto the pump. Keep using the wooden toothpick if needed. The pump is now ready to be mounted back onto the car : Now, you can clean the housing with rags before putting the pump back in place: Don't forget the bearing surface, where the threads of the retaining screws are located. Here you can see some dirt left, that I removed right after taking the picture... You can now put the pump back into the housing. Be careful, not to pinch both O-rings . Once there's only 5-6mm (1/5 -1/4") between bearing surfaces of the pump and the housing, it gets a bit harder to push in by hand. This is probably caused by O-rings, which may act as a slight "bead" to efficiently seal. You now realize how clever it is, to lubricate both O-rings to prevent them from rolling inside out and to make this operation even more difficult. When the pump stops into the housing, you can put 2 retaining screws back in place (#3 - tightening torque = 9,5 mm) Put the black palstic pump wire protection in the correction position and clip it into both holes. Be careful, you still work 'blind' (unless you have a small mirror) . Reconnect the pump connector on the Haldex Control Unit and rotate the Haldex in its normal position. Watch out to rotate the Control Unit in the correct direction not to twist unnecessarily the pump wire. Put both retaining screws to fix the control unit (#3 - tightening torque = 9,5 Nm). For the lower screw, the propeller shaft flector is slightly in the way and leads you to put the bit with a small angle. But you can still manage to have enough grip with the bit to tighten. You can now install the new bleeder screw (#13 - tightening torque = 38 Nm). Step #4 : Oil filling According to the workshop manual, the filling shall be performed with an oil temperature between 20°C and 40°C (68°F / 104°F). If the ambient temperature is to low, put the oil can in a bucket filled with hot water for a while to bring the oil at the right temperature. You can now inject fresh oil in the filling hole (see blue square, on the 5th picture) with the syringe. You have to fill with oil, until it overflows. This should be approximately 650ml (~22 fl oz). Put the OLD filler screw back in place temporarily and tight it slightly. Yes, you've been told to keep it upon removal at step #1! Do you remember? ! Etape 5 : Oil level adjustment and ending Start the engine and let it run for ~1mn, to let the hydraulic pump fill with oil correctly. Shut the engine down, then remove the old filler screw again (#14 / still the blue square on the 5th picture ). Top up with oil until it overflows again, and you can put the new filler screw to finalize the operation (#14 - tightening torque 15 Nm). That's it! Fresh oil! Clean pump strainer! Happy Skoda owner! ... You can put the car back onto the floor now ! Now it's up to you!1 point
-
Few Hours! Once I extracted the files to the memory stick and plucked up the nerve to do the update it took no more than 45m to complete. Another dealer taking the proverbial.1 point
-
1 point
-
1 point
-
It does not matter if the tyre is a slightly different size / pressure, or 2 on an axle are not the same. Like when a spare might be fitted. That is why you are RESETTING the TPMS. So that it registers the setting. Circumference and then notices a difference from the setting. So car stopped, RESET, and then after a while of driving it should be logged / registered. ........... The bigger cars, Superb / Kodiaq might well disable the ACC / CC or other features when there is a very odd one out size, but should not give a 'TPMS' warning. There are threads where people did have issues with the very wrong size spare some Superb with Haldex got as Space Savers and the ABS / TC nipping the brakes and causing a hazard as people drove too far, and maybe too fast with too small a tyre. That is a different kettle of worms, or can of fish.1 point
-
Hi Gerry, IIRC, you will require one in at least some countries.1 point
-
Ditto for me, passed test the same year, you had me worried but mine does not expire until I am 70, were you 22 when you passed your test? I have never exchanged mine as I refused to pay again for something that was valid and to keep paying every 10 years. £5 sounds a lot, as much as I paid for my first car, I only earned £16 per week gross.1 point
-
The topic prompted me to find my UK car driving license which was issued in 1976 for the princely sum of five pounds. The stated expiry date is January 2024. Original green print, no picture version and still in the same intact plastic 'wallet'. At the time the expiry date seemed so impossibly far away.....but here we are and now so close. I can assure you that the power of my early cars were unlikely to break any highway speed limits although the narrow crossply tyres fitted could easily lose adhesion under almost any conditions other than bone dry.1 point
-
1 point@Ari19welcome. Are you certain that your car has a GPF (OPF) in Australia? For some reason in the UK where it is petrol we buy they are Gasoline Particulate Filters. Edit. Sorry I see your link now. So do you have a 1.4 TSI with or without ACT, and has it an 8:speed auto, not a DSG?1 point
-
USEFUL WEBSITE.... 2016 Skoda Superb - Wheel & Tire Sizes, PCD, Offset and Rims specs | Wheel-Size.com Angelo1 point
-
The problem continues for me even when AA is disconnected. I turn off wifi in the car so that only Bluetooth is connected. The error continues regardless of AA.1 point
-
V2 is the non coding route yes. If the cars current map is pre v12 you needs to do the Seat workaround as well if it's a Seat. V2 works fine on an Arona what I tested it on... and the gold card as well 😇. Have three cards, the Seat original 16gb, a Skoda 32gb and Samsung Gold card from the experiment I did a few years back. Used that one. Those I experiment with on the partners card.... very understanding 🤣.1 point
-
1 pointWent on a mighty epic quest in Google worthy of King Arthur himself and was able to find pictures of the MK4 console's underside. I might try to remove it eventually based on these pictures. From what i'm seeing i'm almost 100% sure the noise comes from the white plastic rubbing against the black plastic. Silicone based or Dry PTFE lube WD-40 cans should do the trick.
 1 point
 -
1 pointNo need to remove the fuel, the engine will adapt by reacting to the signals from the knock sensor in exactly the same way that it does when using the specified fuel1 point
-
Any signs of oil in the water or vice versa? Heater working ok?1 point
-
I was in Germany at the weekend & saw this superb with Alutec alloys that I thought looked pretty nice (18s rather than 17s though). The anthracite will look good with the DragonSkin I think & will look better during the winter with all the mess on the roads.
 1 point
 -
1 pointVarious, couple of different 4x4s when it snowed, mainly volvos otherwise.1 point
-
1 pointI see you had very well trained mechanics working on your car. I had heard similar at a big chain tyre place to the reason why they wouldn't work on regular brake disk/pads on EV's: "they have their special regen brakes"1 point
-
Can we get a didn't watch summary? What is the bad news? Instead of giving view count, a quick summary on the click-bait title would be useful and informative.1 point
-
1 pointNot sure which post you were referring to, neither I or others have mentioned being worried about this issue! I have facility which doesn't appear to work as specified and was asking fellow owners if they had experienced the same issue, I don't need replies from someone who doesn't know what they are talking about and who just wants to criticize genuine enquiries. I was once told if you have nothing to contribute to a debate - say nothing, you might want to try it, because I, for one, am not interested in your fatuous comments.1 point
-
1 point
-
1 point@Damian@DPMmight just be able to help if he sees this & hopefully others that know the answers will be along.1 point
-
@AndyM20 You had bought a dog of a car had you not and took it to muppets to get jobs done? http://briskoda.net/forums/topic/451930-dangerous-tyre-wear-on-inside-shoulder/page/2 Easy to understand why noisy. ? What did you replace it with?1 point
-
That could be the check valve in the pump or the BCM signal to the pump, without diagnostic equipment I would change the pump first.1 point
-
1 pointSkoda UK gives the following information in additional information section towards the end of the brochure (brochure is available online, as per link) Service intervals When you order your OCTAVIA, you can choose whether your car is on a fixed or a flexible service regime. Your ŠKODA retailer will help you decide which regime suits how your car will be driven, enabling your car to stay in the best possible shape. Fixed regime: service every 10,000 miles or one year (whichever comes first). This is recommended if the vehicle is likely to be used in the following way: > Driven fewer than 10,000 miles per annum. > Mainly short journeys, driven mostly in towns or cities. > High vehicle loading/towing and frequent hill climbs. > Heavy accelerating and braking, using high revs. Flexible regime: Sensors in the engine detect when a service is needed. A service light will show between 9,000 and 20,000 miles or up to 24 months (whichever comes first). The flexible service regime is recommended for vehicles with a daily mileage of more than 25 miles where the vehicle is driven regularly and mainly at a constant speed with minimum vehicle and engine loading, minimal towing and driven in an economical manner https://www.skoda.co.uk/_doc/0bcfc2d5-654f-49b2-a524-91e141293e36 Note the first bit, the customer gets to choose, not some technician doing the PDI makes a random decision and sets car up that way. So if that is what what happened, complain to supplying dealer, pointing out what they did caused false advertising, and you want remedy. (its always good to use legal term remedy as it implies you are expecting something to compensate you). The reality is only when enough people complain and hit their profit will they improve and do what brochure says. If you do mainly town driving, or under 10,000 miles a year and they told you only needs a service when car says so, they are also incompetant and wrong.1 point
-
1 point
-
1 point


.thumb.jpg.f83a46b9b3c0d976b9dbffbb523c9874.jpg)

.thumb.png.c0f0287281cb72c181130ce8b987e5bc.png)