




Breezy_Pete
Sponsor
-
Joined
-
Last visited
Everything posted by Breezy_Pete
-
No drums on a vRS @VWD.
-
Is one of the hvac codes G65 low pressure? If so that may explain why AC isn't triggering fan action, just not getting the high side pressure up sufficiently to trigger it. I wonder if you've got some wiring damage that's affecting the positive feed to the coilpacks at high temps? The oxygen sensor heater fault may point to a bust wire at the interconnect down on that bracket in front of the gearbox. Is it an AZQ engine code or a BME?
-
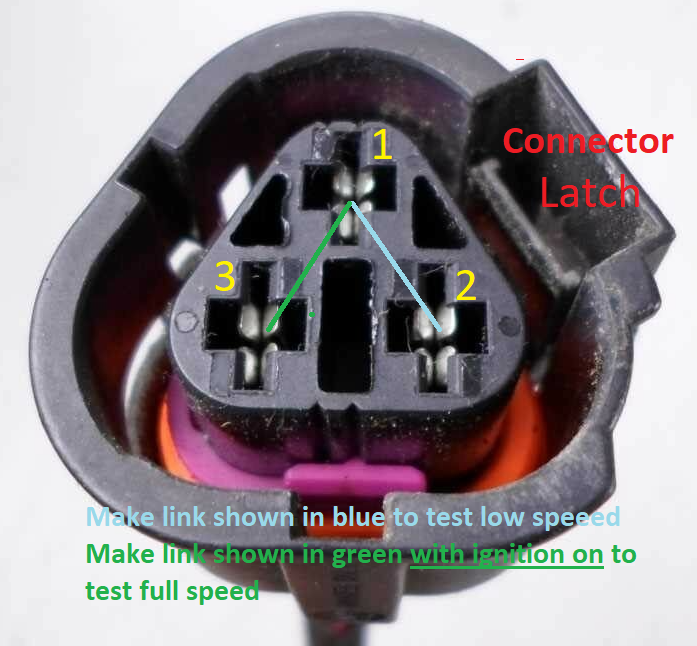
Have you looked at the brake servo vacuum hose at all? They tend to crack and leak at the joints of the hard plastic sections, and the plastic will be softer when hot, so more likely to open up. I would think this is more likely the cause of your misfires than the temperature. Two radiator fans or just one? The thermoswitch is a common source of leakage, and can generally be fixed by just tightening a little, 29mm spanner or deep socket. If you take the connector off to get a socket on, may as well bridge some pins of the loom connector whilst there to test each speed. I'll find a helpful photo shortly showing which pins to short. Ignition needs to be switched on to check full speed, but not the low speed.Does the temperature gauge ever go above halfway? Did your fuse check include blade fuses 8 and 11under the cover to the right of the strip fuses on the battery holder?LED lamps may well be even less reliable.Breezy_Pete replied to a post in a topic in Skoda Favorit, Skoda Felicia, Skoda Fun and Skoda FormanMaybe the coolant flow is low for some reason?Breezy_Pete replied to a post in a topic in Skoda Favorit, Skoda Felicia, Skoda Fun and Skoda FormanThe coolant temperature may be 100 at the engine, but with ambient temperatures low at this time of year, will probably be a lot lower at the thermoswitch. An IR thermometer pointed at radiator fins close to the thermoswitch may give clues about whether this hypothesis is correct/not.A thread here where the OP eventually told us that some injector cleaner fixed his red-hotness:I wasjust hoping you might find something that could explain the bad behaviour. Of course there may well not be anything visibly broken. A bad solder joint might be seen, maybe with magnification. PM me anything showing the circuit board, if you get in there for a look, please. 🙂I hope you will still do a post mortem on your old BCM ?Yep. No sense in replacing it if the readings are good.If both of the windows don't open when the key is held in the unlock position (with door previously shut and locked) I'd say you may well need a repair to the driver's side motor module. Pop round with door card off and try a known good one 🙂Yes, very little charge in that, get a charger on it.Look what it's reading in engine ECU measuring blocks when engine is at ambient and operating temperature.Just a couple of ideas I had. Does your courtesy light come on when driver's door is opened?Fuse 14 is associated with ECU relay for your engine.If only 4 volts is getting to the pump it probably won't work, but there are two different relays that supply this voltage at different times, one when driver's door is first opened, the other when engine ECU tells it to. Seems unlikely both have a problem. Please check the two fuses I've mentioned.Do you hear the fuel pump run as you open the driver's door, after unlocking the car from outside at least half an hour since last used?Fuel pumps rarely give trouble.See if fuse 52 is blown. Check fuse 14 too. Diagram attached: Mk1 Fabia Cabin Fuses.pdfThe fuse will stay powered. 👍The radio may well have a permanent feed to it, but be switched off (and on) by CAN communication. Many electronic modules are like this.@rdemirel, I guess you're referring to your Karoq, rather than a Citigo, in which case you'd be better off in the model-specific forum for that car.This was from August 2011, there's another list from May 2013, but I expect there's a lot of overlap. Ones that are unused on any given car may not have a terminal in both sides of the fuse socket, and if so won't work.




Important Information
Welcome to BRISKODA. Please note the following important links Terms of Use. We have a comprehensive Privacy Policy. We have placed cookies on your device to help make this website better. You can adjust your cookie settings, otherwise we'll assume you're okay to continue.