Breezy_Pete
Sponsor
-
Joined
-
Last visited
Everything posted by Breezy_Pete
-
Skoda/VW say you should check it warm, so I wouldn't worry about it.
-
If it has 1Z as the 7th and 8th digits of the VIN it's a mk2, if they are 5E instead, mk3. Parts look-up here, Skoda Parts catalog - ETKA Online, Skoda EUROPA, original Catalog Skoda EUROPA (7zap.com)
-
My gut feeling is that ^ may well be cheaper, but no personal experience to go on.
-
Might be worth asking this lot on the phone if they can really get it https://www.lllparts.co.uk/product/expansion-hose-from-vane-pump-br-to-steering-gear/mpn/3B2422893C
-
I'm a touch confused about where this has come from? When I look for PAS hoses for v6 diesel 2007 Superb these are the ones I'm seeing: LLLParts Don't see the one you've mentioned @cheezemonkhai? Item 10 or 12 if it's one that connects to the pump? Would be the second item 10 part number for a RHD car, and not to sure how to work out which of the two item 12s apply. Some difference between versions of the 2.5l diesel I think. Am I being daft?
-
Oh wow, much cheapening.
-
Seems like a great idea to me. Gives the observant owner an early heads-up about an alignment issue well before a new tyre or two might get ruined and wasted.
-
Oh, I'm surprised @AGFalco, does it not work on face-lift mk2s (either)?
-
Keep an eye on fuel economy. Even a small leak can affect the info the rear lambda sensor feeds back to the engine ECU with potential impact on fuelling. The flexis, in my experience, tend to be more broken than they appear when both ends of the section are still attached and supported by the rubbers. Disconnecting the front end to allow more exploratory movement may reveal significant damage.
-
Looks like it might be ambient air temperature sensor, often mounted just behind front bumper.
-
Hmm, I agree. Possibly just lacking an employee with relevant experience, and not bothering to try to research it. @langers2k is another fella who may well have relevant knowledge.
-
I'm pretty clueless on the mileage adjustment side of things, but vaguely remember once reading that mileage can be increased on secondhand clocks but not decreased. Was the replacement cluster you acquired higher mileage than your original? @hutchysrs50 is clued up on this stuff if I remember right.
-
YES Putting the switch in the thick brown earth wire would work just as well.
-
Does the car have RF remote central locking? If so, try holding down the lock button if you want to close windows.
-
Not sure how helpful it is, but the revision that was superseded by the part number you have was 3B2837015L.
-
If what seller supplies has 28 wires then there has to be enough, if not then do a count. There are other sellers selling the same thing for sometimes only £20, I'd be asking one of them how many wires they include if it were me.
-
Ask the seller how many wires are included before purchase. There are 28 positions that might be filled. I believe 26dipp was suggesting repair to existing broken wires by soldering in a new, 'extra' bit of wire between each/every broken pair of ends. That approach gives more working room and also more length than there was before, which will probably reduce the chance of the same wires breaking again in future.
-
I meant Skodas, and should have been specific.
-
Was wondering the same.
-
Or just put the correct type of bulb back in...
-
Download the fifth pdf in the list you'll find here https://www.briskoda.net/forums/files/file/76-mk1-fabia-workshop-manuals/ It's the circuits for early Fabias. Relay info specific to your engine code is probably findable by searching the pdf for AQW. Other relays may be listed near the end with fuse info.
-
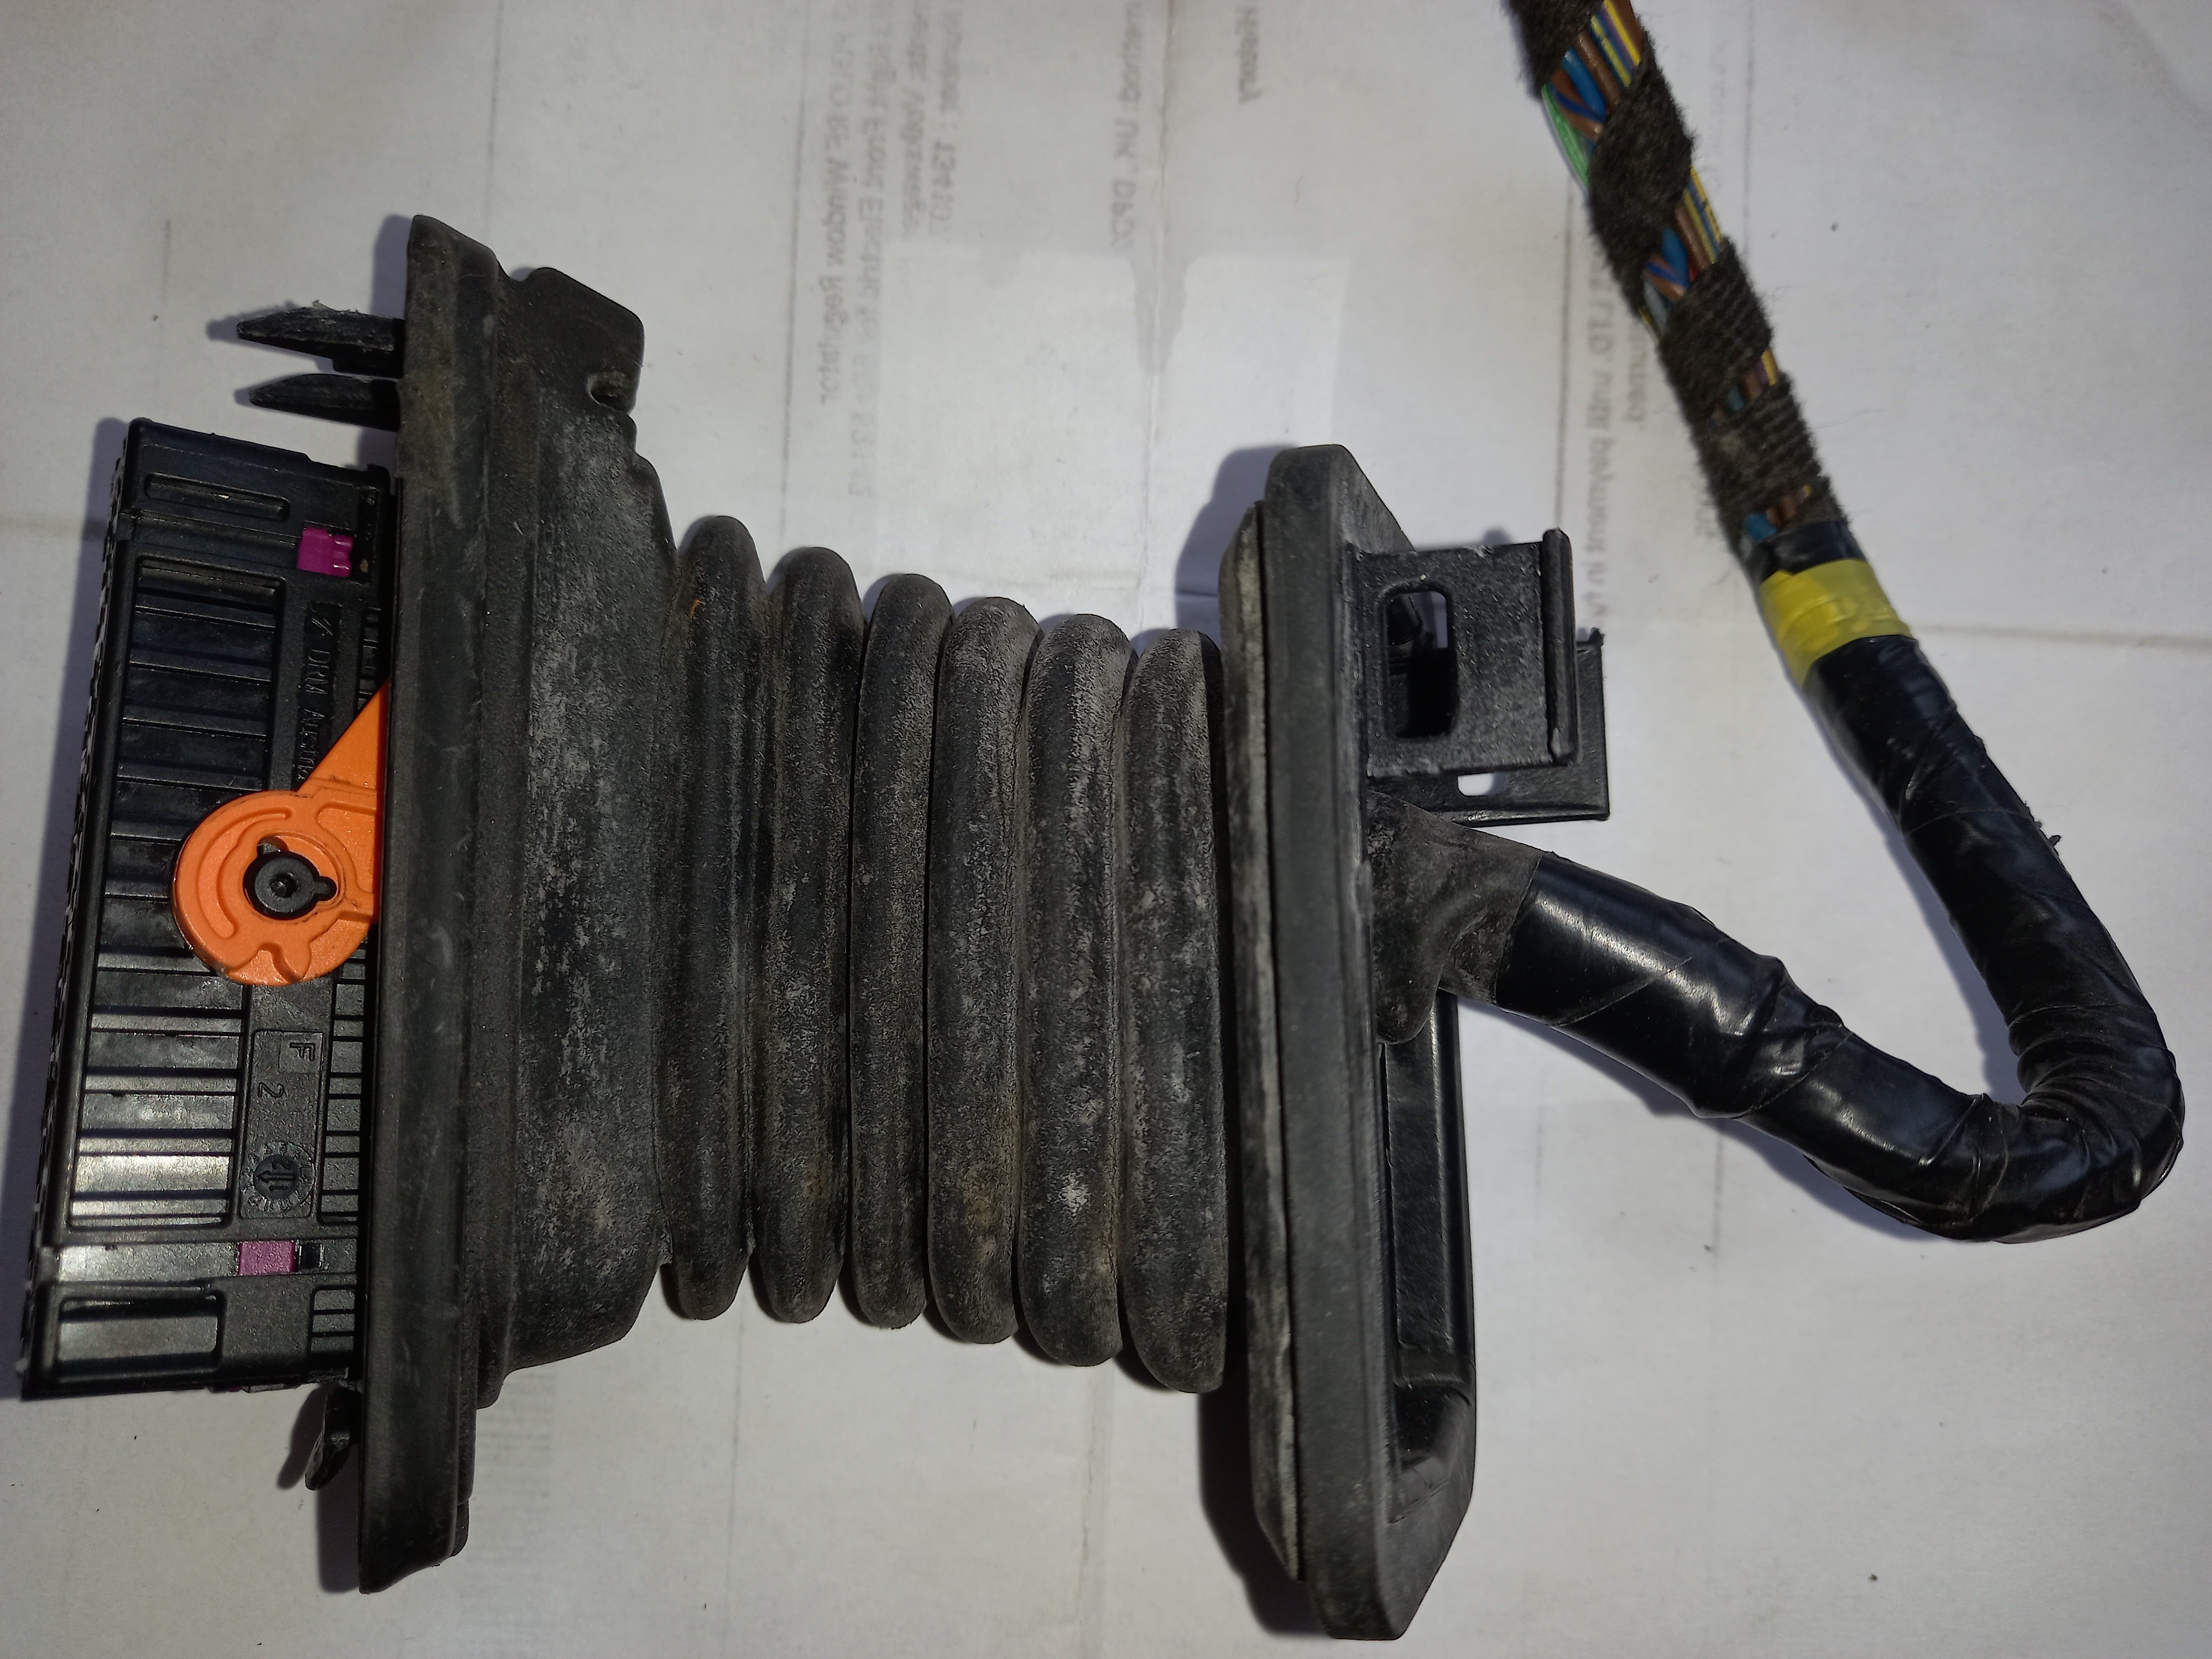
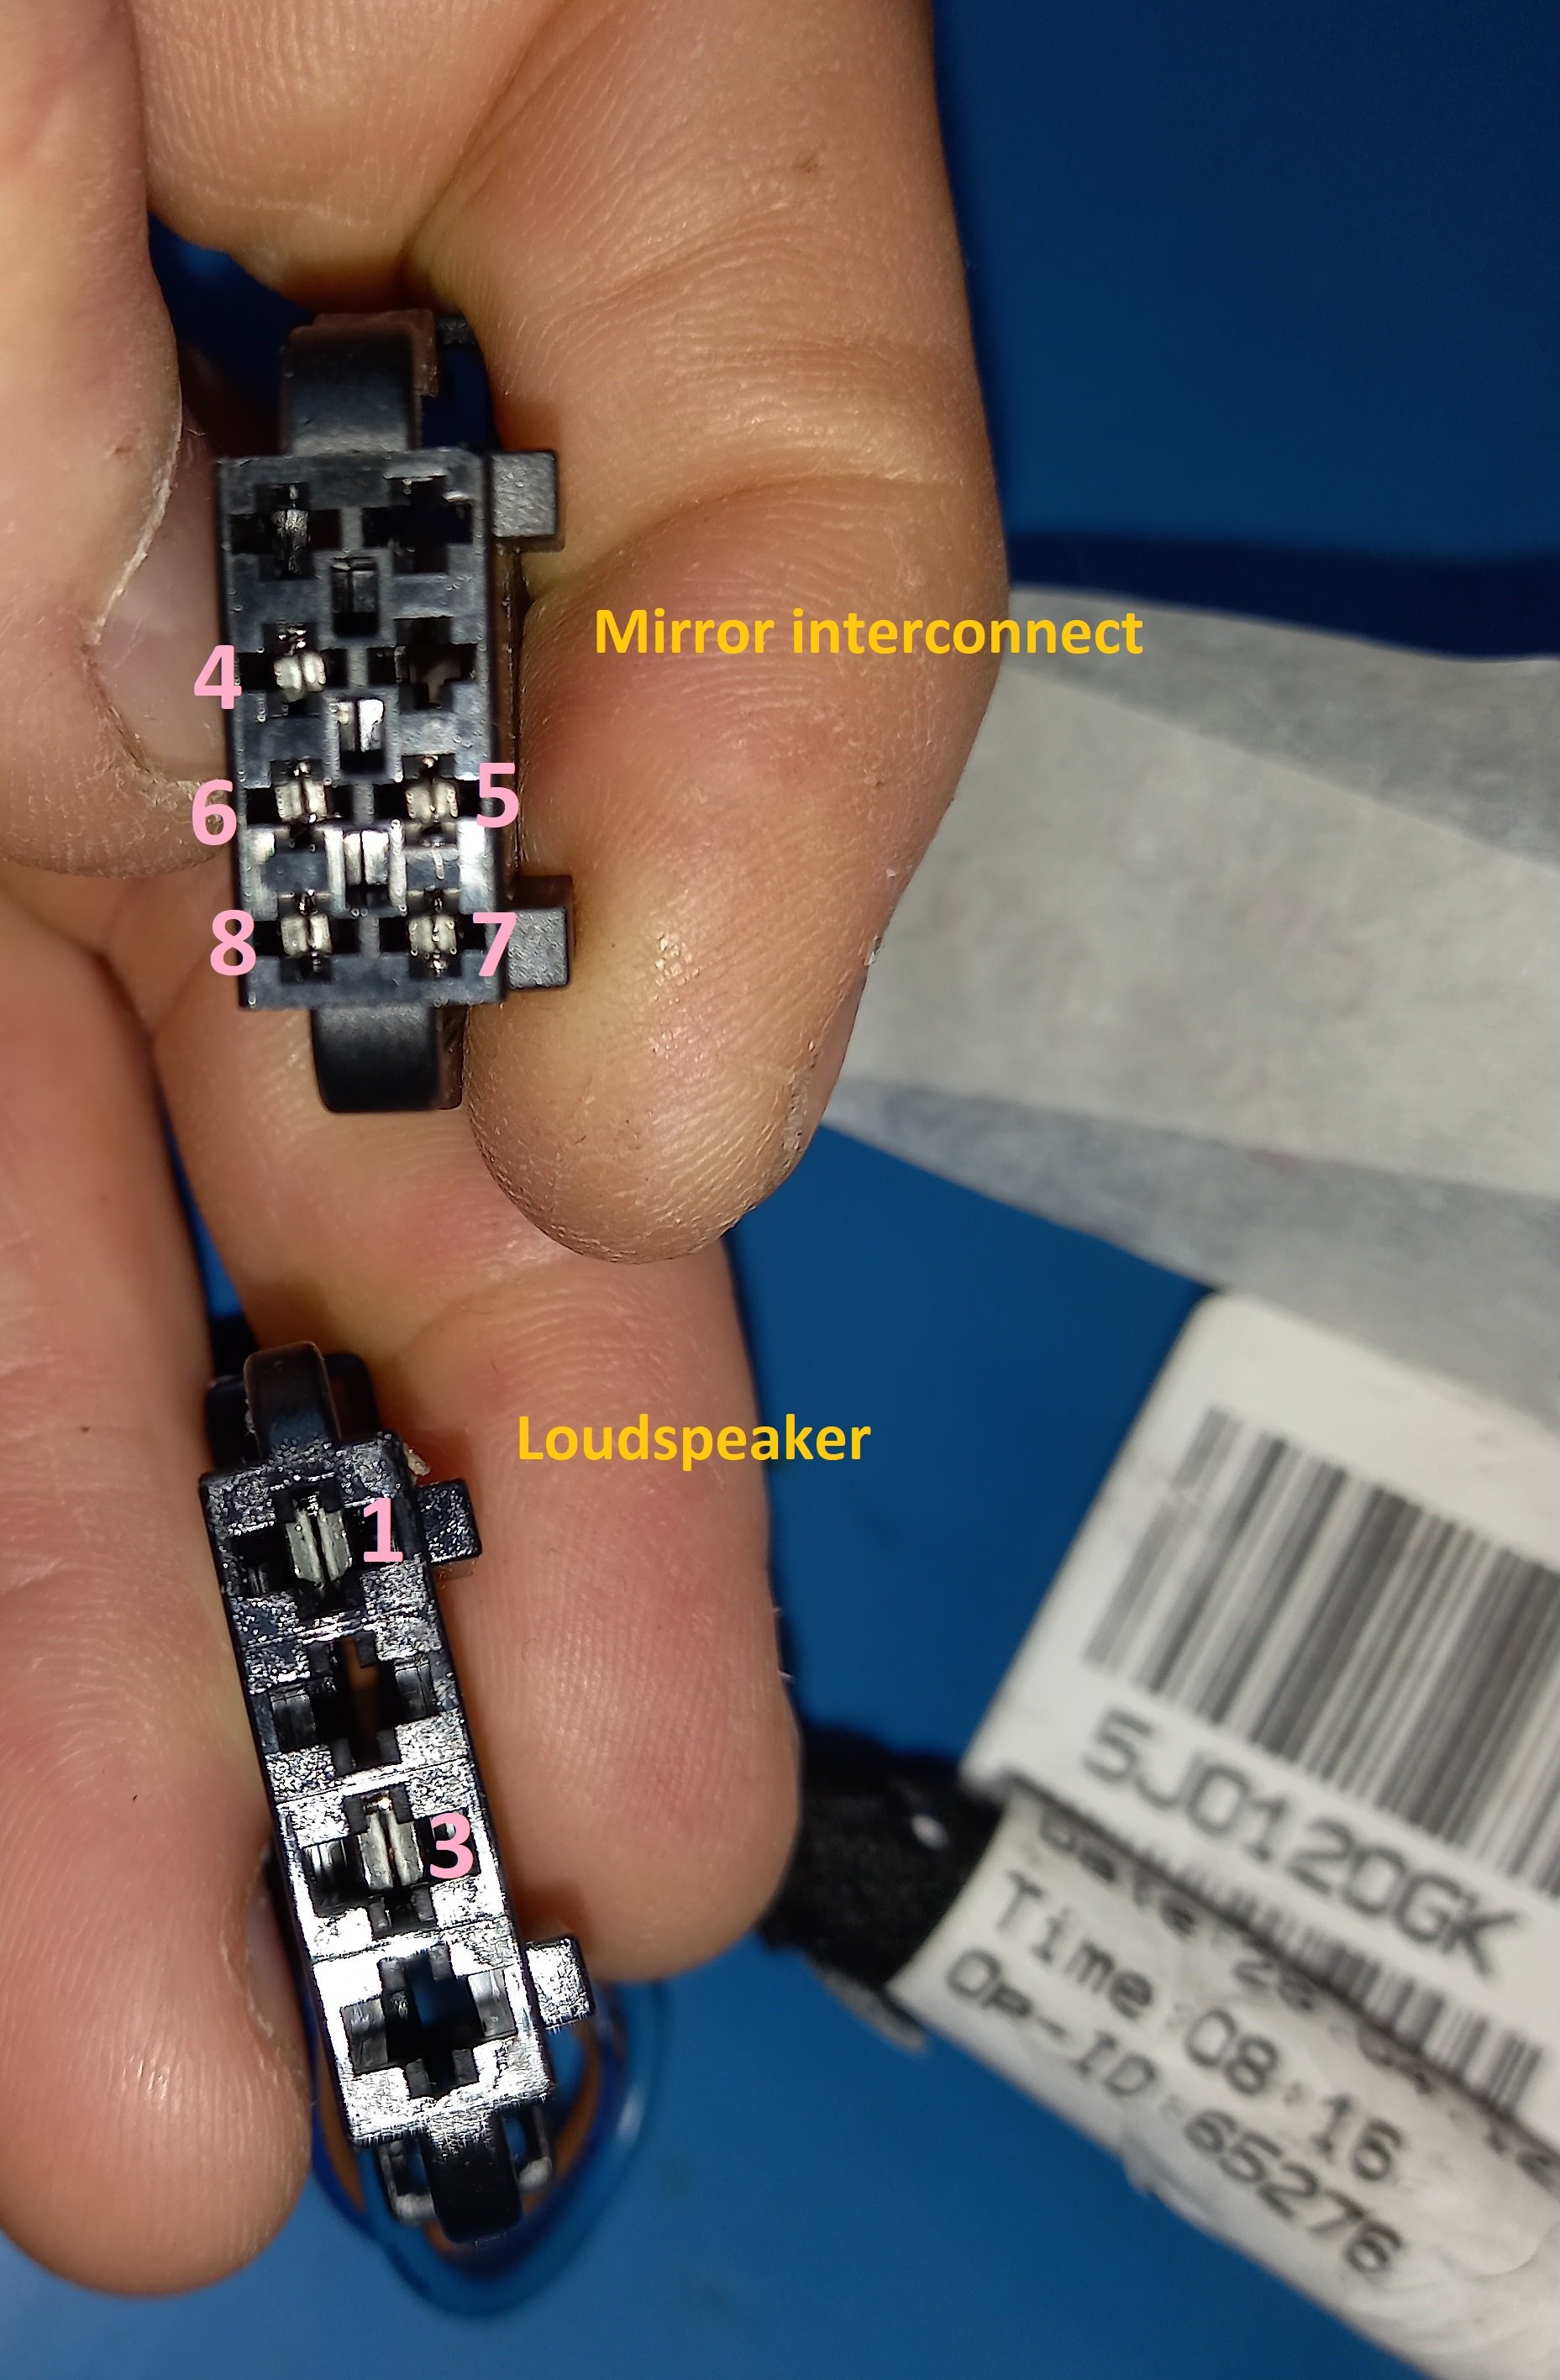
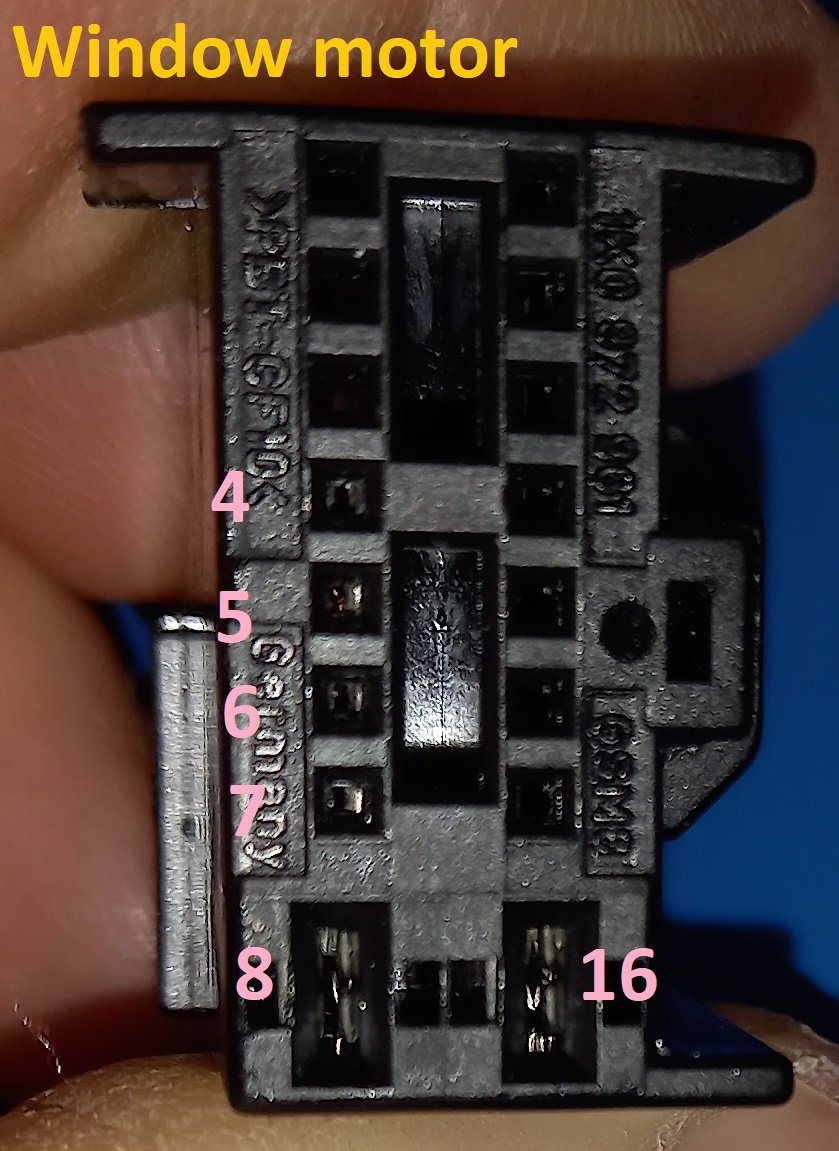
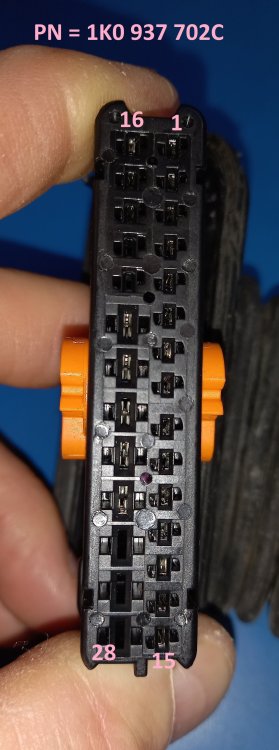
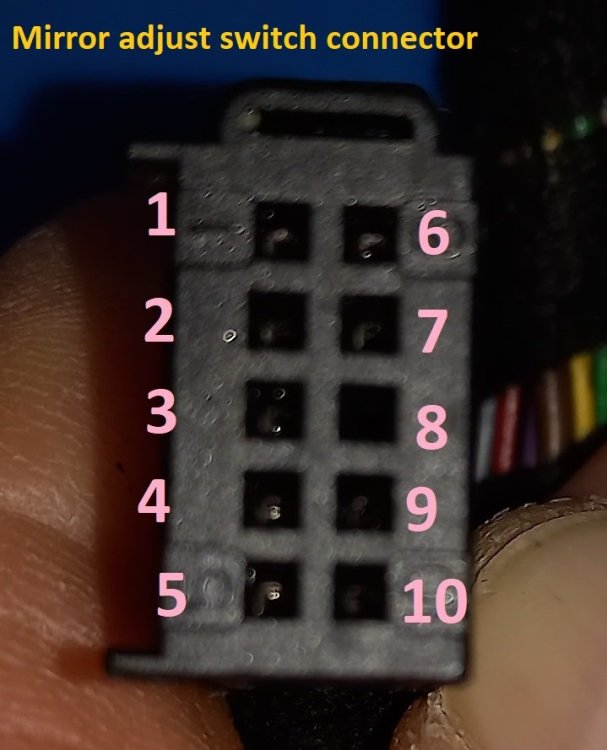
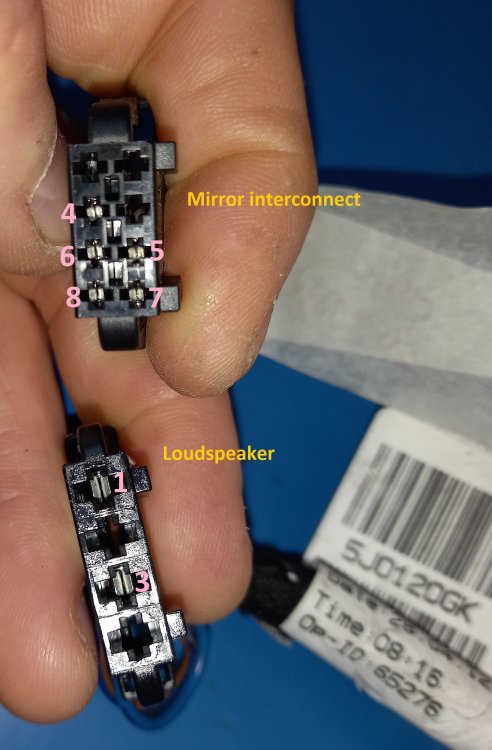
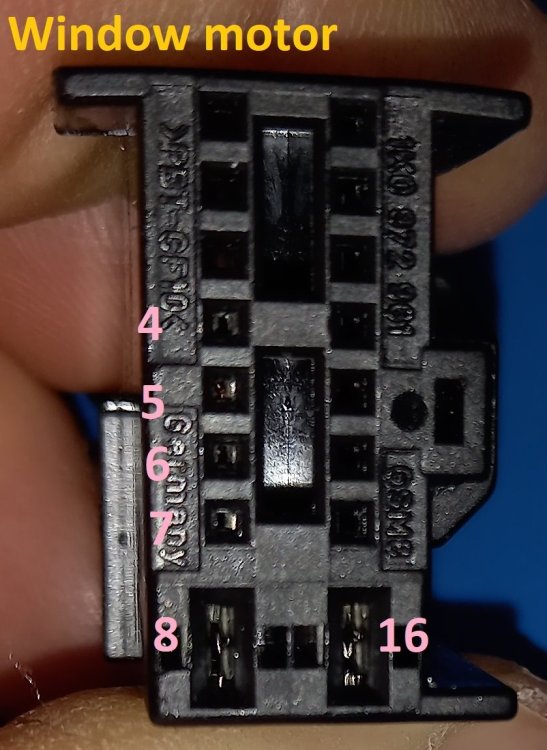
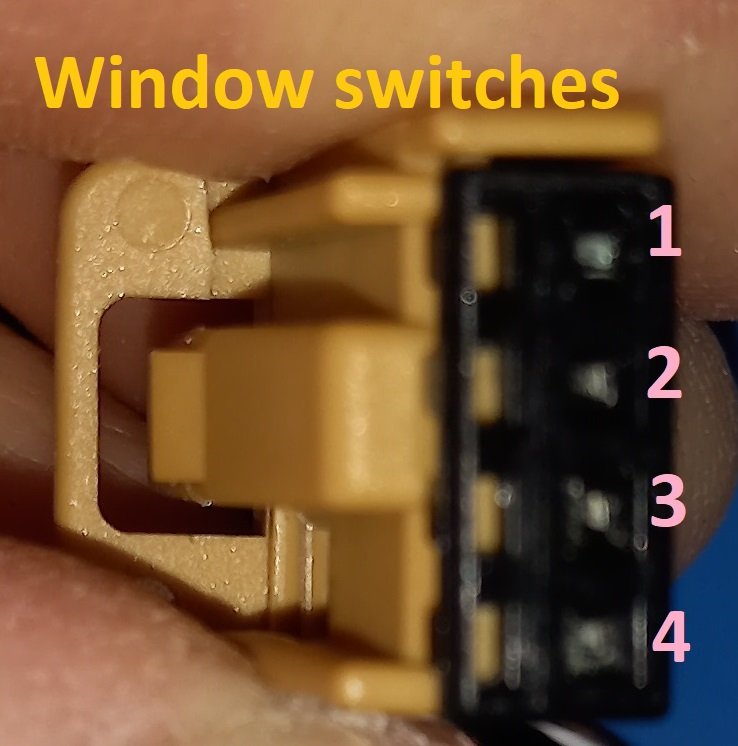
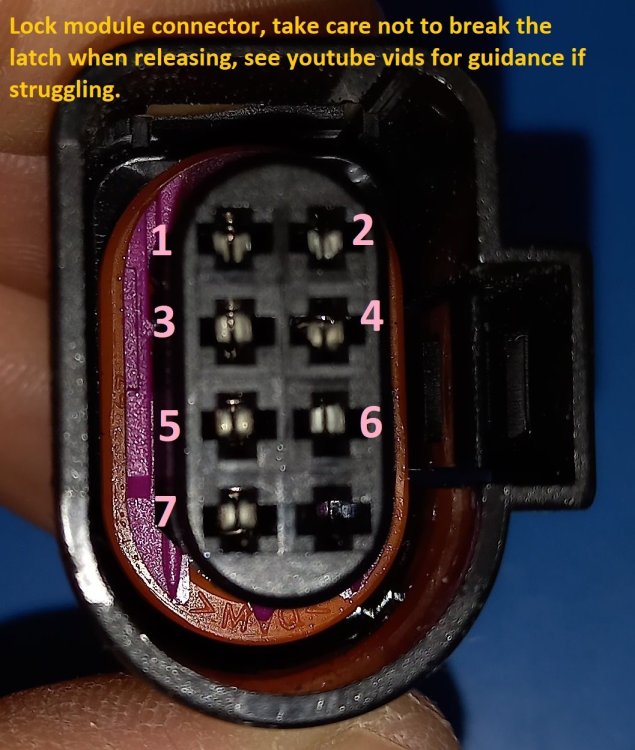
It's common knowledge that these looms frequently give trouble in mk2 Fabia and others with similar connector/boot type, and it's not too tricky to eyeball the wiring under the rubber boot for obvious breakages in the door hinge area. Measuring wires end to end with a multimeter to check continuity may add reassurance that the wiring is really intact, and potentially help to locate faults to more exact locations. For example, the door lock module. If all the wires are measured as reaching their destinations it may save unnecessary loom replacement, or confirm loom fault if they don't. The photos and tables here relate only to one particular variant of loom, with part number 5J0971120GK from 2012 (the letters at the end being not always simply a 'revision number' but may actually be the only difference in the part number of functionally different loom variants). Thanks go to @jps711 for permission to use this loom for photos and information gathering during repair. If anyone wishes for info on looms with different part numbers, I may be able to help find the differences, and would welcome any unwanted/broken looms that might be cluttering up anyone's garages/sheds since replacement. For each I might receive I'd do dedicated wiring tables, with cross-checking against circuit diagrams. It's not completely straightforward to find the info via the circuits, as they are grouped by functions (e.g. mirrors, windows, locking), not 'here's the wiring diagram of the whole drivers door' for example. This is the area that always contains the faults, due to a poor design where the loom just bends back and forth with door movement, rather than a twisting action as used on earlier cars, with a vertical dog-leg in the rubber boot. The photos and wiring tables are from the 'destination connectors' points of view. I strongly recommend using short pieces of solid wire to temporarily insert into connectors at each measurement point, as many mulitmeter probes are not sufficiently fine to go in far enough to make good contact. Double check that the meter hasn't 'gone to sleep' or otherwise malfunctioned any time you don't get a beep when expecting one, do this by shorting the two probes to each other. This is the pin numbering arrangement of the door disconnect connector, viewed on the mating face. Be aware that the rotating orange latch needs to be in the open position to disconnect and reconnect this from/to the A-pillar male counterpart. Attempting to refit with the latch in the wrong position will fail, and can cause pin damage, possibly. On to the nitty-gritty of the pinouts. All photos are as above, of the mating face of the connector, observe the housing features to ensure same orientation: Pin number at this connector Wire colour(s) Pin number at 28-way door disconnect, and/or other conn 1 Blk/yel 9/28 2 Wht/blu 6/8 at mirror conn 3 Brn 16/28 4 Gry/blu 8/28 5 Blk/blu 7/28 6 Wht/grn 11/28 7 Wht/blu 7/8 at mirror conn 8 No connection 9 Grn 12/28 10 Wht/grn 8/8 at mirror conn Pin number at mirror interconnect connector Wire colour(s) Pin number at 28-way door disconnect, and/or other conn 1 No connection 2 No connection 3 No connection 4 Blk/red 13/28 5 Brn 16/28 6 2x Wht/blu 10/28 and mirror sw 2/10 7 Wht/blu mirror sw 7/10 8 Wht/grn mirror sw 10/10 Pin number at loudspeaker connector Wire colour(s) Pin number at 28-way door disconnect, and/or other conn 1 Brn/blu 22/28 2 No connection 3 Blu 21/28 4 No connection Pin number at Int monitor switch connector Wire colour(s) Pin number at 28-way door disconnect, and/or other conn 1 Blu 17/28 2 No connection 3 Red/blk 15/28 4 Brn/yel 18/28 Pin number at WM connector Wire colour(s) Pin number at 28-way door disconnect, and/or other conn 1-3 inclusive No connections 4 Grn/blk window sw 4/4 5 Gry/wht 5/28 6 Wht/blk window sw 3/ 4 7 Brn 16/28 8 Thick brn 24/28 9-15 inclusive No connections 16 Thick Red/wht 25/28 Pin number at window switch connector Wire colour(s) Pin number at 28-way door disconnect, and/or other conn 1 Brn 16/28 2 Gry/blu 8/28 3 Wht/blk 6/16 at Window Motor 4 Grn/blk 4/16 at WM Pin number at lock connector Wire colour(s) Pin number at 28-way door disconnect, and/or other conn 1 Brn 23/28 2 Blu/yel 1/28 3 Vio/yel 2/28 4 Grn/yel 3/28 5 Yel/brn 4/28 6 Brn 16/28 7 Yel/blu 6/28 8 No connection Please let me know if you find errors or omissions in the above, or if you know how to format it so the tables are alongside the photos! Cheers Pete


-
Yes, compare the photos in some ebay listings for replacements and you'll see that there are bits broken off/ missing on yours which aren't readily repairable. I wouldn't bother spending money on replacing it if I were in your position.
-
I doubt your car has wheel sensors? Isn't it the indirect system which uses the ABS sensors? I thought only very recent cars used anything else.
-
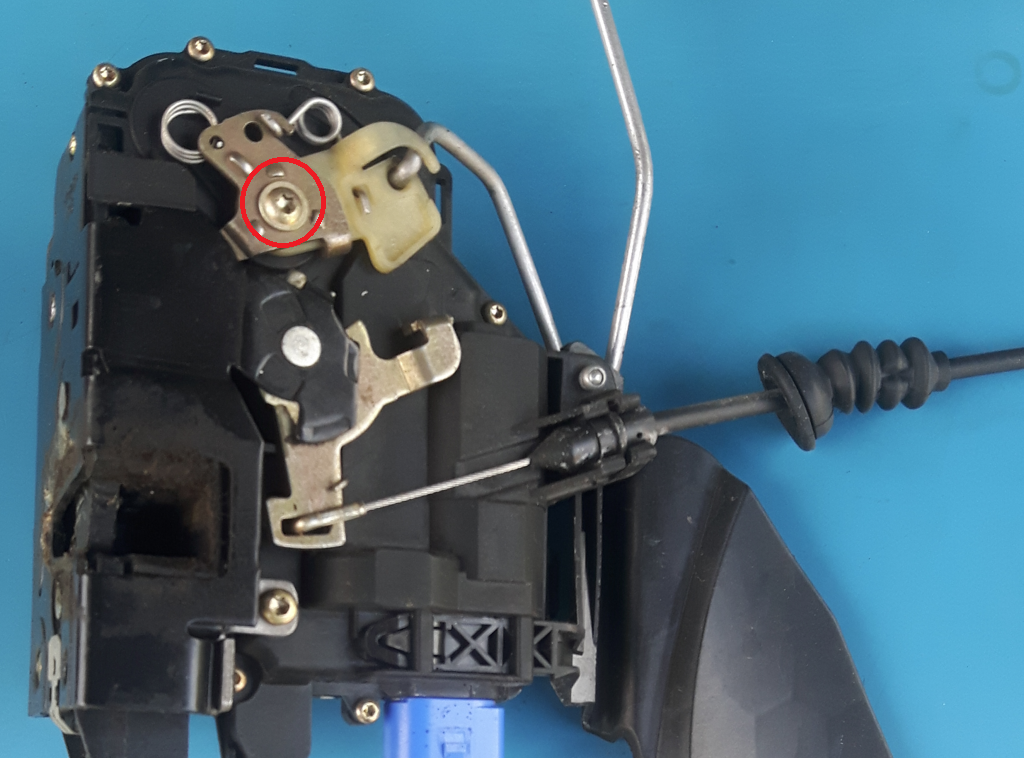
@Nick-w You don't seem to have understood the link I supplied. The way I read it, if you drill a suitably positioned hole on the inside of the door metalwork, you can get a Torx screwdriver through it onto this screw, which then allows you to unlock the door directly without electrical help.