




Breezy_Pete
Sponsor
-
Joined
-
Last visited
Everything posted by Breezy_Pete
-
No worries.
-
It probably is the relay, because when they wear out the problem is the contacts that carry the high current, not the coil. so just because you hear clicking doesn't mean there's an adequate connection being made. It does confirm that the stalk signal is being received and correctly acted on though. It sounds like you've ruled out virtually every other possibility except perhaps wiring damage between control unit and wiper motor. To check this you could unplug the relevant connector from the control unit (with everything off, keys not in ignition) and link two contacts of the loom connector to simulate the relay being switched on and conducting well. See here: https://www.briskoda.net/forums/topic/488162-strange-windscreen-wiper-behaviour/?do=findComment&comment=5480720 (see also my next post in that thread too, after I'd tried it on my car). If that results in wiper function being OK, you face either replacing the relay on the circuit board, or replacing the whole control module (needs minimal coding, none if the donor car has exactly the same options). Relay replacement is described here: https://www.briskoda.net/forums/topic/473170-wiper-relay-replacement/
-
Best to start a fresh thread, since you've ruled out the relevance of this solution.
-
Look at the image of one of these DPF pressure sensors in the amazon link in the post above your first one. Find an item that looks the same in your engine bay, inspect it for obvious signs of damage as a first step.
-
I don't think the current UK MOT involves any functional check of the shock absorbers; just visual. @Ju1ian1001 may be able to confirm?
-
You could probably drill the head off, if you're determined to remove it , then you may have enough left to get mole grips on once the drum's off.
-
Put point of punch into the outer end of one of the mangled bits of the screw head. Hold it at a suitable angle to be able to knock it round anticlockwise with a hammer on the other end!
-
Tap it round with a punch and hammer. Shouldn't be too difficult.
-
Looks like driver's side shoes are quite new compared to other side. While you've got access, and with handbrake released inside the car, check (both sides of car) that the pivots move OK at the top of the levers inside the drums that the handbrake cables pull on. It's quite common for those to seize up, giving handbrake unevenness. This is how things should move: 20200422_154952.mp4
-
Try this guy: Home | Coverdale Car Parts Can't imagine what a new genuine one would cost though; be sure to be sitting down. Would you not consider one from an ebay scrappie? You could probably buy several of those before you'd spent as much. For some reason I assumed you meant the cabin fan, but maybe you meant radiator fan?
-
Each page of circuit has a sequence of numbers running along the bottom, cropped out of your image unfortunately. The numbers in the rectangles tell you which of these numbers at the bottom of the page to go to to find the continuation of that wire. Often but not always on a different page of the circuits. When you get to that page/number referenced in the rectangle, you'll find another rectangle referring you back to where you just came from. It's explained in this document: CFD explanations.pdf
-
Thanks. An engine change sounds drastic, but is surprisingly easy (given a safe way of lifting and supporting one, i.e. an engine crane, which my workplace happens to have). Nuts and bolts, plumbing and some electrical connections. Much, much easier than the messing about with taking apart the old one and laboriously rebuilding it; and far more successful, with the benefit of hindsight. Really wish I'd listened to @StevesTruck and taken the plunge earlier. Timing was very lucky for me; a low mileage, surprisingly cheap engine came up on ebay days before the owner/main driver said "my engine's sounding really, really bad recently". It passed MOT a few days after my last post with pleasingly low emissions numbers, and it runs beautifully smoothly and quietly.
-
Except if there are indeed differences within head or block. For example BBY and BBZ have different cams, I believe. Need to know the engine code of the Octavia engine in order to look for any such differences.
-
All Fabia 1.9SDI engines are code ASY, so that is what you have.
-
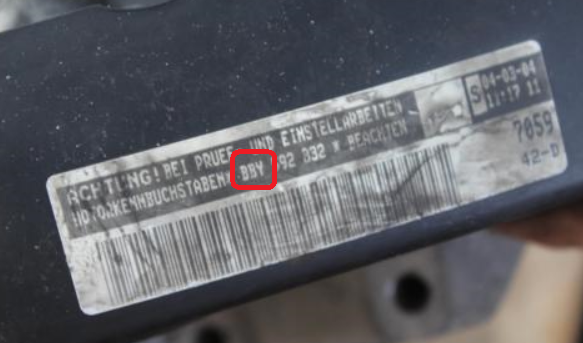
Usually on the sticker on the upper cam-belt cover. (Example below; different code though, in that case BBY)
-
The only Skoda to feature the ASY code engine is the Fabia, so I doubt it will be a drop-in replacement. Seat Cordoba and Ibiza, and VW Polo are the other possible sources of an ASY-code engine, which may widen your searches a little, depending on what is available in your country.
-
It's a shame your engine isn't an earlier (AZQ code) 1.2/12v or it would already have a wideband precat oxygen sensor. I recently noticed that the BME code version reverted to binary sensing. Had always wondered up until then what the difference was. The PCV system may be a problem for this set-up. Expect seals to pop and oil to leak.
-
Sounds very familiar.
-
Have you got a multimeter to check battery voltage before and after starting?
-
A cheap handheld scantool or VCDS Lite may well help you to identify what is wrong.
-
Not any more. G12Evo has replaced it I believe.
-
What he ^ says is great advice. Turns out that none of the fuses you list seem to be engine-related so that info may not have been essential after all. Is the radio the factory original? Any tinkering in that area is usually a prime suspect.
-
Look for a sticker on the upper cambelt cover, that will have it at the start of the engine number if you have such a sticker.
-
Phone them up instead of using their rubbish online parts by reg number system. The staff have a better interface that they can consult to get closer to the correct parts, I believe. Or use another motor factor before all such choices disappear and ECP have a monopoly.
-
That would suggest that you'd been neglecting the normal maintenance requirements of the car.


