


Leaderboard
-

moley
Resident Member33Points10,120Posts -
shyVRS245
Locked21Points0Posts -
Westbury63
Members8Points1,199Posts -
MikeTheThinker
FREEDOM7Points8,484Posts


Popular Content
Showing content with the highest reputation on 06/02/21 in Posts
-
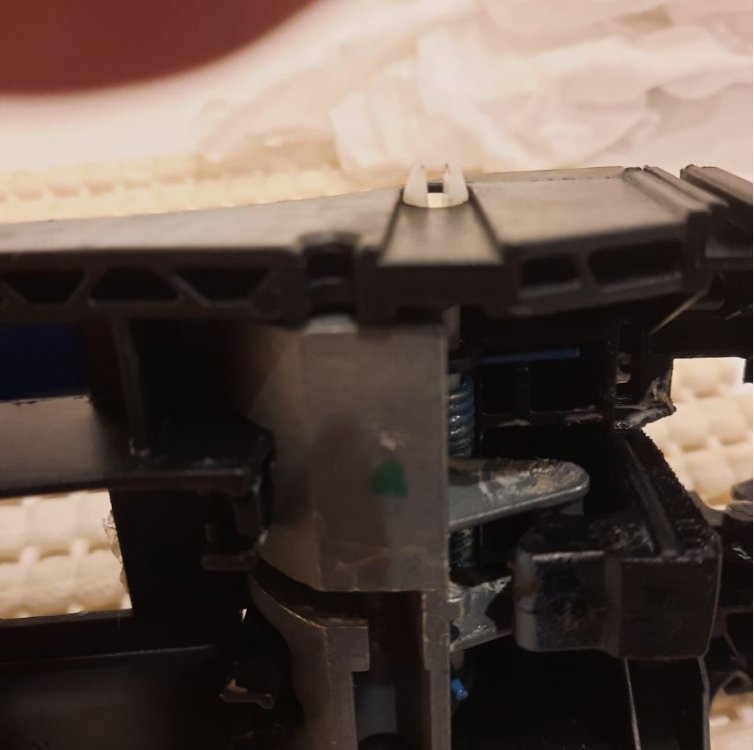
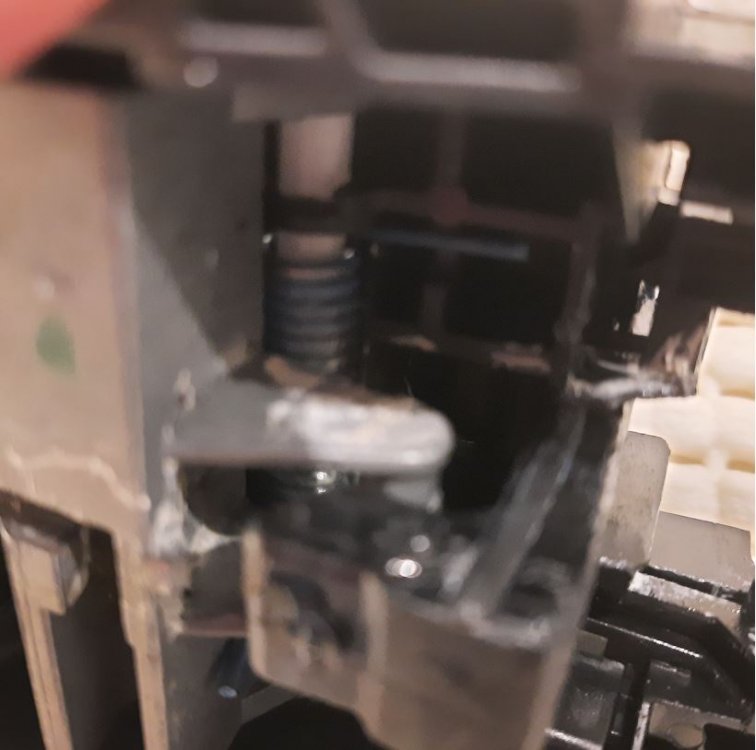
Hi When I bought my 2016 Superb I knew it had a passenger front door handle issue because it pulled out too far when I went to open the door! So after buying the car I knew I had to tackle the problem. I looked at uTube vids to check how to put the handle back in. Pulling the end cap on the backplate with a hook, seemed straight forwards enough. The handle would work OK for a while and then one day it came out again. This happened several times and I realised the backplate needed replacing as some glue could be seen from a previous repair. So I got the new plastic backplate (£23), fitted it and all seemed well again.....for a while. Then one day while washing the car, it pulled once more. I left it like that till a DSG oil service at Heritage Skoda in Bristol. They popped it back in and quoted me to properly fix the problem, £426 for a new KESSY handle, to paint it and fit it! Too much for a door handle that doesn't get used much. So today I took the handle off and mated it to my old backplate to see what the issue really was. All it seemed to be was that the "hook" that connects with the cable pull on the backplate sometimes worked and sometimes it didn't depending on how you pulled the handle. Pulling left seemed better than a 'straight' pull. There are mm in it between the hook of the handle "grabbing" the spring latch in the backplate and slipping off causing the handle to pop out. The end cap also showed some wear. Plastic on plastic with no lubrication. So my solution... Was to put the hook end of the handle into a bowl of boiling water. At the same time applying pressure to bend it in the hook direction. Finally cooling it in cold water. After several goes the hook has moved several mm left , so it now contacts the spring latch perfectly. I will order a new end cap to ensure the hook stays close to the spring latch through out operation of the handle. Cheaper than £426!!! So if anyone else has this issue, try this first. Take the handle out and perform the above. Will take less than an hour and will solve your problem without spending shed fulls of dosh! I am still at a loss as to why the drivers side rarely seems to get this problem especially when it gets used so often. Maybe it's because most people are right handed... this suits the design of the drivers door. This doesn't work so well on the pax door. Maybe always opening pax door with left hand would reduce the problem...hey ho!
 2 points
 -
2 pointsCould the competitive order get shaken up this year? As usual teams are driving a coach and horses through the rule book. Originally for cost cutting reasons the 2020 cars were to carry over to 2021. Then Pirelli couldn't cope with the cars development so a downforce cut was mandated. Then Mclaren have a new engine needing major modifications which suspicious rivals think will end up being a new car. Now FI/RP/Aston Martin have built a completely new chassis (and are allowed to upgrade bought in 2019 parts to 2020 ones). Does this mean AM are going to pretty much run the 2020 Mercedes? Waiting for the RedBull protests already 🙄2 points
-
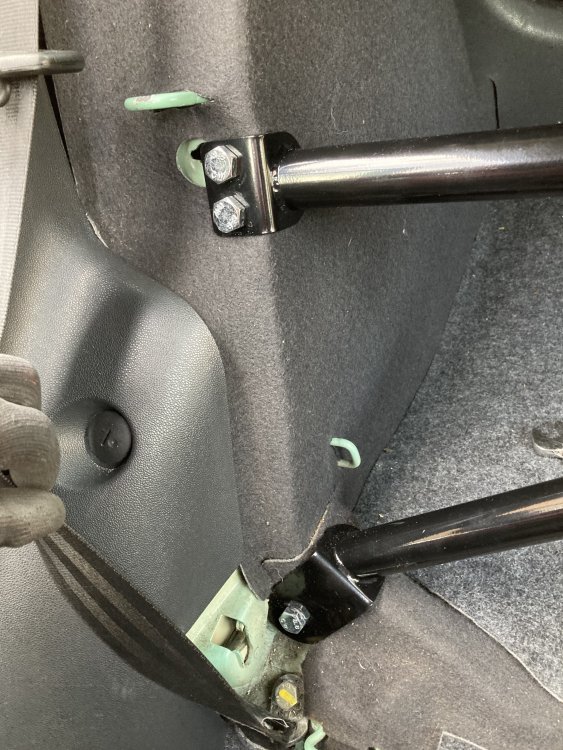
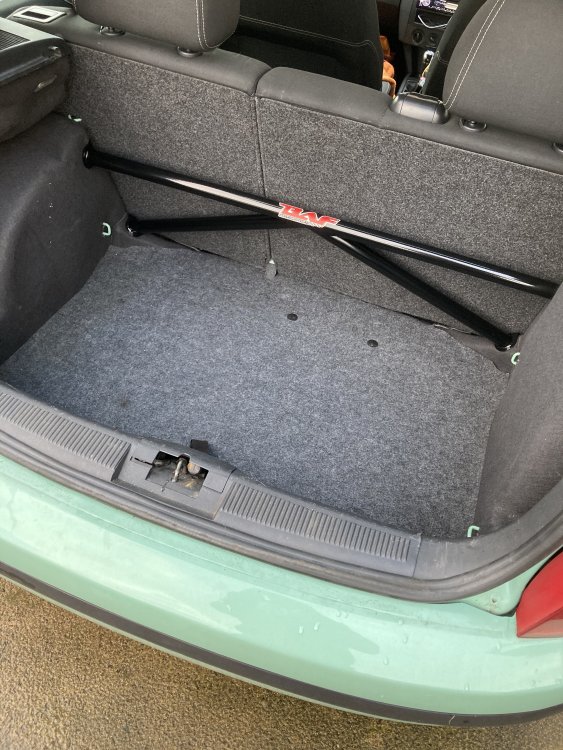
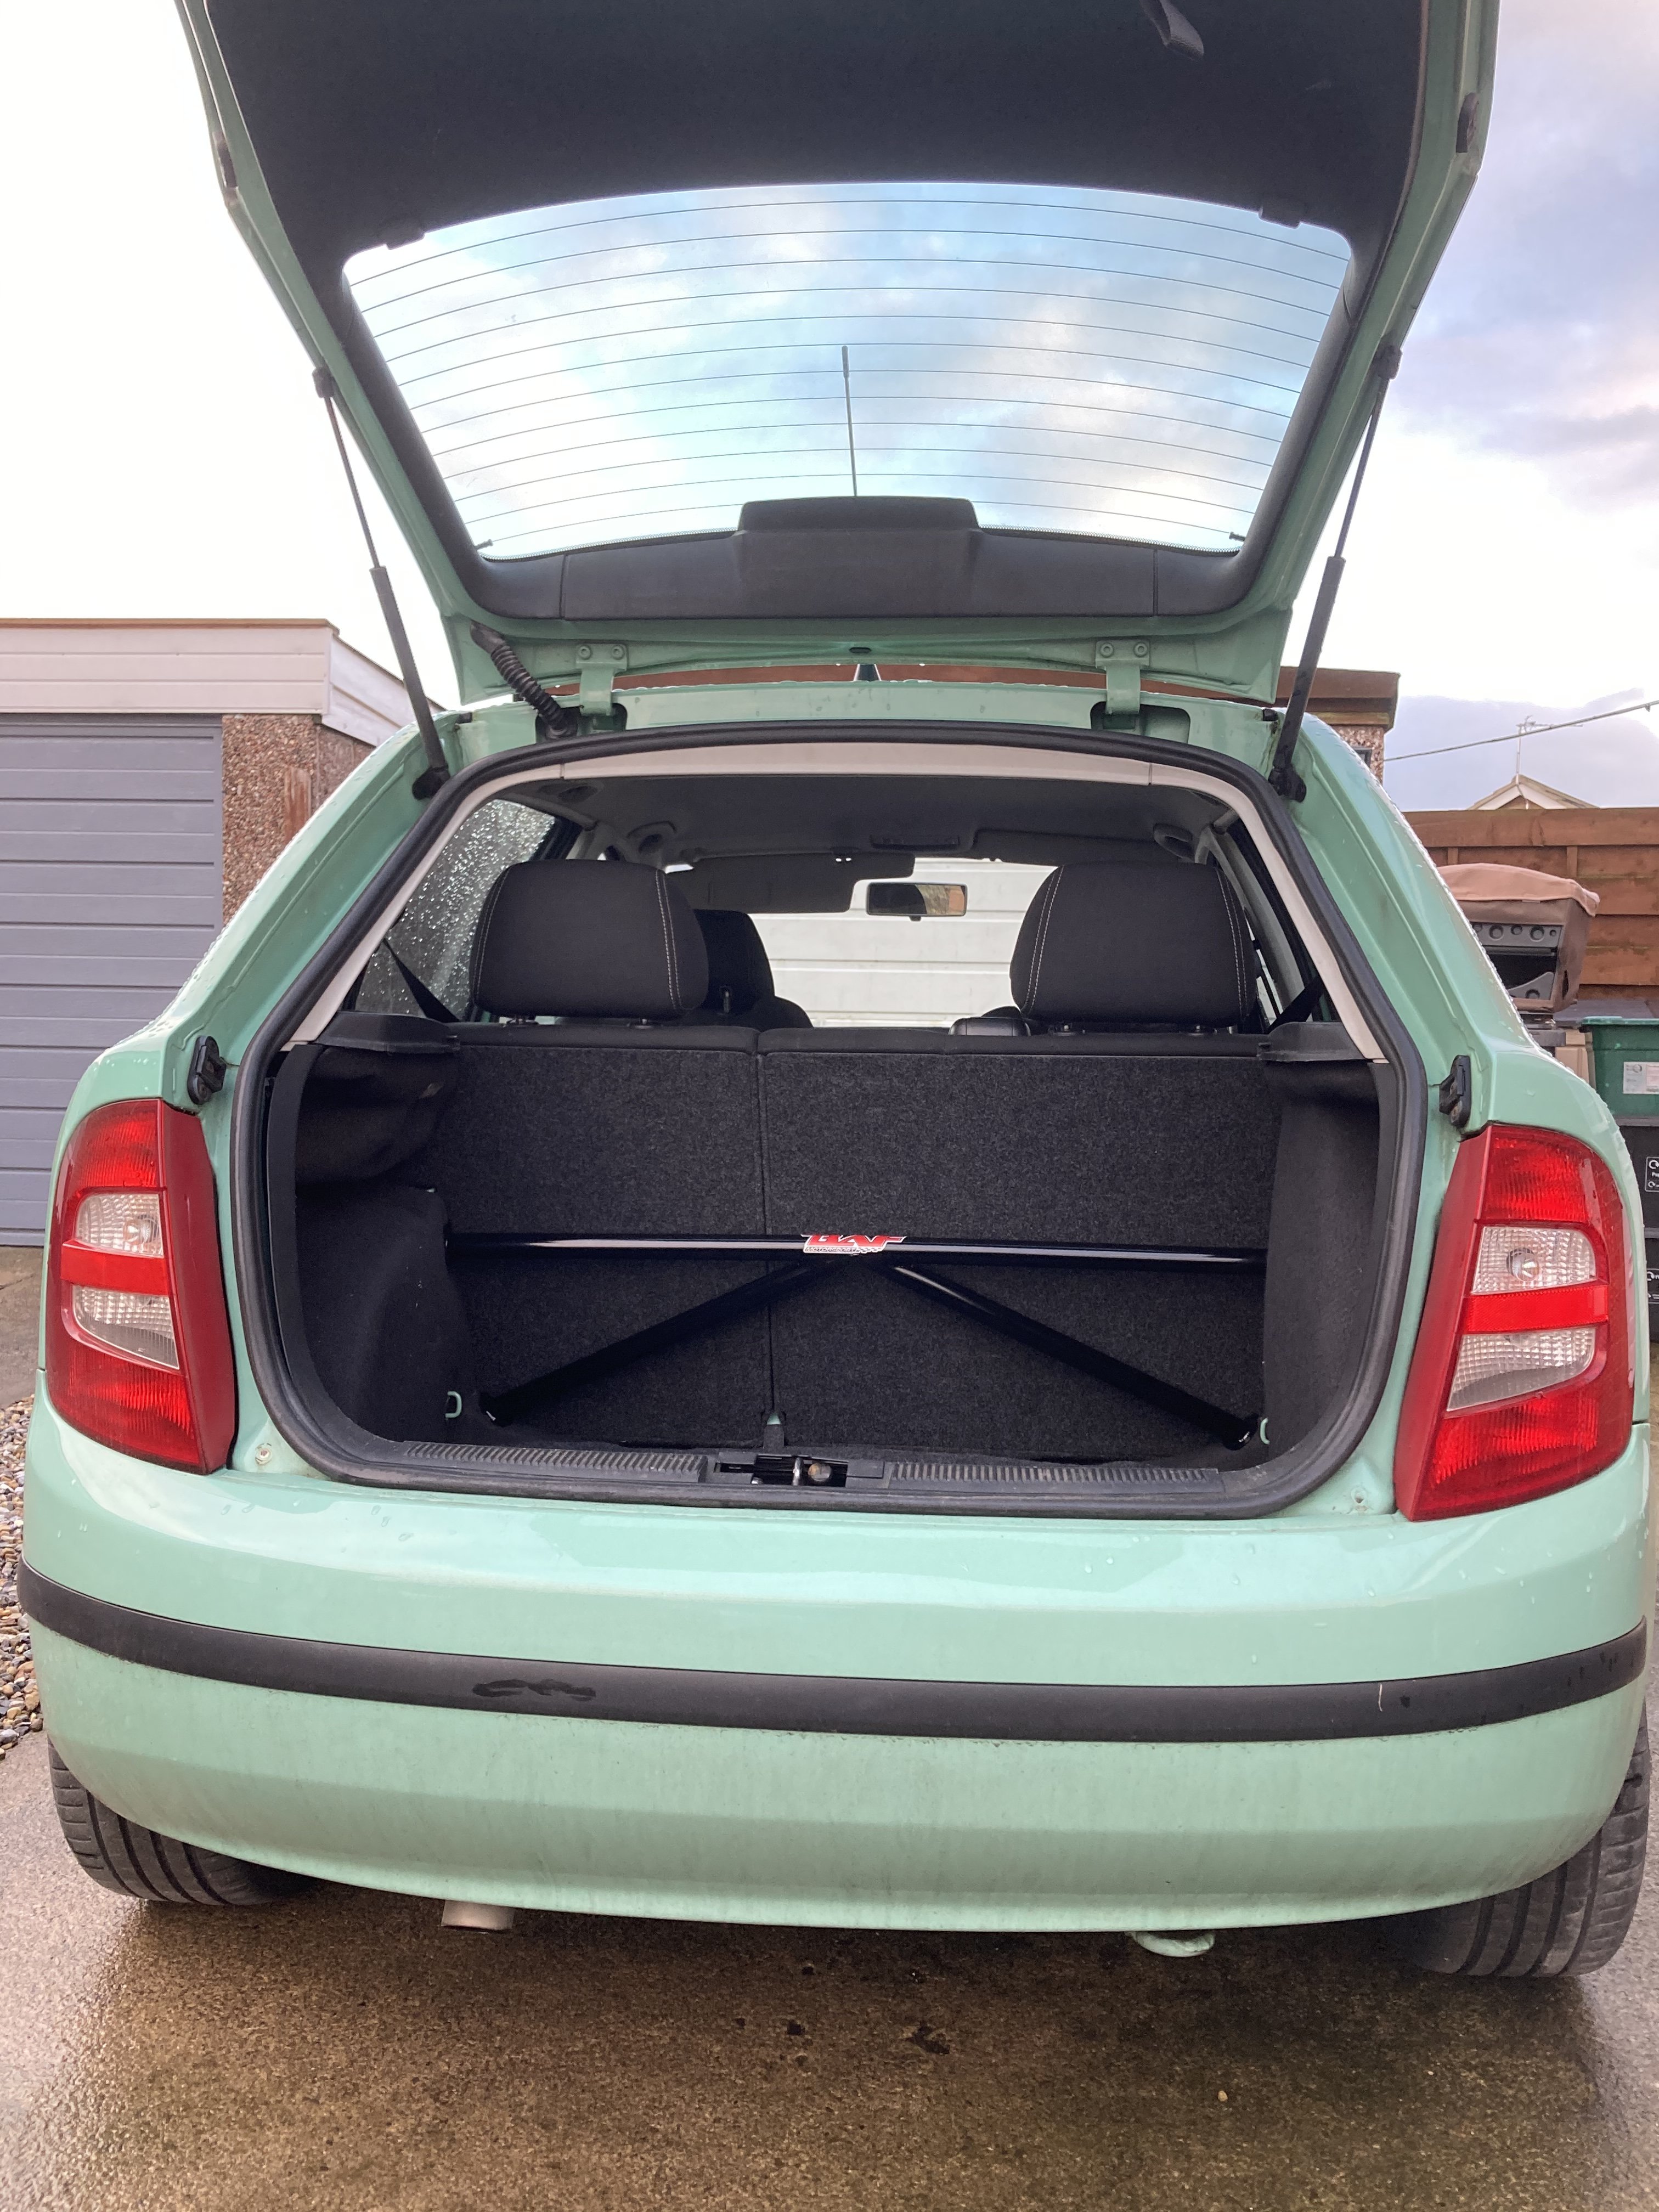
Fitted a baf motorsport rear strut brace, nice bit of kit


 2 points
 -
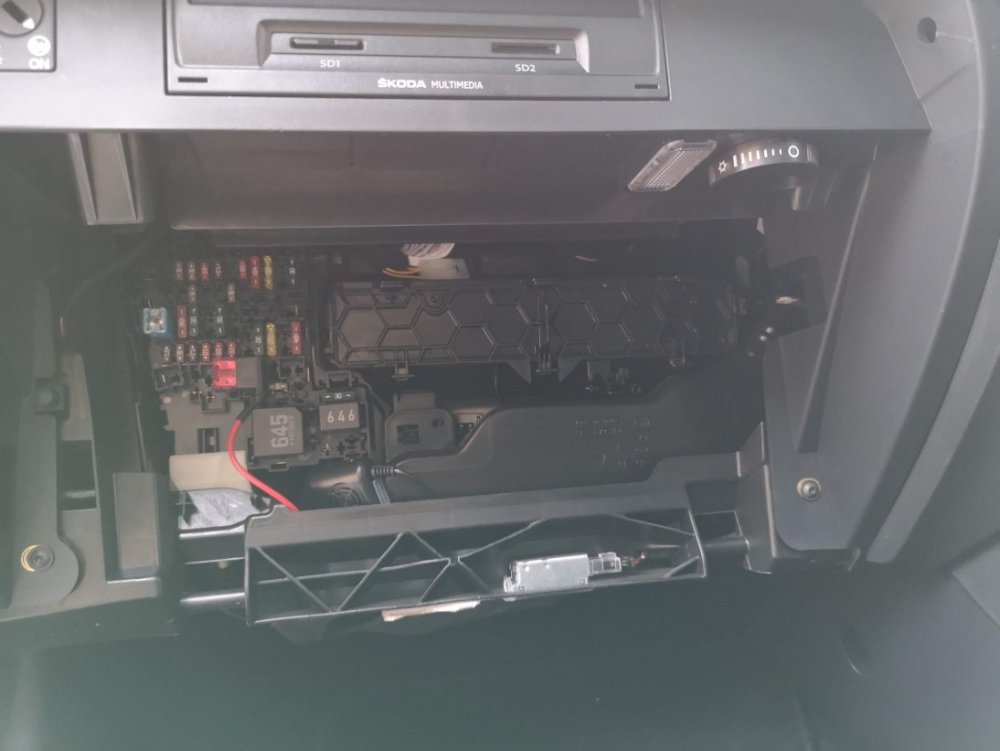
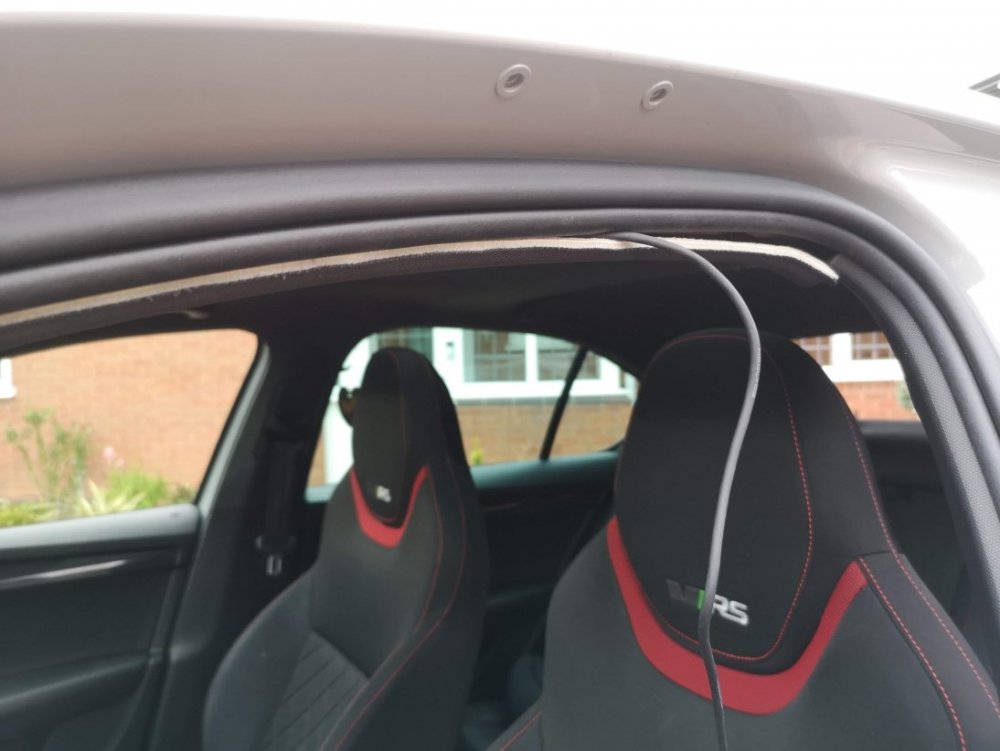
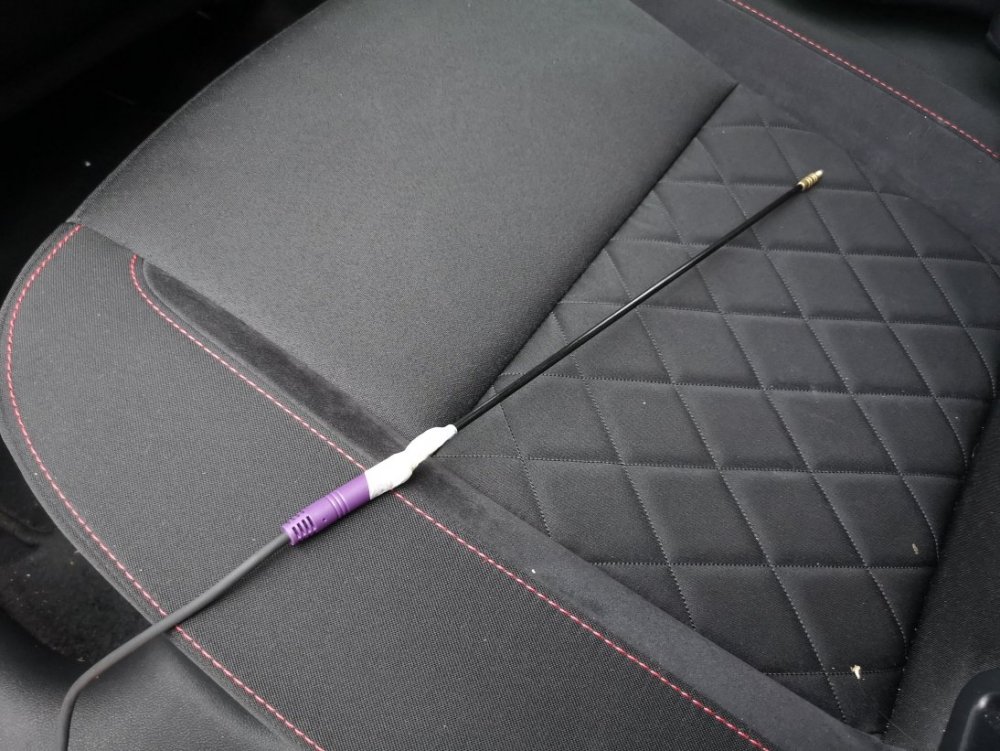
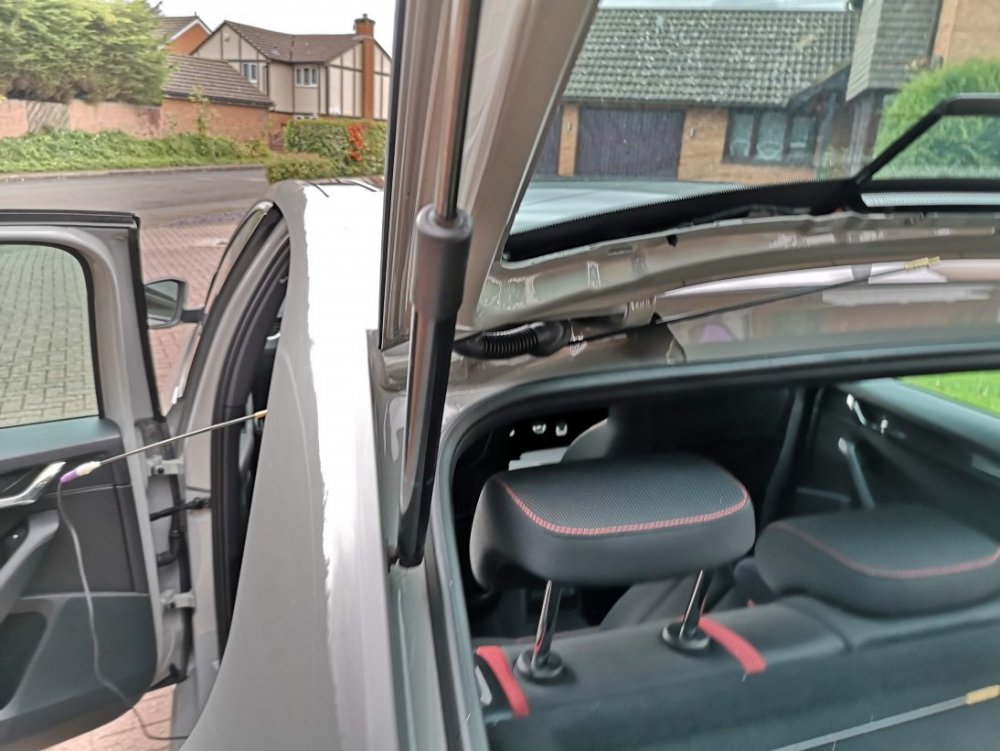
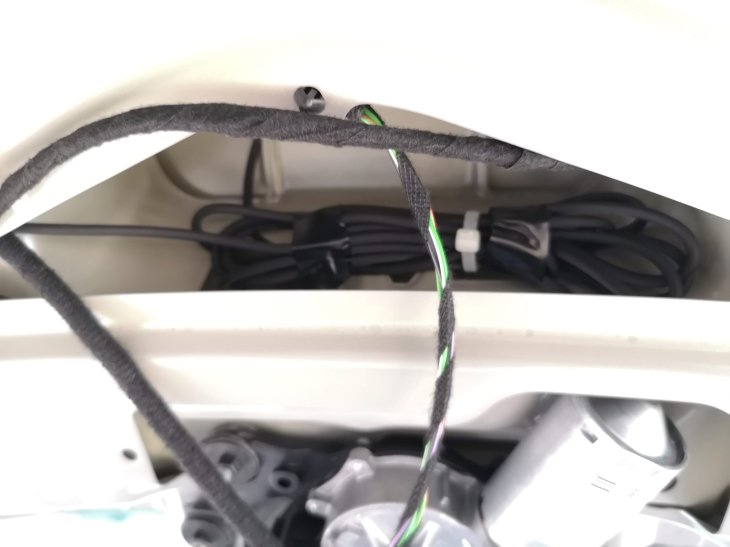
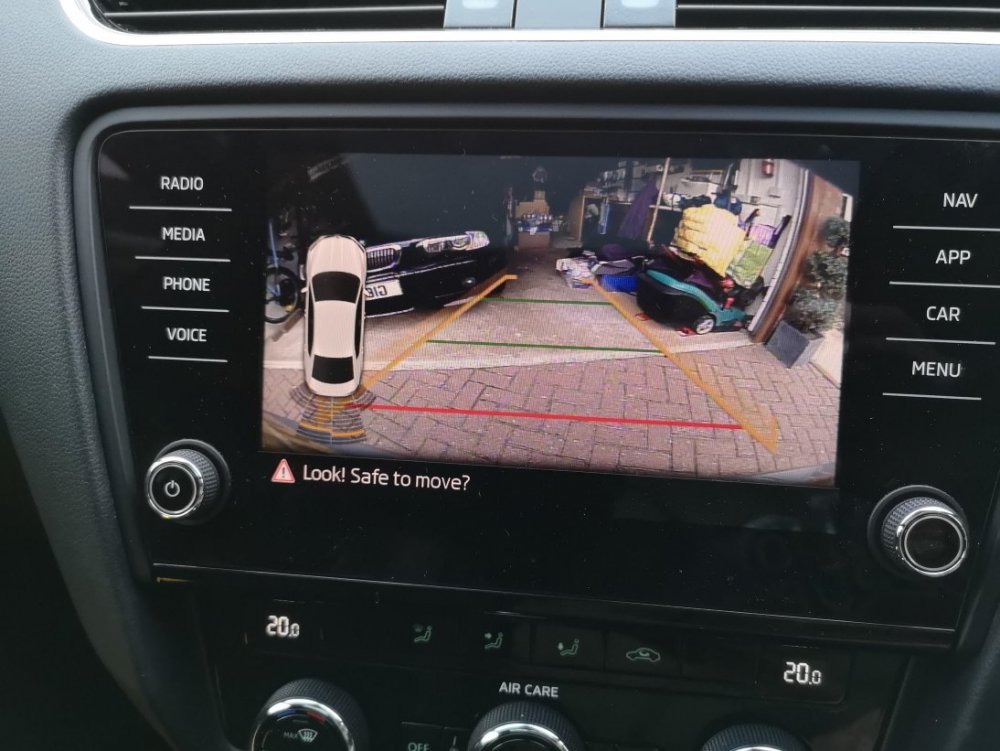
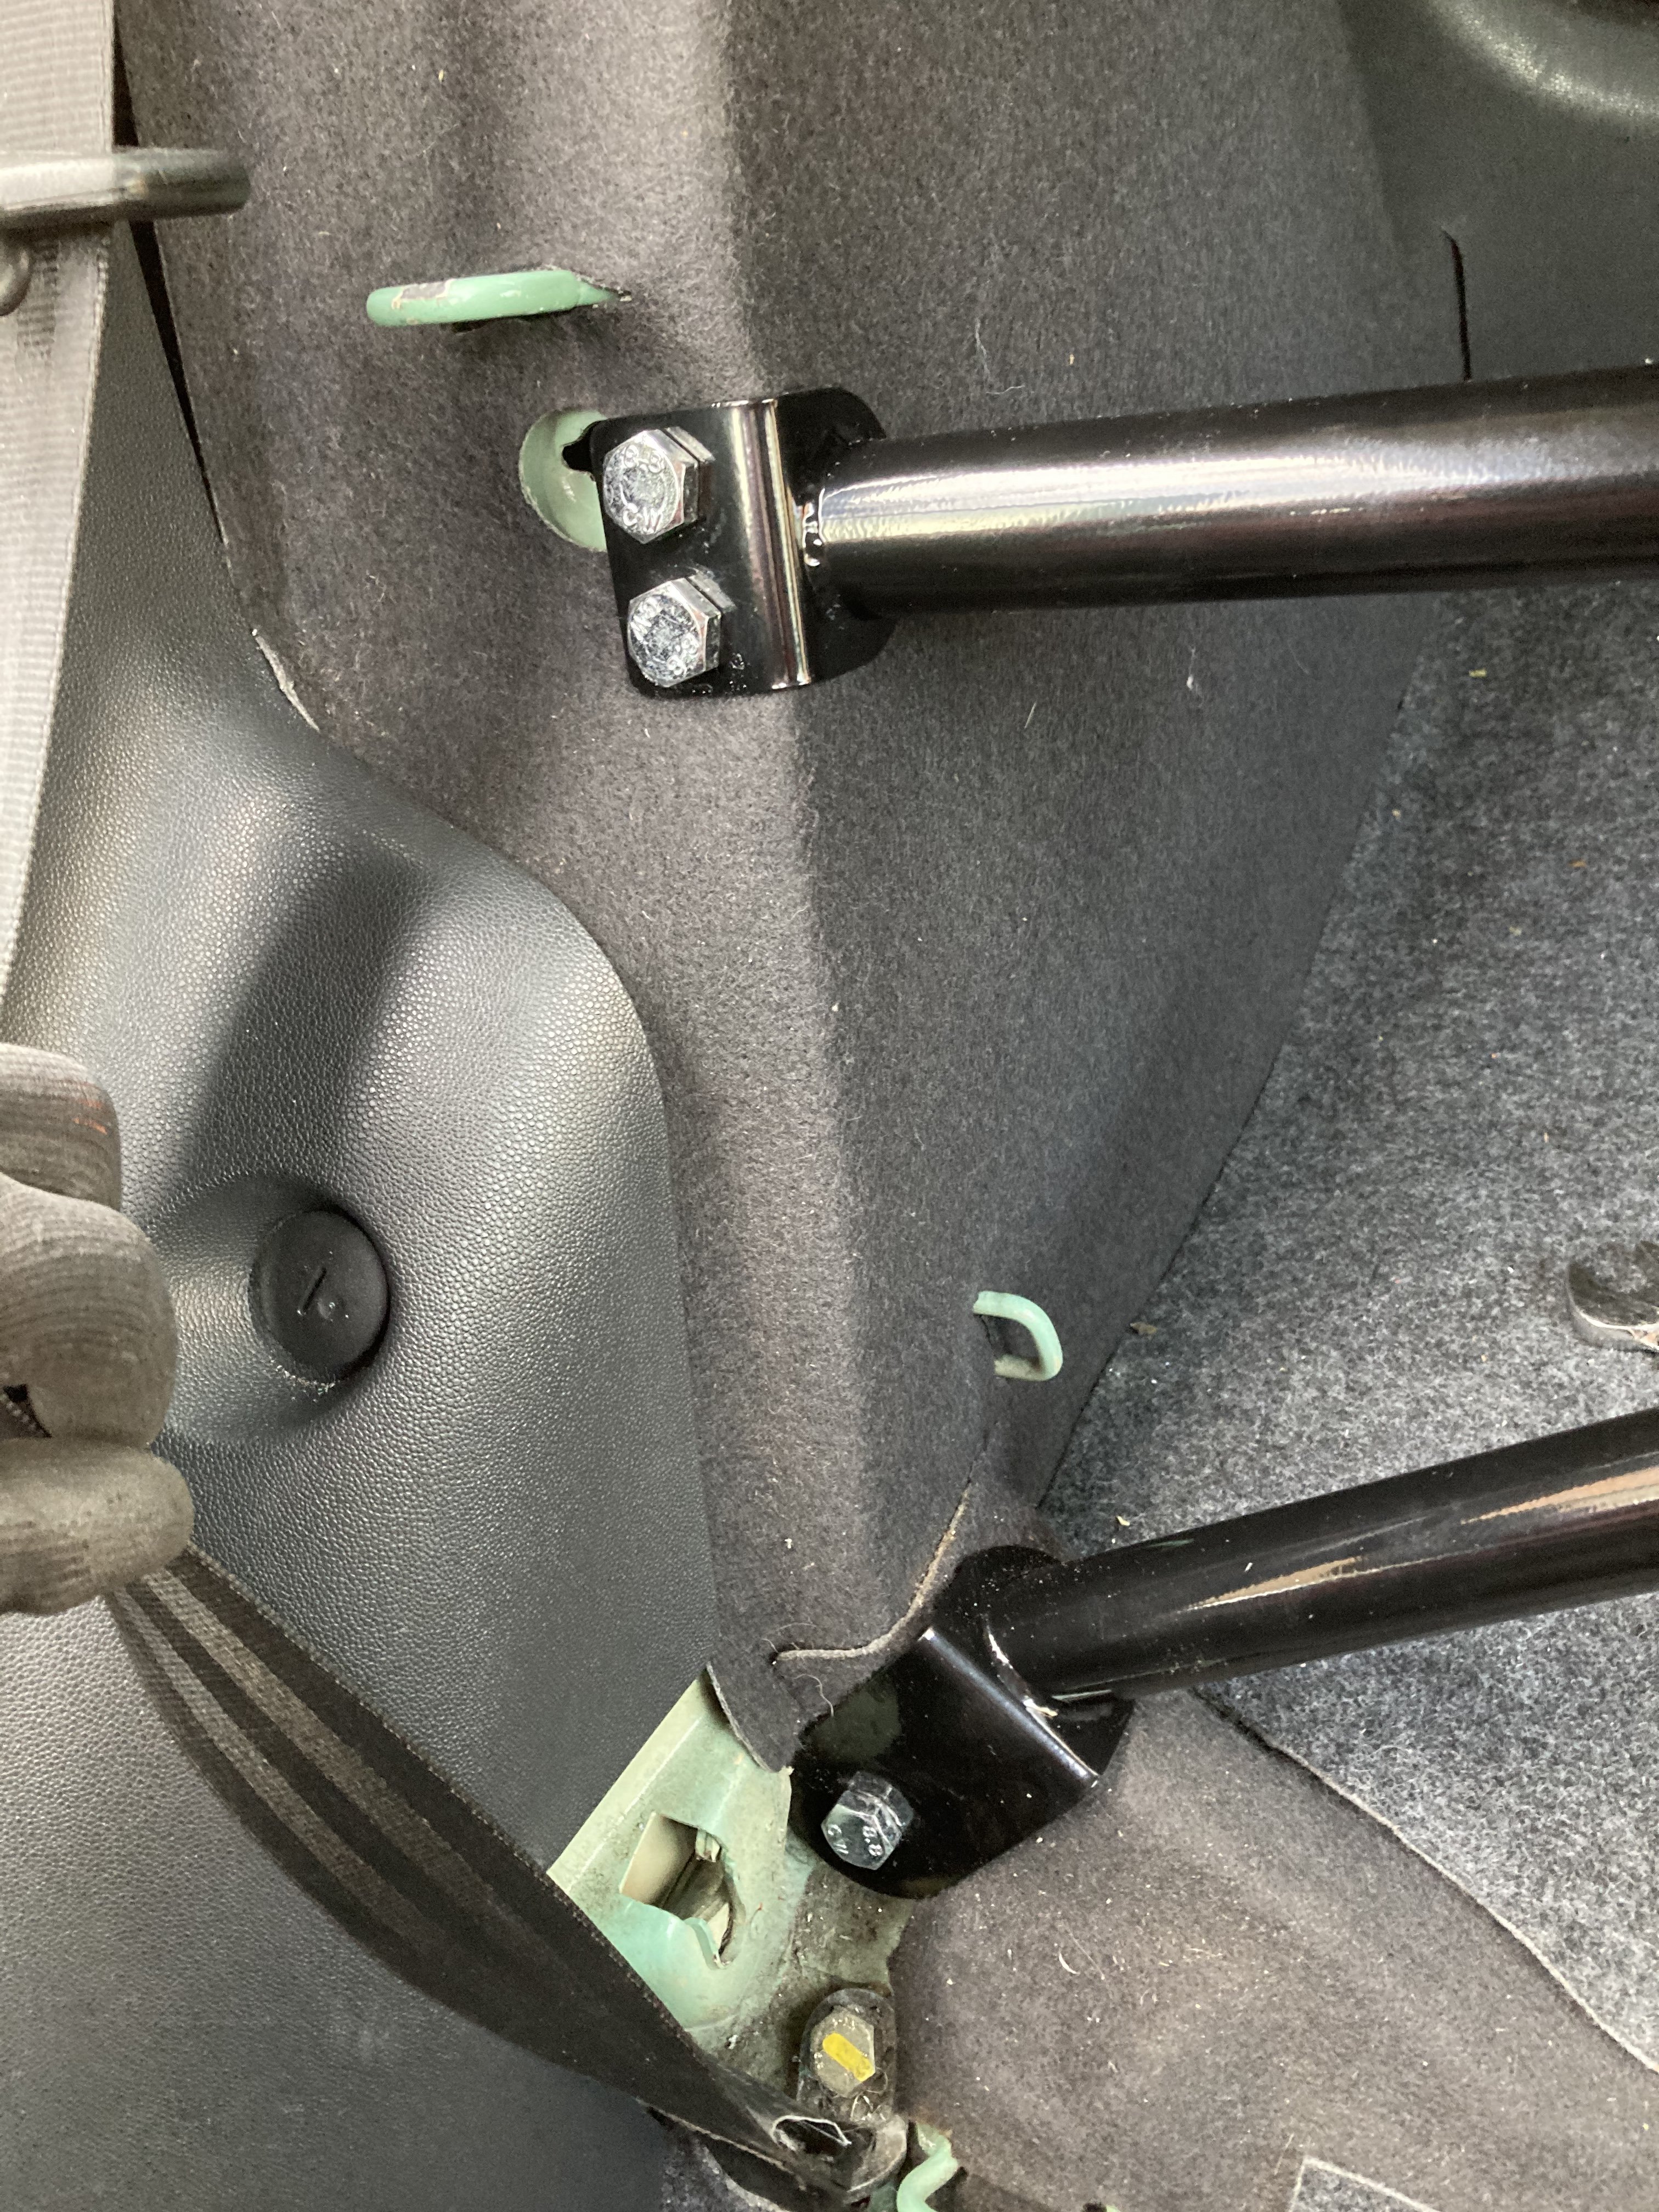
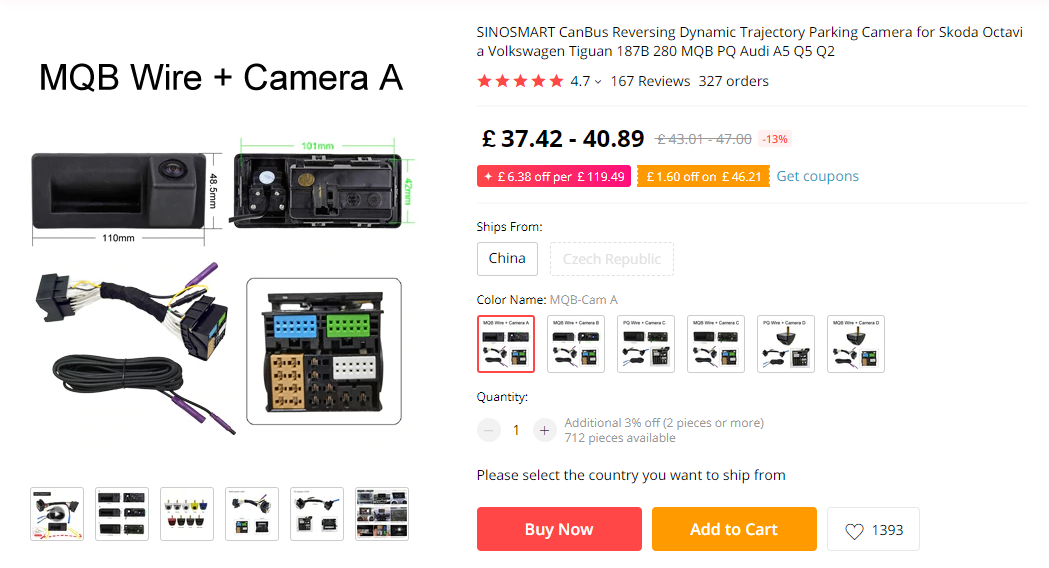
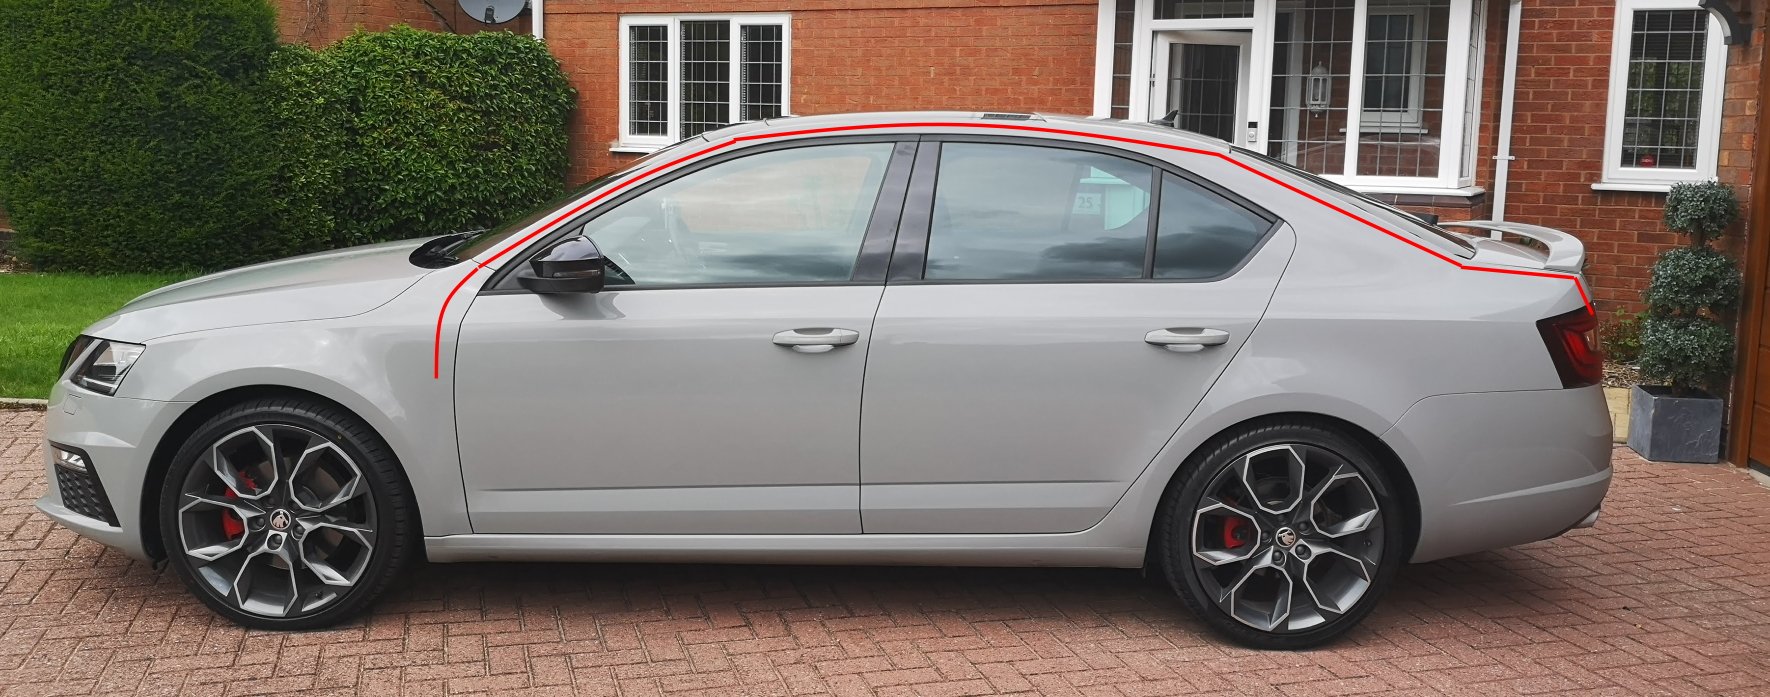
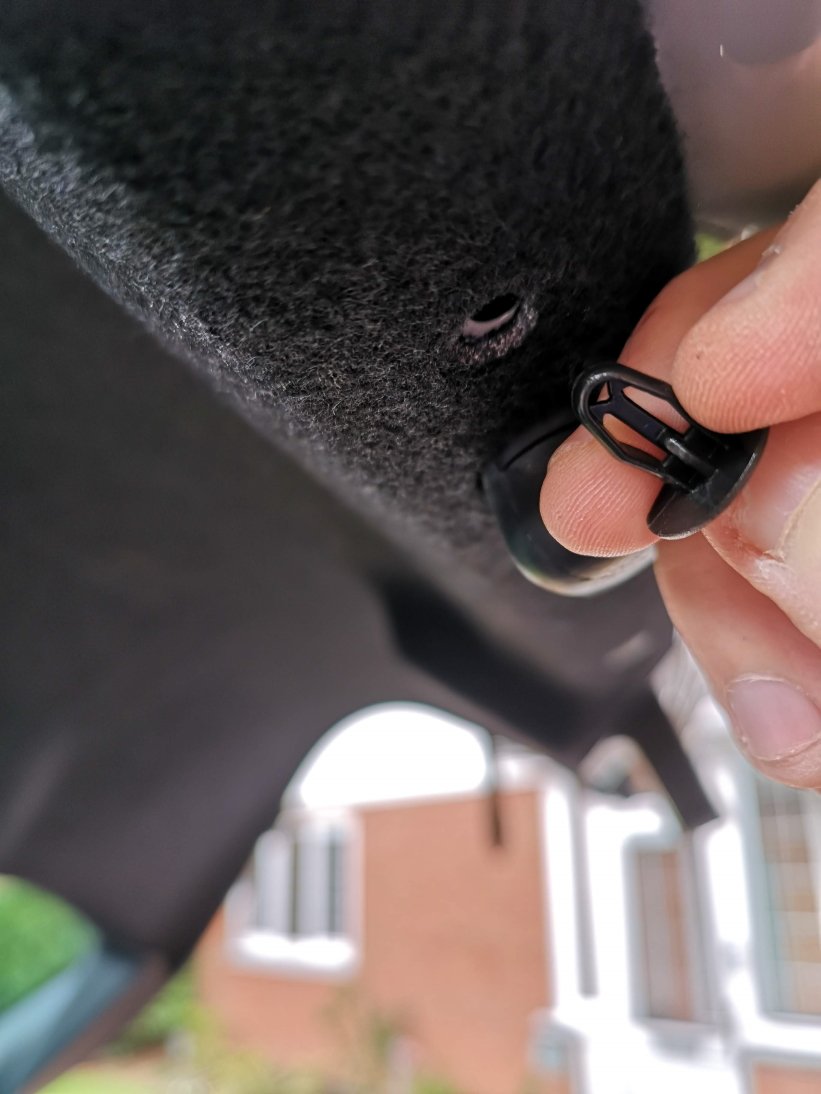
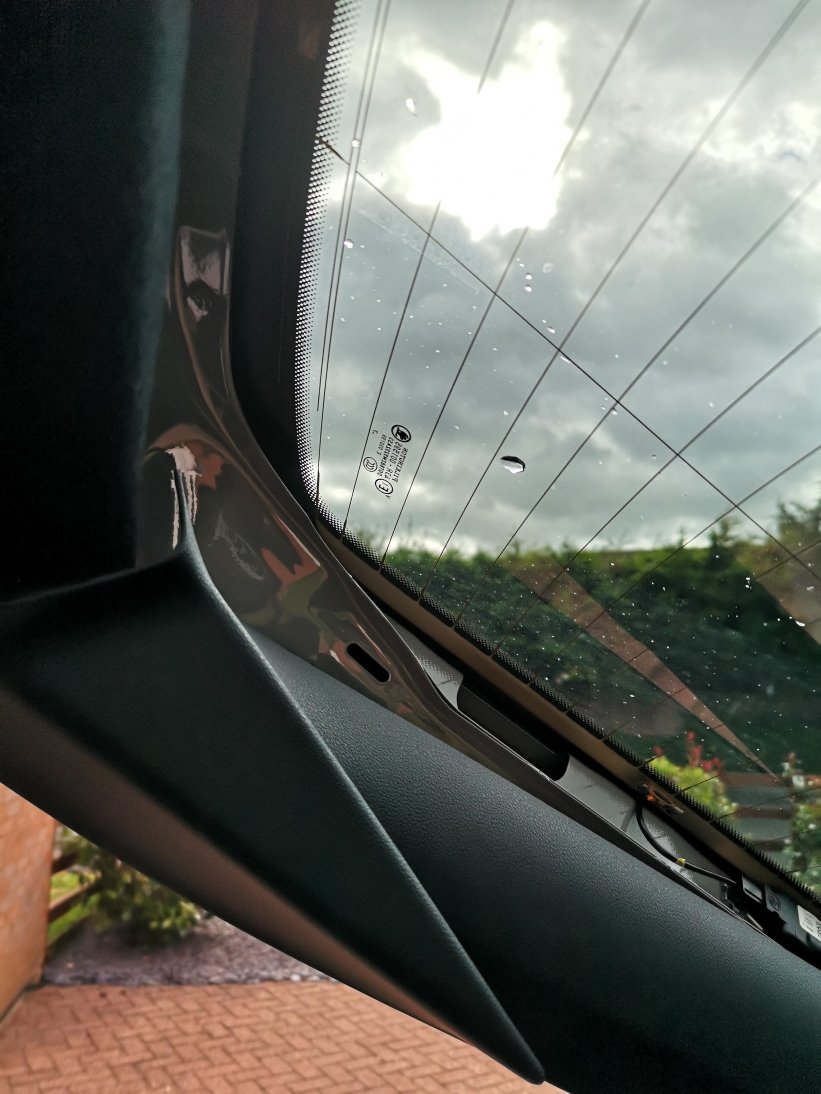
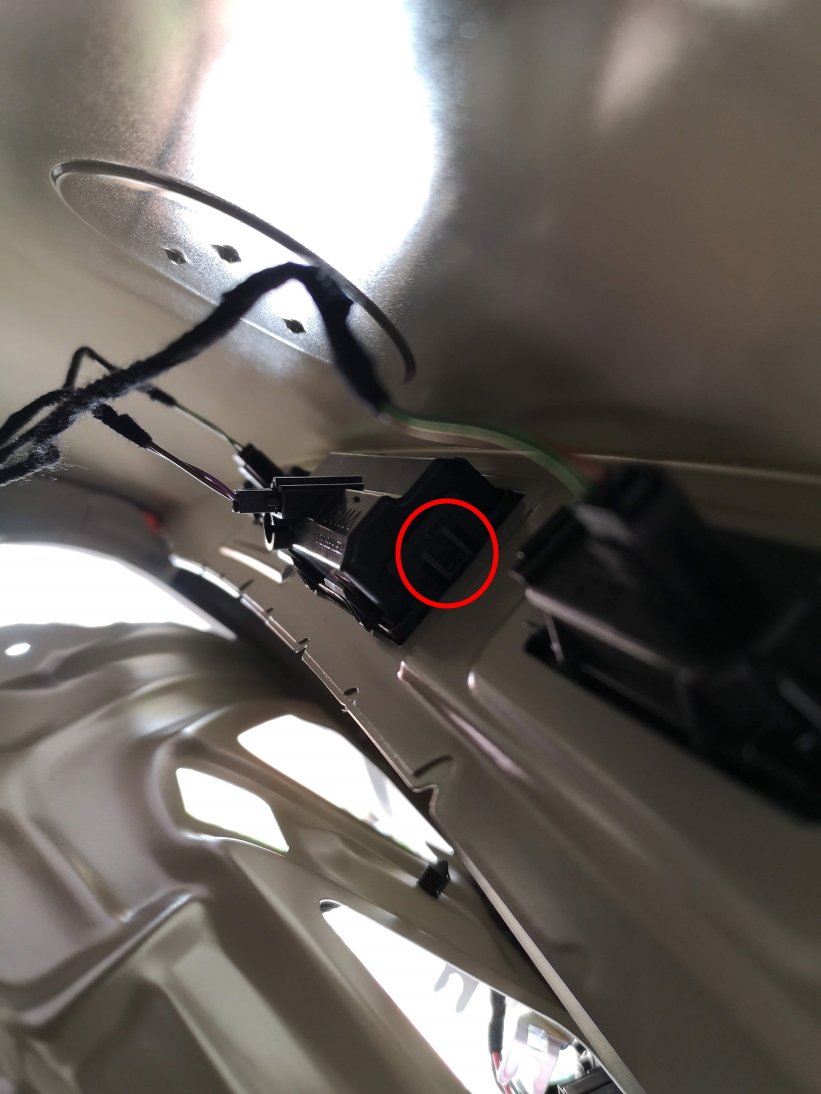
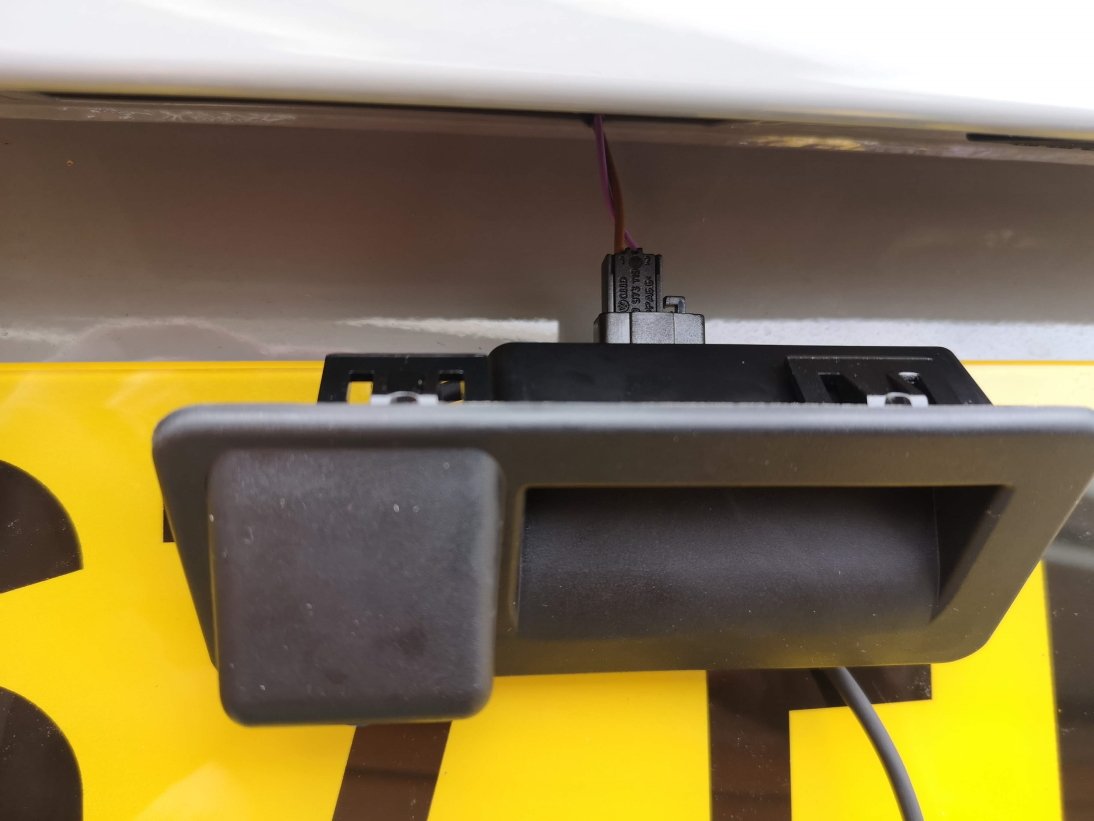
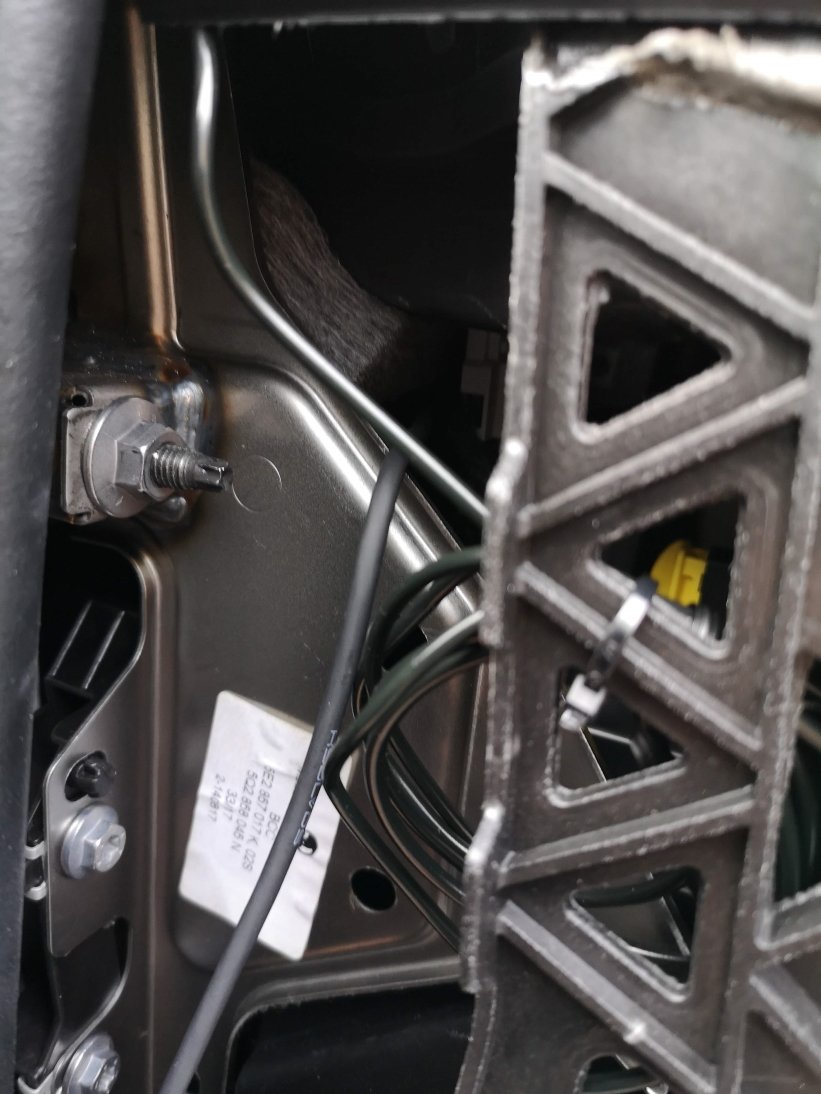
As there seems to be a lot of people asking questions about this lately, I thought I'd put together a quick guide showing how I fitted my reverse camera to a facelift VRS hatchback. They way that i've fitted this will apply to most models, with the key differences being the size of handle (based upon car model year) and whether hatch or estate (but this is just inside trim differences), there may also be wiring loom differences for earlier cars or none VRS models. I've benefited from info from these forums so hopefully this will be useful to others. I am by no means an expert & I won't be able to answer all of your questions, hopefully others will chip in and can add other info as well. First of all, this is the camera that I ordered for my MY 2017 VRS (Camera A/Handle A): https://www.aliexpress.com/item/4000230897829.html?spm=a2g0s.9042311.0.0.40694c4dTEPT93 (link may no longer be valid when you read this so screenshot below) No programming is required for this camera and it supports dynamic reverse guidelines Tools: Trim removal tools would be useful, but otherwise plastic tool that won't mark your car, or screwdrivers or similar with masking tape over the end. A T20 torx head tool is required if you have a hatchback to remove the pulldown boot strap Cable rods are very useful, I couldn't have fitted through the roof lining without. Stereo removal tools unless they come with your camera kit Cable route - I went with an OEM route for my cabling, following existing cables through the roofliner and out to the back as show by the red line below. The camera: The first thing that I did was to check that the boot release switch was working on the new unit - there's no way you want to wire this in and find it is faulty. You'll need to start removing the boot trim to access it. Remove the plastic clips from the lower boot trim- this consists of a few plastic clips which easily pop out with trim remover/screwdriver. There are 8 of these on the hatchback. After that start removing the upper plastic trim, this simply requires forces to release the metal clips. You don't need to remove all of this for now, but it will all need to come off later Remove the lower upholstered trim covering the tailgate. More metal clips - work your way around. You'll also need to remove the pull down strap with the T20 torx head. When this is down you should be able to drop the boot liner which will give access to the boot release handle. This can be awkward to remove, but can be done by pushing in the clip on one on the ends whilst also pushing down on the handle from the inside (ignore the clips along its length) - it should then pop out. Repeat for the other side. Unplug the harness and plug the new handle in - check the release switch works. You can either now push the new handle in until it clips, or leave it out to test the video connection later before fitting. To wire it in Remove the glovebox (open, rock left to right whilst pulling up & you'll hear the bottom clips release. Raise the glovebox lid up and inside the housing and reach in and remove the dampening on the left hand side) Use the stereo release keys to release the multimedia unit. The kit used here comes with a replacement harness that sits between the original one and the media unit & includes the video feed cable. Some people have removed the upper glovebox section to provide more access, be careful not to unplug the airbag connector if you do this. This can be fiddly, but I found the best way was to lie on my back with my head in footwell looking up at the unit from underneath. With the media unit slid fowards this gives access to the harness. It's the large one at the bottom and there is a locking connecting that needs to be pushed backwards to release. Check how it works on your replacement harness. Unplug old harness and plug it in to one end of the new one, push the harness in to the void and plug the new connector block in to the media unit. This took me a while to get it all to fit in. When done you can now test the video feed to the rear camera before your start wiring it in permanently. I took the camera cable over the top of the fusebox cage & out through the side panel I then ran the cable up the A Pillar to the roof lining and all the way to the end. Cable rods were really useful at this point, especially to get around the B pillar , and to go from the end of the roof liner through the cable exit point behind the rubber trunking where the original boot cables are. You can also run the cable in the trim above the sill and work your way back up to the roof lining on the C pillar. When you get to the end of the roof lining you'll need to unclip the rubber gator at the top of the boot so you can get the cable out of the roof liner and in to the boot via this gator. If you install the same way as me you only need to peel the roof liner down a few cm, being careful not to deform or damage it and you'll see the OEM cables behind. Once you've got the cable this far it's a case of feeding it through the rubber gator, up the side of the boot and over to the handle; connect the video cable and tidying up any spare cable. Everything should now be up and running. Retrace your steps to refit your trim. You now have a fully working reverse camera, activated when reverse is selected and with dynamic guidelines. The parking sensor guide now shifts to the left of the screen the same as an OEM reverse camera. I will come back and re-edit this tomorrow and resize pics as it's getting late. I'll tidy up any errors as I see them so please don't jump on me straight away!


 1 point
 -
The bad news is after doing the pig of a job fitting the new slave cylinder in the tiny space behind the DPF that you can get one hand into but not out again I did not realise that the pipe seal had either fallen out while fitting or I had fitted it the wrong way round, the union was leaking but not in view and the fluid was going behind the bulkhead insulation. I spent most of the day trying to pressure bleed the system wondering where all the air was coming from and where all the fluid was going to. Much later I saw the lake forming on the block paving under the vehicle The good news is that an autopsy showed that the old cylinder seal had broken up into tiny hard & brittle pieces, it would not have lasted much longer and the extra heat had put it out of its misery, I'm glad it has happened now and not later in France, I am confident that I wont have to remove the gearbox to do the concentric bearing which for a while it was looking like I may have to (I pressure tested it earlier). I will add some extra thermal insulation around the cylinder to hopefully prolong its life but will know the early symptoms now if it does fail again. Snow is forecast for tomorrow so its going to be hors service for some time yet.1 point
-
1 pointJust stay on top of scheduled servicing and you'll be ok, I wouldn't throw any more crap at it though or it'll join the ricers in the weeds!1 point
-
1 point
-
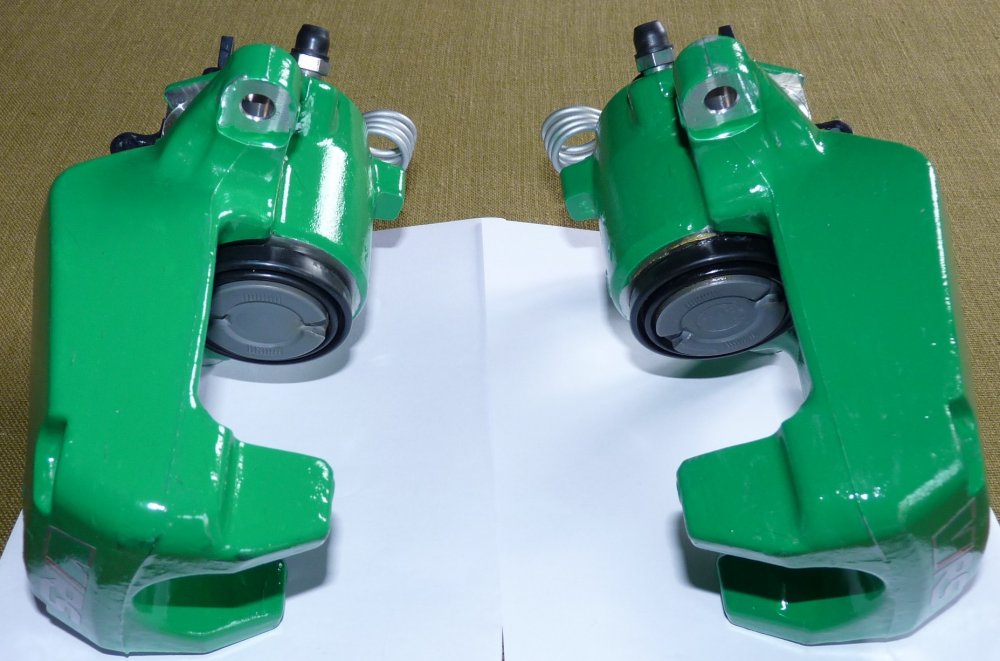
1 pointWell, I finally got fed up with freeing off my rear brake calipers so invested in a pair of new ones (not referbished). Got out my tin of Hammerite green smooth paint, (bought many years ago) and gave them a coat of paint, also bought and fitted some new handbrake return springs and some Vrs decals just to bling them up a bit. Just waiting now for the weather to get a bit warmer so I can fit them.
 1 point
 -
Thank you @misor1994 for the images. That is really helpful to see - and know that my car is "normal" and as intended from the factory.1 point
-
1 pointGood way to pass time in Lockdown! I think it's normal. The fronts need to be easy to remove for repairs, the rears less so. I believe they use carpet type material for sound proofing puposes.1 point
-
1 point
-
1 pointMy car is going back to the dealer this coming week to have the towbar fitted. They have given it me for cost price including driving the 260 mile round trip to pick up and drop off the car. I haven’t been back to the independent tow bar fitter to ask if they have managed to resolve the issue they indicated they would have. I will do that on Monday and confirm if they were able to resolve it as a reference for others. Would I have bought this car had I known about the cost and hassle of aftermarket tow bars, probably not! Hope others manage to get it resolved.1 point
-
1 pointI have a full set of issues as referred to here, My car came off the line in March 20 if that helps.1 point
-
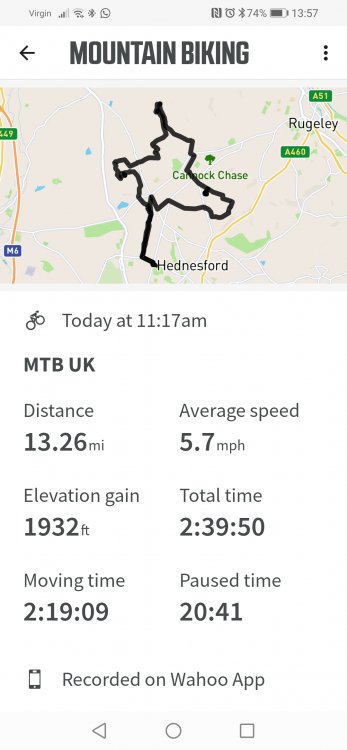
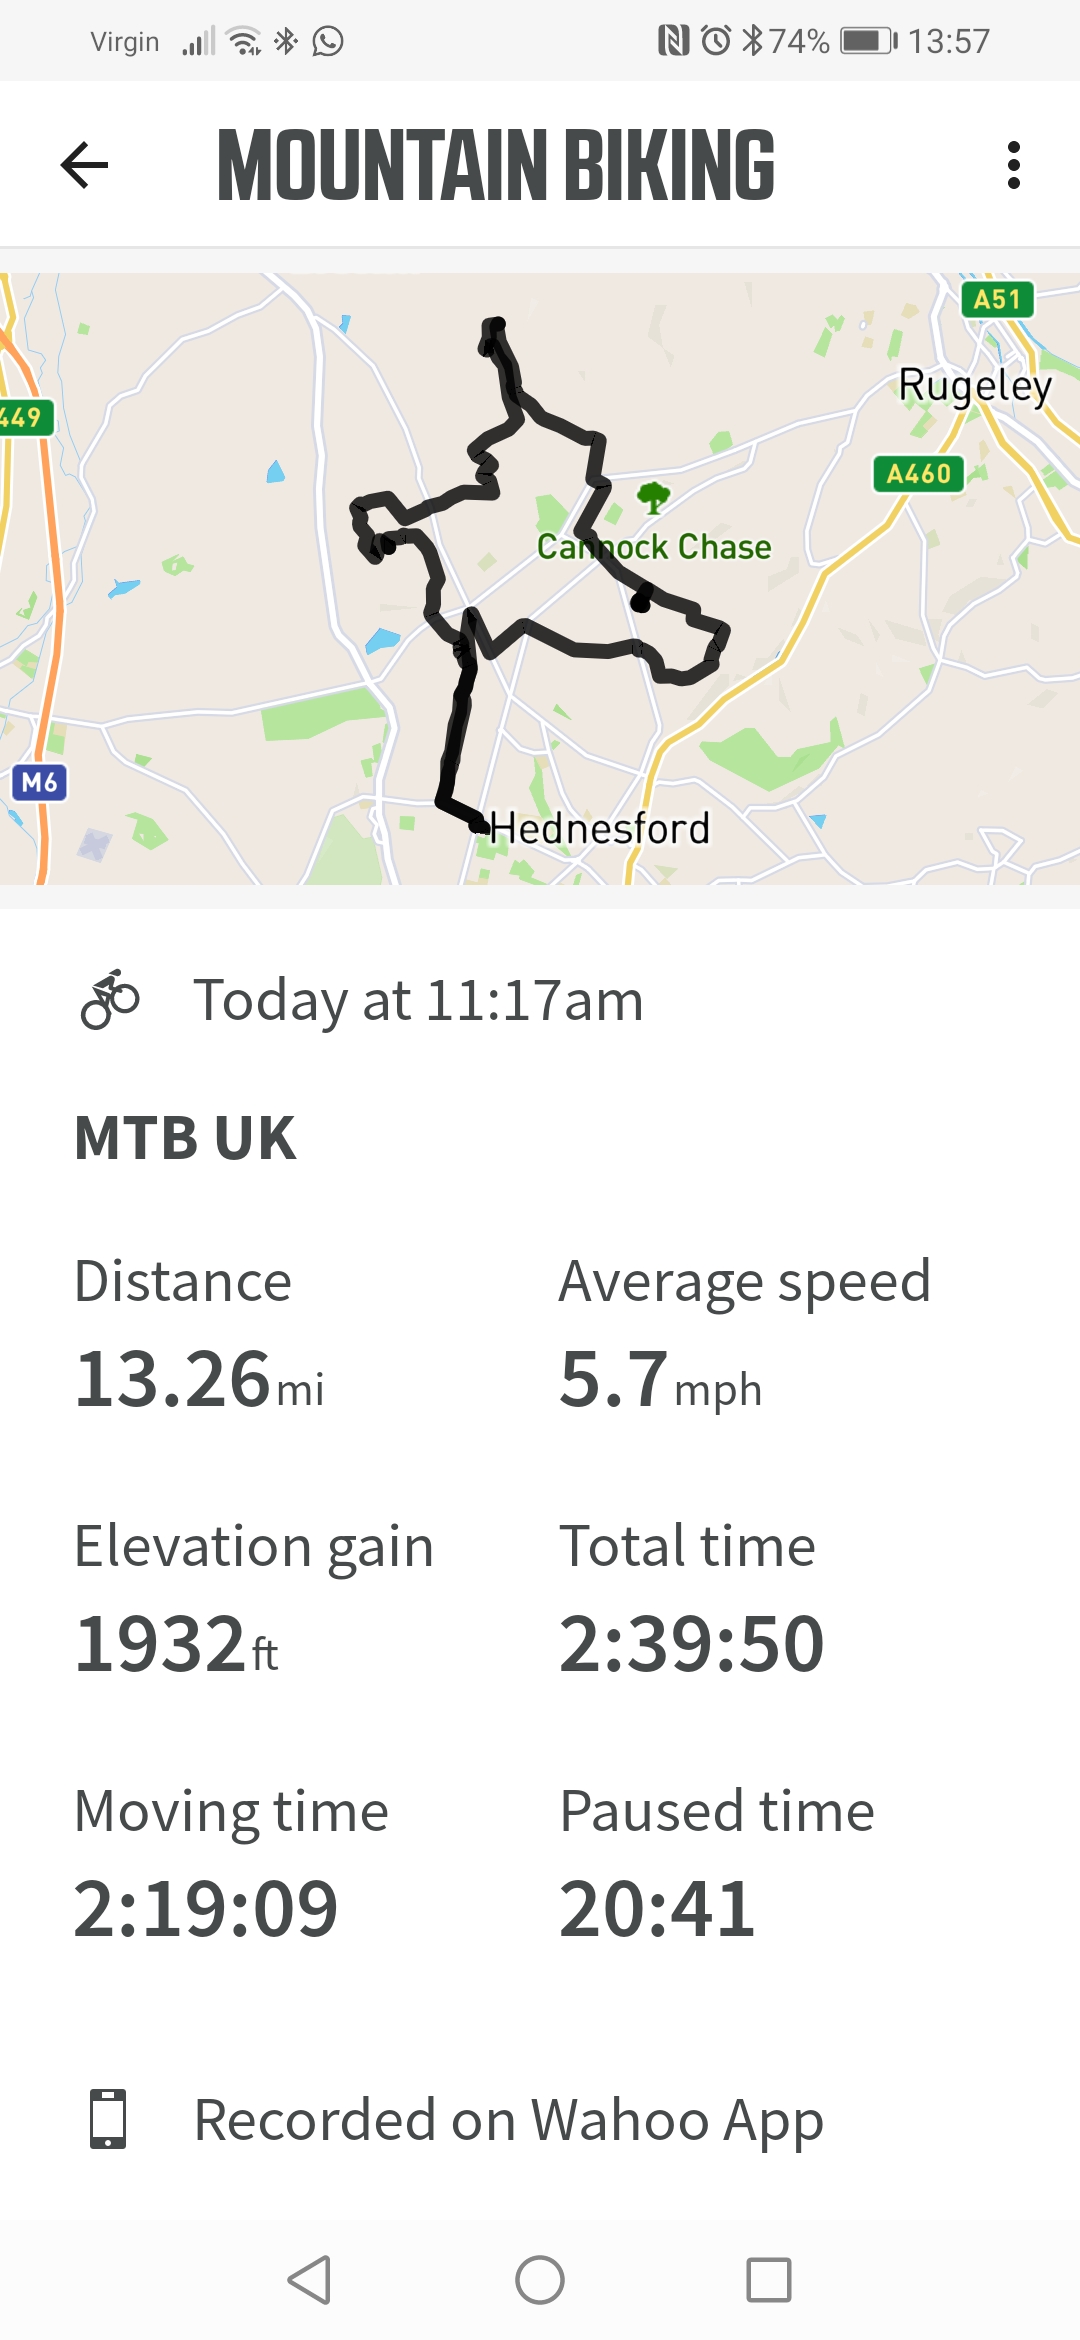
1 pointFinally back on the horse... Snow and ice one weekend, leaking washing machine the next Usual mud and heavy slop
 1 point
 -
1 pointIf it's got navigation then it can't be a Bolero! Can't help on the camera, not done the retrofit myself.1 point
-
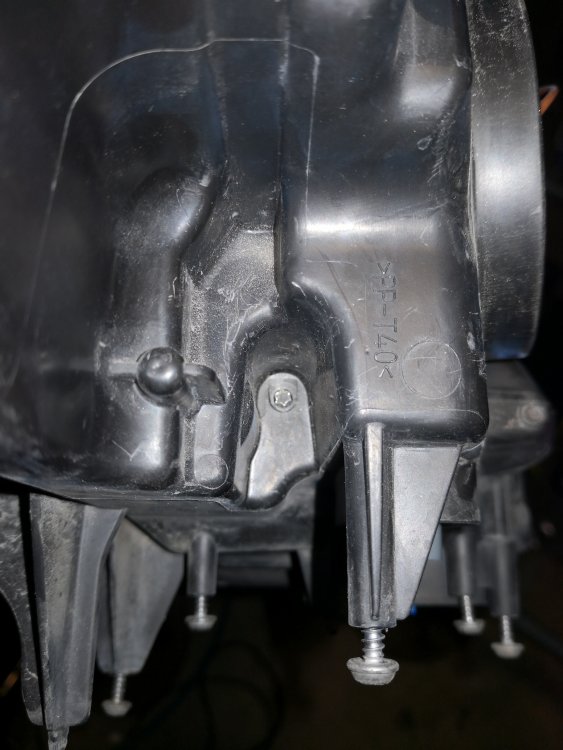
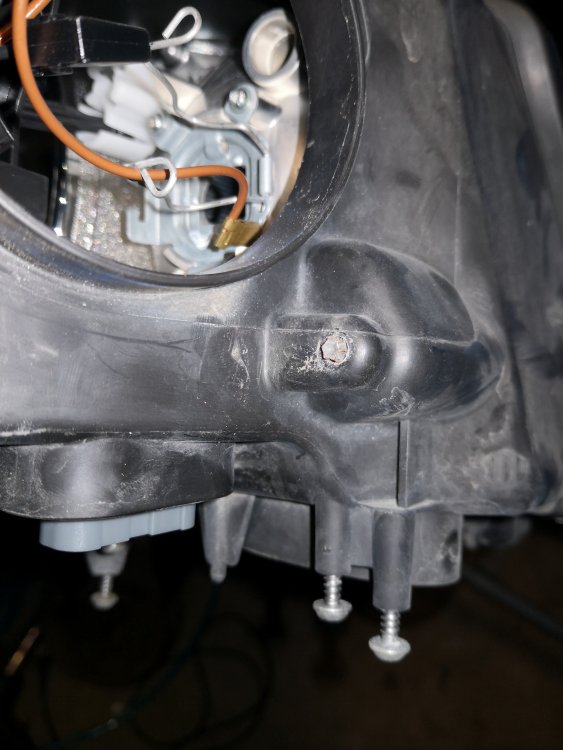
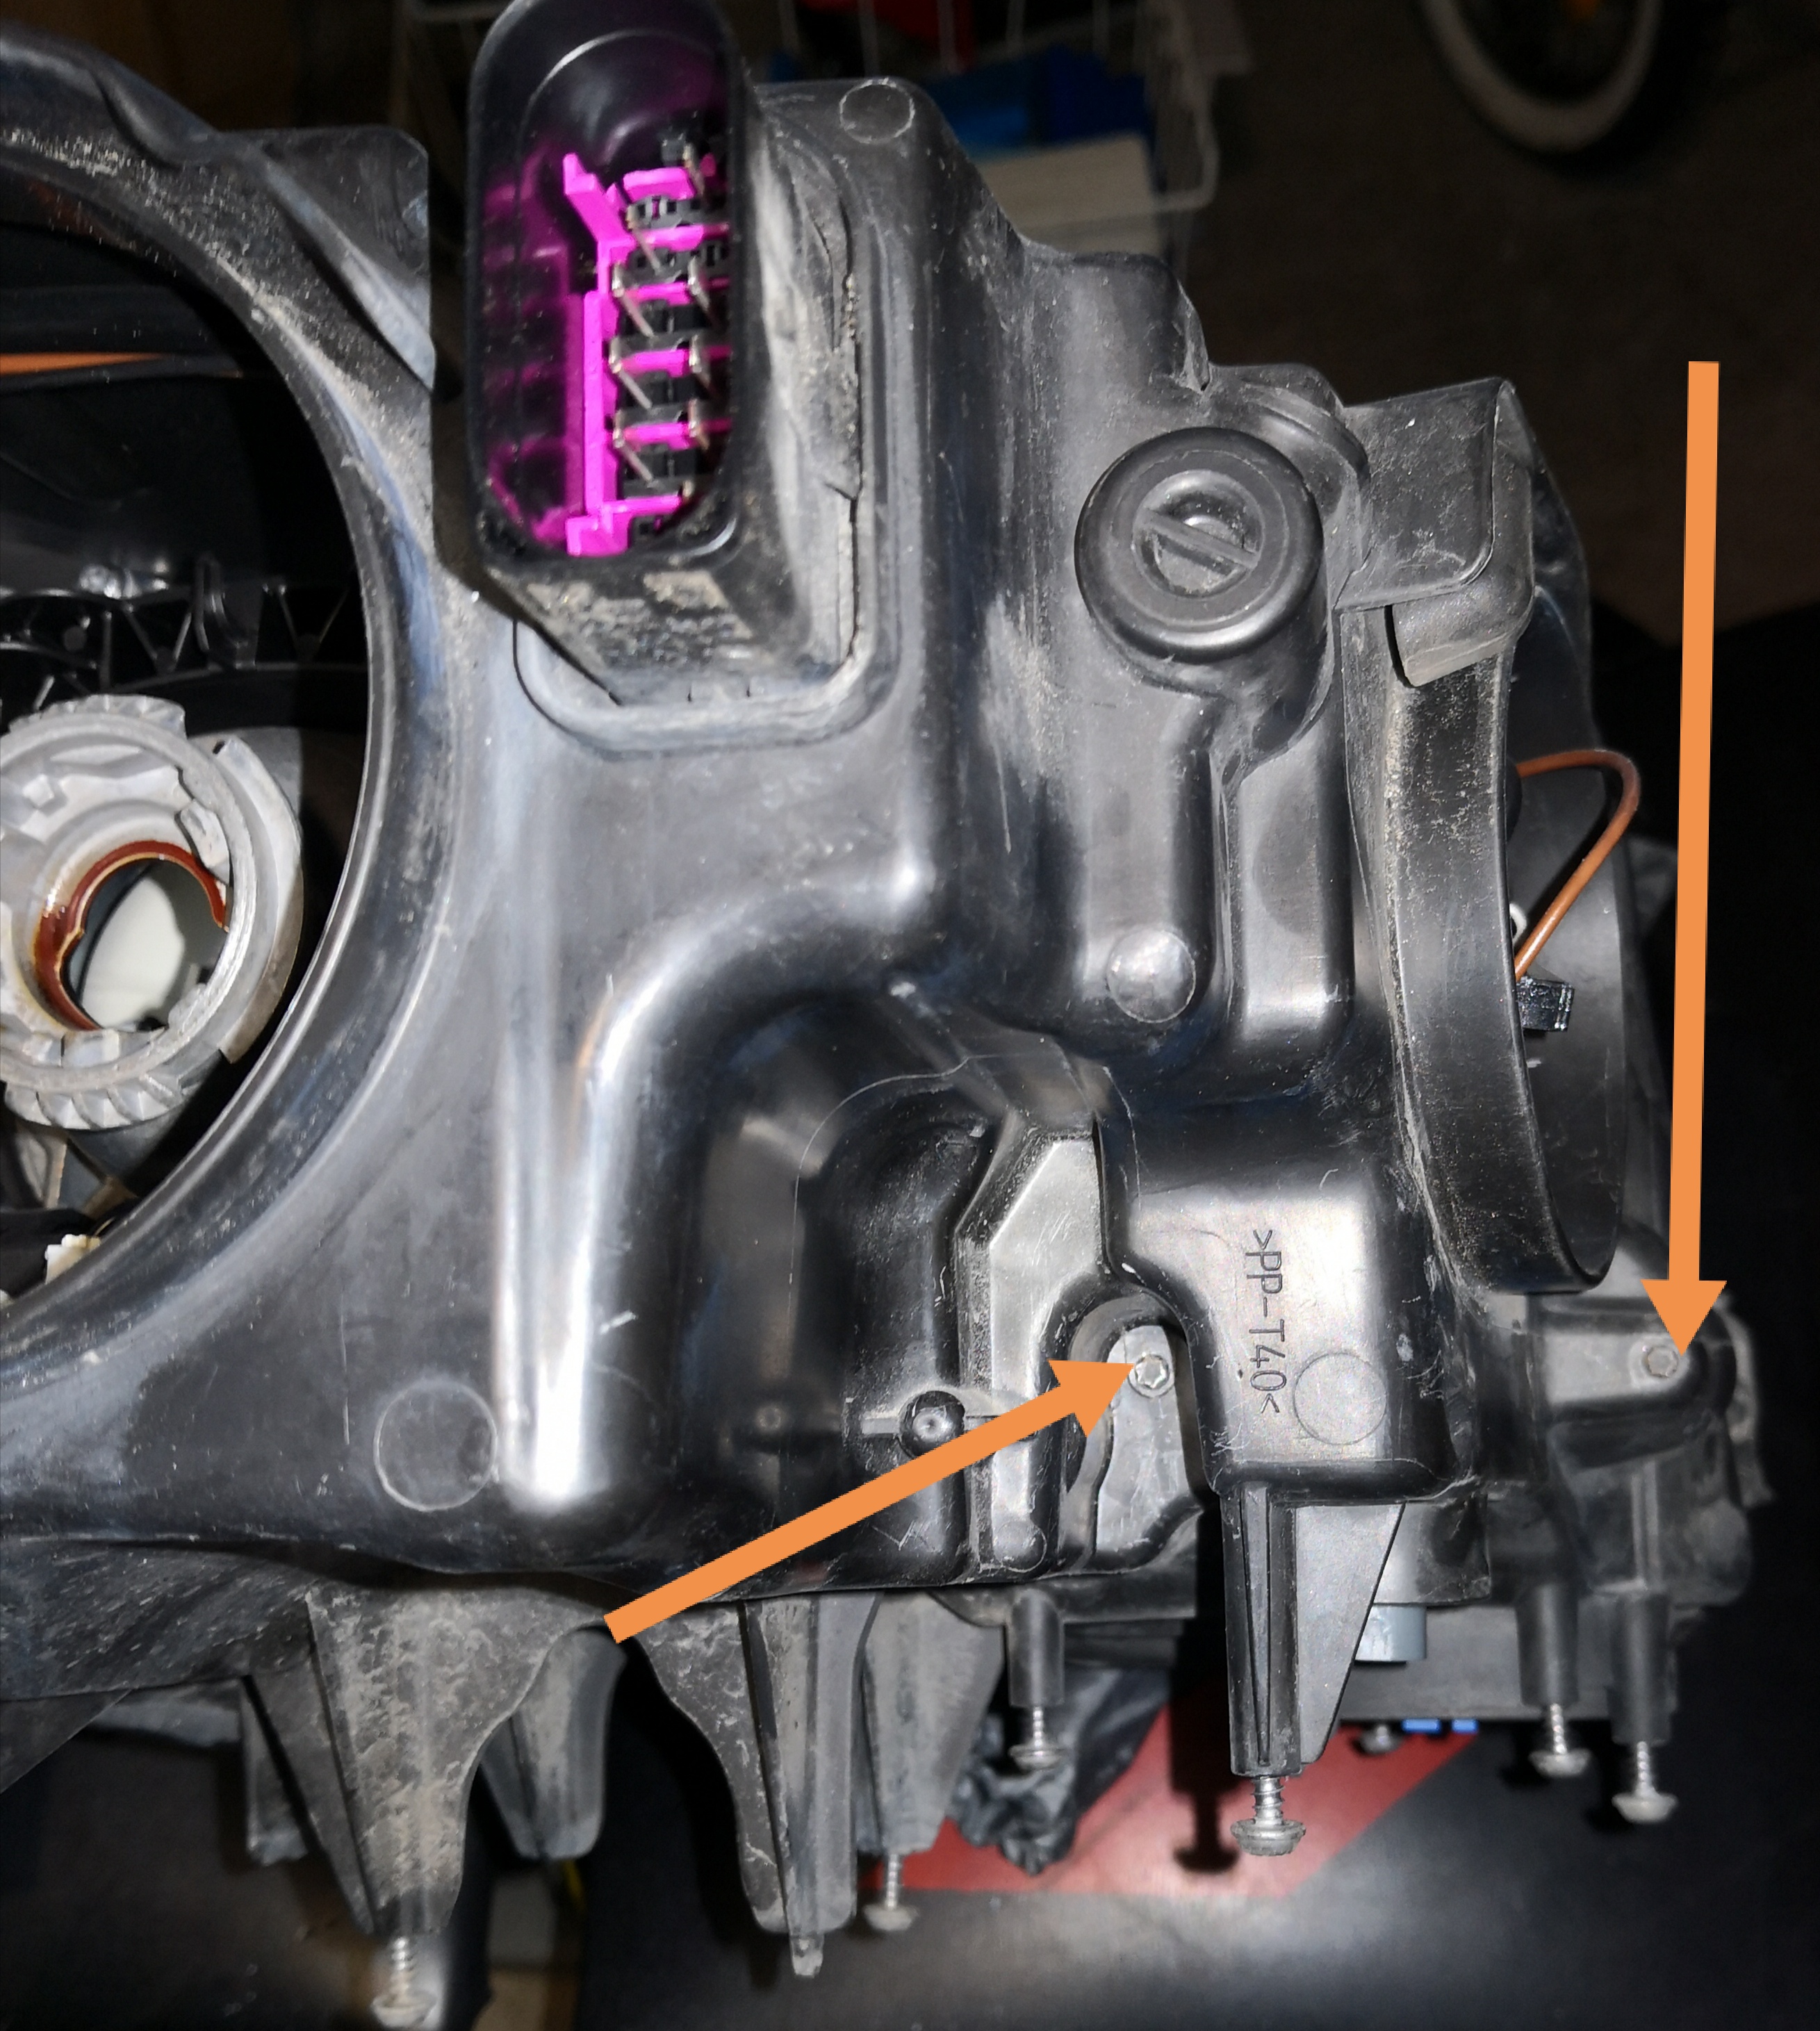
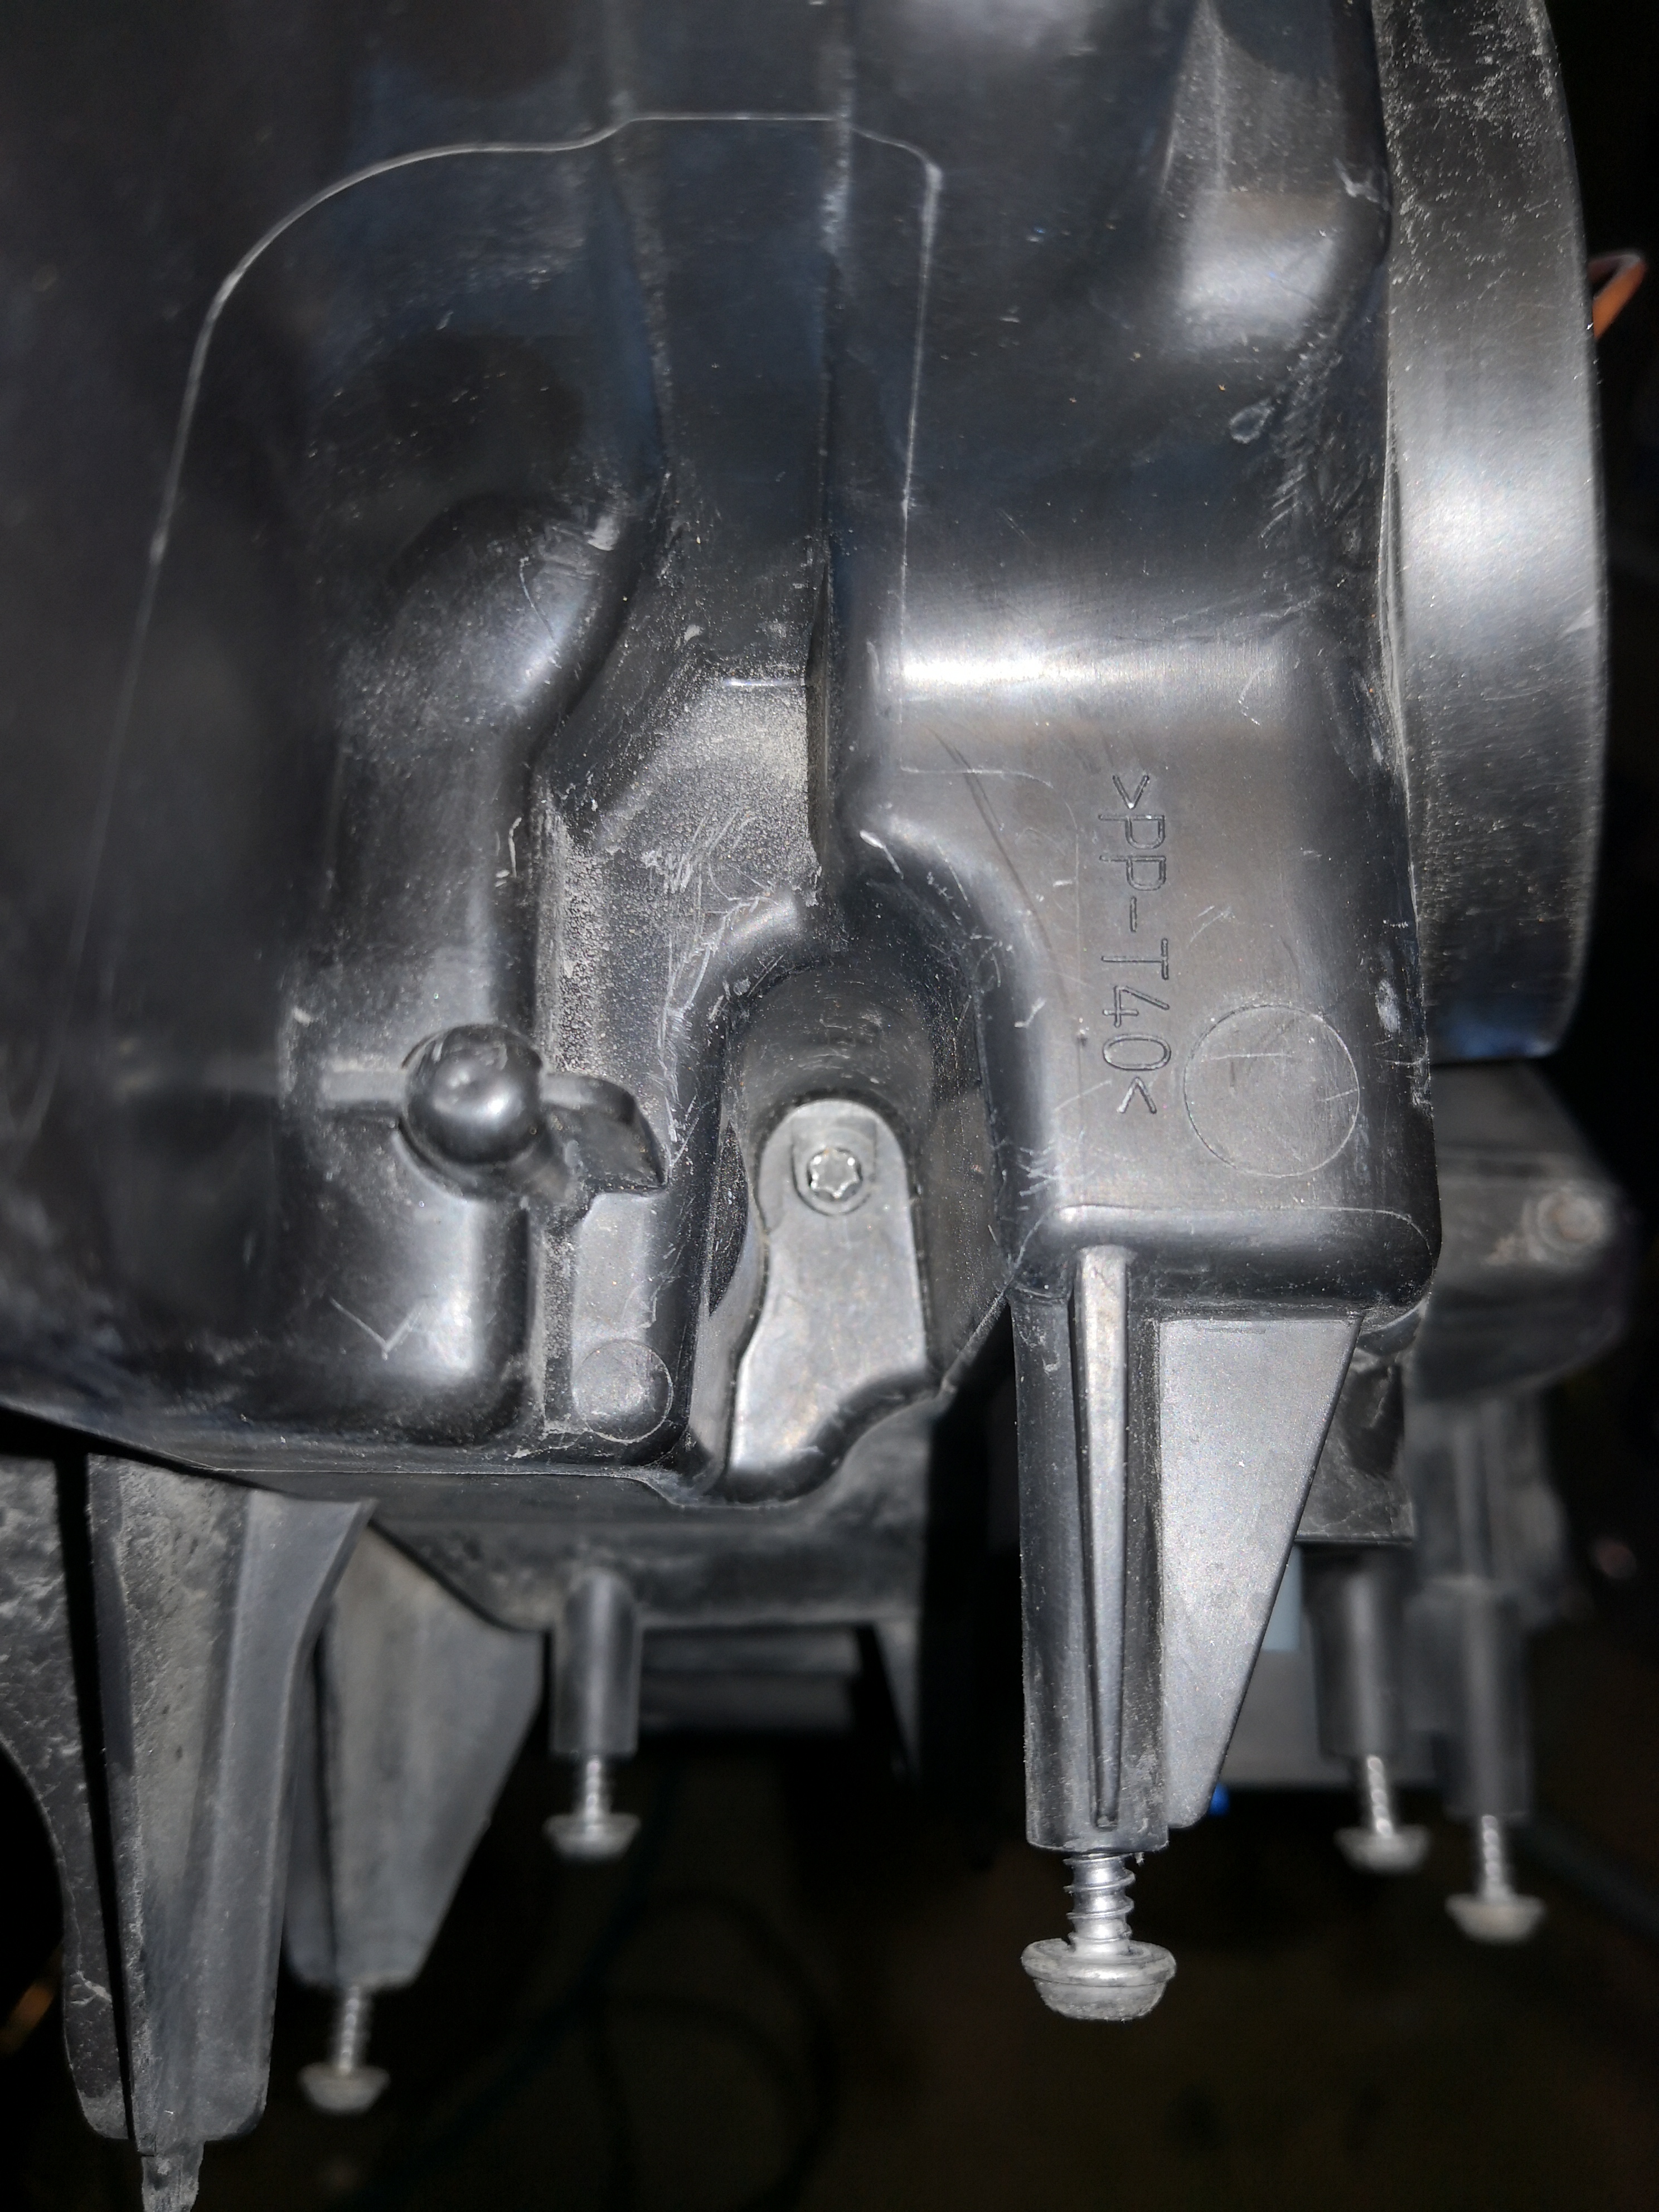
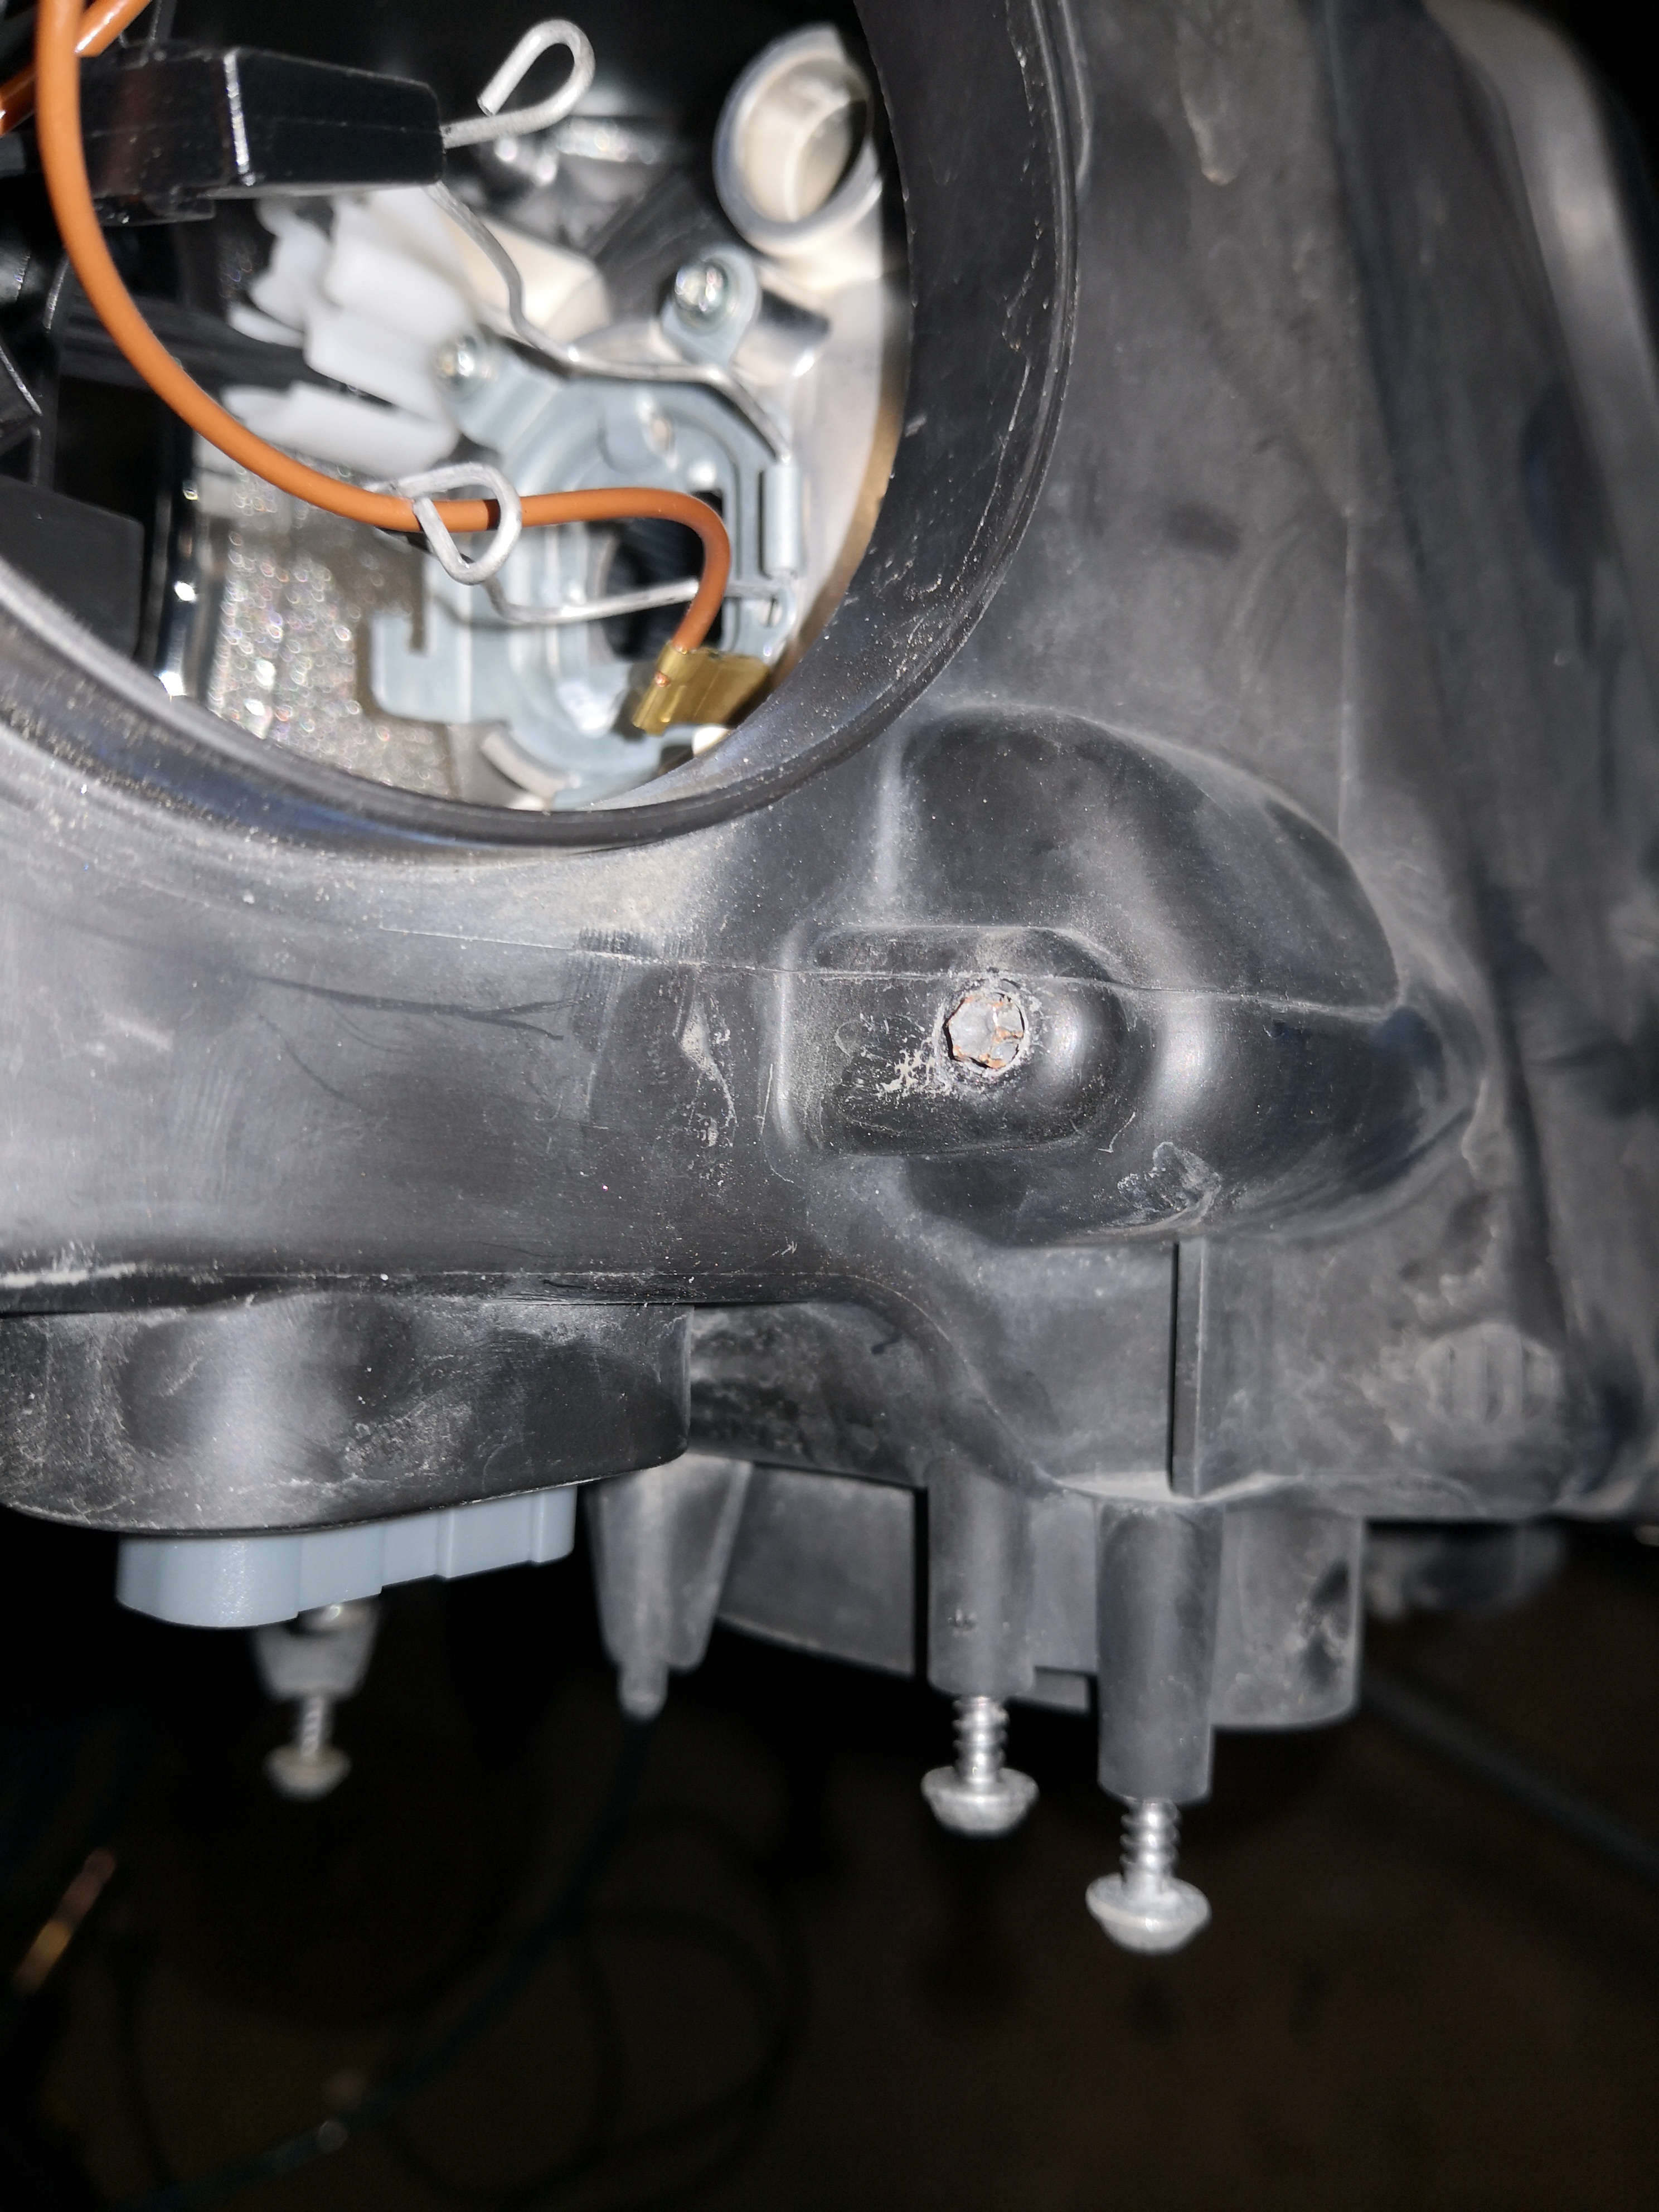
Ok. That's true. My bad. Here is some pictures where you can find those adjusting screws for the halogen bulbs. In the picture you can see the backside of the left headlight unit. Left arrow pointing vertical and right arrow horizontal adjustment screw. The original question was: They are... But only manualy.

 1 point
 -
1 pointThat looks like a MIB2 Amundsen to me. To update the maps (which MUST be saved on a genuine Skoda SD card - if you use the one you have then save the contents on your PC first as a backup) then visit the Skoda Portal here then enter your VIN and it will show you the latest available maps to download. Once downloaded follow the instructions to uncompress them then copy all the uncompressed files onto the SD card AFTER clearing it first (I use fast format as that's quicker than deleting all the files).1 point
-
1 pointFollowing on from my last visit with the dealer, I had a call from someone else at Skoda UK. Apparently the km/miles on the sat nav and the mph/kph on the dash are known about by Skoda UK. They're working on them but there's no timescale. There was another issue with remote lock / unlock using the app. Apparently, this used to work for some people when the MySkoda and Skoda Connect app were 2 different things. They merged them in Nov/Dec and broke the feature for anyone who didn't have it working before the update. There's a fix planned but there's no timescale. Does anyone know if the dash / sat nav units are just issues with older build cars or is it something that also affects new build? I've told the garage that I want to reject the car (there's also issues with the matrix LEDs) but I'd still like to stick with an Octavia. Not even going to try if it's something that's going to drag on regardless of the age of the car1 point
-
I’ve emailed the tuner there and asked him all those questions so will let you know ASAP!1 point
-
@newbie69 - how much would you like to spend Powerbulbs have a selection of branded bulbs: - https://www.powerbulbs.com/product/osram-ledriving-fl-led-h8-h11-h16-twin - https://www.powerbulbs.com/product/philips-ultinon-essential-led-h11-twin - https://www.powerbulbs.com/eu/product/x-tremeultinon-gen2-led-fog-lights-h8-h11-h16-twin - https://www.powerbulbs.com/product/philips-ultinon-pro9000-led-h8-h11-h16-twin1 point
-
1 pointBecause most of us who drive to work at silly o'clock on a frosty morning do so alone, so the passenger side heat pad is never needed. I realise that Aspergers completists would be incapable of driving a car knowing that a part of it wasn't working but there aren't that many of them about despite their heavy presence on the forums.1 point
-
1 pointRetrofits tend to be personal preference as to what's important and how much it's costs. It'll also depend what spec your car has to what's just software tweaks rather than hardware changes, For example: - a vRS gets lane assist, satnav and fogs as standard which means that high beam assist, traffic sign assist and cornering fogs are trivial software tweaks - on your 1.6TDi (not sure of the trim?) you can probably only enable cornering fogs as it probably doesn't have a highline front camera A good starting point is to find a local member with VCDS or similar to find out exactly what modules you have to make an informed decision about what's possible Simple things like reversing cameras tend to be a popular first mod.1 point
-
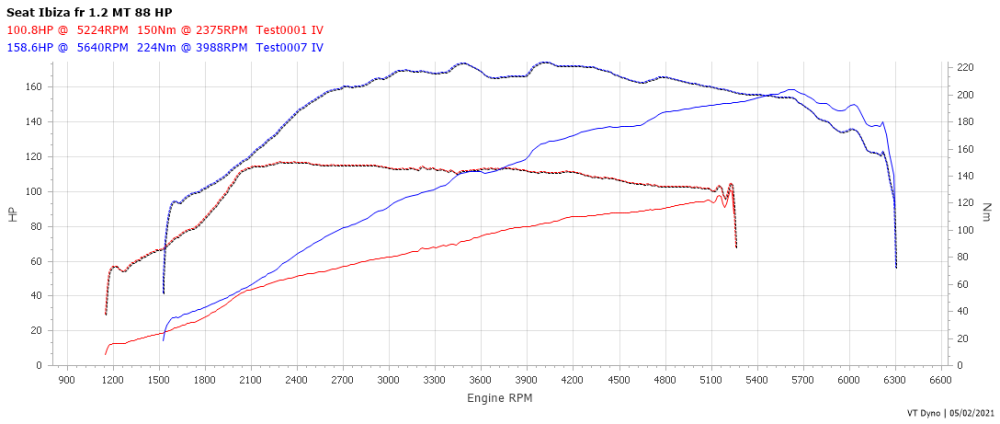
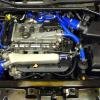
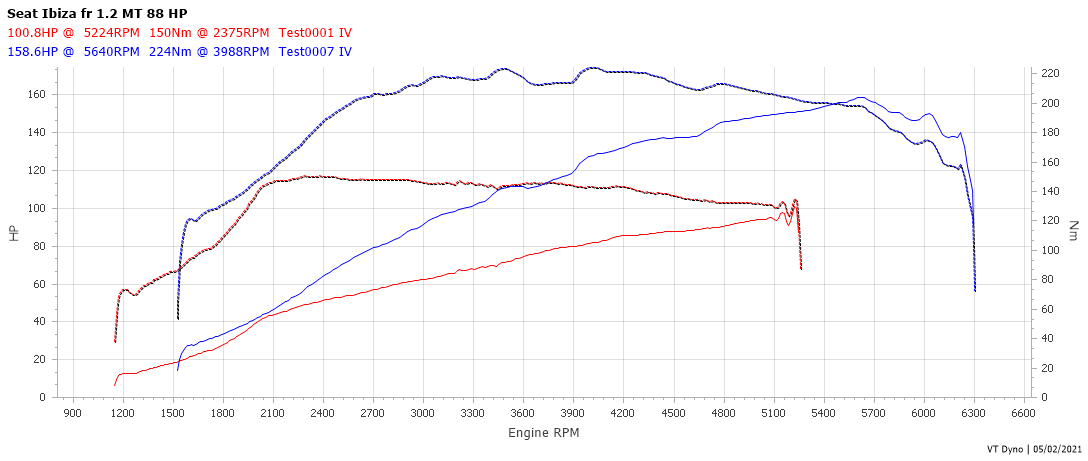
Hey guys, I’ve got a 16 plate Ibiza fr so not a Skoda😂 but I’ve got the same engine as you lot, 1.2tsi 90hp got the turbo swap done yesterday and tuned, although a conservative tune as we are going to do more power once I have my downpipe and induction kit fitted, atm I’m stock internals other than the turbo.... We never ran into any issues of boost cut and actually had a really smooth graph, so don’t think the map sensor is the issue for you guys. hope this helps!
 1 point
 -
1 pointFEC for Drive Mode Selection is insatlled in gateway. You have it inactive becasue adaptations were not setup properly - look for adaptation channel with word "charisma" and have it enabled.1 point
-
Modern cars mostly charge the battery when the engine is on overrun, or when braking, and by not having the alternator sapping engine power during normal running saves fuel. To allow this process the battery is normally kept at 80% charge to allow some capacity for the alternator to dump energy whilst braking or during engine overrun.1 point
-
Applying any roof rack will increase wind noise levels. This is certainly the case on my estate with roof rails, so I can't see how you could avoid this on a saloon. So called wingbars seem to be the way to minimise noise.1 point
-
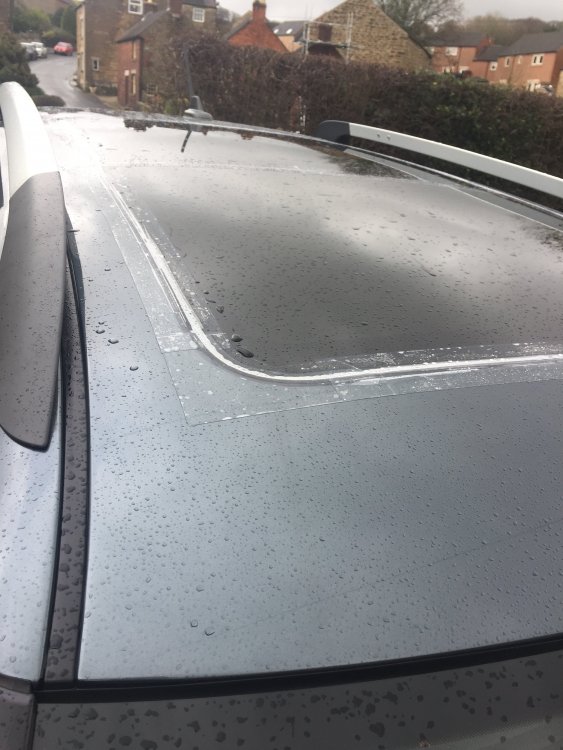
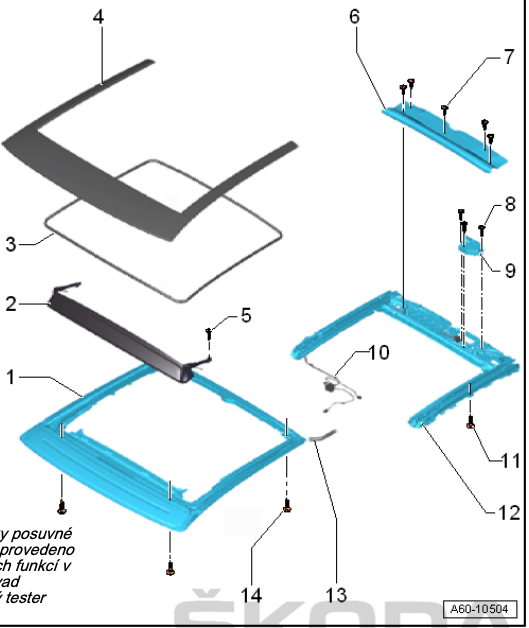
I tried fitting strips of Oraguard stone chip protection film around the full perimeter (and the joint between the glass panels), to seal the sunroof, and removed fuse 27. The film got full adhesion to the roof and glass, but after 2 or 3 days of rain, the water found its way through again. It must have been due to the thickness of the film, causing small gaps at the overlaps. But a single piece wrap would probably work better.
 1 point
 -
1 pointAny battery that'll physically fit and matches the existing technology should be fine. As mentioned above, you can update the capacity in the battery monitoring to match Much like tyres, spares or anything else, everyone will have their own preferred batteries. I've used Bosch and Varta previously without issue.1 point
-
1 pointHi. If you need any help with insurance for additional seats being fitted in a Caddy then lease feel free to drop me a line. Regards, Dan.1 point
-
I have discovered what causes the clutch master cylinders to fail and why mine went after the increase in power. The cylinder body is plastic and it is located less than 10cm away from the DPF which runs hotter than 650°c during active or passive regeneration, there is a tiny bit of aluminised cloth between them as a heatshield. Nice job VAG It looks like an absolute pig to remove, I think the DPF will have to come off. I bet the failure rate on them is much higher on the more powerfull models, more power = more heat generated in the exhaust.1 point
-
1 pointShort update - so made my return journey home this afternoon and the regen completed within 15 minutes of the start of my journey1 point
-
1 pointMy best advice would be to head over to Mk2 Fabia Vrs facebook page if your on Facebook and want advice, This place is for people would argue about the colour of an orange. Shame really as I'd imagine other parts of this forum are useful.1 point
-
£30 per month is over £400 per year Adding £400 per year is rather more than nominal1 point
-
You can try putting key into ignition, turning to ON position, not starting car though, and press one of the buttons on fob for a few seconds, I don't know which button you press but this is usually the procedure for synchronisation. To reprogram a key you'll need a scanner tool that suplies this function you'll also need software that has this function. You will also need a 4 digit PIN that you may need to get from the dealer.1 point
-
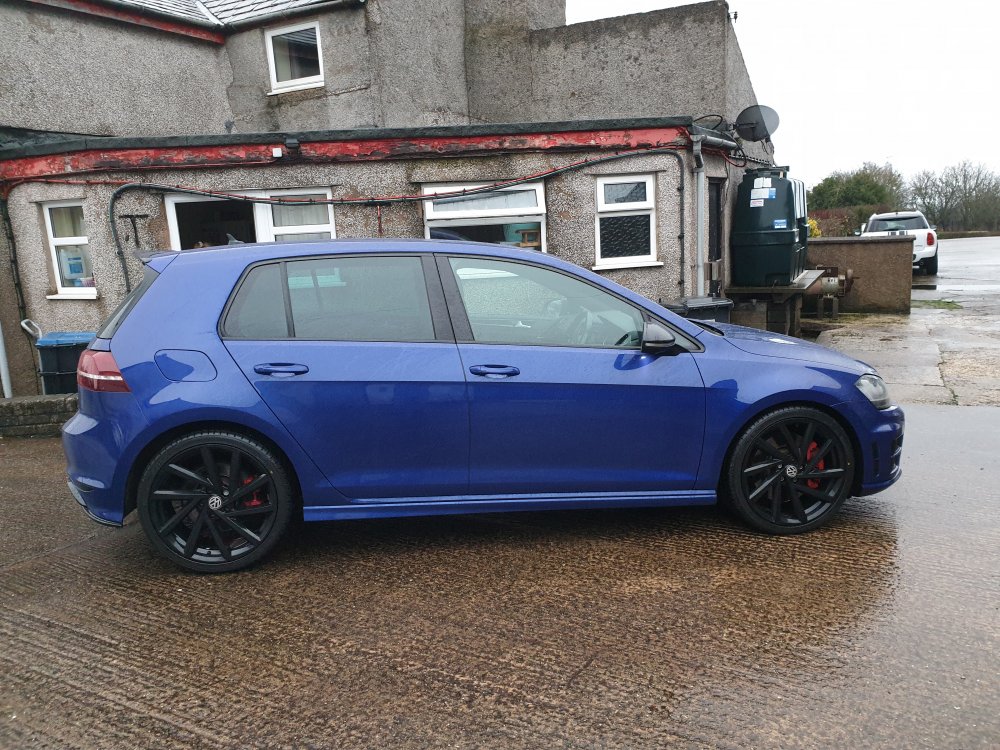
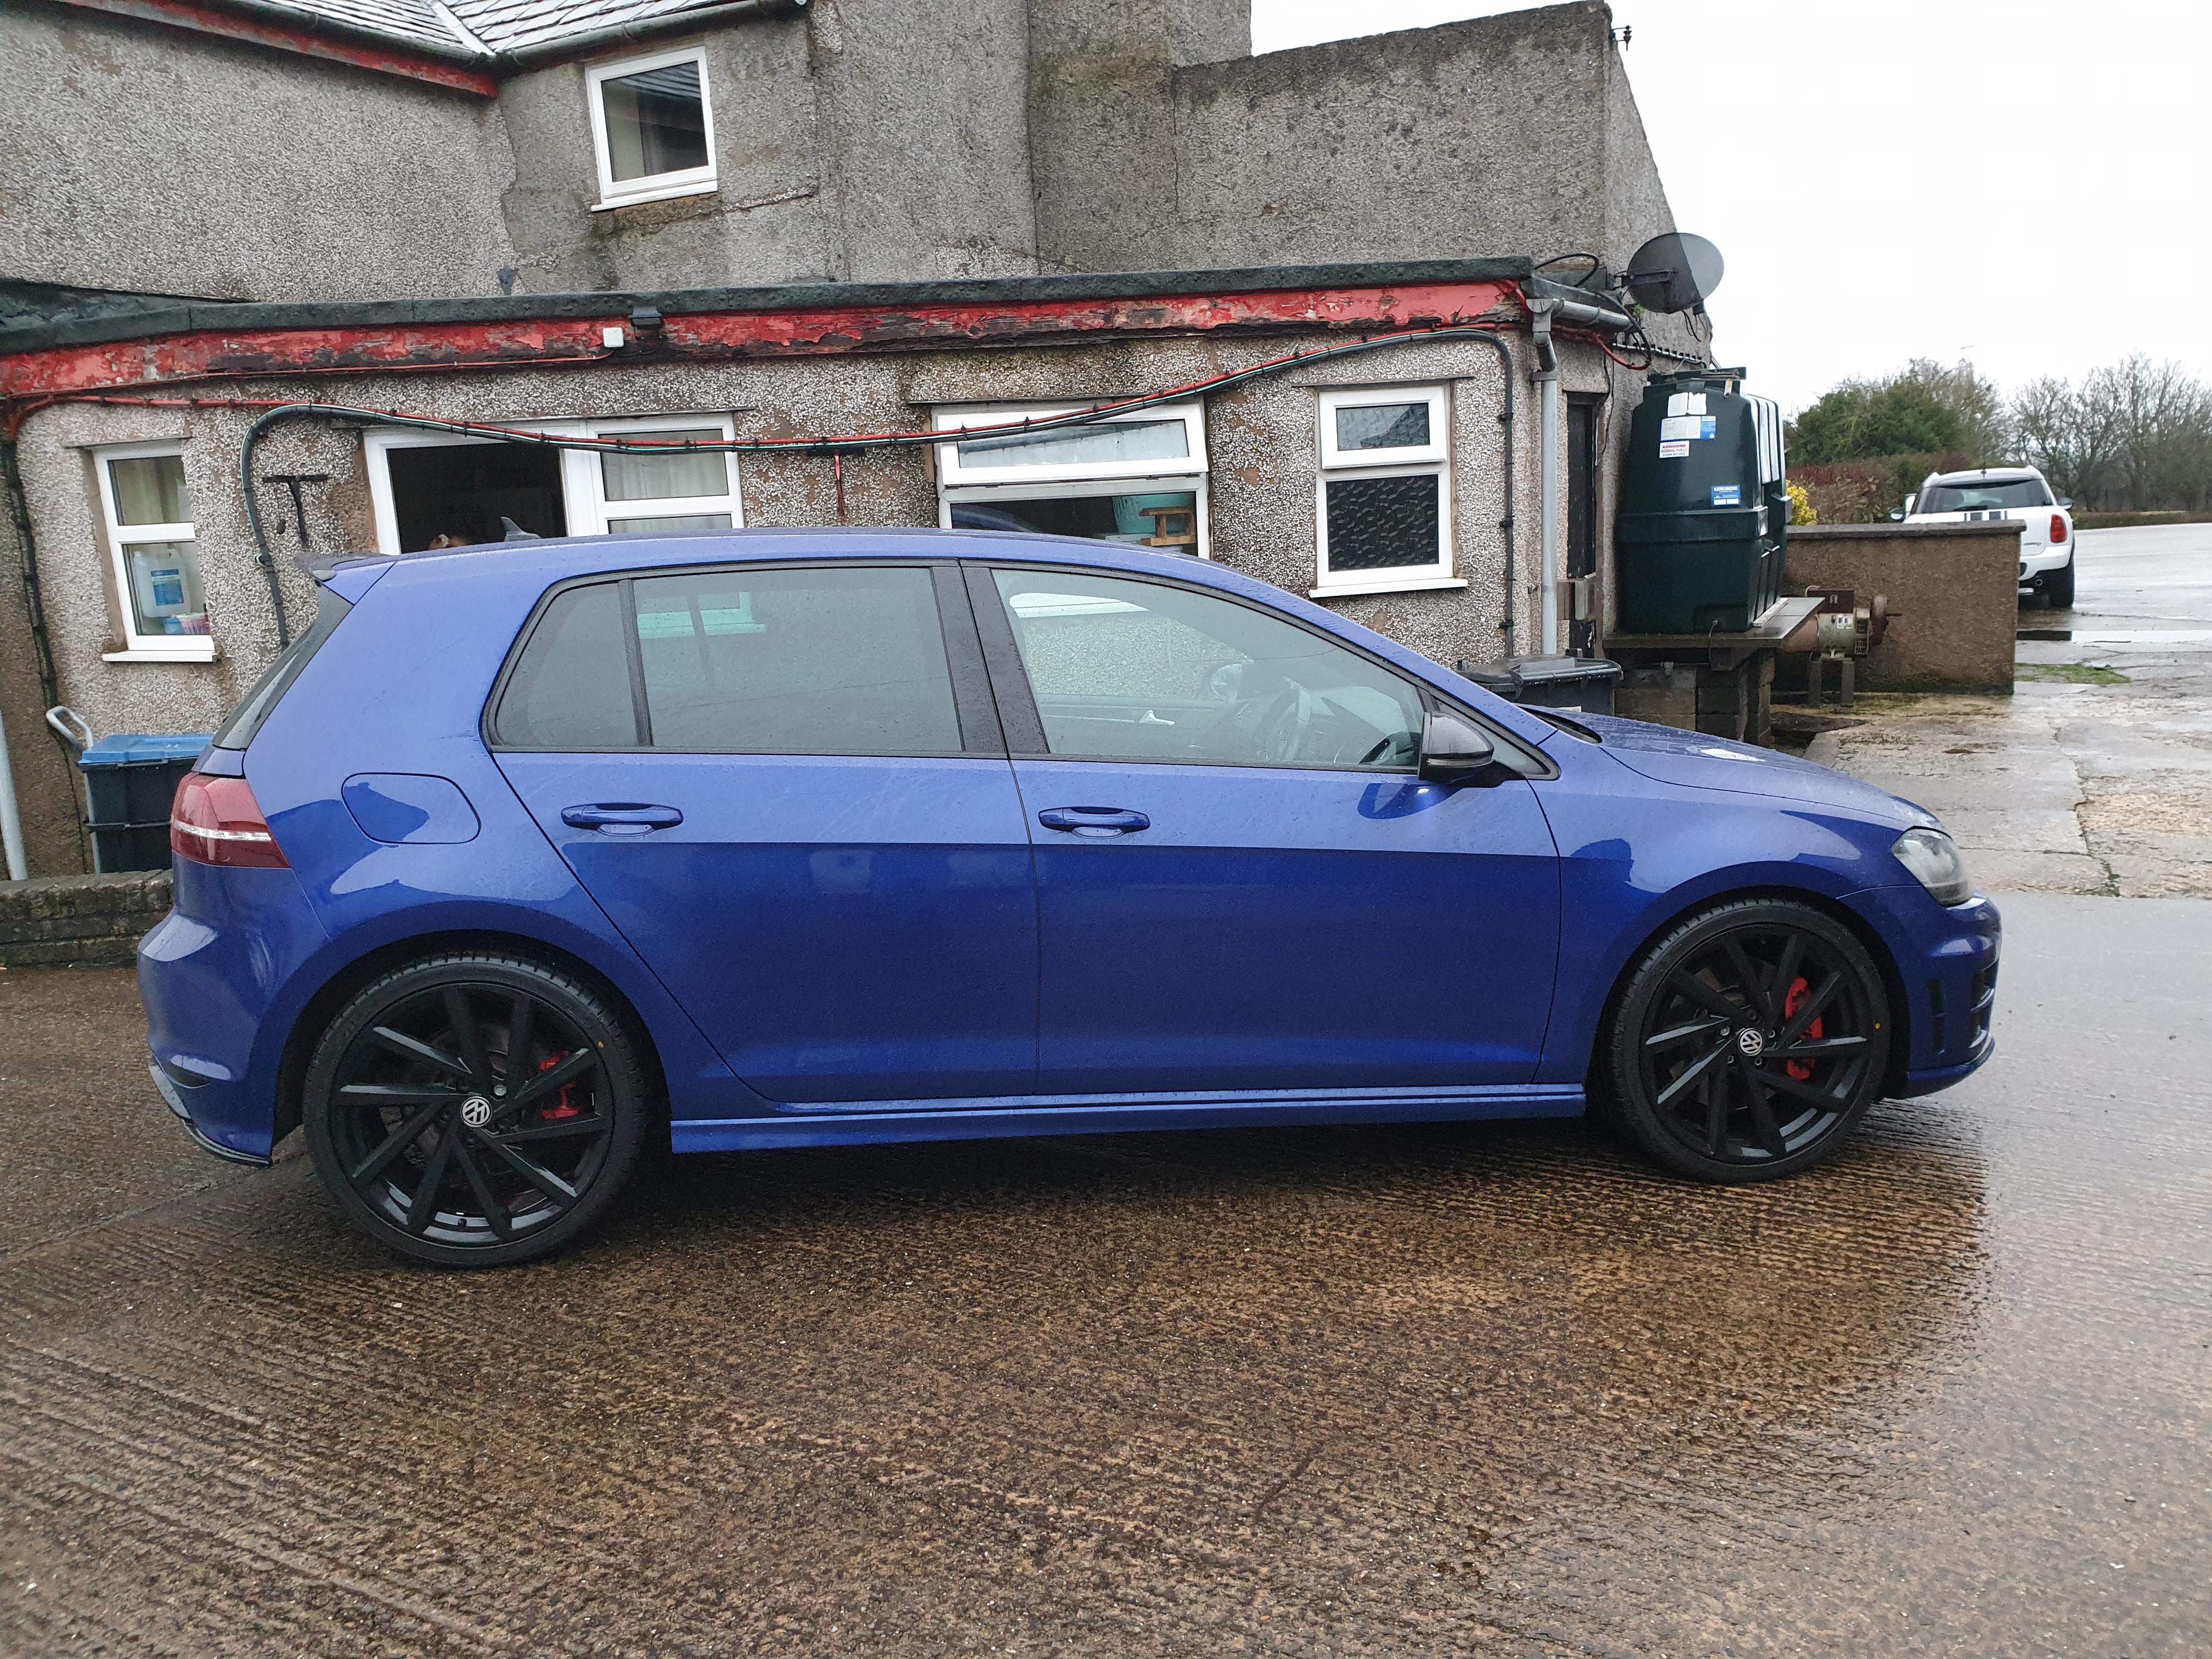
1 pointWell it is goodbye. Now owner of Mk 7 Golf R DSG Good spec with full heated leather, sat nav, reverse camera.... Plus APR Stage 2 ECU/TCU 390bhp Scorpion downpipe and 200 cell cat Scorpion res delete Airtec intercooler MTC inlet R600 turbo elbow Maxton rear roof spoiler lip Mk 7.5 Spielberg alloys and new Falken Azenis 235/35/19's Detailed and ceramic paint protection Puts a smile on the face for sure. Best to all on Briskoda and hope we can enjoy driving again soon. Grant
 1 point
 -
1 point
-
1 point16 days from order to pickup this Saturday. Got lucky. The dealer had one on the way with exact colour and spec as I wanted 😃.1 point
-
1 pointInteresting... I always want new ones on the front. I'd rather manage a bit of oversteer than terminal understeer. Equally, in snow and ice, more tread on the front should provide better traction and braking.1 point
-
The lights were different. The FLift had clear plastic lenses, the original were glass IIRC.1 point
-
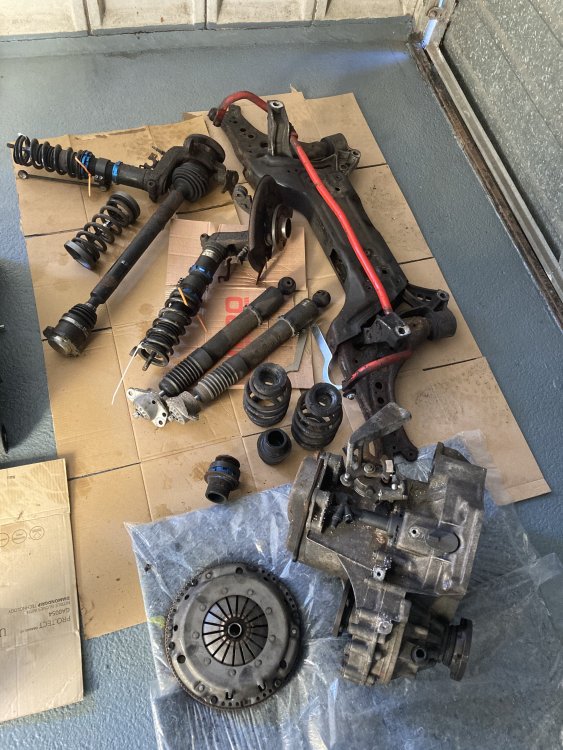
The update New mods awaiting for the Fabia, Gearbox with wavetrac lsd fitted, Scale fully adjustable coilovers, single mass flywheel, eibach front arb. Just need a good clean up and I’m going to paint the box
 1 point
 -
The bonnet parts diagram for a pre-FL (1997) bonnet is here, and for an FL (2003) bonnet is here. Both are showing the same part number for the bonnet.1 point
-
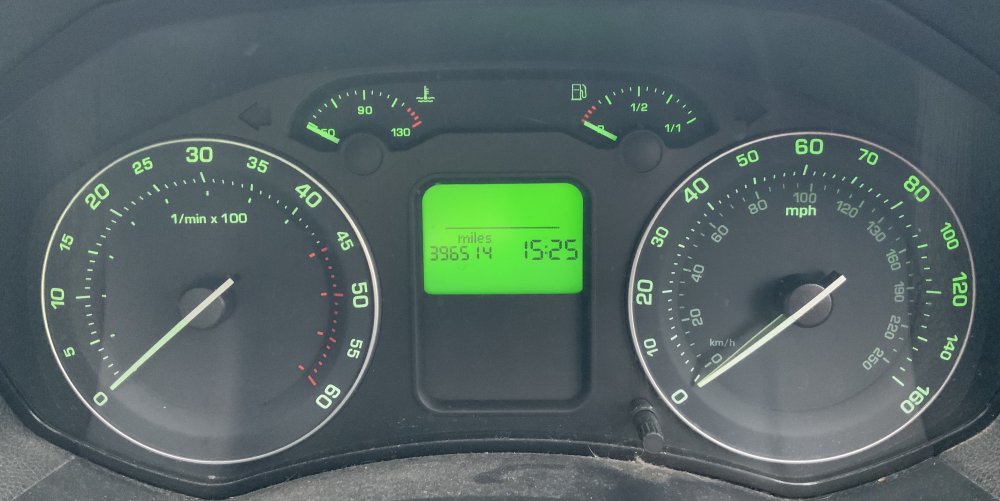
1 point1 pointI had my Octavia 1.9 PD since March 2009 but it has done 396514. First engine had lasted about 168000 a crankshaft bearing shell had broken up so the engine was scrapped. I had a recondition engine fitted and it still going strong with the mileage of 228514. I know it's not oldest Octavia can anybody beat the mileage?
 1 point1 pointIs this a joke thread? Man goes into a doctors and says doctor can you take a look at my pen15, proceeds to flop said organ out whereupon doctor inspects it thoroughly and says she can't find anything wrong with, man replies: " I know, lovely isn't it ". It is now. Come back if it all goes horribly wrong.1 point1 point1 pointO so very green. Not! Feels expensive, feels big, so that will be because it is expensive and big.1 point1 pointI think the air in the UK is more corrosive to cam belt material than in other countries and the UK motorist has a proven track record of being quite happy to bend over and take it up the tail pipe1 point


.thumb.jpg.f83a46b9b3c0d976b9dbffbb523c9874.jpg)


Important Information
Welcome to BRISKODA. Please note the following important links Terms of Use. We have a comprehensive Privacy Policy. We have placed cookies on your device to help make this website better. You can adjust your cookie settings, otherwise we'll assume you're okay to continue.