


Leaderboard
-

moley
Resident Member13Points10,119Posts -
sepulchrave
Resident Member11Points12,534Posts -
Lady Elanore
FREEDOM11Points24,873Posts -
mac11irl
FREEDOM9Points16,636Posts


Popular Content
Showing content with the highest reputation on 14/09/20 in Posts
-
4 pointsNot really a photo, but I accidentally took a slo mo of this (meant to take a high shutter speed picture, but my phone auto assumed I wanted a super-slomo). The Key frame is on a fade up so it isn't all black Water Bubbles by Amanda, on Flickr4 points
-
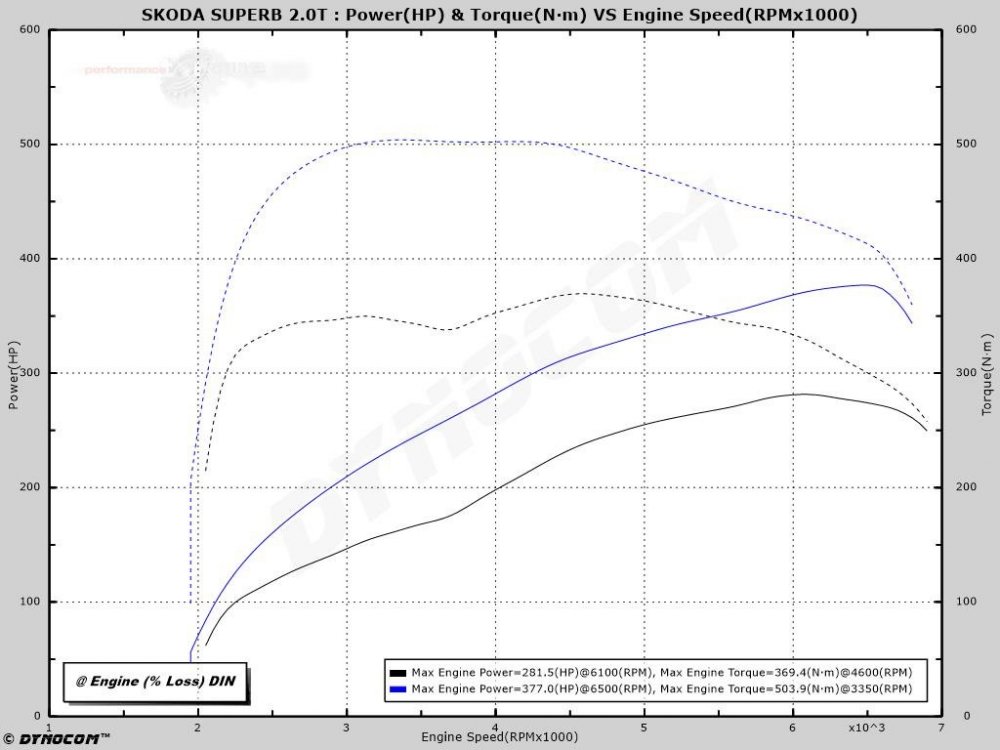
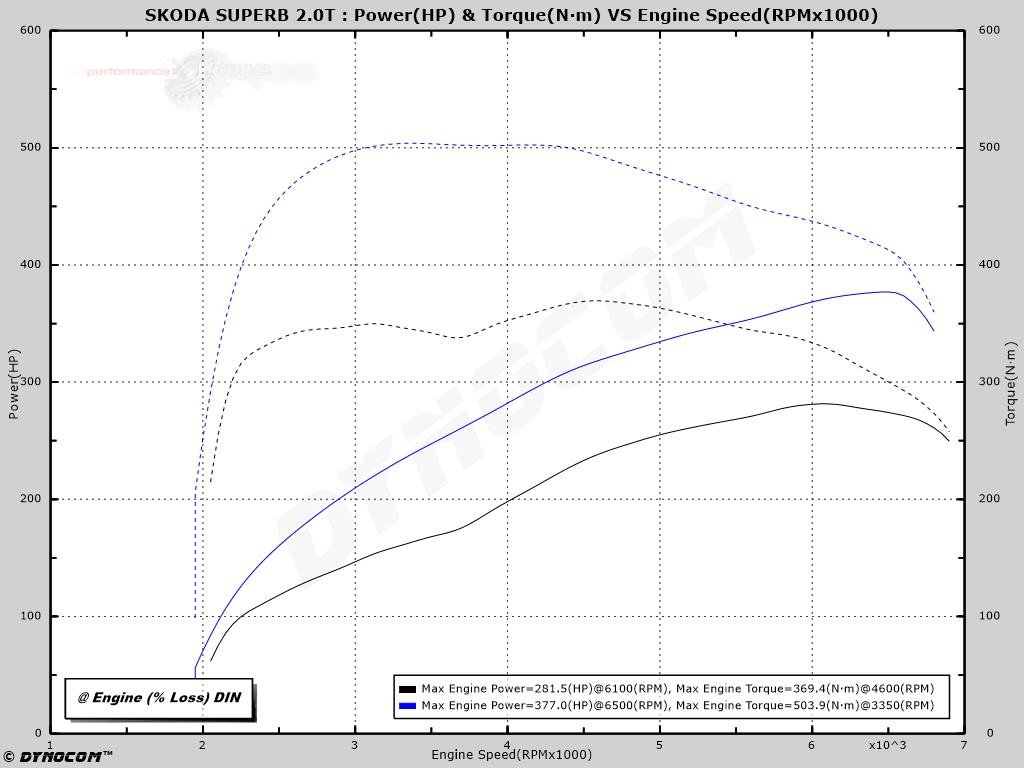
I’m pleased with the results 👌 Custom Stage 1 tune by a local company.
 3 points
 -
3 pointsHi Stonyb1. I'm 6ft tall but I wouldn't describe the amount of effort required to close the tailgate on mine as 'significant' or 'hard work'. It takes no more effort to close than I remember on my previous Roomsters and Berlingo. I have to wonder if the previous owner the Yeti you inspected had changed the struts at some time for a non OE item. They have occasionally been known to fail. Try to view another Yeti and if you find the tailgate easier to close, then get the dealer of your proposed purchase to swap the struts for OE items as part of the deal.3 points
-
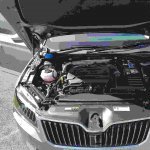
Gloss Metallic Chameleon Purple Blue wrap using Teckwrap USA . The metallic chameleon finish brings out the muscular lines of the Superb and accentuates the side profile spectacularly as well.3 points
-
2 pointsIt's not for tightening, it's for loosening. You should tighten a new filter using your hand otherwise it can be too tight and leak.2 points
-
The technique I employed when fitting mine was to gradually increase the vulgarity of the swear words I aimed at it until it gave in. Eventually worked although the neighbours did get an ASBO served on me 😁2 points
-
2 pointsIt was the 'and became hard work' bit that got me, Lol. If a second or two's effort to shut a tailgate is hard work......... Maybe a building job or kitchen fitting or some hard physical labour might help overcome this issue. No offence intended to anyone......... everyone has their opinion.2 points
-
2 points
-
2 pointsThe Zonda is very 60's Thunderbirds, so it gets a pass on its weirdness, at least in my book. It's also a car I will never own. While the M3/4 is probably beyond my means, even the running cost of a second-hand one will probably be too much for me, it is still almost theoretically possible that I might own one and so it has to look right for my fantasy to live2 points
-
2 points
-
2 pointsThe colours I can't stand are the ones that make a car disappear into the background on the road. VW seem to have decided 50 Shades of Grey are the way to go (which was one of the key reasons I decided against a Tiguan) and SEAT have actually got an Ateca colour called Dark Camouflage! I wonder what the insurance premiums will be for that??2 points
-
2 pointsThank you for all of your suggestions and feedback. I visited the garage on Friday to look at the engine and discuss options. I've decided to go ahead and get the head replaced. The actual part is around £1100 new from Skoda. The garage searched for a reconditioned head but was unable to source one fitted with all the necessary parts. The additional work in the bill includes replacing the timing chain and putting on a new tensioner as apparently the original plastic part is a known issue. I've also agreed to let them replace the water pump as it is easily accessible with the engine dismantled. I did search to see what cars I could get for £3500 - nothing came close to the current spec of my Superb, so I'm comfortable, but not happy of course, to pay out. I'll shove the cost onto a credit card and worry about it next year. Thanks again! Richard2 points
-
2 pointsI have always copper greased bolts whether it be a wheel nut, strut bolt, drop link, lower arm etc, Simply for ease of taking them off next time. Particular anything on the underside of the car and with living in Scotland, The winter months & grit isn't too kind on bolts and nuts and there's nothing worse that having to cut/heat nuts & bolts off.2 points
-
Hi all ! I've changed the brake fluid on my Superb Mk3 few weeks ago. I fumbled a bit, but the maintenance manual found on cardiagn.com helped me a lot! Requested parts : - 1,5 to 2l of DOT4 brake fluid. Don't forget to get ESP compliant one. - Break cleaning spray - Difficulty level: 2 - Operating time: 1h or may be much more... (see below... ) - Number of operators: 1 - Required tools: ¤ A bleeder kit, including container for used brake fluid. ¤ A syringe (brake fluid resistant) ¤ A wrench of 11 ¤ Torque wrench and socket of 11 ¤ Jack ¤ Cloths ¤ Multigrip pliers ¤ A small torch. Possibly 50 cm of aluminum foil + masking tape ... (you will understand below) Tools: I've bought the following brake fluid bleeder kit: It can be found under different names of resellers and on different well known online shopping sites for ~ 55 to 60 €. A little tip, when making the choice, look at the opinions of buyers, because there are several diameters (even if there is a standard for European vehicles). For the one I chose, there were a few previous buyers who had used it on VAG vehicles. A good guarantee to avoid any bad surprises... A very simple and useful improvement before starting: make graduations on the used fluid container: A graduated beaker, an indelible marker and a strip of scotch tape (to mitigate risk of erasing by rubbing (Skoda... Simply clever! )). Well... I may drink half of pint or a soda can from time to time, but assess 20 or 30cl just in a glance, is way over what I'm able to do... or ... I should drink more often ... Well, here at least , one knows how much fluid comes out ! I did the same thing on the bleeder tank, to be able to asses the remaining quantity before I start flushing the last caliper: It prevents any air from entering the brake fluid tank . Otherwise, you may need to repeat the process on this caliper. Dealing the syringe, I've bought this one for ~20-25€ (also on a well know shopping website) : 1st Step: Preparation. First, check that the dip tube in the bleeder tank is correctly set and goes deep enough to the bottom to avoid any risk of defusing the system. The bleeder tank must then be filled with 1.5 to 2l of brake fluid. If you fill it with only 1.5l, place the tank so that the dip tube is really at the low point (not obvious in the engine bay, that it is perfectly horizontal, especially if you remove the wheels and use a jack) Keep the new brake fluid cans, once you've poured the brake fluid into the bleeder tank. You'll need them to collect the old brake fluid to bring it to a recycling center. Once here, start pumping to pressurize the bleeder system (still NOT connected to the brake fluid tank of the car) I've set the pressure ~ 1.2-1.4 bar. This is more than sufficient, even if the system is can be set up to 4 bar. Anyway, above 1.2 bar, pumping starts getting a little harder. Wait for ~30s and check there's no leaking. The pressure shall remain steady. If any leak appears, just tighten the bleeder tank cap a little bit (use multigrip pliers if necessary). When there's no leak anymore, press the pressure relief valve to make the pressure drop down. Now you can remove the brake fluid tank cap. Remove some brake fluid using the syringe, until the level gets down to the lower part of the yellow strainer. Then put the adapter cap onto the tank and tighten it firmly (with your hand is enough. And that's a good point, given the poor accessibility ). You can now connect the hose to the adapter cap: Pressurize the system again and make sure that there is no leak around the adapter plug on the brake fluid tank. (no small bubble at the bottom of the adapter cap). 2nd Step: Flush the calipers The bleeding order is the usual one: 1 - Rear Right / 2 - Rear Left / 3 - Front Right / 4 - Front Left. Considering it was the first time I flushed the brake fluid on a car, I rather removed the wheels for a better accessibility. But it should be feasible to do it without removing the wheels. In this case I would recommend to protect the alloy wheel with aluminium foil stuck with maksing tape (since very easy to remove). This is to avoid accidental damage on the rim paint. Therefore, without disassembly, we can estimate the required time to 1 hour. If you remove the 4 wheels, it is rather 2 hours. The bleeder screw is on the upper inner face of the rear calipers. It's now time to remove the protective cap from the bleeder screw. Then install the old brake fluid container, the small chain helps making the container safer (no reversal possible) : Before starting, spray some brake cleaner on the caliper and on the bleeder screw. Fit the rubber end of the collecting container securely, then loosen the bleed screw with the 11 mm open end wrench And... Here we go ... No panic, it flows very slowly ... With 1.2-1.4 bar, it allows you to take time .... At the beginning, the used brake fluid is quite dark, well ... here not that much. I really expected worse. Then, it cleared up progressively until it was really very clear ... So clear that I even said to myself: "crazy, it's even clearer than a Bud light or a Tsingtao!". .. That is to say ! Well, I give it to you, the used fluid wasn't dark as a Guinness either ! Check there's no air bubble in the system all along the bleeding operation. The recommended volumes for calipers are identical for both manual gearbox and DSG gearbox. Rear Calipers : 0,3L each Front Calipers : 0,2L each In the maintenance manual, you can also find the recommendation to bleed the clutch slave cylinder for manual gearbox only (with 0.15l). But after discussion with a professional, this seems very rarely done and is more risky since it may introduce bubbles into the brake system. So for manual gearbox owners, I let you decide to do it or not. Note that the maintenance manual does not specify whether these are minimum volumes or whether they already include margins. Even if the Brake fluid was already the right color well before reaching the recommended volume, I had rather to let it flow a little more. Therefore 1.5L is really a minimum quantity to buy! Once you think this is OK, simply tighten the bleeder screw gently with the 11-wrench. Remove the rubber cap from the bleeder screw and tighten at 10 Nm with the torque wrench. N.B.: If you haven't removed the wheels, it does not seem easy to access the bleeder screw with a torque wrench, unless you have a socket wrench (fork type)... Once the first rear caliper has been flushed, old brake fluid color is easy to check as the used container is being filled. When the 2 rear calipers are flushed, empty the old fluid container into the new brake flluid cans (but empty), which you kept from the beginning. This container has a too small capacity to process the 4 calipers, indeed For the front axle, the bleed screw is approximately at the same place, on the inner upper face of the caliper: 3rd step: Level adjustment Once the 4 calipers have been processed, the pressure in the supply tank must be released using the pressure relief valve. You can then disconnect the quick connector from the adapter on the car brake fluid tank. Warning! Pay attention to possible brake fluid drops, when you remove the whole system. Brake fluid is very corrosive on paintwork!!! Adjust the brake fluid level in the tank to set it between min. and max. marks. Don't forget to take the discs & brake pads wear into account (as mentioned in the workshop manual)! This being said, I've checked the discs and pads, they are at least 5mm above the minimum thickness and I'm almost certain that I'll have changed the brake fluid before the brake discs or pads. ! Use a small torch to try seeing the fluid level in the tank. But not that easy... When done, you can think of "finalization". Replace the brake fluid tank cap. 4th step: retarting Now everything has been tighten or closed, press the brake pedal several times. It should not go down more than 1/3 of its stroke before you feel resistance. Otherwise, the calipers must be flushed again, because bubbles may remain in the system. Note : the brake pedal may be hard with a very short stroke (1cm). But when you think you've reached the stroke end, you may notice a curious phenomenon: the brake pedal slowly fade under your foot ! Don't panic, it should go away after a test drive! A test drive will now allow checking the correct operation of the ABS system and that there is no obvious asymmetry when braking. Before starting, check that the brakes work from very low speeds. Then brake strongly to test the ABS unit and check it triggers normally. Normally, if you get here, everything is successful! Well done ! If you want workshop manuals, for maintenance and brakes, you can download them for cardiagn.com Enjoy !2 points
-
2 points2 points2 pointsStarting to split hairs here chaps, I've used copper grease on wheel bolts for forty years and then torqued them and never had one come out or even loosen slightly and that includes van wheel bolts at 240Nm. Because they're in and out so much it makes sense to protect them from seizing, you can always tell when they've been put in dry and used through the winter because you need the big bar to get them out and they make a horrid screeching sound as they crack off.2 points1 pointFront right fog light not working. What a pain! First few drives good though. Happy with feel, power etc Nice inside etc1 point1 pointMe too! I just picked up a MY2018 280 and all I can say is wow! Can’t imagine what it’d be like at stage 1, launch control was enough to make my 12 year old daughter scream earlier today and it surprised me how quick it got to 60/70 mph!1 pointJust disable kessy when you lock the car, no need for a faraday bag. tom1 pointThe car got traded in today with the original Bolero head unit re-fitted so the Kenwood and all it’s associated bits is now listed on eBay if anyone is in the market for one! i won’t post the link here so as not to breach forum rules (?) but it should be easy enough to find. moderators please let me know if this goes against forum rules....1 point1 pointThe suspension will be completely knackered after sixteen years, just replace the whole lot, the parts are not expensive.1 point1 pointSuccess. New Battery solved the problem. Thanks to those above who pointed me at. Added a video for others who may stumble upon this... Excuse the Dusty car. It really is a clean car, although the dust and state of the Engine bay may not convince you. (Screen shot of the battery I bought as well...)1 point1 pointOne more thing. The resistor got burnt because you reversed the wires at fuel sender. Before connecting the repaired PCB, you have to connect the wires correctly to fuel sender.1 point1 point1 point1 pointShould have only been like 3 replies to this thread... unsure why the discussion on grease was needed haha1 point1 pointBack on the original topic, I called Skoda for an update as I'd not heard from my dealer if the car had changed status (build week was scheduled for last week). Apparently it's now waiting for shipping. So I guess it was Assuming 4 weeks, then it'll be exactly 8 weeks from order. Without wishing to re-ignite ^^ discussion, I asked the dealer what would happen Jan 1 and he said he had no idea and they were waiting for advice from Skoda UK. As it won't be long before orders taken will fall into '21 delivery. He was pretty worried about it both in terms of potential confusion and unhappy customers.1 point1 pointNot the Forrester but have a mate who had a 2.0 Impreza Sport (ie the non-turbo-nutter one). He absolutely loved and and put a lot of miles on it... until someone decided to use a spade to open the back door to his house and nick the keys and car...1 point1 point1 pointWe spent the first 3 months of this year (remember the time before Covid Acopalypse?) in Aus, so Aussie summer with really strong sun. We found that the best cars to see in the distant heat haze were invariably white. Much more visible ahead than any other colour, we could see a white car without lights on before many other colours with lights on. Very useful when overtaking Road Trains. Just an aside in this colour debate.1 point1 pointNo it does not look horrendous, in fact it is nicer than several of the colours that you have to pay through the nose for such as - Meteor Grey, Candy White, Moon White, Magnetic Brown, Brilliant Silver and Velvet Red. White is the worst colour for a car, silver is just boring, brown is the colour of ****, Meteor Grey looks like primer, and Velvet Red looks anything but special.1 point1 point1 pointI couldn't find the footnote that the asterisks were referring to. However, a PDF document on the page had this information:
 1 point1 pointThank you very much I bought the part and fitted myself everything is normal now. Thanks a lot1 point1 pointIt's only the 8 valve 1.4 mpi engine that has a slightly lumpy idle as a result of tuning the prehistoric lump to meet emission standards, and they only used that engine until 2003. None of the other MK1 Fabia engines have a lumpy idle by default.1 point1 pointJust an update for anyone who cares to know more. A day after the above post the check engine light came on and after being told it was an exhaust sensor and having that replaced by the dealer the same issue occurred, the car has been back with the dealer and has now been diagnosed with a faulty camshift actuator (hence the check engine light). Apparently as this has an effect on the timing of the motor the ACC and Start Stop Systems can't work effectively hence the error. Searching around this seems to be quite common on the EA888 Engine. I now feel comfortable that the real error has been detected and fixed.1 pointIt probably wont be any cost saving over here in NZ as I would guess conservatively that the VRS EV will be easily be a minimum of $10k more than a Vrs Kodiaq is now. With a plan covering services at $400 a year and $2000 for the diesel to do an average say 20,000kms in mileage yearly, that's 4 years of ownership just in the up front cost without factoring the actual electricity cost and the inconvenience of charging and the limited range to overcome. EVs are going to pay road user tax here soon also which is fair enough too.1 point1 pointI beleive you meant me - @pab567 I always recommend MIB STD2 PQ units1 point1 pointJust an update. I have read a lot of people complaining about the humming/vibrations in 2 cyl mode at 1400-1600 rpm especially with manual transmissions. This issue is not being taken care off for years. People reported this with the 1.4 TSi ACT / COD engines back in 2013-2014. It is rather annoying. I seriously think that at one point I will turn it off completely (reprogram the ECU). Too bad I have bought extended warranty for 5 years. So, guys I would recommend to avoid the 1.5 TSi. It is a lovely engine but the 2 cyl mode is annoying. Some people will not hear those hummings and vibrations but most of us will hear it. The cure for now is to turn on the radio and enjoy the ride.1 point1 pointfor mine is: 1. Adjust seat to desired position 2. Press SET 3. Press and Hold '1' until an acoustic confirmation is heard. Release '1' and the setting is stored in '1'1 point1 pointGloss Metallic Chameleon Purple Blue wrap using Teckwrap USA . The metallic chameleon finish brings out the muscular lines of the Superb and accentuates the side profile spectacularly as well.1 point1 pointNot if there's a bad connection between alternator and battery, or if the battery itself is in poor condition. Is it the car's original battery? (Skoda part number on top surface usually suggests this, few people replace with genuine).1 point1 pointMy point is that I ordered the car when there was no import duty. I agreed a price with the dealer and have been told by Skoda that the car is being built at he end of September giving them plenty of time to have the car imported into the UK before the tax change applies. I would not be taking court action against the government, it would be against Skoda UK for causing me the extra expense by failing to supply the car on the schedule that was agreed. On signing the contract I very specifically informed the dealer I had to have the car before the end of the year. By accepting my order both the dealer and Skoda are contract bound by that condition.1 point1 pointcommon engineering knowledge Never lubricate threads or bolts unless stated by the manufacturer. Its not the fact they "may" come loose, it's that lubricating wheel bolts means you will apply a larger load to the bolt to get the same torque figure as there is less friction on the threads so there is always a risk of stripping the threads and or stretching / weakening the bolt. You won't notice it when torquing them up as you just wait for the click of the torque wrench, but the damage that "may" occur you simply won't know / see. Just clean the threads and fit dry.1 point1 point1 pointGenerally, its best to slightly loosen the nuts prior to lifting anyway. If you know they are stuck (Not been removed for ages) Try loosening a screw threads turn each nut, move the car a metre or sos, then jack up, axles stands/chocks, lets to finish. When refitting, smear the touching faces of the wheel and hub, with a little copper grease, making sure not to let it touch the brake pads and the discs braking area.1 point1 pointGreat to hear @Sandgroper. But in case anyone uses this for reference, what you actually did is slightly different from what (i think) you described. @BOD20 is spot on - the two folders and the metainfo file need to be copied to the root of the card / stick. They can be copied at the same time - you don't have to do them individually. But it sounds like originally you copied the whole high12 folder onto your card, meaning the two mib folders and metainfo file were not at the root. Thus the car couldn't read them. Sorry for the pedantry, but it might help someone else 👍.1 point1 pointThis is the procedure for the Satnav update for a Columbus 9.2 inch using a Windows 10 PC to download and prepare the update. No extra software required for a Windows 10 pc (i.e. you don't need to use 7zip or anything else). The procedure for Amundsen is different. 1. Went on to the Skoda update portal, put in my VIN and the ECE2020 maps update was available. 2. Downloaded the map file to my PC. It was 26 GBytes and took about 2 hours on my average 32Mbps broadband connection 3. This gave me a zipfile called "HIGH12_P184-EU_2020.zip" 4. I unzipped this to the hard drive of my PC (Right-click on the file and select "Extract All") 5. This took a while but I ended up with a new folder with the same name as the original zip file ( "HIGH12_P184-EU_2020") 6. Inside this folder were two subfolders - Mib1 and Mib2 - and a file called metainfo2.txt. These 3 items are all that you need. 7. Took a 32 GByte USB stick, connected it to the PC, and formatted it to FAT32 (go to "This PC" in File Explorer, right-click on the USB stick icon, select "Format" and select "FAT32" as the "File system"). 8. I selected the three items from step 6 above (i.e. the folders Mib1, Mib2 and the file metainfo2.txt ) and copied these to the USB stick 9. This process took about another 2 hours 10. Connected the USB stick to the USB socket in the car. 11. Switched on ignition, opened Satnav, tapped the settings icon, then "Version information", then "Update (SD/USB") 12. It took a few minutes but then it started to upload the data with a percentage display showing progress 13. It took about 40 minutes to complete the upload - ignition has to be on so best to do this whilst driving somewhere. That is it - but note the time it takes to download, copy to USB, and install in the car. Note there should only be 1 file "metainfo2.txt" and 2 folders "Mib1" and "Mib2" at the top (root) level of the USB stick. If there are any other files showing in addition to those then delete them from the USB stick before step 10 above.1 point1 pointHi. My update went smoothly yesterday. (Car is a 2017 L&K) It was the first long trip for ages so got the USB stick ready before I left home. Right click and format usb stick (128 Gbyte) on a Windows 10 laptop. extfat format for this size of USB Used VIN and downloaded zip file. took about an hour Went to the download folder, selected the zip and extracted files to the root of the USB stick. Let this run overnight as it was taking a long time. Contents of USB stick were: Mib1 (folder) - Mib2 (folder) - metainfo2 (text document) Put in car as I left home. (Centre console USB socket) Selected upgrade via head unit. Now it took a few minutes reading the USB (probably 5 or so) and then prompted to confirm upgrade. The upgrade completed about 45 minutes later. The last time I did it it did not seem to take so long to inspect the USB from what I remember. Patience is required here. Xlray.1 point


Important Information
Welcome to BRISKODA. Please note the following important links Terms of Use. We have a comprehensive Privacy Policy. We have placed cookies on your device to help make this website better. You can adjust your cookie settings, otherwise we'll assume you're okay to continue.
Account
Navigation
Configure browser push notifications
Chrome (Android)
- Tap the lock icon next to the address bar.
- Tap Permissions → Notifications.
- Adjust your preference.
Chrome (Desktop)
- Click the padlock icon in the address bar.
- Select Site settings.
- Find Notifications and adjust your preference.
Safari (iOS 16.4+)
- Ensure the site is installed via Add to Home Screen.
- Open Settings App → Notifications.
- Find your app name and adjust your preference.
Safari (macOS)
- Go to Safari → Preferences.
- Click the Websites tab.
- Select Notifications in the sidebar.
- Find this website and adjust your preference.
Edge (Android)
- Tap the lock icon next to the address bar.
- Tap Permissions.
- Find Notifications and adjust your preference.
Edge (Desktop)
- Click the padlock icon in the address bar.
- Click Permissions for this site.
- Find Notifications and adjust your preference.
Firefox (Android)
- Go to Settings → Site permissions.
- Tap Notifications.
- Find this site in the list and adjust your preference.
Firefox (Desktop)
- Open Firefox Settings.
- Search for Notifications.
- Find this site in the list and adjust your preference.