Leaderboard
-
MikeTheThinker
FREEDOM12Points8,481Posts -
AnnoyingPentium
FREEDOM12Points5,646Posts -
pinkpanther
FREEDOM8Points3,911Posts -

lancpudn
Members8Points862Posts


Popular Content
Showing content with the highest reputation on 03/05/22 in Posts
-
3 pointsThe dsg boxes are generally reliable but do need oil changes. Usually around 40k miles but this can vary. The box on the 1.5 (dq200) is specific to lower torque cars (1.0, 1.2, 1.4, 1.5 and 1.8 TSI's and 1.6 TDI). It has a dry clutch setup and the manufacturers say is sealed for life. Although some on here have had it serviced successfully. The box on a lot of the 2.0 cars (dq250)(diesel or petrol) is a wet clutch setup and is known for its reliability and strength. Newer boxes are similar in robustness to the 250 but with improved shifting and sometimes more gears. They also can handle more load and often used in higher power applications. Basically if looking at one make sure it has been serviced to the correct regime and you should be good.3 points
-
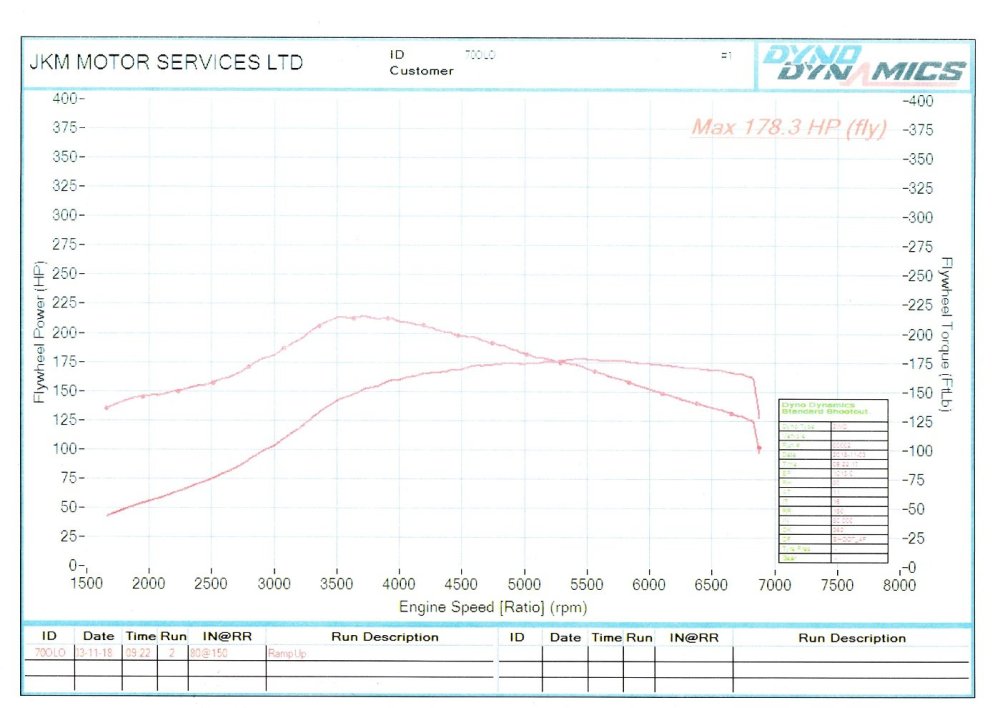
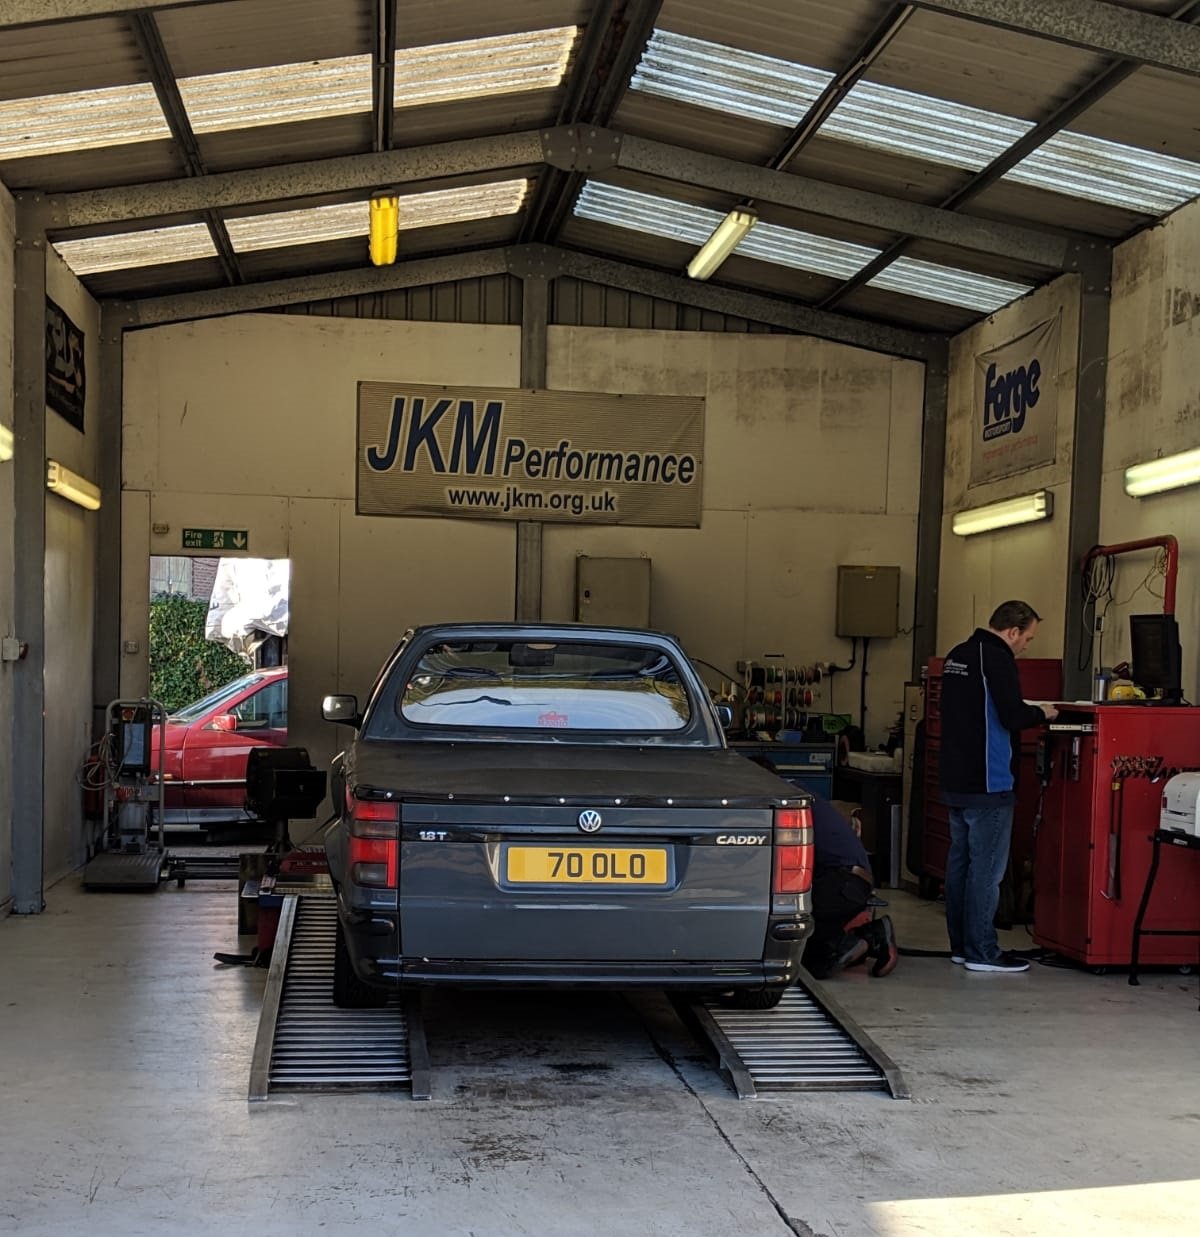
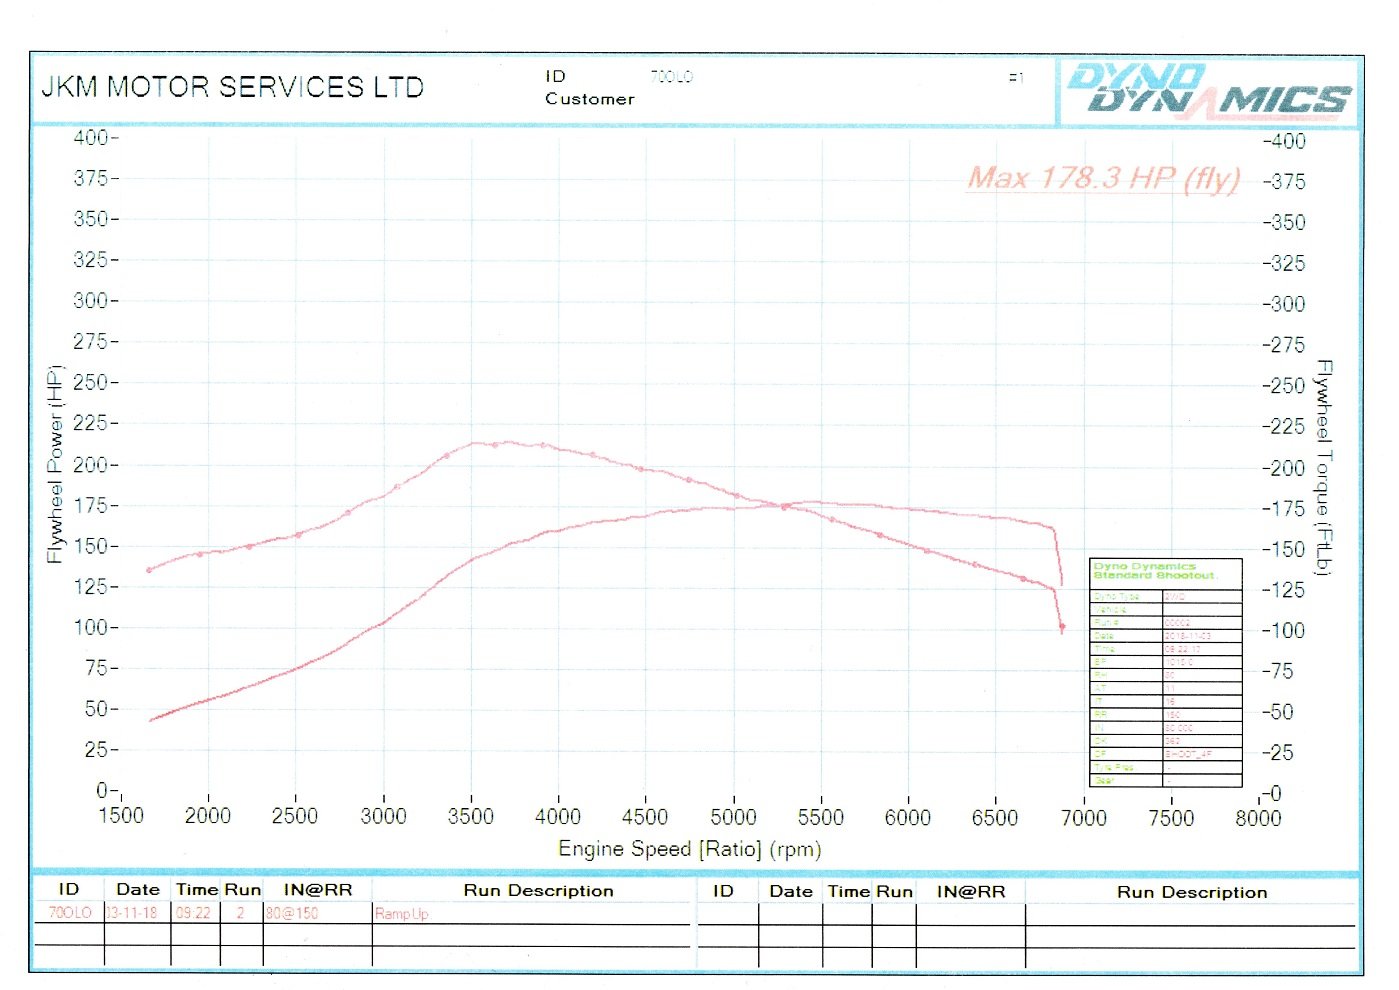
2 pointsThis is in the wrong chronological order, but I forgot to include it at the time so I have added it now. In Nov 2018 there was a BriSkoda rolling road day at JKM, which is not far from me so it would have been rude not to take part. Unfortunately I had another commitment, but my son took the Caddy along. It made a little under 180bhp peak flywheel power, which is, as is traditional, a little less than what I was hoping for, but not too shabby for something that emerged from the factory with one third of that. Frankly whatever power it made, I was mostly just relieved it did not go bang on the dyno.

 2 points
 -
When I bought my Octavia I got a spec sheet from this eBay seller for 3 euros; https://www.ebay.co.uk/itm/224631127243. Arrived in a couple of hours I recall.2 points
-
2 pointsWell, spoke to my dealer this morning and no change, no update. So I'm done, my order has been cancelled and I've bought a 7 seat Kodiaq this afternoon. 1 year old with 8k miles. It's being delivered Friday lol. The new dealer (different branch) said that the hold up on Octavia's is the wiring harnesses from Ukraine. Told me he very much doubts I would see the Octavia I ordered this side of Nov, which by going from peoples experiences on here is optimistic!2 points
-
Just a brief update, its been a week now and not a squeak, or squeal to be heard. Cautiously optimistic but it looks like its sorted. 👍2 points
-
2 pointsThat's what I would expect. The engine uses fuel when idle and while stationary you're getting 0 miles/km to the litre/gallon/whatever unit of fuel. As soon as the car is moving you're getting more than 0 miles per gallon. The average fuel consumption (which is probably what you're seeing on the dash) increases when you're at idle/stationary.2 points
-
2 pointsI phoned the dealer again as I hadn't heard from them (salesman had left) and it was indeed built last week, Week 17. So all on time. Expected collection will be "in a few weeks" - probably right when im on a weeks holiday. 🙄2 points
-
2 points
-
Could be one for the life hacks thread in Off Topic.2 points
-
Hi all, As many VAG cars, my Superb Mk3, is fitted with a DSG6 (DQ250) gearbox. Here is a tutorial to change its oil and filter on your own. You'll probably tell me: What's the point with it? Just have a look on Google or YouTube and you'l find plenty of them! That's true, but having done this exercise, I could see that it is very rare to have all information in a single tutorial. I will therefore try to be as exhaustive as possible. Here a list of some Skoda models also DSG6 equipped (I nevertheless let you check on your own, since depending on engine type or MY, some may be DSG7 fitted⚠️ instead of DSG6) ! - Octavia 2 - Yeti - Kodiaq - Superb 2 - Superb 3 First of all, here is the DQ250 gearbox: We're going to focus on the following items: #17: Filter housing - Tightening torque : 20Nm #18: O-ring - P/N N910 845 01 (normally sold with the filter) #19: Oil filter - P/N 02E 305 051C #26: Oil pipe - Tightening torque: 3Nm #27: Seal ring - P/N N 043 089 2 (normally sold with the sealing plug) #28: Sealing plug - P/N N902 154 04 - Tightening torque: 45Nm Not shown on this pic: DSG Oil - P/N G 052 182 A2 - 6l - Difficulty : 2 - Time needed : approx. 2h - Number of person needed : 1 - Necessary tools : ¤ VCDS software (or similar, To be confirmed) ¤ 24mm socket ¤ 8mm and 14mm Hex ¤ Torx 25 and 45 ¤ Ratchet or classic wrenches for disassembly ¤ Torque wrench(es) to apply specified torques (3 / 20 / 45 Nm) ¤ Short and intermediate extensions for ratchet or torque wrenches to enable easier access to screws ¤ Small flat screwdriver ¤ Filling hose VAS6262 ¤ Wooden toothpick ¤ Small fork ¤ Slip joint pliers ¤ Oil drip tray ¤ Twine (about 80cm long) or an old metallic hanger (wire one) ¤ Wide masking tape ¤ Rags ¤ Lifting means Concerning VAS6262, you can find one on numerous website at various prices. Without switching to a much more expensive pump model, I suggest taking a filling hose with a 1/4 turn shut-off valve close to the adapter on the can side. These ones are less widespread but still at affordable price and of course easier to use, since you can work without being 'showered' with oil. I've chosen this one on toolstogo-uk.com https://www.tools2go-uk.com/13664247/gear-oil-filling-hose-for-vag-dsg?g…=&Lng=en Dealing now with the DSG oil kit, you really have to be careful on the kit content ⚠️. Indeed some kits only content DSG oil and oil filter, but no sealing plug nor seal ring! ⚠️ Warning: Prices can really be different from a website to another (starting form 90€ up to ~200€ !) Chose the right one! After hours of searches and checks, I finally bought the Febi-Bilstein kit, which can be found on autodoc.co.uk for 100€-ish https://www.autodoc.co.uk/febi-bilstein/15821763?search=FEBI BILSTEIN Transmission oil change kit (171762) It effectively contains: - 6l of gearbox oil - DSG oil filter (#19) and its O-ring (#18) - Sealing plug (#28) and 2 seal rings (#27). By the way, I still don't understand why 2 rings?🤔 Note: I did not take time to ask for OEM spare parts prices by my local dealer. Step #0 : Preparation You need to lift the car high enough to get under the car and to get enough space to move your arms comfortably around the gearbox. Note: Though you've lifted the car, it needs to remain horizontal to make a proper filling with right oil level (see step 7). Step #1 : Air system removal Start with removing the air box. You first have to remove the 2 T25 Torx screws (#1), then unclip the cover on the rear face (#2) and lift it by rocking it as shown by arrow to avoid breaking the 2 lugs at the front side of the cover (#3). Finally simply push to the rear to release the lugs (#3). You now have to unclip the 2 lugs, where the 2 torx screws you have just removed where tightened (#1). Be careful for this step, since these 2 lugs may break. I've seen 1 or 2 pics of broken lugs on this forum. ⚠️ Then, you need to push the airbox backwards, so that its front side can 'rip' other the bonnet slam panel. Then unclip the hose (#3) and with a rocking motion back and forth, release the front side so that the airbox can be fully removed. However, do not hesitate to put one hand on the back of airbox to be able to pull forwards more easily (#4) and take the airbox out, which is quite large. This being done, you need to remove the air filter housing. This is simpler. Start with unplugging the small hose (#2) at the air filter housing outlet and unplug the air flow meter connector (#3). ⚠️Be careful: There's a small grey latch on the connector (if equipped) to unlock before pulling the connector off, otherwise it won't come out or you risk ripping it off. Now, remove the metal collar (#4) on the large air hose downstream the air flow meter. Use a slip joint plier for this. You can now unclip the air filter housing, which is simply fitted onto 3 shock absorber pins (#1). Pull vertically upwards. Don't hesitate to pull hard (continuously and not jerkily), it holds up really well! The 3rd pawn is under the air box (dotted circle), but it comes out quite easily when the other 2 are already out. Once the air filter hosing has been unclipped, all you have to do is disconnecting the large hose, downstream from the flow meter. Be careful to 'close' the hose to avoid any foreign object damage or even just dust towards the engine. Masking tape will do do the job! Step #2 : Battery removal To take it out, you need to remove a 13mm hex screw, which tightens a retaining bracket et holds the battery in place. This screw is on the front of the battery (#5 on previous pic). Then remove both battery terminal covers (by lifting vertically) to access the clamping nuts of both battery terminals posts (10mm Hex socket). Warning⚠️: Start disconnecting the "-" terminal post before disconnecting the "+" terminal post! For more safety, wrap them with masking tape as well if you want. Battery can be then removed easily, even if it weighs! Step #3 : Battery fixing plate removal You can now access the battery fixing plate, which is held by 2 10mm Hex screws (blue squares) and one 10mm hex nut. Sorry, the latter is out of the pic, but it can be found easily (just follow blue arrow). Be careful don't be too quick at this step, several fixing staples are indeed attached to the battery holder. You might be tempted to cut the tie-wraps, but these are attached to small brackets, which are simply stapled (red circles) or clipped (orange circle) to the battery fixing plate. Staples can be removed by simply pushing them with a flat screwdriver, while the clip-on holder can be pulled out with a small fork. There is now a small Control Unit attached to the battery fixing plate. Unclip the small lug (red circle) and pull the control unit vertically (as suggested by arrow) to remove it from the battery fixing plate: The battery fixing plate can now be removed. Step #4 : Oil draining You can finally access the DSG oil filter housing: A 24mm hex socket is necessary to remove it. Once done, protecting the filter location against foreign object damage or dust is necessary. Aluminium foil will do the job. FYI, here is the difference between a new filter and a filter with 60,000 km on the clock. Now remove the sealing plug with the 14mm Hex. Once done, the oil flow will be very thin, due to the oil pipe. Remove the oil pipe, using a 8mm Hex. After that, the oil flow is more important. Step #5 : Oil filter replacement Once the gearbox is empty, you can put back in place: - The Oil pipe (still using the 8mm Hex. Tightening torque = 3nm). If you don't have a torque wrench complying with such a low range. Take it easy! Just to give an idea, it is roughly the same order of magnitude as for closing a jam jar lid. (Sorry, this is the only simple image I found quickly ...). Well just keep in mind, it's light !! - The new DSG oil filter (don't forget to moisten the O-ring in its hole) - The new O-ring on the filter housing (don't forget to moisten this one too) - The filter housing, which must be tightened at 20 Nm (with the 24mm Hex socket) Step #6 : Reassembly Steps #1 and #2 can be processed in the reverse order to reassemble : - The battery fixing plate (and the small control unit) - The Battery - The air filter housing and the hoses - The airbox. Step #7 : Oil filling The filling hose can now be screwed in the sealing plug thread At the other end, donc forget to shut the 1/4 turn valve, before screwing it onto the oil can. To make it easier, you can attach the can to the bonnet with a 80cm long twine or an old metal hanger (wire one), that you can shape to transform it as a can holder. If you want to fill the gearbox faster, you just need to make a little hole in the can bottom (now upside down ) to enable air getting in the can. Of course, don't forget to open the 1/4 turn valve. http://img.xooimage.com/files1/b/e/c/whistle-1bb1.gif You have to fill approximately 5,5l. Once again, don't forget to shut the 1/4 turn valve upon each oil can change http://img.xooimage.com/files1/b/e/c/whistle-1bb1.gif. Warning: Do not make a hole in 6th can, otherwise there could be some side effects... http://img.xooimage.com/files1/3/e/0/33-2bc7.gif When the 6th can is half empty, shut the 1/4 turn valve, remove the can from the filling hose. Put now the free end of the filling hose into the dip tray. You can now open the 1/4 turn valve to start adjusting the oil level Step #8 : Oil level adjustment ⚠️ Now, start the engine and keep your foot pressing the brake pedal. Move the gear lever in accordance with the following sequence: P to R, wait 3s R to N, wait 3s N to D, wait 3s D to S, wait 3s S to D, wait 3s From this point, most other tutorial suggest getting back directly to P. I personally rather got back step by step, still waiting 3s after each step. Once back to P, you can remove your foot from the brake pedal, but keep the engine idling. Now, connect your VCDS cable and select the gearbox controller (02 Auto Trans): Once in the gearbox controller menu, there are 2 options: 1) Either get into "08 Meas. Blocks". then in the new window, get into "Group 019" and check the Temperatur cell of "ATF (Auto Tranmission Fluid)" parameter. This is at least what I've found in several other tutorials. But though owning an official VCDS cable, the "08 Meas. Blocks" is greyed on mine. (may be my Micro-CAN version starts reaching its limits). Hence I had to use option #2 below. 2) Or get into "Adv. Meas. Values" menu: From this point, type "trans" in the search cell to find all parameters related to the gearbox. In the results list, tick "ATF temperature - Transmission fluid temperature": Now with the engine still idling, just wait for the oil temperature to get between 35 and 45°C. It may take several minutes. Be patient. When oil temperature is close to 35°C, you can remove the filling hose completely. Don't worry temperature is increasing really slowly. The oil flow from the oil pipe starts decreasing. Once the oil temperature is within the 35-45°C range, you can observe that a slight amount of oil flows out via the overflow tube every 30 seconds, independent of the oil level. This is caused by oil pulses, which cool down the coupling. According to workshop manual, this oil quantity is not a criterion to determine the correct oil level. Therefore, they must not be taken into account when assessing oil level. You can now screw back the sealing plug (with 14mm Hex). Tighten it at 45Nm. From this point, you only need to stop the engine, disconnect your VCDS cable and put the soundproof housing back in place under the engine, and... That's it! Well, non counting the specific tools, you've just saved ~200€! Note: I'd also like to write special Thanks to @J.R., who helped me to translate some technical words I was missing! Much appreciated.👍 _1 point
-
1 pointVW to enter F1 with the Audi & Porsche marks https://www.bbc.co.uk/sport/formula1/613004701 point
-
1 pointLost a bank passbook and my damn passport a few months back. Ripped the house apart, ripped the car a part or so I thought. I knew that if I found the passbook I’d find my passport, but to no avail. Ended up cancelling my passport as reported lost 3 weeks ago as I need it for a holiday later this year. Found it today inside the dashboard of my Octavia. When closing the glovebox the passport and bank book had tipped out and landed behind the glovebox inside the dashboard. So if you are missing anything, selling or buy an Octavia check behind the glovebox, you never know what you might find. ****ed off is an understantment.1 point
-
1 pointPop the lower plastic trim off and uncover the seat belt mech, Spray it with some WD40 as it’ll be catching, should do the trick. Mines tends to start sticking in the hotter weather.1 point
-
1 point
-
Thanks for that. Took the plunge and paid for the access to Erwin. Got a full list of the build codes and there is some interesting info on there.1 point
-
1 pointI have only ever seen a number stamped in the locking nut key. As @roottoothas stated, an understanding of the background to the question may support an actual technical answer rather than qwerty. SKODA LOCKING WHEEL NUT BOLT KEY MASTER KEY REMOVER ALL NUMBER JUST SEND PICTURE | eBay1 point
-
1 pointThanks for that info. In the end I couldn't stomach spending so much on a car I might only keep a year or two, so I went for a second hand atoto a6 pro (VW fit) off eBay. I'll see if I can live with that. I'm hoping I can get Android auto working on it via 'head unit reloaded' and therefore won't be too bothered by it being rather long in the tooth processor and ram wise. We shall see... I might yet be back to the xtrons. Cheers Tom1 point
-
1 pointYes I know. I do possess locking wheel nuts on my Fabia for that reason, but I live near Ayr, so no surprises why.1 point
-
1 pointIt also makes the thief consider if there are easier options than yours. Most security is about making it awkward enough for the putative thief to nick your stuff that they decide to look for easier pickings.1 point
-
1 pointBest get the car and see that all is well first and you have no issues. Be sure the servicing is up to date, good air filter and plugs fitted etc. If the 1.2 TSI with a stage 1 remap did actually get 138 bhp that would be pretty good. That will be on E5 Super Unleaded probably so 99 ron, or maybe 97 ron. Is the Tuners chart showing that as being on 98 ron which you can not buy in the UK. ? What do they show for 95 ron? http://awesomegti.com http://goapr.co.uk http://onlyrevo.com1 point
-
1 point
-
My understanding is that the credit checks for car finance are fairly soft and whilst they may slightly reduce your credit score they don’t involve the full affordability checking as per a mortgage where obviously applying for three at the same time would not be allowed. So I suspect it doesn’t make much difference. Car finance is low risk for a lender since should you not be able to pay then they reclaim the asset.1 point
-
Call Skoda Assist and say you are scared to drive. They can read the fault codes. You paid for that. It is the AA that respond. 0800 526 625 Then Skoda Fixed Price Servicing and maintenance is £60 inc VAT for the first 30 Minutes of a diagnosis, and that diagnosis starts with plugging in to the OBD. But no need to be paying that.1 point
-
Not really visible from anywhere but below when the engine is in the bay. You can probably touch it though, blind.1 point
-
1 pointDo you really think Board members order a car through a dealer. More like a top spec one delivered to a parking space outside their office, and existing one taken away every 3 months. Bet they have never been near a retail order form, or had to wait for months1 point
-
1 pointI'll preface this by saying its software (box or map) and you need to trust the software developer if you're going to use it. That means a good reputation, long time in the market, large user base and probably don't be the first to use a new revision. Something like a JB4 works by sitting in between the ECU and sensor. Its allowing the user to manage boost pressure and fueling only. The ECU is in control so its using factory parameters. The JB4 doesn't send out of bounds information to the ECU, rather it sends altered information to the ECU. For example if the boost limit it 28lbs and you want 5lbs more than standard (Map 3) the JB4 tells the ECU that the boost is less than 28 lbs so it keeps boosting until the JB4 sees 33lbs at the sensor. Because of that the JB4 uses the factory safety systems. If it detects knock from the factory system, for example, it drops into a pass through mode and allows the ECU to have total control without alteration by the JB4. I'm sure you could go full retard but it is some what idiot proof. But like most software you need to understand how to use it to get the most out of it. No, its not traceable. That's just what map sellers say to push people towards buying a map. The ECU only ever sees factory levels or below. That's how it works. Only the JB4 sees the data from the sensor so it can't be recorded by the ECU. That said the JB4 is for "stage 1" maybe "2". Its for a TIP and light upgrades. Why would you pay extra for a map at that level when it doesn't have the versatility of the JB4, affects your warranty and it doesn't out perform the JB4? And when your ready to go to stage 3 tune you can uninstall the JB4 and sell it on ebay and get most of your money back. Its a performance and financial no brainer. Below is a group of dudes taking their cars to a group dyno session as dudes do. Maybe on a different day you get different results but the JB4 is at least comparable. Burger Motorsports JB4 Performance Tune VW / Audi / Skoda – AutoInstruct If your going more than stage 1 and a bit then you can't use a JB4. So changing the turbos or changing the exhaust for a fully sic downpipe with a marginal cat (or no cat) in the wrong position isn't going to work with a JB4. For that you need a "map" so you can go outside the factory parameters without the ECU complaining. Personally I'm skeptical of the whole tuning scene. If I go to an accountant, a doctor, a mechanic I pay them their rate and they use their expertise to do the best for me. Thats not the case with "tuners", they are basically retailers trying to sell as much brand X as possible. The marketing is full of vague claims and light on any testable data on purpose. My favorite claim from APR for their intercooler is "Designed by engineers with lasers". Impressive. Do they mean... like in Star Wars? Pew Pew. I'll probably get a tune at some point.1 point
-
Ok had this done yesterday along with a full service, labour for the joint, 1.5 hours, at a cost of 90€ + vat, around 112€ -- I did supply the joint so around 220€ n total -- I don't call that too bad, Around £180 all in!!1 point
-
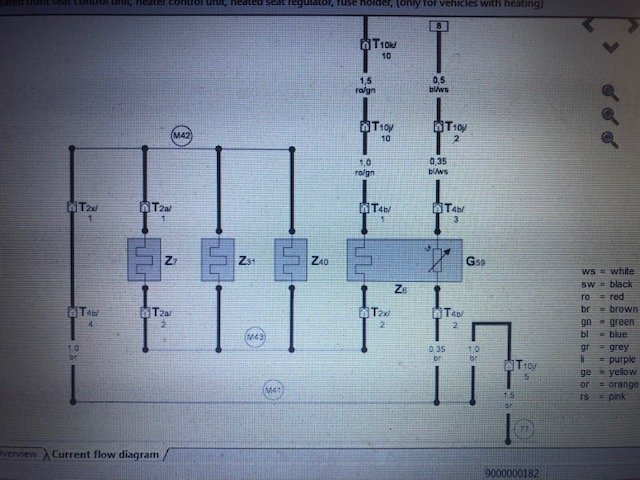
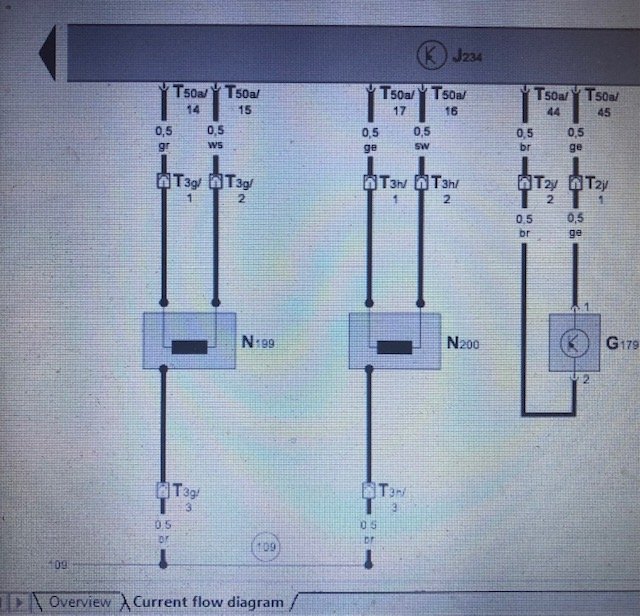
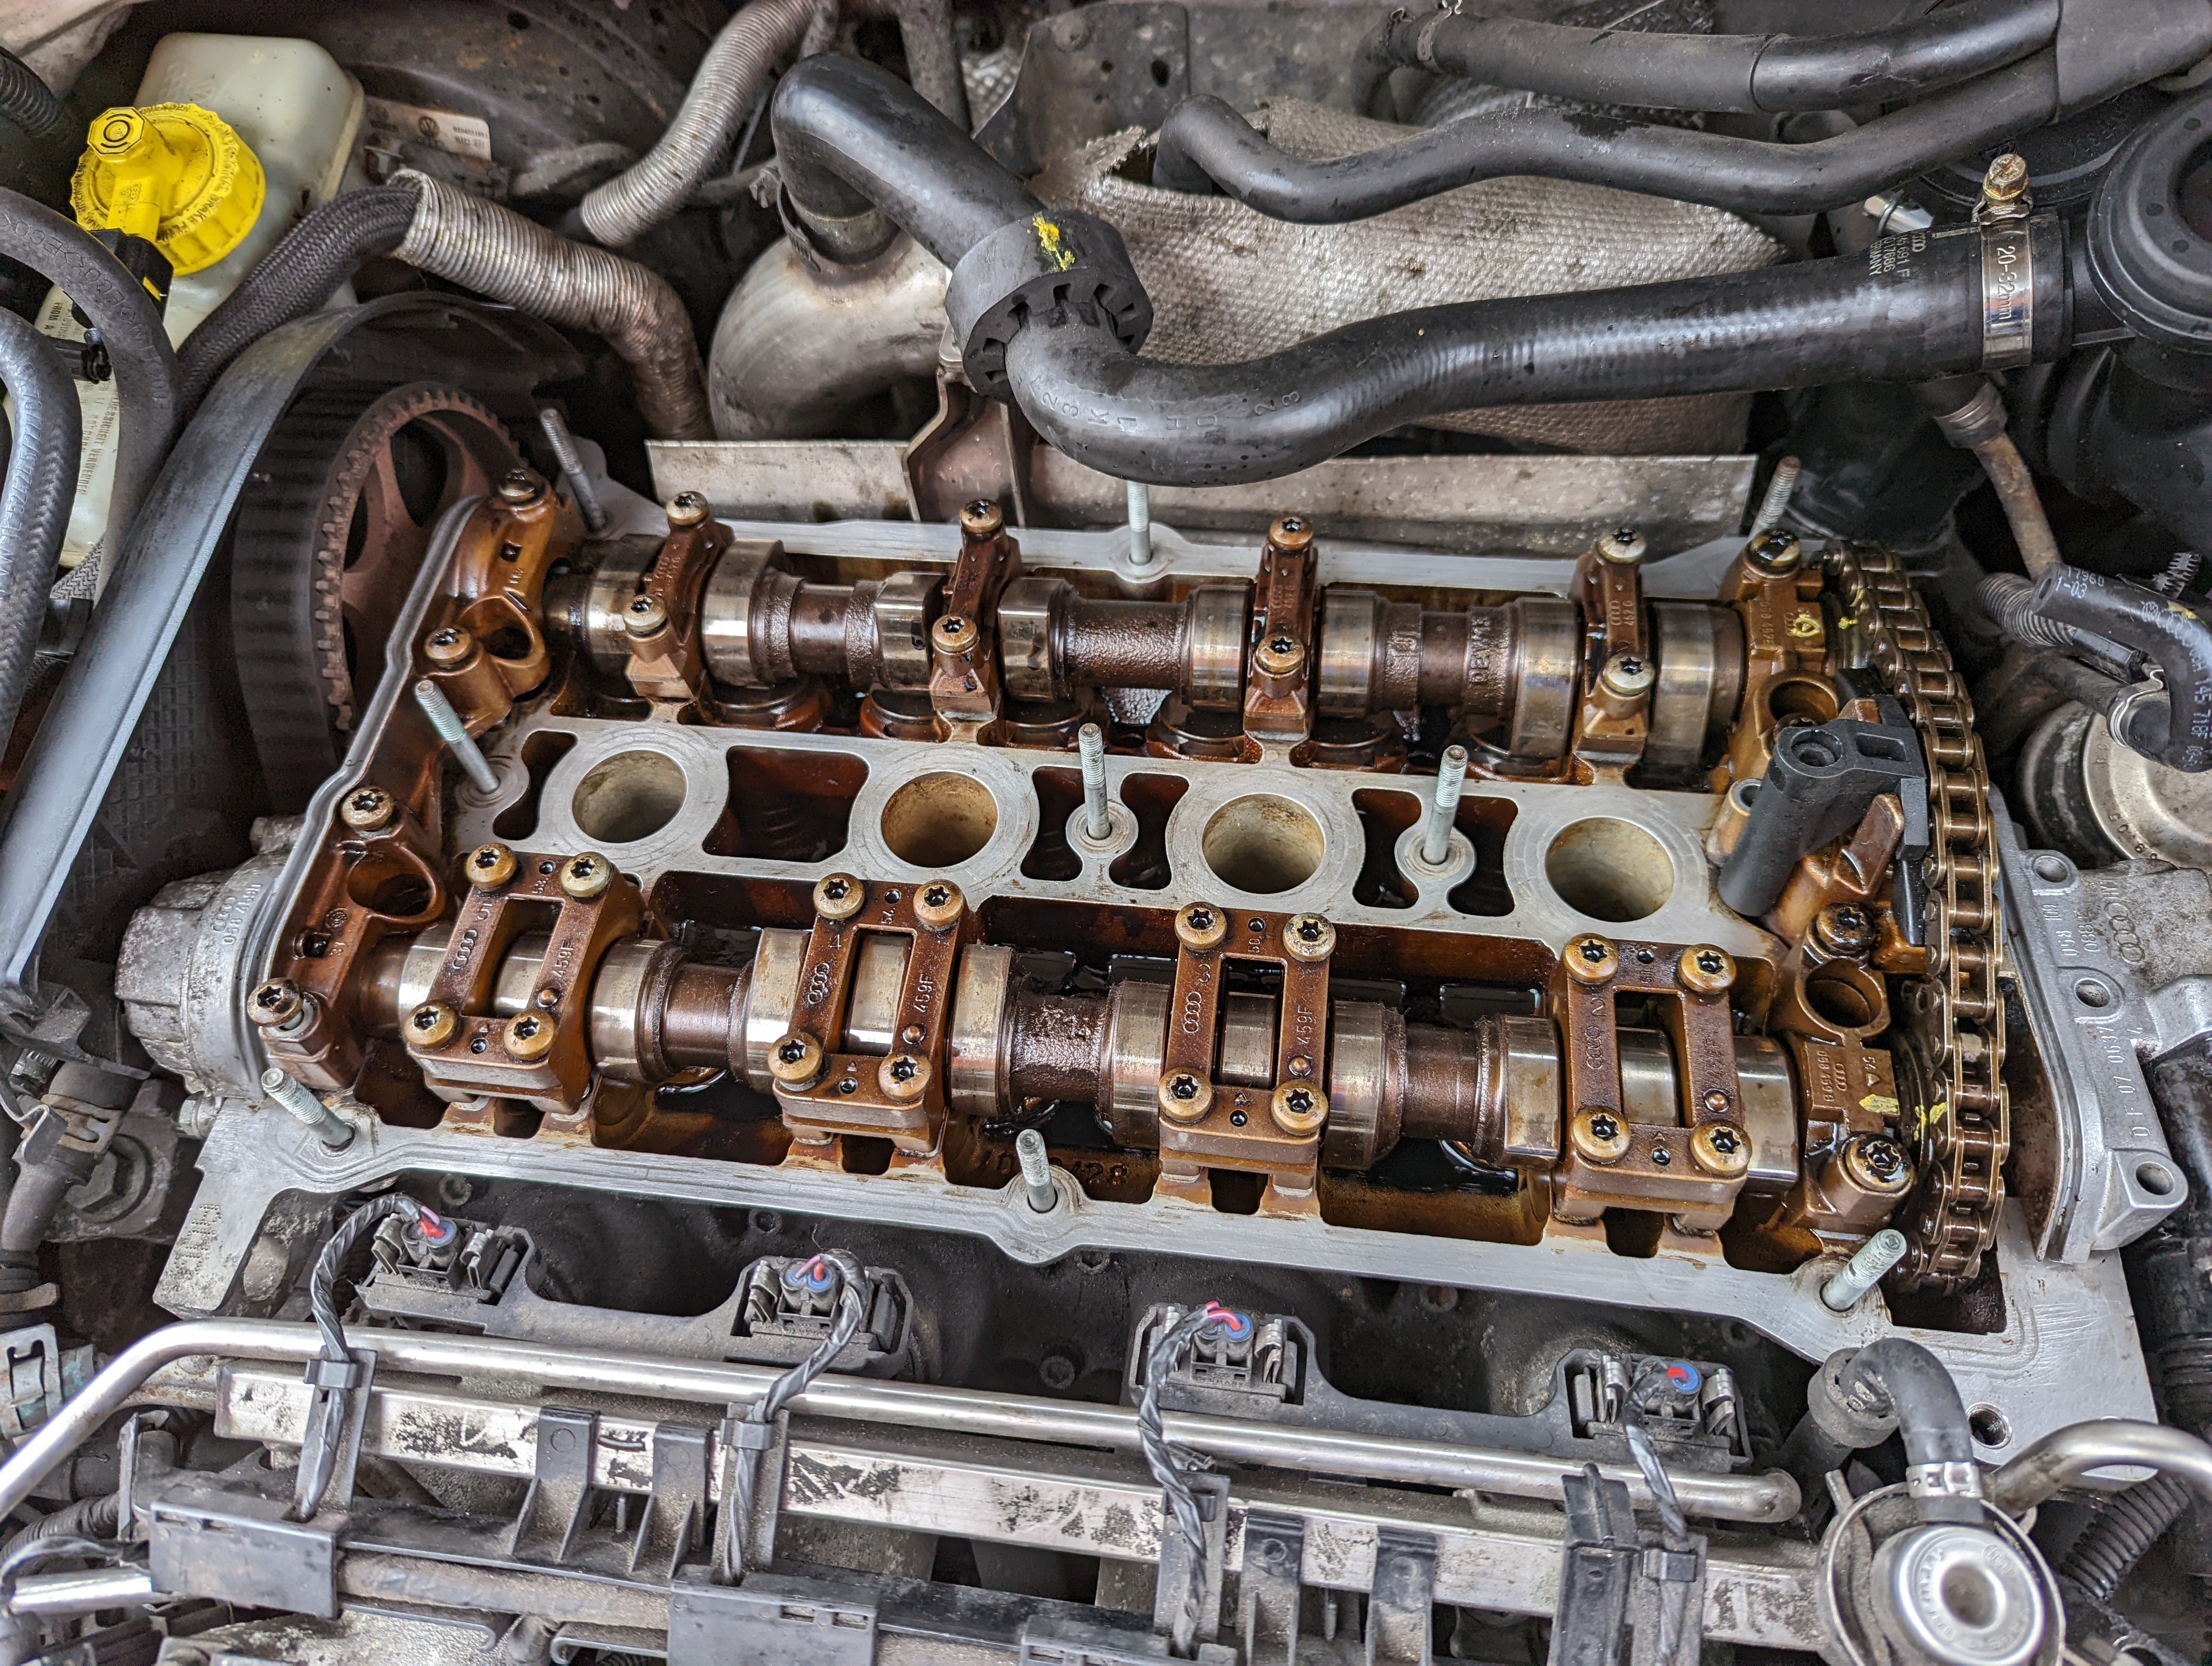
1 pointThis is the Airbag wiring diagram The seat heating and you'll see the two 2 pin & one 4 pin connectors
 1 point
 -
Well first and foremost it is contracted out Customer Services and people who seem to be trained to refuse almost everything and let the paying customers fight for the right to have vehicles of merchantable quality. You have a bunch of people who might have been selling trainers in a shop recently that are now panning off Skoda / VW Group car owners.
.thumb.jpg.695083689aa3716288a21e921d445a10.jpg)
 1 point
 -
After needing a new gearbox after 4 months from new, our Mk4 now has a rear view mirror that has become disconnected and just waves about. Gearbox done under warranty after hassle. Rear view mirror replacement so far refused under warranty as "either the windscreen has been replaced or the car has had an impact", according to main dealer. Neither applies. I'm in discussions with Skoda UK Customer Service. Anyone have suggestions. Sadly feels like this will be our last Skoda.1 point
-
Well, you could use a magnet on a stick...1 point
-
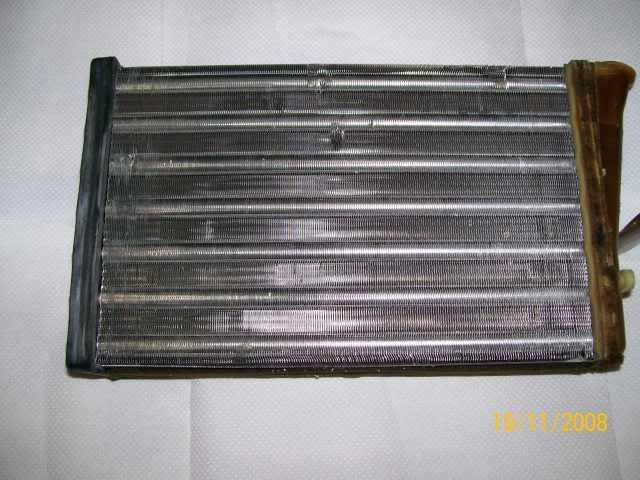
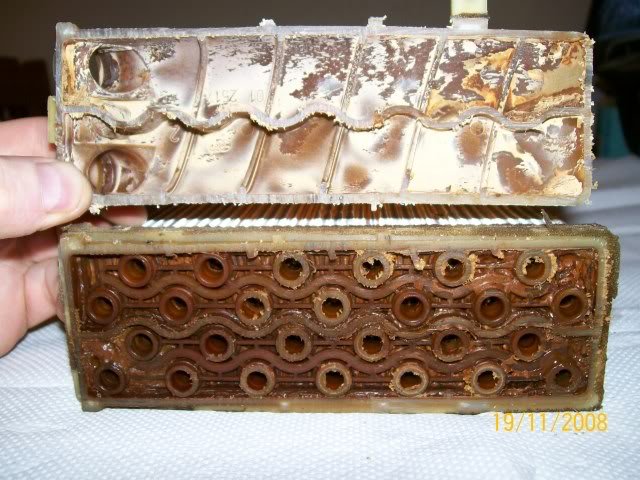
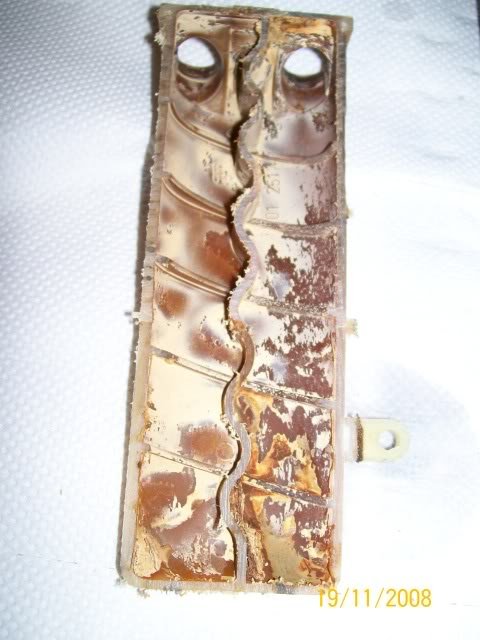
You'll never get all debris out, because within heater matrices the incoming and outgoing large-bore connections split up into many smaller bore pipes which are all in parallel. If any of these are partially or fully blocked with debris, your flushing fluid will preferentially go through others instead. Here are some pics of a Vauxhall one I cut up many years ago:
 1 point
 -
1 pointMy job's a bit "niche" really. I started in the late 1980s, working as a design engineer for a sports car company. That gave me my first encounter with the world of "homologation". I then moved to work at a university for a small consultancy and test house that dealt mainly with specialist vehicles of various sorts. Just over 20 years ago, my wife got the chance of a good job in rural Cumbria where there was no car industry (to speak of) so I had to think of something I could do largely from home. Homologation lends itself to that pretty well... I now have 3 jobs, really. I work for a company that converts medium and large MPVs into wheelchair accessible vehicles (including the new Caddy, as it happens!), but I'm also paid by the industry as a whole, to monitor and lobby for appropriate changes and concessions to proposed vehicle regulations for our sector, so I work for the UK and our EU trade associations too. Converting a vehicle for wheelchair access means dropping the floor, usually, and that typically means displacing fuel tank, exhaust and AdBlue tank. That would be sufficient to invalidate the base vehicle's emissions approval. Ordinarily, that would mean us having to hold our own emissions approval for the converted vehicle, but that would be both impractical and ruinously expensive. Plus (as we found out in the wake of the VW scandal), the bloody cars we were converting, would not have met the emissions requirements anyway - even before we converted them)! Long story short, I've been doing this for a long time now, but emissions has been kept (as far as I'm able) at arm's length, which is why I have very limited direct experience of emissions testing - and I'd like it to stay that way! (It is fearsome in its complexity. There are homologation engineers who specialise in emissions and nothing else. I have to be a bit of a "jack of all trades"). We have enough trouble managing the structural requirements (seat belt anchorages, seat belts, seat strength, fuel tanks and so on). However, I do attend wide motor industry regulatory meetings, so I get to hear the major manufacturers talking about forthcoming emissions regulations, I speak to various type approval authorities (usually the Vehicle Certification Agency in the UK, but also RDW in Holland and (since Brexit) STA in Sweden, in the course of my work. Those guys are bound by various professional conduct requirements, so they can't actually "dish the dirt" on specific manufacturers and their tests, but they've said very interesting things "in general terms". Lastly, my lobbying work does, of course, mean that I talk to the civil servants (both in Brussels and London) who draft the regulations. Anyway, getting back to your story above, I feel a bit sorry for VW when it comes to CO2 discrepancies. CO2 emissions and fuel consumption are directly related. ALL ICE car engines have very similar efficiencies, so the CO2 figures and the fuel consumption figures are very close to being proportional to each other. Certainly, for all practical purposes, we can regard them as being proportional. Under the NDEC requirements, "official" fuel consumption figures were widely regarded as a joke. Few cars (VWs or otherwise) ever gave their official MPG figures. Therefore, their CO2 figures were similarly inaccurate. As mentioned previously, that's a separate discussion on whether or not it constitutes "cheating", because (in my view at least) that's as much a failing of regulation as anything else. In the case you mention above, I think the authorities were just "*&^%ing VW about" a bit, by way of punishment. Believe it or not, the EU Commission didn't have any really effective sanctions against such wrongdoing, at the time, so I think individual type approval authorities all across the EU just went out of their way o make life a bit difficult for VW. That's now been addressed though. In the subsequent raft of legislation, the EU has given the Commission the power to fine a car manufacturer up to €30,000 euro per non-compliant vehicle and the recalls scheme (which was really only ever used for safety issues), has now been extended to cover environmental non-compliances. Plus, of course, advances in emissions testing equipment technology, has made "lab grade" gas analysers small enough to be portable so they can now do "real" emissions testing on a real road. Anyway, best get some work done...1 point
-
1 point@MariusMo the three connectors in your earlier post are for the seat heating nothing to do with the airbag1 point
-
From memory use silicon grease - that's what used to be recommended for the MAF sensors on the Mk1 Fabia1 point
-
1 point
-
Suggest you use MartiniB's VW link in the first post of the thread. All the same files, just zipped differently. Skoda had a weird compression on this year's release which causes unzipping programs to stumble. Since you are using Mac the VW recommendation is: If the map update is performed using the Apple® OS X operating system you may find that Discover Pro does not recognise the map material or displays it incorrectly. This is due to a lack of compatibility between the “7 zip” program and the OS-X operating system. In addition, the OS-X operating system has a tendency to create hidden additional files on external data media. We therefore recommend that OS X users use the “Keka” unzipping program. We also recommend using the “CleanMyDrive” program to remove any hidden files. You use Keka as the unzip program and you must use CleanMyDrive app run on the SD card. The unit does a full signature check on the map material import. MacOS can add additional characters into the file which then leads to the validation failing. CleanMyDrive hoovers out all of the Mac bloat characters stuff put in the file by the Mac system. Just one character variation will knock the import out. In your case its stumbling on the unzip, but you still need the CleanMyDrive in.1 point
-
1 pointUse the search function on the forum to find some answers. sounds harsh but that is what forums are for, searching for answers. Sat nav easily done via CD player. Again, lots of answers. Enjoy your motor and welcome to the forum.1 point
-
1 pointThese are two completely separate bits of emissions legislation, though. Nobody was accusing VW of cheating on the CO2 reg. And yes, we now have a separate GB one that mirrors the EU one, but don't get me started on "Brexit dividends". We've shot ourselves in the foot quite nicely by doing that! Beforehand, there was one New Car CO2 Regulation for the whole of the EU, and manufacturers could average their fleet CO2 emissions over their entire sales across the EU. Now, they can do that across the EU but for the GB regs, they can only average their emissions across what they sell here. Unfortunately for us, the UK likes its higher performance, and heavier cars, so when we were in the EU, they could average their CO2 emissions with loads of little city cars and low CO2 emitters, sold in the Mediterranean and Eastern European countries to meet the targets. Now, many of them are going to be struggling to meet the same targets for GB-only. I therefore think they're going to start withdrawing some o the higher CO2 emitters from our market, whilst still being able to sell them in the EU.1 point
-
1 pointOnly got the rear done but it made a massive difference and stopped the rear from excessive roll1 point
-
1 point
-
1 pointYou say driver did nothing wrong in pulling up to the junction but in my own similar experience I find that many young drivers arrive at junctions with great haste . Often one wonders if they are going to drive onto the main road without stopping. As for lane assist it just takes time and patience to get used to it You say driver did nothing wrong in pulling up to the junction but in my own similar experience I find that many young drivers arrive at junctions with great haste . Often one wonders if they are going to drive onto the main road without stopping. As for lane assist it just takes time and patience to get used to it You say driver did nothing wrong in pulling up to the junction but in my own similar experience I find that many young drivers arrive at junctions with great haste . Often one wonders if they are going to drive onto the main road without stopping. As for lane assist it just takes time and patience to get used to it1 point
-
That's a new one on me 😄1 point
-
If it were me I'd use 3m double sided automotive foam tape... The sort that is used for sticking badges on. I have a roll of the stuff and it's never let me down for that sort of thing1 point
-
1 pointI had the same problem and used Gorilla Glue. Just damp the surface with a little water and put a thin strip of glue on the foam. I say a thin strip, as it does expand to the sides if you use a little too much. I found that out to my cost. Works a treat though.1 point
-
1 pointCoincidentally our dealer called yesterday to say my wife's new facelift Karoq SE L is in the dealership, PDI'd and ready for delivery. It was ordered on 17 February 2022 the day facelift orders were opened. No extras other than metallic paint. I ordered my new Superb on 23 March, (my fourth - love these cars). Very different story there. Dealer said it may be October before I see it, perhaps longer. He said Skoda had adopted a policy of under promising and where possible over delivering on lead times. My wife was due a change in June and ordered early based on delivery lead times and strong residuals. She had a build week confirmed by end February. @RCC49 - Happy motoring! 😃1 point
-
It will be "worn" and it will be BS. My chauffeur friend generally did his own maintenance but had the servicing done by the selling dealer during the warranty, on collecting the vehicle the invoice said "front & rear brake pads 75% worn" he asked to speak to the service manager and complained that it could not be true as he had recently replaced them himself, "ah but how many miles have you driven since?" was the response, he scratched his head & said well I did them last night & it took me 20 minutes to walk home after dropping the car off this morning so it would be between one and two miles 😳1 point
-
1 pointI thought about the permanent one but i don't want to drain my battery. The 70mai have an inbuilt battery to start recording if the car has a choc so I went with the rear wiper. I would stay away from the headlights, blowing a fuse on theme or shorting theme in any way will be more dangerous than a simple wiper.1 point
-
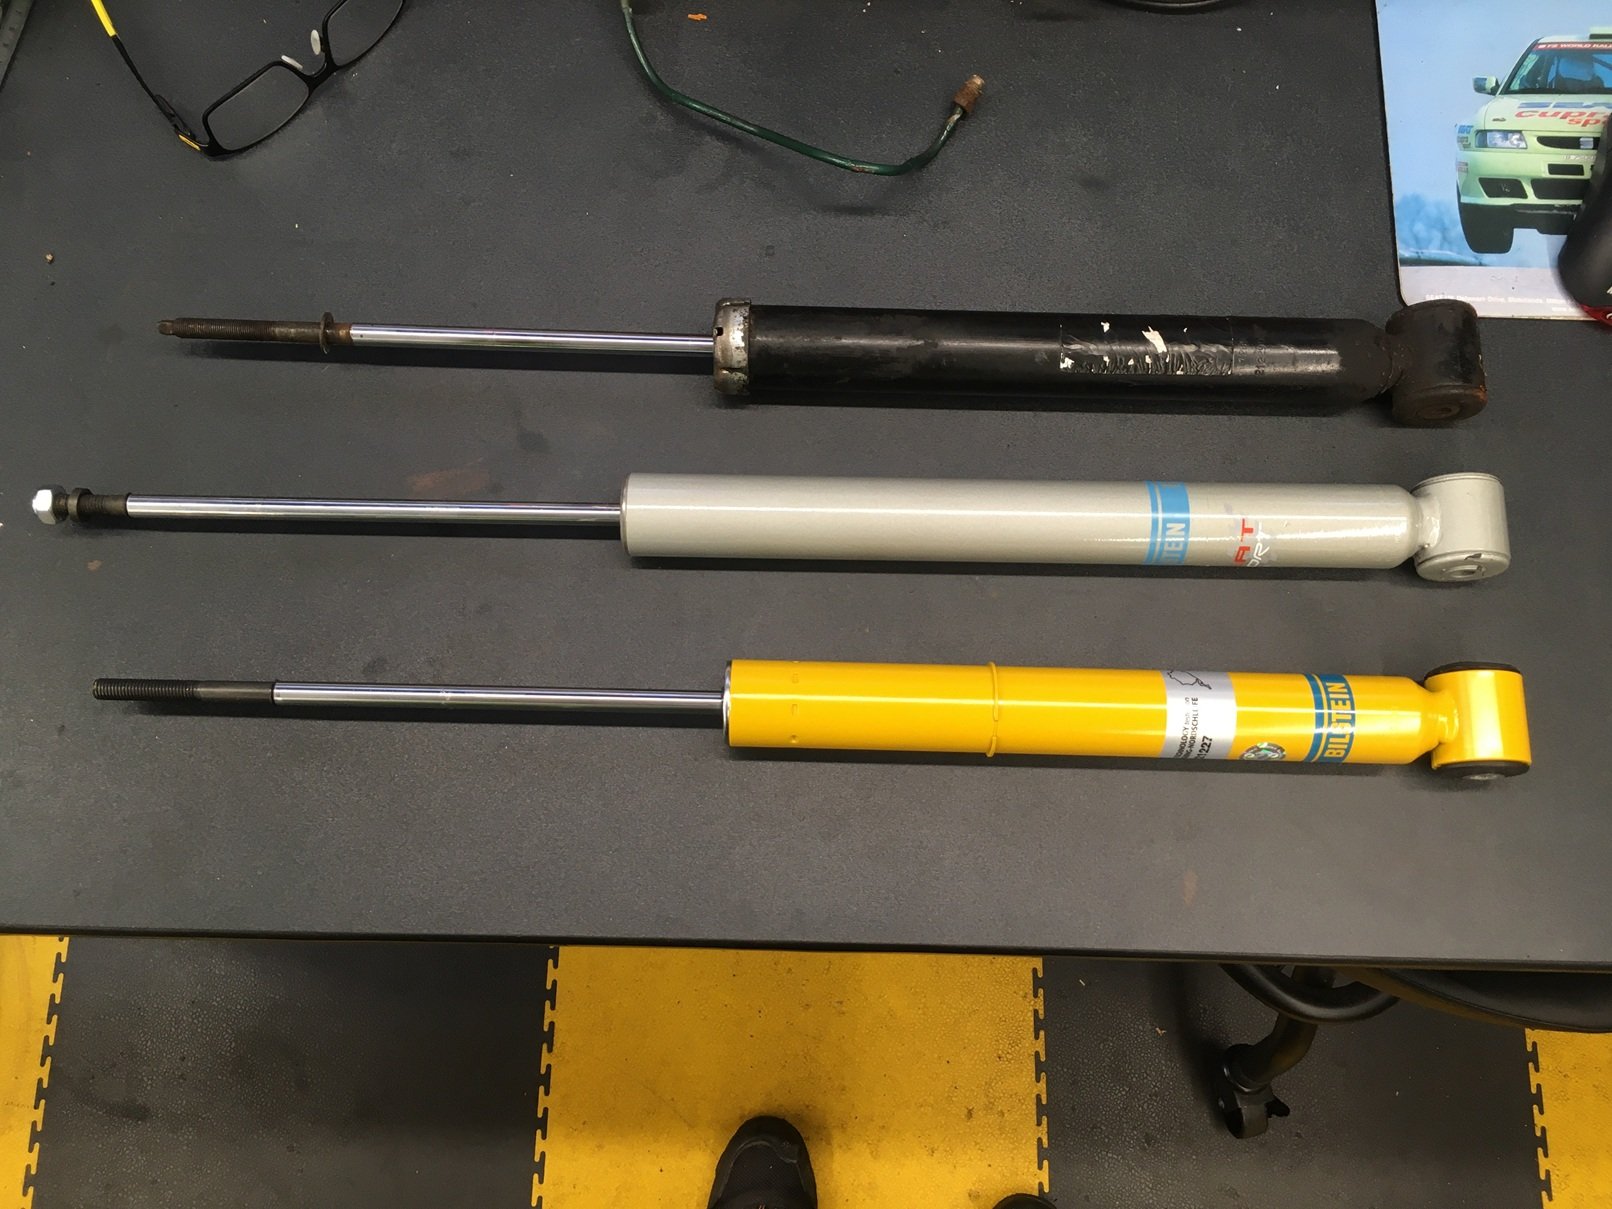
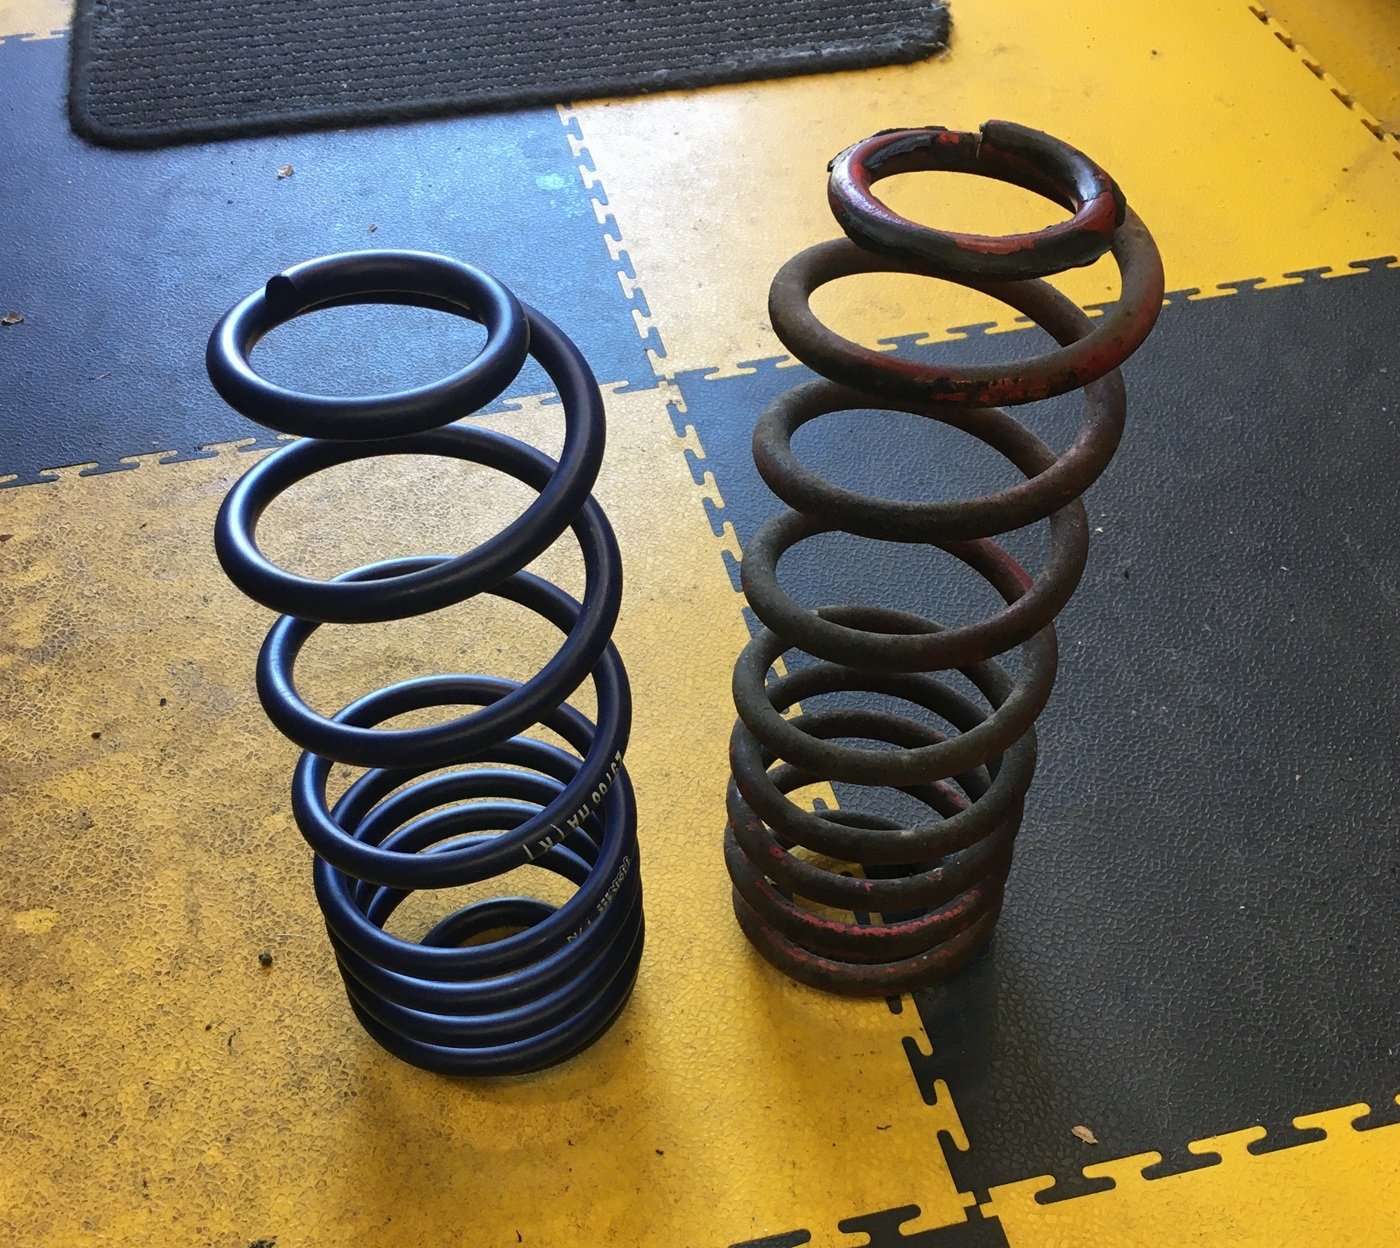
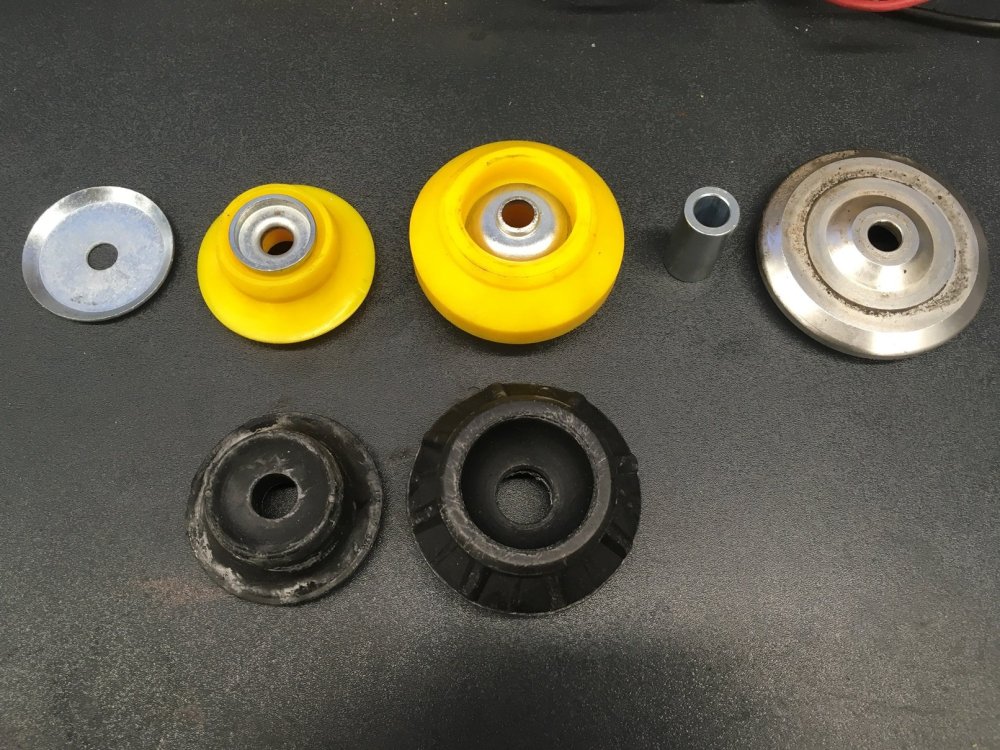
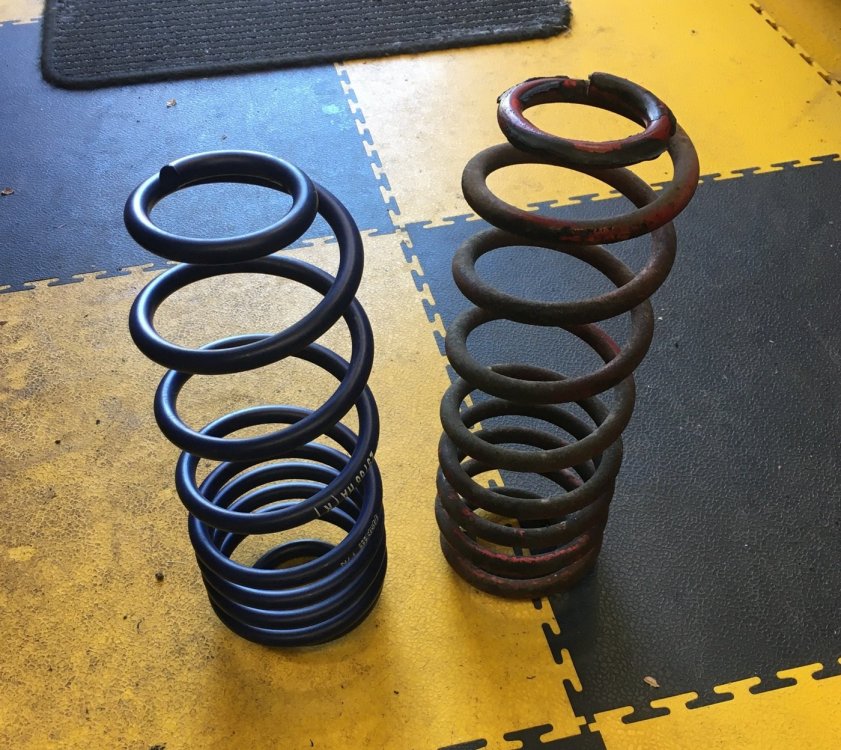
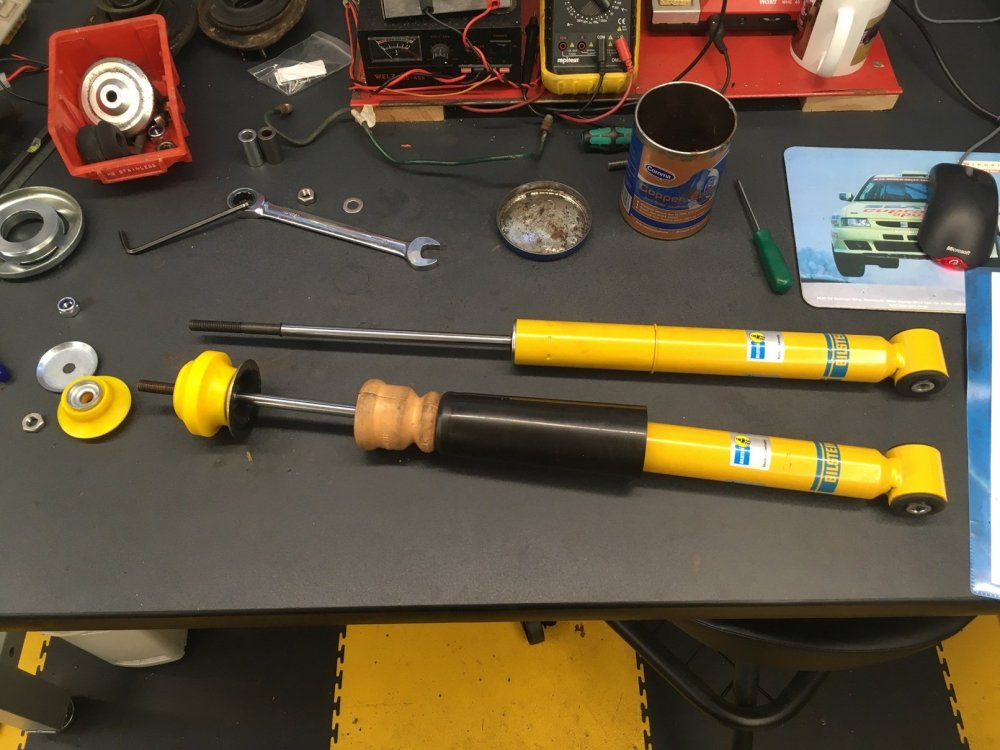
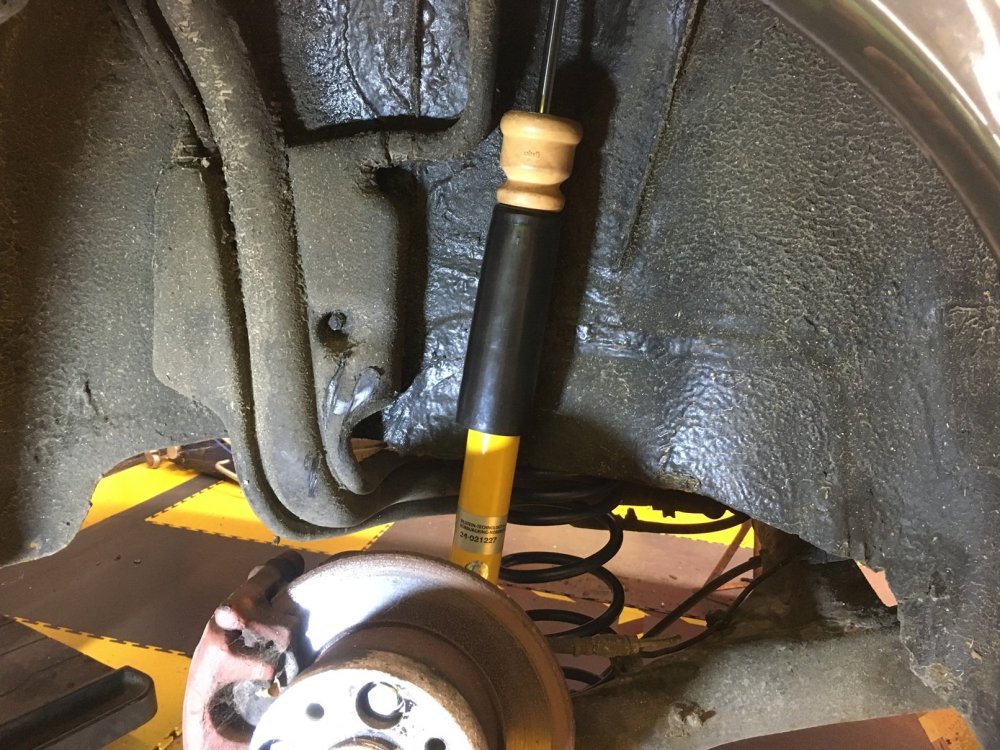
When I dismantled the rear suspension, I thought the top mount bushes looked familiar, but they had seen better days and it was impossible to compare definitively with new parts. I soon found out why they looked familiar once I started searching for replacements, and discovered they were the same part number as mk2 (and mk3) Ibiza parts. I had some Powerflex Ibiza bushes on the shelf, so I decided to fit those. Unfortunately, they did not include the various spacers and shaped washers required, so I had to order a cheap rubber top mount kit to get those. When I took this picture I had yet to realise that the two shaped washers are different sizes, and it is the slightly larger one which goes on top of the top bush. I had toyed with the idea of fitting coilovers to the rear too, before deciding to go with lowering springs and uprated dampers. This did not make things significantly easier as good quality uprated dampers for the rear of the mk2 Caddy pick-up are no easier to find than coilovers. I found some mk1 Leon SEAT Sport Bilstein dampers for a bargain price, and bought them thinking they might fit, but when they arrived it was clear that the damper body was longer than on the parts I removed, and the threaded section at the top of the damper rod was significantly shorter. These were not going to work. I then reasoned that as the top mounts are the same as the mk2 Ibiza, that meant that the threaded section on mk2 Ibiza dampers must be the right length. As my mk2 Ibiza track project was in the workshop alongside the Caddy it was easy enough to measure the Ibiza rear dampers and confirm that they appeared to be the same size as the Caddy parts. Satisfied that these were likely to fit, I negotiated a discount on some mk2 Ibiza Bilstein B6 dampers, which arrived a couple of days later. In the picture below, the damper I removed is at the top, the mk1 Leon part is in the middle, and the mk2 Ibiza part at the bottom. The rear springs I decided to try are H&R springs intended to provide a 25mm drop on a mk1 Octavia. I stood them alongside the unknown springs I took off the Caddy and it is clear that the H&R springs (on the left) are both shorter and less substantial (so probably softer) than the parts I removed (on the right). Although I was not particularly aiming for a further drop in rear ride height, I thought I would have a look to see how it looked with the H&R springs fitted. I think the rear bump stop kit I used was intended for a mk4 Golf. Initially I wanted to use a Powerflex kit, intended for lowered cars, but I could not identify one which was suitable, so I resorted to cutting-down the full length parts. The struts looked OK assembled on the bench, and went onto the Caddy without difficulty. Once I lowered the Caddy off the lift it was clearly sitting lower at the rear than what I wanted. I left it sitting in the workshop for a couple of days to make my mind up whether I could live with it that low, before deciding that it needed to be higher. Swapping back to the springs I had just taken off was achieved pretty quickly, but even once I had done that it was not far off from sitting on the bump stops, so the struts came off again, I cut a bit more off the bump stops, then it went back together again. I would have included a photo here of how the Caddy looks sitting on its new suspension, but as the ride height is unchanged, it would be pointless.

 1 point
 -
Whirring sound on front passenger side that changed on changing gear. Also gear change seemed stiff for a new car. All in all not the Skoda experience I've had for many years.1 point


.jpg.4258e4d64c2cf1b49b77cfaf875c80a4.jpg)