


Leaderboard
-
AnnoyingPentium
FREEDOM27Points5,646Posts -
MikeTheThinker
FREEDOM19Points8,484Posts -
Lady Elanore
FREEDOM12Points24,877Posts -
sepulchrave
Resident Member11Points12,534Posts


Popular Content
Showing content with the highest reputation on 16/11/21 in all areas
-
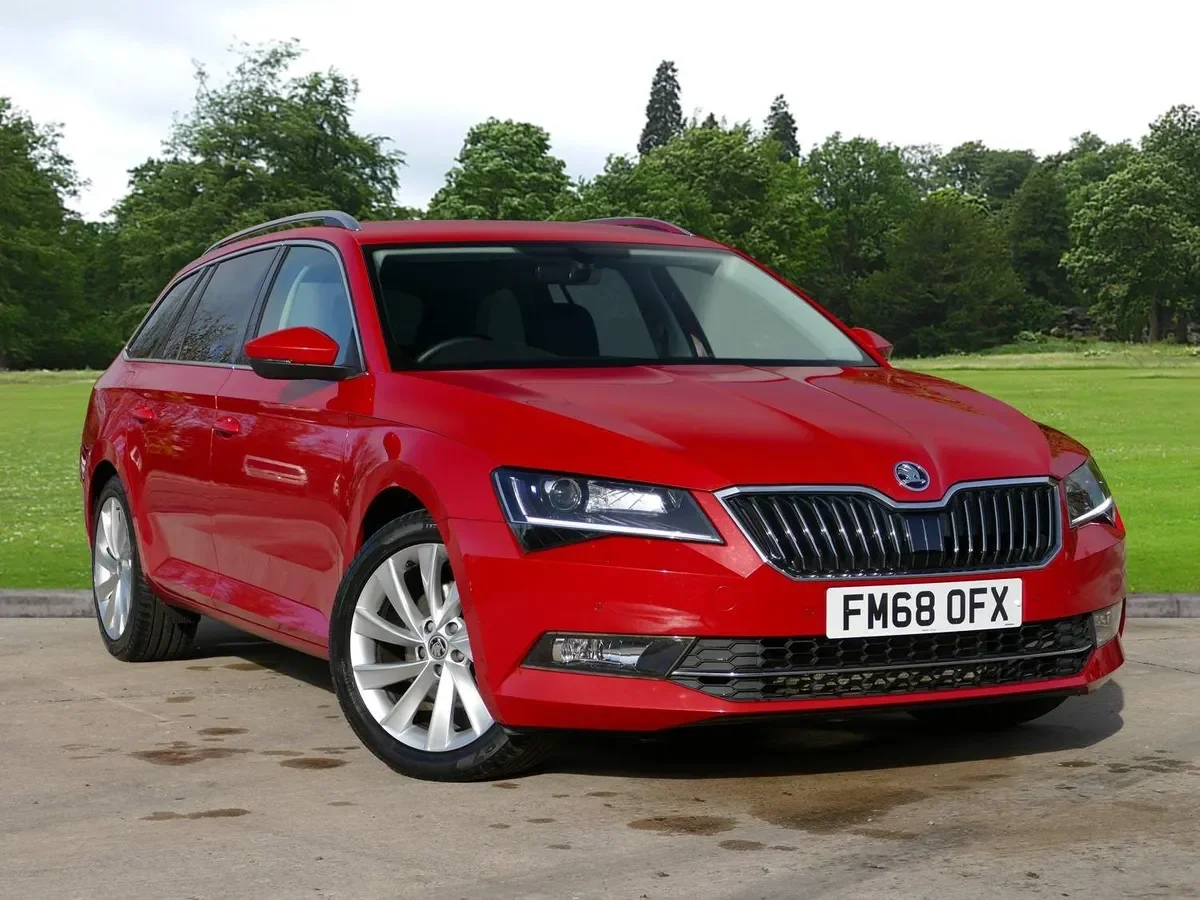
The first official images of the Karoq facelift are now unveiled ahead of the full digital launch 30th November 2021 A more striking front with a new, wider, hexagonal radiator grille, reworked LED headlights and lots of new technologies. These are the key innovations to be found in the modernised KAROQ, which will be unveiled in a digital premiere on November 30. The sketches give a glimpse of the design changes, especially for the headlights. The front lights are now slimmer and extend as far as the radiator grille. The new line of the daytime lights is now divided into two parts. Beneath it there is a second module for the fog lights or – in the top-of-the-range model – a separate LED module. This lights layout gives the car the characteristic “four-eyes” look. The rear lights have kept ŠKODA’s hallmark C-shape design, but they too are more slender and accent the car’s width. Another new feature is the extended rear spoiler and redesigned bumper with a black diffusor. https://www.skoda-storyboard.com/en/models/karoq/first-sketches-of-the-new-skoda-karoq/5 points
-
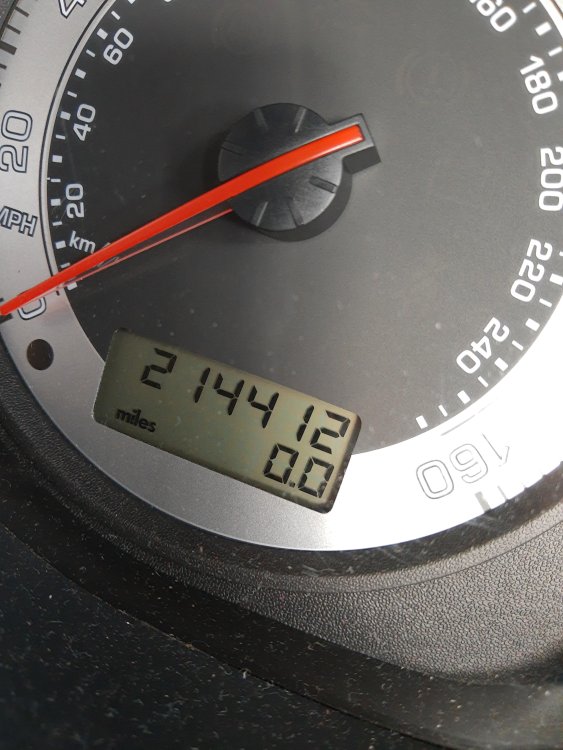
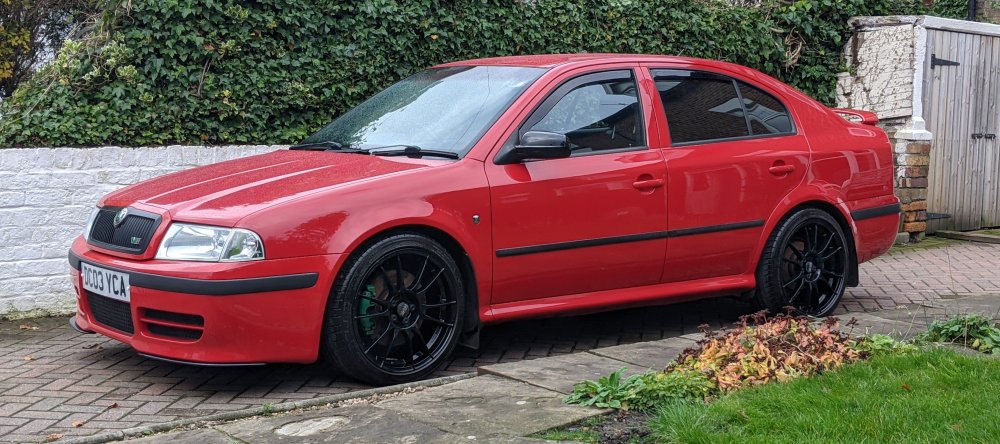
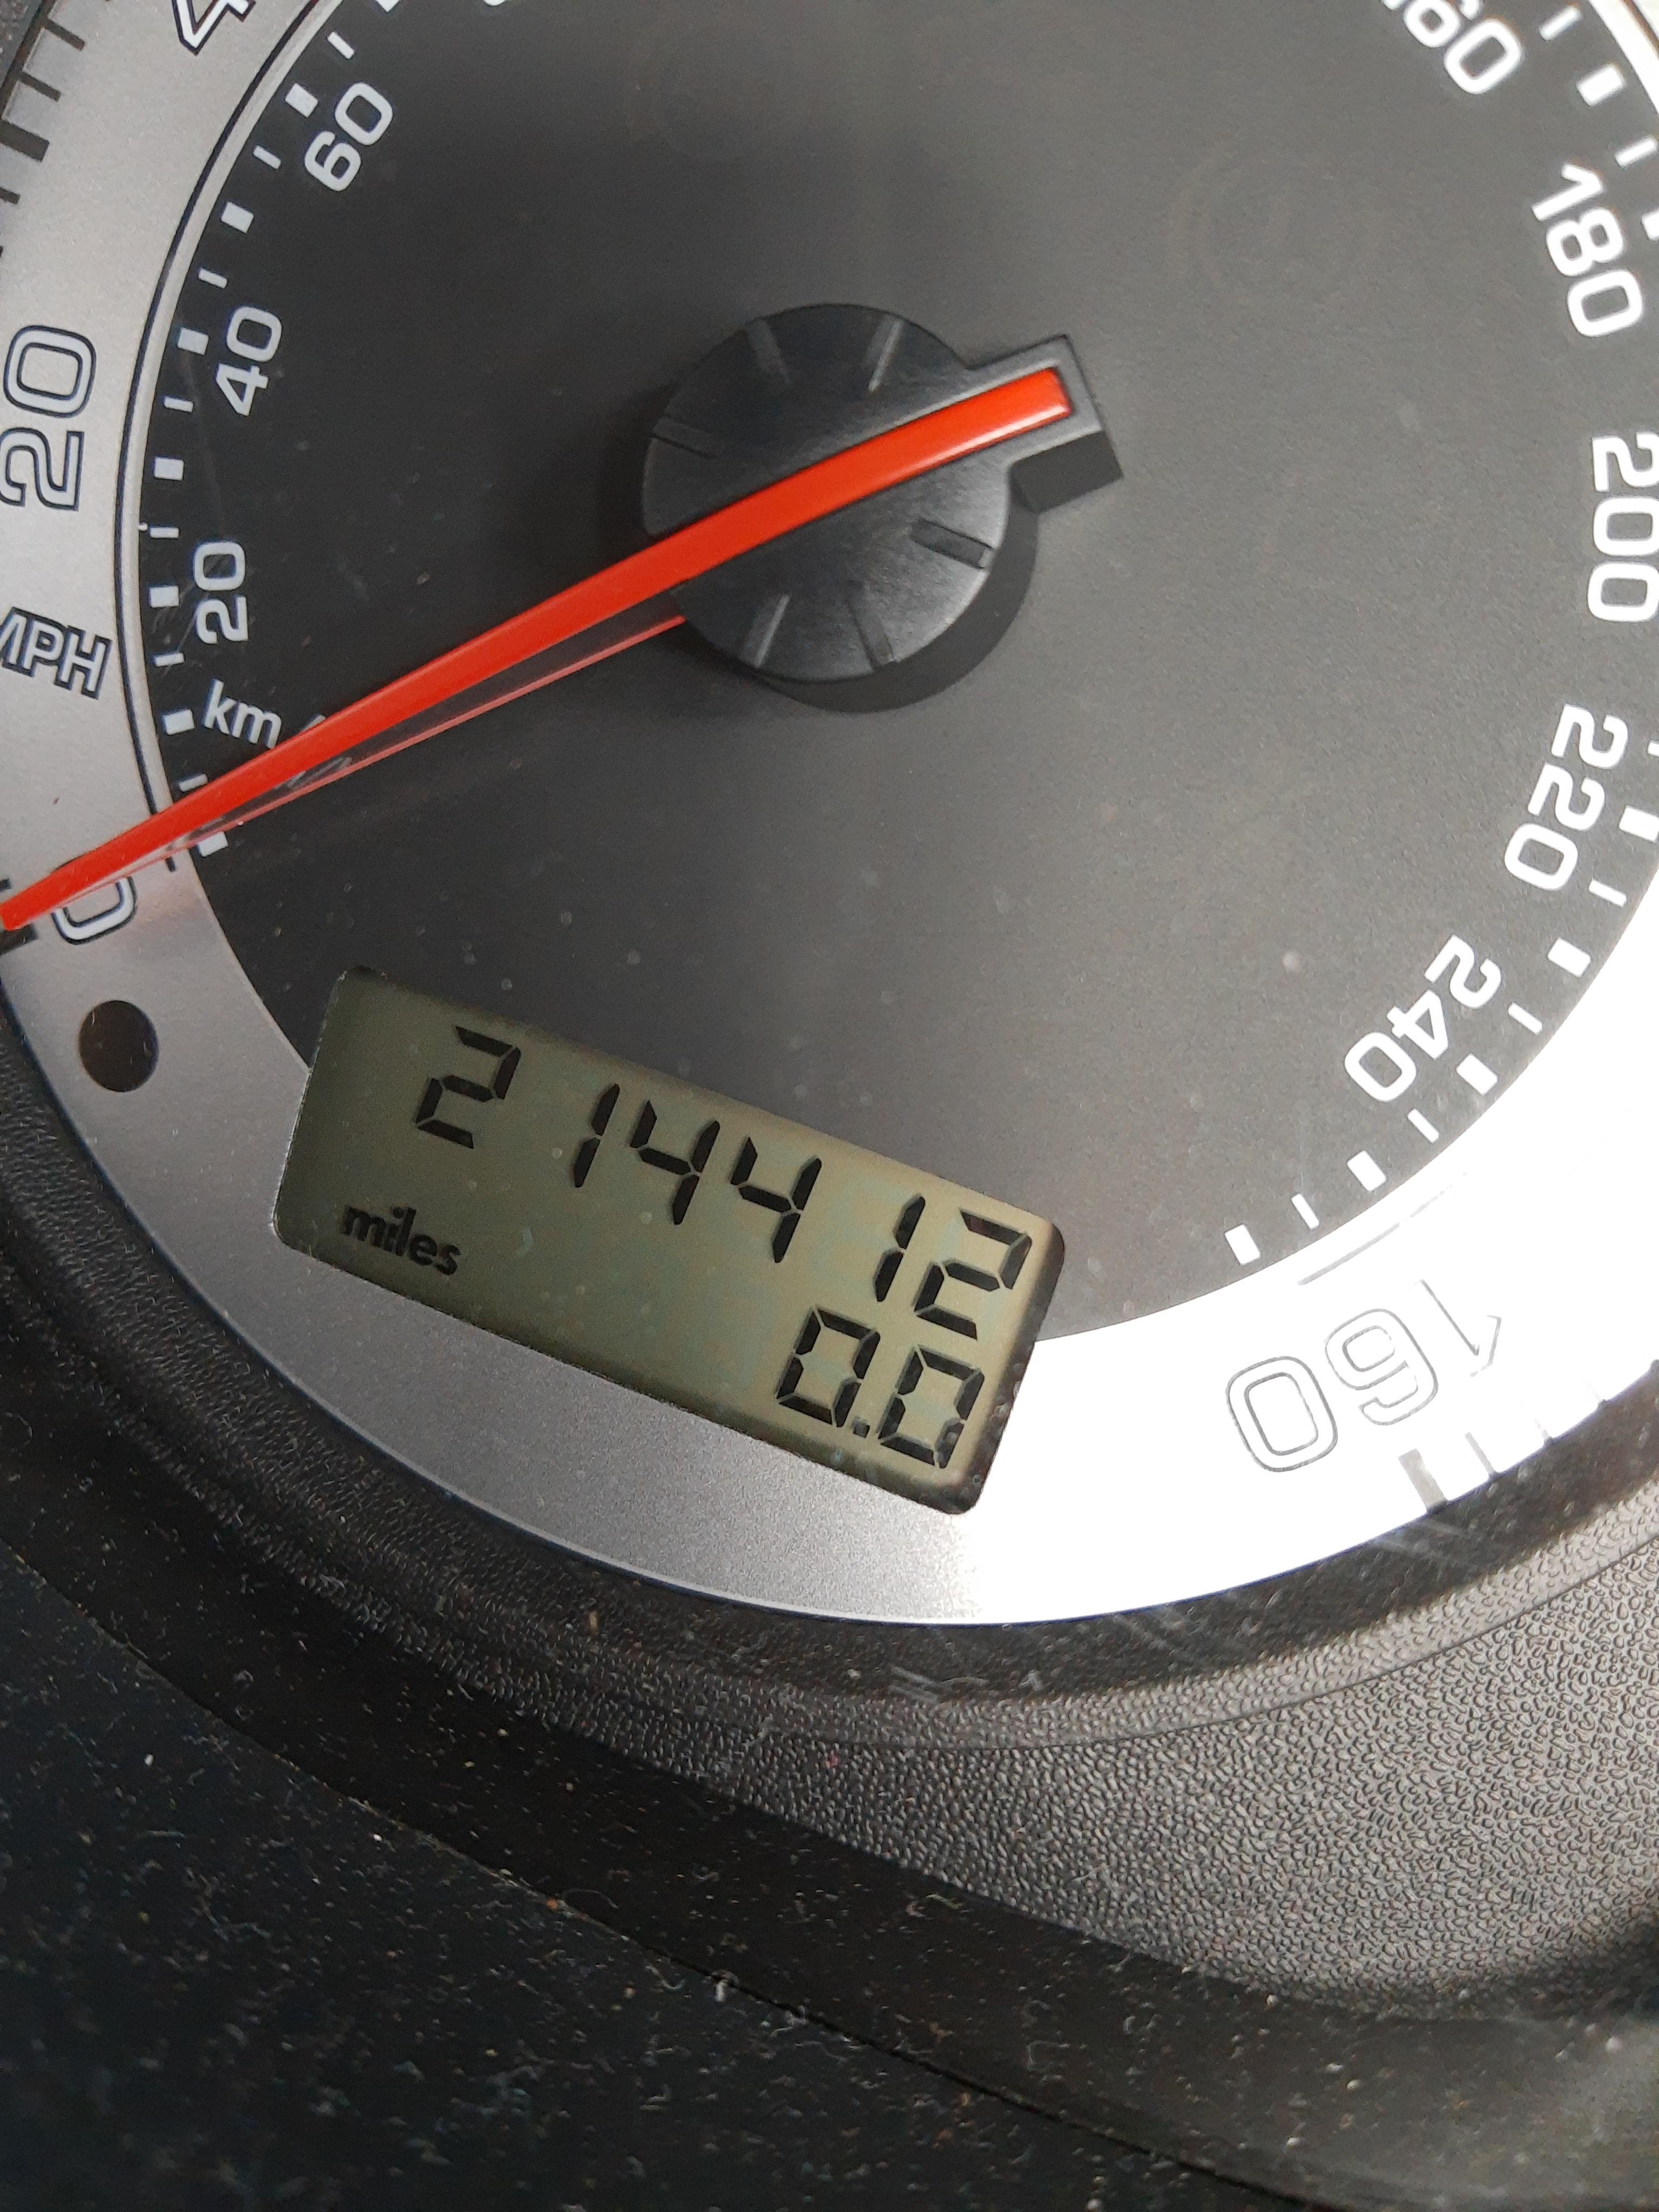
Where's all the high mileage people gone?! 😜 Not doing anywhere near as many miles as I used to. Missed the 214k mark but happened to catch the palindrome as I stopped to fill up and reset the trip.
 4 points
 -
4 pointsI'm surprised there has been no vandalism of vehicles occupying EV charging points for excessively long periods, especially the free ones. I'd drop the free points and simply charge for the electricity used and then charge double rate for the time parked connected and not charging. I'm pretty sure that people who abuse the facilities would be less inclined to do so.4 points
-
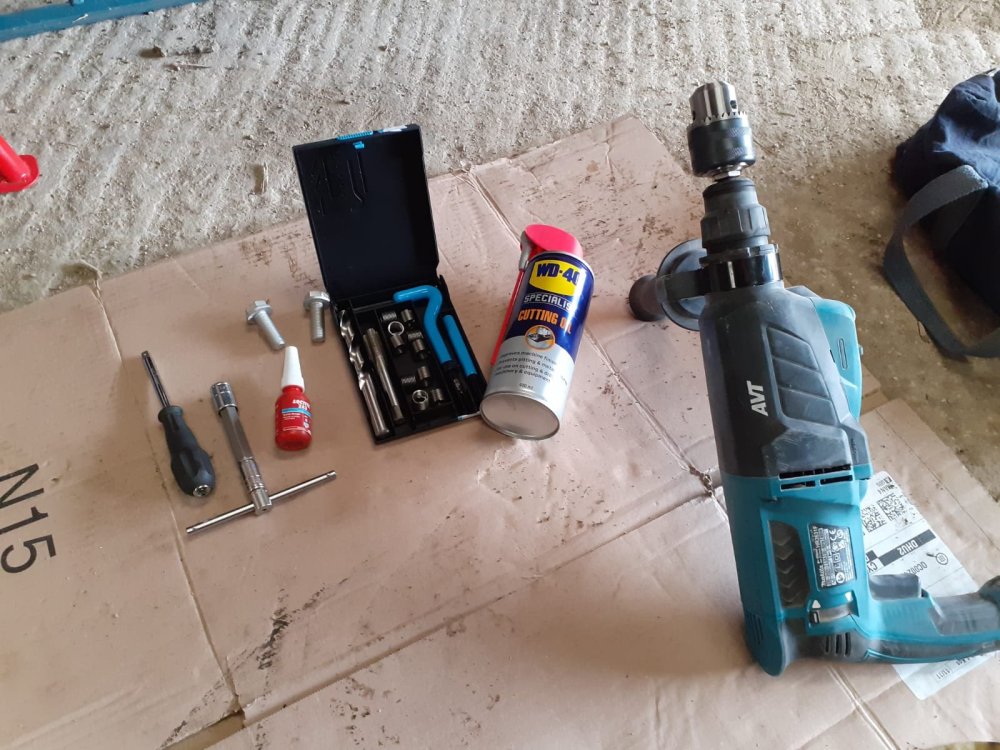
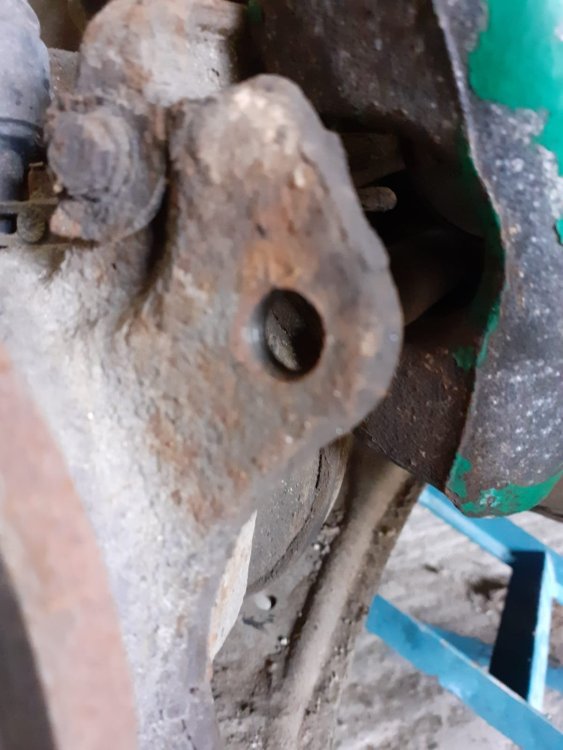
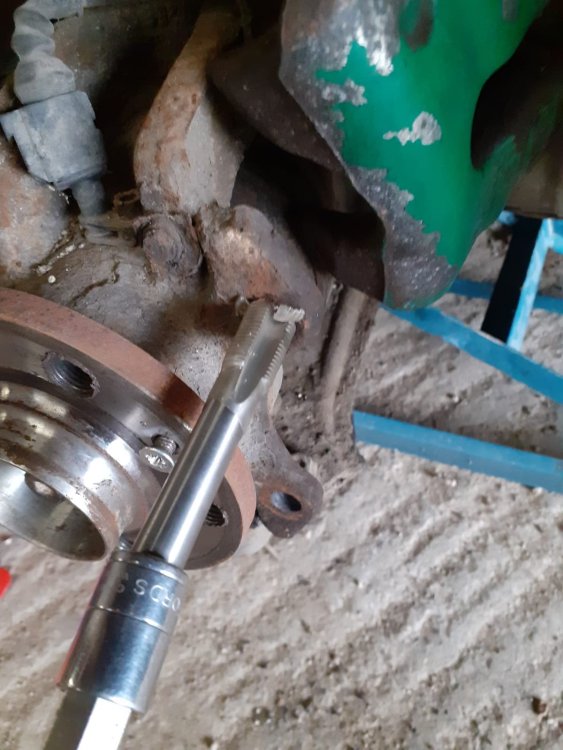
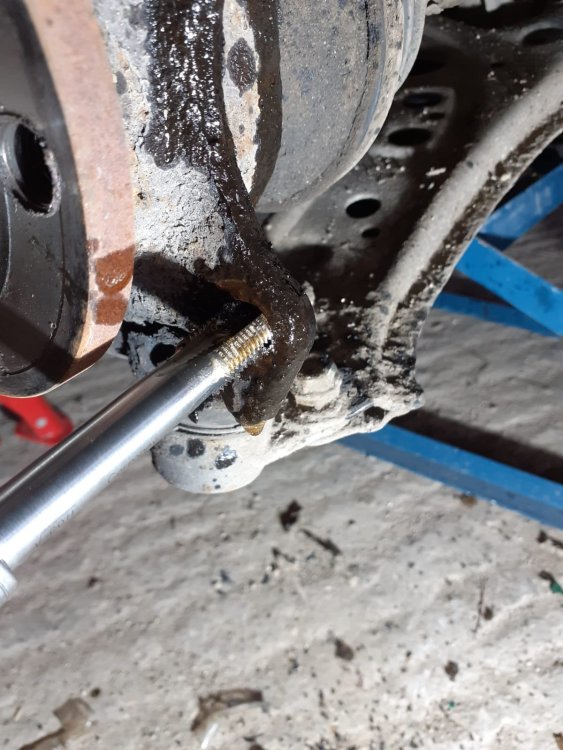
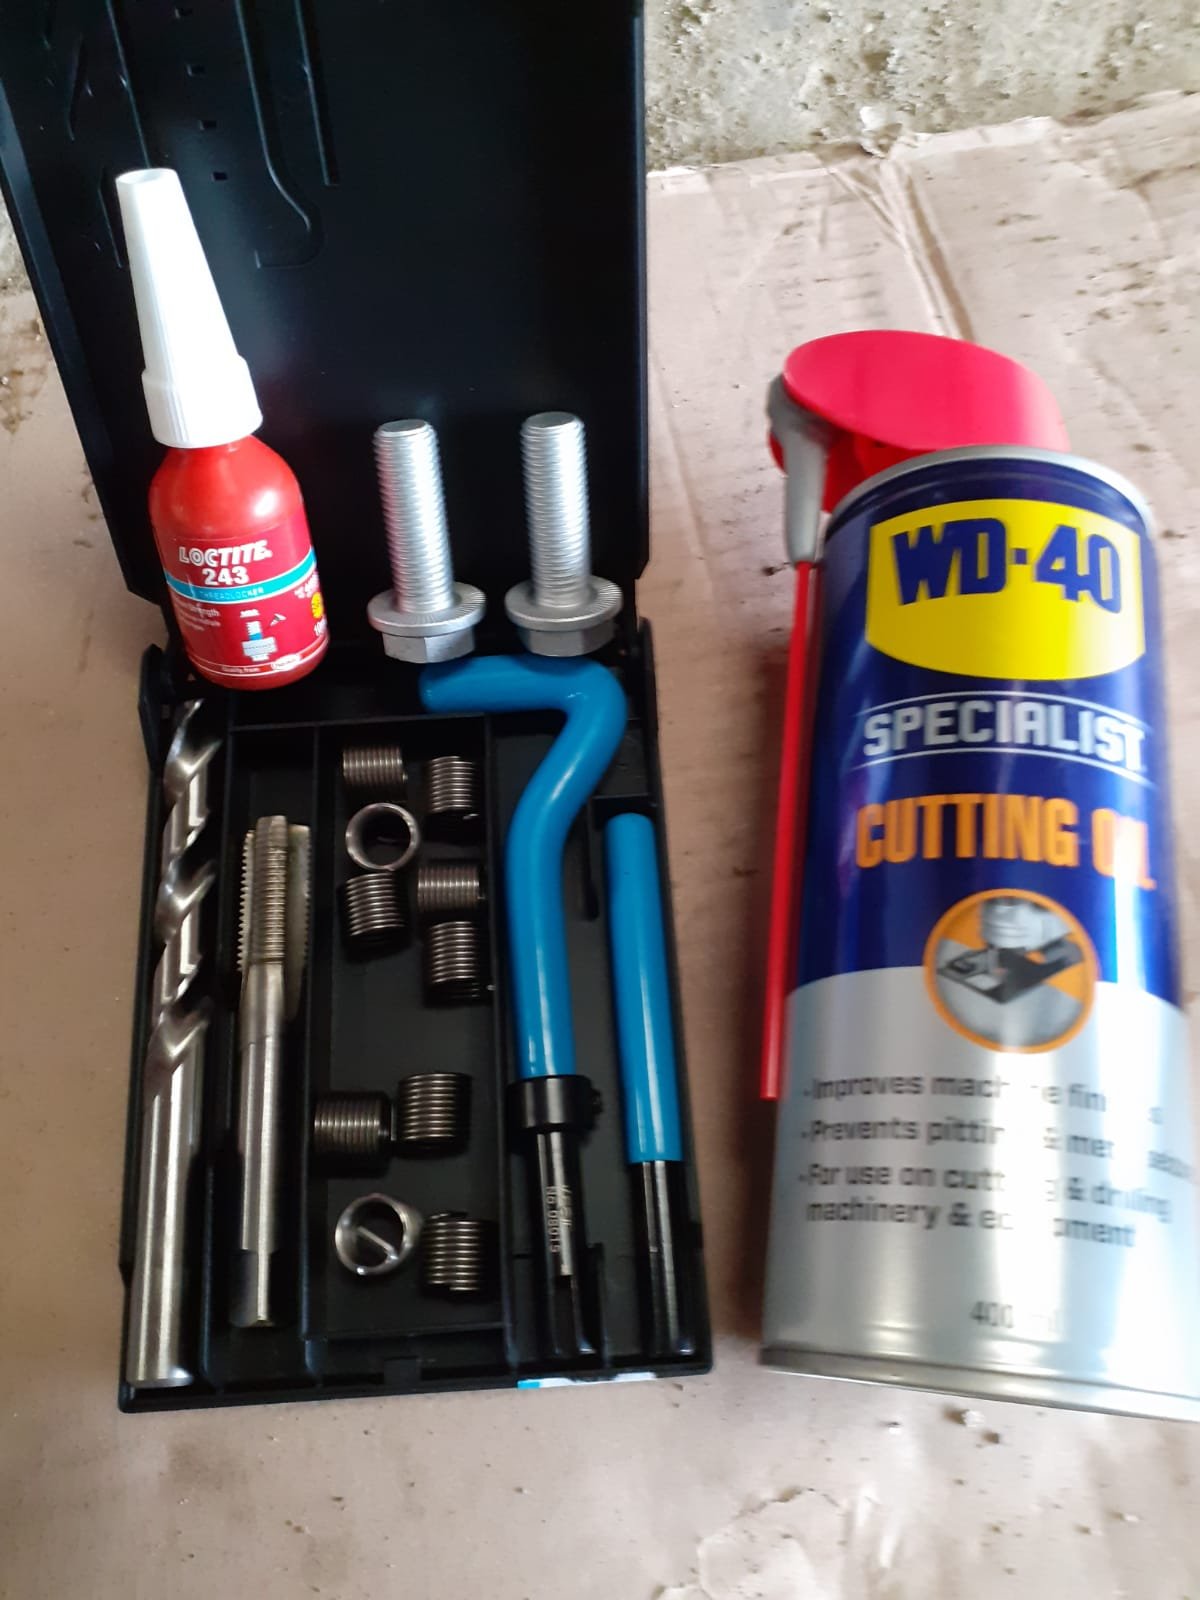
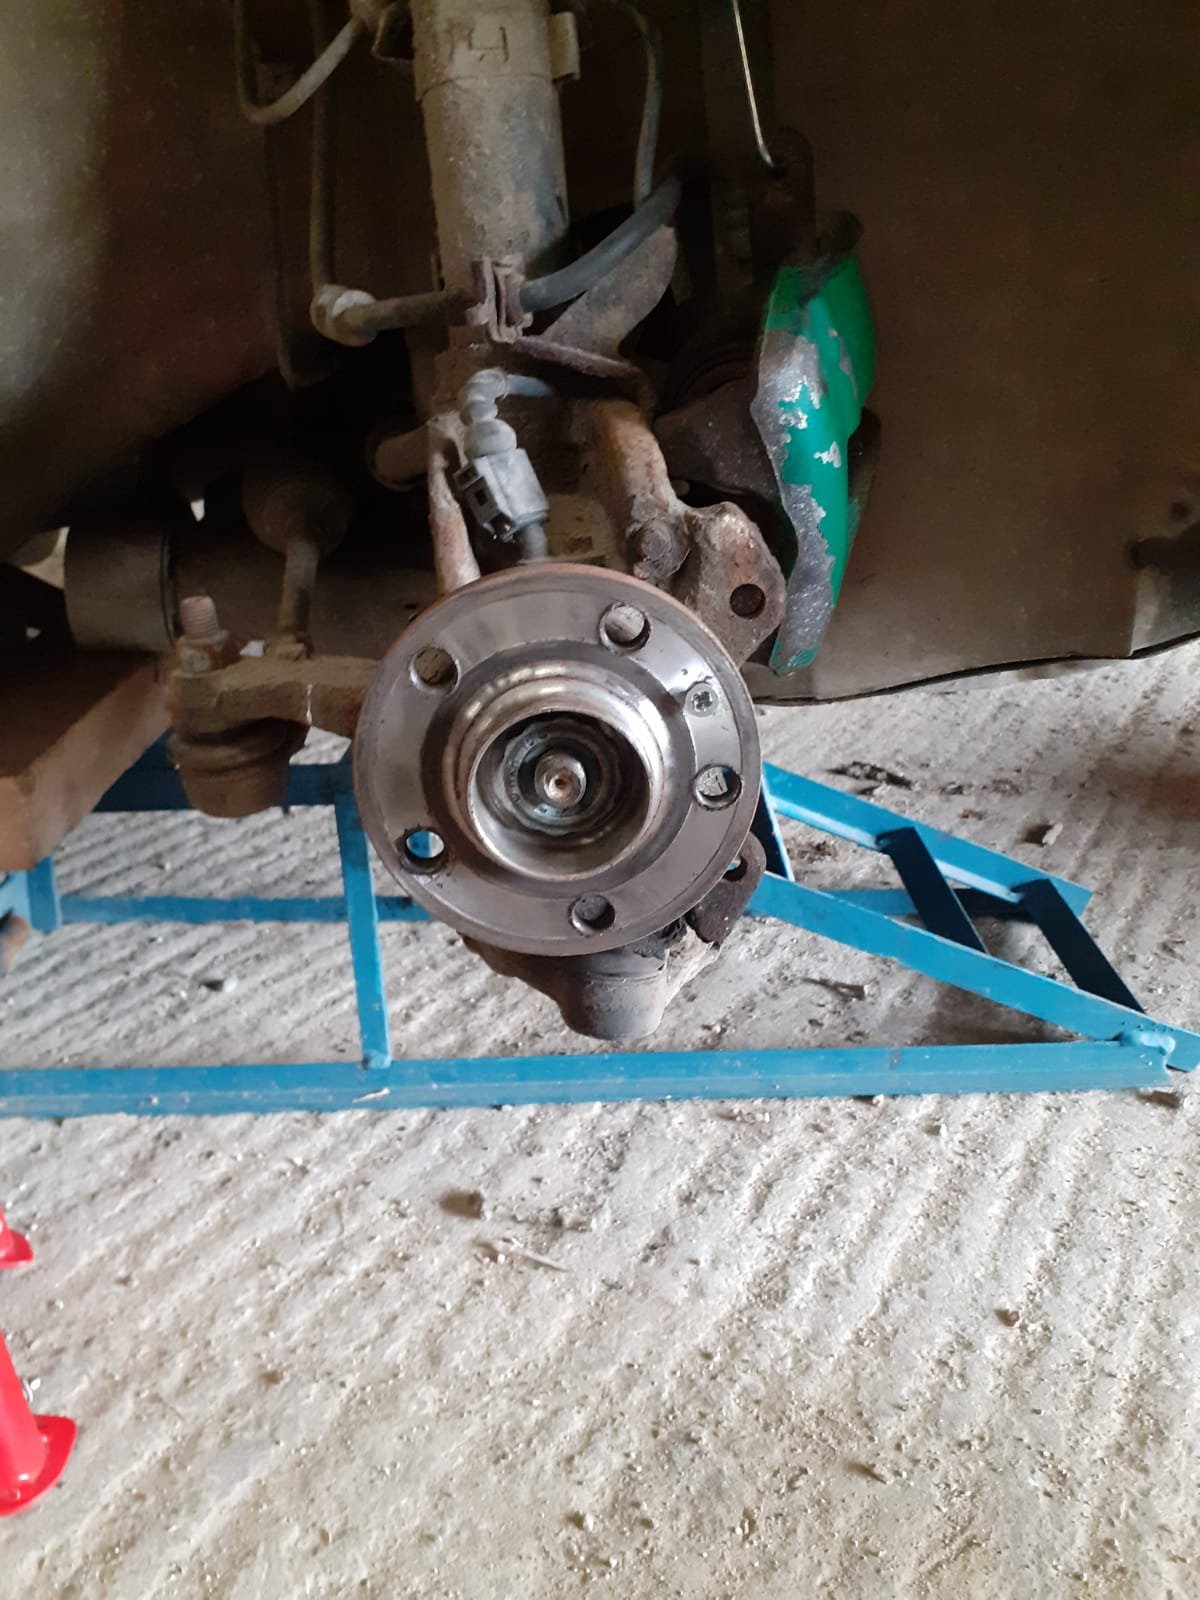
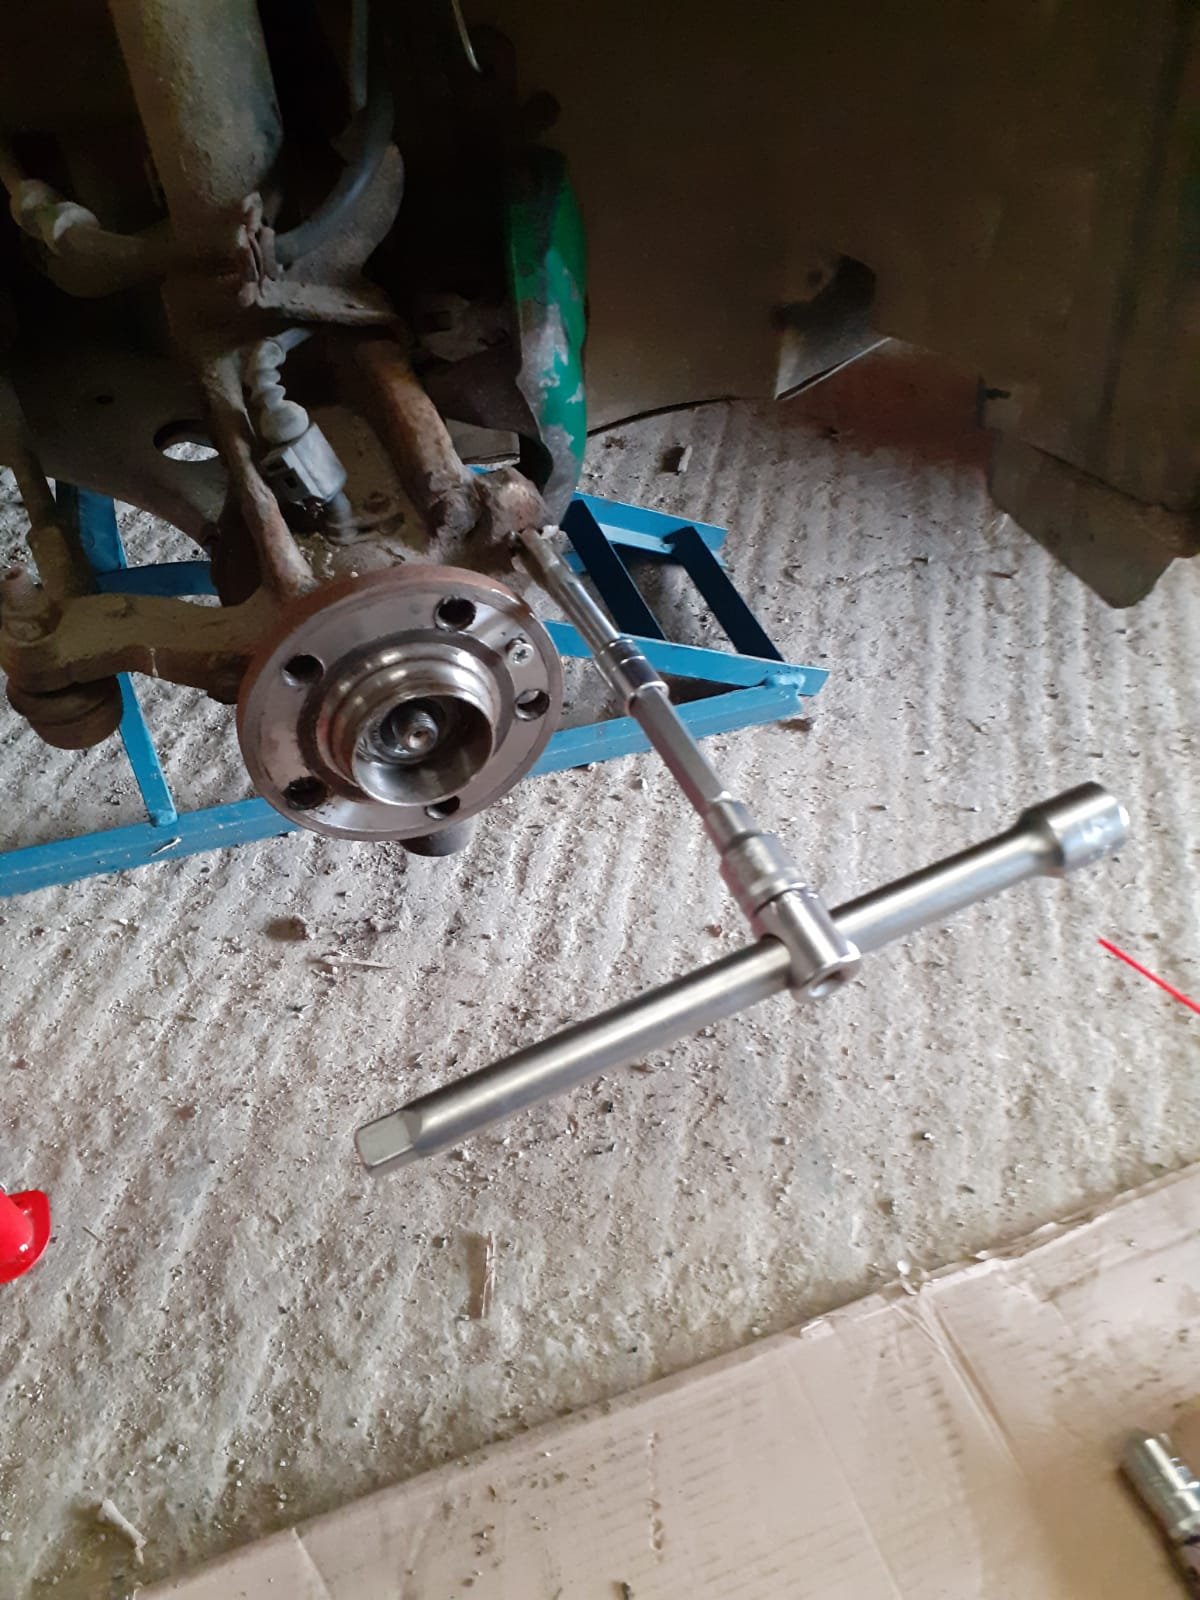
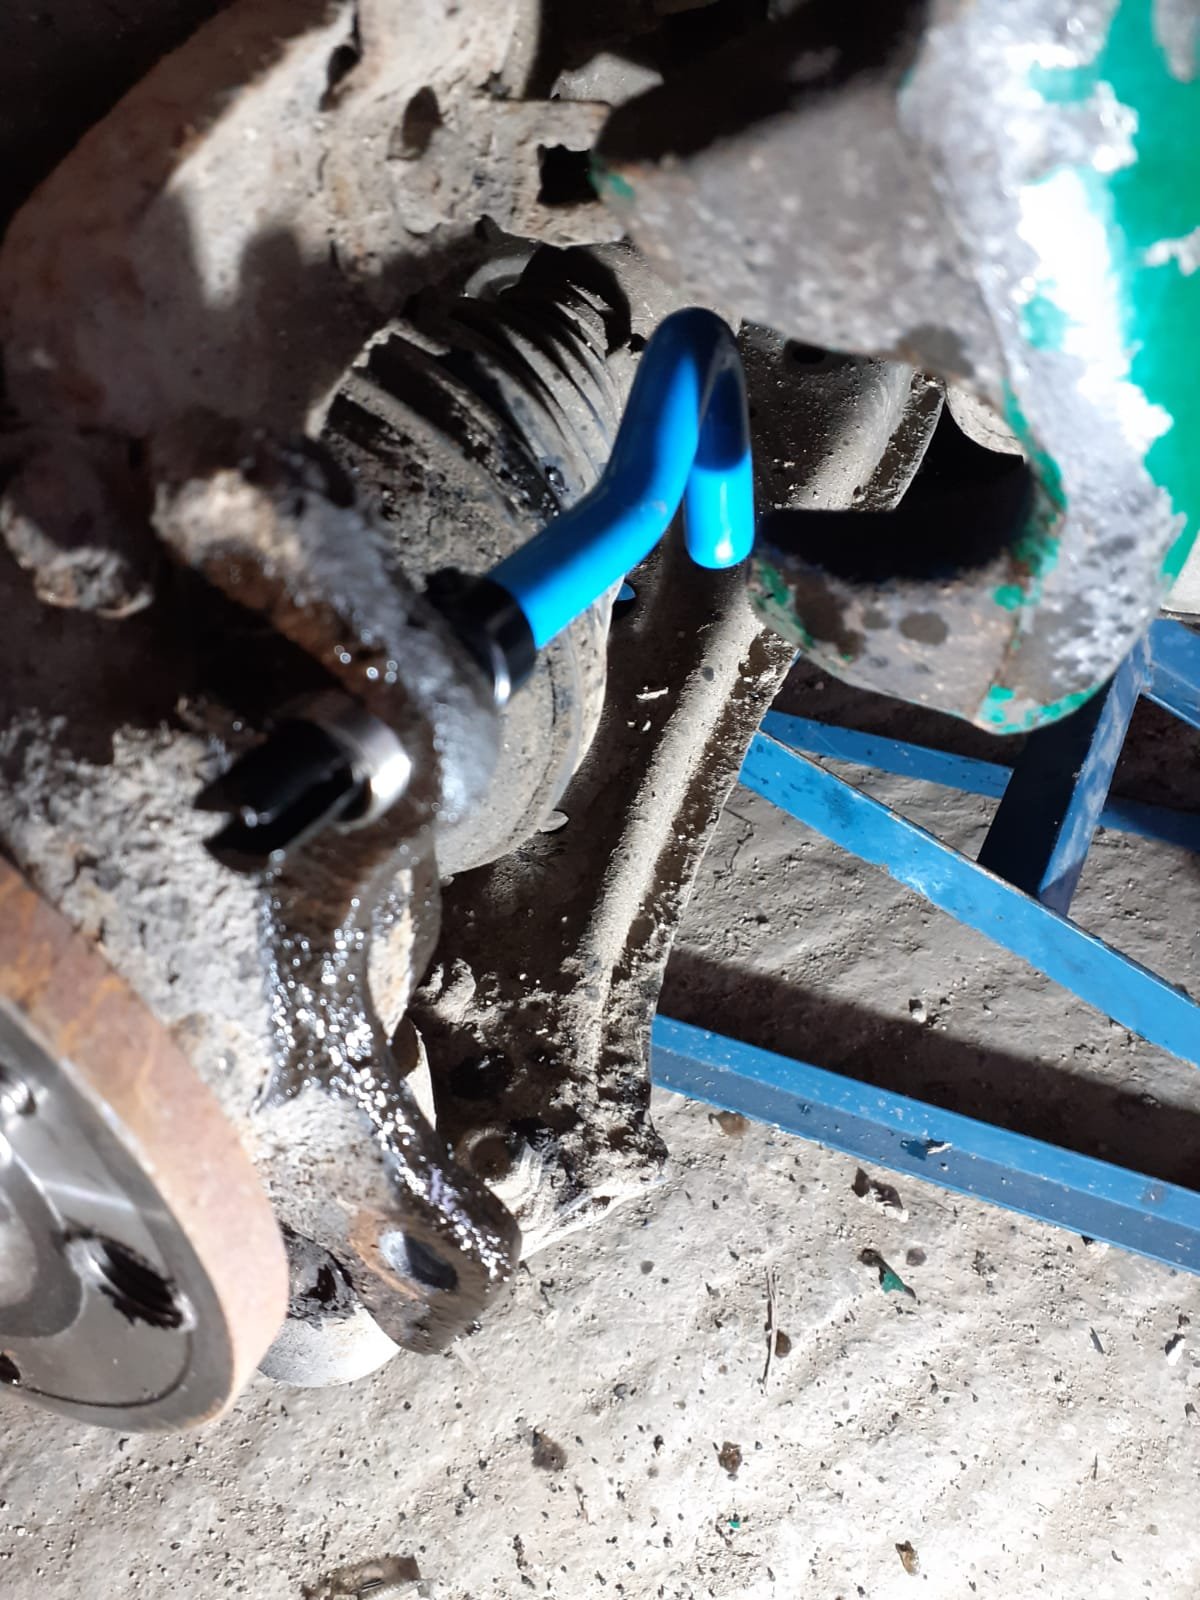
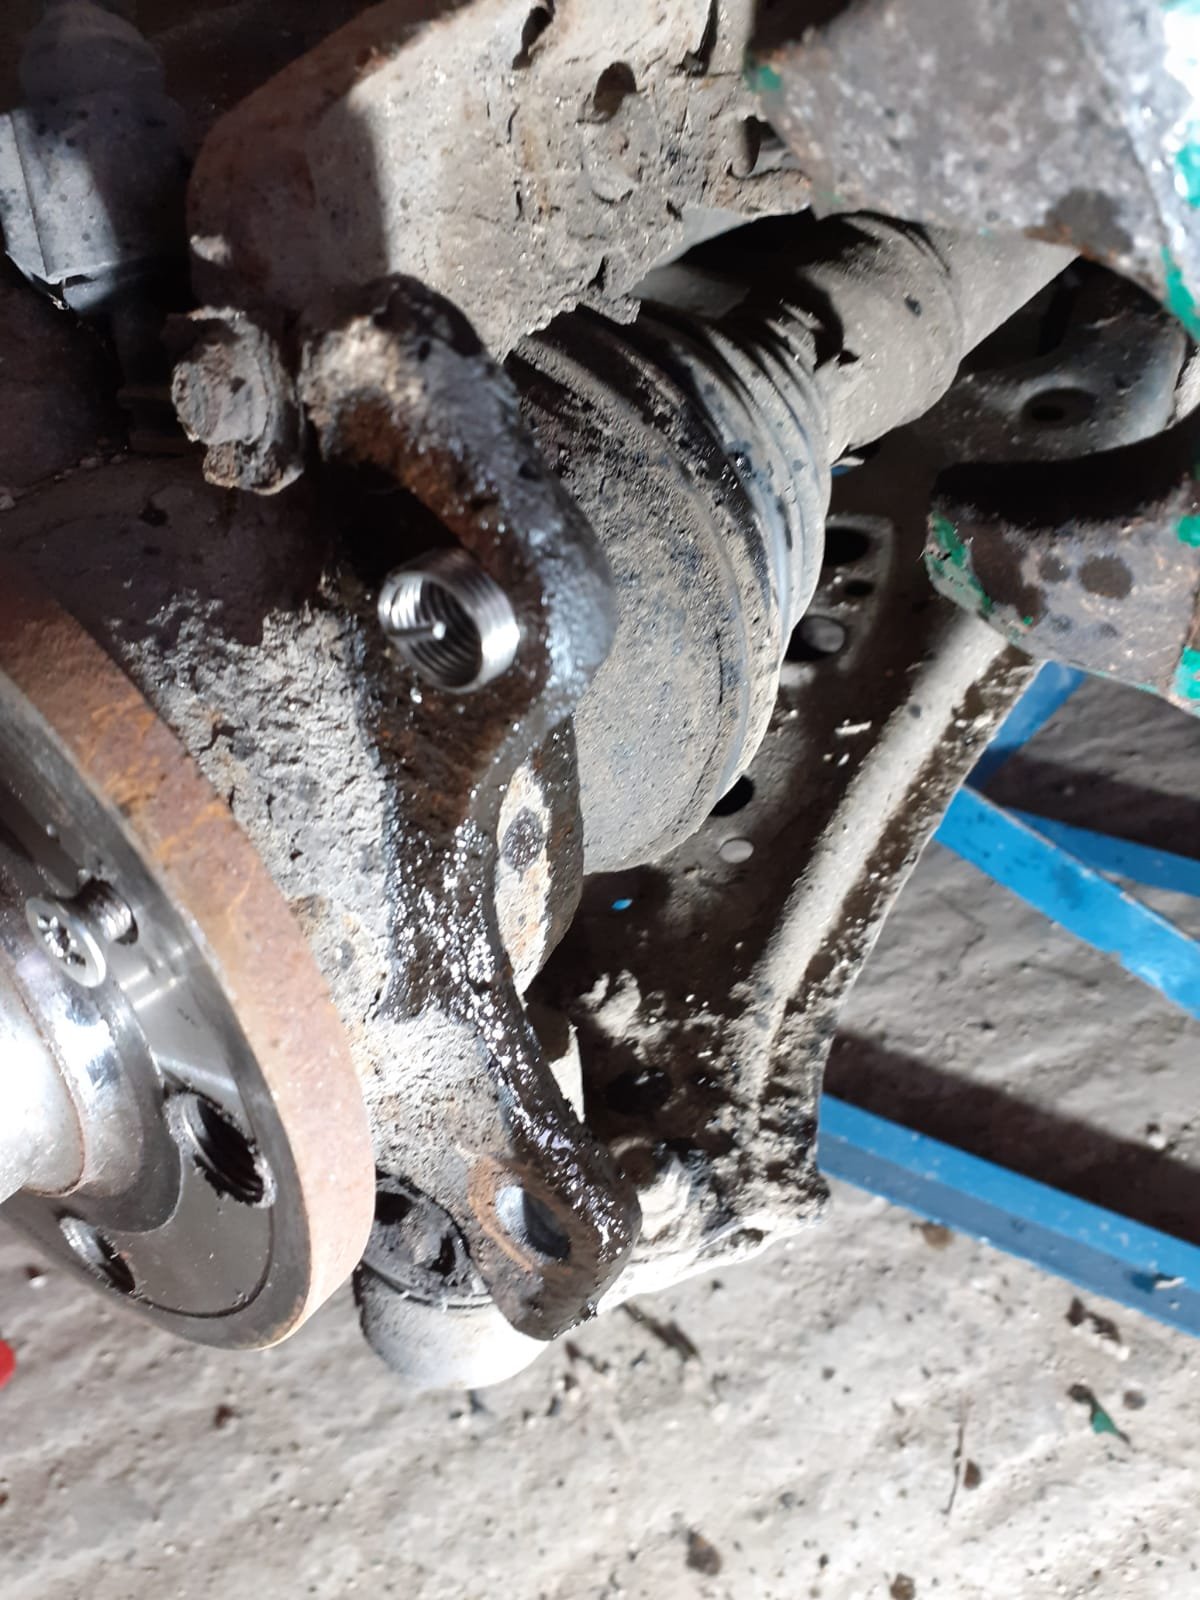
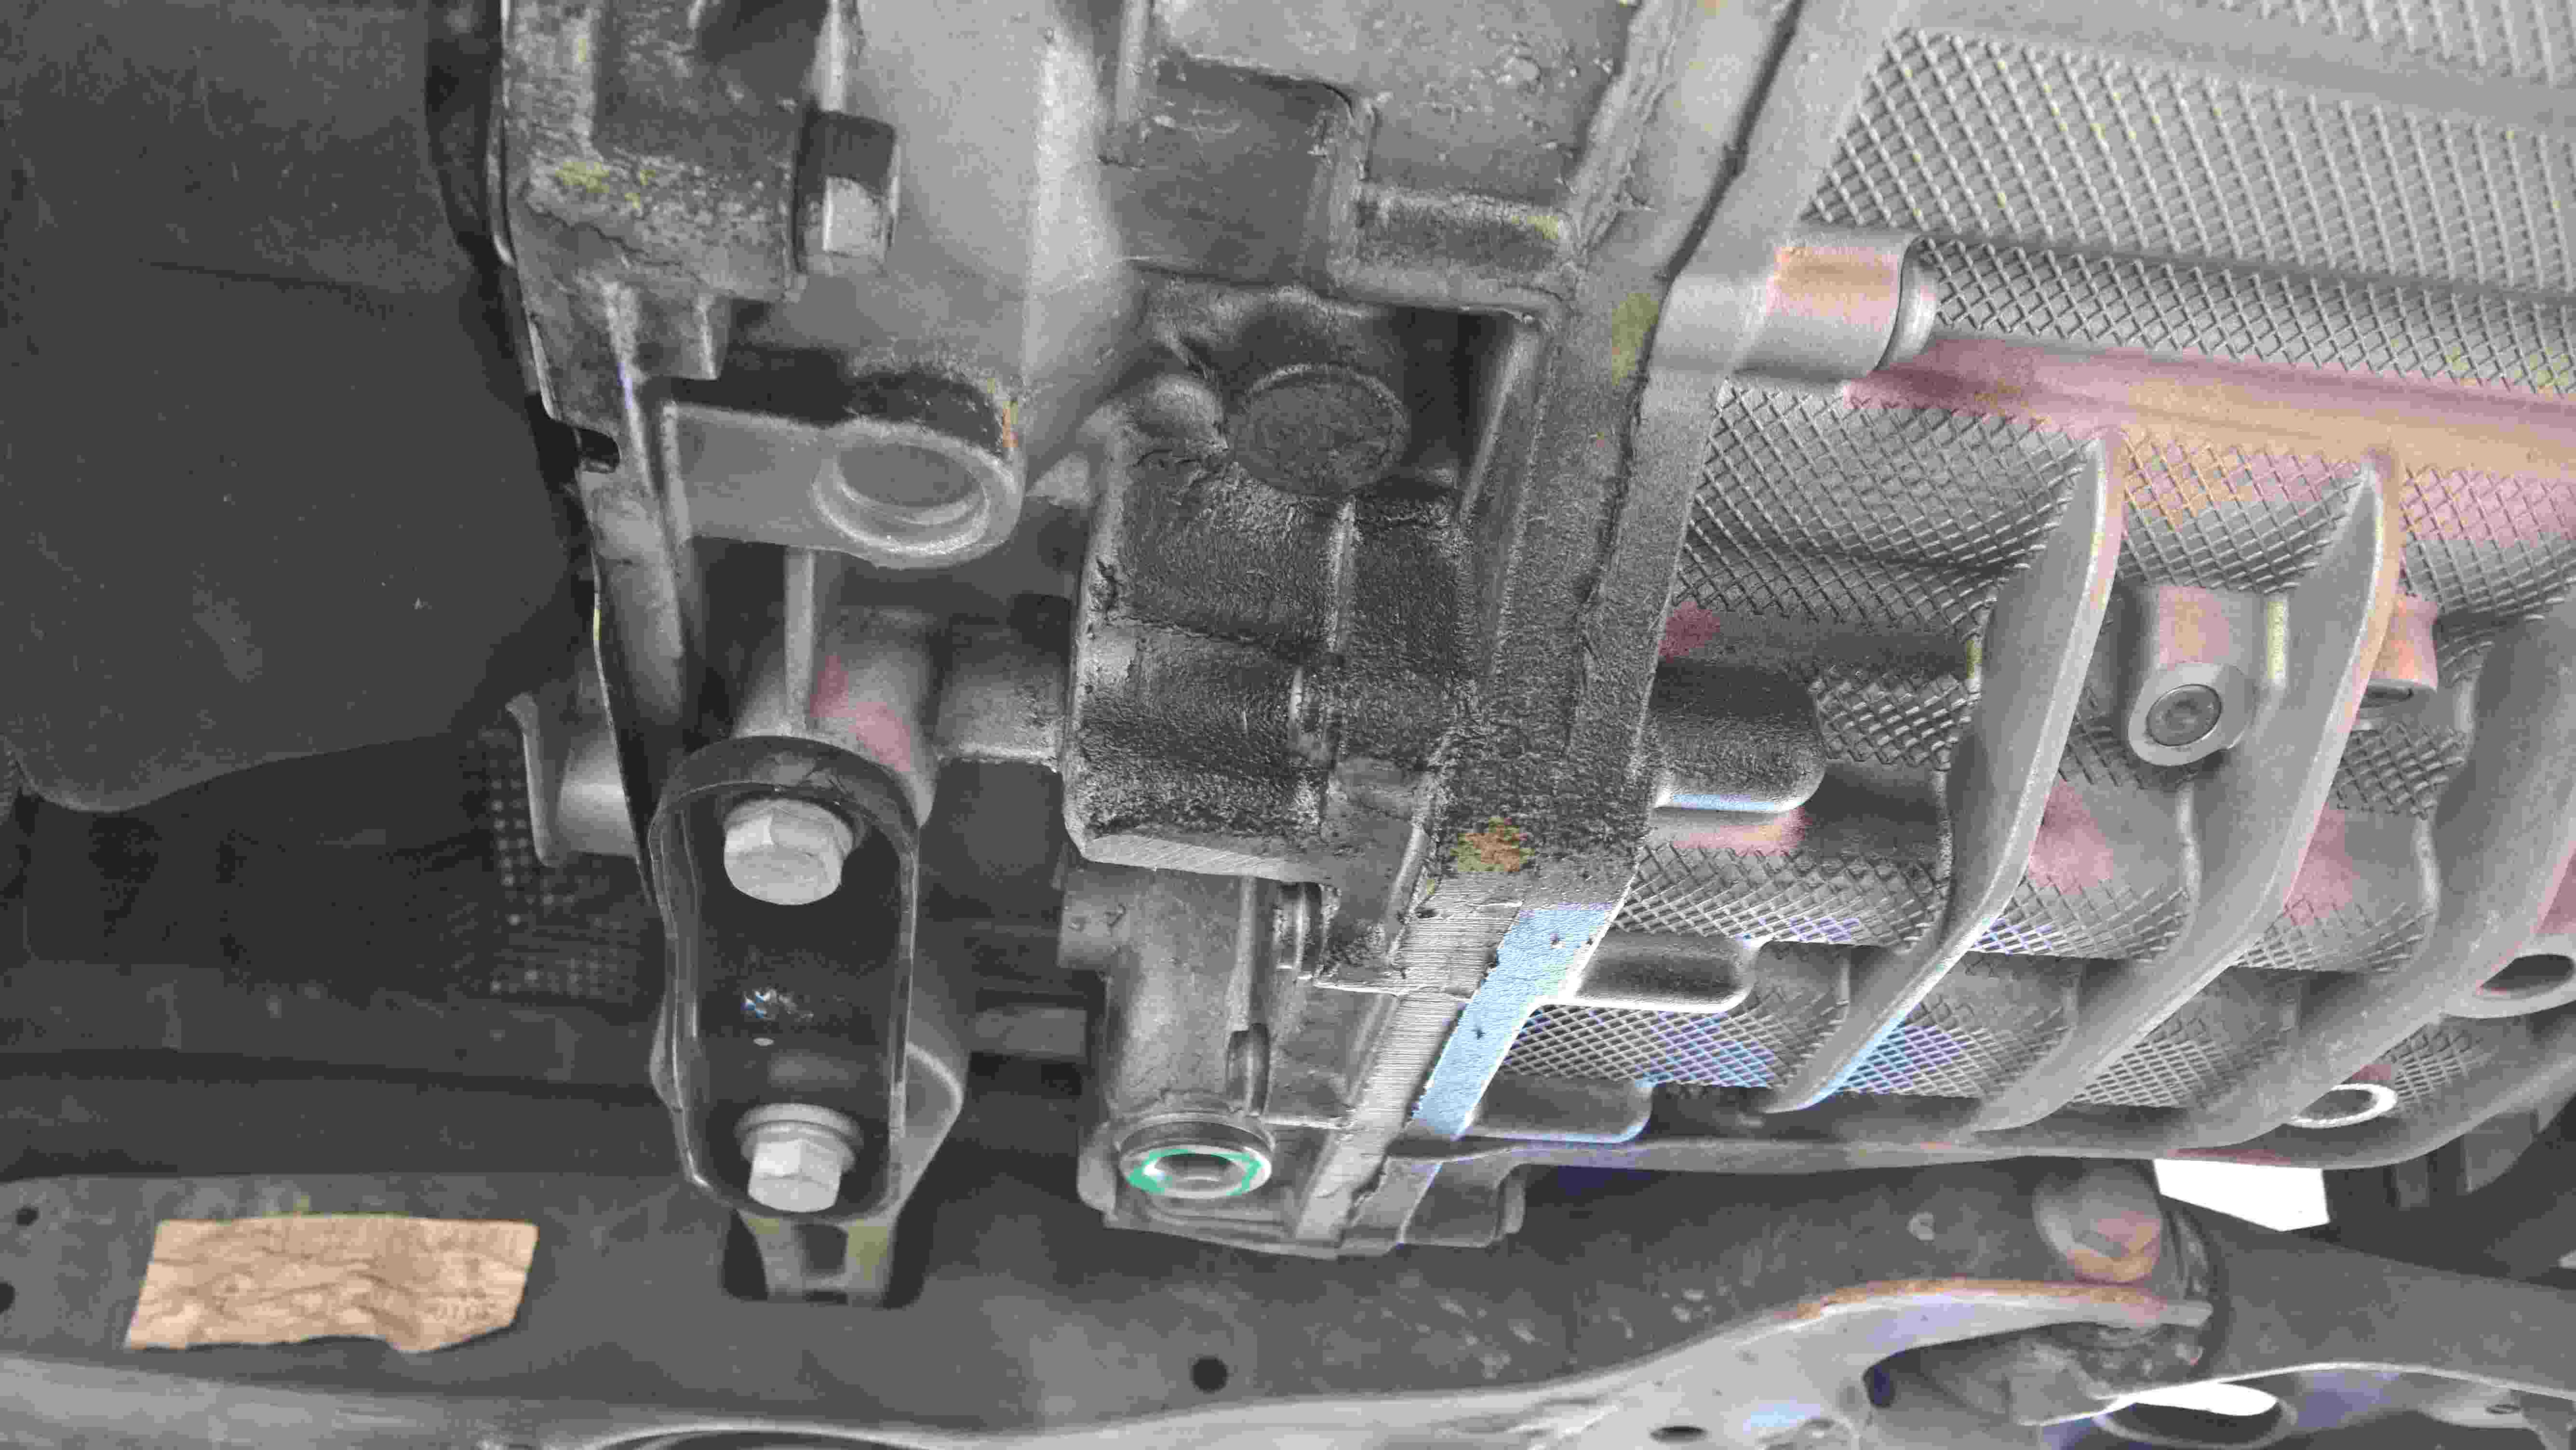
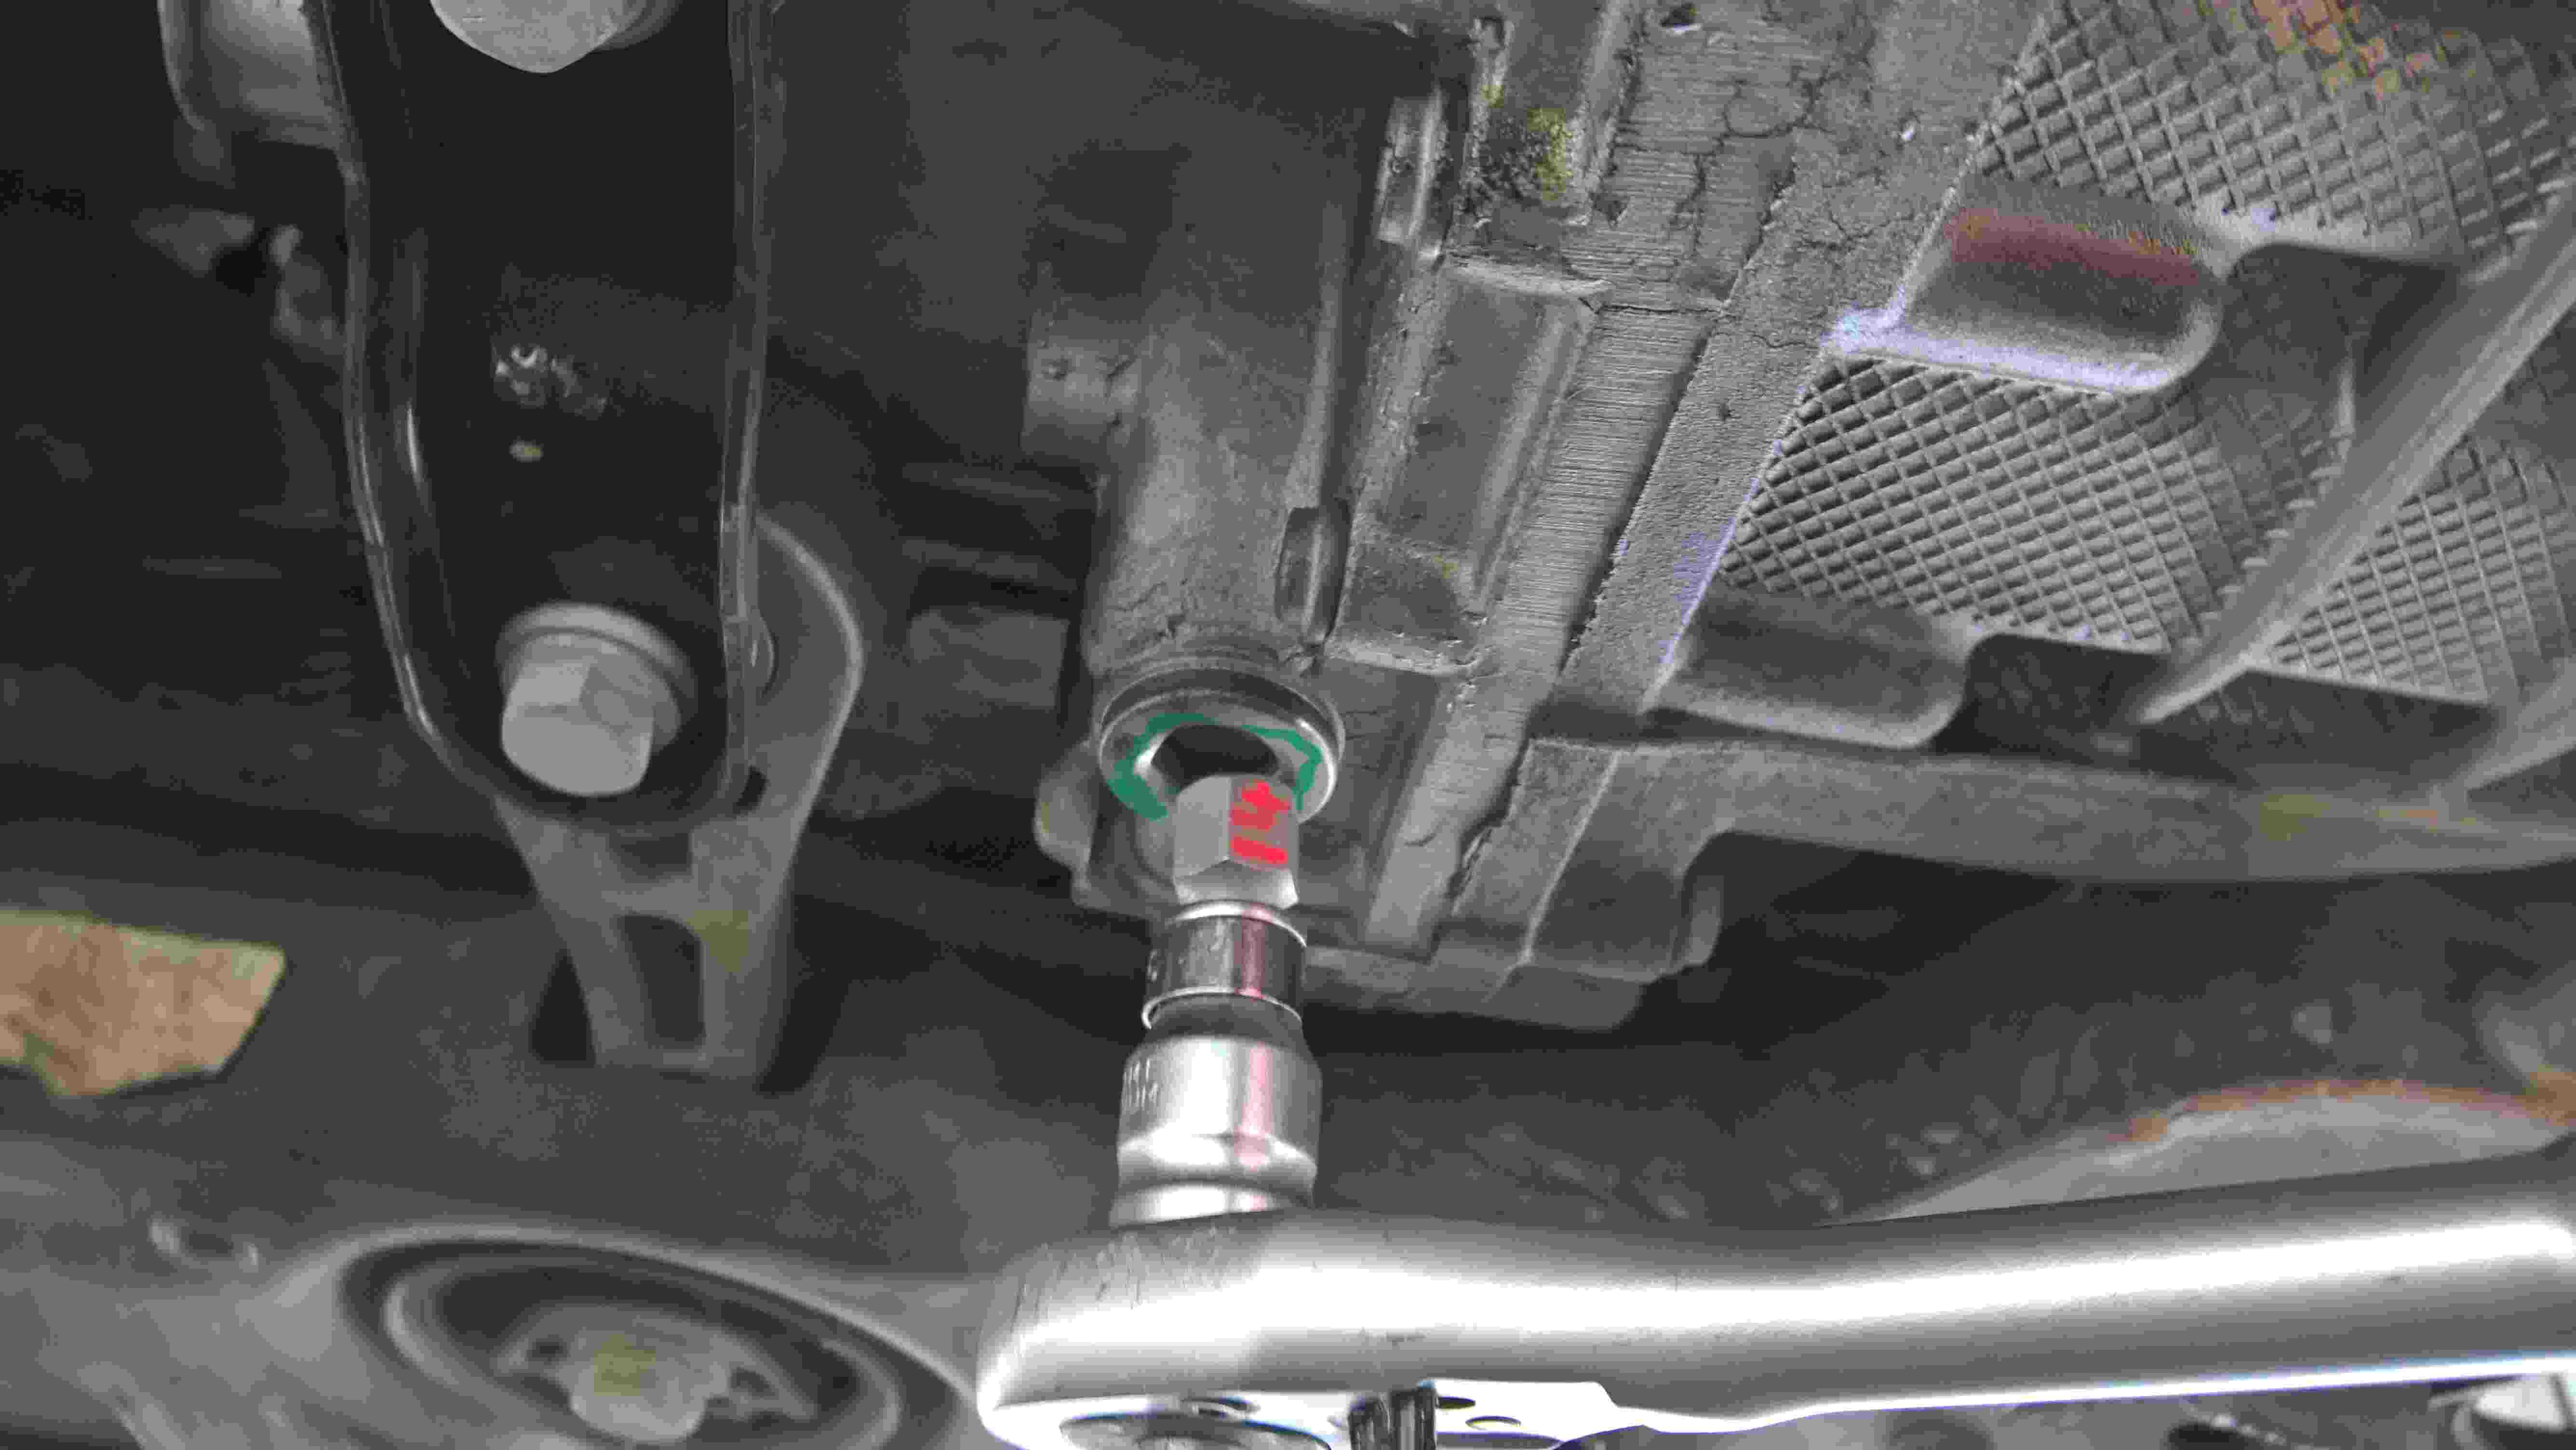
Stripped the front brakes on my 2007 Fabia VRS TDI and the M12 bolts that hold the brake carrier stripped the threads out when removing the bolts! Repaired using ‘V-Coil’ (heli-coil type) kit. Posting this as no one else seems to include parts/sizes etc. It's an easy job with the right parts and tools: Parts: 2x M12 x 1.5 x 35mm Bolts - these bolt the carrier to the stub axle. (Both these part numbers are genuine VAG: CFB606B-2 or N90708504) – Around £7 for two bolts! V-Coil 4022 12mm x 1.5 Metric Fine Thread Repair kit - £35 https://www.amazon.co.uk/gp/product/B00EO4MPC4/ref=ppx_yo_dt_b_asin_title_o00_s00?ie=UTF8&psc=1 This kit includes; 12.4mm drill, 12mm tap, 10x thread inserts (around 15mm deep), insert tool & tab removal punch. Thread lock Red - e.g. Loctite 2700 WD-40 Specialist Cutting Oil - £6 Tools: Drill with 13mm chuck (engineering drill with keyed chuck if possible) Tap wrench (large enough for ¾” square tap or make one up with ½” T bar, sockets & 10mm straight Hex) 18mm socket (for carrier bolts & wheel nuts) 12mm or 13mm socket (for carrier slider bolts) PZ3 screwdriver (for brake disc screw removal) The main issue is drilling out the 2x holes with the 12.4mm drill bit, you need a drill with a large 13mm chuck and strong enough to stop the drill bit slipping!) I used a heavy duty SDS Plus drill with an additional attachable chuck (key type) so I could fit the normal 12.4mm drill bit, I initially tried drilling very slowly but the bit grabbed straight away slipping the clutch on the drill. In the end I had to start at full speed then try to slowly move the drill through the hole, this worked but pulled the drill through the hole very quickly (very difficult to keep perfectly straight!). My top hole ended up on a very slight angle. I was going to use the cutting oil for drilling but didn’t get chance to use in the end. Just try and make sure you drill through straight as the carrier bolt holes don’t allow for much error. Ideally it needs an old slow speed engineering drill with 13mm key chuck and no clutch. I didn't have a tap wrench but discovered the end of the M12 tap fit into a 3/4" square socket, so I used a 10mm socket on the tap (wrong way round) and used a 10mm hex bit to go into another 10mm 1/2" socket and then onto a 1/2" 'T' bar. It was slightly loose but worked fine; just hold it straight when cutting the threads, use the WD-40 cutting oil and backed in/out when cutting the threads. I didn't have any brake cleaner so used normal WD-40 to clean out the cut threads, then washed out with white spirits. Once the threads are free from oil screw in the V-coil inserts, put Red thread lock on so they lock in. I screwed them from inside the wheel arch until the inner face was flat, so the extra insert threads could be seen sticking out (about 5mm) when looking at the axle, then break off the insert tabs, I didn't bother removing the extra screw threads as they only stick out as much as the original bolts. You could cut/grind them off if needed but not a lot of point. Re-fitted the carrier and M12 bolts are now nice and tight. Good luck.


 3 points
 -
3 pointsTbh… every company should provide a socket on every space even if only 50% can be used at full power at the same time. that solves the issue of charger hogging.3 points
-
3 pointsFree never works, it's completely open to abuse. I agree those kind of penalty is needed at some placed..... But one has to remember slower chargers (not 40+kW rapid chargers) are meant for car parks. It doesn't make a lot of sense for people to drop what they are doing and move their car a few spaces down the car park, it's an unnecessary added complication for EV ownership. Our workplace have this problem with 4 charging spaces and about 10 cars needing to charge. The solution is always to get more charger installed (we are getting ~30 soon). So I think: - Rapid chargers should be time based fee, so people would learn about their vehicle charging curve and hopefully have quick turnarounds. These are the mid-journey petrol pumps, charge and move asap. Idle penalty fees here need to be huge, akin to parking tickets. - Destination slow chargers can be either time or usage based, as long as it's not free. Time based for higher utilised locations to encourage people to move on (supermarket, gyms), usage based for long periods cars parks (workplace, flats).3 points
-
Just wanted to update and thank everyone for their comments and help. Reserved a petrol superb estate yesterday, some great advice on here helped make my mind up on it, looking forward to giving it a whirl asap

 3 points
 -
2 points
-
2 pointsIf you seek certainty then good luck with that, I live in a probabilistic universe.2 points
-
No, my EML isn't on, I was stopped at the time.
 2 points
 -
Just an update in that I did a thorough check of all the wiring in the brackets below the starter in front of the gearbox this morning and everything looked just fine. No splits or cracks in the insulation. So I bit the bullet and bought a Lucas remanufactured alternator and fitted it this afternoon. The old alternator would do a whistling noise so maybe a dry bearing so I thought just change the whole thing. So far so good in that the battery symbol goes out instantly as the engine is started rather than having to rev it up to make the light go out. I checked the voltage output at idle and again it was fine. I will monitor it over the next couple of days but fingers crossed the issue is now fixed. With the winter coming I wanted peace of mind as the number of revs needed to put the light out seemed to be increasing recently. Thank you to everyone who had given their advice.2 points
-
2 pointsYeah thats the one, I did mine cause I was that far in and it wasnt much more to get the two bushes from PSB.2 points
-
2 pointsI have been thinking for some time about a situation where some get a car in three months and some only in 10+ months. We cannot be sure that the dealer has not in the meantime reconfigured our order for a customer who came behind us and reworked his order for us. The chassis number is already obtained when the car starts production, so the dealers can mumble as they wish if someone pays them extra. We don’t actually see a system of orders from agents, we are guided by the data they give us. There is a lot of room for manipulation2 points
-
2 pointsI mean, I'd recommend that he "gies it laldy" as well. Clear any other crap out as a result.2 points
-
2 points2 points2 points2 pointsThe reason my black one is back n the road is so I can use it around London. ULEZ stopped my diesel and I refuse to change the car because it’s cheap to run. So, when I need to visit London and the outskirts now, I take black VRS for some fun. I think we will be going up another Euro for 2030 now which will screw up our 1.8Ts… 😒2 pointsGive it five minutes and the Furby will decide for you.2 points2 pointsThank you. It's a work in progress and will never be perfect but it scrubs up quite well. I'm determined to enjoy it before cars like this are killed off through legislation etc. I get a lot of pleasure from driving the car, from making small changes and from not confirming to join the SUV masses that fill most driveways on our street.
 2 points2 pointsI'll second this, complete PITA tbh, even with genuine VAG Cupra bushes and the tool. I've had PSB ones on both of my Fabia vRS, and the black one did 90k miles on them and they never showed any wear, plus you can fit them by hand!!2 points2 pointsOrdered the bushes people. Thank you all. I'll report back with my findings and results in due time.
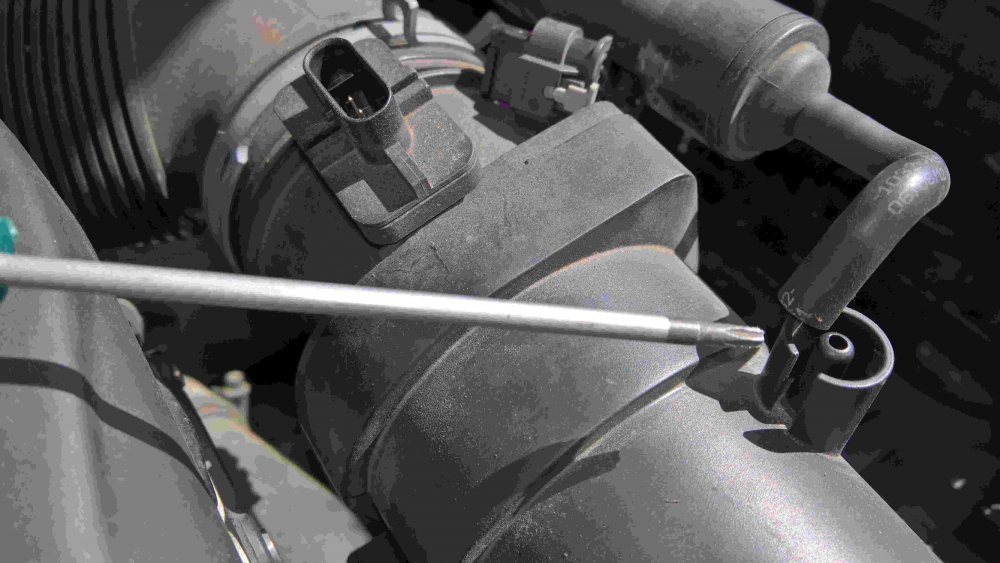
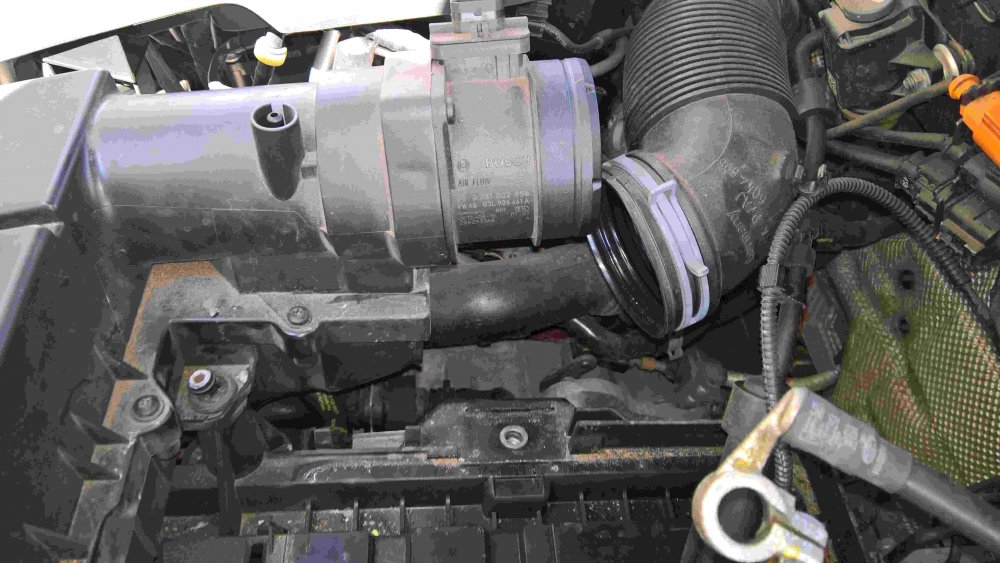
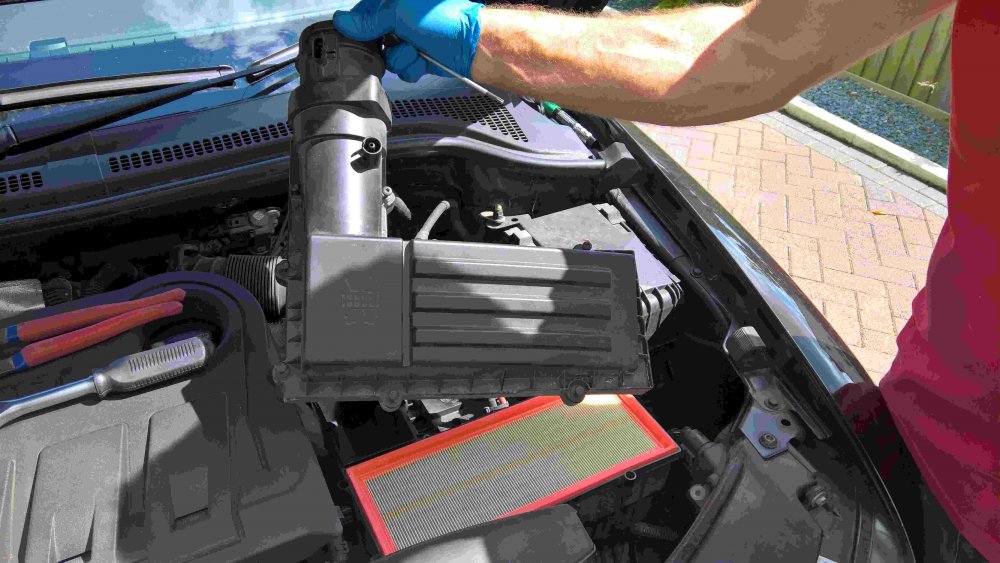
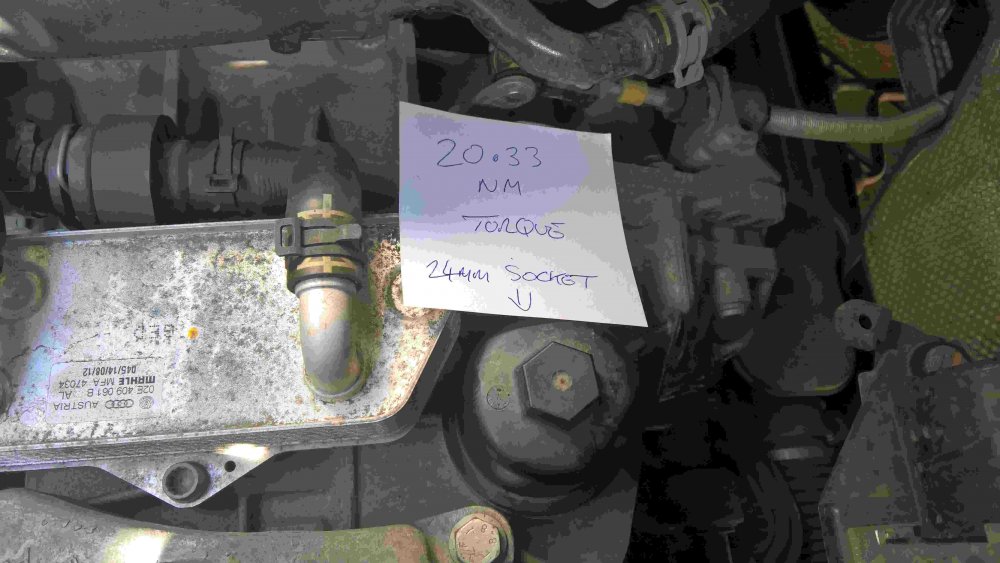
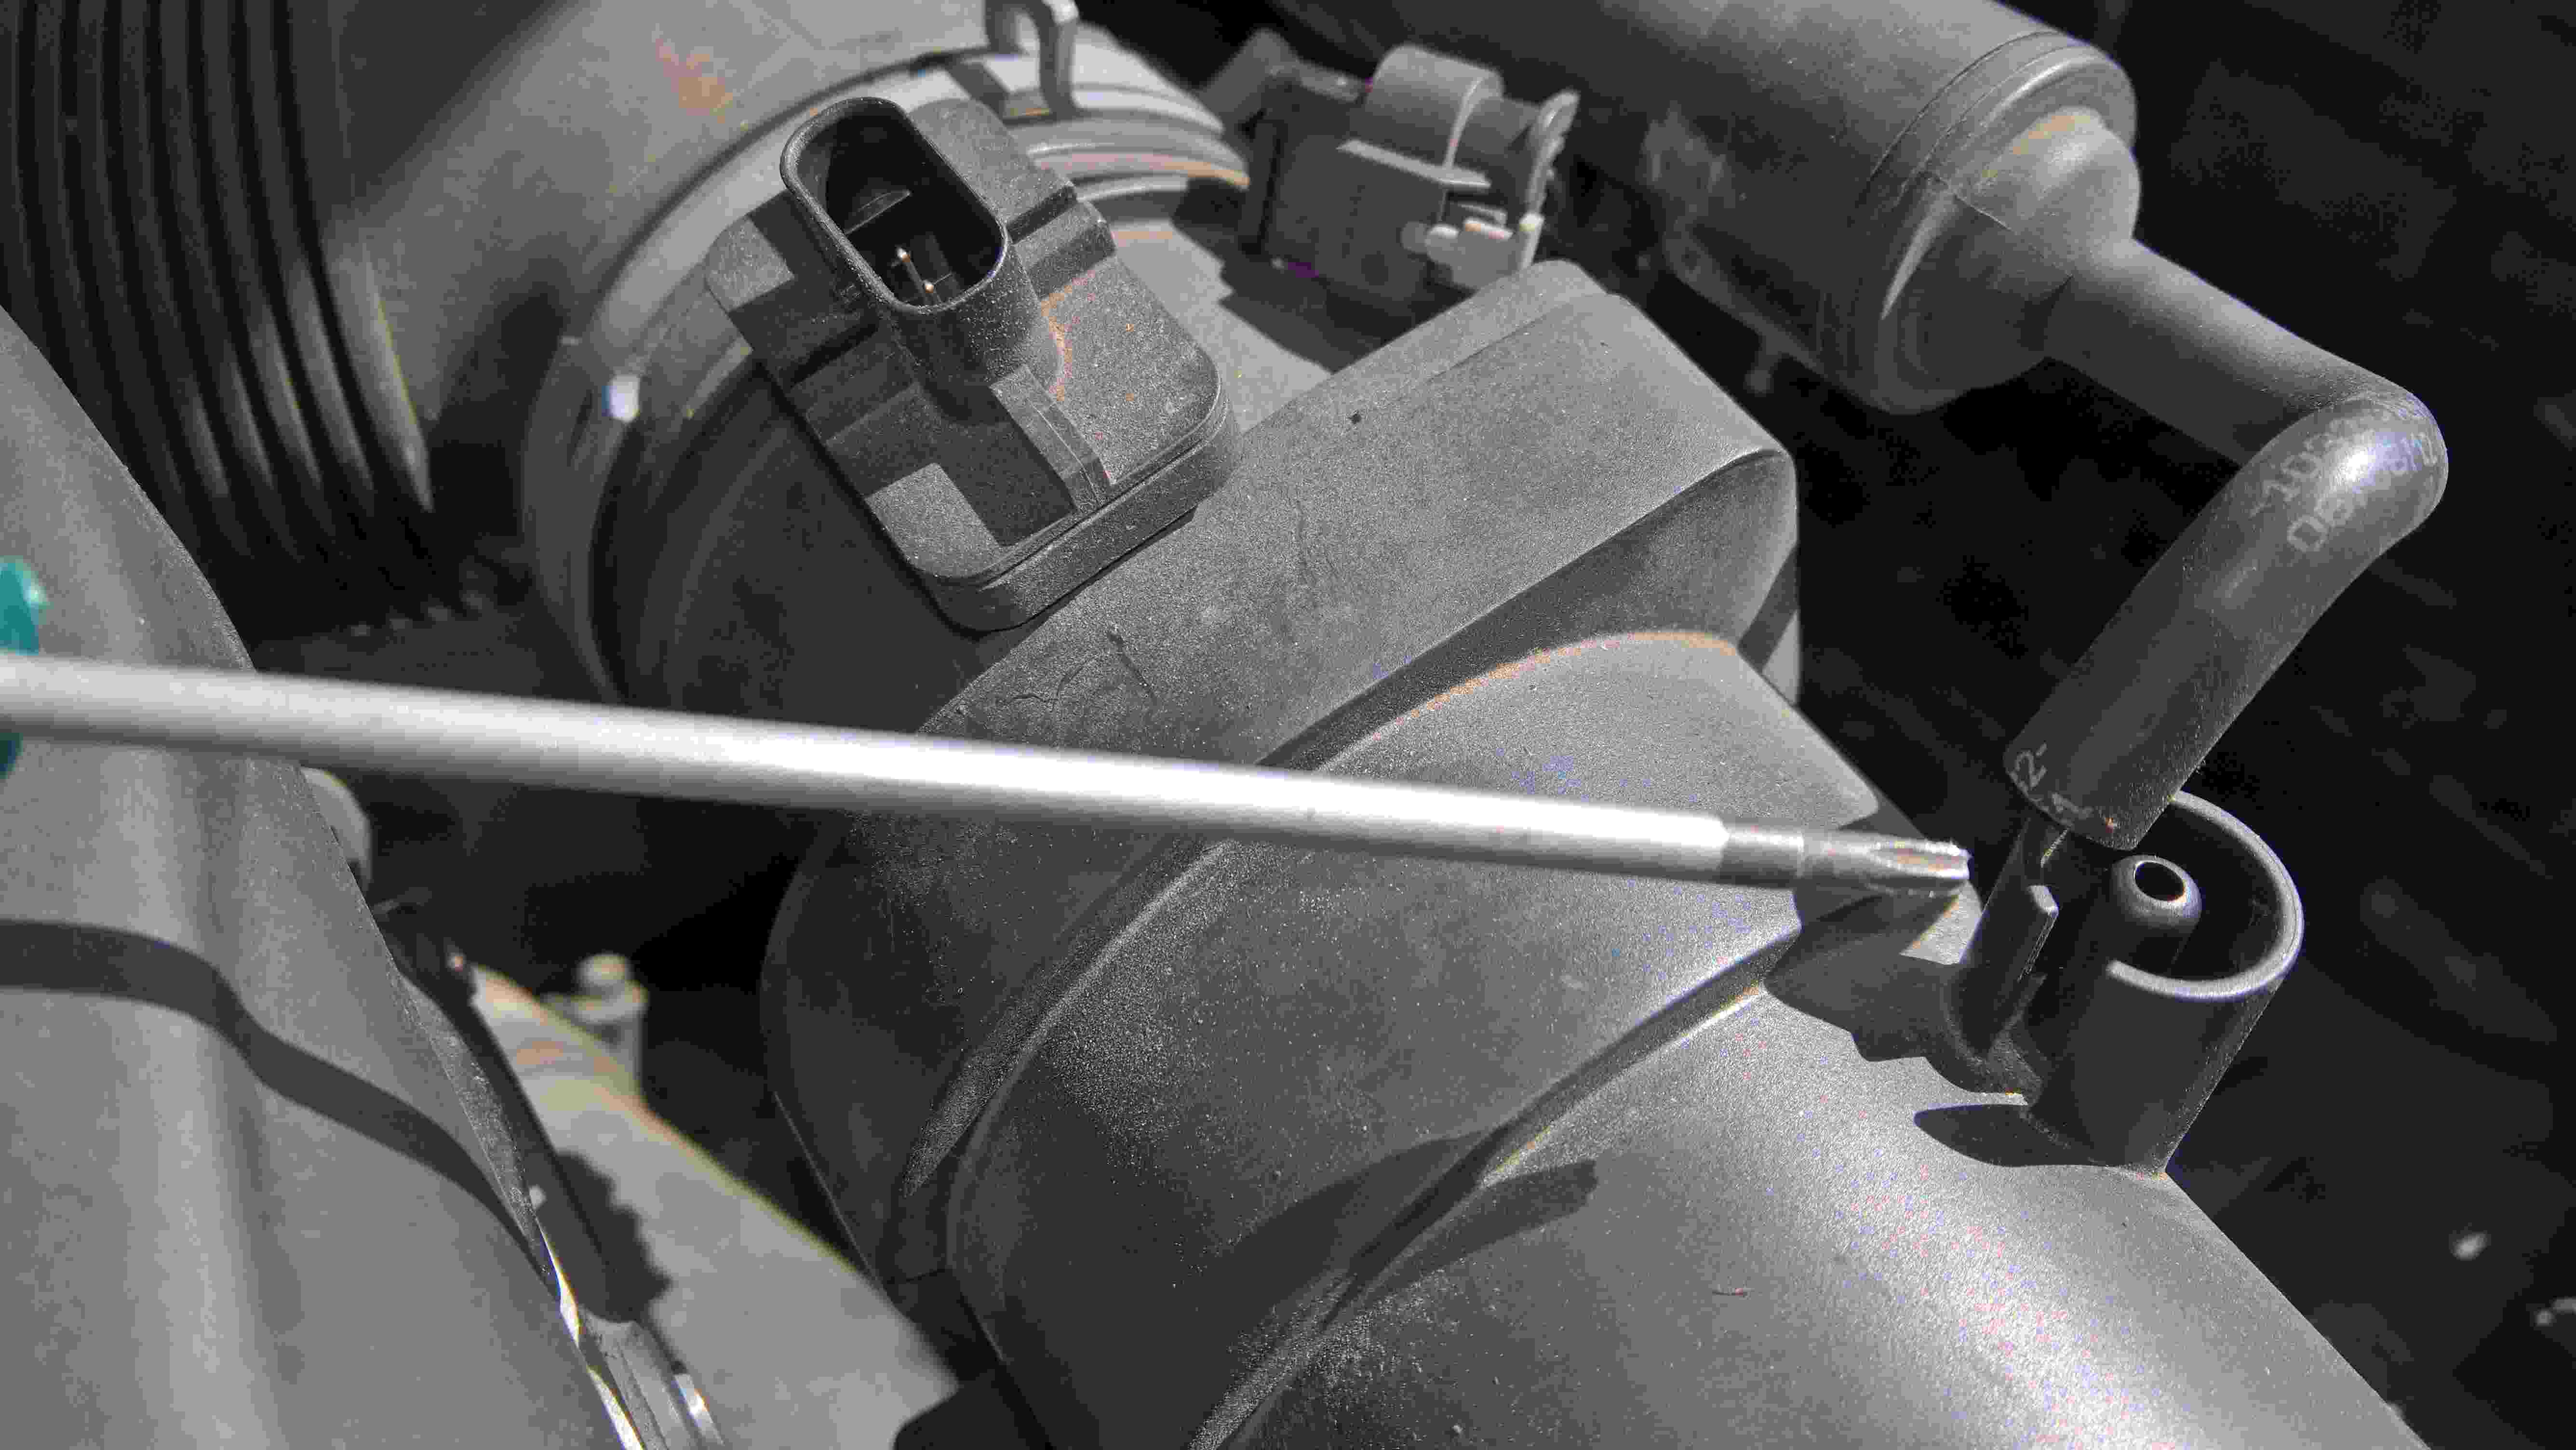
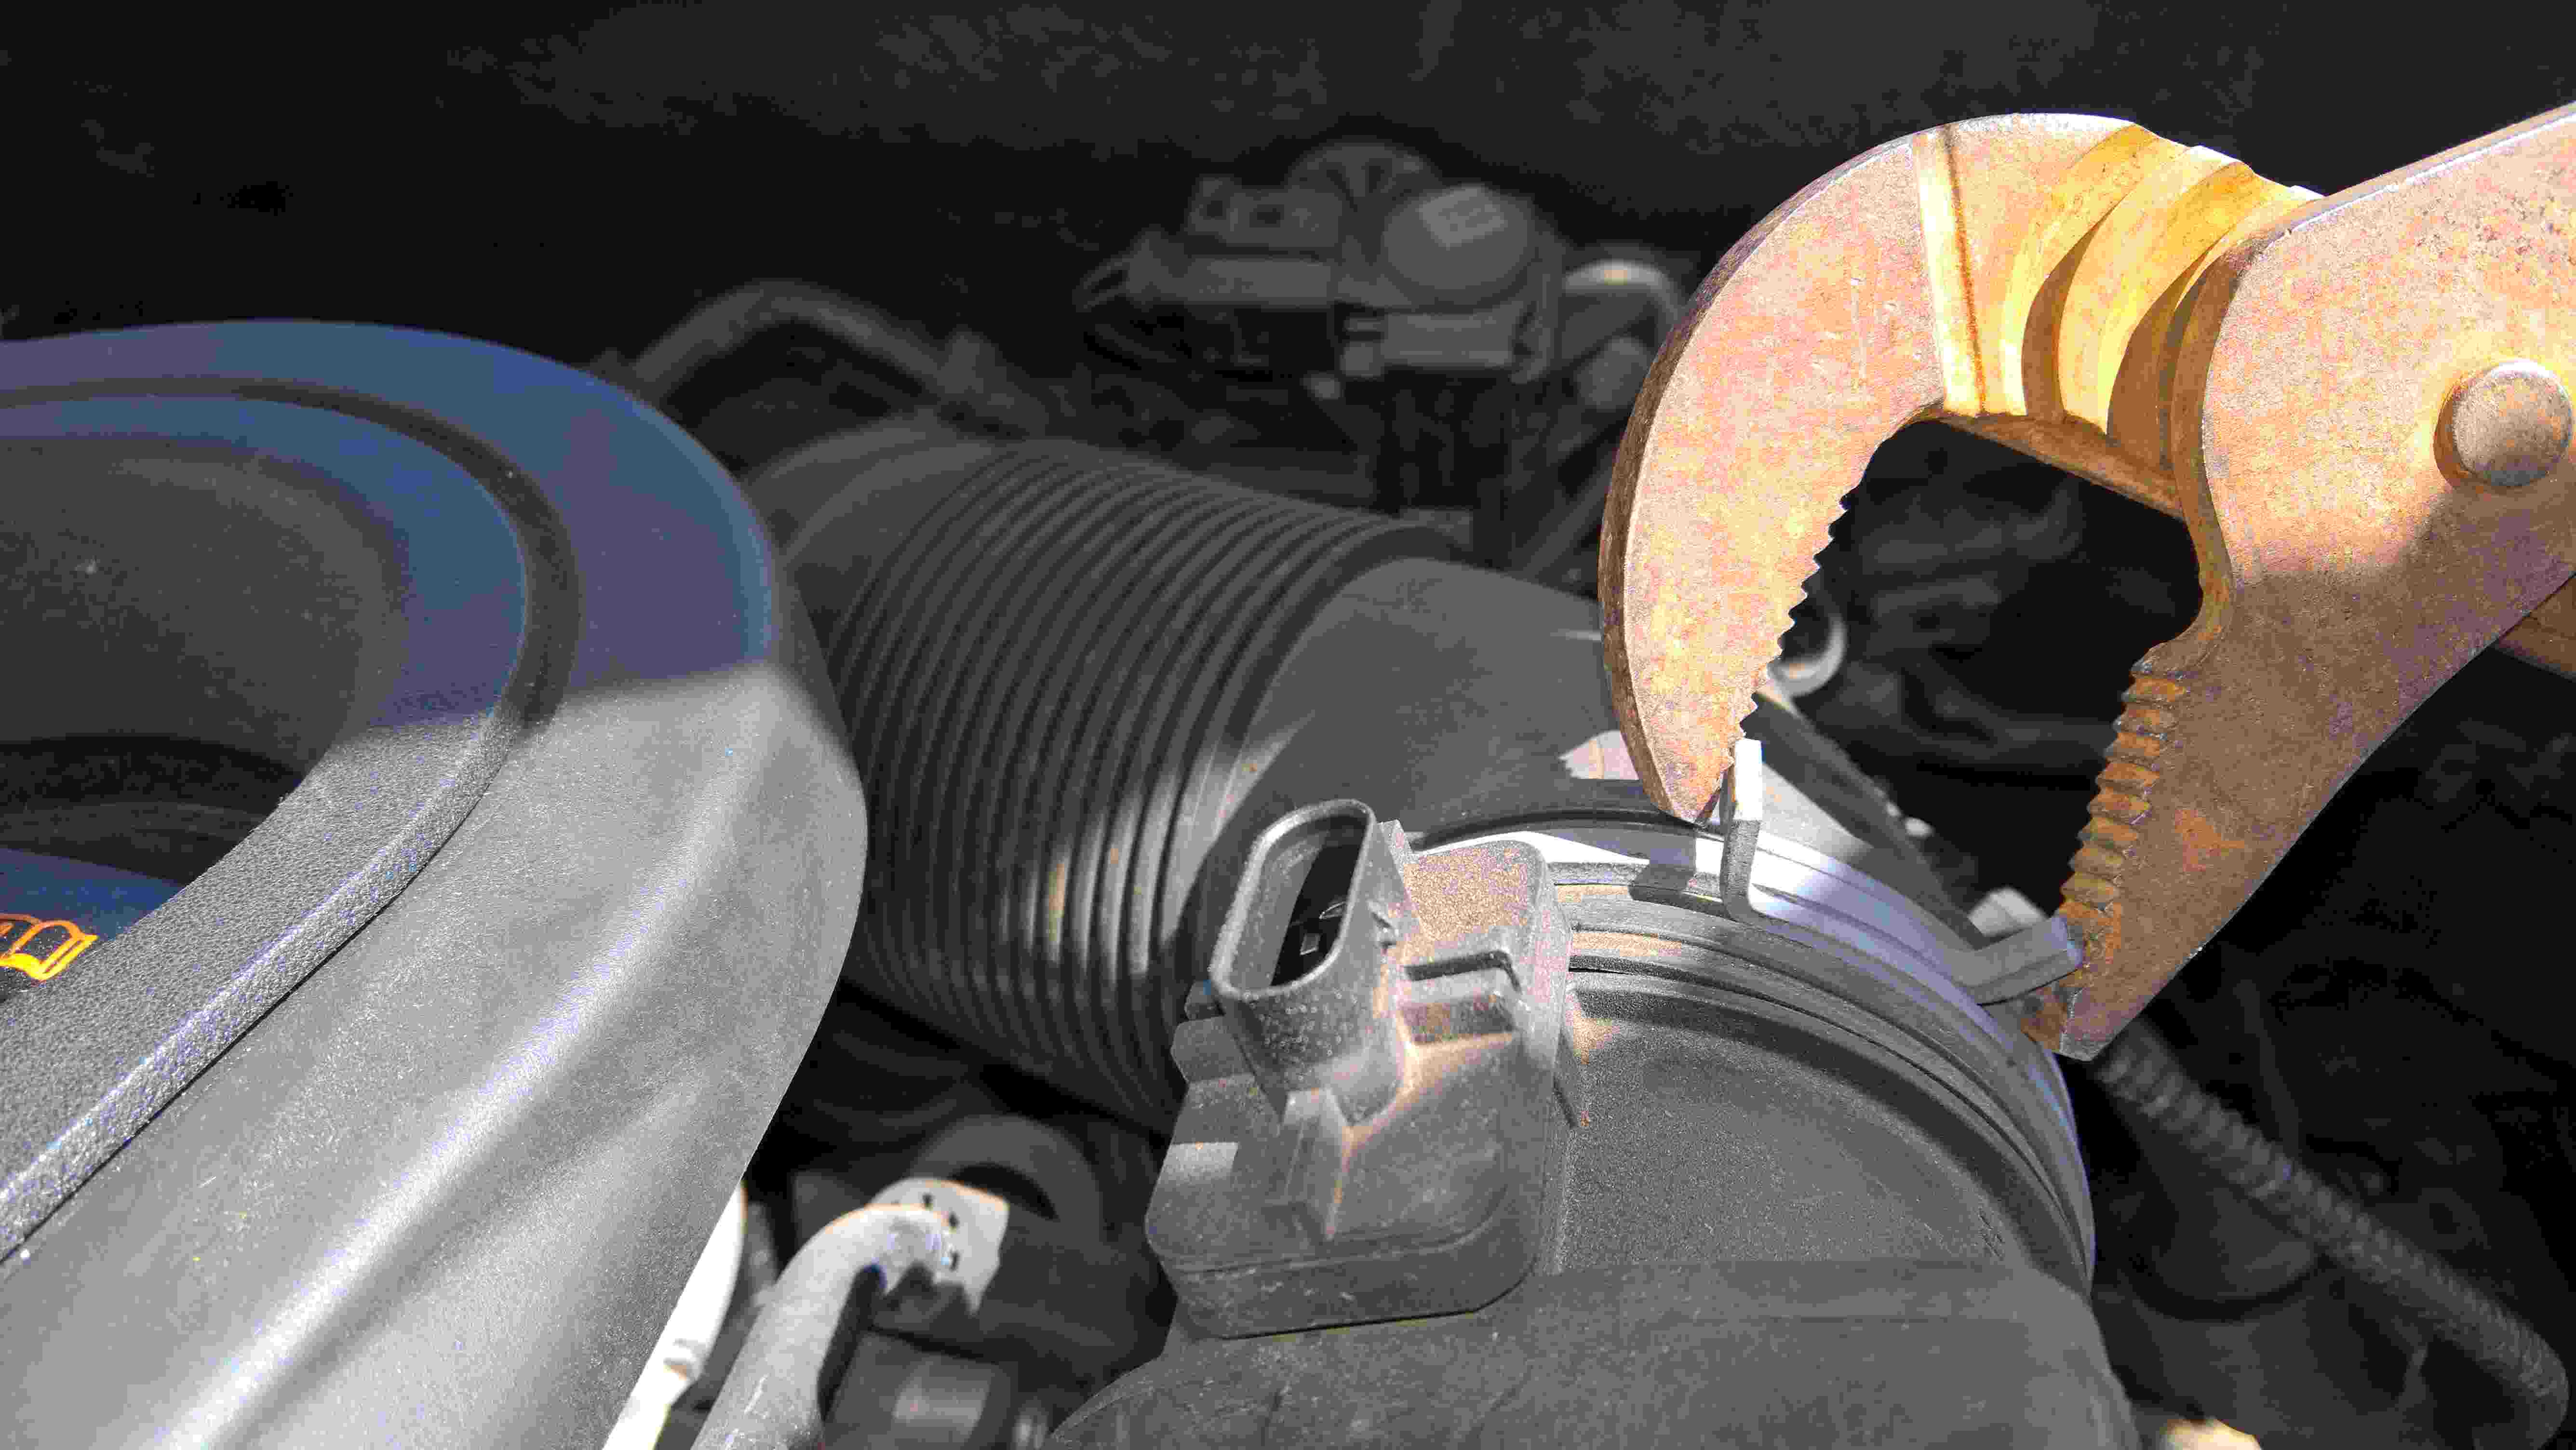
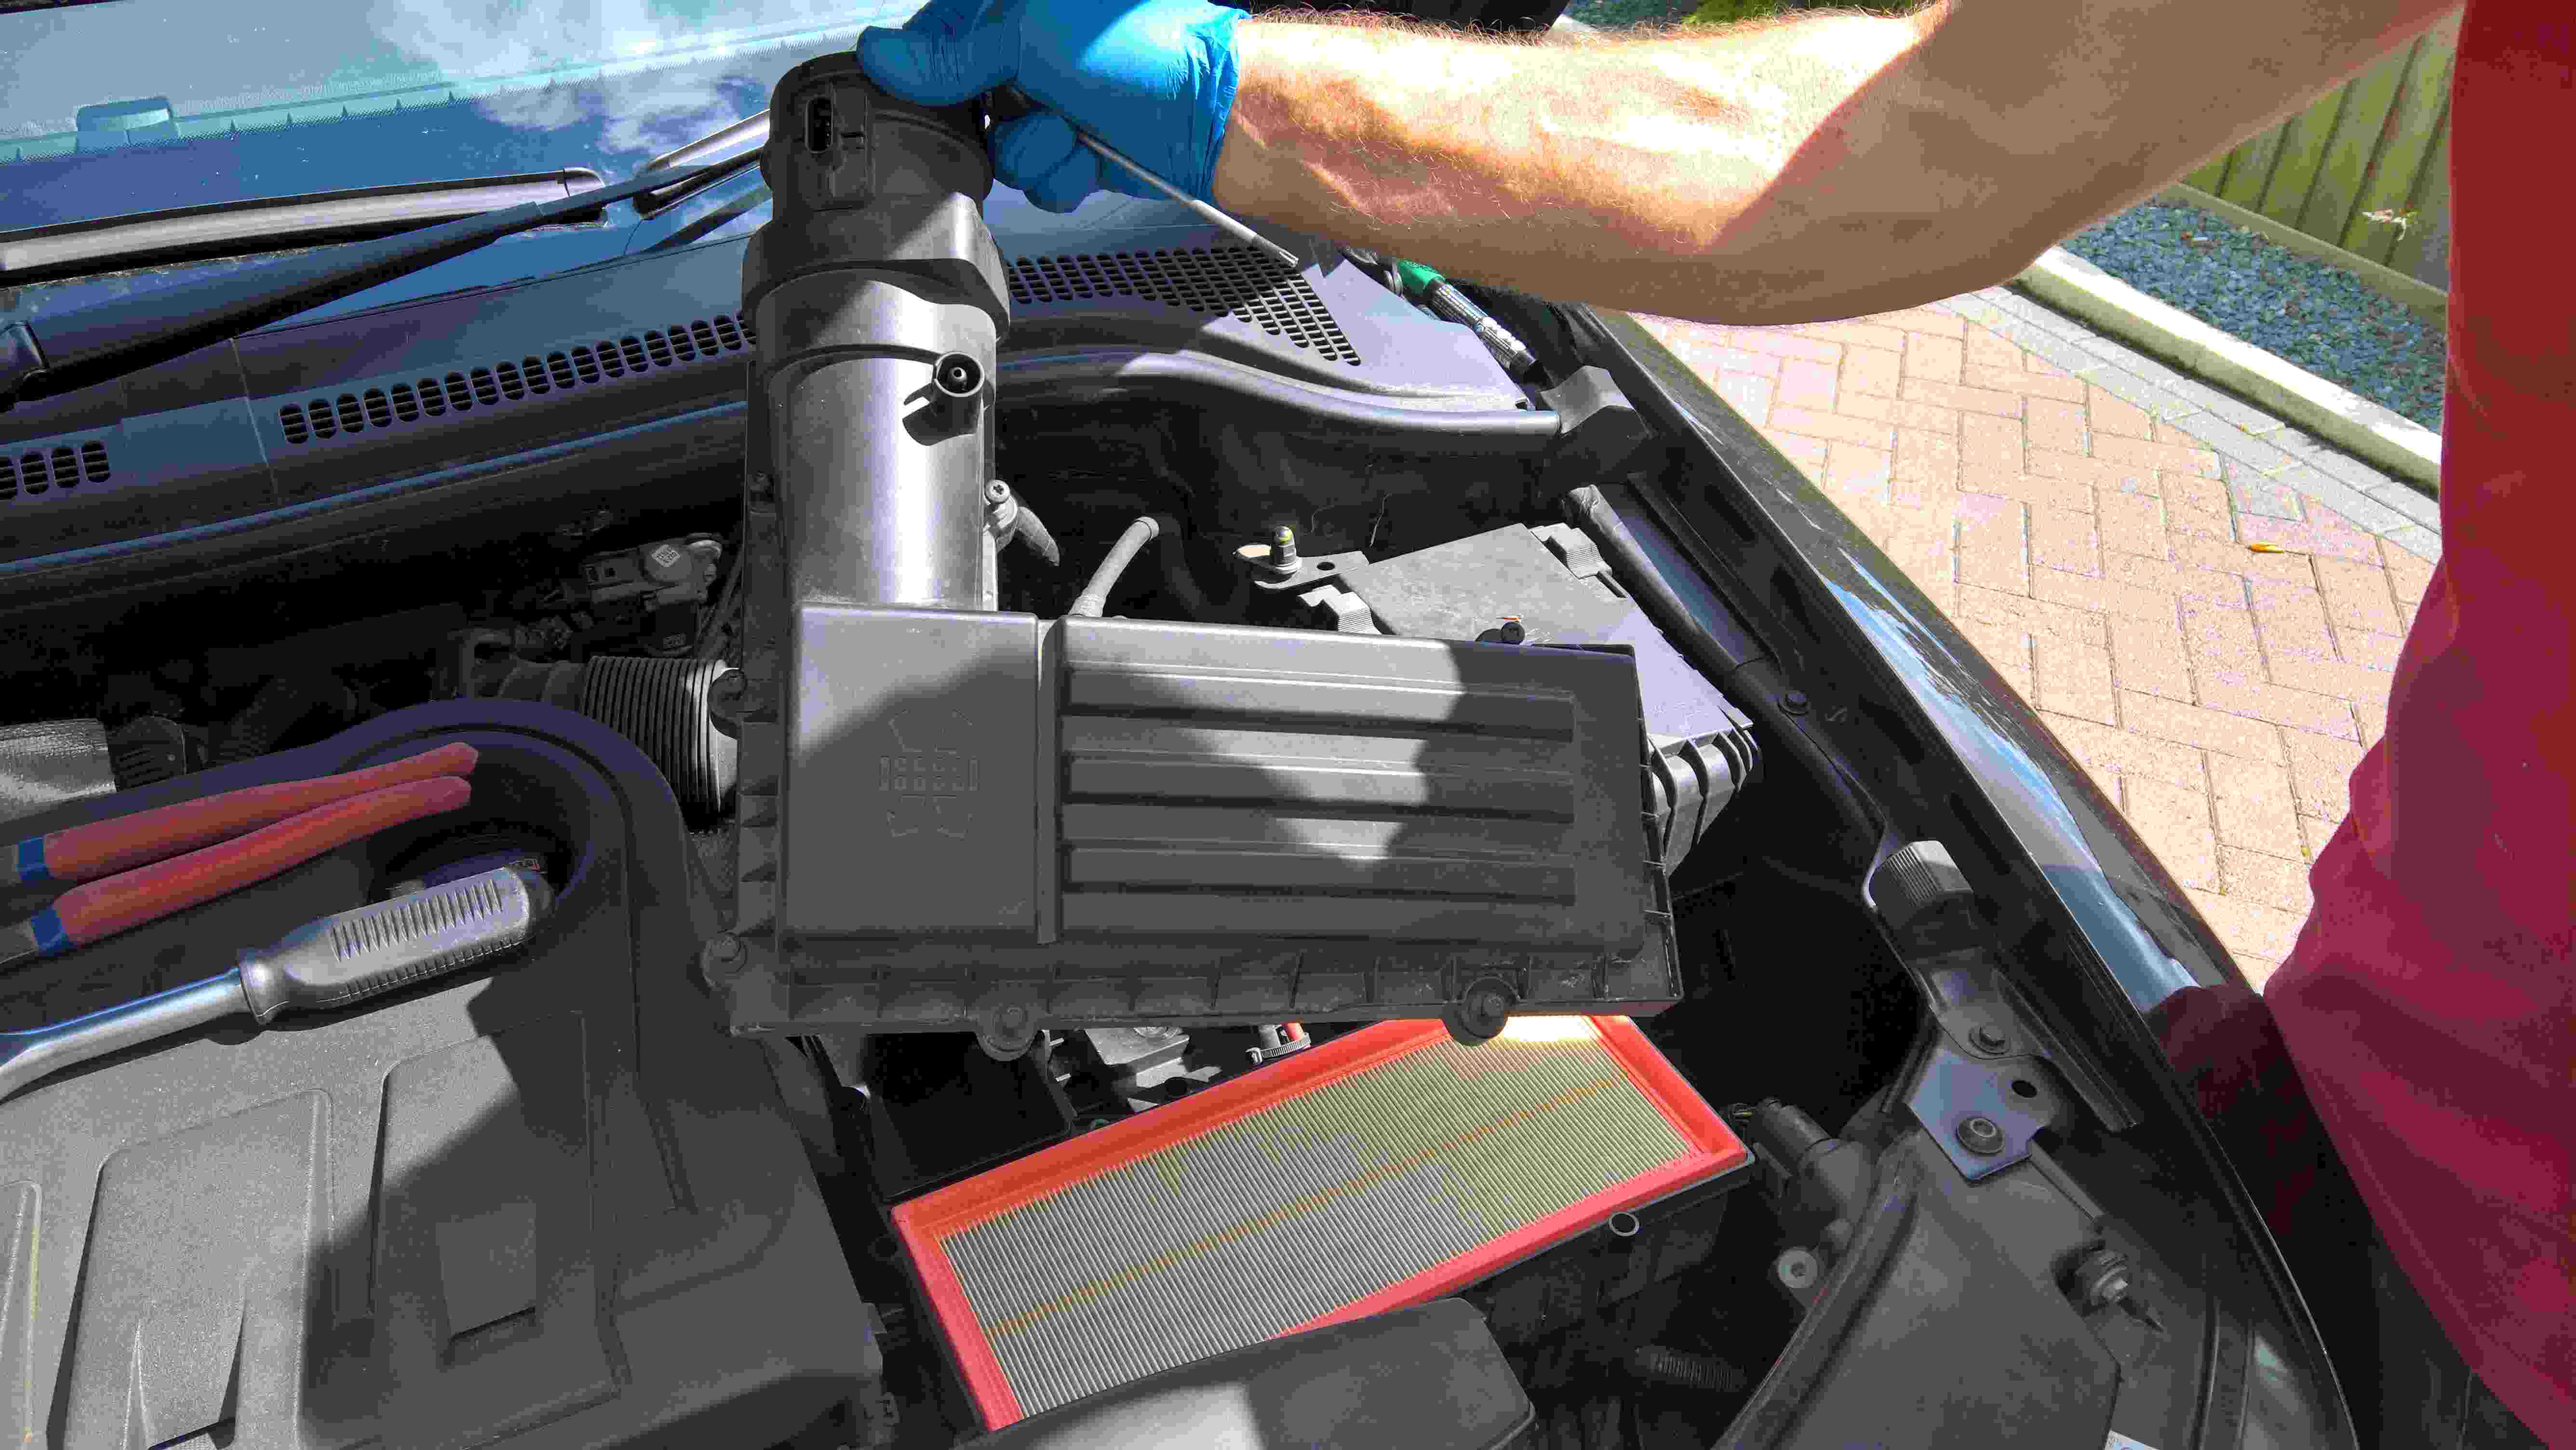
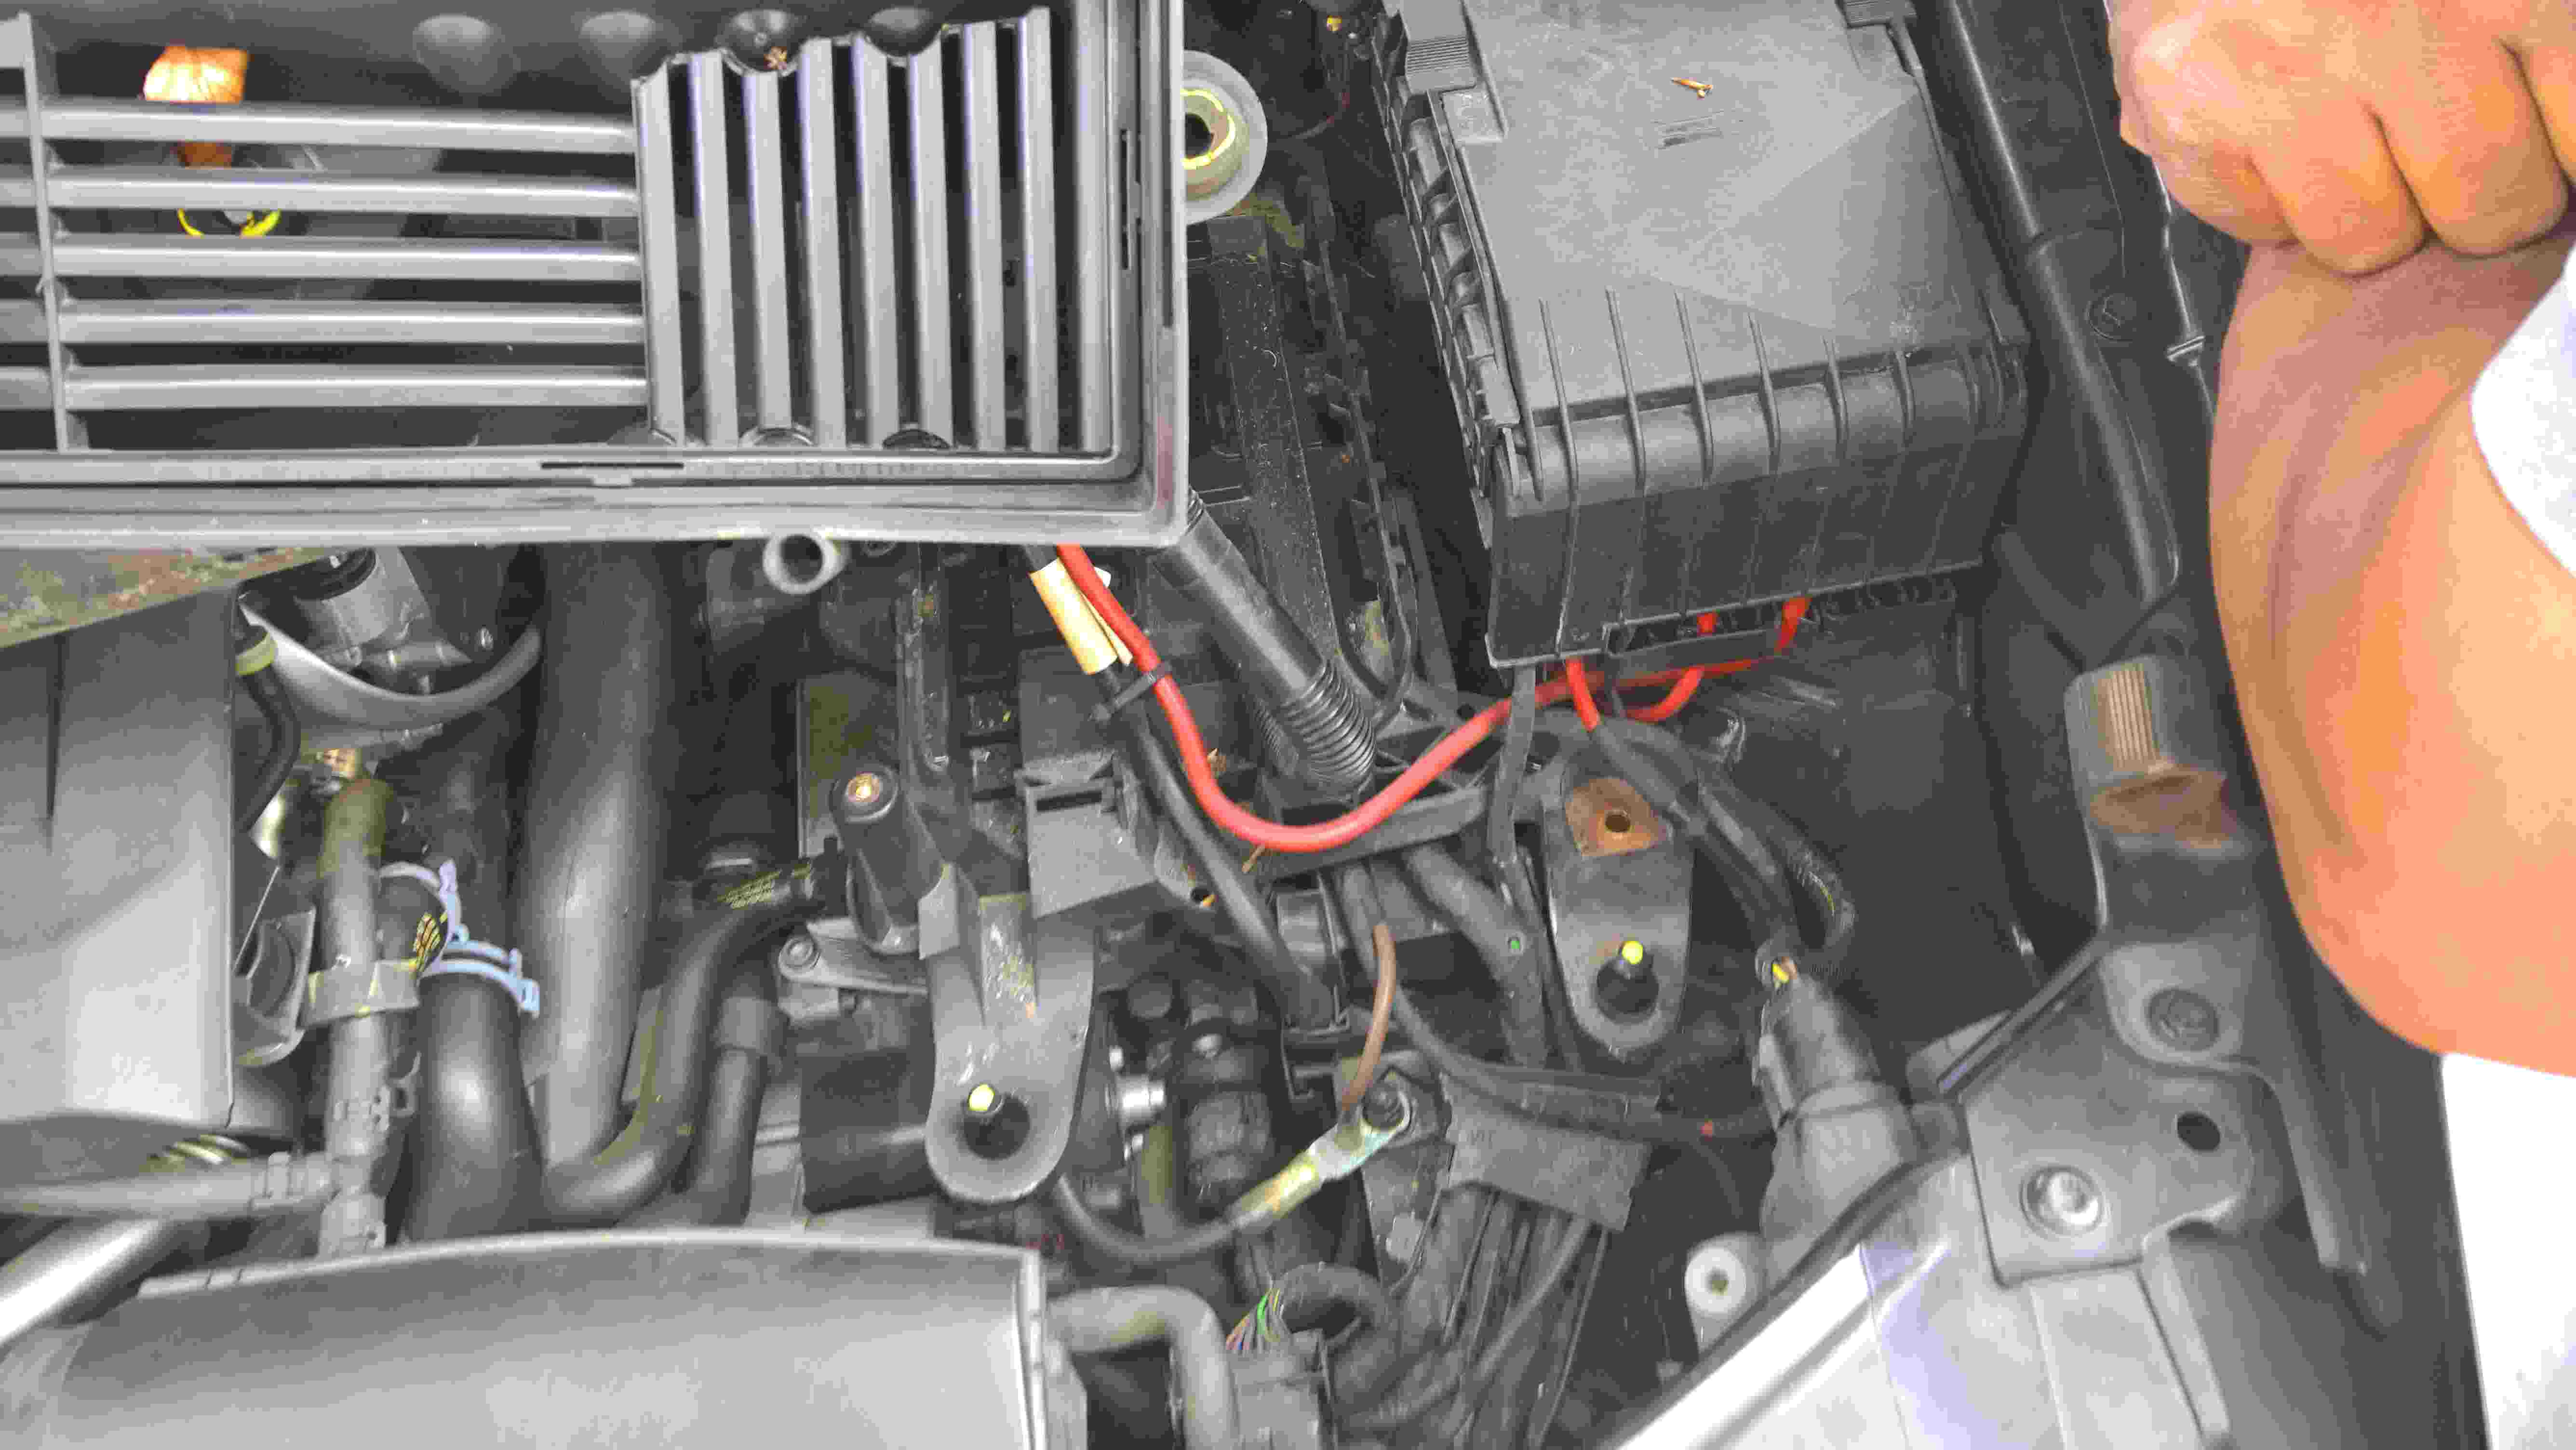
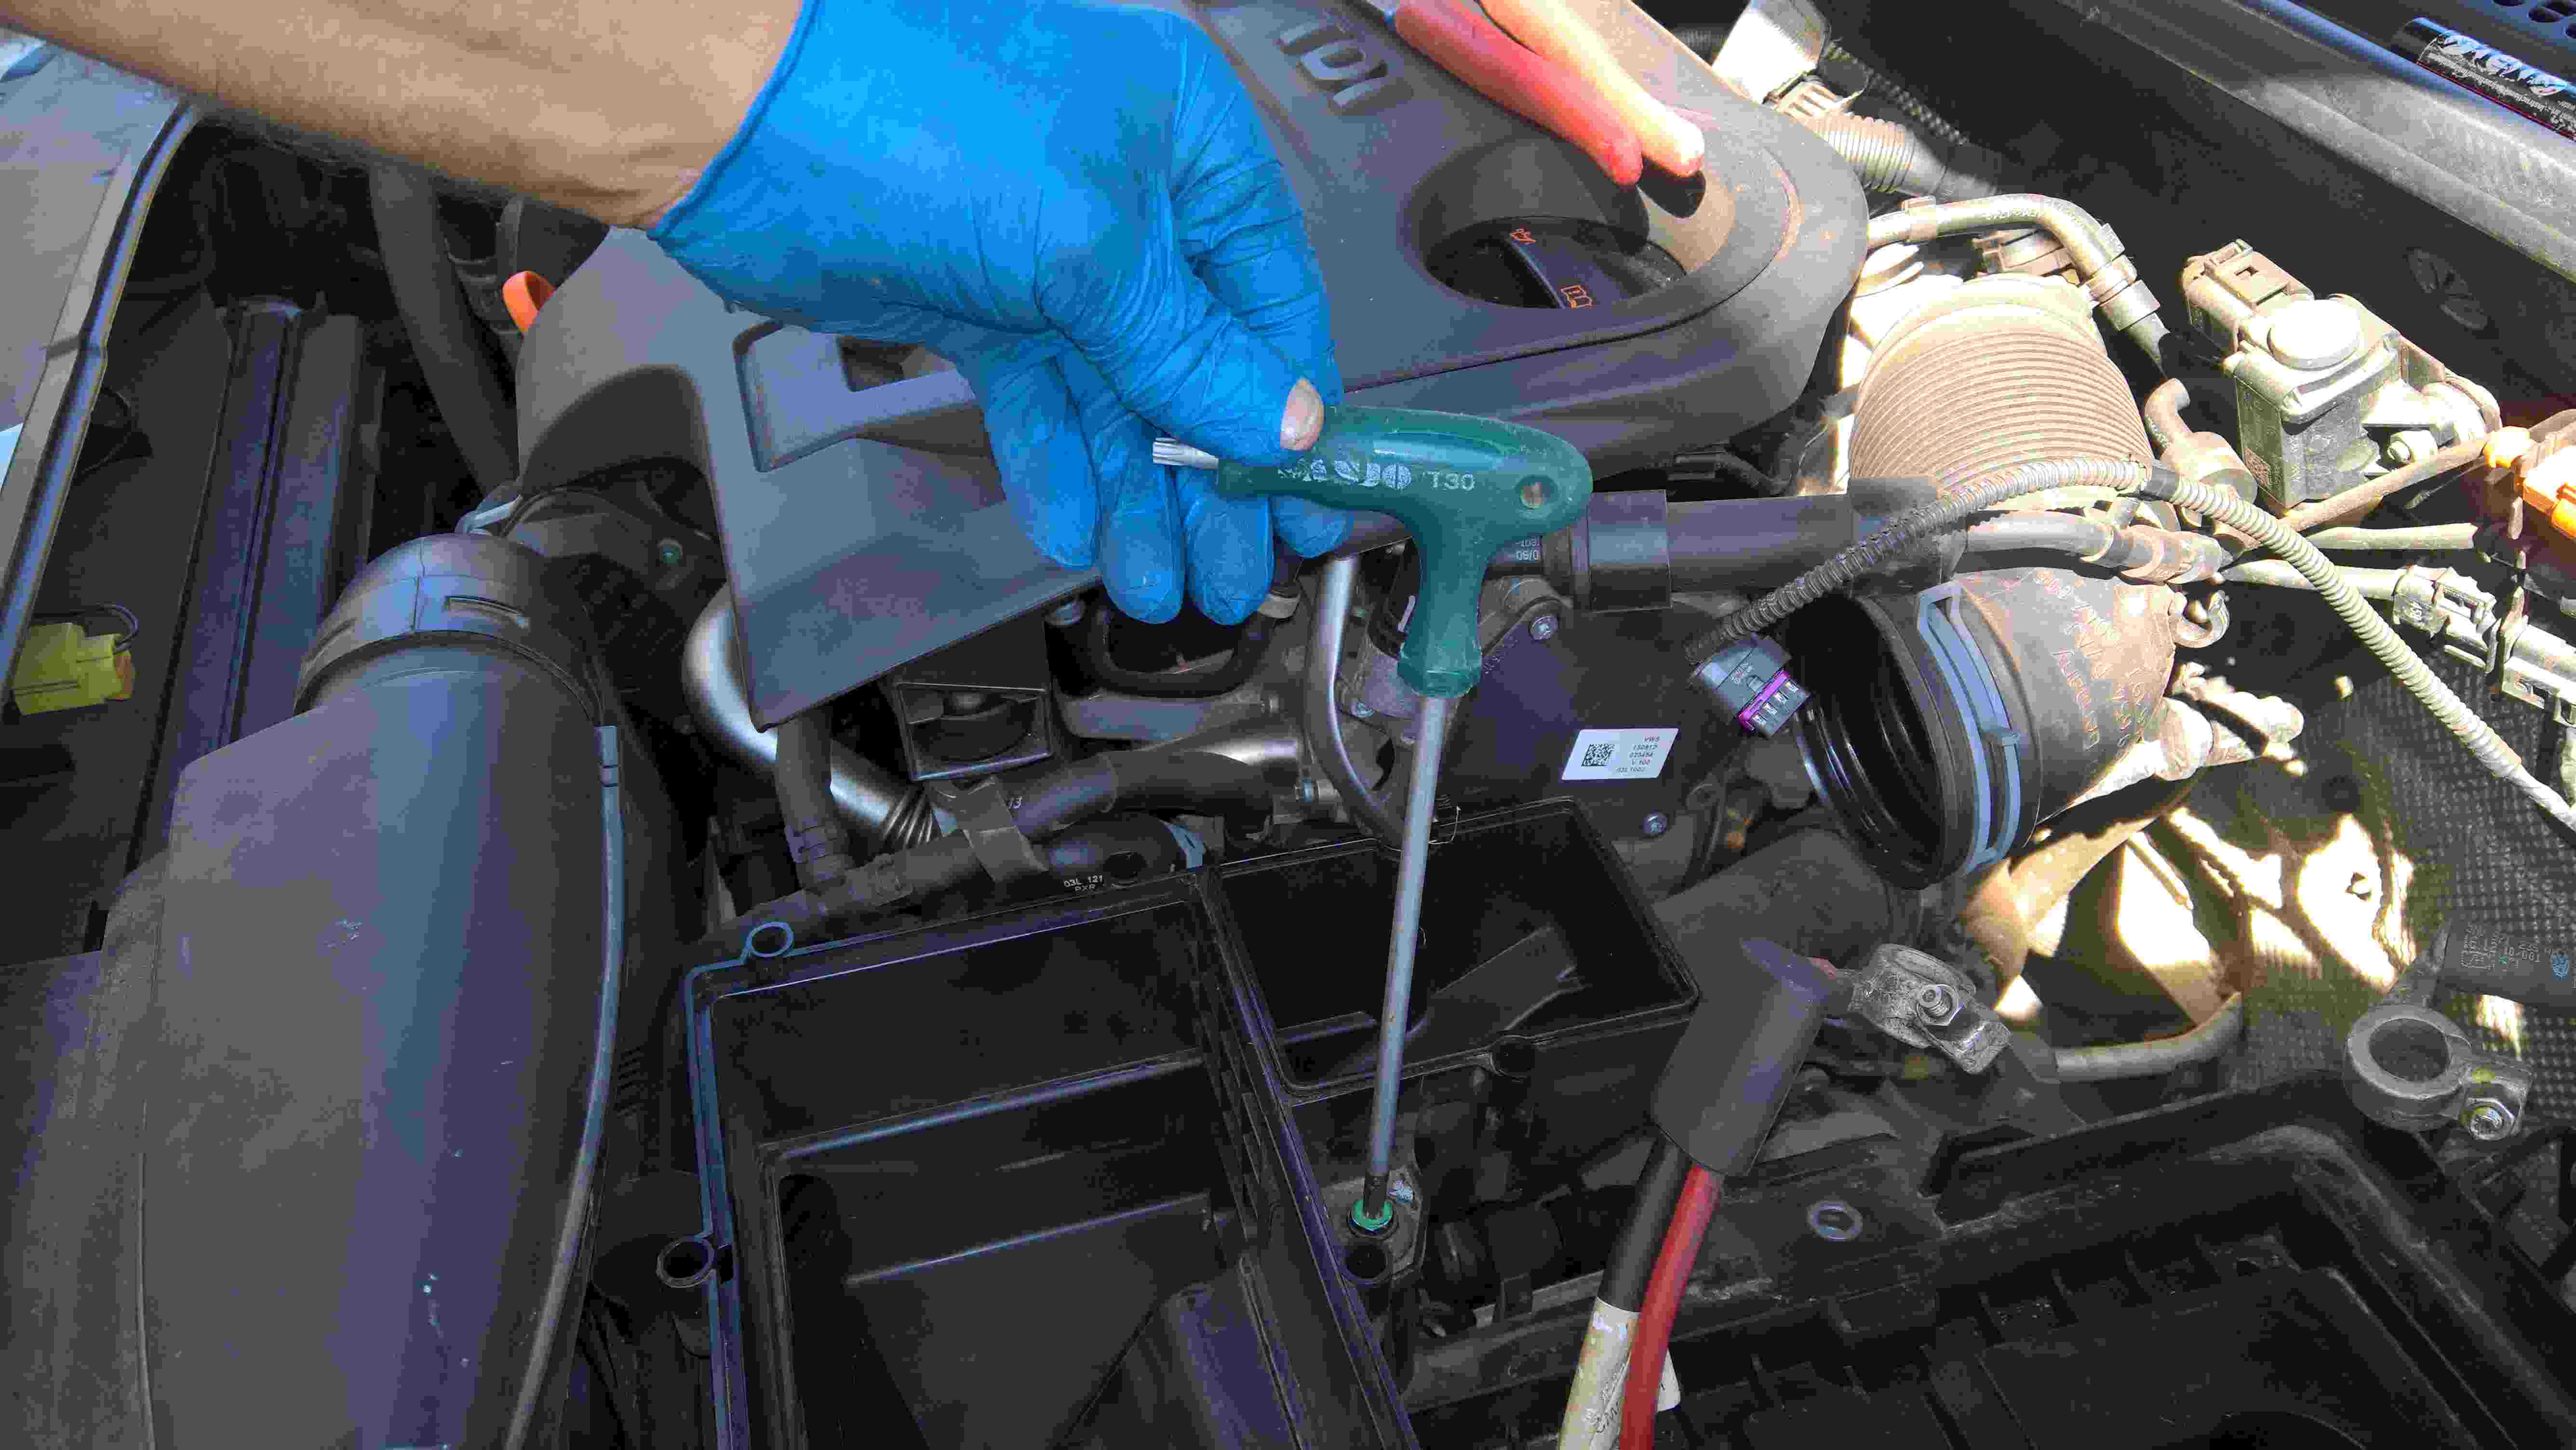
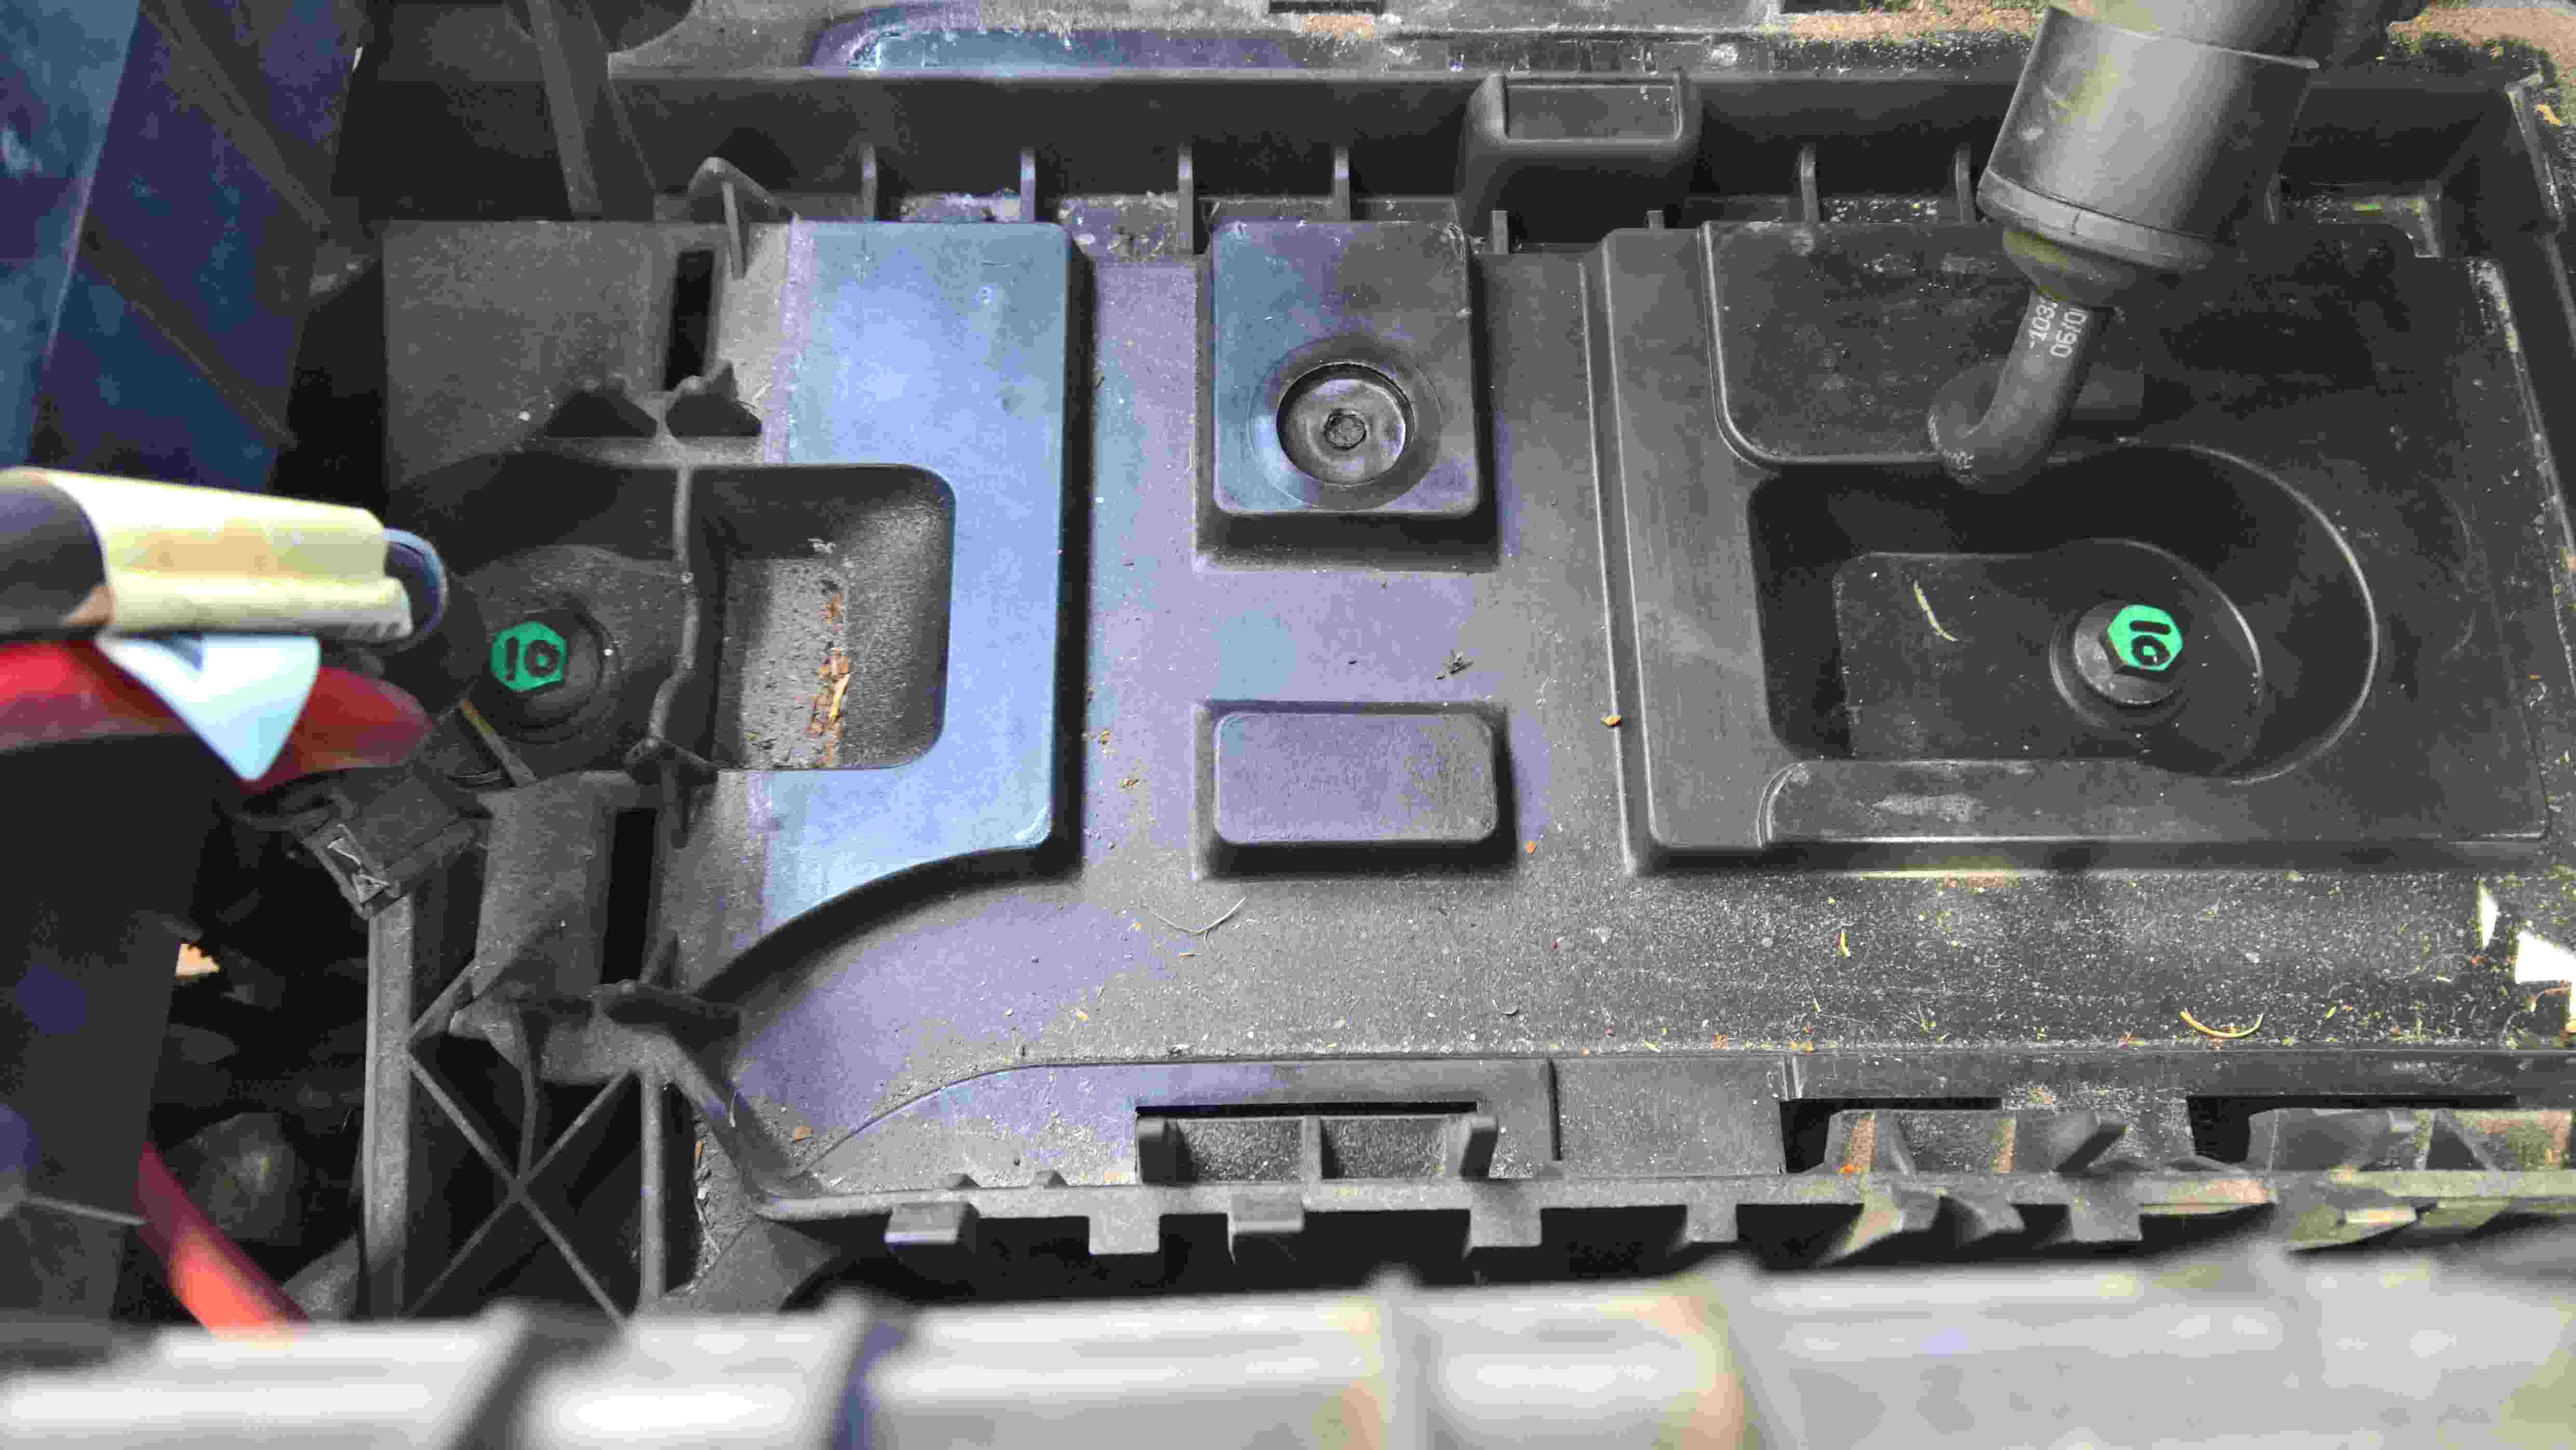
 2 points2 pointsHe means the small bush on the front of the wishbone. To be honest, they hardly ever fail and are not really worth bothering with.2 points2 pointsI understand that there is massive delays but nobody can tell me dealers or lease companies did not know knew this ,when recieving orders for these cars.surly they have treated customers in a disgraceful manner and should of told customers the truth in First place.only whished I knew when I first ordered my car in may.if anyone from skoda ever reads these page .your company is a disgrace for telling blatant lies.2 points2 pointsI genuinely hope not, because if they win this year, all the little tantrums, some alledgedly unsportsman like behaviour and a whole pile of excuses could be justified. I just think the behaviour is unbecoming a winning team (Any team).2 points1 pointI have Now completed the first (40,000 mile) oil change on my 6 speed dsg box I will attach some pictures and information that may help others tempted to do the same though I have seen a recent post that stated they have been quoted £175 at a garage to do it so at that price it may not be worthwhile. For me there was little choice as Blade group will never get their hands on a vehicle of mine ever again. I purchased a " Sealey VS70095 Transmission Oil Filling System 3ltr instead of the vag6262 tool. " (use text between quotes to search) which cost me £69.49 (can be done cheaper without a pump but its slower) I purchased " 1 x Genuine VW DSG Gearbox Oil And Filter Kit (G052182A2, 02E305051C, N910845) from "Lancaster volkswagon" at a cost of £111.92 I already own Vcds (£270) So without going any further - if you can get it done for £175 then do it as even now I have the required equipment It will still cost £112 and a couple of hours of my precious snoozing time in another 40,000 miles time. Still interested...here we go then. I couldn't find an online video of a skoda superb dsg oil change but I did find a very good video of a vw model from a site covering their turbo diesel ( or was it "myturbodiesel" wink wink) search for this "How to change and drain the DSG transmission fluid in your VW w/ VAG6262" and select videos. The car needs to be level but there seems no where to measure the levelness of the superb so I measured the drive level and made blocks of wood to sit under three of the wheels. The oil would drain easier if warm but unless its the depths of winter I wouldn't worry about this too much, the oil is not very viscous. Step 1. jack one side of the car up slightly so that you can reach the furthest and middle of three TX45 screw that holds the engine drip tray up, remove those three tx45's and 8 TX20 (torx size 20) around the edge. (put the 11 screws in the tray and put it somewhere where you can trip over it and send the screws flying) Step 2 Identify the DSG box oil drain plug and slightly loosen it. do not remove it yet You need a size 14mm hex drive and a long ratchet or torque driver I have rung it here in green for you. (viewed from car front) Step 3. Lower the car, lift the bonnet and disconnect the battery . 2 @10mm Pull the battery fleece off (if fitted) Undo the battery retaining clamp. 1@13mm and remove the battery ( the battery tray has lips at the nearside edge so if leaning over the wing, lift and push away from you to disengage. Step 4 Remove the electrical connector from the air cleaner pipe and the smaller rubber pipe. The connector has a small grey peg at the side of it, pull this peg up slightly and then hold it against the connector as you pull it up. Step 5 remove the air inlet pipe from the air cleaner assembly Remove the top of the air filter box and take out the air filter. You now need to remove the lower part of the air filter housing, it is held down by two rubber push on nipples ( highlighted yellow on the 2nd picture below) and one TX30 screw (coloured green 1st pic below) and the air pipes. There is also a ribbed drain tube that goes down through the engine bay to the void in front of the wheel. it is connected to nothing so just pull it up and free. It will make sense when you do it yourself but it requires a yank upwards to lift the filter housing off the nipples and then twisting with the right hand side up in the air so that you can release the left hand U shaped tube. Step 6 Remove the battery tray, it has two 10mm bolts situated under where the battery would be (green and labelled here) and a 13mm bolt above the right hand rubber nipple for the air filter assy. In the picture above you can see the rust marks where this bolt was (just below the red wires) You can now see and easily get to the Dsg filter...It has a 24mm nut shape in the top of it and it is a one piece dome of plastic that is torqued up to 23NM. (My torque wrench starts at 48NM) As its unlikely you will have a torque wrench capable of measuring such a low value it would be wise to mark the top at say 6 o'clock and count the revolutions as you undo it. It is sealed with an O'ring so does not want to be overtightened. Clean around the filter case and then unscrew the cap, very little oil will spill if any at all. You will now see the filter which can be removed by pulling up, have a suitable container nearby to put it in as it is full of old oil. Put the new O'ring on to the cover, smear some oil around it and on the rubber gasket of the new filter and re fit both. Step 7 Re fit all the parts you have just removed apart from the engine tray and sump plug. Spend a moment looking down at the dsg filter cover and come to the conclusion that it should be possible (next time) to replace the filter without removing all this stuff, depends how strong your grip is but I will try that next time. Step 8 Drain and Fill By now the car has resettled after having been jacked up and as it is now back down you have limited room to work underneath, this is why you loosened the drain plug as it is too difficult to do later. Get a suitable container to drain the old oil into, I used an old 15kg tile adhesive bucket with an internal diameter of 280mm cut down to 130mm (the old oil filled to a height of 100mm) Put the container under the drain plug and ....blah blah blah Some oil will come out but not that much, not until you get your 8mm hex drive and undo the snorkel....let it drain.. then replace the snorkel. The VAG kit and the sealey have the correct size adapter to screw into the Dsg box and the sealey has a quick fit push connector and isolating valve so you waste less oil when passing the filling tube down through the engine. The sealey says it holds 3 litres, it either doesn't or my new bottles of oil were overfilled, not that important so just fill it up and pump it in. you need to keep adding oil until it spills back out through the snorkel ( you did re fit the snorkel didn't you?!) check for overspill at approx. 4.5 litres pumped in. Once it starts trickling back out you can connect the Vcds and start the car, as the video shows -pass through each selector position pausing for a few seconds and then back to park. as the oil warms it will expand and you will see more draining out , on Vcds select control modules, dsg automatic transmission and then measuring blocks and click the top left up arrow to get to block 19 , here you will see the dsg oil temp and when that reaches 35c you can turn off the engine andput the sump plug back in, torque up to 45nm Re fit engine tray and rejoice (hide those three extra bolts leftover...bound to be ok without them huh?)
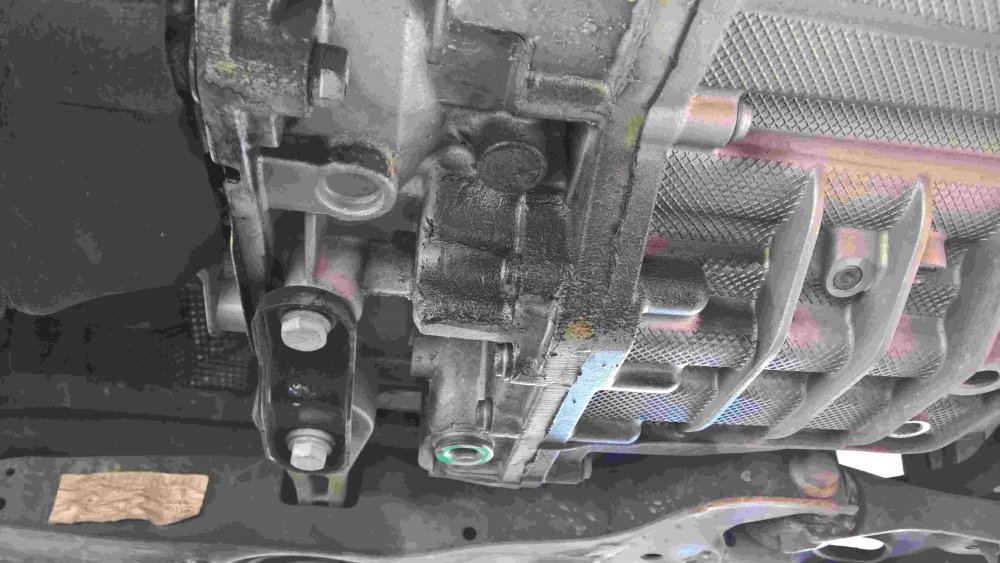


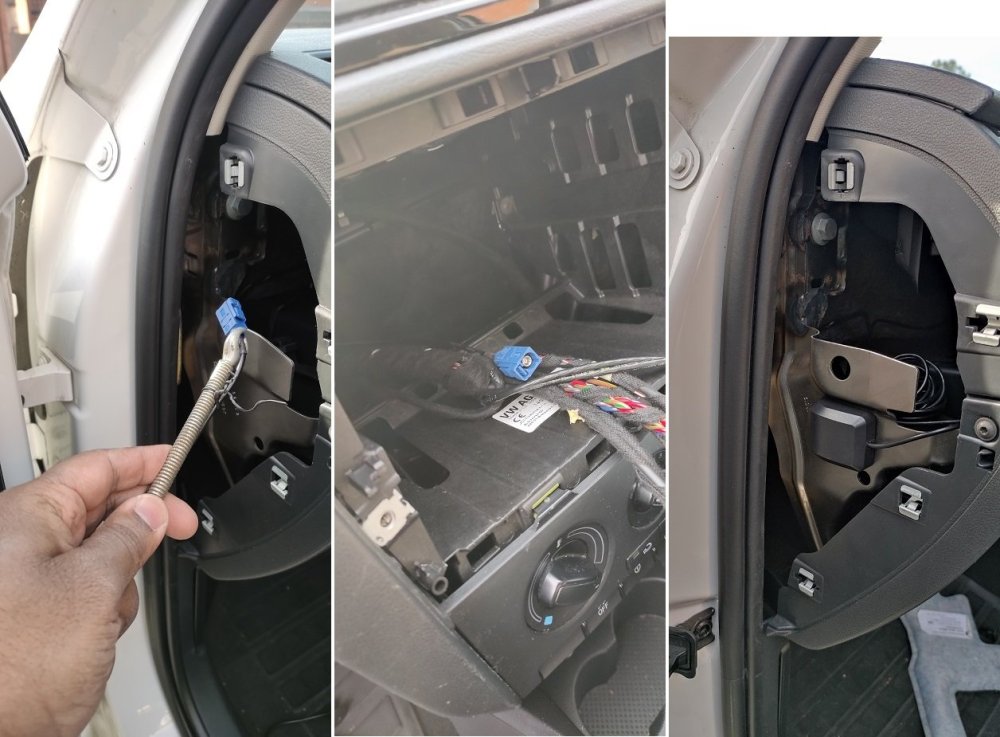
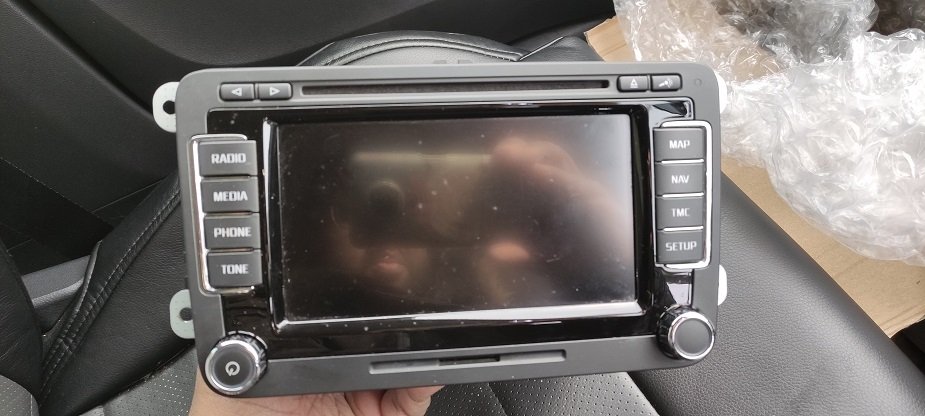
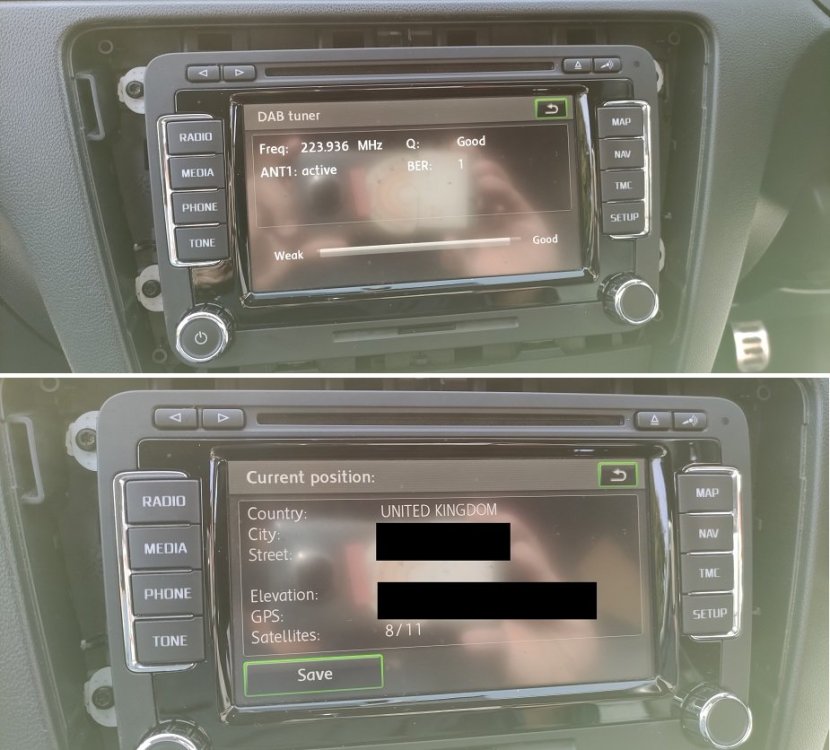
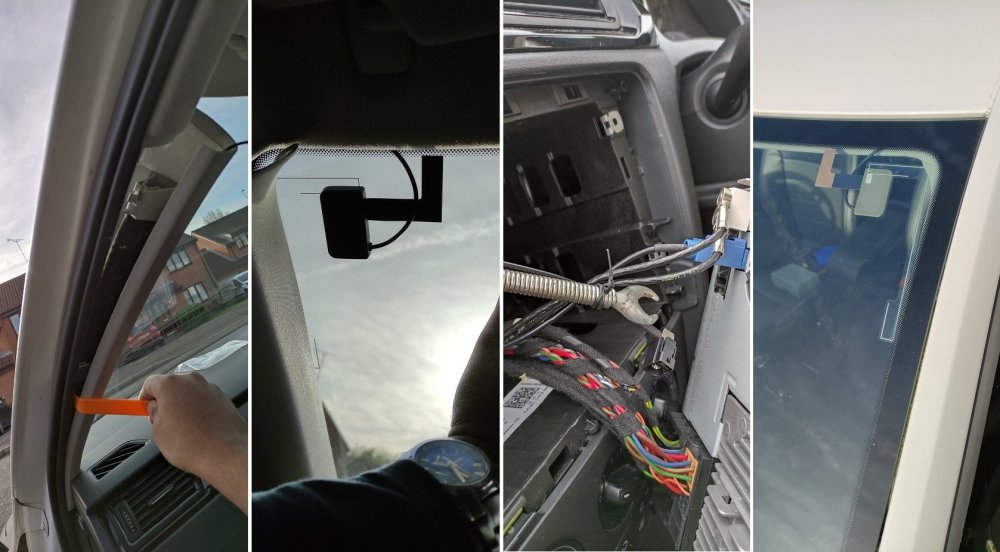
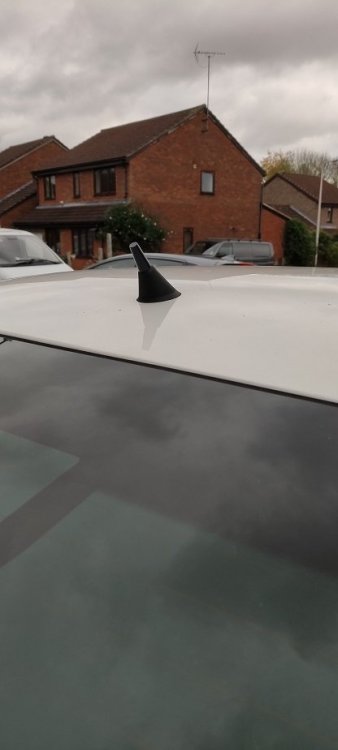
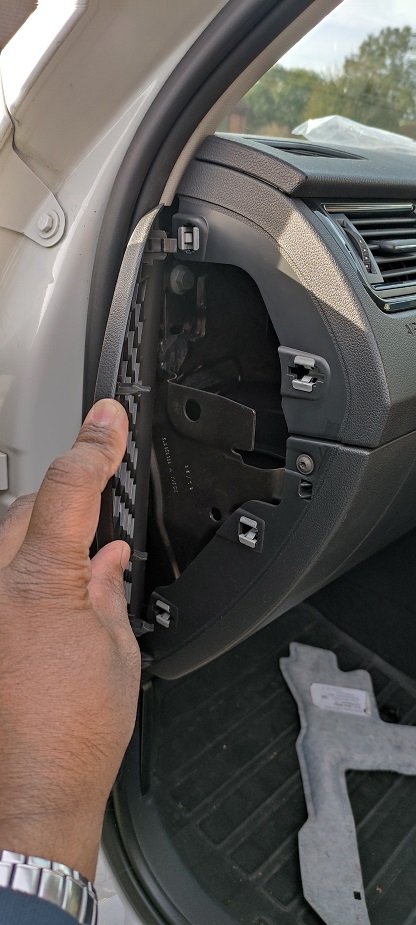
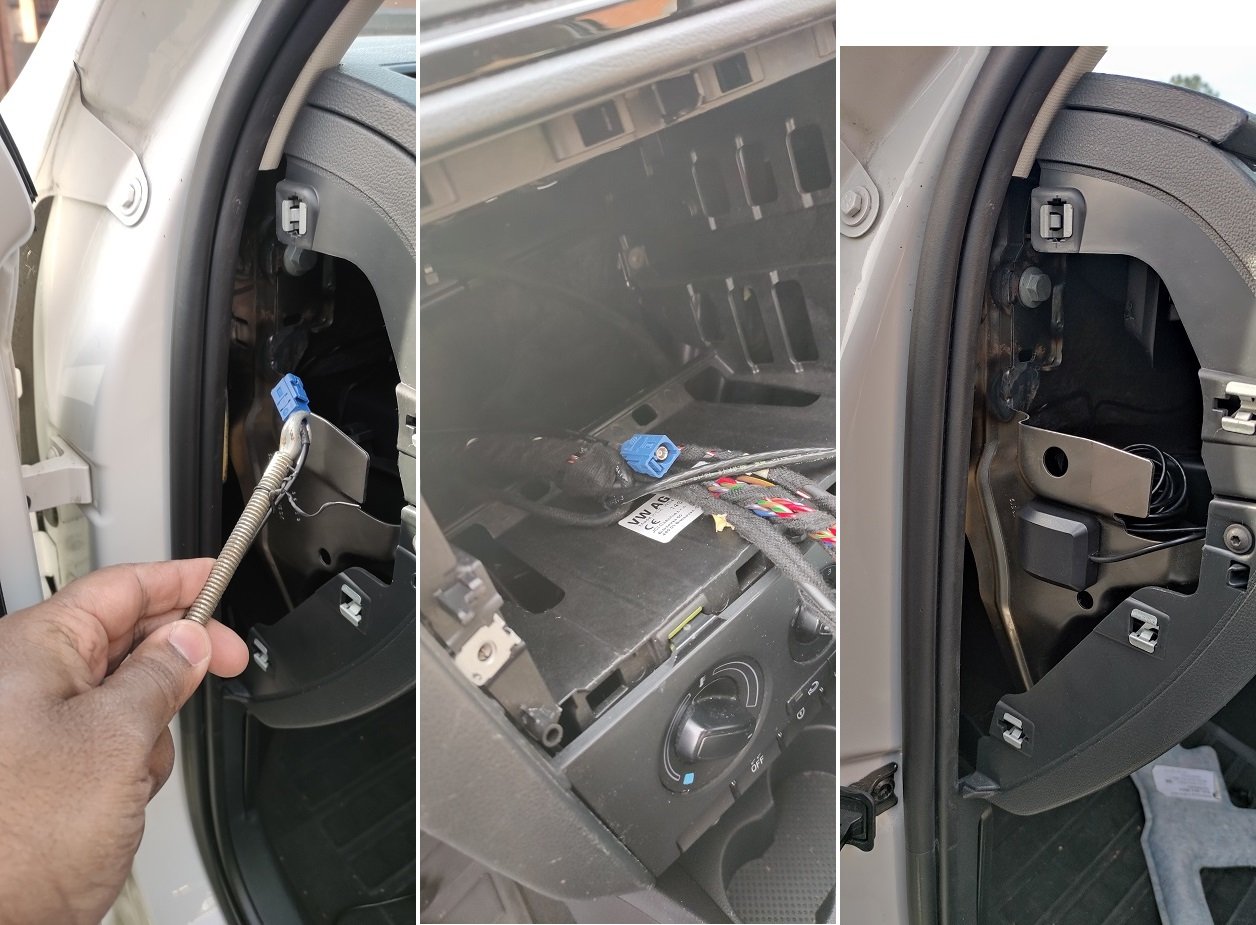
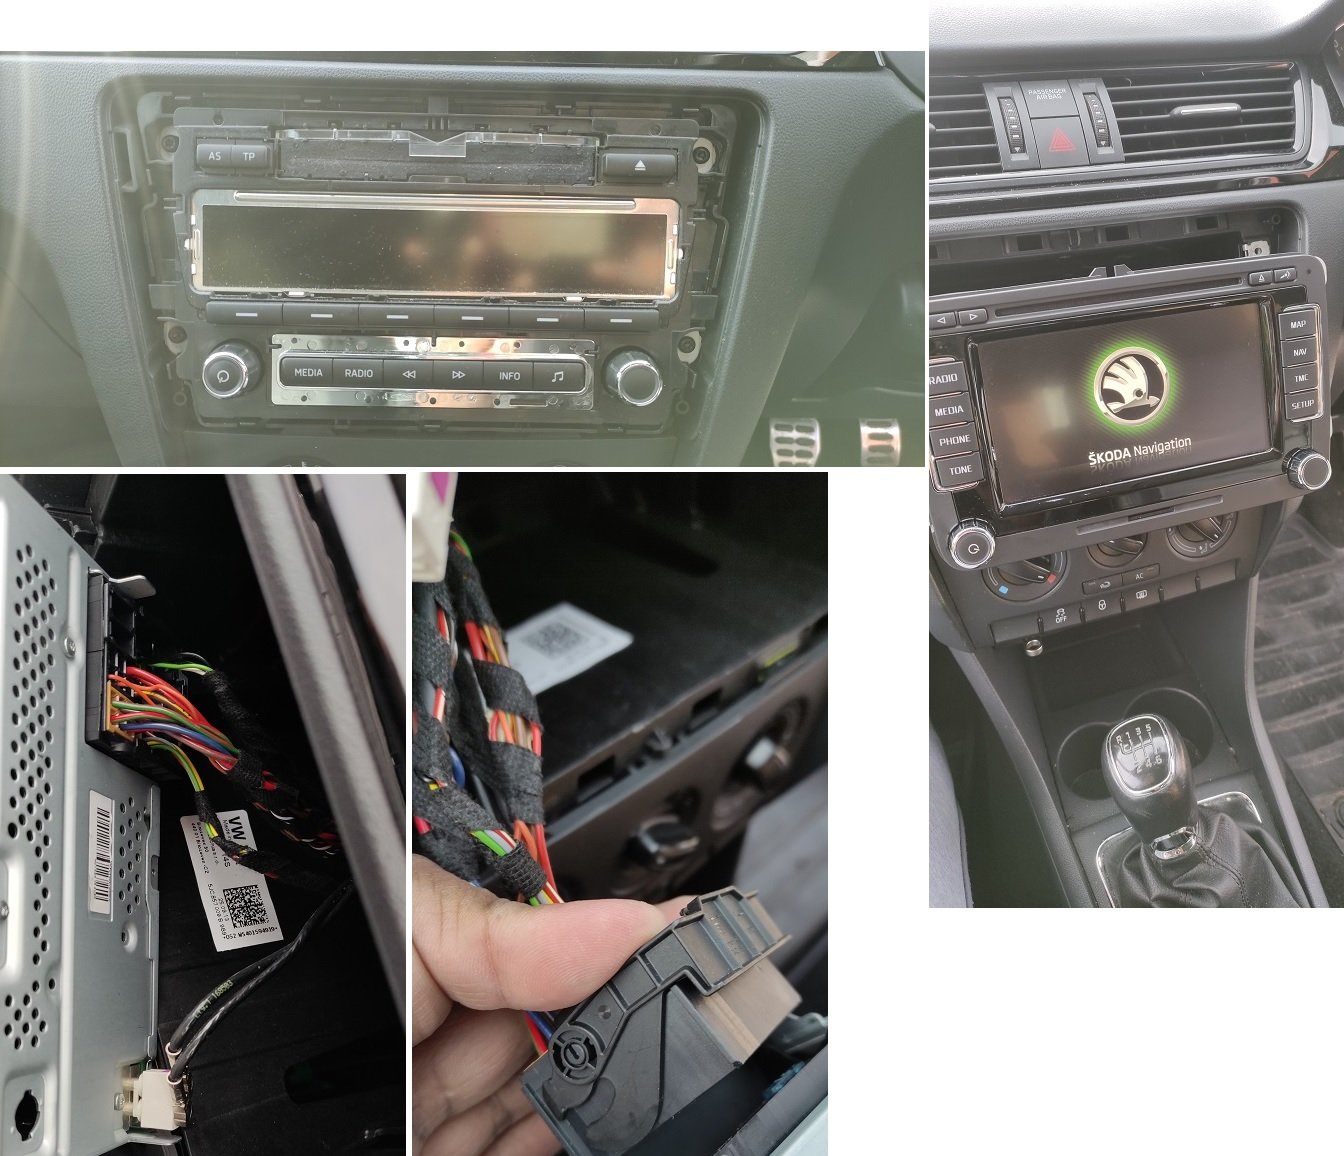
 1 point1 pointAfter spending the last few weeks focused on this, I thought I'd write up my experiences in retrofitting a Columbus headunit with DAB to my Rapid. There's a lot of different posts scattered around so I've tried to collate as much as I can here. Note that I have focused on Swing to Columbus, but most of the information here can be used to go from Amundsen to Columbus too. I'm no good with terminology - what's a Swing headunit? The Swing headunit was the standard option on the Rapid. It has FM/AM radio and a CD drive. It interfaces with the USB and AUX ports below the heater controls (known as MDI), an external Bluetooth (module to provide calls and music playback and displays information on the instrument cluster (known as Maxidot). If you have OEM parkig sensors they will also display on this unit too. If you have a multifunction steering wheel (MFSW) this also controls the unit. And what's a Columbus headunit? The Skoda Columbus headunit was never offered an an OEM option for Rapids but is a popular retrofit option. This headunit is also known as the RNS 510 which is the VW variant of the same headunit and only differs in the backlight illumination (green for Skoda, red for VW) and the startup logo. This is a touchscreen navigation headunit with a DVD drive (you can watch movies on it while the vehicle is stationary) which also interaces with MDI, external Bluetooth and Maxidot like the Swing. It comes with its own SD card slot and a hard drive to store music on. It also displays parking sensor information if you have them fitted, MFSW compatible and has voice control. Additionally some come with DAB / DAB+ and the hard drive can either be a traditional HDD (spindle) or SSD (a big memory card) each with different storage capacities. On top of all that the screen can also either be LCD or LED (newer). Sounds complicated - how can I tell which one I am getting? Best thing is to ask the seller, you can also use the part number to help which is in the form 3TO 035 686 ?, where the ? is one of the following letters: A - first version, SD card slot takes a 2GB card max B - ? C - ? L - LED screen And where do I get one from? You're best bet is through eBay / Guntree. There are many sellers out there, some who are selling their units because they have a new car, some who are refurbishers / ICE sellers. There are VW retrofit specialists who also sell them through their websites. And of course, Briskoda classifieds! Expect to pay £300-600 for one, feature/condition dependant. Anything to look out for? Some units have upgraded firmware which allows "Video In Motion" i.e. you can watch DVDs while driving. Personally I'd prefer getting an unfettled unit as you don't know what the source of the firmware is. Check the stickers are intact on the outside in case the mainboards have been switched or the hard drive has been replaced / upgraded; again personal preference. Aside from that the usual checks for cracked screen, missing buttons, wear and tear etc. Oh, and make sure the unit comes with the code! The code is a 4-digit number specific to the unit and you will need it once you connect it up to your vehicle. Do I need anything else? A GPS antenna for the navigation and if your unit supports it, a DAB aerial too. These are around £10-15 each for the simple stick-on types. The connector types are Fakra. You will also need a new surround which can be purchased from a Skoda dealer (I paid £7.50), part number 5JA858415 9B9. That's quite an outlay for old tech ... It's true that there is no native Apple CarPlay / Android Auto or apps like Spotify and the UX looks dated compared to newer vehicles. However it will depend on your requirements. Some (like myself) prefer to go down an OEM route for the looks and playing nicely with the rest of the car. Some may not be fussed about that and want something with all the latest and greatest tech. Some aftermarket units will interface with Maxidot / MFSW but you would have to wire in a new mic for the Bluetooth as well as GPS / DAB etc. Note that there is a company called Ampire who have an interface which enables Apple CarPlay / Android Auto for the Columbus but it's very expensive (£800 at the time of writing). There is also a Skoda approved Kenwood interface which replaces the navigation with Garmin and adds Spotify (part number ZGB500051259, it's not sold anymore by Skoda but I have seem them pop up on eBay for around £200-250. Food for thought. Any other OEM units I could consider? There is another OEM headunit called the RCD 330 which was/is installed in Asian markets - this has a more modern interface with Android Auto / Apple CarPlay but no DAB and Bluetooth is built-in so you would need another mic. The Rapids could be spec'd with a unit called Amunsden (RNS 310 / 315) which is similar to the Columbus but with a smaller screen, no DVD, no voice control and no hard drive. These are a cheaper alternative but ensure you get one without Bluetooth built-in so that it can interface with your existing BT module (the MAC address on the label of the unit should read all zeros). These come in DAB variants too. There is another unit called Bolero, I don't know much about this but it looks similar to Amundsen but I believe it's older. Below is a table I've put together to compare the different options. Understood. How do I get it installed? Swapping the head unit over is a super simple DIY job, with just a screwdriver required and it should take no longer than 20 minutes to do. You will also need to wire in the GPS and DAB antennas too if you have those, which will take a little longer and depending on where you put them. I spent 90 minutes on mine which is a DAB+ so two antennas to wire in plus the headunit itself. @deanobanks93has an excellent illustrated guide HERE on how to swap the head unit over; although it's a different unit he/she is putting in the same instructions apply. Remove the surround with your fingers / trim tool, remove the 4 T20 Torx screws holding the unit into place, remove the quadlock and radio antenna connectors, plug them into the new unit and screw it back into the housing. Simple enough. What about the DAB and GPS antennas? Let's start with the GPS antenna. This should be stuck on to a metal part of the vehicle. I decided to put mine on the metal on the side of the dashboard. It's easy to get to and gives good reception (more on this later). Some stick it behind the unit on a metal part of the frame too. I'd recommend investing in some trim removal tools which are only a couple of quid from eBay delivered. Remove the side trim using a trim removal tool or you can push it out from the back if you get your hands behind the trim by going under and behind the glovebox where the fuse box is. There's three clips which disengage once you apply some pressure. Once this is removed, you can see the metal where the aerial can be stuck. I put mine on the outside, some have placed them on the inside too. Stick the antenna on then you need to thread the wire through to the headunit along the top of the glovebox. If you have another pair of hands or very thin arms you can just about get it through; however I ended up using a drain unblocker tool which is flexbile enough to poke through the gap while being rigid when pushed; tie the end of the antenna to it then push it along until you get to the headunit. There is a small opening to the left of the headunit where you can thread the wire into. Once through connect to the headunit (the blue connection at the top). I placed my DAB aerial on the top-left corner of the windscreen, it's a stick-on type. You will need to remove the pillar trim using a trim removal tool then feed the wire down the pillar and back through the top of the glovebox. I also tucked my wire at the antenna side into the headliner then down for a neater finish. You can get other types of aerials - I'm considering an all-in-one sharkfin which has FM/AM, DAB and GPS but it would require routing the cables from the back of the vehicle. A neater solution if you can do it (I was quoted around £300 by a local car audio specialist for this). Once done, give it a test - there are settings in the unit which show the DAB and GPS signal strength. Mine were fine for my area. Put all your trim back and get the kettle on - you deserve it. The final optional step is to tell the car that you have Navigation so the Maxidot can display turn-by-turn instructions. This is a case of coding via VDCS, you can look HERE for members nearby who can do this for you if you so wish. Seems doable. How's the unit itself? If you've come from Swing it's a huge improvement. The sound quality is noticeably improved and you now have navigation with traffic, in-built music storage, DVD playback, voice control, an SD card slot and DAB (if you chose it) with a touchscreen interface and you still have all your existing funtionality as it was before. The Maxidot displays DAB stations, and lets you control the music on the new sources (SD / hard drive). You can now also stop / forward / rewind tracks on your connected Bluetooth device and they will stop playing on your device when you switch sources on the Columbus which is another big win if you use your phone to play music; the BT audio mode on the Swing is very primitive and acts like an AUX source. Phone calls can also be initiated on the screen instead of using just Maxidot and you can setup speed dials rather than having to scroll through phonebooks or calling lists. If you have DAB, you probably won't need be listening to FM/AM, so now's the time to ditch the fugly long aerial and replace it. I went with a 3cm stubby variant, very low cost but looks so much better. I don't think a sharkfin would work as the roof is slightly sloped at the back which means it may not sit correctly - maybe one to try out in the future. And any downsides? The main one is the screen - it's resistive so requires some firm presses on the screen, not like your modern capacitive smart phone screens. It takes a little getting used to in this day in age but unless you're constantly fiddling with the screen while driving it's not a huge deal. You always have the option of the voice control to perform those tasks too. The system can take some time to startup compared to the Swing, which I think is to do with loading music from your various sources. On the Swing it seemed to load files from USB once you selected a folder where as the Columbus it seems to do it all on startup. One thing that does annoy me is the right knob in DAB mode - I was hoping that turning it would scroll through my presets but it brings up the manual tuner which is completely pointless. You can use the arrows on the screen and the stalk so not something that keeps me up at night. Anything else I should know? The maps and firmware can be updated, I'm not planning on this as I bought a relatively new unit. You can also change the startup logo. If you want the Bluetooth audio to play from your Spotify app on your phone you may need to open the app on your phone first. I also have a Music app to play locally stored files and the unit picks up whatever app was last used. On my phone at least I have to turn on "Bluetooth autoplay" in the Columbus for Spotify to work, if you don't you have to manually play a track in Spotify first. Thanks, this has been helpful. You're welcome - if you have any questions feel free to contact me. There's also a few ICE experts here who can help. If there's any mistakes in the above please let me know and I will amend.


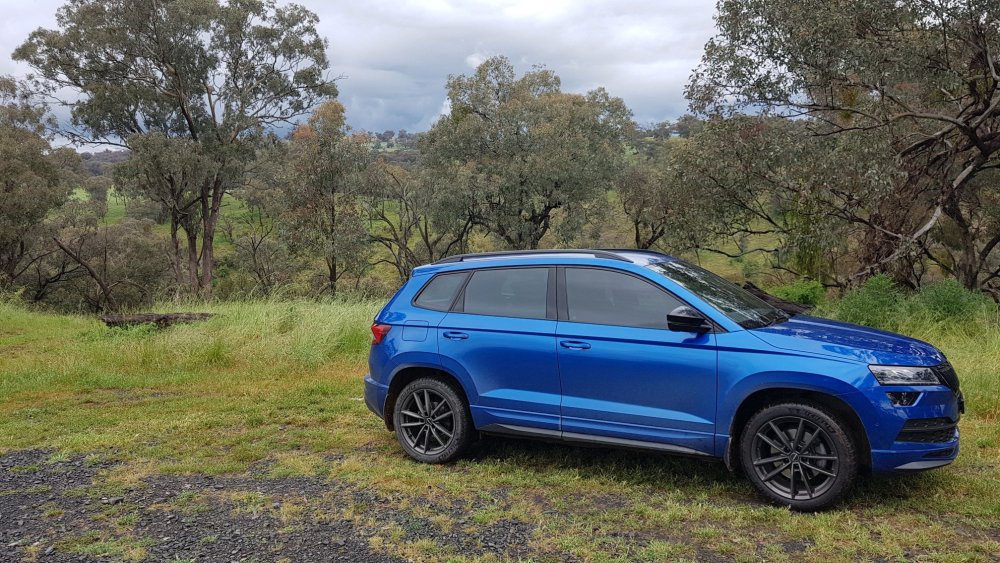
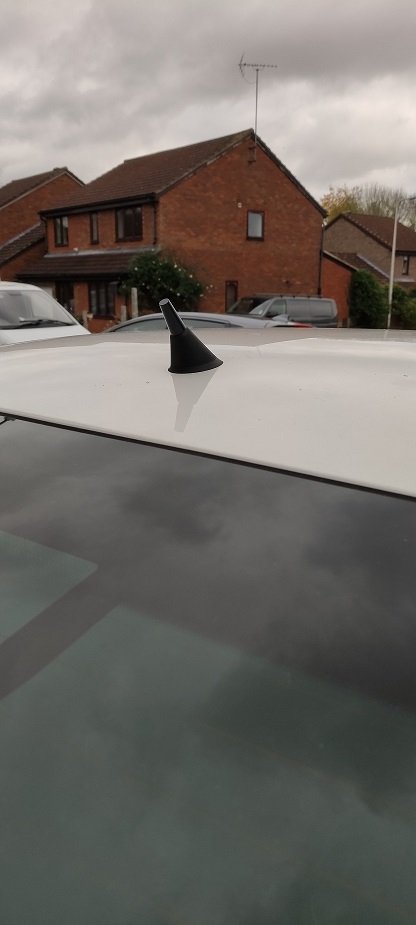
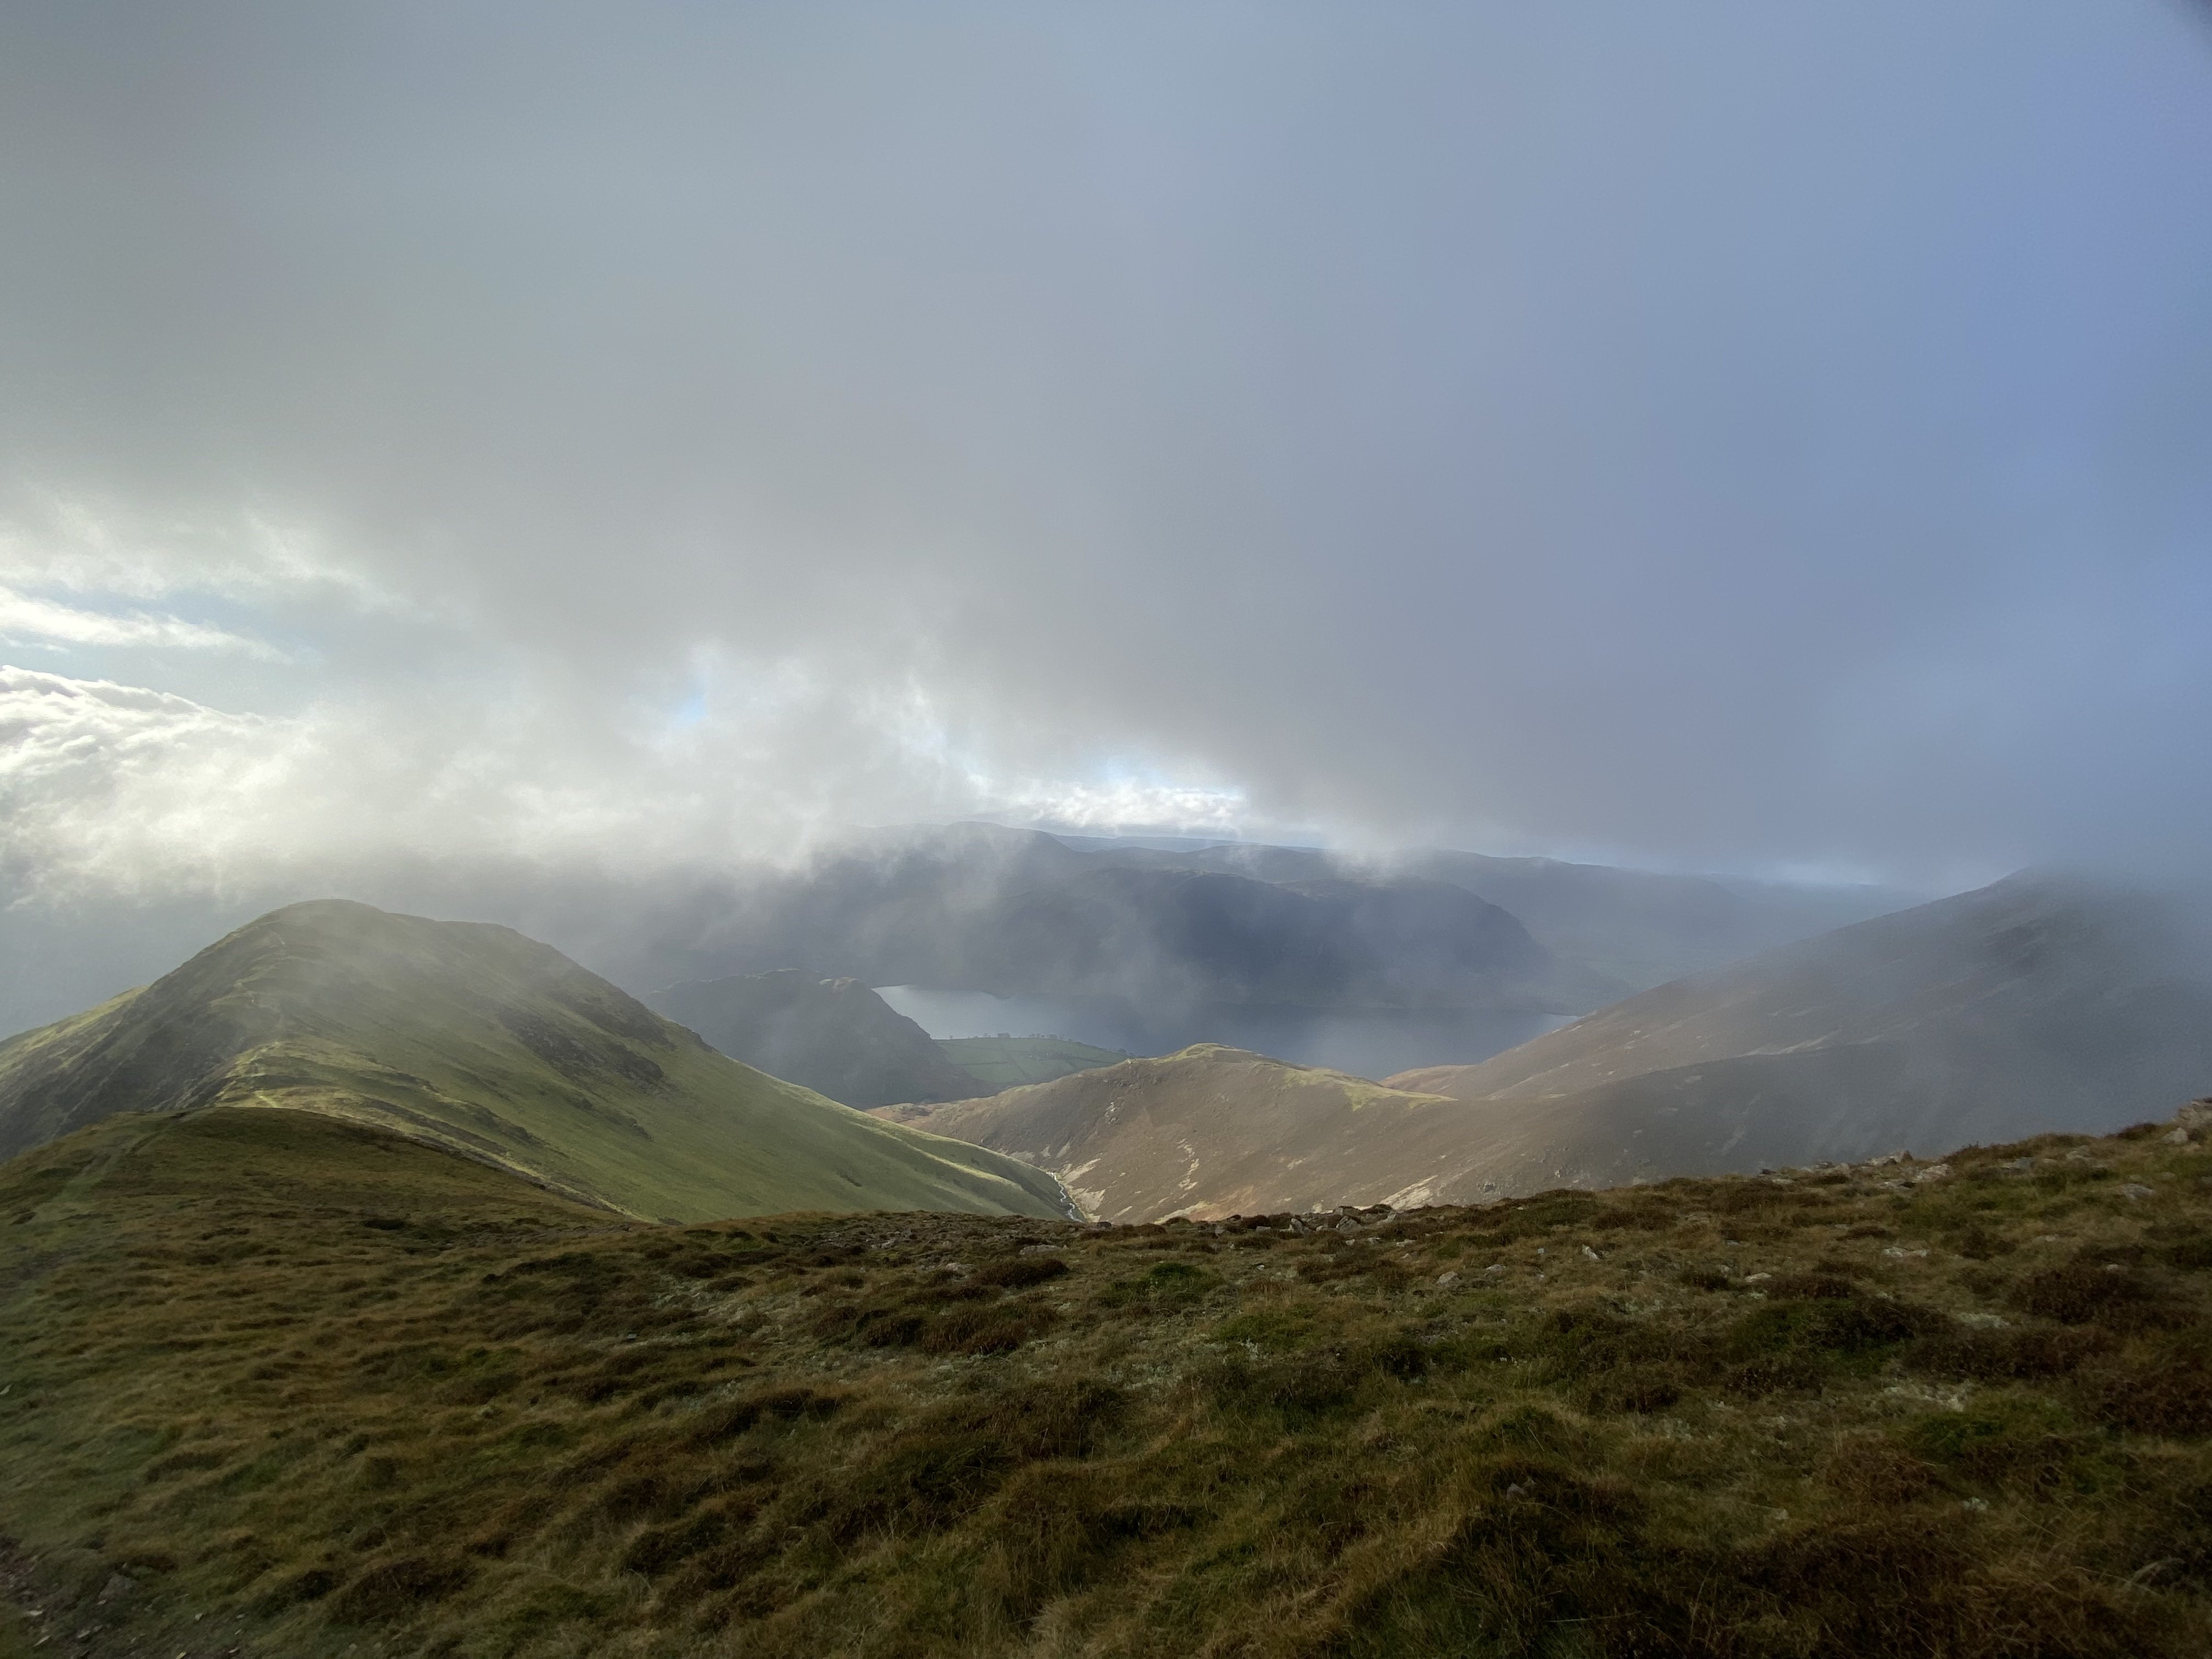
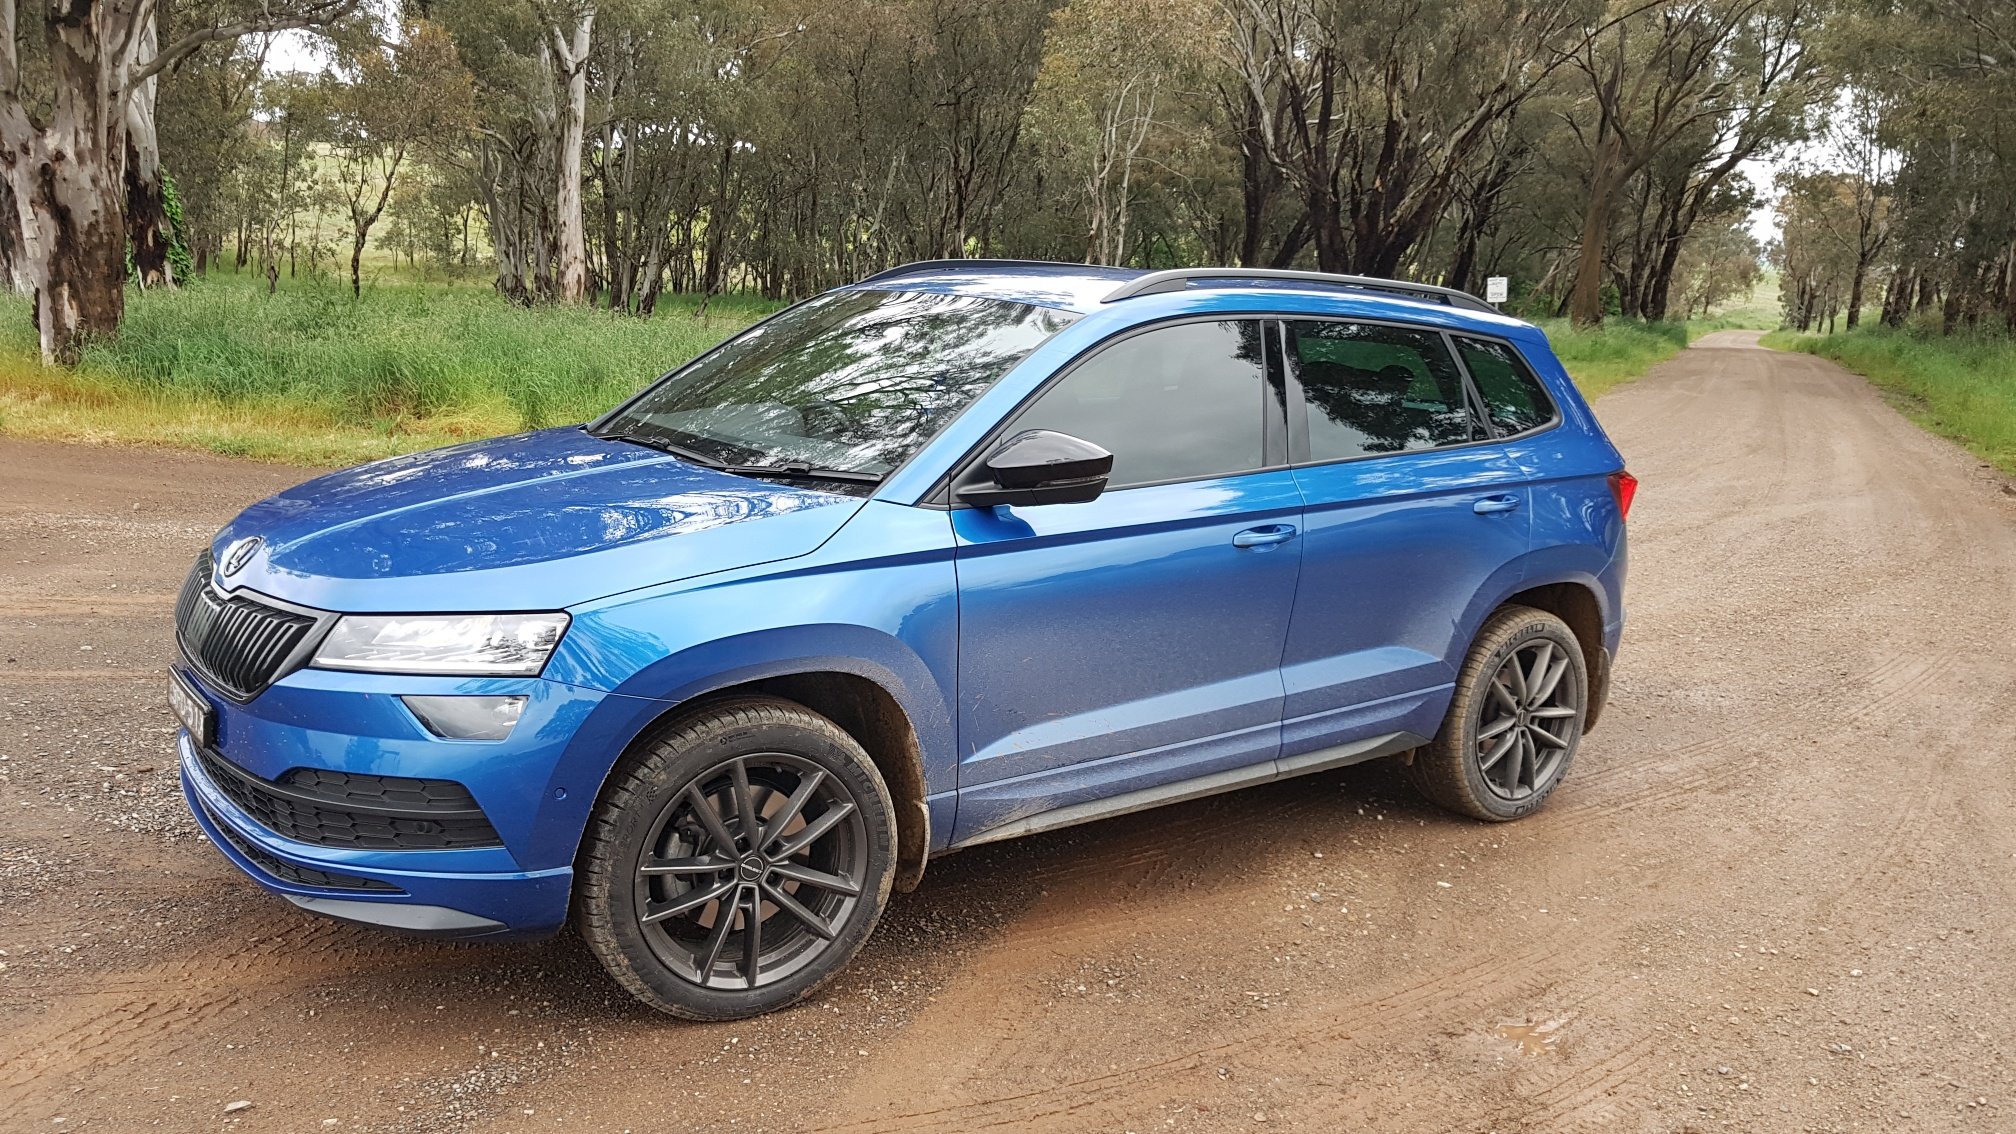
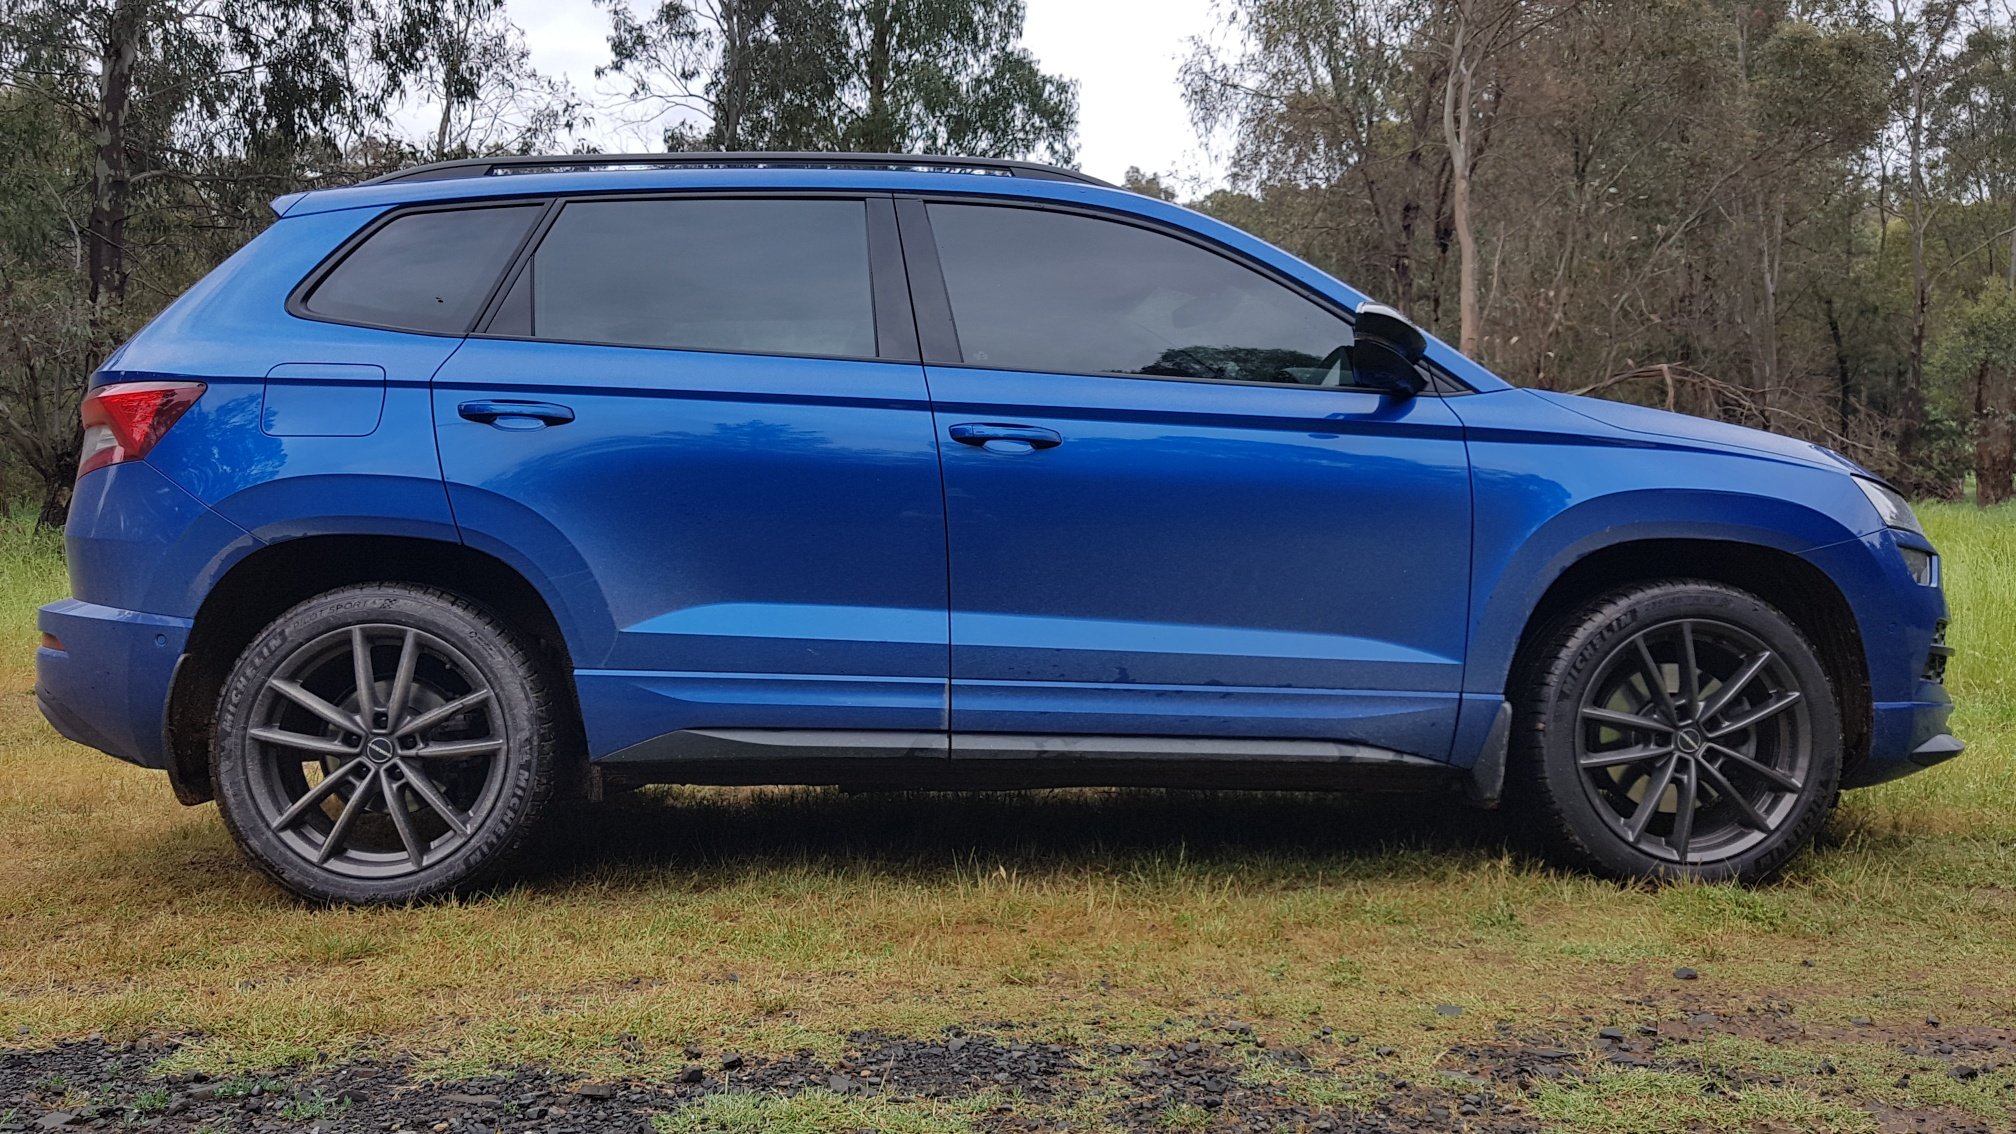
 1 point1 pointDoes any one know what media the satnav uses? Is it cd or media card based? I cant find anything in the car! I'm looking at getting the satnav up dated. Diy job or does the car need to go to the dealer at all?1 pointIt usually occurs in engines where the stretch bolts are too weak or not tightened properly, the old PD130 is a very good example, head lift is an extremely common occurence with them when they're driven enthusiastically. Edit: If your car is a petrol turbo then it can't be head lift, your head must be cracked.1 pointJust shy of two hours the guy had it done in. Car was just as clean inside as before. He cleaned the rear view mirror, which was nice of him.1 pointThey are 7Jx17 ET40 which is the official winter rim size for fitting chains etc. Wearing cross climates at the moment. More than up to the job with 4x4 as well.1 point1 point1 pointIt's fifty quid and it'll take ten minutes, I'm not sure how you value time but I dislike wasting mine, especially at MOT time.1 point1 pointI like this thread for its nice little trip down memory lane 😎 It's just answered my question to Mrs Gaz last night of 'When was it we went to north Wales?' (2016). And a post from Andy (Auric) being his usual 😄 Gaz1 pointYes, fast enough because I had already removed half the dashboard!!!1 point1 pointIt needs a big run-up for hills! But yeah it does, looks as if it's going into battle, that road-end has a slight downwards slope on it, which helps convey that idea well, I think.1 point1 pointStill going strong💪 4000km driving now with turbo. have been standing in garage and not used for like some months now. Waiting for time too give service with new spark plugs now.1 point1 pointThe links sepulchrave put up also have the leak side I forget to put, exhaust, the blow to the hiss of inlet, a spray around with carb cleaner or other may highlight a leak (gasket, joints (i don't know what you have there). Only other thing as highlight in links is computer wobbles. I'm not keen on committing to replacement by cutting the wires, just in case some sort of clean up can be done, but if the sensor's low cost then the hassle might not be worth it. What make of sensor is fitted now? For future reference, if you didn't already know, an MoT can be done up to one calendar month before the expiry date and still keep preserving the anniversary of the expiry date - but if it fails you're without MoT until you can pas a retest. As long as you don't mind losing the months you could have the test months before to move it to a more convenient (warmer, lighter) time of the year.1 point1 pointIf it's any consolation I have to fit a new one on my 2.0 every two years just to get it through the MOT, it's because the engine core is so ancient, I guess yours is a 1.4 MPI so it's no surprise to me, both our engines barely met Euro 3 emissions when brand new!1 point1 pointThat reminds me of "The Comic Strip Presents - Four Men in A Car" and this exact clip! 😂 Stuck CD1 point1 pointMay I humbly suggest a sheet of 18mm ply from your local wickes will transform your driveway into a usable workspace, even a remnant of industrial carpet will do and you can roll it up to store it.1 point1 pointThe roads could be closed due to works, in which case this sign could reflect this and be updated far quicker than your SatNav.... the fact that the council/HA likely wouldn't actually get around to the alterations for weeks is what lets the technology down.1 pointThe problem with 8Jx18 rims fitted with 235/45R18 tyres is that the sidewalls don't bulge out much, so the rims are very exposed to kerbing damage. Going for a narrower 7.5J rim fitted with slightly oversize 245/45R18 tyres would massively improve rim protection as the sidewalls would bulge out quite a bit. 7.5Jx18 ET46 Alloy Rim https://eshop.skoda-auto.cz/cs_CZ/kolo-z-lehke-slitiny-trinity-18-pro-superb-ii-octavia-iii/p/3T0071498J+8Z81 point1 pointPHEV should really be confined to 3.5kWh or 7kWh chargers as they just don't need anything faster, plus there should be a 1 hour time cap. The battery is likely in the region of 10-20kwH and even though it might be empty the car can move without it I really think anything faster should have a time cap for EV and a very short/more expensive tarrif for PHEV. Whilst I don't have an electric, we see cars in shopping centres plugged in when you arrive and 4 hours later they're still plugged in. Some poor sod in an electric car is looking for a charging point and actually needs it.1 point1 point1 point1 point1 point1 point208kW (280hp) and 470Nm (345 lb-ft) + damp dirt roads = lots of fun! Here's a few photos of my grubby Sportline
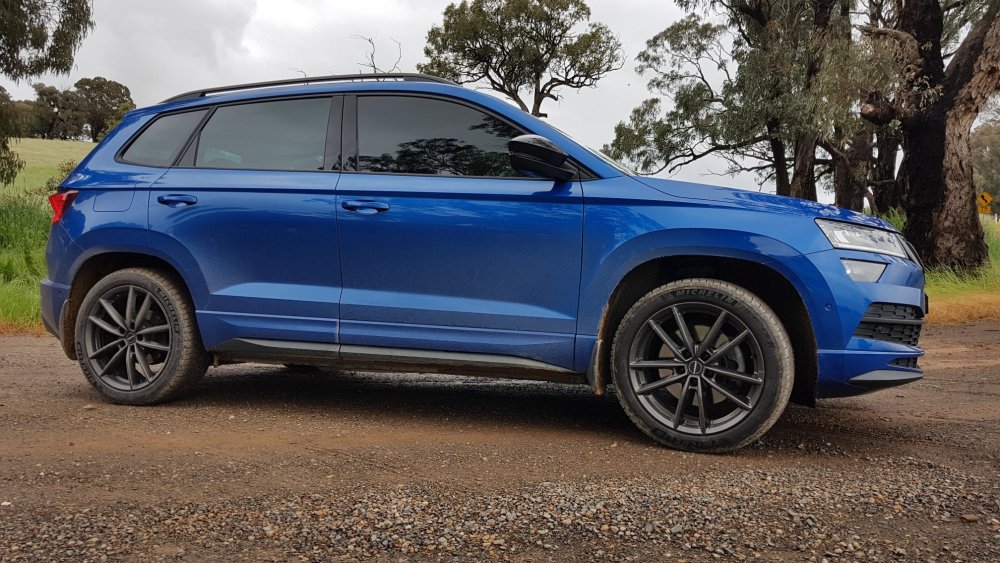
 1 point1 pointAnother owner has recently gone down the same route (you should find their thread in the more recent topics in the Rapid section). In a 2014, the best option is to source a RNS-315, also known as an Amundsen. This is the factory Nav unit for that year of car and it adds navigation, vastly improved audio quality (without having to upgrade the speakers), better Bluetooth control and more Bluetooth options among other things. Does your car have Bluetooth fitted? If so, I would recommend this route. If it doesn’t, then it’s worth considering the RCD330, which is the factory radio fitted in some overseas markets. It has no CD drive and no Nav, but it has a big touchscreen and adds both Apple Car Play and Android Auto support, allowing you to mirror your phone and it’s apps to the dashboard. It also has integrated Bluetooth. And it’s surprisingly cheap! I do not recommend Xtrons. I’ve tried three of their head units, each one was garbage and I ended sending each one back for a refund. One actually started smoking!1 point1 point


.thumb.jpg.06721e8c8b33ed0eea16572ff131b291.jpg)


_1.thumb.jpg.a1192bbf41f272c9e8d062560a0c4c2a.jpg)


Important Information
Welcome to BRISKODA. Please note the following important links Terms of Use. We have a comprehensive Privacy Policy. We have placed cookies on your device to help make this website better. You can adjust your cookie settings, otherwise we'll assume you're okay to continue.