


Breezy_Pete
Sponsor
-
Joined
-
Last visited
Everything posted by Breezy_Pete
-
I'd say they are right, but being too literal, not thinking about it quite enough. Your photo shows two pipes connected to it, as does ETKA: LLLParts Just one of them is short and open-ended.
-
I think if I read this in the morning I'll probably understand it: https://www.tiepie-automotive.com/en/articles/abs-sensor-hall
-
Still beyond me.
-
Beyond me, but looks like they maybe generate a voltage?
-
Pal just bought a 2001 Impreza, drove it a mile and got a flashing emissions warning light. Snapon scanner said misfires cyls 1 and 3 and running rich. EJ205 engine I think. Coilpacks? plugs? Other? Access looks fun if I am to get at either/both. Do they come out with engine where it is? They must, right?
-
Again! 😁
-
Yep
-
The one I read pertaining to your car (well Superbs of that age in general) was bought from erWin a while back, the one that above screenshot is from was wild on the net somewhere as far as I recall.
-
See what readings you get on a 'diode' range of the DMM?
-
No idea! Diagram added to previous post by edit btw.
-
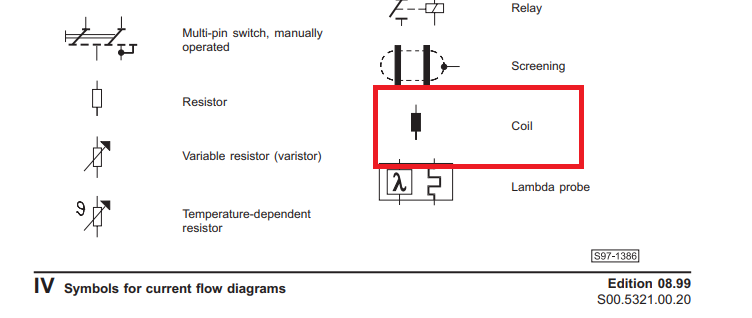
Wiring diagram does show a + and - next to the sensor connections too, now that I look carefully. You're winning me over. Perhaps there's a diode in there, although it's just shown as a blacked out resistor shape in each. Like this one: Active devices usually show a transistor symbol to indicate such?? Please do a post mortem dissection on one if you do end up replacing one.
-
Fair enough. 🙂
-
Hmm, I'm unconvinced. What could possibly be responsible for high-resistance readings - no offence intended - is difficulty in getting meter probes reliably onto sensor pins which might be deeply recessed in housings?
-
Would need 3 connections for an active sensor of any type, I think?
-
Engine code would be useful for narrowing down the possibilities. It'll be one of the item 12 selection here, which you will see, are different depending on engine code in the 5th, 'data model' column of the table. View on a computer not a phone to be sure of seeing the full table, view the relevant link in my signature if 'engine code' is a mystery term to you. switch; clutch pedal - Octavia(OCT) [EUROPA 2003 year] (7zap.com)
-
Repair kits are available cheaply, never tried one though.
-
🤞
-
A little silicone grease helps.
-
I doubt anyone's touched that since build day?
-
Spark plugs also irrelevant. After checking for mistakes with oil filter: Get the garage to fully warm up the engine, remove the oil pressure switch, fit a pressure gauge there and see what the pressure reads at a steady 2000rpm. Is it a CAXA engine? (code may be found. at start of engine number on V5c document, and on sticker in boot near spare wheel well). If it is, I think minimum pressure at that engine speed needs to be 2 bar. Changing oil type may help, but additives not recommended.
-
Air filter is irrelevant.
-
Thanks. How bizarre. Looks like that broke ages ago and the bolt head has just been sticking there with corrosion debris? I guess there are 3 other similar bolts to remove/inspect? The symmetrically opposite one on t'other side especially. Items 6, 4 here? LLLParts
-
Pics?
-
Pins 5 and 6 of the switch unit get connected to 0V/earth (pin 11) via the following resistances depending on each switch position: 1. Press switch down to the first detent - 150 Ohms to earth 2. Press switch fully down - short/0 Ohms to earth 3. Pull switch up to first detent - 1.8k Ohms to earth 4. Pull switch up fully - 530 Ohms to earth. These were measured on a new aftermarket switch unit, if I remember right, so may not be precisely those of a genuine switch, but I'd expect reasonable agreement. Pin numbering (just visible in your photo) includes the non-fitted pins.
-
Probably true at ~5 years old but they're writing instructions for general use whatever the age of car. With changes in coating materials away from those with hazardous materials (cadmium?), even relatively young genuine fasteners seem to corrode quite rapidly.


