


Leaderboard
-

moley
Resident Member25Points10,120Posts -
shyVRS245
Locked20Points0Posts -
skomaz
FREEDOM7Points11,089Posts -
Lady Elanore
FREEDOM5Points24,878Posts


Popular Content
Showing content with the highest reputation on 10/10/20 in all areas
-
4 points
-
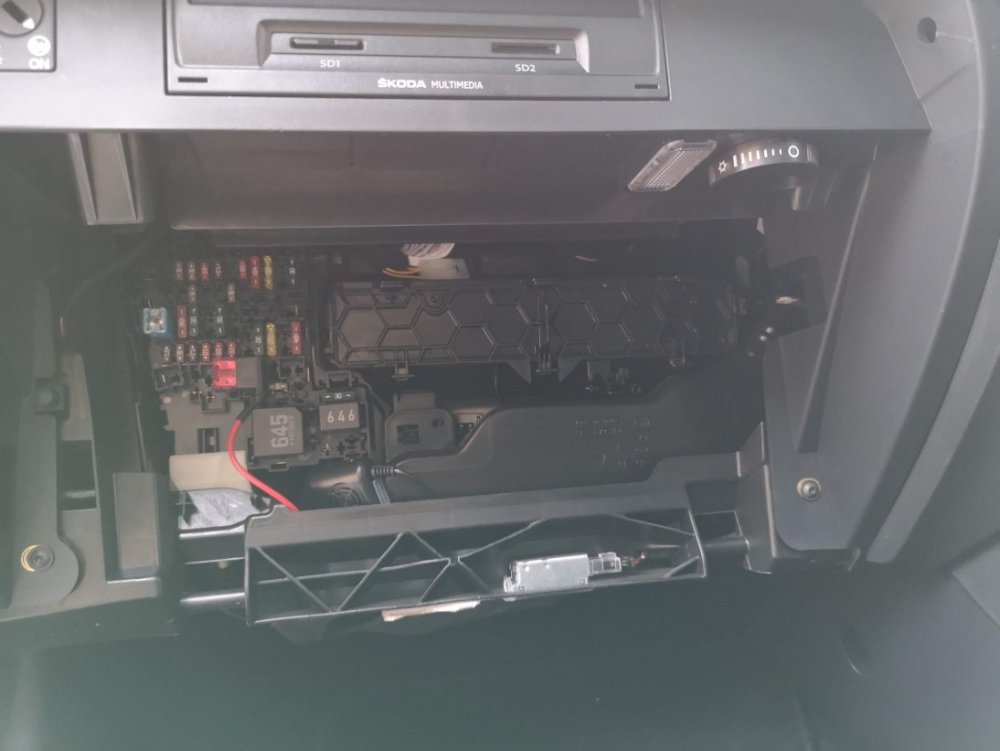
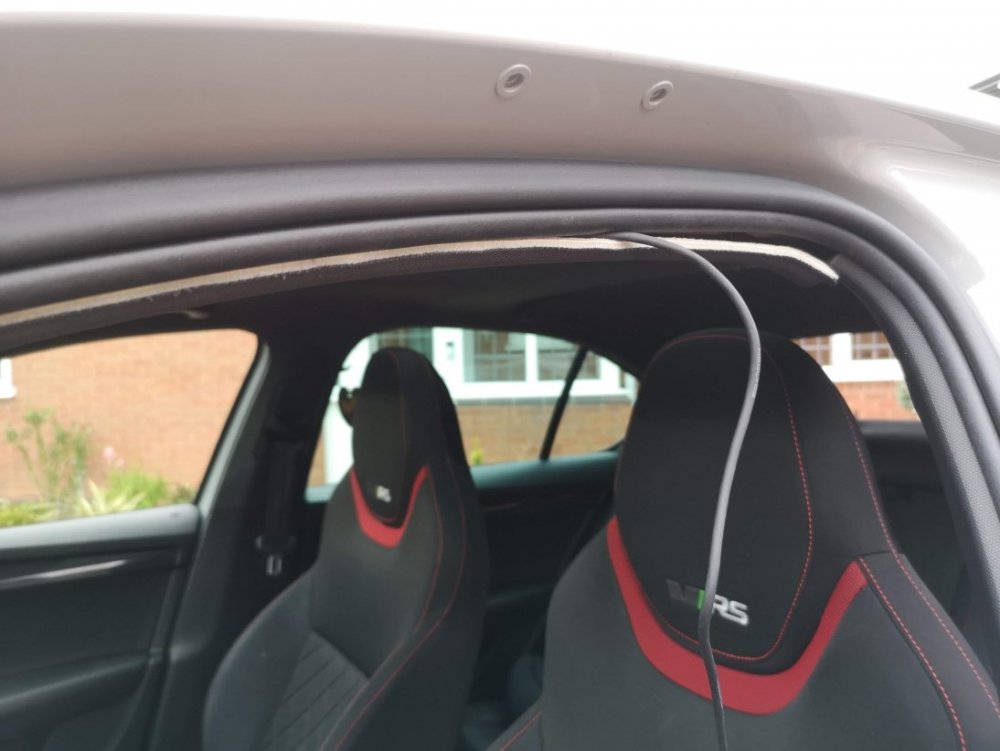
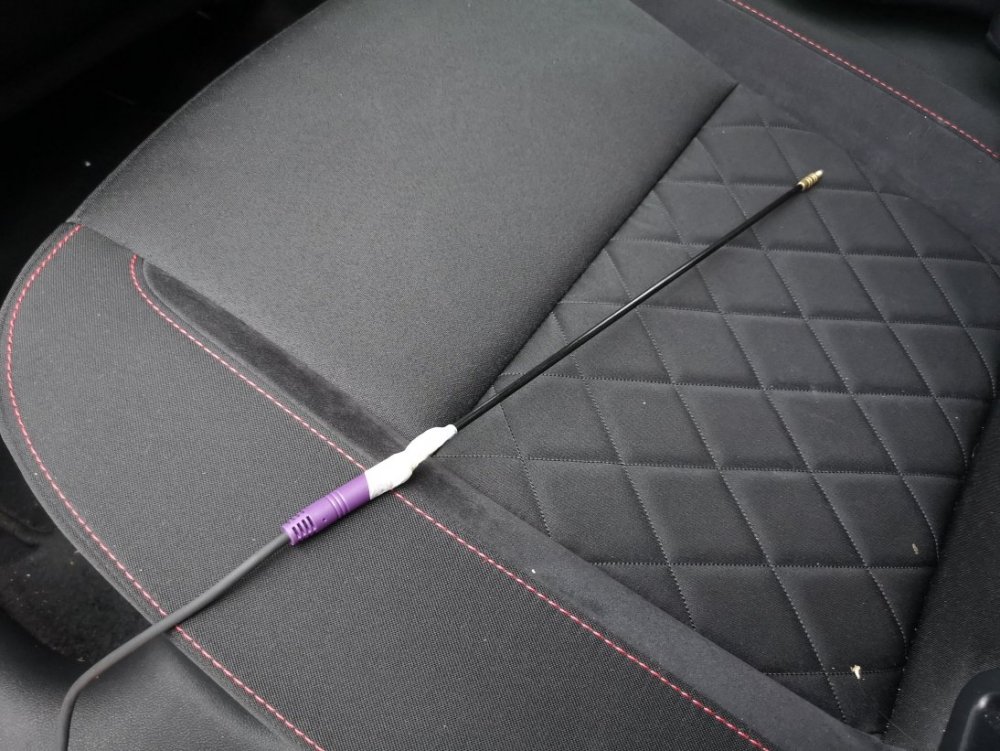
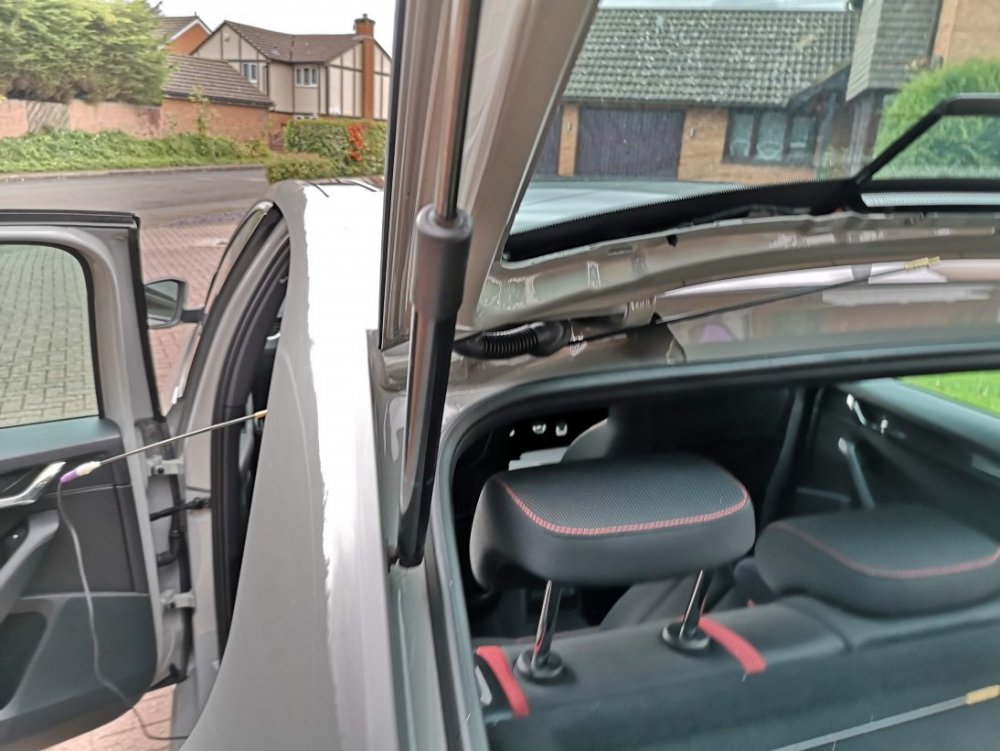
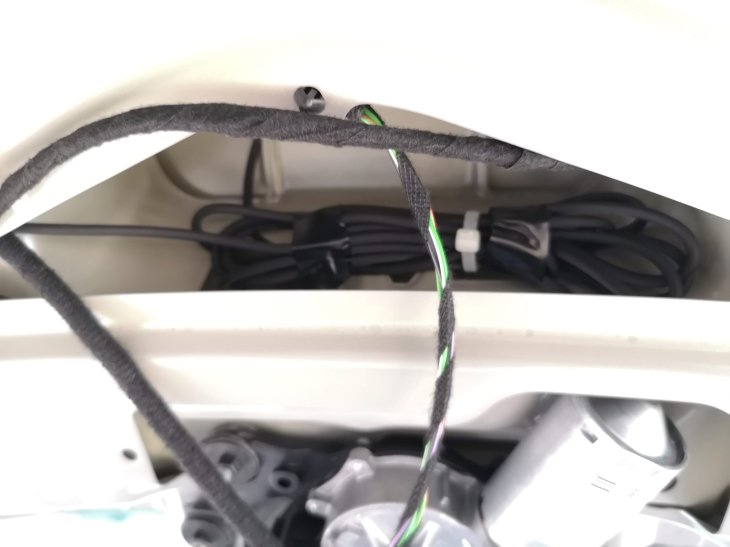
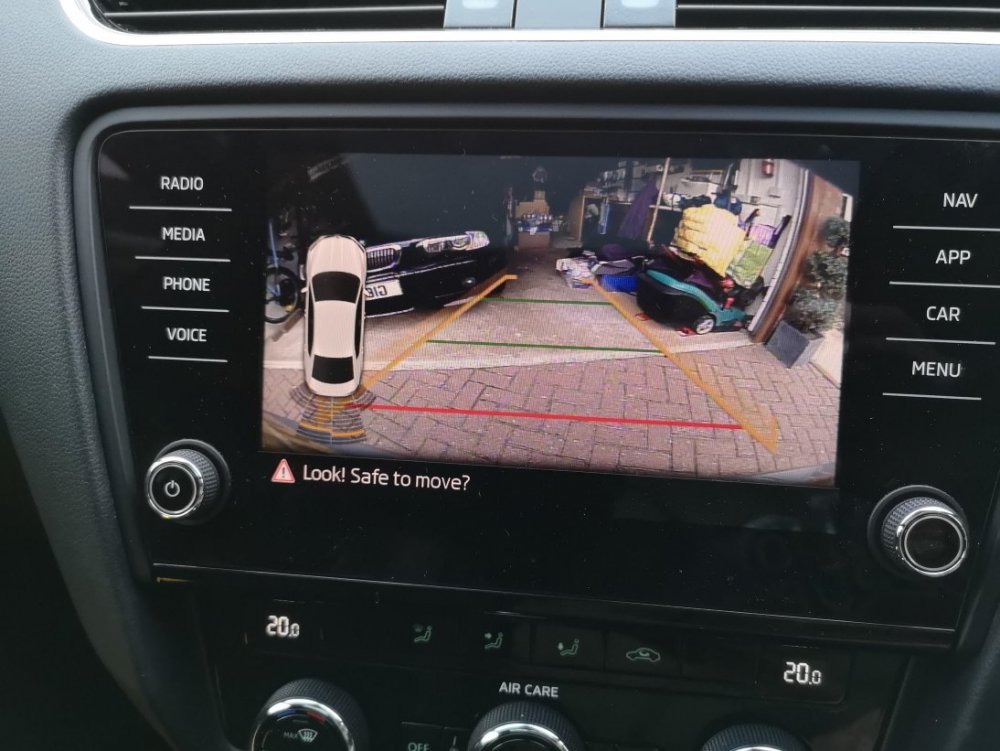
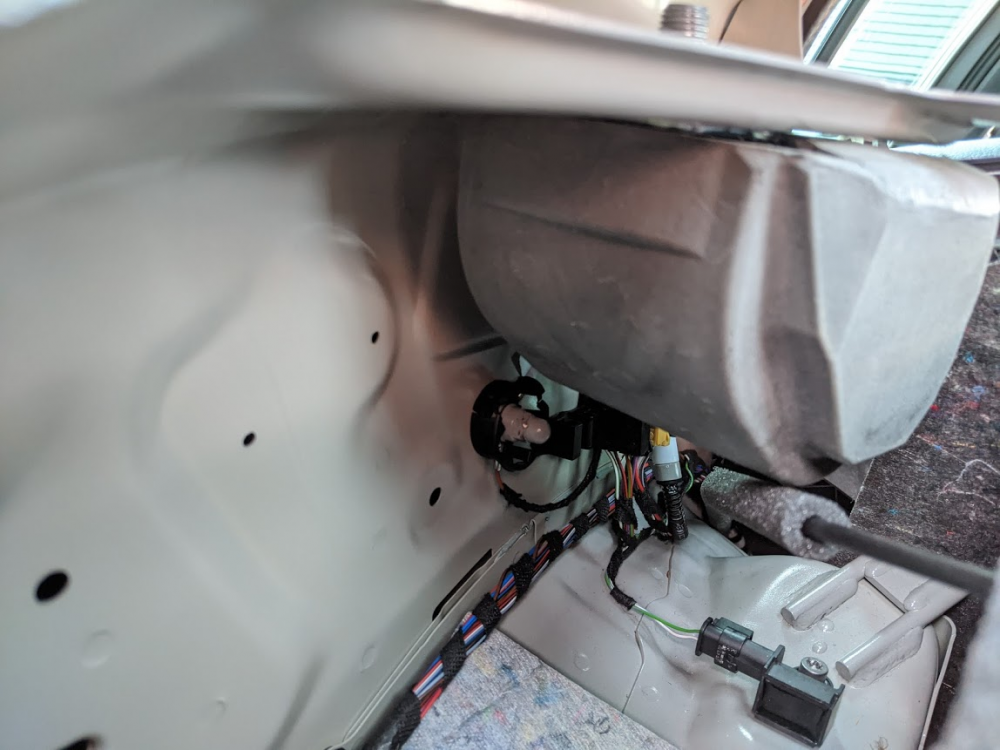
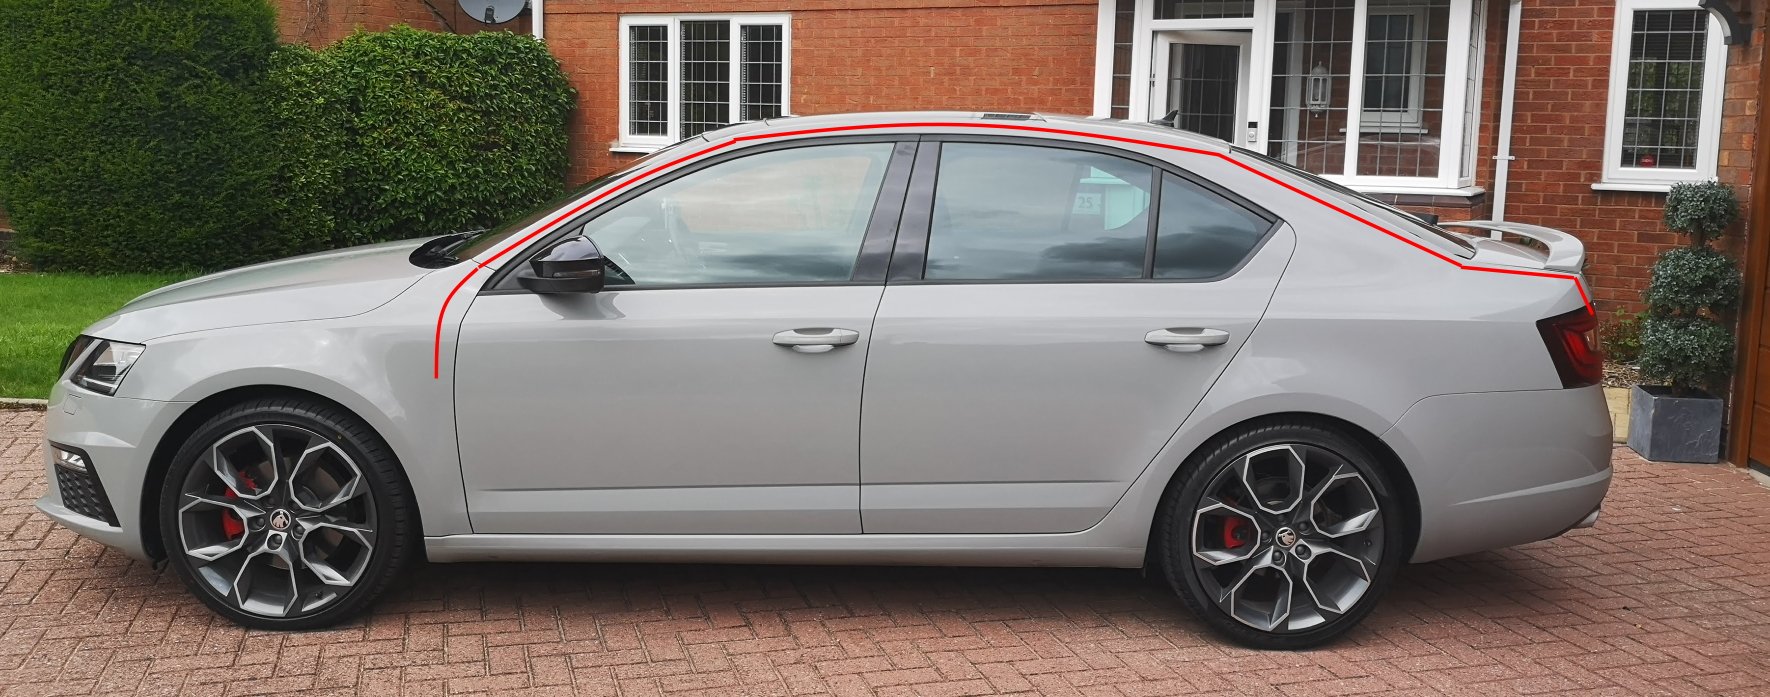
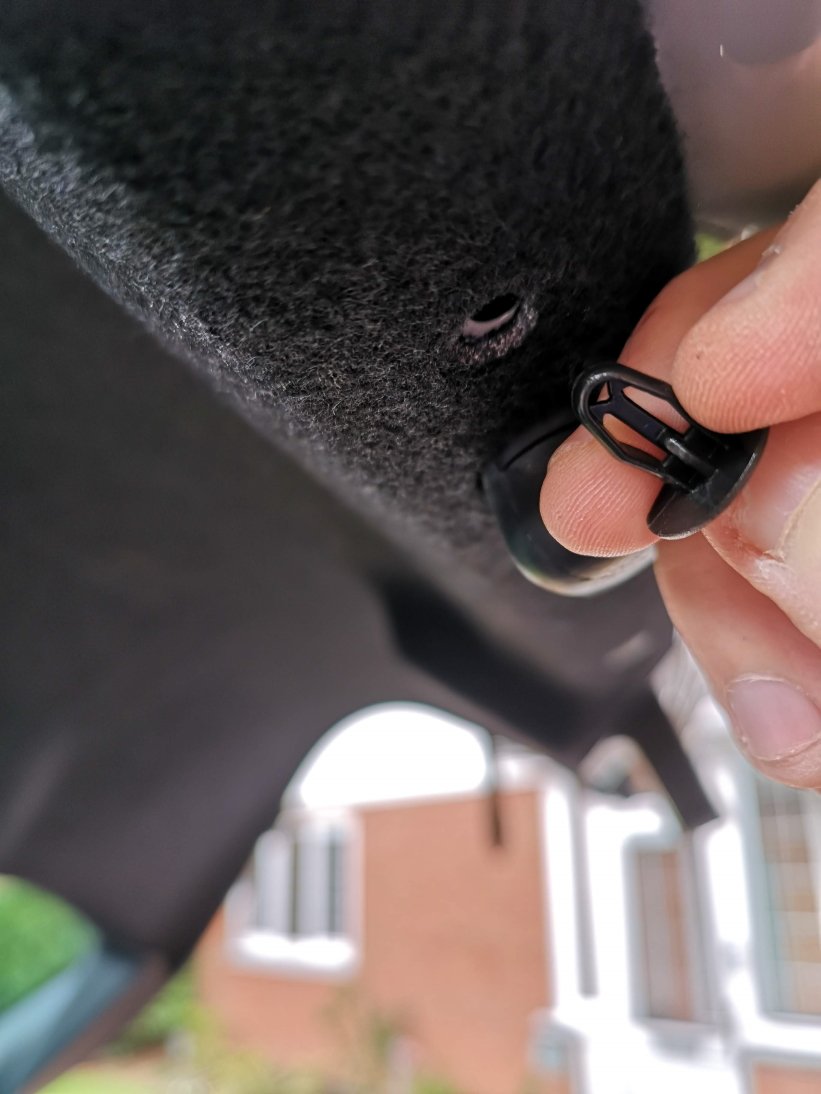
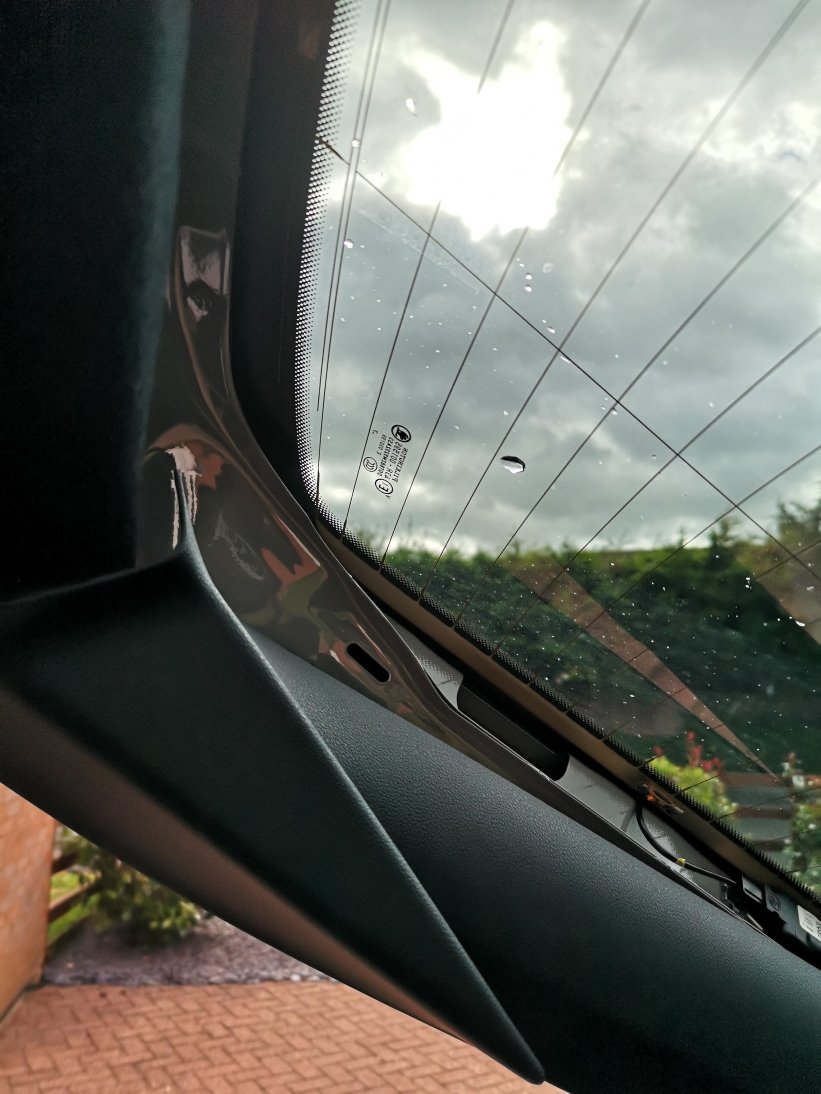
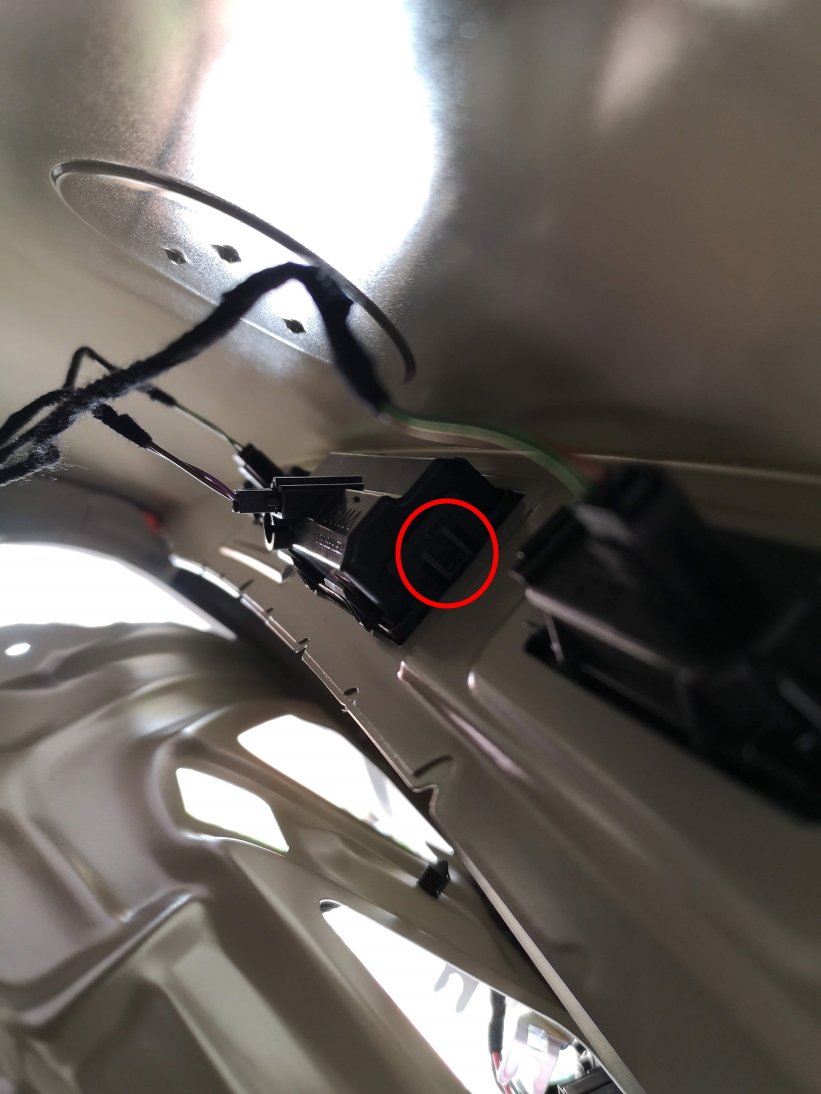
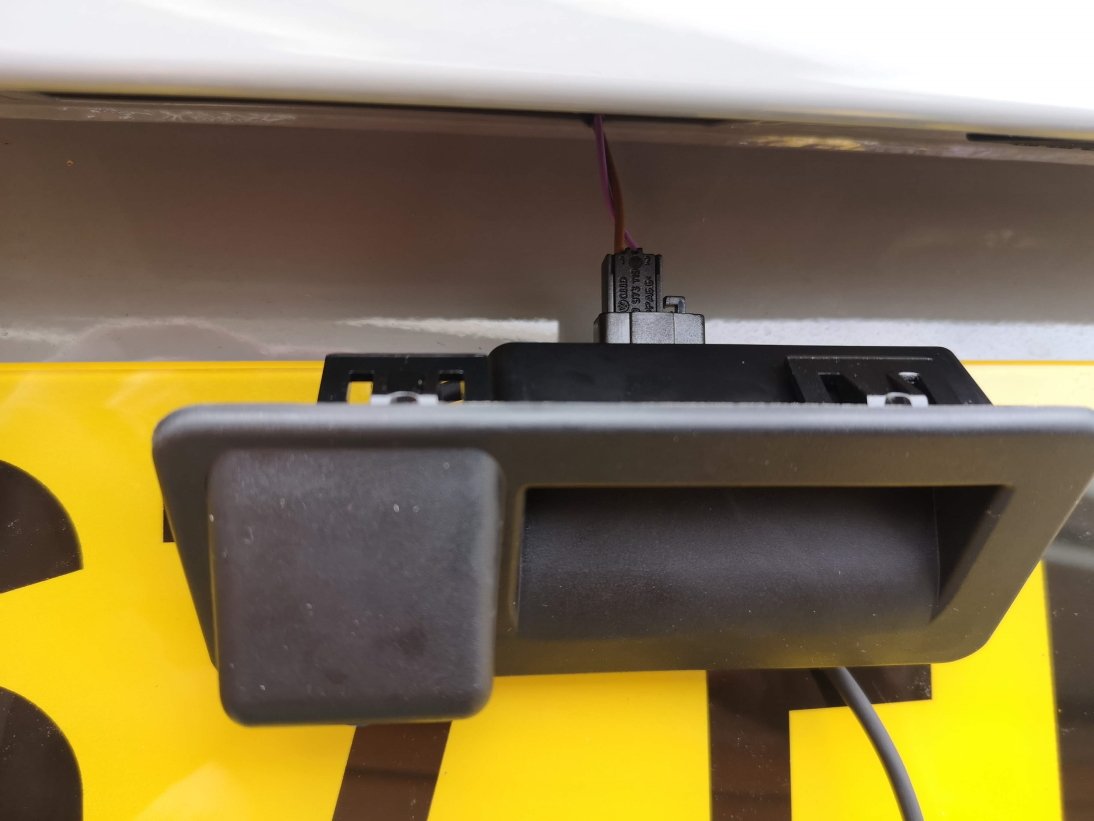
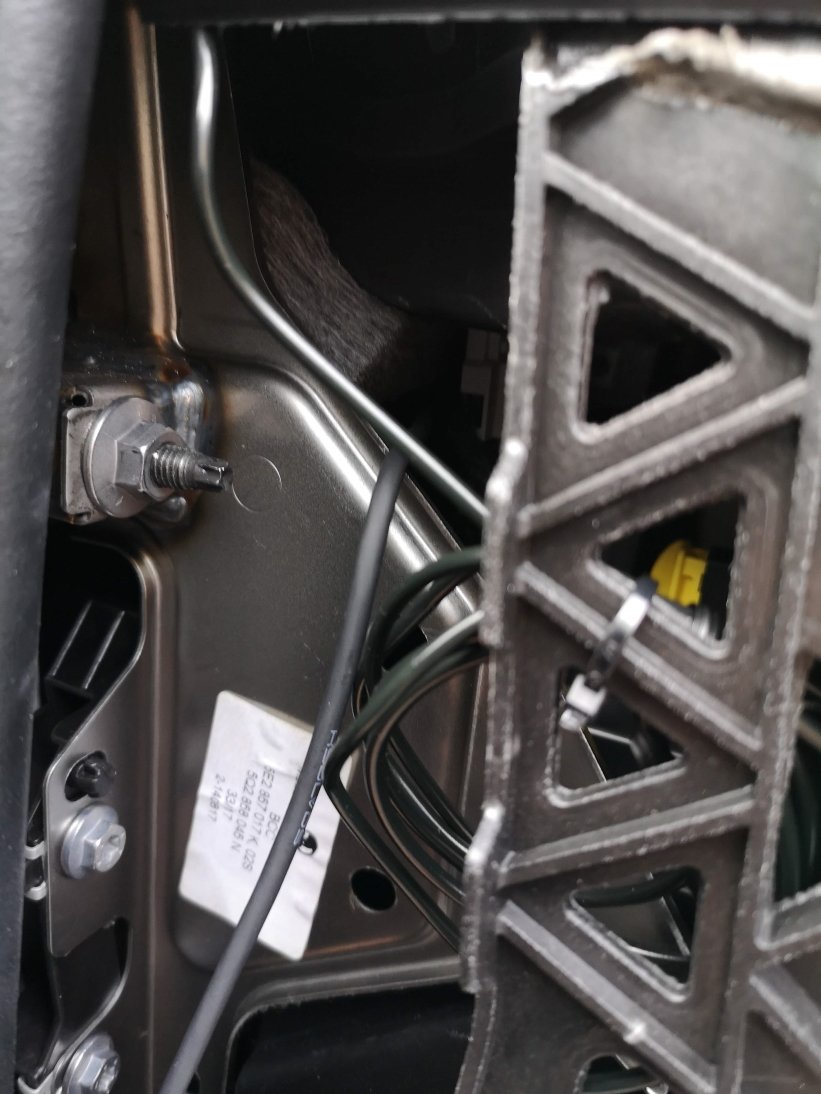
As there seems to be a lot of people asking questions about this lately, I thought I'd put together a quick guide showing how I fitted my reverse camera to a facelift VRS hatchback. They way that i've fitted this will apply to most models, with the key differences being the size of handle (based upon car model year) and whether hatch or estate (but this is just inside trim differences), there may also be wiring loom differences for earlier cars or none VRS models. I've benefited from info from these forums so hopefully this will be useful to others. I am by no means an expert & I won't be able to answer all of your questions, hopefully others will chip in and can add other info as well. First of all, this is the camera that I ordered for my MY 2017 VRS (Camera A/Handle A): https://www.aliexpress.com/item/4000230897829.html?spm=a2g0s.9042311.0.0.40694c4dTEPT93 (link may no longer be valid when you read this so screenshot below) No programming is required for this camera and it supports dynamic reverse guidelines Tools: Trim removal tools would be useful, but otherwise plastic tool that won't mark your car, or screwdrivers or similar with masking tape over the end. A T20 torx head tool is required if you have a hatchback to remove the pulldown boot strap Cable rods are very useful, I couldn't have fitted through the roof lining without. Stereo removal tools unless they come with your camera kit Cable route - I went with an OEM route for my cabling, following existing cables through the roofliner and out to the back as show by the red line below. The camera: The first thing that I did was to check that the boot release switch was working on the new unit - there's no way you want to wire this in and find it is faulty. You'll need to start removing the boot trim to access it. Remove the plastic clips from the lower boot trim- this consists of a few plastic clips which easily pop out with trim remover/screwdriver. There are 8 of these on the hatchback. After that start removing the upper plastic trim, this simply requires forces to release the metal clips. You don't need to remove all of this for now, but it will all need to come off later Remove the lower upholstered trim covering the tailgate. More metal clips - work your way around. You'll also need to remove the pull down strap with the T20 torx head. When this is down you should be able to drop the boot liner which will give access to the boot release handle. This can be awkward to remove, but can be done by pushing in the clip on one on the ends whilst also pushing down on the handle from the inside (ignore the clips along its length) - it should then pop out. Repeat for the other side. Unplug the harness and plug the new handle in - check the release switch works. You can either now push the new handle in until it clips, or leave it out to test the video connection later before fitting. To wire it in Remove the glovebox (open, rock left to right whilst pulling up & you'll hear the bottom clips release. Raise the glovebox lid up and inside the housing and reach in and remove the dampening on the left hand side) Use the stereo release keys to release the multimedia unit. The kit used here comes with a replacement harness that sits between the original one and the media unit & includes the video feed cable. Some people have removed the upper glovebox section to provide more access, be careful not to unplug the airbag connector if you do this. This can be fiddly, but I found the best way was to lie on my back with my head in footwell looking up at the unit from underneath. With the media unit slid fowards this gives access to the harness. It's the large one at the bottom and there is a locking connecting that needs to be pushed backwards to release. Check how it works on your replacement harness. Unplug old harness and plug it in to one end of the new one, push the harness in to the void and plug the new connector block in to the media unit. This took me a while to get it all to fit in. When done you can now test the video feed to the rear camera before your start wiring it in permanently. I took the camera cable over the top of the fusebox cage & out through the side panel I then ran the cable up the A Pillar to the roof lining and all the way to the end. Cable rods were really useful at this point, especially to get around the B pillar , and to go from the end of the roof liner through the cable exit point behind the rubber trunking where the original boot cables are. You can also run the cable in the trim above the sill and work your way back up to the roof lining on the C pillar. When you get to the end of the roof lining you'll need to unclip the rubber gator at the top of the boot so you can get the cable out of the roof liner and in to the boot via this gator. If you install the same way as me you only need to peel the roof liner down a few cm, being careful not to deform or damage it and you'll see the OEM cables behind. Once you've got the cable this far it's a case of feeding it through the rubber gator, up the side of the boot and over to the handle; connect the video cable and tidying up any spare cable. Everything should now be up and running. Retrace your steps to refit your trim. You now have a fully working reverse camera, activated when reverse is selected and with dynamic guidelines. The parking sensor guide now shifts to the left of the screen the same as an OEM reverse camera. I will come back and re-edit this tomorrow and resize pics as it's getting late. I'll tidy up any errors as I see them so please don't jump on me straight away!


 3 points
 -
2 pointsThere are too many of these topics with no solution given. I'll try to make a difference. The EGR was the problem. Judder started when EGR opened. It disappeared at higher revs but I think the problem remained it just couldn't be felt at higher revs. The EGR was brand new but non-OEM. I got an OEM one and that solved the problem.2 points
-
Well, at 76 I do have some metal in my body, but not enough to make a half decent aerial ...2 points
-
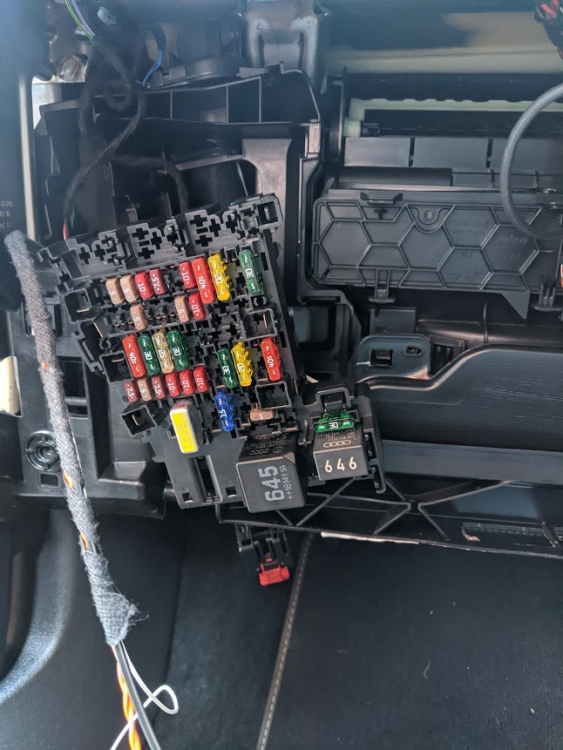
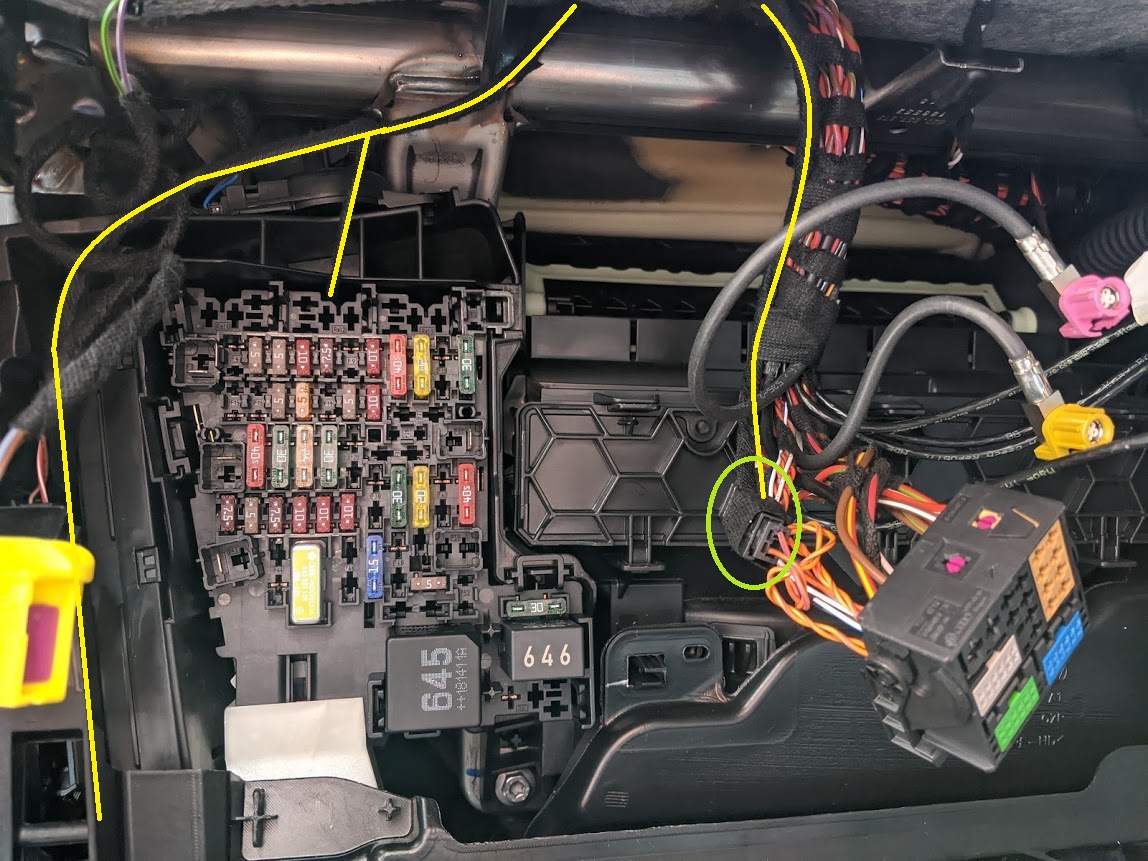
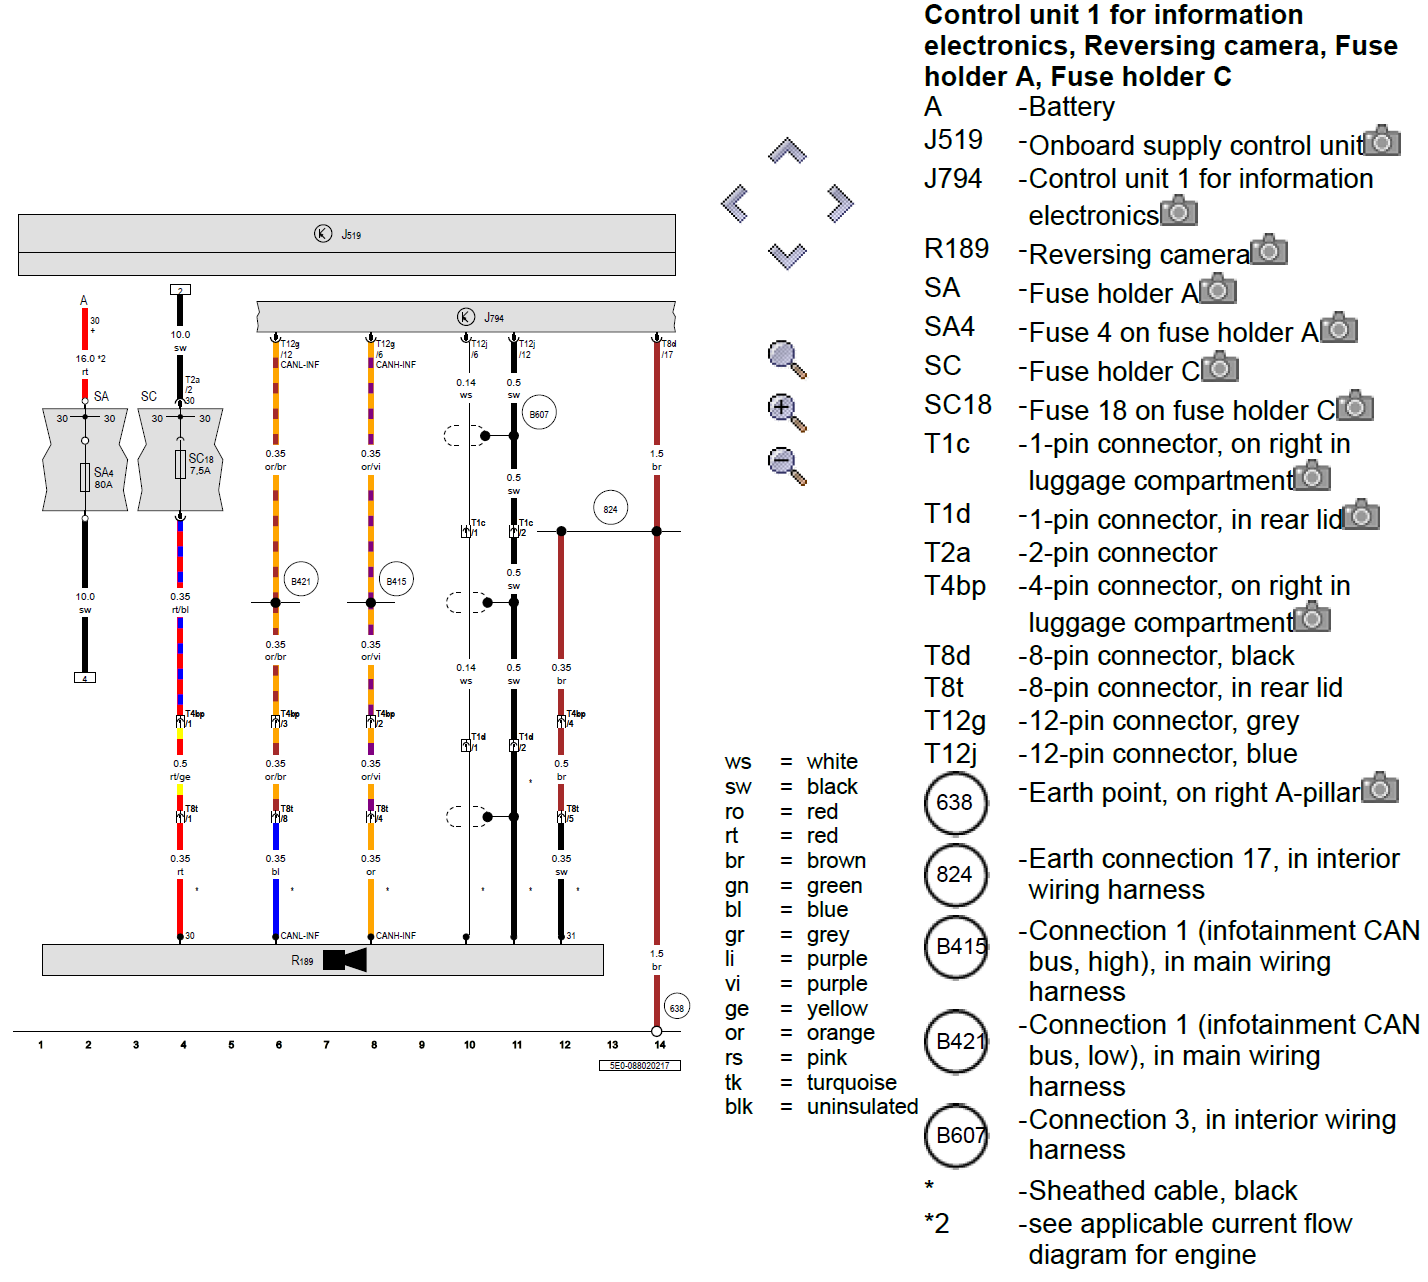
Nice guide, shame you didn't write it two days ago when I started fitting my camera As I did a few things differently, I'll add some extra info as it might help others. I used an OEM/original high camera from AiDU Auto on aliexpress. At time of writing they offered: - a highline kit for the MK3 Octavia at ~£75 - a highline kit with washer jet for a Tiguan also at ~£75 After a quick chat, they were happy to parameterise the Tiguan kit with an Octavia file so I bought the Tiguan kit. Given they were the same price/size/shape it seemed daft not to get the bonus washer jet Unfortunately, the washer jet pipe was slightly too short but I was able to remove the fittings on either end and use some PVC washer hose (4mm ID, 6mm OD) of the right length instead. I took a slightly different cable route, shown in yellow: Unlike the kit above, it's not 'plug and play' so you end up with a bunch of wires that need to be connected to the appropriate places. The cables are pre-terminated but as I already had the correct crimps, I cut them to length rather than having loads spare. Factory wiring diagram for the highline (PR-KA2) camera is as follows: The earth wire was shorter than the others so I used the earth point in the boot below the rear seatbelts: For power, I removed the fusebox and used fuse 18 as per a factory install: After trimming and terminating the wires, I ended up with this: - new wires highlighted in yellow - new connector tapping into the CAN-bus circled in light green For the CAN-bus connection, I de-pinned the original quadlock connecter and moved the two CAN-bus wires into a separate connector, this means I didn't need to cut or modify the original wiring to tap into the CAN-bus: The eagle eyed amongst you may notice I used a 5a fuse in slot 18. After a quick shopping trip, I've now replaced it with a 7.5a fuse as per the factory wiring diagram. Coding was super easy: - Address 19, add 6C to the installation list - Address 10, coding, tick byte 2 bit 4 - Address 5F, adaptions, change Car_Function_List_BAP_Gen2-VPS_0x0B to "activated" - Address 5F, adaptions, change Car_Function_List_BAP_Gen2-VPS_0x0B_msg_bus to "Infotainment data bus" All works just like a factory install with the various modes etc. As expected, the only error code currently stored is "no basic settings" so I'll need to print out a VAS6350 board and calibrate it at some point


 2 points
 -
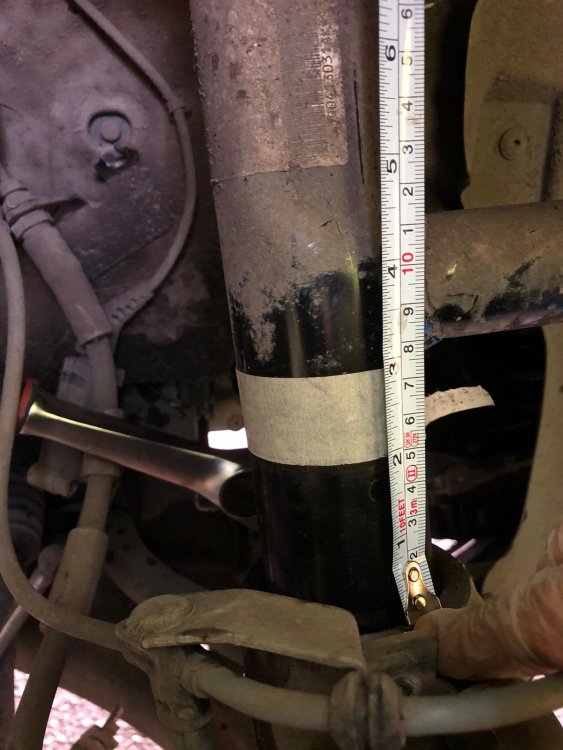
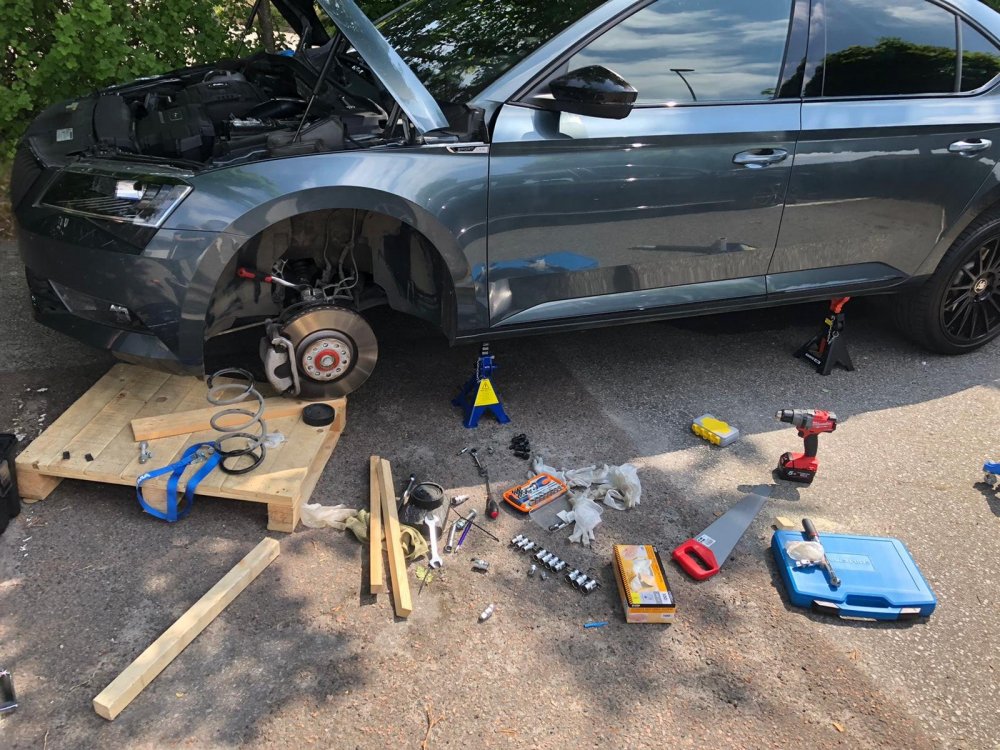
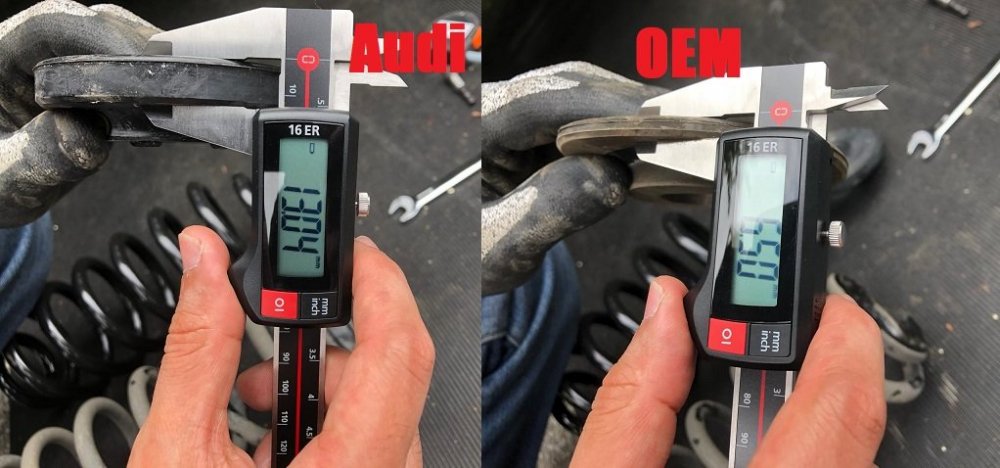
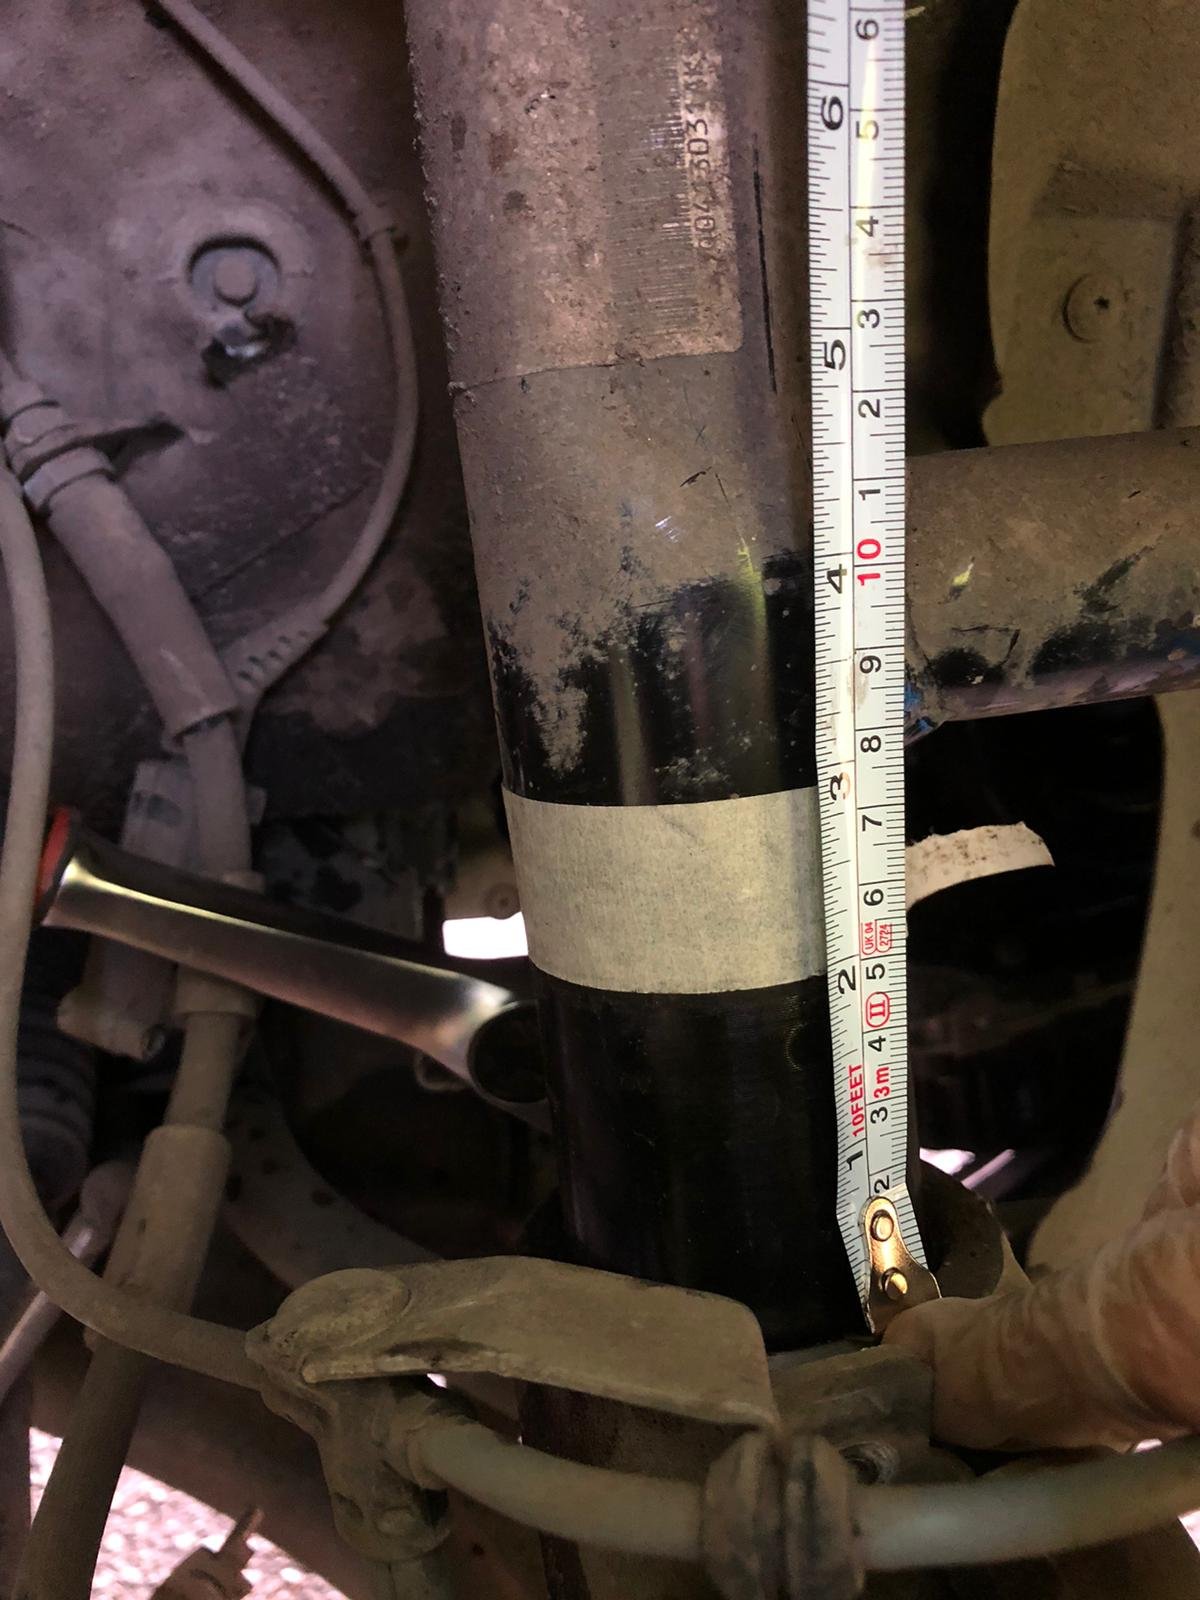
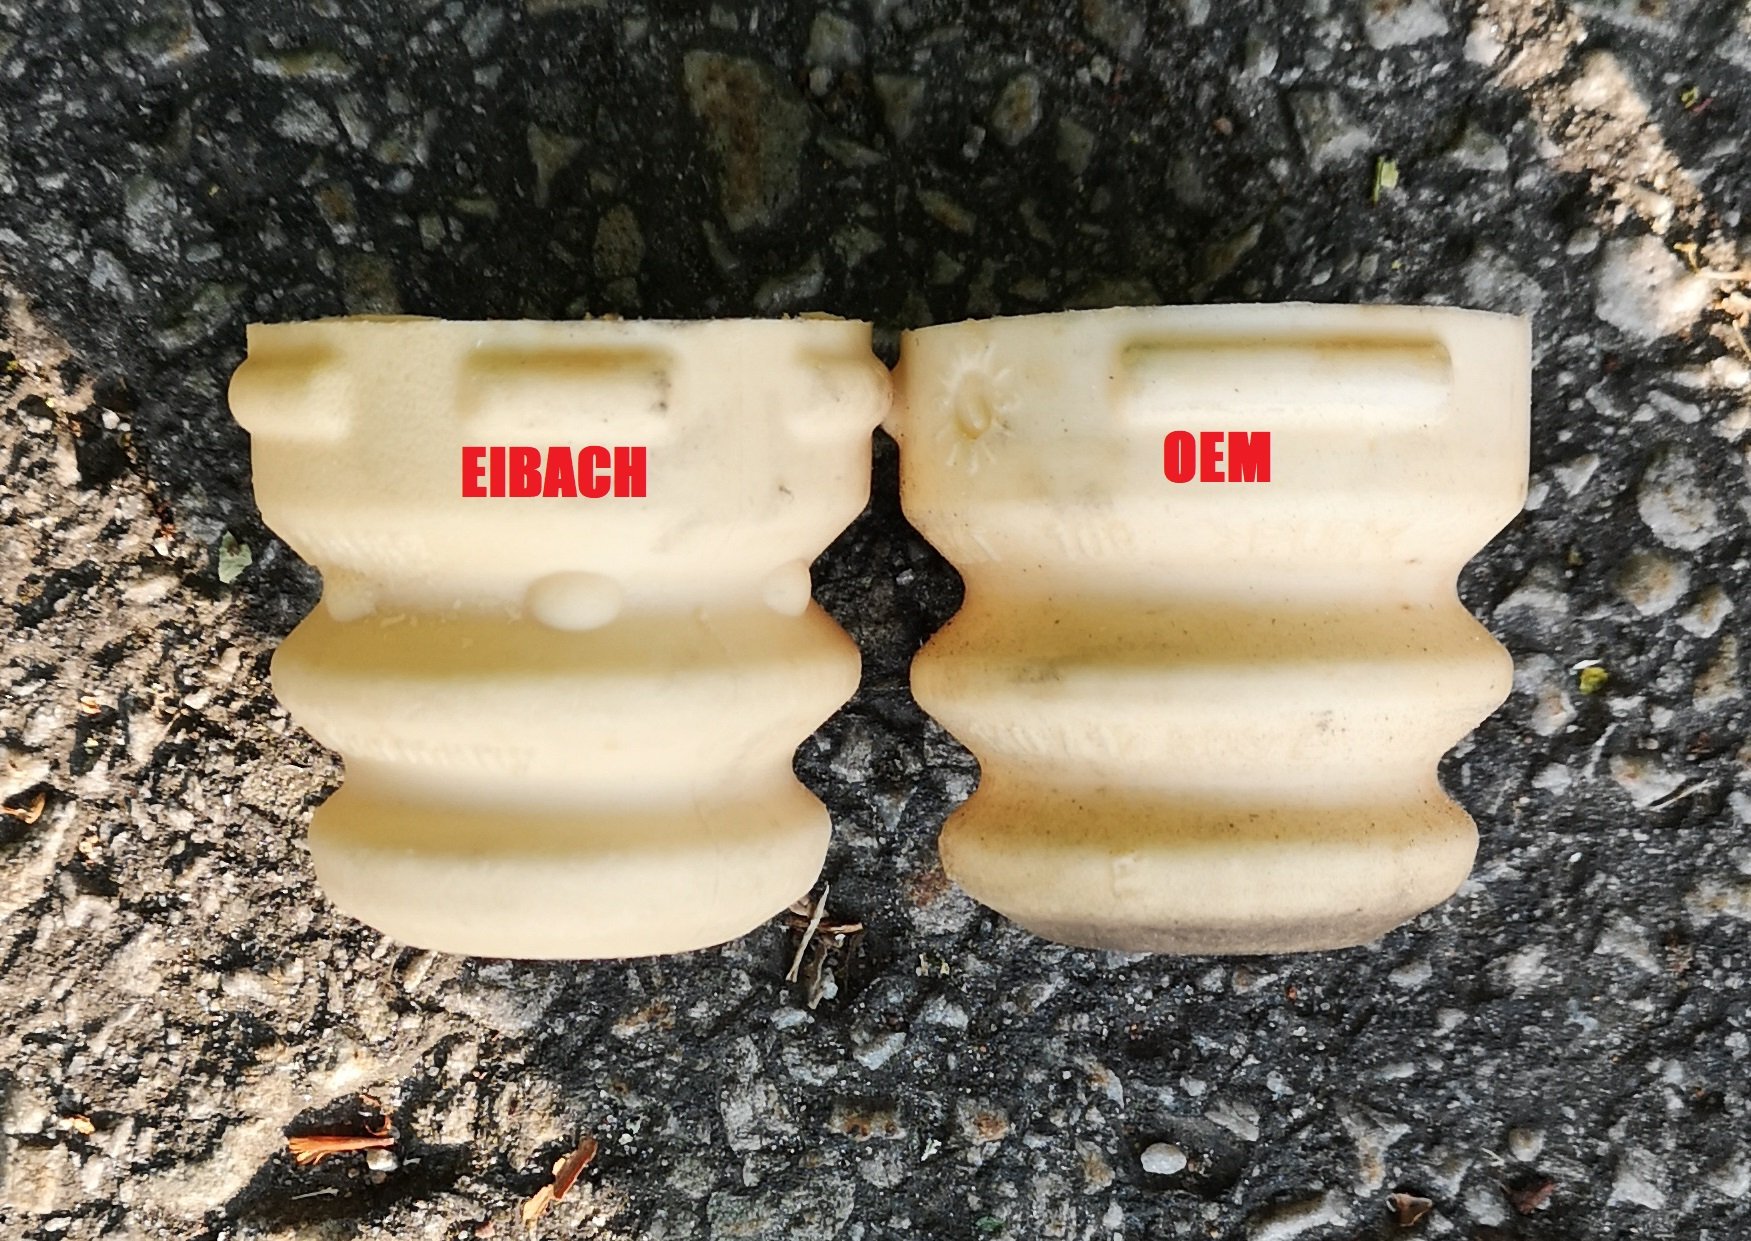
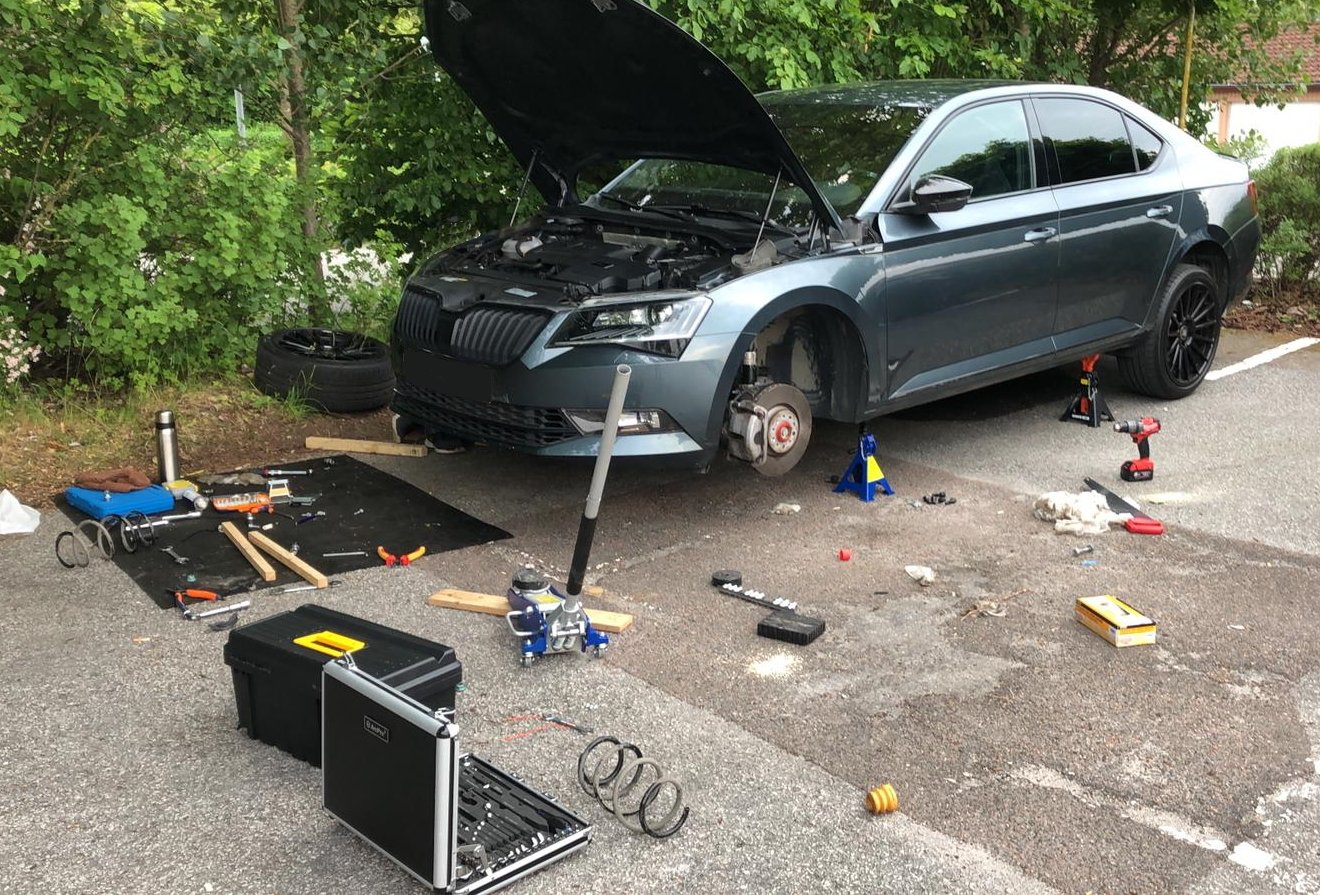
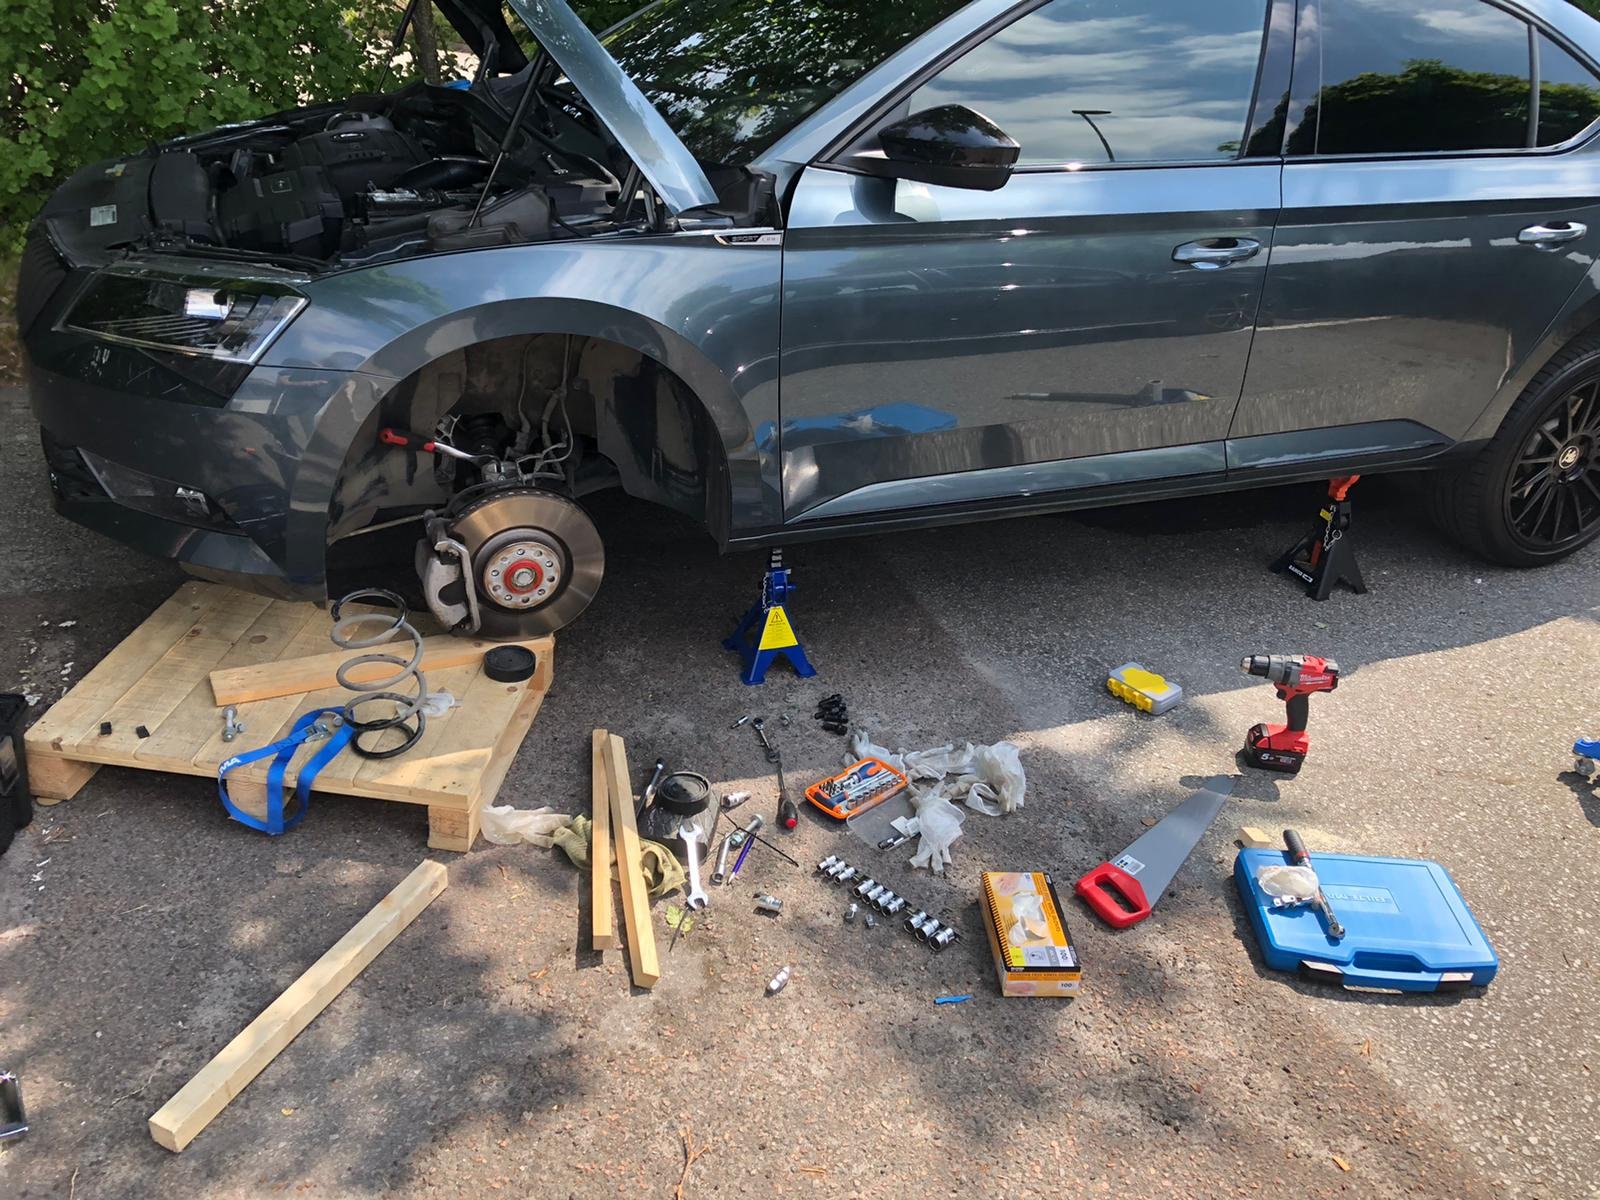
Ok so I wanted to put up a mini guide for this as all my info for this prior install came from MK7 Golf GTI's and R 's which are 95% the same but not identical. There's a few threads on the internet and YT where you can gather the big picture of the amount and type of labour involved in this job (l will link them below) and I don't plan to repeat all of it but rather build upon it with my own DIY oriented tips and findings on the 272 (280 is the same). Also because we struggled a lot at some points (probably because it was my first time messing with springs on my own) so If I could save another guy's time and trouble doing this for the first time I'd be very glad. It's a PITA job if you haven't done it before, especially if you follow the "easy" 2x4 method that seems to be so popular online like I did. As someone said it's half art half science and you have to work by feel at certain stages otherwise you might be stuck with a half removed/installed strut... It took me and a buddy that was helping me out close to 6-7hr for the two fronts but that's because we got stuck at some point, I'm pretty sure I could get them done again in 4hr max now that I know the tricks. Rears are really easy, 2hr is probably all the time you need so around 6hr in total. Getting the strut out: So the start was really easy: I removed wheel, lifted the front of the car (i did both ends to avoid working at an angle), and unscrewed the plastic leveling arm bracket, the brake line bracket on the knuckle and the DCC plug (both sides). Then I just undid the end-link nut and the triple square bolt and nut that keep the strut in place on the knuckle and ready I was for the 2x4 method. This refers to a 2x4 inch wood block, used to lift the strut up and out from the knuckle (by attaching it to the strut and jacking it up with a jack) without needing to drop the axle too low or undoing any drive shaft or ball joint bolts or brake calipets etc. It's the approach with minimum fasteners replacement so I guess that's why it's popular with the DIY-ers but retrospectively I'm not too sure it's actually quicker than removing the shaft from the knuckle, especially the first time, and especially during the re-install stage which is where we got stuck. This video shows it very well: My comments on this: * Before you start dropping the lower control arm: put some masking tape to mark the height at which the strut is seated inside the knuckle. You'll thank yourself later when it will be going in very slow and hard and you won't know how much more you should continue to drop it. Here's mine while going back in, the bottom of the mask needed to go down to the top face of the knuckle seat (50mm more at that point) * Install your spreader or 1/4" ratchet at the knuckle as shown in the vids and guides, and start wiggling the LCA via the brake disc (pull towards you and push towards the inside of the car) so that the LCA starts to drop as the spreader keeps it loose. It should do quite easily at the beginning, like 2-3cm immediately. Then reposition your spreader lower, below the strut's little tab at the back (you'll feel it blocking further drop back there) and repeat and you should have the strut out/LCA down by a total of 6-8cm (3"). The little tab will be fully ABOVE the bolt hole. Only then proceed to the 2x4" otherwise you'll need to compress the spring dangerously high. * Don't use an actual 2x4 piece (not even the guy in the vid uses one i believe), it's going to be too big for the available space. I went with a rectangular 45x45mm (1.75x1.75") piece and it worked a breeze, much easier to get in and out and position as close and as parallel as possible to the strut which is what you want in order to avoid going in at angle and end up snapping it mid-way. * Install your piece of wood as parallel and as close as possible to the strut (sorry no pic of that). Also drill as small a hole for the bolt as you can (12mm is fine, i did a 10mm and slowly "ate" a couple mill around it with the drill bit for a snug fit). That way the wood doesn't even need to lift the strut itself, it's all done via the hole and the bolt and it's still very rigid. * Now, have a friend SLOWLY jacking the wood up and keep wiggling the brake disc to help release the strut. Even with the spreader, the knuckle probably won't be that loose to simply lift the strut out by jacking so go slow and patiently. If it's not right you'll start lifting the entire LCA with the strut (and the whole car) up from the jack so back down, reposition your spreader at the top if needed, and repeat jacking and wiggling the disc. It should soon come out. * Once it does, rotate the knuckle away from the strut's axis so that it's got room to decompress once you release the jack. Then just undo the 3 small bolts at the top and the strut should drop right out. <<< STRUT OUT, that's 20% of the whole job done >>> Now on to spring removal: Videos show the GTI/R springs simply extend 1-2 cm with very little force so no spring compressors needed. The Superb however sits higher from factory, even the Sportline. I expected the release wouldn't be so light and i was right. When the last thread is out the springs decompress a couple of cm and shoot the top mount and nut a few meters forward. It's probably not going to kill you but you definitely don't want to stand in its way and trying it, it's a fiercer release than on the GTIs and Rs. Still I wouldn;t get compressors when doing it again but make sure you do as I did and have the axis of the spring clear for the release, be above it and step on it steadily and use a standard ratchet (not some sort socket) so that your hand is away from the spring's shooting path, here's a short clip of that: Re-Installation Nothing to note here, remove spring, install new spring and seat it correctly on the rubber base, use Eibach's supplied bump stops (they look identical to OEM), put back the spring bushing and top mount, ALIGN them properly by checking the alignment marks! and start screwing the top nut (you can simply compress the spring by hand for the first few mm needed. Here is where it pays to have a special 21mm pass-through socket and a 7mm Allen key as you won;t be able to put the exact amount of torque (the damper piston with the inner screw will be spinning. I didn't so I had to improvise, I tightened it up to where it felt really snug and also noticed there were installation marks from factory and I was already maybe half a turn past them so they should be good. No funny noises/clanks after anyway Once the strut is assembled again, vids say "just follow reverse order". yeah, reverse order my ar53... Notes: * DON'T tighten the 3 top mount bolts as you'll never be able to tilt the strut to the required angle to sit in the knuckle again, just a couple of threads to prevent it from dropping should be fine. * Re-insert the spreader if you removed it before, re-attach your wood to the strut, jack it up to clear the knuckle, rotate the knuckle and align the strut and knuckle as concentrically as you can by eye, then lower the jack SLOWLY so that you ensure the strut starts seating properly. Unfortunately it won't just go back in by the spring's force. First time we had a tiny small angle between strut and knuckle axes which was enough to stop anything from moving further. Moving the jack below the LCA and trying to jack it up to force the strut to drop in resulted in jacking the entire car up... After lots of swearing and re-trying we figured it out: * After the strut is in a few mm, and ONLY IF you see it;s going in straight and not at an angle, move the jack below the LCA and SLOWLY jack it up while at the same time wiggling the brake disc the same way you did for releasing, so that the strut is allowed to drop deeper every time. Re-position the spreader as you go so that you don't obstruct the tab to drop and it once it's fully in (your marking tape will tell you that without doubt) you're done. Re-tightening the bolts and connectors is straight-forward and that's 40% of the job done. The passenger side is another 40% and the rears I'd attribute a mere 10% of the total time needed for each one. A nice mess mid-way... REARS Those are probably 3x easier I'd say (actually 4x according to my time estimation above ). One leveling arm only as well as the DCC plugs το disconnect and you can start undoing the 3 bolts needed: a) end-link bolt-nut b) shock bolt-nut c) wheel bearing bolt-nut. * I'd recommend starting from the end-link on the inside and working your way out as i feel doing that last will put too much force on the end-link after everything is loose and the spring still pushing. * You will need to use your jack to align the different holes to facilitate the re-mounting as you're fighting vs the spring at that point. The arm to wheel bearing joint is a really tight fit so a screwdriver will be most probably needed to do some micro alignment for the screw to go in and out properly. >>> I opted to replace the top spring pads/bushings with the Audi TT ones (OE part number: 8J0512149 ) as suggested in some threads to avoid reverse rake. Those are ~6.5mm thicker so the rear sits 6.5mm higher. It turns out it was a wise choice as you'll see Coming back soon with photos of the end result and the handling changes


 1 point
 -
1 pointThe vag dpf app reporting 100% or 24g is not a problem... The dpf is not full of soot at this point and no immediate action is needed. Unless the car starts illuminating warning lights, the driver shouldn't need to try and cause a regen by extending their drive or any other method. Don't get me wrong, it's certainly a useful tool but if the car is healthy and behaving normally, just leave it to do its thing! It'll ask for help when it needs to...1 point
-
This is where some very nice cars head on a Sunday if not going further north to drive the A93. http://classic-car-tours.com/sunday-worship Croftamie. G63 0EU For McLaren owners in 2021. £16,995 per couple with your own car. £21,789 with a rental car. https://cars.mclaren.com/gb-en/experiences/lifestyle/mclaren-highland-drive-20211 point
-
Well all in all that was solved by resetting the ECU to factory defaults by writing value 00 to channel 00 in the engine control module. I really can't believe the ECU needs to be reset and cannot figure out but itself something has changed. But that's what really fixed the problem.1 point
-
@310golfr @gav_is_con i own OBDEleven and have already changed several of parameters, but i can't accept disabling Start-Stop completely - for my taste, by default OFF, but still possible on demand1 point
-
Wires are usually the first thing to need checking as they often snap inside the door wiring loom.1 point
-
Saw a convoy of 6 McLarens (no idea what model) of at least 5 different colours going up the A1 this afternoon1 point
-
1 pointFit them whichever way round works, it really doesn't matter from an engineering perspective.1 point
-
Ok that explains the lower rear end because springs are not typically wearing out even after 5 (or more years). I see what you're after but with a quick check, the difference in the load rating of the rear springs between the FWD 220 and AWD 280/272 seems to be only 3kg according to Eibach's catalog, which begs the question why even bother with a different part number to begin with, but after my story with the wrong part in their PDF catalog better to double check with them directly. I will definitely go B6 Damptronic if/when my DCC shocks die (or even earlier... I am a sucker for good handling) PS. Do you want my Sportline springs maybe?! I have them sitting at my garage and they are definitely never going back on... I doubt that they are any firmer than L&K springs though although I haven't cross-checked part numbers. If you do and find out they are firmer let me know.1 point
-
1 point
-
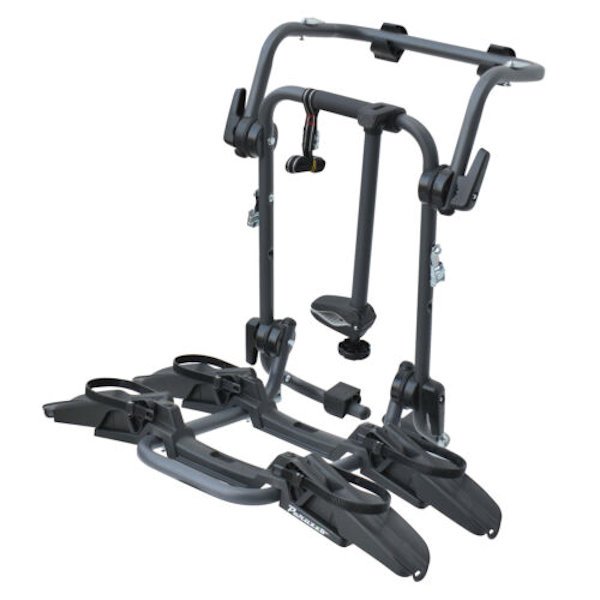
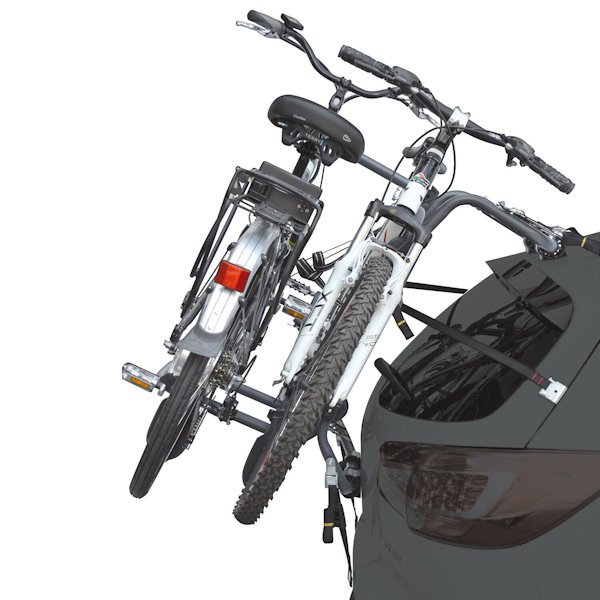
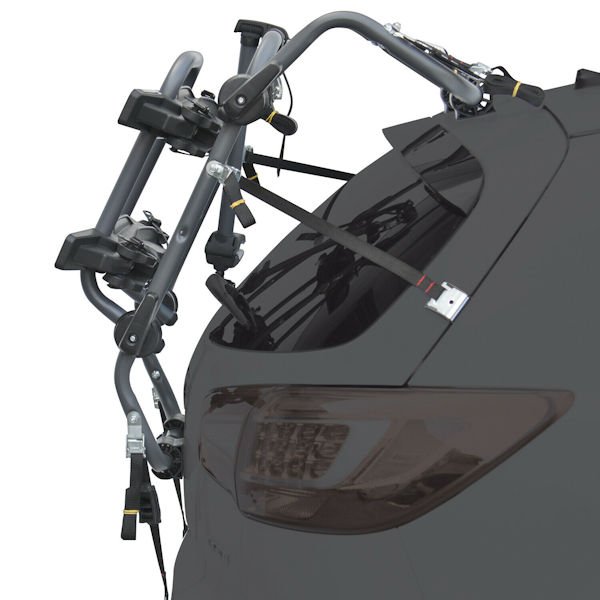
1 pointHey both, I have cleared out the scuttle and am waiting to see if that worked. Had some mad weather last night so I guess it did the job - have also been running the heating / AC to make sure it wasn’t that. Filter got a clean down also thanks for the tip! here is a great video for removal that I used1 point1 pointLooking at that rack on this video, it seems you may need a light board?1 pointThe old drive Yetis, the young drive Fabias, - simples!1 point1 pointI am fully in agreement with PetrolDave and ScoutCJB on their opinion of the P Zeros. Had them on from new, but when I mapped my car, changed all four for the Michelin PS4S. The P Zeros could not handle the grip on my car when it was standard in the wet, so with the mapped 329bhp, I knew I needed something with far more grip. Extremely happy with the Michelins. Never had any sawtooth problems with the P Zeros though.1 pointThe VAG Group's market strategy has always been a spread of offerings from lower cost lower margin to higher cost higher margin. Audi has been the flagship marque with all the toys and (allegedly) flashy looks, followed by VW as the "sensible" or "family" brand, then Seat as the "young person's" brand and Skoda as the "economical, reliable but not flashy" brand. Various things have happened that probably come under the "laws of unintended consequences" for VAG, including changing reliability figures putting Skoda above Seat above VW and way above Audi, the "dieselgate" scandal which has hit Audi and VW brands hard, harder economic times making buyers more concerned about value for money than bling and the outright success of the Skoda and Seat brands themselves. VAG accountants are looking hard at Margin Return (ie, how much profit they get to keep from selling a vehicle) and MR for Audi especially and VW is being reduced by market pressure on selling prices and the cost of after sales support (reliability). A major influence in the car sales market is fleets, where fleet managers are looking harder and harder at the cost of ownership - and the likes of Skoda are coming out well. Skoda's own "blinging up" of its offerings is making them more attractive to fleet car drivers which also adds to the pressure. Then of course there's the EV shift, which is adding further buggerance to the market. Despite the public image VAG likes to portray of everyone working together in harmony stories from insiders tell of bitter battles between the boardrooms of the various marques who are fighting for prominence, and I expect this will continue until the markets get past the shakeout that's gathering pace now - EVs, Covid, economic downturn, decline of the US empire, rise of European influence and the rise of the Chinese Empire. It's going to be an "interesting" ride ...1 pointThat's 'cos your body then acts as a big aerial to transmit the signal from the fob in one hand to the door in the other... However, the best method I've found is place the transmitter on your chin and press the button...1 pointBuy an hour on Skoda ErWin and use your vin. Download the correct manuals for your vin. You are looking for the section "Axles_steering" Section 2 Axle alignment. It has the figures, but more importantly, the correct adjusting methods. If your car has adaptive cruise, assist etc then the later sections cover that but beware that doing an alignment of the camera and radar is a job that needs specialist equipment for these to continue working after certain adjustments have been done to the car.1 point1 pointThank you, all I got through google was the predictable Men in black I and II. Steve1 point1 pointGetting back to the OP. Rear mounted, no tow hitch, suitable for bikes without crossbar. Peruzzo Pure Instinct Rear Car Boot Cycle Carrier 2 Bike Rack Holder Bicycle- less than £130 and no need for light bar as number plates and light clusters are not obscured. Seems to fit the bill, it also fits my Yeti. Thanks
 1 point1 pointThe filter is a plastic mesh on the fifth generation Haldex. Volvo have a part number for it but it just needs to be 'washed' clean. This is a still from the video the garage sent me.
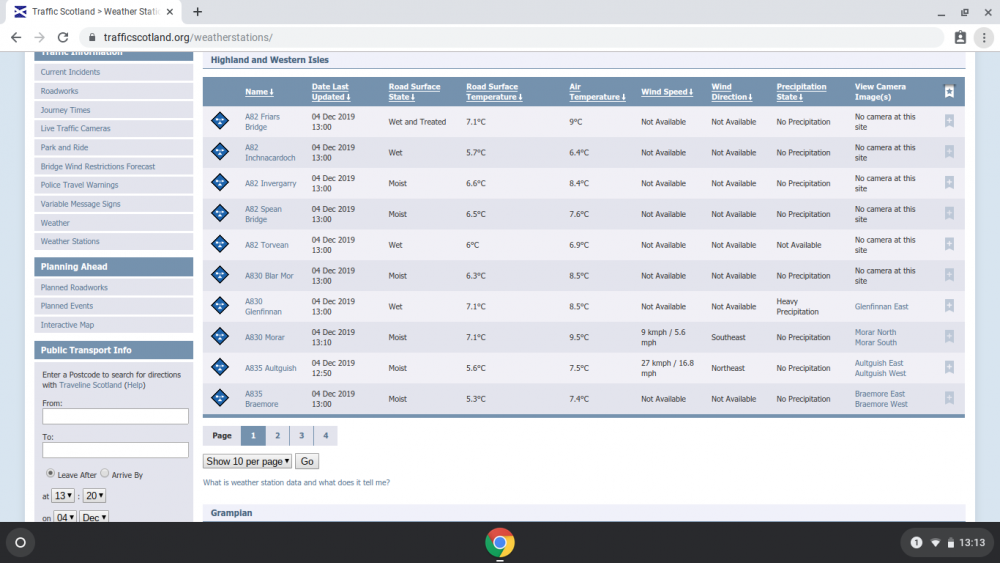
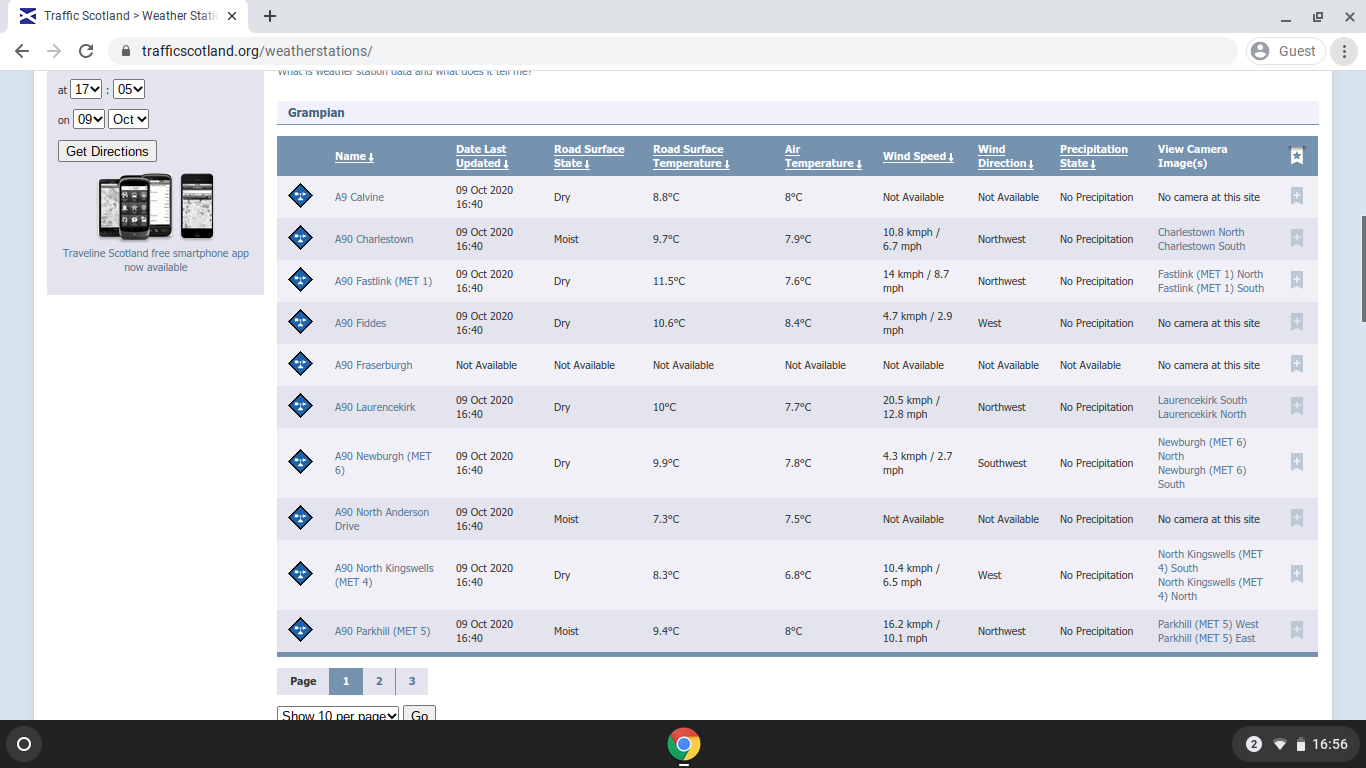
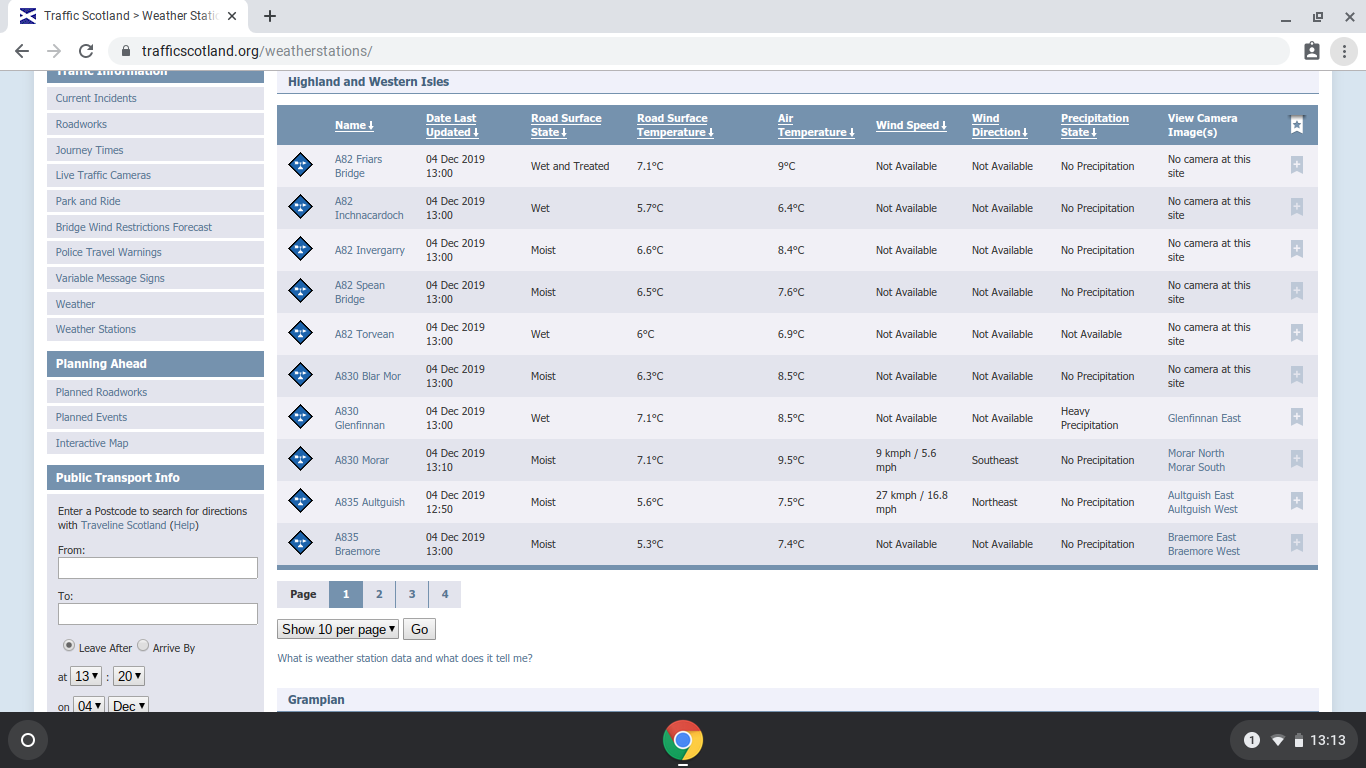
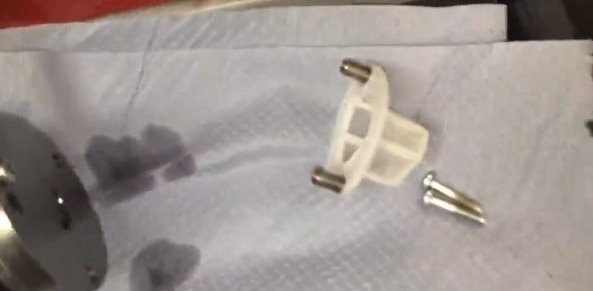 1 pointYeah the Audi pads seem to work well, especially when lowered. It's weird for the rear to be lower on a stock car though, mine was around 5mm higher than the front when I was stock but if it works for you then great! For "stiffer but not lower" I would suggest you consider upgrading dampers, not springs. The B6 Damptronic that recently became available for the Superb are the cheapest DCC compatible dampers I am aware of that would also work with stock springs while seriously upgrading the ride. Plus there are no aftermarket springs that are stiffer but not lower.1 point1 pointWe were in heavy traffic a couple of weeks ago on the M5 in Somerset and with ACC set to 20mph in Eco mode on the DSG wife was amazed how the car kept crawling forward following the Audi and braking to a halt as it stopped with my only input to keep it in lane with the steering wheel.1 point1 pointDid you ever try the old A74. Officially Britain's most dangerous trunk road. Horrendous narrow dual carriageway, with awful standing water and old style T junctions to join it. The long needed replacement motorway North from the M6 must have saved countless lives.1 point1 pointI checked. Bernd won the '36 Eifellrennen ( Gemany's second GP) in fog, some 40 seconds a lap faster than anyone else, and the same year won the German GP by 4 minutes. Stewart also won by 4 minutes in foul weather in '681 point1 pointThe Gen 6 Haldex will be first fitted to the Mk8 Golf. It's not relevant to Yetis of any age.1 point1 pointYou could replace it as it is just screwed on, but, normally, a clean will make it as new. My garage videoed it after cleaning, but not before !!!! Grrrr!1 pointThis is more like Offroad in the UK. The thing with many offroad courses is they show going through dirty water with solid underwheels ground, when you want to see having to go into and through and out of mud. Sucking you in mud. Articulation and ground clearance are another matter. If a vehicle lets you disconnect the sway bar it is a pretty good idea to do it, like you can on the Jeep.....1 pointYou can probably get an aftermarket one for around £40 or an OEM one for around £75. You might want to take a look at the thread in the Octavia section as both styles are shown:1 pointSimple weather factoids concerning driving. When you listen to the weather people you might well hear the temps in towns and cities. Towns and cities tend to be where the weather is not at it's severest. Like near water, sea, rivers, lochs. Apart from a few places you build, villages, towns and cities & airports where the weather is generally warmer and least prone to fog or freezing fog. Then they give the Air Temp, that is taken about 2 meters above the ground. So you want the 'Grass Frost', or Ground temp. That is what the tyres are driving on, the ground / road. The Grass Temp / Ground Temp might be 5 or 5 degrees C below the Air Temp. & the Road temp even lower when measured by a sensor. Hence you put down salt at around 6*oC when there is moisture there to have turned to brine. Black ice might occur on roads when the air temp is above freezing temperatures given by the weather people or even 'Ambient Temp Sensors' on vehicles. As the sun goes down it may not take long for the road temp to go below the air temp by quite a few degrees. With a frost the road can stay at a low temp when the daylight / sunrise has happened. A shaded part of the road still moist from the day or night before can be where the Black Ice will form even if the air temp near is high. The season is changing now in many areas. Fiddes just above Stonehaven on the A90 will have some of the lowest 'recorded' road temps quite often in winter without having the lowest air temps. Bottom an example from l lunch time December 2019.
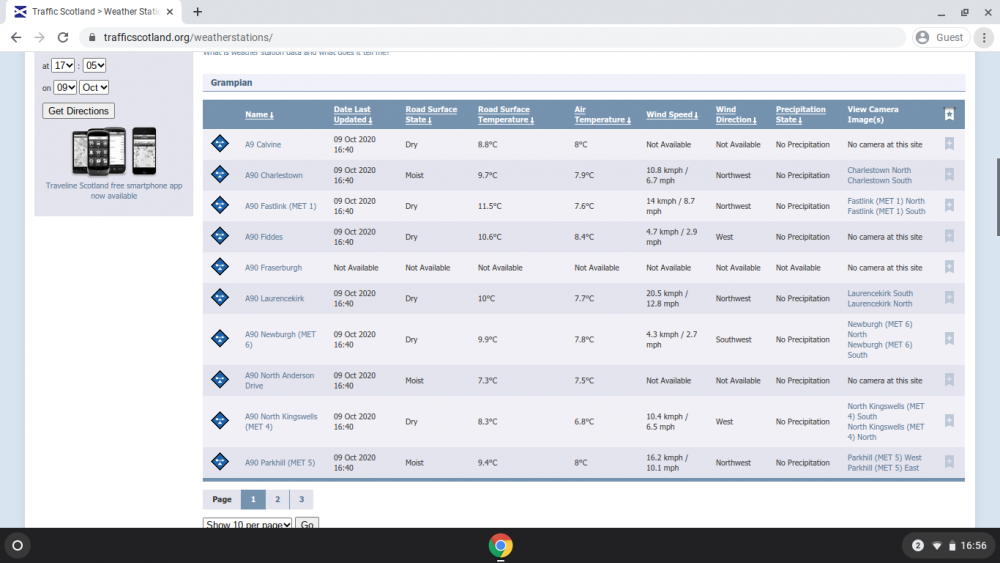
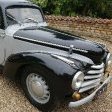
 1 point1 pointTreated the wagon to some new tyres The Eagle F1 Asymmetrics that were originally on the R360 wheels when I bought them were almost 4 years old. I'd noticed the grip levels getting steadily worse, and the car was getting a bit noisier on rougher road surfaces too so I jumped on a cashback offer from Michelin - £100 off a full set of 19s. Michelin Pilot Sport 4S (235/35/R19) I can happily report that what everyone says about them is true - they're epic. Grip levels are just astounding, they're about 50% quieter and to top it all off the ride quality has improved thanks to Michelin introducing softer sidewalls. Well pleased!1 point1 pointHave a look on Aliexpress or Etsy, both are quite good for finding odd things. Type carefully though as you maybe offered something quite unusual or unexpected. 😂😳1 pointCan I add on this topic with mine? Arrived 2 days ago...1 point1 point1 point1 pointQuick update on this, she due to go to JK Classics in Lincoln for a full nut and bolt rebuild at christmas/new year with some sympathetic and modern upgrades. fuel cell in the boot disguised to look like a picnic hamper, alternator upgrade and various concessions to safety, all hidden from view to maintain the factory look of the engine bay and interior. once she's done, she will be driven on a regular basis (need to get my money's worth. Having spent a long time here talking to the guys while they fixed the fuel leak on my Wartburg Volkspolizei car, I'm confident they'll do a great job. https://www.jkclassics.co.uk/1 point1 pointnice results, ive got a neglected fabia vrs which will most likely end up getting the sills done, im half tempted to get rid of my current car and get the fabia back on the road1 pointWell in the past 5-7 years they’ve had a bit of a ‘rags to riches’ story, it’s unfortunate to see Volkswagen’s directive to ‘put them back in their place’ in my opinion. Of course many people here will disagree, but ŠKODA’s rising popularity especially outside of Europe has been because of their increase in premium features and perceived value for people coming from outside the brand. Most people new to the brand have been cross-shopping brands like VW Volvo and Peugeot, not Dacia. Unfortunately ŠKODA’s rise in popularity has come at the cost of the “golden child’s” sales so VW have to protect them by neutering ŠKODA.0 points0 pointsIs the green 'P' plate for the pram's occupant, or the pram's driver?0 points


(Small).thumb.jpg.ce1b03a69ca84522c71907ee99b42836.jpg)


Important Information
Welcome to BRISKODA. Please note the following important links Terms of Use. We have a comprehensive Privacy Policy. We have placed cookies on your device to help make this website better. You can adjust your cookie settings, otherwise we'll assume you're okay to continue.