Leaderboard
-
J.R.
Resident Member14Points15,266Posts -
Breezy_Pete
Sponsor12Points24,199Posts -
Westbury63
Members11Points1,199Posts -
.jpg.1006585dfe4e2977315b67c3d642e37b.jpg)
Guest_
FREEDOM9Points83,824Posts


Popular Content
Showing content with the highest reputation on 05/01/21 in all areas
-
4 pointsWhat on earth are you talking about? I certainly need a translation for this posting. As has been said I was trying to help and I had directly answered your question - My question is why my car fails to tell me when it needs a whopping big hot FART ? I dont think the country that you or I drive our cars in has any relevance to your request, the journey profile will.4 points
-
3 pointsIf the coolant temperature gauge is above 90'C, I'd say you have a problem. The gauge doesn't tell you the true temperature so any time it's above 90'C means something is wrong unless you're putting massive load on the engine for a sustained period of time. Seems very unlikely in or around Crouch End during Winter to produce that kind of load. A DPF issue shouldn't cause three warning lights immediately, first you should get a single 'DPF' light showing. At this point you should do a regeneration drive (not a flogging), as described in the owners manual. If you never had only the DPF light showing, then you may have another problem. You also mention a DPF sensor over voltage? That could cause DPF issues too although you've not mentioned which sensor. Might be worth finding a VAG/Skoda specialist who knows about DPF systems to check the car over. Certainly feels like the DPF blockage is a symptom of an actual problem rather than just London driving.3 points
-
3 pointsI'm interested in this post, but I'm mystified as to why you chose to lay into member J.R.... He was only trying to help? No?3 points
-
Agreed. 280/272 is way to go if you want a petrol & don't plan to do mega mileage - life's too short! My 280 L&K is the first 4WD car I've had & is so planted. Even now with 360bhp I can't spin the wheels in the dry & even in the wet it's nigh on impossible to loose traction if you have to drive "smartly". Only downside is the fuel consumption & the fact that it drinks from the 99RON pump. What the hell, I'm not doing much mileage at present & fuel prices are the lowest they've been for a while. The grin factor is worth it.3 points
-
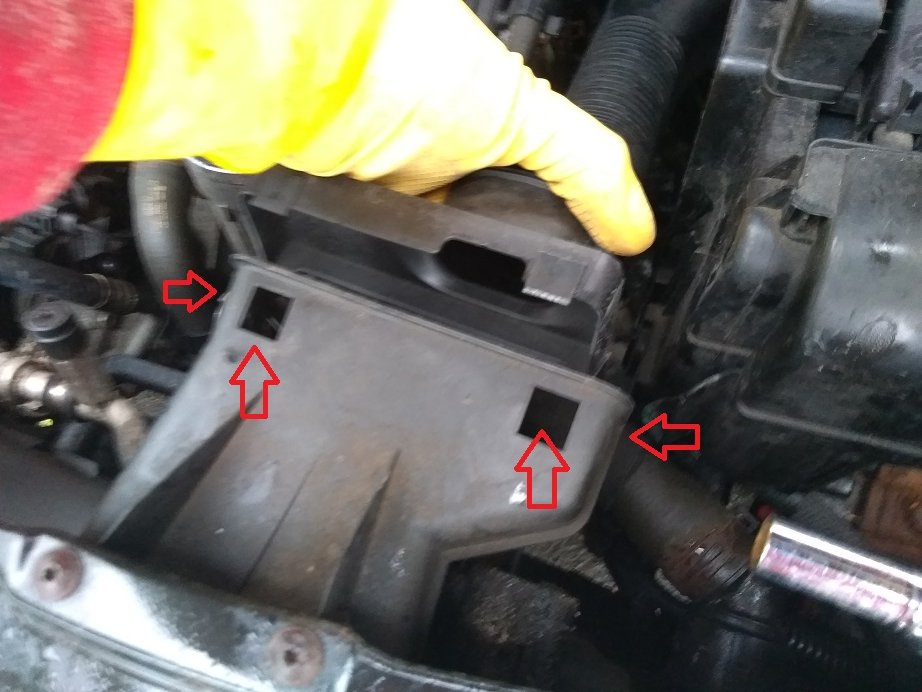
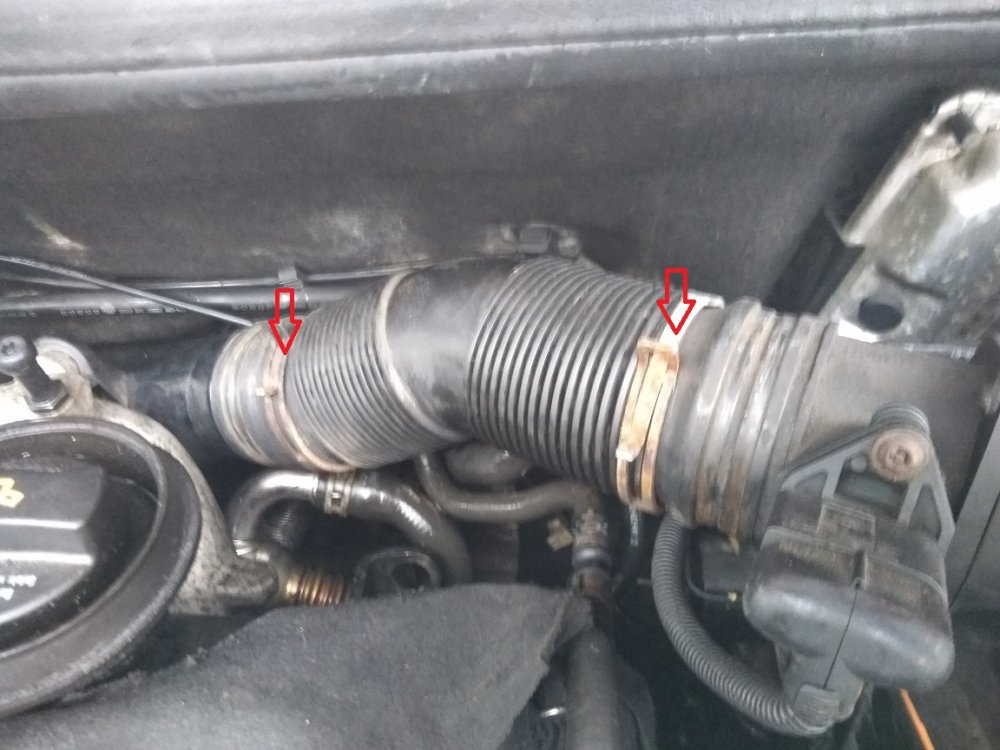
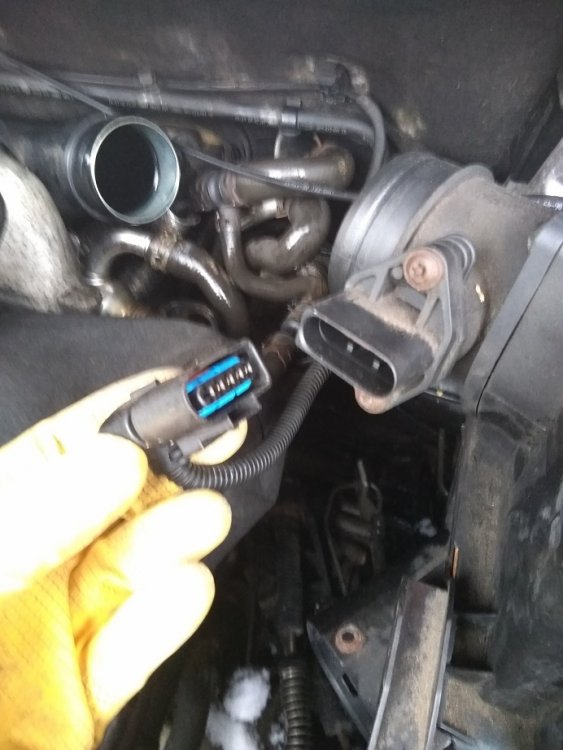
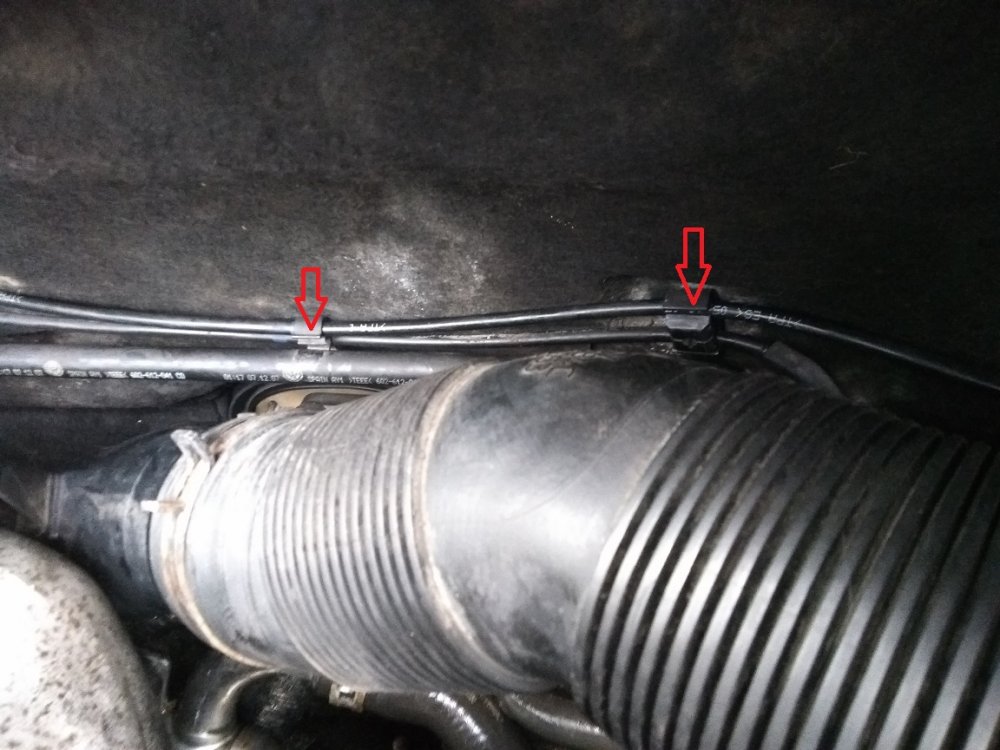
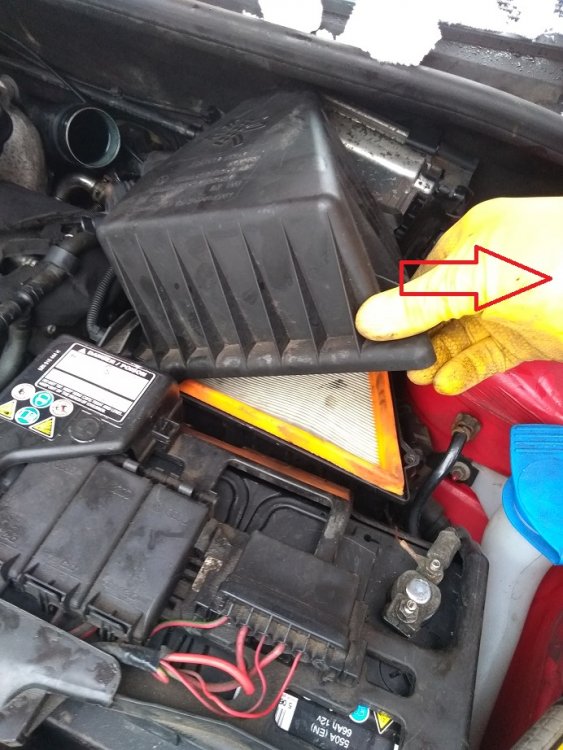
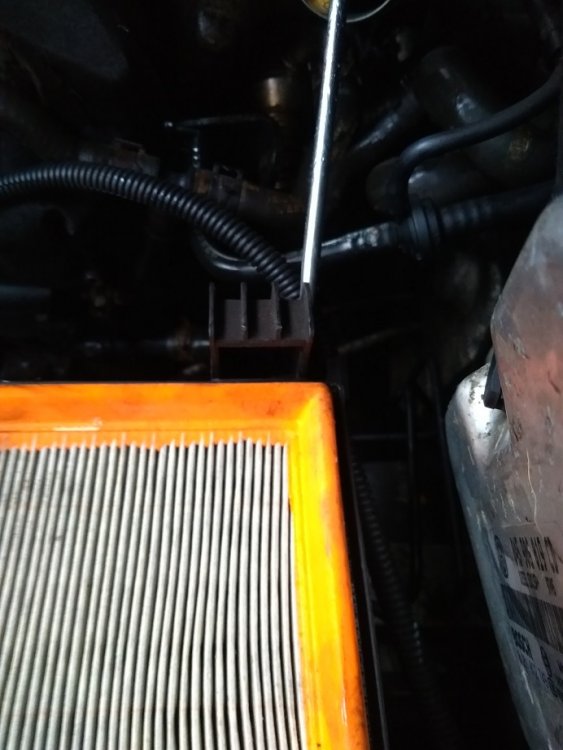
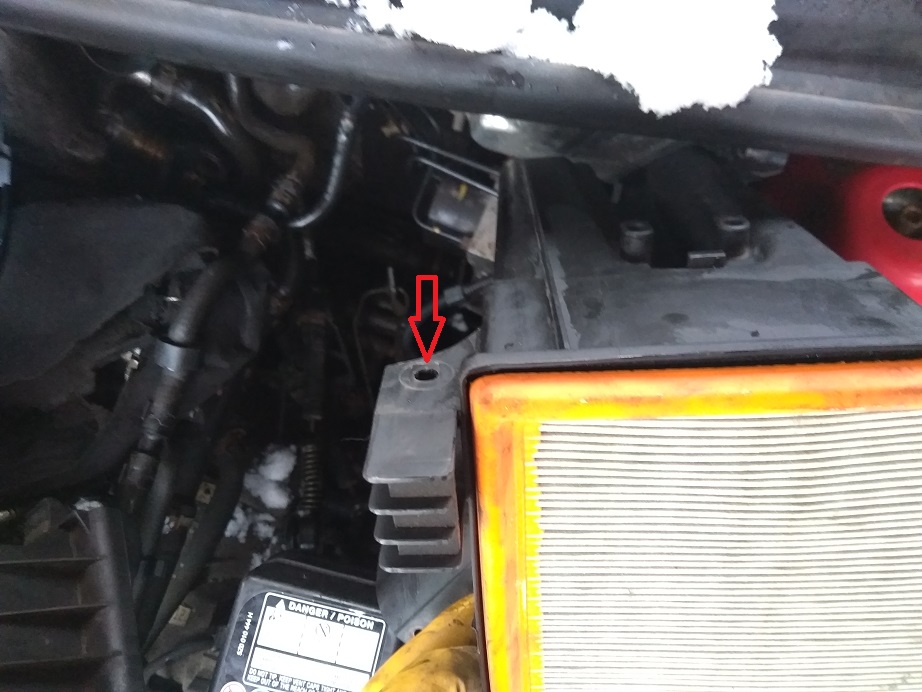
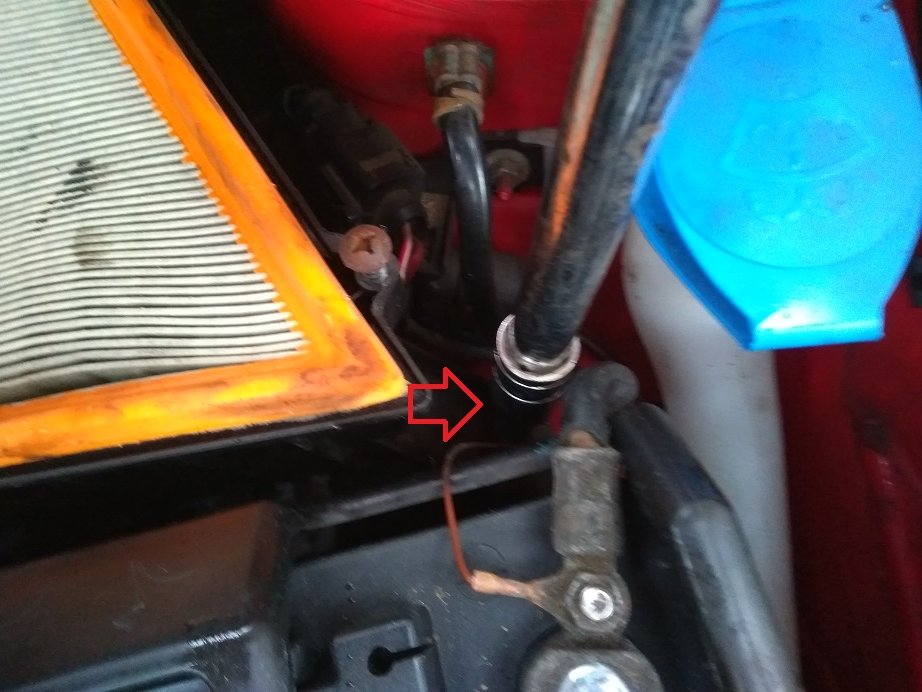
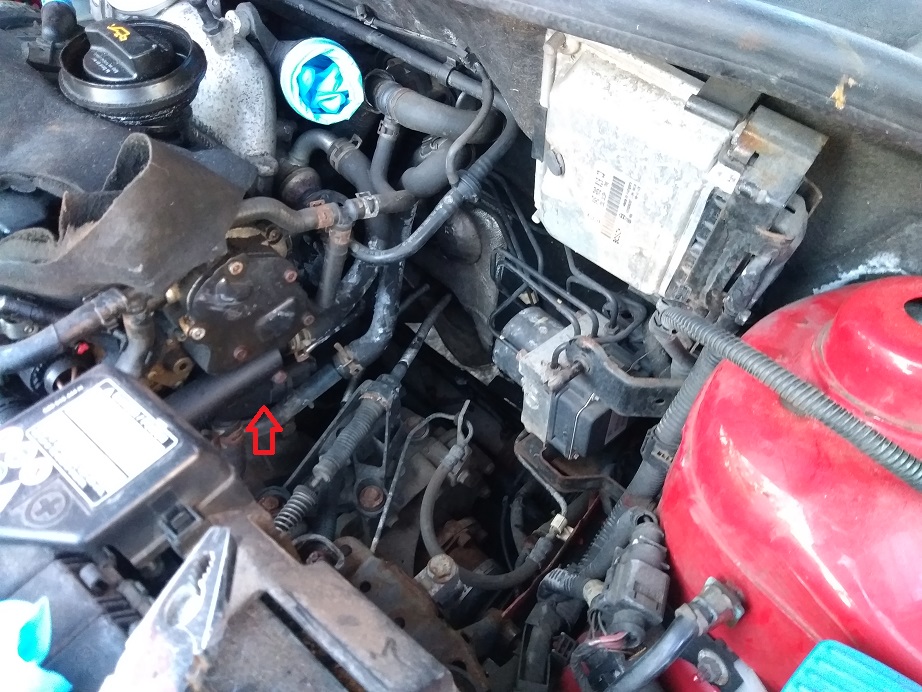
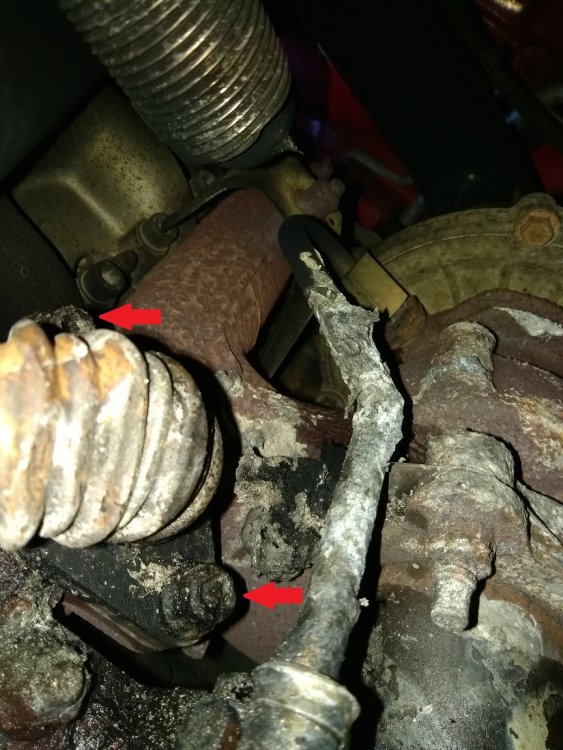
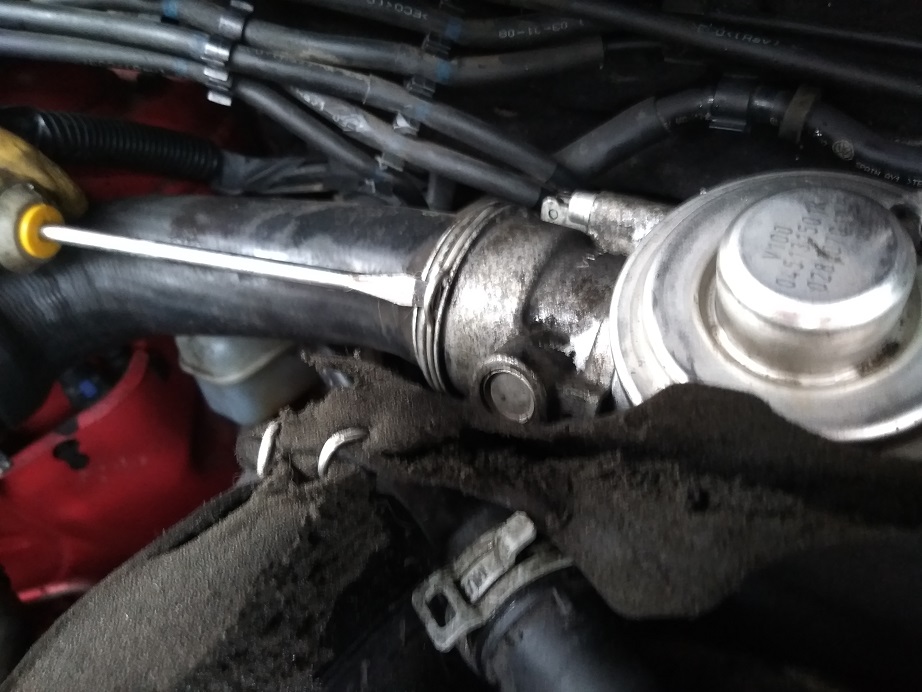
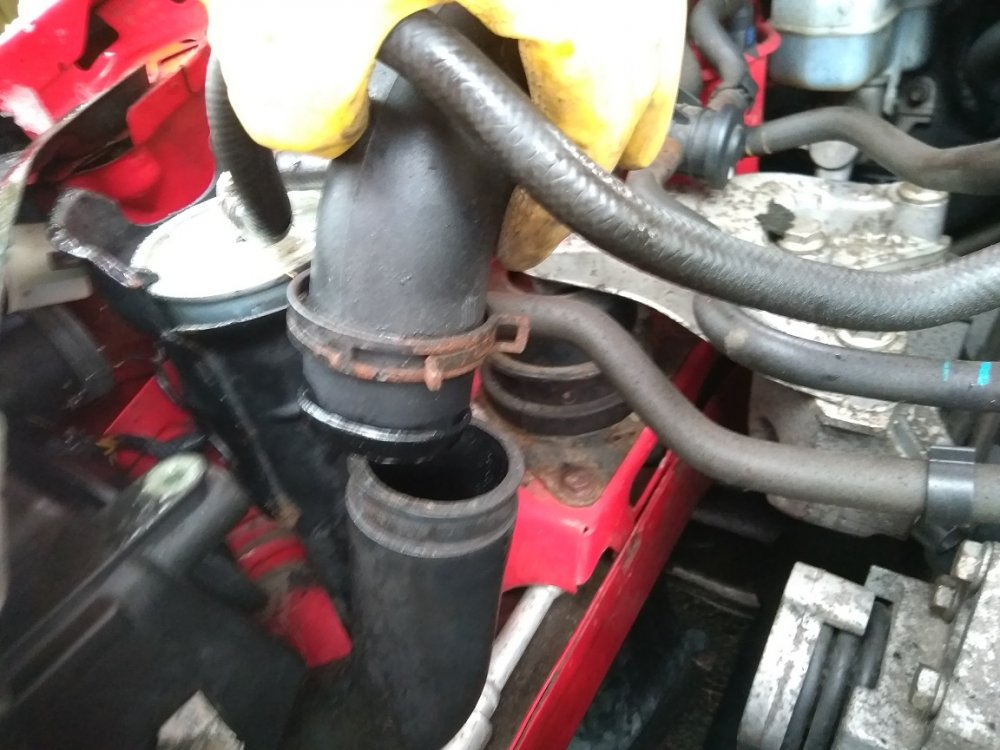
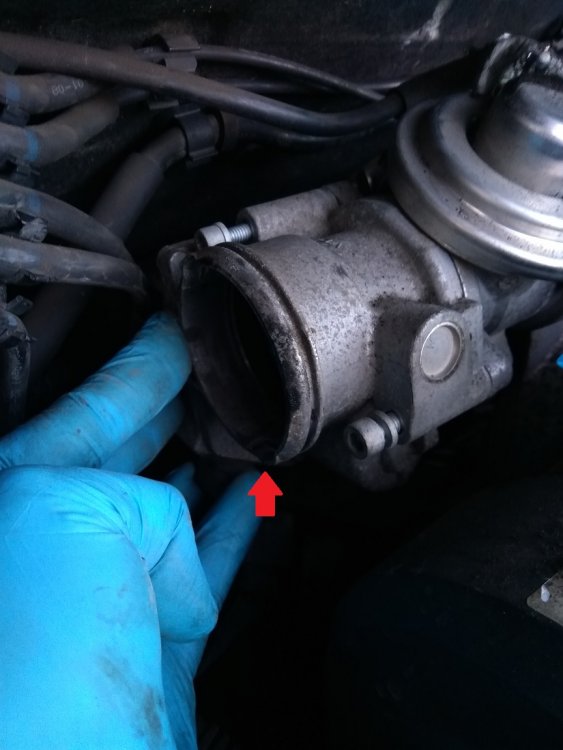
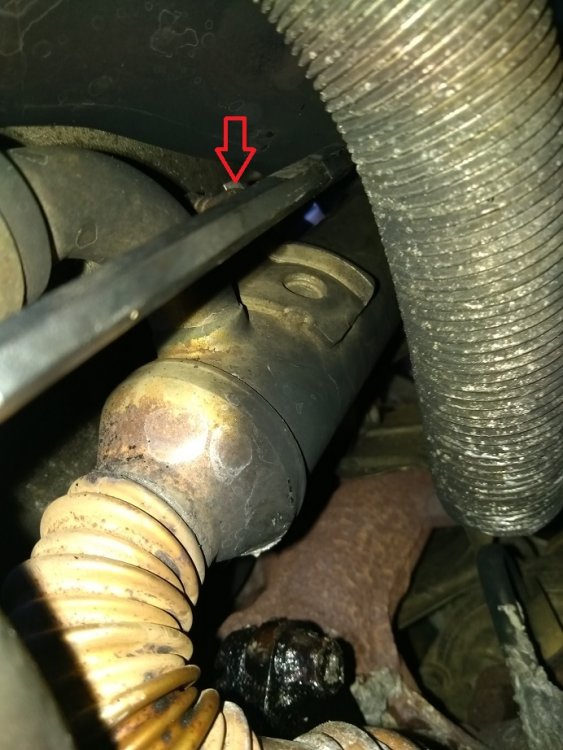
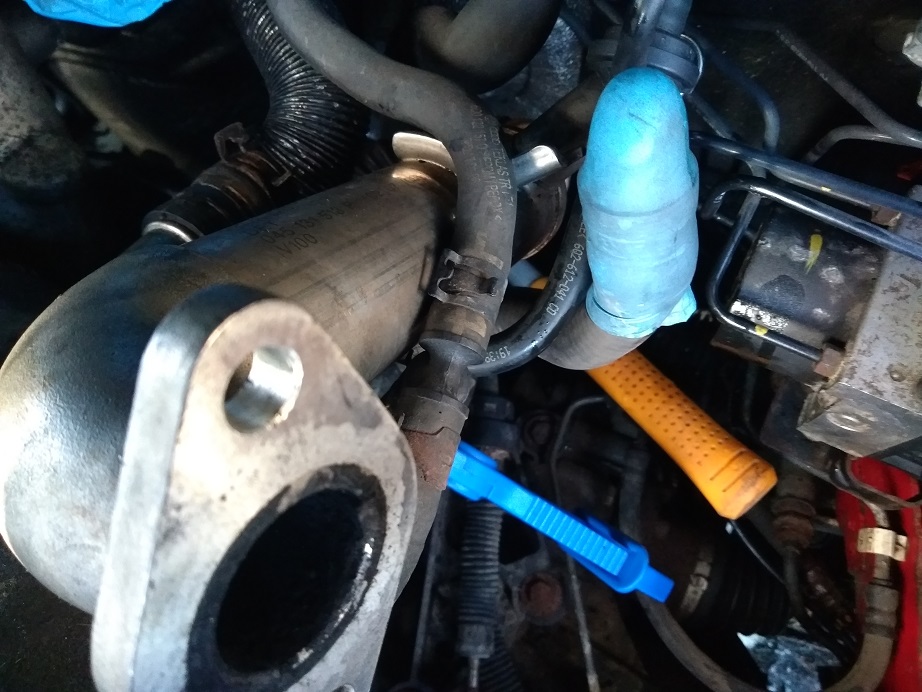
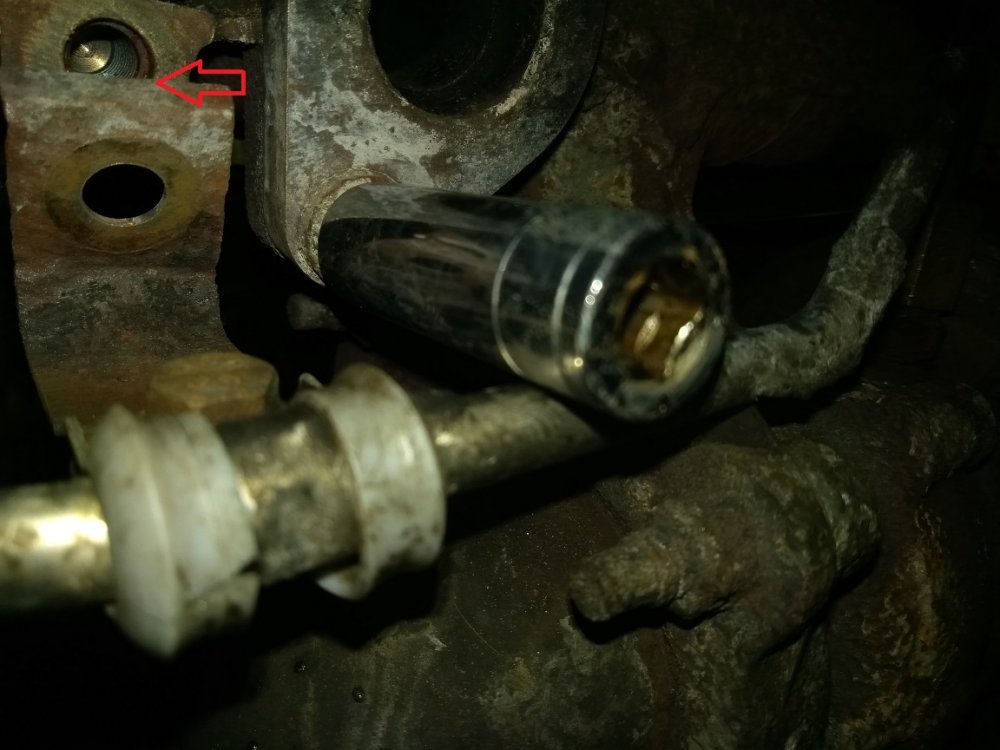
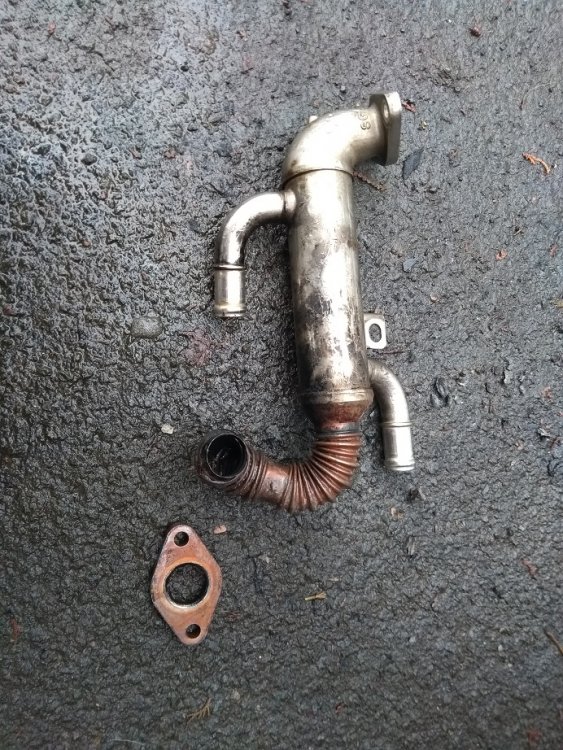
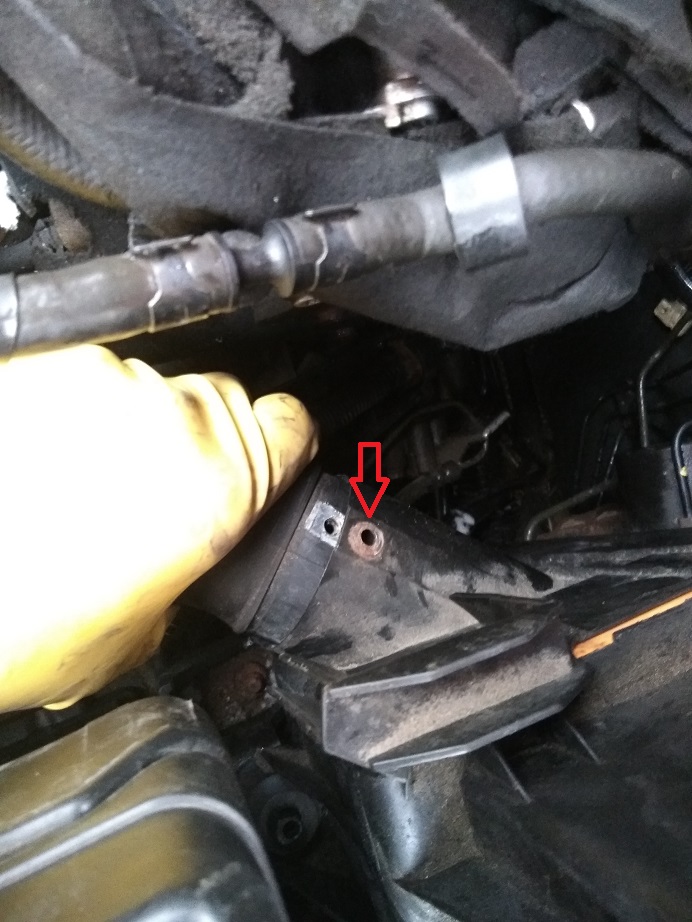
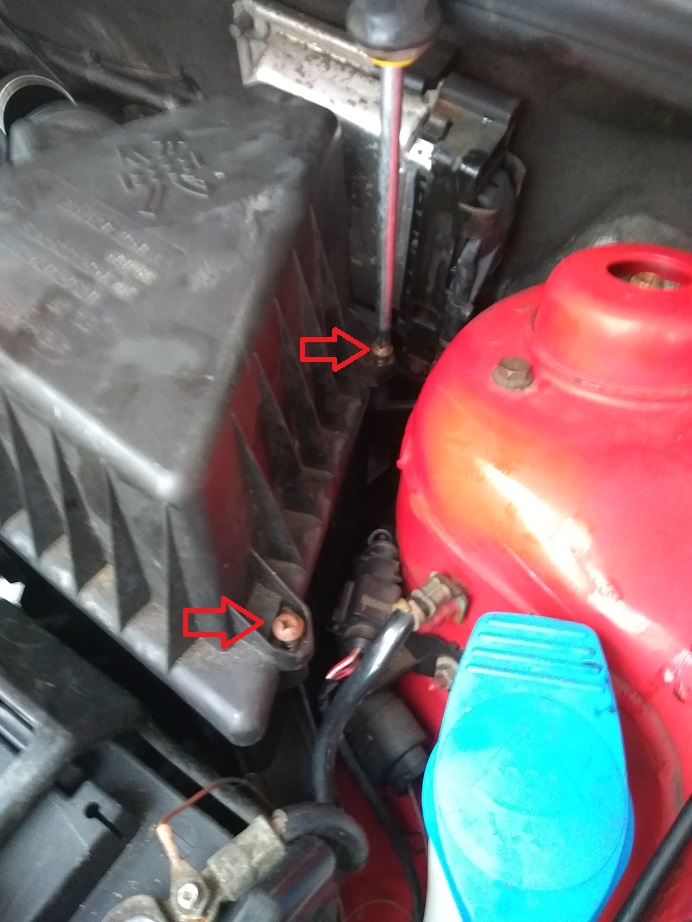
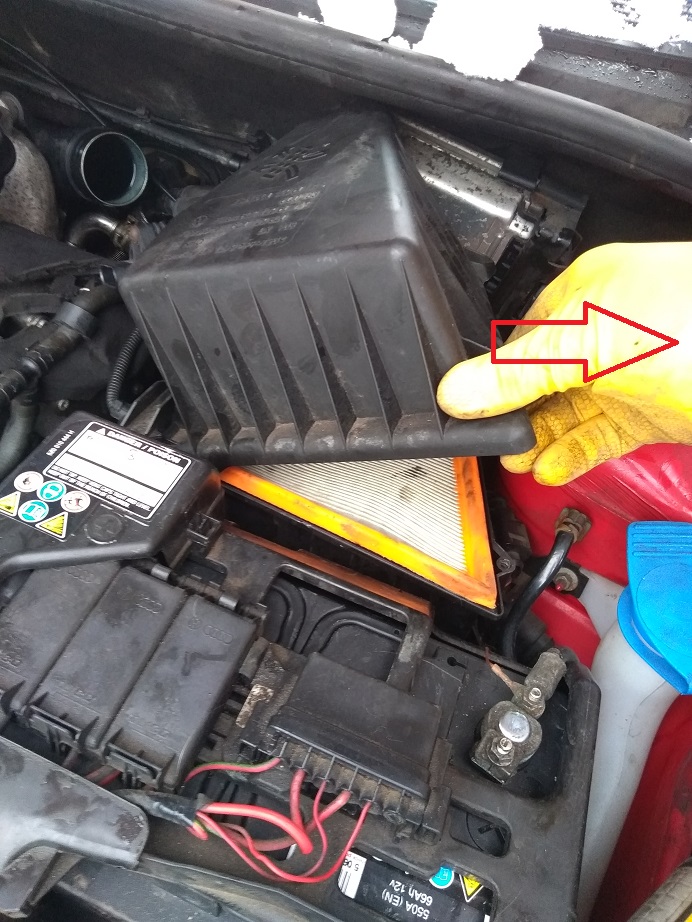
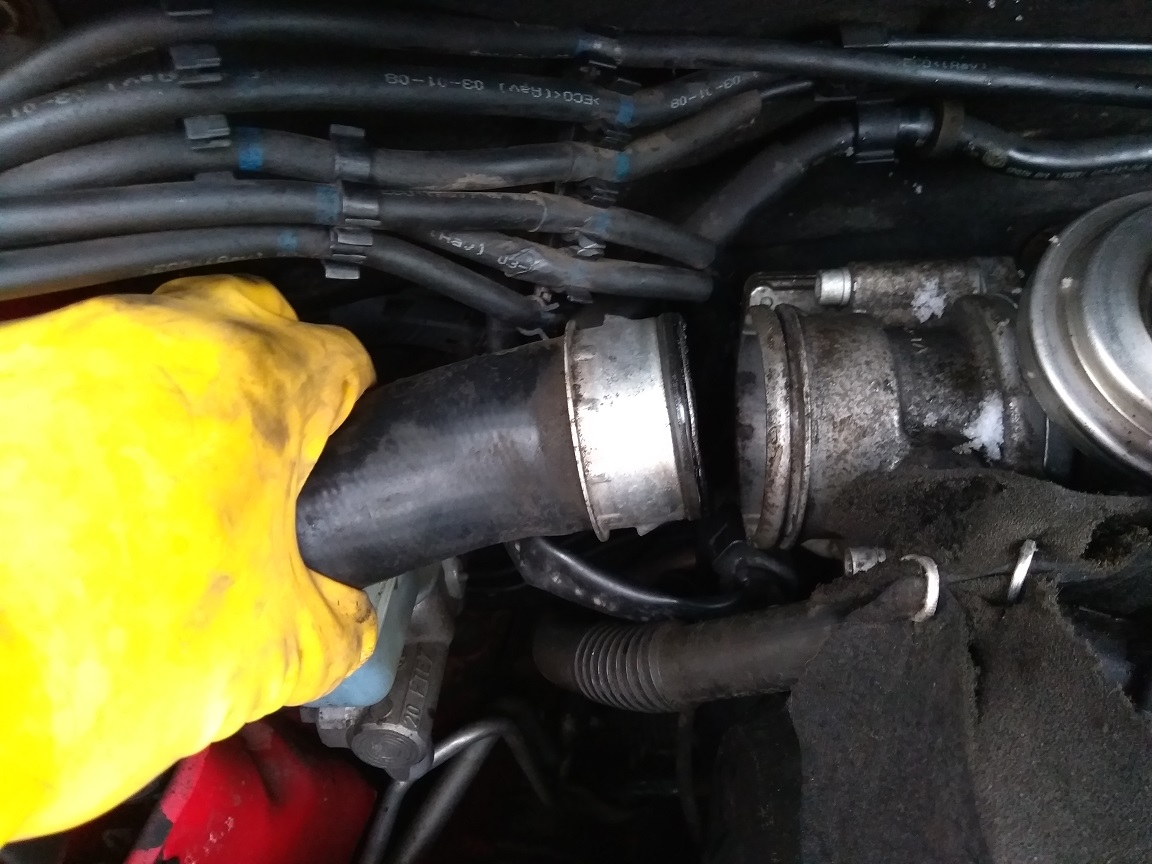
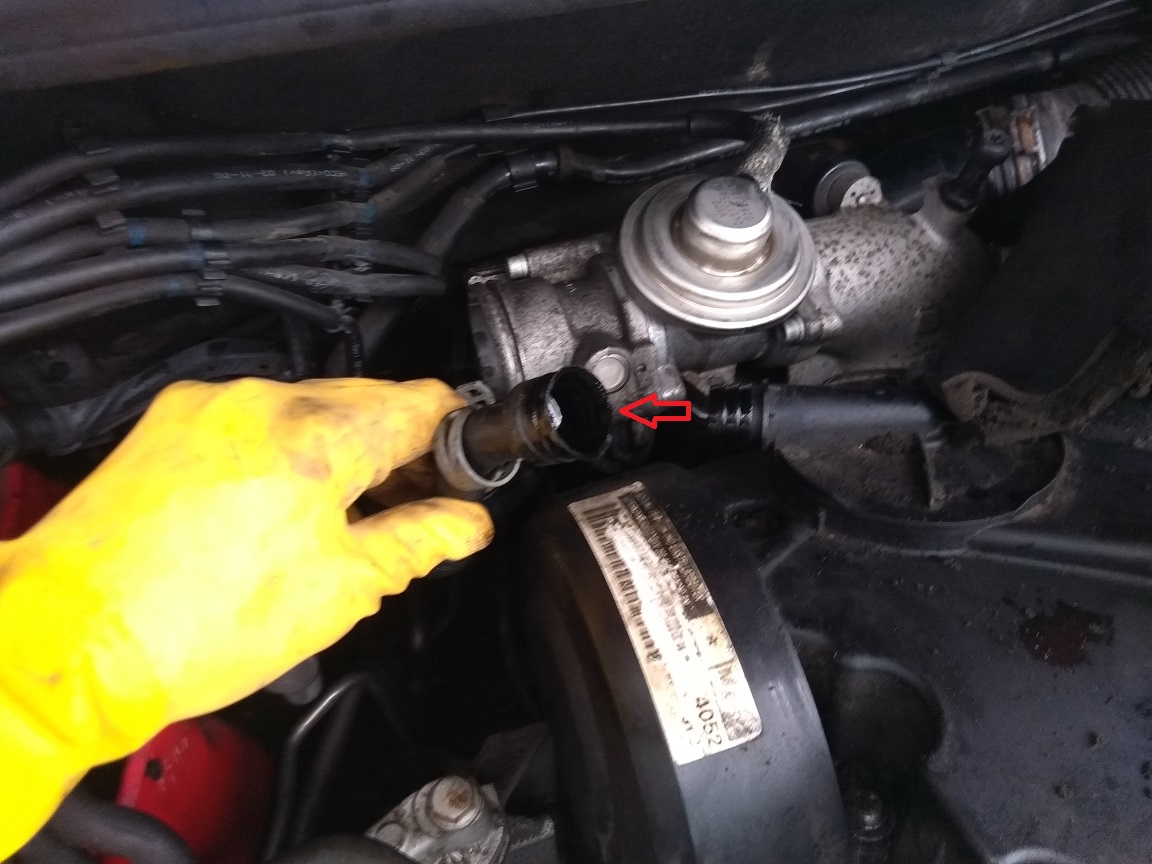
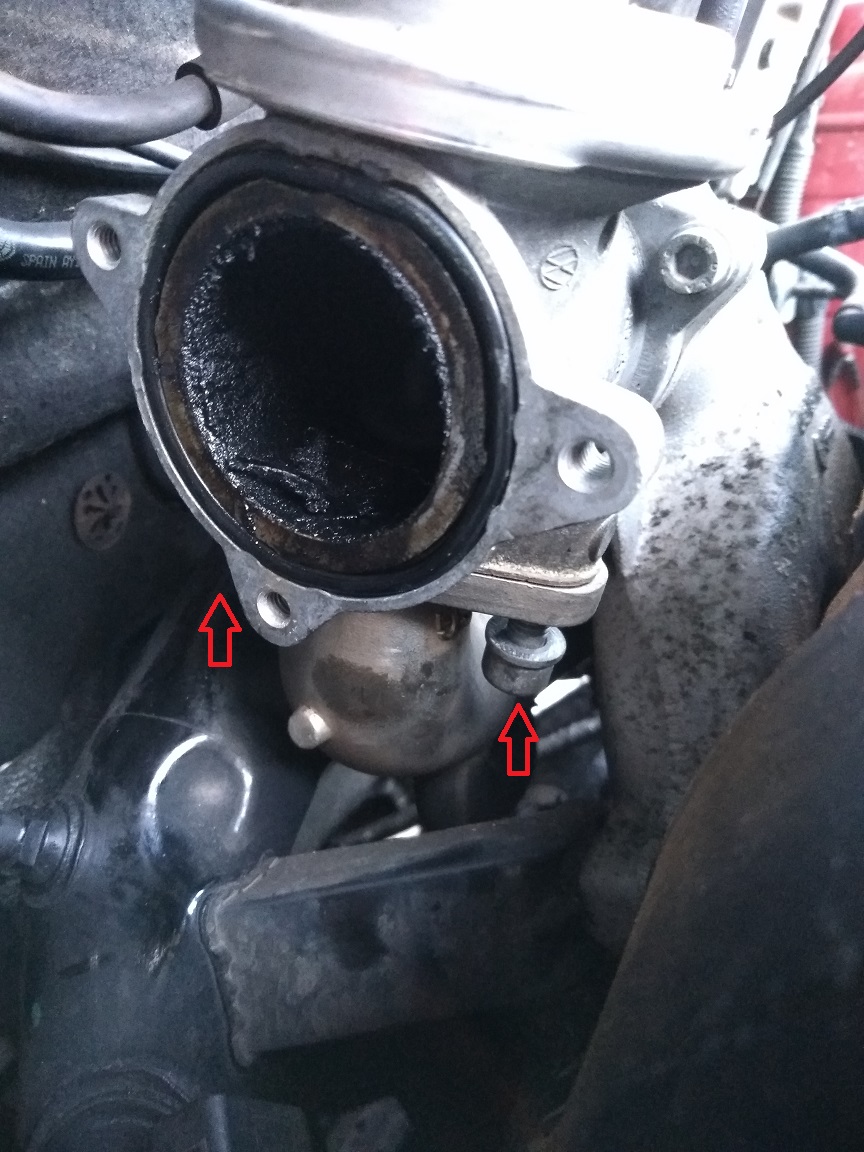
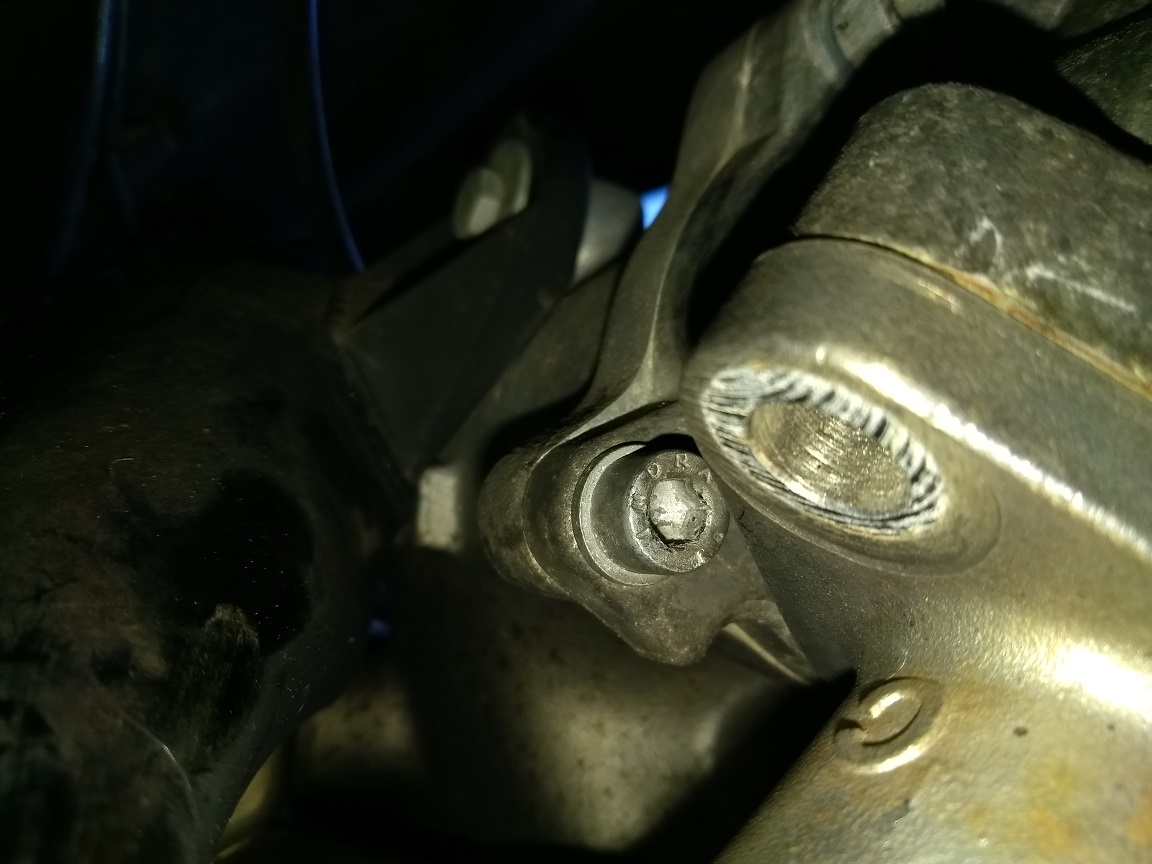
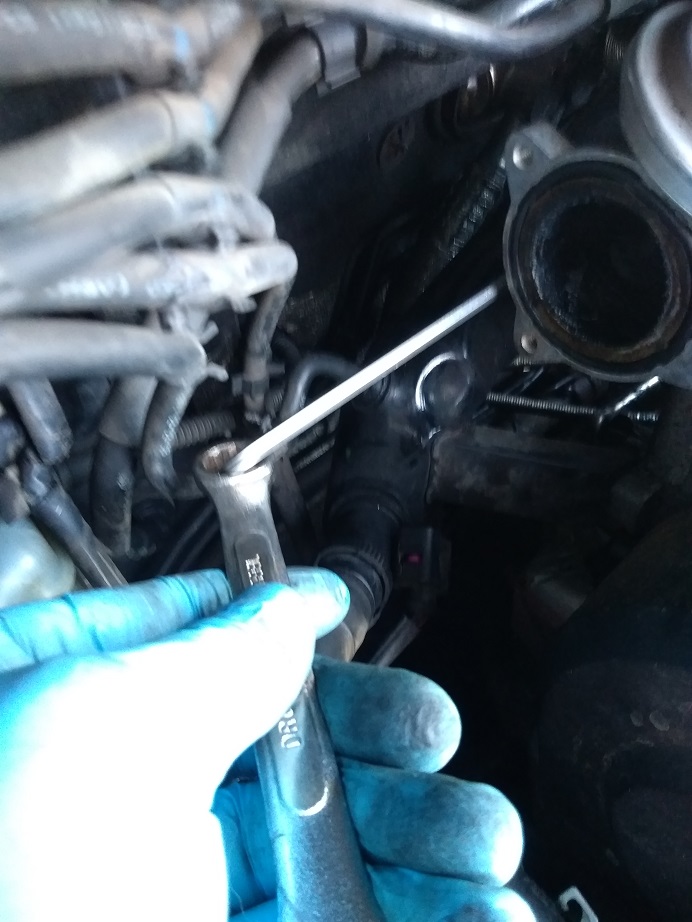
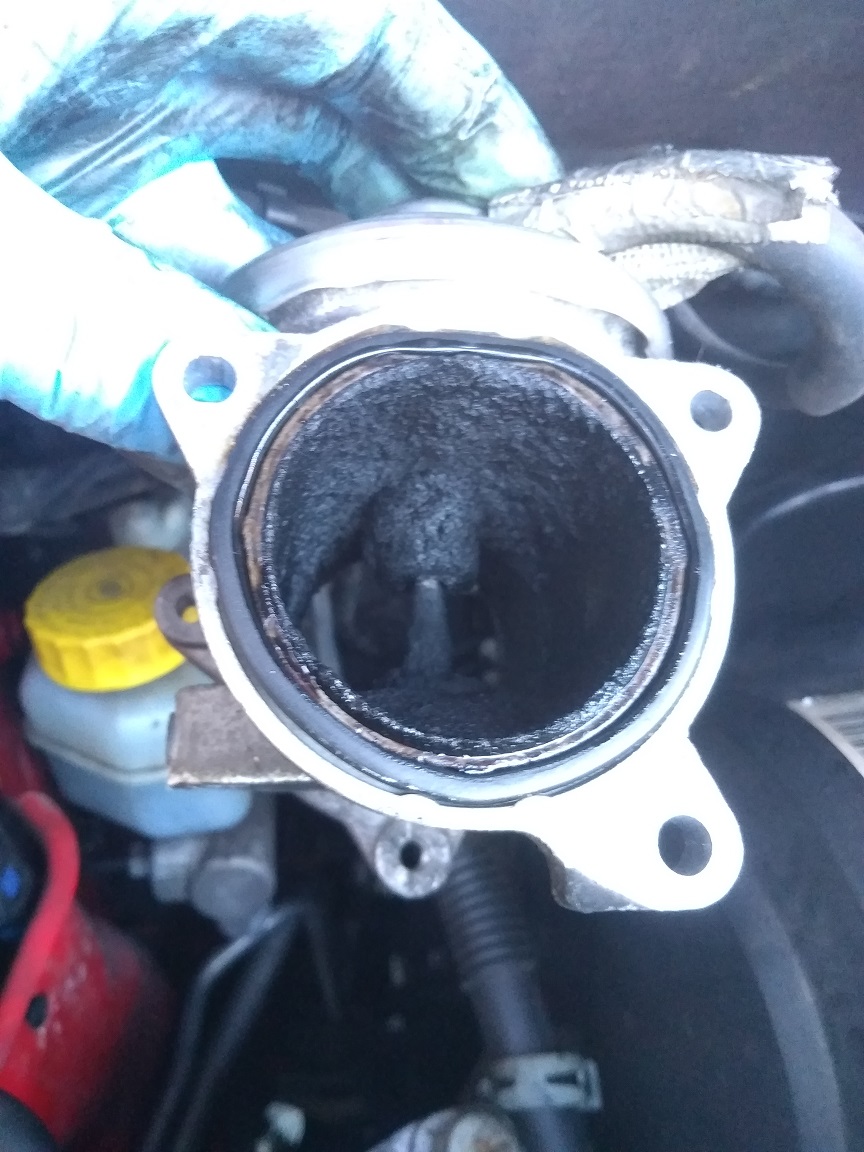
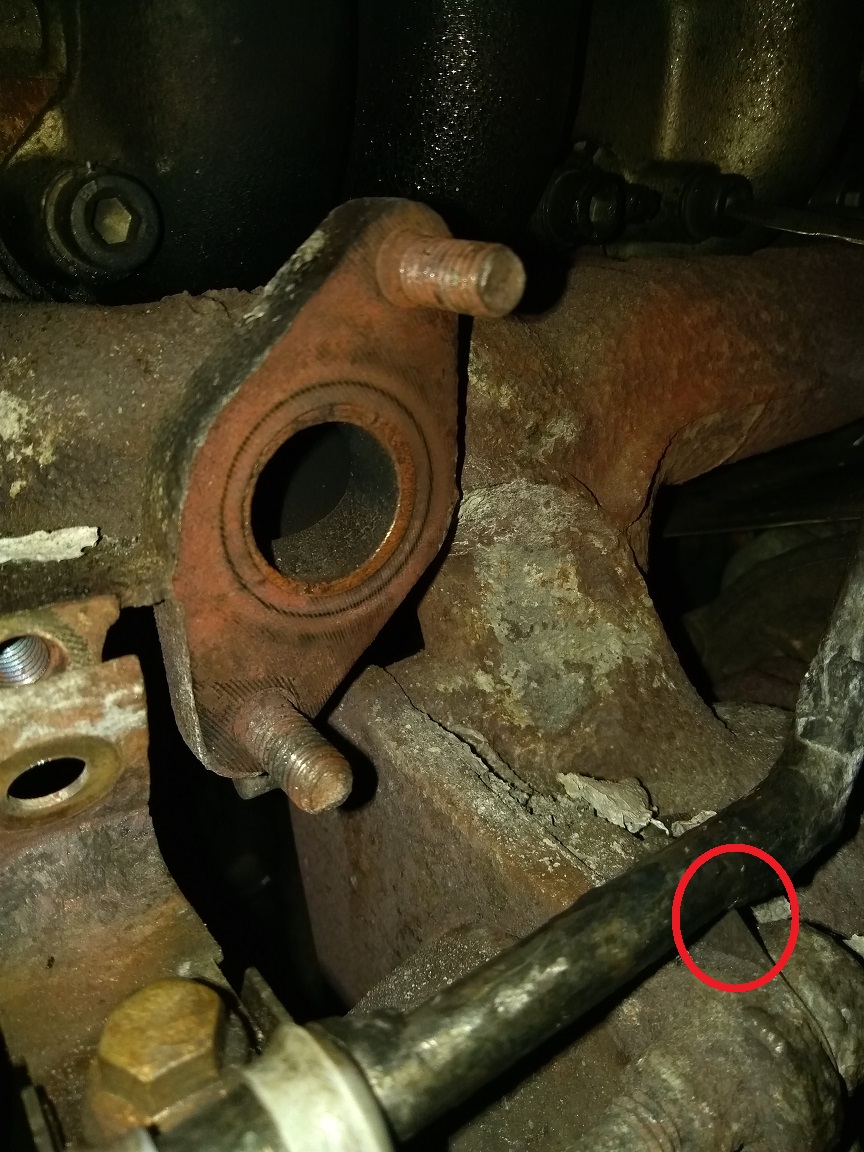
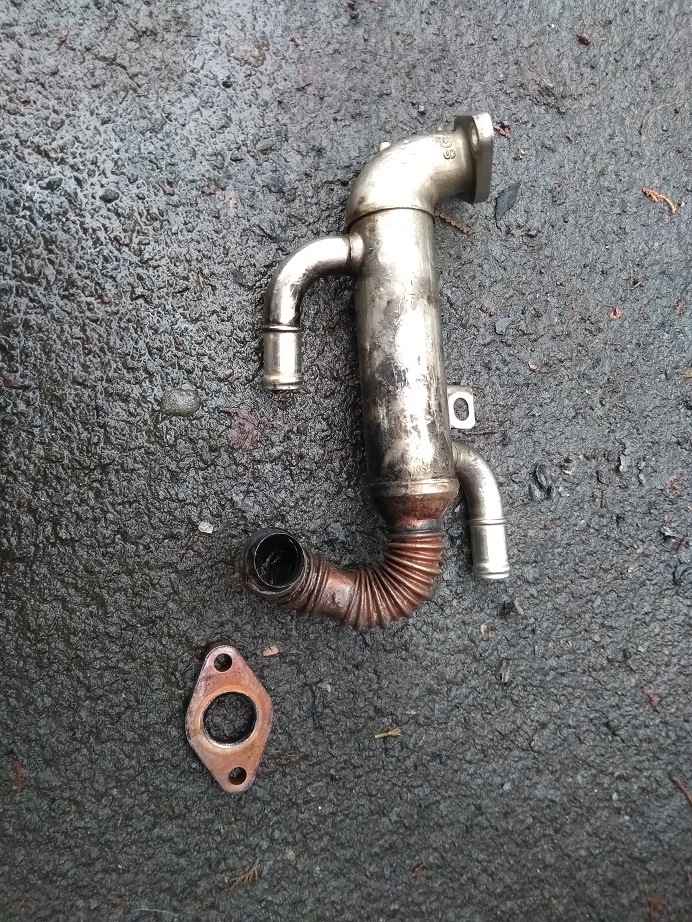
Firstly thanks to Wino for pointing out that I did not have to remove the sub-frame and accompanying parts to change the EGR cooler. For whatever reason the Haynes manual that covers my model does not have an entry for this type of cooler. Since there were no instructions and based on the advice from Wino, I opted to tackle the repair from the top. In all the repair is relatively straighforward, the biggest issue is access and the restricted work space, I think I only lost the head and flew into a rage two or three times. I had to do the repair over a few days because of the reduced daylight hours and in total it took me approximately 8 hours including removing, cleaning the EGR valve and also the exhaust repair putty that I had tried as a quick fix. (I have been told I should be paid by the job and not by the hour). To be fair you could probably save yourself some time by firstly removing the protective panel underneath the engine bay of the car. The amount of nuts, bolts and tools that I ended up dropping in the engine bay meant I spent at least an hour trying to recover them all individually before I finally removed the underneath panel. Not included is the time I had to spend cleaning the hall in my house when I dropped a tub of swarfega that exploded like a bomb absoluetly everywhere including over the ceiling (never pick anything up by the lid). So I searched for a brand new EGR cooler and discovered they were between £150 - £250. Given the age, miles and condition of my car I opted to take the chance and buy a second-hand cooler from eBay that cost me just under £30. I also opted to remove & clean the EGR valve as the EGR cooler is attached to it and you also need to remove the Intake Manifold Changeover Flap that attaches to the EGR valve also. It's purely optional but it will make it easier when installing your new EGR cooler so might be worth having some carb cleaner to hand and you can judge yourself. So as well as a replacement cooler, part No. 045131513P, I also bought / had these additional items for the repair; 1. Replacement gaskets at each end of the cooler. Note that both gaskets are different thickness & material so source them separately. 2. Replacement O ring for between the Intake Manifold Flap and the EGR valve. 3. Coolant fluid (Depending on how much you loose you might get away with not needing it straight away) 4. Replacement O ring for between the EGR valve and exhaust manifold (Optional) 5. PlusGas anti-sieze lubricant or similar (Optional) 6. Carburetor Cleaner (Optional) 7. Gas blow torch and a bucket of water or garden hose on standby (Optional) One thing I did not have but I think would be handy as well as save you some time, is an 11mm hex spanner (if there is such a thing). Two 11mm nuts hold the bottom flange of the EGR cooler onto the engine block and the bottom nut has what I believe is a solid steel oil pipe that runs in front of it. The pipe severely restricts access to the nut if using a socket. If you want to avoid having to remove the pipe and or make it a lot easier for yourself then try get the above mentioned tool. A regular 11mm spanner might and will probably do the trick. I will highlight the issue further on into the repair and you can decide for yourself. So the first step is to create space. I started by removing the air filter box and assembly. 1. Removed the screw that attaches the air intake hose to the air filter box and then remove the intake. Red arrow indicates position of screw (Picture 1). 2. Removed the air intake hose from the mount at the front of the car (4 lugs hold it in place, 2 top and 2 side) (Picture 2). 2a. Removed the hose that connects the air filter to the turbo by squeezing the hose clips (Picture 2a). Remove the hose and note which way round it goes 3. Removed the air mass sensor from the air filter cover (Picture 3). 4. Removed the two screws that secure the air filter cover (Picture 4). 5. Uncliped the vaccum hose that runs from the air filter cover (Picture 5). You could probably just disconnect the vaccum hose from the air filter cover. 5a. Lifted the air filter cover and moved to the right (Picture 6) then placed the cover out the way. 6. Followed the air mass sensor cable that I removed in step 3 and located where it is attached to the air filter housing at the back. Carefully used a flat head screwdriver or long nose pliers to pry / pull it out (Picture 7 & Picture 8). It may be easier to do this after step 7. 7. Located and unscrewed the bolt that holds the air filter box in place (Picture 9). Lift the box upwards and out of the car noting the rubber O ring and stub located between the box and battery that may be holding the box in place. You should now have created a large space that will allow you access to where the EGR cooler attaches to the engine block (Picture 10...ignore the red arrow for the moment, we will come back to this). At this point I was able to also remove the stubborn exhaust repair putty and get a wire brush in to clean up the nuts that I would be removing. 8. Located both the EGR cooler nuts holding it in place on the engine block and lubricated with anti-sieze (Picture 11). I went back and regularly applied the anti-sieze whilst working on the next steps. All that crap you see in the picture is exhaust repair putty. 9. Whilst the lubricant gets to work, I then moved to the left hand side of the engine bay and started to remove the intercooler hose. Pry out the clip holding the hose onto the Intake Manifold Flap (Picture 12) (Note the orientation of the clip if you managed to fully remove it) and detach the hose (Picture 13). 10. I followed the hose down to the front of the car next to the fuel filter. Released the hose clip and then completley removed the intercooler hose (Picture 14) 11. Released the clip holding the crankcase oil vent pipe and disconnected the pipe (Picture 15). I only did this to create space so may not be necessary. 12. I then moved onto the Intake Manifold Changeover Flap (IMCF) and started by removing the wiring plug attached at the bottom of the unit. Using a 5mm Allen / Hex Key I then removed the three bolts that hold the IMCF onto the EGR valve. (Picture 16) Note that the third bolt is underneath and marked by the arrow. Once the bolts are out the IMCF can be gently pulled away from the EGR valve and removed. Locate the O ring and check the IMCF for build up of soot and clean if desired. 13. I then located the two bolts underneath the EGR valve that hold the EGR cooler in place and using a 6mm Allen / Hex key, removed the bolts (Picture 17). 14. This step is entirely optional but I would recommend as refitting the EGR cooler is awkward and the extra space and visibilty will help. I removed the EGR valve via the three 5mm hex / allen bolts that hold it in place. The bolt underneath is awkward to access. I found a long ball end hex / allen key and spanner helped easily remove the bolt (Picture 18 and Picture 19). Remove the pipe that connects to the EGR valve and clean the valve as required. Here is my EGR after 140k miles (Picture 20). 15. Returning back to the EGR cooler itself I then used a long 6mm hex / allen Key to remove the single securing bolt that attaches the cooler onto the engine block (Picture 21). The picture Wino provided earlier in the post will give you a better idea of where it is. You might find at this point, like I did, that the EGR cooler is now free from the engine block and was being held in place only by the coolant hoses. In my case the EGR cooler had completely failed around the flange that attached onto the engine block (See Picture 24) 16. To make things easier and create more space I opted here to disconnect the EGR cooler from the coolant hoses and completely remove the unit. Using long nose pliers I undone the hose clips and moved them up the hoses out the way. The hoses were on pretty tight, possibly even under a vaccum. So here I used a flat head screw driver and carefully released the hoses enough that I was able to pull them off. I had purchased hose clamps but it turned out as long as they were held high, there was little spillage of the coolant. (Picture 21a...one hose has been removed, placed upright and covered to prevent any dirt entering the system). 17. Now onto the awkward part, removing the two nuts that secure the EGR cooler onto the engine block. So as well as Wino suggesting the use of anti-sieze lubricant on these bolts (I didn't apply a few days before as it was almost impossible to reach the lower nut without removing the air box as described above) I was also advised by an experienced mechanic to heat up the nuts/ bolts (I wasn't sure what I was dealing with yet) before removing them as such nuts / bolts that are subjected to high temperatures are notorious for breaking (and then your in a real world of hurt). So this meant I had to make absoluetly sure that there was nothing within the area that was flammable which I assumed would be unlikely given the high operating temperatures in this area anyway. So a quick check with a small inspection mirror and a garden hose on standby and I was ready to go. The fact as well that the EGR cooler had completely detached from the flange (See Picture 24) meant I was able to remove the cooler as per the previous step and manouver the coolant hoses were out the way. Had the cooler still been in situ I am unsure if it would have been possible to use a blow torch without burning one of the coolant hoses. I do suppose though that you could try and remove the hoses at this stage if they were in the way. Given the condition of the nuts it wasn't that obvious what size they were, but to cut a long story it turns out they are 11mm. Starting with the top nut I applied heat for a good few minutes before then taking my 11mm hex socket which I lightly tapped onto the nut with a small hammer to ensure it was completley on, straight and no risk of slipping. Applying a bit of force to tighten the nut initially (another technique I was advised to use) before then turning the other way and the nut started to turn and loosen quite easily. Now onto the bottom nut and here is where I got a little stuck. As mentioned earlier there is a steel pipe that runs in front of the bottom nut and as a result you can't get a socket fully onto the nut. To make things worse the nut was in such a condition that no 11mm tool, including a simple spanner would fit onto the nut (Picture 22...ignore the socket for the moment, note however the pipe). So it got to the point I thought I was going to have to remove the pipe but instead I noticed a few brackets holding the pipe in place and figured if I remove the brackets it might allow enough flexability to get the socket on...somehow. If you look again at Picture 22 I've indicated with the arrow where the first bracket bolt is located, I removed this bolt first. Go back to step 7 and look at Picture 10. In that area highlighted by the red arrow, following the steel pipe round the side of the engine block, you will find another bolt that holds the pipe in place, I removed this bolt as well. Going back to the nut, I then applied some heat before lining up the hex socket and begin hammering the socket onto the nut to ensure it was completley on whilst displacing the steel pipe. Don't think I tightened this one first but either way it came off no problem and I believe I created enough flexability in the steel pipe to allow it to bend with the socket. So the reality is that you could use a spanner and this is where you might decide to do so as opposed to doing what I done (I did try but couldn't get it on). It turns out that these nuts are only tightened to 9Nm anyway and given the nut was such a tight fit, It would have probably worked fine if I had persevered and managed to get the spanner onto the nut. For me I opted to give myself the best possible chance of getting these nuts off without rounding or breaking them and that meant using anti-sieze, using heat and using a hex socket as opposed to bi-hex 12 point sockets or spanners. So with the nuts off, I removed the flange and the gasket and cleaned up the mount (Picture 23) I've highlighted where I think the steel pipe impinges on the engine block and the extent of the EGR cooler failure (Picture 24). So all you have to do now is get your replacement cooler in place and more or less follow the instructions in reverse, I do however have a few pointer. Firstly remember and make sure you have found and removed the old gaskets and make sure you remember to fit the new ones as well as your new O rings on your EGR valve and IMCF. Manouvering the replacement cooler into place was a bit fiddly as I had connected the coolant hoses and re-installed the EGR valve. I would suggest if you can that you manouver the replacement into place first, particullarly where the EGR cooler attaches to the EGR valve. It might be however that it will be easier to connect the coolant hoses first but certainly keep the EGR valve off until the cooler in in place. Regarding the cooler hoses, if you choose to attach them before manouvering the cooler into position, attach the bottom one first. I then back-filled the cooler fluid within the EGR cooler via the top cooler inlet/outlet to minimise air in the system before then attaching the other cooler hose to the EGR cooler...remember the hose clips. I then removed the lid from the coolant expansion bottle within the engine bay and squeezed the coolant hoses on the EGR cooler. I done this until I no longer saw or heard any air bubble from the expansion vessel before poping the lid back on the expansion vessel. The 11mm nut that I had difficulty getting my socket over, I put that on the top as opposed to the bottom stud to make it easier to tighten the nuts back up. I had a torque wrench to set them back to 9Nm. If you tighten the nuts till they stop and then another 1/4 turn and you will be there. As always I'm certainly no expert and very much the reluctant roadside meachanic. Feel free to add any pointer or advice. Again thanks to Wino and hope this helps anyone that needs it. Stay safe, Gavs.


 3 points
 -
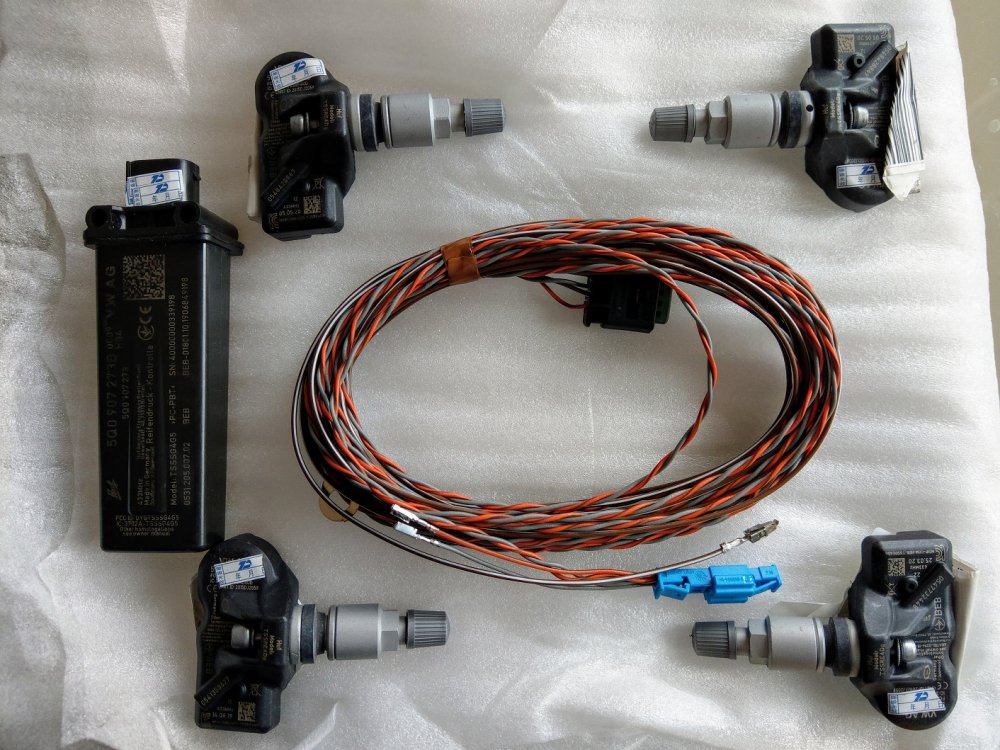
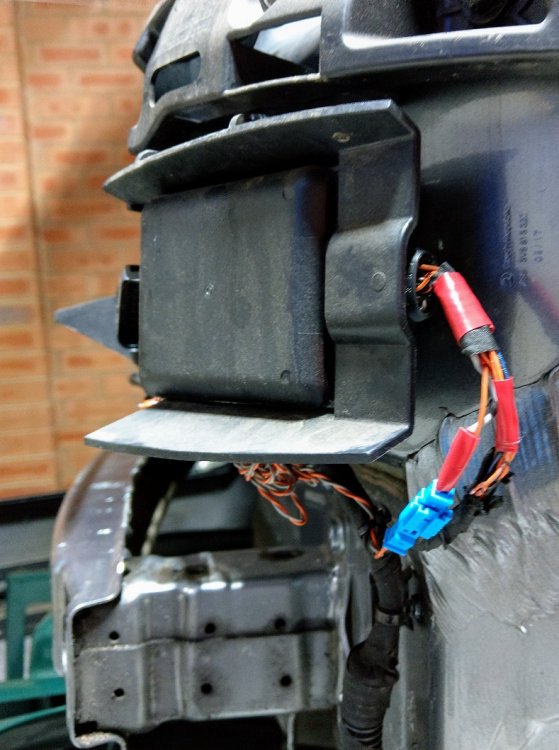
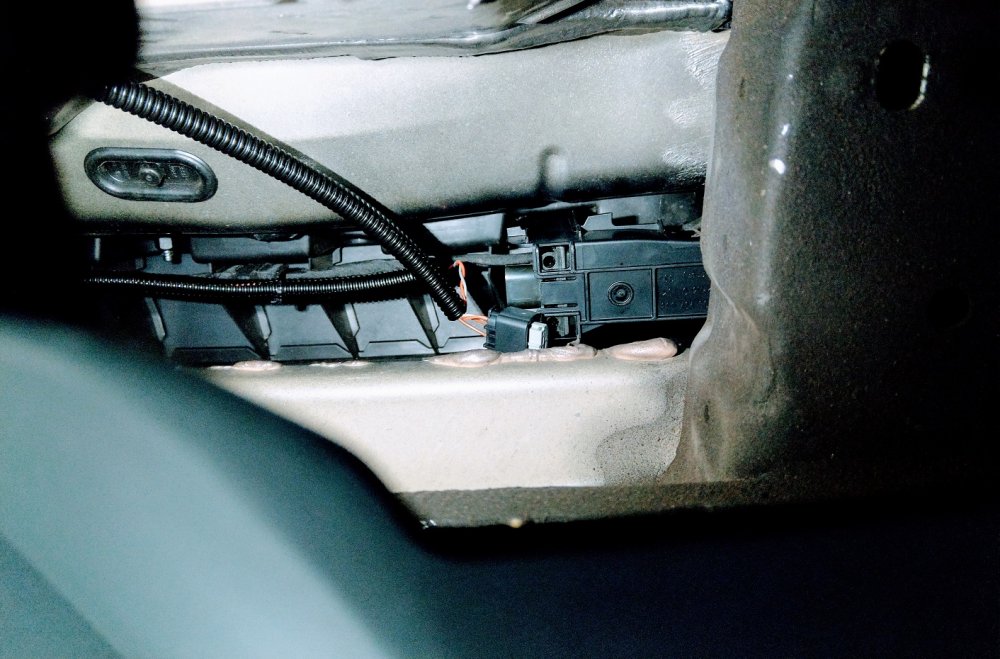
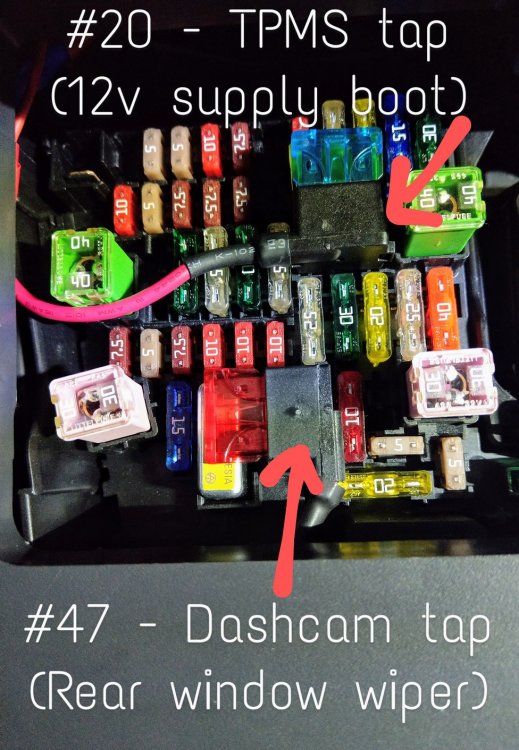
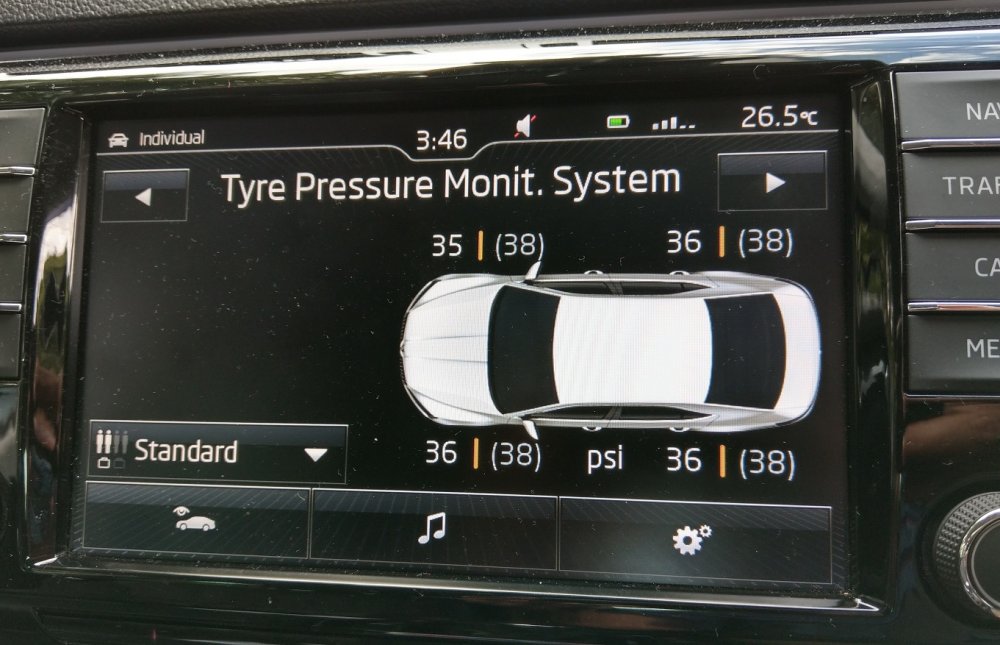
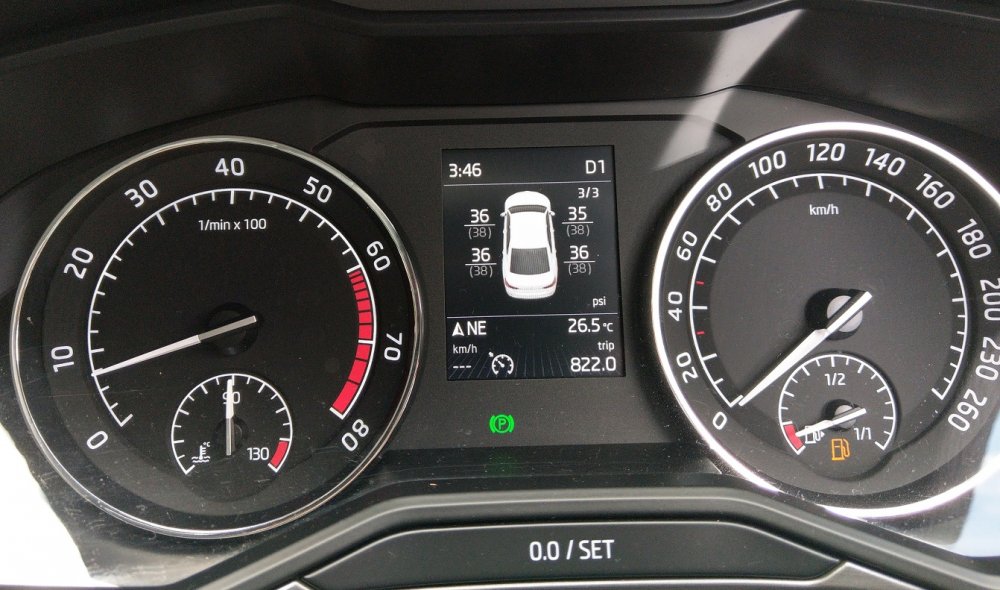
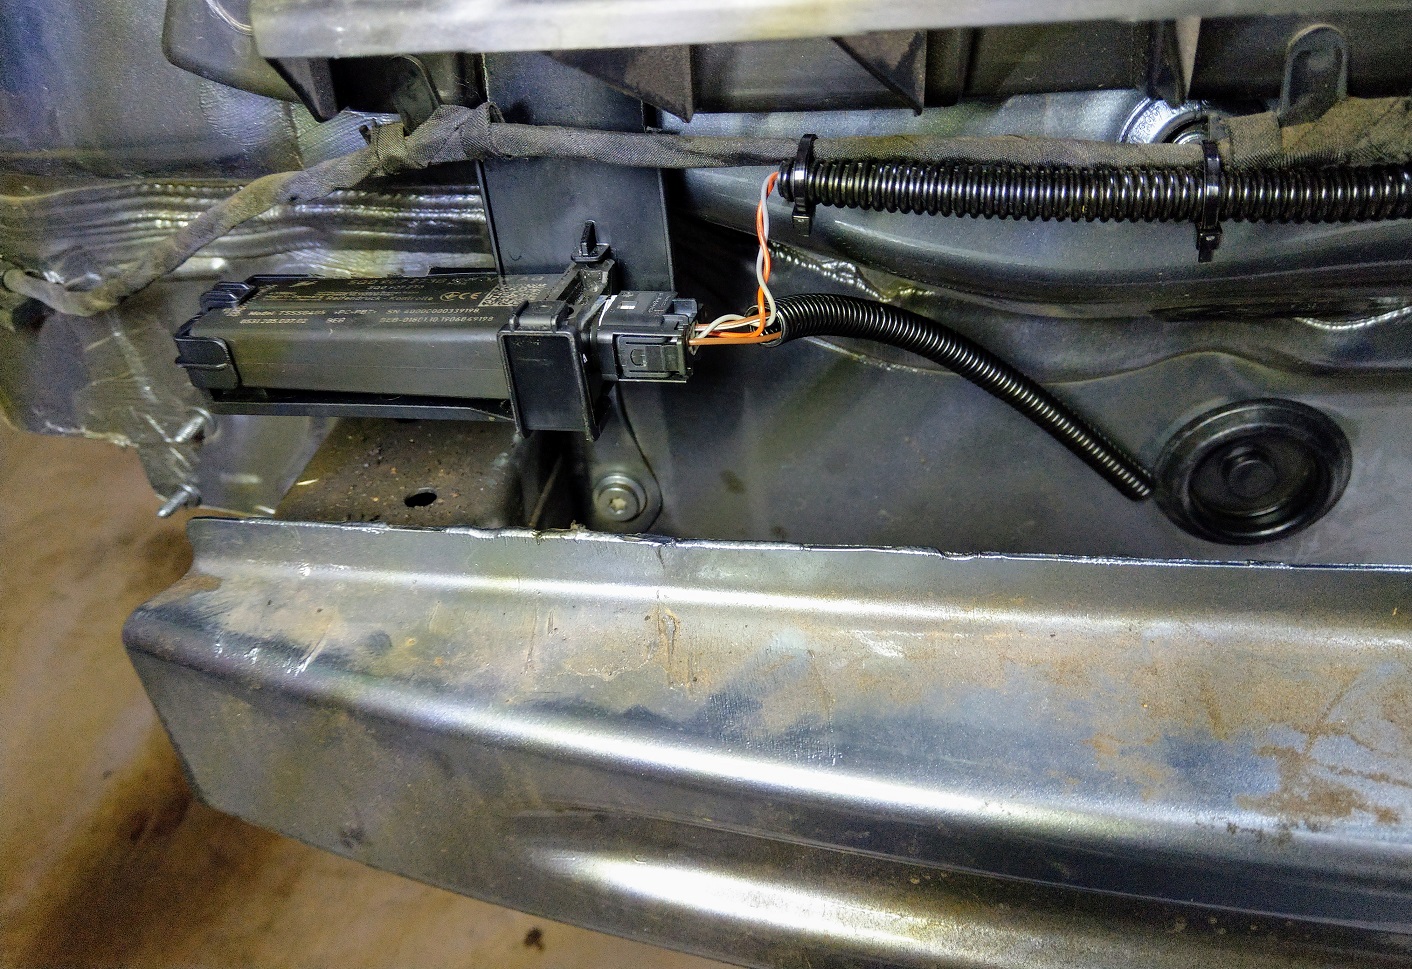
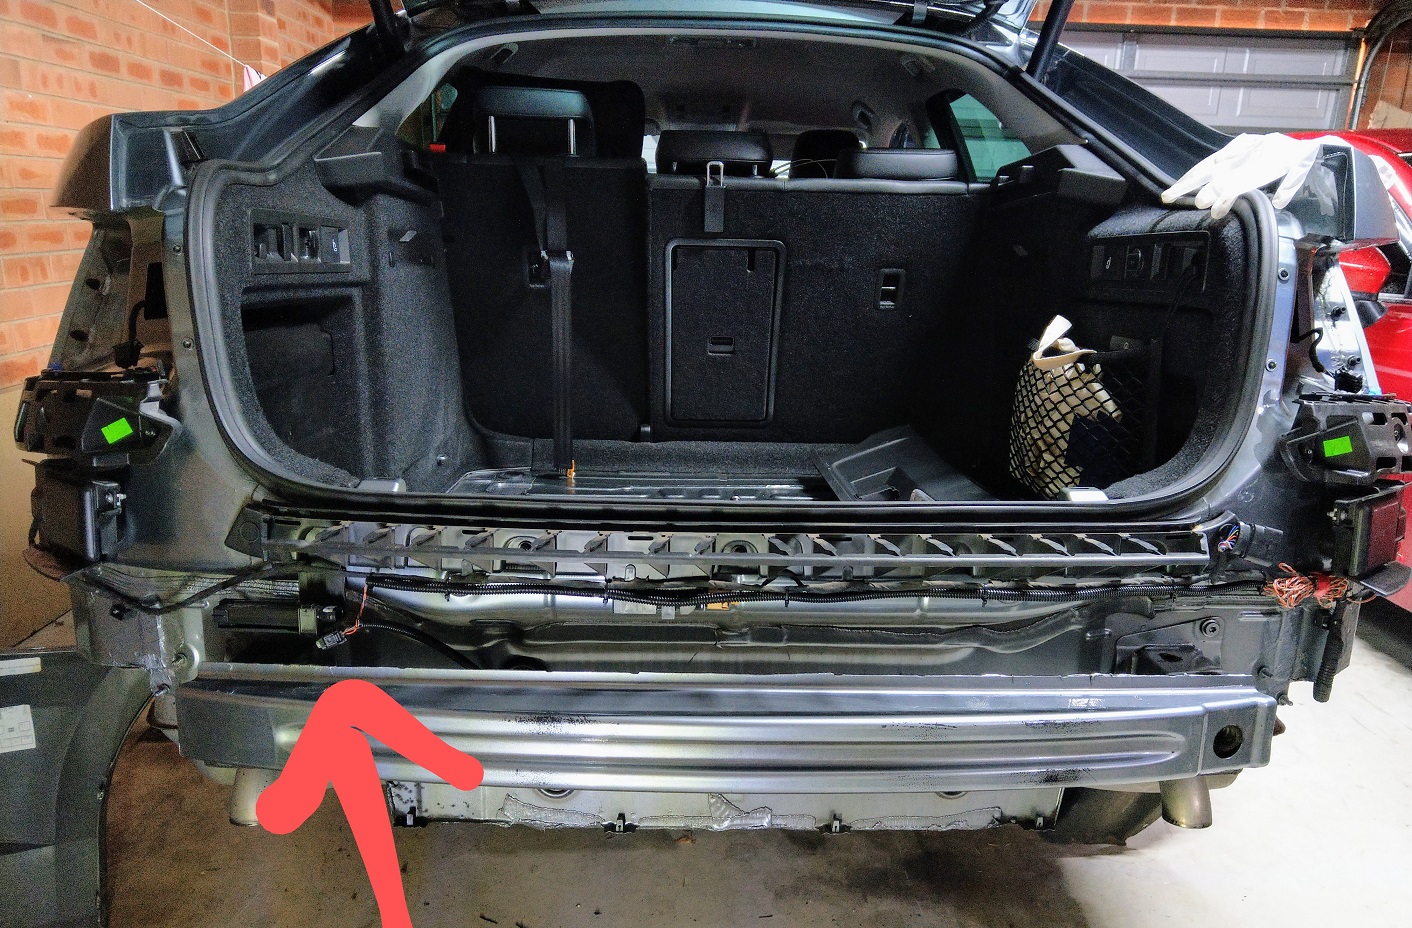
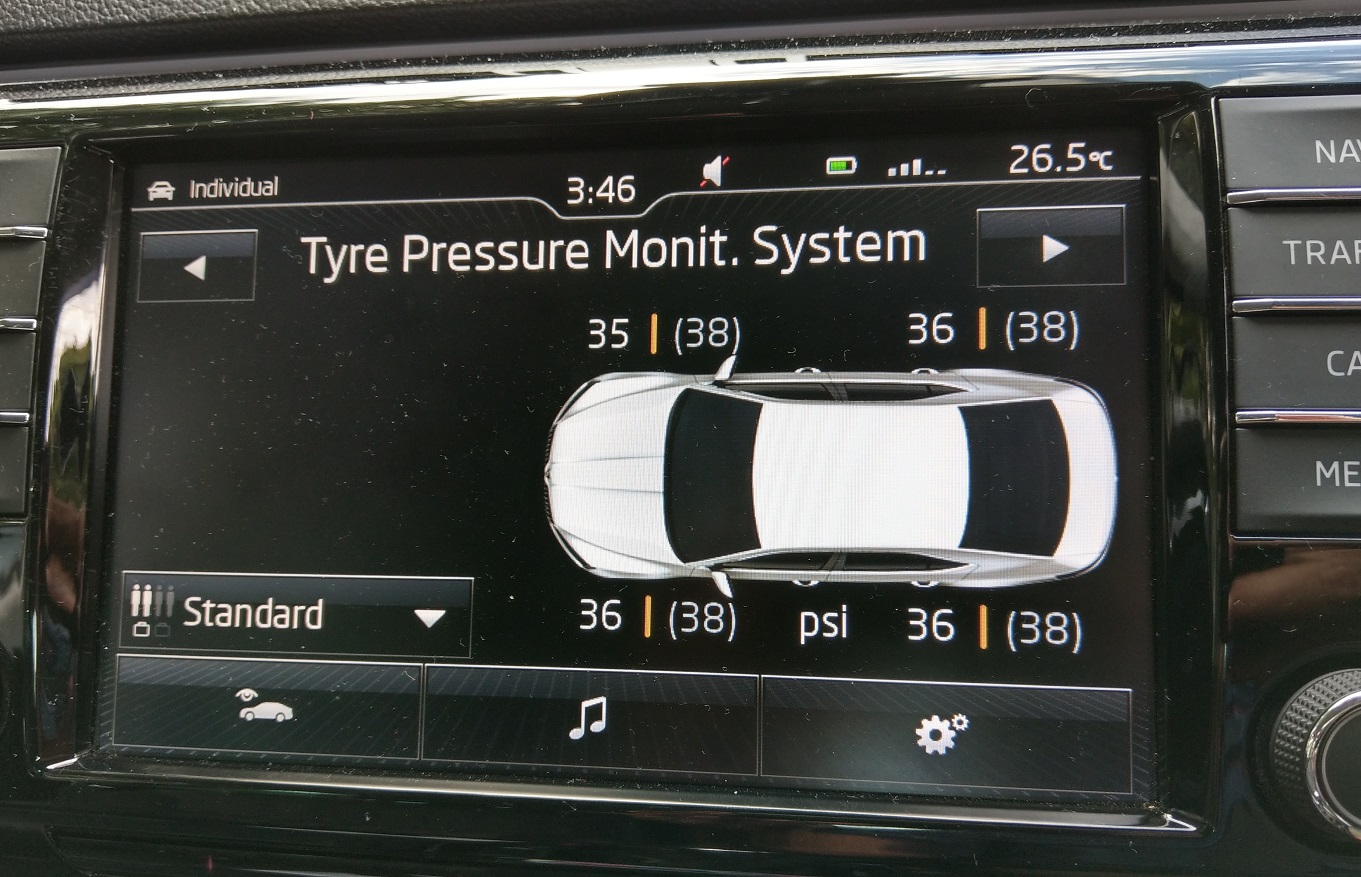
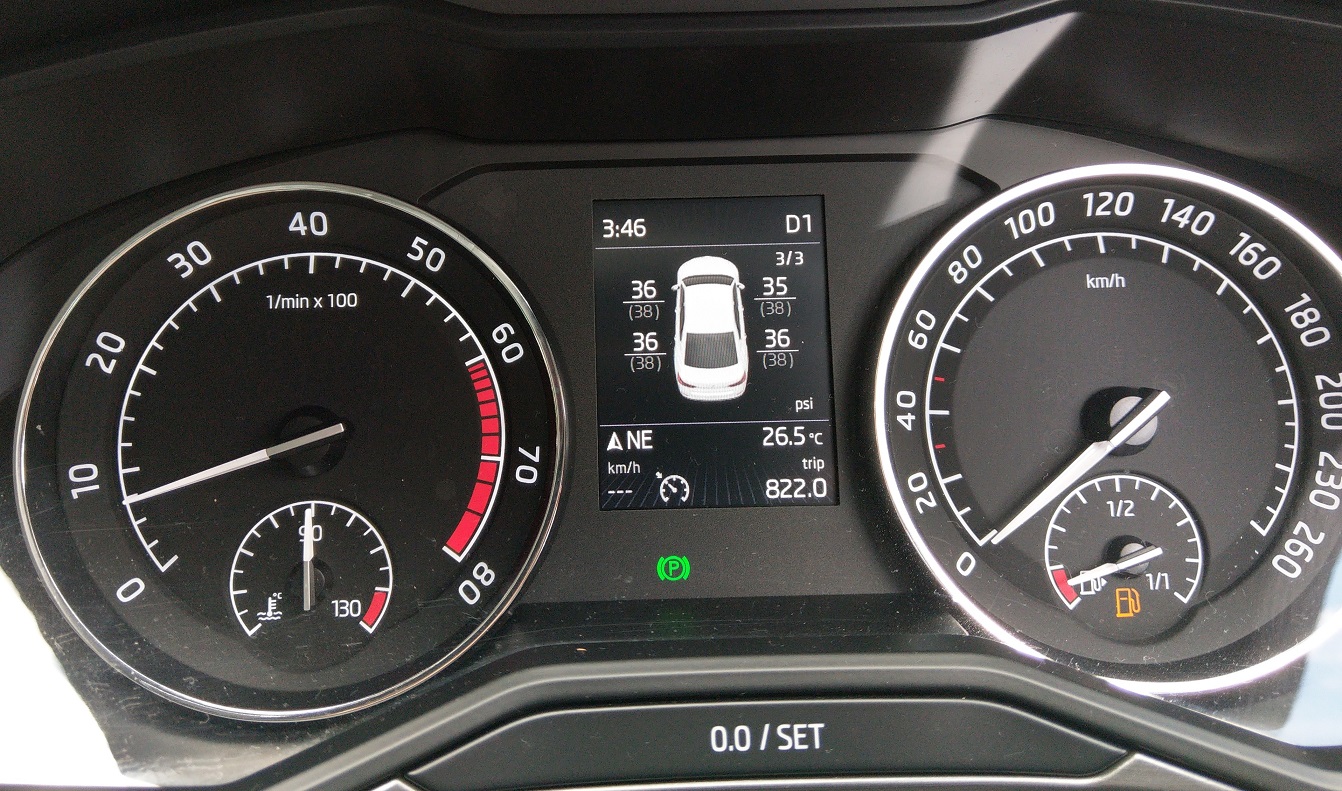
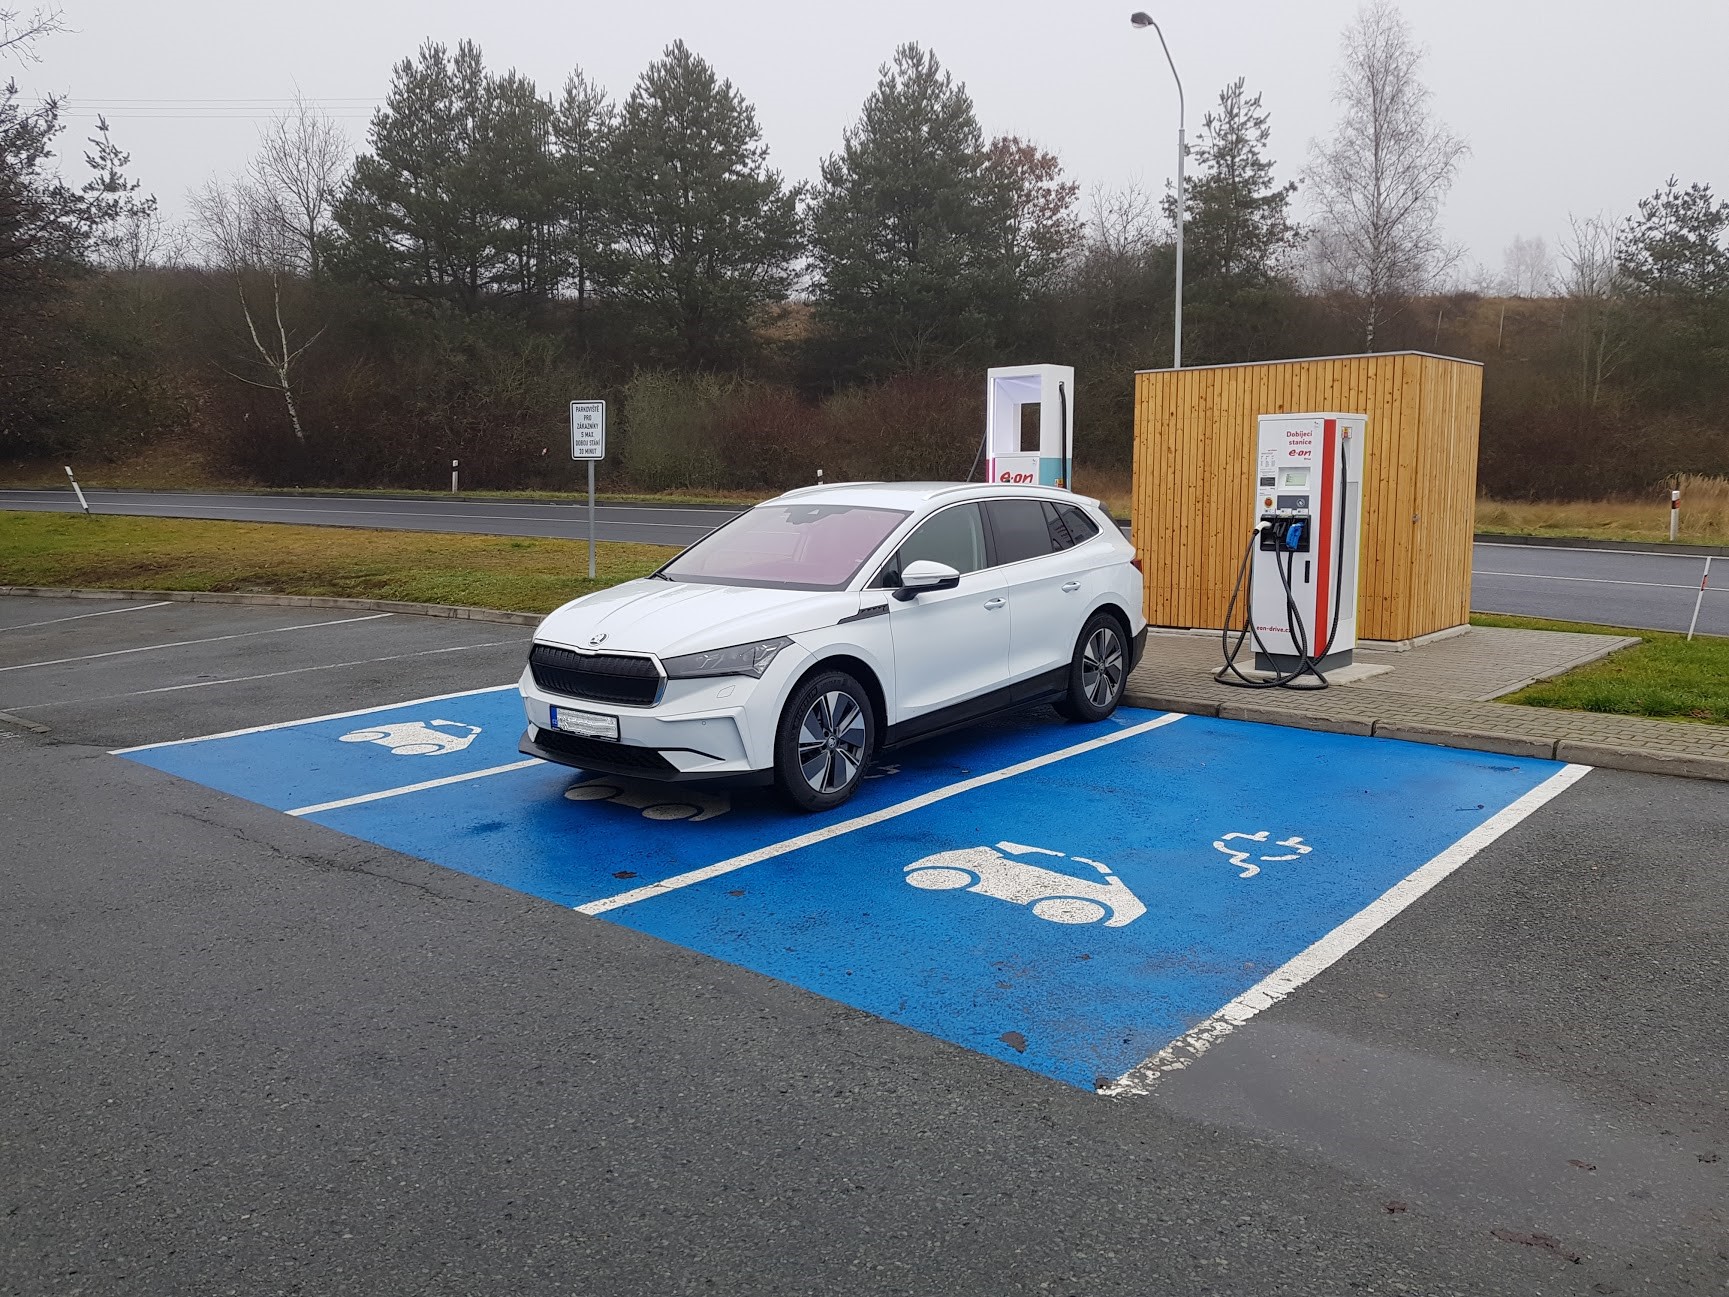
I can see Gandalf's Pressure now!! woOot 😁 After months n months of planning, I finally retrofitted the Direct TPMS (Tire Pressure Monitoring System). It all went well and everything is working as expected. Turns out the module (5Q0 907 273 B ) was already parameterized (the VCP bit), so once I did the VCDS coding bits, it was all running. I will however need to update (via VCP) the TPMS module's parameter file so it has the right tire profiles, but it's all good now 👍 Very happy I am 😊. I'll put a write-up together, but essentially it involves:- Part 1 - TPMS Installation. Mount module under rear bumper and tap (into the blind spot radar) CANBUS Extended. Part 2 - TPMS Power. Run power source through interior trim to fuse panel up front, for constant power supply.. Part 3 - VCDS Coding of CAN Gateway, Instruments and ABS modules. Part 4 - VCP to load parameter file for TPMS module. Part 5 - Install Tire internal sensor inside tire. some pics below...... the unit is accessible from underneath the bumper - no need to remove the bumper to access it. just incase.


 2 points
 -
2 pointsThe part number of the sensor referred to by the OP is indeed the differential pressure sensor. A common problem area I think; probably to do with it having to work with some pretty toasty gases. I suspect the OP may have been 'at altitude' during last night's postings. May explain why he thought he was producing something of great clarity and insight, and the rest of us are 'yet to appreciate the brilliance'...2 points
-
2 pointsThat verges on unreadable and rude, I suggest you read JRs helpful post again, sort your above post, your details say you live in London but the post above must mean very new there.2 points
-
Some very detailed and informative replies, thank you. From what I am reading and the links posted, the technology has been gradual and not at the behest of consumers but legislators. Interesting. I remember reading an article by Richard Hammond many years ago. He was talking about his Yamaha FS1E 50cc needing an MOT in February each year, and how the 16 miles round trip to the MOT station on such an underpowered (although not when you're 16 they're not! ) vehicle on slippery rural roads acted as a bit of a reset button. It reminded him about other road users and viewing hazards for what they might be, potentialy life changing encounters. I think it would do most folk the world of good to experience the same. Maybe to a couple of hours on a 125cc and a couple of hours on a pedal cycle ideally, to remind them of what roads are like outside of their supersafe metal boxes. Reset their driving to surviving without a never ending list of letters confirming the safety stuff fitted ESP / ESC, ABS / TC / ASR / XDS/ XDS+ etc. 26,610 people were killed or seriously injured on UK roads in a year. 1770 deaths, meaning 24,840 were seriously injured. 68 people every day! This figure remains fairly constant despite all the increases in standard fit safety equipment, How come this does not make the news? Why is this acceptable? What cost to society in purely financial amounts if nothing else? So if the safety kit fitted increases, yet to no real decrease to the 26610 figure, then surely we need to look at driver education and training? I for one would be happy to sit my drivers test every few years, or have it subject to appraisal. Believe it or not, 1989 doesn't seem like a lifetime ago. In 2005 I purchased a 2002 Octavia and ran that for 13 years. It had all the tech I've ever wanted and all the tech I'll ever need. I wouldn't have minded cruise control mind. However, looking at the Scala technology in the thread I referenced, I don't think a new Skoda would be for me.2 points
-
2 pointsI replaced mine yesterday and the difference is like night and day. I fitted a bosch S5 A08 which turns the engine over far quicker than the varta battery. I got mine from Amazon for £125 quid and arrived in 2 days. You do have to code it but the selection for bosch battery wasn't a choice so mine is left as varta. Serial number for my old battery was just lots of ones 111111111. I changed it to reflect the bosch battery and changed the Ah to 70ah. It brought up all sorts of errors when connected for 30 seconds even the reverse camera not working then all back to normal. Mines a 2016 vrs diesel BTW.2 points
-
2 pointsI have done my analysis and my suggestion is that you take a photograph of the cam belt and not the auxiliary drive belt Your cam belt is likely to be 16 years old, how much longer do you want to wait?2 points
-
2 points
-
2 pointsSell it mate a 280 with a non working exhaust flap isn’t worth having ..... p.s this may or may not be useful advice depending on your point of view.....2 points
-
2 points
-
2 pointsIf you find a flat spot (must be totally flat for at least 12 meters) against a wall. Drive up against the wall as close as you can. Use some tape and put a mark where the upper edge of the beam, one mark for each side. Now back away from the wall and stop when the front of the car is 5 meters away from the wall. Now adjust the headlight so that the upper edge of the beam hits the wall 6cm below your first marks. This will give you a quite good adjustment of the dipped beam. Another way is to use a tape meter or laser meter. Find the center of you headlight and take a measure from ground to the center. An estimate is that it should be at around 500mm. Find a flat spot like above. Use the equation below to calculate on what height the beam should hit the wall. Put some tape on the correct height and adjust the dipped beam so that it touches the tape. 5000 = distance between front and wall. 500 = center of headlight (mm) differs from car to car, must be measured. 1.2 =desired drop per meter in percent. In Sweden a minimum drop of 1% is required, most manufacturer has their own drop somewhere between 1.2% and 1.5%, maybe even higher. Equation 500−((5000×1,2)÷100)=440mm With these values the dipped beams upper edge should hit the wall at 440mm from a distance of 5 meters. The longer distance used the more accurate the adjustment will be, 10 meters is recommended. At 10 meters with a drop of 1.2% the formula is: 500−((10000×1,2)÷100)=380mm At 10 meters with a drop of 1% 500−((10000×1)÷100)=400mm There's only a few centimeters in difference at these distances but a small difference at 5 meters will make a huge difference in 70meters. It's better to start a little bit slow and carefully raise the beam. If not done properly oncoming traffic will be temporarily blinded.2 points
-
I frequently see drivers of cars that clearly have the required tech, still unable to park their car or using a phone in the traditional illegal method when the tech is available with the vehicle to use it safely.2 points
-
Engine tech has been driven by the need to meet ever stricter emissions rules, and we're well into the diminishing returns space with internal combustion technology. When it comes to safety technology, the lowest common denominator always applies. You design for the least capable driver you can conceive of. Even those of us who consider ourselves capable can be assisted by safety technology. Last summer I came within a few metres of a head-on collision thanks to a muppet who decided to overtake several cars on a bend. The brake assist feature on the Superb definitely contributed to making it a near miss rather than a collision. The technology is well enough designed to stay out of the way unless it's needed. I would say this is true of most driver assistive technologies as they have advanced. Once a piece of technology is available it's only a matter of time before it trickles down from the luxury/sporty end of the market to the average family car, often hastened by regulatory pressure. ABS is a good example of this: it started becoming common on cars during the mid to late 90s, and was eventually mandated by the EU on new cars built from July 2007. DRLs have followed a similar path. Driver comfort features are the sort of thing that trickle into use and reach a point where customers ask for them next time once they have used them. There are several features on my Superb that I never missed on my previous car when I didn't have them, but which I'd be extremely reluctant to go without now. Another thing that tends to happen is that technology platforms introduced for one purpose inevitably get expanded as engineers think up new ways to use the technology that's available. A lot of vehicle systems switched from direct wiring and switches/relays to using ECUs to control them because it reduced the amount of wiring needed in the vehicle, and CANBUS allowed a lot of data to be shared between different modules using just two wires. But once you have an ECU controlling stuff, the engineer will look at it and think "what else can I do with this?". Tyre pressure monitoring via ABS is a good example: there are already speed sensors on each wheel collecting data and sending that back to the ABS controller, all it takes to add tyre pressure monitoring is add a few lines of code to the software in the ABS and instrument controllers, and add some warning lights and now you have tyre pressure monitoring with very little extra effort. A lot of clever little features will have evolved this way. It's also worth remembering that all of these addition technologies have arrived slowly over time. 1989 was 32 years ago - that's a very long time in technology development, and makes for a very stark comparison with 2021, but if you compared 1989 with say 1990 or 1991, the changes would be marginal.2 points
-
New EU legislation will have the Lane assist and other stuff as standard on all cars. https://www.ec.europa.eu/commission/presscorner/detail/en/IP_19_1793 http://autocar.co.uk/car-news/new-cars/european-union-lists-safety-features-mandate-2021 Drivers were not paying attention so safety stuff as required, now so much stuff for safety is there and drivers still do not know how it works and are distracted by it and the Bluetooth, and connectivity / Infotainment etc. So there is ESP / ESC, ABS / TC / ASR / XDS/ XDS+. Now there are so many warnings and things to alert people and they still hit things and have blind spots as the car is designed. Drivers were dead dozy, had run flat tyres and never knew there was a puncture / blow out so TPMS were required. Now many still never check tyre pressures unless there is a warning. Same with Oil, Coolant, Washer Fluid etc etc. Auto Lights and Auto Wipers and many have no idea what lights are on when or if there are any on to the rear. Many have no idea where to put the wiper stalk, or how to chose from the menu what they want, front, rear wipe, angel wipe etc.2 points
-
2 points
-
2 points
-
Our Kodiaq is that exact model - bought May 2018 and currently on around 63k miles. It has been faultless and still feels as fresh as the day we bought it. I would be quite happy with an 80k mile 2 year old car because the likelihood is that it has been doing long gentle motorway miles with low wear and tear, rather than living a hard life doing short miles and lots of braking and gear changing. Check the front brake disks for wear to give you an idea - ours are starting to look a bit worn, but it’s still on the original brake pads and disks. Similarly, check the front tyres for wear - at 63k miles our are looking like they might need changing by 70k miles, but they might stretch out to 80k miles, in which case you need to budget for new tyres. Ignore the poster who claimed the 7 seaters have a hard ride with a tow bar - ours is a 7 seater with factory tow bar and it has the best ride of any car I’ve ever owned - partly the reason we bought it.1 point
-
My last 3 Skoda's have all suffered the same thing after plenty of rain or after washing including Octavia 245 with LED headlights, 2019 Superb 272 Sportline Plus with Xenons and my current 2020 Matrix LED SEL Superb with the same condensation inside the headlamps. Simply clever built-in standard feature I'm afraid, no point in complaining.1 point
-
1 point@Teir You mean personalising? Personalising is not connected to headunit anyhow, but yes, it definitely works for pre 2021 Kodiaq.1 point
-
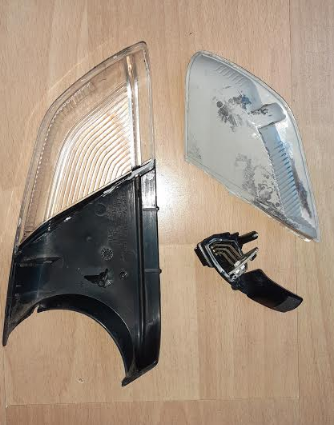
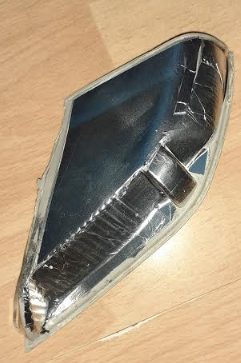
I had an issue on my door mirror indicator, where the indicator unit had suffered water ingress. Luckily, the indicator functions, but is light output was low. I decided to refurbish the indicator. Is separated the outer cover of the mirror cover using these You Tube guides and The indicator unit is glued together, but by carefully inserting a blade , the clear lens part can be separated from the reflector part of the indicator. The indicator has three orange LED's. On mine, the reflective coating has been dulled by the water ingress, so I applied some double sided tape over the dulled reflector, then used some tin foil on the double sided tape as a reflector. I glued the parts back together with 151 Fantastic Elastic glue £1 https://www.poundland.co.uk/19623-151-fantastic-elastic-glue/ It now works as well as the other indicator. Hope this helps
 1 point
 -
I have looked at the Haynes manual, and the instructions for refitting the glass into the regulator, state that you should replace the two plastic "spreader plugs". Also, it states to fit the larger plug into the hole in the glass, then fit the smaller plug into the large plug. Then you should lower the glass (with both plugs fitted) and engage the plugs into the plastic bracket on the regulator. I had fitted the glass into the plastic bracket on the regulator, then tried to fit the plugs into the hole in the glass, but i found it difficult to push the smaller plug inside the larger plug, using the access hole in the panel.1 point
-
1 point@gadgetmanI have been flying model planes for many years and multirotor craft since they became available to build and solder at home. "Drones" is a term now used in the legislation to include both fixed wing and multirotor unmaned flying models. When I first started doing Aerial Photography, with some of the first affordable compact cameras in a fixed wing model, the general public were genuinely interested in what I was doing. These days most people seem very atagonistic when they see you flying a multirotor in the countryside and they do not see the irony of them taking photos of you, with their mobile phones, in order for them to complain about you taking photos of them from hundreds of feet away. You therefore need a good appreciation of the current rules and I am still trying to get my head around them. Having said that many places and organisations such as the National Trust, English Heritage, many Councils, most tourist places and landowners have banned the use of drones on their land. Class A1 is:- A1 (fly over people). This applies to low risk drones because of their weight being less than 250g, their construction or because they are a toy (designed for use in play by children under 14). However, flights over open-air assemblies are not permitted. In my opinion this means that you cannot fly in built up areas in which people are walking about but only accidently over one or two people. Also the control range of Class C0 drones is 50m max and they must be certified to 2009/48/EC as a toy. CAP2007 gives more details http://publicapps.caa.co.uk/docs/33/CAP2007_EU_Drone_Rules_Factsheet_V7 5.pdf This is a good video summerising the new rules but as always until the rules are tested in a court of law there will always be differing opinions. I am sorry if this is a bit of a ramble and it looks like I am trying to put you off buying a drone but I wanted to make you aware that it is becoming increasingly more difficult to find places, and suitable weather as the lighter the drone the calmer conditions it needs, to fly them.1 point
-
1 pointThere are quite a few threads on here about exhausts for 280's, 220's & some with pics. https://www.briskoda.net/forums/topic/475703-exhaust-options-for-sportline-280/ From memory the exhaust is in sections. I have no experience / knowledge about the flap coding so hopefully someone who's done an exhaust change on a 280 will jump in.1 point
-
1 pointThe belt that you have photographed is not the timing belt, it is the auxiliary drive belt, to inspect the camshaft (& water pump) drive belt you will need to remove the top and middle covers that are just visible in some of the photos, they are held in place by spring clips, easy to remove, a little trickier to replace. The cambelt is shrouded by the covers to avoid dust & dirt contamination, it is likely that yours is on the original belt, I changed mine at 225000 miles but it had less than half the age of yours & was starting to disintegrate.1 point
-
1 pointAGM is the best for stop start. Charging - Red on red, black on the earth tab or a bolt head in the body nearby. Whatever battery you fit, it needs regular car use to keep it in good condition or charging once per month if you do a just a few hundred miles a month.1 point
-
1 pointRemove the jacket from the old battery it pulls off. Undo the bolt at the front of the battery which has a clamp holding the battery in. Undo 2 10mm clamps positive and negative remove battery. Reversal is the harder bit trying to get the battery clamp in position but all in all 15 minutes.1 point
-
Excellent work! Did you need to code each sensor to its position so it knows how to display the relevant pressure?1 point
-
1 pointIf you read the rules then you will find that drones below 250g with cameras still have restrictions on them. You will also, as I understand it, have to register as an operator with the CAA. The BMFA has some good information. Remember that cheap and good quality do not often come together.1 point
-
1 pointI've only to pay for the one I've fitted, thankfully, as I work in the trade so got it through my work, no labour costs either. Would've been a nightmare otherwise.1 point
-
Yes. Excellent garage with top level of service.1 point
-
Congratulations! Crazy Man, in this word best meaning I'm fully satisfied with lot cheaper alternative - 3.61€ 2020 Direct TPMS Set 53€ 2017 Direct TPMS Set1 point
-
1 point
-
1 pointYep, all too often I find myself ‘flashing’ the car in front whilst trying to set the ACC......1 point
-
iirc there is a little plastic barb at the end of aerial where it goes into the base. it squeezes in and the aerial slots into base then it springs out inside the base to stop it coming back out. thats the anti theft. you literally need to just pull it Nd will likely break that tab off doing so. if your replacing it with a fin though, im pretty sure you get the whole thing off inc the base in one go? pull down the headlining and undo the nut. then disconnect the wires from the base. then attach wires to new fin base, put in your fin in make sure the seal is a good fit or use some sealant if in doubt and do up the nut nice and tight.1 point
-
1 pointThere is nothing to warn you of if your journeys are long enough to allow the regenerations to take place without interruption, otherwise you are warned to drive for 10-15 minutes at 2.5k rpm or whatever to allow it to do its stuff. If you were regularly doing fast road journeys there would be more passive regeneration but the active ones would still happen just with less frequency. There is nothing to be gained by the vehicle telling you that its approaching an active regen and to go for a long high speed journey presuming that is what you mean by a hot fart, that sort of forced passive regen will not do as much good as the programmed active one. The only advice I can give you is to keep an eye on your tickover speed, if it seems increased open a window & see if you can hear the radiator fans running, if so then keep driving until it has done its stuff, if you switch off & realise the fans are running try to go out for a drive to let the process complete or if you know that your next journey or one you will do soon will allow a regen then dont bother. I would like to know how often my is currently regenning, I can see from VCDS how many kms have been done since the last one and since the lockdowns it has never been more than 200 miles but unless I do scans regularly and note the mileages I cant actually know that for sure, and in any case if I do know the frequency I can do nothing about it other than to decide to change to a petrol vehicle.1 point
-
Already fixed it now, but thanks anyway for the reply.1 point
-
1 point/\ Dean is 90% correct. swap the wires to maintain a permanent live for radio memory, but also get an antenna amplifier to fit on the harness or you can have trouble with am/fm signal being very weak. the amp is built into the standard headunit, so the upgraded unit will need the inline booster. cost very little and easy fit. may also need an antenna plug adapter depending on the unit you get1 point
-
1 pointClean the area around it and gaffer tape it thoroughly. It's more about other road users and the 'death trail of slipperiness' than about whether the car makes it.1 point
-
I also wondered about the fix not being done before especially as many dealers were doing it without permission, its almost like they know of the risk on the 1.6 tdi engine & left them well alone, however they had to contact all the registered keepers and probably are obliged to make contact again now for those that have not been recorded as converted. My UK neighbour like you Langers has refused the fix but they keep writing to him, he is a very nervous sort and will never have a main dealer look at his car for fear that they will convert it, in doing so he has protected himself from their incompetence. I did a VCDS scan once for him and as a wind up said that while I was at it I had installed the latest ECU programming, he freaked out1 point
-
1 pointI mean, mismatched axle to axle isnt too bad all things considered. If its two different tires side to side per axle and especially on the front I would agree with you. I understand that on a track the main problem would be tires heating up at different rates and what not,but if you have the same tires side to side of each axle would this not become a non issue? Besides, on a nose heavy,front wheel drive car such as the fabia wouldn't the front wheels be doing 90% of the work on a trackday, so them tyres would be the ones that would be taking the brunt of the wear and tear of hard track driving. Because of this, surely the rear tyres wouldnt necessarily need to be some mega expensive r-comp barely street legal tyre, a decent tyre should suffice for all but the very top level of racing.1 point
-
So you can probably prove that no-one else has buggered about with the injectors better than they can prove that someone has. Talk to a solicitor, a respectable one not a 'no win no fee' bottom feeder.1 point
-
1 point
-
1 point
-
1 pointThanks Tony, I hope you are right! I did not see how the pedal box could affect the turbo as it is not and has not and cannot increase the engines power, It is adjusting the response to pressure like having a lead foot at take off. If I remember correctly I have it on setting 1 with 2 so not too responsive, any more and I reckon my wife will rear end a bus !!1 point
-
1 point
-
1 point


(Small).thumb.jpg.ce1b03a69ca84522c71907ee99b42836.jpg)


.thumb.jpg.683fc09a88a36e3a8a88cc4faae6baa4.jpg)


.thumb.jpg.06721e8c8b33ed0eea16572ff131b291.jpg)