Leaderboard
-
skomaz
FREEDOM10Points11,164Posts -

Lee01
FREEDOM8Points36,414Posts -
chur1996
Finding my way5Points41Posts -
MikeTheThinker
FREEDOM5Points8,509Posts

.thumb.jpg.9dd3f612ba7f13d10be5c518d3c8d255.jpg)


Popular Content
Showing content with the highest reputation on 07/02/26 in all areas
-
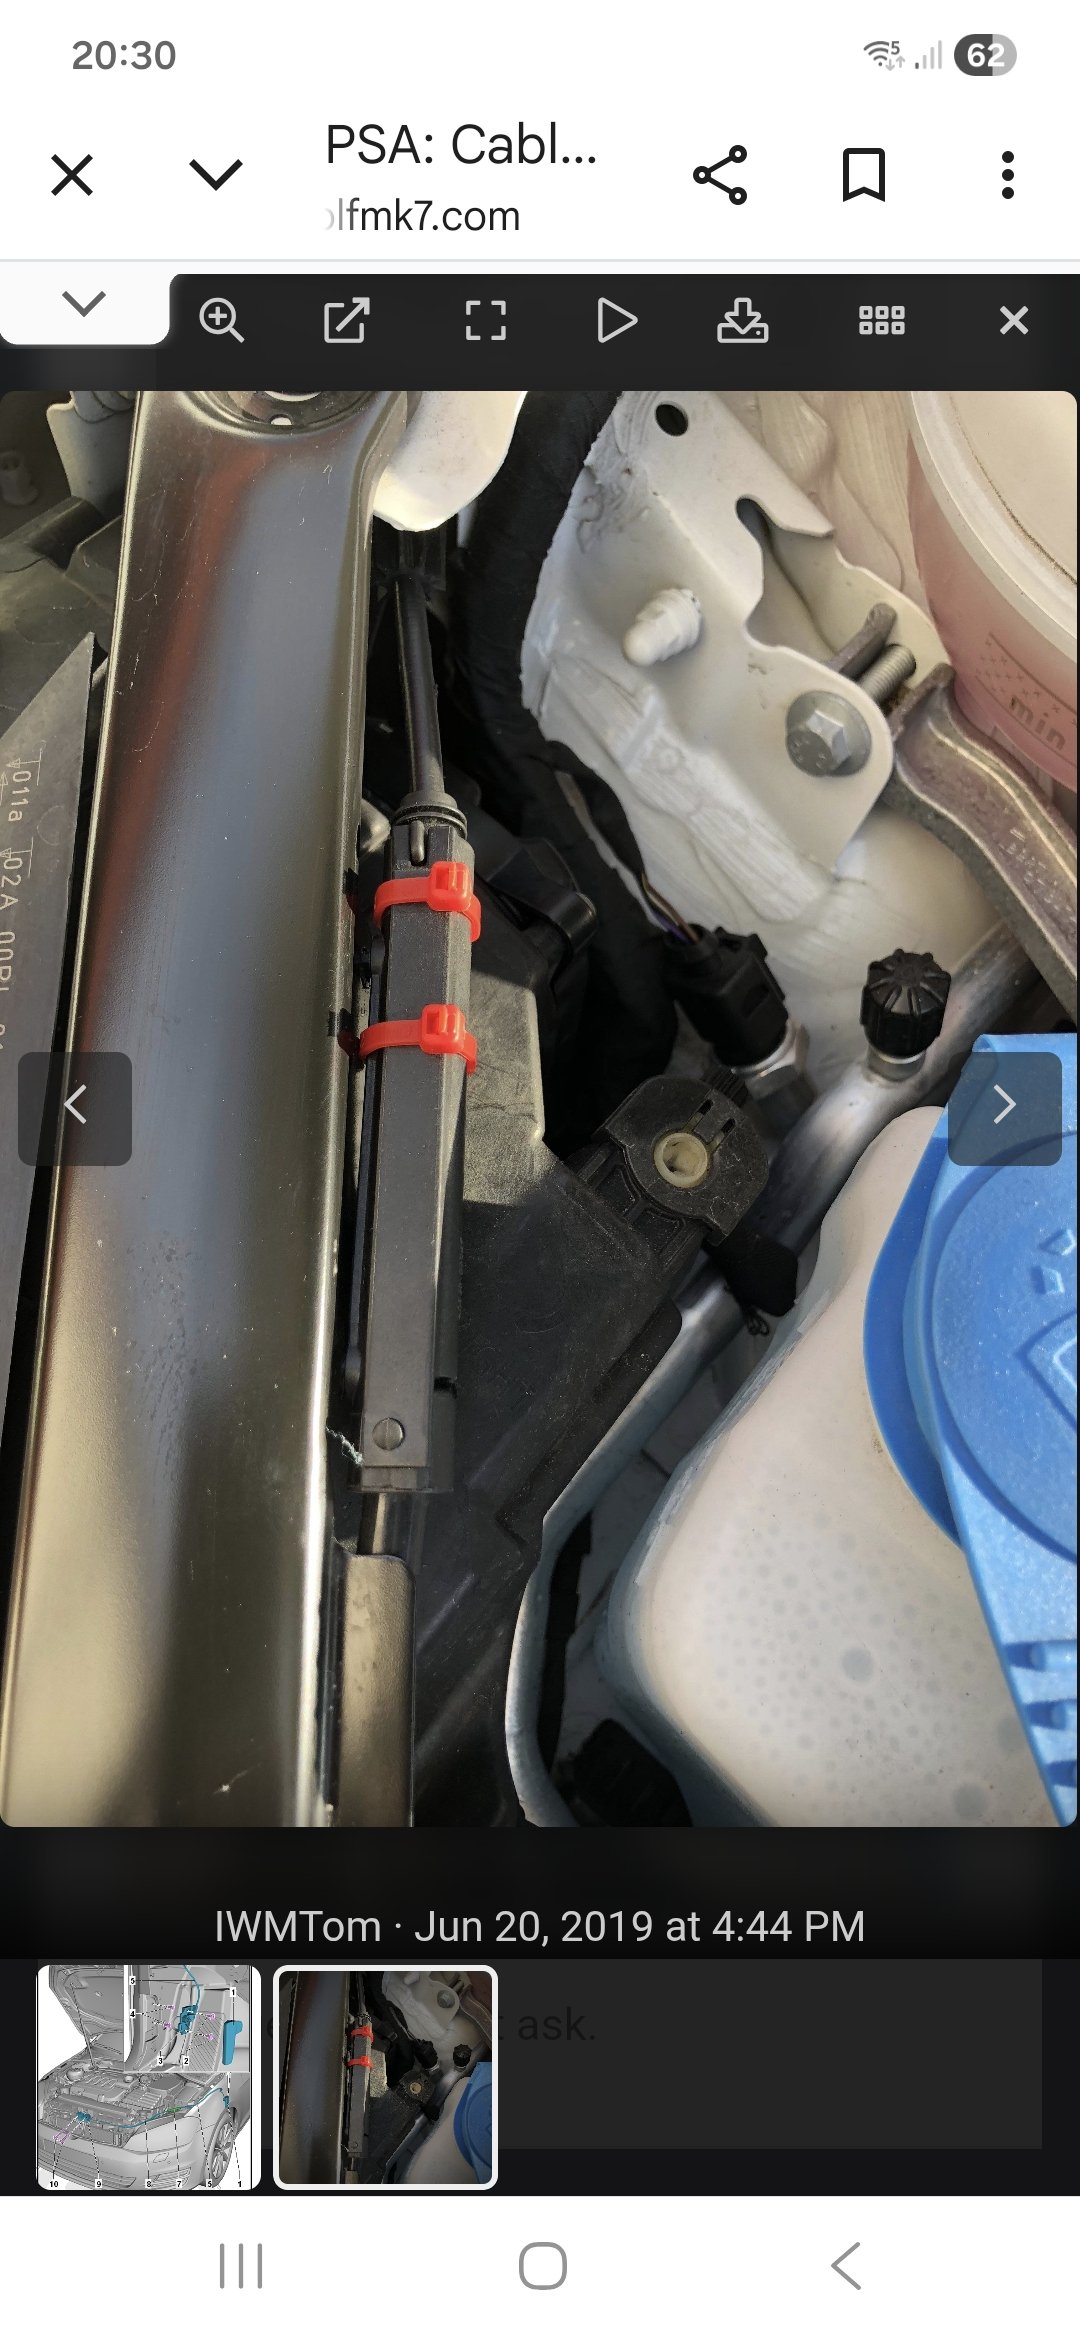
3 pointsEvening all. Quick update. My bonnet is now open, a very cold, difficult 2 hours, will not bore you all, but if it happens to you, please message me. Dont go under the car or through the wheel arch, impossible. Just wanted to say, there is a junction box, little thin black plastic box attached to the underside of the cover/tray opposite the airbox, held on by two silver clips. The two bonnet cables meet there, one from the release lever, the other from the latch, the latter pops out under stress from a clogged latch or the plastic pops open, combination of both over time. Please zip tie it shut the next time you are under the bonnet! Cannot stress this enough. And clean and grease your latch. Also grease the cable before you zip tie it. Huge design fault by VW., a zip tie would have saved me hours of grief and stress. Looks like below, from a Golf I think. Ours is on the passenger side. Any advice, please ask. Graham.
 3 points
 -
3 points
-
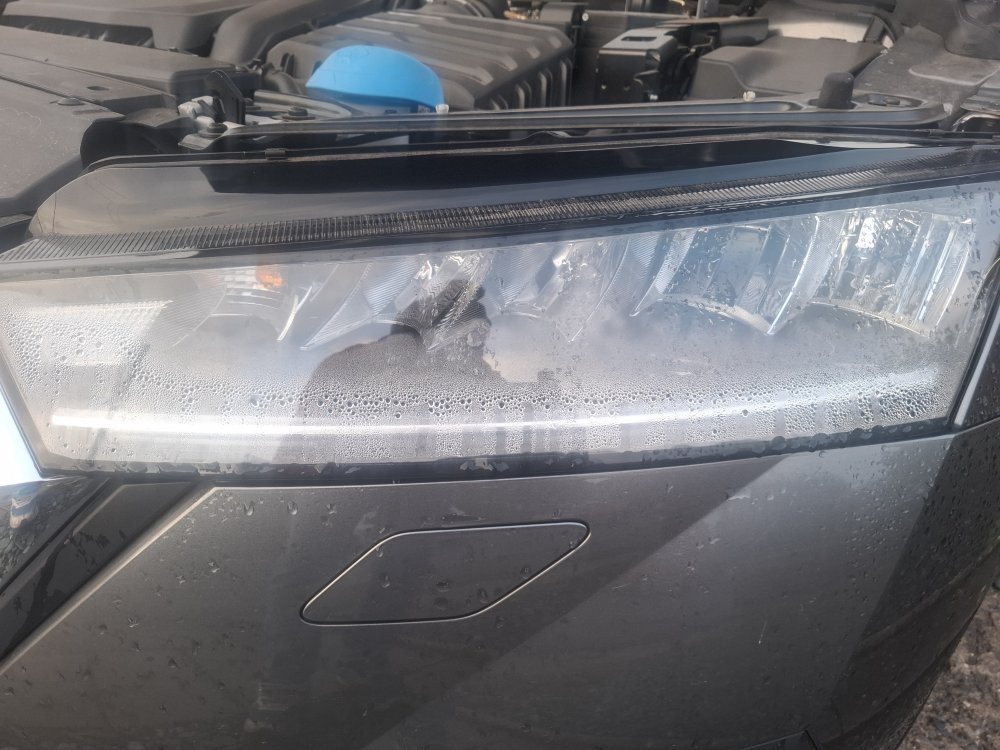
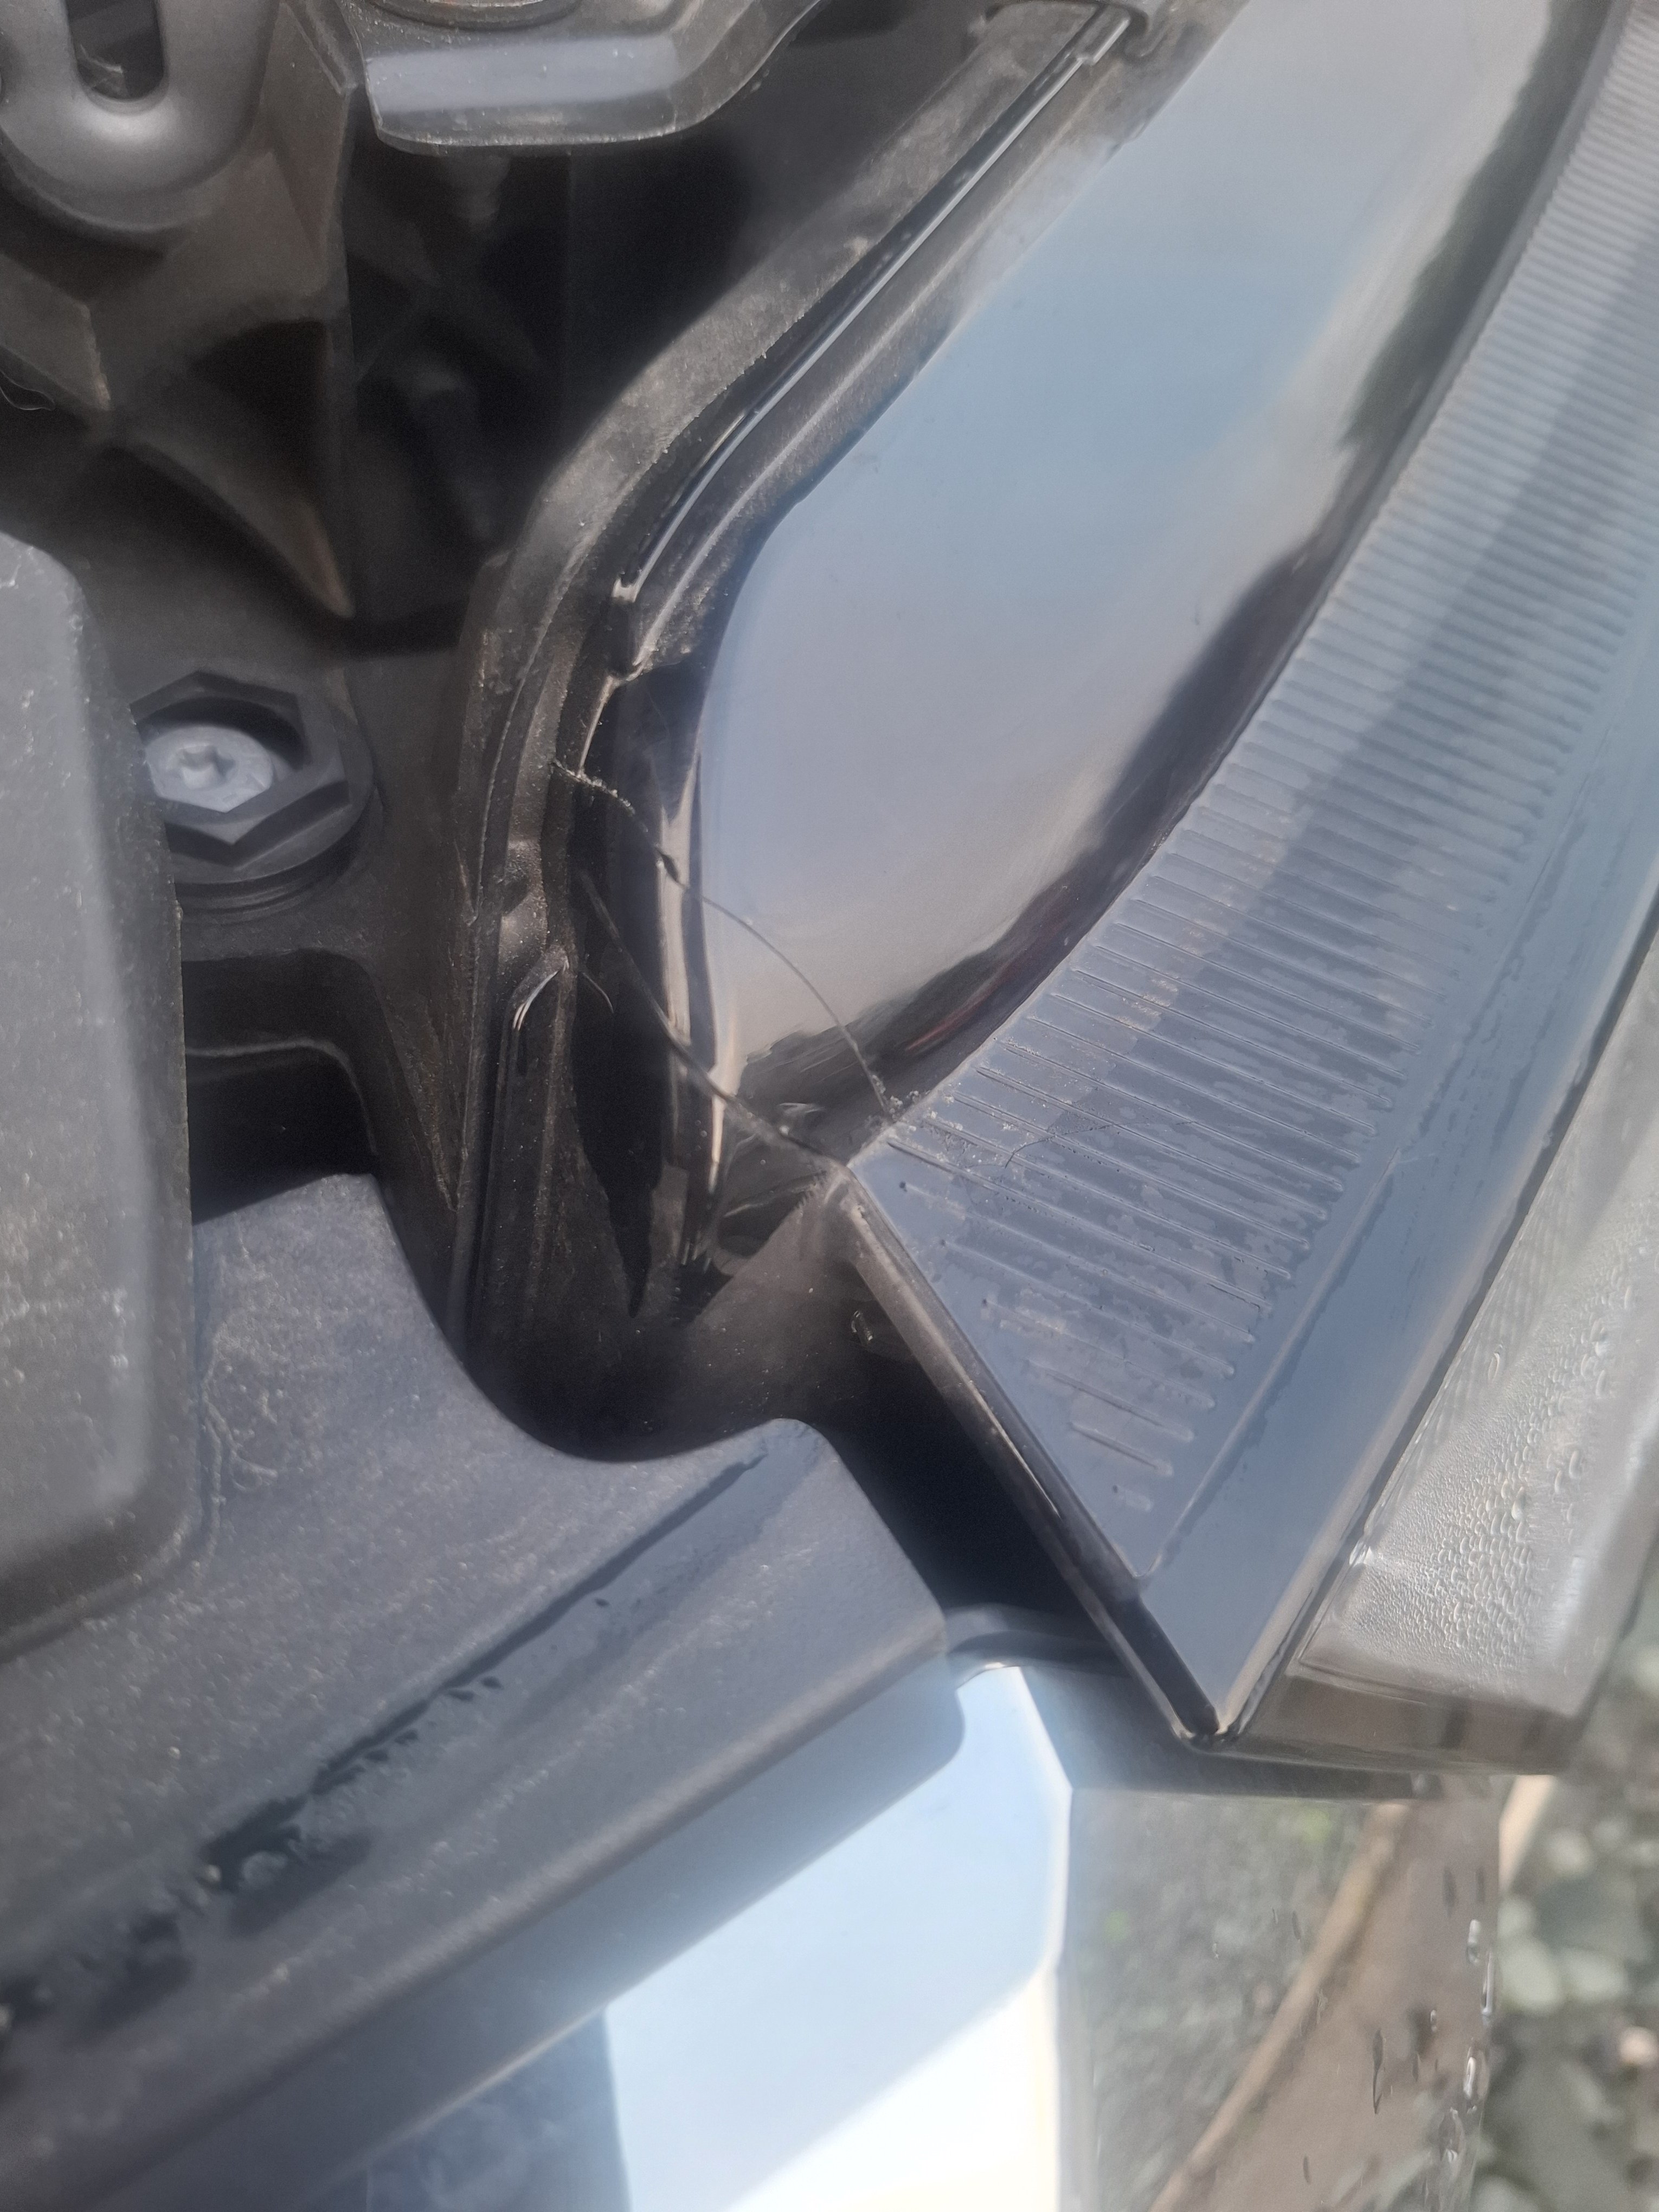
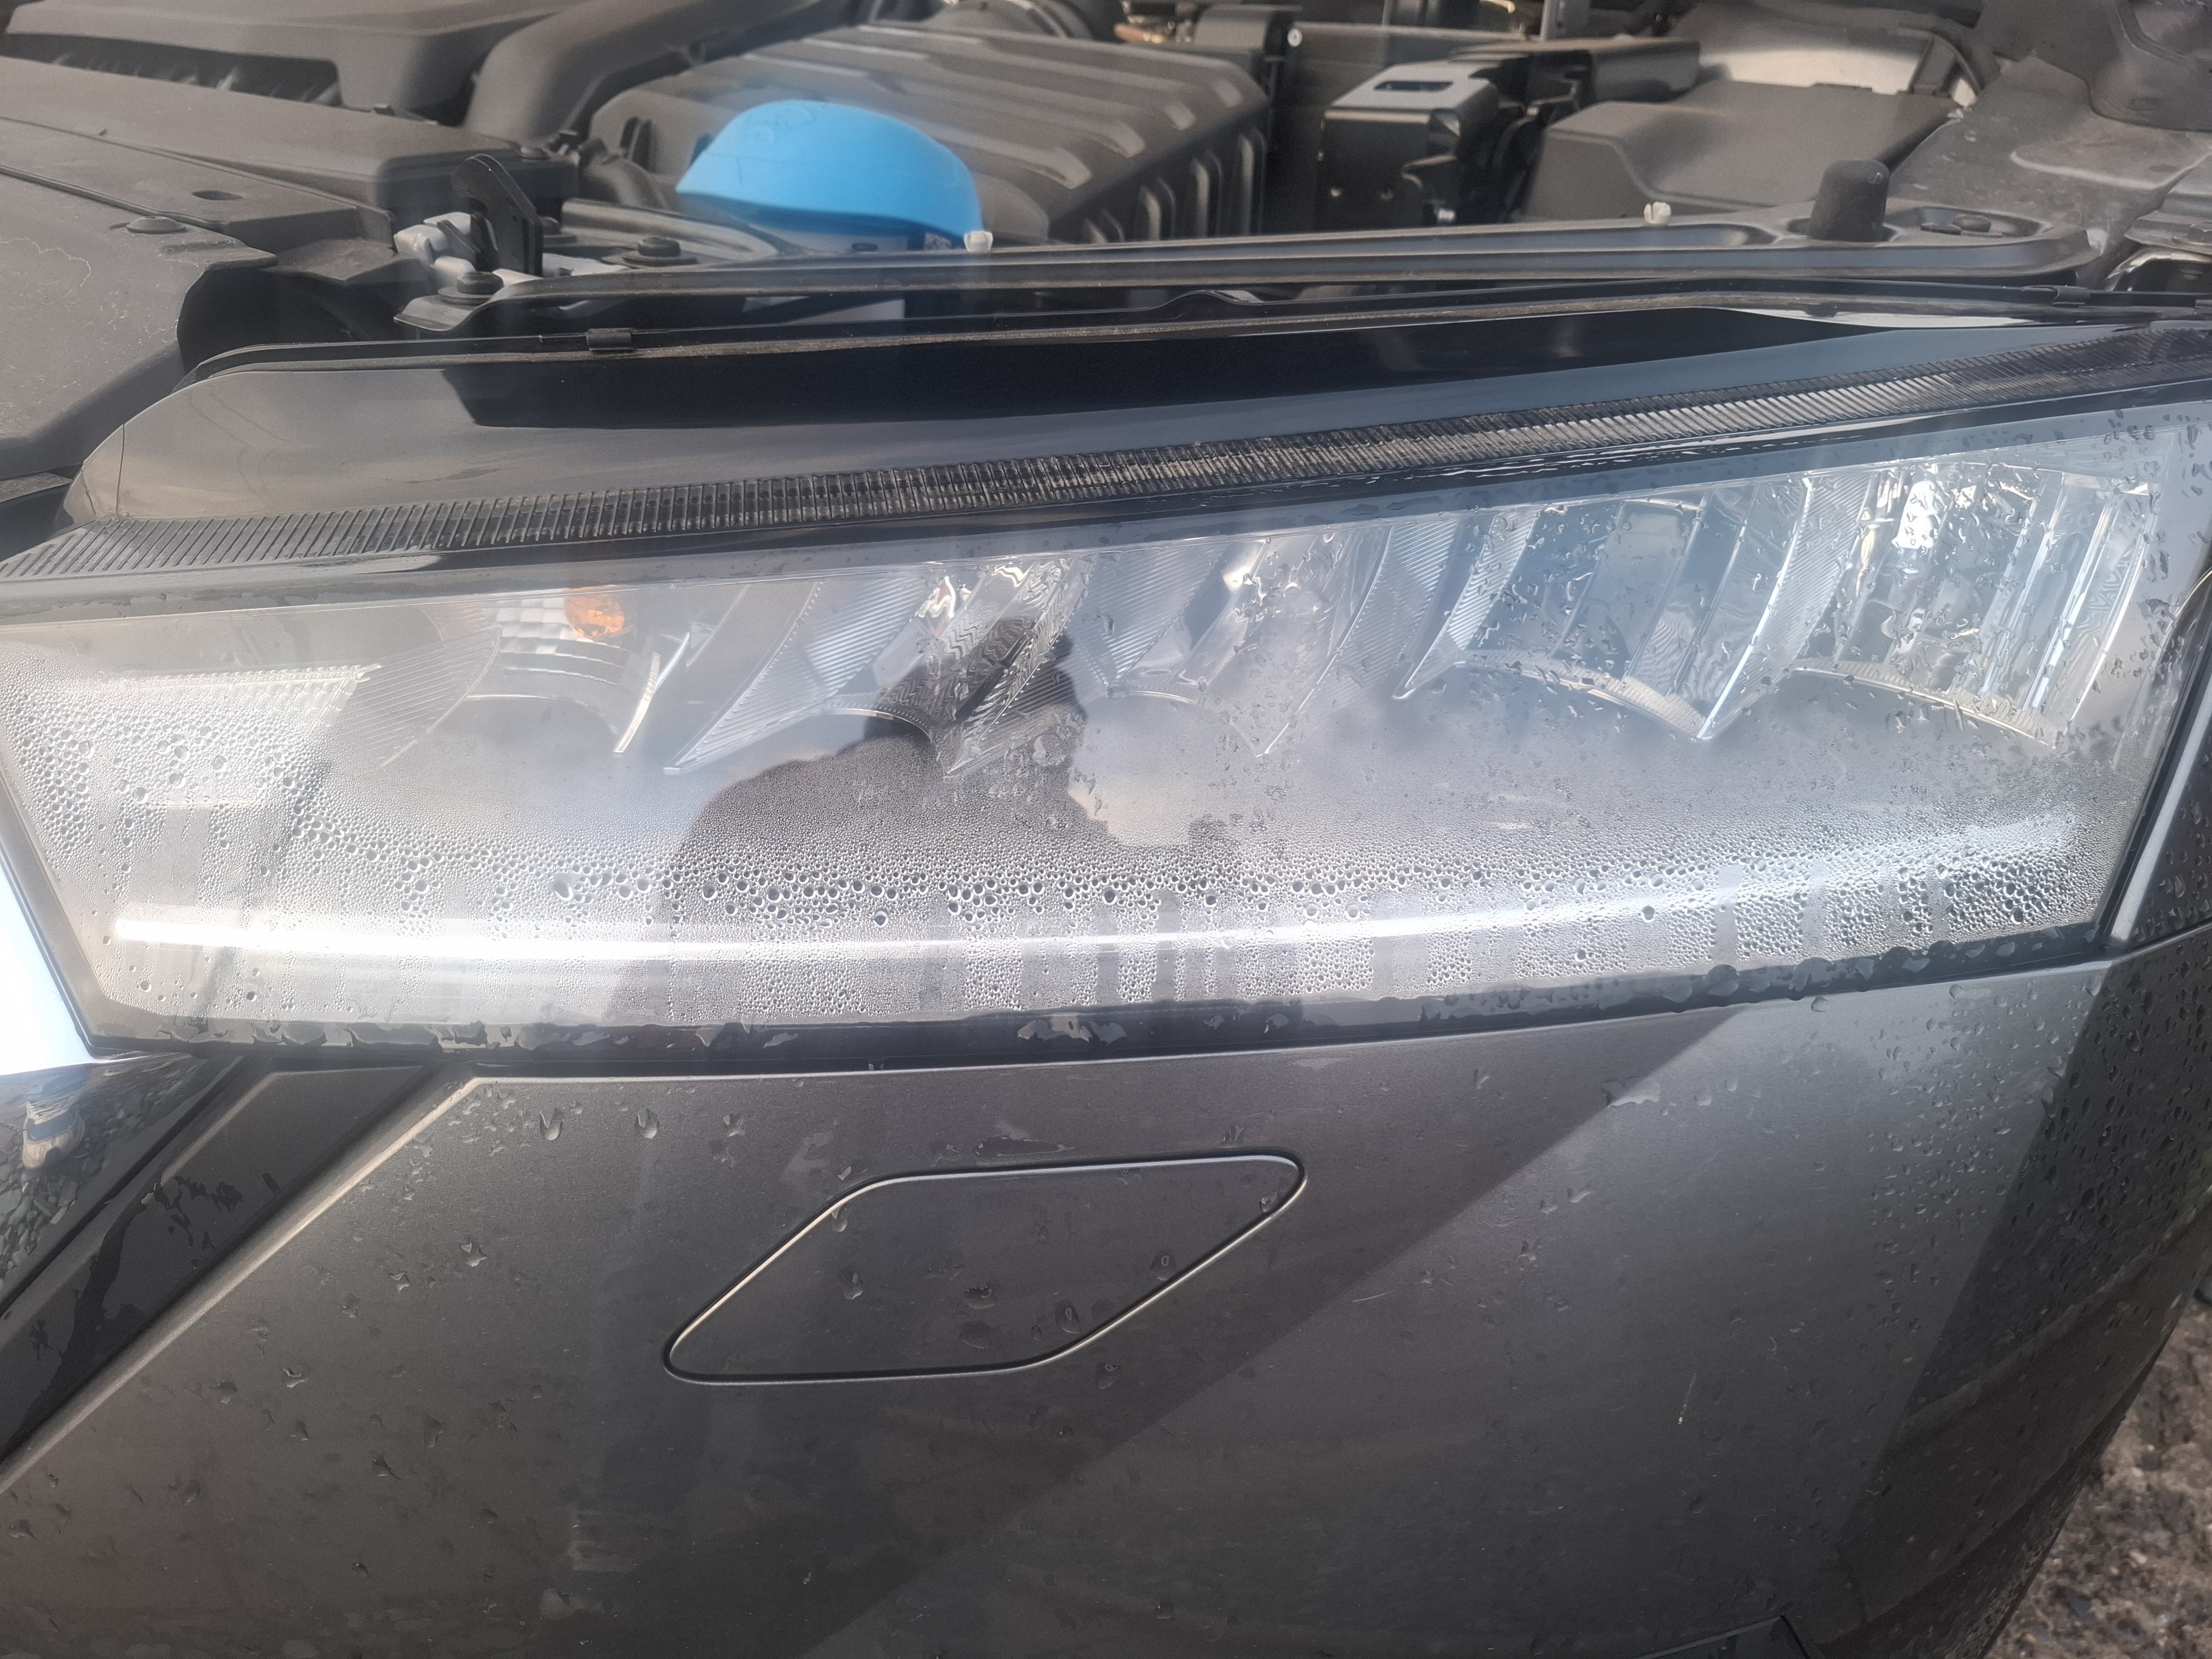
2 points***UPDATE*** Apologies for the delay, things have been progressing but I wanted to wait until their conclusion before posting. Also, I didn’t want to tempt fate! The good news is that the Dealership (DM Keith, Wakefield) have replaced BOTH headlights under warranty. This has taken some time (the car was taken in for initial assessment last September), but in the end it was well worth the wait. Hopefully this will help others with their claims, as it should be a matter of record with Skoda UK.2 points
-
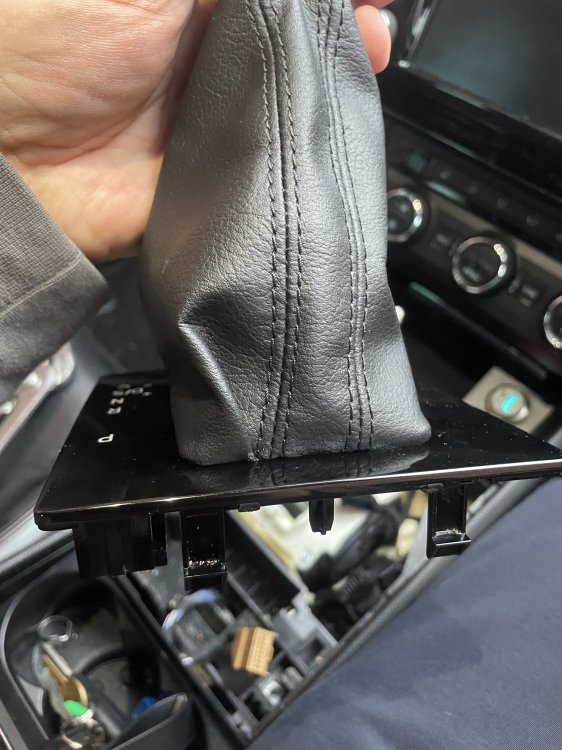
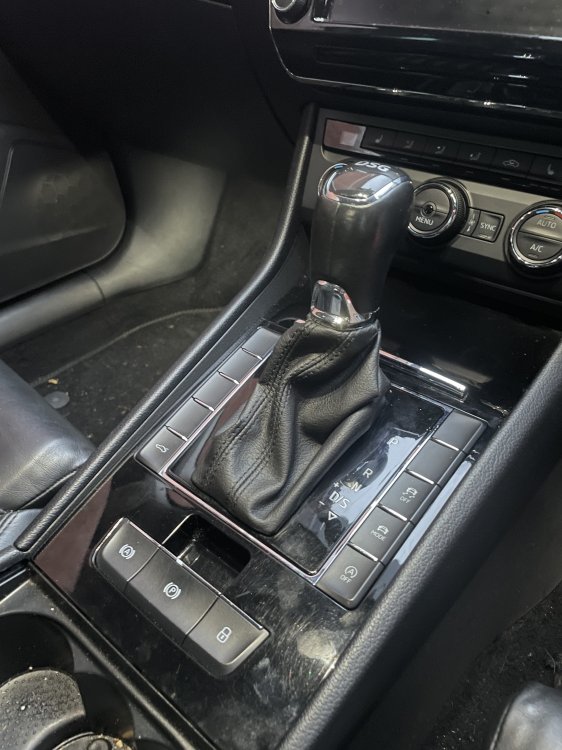
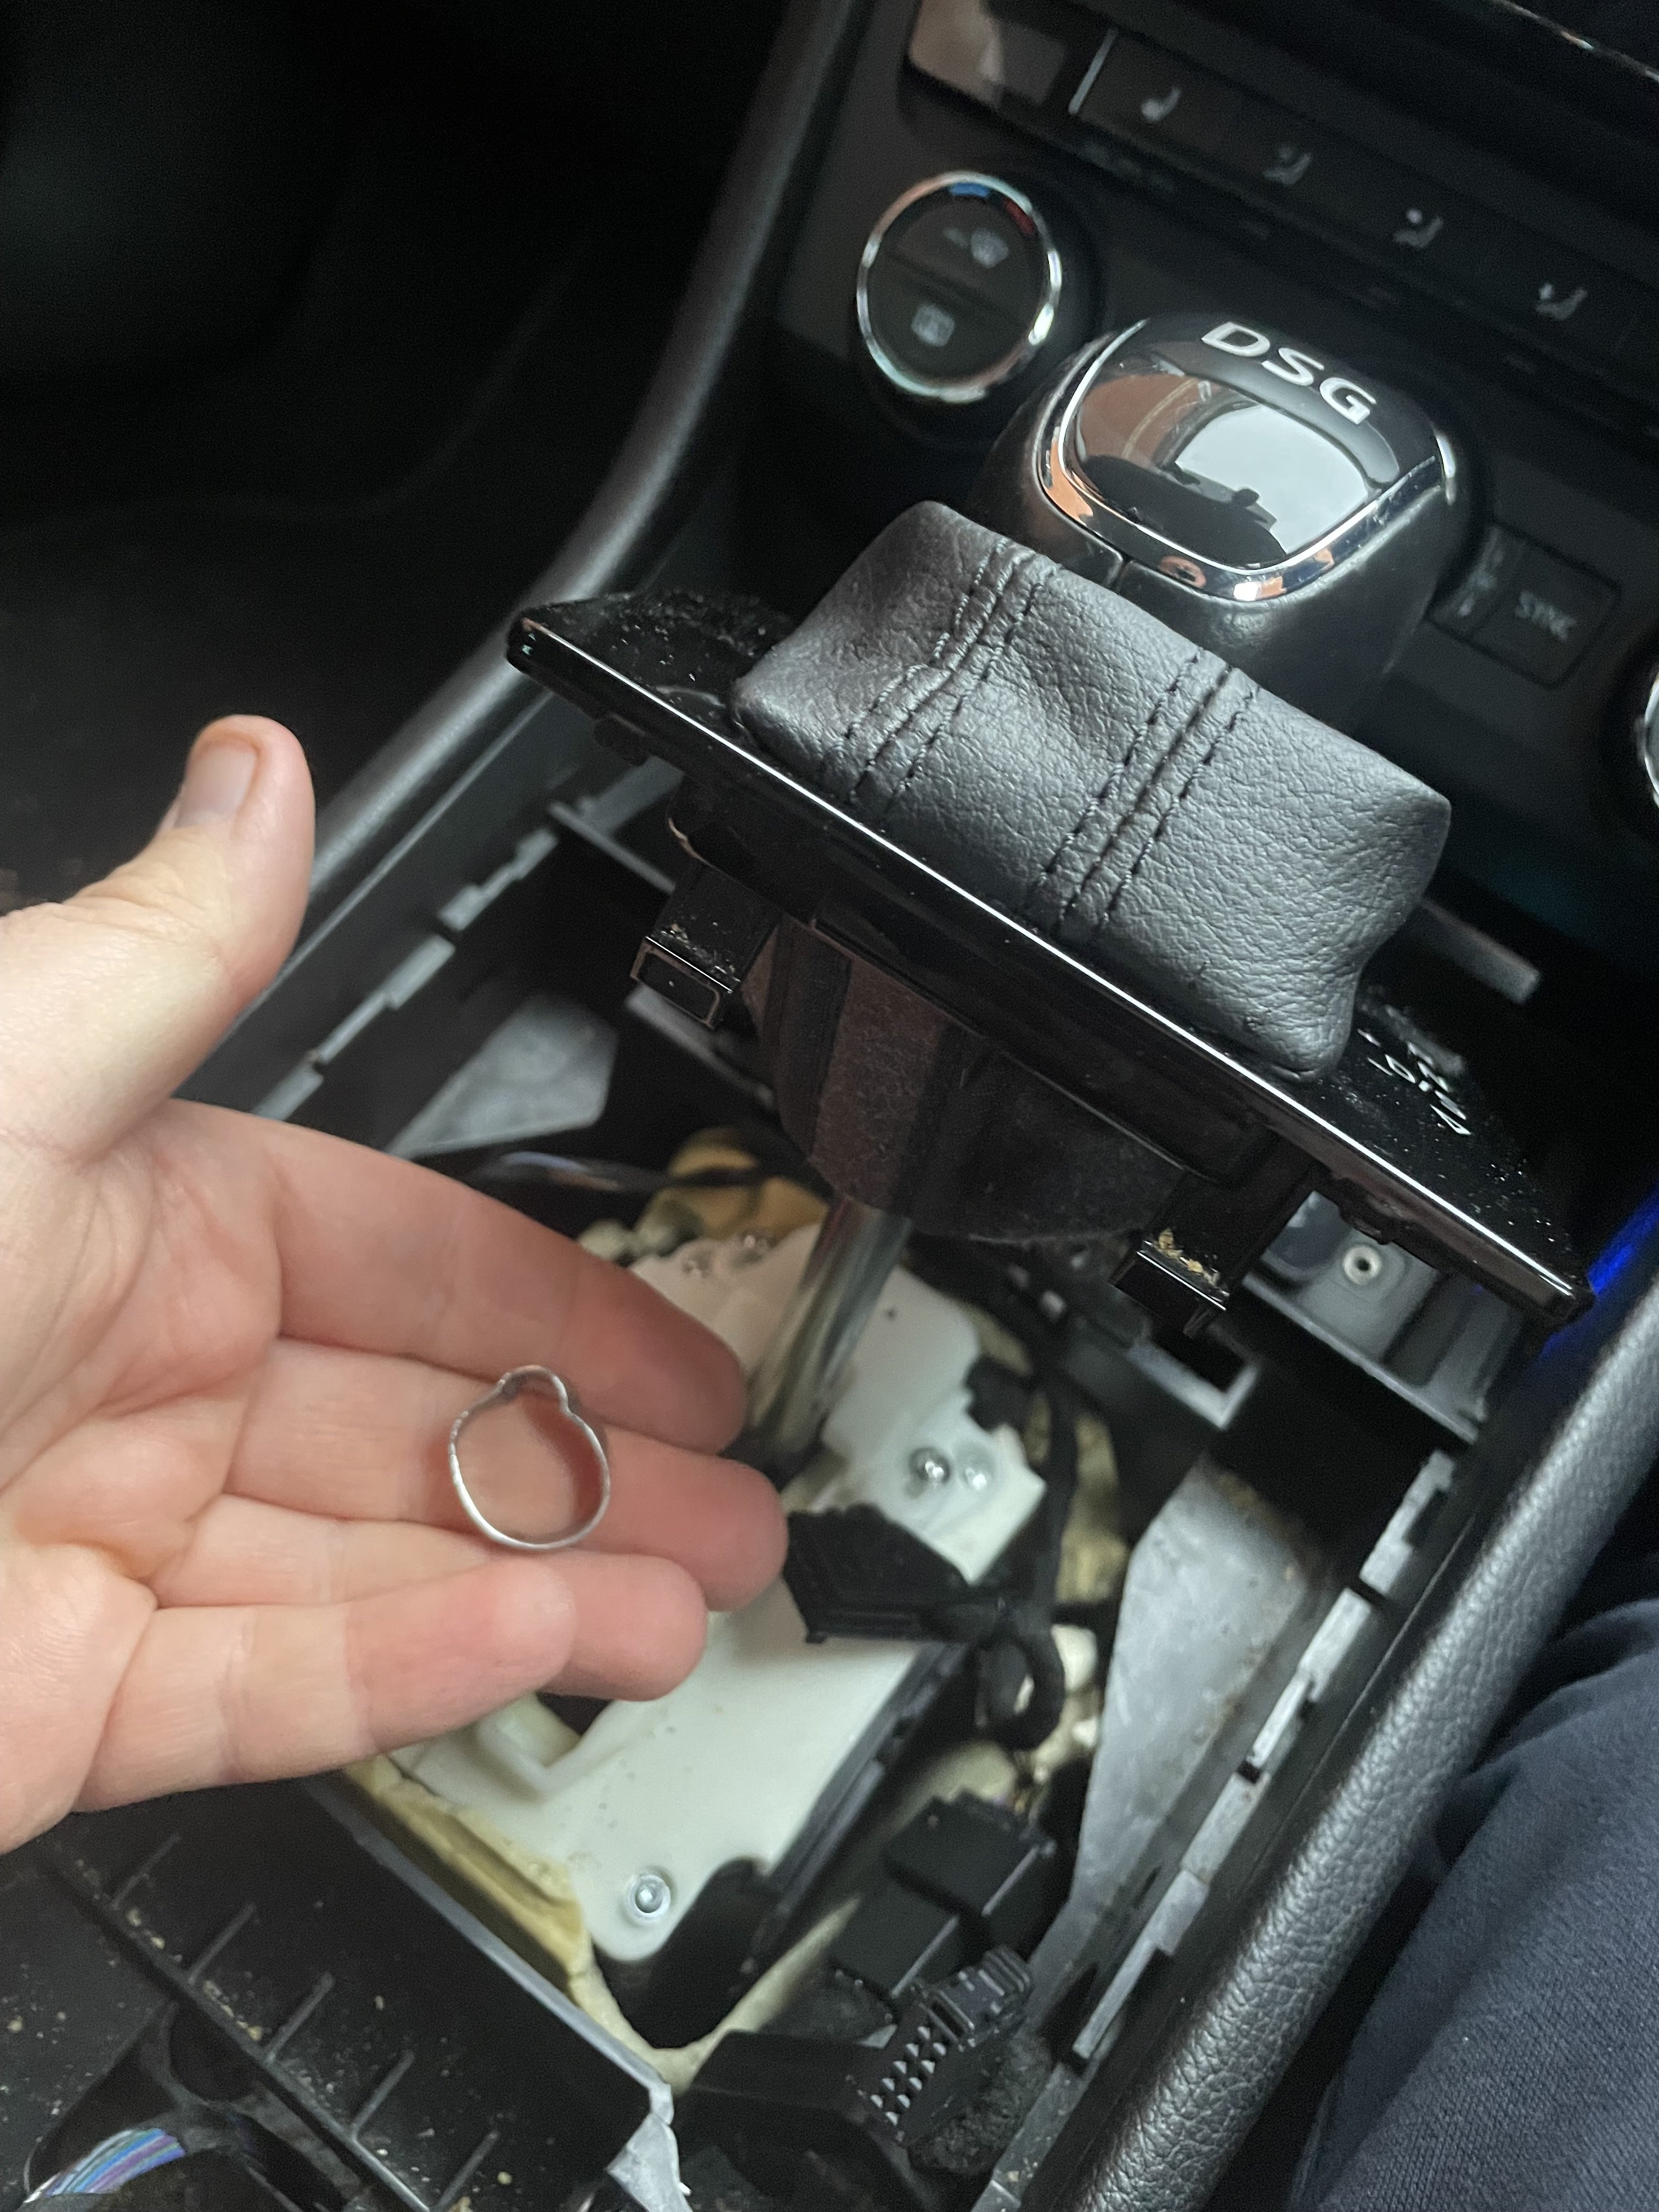
Changed the gaiter today. Old one was starting to peel on the corners. Got a nice black leather mk7 golf one from @tombee Dismantling from car was pretty straight forward. Taking the knob off the top of the gaiter was challenging. A couple of screwdrivers prying key parts and some swearing was required. Also managed to push the button in when doing it which the manual says is a no no and you need a special tool to reset it. Turns out you can flip the top off and reach in with a screwdriver to reset it. The golf gaiter is bigger than the superb one so had to cut it down a bit. And the original is stapled on to the frame. I doubt it would have taken more staples as it seems a bit brittle. And I don’t have a stapler. So superglue and some pegs to hold it all in place was the method I went for. Had to pleat in some corners but kept that to the front so it can’t be seen in the car. Then made the schoolboy error of not putting the metal ring on before the knob. Doh. All in all wasn’t too bad and really pleased with the look. A note for those with the new P switch on top of the gearbox. If your gaiter is a bit baggy as mine is now, it can get trapped between the shaft and the switch and make it so the switch doesn’t press and you can’t get the key out the ignition. Some careful positioning of the gaiter and it seems to be all Good.


 2 points
 -
1 point
-
1 pointThanks for your update, I am unfortunately having to contact the Motor Ombudsman for the same issue! Despite another user on this thread sending me details of it being fixed under warranty and finding out that Skoda actually completely changed this part (no doubt because they found a weakness), Mitchell Skoda in Chester are unwilling to accept that this is a Warranty issue 🤷🏻♂️! Skoda UK have offered to pay 50% but Mitchell Skoda won’t match that and are still adamant that there are no other reported cases, stating that even if there were each garage works to a different standard, I quote their warranty manager: “We have contacted the Skoda technical department who agree with our findings and have confirmed that there are no known issues with this model. It would not be appropriate for us to comment on any other vehicles or dealership decisions”. Anyway if anyone else has any pictures of this fault on their Octavia headlights, could you please add them on here, to strengthen my case and anyone else’s who may face the same issue with Skoda. I’ll update once I hear back from the Ombudsman, although I imagine that may take some time.1 point
-
@Jamesotaylor I have just started experiencing this issue, intermittently it seems but same behaviour. Idle goes to 1k and the power steering is juddering / cutting out. Switching off ignition and restarting goes back to normal. Battery seems healthy and alternator is working OK based on running voltage of 14.2V Did you make any progress or solve it yet?1 point
-
1 pointThere's around 6000 new Skodas in UK stock, 875 of them are Karoqs. Had similar from Honda and Hyundai in the last few days - Hyundai particularly pushy. Don't know if this means they're all struggling, or they're just reacting to each other. Did buy the Honda at an event, but it was pure chance - didn't know it was on. Was a bit embarrasing, showroom was deserted. Got an OK deal, but nothing stunning.1 point
-
To save money. I own a 2005 Seat Cordoba, which, compared to earlier models, is missing cover on the bottom of the dashboard. It wasn't visible, unless you got your head into footwell, so they replaced it by much smaller piece of plastic that only covered the visible part of the area. Similarly, top of the cargo area has no trim, even though rest of the trim suggests that at some point, it was planned (or maybe present in higher trims, who knows). This part of the boot floor is similar case, it's just not part that's not visible under normal circumstances.1 point
-
1 pointHopefully if we can get enough people coming forward with the same evidence then we will be more likely to have a chance of claiming under warrenty

 1 point
 -
Τhe holes are for the clips of the Ω shape plastic panel that is missing, in the centre there are two metal columns like I I shape,this is the main support for this part. The whole area is covered by factory carpet and behind it are the cables for the rear lights, the wire for the trunk latch.1 point
-
Hello, just thought I would say hello as I am new to this website. I currently drive a VW Golf GTi Mk3 1996 but have just bought myself a Skoda Fabia Estate 2011, nice low milage - logbook says grey but I think it's a blue! The car needs a bit of work (paint mainly) as the previous owner didn't know the width of the car and or garage opening 😉. I need to possibly get a Skoda part so will post in an area that I have already managed to read on-line. Thanks All1 point
-
1 pointThe 'update' is them trying to sell you a new car!. Out with the old and in with the new, hence update. Anything to get you in the showroom, hoping once you're there you just might decide to buy a new car. The hardest part for any sales is trying to get a potential customer in the showroom, once you are in the showroom there's always the chance of a sale for them.1 point
-
1 point
-
1 pointJust to chime in. I use two phones on my 69 Plate. An iPhone 8 on iOS 14, Jailbroken so I can use CarBridge. and an iPhone 17 on iOS 26 (Primary device) The 17 displays turn information on the VC if I use Google Maps The 8 does not. @TonyElv Are you using an up to date iOS?1 point
-
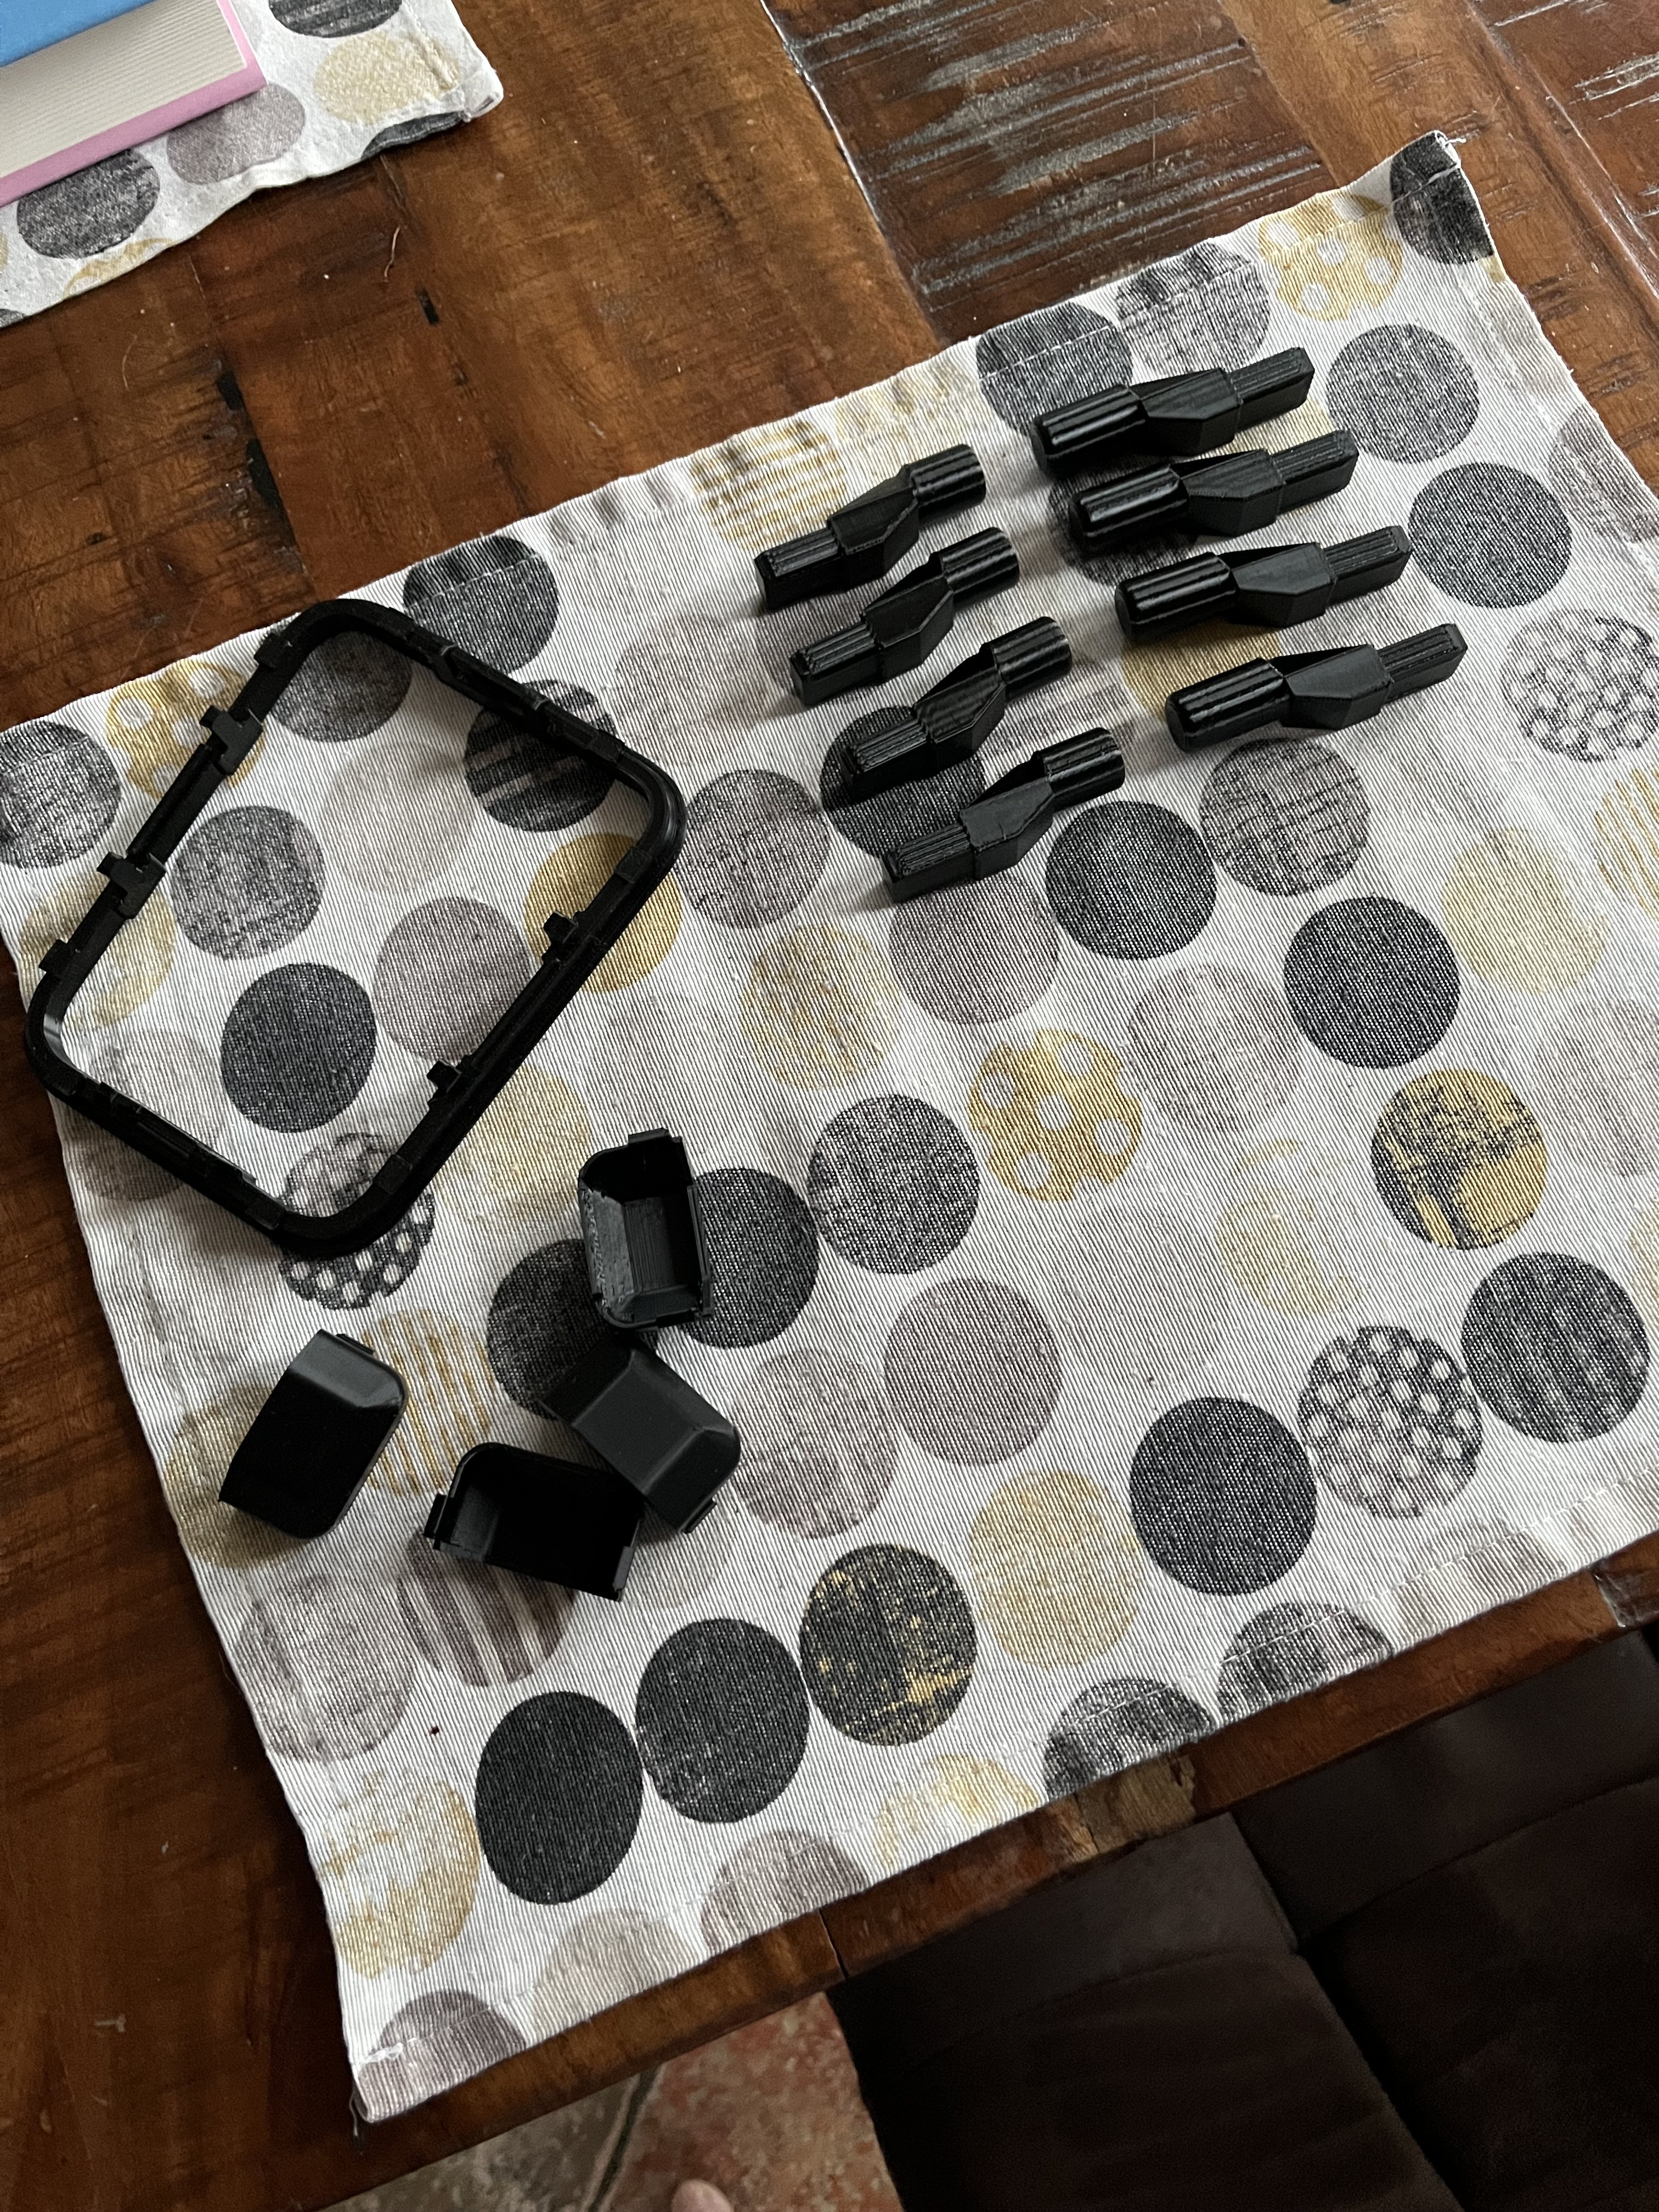
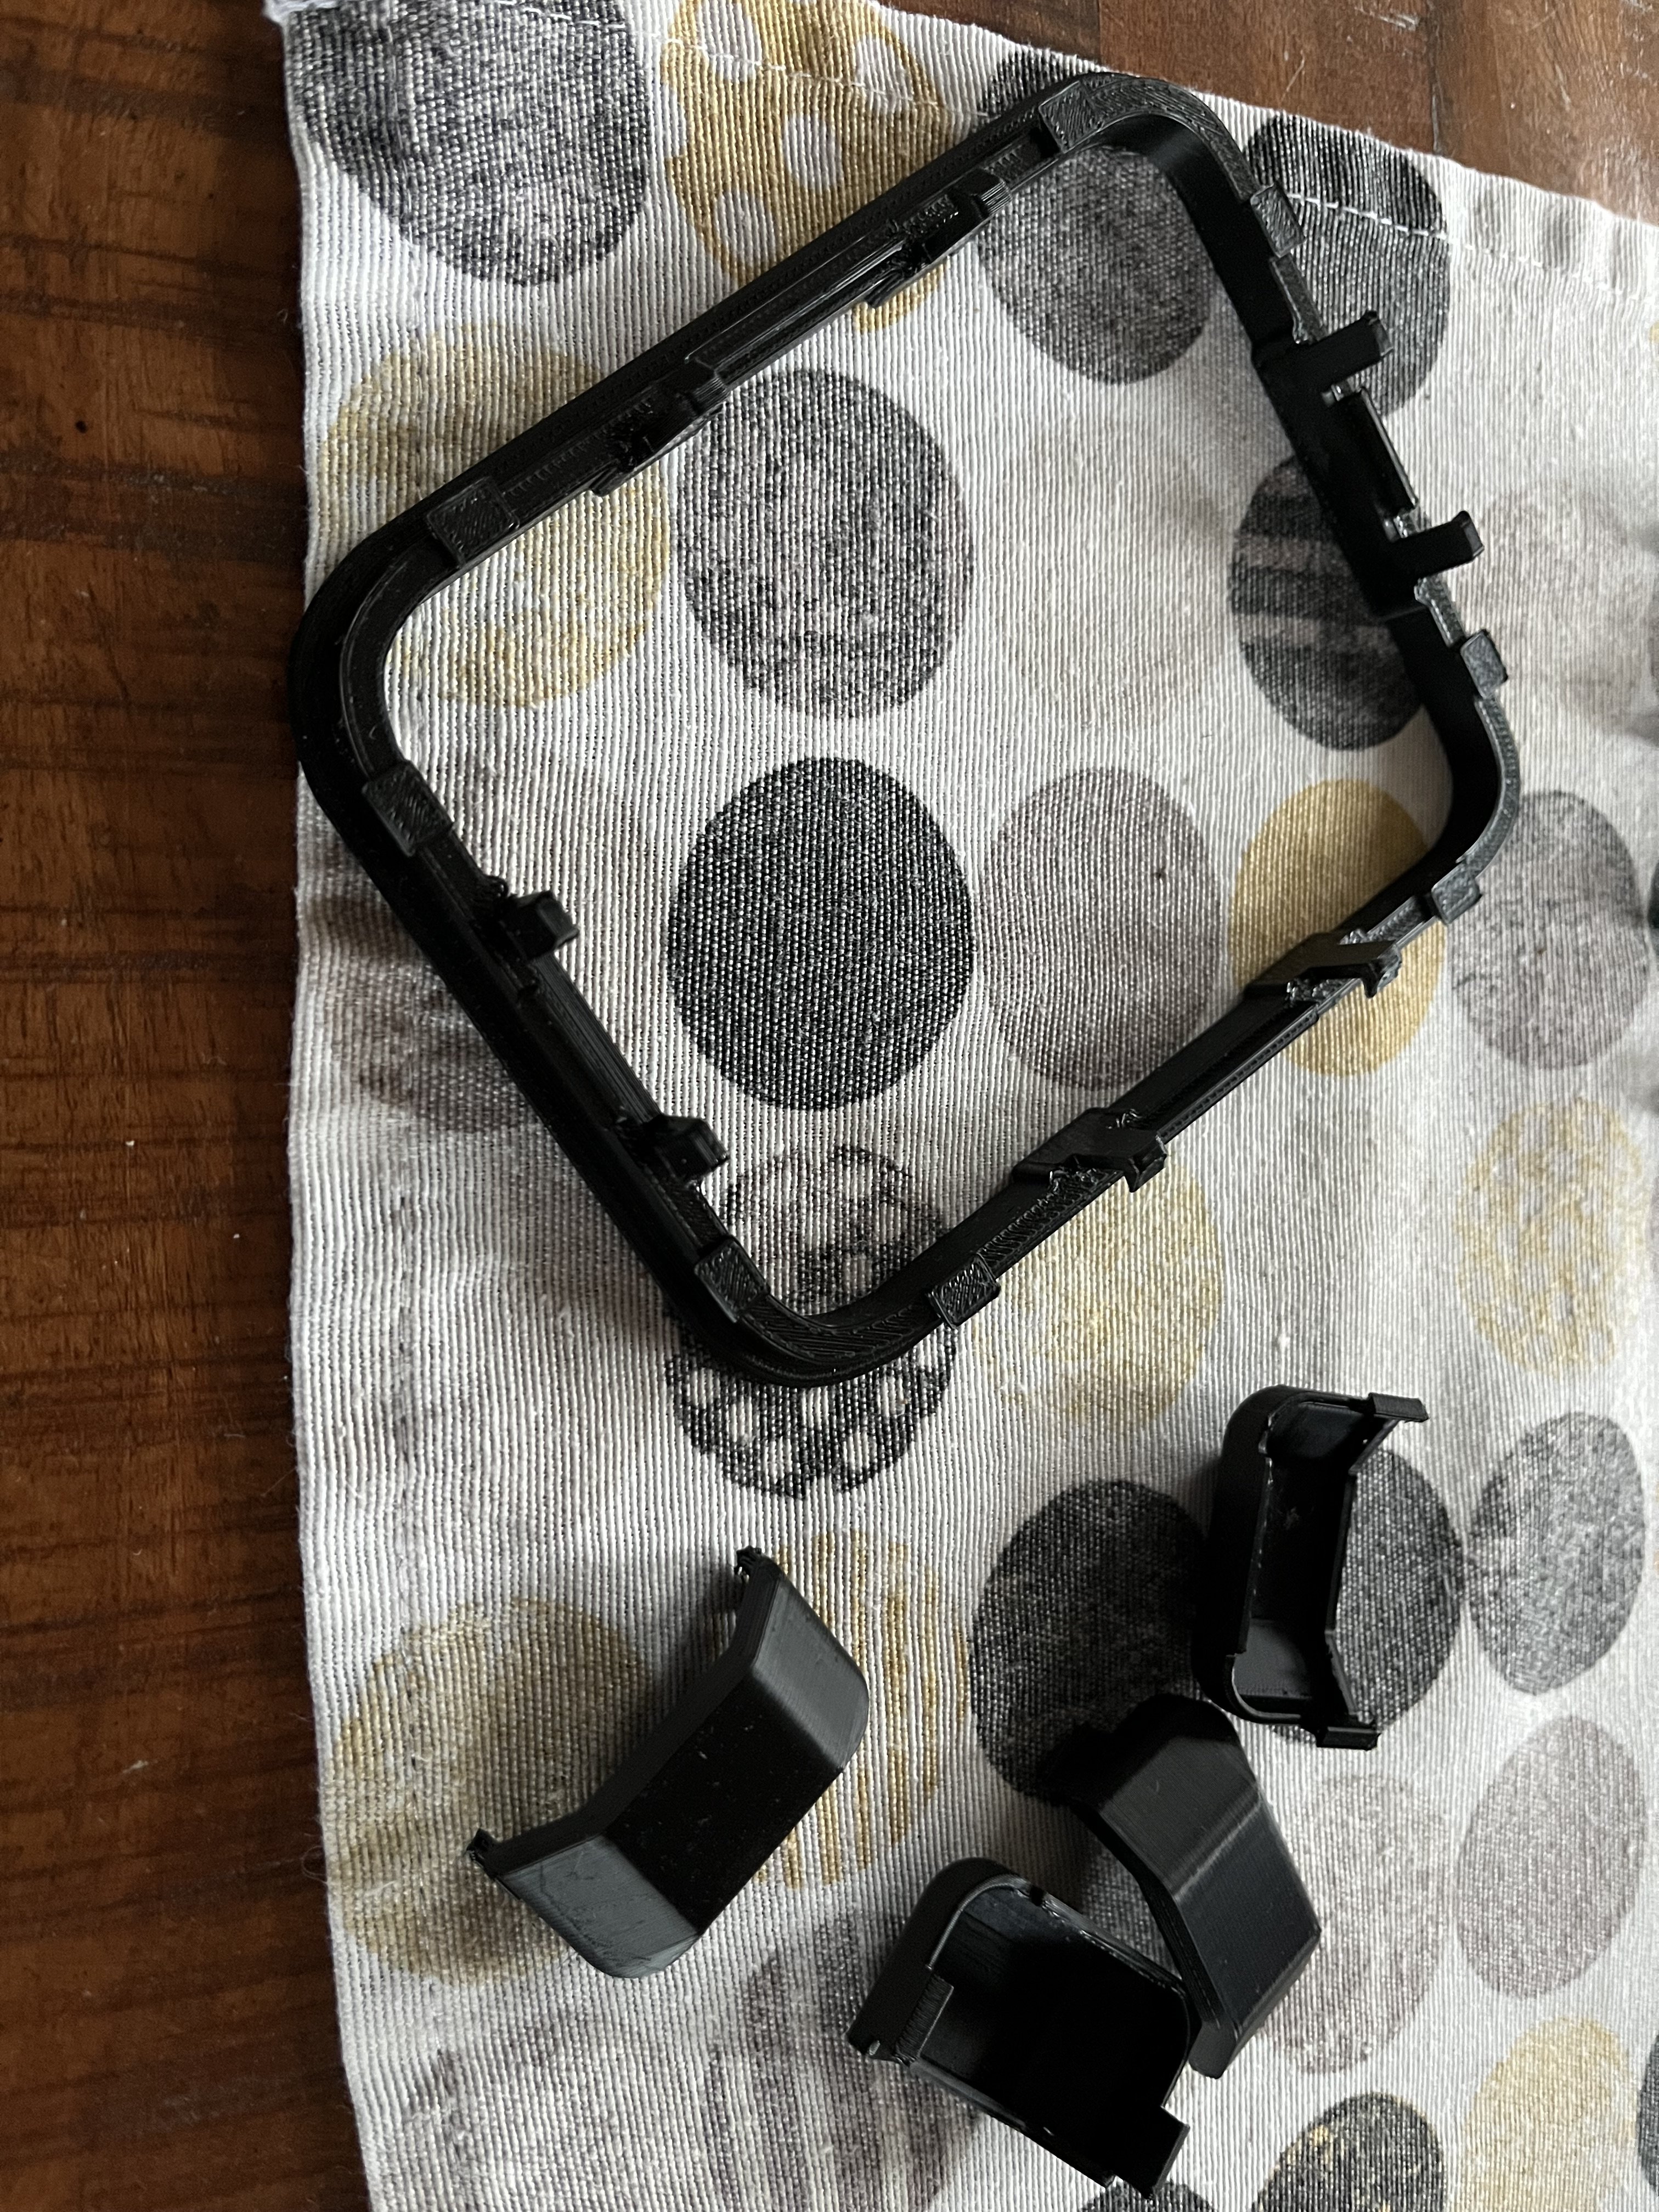
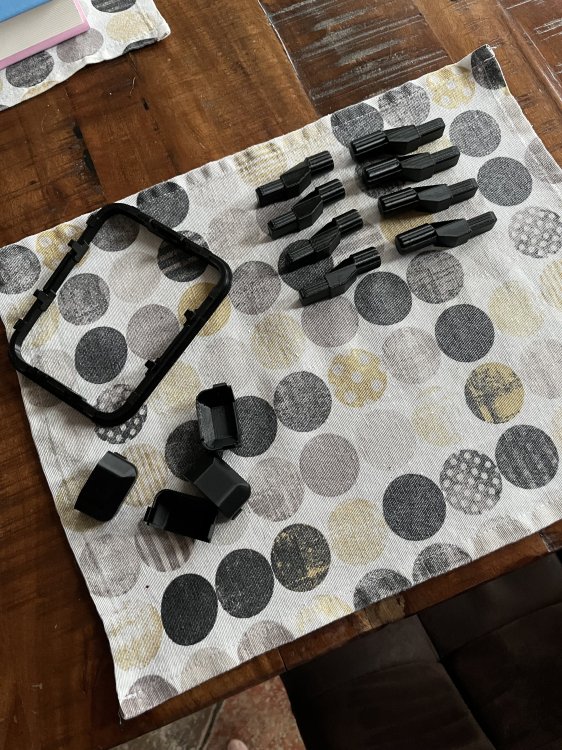
1 pointSo, the 3D printed parts arrived, I’ve fitted the parcel shelf lugs and the gearstick gaiter, am waiting for the rear bumper attachment point cover to dry after painting it!
 1 point
 -
Unfortunately I don't deal with MIB3 units1 point
-
1 point
-
1 pointEvery 100000 km?! 😳 It sounds huge! I clean the strain gauge on the Haldex pump at each Haldex oil replacement every 45000km. Here are pics of the strain gauge upon Haldex oil replacement on my ex Superb estate Mk3: 1st oil replacement after 45000 km: 3rd oil replacement after 45000 km too: I didn't take picture at 2nd oil replacement, but it was similar (after another 45000km too). I know some 4x4 VAG owners do it every 30000km. It can make sense to adjust the mileage of Haldex oil replacement, depending on where you live and the type of roads you have there, and the way you drive...1 point
-
1 pointImportant is also to get the Haldex filter cleaned. It really gets dirty and therefore looses the efficience. I have had it done in every 100 000 km.1 point
-
1 pointWell, I'll let you confirm by your local dealer, but the timing belt replacement Skoda recommendation should be at 210000 km (140000 mi?) for your TDI150 without time limit. My wife formerly had an Audi Q3 Mk1 (MY2015) also TDI150, I had it replaced at ~135000km (~83900mi) and 7 years just for my peace of mind, though the timing belt still looked OK.1 point
-
1 point
-
Hi everyone, Just wanted to share some feedback regarding DSG DQ250 tuning, as it may help others. On my Skoda Superb 3V EA888 Gen3 running E85 (around 365 hp / 460 Nm), I had been experiencing micro-jerks under full load and noticeable torque cuts around 6800–7000 rpm, even after doing proper VCDS resets and adaptations. The engine itself was running perfectly, but it was clear that the stock TCU strategy was no longer suited to the torque level. After doing some research, I contacted Kalam at Russell Road Racing (RRR), who works with Simos Tools. I can honestly say the service was excellent: professional, knowledgeable, and very responsive. After sending him my ECU, TCU, and Haldex information, he prepared a custom TCU file perfectly matched to my DQ250 version. The flashing procedure was straightforward (full flash), followed by a full VCDS recalibration. After installation and adaptations: * No more jerks * No more torque cut at high RPM * Much smoother gear changes * Gearbox now fully aligned with the engine tune * Much better driving experience overall Even after only a short learning period, the improvement was very noticeable. This is not a generic “stage” file, but a proper calibration based on the real setup and data. Clutch pressure and torque management are very well handled, without unnecessary harshness. For anyone running Stage 1+/Stage 2/E85 on a DQ250 and experiencing shift issues or torque intervention, I can genuinely recommend Kalam / RRR. This is proper engineering, not marketing. If anyone has questions abou t the process, feel free to ask. ---1 point
-
1 pointI strongly disagree. From my 40 years involvement in rallying, both stage and road events, it's almost impossible to correct understeer - once you have lost traction at the front you just go off forwards. Oversteer is easy to correct - you just steer into the skid. New tyres always on the front. Back to the topic of tyre choice, I had a nasty experience last night on one of the awful B roads in Kent. Coming back from Ashford after collecting a newly rebuilt wire wheel for my 1937 Morris 8, we hit a hidden trench in the road caused by the incessant rain. We hit it hard enough for the car to jump in the air so I stopped to check the front to make sure the wheel was still intact. Not only was the wheel still intact, the tyre also looks to be undamaged even in daylight this morning. They are KUMHO Ecsta PS71 R18 Y (92) and have a decent rim protecting "flange". They have only been on the car for 4 weeks after having the front wheels refurbished so I can't give much info about performance but in the heavy rain with standing water yesterday they seemed to perform well. People may reject tyres from the far east but both KUMHO and Hankook make excellent competition tyres for motorsport and have been "control" tyres in many formats.1 point
-
I have just coated mine in Fusso 12 month Wax, have to say it’s pretty good so far. I did the whole, wash, iron fall out, clay bar and polish before applying the wax. Doing detailing on the side it’s worth the money over a ceramic but time will tell
 1 point
 -
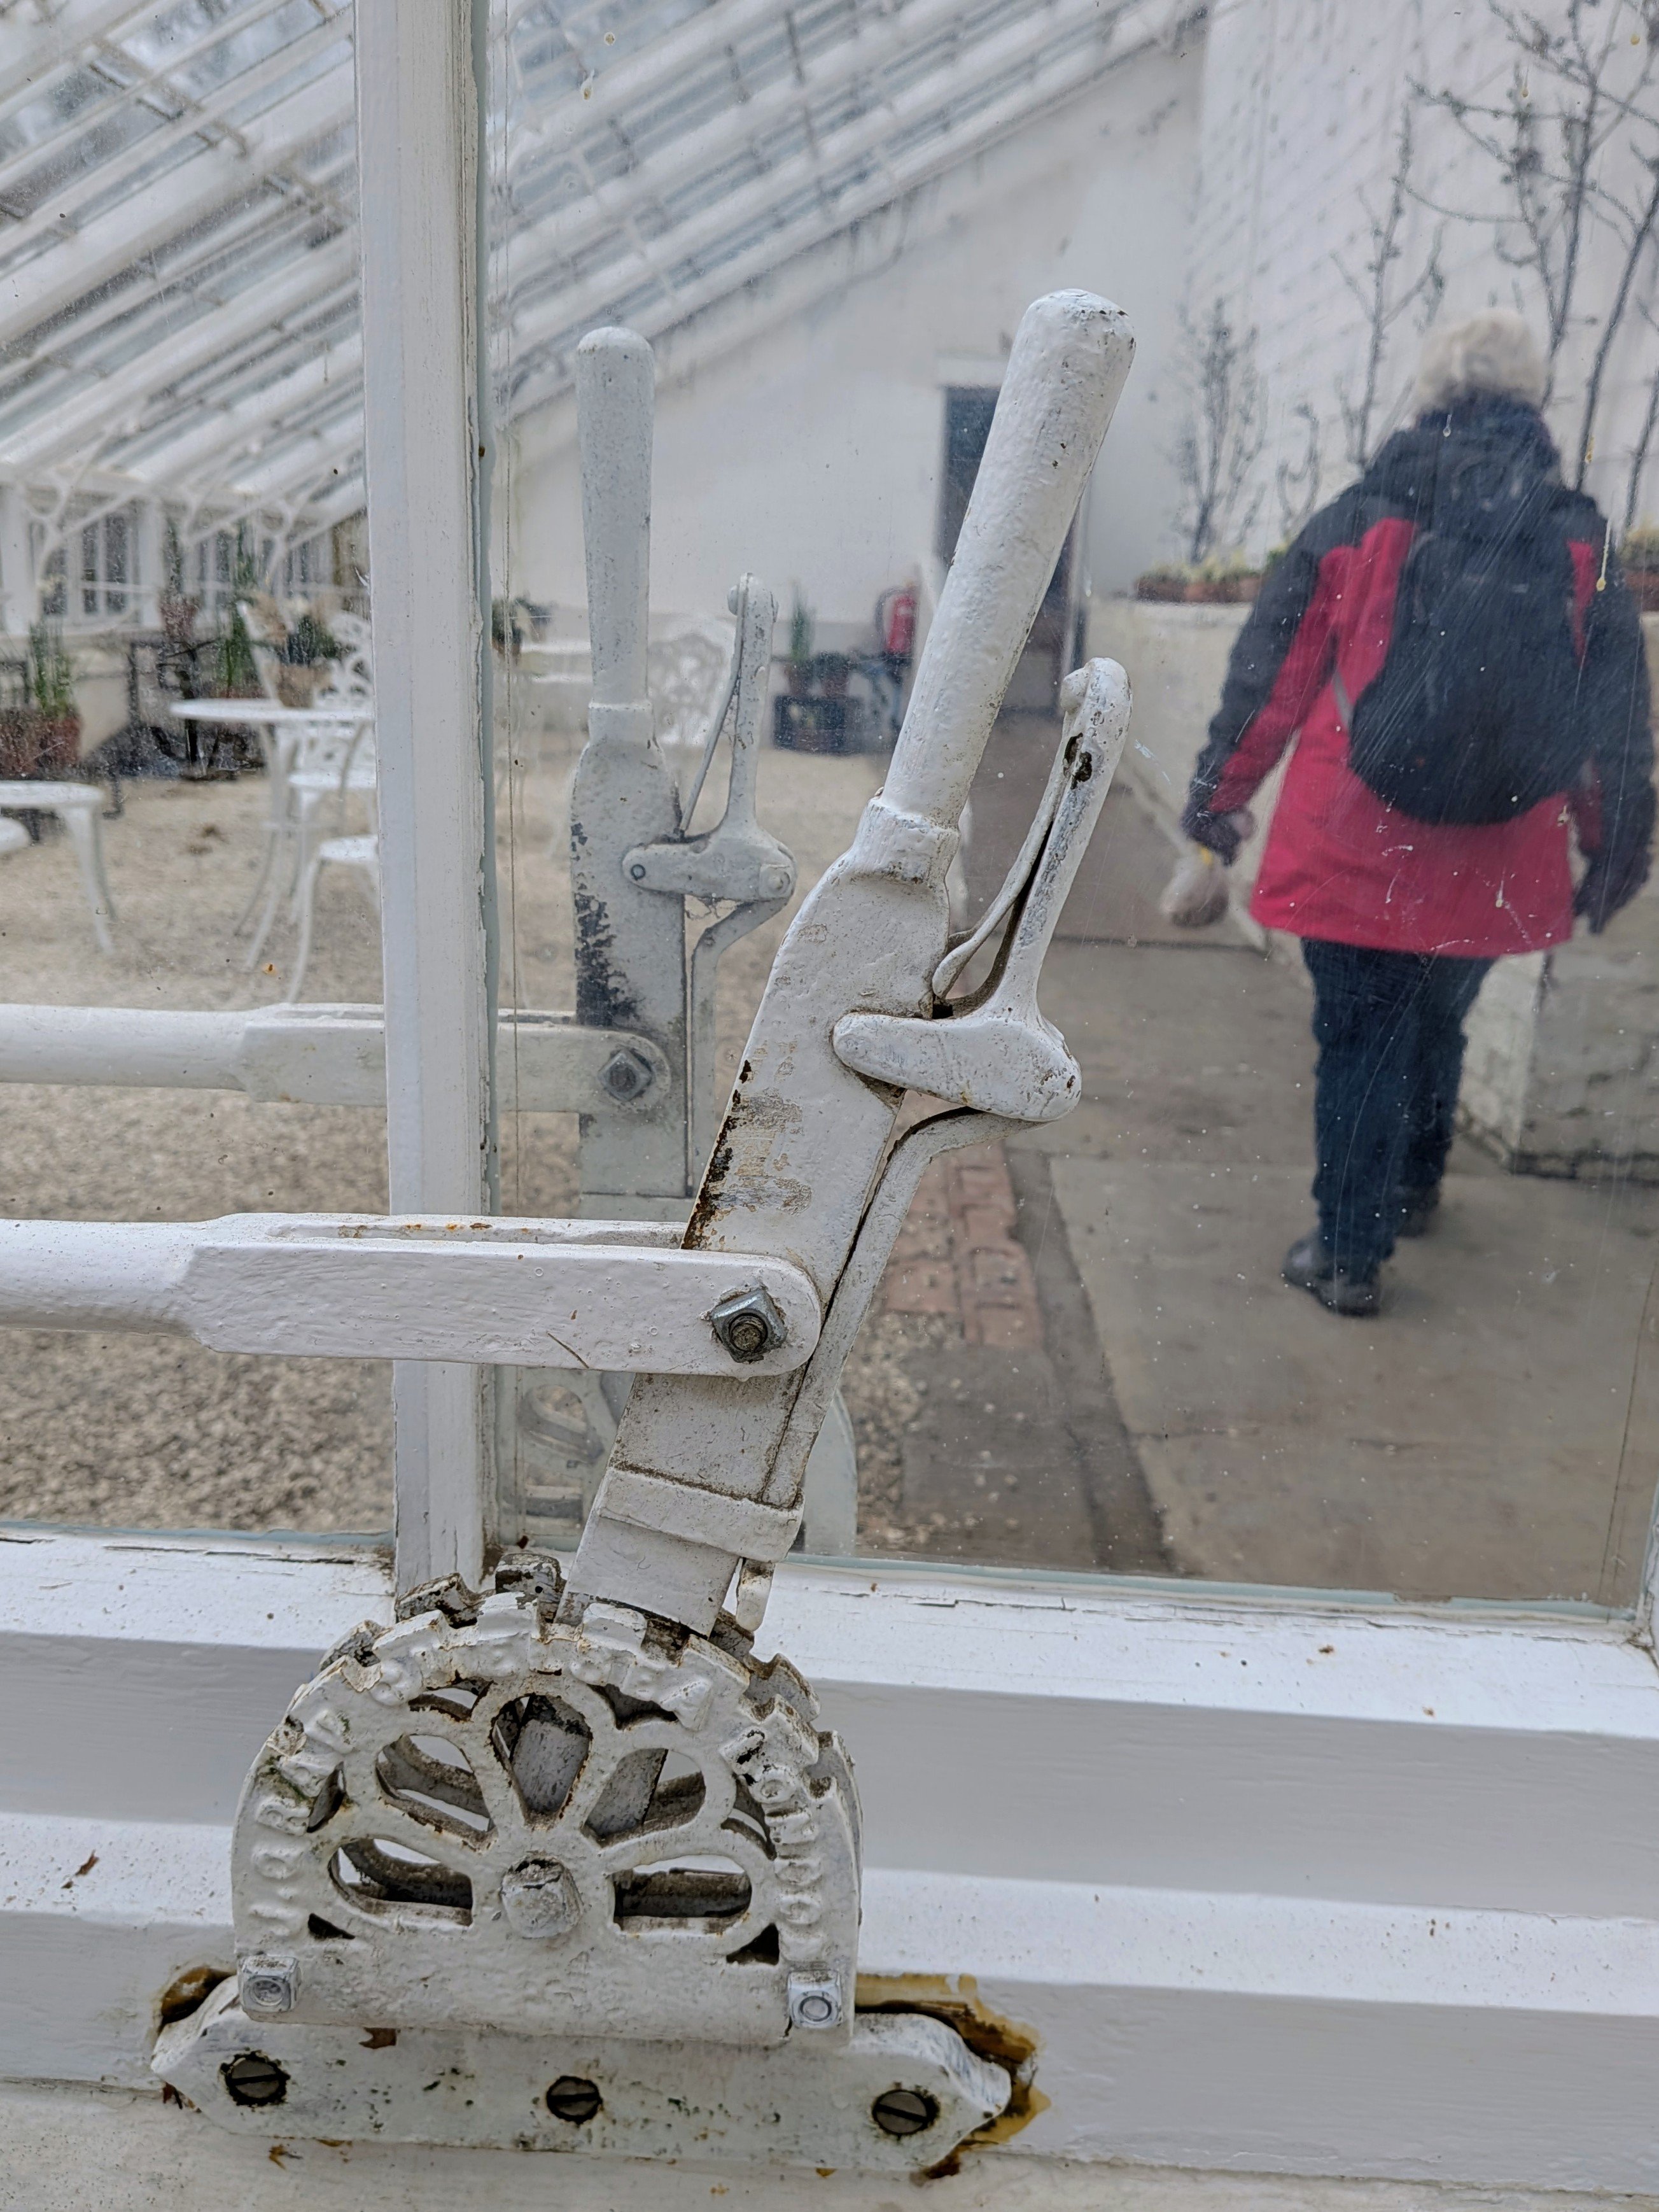
1 pointA few from the weekend - they were sorting and pruning the vines. Even the mechanism to open the windows is ornate 👌 Spring has most definitely Sprung and I hadn't realised quite how beautiful Snowdrops are inside.....


 1 point
 -
Been thinking about getting mine pro cleaned, detailed & ceramic coated. Always cleaned my own cars but older age & mobility issues are making it more difficult to get on my hands & knees to get stuff done. Hopefully with a ceramic coating (or similar) it should just need a foam, pressure wash & rinse with pure water to keep it looking it's best.1 point
-
They should be fitted as standard to all the range! Re rubber vs carpet (for car mats obviously) due to the Climate Change hoax the weather has been unpredictable, and we never did end up putting the carpets back in over the "summer". So we have had the rubber mats in for the past 14 months since we got the car. I would recommend the Škoda Original mats. They are heavy duty and have a mm perfect fit. Also, a solid 1cm+ lip round the edge so noting washes off the mat to the carpets. Which is the reason I fitted the grills to the air vents. The lip on the mat in the back goes right up to the vent. What was the result of the poll on carpets vs rubber mats? ,1 point
-
Might be power steering fluid is past it or low and has too much moisture in it. Old volvo of mine used to squeel when starting when cold and once warmed up was ok. i changed fluid which was well past it and problem stopped. Still worth getting it scanned to see if its stored any codes. Could be as simple as a low battery.1 point
-
1 pointI would start by having a look at the 'Willtheyfit' website to compare with what you have on now.👍1 point
-
Hi All Wanted to start this thread as while there are many many posts on the topic of firmware updates to head units, not too many seem to cover the actual process end to end so thought it may be nice to share the guide i put together from multiple sources and i wanted to make it as detailed as possible to help anyone in the same boat as me.. I will try and answer in this post all the questions i had to save you the bother of looking on loads of different sites and threads Full disclosure:- As an IT professional all my life, I am familiar with the inherent risks and problems which can be associated with Firmware updates, but I don't know cars at all. Before going ahead, I did a lot of reading, research googling and you-tubing so be warned the process may be relatively simple but if an update like this goes wrong, it will cost you to have it fixed and I'm sure running the update will in itself invalidate any warranty. Any updates completed are 100% at owners' own risk. Neither I nor the forum site BRskoda maintain any responsibility for the process or any files downloaded or the source from which they were obtained. I cannot supply a copy of the source code please used don't ask, nor can i tell you whom can or might, but they are out there. You know who you are and you have my deepest and sincerest appreciation At the time of writing my Mib1 unit was running 0435 and 0490 was I believe the latest available. The Update file I used for 0490 was named MSTD_EU_SK_P6230.zip These are only my own findings and results when running a code update on an Ambulsmen MiB1 unit this process could change in future releases. Your outcome could be different. Before posting the below I cleared with moderators. Initial Prep Think do you really need to want do this..? (I had unimpressive DAB reception and very poor response on the touch screen using v0435 I heard it was improved in later releases). I wouldn't do it unless there is a likelihood of it definitely fixing an issue or problem which you are experiencing. Check and Confirm what sort of unit you have. Press and Hold Menu button for 5 seconds. Obtain below data as pictures and refer to another source to obtain the correct and appropriate files for download. [I strongly recommend using multiple virus checkers on the file or performing the initial extract a virtual environment] Personal Recommendations Plan and re-check everything (once started you cant stop it) Be slow and methodical DO NOT rush Print off the instructions and process to work through. Give your car a good 40 minute spin out on a quick road to top up the battery without using any utility which may put extra strain on the battery. (See this link to check your battery Status https://www.youtube.com/watch?v=cqM79n7MeJw ) Run the update during the day for better light and so you wont need to use the cabin lights to see what you are doing. Disable daytime running lights to prevent additional and unnecessary battery drain. Get out and check your lights are actually off. The upgrade process will take 45-60 Minutes be prepared for that. - Do use a battery charger or jump pack the unit could well brick itself if power continuity is lost midway through the flash. I got one in a well know UK wide Auto-parts store for a shade over 30 notes. [Beware the charger you use will need to be Start Stop compatible if that's a technology in your car]. A big shout out to the below whoever you are you helped me build this guide https://www.youtube.com/watch?v=gWXJI8V9OEc&t=213s https://www.youtube.com/watch?v=2Sj5-KHuhRk https://www.briskoda.net/forums/topic/378192-amunsen-mib1-firmware/?hl= amundsen https://www.briskoda.net/forums/topic/480534-experience-of-upgrading-the-firmware-on-amunsden-mib25-system/ Process Format an SD card as FAT32 (mine was 32Gb). (Use a clean one not your SKODA one) Using 7Zip extract the contents on to the SD card. --- This should leave 3 Folders and 1 Text file on the SD Card. With the car ignition off remove any inserted SD cards CDs and USB media. Insert SD Card containing the Firmware Update in to slot 1 Attach battery pack \ charger confirm it is working as expected. ----- TURN ON IGNITION ONLY ----- ----- DO NOT START THE CAR ----- ----- ENSURE LIGHTS ARE OFF ----- ----- ENSURE AC \ FANS \ HEATED SEATS - ETC ETC are all OFF ----- Power on the ICE unit Press and hold Menu button again for 5 seconds Choose Software Download Versions Select Update Select the source (SD Card) [all others will be greyed out] Select the Release version detected First the Metadata will be validated Press Start A note is displayed say how "The update may take longer than 60 Minutes to complete and not to start the engine or interrupt the process once started" is shown Click Next The appropriate code will copy from the SD card to the unit The Unit will now restart and then download and restart multiple additional times (About 15. I lost count). (Up to this point the process will have taken approx. 20 mins) The Software update process will now create a "Mirror Copy" (multiple horizontal lines showing a copy percentage against each of them) When each line has finished its copy and reached 100%; The Unit will reboot, upon resume it will start on the next line The Unit will start another set of multiple Software downloads and restarts. The Unit will restart again When the screen Titled Software Update Result is displayed Click Update Summary Review the updates applied and return to the previous page. Click Close If displayed Cancel the Diagnostic Tester warning to check for error codes. These will however be visible to your Dealership upon service have them cleared for best practice. The Unit will restart again. [For the final time] Once the update has finished wait 5 minutes for any last background processes to complete Press and hold Menu for 5 seconds to confirm the new version is running. (Now expected to be 0490). I Started at 12.05 and following the above my update was complete by 12.48 Issues in 0435 Touch Screen not responsive DAB stations missing from radio + reception often poor (where i know we should have reception Was considering upgrading external Ariel) Playback from SD Card would not move on to next Album (when organised in to folders) SatNav UI well a bit "basic"... Status in 0490 Touch Screen 100x better DAB radio now works like DAB Radio (I live in a not so hot spot for reception.) Playback from SD card fixed Not had opportunity to play with the NAV yet (will try and post tomorrow) Conclusion:- If you have the stones for it; and you do have similar problems the upgrade is well worth the effort. IMO Update 0435 is S*!t and is full of bugs... Keep the wheels turning guys. Have a good one1 point
-
1 point
-
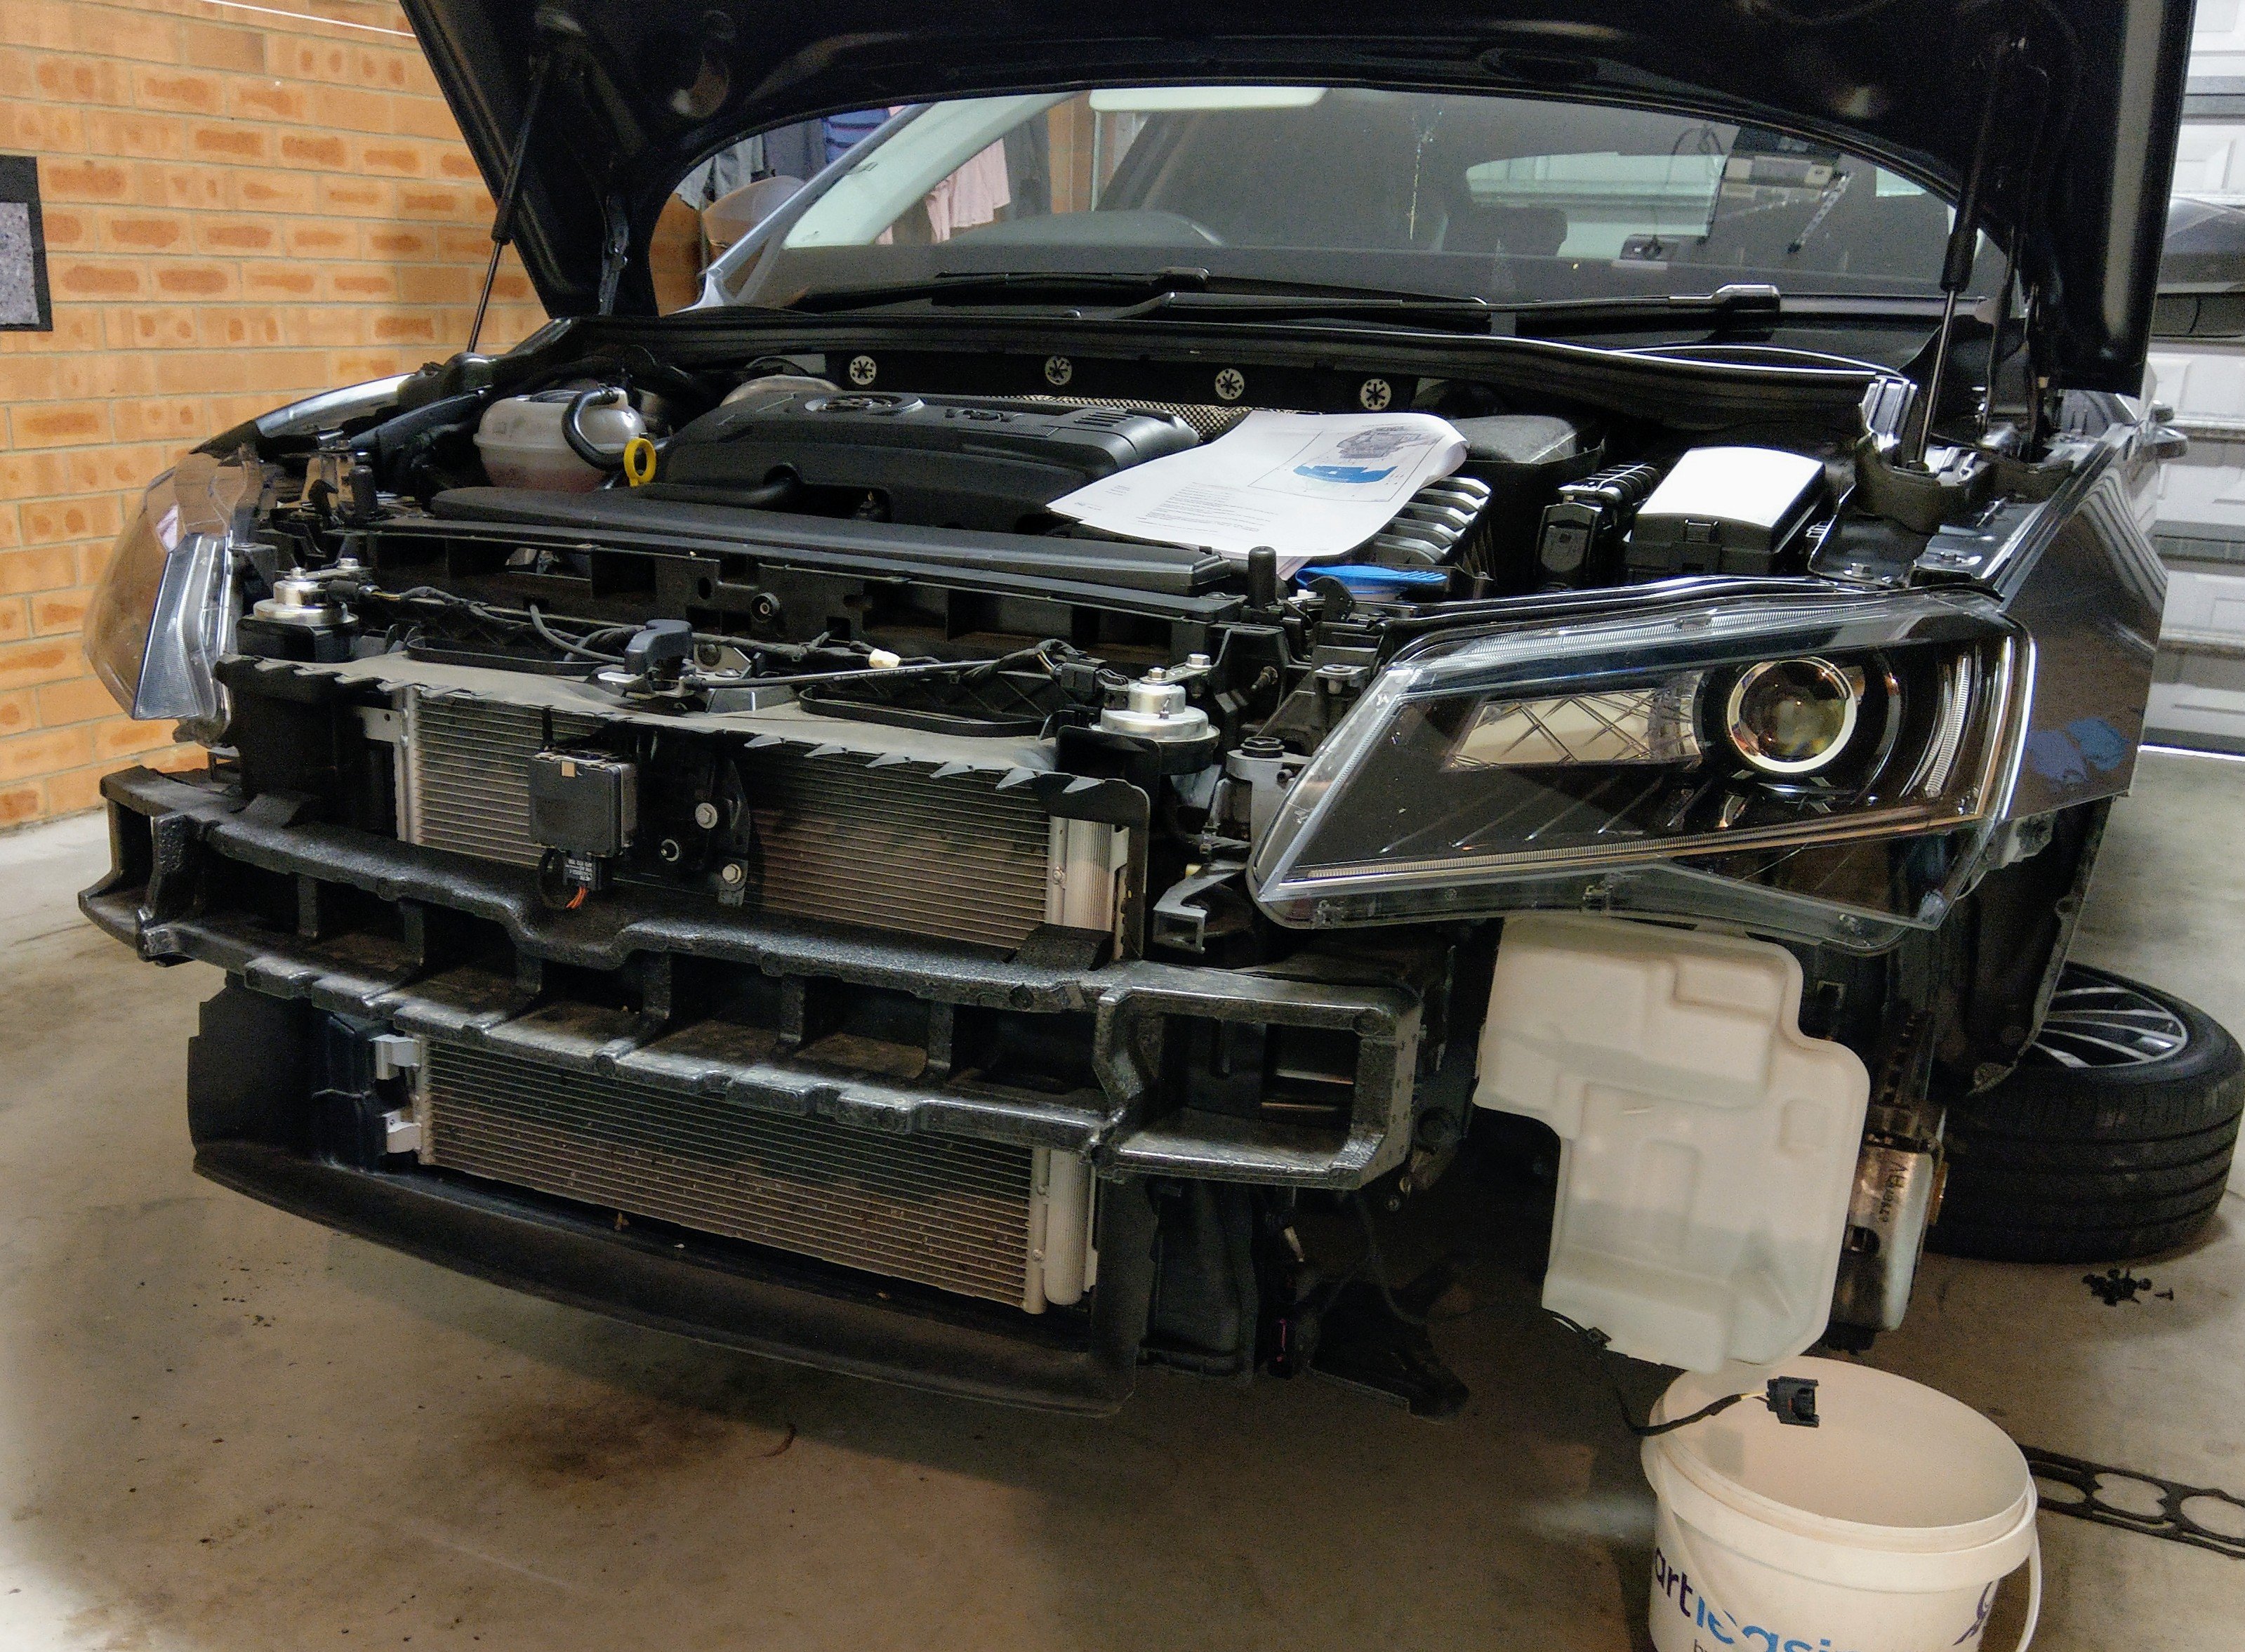
1 pointThere r 9 screws that hold the grille to the front bumper, and 8 tabs/clips!!! Bit overkill, but yeah, having the front bumper off will involve a lot less swearing, in order to remove & fit the grille. To remove bumper - wheels off, wheel arch liner off, disconnect washer pipe, disconnect wiring harness, remove screws - pull bumper out. be careful NOT to hit/upset/knock the ACC radar while sliding the bumper in/out. I created this how to guide on removing the front bumper. Removing Front Bumper.pdf

.thumb.jpg.520a7219b9755d0bb4ddfda713d45164.jpg) 1 point
1 point


.thumb.jpg.f83a46b9b3c0d976b9dbffbb523c9874.jpg)