


Leaderboard
-

moley
Resident Member8Points10,120Posts -
MikeTheThinker
FREEDOM8Points8,484Posts -
shyVRS245
Locked8Points0Posts -
.jpg.1006585dfe4e2977315b67c3d642e37b.jpg)
Guest_
FREEDOM8Points83,824Posts


Popular Content
Showing content with the highest reputation on 11/10/20 in all areas
-
2 pointsDear G**, how hard is it to find the jacking points! Just use your eyes and look! I really despair of peoples inability to cope with simple tasks.2 points
-
2 pointsAaaargh. You can see the triangle mark in the lower picture, only just in shot on the right. That drain hole is suffering from jack attack The seam sealer has broken it's surface, so it's not sealing and letting moisture in, the opposite action you are trying to prevent - metal showing - typical of what I was on about in above. Not a pleasant sight, but I guess not many care where/how they jack it up. That's why I'm keeping my car as long as I can, because I know it's strengths and weaknesses.2 points
-
2 pointsUltimately I think you're going to need a report saying diff damage from lack of oil. Would be interested in seeing decent pics of the drain plugs for the haldex and the rear diff. I bet the rear diff one will have witness marks showing it has been undone when it shouldn't have done.2 points
-
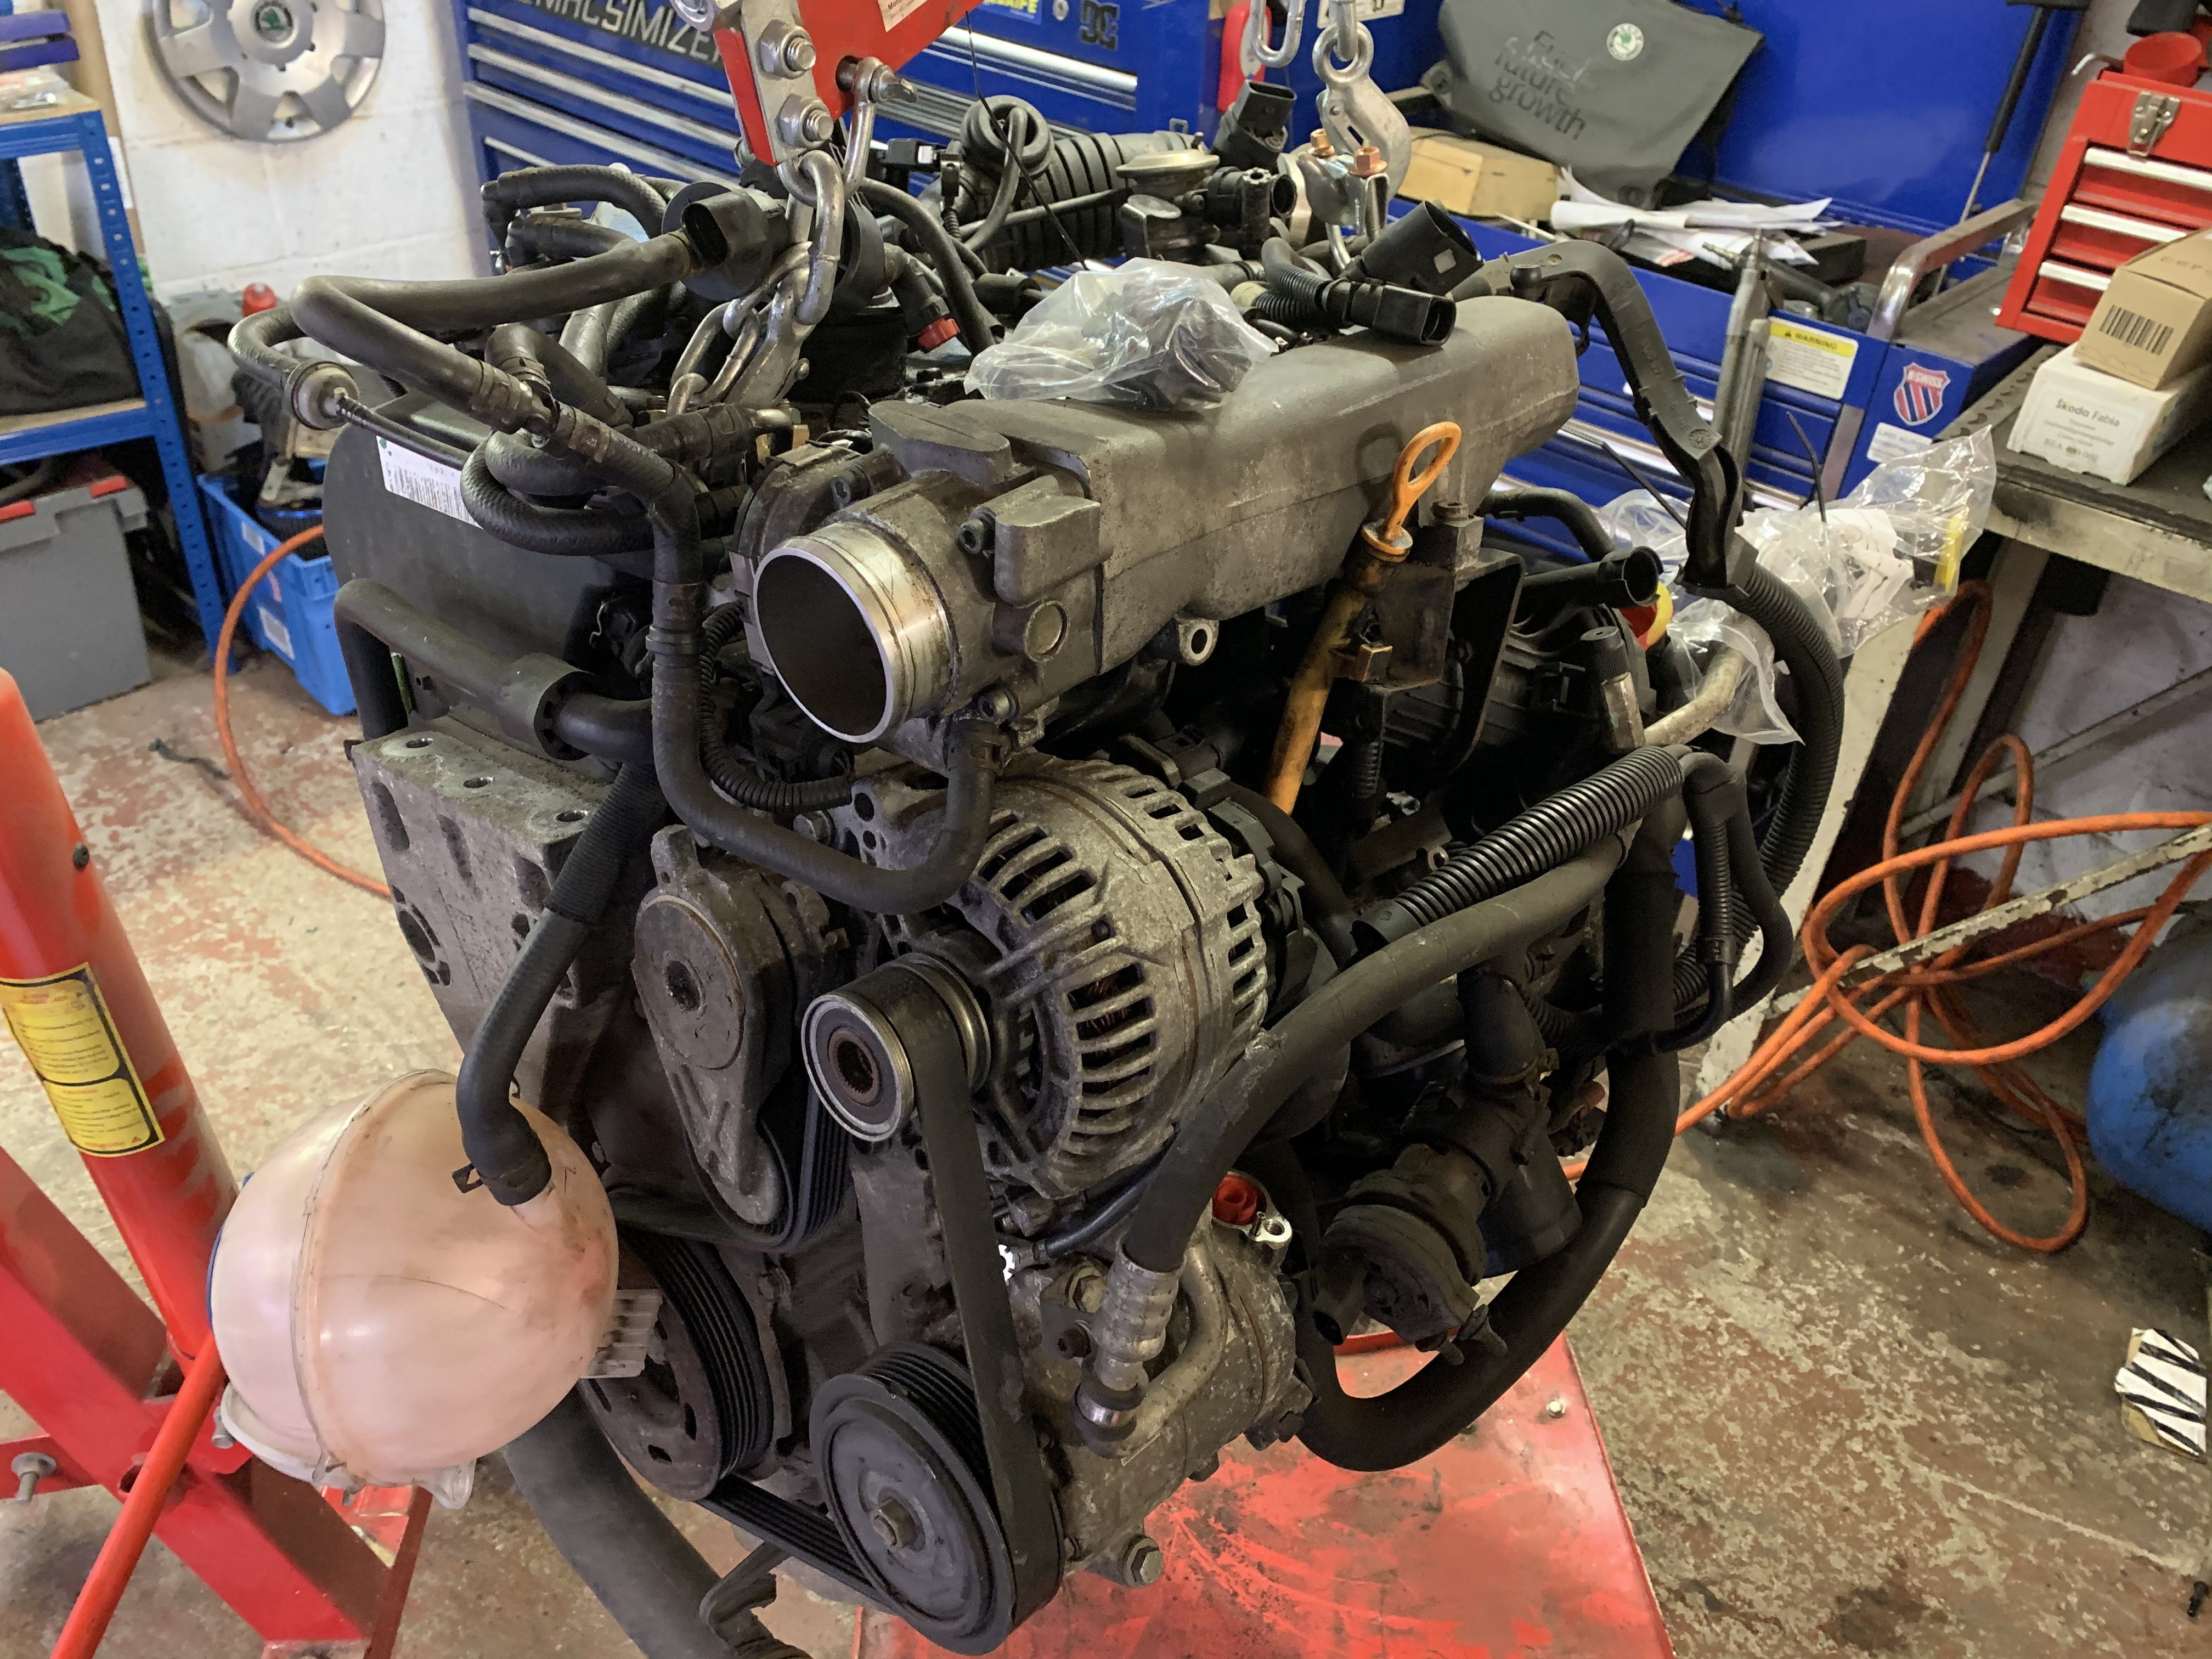
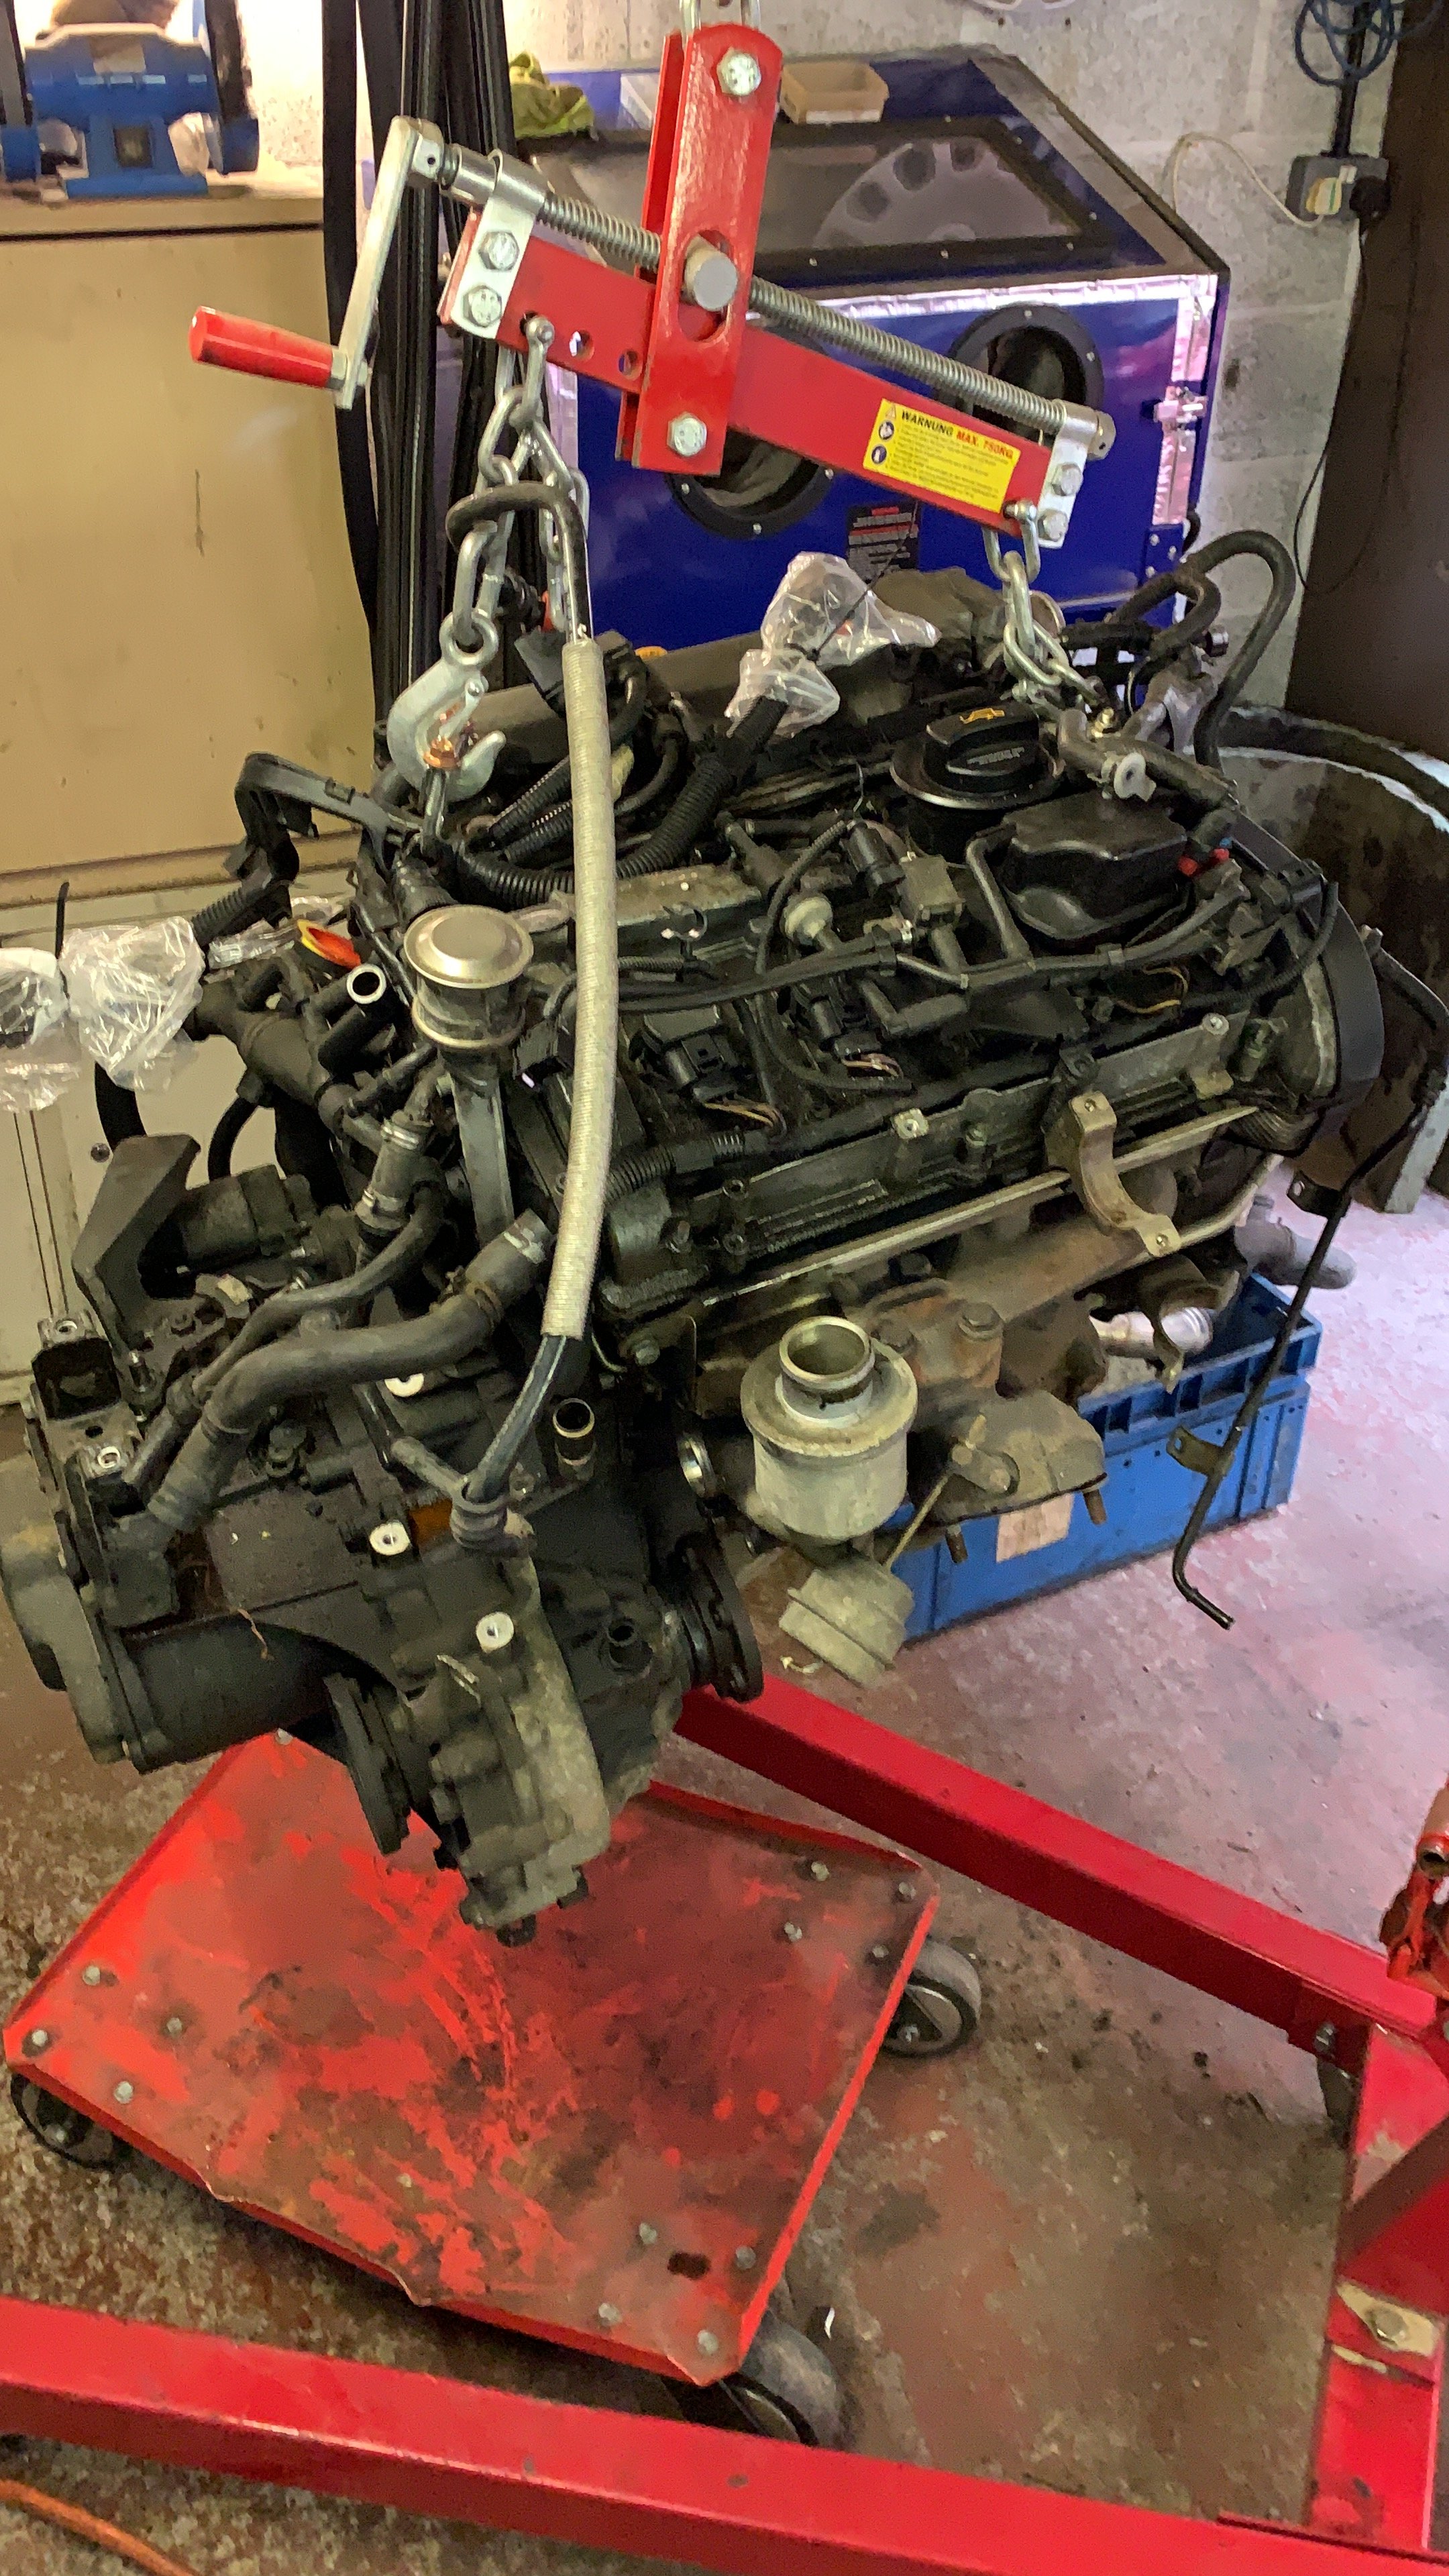
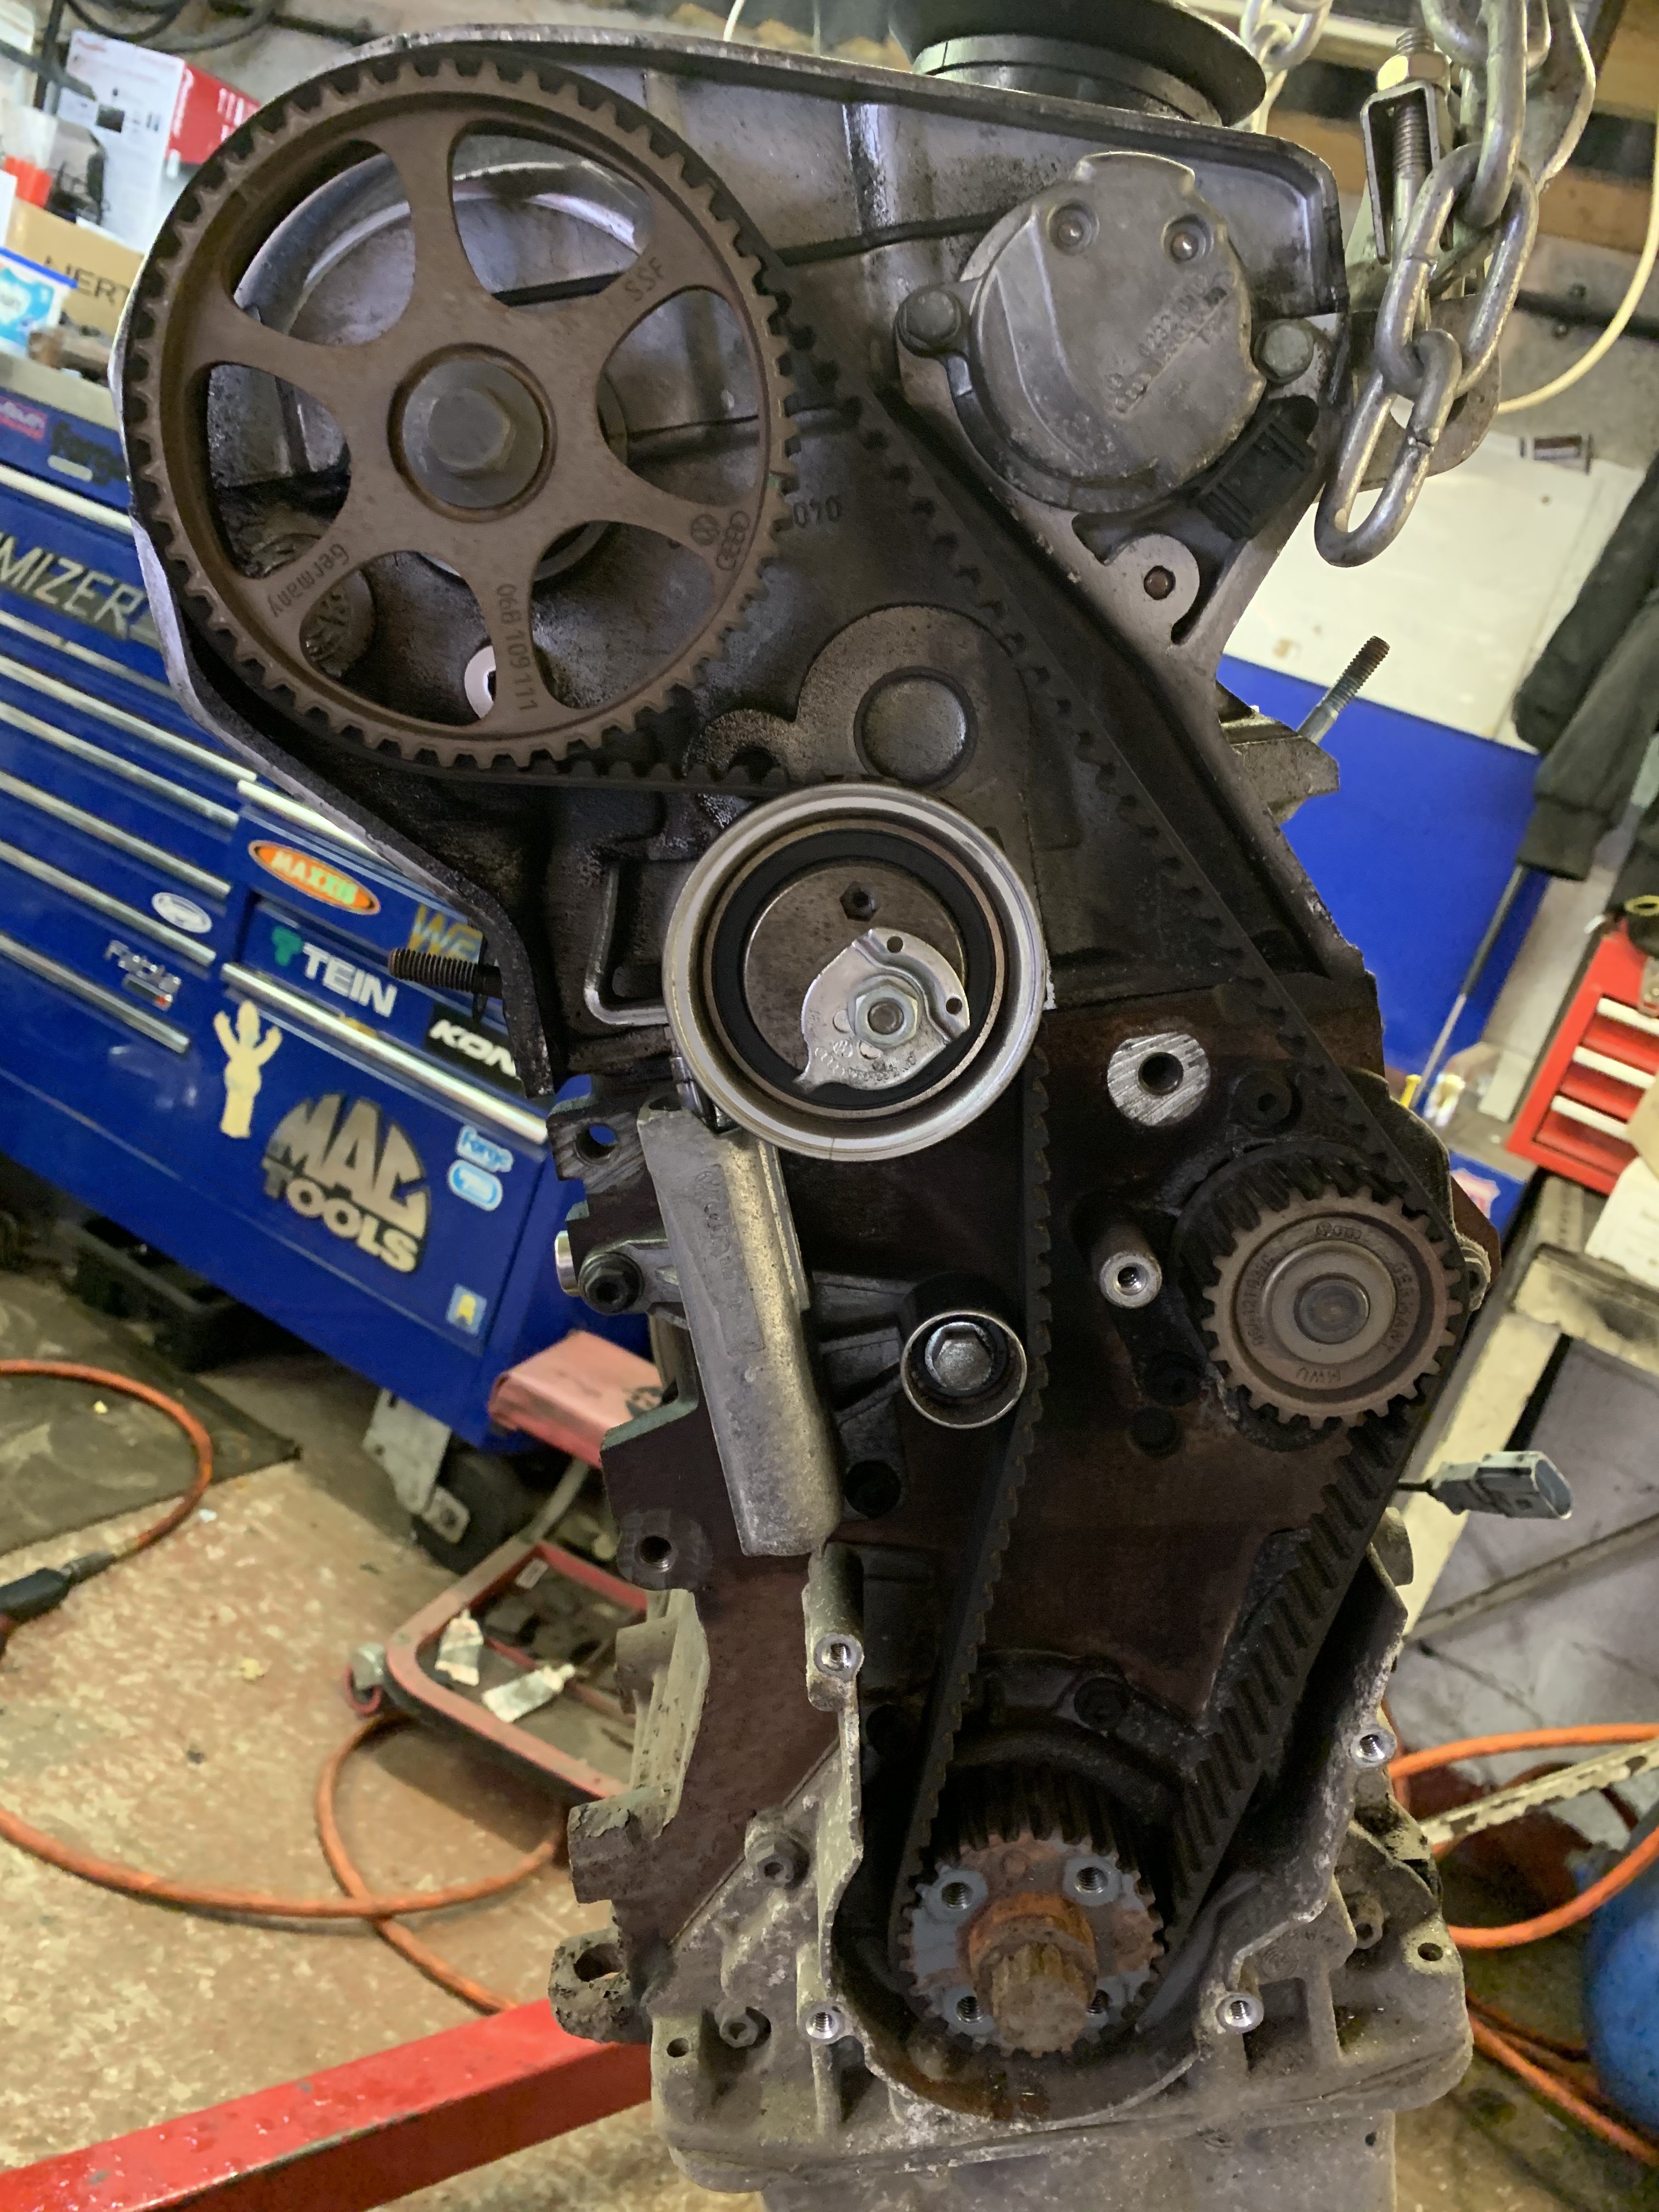
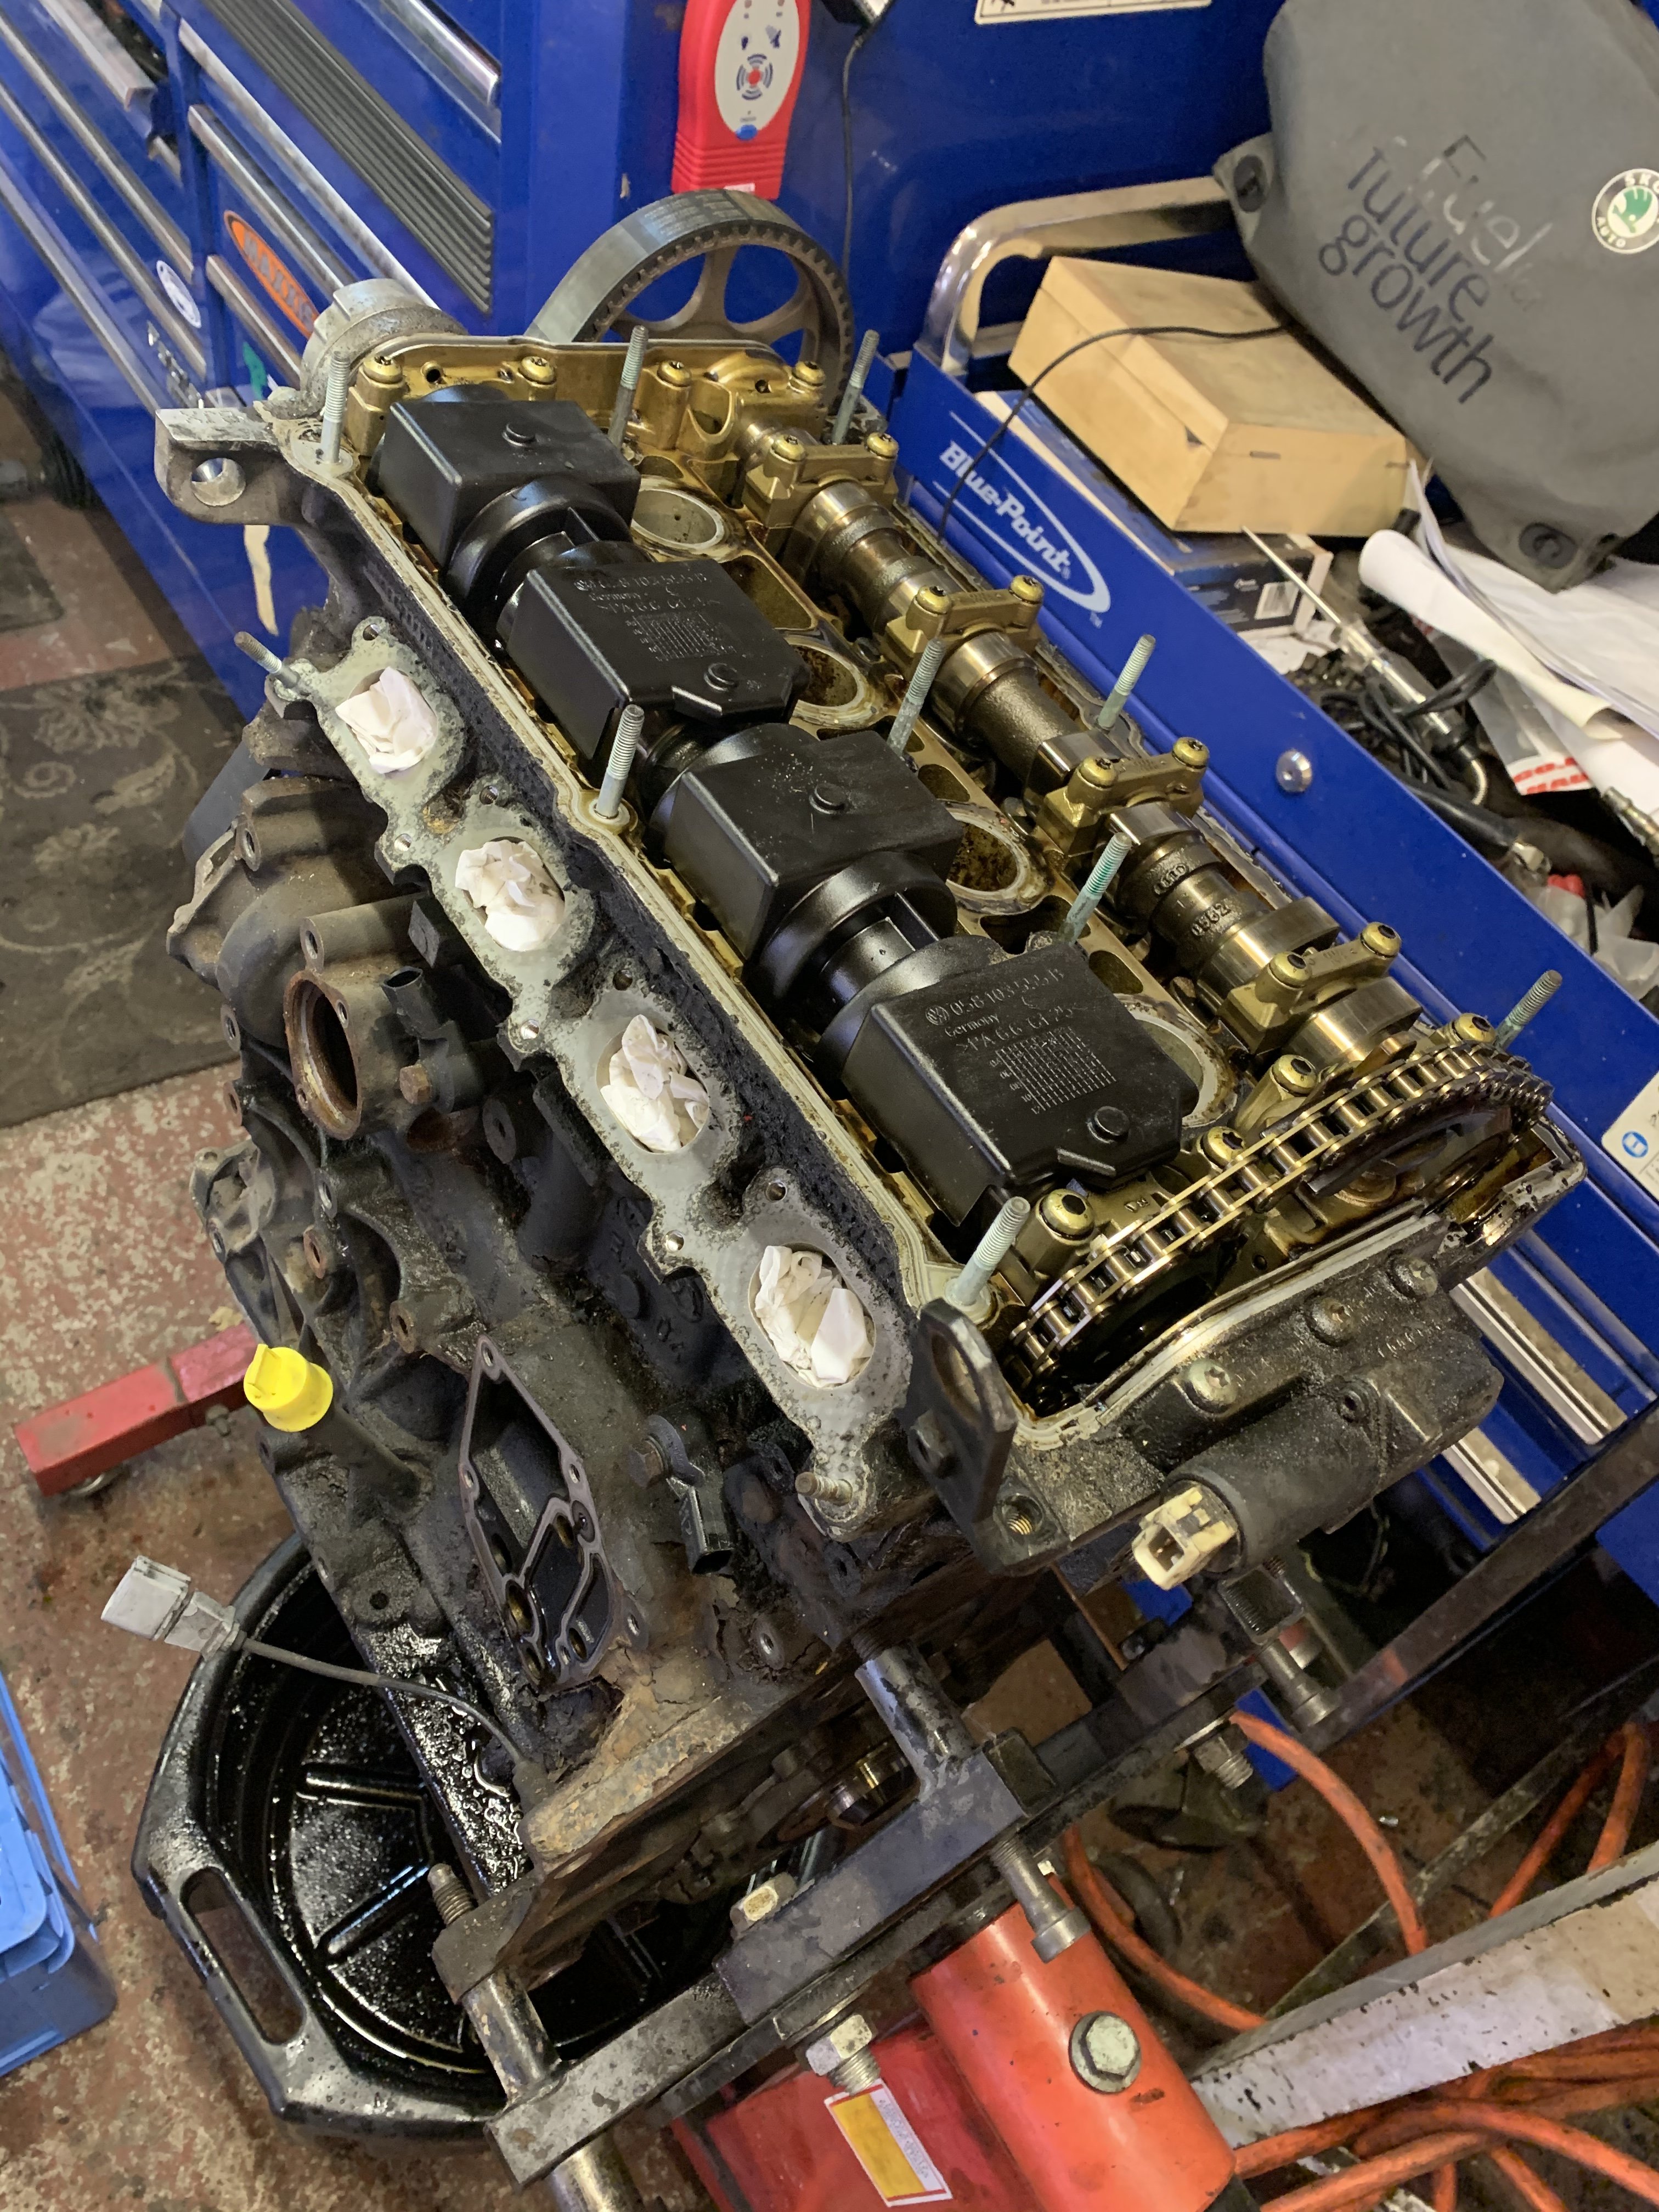
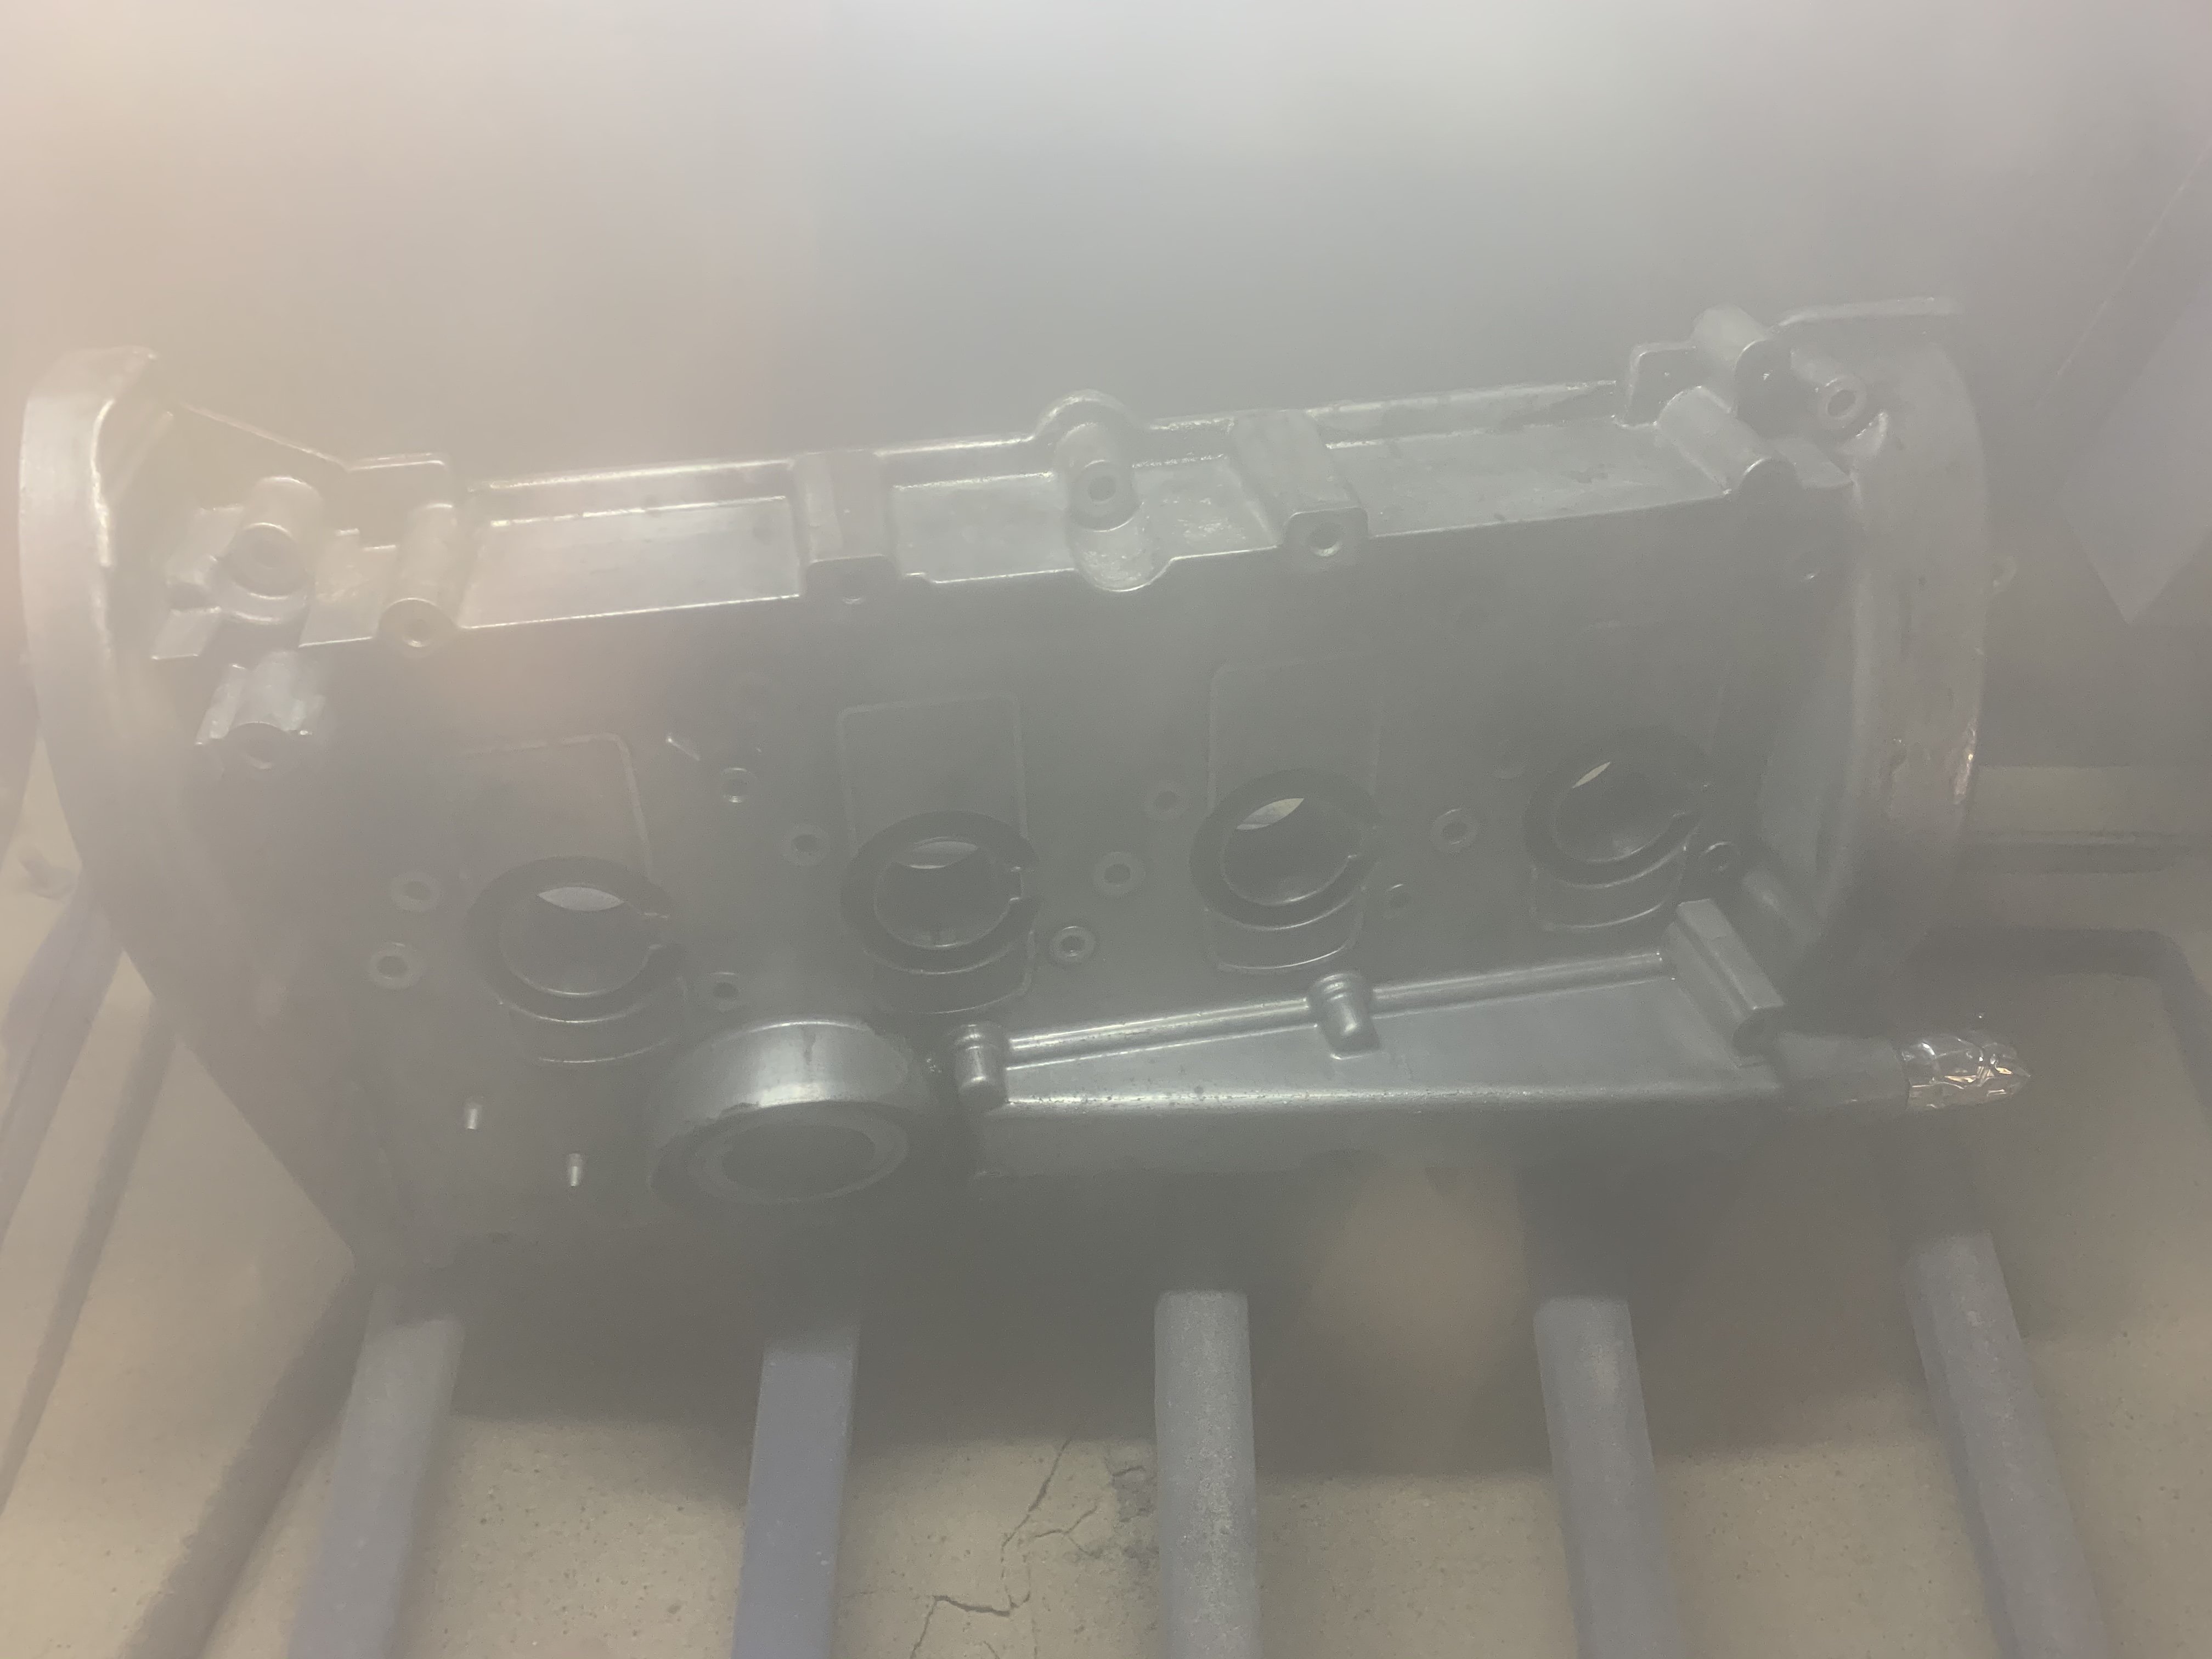
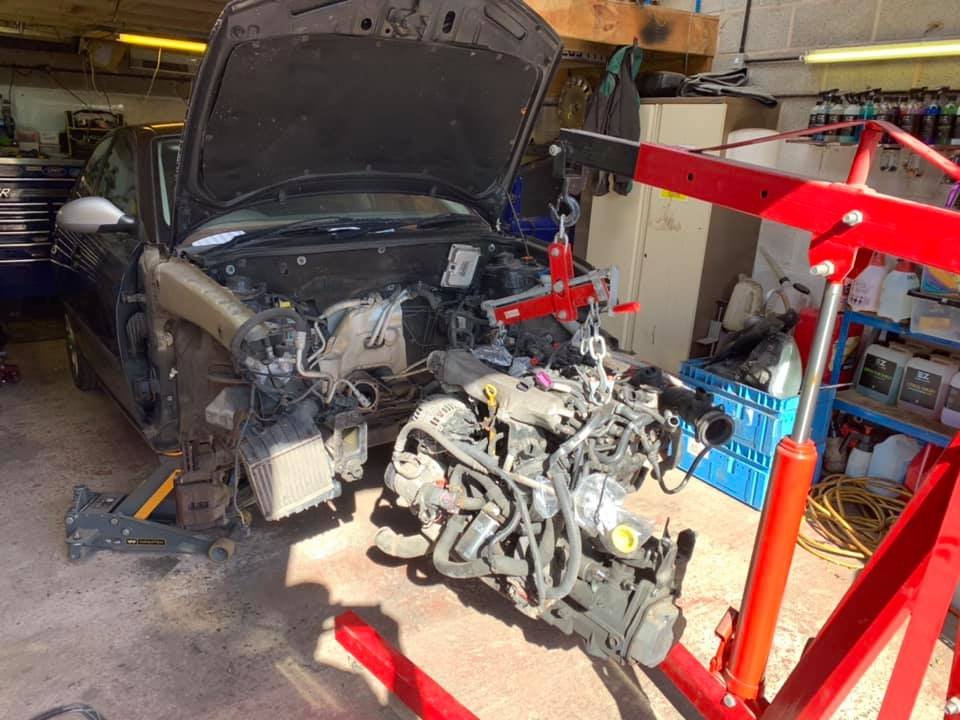
Well good news is the engine turns over freely, nothing has stuck or siezed in the 2years since the engine went back in. Only wound it over with a ratchet on the crank bolt but it’s a start. I have now got a running in base map from Faboka (John) which will allow me to at least get it started and run in. Boost pressure is standard VRS which is more than enough to bed everything in. Battery is on a long trickle charge, hopefully it’ll come back to life after 4yrs off the car. Tomorrow evening will see the battery reconnected, a test of all systems, then try and load the new map onto the ecu with my mpps cable- if I can remember how to do it?? I’ll try and bleed some fuel through up to the engine and check everything for leaks. I’m not going for the big start until my two mates who’ve helped me out so much are round, beer and pizza have been mentioned so all will be good I hope. I have fitted the spare wheel tonight, cleaned all the tools and that’s the boot finished.. More tomorrow2 points
-
The wheels are certainly dividing opinion but I’m of the thought that I’ll run with them for a year, then can always change the colour again... tonight has seen only some mild tinkering, I got all the boot plastics out of storage, built everything back up, cleaned all the boot latch with small detail brushes and Surfex HD. I then dug out a rare set of genuine Skoda accessory boot bags, and a new genuine Skoda boot liner. In readiness for the big start up, I’ve put 2x Jerry cans of Shell V-Power Diesel in the tank, connected all the fuel pump wiring back up (it’s been disconnected ever since I had the tank out to do the floor resto..) so we can connect the battery and cycle the fuel pump and check for leaks. I’m going to pull the glow plugs out next week and put some oil down onto the piston tops, let it sit for a while then crank the engine over from the bottom pulley. Reason for this is the engine has been sat in the car for over two years now, and hasn’t spun at all apart from the initial turning over by hand. Just want to make sure nothing is stuck or overly dry in the block. more soon2 points
-
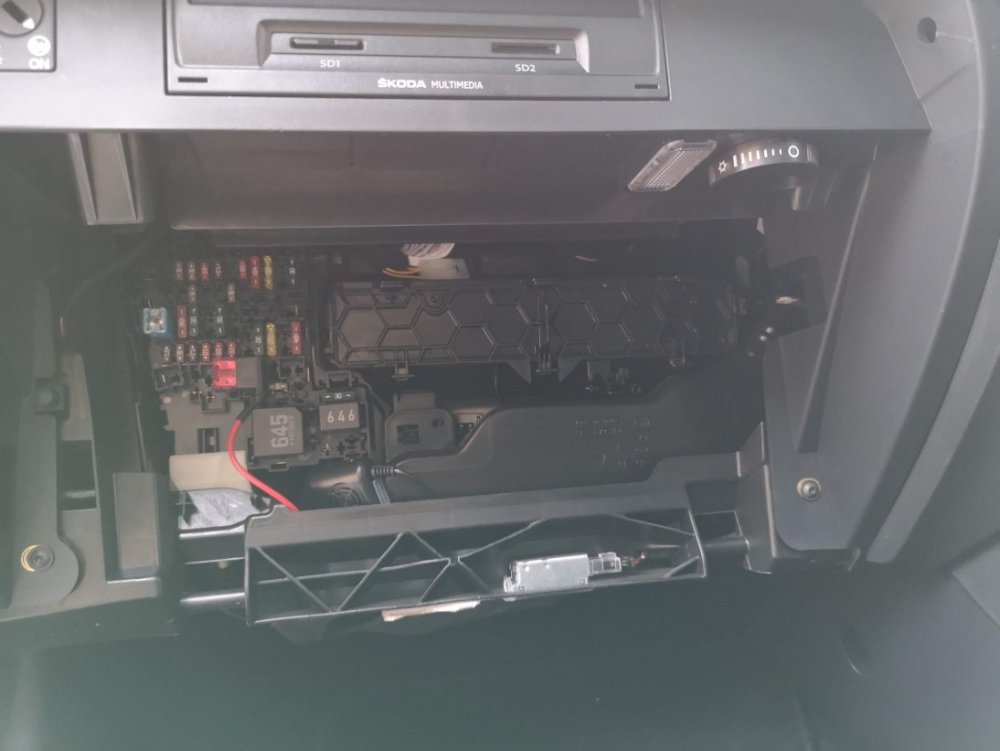
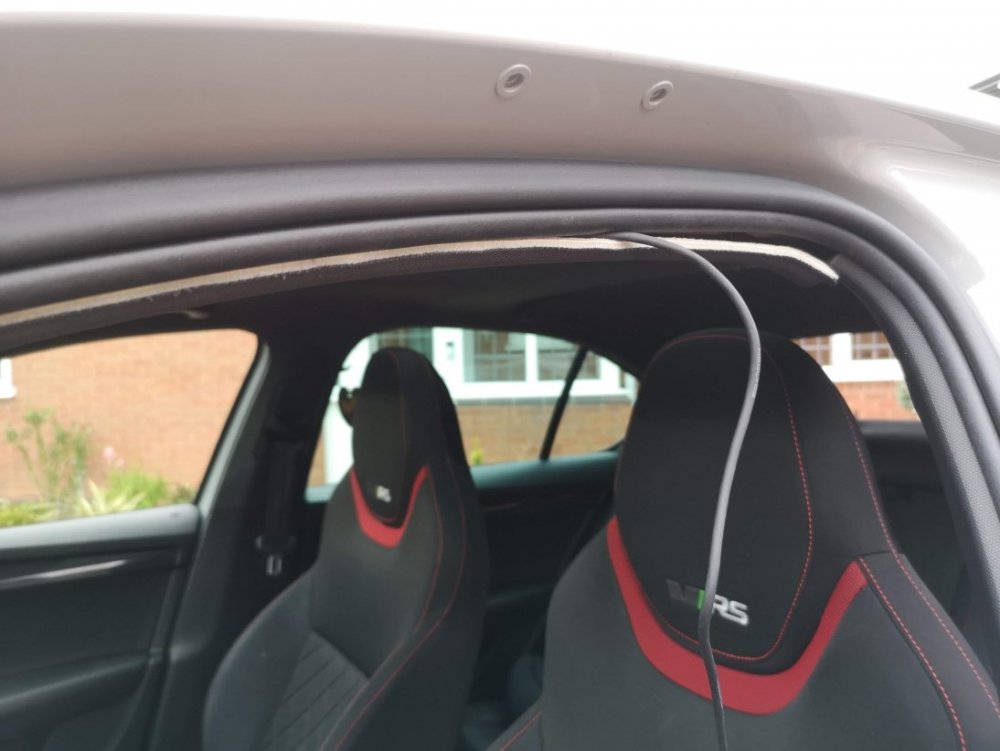
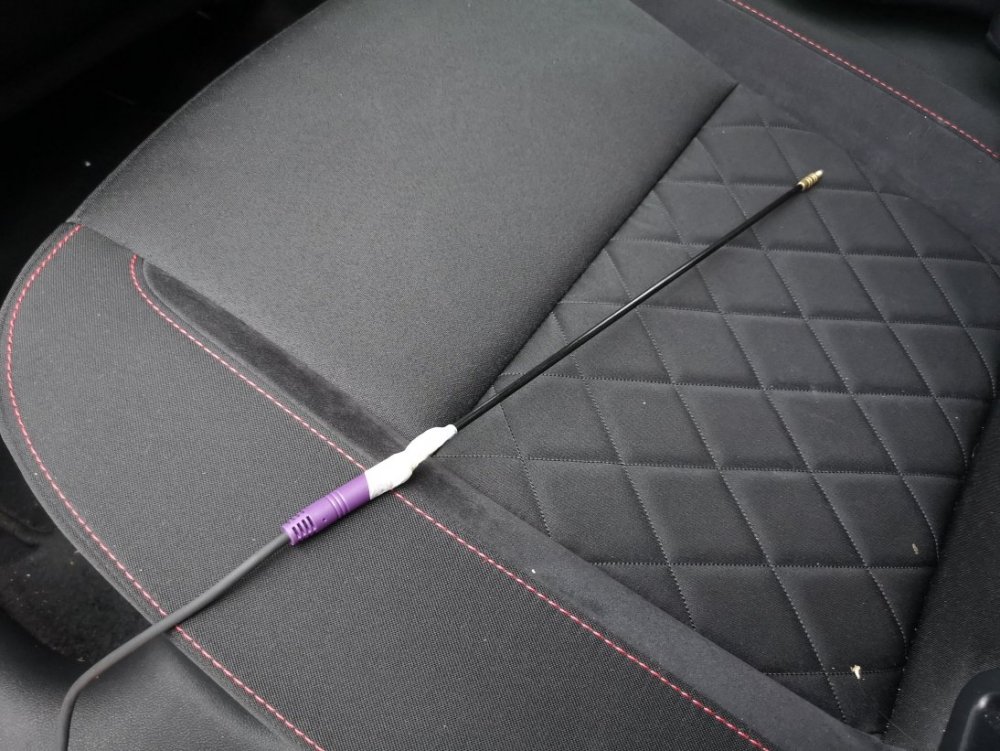
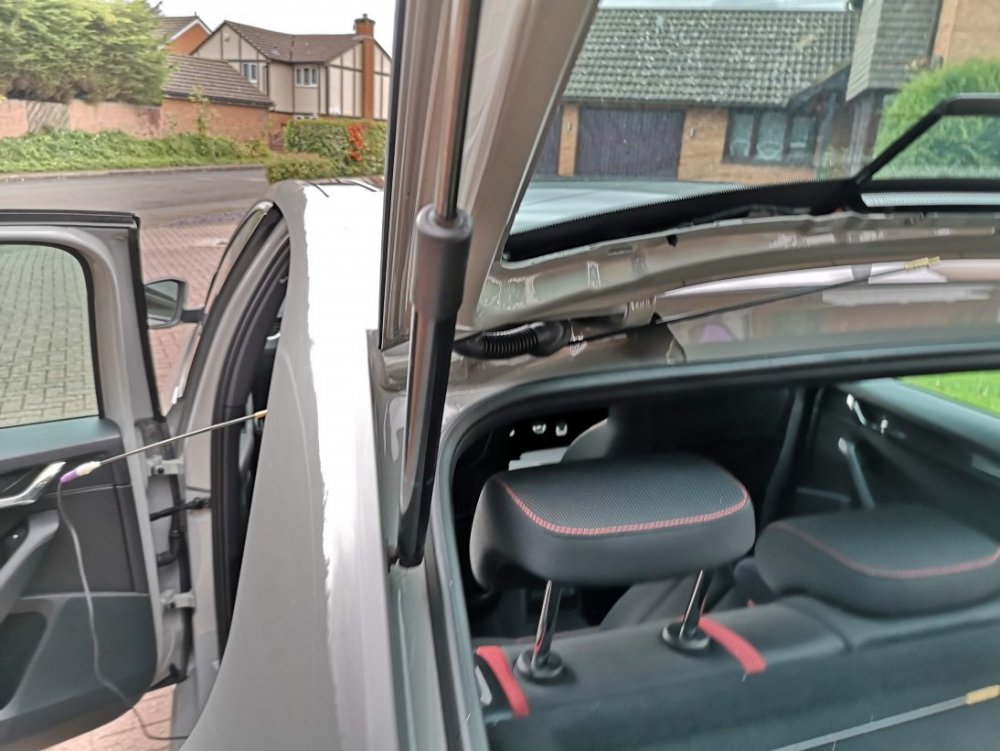
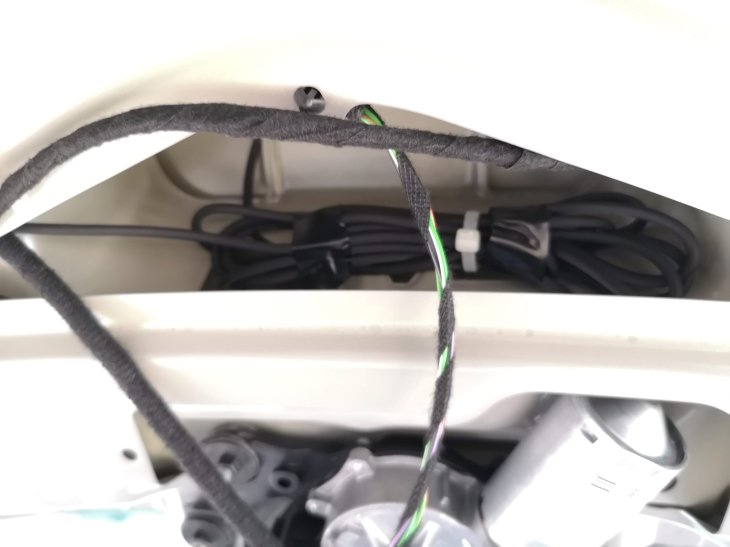
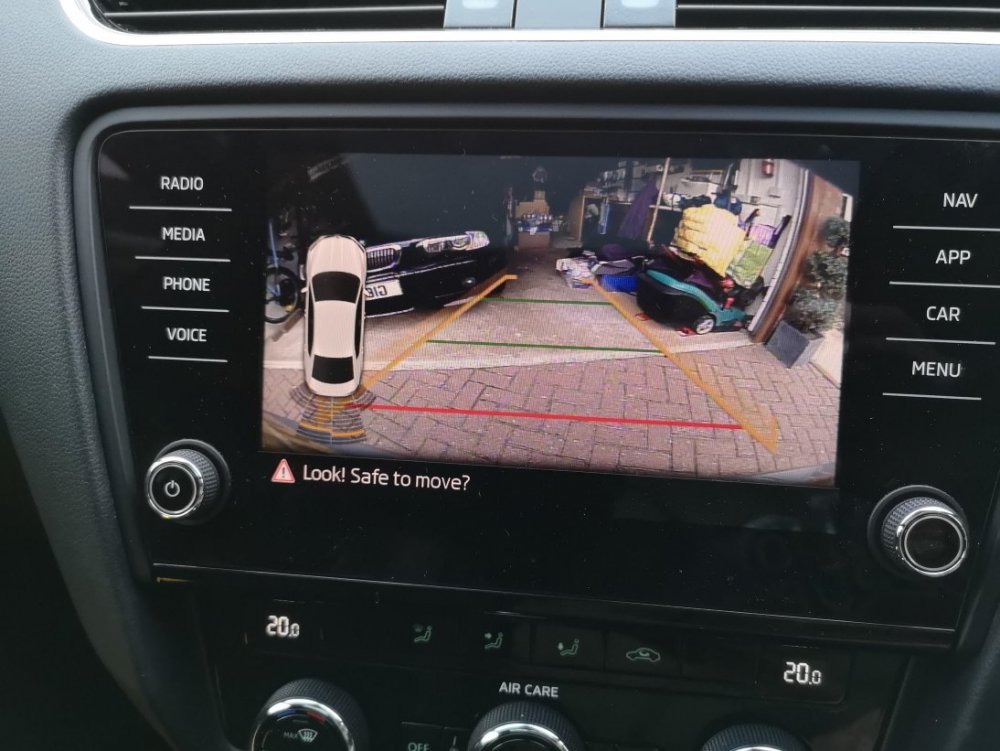
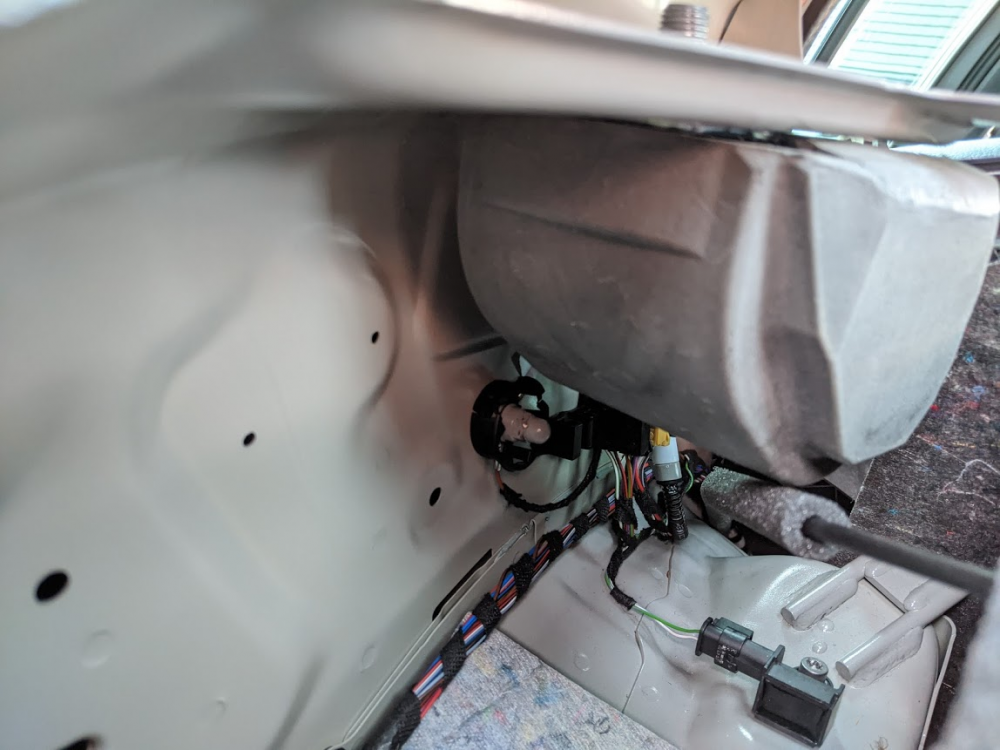
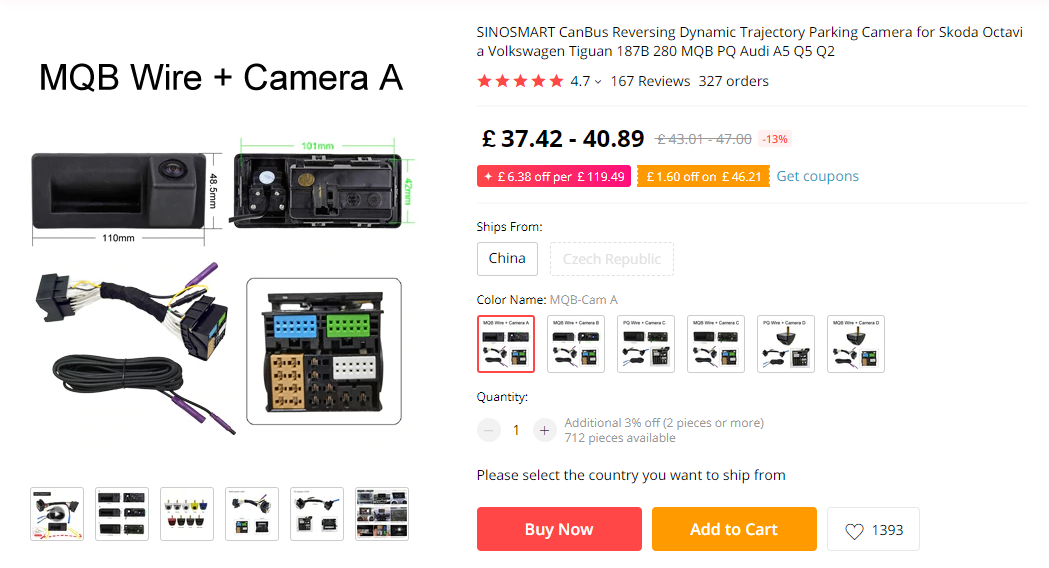
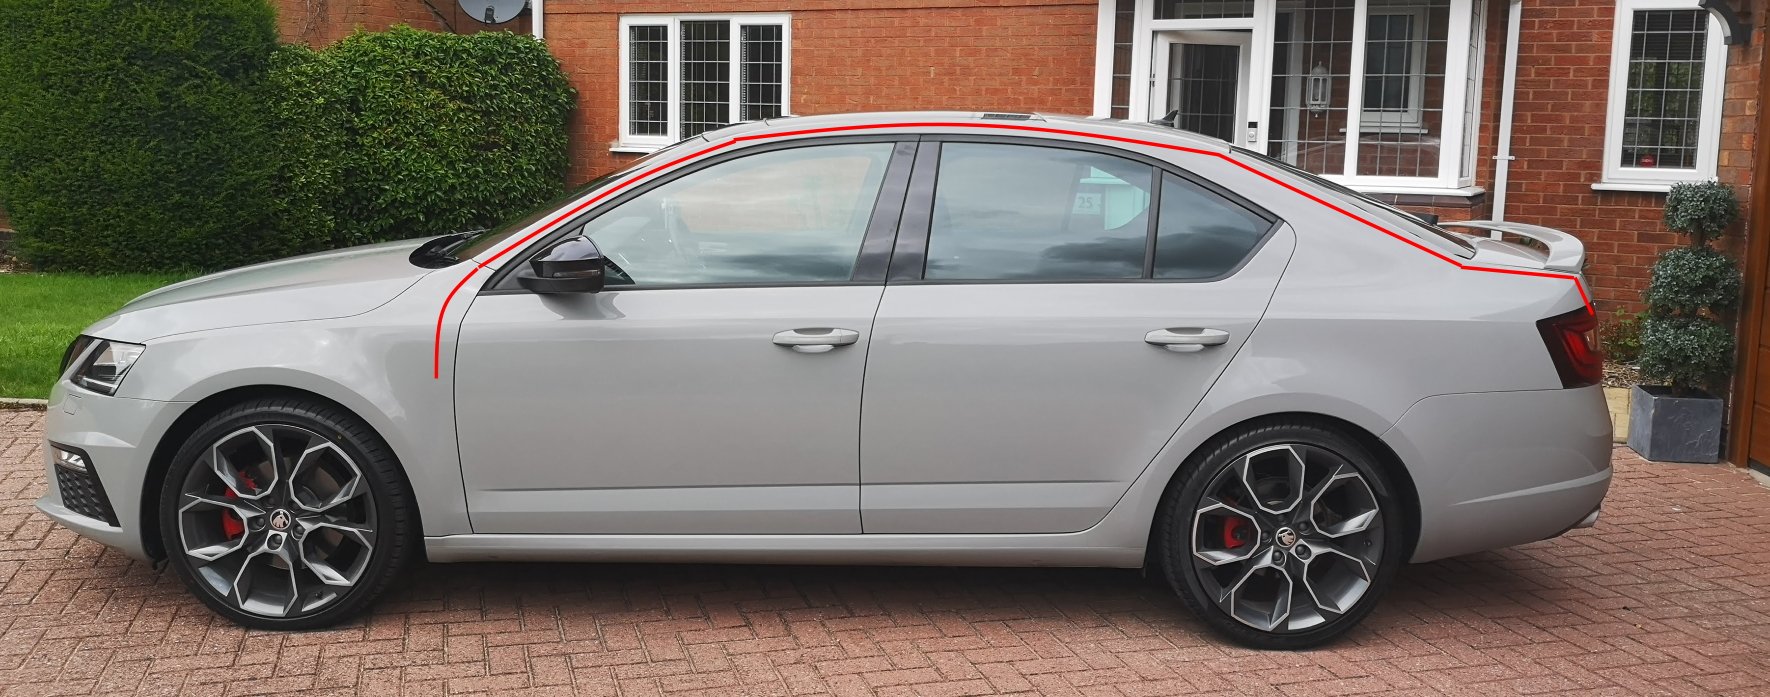
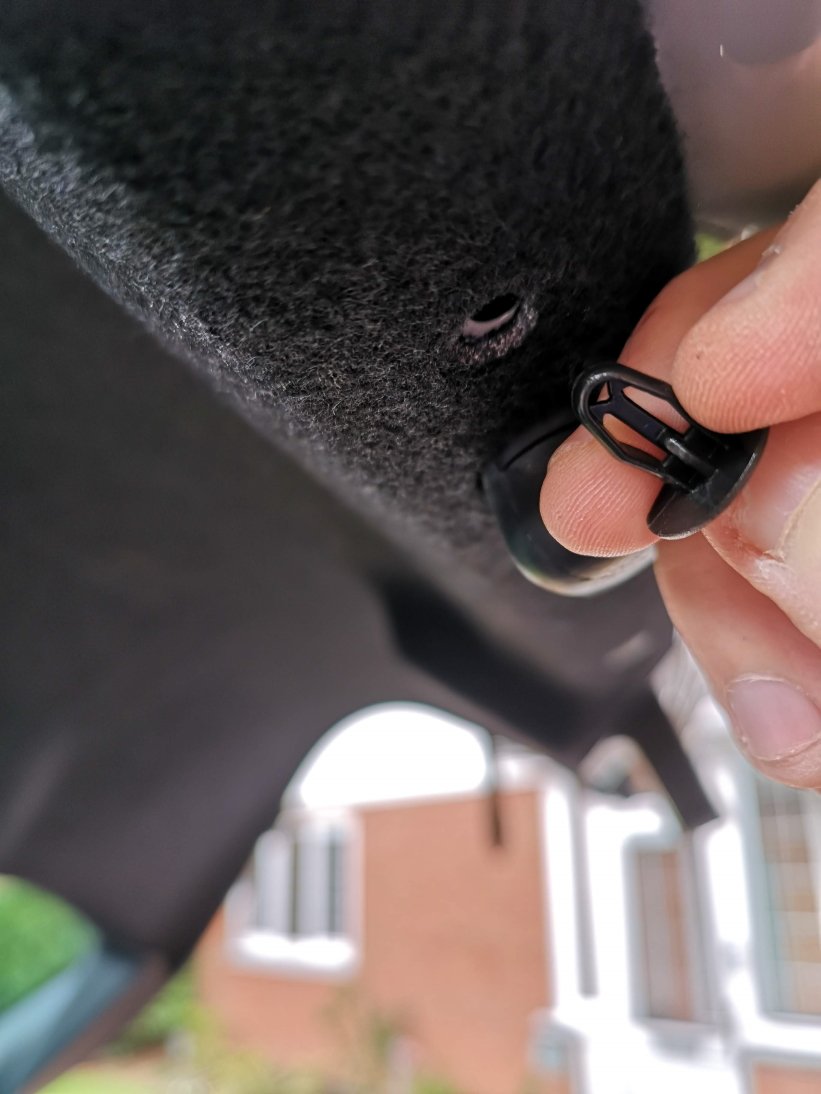
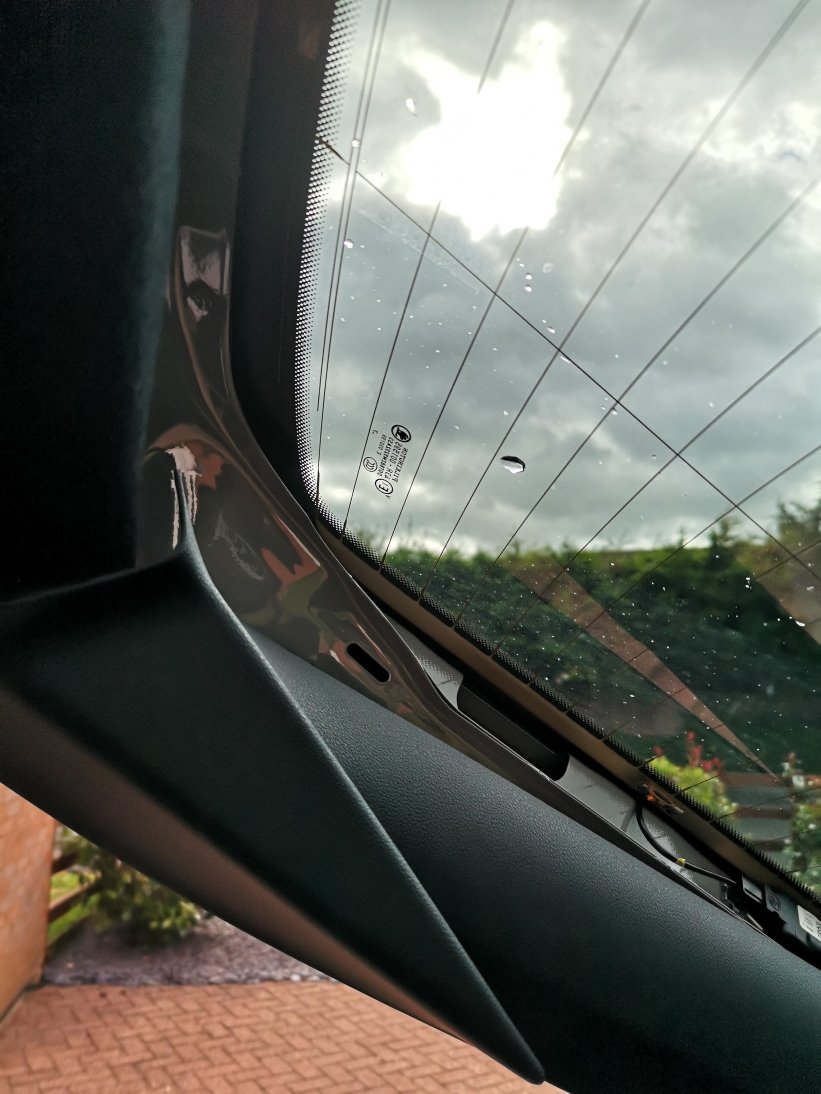
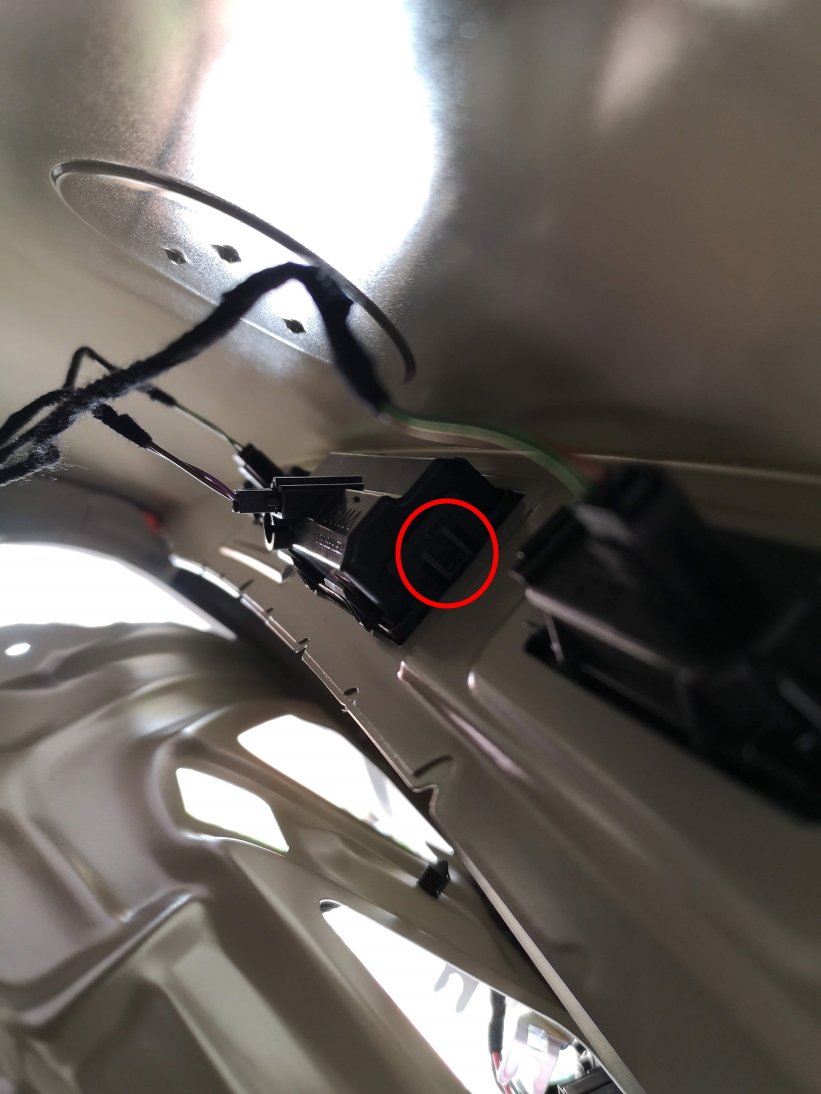
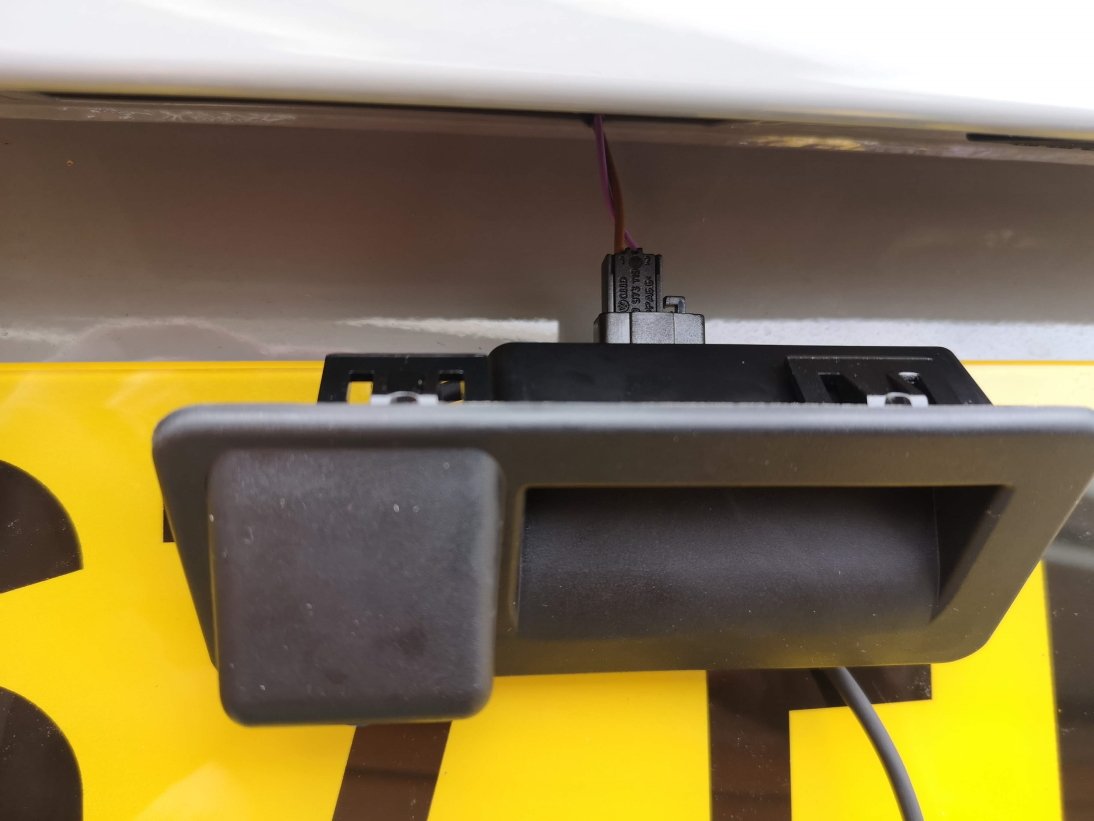
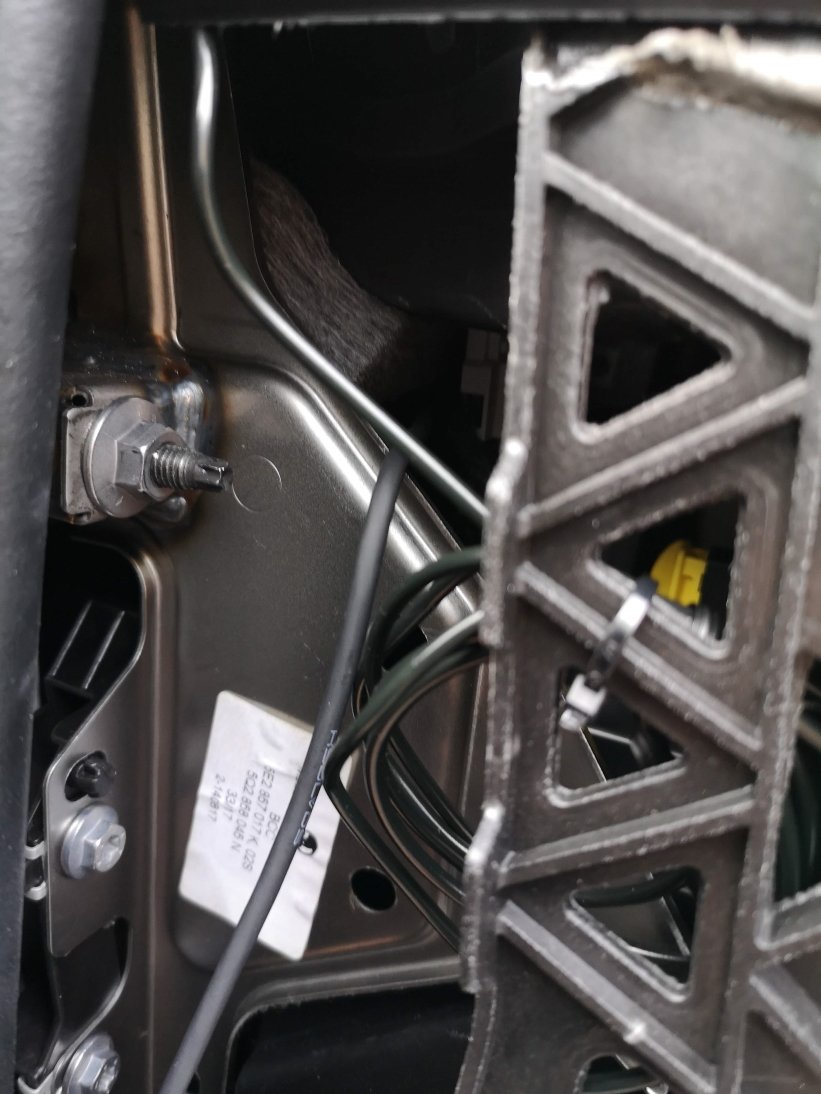
As there seems to be a lot of people asking questions about this lately, I thought I'd put together a quick guide showing how I fitted my reverse camera to a facelift VRS hatchback. They way that i've fitted this will apply to most models, with the key differences being the size of handle (based upon car model year) and whether hatch or estate (but this is just inside trim differences), there may also be wiring loom differences for earlier cars or none VRS models. I've benefited from info from these forums so hopefully this will be useful to others. I am by no means an expert & I won't be able to answer all of your questions, hopefully others will chip in and can add other info as well. First of all, this is the camera that I ordered for my MY 2017 VRS (Camera A/Handle A): https://www.aliexpress.com/item/4000230897829.html?spm=a2g0s.9042311.0.0.40694c4dTEPT93 (link may no longer be valid when you read this so screenshot below) No programming is required for this camera and it supports dynamic reverse guidelines Tools: Trim removal tools would be useful, but otherwise plastic tool that won't mark your car, or screwdrivers or similar with masking tape over the end. A T20 torx head tool is required if you have a hatchback to remove the pulldown boot strap Cable rods are very useful, I couldn't have fitted through the roof lining without. Stereo removal tools unless they come with your camera kit Cable route - I went with an OEM route for my cabling, following existing cables through the roofliner and out to the back as show by the red line below. The camera: The first thing that I did was to check that the boot release switch was working on the new unit - there's no way you want to wire this in and find it is faulty. You'll need to start removing the boot trim to access it. Remove the plastic clips from the lower boot trim- this consists of a few plastic clips which easily pop out with trim remover/screwdriver. There are 8 of these on the hatchback. After that start removing the upper plastic trim, this simply requires forces to release the metal clips. You don't need to remove all of this for now, but it will all need to come off later Remove the lower upholstered trim covering the tailgate. More metal clips - work your way around. You'll also need to remove the pull down strap with the T20 torx head. When this is down you should be able to drop the boot liner which will give access to the boot release handle. This can be awkward to remove, but can be done by pushing in the clip on one on the ends whilst also pushing down on the handle from the inside (ignore the clips along its length) - it should then pop out. Repeat for the other side. Unplug the harness and plug the new handle in - check the release switch works. You can either now push the new handle in until it clips, or leave it out to test the video connection later before fitting. To wire it in Remove the glovebox (open, rock left to right whilst pulling up & you'll hear the bottom clips release. Raise the glovebox lid up and inside the housing and reach in and remove the dampening on the left hand side) Use the stereo release keys to release the multimedia unit. The kit used here comes with a replacement harness that sits between the original one and the media unit & includes the video feed cable. Some people have removed the upper glovebox section to provide more access, be careful not to unplug the airbag connector if you do this. This can be fiddly, but I found the best way was to lie on my back with my head in footwell looking up at the unit from underneath. With the media unit slid fowards this gives access to the harness. It's the large one at the bottom and there is a locking connecting that needs to be pushed backwards to release. Check how it works on your replacement harness. Unplug old harness and plug it in to one end of the new one, push the harness in to the void and plug the new connector block in to the media unit. This took me a while to get it all to fit in. When done you can now test the video feed to the rear camera before your start wiring it in permanently. I took the camera cable over the top of the fusebox cage & out through the side panel I then ran the cable up the A Pillar to the roof lining and all the way to the end. Cable rods were really useful at this point, especially to get around the B pillar , and to go from the end of the roof liner through the cable exit point behind the rubber trunking where the original boot cables are. You can also run the cable in the trim above the sill and work your way back up to the roof lining on the C pillar. When you get to the end of the roof lining you'll need to unclip the rubber gator at the top of the boot so you can get the cable out of the roof liner and in to the boot via this gator. If you install the same way as me you only need to peel the roof liner down a few cm, being careful not to deform or damage it and you'll see the OEM cables behind. Once you've got the cable this far it's a case of feeding it through the rubber gator, up the side of the boot and over to the handle; connect the video cable and tidying up any spare cable. Everything should now be up and running. Retrace your steps to refit your trim. You now have a fully working reverse camera, activated when reverse is selected and with dynamic guidelines. The parking sensor guide now shifts to the left of the screen the same as an OEM reverse camera. I will come back and re-edit this tomorrow and resize pics as it's getting late. I'll tidy up any errors as I see them so please don't jump on me straight away!


 1 point
 -
1 pointso from a reading around the interwebs, it appears that our exhausts in the 280 are pretty much the same as the golf R (strangely). the flaps open up for a bit extra noise. [disclaimer - I have done this to my car, if you decide to do it to yours, its your choice] if you want to open them up fulltime, you can either disconnect them via the connector on each side of the exhaust (and tape it back up), or disable via vcds. note that with the VCDS way, you need to fully power down the car before the coding takes effect. engine [01] Coding, byte 9 bit 2 - tick for normal operation, untick to keep them open1 point
-
1 pointSpare wheels were only fitted as a factory fitted option or if the previous owner bought the after market kit. None of the Yeti have a wheel well, the well is formed by fitting the raised boot floor kit.1 point
-
1 point
-
Sure its flat to the top with the bottom being sat against the stop in the strut platform with the natural rise in the spring being sat on the "ramp" built into the strut platform. The photo shows that the top mount is not sat square to the strut which suggests that spring is not flat there. If the flat end is to the bottom this will apply point loading from the ramp on the rising spring seat.1 point
-
1 pointWell that was entertaining. Cold weather effected the tyres and reliability greatly, but the cynical deployment of the safety car really hurt those who at the time had a tyre advantage. Perez was odds on for a podium until the SC gave Riccardo a free stop for fresh rubber. I initially thought the stewards also boobed penalising Albo; all he did was pass a car that had just run off the track. However, he has form for hitting cars that he has just passed (Hamilton's for one) and getting away with it, so maybe it was about time his card was marked.1 point
-
1 point
-
Just picked it up, gave the steering wheel a leather coat and just sat in the car for hours and enjoyed the new car smell.

 1 point
 -
1 pointIts easier to feel for the triangles once you are in right area. Once found a dab of light paint or marker is useful for when you need to use them by the roadside !!1 point
-
1 pointGoing 5w 40 FS can help with some TSI's that are not totally gubbed but with your TDI if using excessive oil you have an issue needing addressed. ? How many miles has the engine done?1 point
-
1 point
-
I got bored watching it but the goy is a dangerous bodger who doesn't even appreciate that there is no centre diff on any of the VAG Haldex equipped vehicles, "probably not a good idea to run the Haldex 100%" is nothing to do with protecting the pump from overheating but in reality (even though he is ignorant of the fact) because it will lunch the front transfer box through transmission wind up. And as for cutting away the foam from the seat squab He says you can buy a replacemen grommet, its part of the loom & I reckon that is bull***t, & any vehicle that he has fitted one too will have a hole in the floor to let in water, road dirt and exhaust gases.1 point
-
1 pointYes, he needed to move the markings over so the triangle is central to the jack, and yes those drain holes are there on all models. They drain the cill area of any water that gets inside, be that spray or even condensation.1 point
-
I got my Kamiq 1.5 SEL DSG about a month ago trading in my Karoq. I was a bit worried about the lower driving position however it's fine and the steering is a bit lighter which suits me. Rear legroom is ok and boot space just about adequate. Auto gearbox also very good. The only slight niggles I have are regarding the updated dashboard and controls from the Karoq which I've not really come to terms with (I'm a technophobe) especially the fan for the climate control which is adjustable on the navigation screen and I don't find it user friendly.1 point
-
1 point
-
1 point
-
1 pointThere's a product selector on the Thule website where you can drill down to your make/model and see what fits. The foot pack is going to vary depending on the bars you choose too.1 point
-
Do yourself a favour and have either an ecs or westfalia wiring kit fitted. £150 or so for either kit and really quite simple to fit. Vcds needed after for coding mind.1 point
-
Not sure some Skoda dealers dream up their prices but if anyone is interested in a low mileage Superb Sportline Estate in Dragon Green (it's gold yellow) registered in April 2017 with 19,800 miles with the exhaust flaps, no GPF up the exhaust and the 6 speed DSG and 280 engine then be prepared to start haggling the price down from £23,990 with Lister's Coventry.1 point
-
I wouldn’t see them as not being important given how much gross profit they create for the group, and the production of components for other Group cars. But it is clear that Volkswagen doesn’t want ŠKODA to take their market placement. I reckon Volkswagen should remember that they are the people’s car and thus should reconsider how not just SEAT and ŠKODA are placed within the market, but themselves. Is an Arteon really fitting of a “people’s car” nameplate? At least the Superb was seen as a luxury car before WWII1 point
-
1 pointThe Powerflex VAG pad I mentioned above is a good fit and is easy to use. The pad mentioned in the earlier post by X19 is the wrong sort, that's why he posted. I guess the reason for taking the weight of the car on the angle of the floor pan is because the seam sealer is not disturbed - break/crush the seam sealer and let the risk of sill metal corrosion breed under the cover of what might appear to be ok. Only VAG could verify - or possibly not You can't see the jacking point, only the positional triangle on the plastic cover - the "jacking" area just looks like any bit of sill. Lie on the ground and feel for it. Good video, right jack, wrong position on the drain hole and obviously not read the owners manual - perhaps he had it upsidedown! Interwebby stuff can be a force for good or bad - you make your mind up.1 point
-
1 pointYou can't see the jacking point location marker moulded into the plastic sill cover just by standing at the side of the car. You have to get down on your knees, or lie flat, to see the rear marking. It is a little triangle, raised, and just in front of the second from the rear of the plastic cover holding self tappers on the horizontal part of the plastic sill cover. It is not on the sill drain hole. There are 4 components to the welded seam: a central thicker part of the body, an inner 90* bent part of the floor pan. another thinner metal panel which is really the outer sill panel, with some swaged holes, which completes the traditional sill structure. There is then a cosmetic plastic sill cover for styling/decorative effect which doubles up as protection to keep gravel rash etc damage away from the potential rust prone area of the welded sill area. To further this protection, there is a thick layer of seam sealer on both side of the welded seam, merging into the floor pan. The post above from X19 is spot on, but seems to have been ignored. The weight of the car is indeed taken on the floor pan pressing, but only at the 90* bend where it is welded together with the other bits. If you rammed a jack under the floor pan anywhere else, you distort the floor pan and get into big trouble. To understand this you have to lie on the floor and look along the line of the sill to see the profiles involved. The owners manual is correct and quiet clear, and yes they are very specific in their reasoning. I've spent some hours in recent times scraping off damaged areas of seam sealer and chasing down the first signs of surface rusting under the sealant. This has been caused by my Skoda dealer raising the car on lifts directly on the sills, even worse, tyre dealers. One tyre dealer tried lifting in the middle of the sill until I stopped him. The areas were rust treated, painted and seam sealed again. My Skoda dealer just raises his eyebrows when I mention this, so now I only use them for "big" things like cam belt changes etc. There is a specific polyurethane "puck" made by Powerflex: VAG JACK PAD PF3-1661 https://www.powerflex.co.uk/product-details/VAG+Jack+Pad+Adpator/13324.html which is exactly the right profile if you want to try and protect the seamsealer. If you want to keep the car as a keeper, these things matter if you are mechanically minded. If not, carry on as normal !!1 point
-
1 pointIt could just be a wiring fault - an occasional break or short circuit. Can you ask what the fault code is? Was this a Skoda dealer? I would take it to an independent garage or Halfords as they might be more forthcoming.1 point
-
If you were talking about a 600bhp Audi RS6, or similar, I would agree on the 'can't use the power comment'. But it's a 2L family hatch / estate. It's not 'that' quick! Hope your Mrs enjoys the 118i 😉😁1 point
-
1 pointSo now we have a report saying diff casing cracked as opposed to haldex unit. I think it's plainly clear to see what has happened here and wish you the best of luck in a resolution.1 point
-
Since you want to go into numbers, Volkswagen Passenger Cars had a 4.5% increase in sales revenue while ŠKODA had a 14.5% increase. ŠKODA also has almost double (8.4%) compared to Volkswagen Passenger Cars (4.3%) on operating return on sales. Not to mention the 1% decrease in sales of Volkswagen, while ŠKODA had a 11% increase... Maybe they should look at themselves before trying to undermine ŠKODA1 point
-
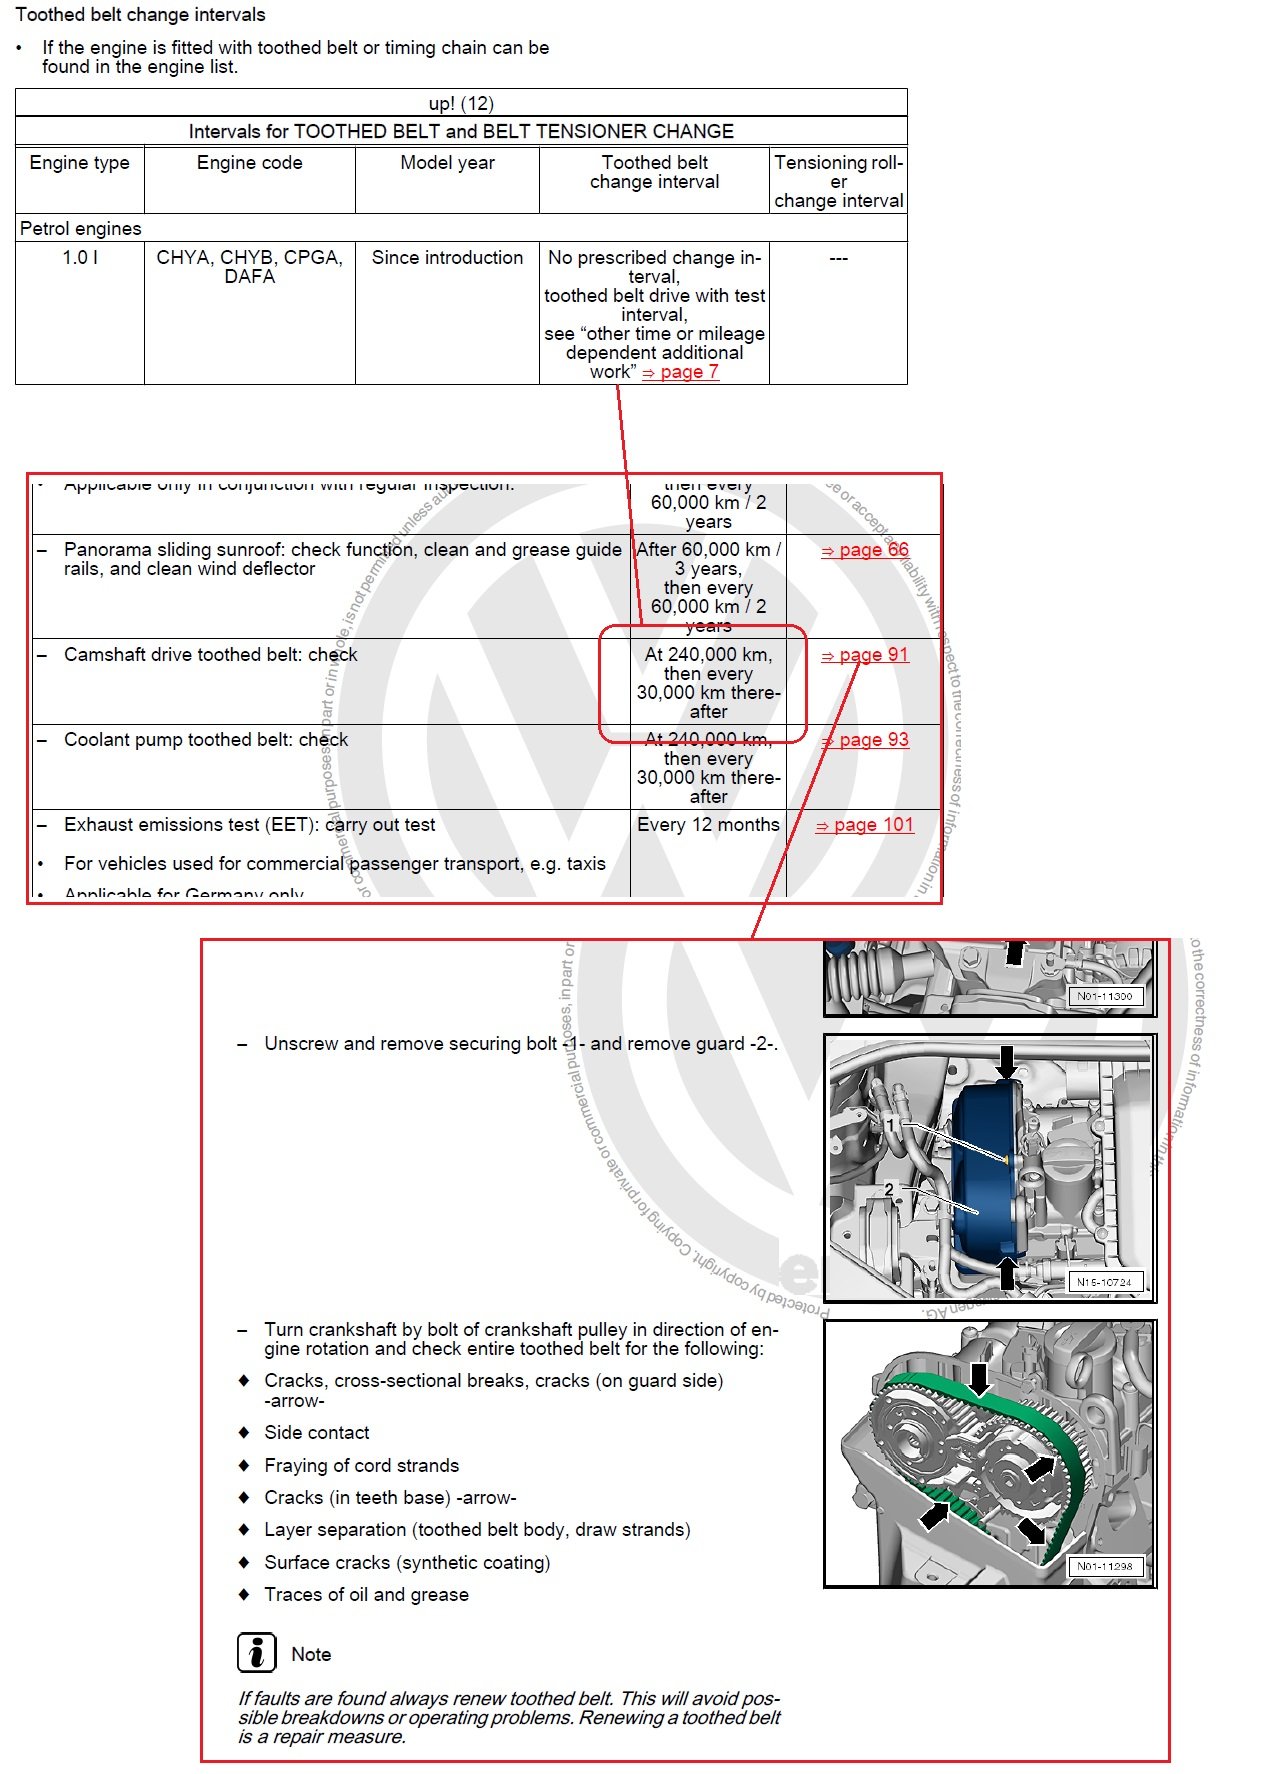
> unsure about cam belt ? When it would need changing ? VW (designers and manufacturers of the CHYA/B engines) recommend inspection of the cambelt at 240 000km (160k miles) and to replace if worn. Water pump is belt driven off the gearbox end of the exhaust camshaft. Cambelt is PTFE reinforced and the cam gears are tri-oval, so wear isn't the problem that it was on previous engines. Clutch wear is pretty much relevant to previous use and whether the driver has been kind to the transmission. Cheers...Snaefell
 1 point
 -
1 point
-
1 pointThere's 2 different lights. One under the door projects the Skoda logo and one under the door mirror for puddles etc. I've got the SE L First Edition though.1 point
-
1 pointMy understanding is that for my 20 reg car if the key doesn't move for 15 minutes now it goes to sleep so no need to bother about these screening boxes. Saves battery life as well. Anyway I always lock the car with the key button and then touch the door handle contacts to disable the kessy when I walk away so the signal booster thieves use will not work.1 point
-
This is where some very nice cars head on a Sunday if not going further north to drive the A93. http://classic-car-tours.com/sunday-worship Croftamie. G63 0EU For McLaren owners in 2021. £16,995 per couple with your own car. £21,789 with a rental car. https://cars.mclaren.com/gb-en/experiences/lifestyle/mclaren-highland-drive-20211 point
-
1 point
-
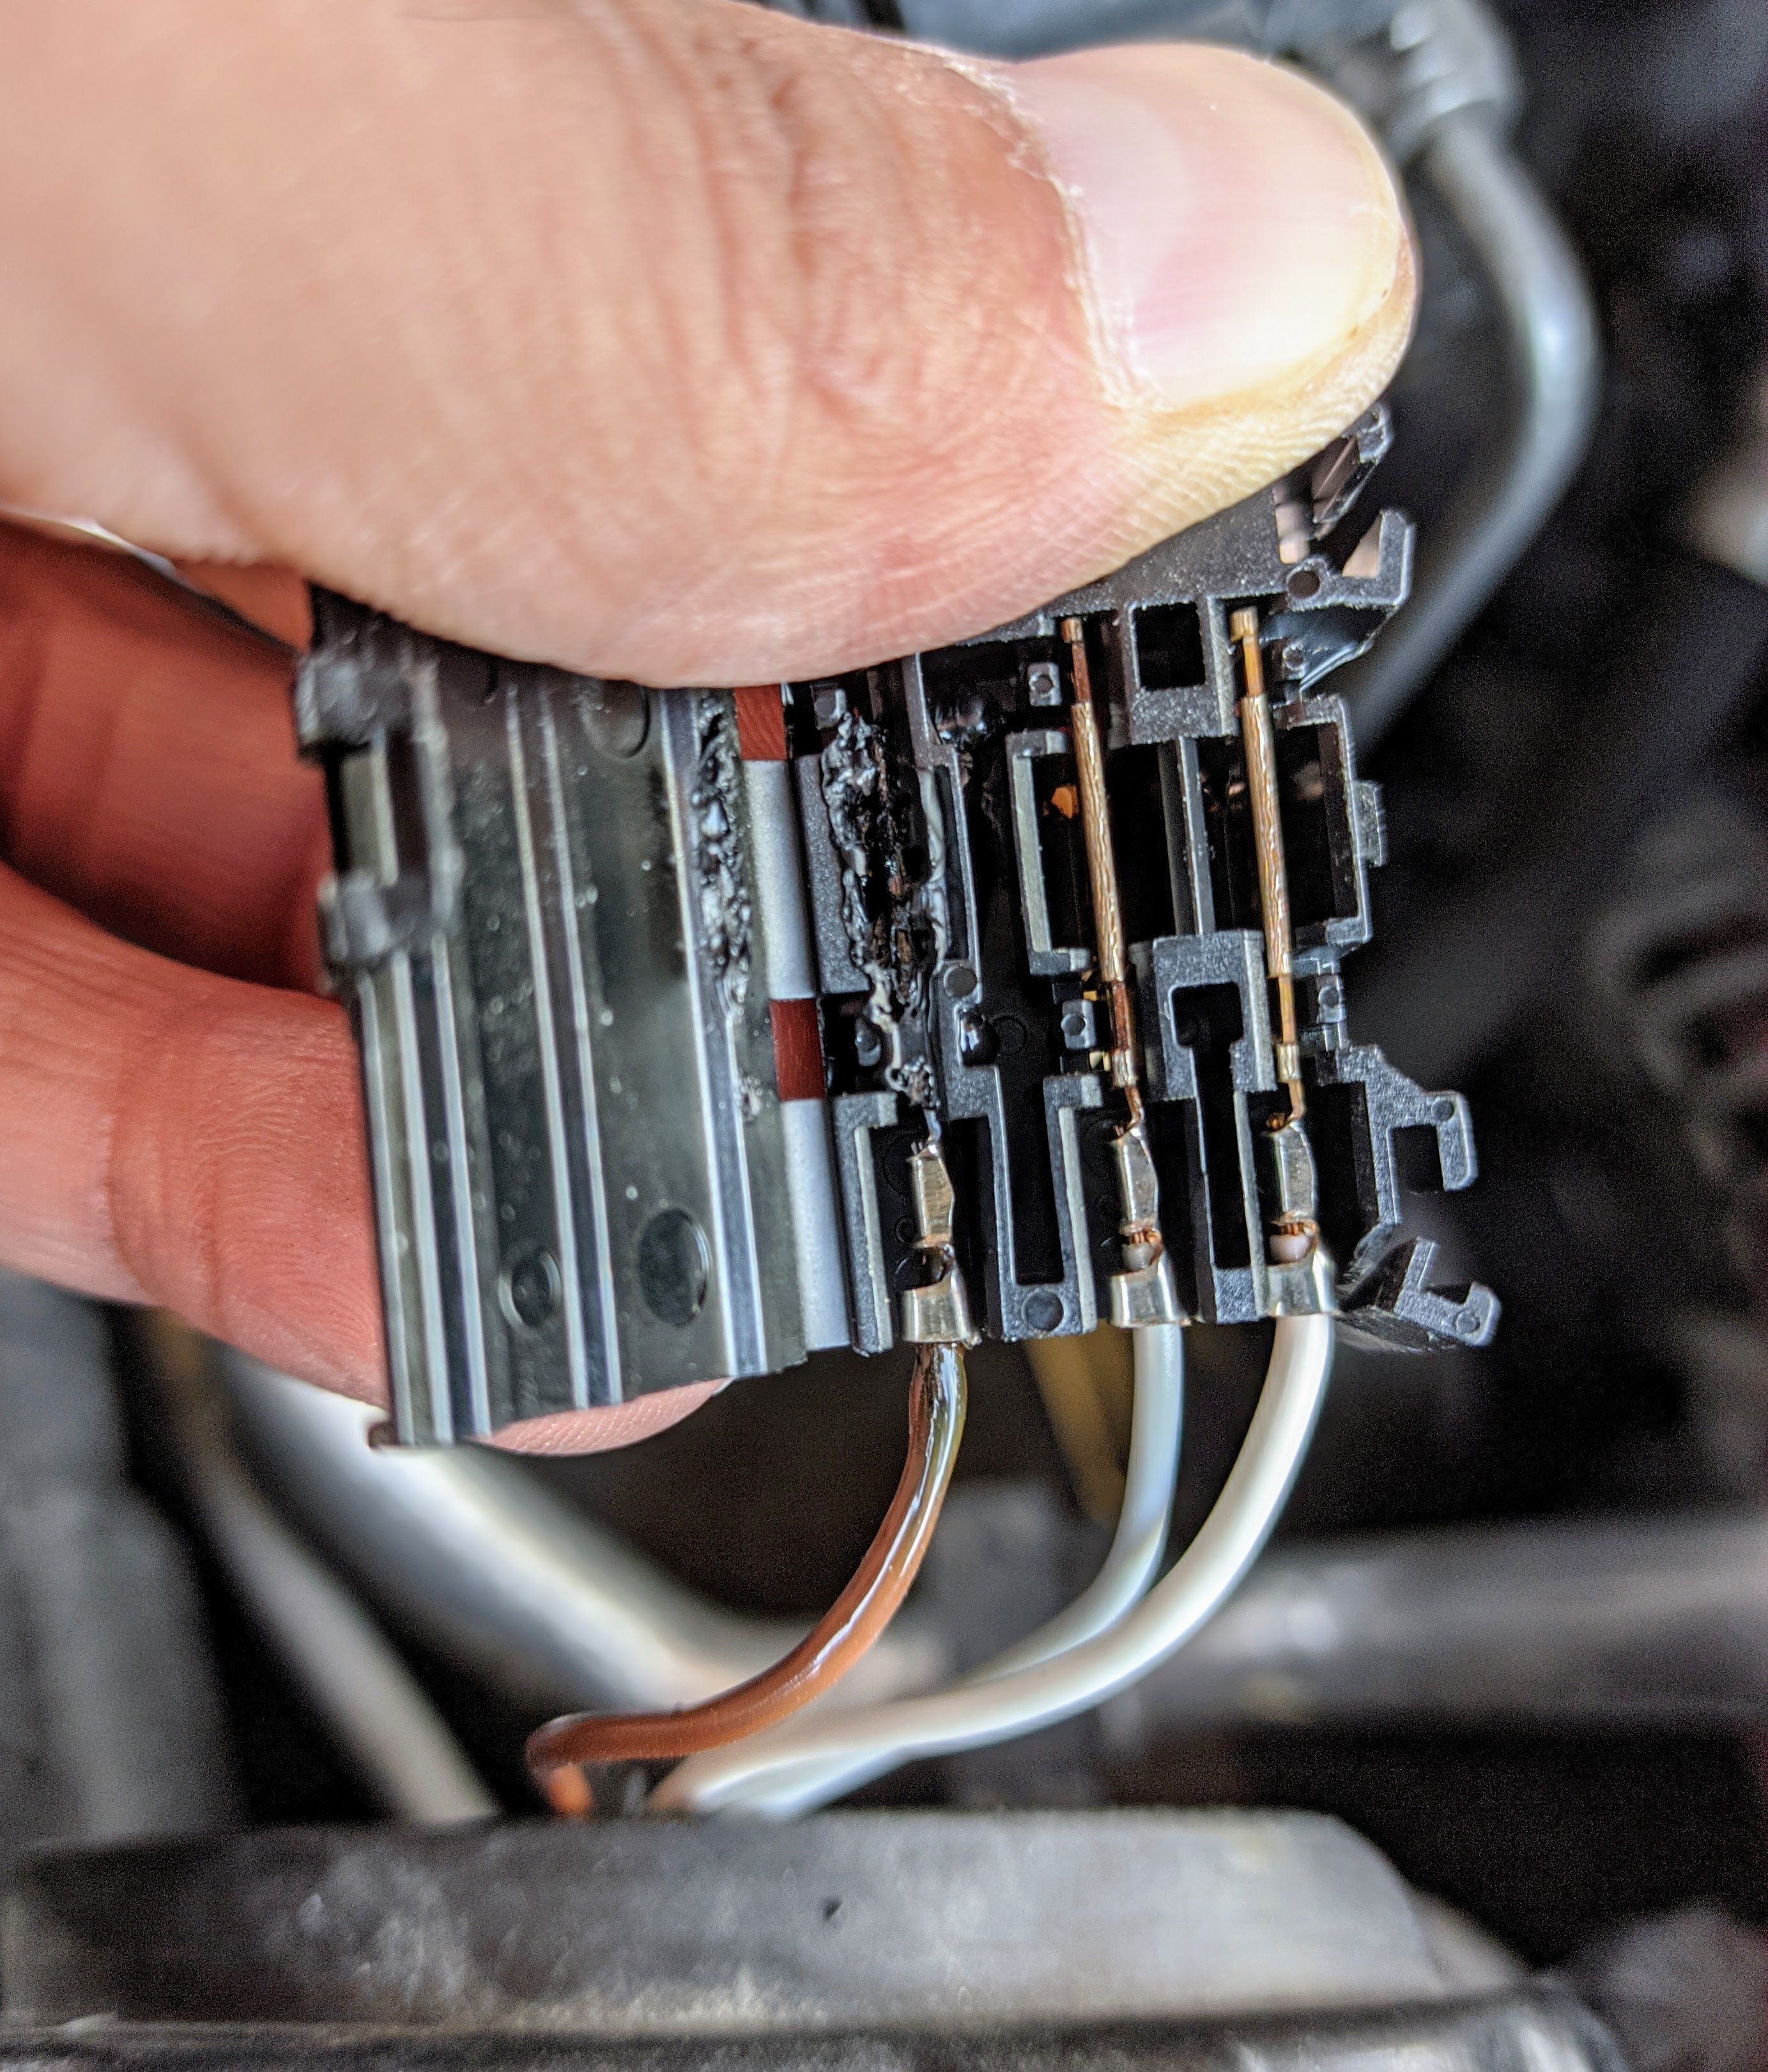
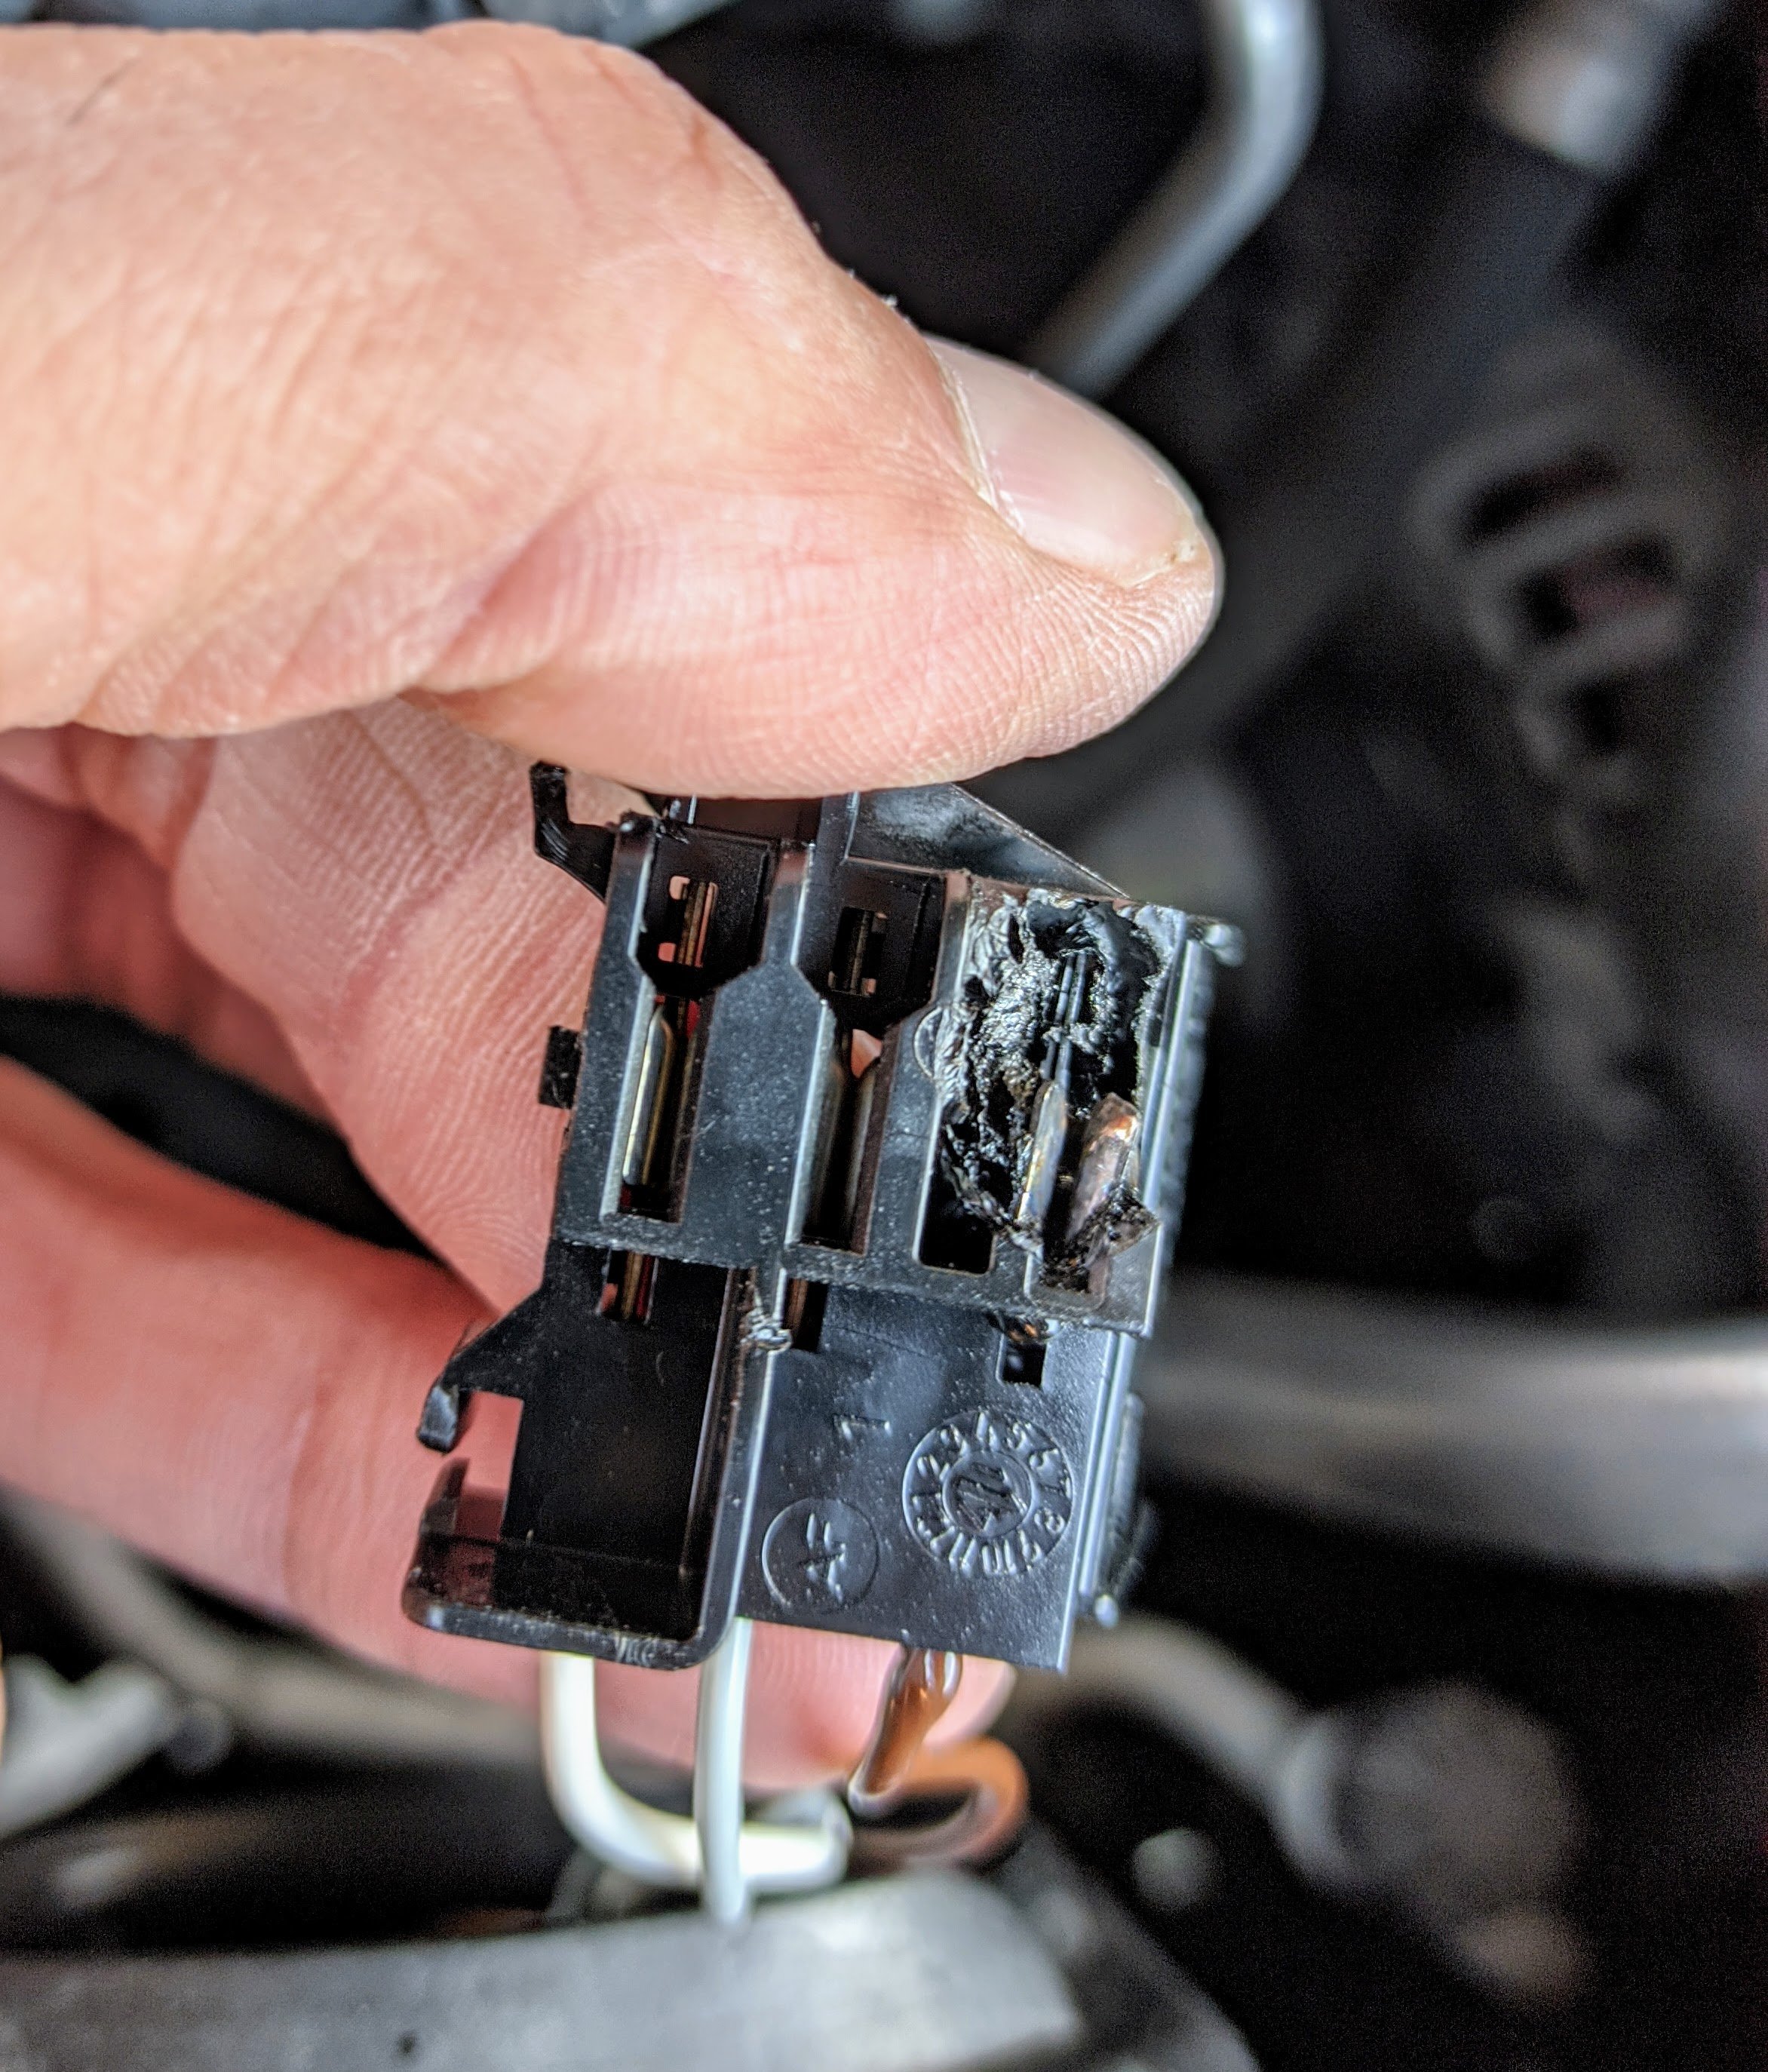
1 pointWell ... Original connector and spades was broken... I've buied new universal connectors and now my headlight work perfectly. Not perfect, but Fixed. Thanks all!


 1 point
 -
1 pointTreated the wagon to some new tyres The Eagle F1 Asymmetrics that were originally on the R360 wheels when I bought them were almost 4 years old. I'd noticed the grip levels getting steadily worse, and the car was getting a bit noisier on rougher road surfaces too so I jumped on a cashback offer from Michelin - £100 off a full set of 19s. Michelin Pilot Sport 4S (235/35/R19) I can happily report that what everyone says about them is true - they're epic. Grip levels are just astounding, they're about 50% quieter and to top it all off the ride quality has improved thanks to Michelin introducing softer sidewalls. Well pleased!1 point
-
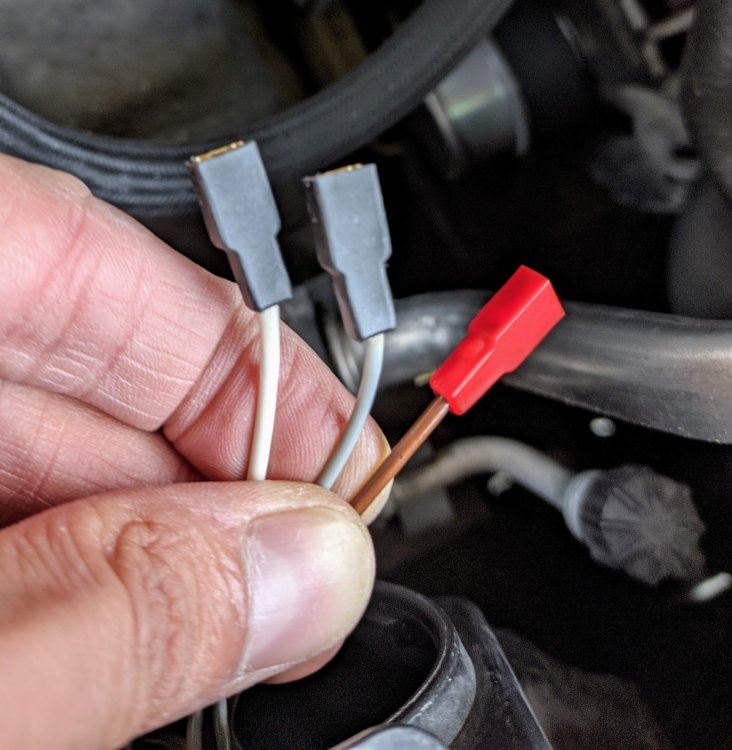
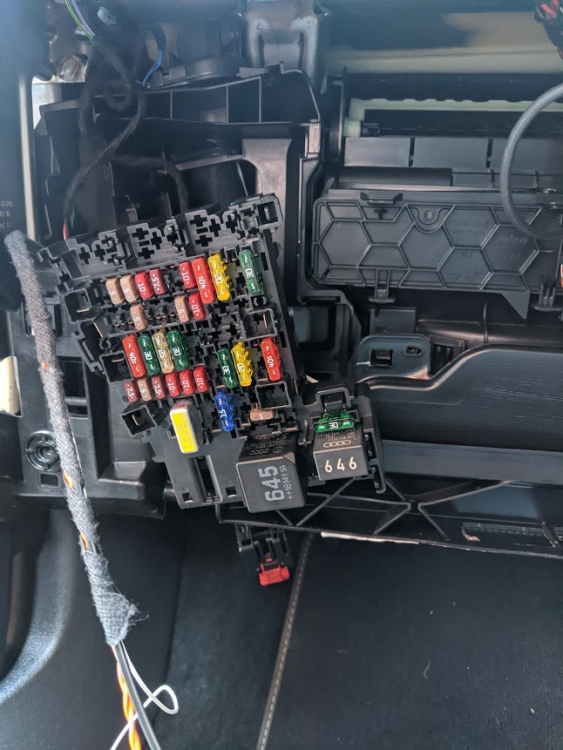
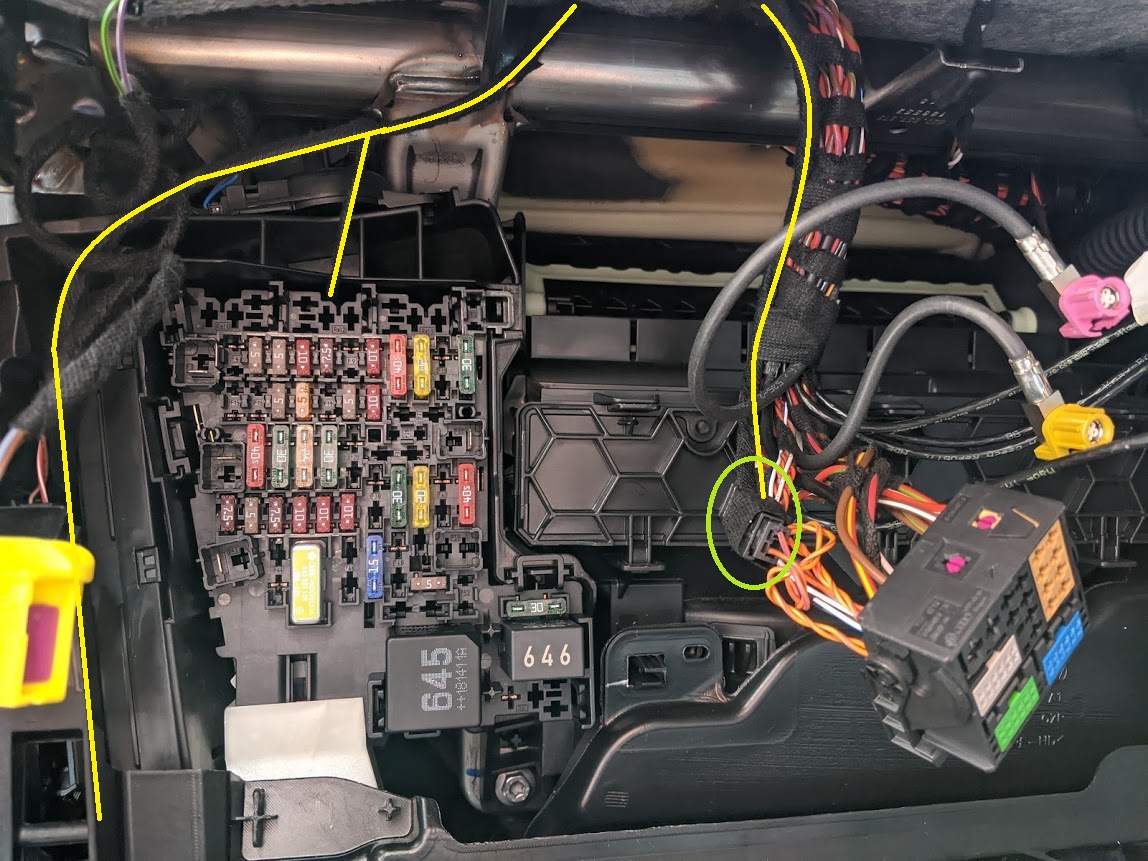
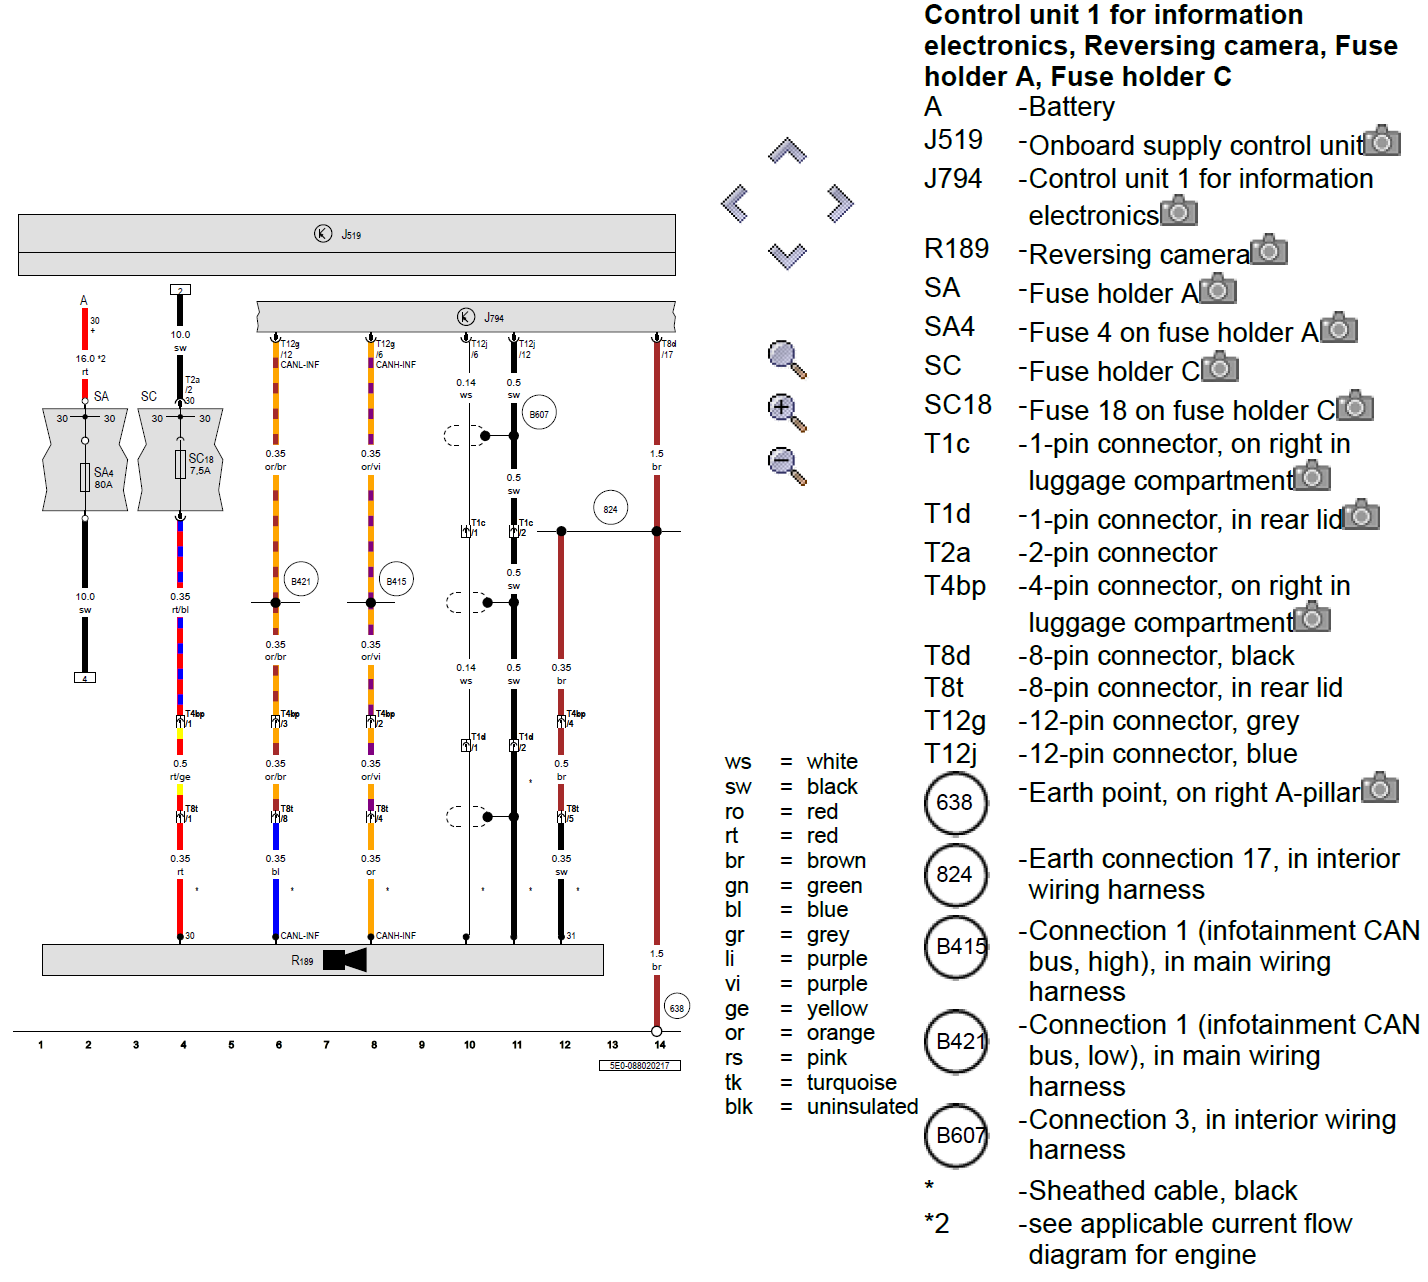
1 pointNice guide, shame you didn't write it two days ago when I started fitting my camera As I did a few things differently, I'll add some extra info as it might help others. I used an OEM/original high camera from AiDU Auto on aliexpress. At time of writing they offered: - a highline kit for the MK3 Octavia at ~£75 - a highline kit with washer jet for a Tiguan also at ~£75 After a quick chat, they were happy to parameterise the Tiguan kit with an Octavia file so I bought the Tiguan kit. Given they were the same price/size/shape it seemed daft not to get the bonus washer jet Unfortunately, the washer jet pipe was slightly too short but I was able to remove the fittings on either end and use some PVC washer hose (4mm ID, 6mm OD) of the right length instead. I took a slightly different cable route, shown in yellow: Unlike the kit above, it's not 'plug and play' so you end up with a bunch of wires that need to be connected to the appropriate places. The cables are pre-terminated but as I already had the correct crimps, I cut them to length rather than having loads spare. Factory wiring diagram for the highline (PR-KA2) camera is as follows: The earth wire was shorter than the others so I used the earth point in the boot below the rear seatbelts: For power, I removed the fusebox and used fuse 18 as per a factory install: After trimming and terminating the wires, I ended up with this: - new wires highlighted in yellow - new connector tapping into the CAN-bus circled in light green For the CAN-bus connection, I de-pinned the original quadlock connecter and moved the two CAN-bus wires into a separate connector, this means I didn't need to cut or modify the original wiring to tap into the CAN-bus: The eagle eyed amongst you may notice I used a 5a fuse in slot 18. After a quick shopping trip, I've now replaced it with a 7.5a fuse as per the factory wiring diagram. Coding was super easy: - Address 19, add 6C to the installation list - Address 10, coding, tick byte 2 bit 4 - Address 5F, adaptions, change Car_Function_List_BAP_Gen2-VPS_0x0B to "activated" - Address 5F, adaptions, change Car_Function_List_BAP_Gen2-VPS_0x0B_msg_bus to "Infotainment data bus" All works just like a factory install with the various modes etc. As expected, the only error code currently stored is "no basic settings" so I'll need to print out a VAS6350 board and calibrate it at some point


 1 point1 point1 pointUsually caused by the EGR valve sticking open slightly allowing exhaust gases (too much) to enter the cylinders and therefore less air to enter cylinders. Replace EGR valve with new one. Quite common not just on VAG engines. No idea of cost.1 point1 point1 point1 pointAny cars with sports suspension probably get away without removing the RHS drive shaft as the springs will be shorter. A car with a BXW engine would normally have normal suspension. Though I don't mind being wrong as that would mean when I need to work on the front suspension of my wife's 2015 Polo 1.2TSI 110PS, I would need to bother about doing that part of the job, from memory, I probably just dived in and removed the RHS drive shaft from the late 2009 Ibiza with the BXW because I needed to do that on my wife's old 2002 Polo with the BBY engine. I'd think that if you had and used very slim/compact/expensive spring compressors, you could shorten the spring enough before taking the strut off and out of the hub carrier. I seem to remember that the (factory fitted) top nut is just a "crushed" nut, so a bit of repeat crushing it would turn it back into a lock nut again.1 point1 point21mm swan neck nd the nut is reusable. Not sure how similar his is to my mk2 in terms of drive shaft and the also mk1, You can squeeze the strut out without touching the drive shaft if you have a spare jack handy.1 point1 pointMaybe make sure that you are prepared to remove the RHS drive shaft nut as that side's lower arm can not usually get forced down far enough to get the strut out of its socket in the hub carrier, sometimes the locking element breaks when you remove this nut, and sometimes it doesn't, so safer to buy in a new nut for that.1 point1 pointI am no fan of PHEVs but 32 miles will cover the daily drive of a huge number of the UK driving population. If it helps clean up the air and save lives then I can accept it.1 point


Important Information
Welcome to BRISKODA. Please note the following important links Terms of Use. We have a comprehensive Privacy Policy. We have placed cookies on your device to help make this website better. You can adjust your cookie settings, otherwise we'll assume you're okay to continue.