


Leaderboard
-

moley
Resident Member21Points10,121Posts -
shyVRS245
Locked17Points0Posts -
Greenliner1
Members11Points2,090Posts -
J.R.
Resident Member9Points15,266Posts


Popular Content
Showing content with the highest reputation on 03/01/21 in Posts
-
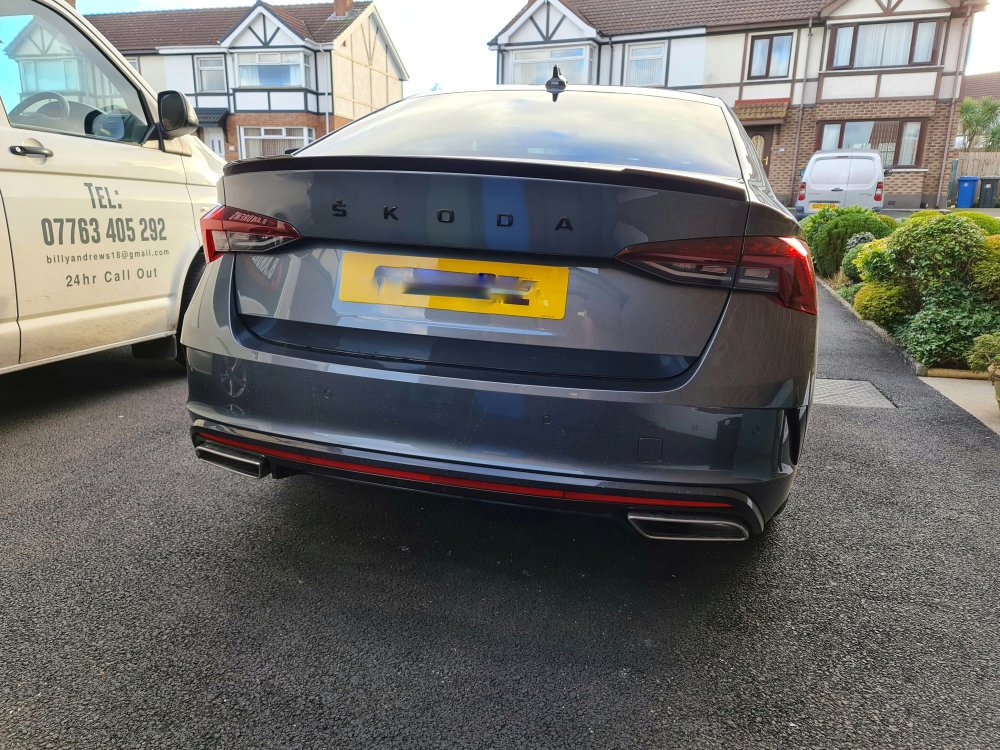
Pic of her debadged
 3 points
 -
Really appreciate the advice, went for then 2.0 TDI SE L with 60k on the clock. Got it off a private seller but took my mate with me who is a mechanic to check I was buying the right car. It had a full skoda service history and he had paid extra for an extended warranty so well worth it I thought.3 points
-
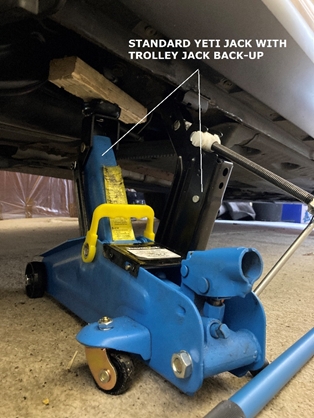
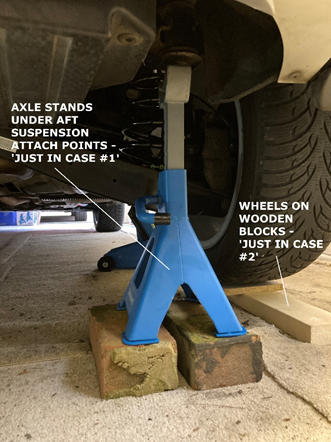
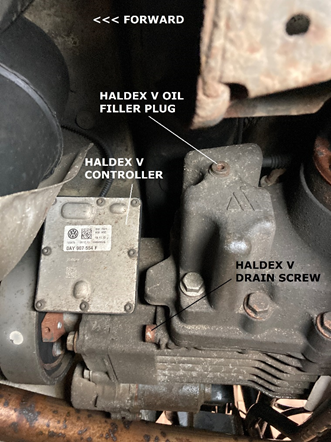
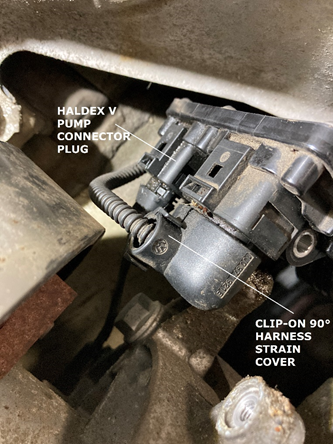
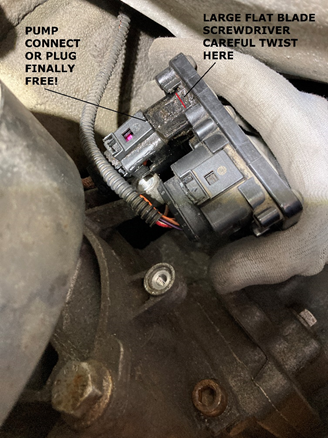
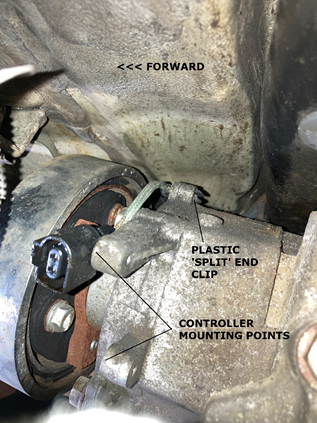
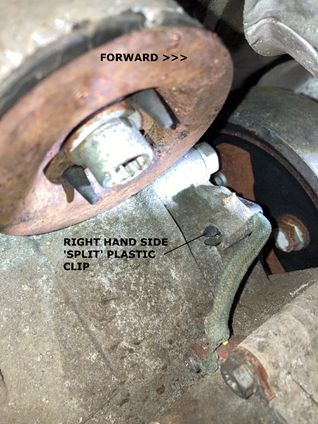
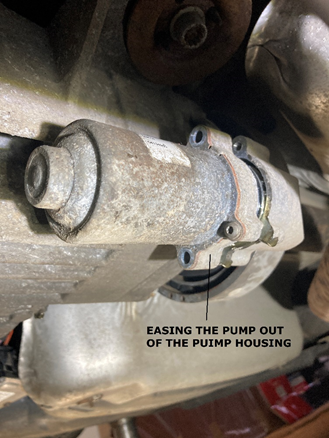
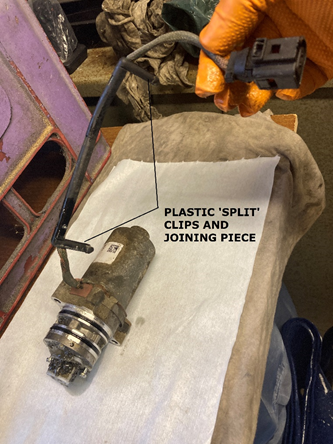
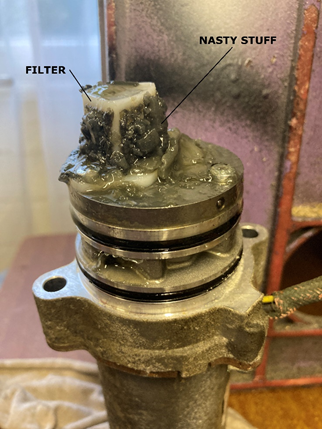
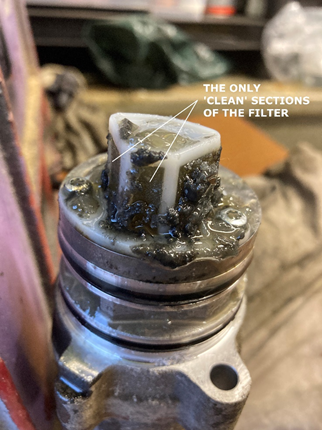
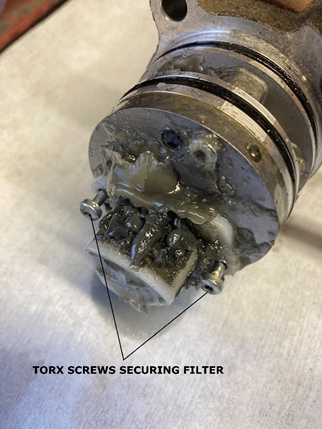
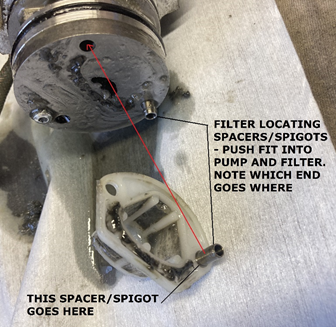
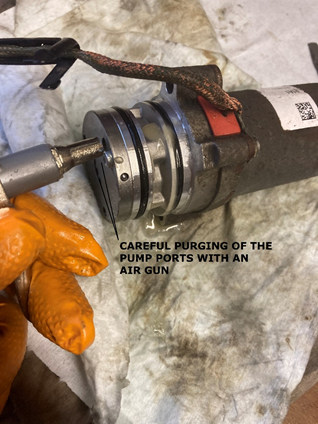
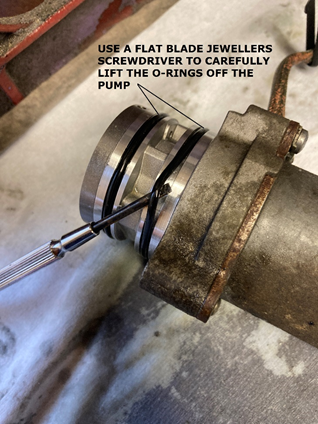
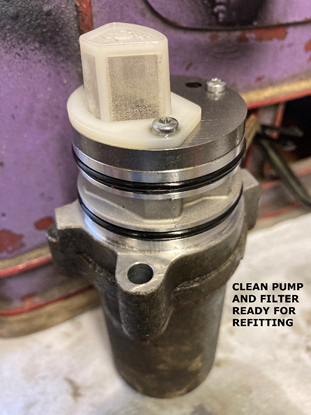
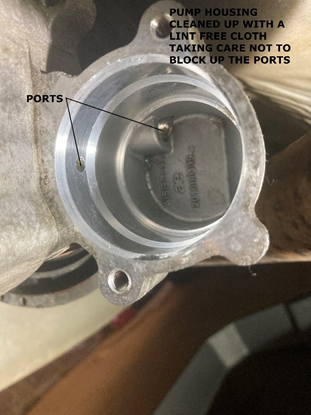
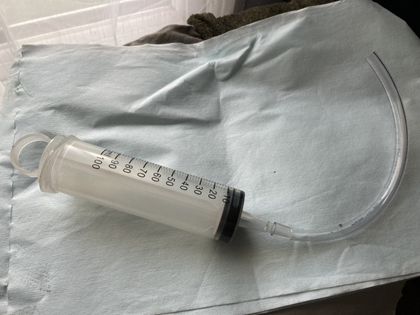
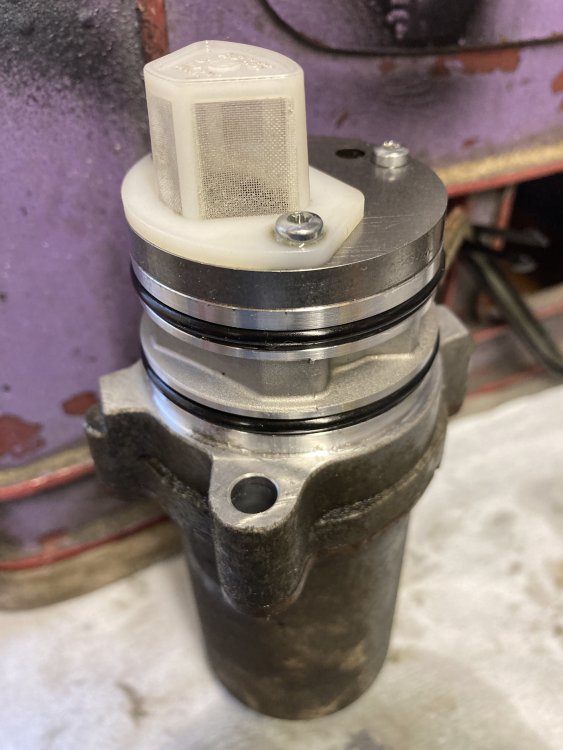
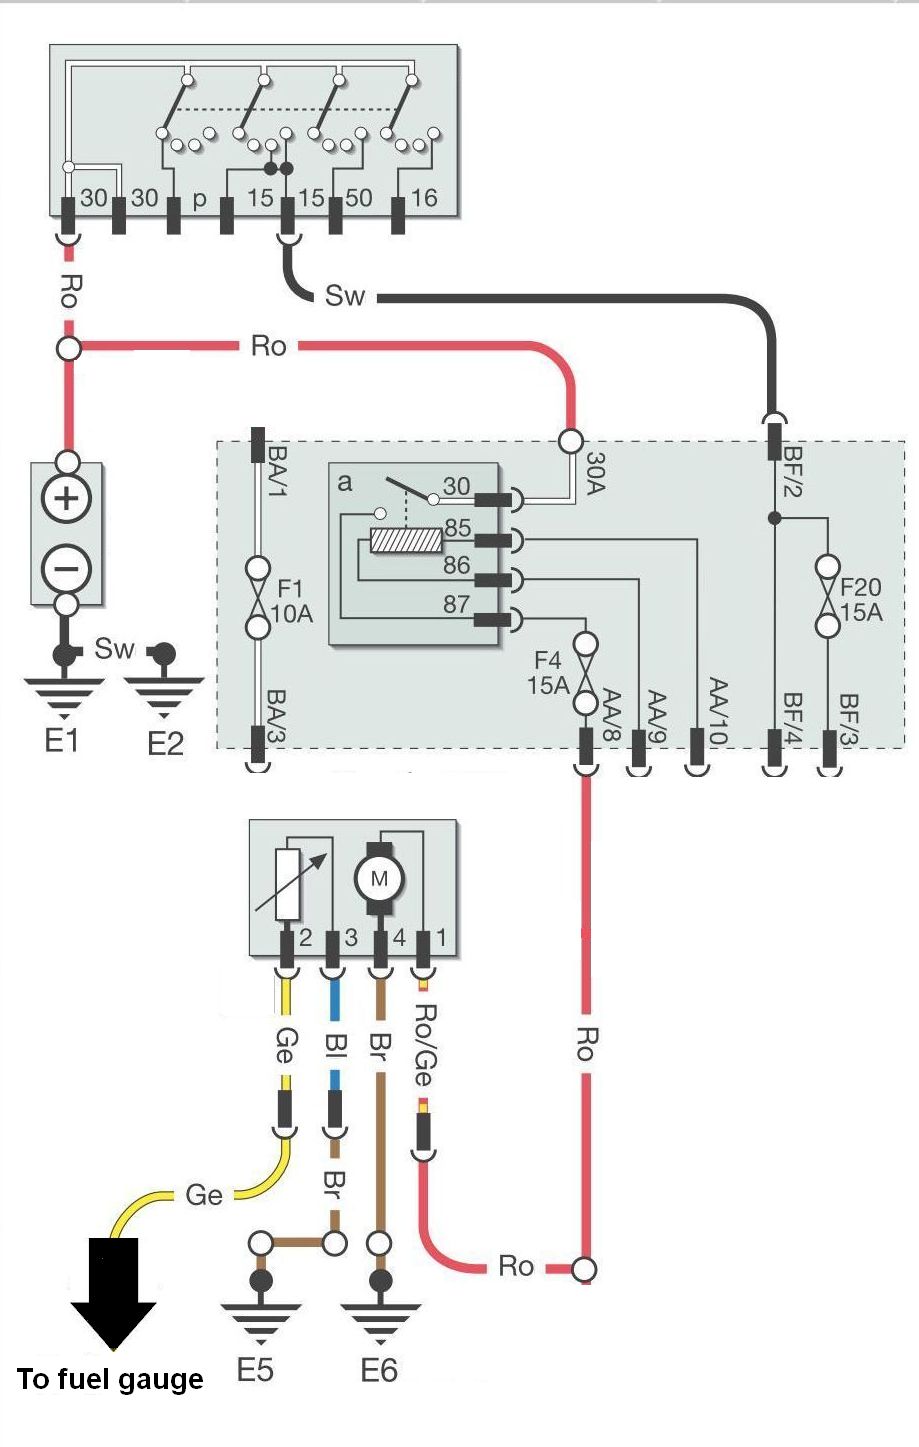
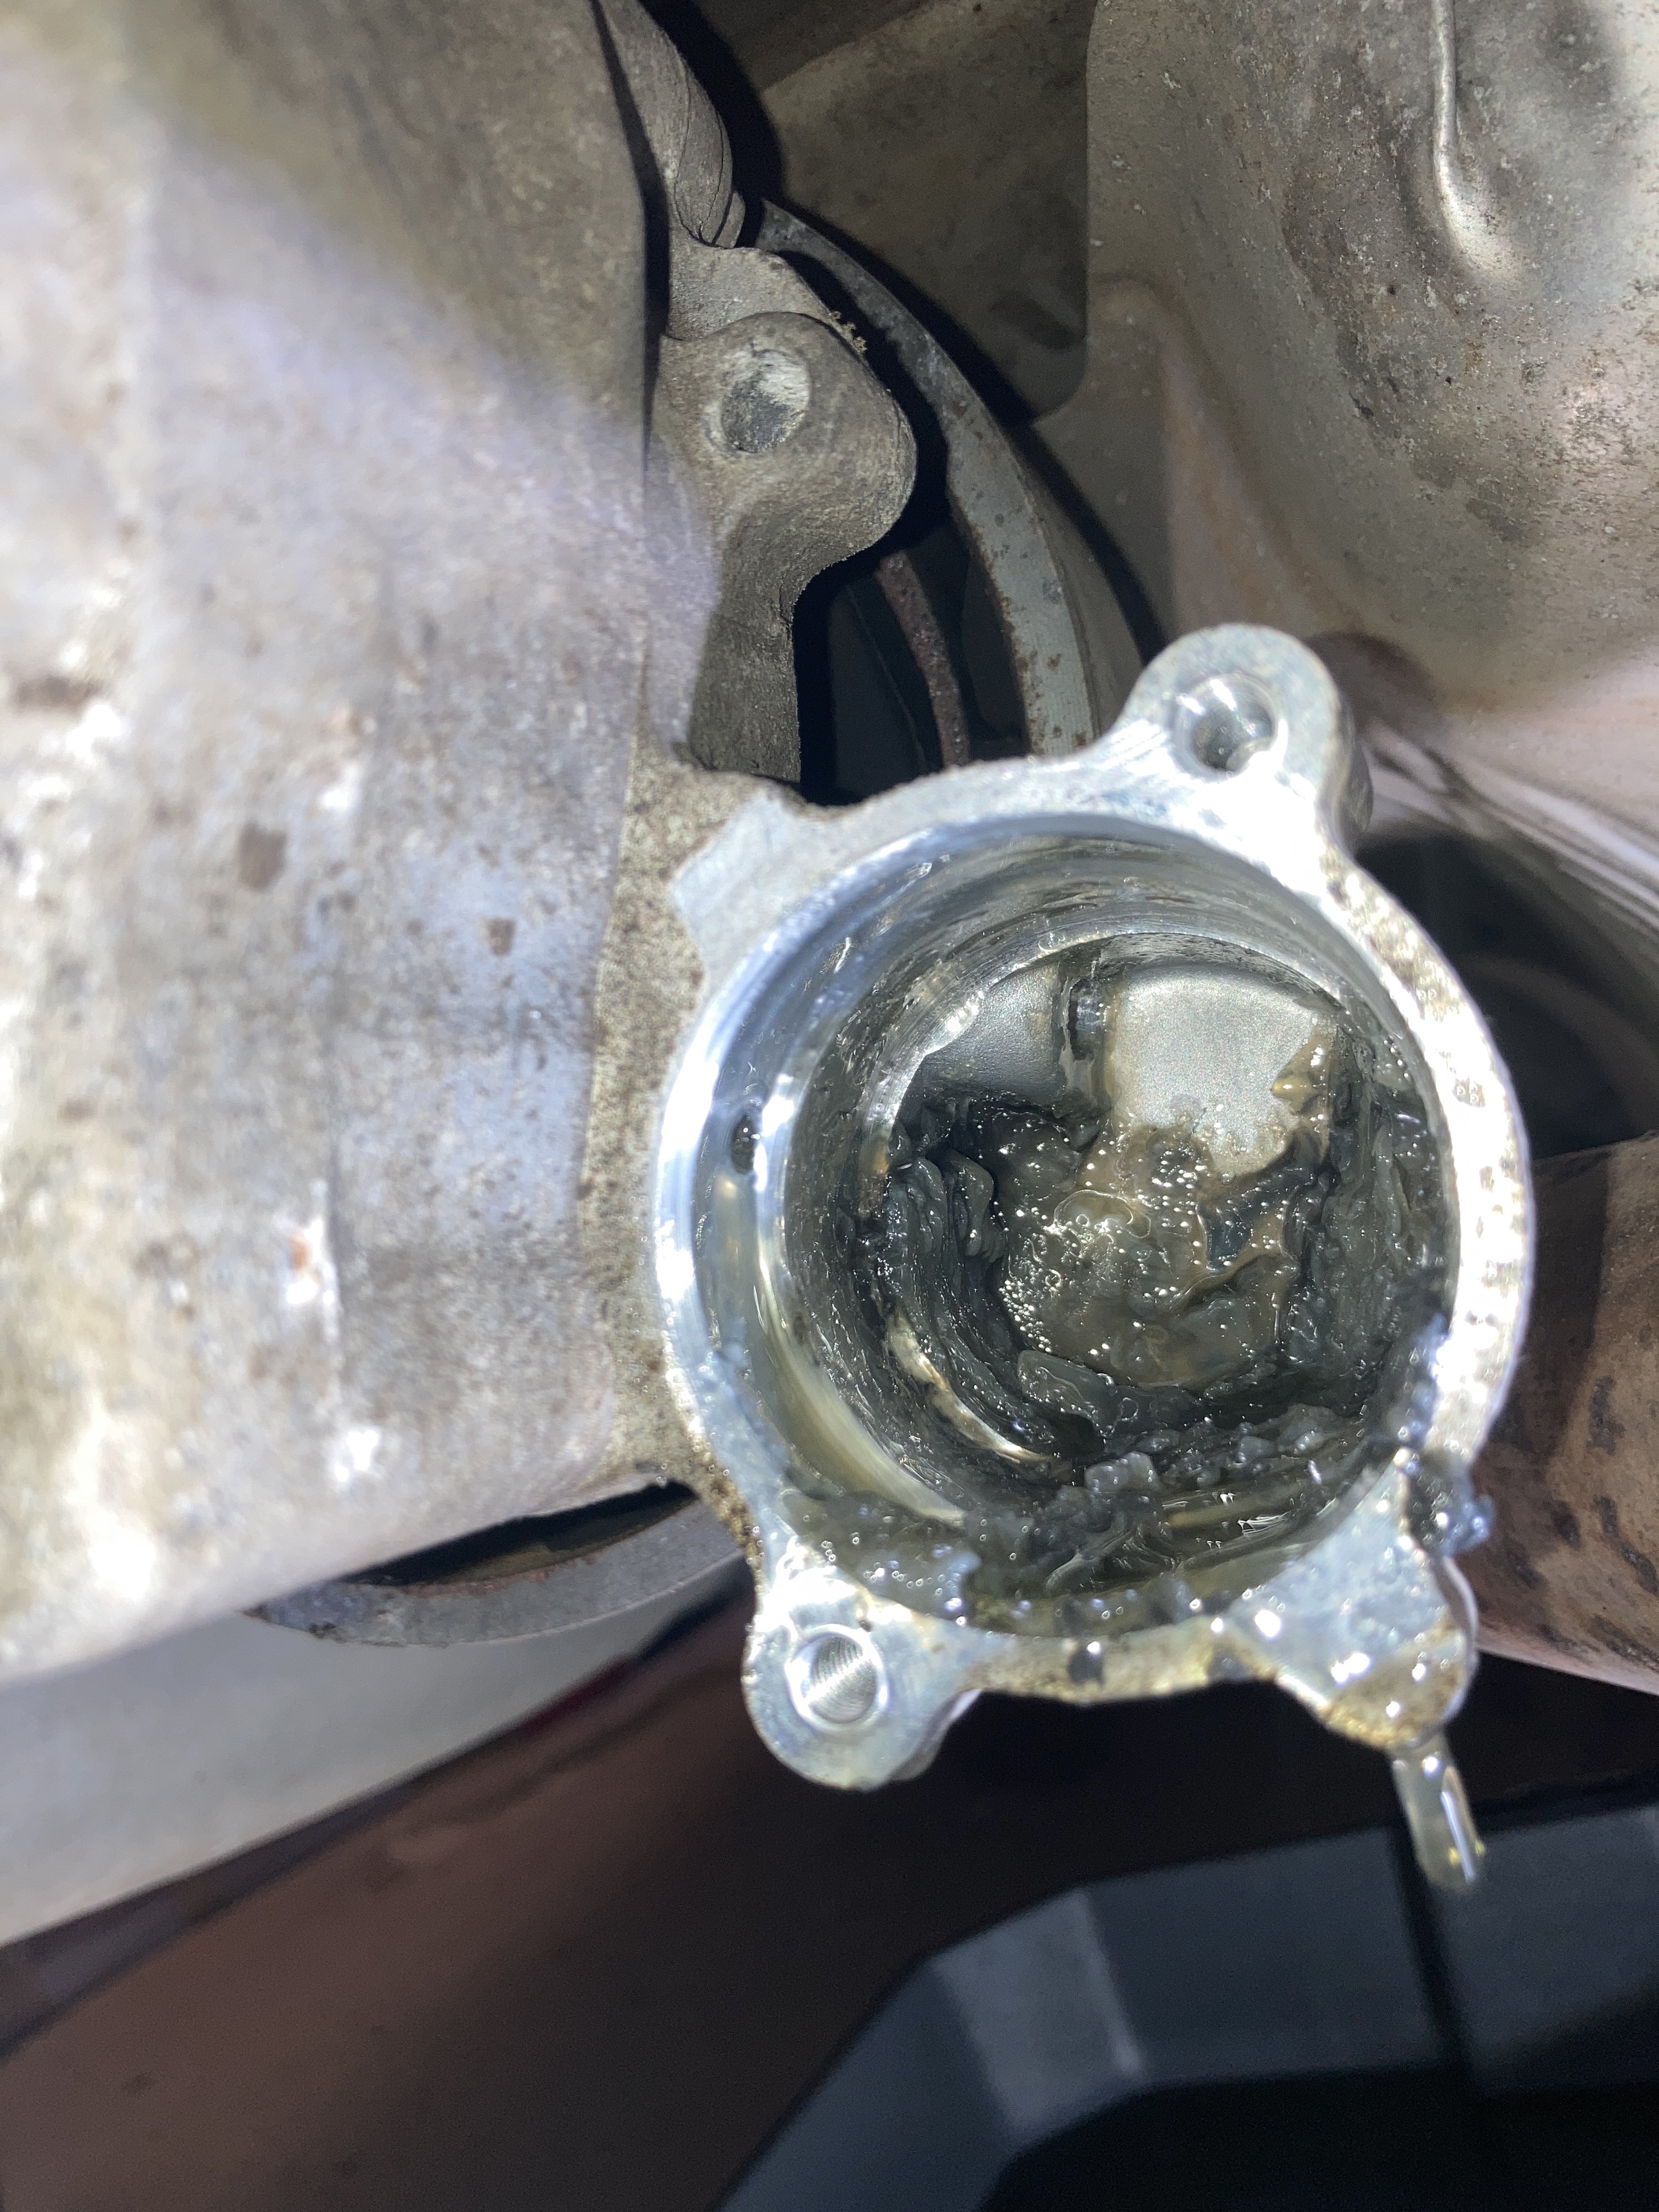
Coming soon when I get the pictures to appear... INTRODUCTION As I mentioned previously in another thread, I decided to have a go at changing the Haldex oil and clean the filter on TIBET III’s Haldex V unit after reading the threads on Briskoda. The idea of this guide is simply how I did it, based on advice from others but it maybe, that I did things slightly differently to others or perhaps I had a problem that others haven’t encountered and which someone else might find useful to know about. It is also Yeti-specific. SERVICE HISTORY After reading about the pump filter issues on the Haldex V and having lost faith with the MK dealer for various reasons, I decided to do it myself. Experience level – I’ve maintained my cars over the years (I’m an aircraft engineer by trade) but more recently, with the cars being under warranty, I’ve let the dealer do it. I reckon anyone who is competent at basic servicing tasks (oil and filter changes etc) can cope with the Haldex V oil change and filter clean. JOB PREPARATION One of my concerns was jacking (safely for me!) the Yeti giving me sufficient room underneath to do the job without struggling for access. I’ve never really trusted the drive on ramp idea so it was going to have to be jacks and axle stands. To jack the Yeti up, I used the standard car jack on one side and a straight lift mechanical pillar jack on the other (actually a 4.5T Land Rover jack). I prefer to rely on mechanical lifting but had in addition a trolley jack on the jack pad inside and aft of the Yeti jack. The LR jack had the good old slotted ice hockey puck to protect the sill flange. The axle stands I positioned at the rear suspension attach points just forward of the bumper behind the wheels. They weren’t taking any weight as such but were there in case the world moved from under the jacks. This may not be an ‘approved’ support point but their role was one of protecting me in the worst-case scenario. I also had wood blocks under the wheels which meant I wasn’t going to get squashed even if someone nicked all the jacks and axle stands whilst I was looking the other way… Perhaps this was all a bit OTT but I had the kit, it doesn’t take long to do and you’re a long time dead. The service kit came from haldexrepairs.co.uk – an excellent and useful website, lots of good info and tips and a good service. The kit was complete including everything from the oil and replacement drain and filler plugs to a pair of gloves. Brilliant. ON WITH THE JOB DISCONNECTING THE CONTROLLER The first thing was to run VCDS to check for any errors but everything was fine. It also warmed the car and everything up. No idea if the Haldex system likes being warmed up but it won’t do any harm! I knew one of the most ‘difficult’ tasks was accessing the pump harness to enable the pump to be removed. In actual fact it wasn’t too bad but even with a torch and mirror, once again the adult-proof VAG plug on the controller was impossible to undo. Yes, I’ve watched all the ‘how to guides’ but it didn’t push further on, the locking tab wouldn’t budge and the plug stayed fast. Plan B was to remove the controller from the Haldex unit to allow better access to the plug. This worked a treat. It’s held in place with two 10mm bolts but it still needed a gentle prize to free the controller from the Haldex unit mount after removing the bolts. This meant I could now get to the plug although it didn’t budge until a subtle and careful twist with a large flat blade screwdriver provided just enough force to ease the plug clear. The other connector plug on the controller has a clip-on 90° cable strain relief cover on it. Removing that enabled more flexibility to access the pump connector plug. The harness is held into position on the top of the Haldex unit above the drive shaft by two plastic split clips. It was easy to do one from the lefthand side (above where the controller was) and the other from the righthand side. The trick is two squeeze the end of the clip together from the aft side and then push the clips forward and out of the locating holes. The two clips are actually joined together by a length of split plastic. The workshop manual says to lower the main final drive unit down for access (7 turns) but I’m not sure why you’d need to. DRAINING THE RESERVOIR & PUMP REMOVAL Delighted with getting the pump electrically disconnected, I slackened the filler point plug and the drain plug - both are Allen socket head screws (8mm for the drain plug and 5mm for the filler plug). The drain plug must be more than just a drain plug as it’s pretty long and torqued (according to the Yeti workshop manual) to 40 Nm. The filler plug is much smaller and shorter and torqued to 15 Nm. I gave the area around and above the drain and filler points a good clean to prevent any crud getting inside the unit. With the drain plug removed, the oil drained into the drip tray and removing the filler plug allowed a full flow. I was impressed as the oil looked pretty clean. Perhaps my filter was going to be okay… DRAINING THE RESERVOIR & PUMP REMOVAL Delighted with getting the pump electrically disconnected, I slackened the filler point plug and the drain plug - both are Allen socket head screws (8mm for the drain plug and 5mm for the filler plug). The drain plug must be more than just a drain plug as it’s pretty long and torqued (according to the Yeti workshop manual) to 40 Nm. The filler plug is much smaller and shorter and torqued to 15 Nm. I gave the area around and above the drain and filler points a good clean to prevent any crud getting inside the unit. With the drain plug removed, the oil drained into the drip tray and removing the filler plug allowed a full flow. I was impressed as the oil looked pretty clean. Perhaps my filter was going to be okay… Whilst the reservoir drained, I set about moving the pump. The first thing to do was to give the pump and the housing a good wipe down to prevent any dust and dirt from unduly contaminating the pump. This was easy with two Torx screws to undo followed by a very gentle tap with a nylon hammer and then a wriggle and out it came, releasing a bit more fluid. FILTER AND PUMP CLEANING I couldn’t believe just how blocked up the filter was – and the congealed mess left inside the pump housing on the Haldex unit – exactly as others had found. It’s strange – almost like grease with little substance when you touch it. It didn’t seem to be water/moisture contamination. The next job was to remove the filter which is held in place by two Torx screws. Then it was a case of gently easing the plastic filter clear. It sits on two locator bushes that also act as spacers and should protect the filer from being crushed when the Torx screws are tightened. I used warm water and a small paint brush and some washing up liquid to clean the filter and then once rinsed, left it to dry off whilst I cleaned up the pump. The pump cleaned up easily and I used a small blast of air from my compressor to clean the old fluid out of the ports. It was then a case of replacing the O-rings, removing the old ones carefully with a very small flat blade screw driver being careful not to damage the pump. Incidentally, there was a couple of patches of light corrosion on the pump (on the mounting flange). This was easily removed with a Scotchbrite pad – don’t use wire-wool as this can cause dissimilar metal corrosion if stands of the wire-wool get embedded in the aluminium pump. I also use lint-free cloths for the cleaning to avoid fluff and stuff getting into the bits where you don’t want fluff. With the O-rings replaced, I blew air through the filter to ensure it was dry and refitted it to the pump. There seems to be two ports in the pump housing – presumable an inlet and an outlet. I scooped the gunge out being as careful as I could to avoid pushing any of it into the ports. REFITTING THE PUMP AND FILLING THE RESERVOIR As with all good Haynes manual advice – installation is the opposite of refitting. Before fitting the pump, I gave the O-rings a good coating in fresh Haldex oil to lubricate them as the pump is refitted. It slipped in a treat and I secured it in place with the two Torx screws. I made sure the harness had the correct routing before I fully pushed the pump home. Once the pump was properly installed, I locate the right and then left harness clips and then reconnected the pump connector plug to the controller, the 90° harness stain relief cover to the other controller plug and refitted the controller to the mounting points on the Haldex unit. I used the airline to give a light blast through from the filler point after putting a very small amount of fluid into the reservoir to help flush it through. I had a small syringe to do this with. A big 100 ml syringe (and a length of plastic hose) comes with the service kit from Haldex Repairs for the main filling. Next job was to fit the new drain screw. The service kit came with new drain screw and filler plug but the original ones could have been reused – there was nothing obviously wrong with them. The new ones obviously have new sealing washers on them. As mentioned, the drain screw is torqued to 40 Nm according to the workshop manual. With everything secure, the next task is to refill the reservoir. The big 100 ml syringe with the service kit works a trat with a plastic hose that just fits in the filler point. I found you had to be careful not to block the filler point completely and that made it pretty much airtight and difficult to operate the syringe. The reservoir took most of the fluid and some started to over flow out so I refitted the filler plug. FINAL CHECK AND VCDS ERROR CHECK AND PUMP RECALIBRATION Next job was to check everything was clear and I lowered the Yeti pretty much to being off the jacks. I started the engine and let it run for 5 minutes. I then used VCDS to run the ‘learn pump’ program as suggested by Haldex Repairs. You could clearly hear the pump running through a specific cycle. The tone changed as the pump filled up. A quick jack up again enabled another oil level check of the Haldex reservoir. What I had initially thought to be fluid flowing showing the reservoir was full but with a more concerted effort on the syringe, I found I got a fair bit more into the reservoir and when it was really full it really did flow out! Unfortunately, I forgot to get a picture of the refilling but that’s a pretty simple job – just be careful not to put too much effort into operating the syringe and end up blowing the plastic pipe off. I used probably 800 ml of the 850 ml supplied in the bottle. Although the car was jacked up at the back, it probably wasn’t that much of an angle so I think the reservoir is pretty good on the level. Another good look round was done as a final leak and security check. I then ran the engine and again went through the VCDS error code check and ‘learn pump’ program. All appears good. I am at a loss as to how the system worked with about 80% of the filter blocked – perhaps it wasn’t. I haven’t been in any snow for three years now. Anyway, job done and as others have said – it is a job that has got to be done. If you’re not up to it then it shouldn’t be too costly to get a garage or dealer to do it – you’d just better point the dealers to Briskoda or the Haldex Repairs website to find out how to do it! Next job will be to take the Yeti out for a road test this weekend. Forecast for snow on Friday…. PS Apologies for the low res pictures, haven't got time this evening to suss why they didn't load - if anyone needs hi res pictures (or a PDF of all of the above) then PM me.


 2 points
 -
2 points
-
@e-Roottoot, @MartiniB I 'think' there was some confusion from @digifish saying cheaper rubber from changing down wheel size, not as a recommendation to buy cheaper tyres which I think @dazedandconfused has maybe read it as 👍 That's what I read it as anyway 🙈2 points
-
who talked about cheap rubber? there were comparison between different inches - price for same brand/model will be cheaper2 points
-
I also wondered about the fix not being done before especially as many dealers were doing it without permission, its almost like they know of the risk on the 1.6 tdi engine & left them well alone, however they had to contact all the registered keepers and probably are obliged to make contact again now for those that have not been recorded as converted. My UK neighbour like you Langers has refused the fix but they keep writing to him, he is a very nervous sort and will never have a main dealer look at his car for fear that they will convert it, in doing so he has protected himself from their incompetence. I did a VCDS scan once for him and as a wind up said that while I was at it I had installed the latest ECU programming, he freaked out2 points
-
1 pointYes, the gauge won't move but the heater will feel cooler because the radiator will remove heat really fast, hence if you mask it the heater will run hotter and the cabin will heat up much quicker than normal.1 point
-
1 pointYes succesfully did a software update a few days ago and it came up with a message around adaptive lights activated.. As far as I am aware the system will tell you when a software update is available much like your mobile phone1 point
-
1 pointDon't know about 16's but the 17" offset is ET49. Somewhere in that region I'd imagine.1 point
-
Hi. Just to let you know that we offer a 12 month product called Total Loss Protection. Whilst it's not exactly the same as your traditional GAP insurance we feel for some customers it can make a cost effective alternative. Please feel free to take a look if you wish. https://www.adrianflux.co.uk/extras/total-loss/ Regards, Dan.1 point
-
At the rate my Mrs clocks up miles, I reckon 100K should come up in the year 2050, but she does love her Fabia so much that she'll prob still own it.1 point
-
Go for fully synthetic 502 00, e.g. Quantum Platinum 5W-40 Fully Synthetic Engine Oil - **5L CUBE** | eBay That's more than 1.5 changes-worth for £20 delivered. Not worth going cheaper or lower quality.1 point
-
Do you guys have to click to accept cookies for the ESP / ESC, ABS / TC / ASR / XDS/ XDS+ systems & then wait while they download the latest version before you can drive off?1 point
-
I don't know what your timescale is but I have one you can have - if that helps. Unfortunately I can't get to it for a couple of weeks until I'm back home again. Let me know, any way.1 point
-
Great project - always good to see something different! Pictures all work fine for me here!1 point
-
Try calling skoda directly for a quote on a rear bumper. I had this issue with my front bumper back in summer and had to get a garage to mend it at the cost of an arms and a leg1 point
-
Wow; I just read the opening post in that linked thread. Glad I'm old enough to be unlikely to have to encounter such a massive steaming pile of horsepoo as what's referred to there.1 point
-
There are car reviewers road testing and reviewing the likes on the VW ID.3 and complaining or commenting on the 'Lane Assist' and saying that you need to make 3 or 4 actions using the switches & screen to 'switch it off' and claiming that legislation says it can not be easily switched off. If the legislation does say that, then oddly plenty cars have lane assist that is on at start up and just needs one momentary press of a button to turn it off. New drivers passing a driving test might never know what was standard on cars built in the last decade let alone ones before that. The only car they ever get in for lessons and that they will drive will have Stop / Start, Lane Assist and parking sensors or cameras. @3mins 10 seconds.1 point
-
My 2014 plate is Gen 4 and this set up has the strainer on the end of the pump which needs cleaned, and also a removable/replaceable filter which must be changed at regular intervals. It is likely yours is Gen 4....have a check here... https://www.haldexrepairs.co.uk/what-generation-of-haldex-is-on-my-car/ Either way it is not a choice, you need the correct pump for whatever generation of Haldex unit is fitted to your car. Despite servicing as per Skoda requirements, at a Skoda dealer my pump failed at 4 years old and had to be replaced. I now change the haldex fluid at a much shorter interval, including replacing the removable filter. It is probably lack of filter change/proper service that has burned your motor out. You may need a new pump and change the filter while you are at it. My advice - don't buy from Ebay - have a look at the Haldex Repairs site above, it has everything you need to know about fault finding etc and you can order the parts you need. This is where I got my new pump and all has been fine since it was fitted two years ago. Best of luck sorting your issues. Dave1 point
-
👍 Good choice. What year? It's a cracking car in that spec. A few simple mods will make it just right. Superskoda boot lights Bonnet struts to make easy access for routine engine bay checks. And check the coolant tank for discoloration. It should be bright pink. See this thread for further details. Its a "CAN" happen fault. https://www.briskoda.net/forums/topic/487819-bag-in-coolant/1 point
-
The OEM Spares are on 15" or 16" steels for a Fabia that are not Space Savers but will not have a tyre that matches identically the 4 on the car, so maybe consider getting an alloy the same size or even type as on the car and getting a 5th tyre. (The wheel and tyre taken off the car when the spare goes on fits in the spare tyre well.) http://briskoda.net/forums/topic/444440-spare-wheel Maybe you will a full size alloy and tyre advertised in the Briskoda for sale ads, maybe an OEM spare and sometimes even a tool kit. Worth mud flaps if you like mud flaps. Maybe best fitting yourself if you can and like more money in your pocket.1 point
-
my new quartz grey octavia vrs is sat at grimsby ready for delivery to the dealer , should be here soon1 point
-
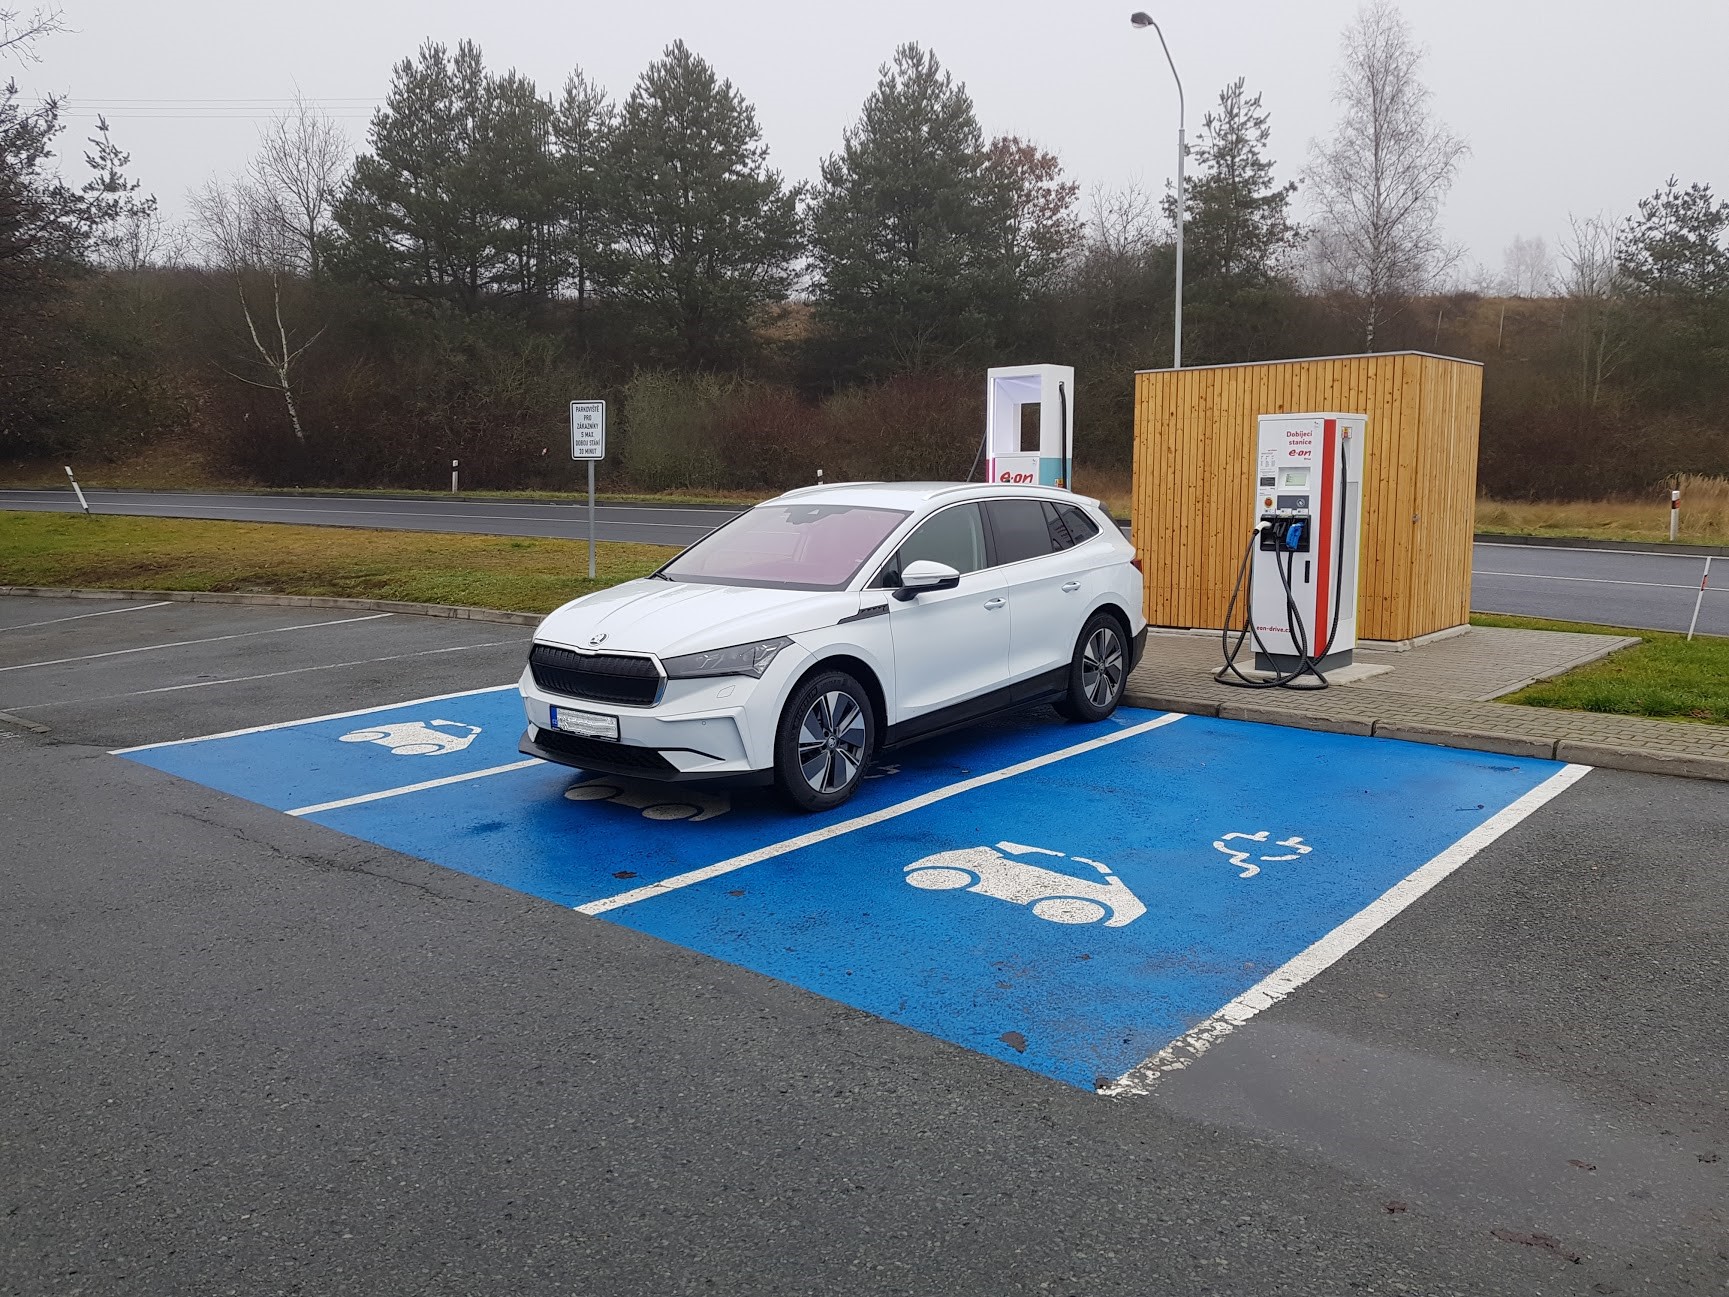
1 point1 pointThe fix was released back in 2016, this surely can't be your first letter about it if you've owned the car since new? Pretty sure the last reminder letter they sent me was back in 2017 which I happily ignored. Are you saying they've sent this recently? The injectors shouldn't be touched during the update. It's a software update via the OBD port and a 'flow transformer' which is just a plastic mesh near the MAF. Had an injector simply failed, it should be covered under the TBM (trust building measure). Would a failed injector cause any movement, let alone so much as to wear the head to failure in just 16 miles. A seized bolt suggests it hasn't been out recently. Even if an injector is fully stuck open, I can't it passing fuel quickly enough on a running engine to cause hydrolock and pop an injector. What are peoples thoughts, something doesn't add up to me... Anyway, my only advice would be getting a full independent inspection to find out what caused the engine failure and then consider legal action if it's shown to be negligence on the dealers part.1 pointI need to learn how to do that...more reading of the manual to be done :( Picture of mine...Quartz Grey...it gets a lot of looks which I wasnt expecting!
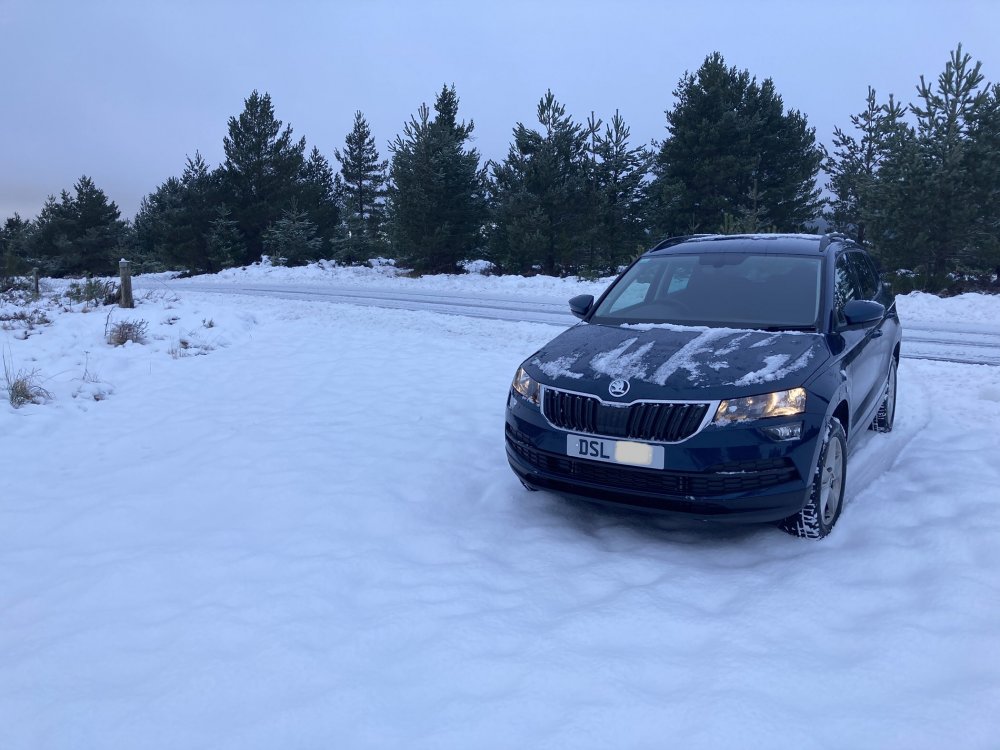
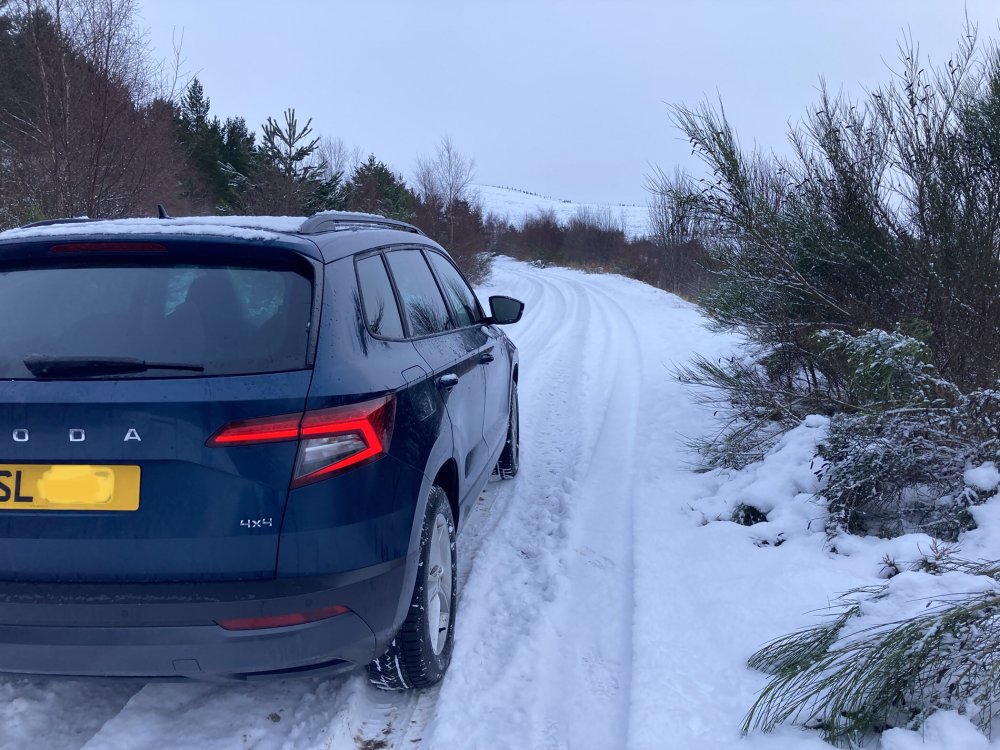
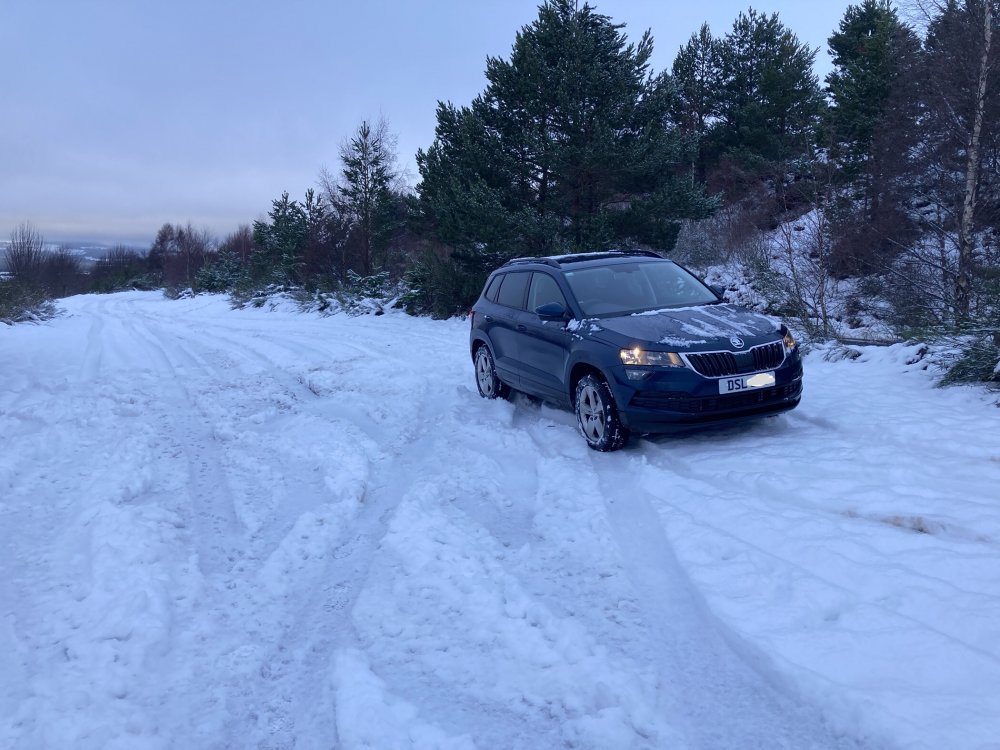
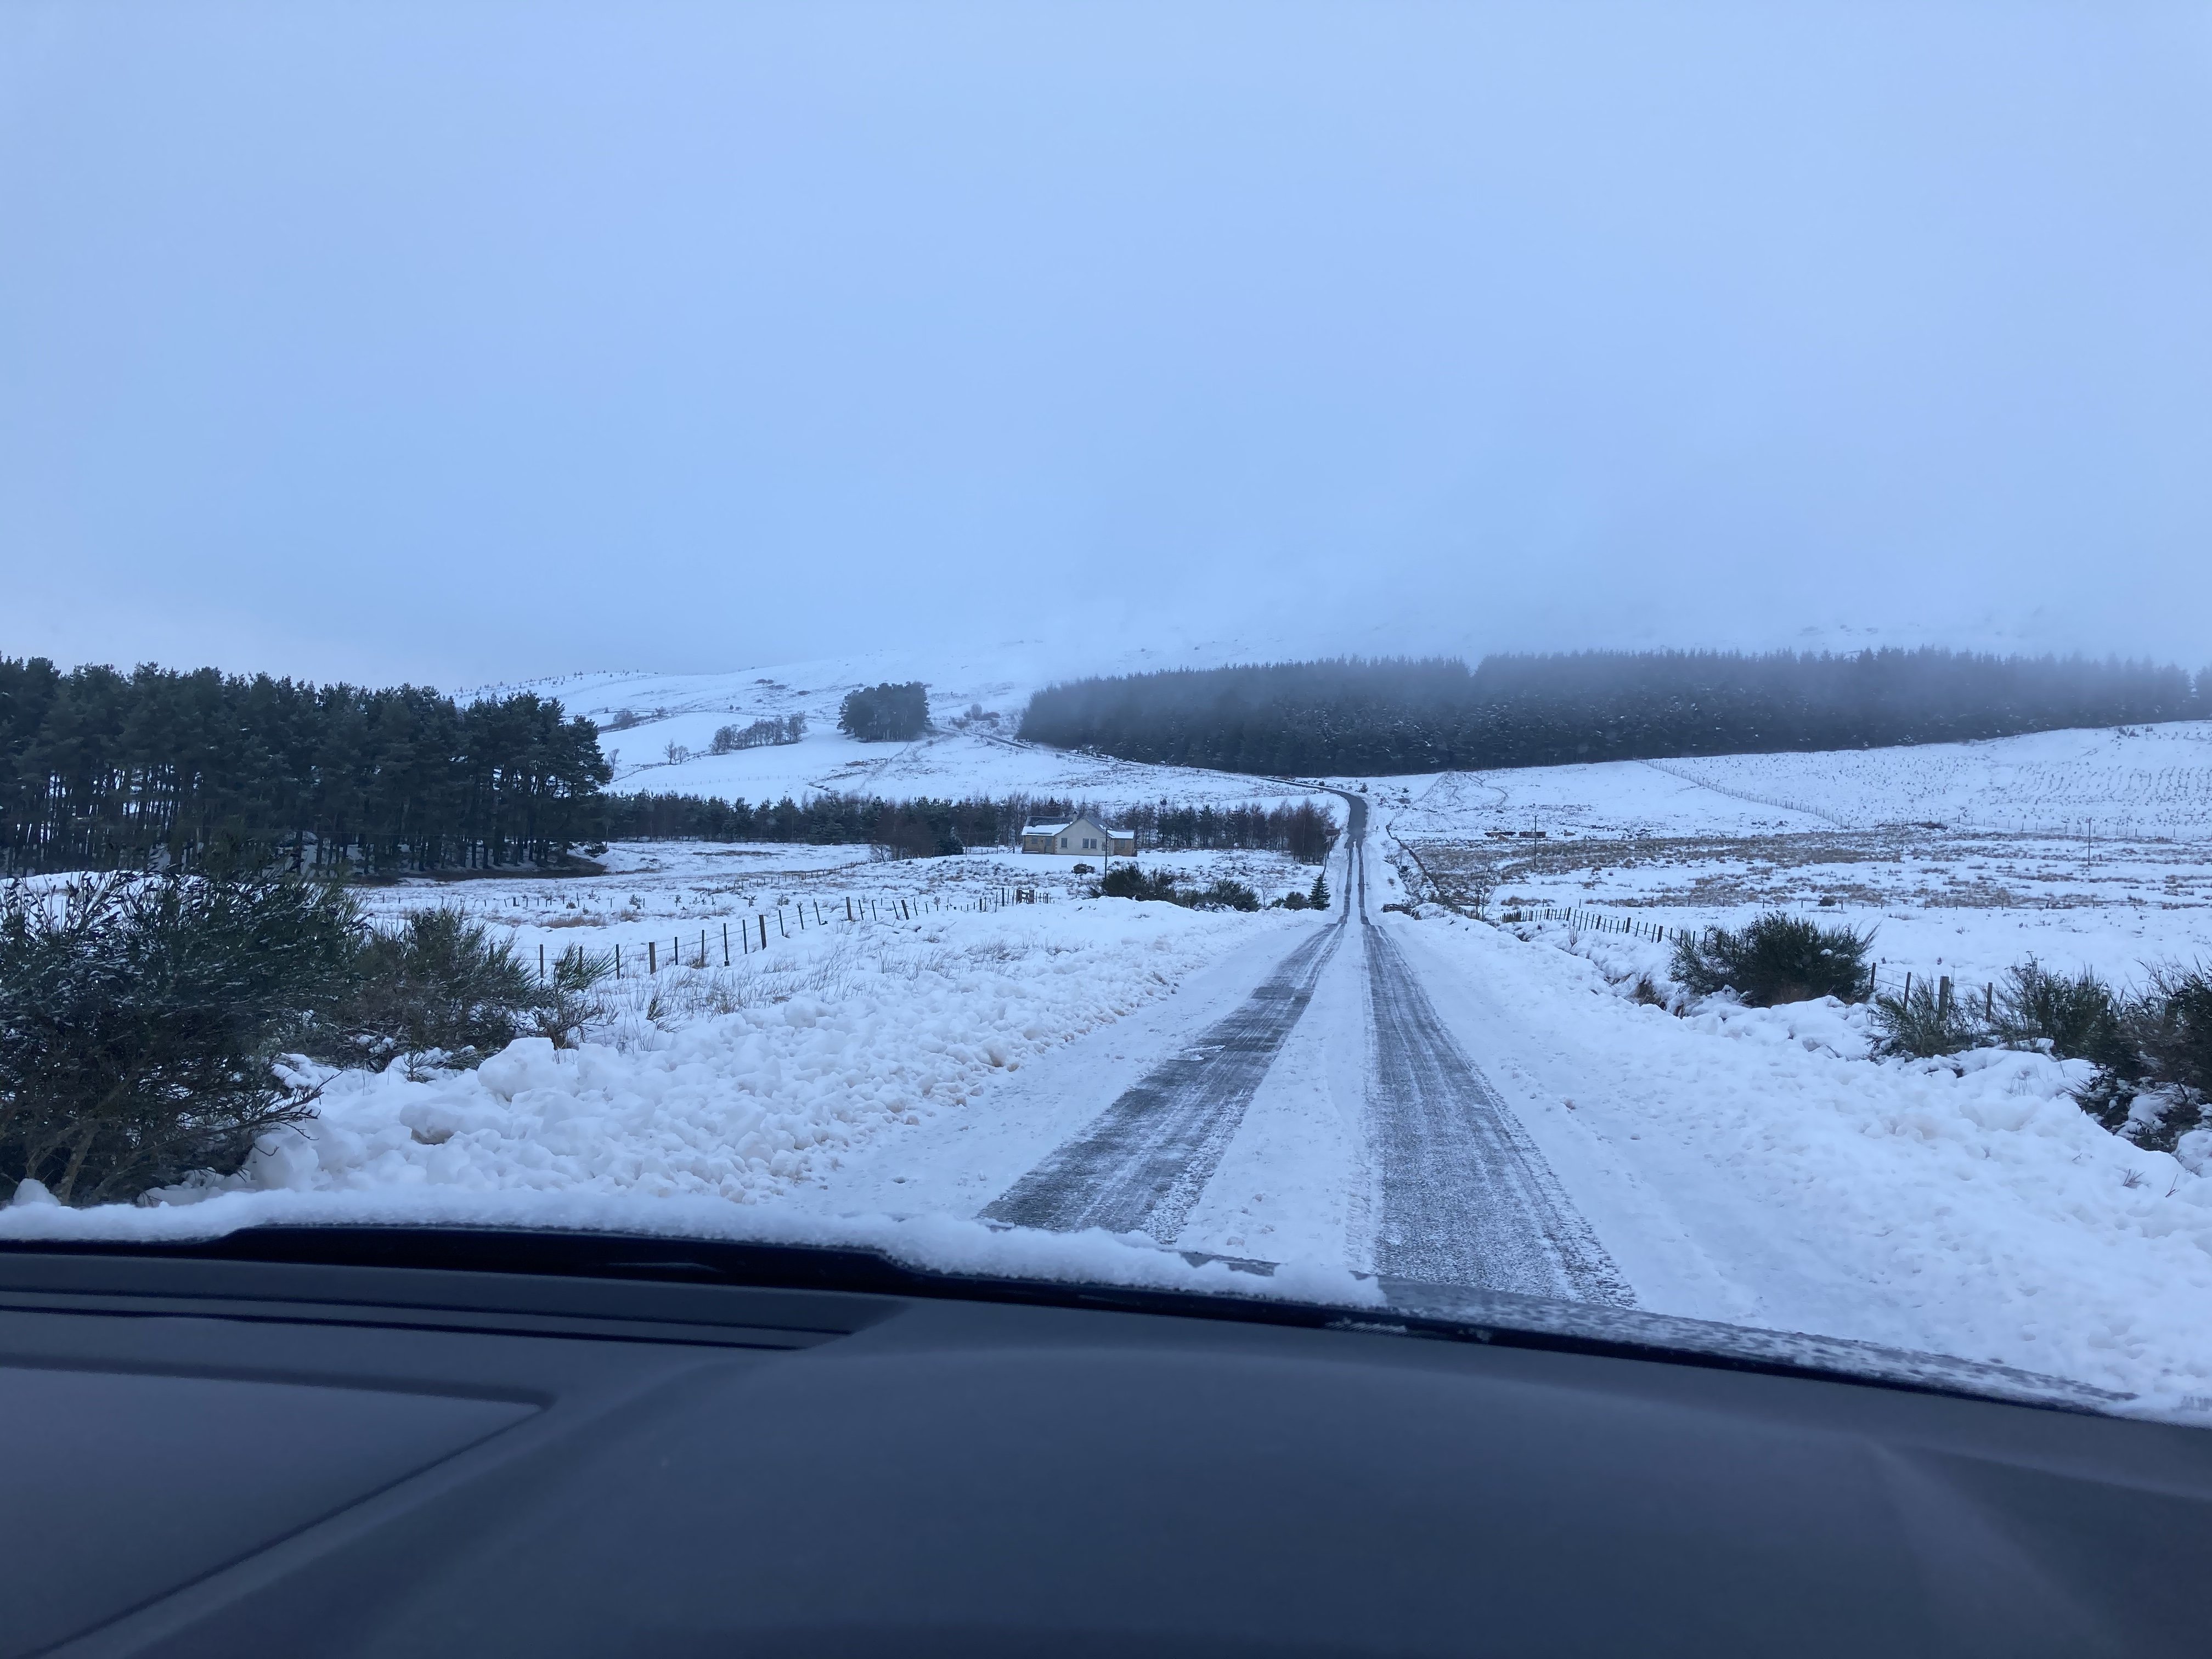
 1 point1 pointVC is brilliant, keep finding more info it can display, love the audio and navigation info on it, very presently surprised it shows it from android auto as well.1 pointMy 2007 Roomie Scout has a full maxidot screen as standard, part number as follows if it helps 5J0 920 940 C1 point1 pointSOme cars have the button to start the engine but not the keyless entry, my SE L is like that. I wish it had Keyless entry though. Having to take the key out to open the door then put it away is a pest, I keep trying to put the key into the start button1 point1 pointI updated my Bolero yesterday and thought I would share my experience. I searched the Internet and only got bits of what to do and not fully. What you need An SD card formatted in FAT32 The update file. A pc laptop with an unzip programme. I started by downloading the update file to my laptop. I initially used winzip to unzip the files but I later found that didnot fully work. So I used a programme called 7zip. Free to download and easy to use. I followed a lot of posts on various forums that said you unzip the file to the root of the SD card. What it doesnt say is that you need to copy the contents of the folder and not just the folder itself. (Once unzipped) So for me that was click on MST2_EU_SK_ZR_P0253T. That will open and there will be lots of folders including a .txt file. Copy those directly onto the SD card. I initially unzipped the file directly to the folder and not the contents. That just left that one folder on the SD card. So when I did the update it didn't work and got stuck on the emergency bootloader screen. I thought I had bricked the radio as it would not read any files. That was until I did the above, then it worked fine...phew!! I accessed the update screen by switching on the radio. Inserting the SD card. Holding down the menu button and selecting update. That then starts the process off. It took about 30 mins in total and you can do it with the engine switched on. The file updated 89 modules. Afterwards I had a B021A fault code on the multimedia 5f control unit. No matter what I did it would not delete. So I researched this and realised you need a new hex code to get the update accepted. After some research I came across a website which helped. http://mib-helper.com/im-so-xory/?key=948 Using VCDS or OBDELEVEN you go into 5f control unit. Adaptions and then look for Confirmation of Installation change. Click into that and that shows a key. Normally 4 letters or figures. Mine was 3 numbers. You then copy that key into the link above and that generates a new hex key. Go back to the adaptions and enter that new key in place of the old one. Save it and the fault code will go away. I hope it makes sense the way I have written it and thought it may help someone out who got a bit stuck like me.1 pointHas anyone clarified if a straight swap of aftermarket shocks (B6, koni active) need notification to insurance company? When I did my B6 I claimed for sport suspension which includes lower springs as I knew I'd go the whole hog anyway and they were happy with that.1 pointA surprise snowfall today out on Beeley Moor. I came across several cars belonging to folks who had been out walking and noticed they were parked on the edge of the ditch with summer tyres!! I stopped my car to assist a young lass and her friends who were trying to get their VW Golf DSG going. Luckily, I have some shoe chains which I simply attach to my walking shoes to give grip even on ice and went to give them a push. I told her to switch the traction control off and keep the revs at 2000 and with help from me, off they went. Next and just behind my car in the footage, a young lad was all over the place, over revving his Corsa. The problem was worsened by the Land Rover driver who just kept coming towards the hazard! Eventually he listened to me and reversed out of the way. I then gave the lad the same advice as the girl and pushed him away from the ditch until he got going ok. Following this, I went on my way and the all season tyres showed their worth! This time I remembered to switch the traction control off and it was no drama 👍1 point1 pointThe dealer won't care at all - don't start worrying as there's nothing at all to worry about.1 pointPS Forgot to say the real testing section I wanted to try out was the part of the road to the left of the wood in the middle of this pic. Unfortunately it had been gritted and cleared.
 1 pointI would skip the 18 and go straight for 17 if you are looking for comfort. And cheaper rubber.1 pointmuch nicer than the original. I bought the original and didn't even fit it it was so poor quality, which really put me off maxton. Glad they have upped their game. Reiger do the best skirts by a mile. i had the maxton skirts also but sold them on after switching to Reiger.
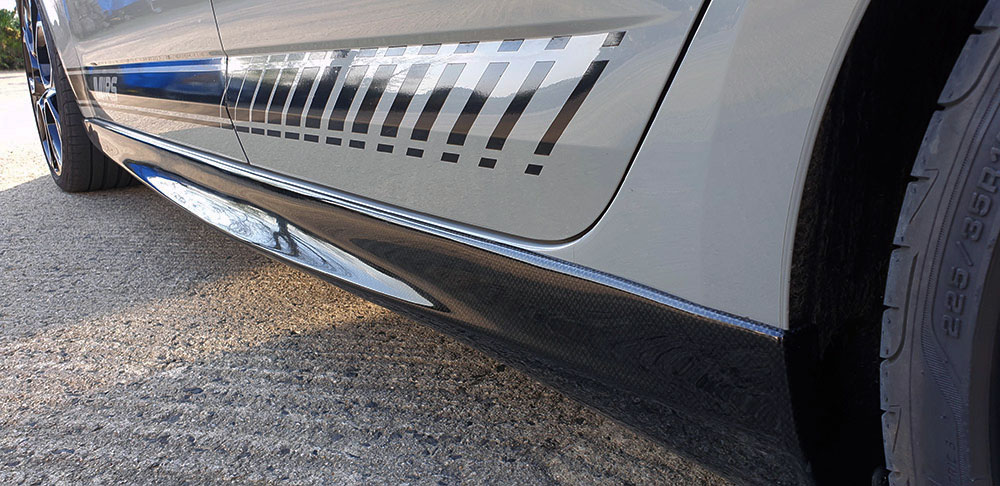 1 point1 pointUpdate on the fitment I spoke about. I wasn't massively happy with the flap on the back being not as tight and sturdy as I wanted, as it was only held on by the two outer clips, and it kinda bowed down in the middle, so I added two extra clips in the middle and drilled two extra holes. Now it doesn't sag in the middle and the fitment and sturdiness is 10 fold. So I'd advise anyone else to do the same as it fits alot better then.
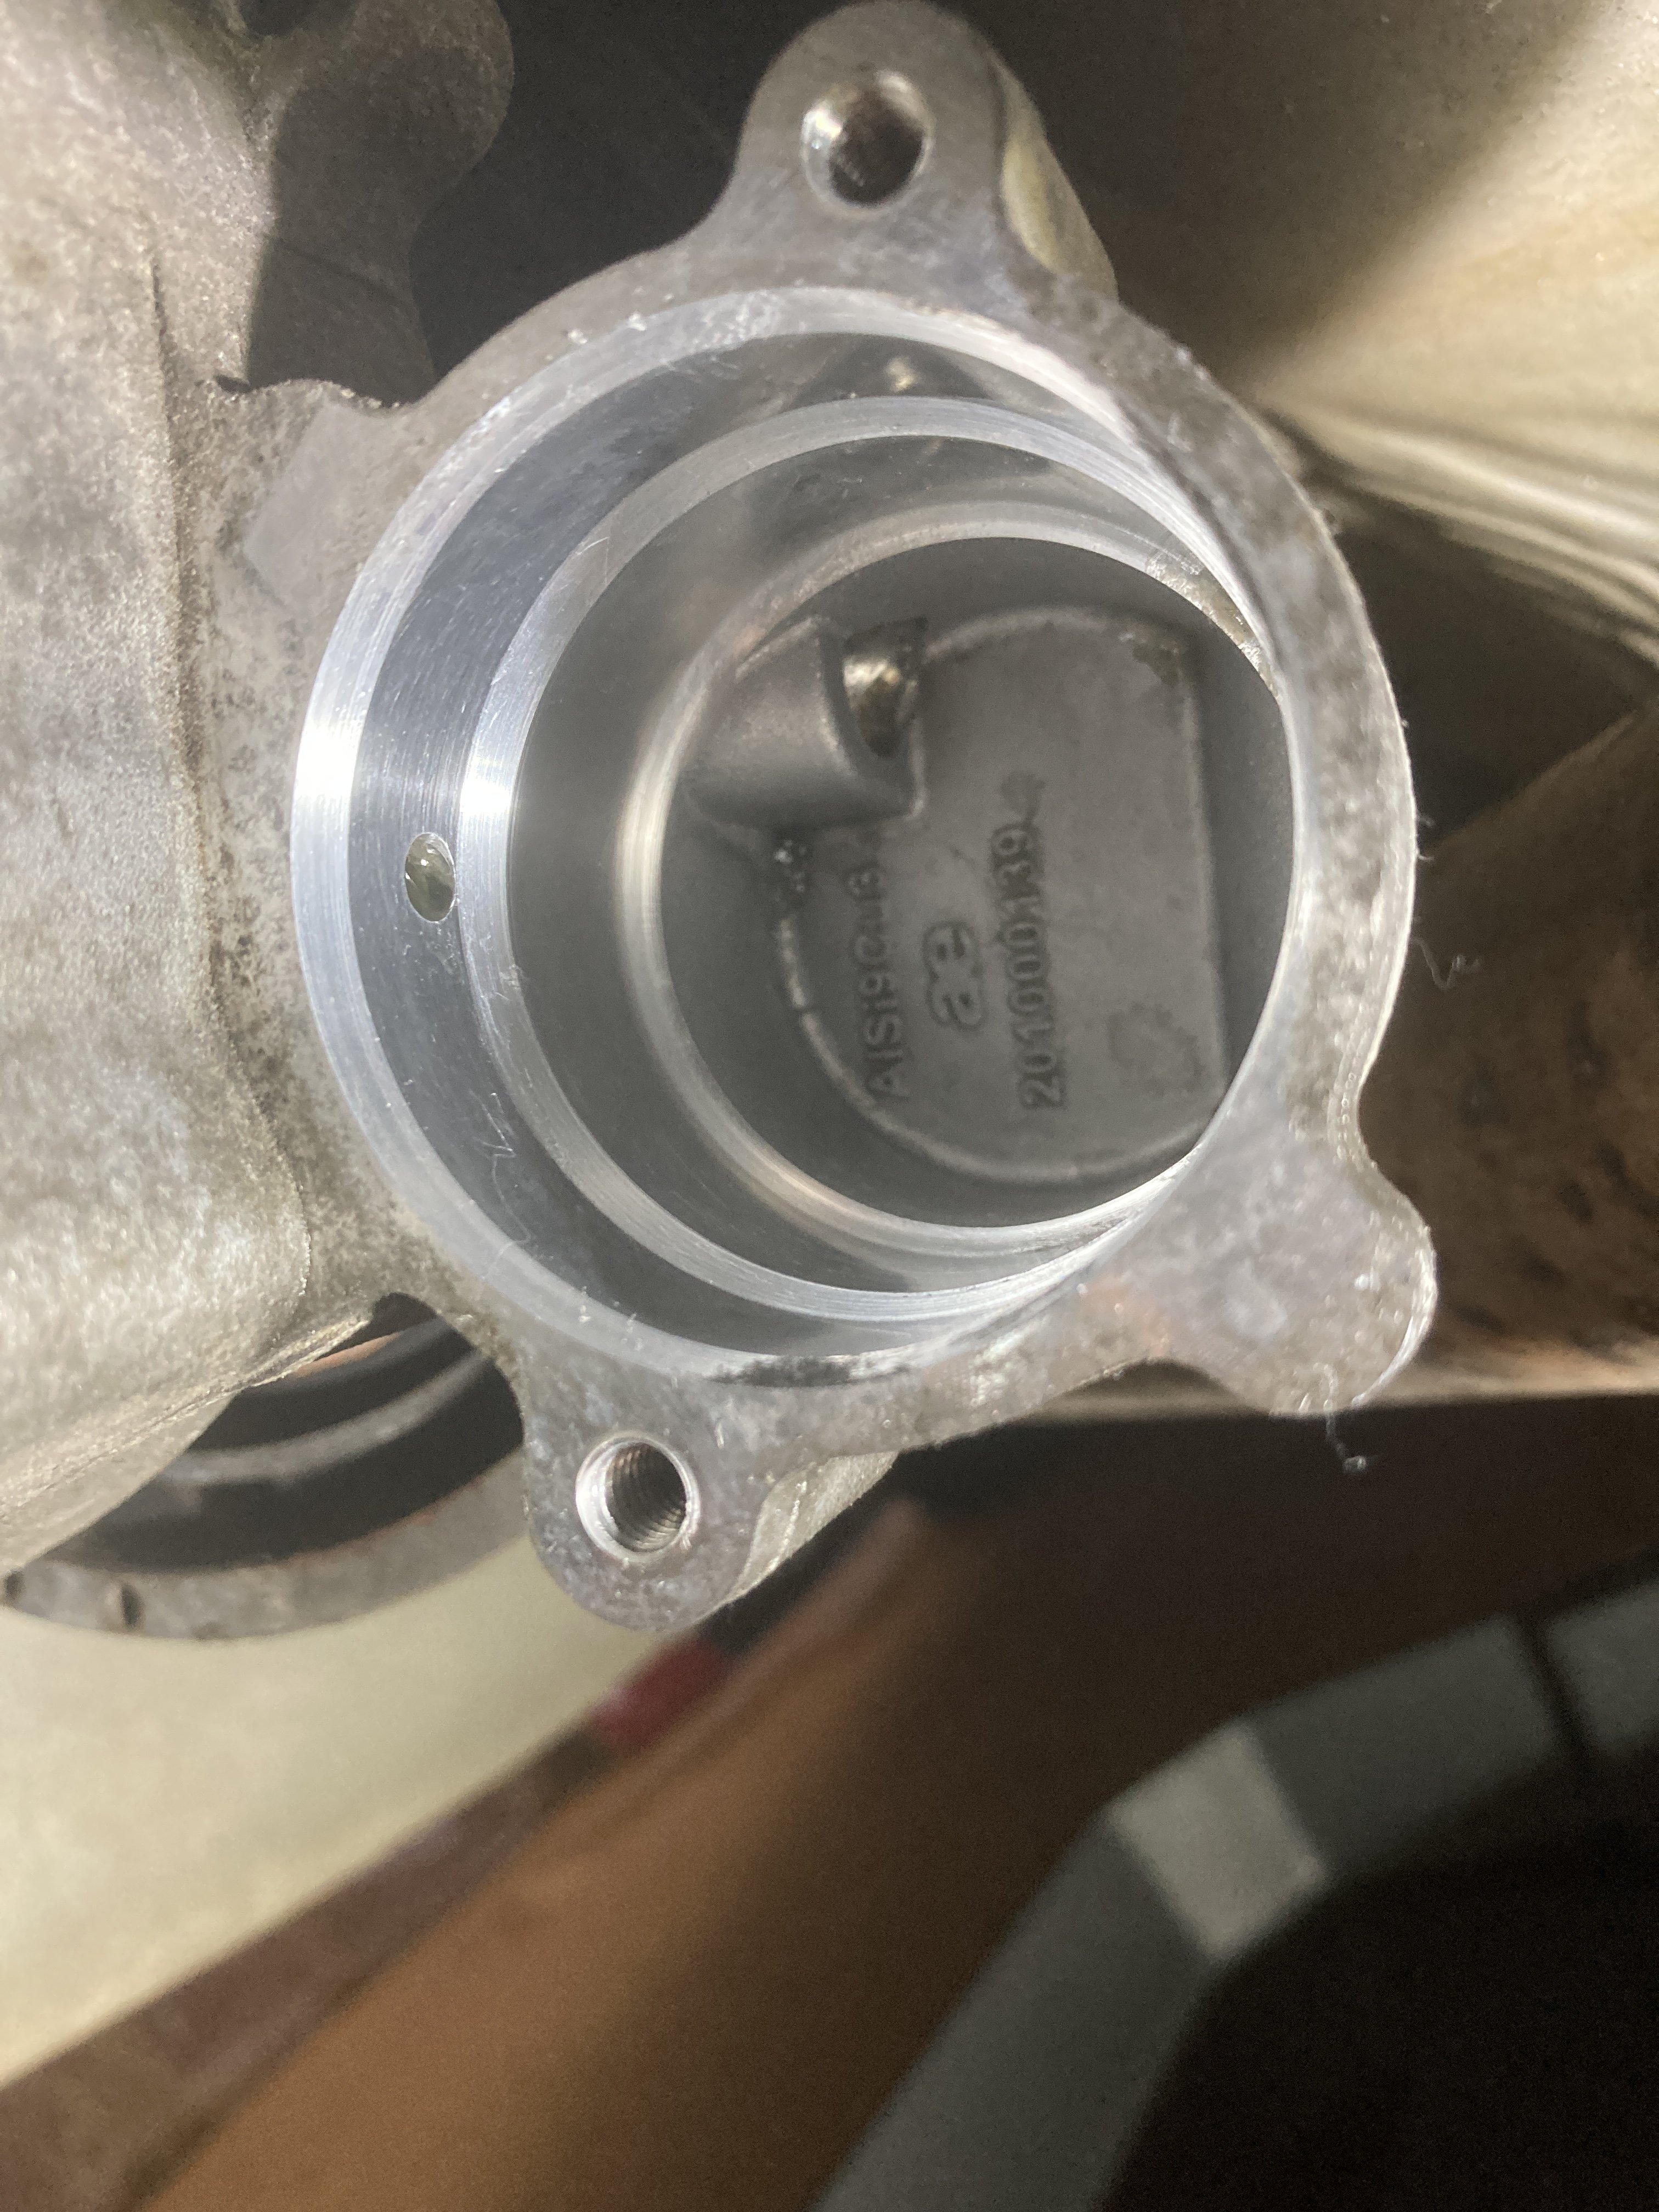
 1 point1 point1 pointYou have to check the period from the last synchronisation on main screen. Sometimes it`s pretty old and you have to sync manually to get updated information.1 point1 pointThe VAG part number is N10292201, which is common across most of the group's vehicles. There are some listed here on fleabay or here on skoda-parts.com and I've included a Brisky thread below which discusses the general issue:1 pointPitting of discs was reported on a car 3 MOT ago with new pads and discs the solution. I looked and plenty of meat left so the car was taken out and a few decent slows from 70 to 20 were performed. Rust gone and no issue on any subsequent MOT. The car had been sat for a while before the first MOT and it wouldn’t surprise me if sitting for 2020 would cause a similar issue.1 pointI do know that Octavia front pads min thickness is 10mm and rear pads min thickness is 9mm. That figure includes the backplate. I can’t remember the minimum disc measurement but I’m sure it was 3mm less than the new disc measurement, therefore a 1.5mm lip on both faces meant they were at minimum size. If it has passed its mot then the brakes work ok, If there’s no vibrations or noise, I’d run until the pads reach min and then change the discs and pads.1 pointBanging on about politics on a car forum has always struck me as an outstandingly pointless exercise. All the best xman.1 point1 pointSadly I decided to sell my beloved Superb, after 5 good years, due to several factors, change in circumstances and with COVID I just don't do the miles that a diesel needs to keep it sweet, luckily my brother in law has brought it from me, so she stays in the family, it has been a terrific car, and a joy to drive, I will miss that BIG car. It left my garage for the last time on Sunday, and today I picked up my first EV, E-Niro 4+, brand new, ordered 3 months ago, so a new motoring chapter starts in my driving career, I will continue to monitor this great forum, so to all of you, I wish you a Happy New Year.1 pointGot bored and desided to do some work, finally got round to properly fitting the luggage compartment seperator thingie: Bought this OEM curtain for just 25 dollars: Fits perfectly and is held on by two fasteners that are just taped on, easy and quick instal: Removing the rear bumper so i can instal some extra backuplights: Cleaned the inside of the bumper and marked up where to drill and cut, in hindsight i should have put each light 1.5cm lower and 5cm farther out on the bumper: Before and after the backup-lights got instaled. Note that i did not lock ISO and shutter so the camera makes the difference look less than it is, one can see on the lights on the houses that the camera compensates.1 pointThat looks very very well.. ! Simple but effective detail !1 point1 pointNever had a problem with any. share my position for it not to come on only shares with skoda so they know where you are if you brake down and if your car gets pinched in settings click if you want to share or not. lane assist would not put you in a dich there are two sides to a road senses white line gently turns to left senses curb or white line turns you back, Leave Heating in Auto then set temp. i cannot find any fine tune. skoda connect i click welcome ok off i go1 pointNot really much in the way of a full update. I have sourced a supposedly good (but used and still 15yr old) engine loom, and have bitten the bullet and ordered a new engine loom from TPS. That way I can rule out any electrical maladies from ECU to engine at least. I have a new camshaft signal sensor to go on, so that means ALL the engine sensors are now brand new, Crank Sensor, Cam Sensor, CTS Sensor, Fuel Temp Sensor and MAF sensor as well. I have yet to collect the loom from TPS as it has had to be sourced from outer Mongolia it seems, so that will be this week at some point. If I still have Crank signal issues it's pointing to the signal reluctor ring on the crank possibly having a bent tooth (could have knocked it refitting the crank maybe) so that might mean sump coming off to check. That will deff have to wait till after xmas. In the meantime I have sourced a bolt in rear strut brace (purely because I like the cosmetic look of it....) and had it powdercoated in RAL 6029 (mint green) This matches the calipers perfectly, so that has been fitted. Excuse the pile of corruption in the boot... Whilst at the mercy of the powdercoaters, I decided to have the front strutbrace done to match as it will provide a splash of colour in the engine bay. Please note the front brace isn't fitted properly, just popped roughly in place to take a pic, as I've got to strip a bit of the engine bay back out it made little sense bolting it down fully. A while ago, prob 2 years tbh, I found a seller on facebook with the rare rear seat with the middle rear headrest option. Middle of nowhere in wet wales I picked it up for not a lot of money (£30 from memory) and stored it in the loft, I knew it was grubby and would need a deep clean so that's what else I've been doing. Before... Grubby but not holed or damaged thankfully. I did toy with the idea of stripping the material off the seat and washing it but the backrest looked possibly the hardest to do so I cleaned it in one piece. Using my trusted Autosmart Bio-Brisk interior shampoo, a splash of Bilt Hamber surfex in with it, I set to scrubbing the seat then extracting using very hot water in the extraction machine. After one pass... In all it has taken four sessions of scrubbing, extracting and drying to get it clean... Nearly 100% dry now so can be fitted into the car this week. Now I was left with the rear seat squab and other back rest of the used manky seat I bought, so I have stripped the upholstery off the seat bases just now in readiness to machine wash. Not a pretty sight... These are currently having a good session in the washing machine at 40c so i'll see what they come out like. I suspect they will need to be washed again to get all the filth off. The water and suds in the machine was brown. And the missus noticed.... Once they are clean and dry i'll put them away somewhere safe for a little side project I have planned..... (watch this space) Next interior job is to get the drivers seat out and then find in my loft, pretty much the last new seat foam base that was available from factory, purchased in 2015. I need to replace the base foam in the driver seat as it's starting to break down on the drivers side edge bolster an I don't want the material going in a hole over the framework. More pics on that when I get to it. Matt1 point1 pointI’d just like to add my thanks to everyone who has posted on this Haldex thread and the other ones with all the helpful info and advice – and especially for the heads up on cleaning the pump filter on the Haldex 5 unit. I asked Allams to do the oil change at 3 years (47k miles). It wasn’t on their to do list as standard service items. At 6 years I assumed the dealer at MK would do it (and I forgot to check beforehand) and it wasn’t done, so it was on my to do list. Then I read the pump filer cleaning info and that became a high priority now being 6.5 years and 88k miles. I bought the service kit from haldexrepairs.co.uk and I’m well impressed with their service and the info on their website. Yesterday, I jacked the Yeti up (many jacks and axles stands) and got on with the task. Probably the most difficult job is undoing the adult-proof pump harness plug from the controller… Yes, I watched all the videos but it’s still impossible! In the end, I unbolted the controller and that made it all possible. The oil looked pretty clean as it drained out and I wasn’t expecting to see the pump filter (and pump housing) in the condition they were – a sort of congealed mess covering at least 80% of the filter. How well it was working, who know. I ran a VCDS check before and after as well as the ‘pump learn’ program from VCDS. I don’t blame the dealers – the manual doesn’t tell them to pull the pump and clean the filter but it certainly should. I am surprised the dealers don’t even have the oil change on their radar – but then, MK told me my Citigo cambelt change was due (it doesn’t get replaced according to the Skoda manual), failed the MOT on it for having the headlights too low (then they found the headlight adjuster on the dash) and told me the wheel bolts ‘won’t tighten, they just keep turning because there’s copper grease on them’…. I won’t be going back there. Anyway, thanks again for the wealth of good info once again on Briskoda. I took a load of pictures and will write up a bit on how I did it in case it’s of use to other Haldex V owners. And after cleaning....
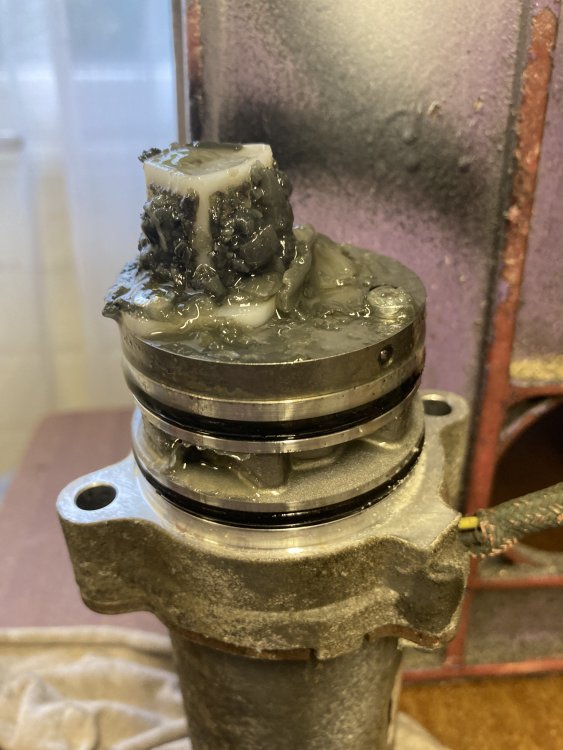


 1 point


.thumb.jpg.683fc09a88a36e3a8a88cc4faae6baa4.jpg)


Important Information
Welcome to BRISKODA. Please note the following important links Terms of Use. We have a comprehensive Privacy Policy. We have placed cookies on your device to help make this website better. You can adjust your cookie settings, otherwise we'll assume you're okay to continue.