


Leaderboard


.jpg.1006585dfe4e2977315b67c3d642e37b.jpg)

Popular Content
Showing content with the highest reputation on 16/01/21 in Posts
-
3 pointsOn a stop/start equipped car, the negative terminal connector on the battery lead has an inbuilt current sensor which accurately monitors current going in and out of the battery. The battery management needs this to track of state of charge (SOC) and with voltage monitoring, also deduce the health of the battery (SOH). It forms a crucial part of the micro hybrid charge management. If you connect a charger or jumper leads directly to the negative battery terminal, you bypass the sensor, the battery management loses track of the true state of charge in the battery which leads to problems with stop/start and ultimately shortens battery life. https://www.yuasa.co.uk/info/technical/micro-hybrid-hybrid-vehicles-explained/3 points
-
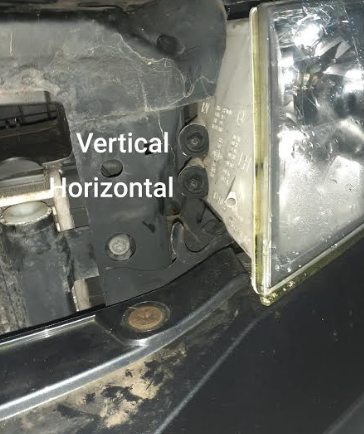
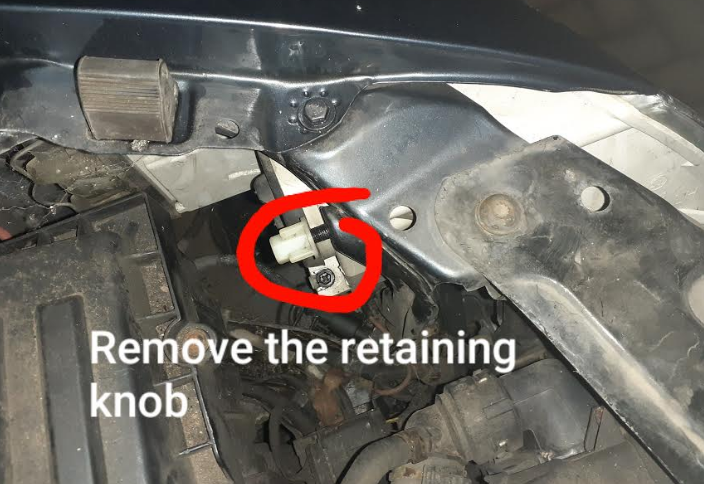
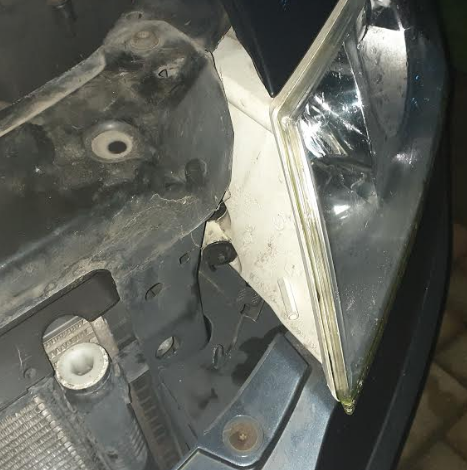
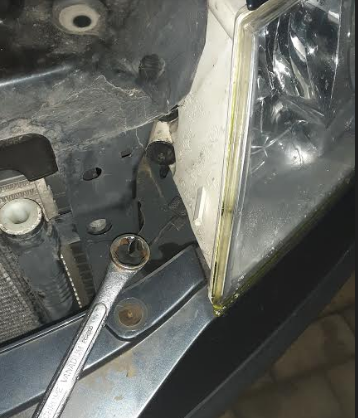
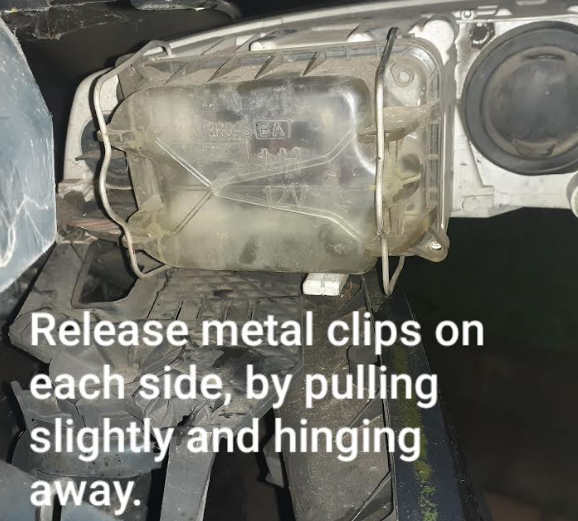
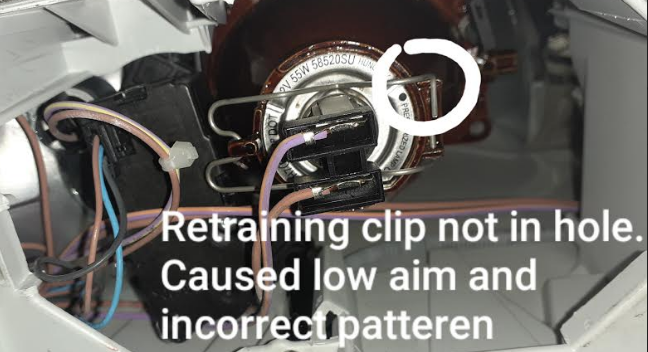
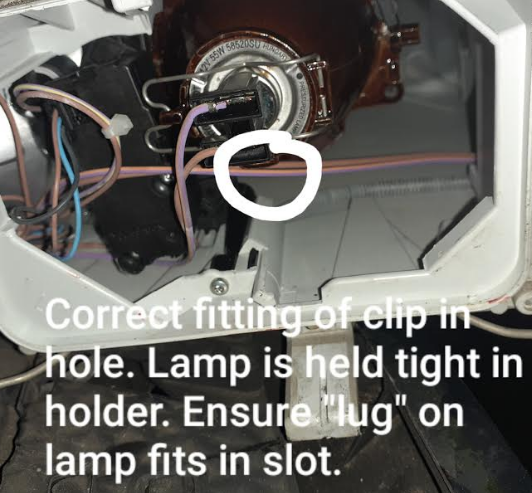
Hi I had noticed that the headlamp aim of the dipped beam was very low (just a puddle of light 2M in front of the car). I don't know the history if the car, so figured that the headlamp aim would be out. I initially tried the adjustment - the adjusters are shown below (Octavia 2 2007 Pre-Face Lift) the adjusters can be rotated with a 10mm socket or a 6mm Allen Key) - You can see the lens of the projector moving - a good reference is to make the gap between the lens and the reflector is equal. It achieved nothing!!! I decided to check the headlamp bulb. Remove the white retaining knob - it is screwed on by hand - the tightness does not affect the alignment. The high beam adjuster is also shown, and can give vertical adjustment of the high beam only, with a 6mm Allen key. Depress the retainer (just under the hook, against the edge of the light), and using a ring spanner or similar, pull the retaining hook sharply towards the centre of the car, this will cause the headlamp unit to move forward 20mm or so. It is now unlocked and can be withdrawn - have some towels or similar to protect the bumper from damage. May be worth having an assistant hold the headlamp to avoid it falling. It is possible to disconnect the electrical connector to remove the headlamp from the car. Swivel the headlamp unit out to get access to the dipped beam lamp holder. unlatch the clips to ether side - they stay attached to the headlamp unit, then pull the cover away. Examine the lamp and ensure that it is located correctly in the holder. In my case, the metal spring clip which holds the lamp in the correct position in the lamp holder, was not fitted correctly. The top right side of the spring clip had come out of the locating hole, meaning that the clip was not keeping the lamp pressed fully in to the holder, causing the lamp to aim towards the floor. With the clip inserted in the hole correctly, the "lug" on the skirt of the lamp should locate in the "slot" in the lamp holder. The clip is held in place (on the left side in this picture) and is unhooked by pressing the clip down (towards the bottom of the lamp housing) on left side of the clip, which allows the clip to disengage from the retaining hook and then to swing open, allowing the lamp to be removed. Once I had re-fitted the clip correctly, and re-fitted the lamp, the correct light pattern was produced (horizontal line with an angled up edge to the left). Refit the cover over the rear of the bulb and engage the clips. Carefully align the headlamp unit in the tracks of the retaining bracket and gently push it in until it stops. If it is difficult, ensure the "rails" on the underside of the headlight have engaged with the rails on the retaining bracket. Once the headlamp stops, push the hook in (using a ring spanner or similar), towards the headlamp unit, which will pull the headlamp in to its fully locked position, and the headlamp unit should be aligned with adjacent panels. As you close the bonnet, ensure that the bonnet does not hit the edge of the headlamp unit - it wont if you have fitted the headlamp correctly. Refit the plastic retaining nut on the top/rear side of the headlamp, inside the engine bay. The retaining nut tightness does not influence the headlamp alignment. Check alignment of headlights and adjust as required. In hindsight, the give away here was that the light pattern was, in MOT speak, "Obviously Incorrect". Had I checked the lamp fitment first, adjustment would probably not have been required. Always pays to check the simple things first, and never trust that someone else says they have checked it!

 2 points
 -
2 pointsAs above. Get them to service it and change to a yearly service as part of the deal to buy the car. Make sure they’ve done it before transferring funds. I completely ignore the stupidity of Vag service intervals, and a lot of others. I always return my own cars to a minor/major interval. Oil & filter (A service), then the next year, oil & filter, air,fuel,pollen filters (if vehicle has them fitted) and brake fluid (B service) Haldex every 2yrs and Dsg and spark plugs every 3 would be my schedule (where applicable) It’ll go between A&B every 10k or 12 months. I bought mine at coming up on 5 months old and insisted on the oil being changed as part of sale. I wasn’t happy after 3 months and dropped it out and replaced it again myself and reset the service schedule to 12 month intervals. Some consider this approach as overkill, but I tend to buy my cars outright and run for 10yrs plus, and find this a better long term attitude towards maintenance to help over the years with reliability. Obviously, if you rent it and throw it back after 2-3yrs it’s not going to matter much what you do.2 points
-
If the three bottom ball joint bolts haven't been touched for a long time they tend to snap, or the captive nuts break away from the plate, so just be aware of that. https://www.ebay.co.uk/itm/Ball-Joint-Mounting-Kit-fits-SKODA-FABIA-99-to-14-N0195441-N0195441S1-N0195442/333551343099?epid=4035655165&hash=item4da93595fb:g:Kg4AAOSwgs1fGapA2 points
-
1 pointFunny you should say that @Wino. Recently swapped a nearly dead Moll EFB for AGM in our Fab 3. My local garage and a VW specialist tried coding it but couldn’t - no option to do so apparently. It didn’t take long for the S/S to operate and it continues to do so without coding. 🤷♂️1 point
-
1 pointYou'd think that the battery management module would smell a rat if the battery voltage increased without any current flowing through the shunt, and reset itself to an estimated SOC based on the off-load terminal voltage, once it stopped rising and settled for an hour or two. If I can think of that control strategy I'd be mighty surprised if the relevant engineers designing the charging system didn't. Bet the car sorts itself out promptly whatever you do. Doubt the OP's car has start/stop though, a shade too early.1 point
-
Likely it will end up costing you more than buying a proper straight vehicle. If you do the repairs yourself it can be worthwhile but dependant on the salvage category (please advise what it is) the repaired vehicle will be worth significantly less, any notional profit soon dissapears in depreciation if you keep the vehicle. The person selling it might be the first intermediary after the insurers disposed of it, probably the second plus the salvage auctioneers all of whom will have taken a profit, when you start paying for labour, overheads & profit margins to have it repaired you will see why it was written off as an uneconomic repair. There were plenty of specialists importing (mainly from Poland etc) & selling second hand all the bits you need, I traded with many of them in 2018 when I repaired my Yeti but they all did not know if they would be able to continue after Brexit, as things have panned out I dont think they will be so the second hand prices will rise. Radiator usually means (dependant on engine & spec) the aircon condensor and intercooler as well, the resellers sell them as one assembly called a cooling pack I think.1 point
-
Yeah think that’s it I was in a large dealership in Lanarkshire and there were 20/30 new Skodas of various models and that was the one that stood out above everything . It’s the kind of car which will punch above its weight and look good in comparison to Audi Land Rover etc only thing I would say is I downsized from Honda CR-V to karoq and then Kamiq and struggled a bit with rear vision however you’ve got top of the range with standard cameras So won’t be a problem1 point
-
Not bad engines the 1.0. However we did have a turbo go which was replaced under warranty. That though is a a sad tale where the local dealers had to have it back twice as after being repaired it was leaking oil. Then they failed to top the oil up to the correct level ! I’d say in an Octavia Estate we feel it’s a little under power. The 1.0 is a popular engine though and well used over the V.A.G. Group.1 point
-
1 pointOriginal fuel filter and 4 year old diesel? Sounds like it to me. When you do get the car going, take it for a decent run and then give the poor old thing some new engine oil and filter for the sake of £40.1 point
-
Finally it came free. Bought an impact socket for that Milwaukee, said for VW axle bolts 🤷🏻♂️. Put my daughter in as light to push brakes. Car on ground. After a few times gunning, it freed 👍🏻👍🏻🤷🏻♂️ These are amazing. Pricey unless you are a Pro, But Speedy hire them for £30 for weekend. You can programme settings so you do not over torque. https://uk.milwaukeetool.eu/en-gb/one-key-fuel-8243;-impact-wrench-with-friction-ring/m18-onefhiwf12/ Thanks for all your help.1 point
-
Paying £65,000 extra to get beaten by the AUDI you must really want the higher driving position and the extra weight and fuel consumption of the LAMBO. Perfect for Premier League footballers then.1 point
-
1 pointTried for an hour to get this working today. Had same problems as others, tried connecting to wifi that also didn’t work. As with a lot of the other software on the new Octavia, absolutely infuriating. Ah well, only 21 months before I can give it back and get something which has been tested better. Nice car, absolutely ruined by software.1 point
-
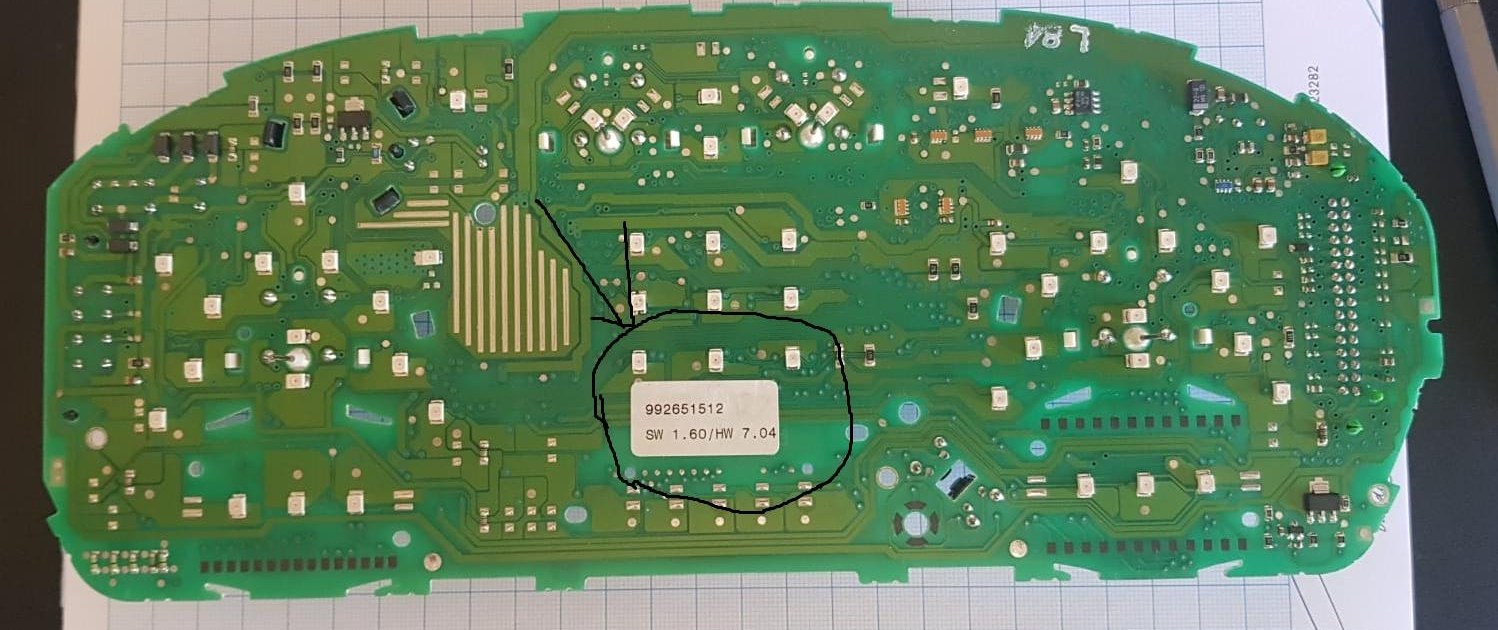
1 point1 pointIf the Octy has been mostly trouble free hang on to it. They go on for miles as I am sure you know. As you say when looking you come back to Octavia again. Otherwise consider a petrol to avoid all the diesel related issues. 1.5TSi looks like a decent engine, although that appears to be fairly young cars which may be outside your budget. I personally considered a 2010 100k 1.9tdi as a potential replacement for my 2005 1.9tdi 250k, if it ever came to it.1 point1 pointThe clue was in the name wasn’t it 😆? A bottle of the finest red from my extensive cellars will be reserved for you 🍷!! Thanks for guiding me through this, It was driving me nuts !1 point1 pointOoh, pretty lites. It's what Wino said, the PCB has failed due to the excessive current draw.1 point1 pointThank you I've got a lot more planed for it but lock down is not helping but i'll get there in the end1 point1 point1 point1 pointI work for a Skoda dealership and own a 272+ and let me just say it’s awesome, imo it’s far better than the 280, power delivery is better much more linear but if you use the loud pedal it it goes like mad, quicker than a vrs but with the refinement of a luxurious car1 point1 pointThis was the sticker. Of course it would be on the side that requires more disassembly to check out.
 1 point1 pointI applaud your use of a carpet roll to save us from having to look at anything grisly Gaz1 pointi have to read that article properly, i started into it and got distracted. Thursday and friday were more 8.5km river side runs, after a couple of nearly decent nights of sleep. jrs teeth seem to have settled for a couple of days, thank god. will be out later today, spud sr wants to go for a run with me... i sense ill be doing a couple of kms with an 18kg back pack1 pointahhh yes i get ya now1 point1 pointSorry, it’s my words on eco things that you can’t turn off. Like the cylinders auto turn off setting.1 pointIt's the fake 'rorty' exhaust/engine sound, which came as standard in the Mk3 Octavia when put into Sport mode, which many owners disliked and switched off. It impresses people ... some people and then becomes a bit annoying. I had it on mine and a Golf GTI, which actually had a real burbling exhaust.1 pointSound generator. Which generates exhaust sound through internal speakers.1 point1 pointI too was unsure why a bump start is a not advised. We recently had to call out our breakdown due to not being able to start our previous car. I asked the question of the breakdown man, he advised that from his understanding it’s really not good for a dual mass flywheels health to be jumpstarted. I’m not sure how much truth his comments have, but as our previous car was needing a DMF soon, I’m glad we didn’t take the risk in bump starting. I hope that may help - and I’m sure someone will correct me if the breakdown gentleman was incorrect 👍🏻1 point1 pointChanged the rocker cover gasket. I wasn't sure if it was leaking or not, or if it was related to my boost issue but I had a spare and it's a quick job. No difference to the drive. Out at the shops. New garage for Rusty after a house move. Not so much space around the car when parked but there is a workshop space next door for, er, activities? Car parts and tool storage? Morning coffee.. Still dailying the quattro after 10 weeks waiting for the Merc to be fixed. It's more practical than you might think!1 pointI should certainly look at a petrol, although the majority coming up in the searches seem to be TDI's at the moment so maybe subconsciously ignored them so far... ACC is the basic requirement, and as for models, while I'm sure the Octavia would be fine, the draw to the Superb is the impression of it being a little more comfortable for the commute! The need for much luggage is a very occasional thing, while the commute's a regular thing where I'm willing to pay a little more for the comfort in spite of not needing the capacity, particularly as there's no regular city-centre mileage where the size might be an issue...1 pointI am from Lithuania and just collected my vRS 2.0tsi with DCC - aaaand surprise, no sound acutator. It is not listed in the specs neither in additional specs. my car is pretty high spec so i thought it would have it... a bit of shame if it is not possible to have it. will need to invest to Akrapovic or Panthera sound then...1 point1 pointDo you have a source for that fairy tale? Odds on its an insurance company. There is however a risk if you did a similar love kiss to the car in front especially if they braked for no reason, no damage to yours & seemingly not to the 3rd party, he says forget about it mate, you cant see anything for all the other dents in my banger. Then he files a report with his insurers for whiplash injuries, damages to the vehicle that may have been reversed into something subsequently and a Police report that the driver of vehicle reg A123 XYZ did not stop, this is a modus operundi of some of the cash for crash scammers.1 pointAny adjustments made that affects the rear toe will affect how the ADAS system works and will require calibration of the sensors thereafter. Minor front toe adjustments will usually be ok. The equipment for ADAS calibrations costs £1000s and requires special training. The full process can take up the majority of a day if there are several sensors requiring calibration and possible adjustments. Some systems associated with the alignment are: Front radar Front lazer (if applicable) Front camera Adaptive headlights G85 steering angle sensors It's all become a bit mental.1 pointWell know up North that you don’t buy used cars from Keighley. most forums have some tales regarding this seller. im 25 miles away and I think I would travel to Plymouth rather than risk from them. very intimidating atmosphere at the garage so I’m told. they do have some exotics but I don’t know anyone who has bought from them. I think there’s a “wedding” hire business this car could be the exception but do you want the risk?1 pointHi, welcome to the forum. Not especially surprising, I suspect Thick***t just are not particularly sure of what they are doing! - I think any competent alignment centre should be able to do, I have seen previous references to preference being for a 4-wheel rig such as Hunter. If only 'marginally out' was there significant wear difference between left and right tyres? If not, I'd be tempted to leave. If they don't know how to align, how competent are they on assessing the geometry?1 point1 pointFirst off, to newbie69, i'm commenting here as i don't want to clutter your 272 remap thread with stuff that's relative to the 280. I don't want you thinking i'm being rude or ignorant. Today i had the apr stage 2 flash done. I thought stage 1 was good, but this is even better, but it comes at a cost. The downpipe and mid pipe (without resonator) cost 1045 quid alone. The remap was 120 quid. I'm still on the standard spark plugs because the tuner can't get any better ones till March. It's now running 1.8 bar of boost. Its 385bhp and 412ft/lb of torque. It will take a while to get used to because it pulls even harder now than stage 1. I'm not so sure if i like the exhaust note though when pressing on. It sounds like the baffles are being blown out the standard backboxes. Above 2600 revs there's a boom. I think i can live with this, i'll just have to drive slower if i'm carrying passengers. As for economy, time will tell, but my 12 mile drive home from the tuners showed 20.9mpg. Gulp! Edit - Just to say that after a few more run outs, mpg has gone up. Some runs have returned 28mpg, others have done 32mpg, so no worse than stage 1 was.1 point1 point1 pointQuite so. Pointless locking doors and windows as well. I was simply saying what I think is the reasoning behind hiding the VRM.1 point1 pointNo requirement for me to tell the police, the only requirement when subject to a non injury road traffic collision under the RoadTraffic Act 1988 is to 'stop' at the scene and exchange the following.. Name and address of the driver Nam eand address of the owner (if different to the drover) VRM (vehicle registration number) 'Stop' means just that, so that the relevant information can be exchanged to anyone who reasonably requires it. The 24 hr rule is if it's an injury RTC and drivers aren't able to exchange insurance details at the scene. They then have 24 hrs to give their insurance details to the police. My RTC is not a police matter whatsoever and reporting it to them would be a complete waste of time for me and them. My registration number is already posted widely on this and other forums. I don't understand the obsession folk have hiding it. Do you think the police and insurance companies trawl the internet for talk of accidents?1 point1 pointI'd say it's as predictive as it can be. For example during launch control, the Haldex is fully engaged even before setting off and in general the system prepares itself based on various parameters like throttle position, steering angle, acceleration etc. to be ready for most scenarios. On the other hand there are situations that simply can't be predicted, ie. if suddenly the fronts go over ice and lose traction, there's no way to foresee that. What's important is that even in the unpredictable scenarios this latest gen is so fast in its responses that you don't ever get to feel the moment it has started to intervene, it is very seamless. Meaning nothing like the first Haldex generations that wheel slippage was required to trigger the system's response.1 point1 pointJust picked up the car, clutch was replaced under warranty as a small oil leak found. Great service from them as to be honest they could quite easily have taken me for a grand! Before I knew the result I spoke with the dealer I bought it from and the Manager told me to contact him before paying if they did try and charge me, so fills me with a bit of confidence that they’re not all out to rip us off. Thanks all for your advice, I will be writing to Skoda UK to complain about the defect on an “Approved” used Skoda, just in case there is an underlying issue that may reoccur in another 15k miles.1 point1 pointThere's a little, white plastic restrictor in the bleed assembly in front of the gearbox which is a known problem causer and folk often remove it. The result is a more responsive clutch pedal with a faster return speed. The manual golf, leon and S3 drivers have been doing it for a while.1 pointThey have some amazing stock of Super Cars and an Alfa Romeo that i would love to buy. At the moment i am only £69,000 short of the Asking Price. I wonder if they accept Magic Beans as a form of payment.1 pointI've just tried it on your behalf and didn't have any problems - you still have 140Mb of free data available. Maybe try clearing browser caches or a different browser, logging off/on etc as I don't believe it's an issue at this side.1 point1 pointi always have a smile to myself when i see a mk1 octy still on the road, esp if its been kept looking pretty well. as i know what it can do and what its probably been through they are getting rarer and rarer mostly due to easily fixable NCT (MOT) failures.1 pointWhat year is your car? Sounds like the alternator excitation wire may be busted. Year and ideally engine code and I can look up the details in wiring diagrams.1 point1 pointWhy oh why does everyone want their old car lit up like a darned Christmas tree, ruining other drivers night vision and looking like a plod magnet. Townies.1 pointRight, four of a kind for the Green Machine today having remembered with about 0.15 of a mile to go and a parking space on left that was long enough to roll into and it to tick over just at end of it. First pic, then after a short wait....
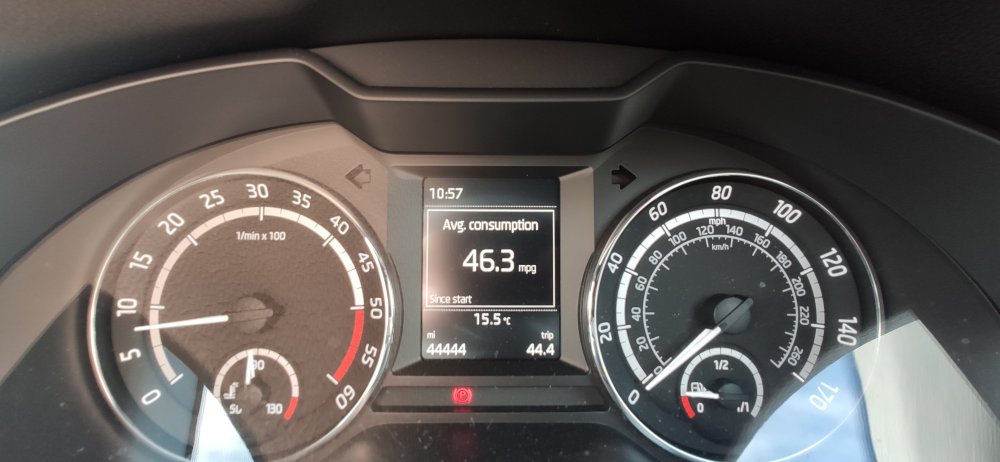
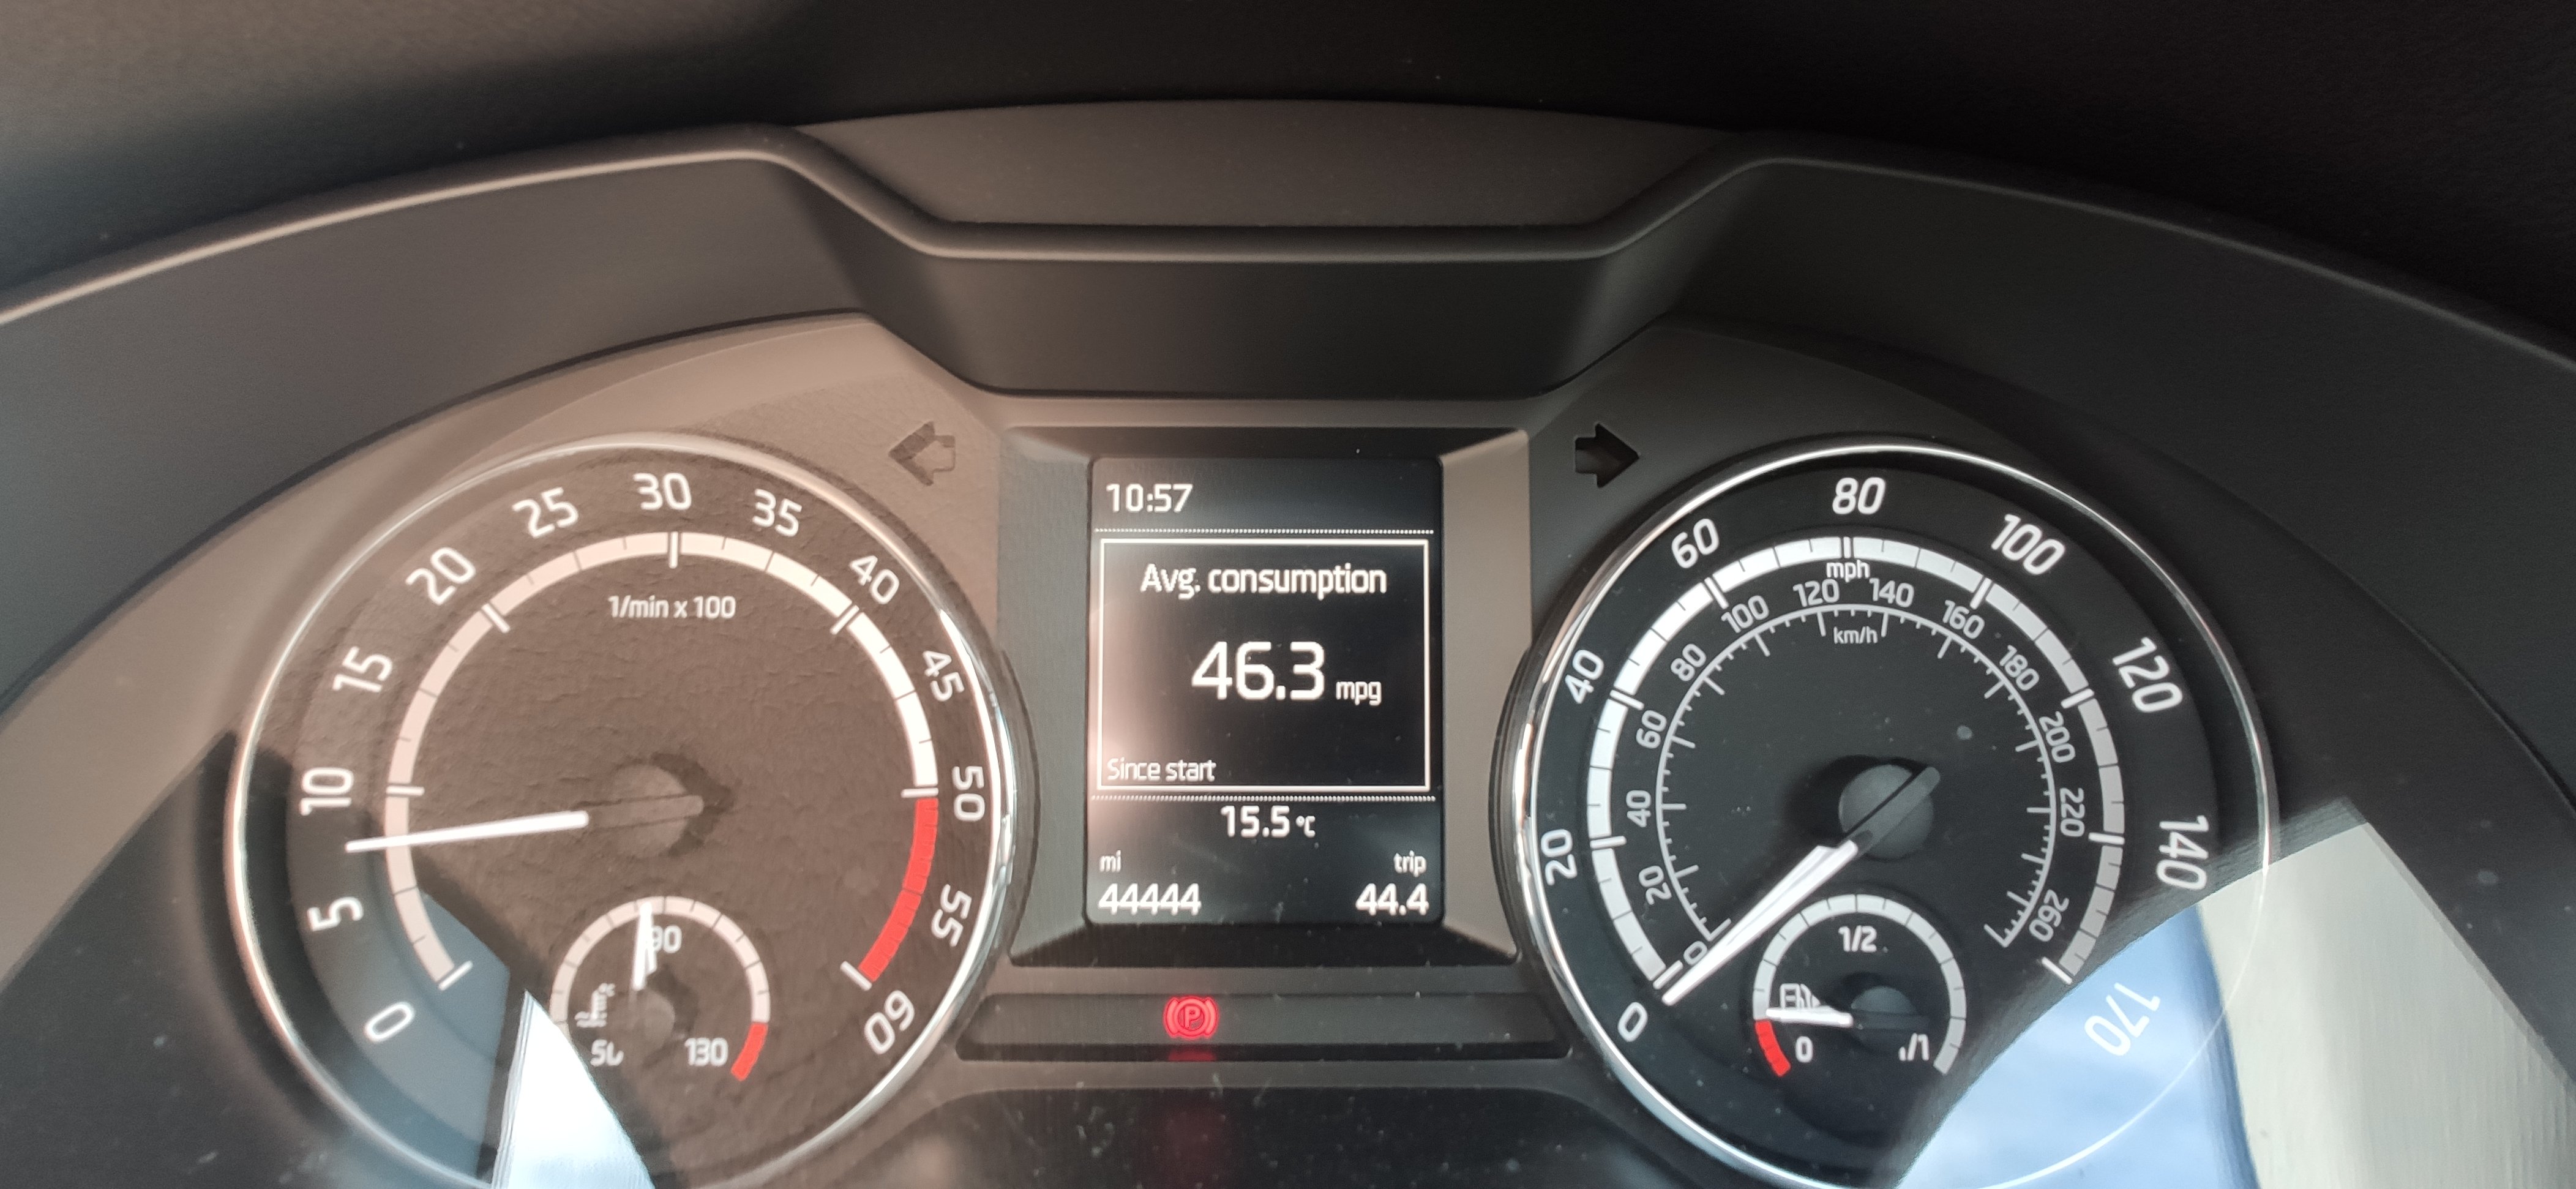
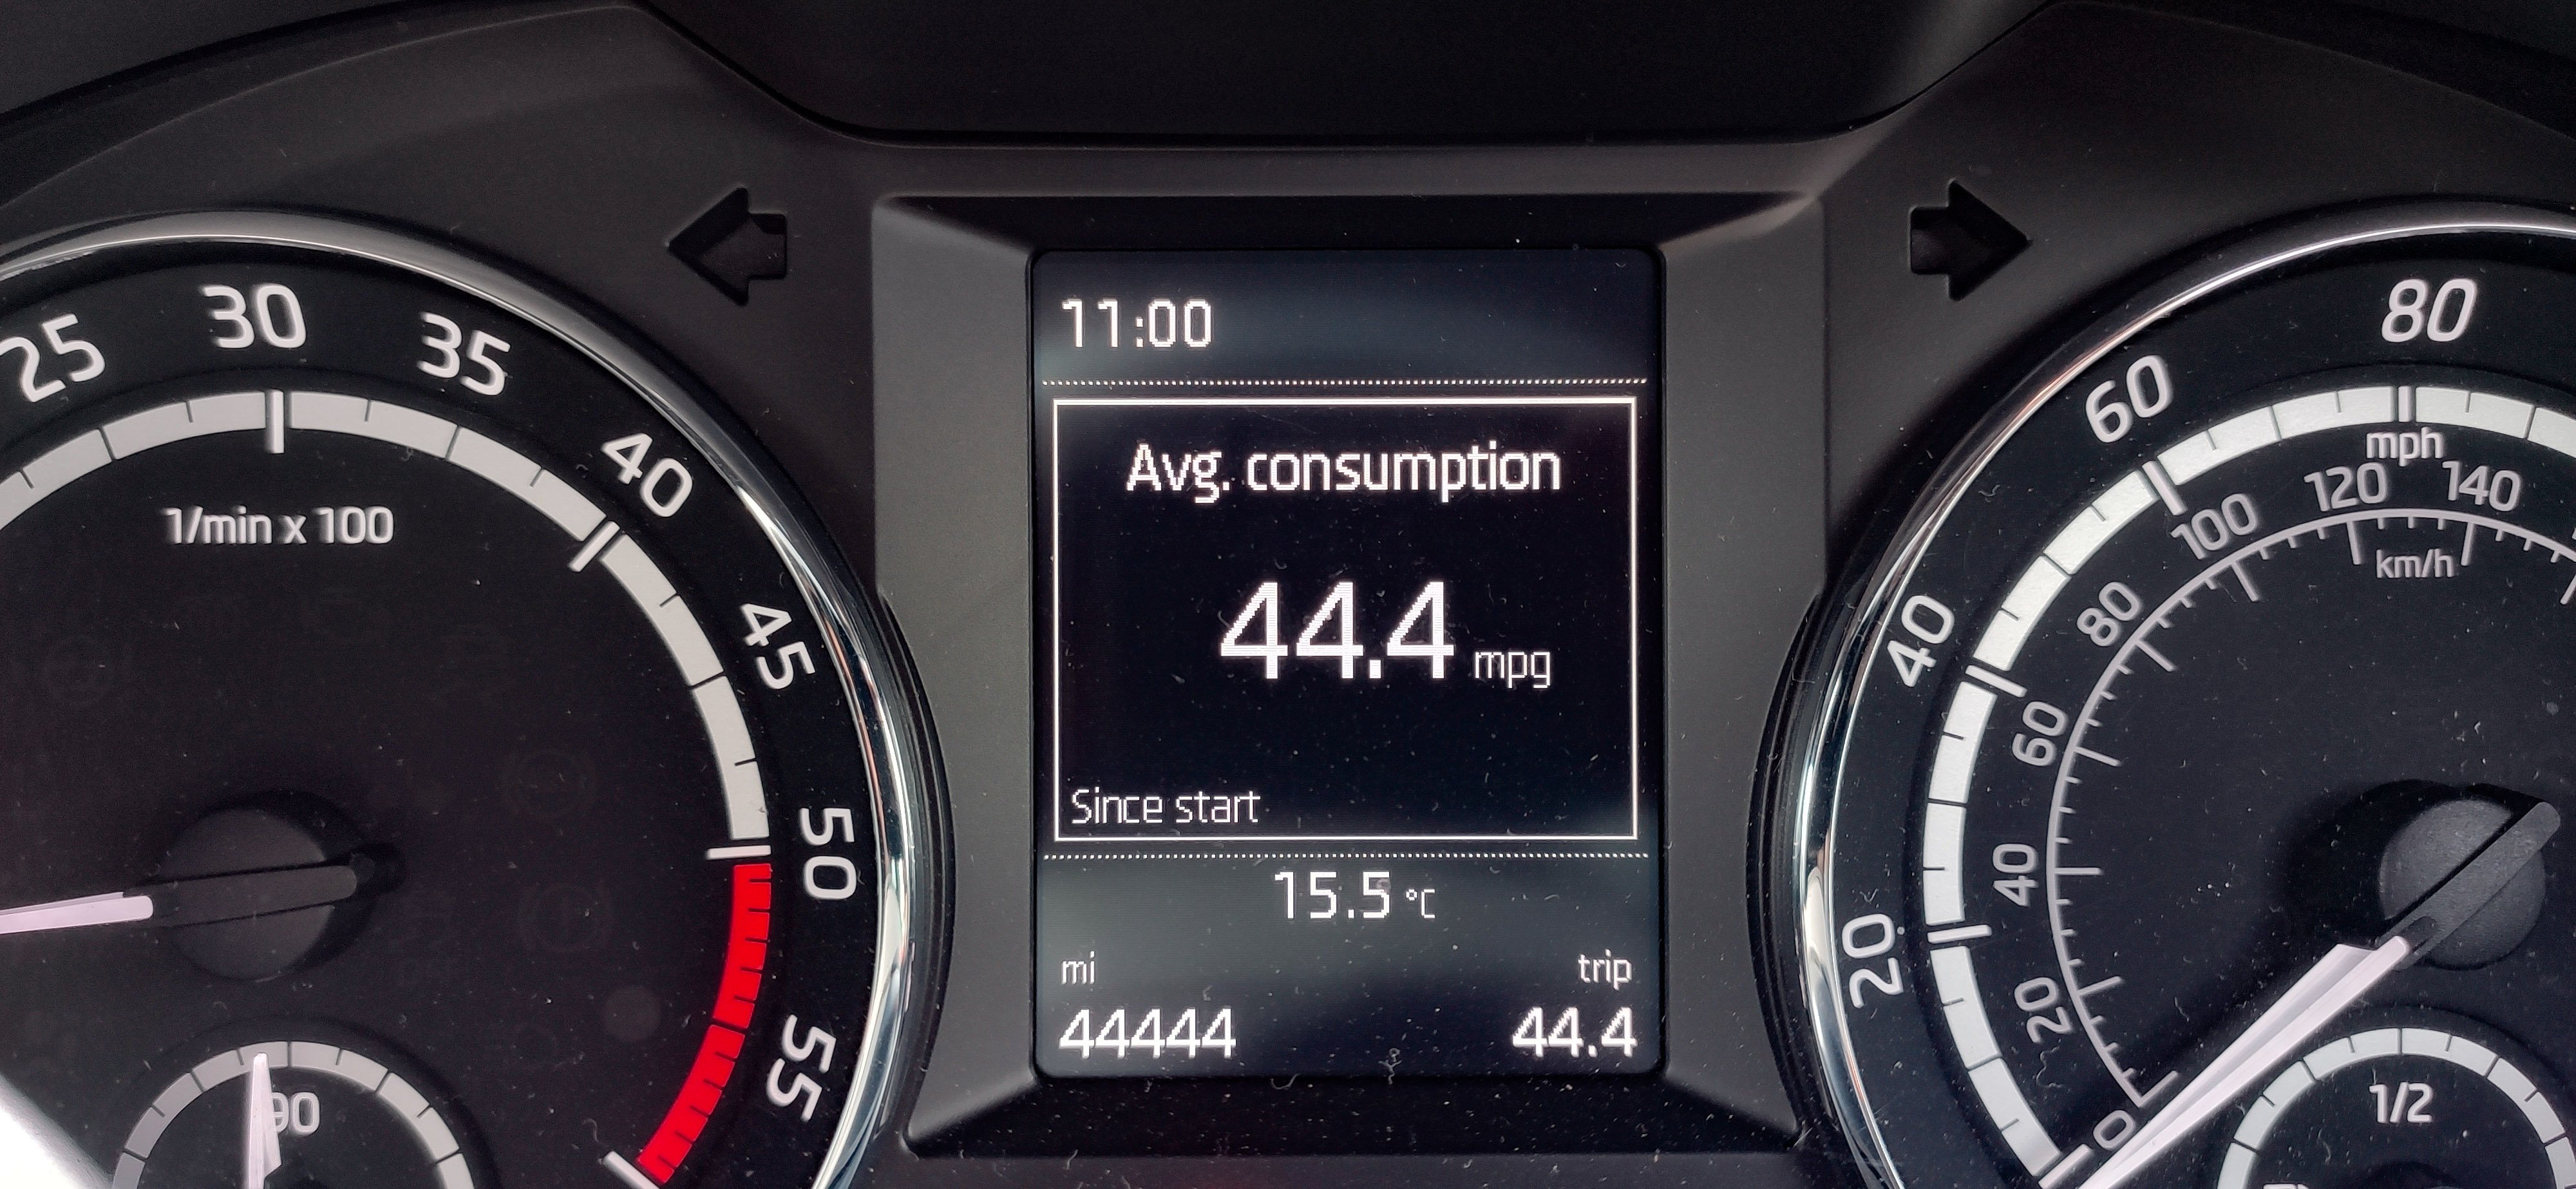
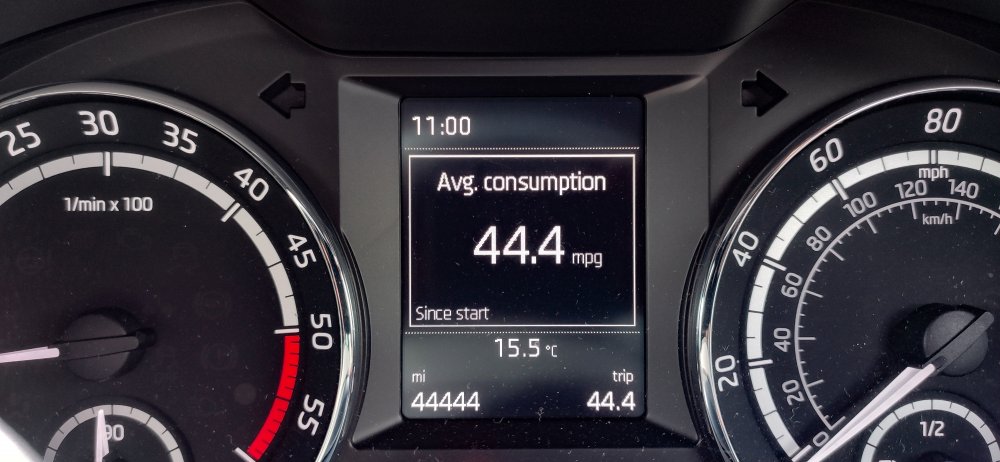 1 pointRolling over to five figures:
 1 point


Important Information
Welcome to BRISKODA. Please note the following important links Terms of Use. We have a comprehensive Privacy Policy. We have placed cookies on your device to help make this website better. You can adjust your cookie settings, otherwise we'll assume you're okay to continue.