Leaderboard
-
.jpg.1006585dfe4e2977315b67c3d642e37b.jpg)
Guest_
FREEDOM17Points83,824Posts -
Monkhai
Moderators12Points31,971Posts -
Breezy_Pete
Sponsor10Points24,199Posts -
pinkpanther
FREEDOM8Points3,913Posts


Popular Content
Showing content with the highest reputation on 29/01/21 in all areas
-
3 pointsA few from this morning's (local) exercise. The moon was especially large (and ?full).


 3 points
 -
Suspension - Koni Special Actives now fitted with standard springs Very little driving done so far, but initial thoughts are positive. One of my real dislikes of the standard suspension was speed bumps, work drive sends me over 7 of the sods... And the Superb bounced and nearly bottomed out. But now, so much better, worth the cost just for that in my opinion. Will test out the handling more and report back. List of jobs getting smaller, though am contemplating an electric tail upgrade...2 points
-
2 pointsTurns out it was the temp sensor being loose, once tightened up regen started and egr working as it should2 points
-
2 points
-
2 points
-
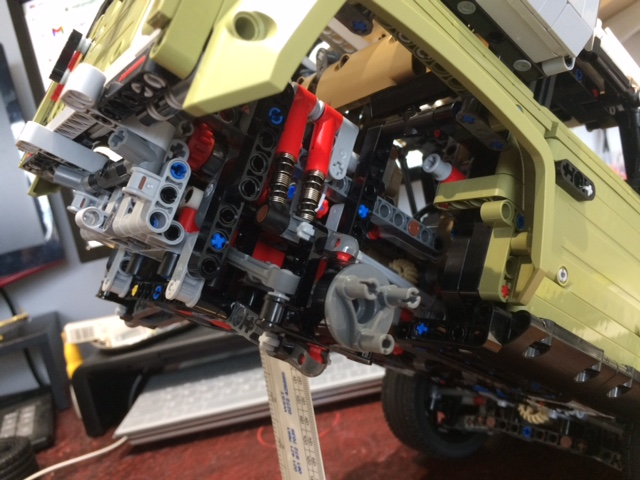
Talking of suspension (well a gearbox actually), after completing the build I'm currently trying to find out why the back end of my LR Discovery Lego kit is locked up & the wheels won't turn! Must have put a cog in backwards somewhere. Suspension works fine though!
 2 points
 -
There has been a massive thread on this in the past. Seems fairly common and normal unless you are seeing another issue i.e. coolant loss or usage.2 points
-
2 pointsIt's still part of the spec, and was in December when I ordered mine as well (rim temperature controlled)...not sure but is there an option to turn it on in the infotainment - in which case it may be that you've had the wrong steering wheel fitted?
 2 points
 -
2 points
-
2 pointsHaldex should be serviced at 30K miles. As well as the oil in it being changed, the gauze strainer should be removed and cleaned. This is not part of any VAG service schedule but it needs to be done to prevent it from clogging, stopping the Haldex pump from operating and potentially burning out. I discussed this with the Service Manager in West End Škoda and they agreed to clean the strainer for a small extra charge.2 points
-
2 points
-
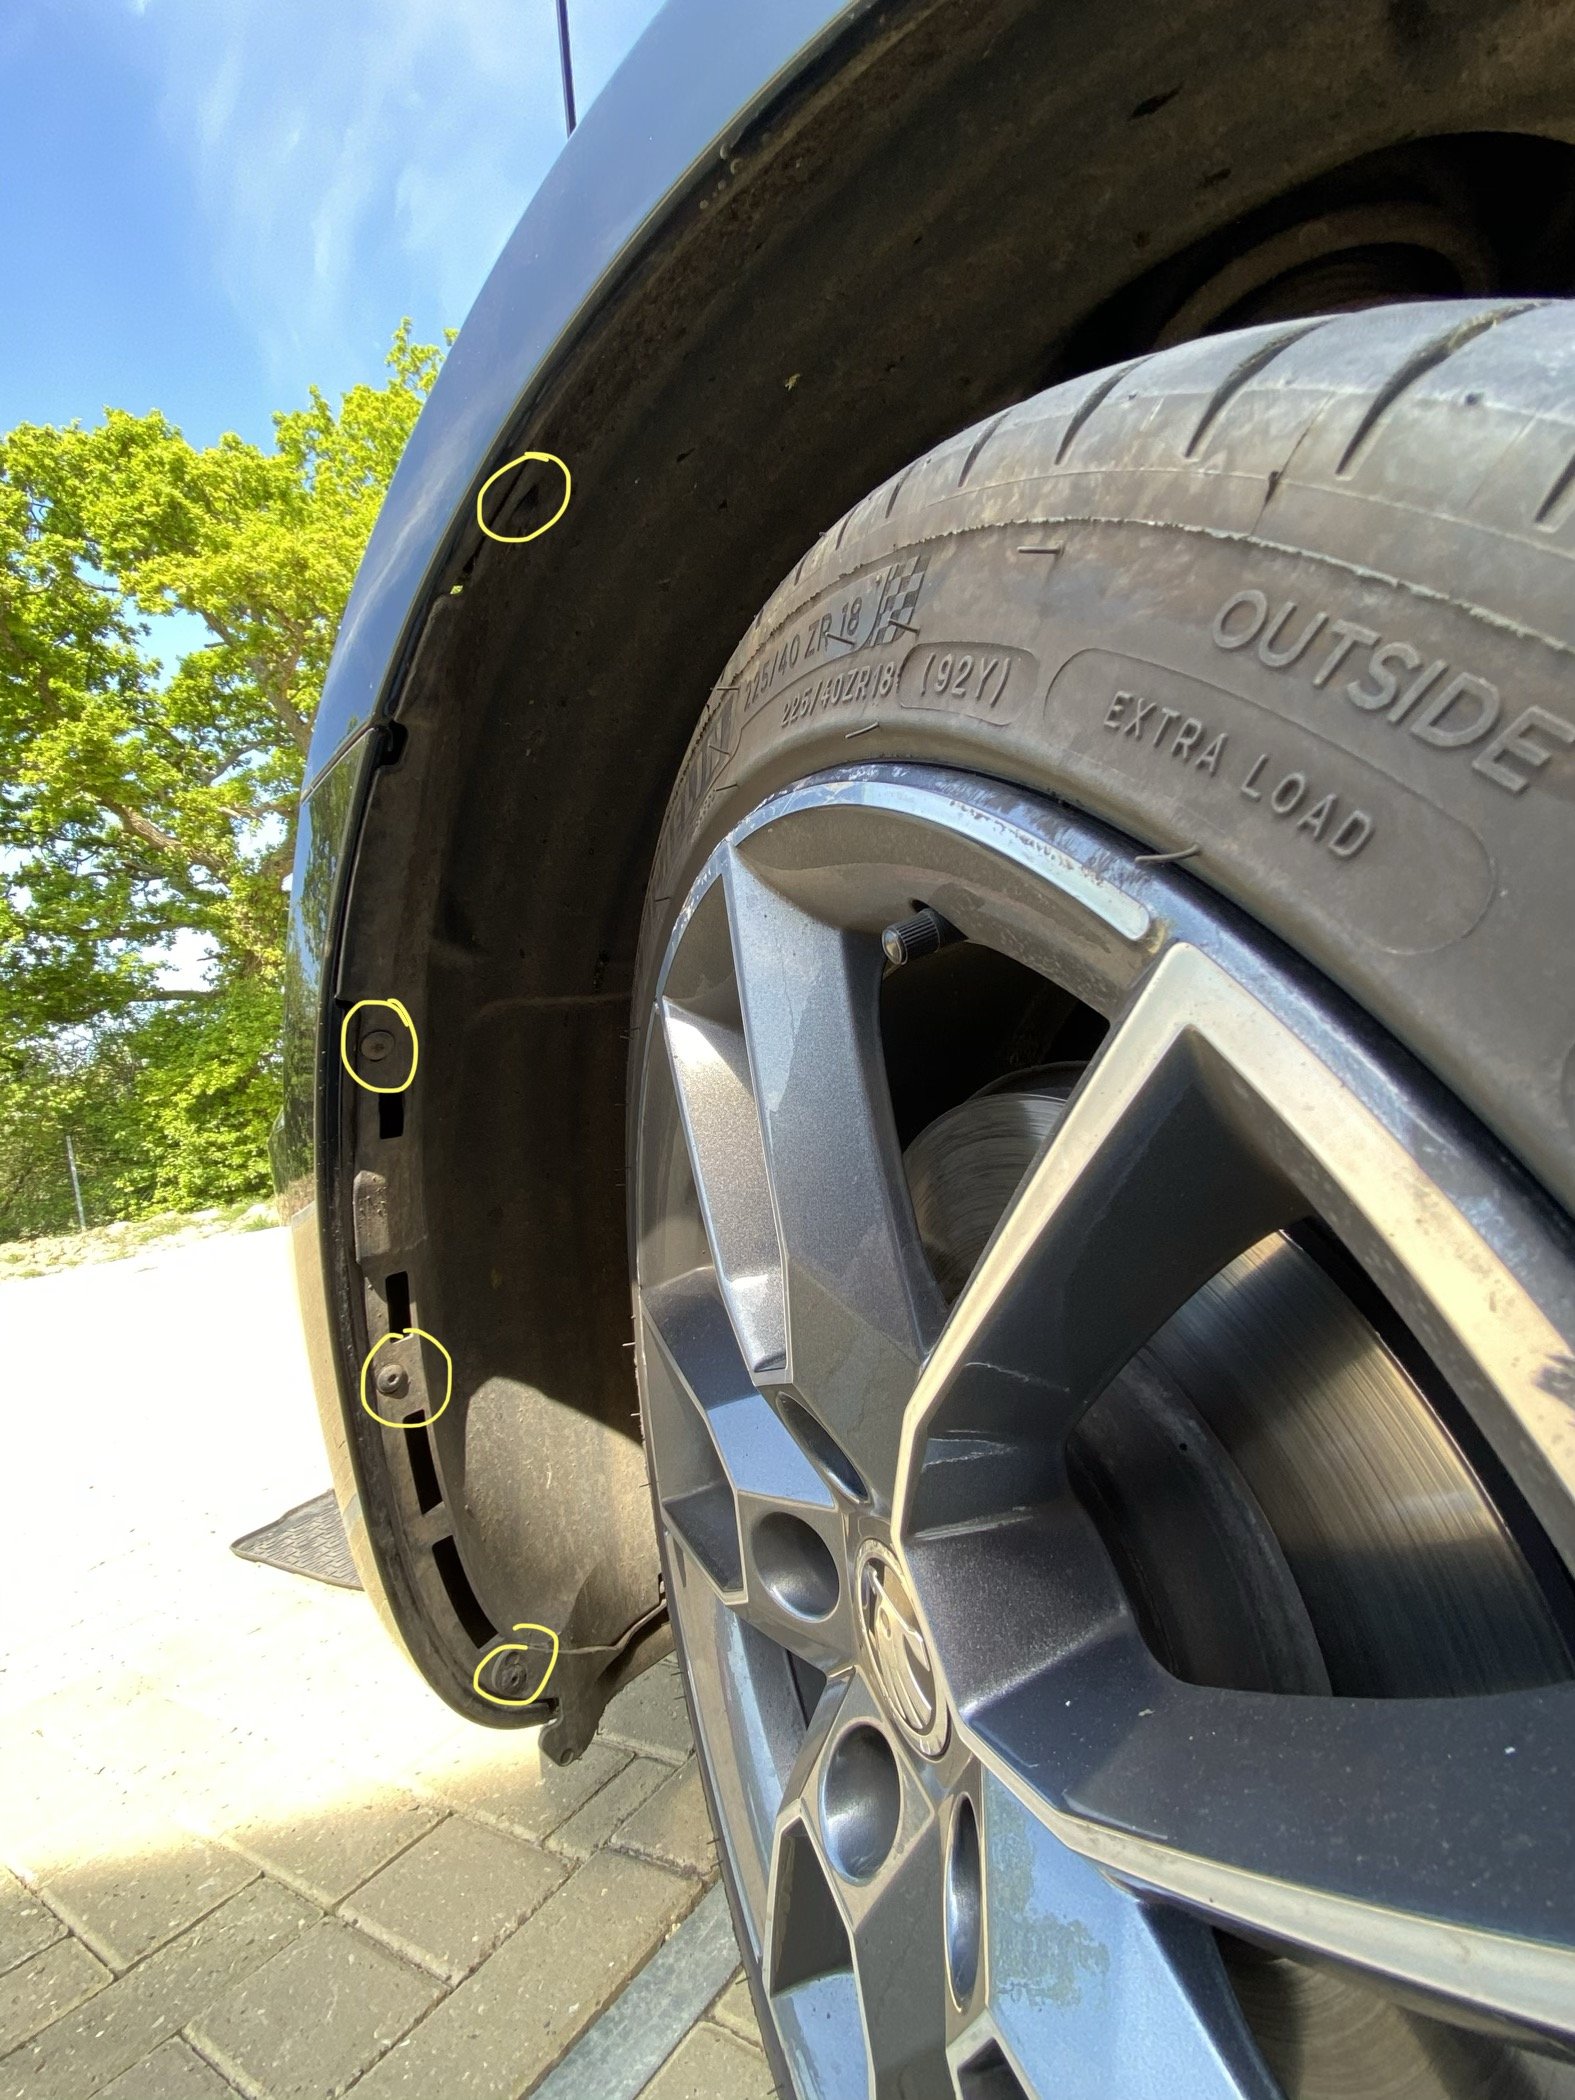
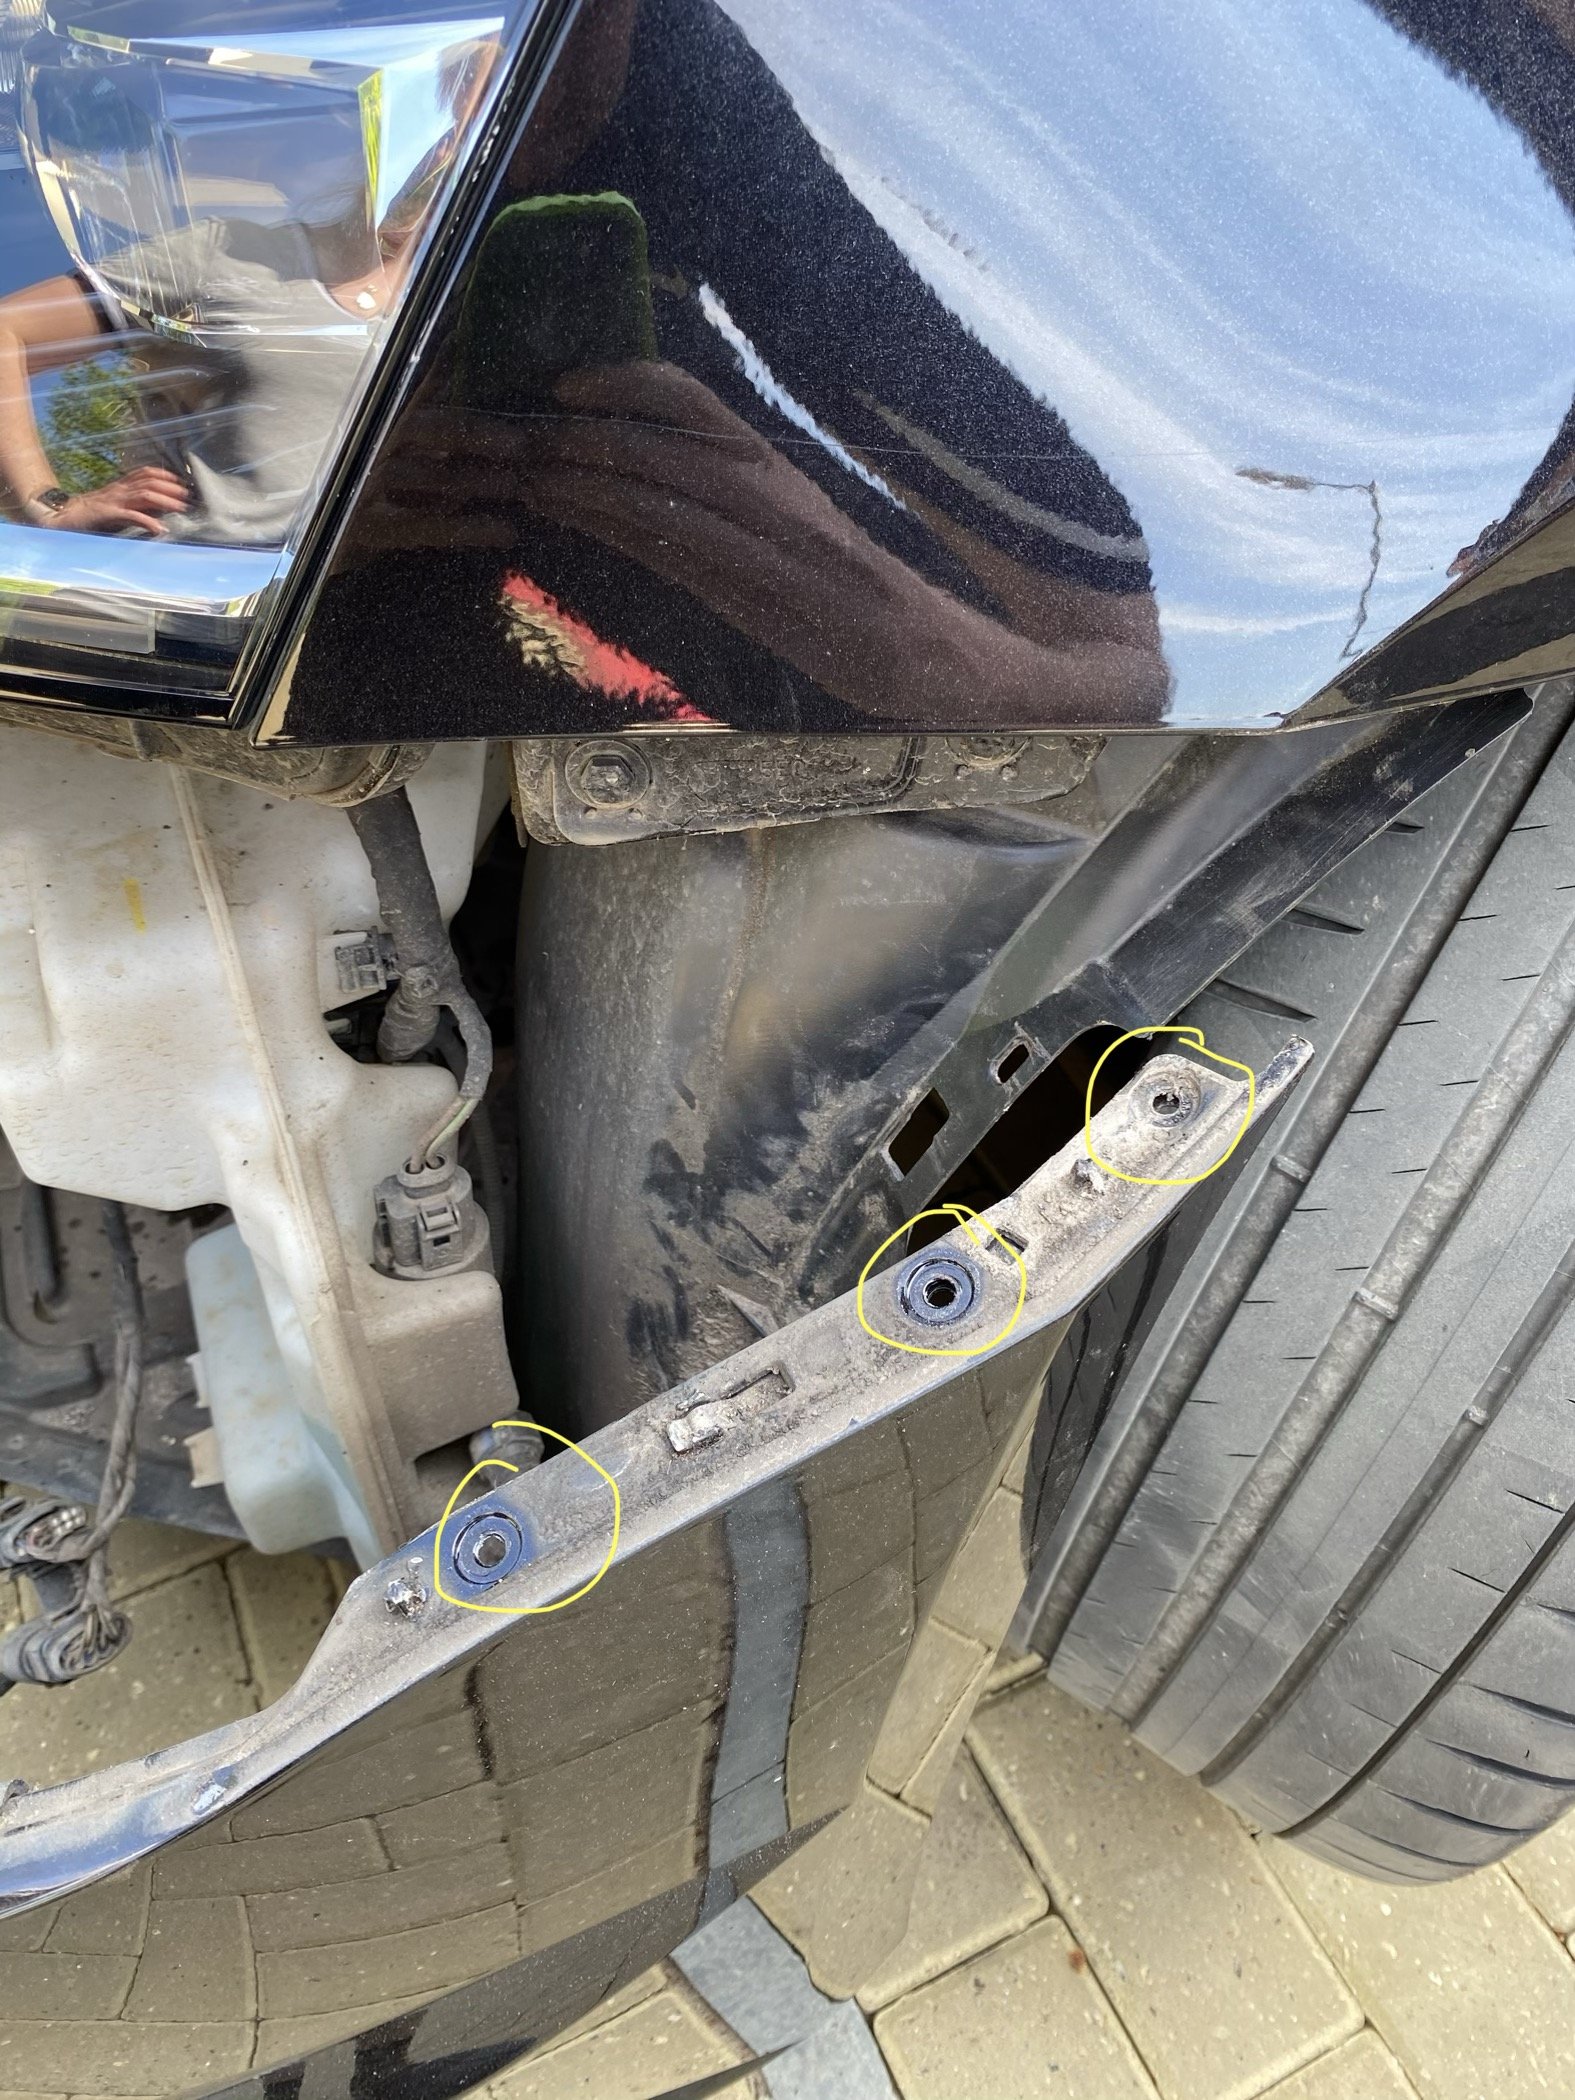
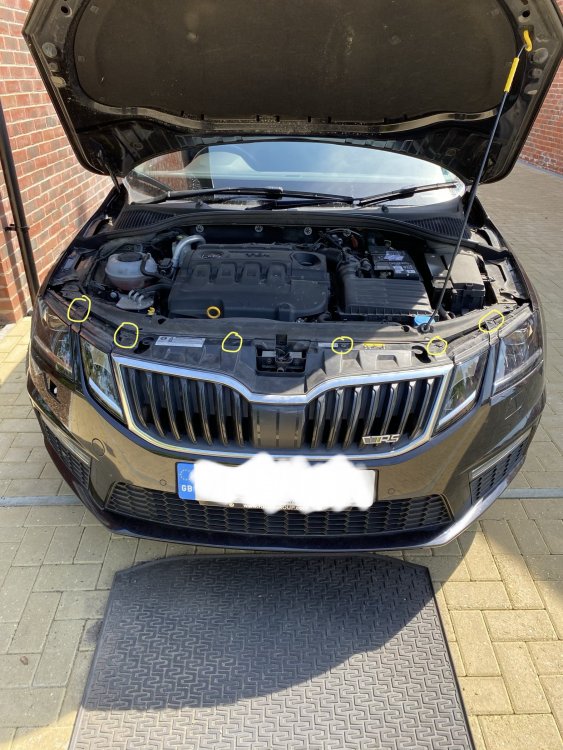
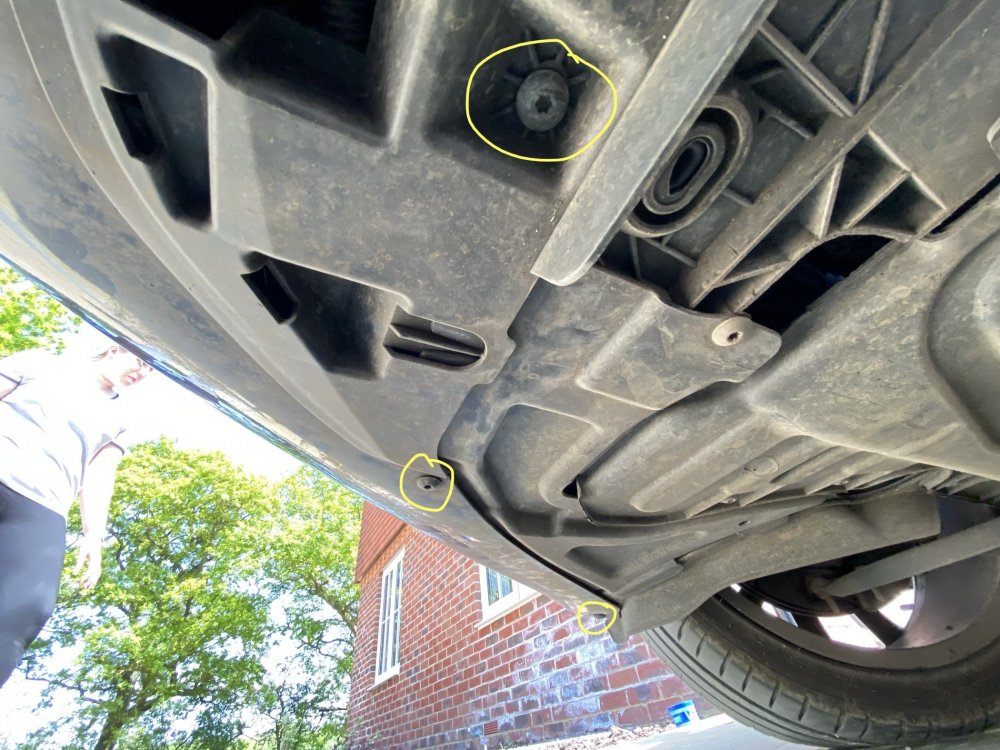
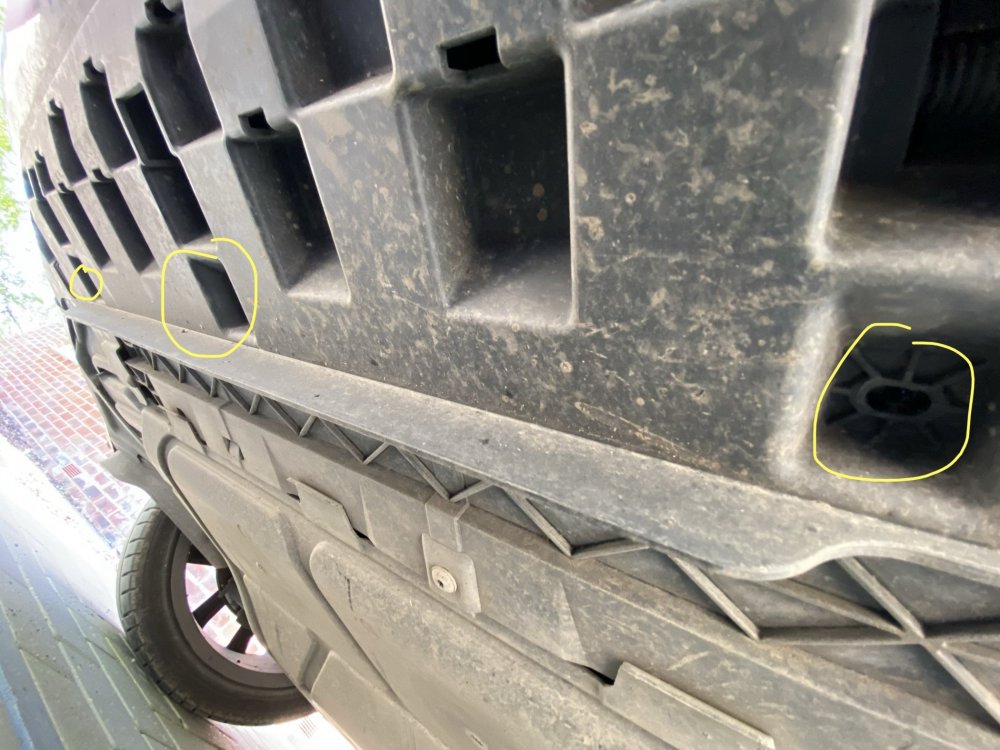
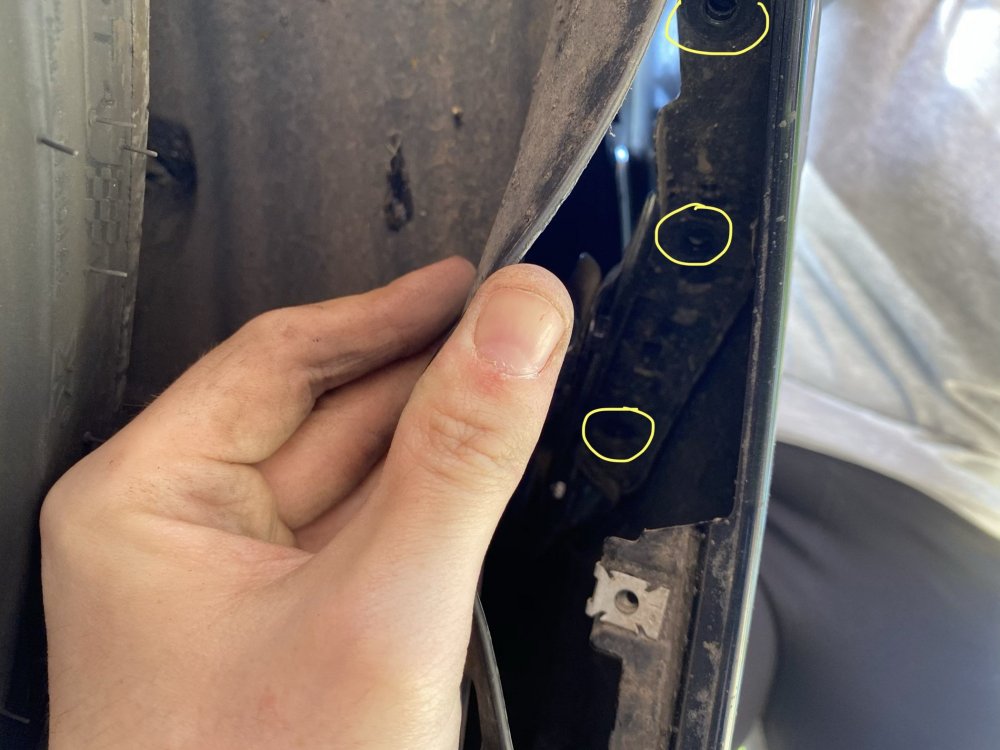
Hi guys, I wanted to put a new thread down for the front bumper removal for the Mk3 Octavia. I read Maxpowers excellent guide which helped a lot but there were a couple of additional things I wanted to add as the Mk3 has one or two more screws in places. Thus I wanted to show how I did it to help others if they needed help too. I had had to replace my right headlight washer jet after kissing a deer. The washer fluid was leaking and I had to top it off a lot more regularly. An annual service reported the washer jet was snapped and I also had to replace the headlight washer jet cover. Which went walk about after the deer incident. Skoda quoted me around £300 to repair this and not wanting to pay that much, I bought the parts in an attempt to do it myself. The parts cost approx £50 if I recall for the new washer jet and cover. Plus some spray on Black magic paint and lacquer from Halfords. This is is what I did. 1. Took off the eight screws attaching the bumper and grill at the top. 2. Took off the eight screws underneath the bumper. 3. Took off off the four screws in the wheel wells. The very top screw isn’t necessary to remove the bumper but removing it makes it a lot easier to man handle the wheel well arch out of the way. The wheel well arch is pretty pliable plastic but you need a bit of brute force to get it out of the way for the next part. Like Max says turning the wheels over gives you more access. 4. This bit, like Maxpower said it’s the awkward bit. There’s now three screws you need to remove. They attach the top corner part of the bumper to the chassis, just in front of the wheel well and they’re screwed in from underneath in an upwards direction. The screw closest to the front of the bumper is the hardest to get to and requires a bit of persistence. Having a longer torx bit and a spare pair of hands certainly helps. And removing the screws are a lot easier than putting them back. Once all of the screws are off, you should be able to jimmy the bumper off. Thats it! Upper should be off! 5. Removing the washer jet is really easy. The washer jets are attached to the bumper so you don't need to remove the covers before you remove the bumper. There’s also a bit of slack with the wires so I didn’t need to disconnect anything. The jet is connected to the plumbing and all you do is press two blue buttons to remove the jet. The jet is attached to the bumper with two shoulder clips. Just jimmy them up to unclip it. Thats it. Putting it back together is actually more of a pain than taking it off. There’s four prongs on the back of the bumper which fit into four separate holes on the front of the car. They’re a bit of an pain to get aligned and I actually snapped one off in the process. I wasn’t too bothered considering as the entire bumper is held on by 28 screws (not including the two at the top of the wheel well) in total! But getting the bumper back in the correct place to seat correctly is quite hard work. Parts need to align properly and some parts of the bumper need to slide into various channels at the top and underneath. Once the bumper was clipped back onto the chassis and back in the right place, we put the three awkward screws in first. These are the three that screw upwards into the chassis just in front of the wheel well. You’ll want a spare pair of hands and a suitably long torx bit to get these screws back in. I got my missus to use all of her weight to keep the pliable wheel well far enough away from the bumper so I could get some tools in to screw them back in. Again it was a pain and persistence is the key. Don’t be surprised if you drop the screw back into the bumper. If you’re lucky, you should be able to retrieve them without having to take the. Upper back off. After doing this twice we came up with ingenious solution of using masking tape and taping the screw onto the bit. Once the awkward ward screws are in you can then replace the others. We did the wheel well screws next, then the eight on the top of the bumper and finished with the eight underneath. It it took about 90 minutes in total which I don’t think is too bad considering neither of us are mechanics. A bit of swearing, a few nicks on the hands but we managed to get it done. I have tested the washer jets for the headlights and they still don’t work! But I believe they don’t go off every time you spray the washer fluid. They certainly don’t leak anymore! I’ll try and attach some photos that might help including all of the tools I used. I also used four ramekins to put the respective screws in so they didn’t get lost and I knew where the were from.

 1 point
 -
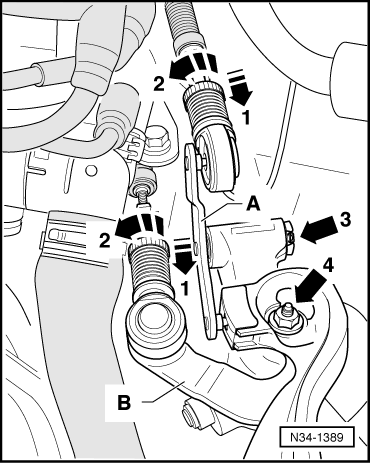
My 2005 Fabia Mk1 was suffering with a stiff gearstick not returning to the centre position. Other than that the gearbox is fine. Fix. I pulled open the gearstick gaiter and could see that the spring was not broken. I then unbolted the battery and removed. The battery tray was unbolted and swung to the right and over the cars wing so I could gain access to the gearbox selector cables etc. On Top of the gearbox you will see the two gearbox cables coming from the car and connecting via swivel connectors to the gear selector arm on top of the gearbox. If you take hold of the large alloy arm (point 4 in picture ) you can move it right + left and up and down and it should be smooth. Take note of the white plastic guid which slides back and fore on the large alloy arm Not easy but if you use a large screwdriver and pry off the gearbox cable connectors from the knuckles on the gearbox arm on top of the gearbox. Marked as number 1 in the picture below. Now take hold again of the alloy selector arm on top of the gearbox and push down to see if it pops back up of its own accord. If it does not or slow/stiff then here is the simple and cheap fix. If you look at the bracket with the two swivel ball joints on it. This has a metal arm (top swivel joint number 1 is connected to the arm and it fits into the cst allow point A in the picture) which fits into a cast alloy section of the gearbox. To remove you will need to look to the right and unclip a retaining clip (number 3 in picture) which simply pulls/slides off by hand or long nose pliers. As this metal arm is stiff going into the cast alloy (part A in picture) , then gently pry out to your left and towards the engine. Once out clean up the metal bar which now should be obvious. Now go back to the cast alloy section (point A in picture ) where the metal bar came out of. On either end take a flat screwdriver and pry out the two plastic sheaths which have been pushed into the alloy cast at either end. of alloy cast A. Order two new ones from the internet or TPS part number 1J0711067L at a cost of £2.20 + vat each. When they arrive coat them with a very thin layer of vaseline inside and the metal bar/rod. Very thin! Now start to refit the bracket and the retaining clip. Be Careful making sure that the white plastic guide fits correctly over the large alloy arm on the top of the gearbox. Once done, then push the alloy arm downwards and when you leave go its should pop back up on its own. Therefore not stiff anymore. If you are at this point and all is well then brilliant. Refit the gear cable swivel joints back onto the knuckles. For the left one I used a hammer to knock a screwdriver (upside down) so the handle pushes the joint back together. The other one I squeezed back together with large pliers. Once done just revisit and test the return to centre of the gearstick in the car. If all is fine then put the battery box back on and refit the battery. The light bulb moment came once I disconnected the swivel gearbox cables. At that point it allowed me to form the opinion that it was the bearbox arm and not in the car and the spring being tired. Hope this cheap fix has been some help for someone before you start to consider more expensive issues.
 1 point
 -
1 pointPicked up my new Scala SE 110 DSG today - I previously had an MK3 Fabia SE L 110 6-speed Manual. The SE seems like a perfect "middle of the road" trim - especially when compared to the Fabia SE L. Things I've lost: ❌ Climate Control ❌ Keyless Start Things I've gained: ✅ Automatic Gearbox ✅ More interior space (both cabin and boot) ✅ Electric windows on all doors ✅ Automatic wipers ✅ LED headlights ✅ Spare wheel Initial experiences: DSG gearbox seems hesitant when moving off - it seems that you have to pre-empt your departure by a couple of seconds to get things moving along. I'll try in S-mode tomorrow... Seats seem very similar to those in the Fabia - perhaps slightly wider? Either way, very comfortable and supportive. Impressive storage space - the driver's cubby is excellent for facemask and pen storage. Android Auto implementation and touchscreen seems far more responsive than the old system in the Fabia. USB-C ports and phone "shelf" are perfectly positioned. I wish that the "jumbo box" arm-rest would stay in position once lifted up (similar to how it works in the Golf) - I may have to make a shim or something to raise it up permanently. The windscreen filler cap that turns into a funnel is an extremely clever bit of design. Perfect! Car seems very well-planted on city roads and motorways. Will try some rural driving tomorrow!1 point
-
1 pointNo pics. The condition of mine at 32k miles, on a 185 bhp Yeti, probably doesn't bear much relation to yours at 21k, on a 280 bhp Superb. There are also different road conditions and driving styles which no doubt affect the build up of matter in the strainer.1 point
-
2010 was the last year Skoda had 239mm front brakes. http://www.oemepc.com/skoda/part_single/catalog/sk/markt/CZ/modell/FAB/year/2010/drive_standart/608/hg_ug/615/subcategory/615025/part_id/2550123/lang/e In 2011, the smallest front brakes were 256mm. http://www.oemepc.com/skoda/part_single/catalog/sk/markt/CZ/modell/FAB/year/2011/drive_standart/697/hg_ug/615/subcategory/615025/part_id/2550123/lang/e In 2011, Skoda also took the opportunity to change from TRW 288mm front brakes to ATE 288mm front brakes. As far as front brakes were concerned, 2011 was a big year.1 point
-
@Carlston And that's true, but it doesn't refer to wheel size. The thread is about brakes.1 point
-
1 pointIf you go to an independent specialist with a borescope they can take look inside cylinder 3 for you, they can also do a leakdown test to tell you if it's the valves or the rings. I daresay the dealer just did a basic compression test then wrote the engine off.1 point
-
1 pointThe eibach.de website has an online catalogue where you can find out what springs eibach sells for your particular car model. Eibach sell two types of aftermarket springs. ERL and Pro-Kit. ERL (Eibach Replacement Line) are standard ride height springs. Pro-Kit are 30mm lowered springs. https://www.eibach.de/en/ http://web2.carparts-cat.com/default.aspx?11=279&14=15&1115=1&1281=17=0&10=CB5B61EB34F54FD0976119BCED0FA042279015&12=100 http://web2.carparts-cat.com/default.aspx?34=0,2047566&240=0&32=22949&230=29&1271=48&1272=3711a928-6aad-497f-b53d-f31d020a6ad1&1273=1&10=CB5B61EB34F54FD0976119BCED0FA042279015&14=15&12=130 Eibach Pro-Kit E10-79-006-02-22 (front and rear sports springs) Pro-Kit Article status: Normal Mounting location : Front axle , Drawdown approx. : 30 mm , Mounting location : Rear axle , Drawdown approx. : 30 mm with technical inspection certificate , Front axle weight. up to : 960 kg , Rear axle weight. up to : 840 kg , for vehicles without level adjustment https://www.ebay.de/itm/Pro-Kit-Tieferlegungsfedern-30mm-u-a-fur-Skoda-Fabia-II-542-Bj-2007-2014/373054750648?epid=1205502331&hash=item56dbcbbfb8%3Ag%3AVL8AAOSwLYdfrtti&LH_ItemCondition=10001 point
-
After a couple of journeys with no problems, the EPC light came on again today, as soon as I put my foot down to overtake someone. The car went into "limp" mode as before. I left the car for 20 minutes while I did my supermarket shop, and it was fine on the 10 mile drive home. No warning lights, performance was fine, but more traffic meant I didn't get a chance to push it hard, just hanging back from the car in front, and a bit of welly to catch up again. I plugged in my code reader. Unfortunately the Superb 3 isn't in the database (it's quite an old reader), so I only have the "generic" code - P00AF. A bit of googling suggests that this is a turbo wastegate issue. A bit more googling suggests that it has become a common issue with VAG cars that haven't been used much during the pandemic - often the wastegate linkage gets stuck, or sticky so it's slow to respond. Being "sticky" seems to fit with what's happening with my car. Boost is perfectly fine if I roll on the throttle progressively, but it goes wrong if I push the throttle hard enough to drop down a couple of gears. I found some pics showing where to spray some penetrating oil on a Golf with 2.0 tsi engine, but I can't find the offending part on my Superb. I guess it's hidden a bit further down, under the turbo somewhere. Looks like it's a trip to the indy.1 point
-
What I can remember, it was either off or full blast. The part I needed I got off Amazon https://www.amazon.co.uk/gp/product/B01MDLZN9H/ref=ppx_yo_dt_b_asin_image_o05_s00?ie=UTF8&psc=1 It was quite a fiddley job, disconnect battery, take out glove box, remove airbag, replace part (need small hands!) Put back together and you might need to clear Air bag warning lights from dash using VAG COM software and laptop cable. https://www.ebay.co.uk/itm/OBD2-Diagnostic-Scanner-Cable-Tool-For-VW-Audi-Seat-Car-VAG-COM-KKL-409-1-NEW-/383889304706?hash=item596195ec82 I watch this YouTube video online, which was a great help. Good luck, I hope this all helps.1 point
-
I don't think sound proofing is the issue. Sure it could use a little more, but my MIB1 Columbus and Canton with some tweaking of the settings and a quality source sound fantastic imo. I'm picky about this sort of stuff as well, I have £300 Sennheiser earphones for example.1 point
-
According to the Skoda website, the "ŠKODA Extended Warranty is sold and administered by Lawshield UK and underwritten by Volkswagen Versicherung AG. Terms, conditions, and eligibility criteria apply." I would treat it like any other insurance product, shop around and find which policy offered the best cover and value for money. Read the exclusions and T&C's of the products to know what you actualy buying. The Skoda logo on the paperwork won't be much use to you if it doesn't cover what you need. PS: Use the search facility on this forum and you will find posts about other members experiences. HTH1 point
-
1 pointTurbo size may be different as well like a Golf GTi having a smaller IS20 (as used on the 245) compared to the Golf R and its bigger IS38 turbo allowing more power to be produced.1 point
-
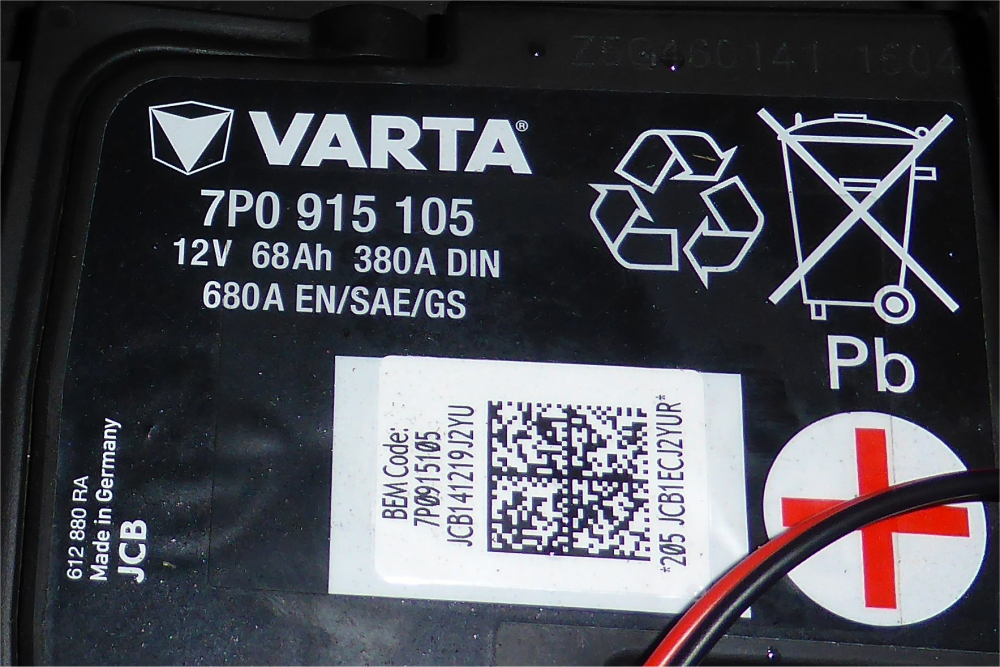
1 pointThat has nothing to do with coding the battery, if doing it without maintaining a charge the only things lost will be trip mileages and time, just needs time to be entered, there will be a few fault lights but they will clear within a couple of hundred yards. Has your battery got a BEM (Battery Energy Management) code on it?
 1 point
 -
1 pointI have had the Kodiaq for only two days and I too am beginning to think that the my Skoda app is completely useless. It looks like it was made by a novice programmer. I am also struggling with functionality problems and I realize that there are serious gaps in programming behind it, I have been a computer engineer for over 20 years and I know what I am talking about. The impression I got is that the entire Skoda Connect system is very precarious and poorly built. Too bad, because the car looks very well done, but the remote connectivity system is is truly to be forgotten.1 point
-
Agree with Colin on this as I've been to his house in our Karoq and despite its generous ground clearance decided that 2nd gear and 15mph was the MAXIMUM speed to take his giant local speed humps. Car just passed it's first MOT with no issues at 29,000 miles.1 point
-
Some discussions ongoing on various other forums and social media about Rainworth Skoda Mansfield. They have a tech who has developed a repair technique and they have a mockup cassette to show customers. Apparently proving very successful and now getting referrals from other dealers. Seats out, sunroof out, repair, refit and reseal. full electrics check for water ingress, carpets lifted and dry out, refit seats, 2x air fresher cycles. Around £14001 point
-
Aston Martin are as British as MINI, Bentley or Jaguar Land Rover so why is it anything to do with Boris?
 1 point
 -
1 pointI bought my original towbar from P. F. Jones the national suppliers and had it fitted to 2 previous Octavias as I said above. Yes each time the ECU/CAN required recoding after fitting and removal but not a problem. Having been informed by P. F. Jones that the same towbar will fit the Mk4 I retained it on changing the car and today received confirmation from them that they have sold several kits for the Mk4 with electrics and have had no adverse feedback. I have emailed my local specialist and await his response re his ability to re-code the car after fitting same. Incidentally the same towbar fits the Golf, Audi A4 & Seat Leon as well as the Octavia Hatch and Estate. If Skoda were to make it an issue then a whole swathe of industry will be committed to the scrap heap all around the world. It would make no sense in the long term.1 point
-
1 pointI would enjoy the new car and stop worrying about Skoda Connect/ My Skoda app, or whatever Skoda wants to call it this week. Even when it is working it’s pretty useless anyway, unless honking the horn and flashing the lights remotely floats yer boat1 point
-
1 pointI have a friend who works for Which.....I'm tempted to ask him if this is something they will investigate and highlight. I'm rather annoyed at this.1 point
-
Would be really nice to have something like this in the Golf GTI.
 1 point
 -
1 pointThis might be worth looking at - When I got my gearbox changed last year this exact scenario showed up on the test drive and turned out to be a loose connection on the gearbox speed sensor. Pushed it fully home and no bother since ! Might be worth a wee look .. Would the sensor have got disturbed while the flexi was being changed ? Just a random hat into the ring suggestion ..1 point
-
1 pointI'm with you on that Lee ! As a check you could just take off the plug to the motor and run 2 wires up to the battery - see which jet squirts. If its the rear then reverse your two wires and see if the front squirts. This will prove the motor out Was it a new motor you fitted ? A second hand one could have bits of crud playing havoc especially as we are now working with 15-20 year old cars !! If the motor checks out and does what its told every time then put a meter on the motor plug and see if you are getting +12v and -12v as you operate the front and rear wash - It dosent matter which is which as long as you get a direction change - But I doubt it will come to that in fairness. I cant see how the stalk would swap directions randomly ..! But I've been wrong before .... A strange one !1 point
-
That list ^ is also wrong with regard to 239mm brakes. Some mk1 1.2 64hp also got 239mm. I know because my partner owns one. Other mk1's with that engine also got 256mm, also not there. Why work with a list/site that's known to contain inaccurate info?1 point
-
1 pointWould have thought there was one.check the label on the inside of your owners manual. It should give codes for all fitted options. You can decifer the codes on several websites.1 point
-
The monte carlo trim wouldn't have made any difference to whether you had 256mm or 288mm brakes. The HP of the engine might have done. For example, the 1.2TSi 105HP has 288mm front brakes, but the 1.2TSi 86HP might have 256mm front brakes. It looks like wheel-size.com made a mistake on the MK2 1.2 petrol 105HP because they claim that 14" wheels will fit. I've added the MK2 1.2TSi 105HP to the 288mm front brakes list. I would have thought that the MK2 1.6TDi 105HP and the MK2 1.9TDi 105HP would have 288mm front brakes, but wheel-size.com again claim that 14" wheels will fit those models. 239mm Front Brakes Skoda Fabia MK1 1.0i 50HP Skoda Fabia MK1 1.2i 54HP 256mm Front Brakes Skoda Fabia MK2 1.2TSi 86HP Skoda Fabia MK2 1.6MPi 105HP Skoda Fabia MK2 1.2TDi 75HP Skoda Fabia MK2 1.4TDi 80HP Skoda Fabia MK2 1.6TDi 105HP Skoda Fabia MK2 1.9TDi 105HP Skoda Fabia MK3 1.0TSi 95HP Skoda Fabia MK3 1.2TSi 90HP 288mm Front Brakes Skoda Fabia MK1 1.9TDi 130HP Skoda Fabia MK2 1.2TSi 105HP Skoda Fabia MK2 1.4TSi 180HP Skoda Fabia MK3 1.0TSi 110HP Skoda Fabia MK3 1.2TSi 110HP Skoda Fabia MK3 1.4TDi 90HP Some of the above could be wrong because wheel-size.com often make mistakes.1 point
-
Kilen 65073 is sold to replace both the 1K0511115CS rear spring from the Octavia MK2 and the 5Q0511115AM rear spring from the Octavia MK3. Spidan 86501 is sold to replace 1K0511115CS Spring Design Coil spring with constant wire diameter Fitting Position Rear Axle Thickness 12,75 mm Length 382 mm Outer diameter 117 mm Weight 2,60 kg https://web.tecalliance.net/gkn/en/parts/1/86501/detail?query=1K0511115CS&numberType=1&oe=1K0511115CS&groups=188#@brc/search:Search%20by%20any%20number%201K0511115CS;mandator:gkn;query:1K0511115CS;groups:188;brands:1;pf:2;page:0/detail:86501;brandId:1;articleNo:86501;mandator:gkn;query:1K0511115CS;numberType:1;oe:1K0511115CS;groups:188 Spidan 87970 is sold to replace 5Q0511115AM Spring Design Coil spring with constant wire diameter Fitting Position Front Axle Thickness 12,75 mm Length 383 mm Outer diameter 117 mm Weight 2,60 kg https://web.tecalliance.net/gkn/en/parts/1/87970/detail?query=5Q0511115AM&numberType=1&oe=5Q0511115AM&groups=188#@brc/search:Search%20by%20any%20number%205Q0511115AM;mandator:gkn;query:5Q0511115AM;groups:188;brands:1;pf:2;page:0/detail:87970;brandId:1;articleNo:87970;mandator:gkn;query:5Q0511115AM;numberType:1;oe:5Q0511115AM;groups:188 So without realising it, it appears that Spidan have made two almost identical rear springs and are selling them under different model numbers. Aftermarket rear springs that are sold to replace 1K0511115CS are often a lot cheaper than aftermarket rear springs that are sold to replace 5Q0511115AM. With companies like autodoc, if you pay a little extra (about £3 or £4 last time I looked) autodoc will pay for the return postage to Germany on parts that you don't want. autodoc are charging about 60% more for the Sachs rear spring that is sold to replace 5Q0511115AM than the Sachs rear spring that is sold to replace 1K0511115CS. Hence, if these really are virtually identical rear springs, getting the MK2 rear spring could save about £40 on just the rear springs alone.1 point
-
1 pointWelcome. You do not say the cars age or mileage. There is no advantage of going to a Skoda Main Dealer over a VW Group Independent that will do the work and not just charge for doing it even if they do not. Personally i would not put my car to Kwik Fit even if they were paying me £100 to let them do the service.1 point
-
http://www.oemepc.com/skoda/part_single/catalog/sk/markt/CZ/modell/FAB/year/2005/drive_standart/453/hg_ug/941/subcategory/941000/part_id/2547532/lang/e#sec_14 https://www.ebay.co.uk/itm/AUDI-VW-Skoda-VAG-10-pin-connector-housing-plug-1J0973735-Headlight/253743177615?hash=item3b14459f8f:g:aokAAOSwUrJf9v4j1 point
-
When replacing a sensor that involves so much labour, I would be tempted to fit the very best available to reduce the likelihood of having to replace again. That cheapo part of ebay could be a false economy. 182000 miles in a 2015 car! Taxi?1 point
-
1 pointLast week i asked a driver of a e-Golf if she wanted to use the Rapid charger as i was just topping up while killing time and could unplug. She said she uses the fast charger in the next bay as it would put in a 100% charge but on the Rapid / 50kW charger the car stopped charging at 90%.1 point
-
1 pointI'm loving the automatic heated seat and steering wheel when it's cold.1 point
-
1 pointI tow a Hobby caravan (1500kg) with a 2.0 TDI 150 5 seater and don't even notice its on the hitch. Average 37.95mpg over a 12 month period mixture of towing caravan and normal. HTH1 point
-
I've attached a picture of the two plastic sheaths which need replacing and fit either side marked number 3 in the Alloy cast marked A.
 1 point
 -
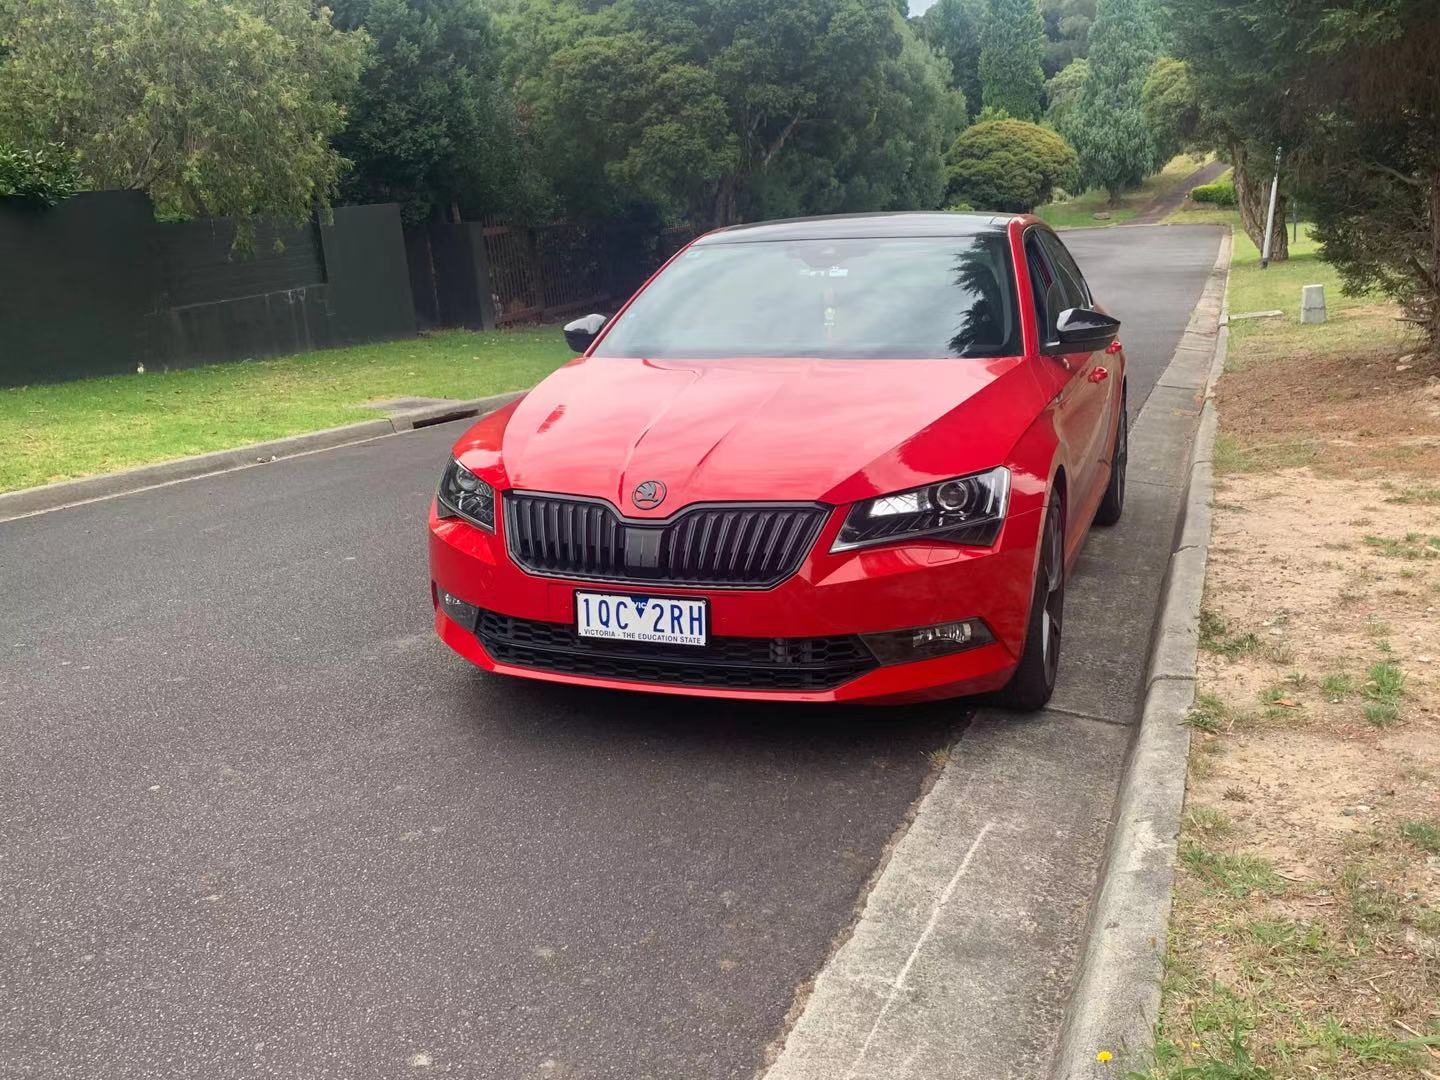
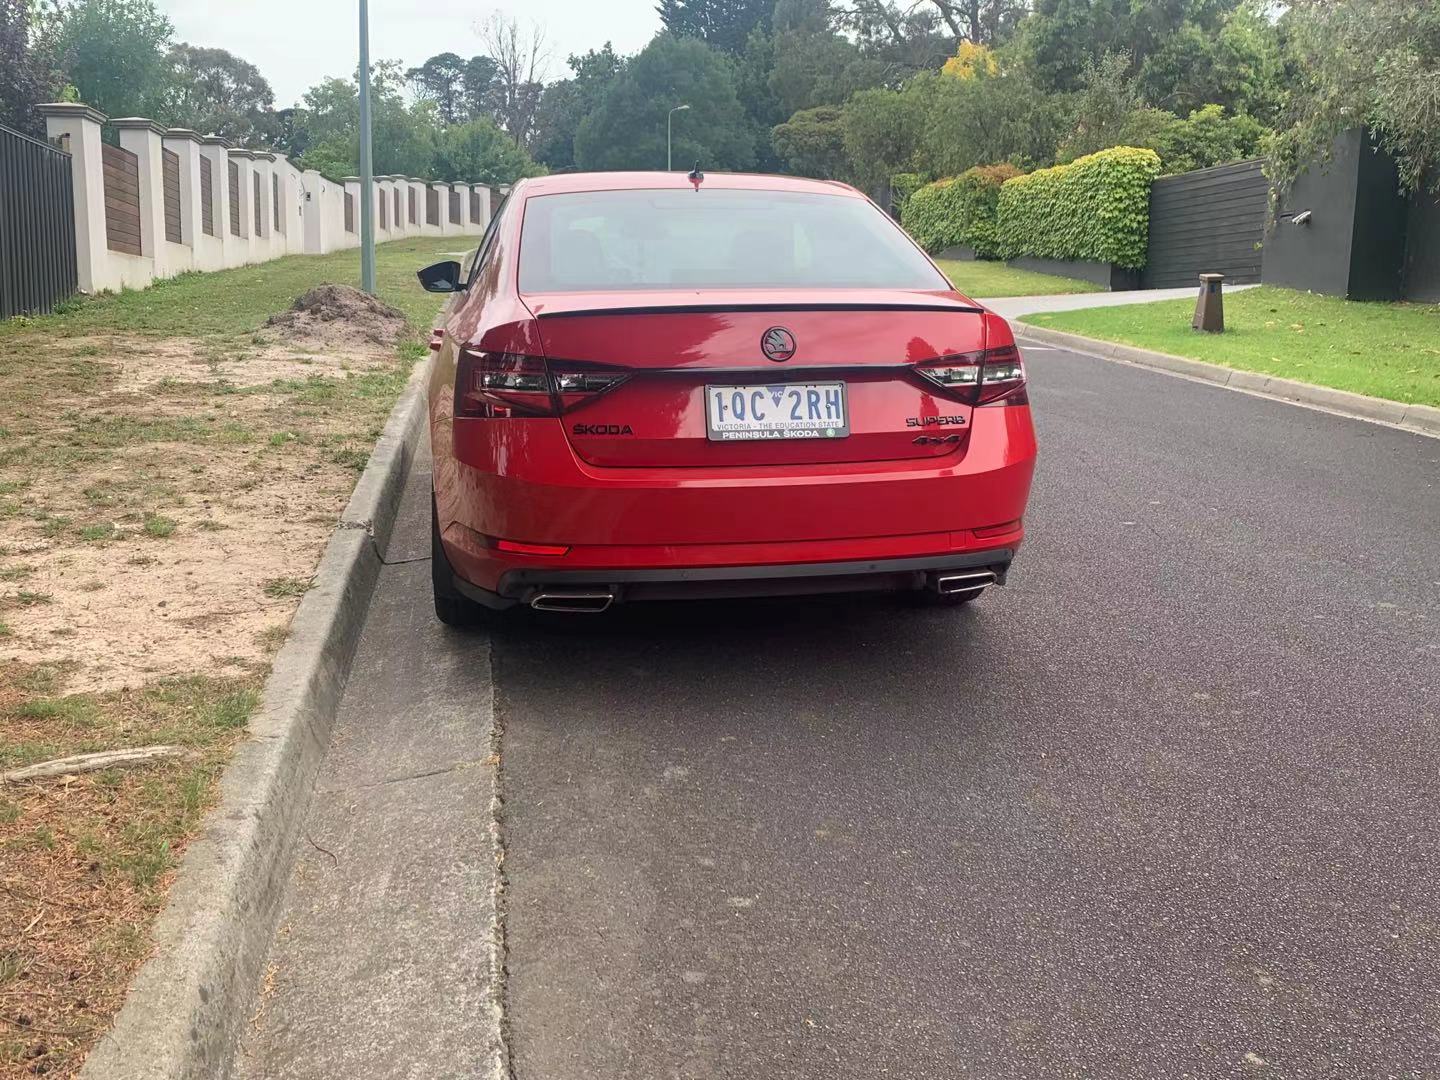
1 pointMade the most of a spell of half decent weather and ceramic coated the car and fitted mud flaps. Really pleased with this colour as I feared it maybe a bit ‘dull’
 1 point
 -
1 point
-
1 pointNeed some of those cute little wipers like Volvos had at one time... but on the inside!1 point
-
I live lower down, in Chesterfield. Only driven on suburban side road ice. I wouldn't fancy living up in Riber Castle, nice as the view is.1 point