


Leaderboard
-
Westbury63
Members21Points1,199Posts -
Lady Elanore
FREEDOM14Points24,874Posts -
shyVRS245
Locked12Points0Posts -
Colin170CR
FREEDOM9Points2,356Posts


Popular Content
Showing content with the highest reputation on 14/02/21 in Posts
-
2 pointsI joined here to ask a question about a different issue but I just wanted to say Wino, thank you. I had the ABS light on and was dreading the bill to replace the pump - £4 later a new fuse is in and the issue is sorted. You're a legend.2 points
-
2 pointsI bought a rear bumper guard for my VRS last year never arrived numerous e mails and no response to phone calls either2 points
-
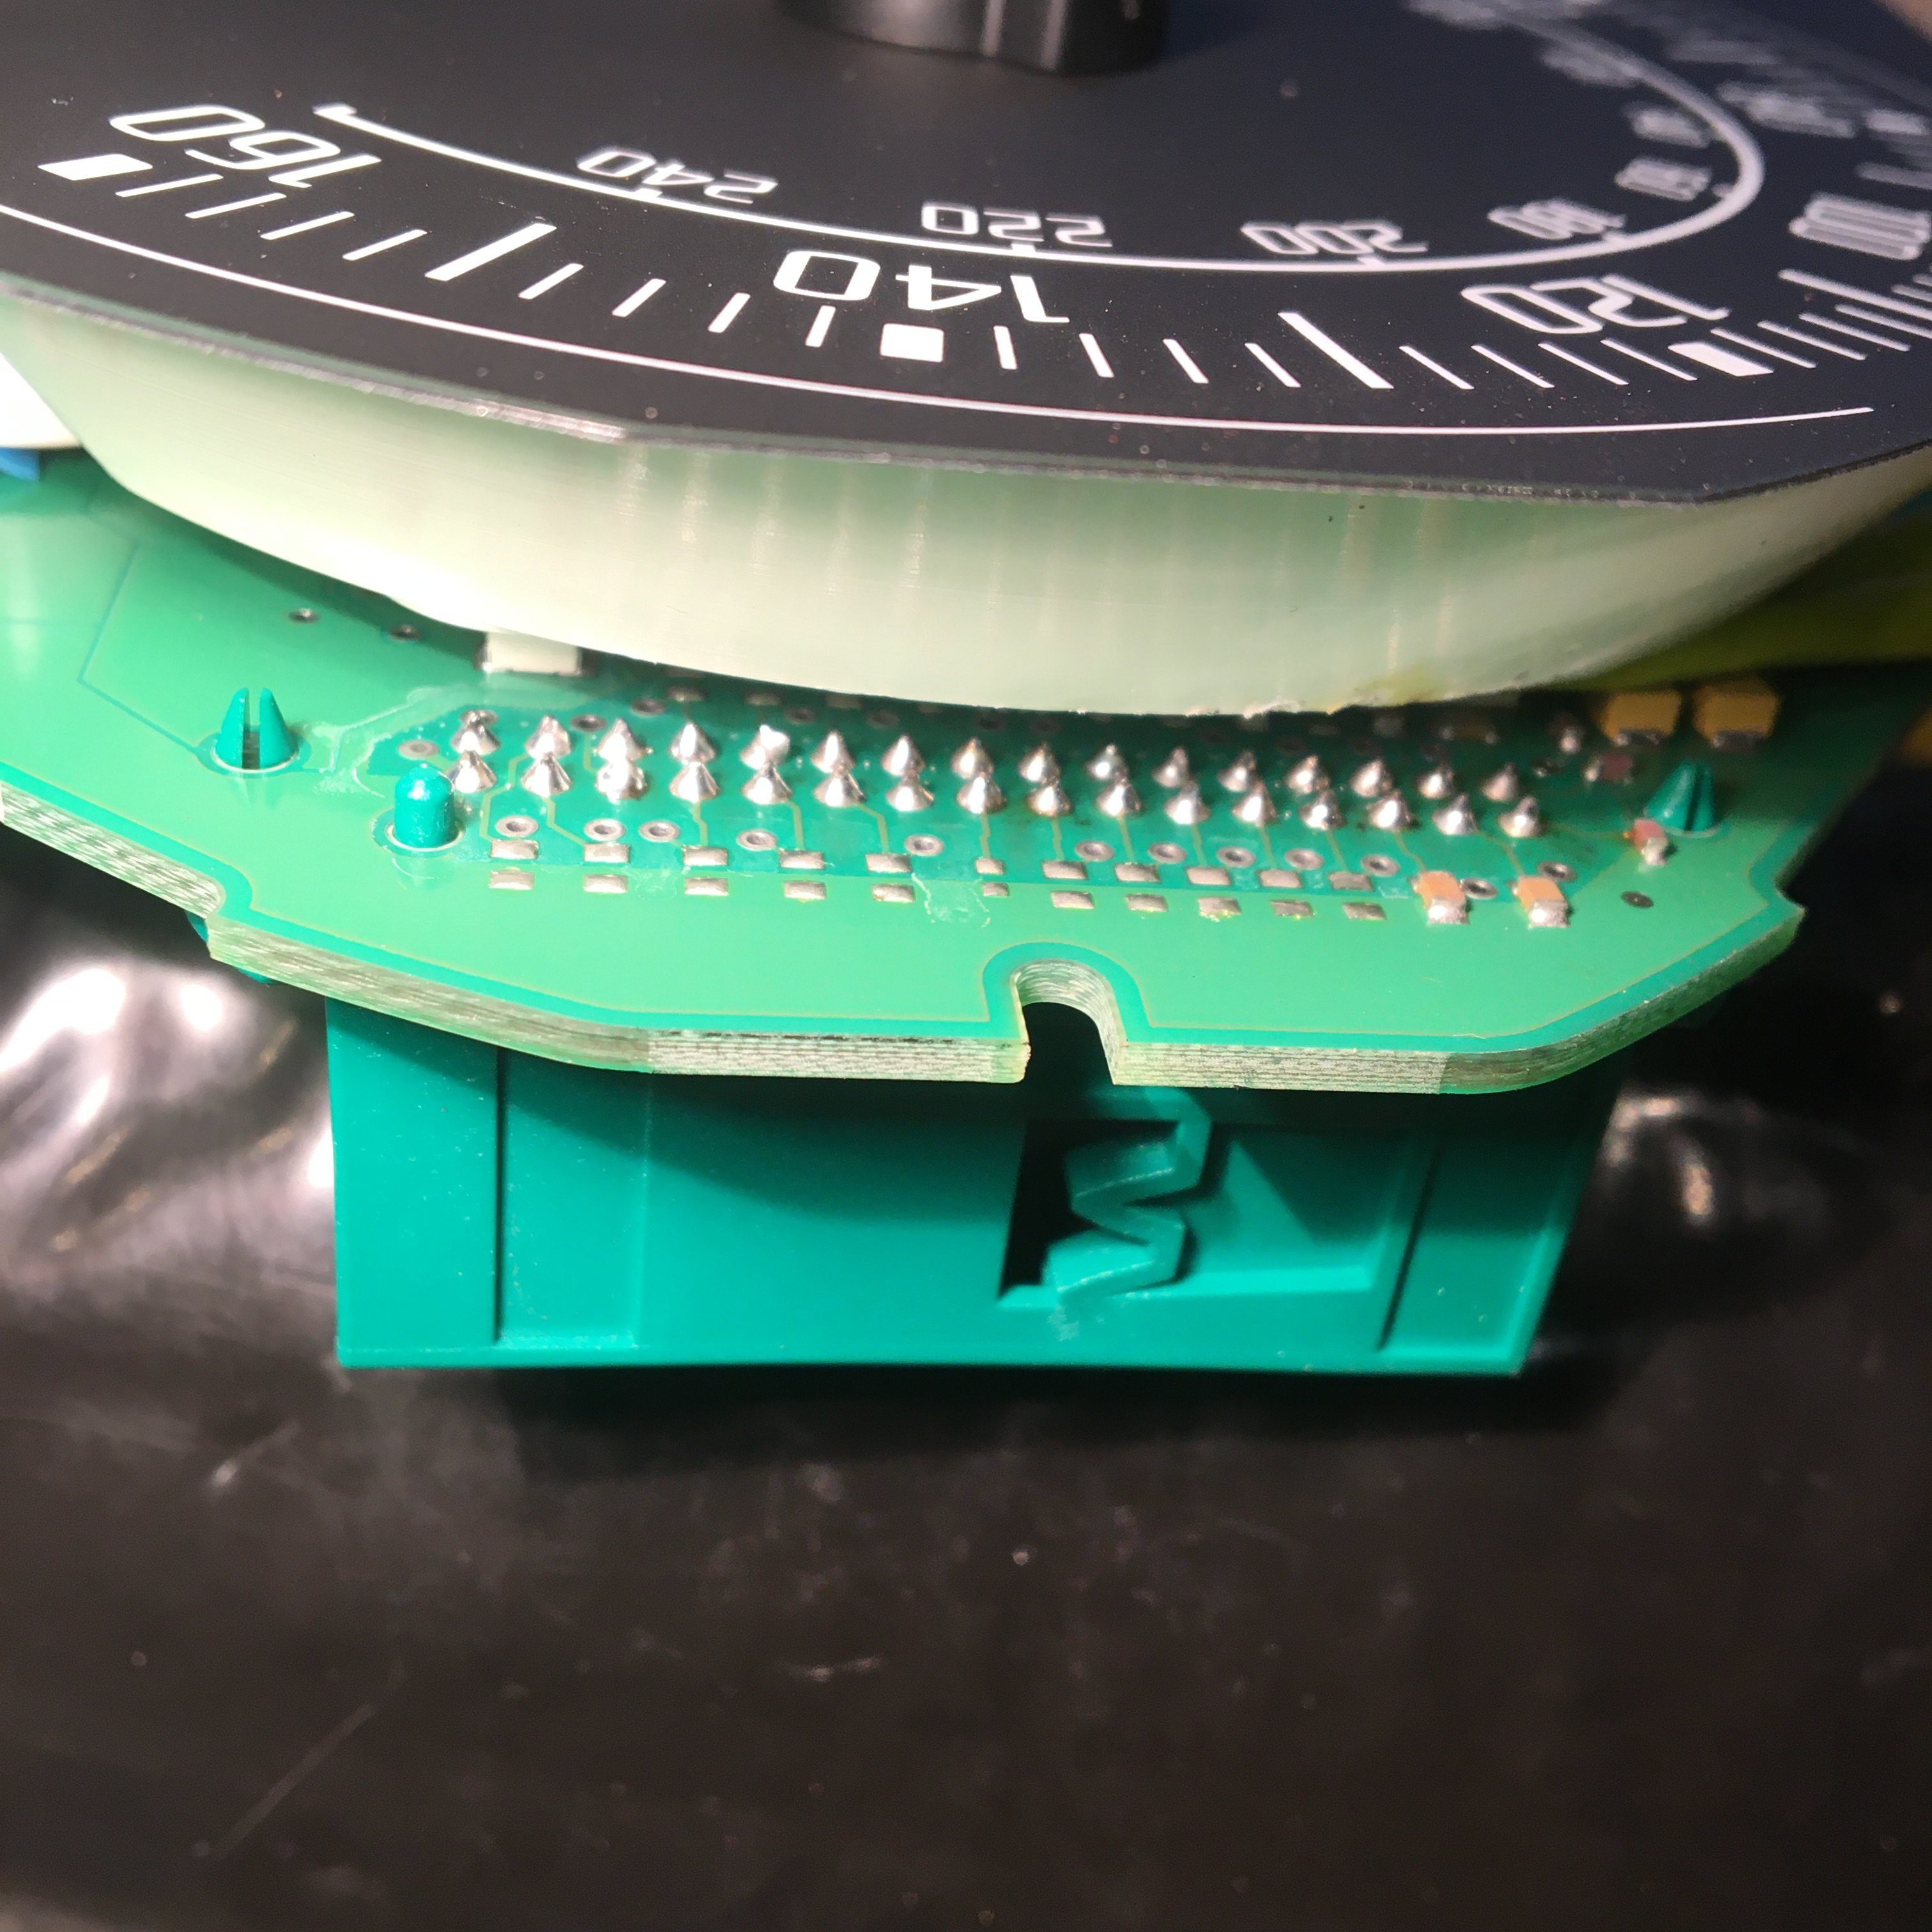
Whipped cluster out and reflowed all pins on both connectors - didn't take that long and just managed to get to all pins without removing needles/faceplate/LCD. All back together again now and lights up and starts fine, and will test drive tomorrow and see if the mystery fault returns (could still be a fault with power getting to the cluster rather than cluster itself). Thanks for the help Wino and Mrgf.
 2 points
 -
2 points
-
2 pointsThanks for replies but checked all fuses linked with washers front/rear and changed them but were not blown, using VW recommended screen wash now at 100% so covers down to minus 15c but today got fed up of trying to keep screen clear so bit the bullet and started step by step checking myself as dealers did not want to know and said would be around £180- £250 to fix in around 2-3 weeks time due to covid problems !!! time i understand but £250 to fix a washers pump that's taking the **** After a bit of testing with meter i found that the fuse connection for washers at the rear of the fuse box was hanging off it looked like it had never been pushed right into the fuse box from new and must have been making contact until the other day just happened to loose connection at that time strange but it does happen, i had to move fuse box down and then push the one side of the connection back into the box, i tried pulling it back out but it's solid and i then pushed the fuse in and it did not move then i tried the washers and hey pesto they stated working again total cost of repair one set of cold hands sorted2 points
-
1 point
-
1 point
-
1 pointI'm pretty sure my DSG ACC hands back control if it comes to a complete stop in traffic - it warns you to apply brake manually, then switches off after a couple of seconds. This is meant to be because of the manual hand brake in the Octavia, whereas models with EPB will apply it and then release & resume ACC after a complete stop of any duration. I wouldn't be surprised to learn that TJA will therefore require EPB.1 point
-
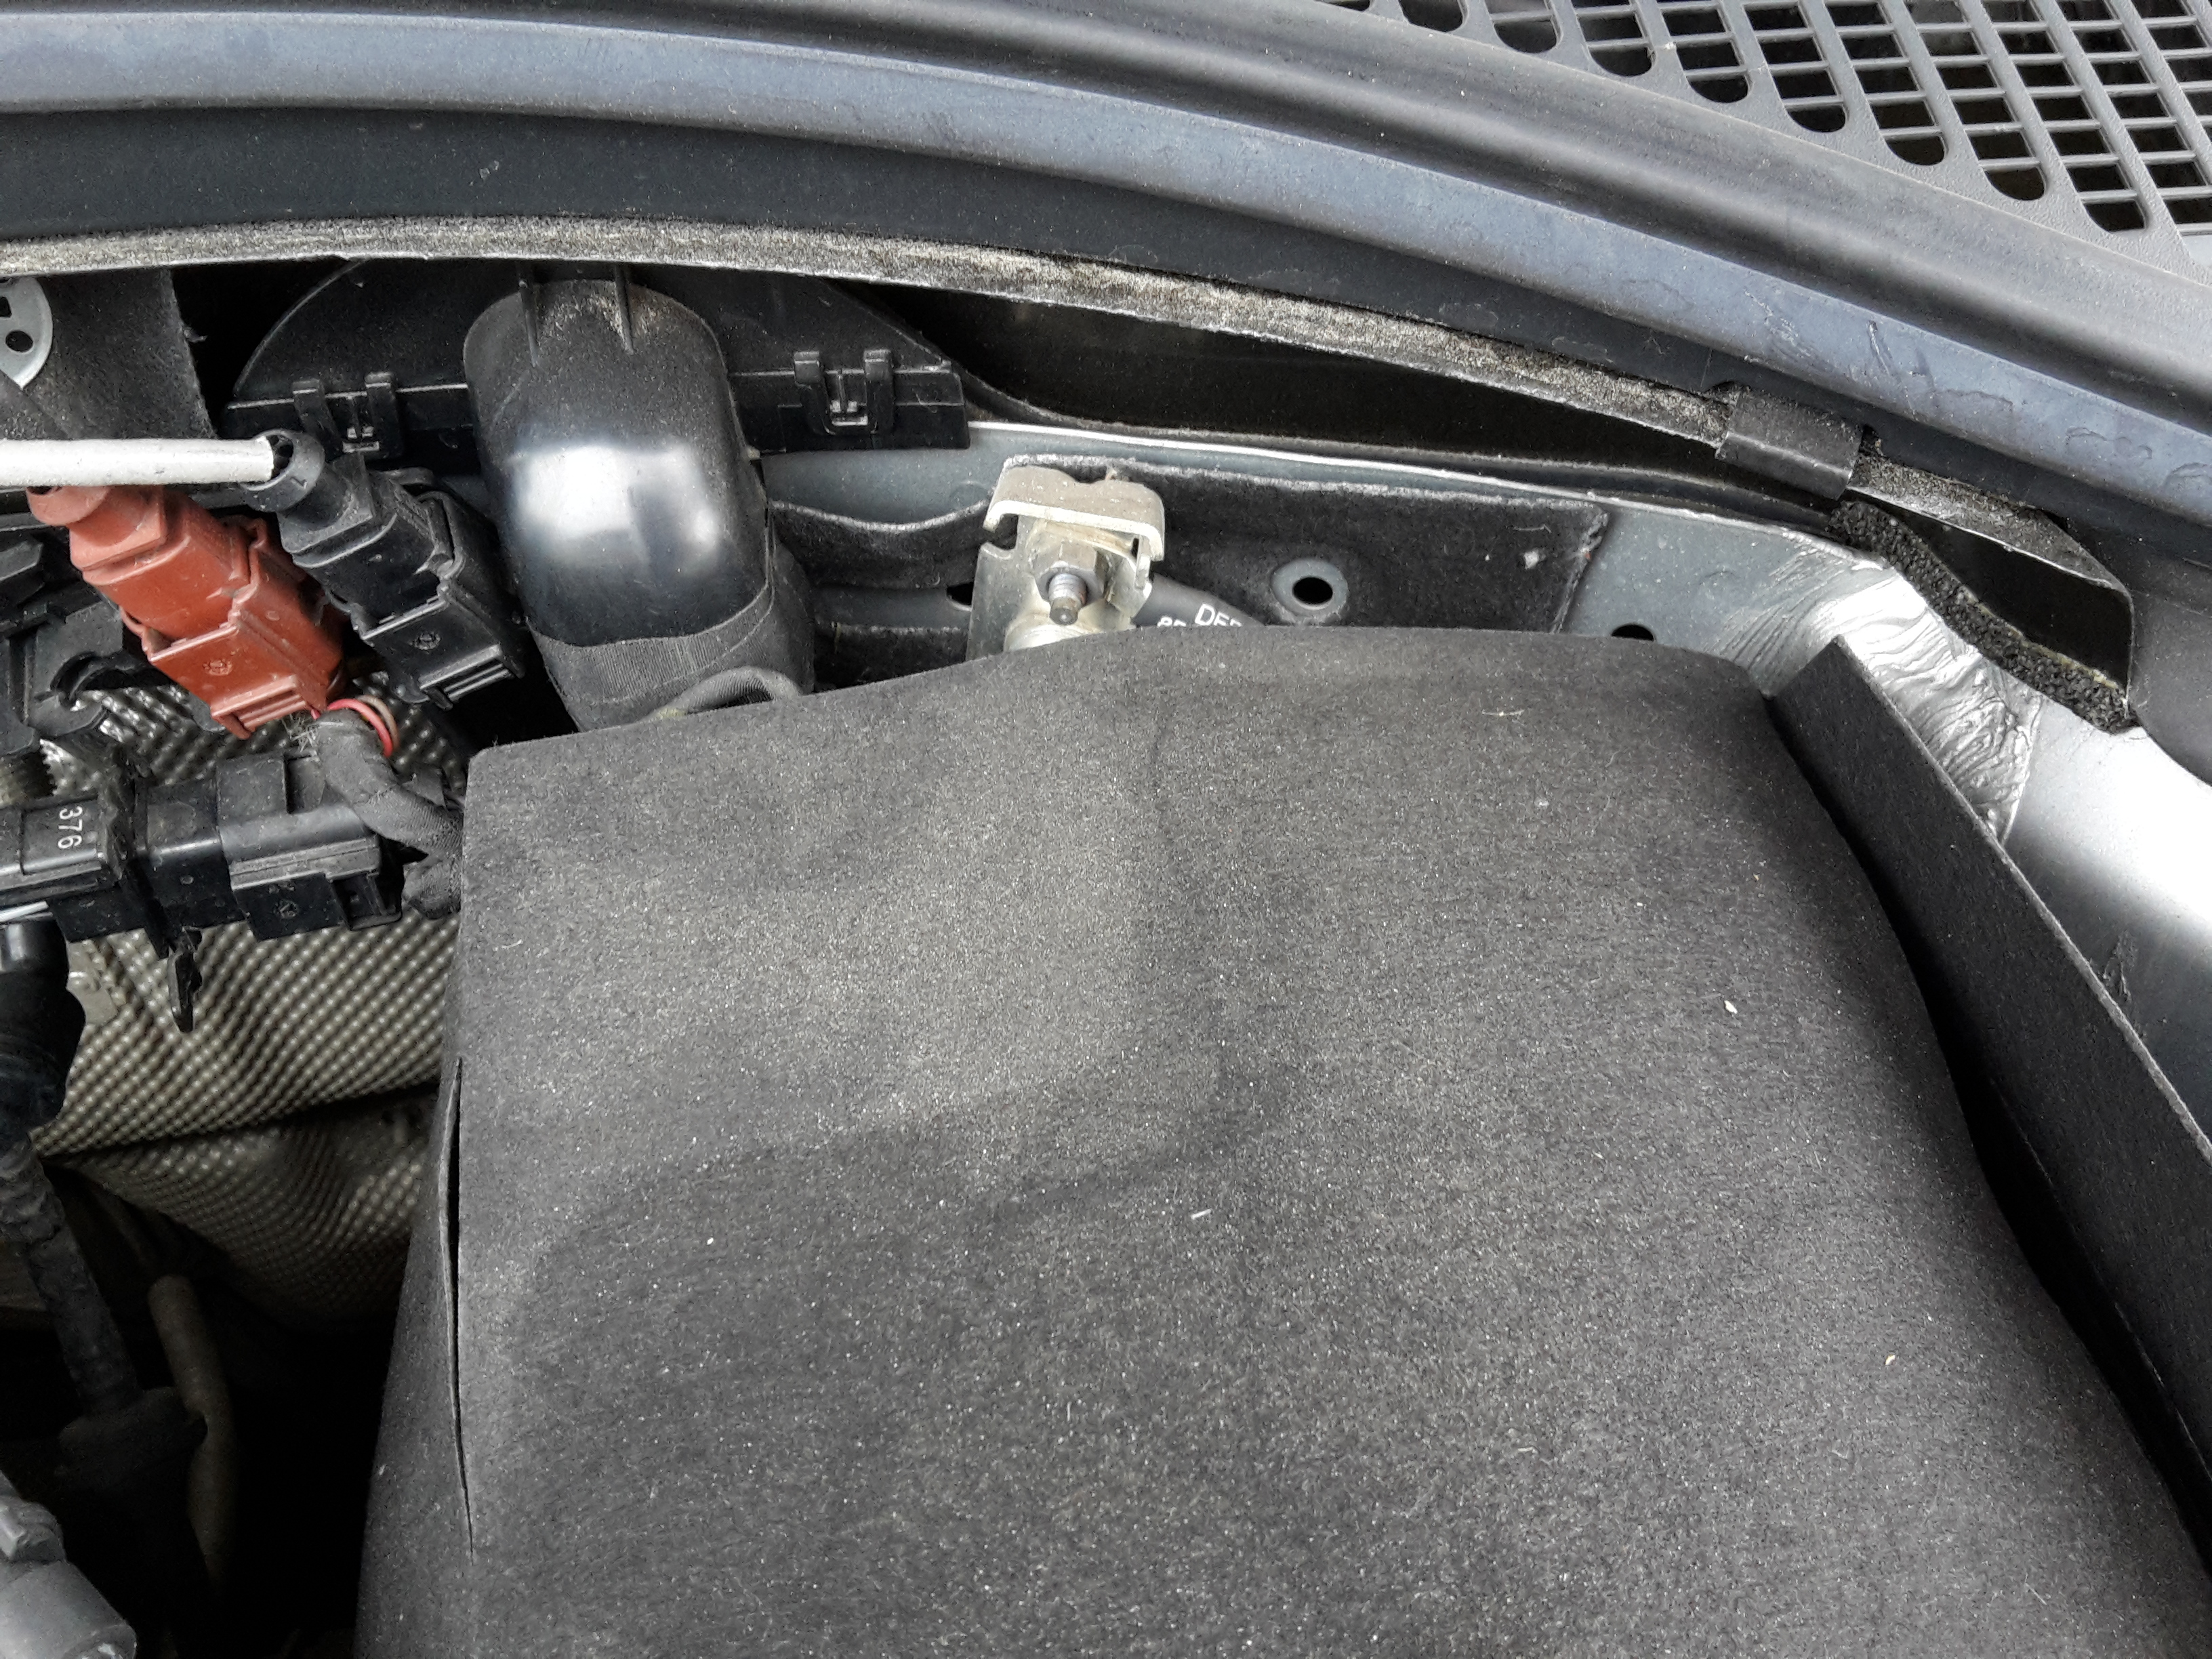
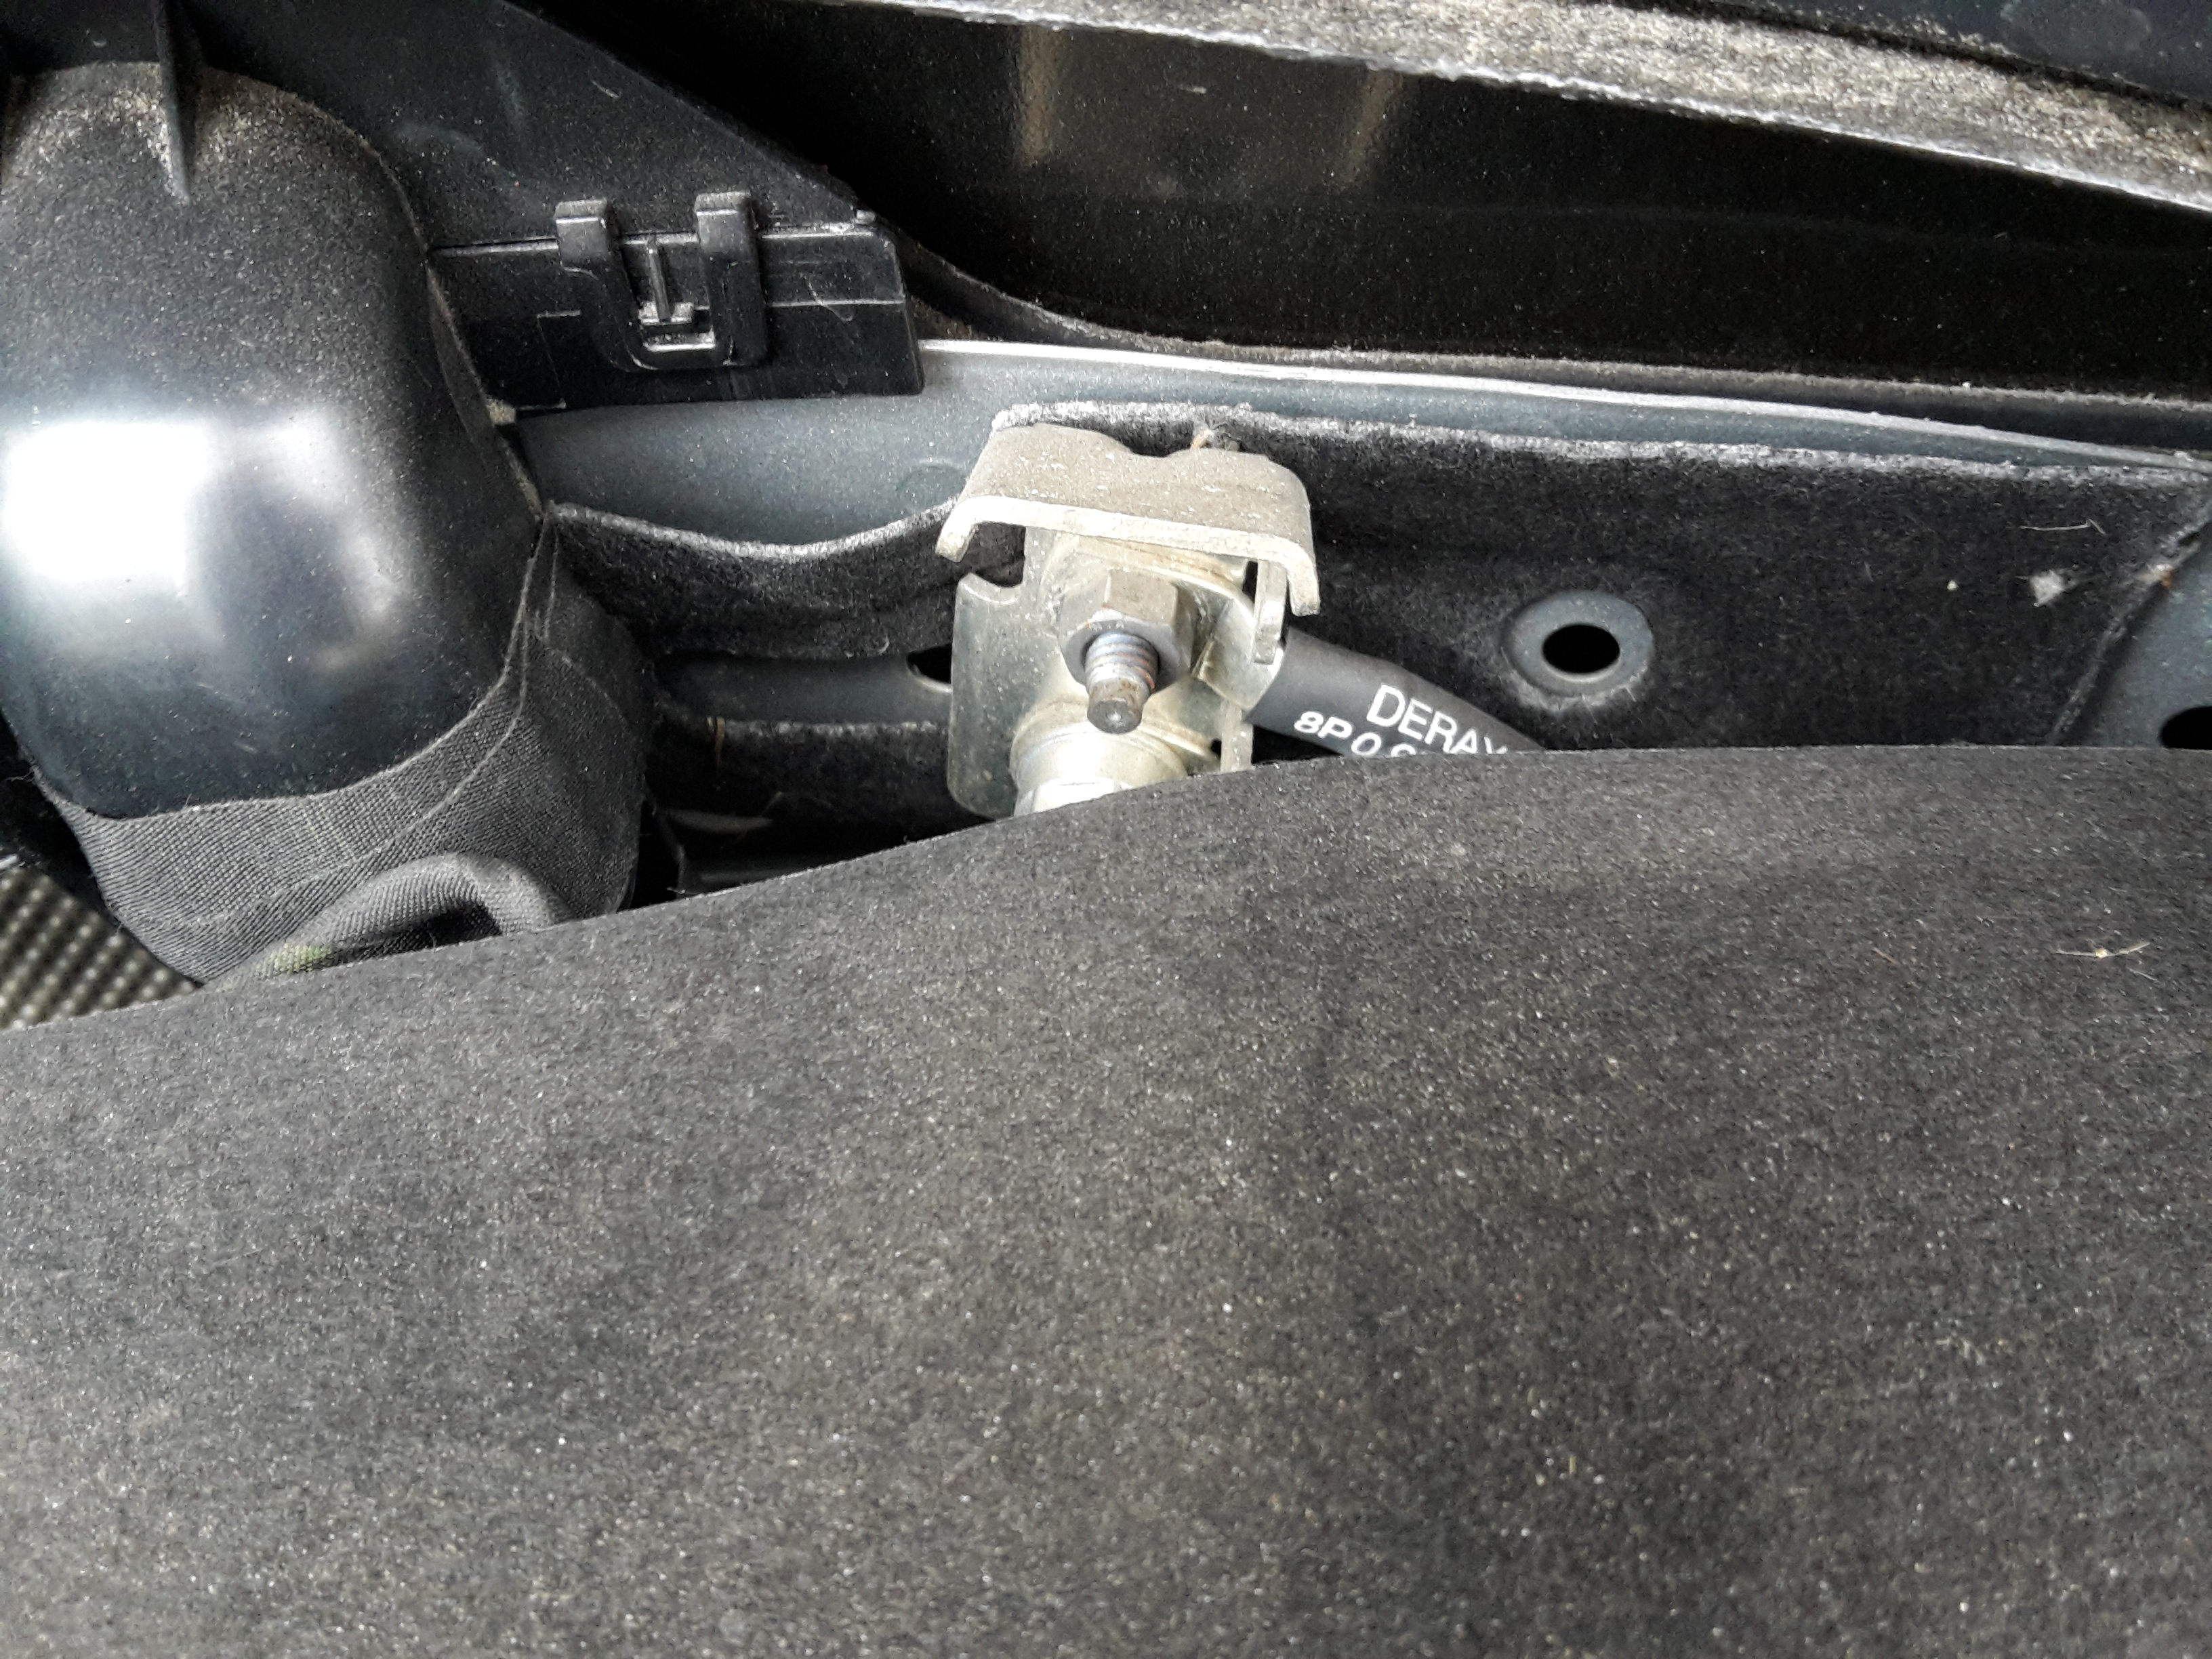
1 pointIf only I could blame her; but I'm pretty confident that the damage to the engine mount was caused by the hideous jerking of the engine at clutch engagement that featured in the car's recent history getting on for a year ago. That same problem with the clutch that was almost certainly due to my own clumsiness when changing the gearbox a year or whatever it was before that. Making mistakes is part of learning. Gotta book it in for MOT now, hopefully that won't bring any new dramas!1 point
-
1 pointIt'll remember indefinitely. Stored in a type of memory that doesn't get erased by power removal.1 point
-
Ah right I get ya. Thank you very much - I'll definitely get it checked out and report back. I guess it would make sense to be the thermostat considering there are no fault codes, like you say the car isnt faulty as such, its doing what its meant to. I do appreciate it a lot - Ive been reading loads trying to understand whats going on and didnt come across anything about thermostat. I'll get it checked out in the week, and also avoid driving until its resolved. Thank you very much1 point
-
1 point
-
@NikTheGeek will do as soon as I find it. We moved a couple of weeks ago and the house/garage is carnage right now.1 point
-
1 point
-
I am guessing that the static pressure was above the threshold to shut down but the high side was not increasing when the A/C was switched on, they were right not to recharge it. An educated guess would be failure of the N280 modulating valve, shear plate failure on the pulley or the central splines stripped on the pulley, all of those would result in no cooling but no fault codes with a correctly charged system.1 point
-
1 pointOh, I don't seem them as boasting at all. If I'd achieved those stats, I would be proud to keep posting them too!! Maybe I should start a thread for the number of units of alcohol consumed.1 point
-
1 pointI also think the EPB is necessary for TJA to work. Why? Because when the vehicle is stationary in a traffic jam TJA needs to be able to apply the 'parking' brake otherwise the car will either creep if left in gear with the clutch engaged or will roll if the clutch is disengaged, and hence needs the EPB.1 point
-
1 pointVW Group are near to only having cars with a 1.0 & 1.5 TSI with Mild Hybrid if they are going to have DSG. Maybe the 1.0 TSI in a Fabia will be the last to have a 1.0 TSI and DSG and no hybrid. It would be so easy for Skoda to produce a 1.0 TSI mild hybrid with DSG and at least give it some performance rather than continuing as they have with the 3rd generation with show without go, yet building Fabia AWD's R5's for campaigning in Rallying, and playing on motorsport history and success. A Suzuki Swift 1.2 can have AWD and a Swift Sport 1.4 mild hybrid 130ps which really puts Skoda's lame offering to shame.1 point
-
1 pointThis tires me out just thinking of it !! Fair play to you though, a lot of dedication.1 point
-
This again is a matter of perspective, you are creating positive relations with one brand (Skoda) while creating negative links with the other (Kia & some others). Think of it this way: When you buy the Stinger you are buying a car which had its' interior designed by the person behind the previous generation of Audi models, which were absolutely beautiful and the chassis and performance side developed by the man who was responsible for the best generation (argueably) of BMW M cars. In terms of pure driving performance it is head & shoulders above what Skoda offers in stock forms. I don't know what MY your Superb is, but I would say that the dash is on par with most versions of the Superb mk 3, unless you had the virtual cockpit + most up-to-date center screen. The virtual cockpit is obviously something that will be hard to beat in terms of functionality. Go drive the few cars you've been thinking of and don't rush into making a decision.1 point
-
1 pointMight be worth adding a link to where you bought it. Is it lowline or highline? A VCDS autoscan would be helpful1 point
-
1 pointI sorted my problem it was less mix in the washer bottle causing things to freeze up and something was stuck in the rear washer jet nozzle now its way better the water gets right to the top and i checked all the connections they was fine but the one inside and near the rear wiper i put shrink tube on so they don't come off the only ones that can come off are the ones that are in the engine bay and under washer bottle but they are easliy accessible so don't need to worry about ripping the plastics off Thanks for your advice1 point
-
1 pointI dont talk to Laura , we had a fall out over my hands are cold1 point
-
1 pointYes it did have the screen/filter cleaned as well.. I work for a company that has Skoda franchise in its business's so they guys look after the car properly when it comes to the basics. They have all the correct tools and at staff rates its affordable also. Leaves me a bit extra to do other things.1 point
-
That seems to be the suggestion on various forums. I have engine code DKTB in my September 19 registered Challenge and cannot definitively say that is the case from ETKA as the intake manifold options refer to PR codes rather than engine codes, but there are certainly two diagrams available - one showing port injectors, one without. I'll try to remember to have a look under the bonnet to confirm. However, on the Superb 272 forum, there is indication that Gen3 EA888 is not so badly affected as the Gen2, potentially because EGR is no longer used. EDIT: I did clean my 2010 Gen2 EA888 valves myself when doing a waterpump change at around 50,000 miles. it was a bit of a faff but not too bad. If the problem is reduced in Gen3, I'm not too concerned - at worst it's likely to be a one off service requirement, if I keep the car for more than 6 years.1 point
-
1 pointOK so your not making a fair comparison, as the ID.4 First Edition in the UK has the 80Kwh battery. Compare the Enyaq 80 with it. ID.4 First Edition has 125Kw charging as standard. I was interested in how you arrived at your conclusion in case I had overlooked something, but I'm not interested in Enyaq 60.1 point
-
1 pointHm, I am not an expert, but I think the electromechanical parking brake might be a requirement for this. I would be glad to have those systems in my car as well, but I have an experience just from the vehicles equipped with EPB.1 point
-
Your point was very clear. Best to just ignore the facetious comments until someone helpful answers you.1 point
-
Thanks for the reply's. I have checked the voltage of the battery this morning and it is showing only 12.1 volts which is only about 50% power so this is low for this battery. I think this is what the problem is. I will charge the battery up and see it that solves the problem. Thanks again1 point
-
The removal of the service history seems to be deliberate, it is not available as a paid extra. I have emailed support on two occasions, they just say they have referred the query on and I never get a further response. The developers responses to the (poor) reviews on the apple store say "by the end of this year (2021) we plan to introduce a new service which will also contain the history of service visits" so don't hold you breath, all in all pretty disappointing when the old app did all of this and more.1 point
-
1 pointOctavia's don't really hold their value very well even under normal circumstances, there are plenty of standard models available for sale at low prices from the likes of Arnold Clarks which will mainly be ex hire or company cars. Not so many VRS models around though, which should help if/when you want to sell yours. Part of the issue is that Skoda and the rest of the large car companies like to charge different customers different prices for exactly the same cars. You'll pay the highest price as an ordinary, hard working person walking into a showroom. If you are NHS, Police etc as a profession, they'll offer you even more off the price, even if you are a high earning GP or Consultant! Large hire companies then hoover up thousands of cars at really low prices per car and it is these cars which are then dumped back onto the marketplace for sale again, still at really low prices with warranty remaining and not very high mileage via the likes of Arnold Clark. This business model keeps the factories busy but really doesn't help ordinary buyers.1 point
-
1 point
-
I picked it up yesterday in fact. Ludicrous is the word for it. Reached 140mph and was still climbing albeit slowly by that point, 2nd and 3rd are just silly fast. Think the 1.4 turbo is fast? This effer just pulls, and pulls, right to and beyond redline.. it's like nothing i've driven before, when that lil turbo kicks in hold on tight! Overtaking is easy as pi$$ now, BMW 118i was upset that i came up behind him quickly doing 60 in a 60, he was doing 45, and at the next straight bit of road he planted it, only to get left behind by a wee 1.2tsi fabia 😂😂1 point
-
I would go for the 1.4TSI. The distance and terrain will mean a lot of gear changes and higher revs. I have the DSG on a 67 plate and couldn’t be happier. It’s damn quick off the mark too.1 point
-
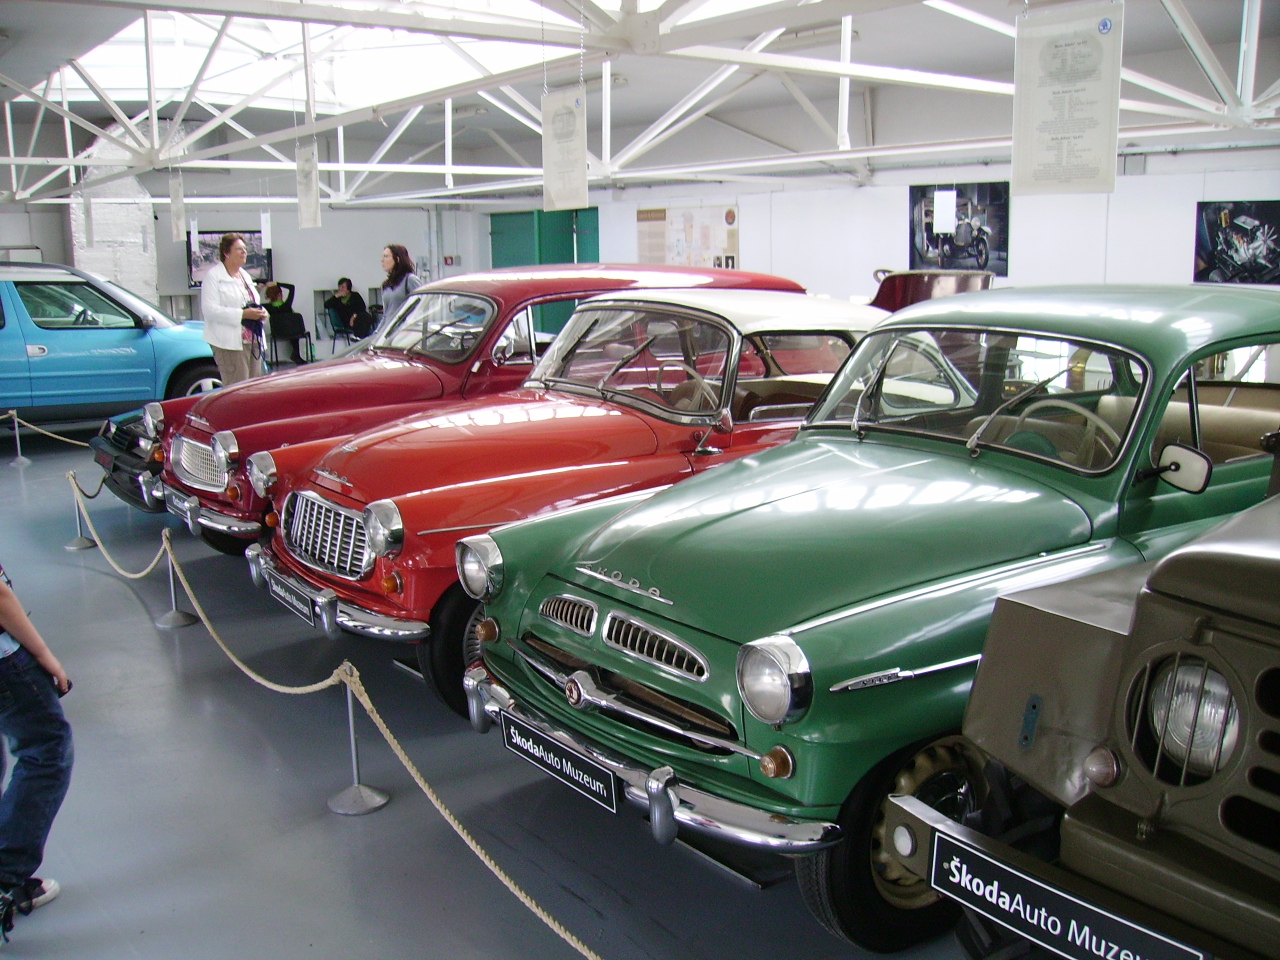
The all-wheel drive Octavia Scout: an excellent 4x4 VIDEO TEST OF SKODA OCTAVIA SCOUT
.thumb.jpg.ef42fefec8d78053a417faa771065700.jpg) 1 point
1 point -
Press the starter button with the key itself. There's an RFID module in the button and the key that only work when realllly close. Had to do this myself after getting stuck at work when the key fob battery died. Recommend getting a new pack of Duracell CR2025's off Amazon, they're generally really good. Always had issues with other brands arriving already dead or just die within a few days.1 point
-
That’s a really good news 😁 thanks for it I can find it in Hungary also and save the shipping, but thanks anyway, appreciate it Not interested, you can jump on it 😁1 point
-
1 pointFrom what I've read and been told, it's faster, it's worth getting if you need a new drive, but unless you're a very heavy user or really really want to shave 5 seconds off your windows boot time, it's not worth spending loads of money on. I plan to get one as I need more storage anyway but that's the only reason. The change from hdd to sata ssd was way more needed/noticable by the average user I believe.1 point
-
There are 3 'versions' of the Mk3 vRS with a 245bhp drivetrain. Chronologically, the first is the 'vRS 245', which launched in the summer of 2017 and was a special edition vehicle (with standard fit optional extras) that sat as the range topper above the regular vRS with 230bhp. The following year, the 230bhp drivetrain was discontinued and the regular vRS received the 245bhp drivetrain - this also often gets referred to as a '245' so as to distinguish it from the earlier 230bhp cars. This was shortly followed by a new range topper, the '245 Challenge Edition' which was very similar to the original 'special edition' 245 with some standard fit extras. You'll find the original version mostly on 67 and 18 plates, with a handful of 17 plates (and possibly a few 68 plates). The specification of these cars added the equipment listed below (compared to the 230bhp vRS of the same period): (Also not mentioned above, Performance Dials available in the infotainment system for boost, oil temp, power etc.) The gloss black 19" wheels and tail pipes are one of the most obvious visual clues that a car is a 'special edition', along with badges that have a black V rather than a grey V, albeit as the years go on more and more will be getting modified, so this method of identification can't be relied upon. Things that all 245s got regardless of the year or version are the VAQ electro-mechanical diff and the updated 7 speed DSG. The 245 Challenge edition gets much the same list of added extras but also includes Dynamic Chassis Control (DCC) and KESSY. Hopefully that helps work through what is quite a confusing timeline.
 1 point
 -
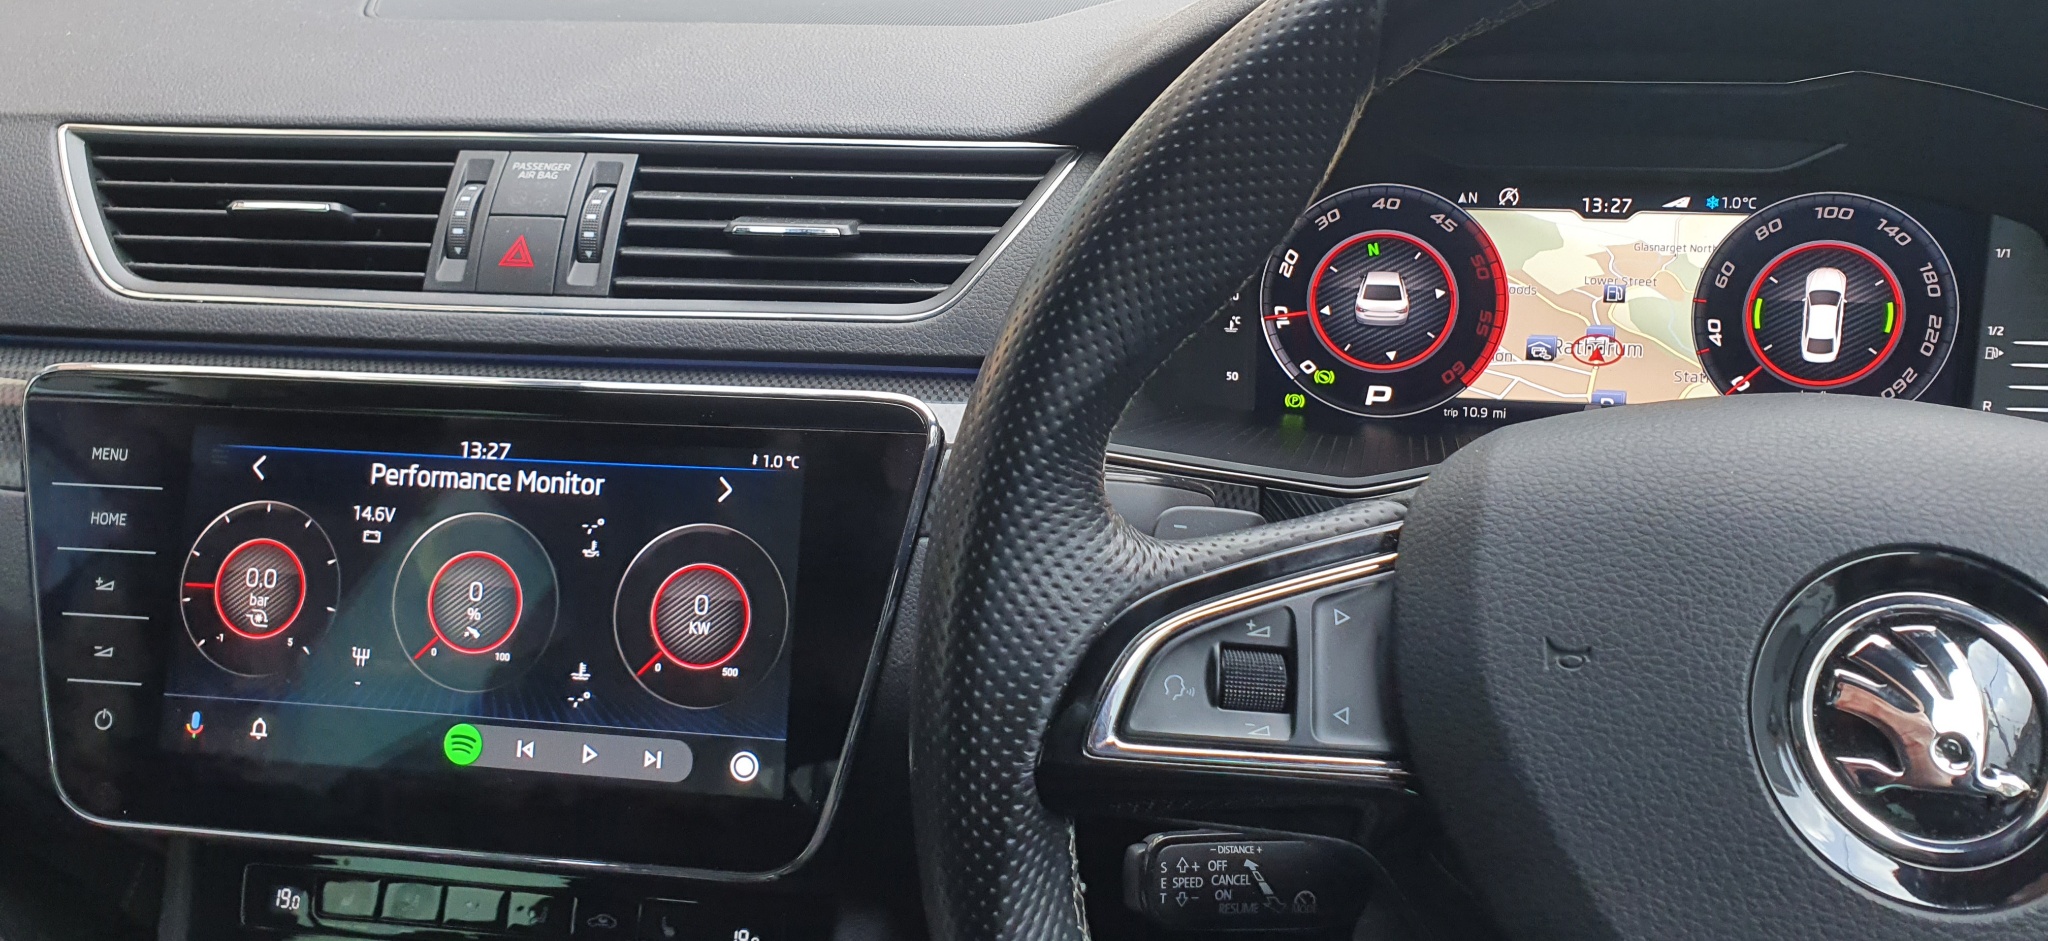
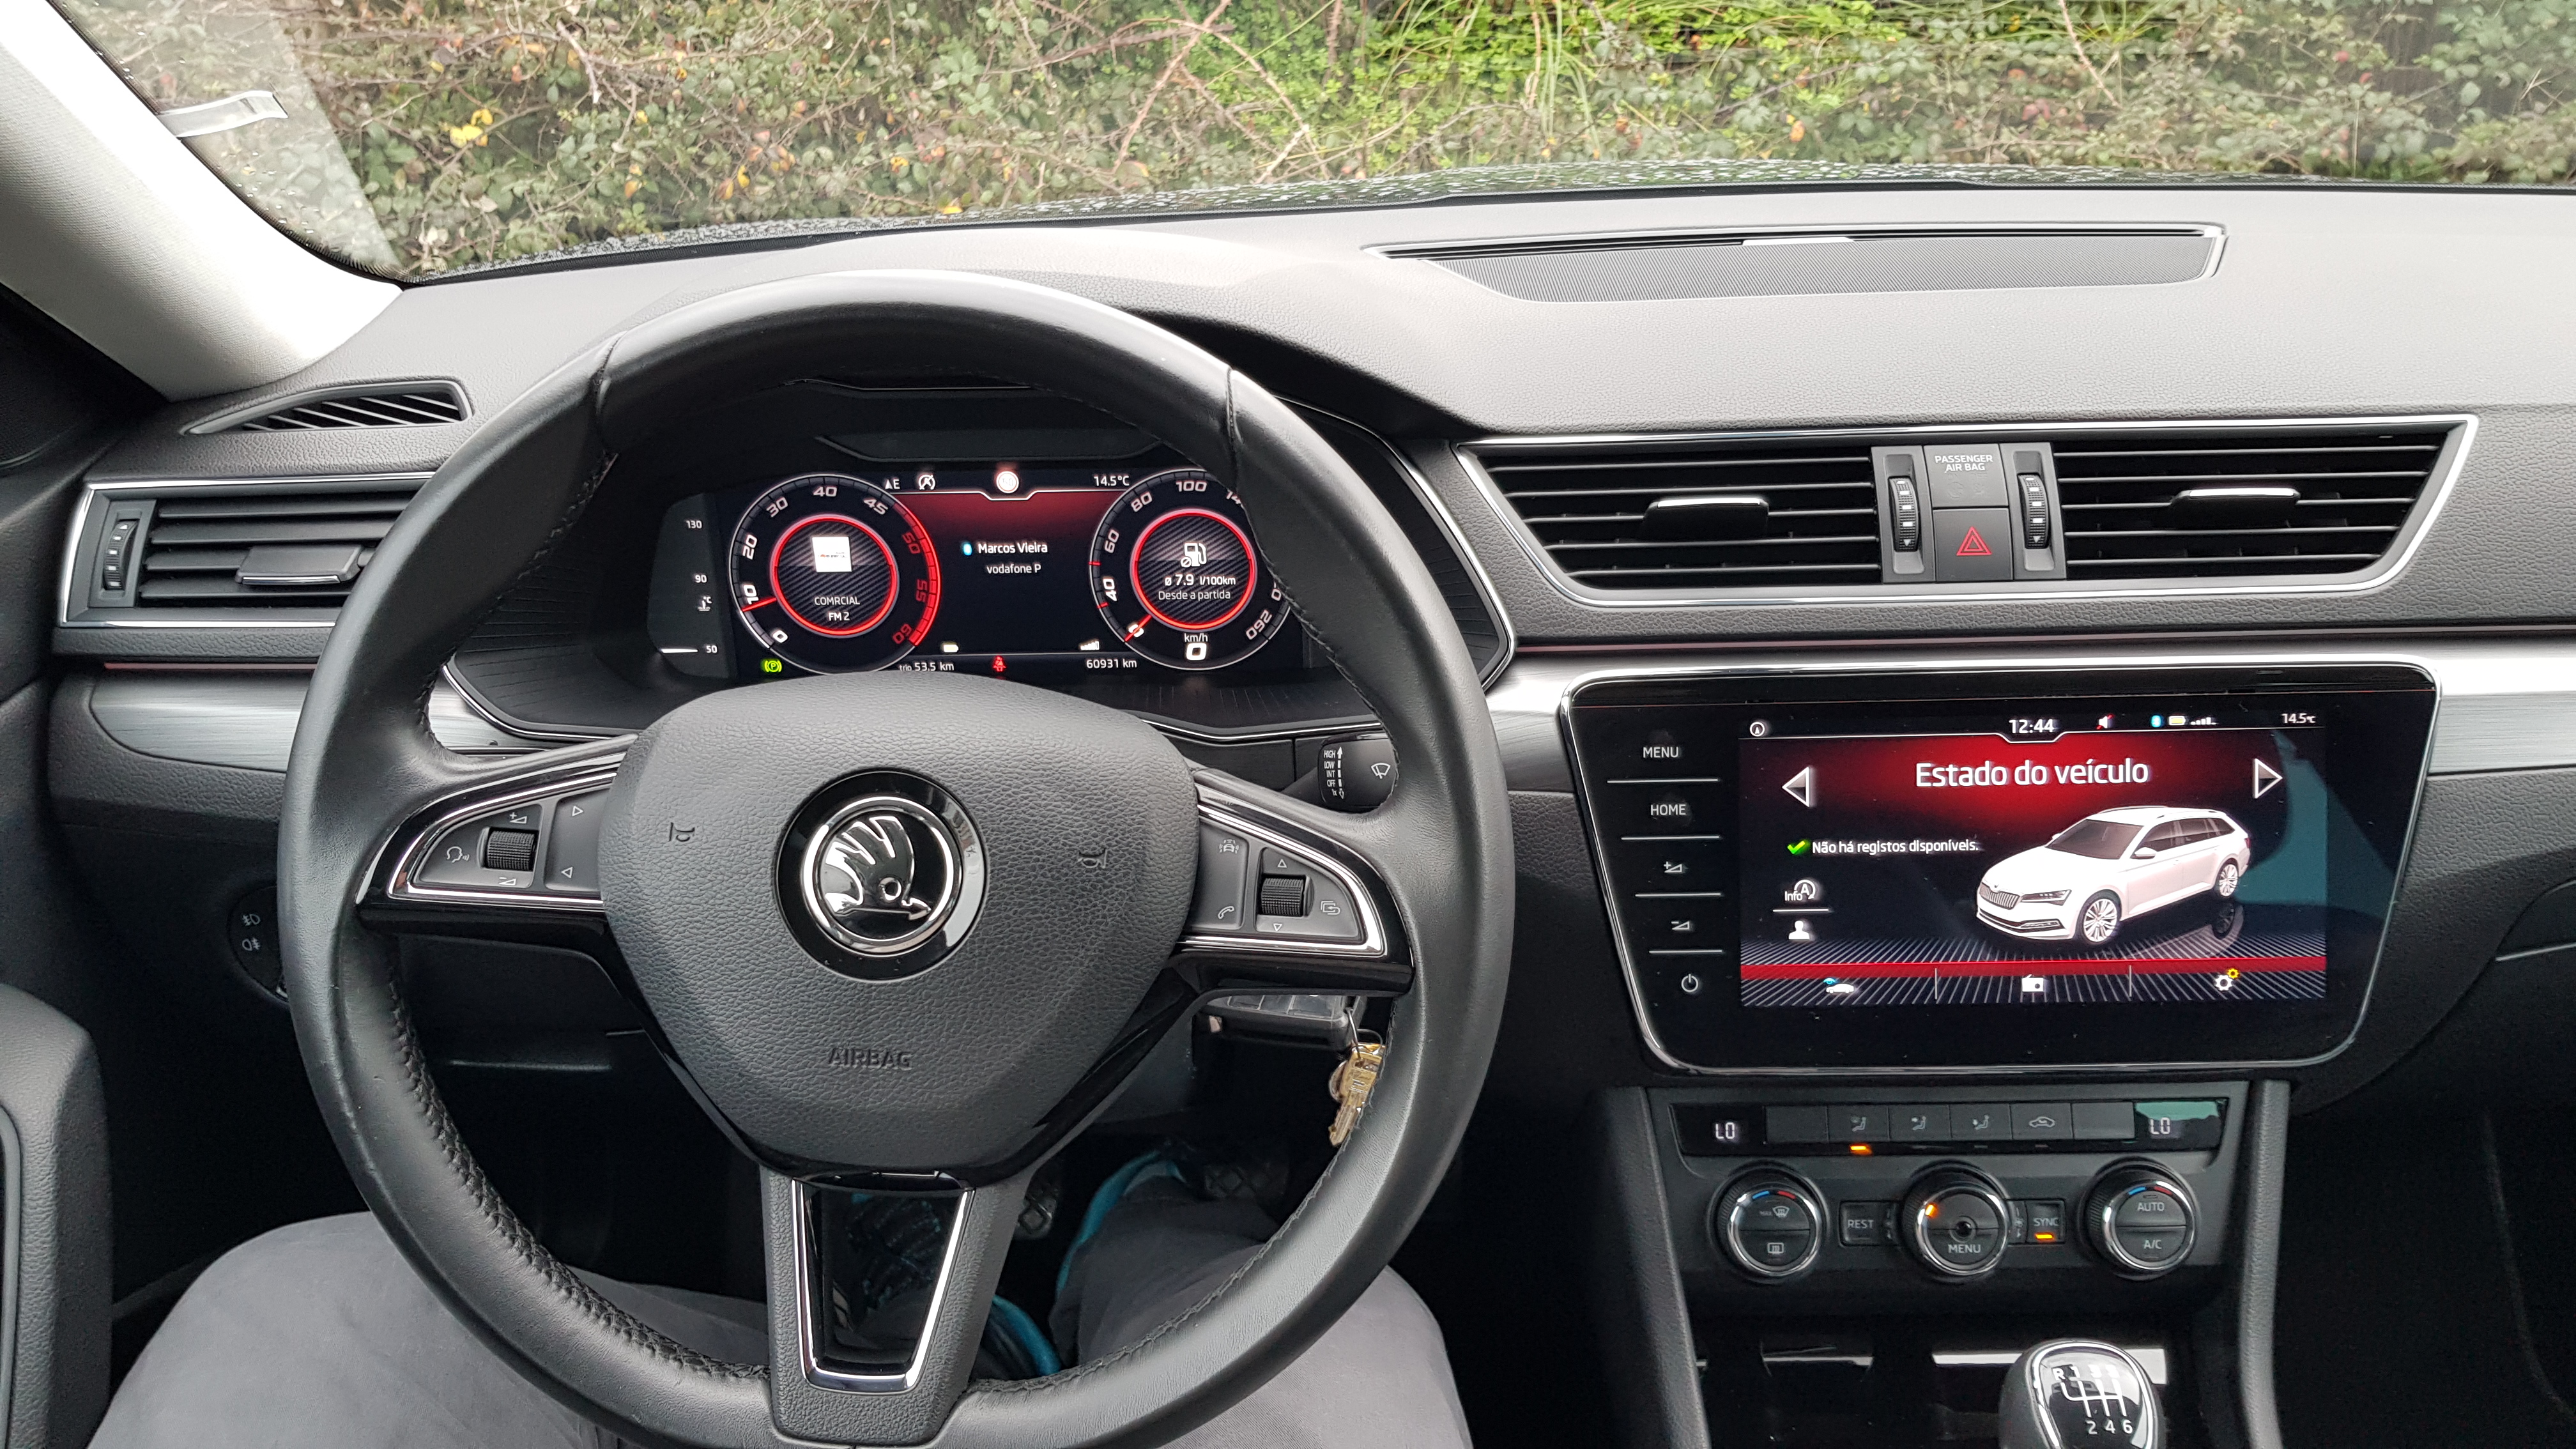
1 pointAfter a bit of hoop jumping (and help from here) the virtual cockpit retrofit is done and all working. RS theme on the VC and Android Auto Performance Monitor ties together nicely
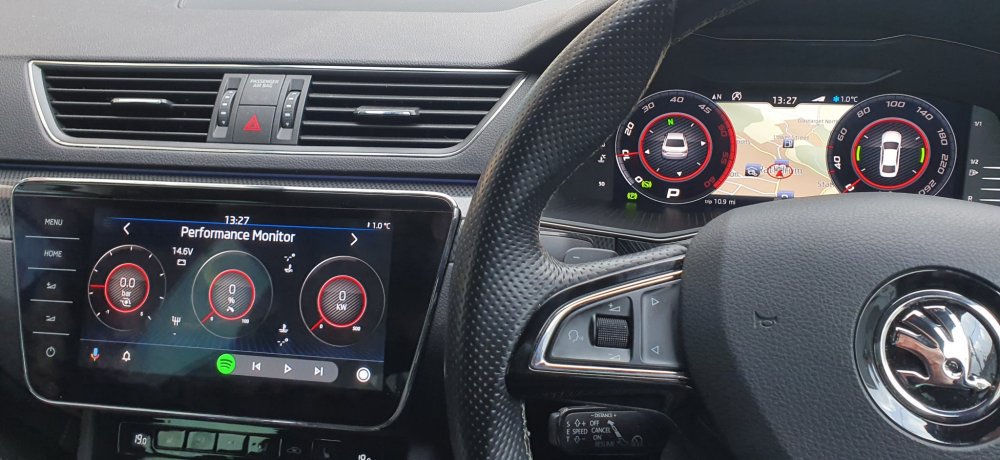 1 point
 -
1 point
-
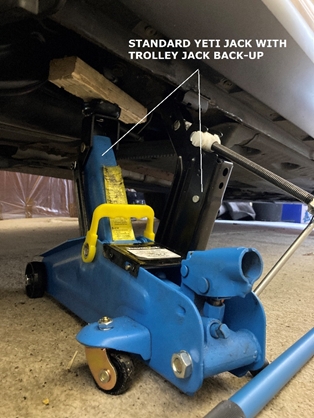
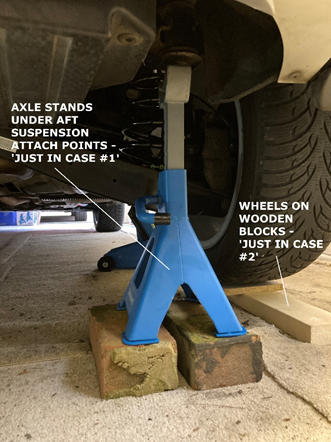
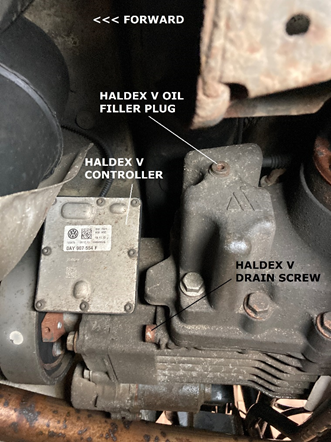
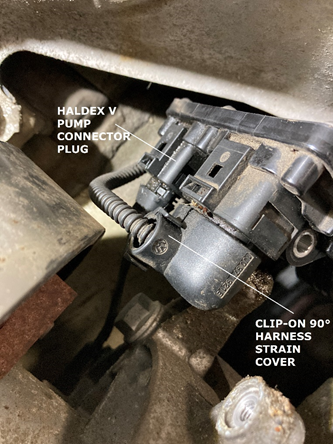
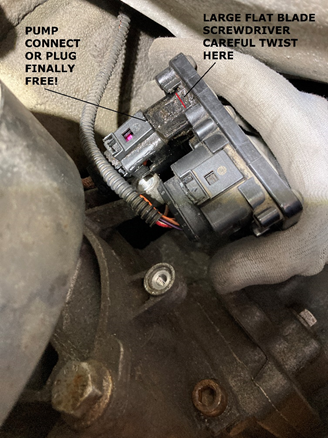
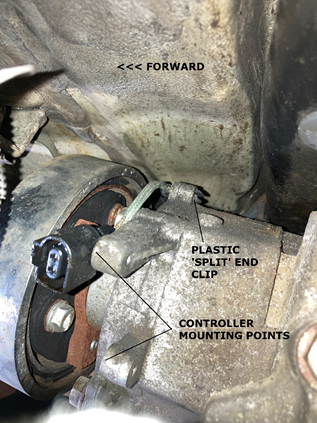
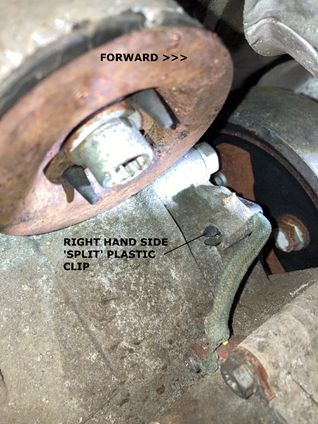
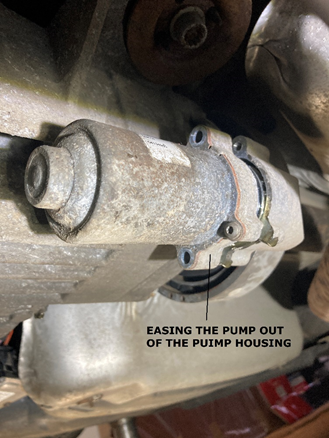
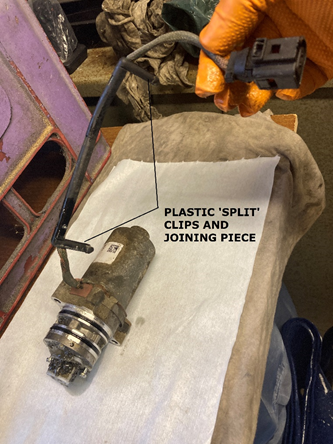
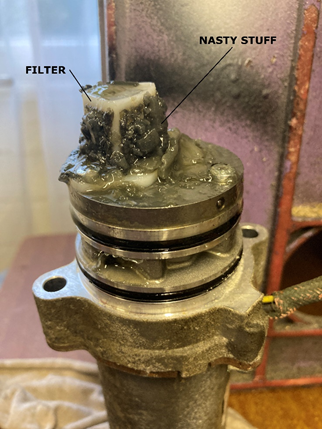
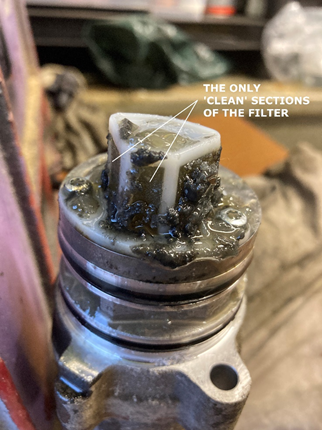
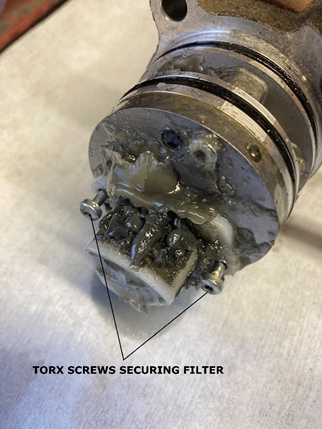
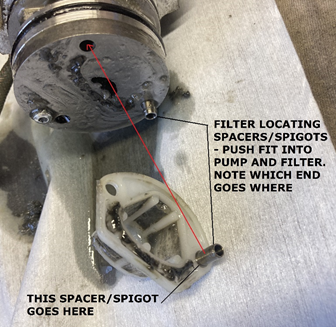
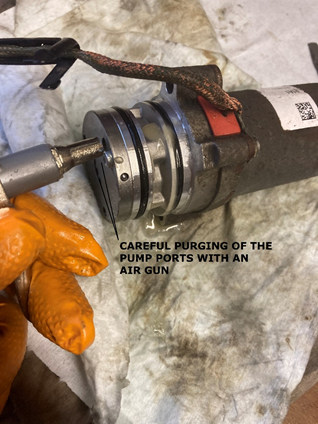
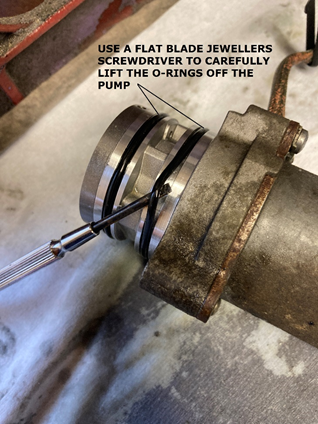
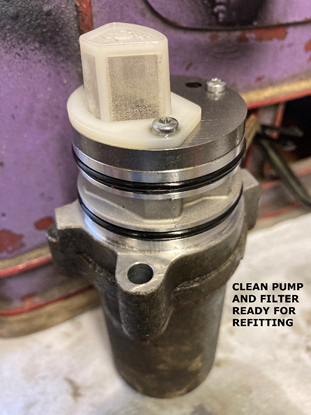
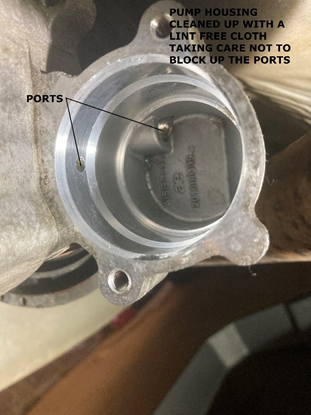
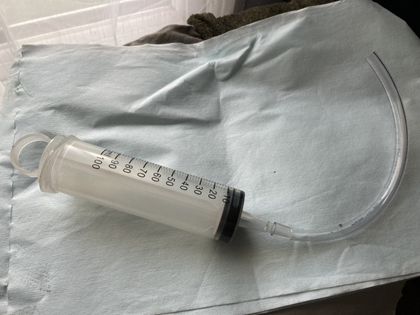
Coming soon when I get the pictures to appear... INTRODUCTION As I mentioned previously in another thread, I decided to have a go at changing the Haldex oil and clean the filter on TIBET III’s Haldex V unit after reading the threads on Briskoda. The idea of this guide is simply how I did it, based on advice from others but it maybe, that I did things slightly differently to others or perhaps I had a problem that others haven’t encountered and which someone else might find useful to know about. It is also Yeti-specific. SERVICE HISTORY After reading about the pump filter issues on the Haldex V and having lost faith with the MK dealer for various reasons, I decided to do it myself. Experience level – I’ve maintained my cars over the years (I’m an aircraft engineer by trade) but more recently, with the cars being under warranty, I’ve let the dealer do it. I reckon anyone who is competent at basic servicing tasks (oil and filter changes etc) can cope with the Haldex V oil change and filter clean. JOB PREPARATION One of my concerns was jacking (safely for me!) the Yeti giving me sufficient room underneath to do the job without struggling for access. I’ve never really trusted the drive on ramp idea so it was going to have to be jacks and axle stands. To jack the Yeti up, I used the standard car jack on one side and a straight lift mechanical pillar jack on the other (actually a 4.5T Land Rover jack). I prefer to rely on mechanical lifting but had in addition a trolley jack on the jack pad inside and aft of the Yeti jack. The LR jack had the good old slotted ice hockey puck to protect the sill flange. The axle stands I positioned at the rear suspension attach points just forward of the bumper behind the wheels. They weren’t taking any weight as such but were there in case the world moved from under the jacks. This may not be an ‘approved’ support point but their role was one of protecting me in the worst-case scenario. I also had wood blocks under the wheels which meant I wasn’t going to get squashed even if someone nicked all the jacks and axle stands whilst I was looking the other way… Perhaps this was all a bit OTT but I had the kit, it doesn’t take long to do and you’re a long time dead. The service kit came from haldexrepairs.co.uk – an excellent and useful website, lots of good info and tips and a good service. The kit was complete including everything from the oil and replacement drain and filler plugs to a pair of gloves. Brilliant. ON WITH THE JOB DISCONNECTING THE CONTROLLER The first thing was to run VCDS to check for any errors but everything was fine. It also warmed the car and everything up. No idea if the Haldex system likes being warmed up but it won’t do any harm! I knew one of the most ‘difficult’ tasks was accessing the pump harness to enable the pump to be removed. In actual fact it wasn’t too bad but even with a torch and mirror, once again the adult-proof VAG plug on the controller was impossible to undo. Yes, I’ve watched all the ‘how to guides’ but it didn’t push further on, the locking tab wouldn’t budge and the plug stayed fast. Plan B was to remove the controller from the Haldex unit to allow better access to the plug. This worked a treat. It’s held in place with two 10mm bolts but it still needed a gentle prize to free the controller from the Haldex unit mount after removing the bolts. This meant I could now get to the plug although it didn’t budge until a subtle and careful twist with a large flat blade screwdriver provided just enough force to ease the plug clear. The other connector plug on the controller has a clip-on 90° cable strain relief cover on it. Removing that enabled more flexibility to access the pump connector plug. The harness is held into position on the top of the Haldex unit above the drive shaft by two plastic split clips. It was easy to do one from the lefthand side (above where the controller was) and the other from the righthand side. The trick is two squeeze the end of the clip together from the aft side and then push the clips forward and out of the locating holes. The two clips are actually joined together by a length of split plastic. The workshop manual says to lower the main final drive unit down for access (7 turns) but I’m not sure why you’d need to. DRAINING THE RESERVOIR & PUMP REMOVAL Delighted with getting the pump electrically disconnected, I slackened the filler point plug and the drain plug - both are Allen socket head screws (8mm for the drain plug and 5mm for the filler plug). The drain plug must be more than just a drain plug as it’s pretty long and torqued (according to the Yeti workshop manual) to 40 Nm. The filler plug is much smaller and shorter and torqued to 15 Nm. I gave the area around and above the drain and filler points a good clean to prevent any crud getting inside the unit. With the drain plug removed, the oil drained into the drip tray and removing the filler plug allowed a full flow. I was impressed as the oil looked pretty clean. Perhaps my filter was going to be okay… DRAINING THE RESERVOIR & PUMP REMOVAL Delighted with getting the pump electrically disconnected, I slackened the filler point plug and the drain plug - both are Allen socket head screws (8mm for the drain plug and 5mm for the filler plug). The drain plug must be more than just a drain plug as it’s pretty long and torqued (according to the Yeti workshop manual) to 40 Nm. The filler plug is much smaller and shorter and torqued to 15 Nm. I gave the area around and above the drain and filler points a good clean to prevent any crud getting inside the unit. With the drain plug removed, the oil drained into the drip tray and removing the filler plug allowed a full flow. I was impressed as the oil looked pretty clean. Perhaps my filter was going to be okay… Whilst the reservoir drained, I set about moving the pump. The first thing to do was to give the pump and the housing a good wipe down to prevent any dust and dirt from unduly contaminating the pump. This was easy with two Torx screws to undo followed by a very gentle tap with a nylon hammer and then a wriggle and out it came, releasing a bit more fluid. FILTER AND PUMP CLEANING I couldn’t believe just how blocked up the filter was – and the congealed mess left inside the pump housing on the Haldex unit – exactly as others had found. It’s strange – almost like grease with little substance when you touch it. It didn’t seem to be water/moisture contamination. The next job was to remove the filter which is held in place by two Torx screws. Then it was a case of gently easing the plastic filter clear. It sits on two locator bushes that also act as spacers and should protect the filer from being crushed when the Torx screws are tightened. I used warm water and a small paint brush and some washing up liquid to clean the filter and then once rinsed, left it to dry off whilst I cleaned up the pump. The pump cleaned up easily and I used a small blast of air from my compressor to clean the old fluid out of the ports. It was then a case of replacing the O-rings, removing the old ones carefully with a very small flat blade screw driver being careful not to damage the pump. Incidentally, there was a couple of patches of light corrosion on the pump (on the mounting flange). This was easily removed with a Scotchbrite pad – don’t use wire-wool as this can cause dissimilar metal corrosion if stands of the wire-wool get embedded in the aluminium pump. I also use lint-free cloths for the cleaning to avoid fluff and stuff getting into the bits where you don’t want fluff. With the O-rings replaced, I blew air through the filter to ensure it was dry and refitted it to the pump. There seems to be two ports in the pump housing – presumable an inlet and an outlet. I scooped the gunge out being as careful as I could to avoid pushing any of it into the ports. REFITTING THE PUMP AND FILLING THE RESERVOIR As with all good Haynes manual advice – installation is the opposite of refitting. Before fitting the pump, I gave the O-rings a good coating in fresh Haldex oil to lubricate them as the pump is refitted. It slipped in a treat and I secured it in place with the two Torx screws. I made sure the harness had the correct routing before I fully pushed the pump home. Once the pump was properly installed, I locate the right and then left harness clips and then reconnected the pump connector plug to the controller, the 90° harness stain relief cover to the other controller plug and refitted the controller to the mounting points on the Haldex unit. I used the airline to give a light blast through from the filler point after putting a very small amount of fluid into the reservoir to help flush it through. I had a small syringe to do this with. A big 100 ml syringe (and a length of plastic hose) comes with the service kit from Haldex Repairs for the main filling. Next job was to fit the new drain screw. The service kit came with new drain screw and filler plug but the original ones could have been reused – there was nothing obviously wrong with them. The new ones obviously have new sealing washers on them. As mentioned, the drain screw is torqued to 40 Nm according to the workshop manual. With everything secure, the next task is to refill the reservoir. The big 100 ml syringe with the service kit works a trat with a plastic hose that just fits in the filler point. I found you had to be careful not to block the filler point completely and that made it pretty much airtight and difficult to operate the syringe. The reservoir took most of the fluid and some started to over flow out so I refitted the filler plug. FINAL CHECK AND VCDS ERROR CHECK AND PUMP RECALIBRATION Next job was to check everything was clear and I lowered the Yeti pretty much to being off the jacks. I started the engine and let it run for 5 minutes. I then used VCDS to run the ‘learn pump’ program as suggested by Haldex Repairs. You could clearly hear the pump running through a specific cycle. The tone changed as the pump filled up. A quick jack up again enabled another oil level check of the Haldex reservoir. What I had initially thought to be fluid flowing showing the reservoir was full but with a more concerted effort on the syringe, I found I got a fair bit more into the reservoir and when it was really full it really did flow out! Unfortunately, I forgot to get a picture of the refilling but that’s a pretty simple job – just be careful not to put too much effort into operating the syringe and end up blowing the plastic pipe off. I used probably 800 ml of the 850 ml supplied in the bottle. Although the car was jacked up at the back, it probably wasn’t that much of an angle so I think the reservoir is pretty good on the level. Another good look round was done as a final leak and security check. I then ran the engine and again went through the VCDS error code check and ‘learn pump’ program. All appears good. I am at a loss as to how the system worked with about 80% of the filter blocked – perhaps it wasn’t. I haven’t been in any snow for three years now. Anyway, job done and as others have said – it is a job that has got to be done. If you’re not up to it then it shouldn’t be too costly to get a garage or dealer to do it – you’d just better point the dealers to Briskoda or the Haldex Repairs website to find out how to do it! Next job will be to take the Yeti out for a road test this weekend. Forecast for snow on Friday…. PS Apologies for the low res pictures, haven't got time this evening to suss why they didn't load - if anyone needs hi res pictures (or a PDF of all of the above) then PM me.


 1 point
 -
1 pointHello Finaly i have done it with the help of Vagguide. https://m.facebook.com/vagguide/ My car is 2016 version , i had to change BCM and GATEWAY so that everything was functional. I had to replace the trim under the dashboard was well . This retrofit depends on the MY of the car , after MY17 i think you only need virtual cockpit.
 1 point
 -
If you are worried about the environment, a modern diesel is less harmfull for the planet than a petrol due to the much lower CO2 and with a DPF, particulates are greatly reduced. Also, the purchase of a new car to replace it has a huge environment impact vs running your existing car. Even purchasing a s/h car has an impact as it feeds the chain further up for new cars and their impact. Even replacing your car with an electric one is just shifting the environmental impat from the user to the mining of the lithium and production of the electricity to power it. If you are worried about cost of the fuel, the money you will spend replacing the 1.6 will buy you plenty of miles in it at the slightly more expensive fuel cost. If you are worried about clean city zones like Bath, Bristol and Birmingham coming in to force, Euro 6 diesels are exempt (a big climb down for Bristol that were originally going to ban all privately owned diesel cars). They have finally realised how clean modern diesels actually are. The best thing you can do (from an environmental pov) is to keep your existing car for as long as possible! All that is assuming that your 1.6 is viable and not on it's last legs or anything!1 point
-
1 pointA Hybrid Fabia VRS MK4 is about the only car I would consider and since it will never exist there will not be a 'buzz' about the MK4.1 point


.thumb.jpg.f83a46b9b3c0d976b9dbffbb523c9874.jpg)


.jpg.7fb884b6b953250d2cafbb6fcf2211af.jpg)


.thumb.jpg.fec7cb3b79e9b6a6092a9de7d6b7d63e.jpg)