


Leaderboard


.jpg.1006585dfe4e2977315b67c3d642e37b.jpg)


Popular Content
Showing content with the highest reputation on 15/08/21 in all areas
-
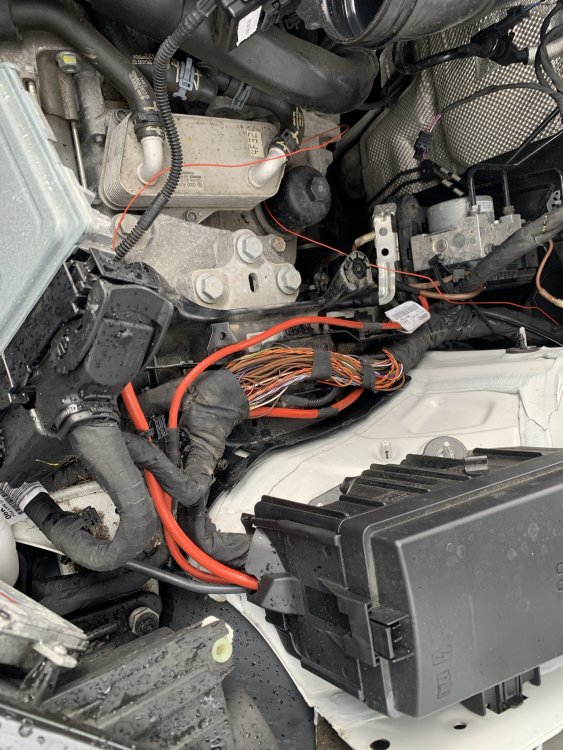
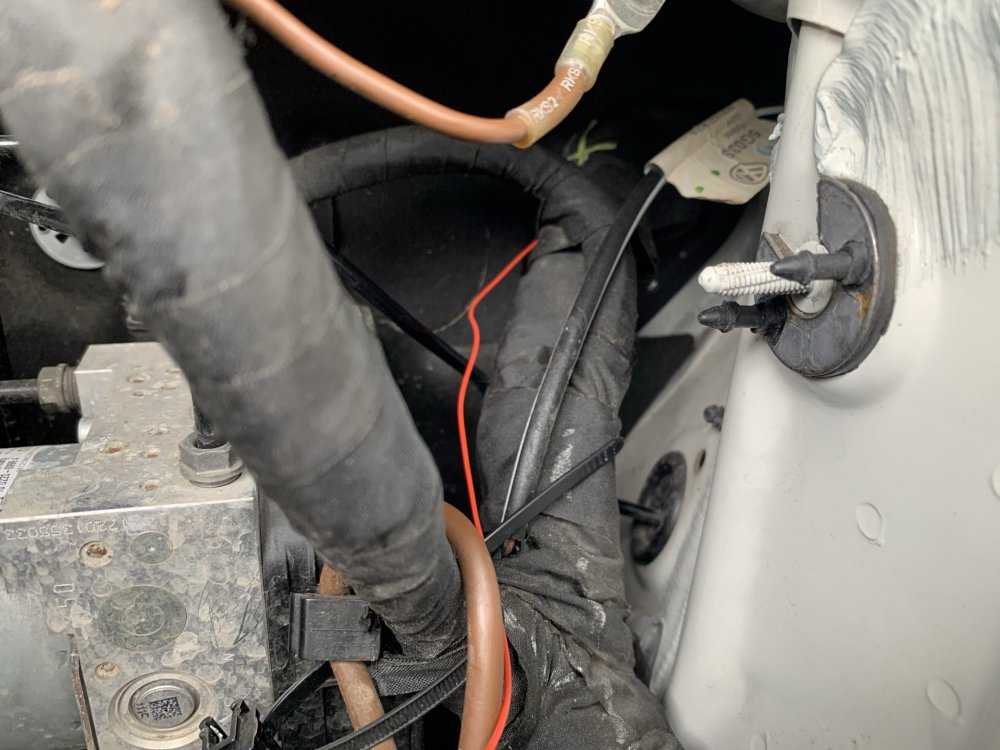
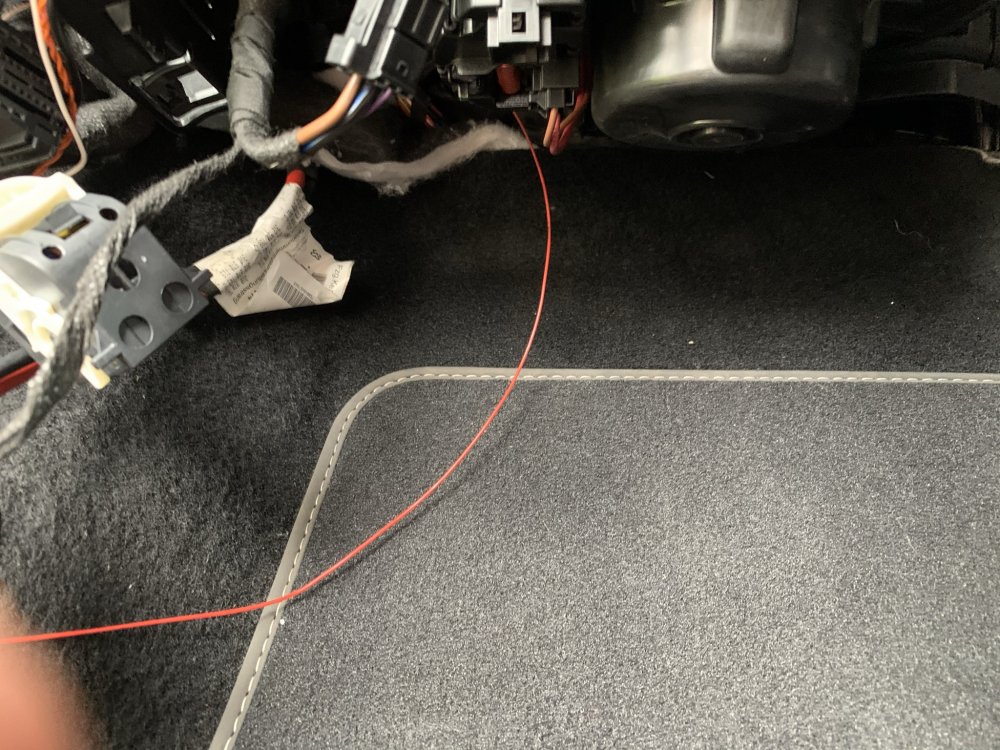
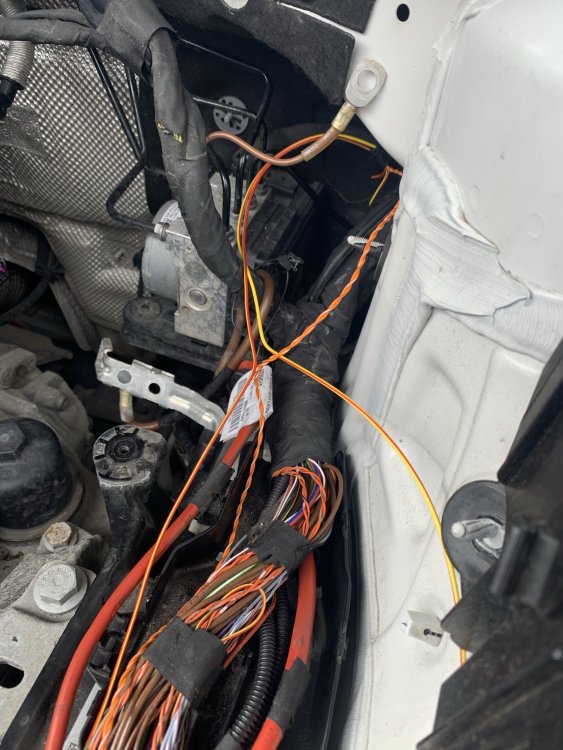
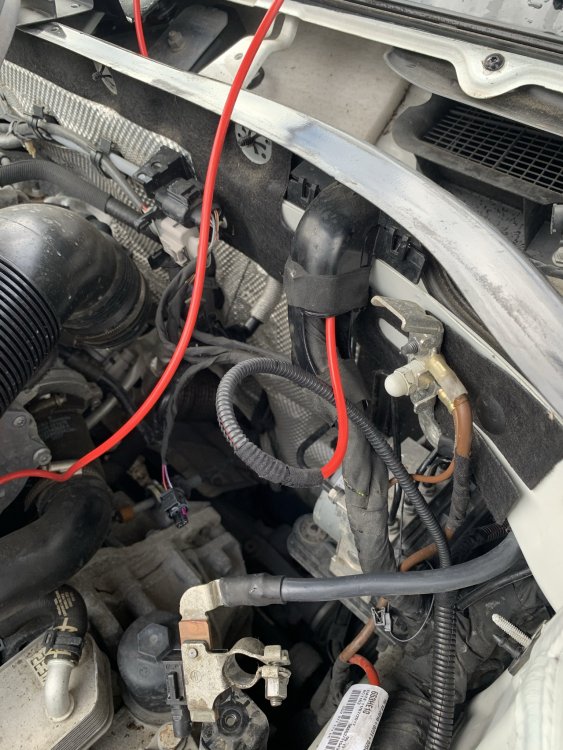
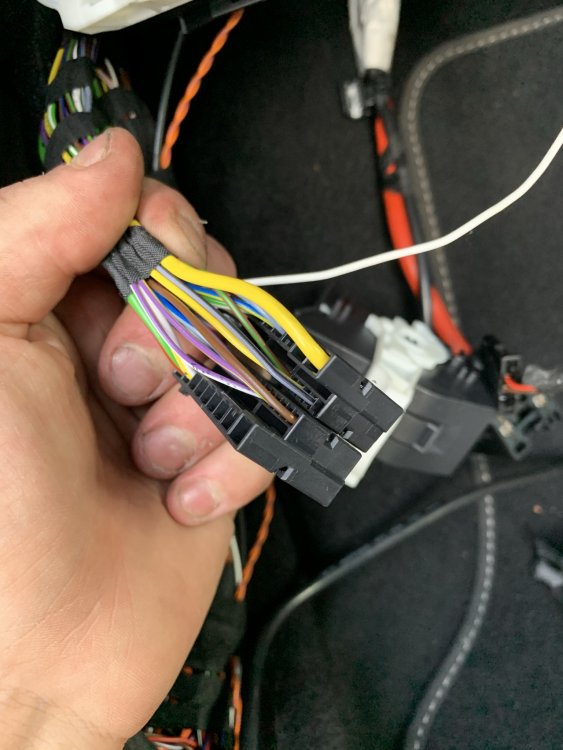
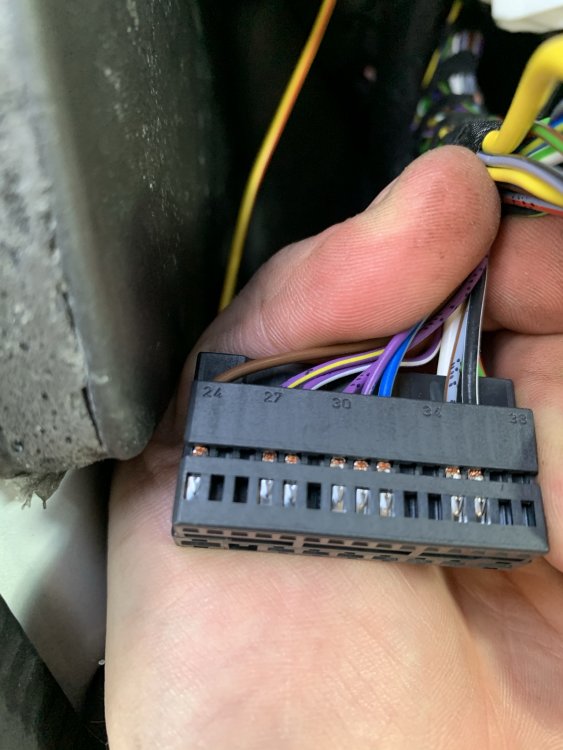
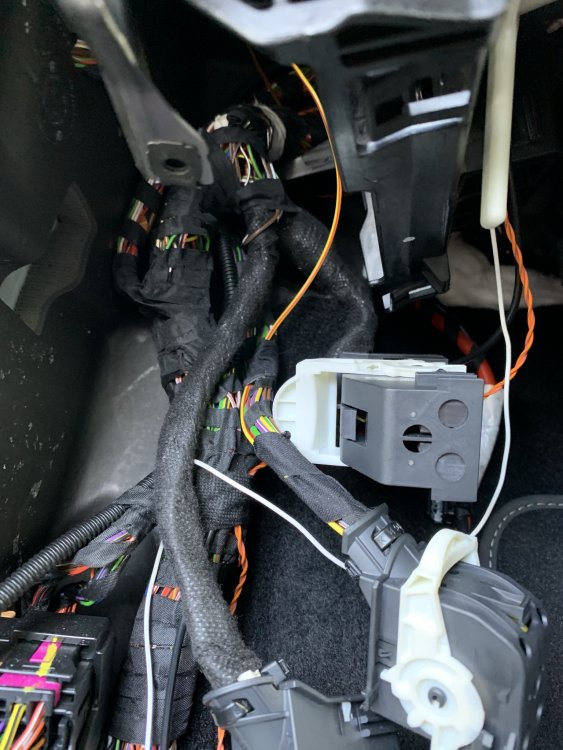
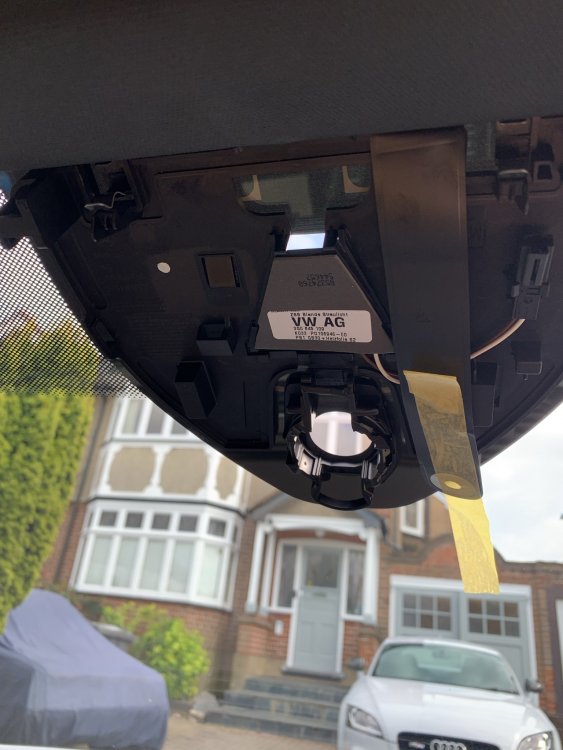
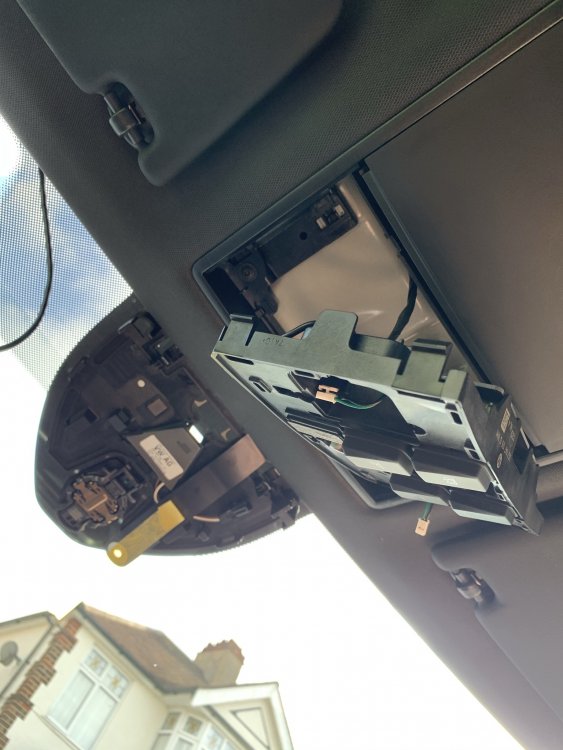
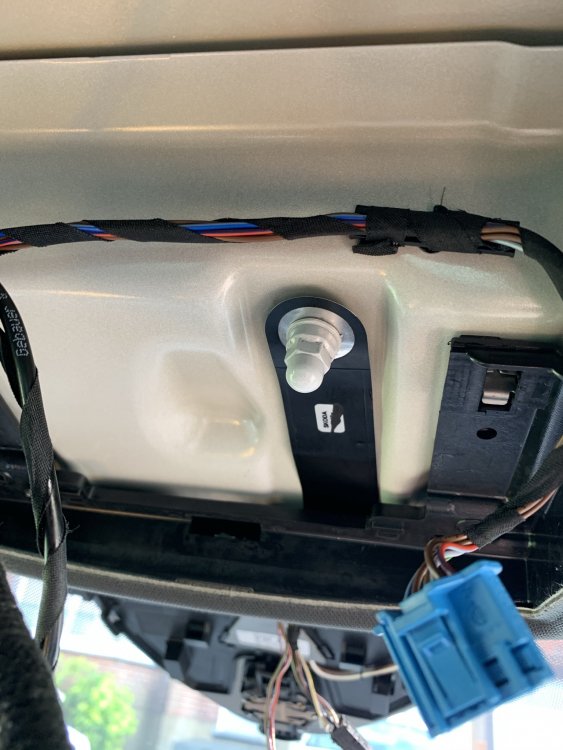
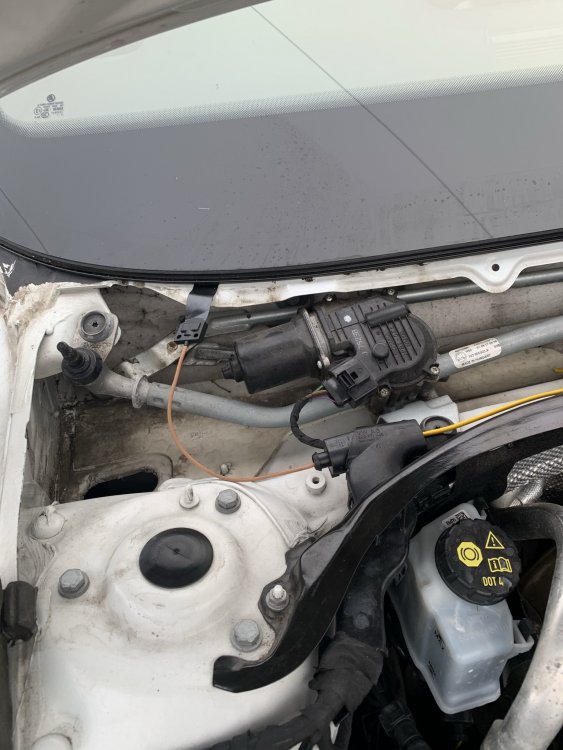
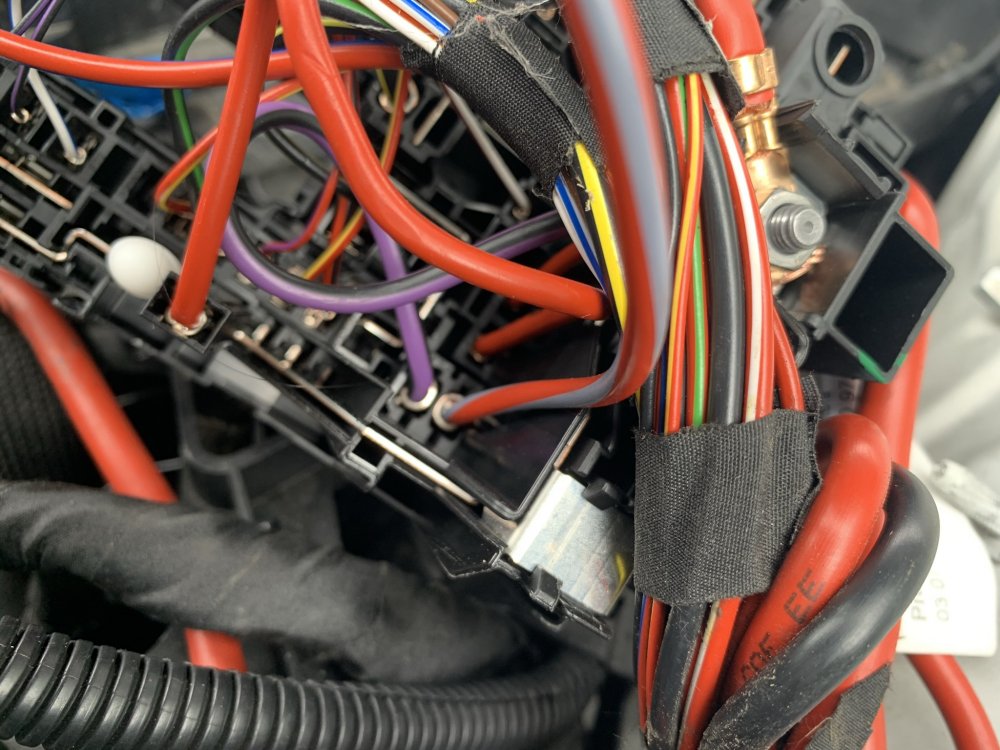
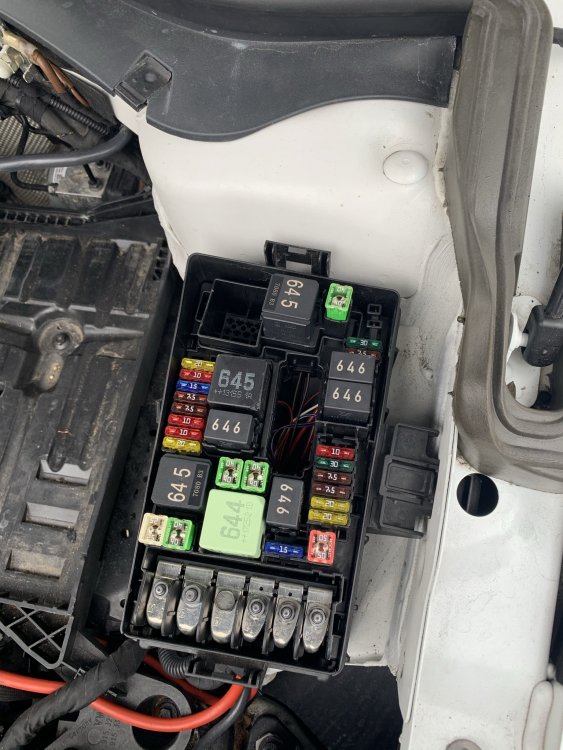
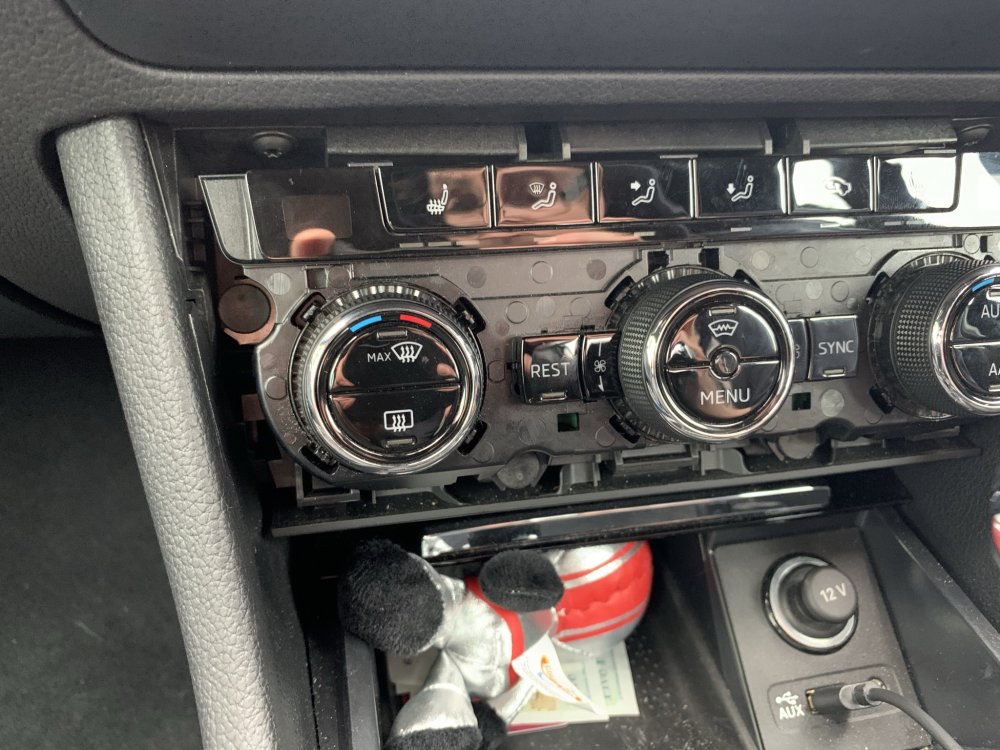
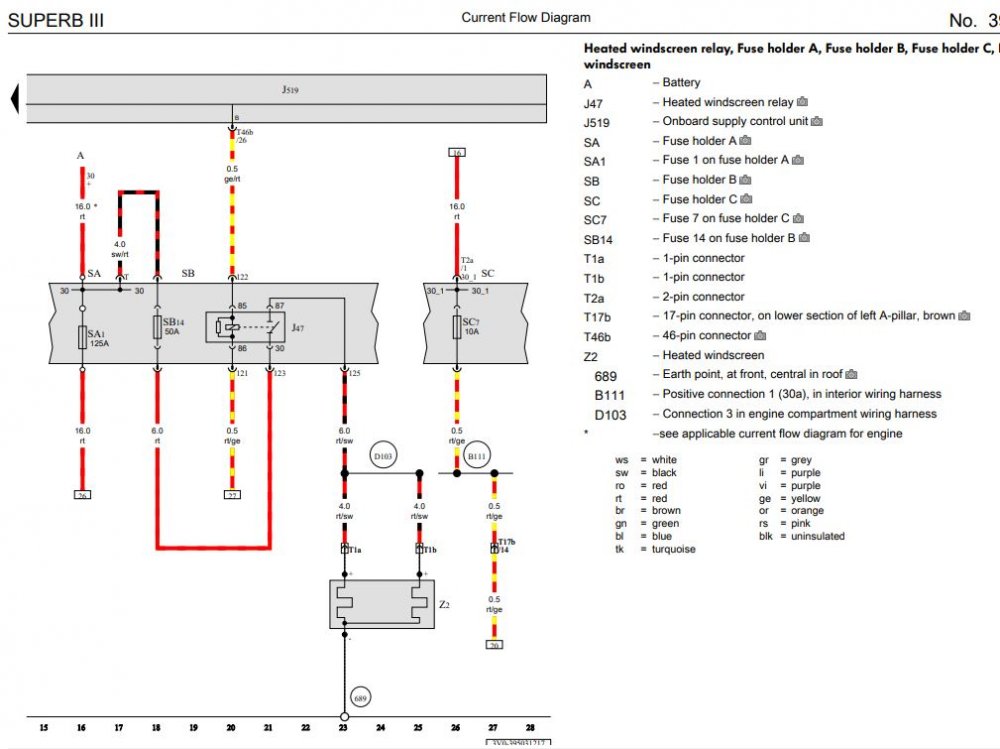
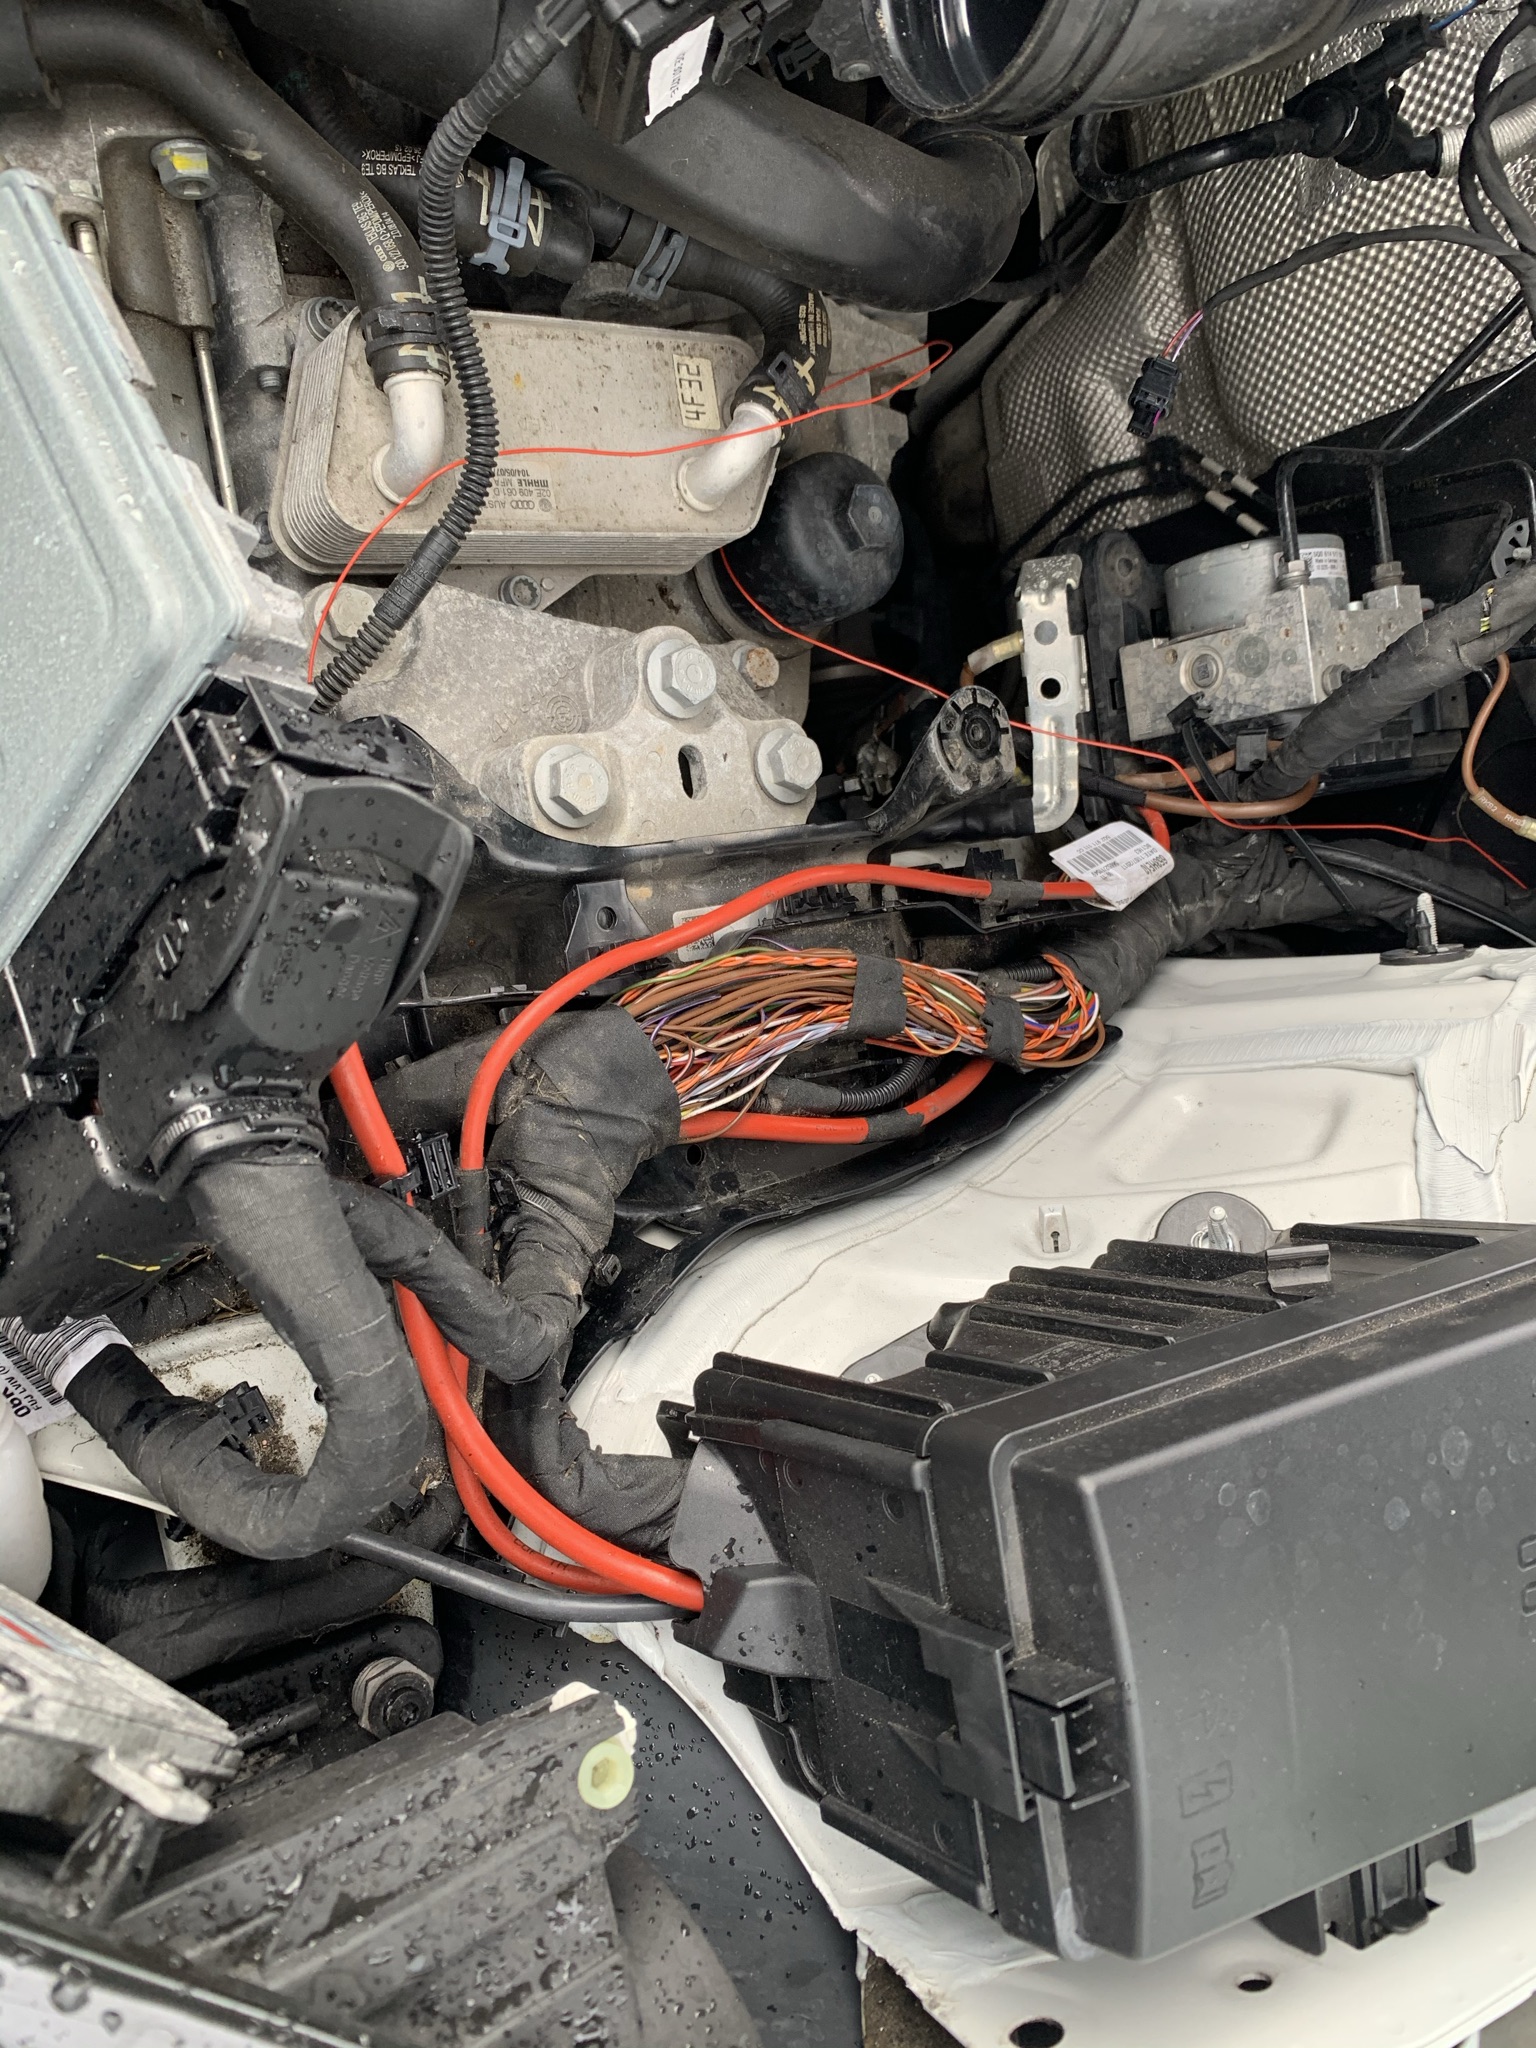
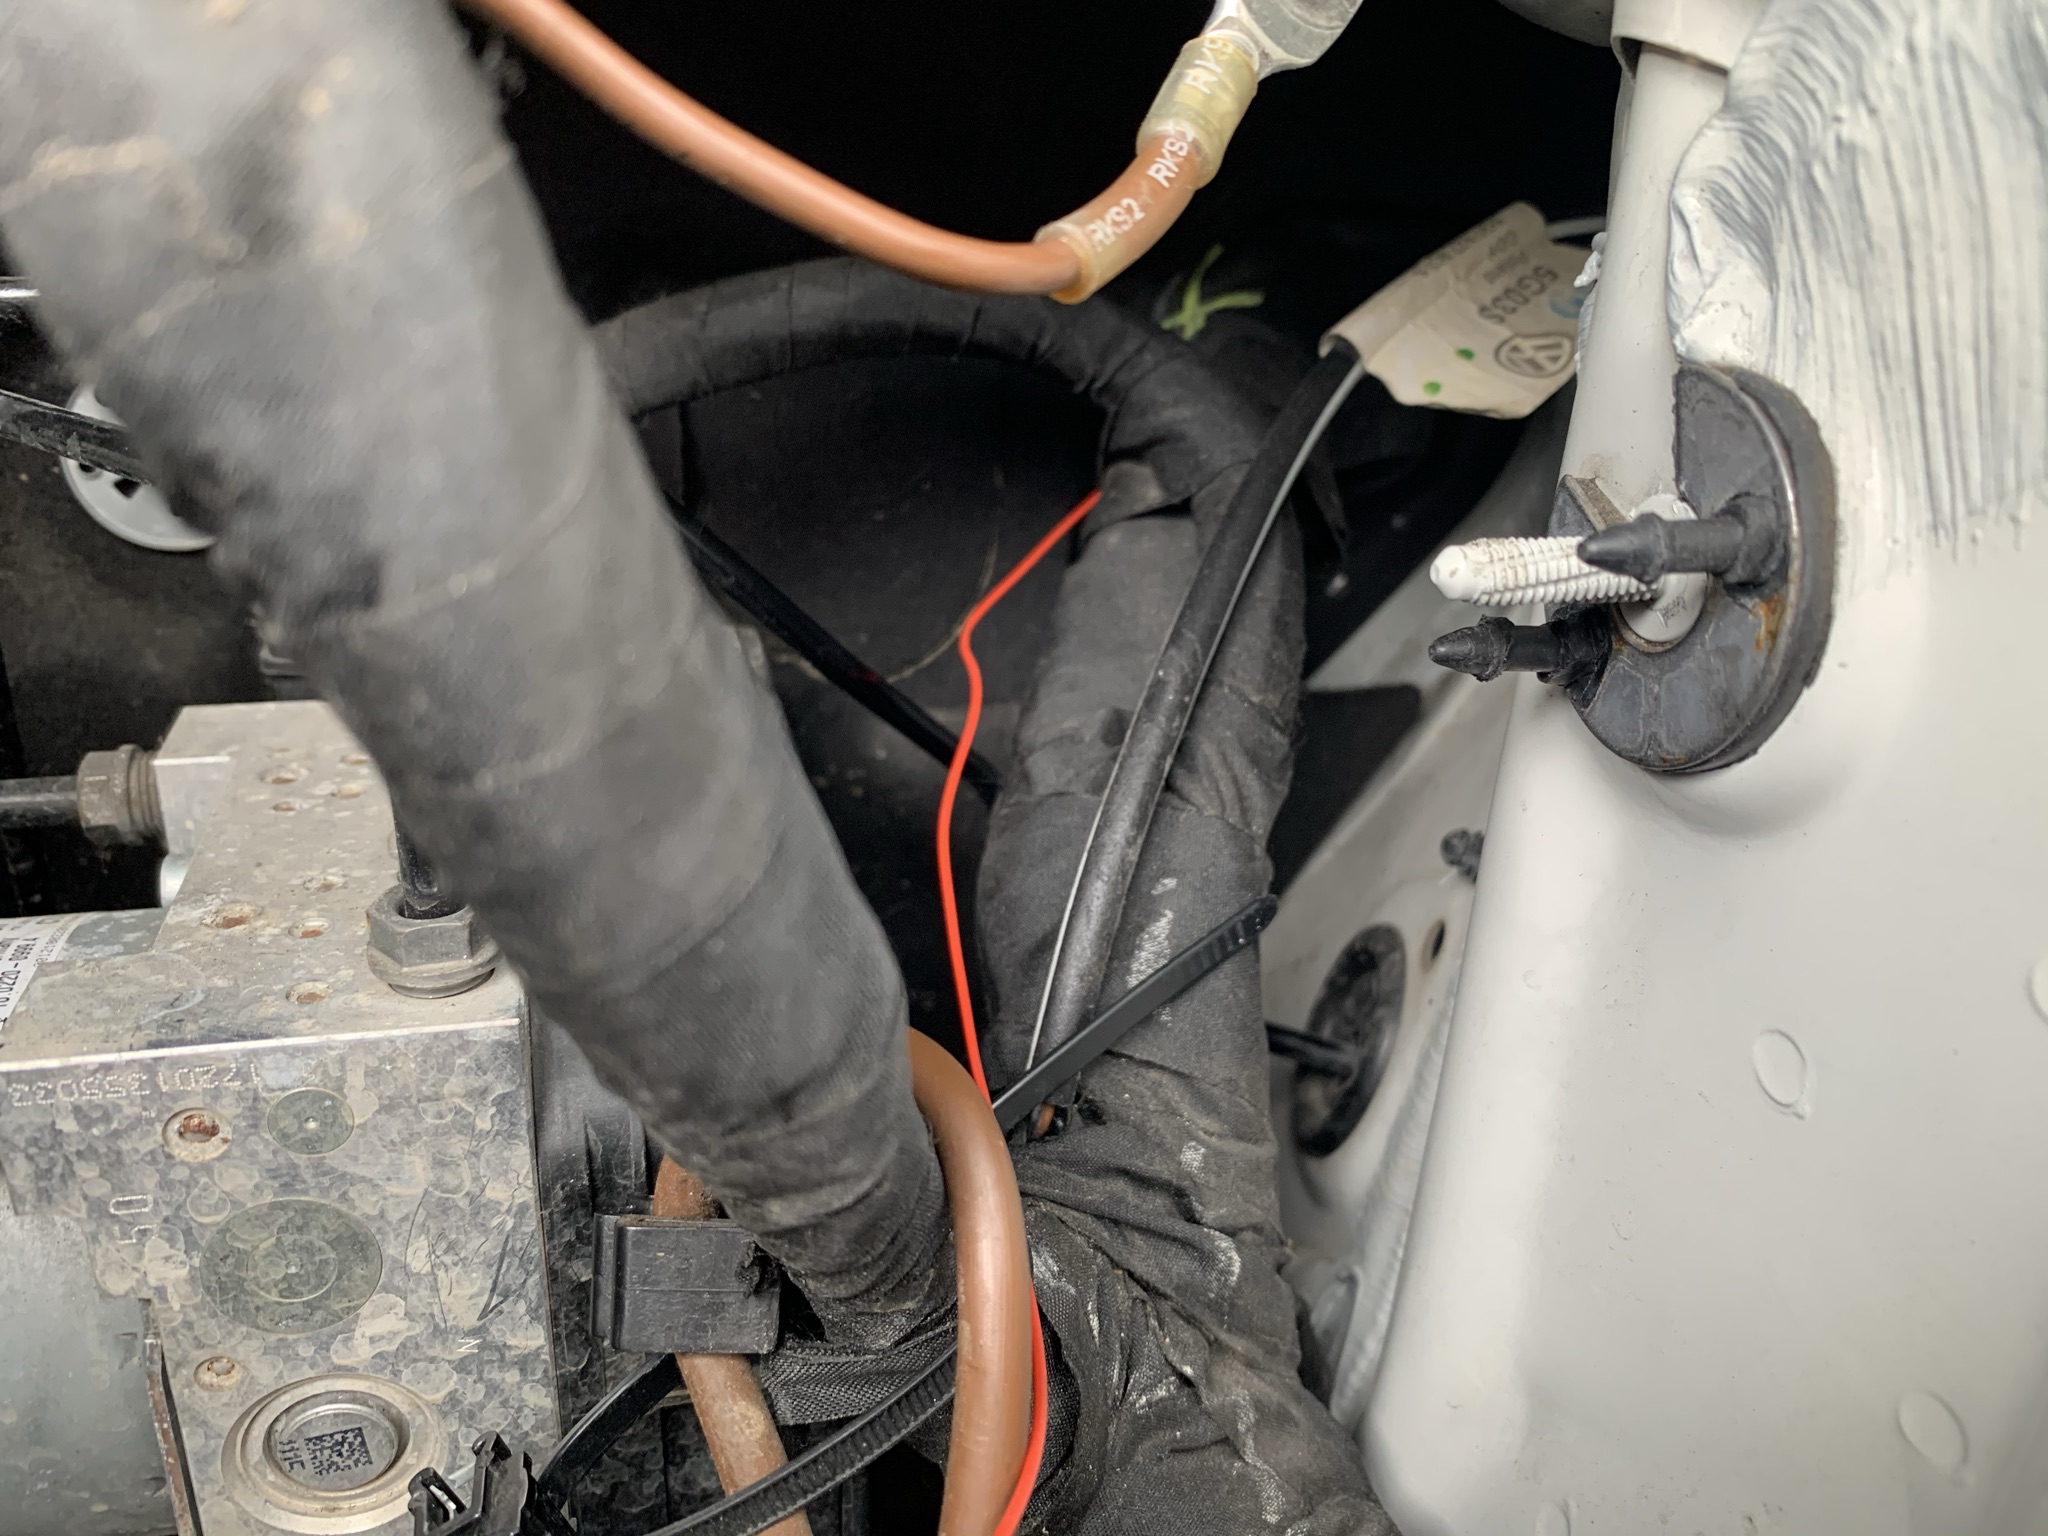
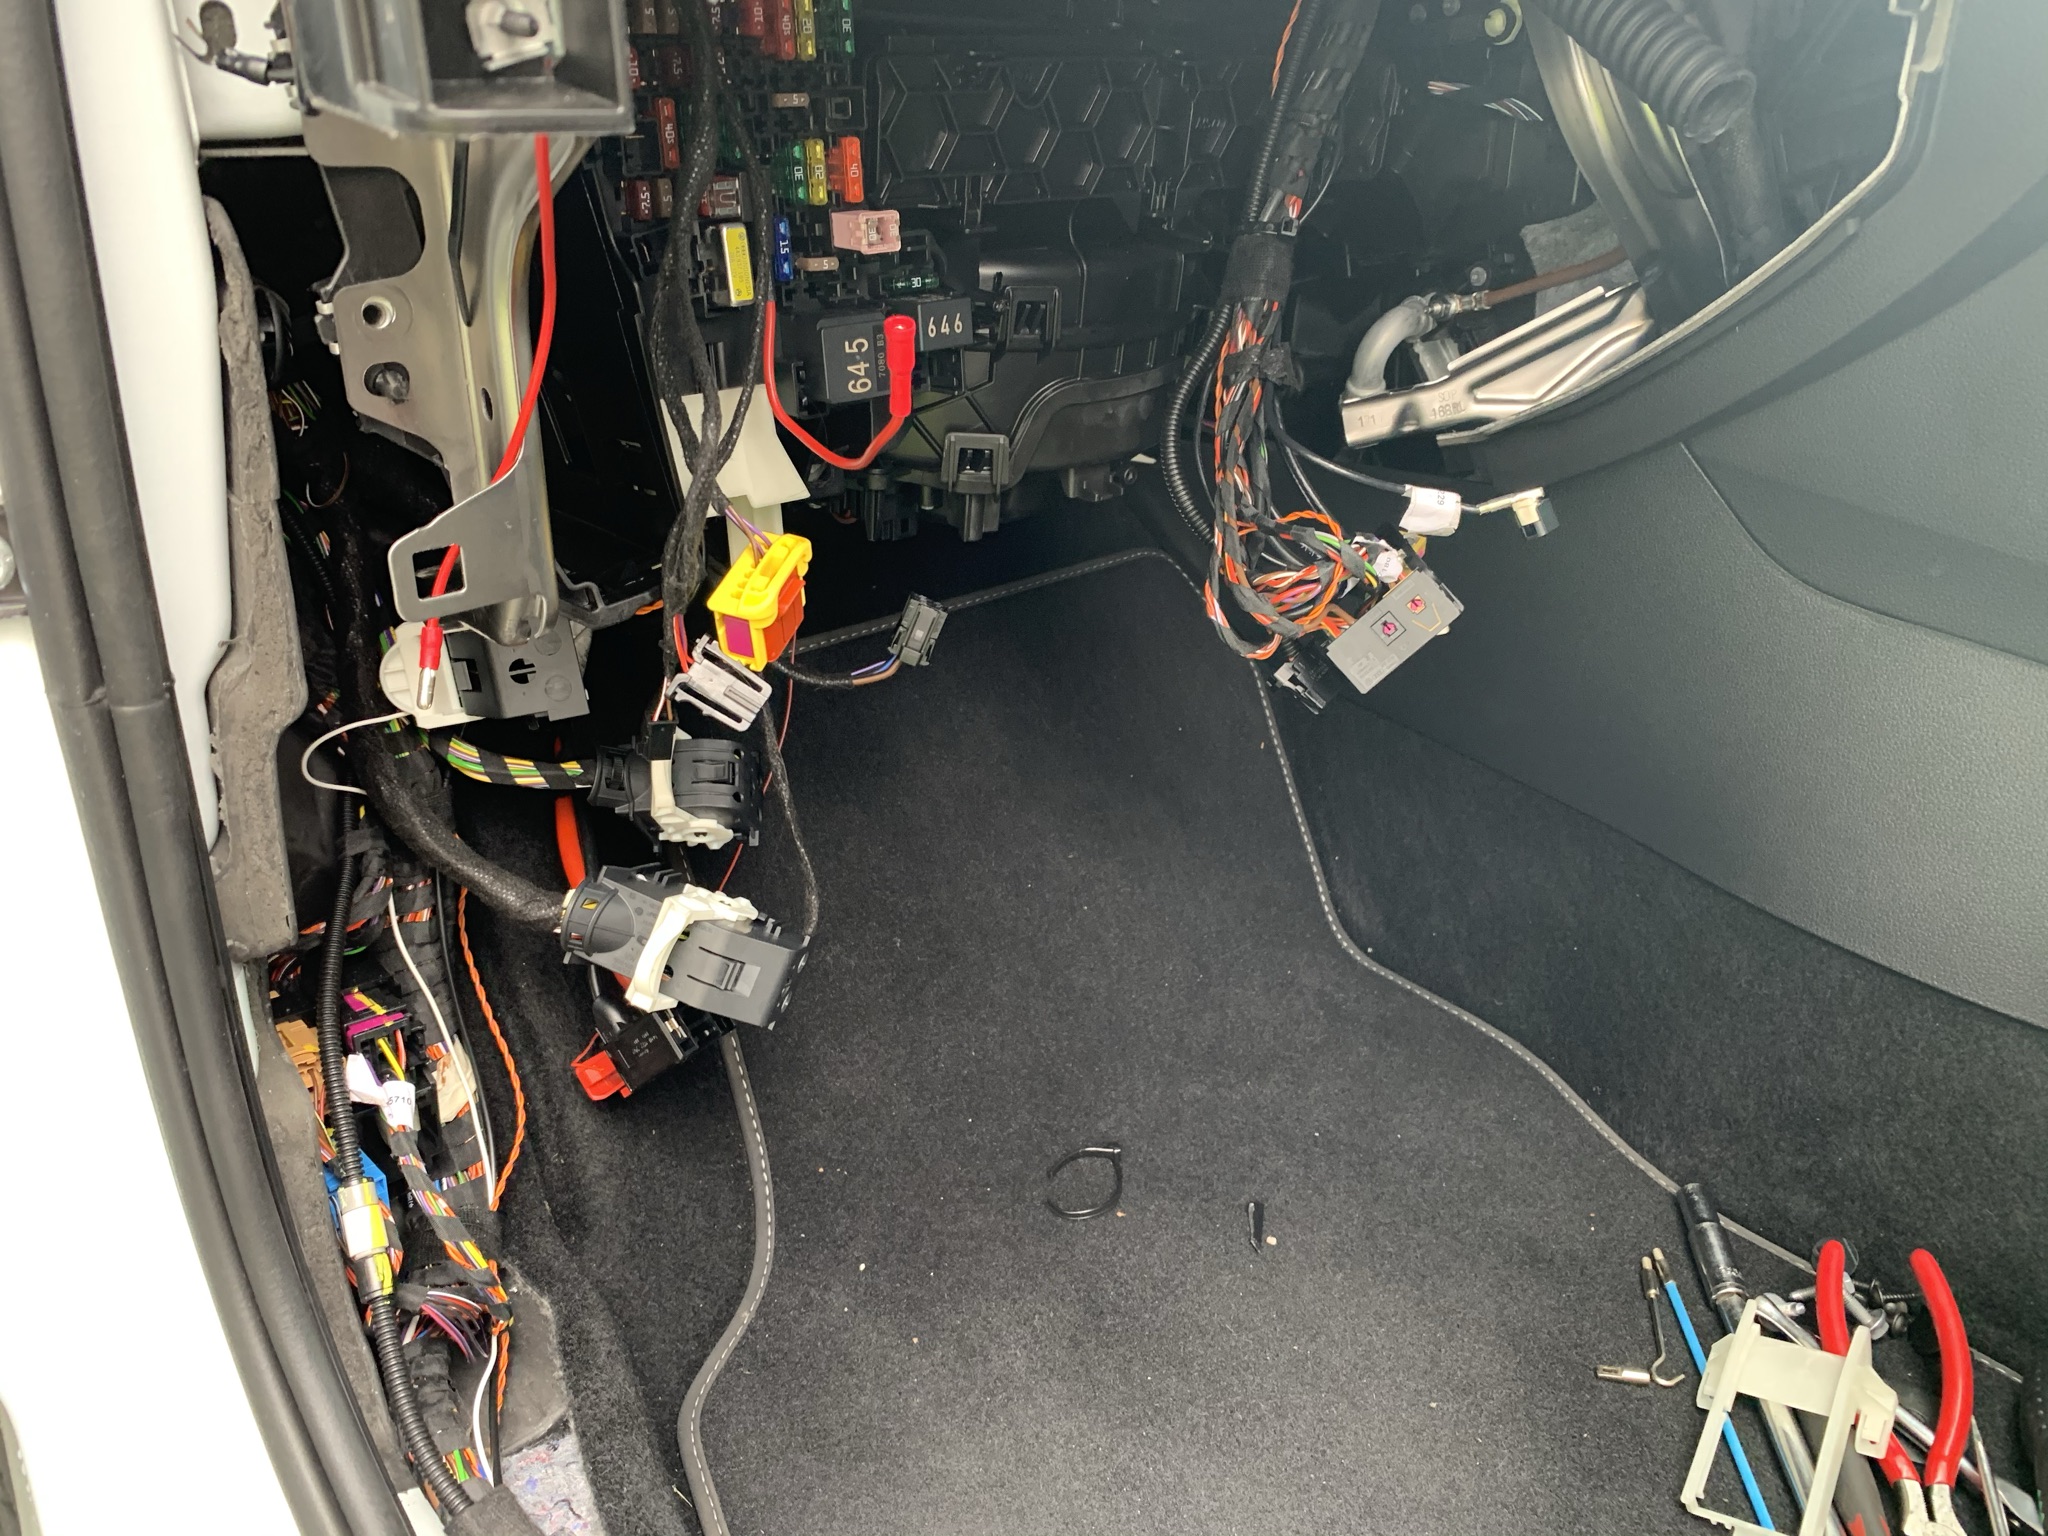
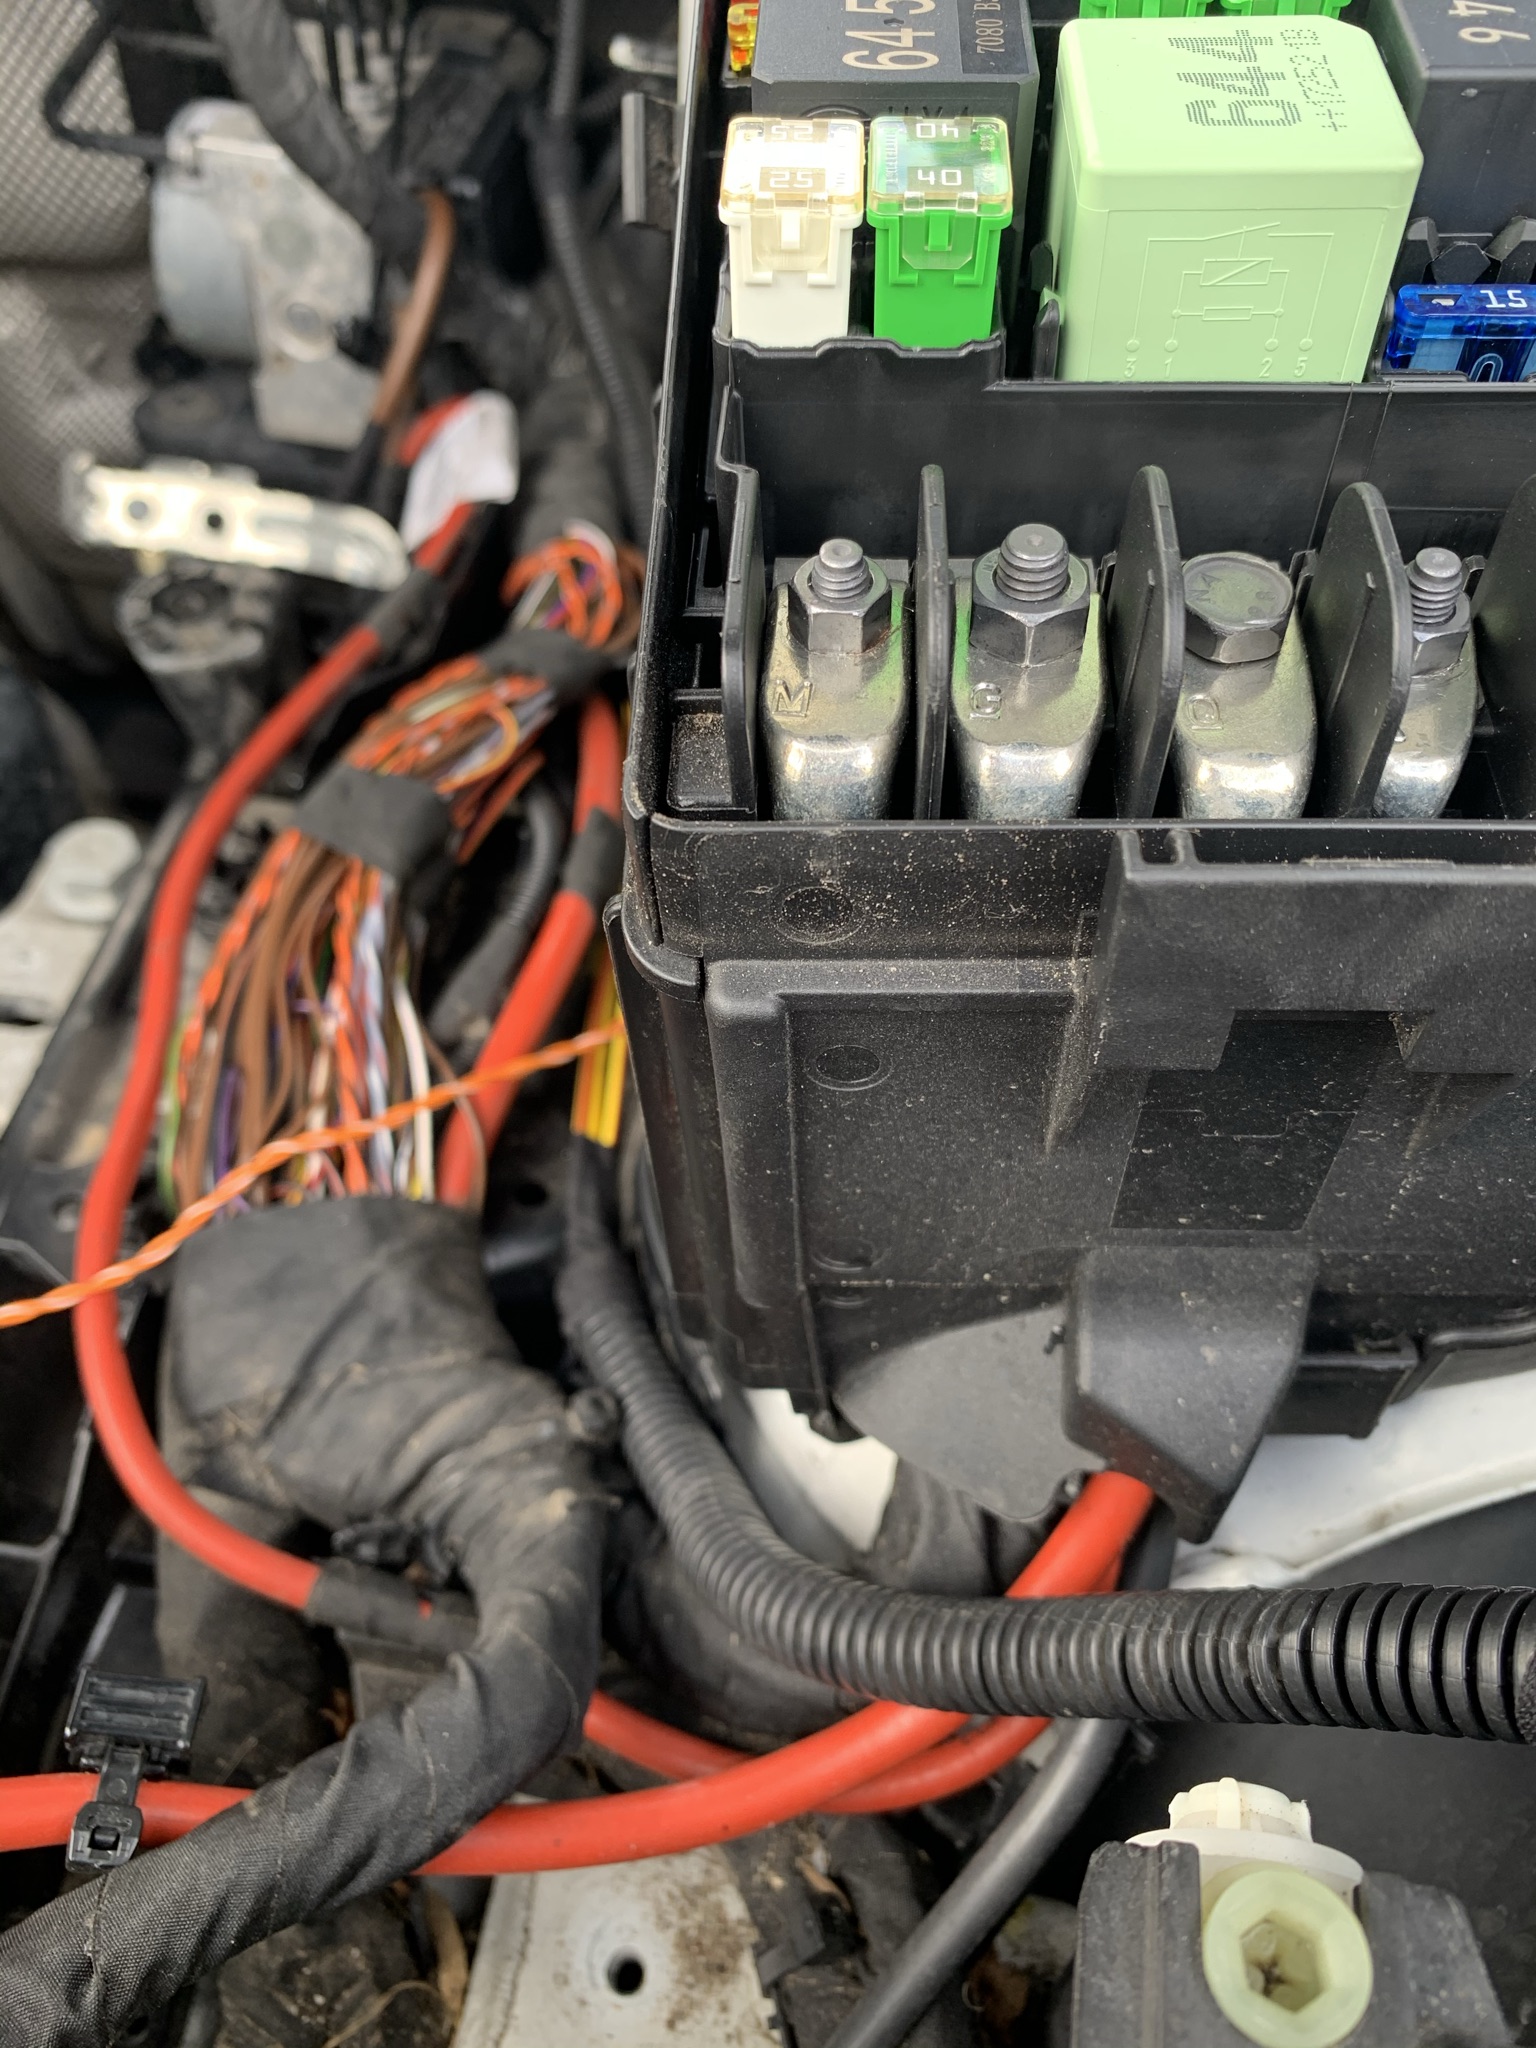
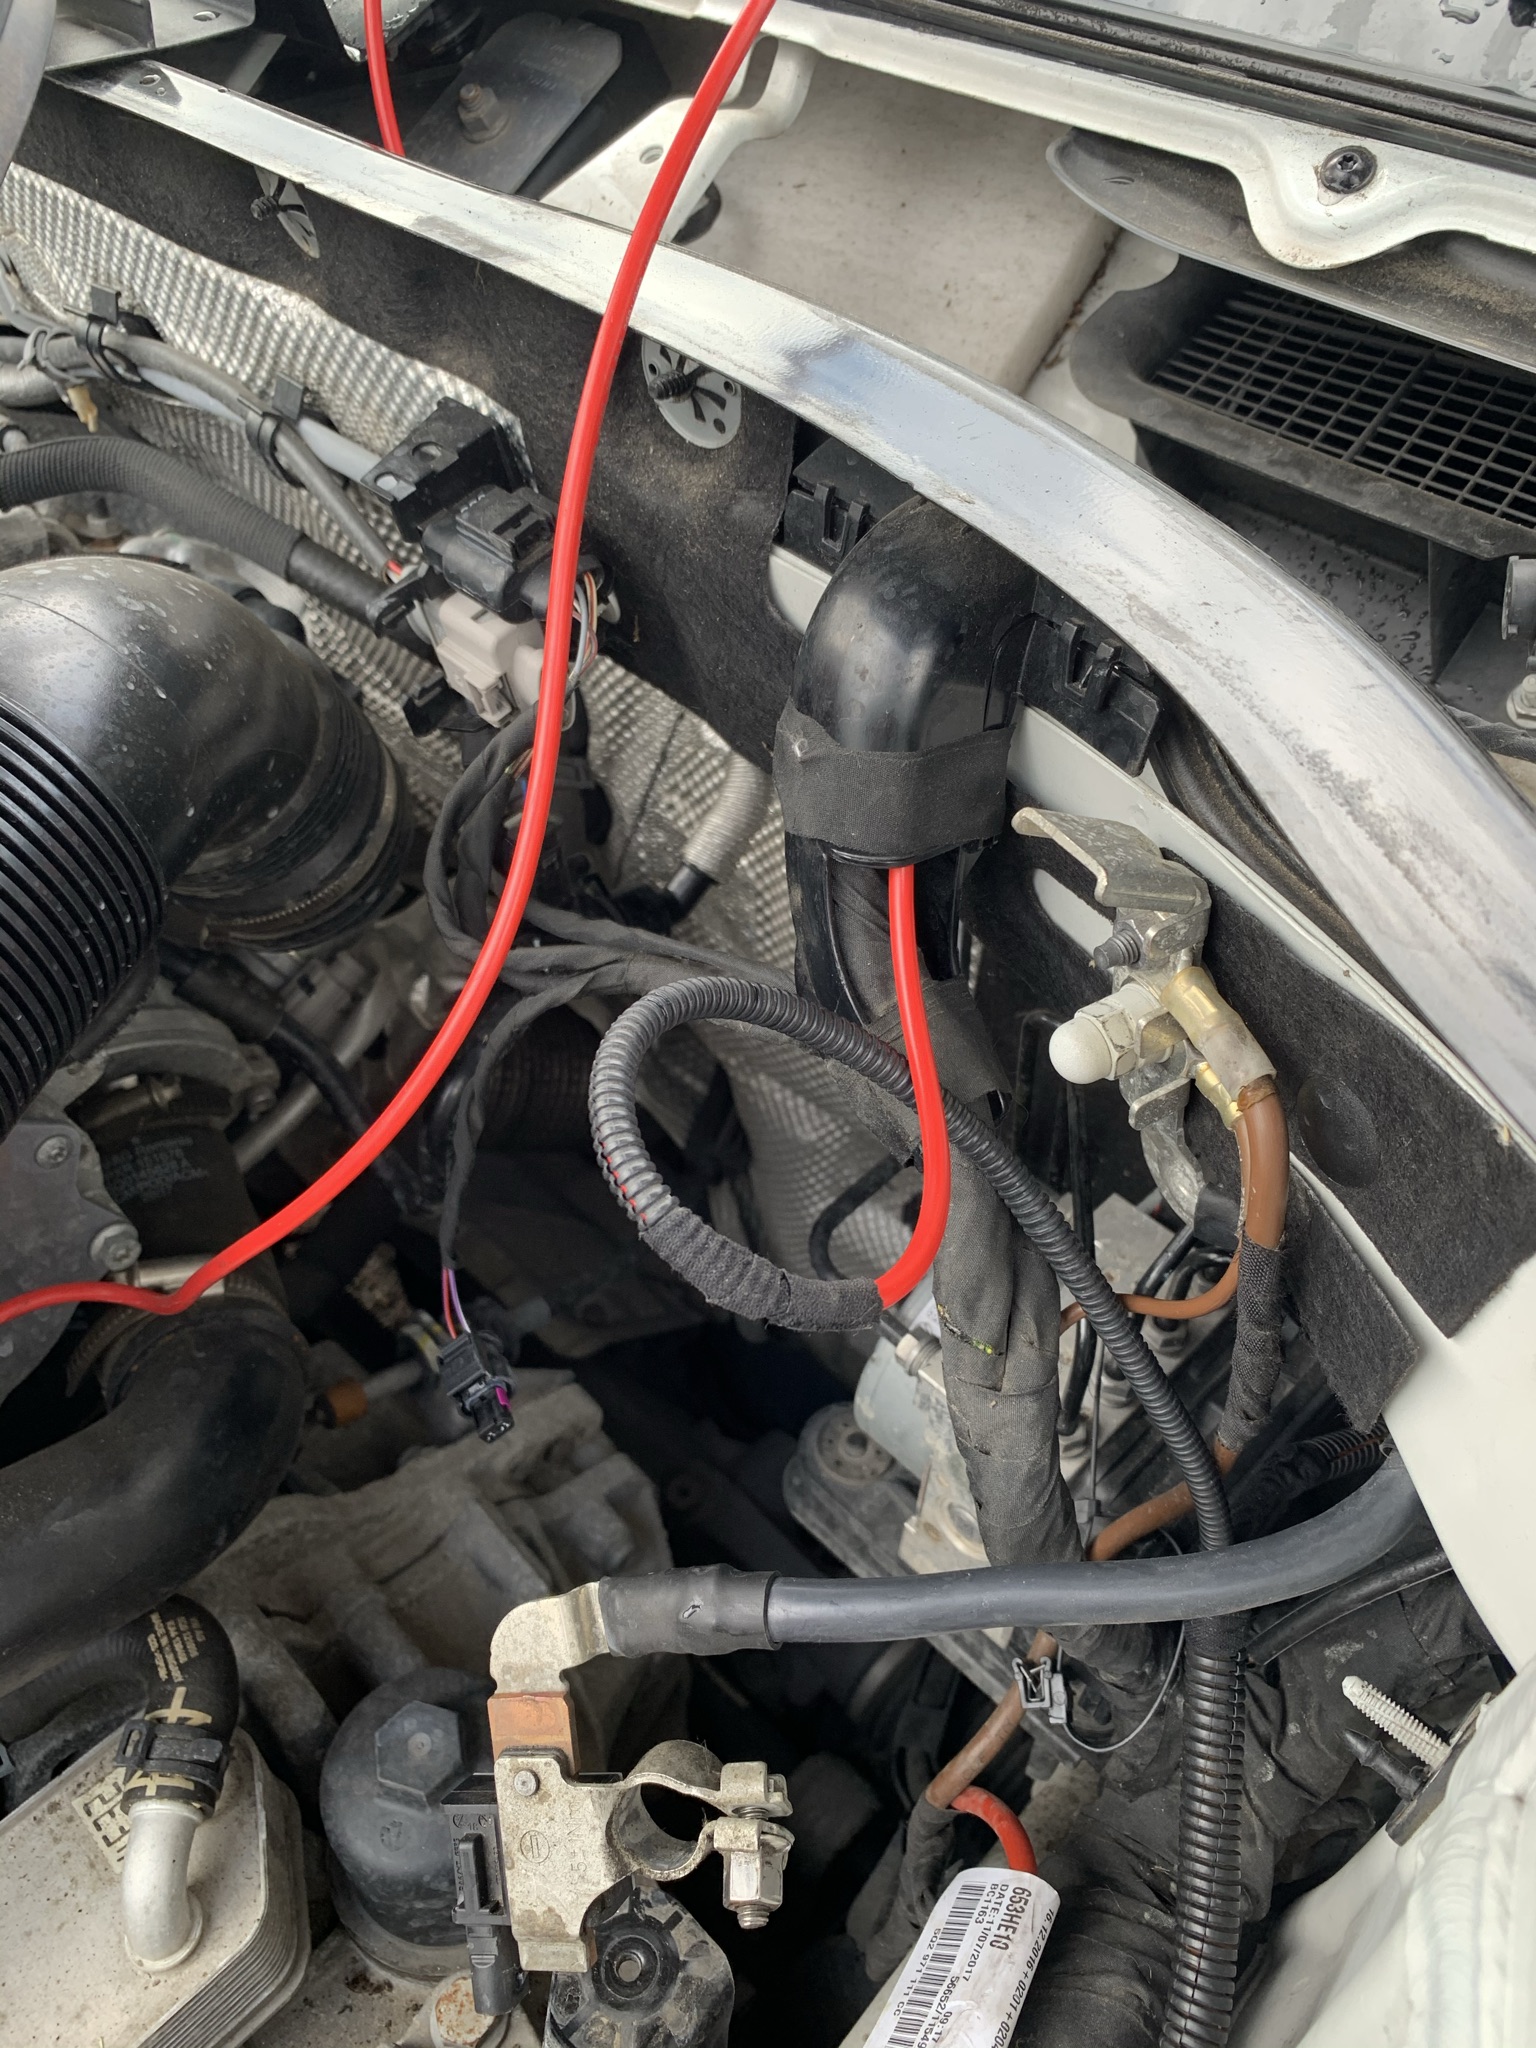
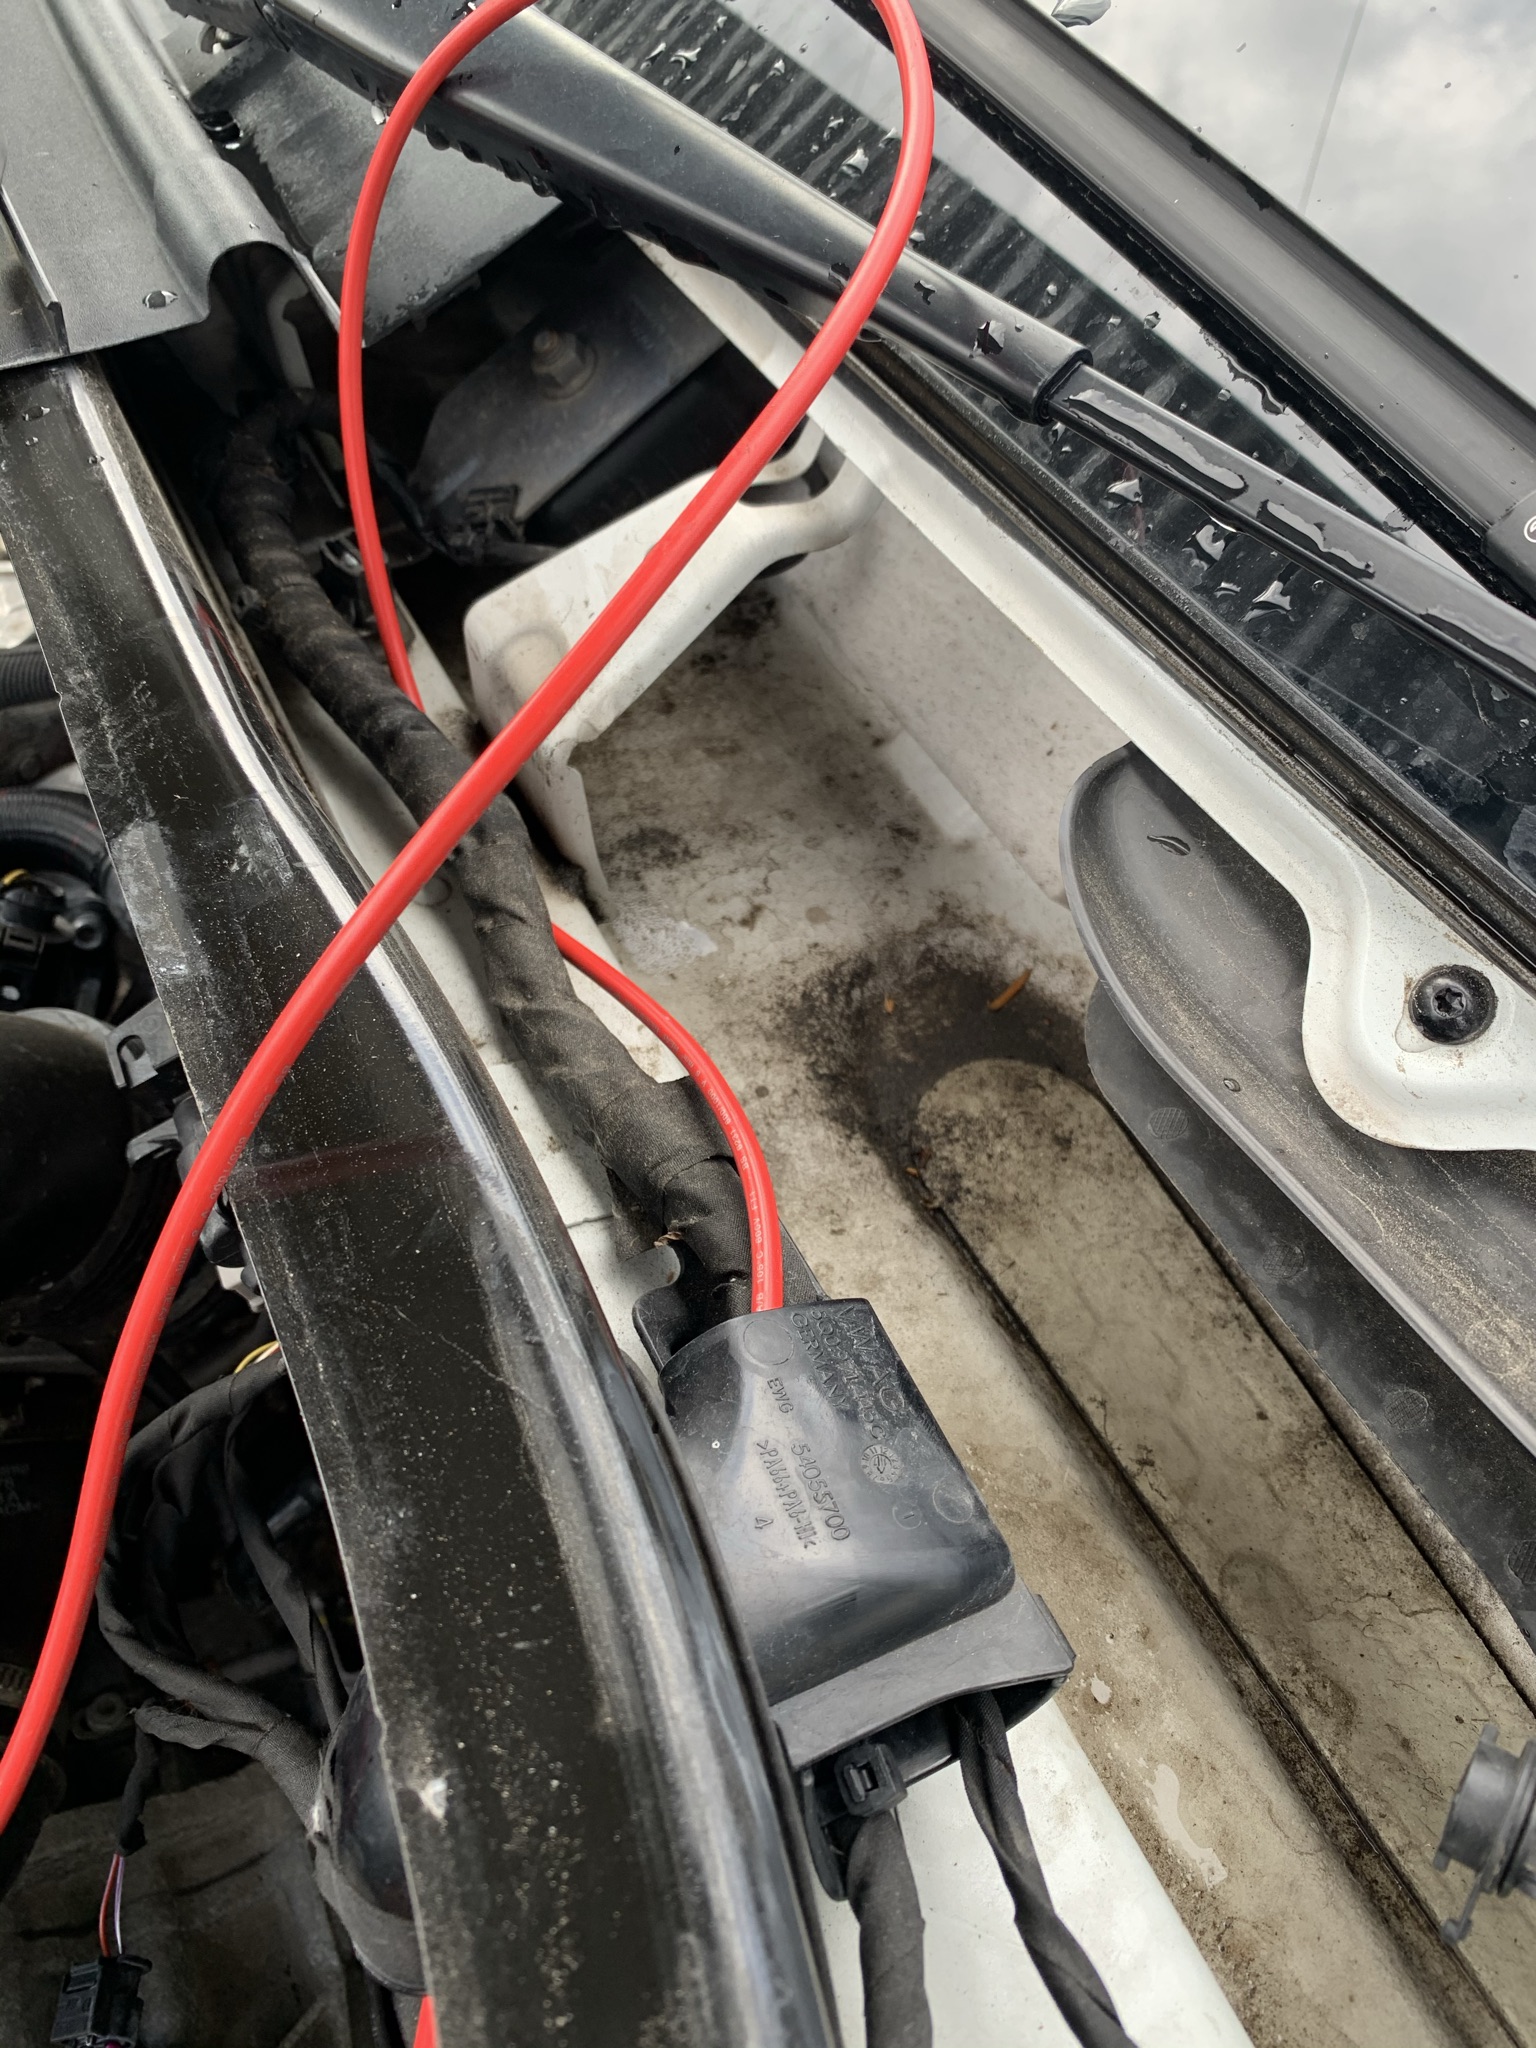
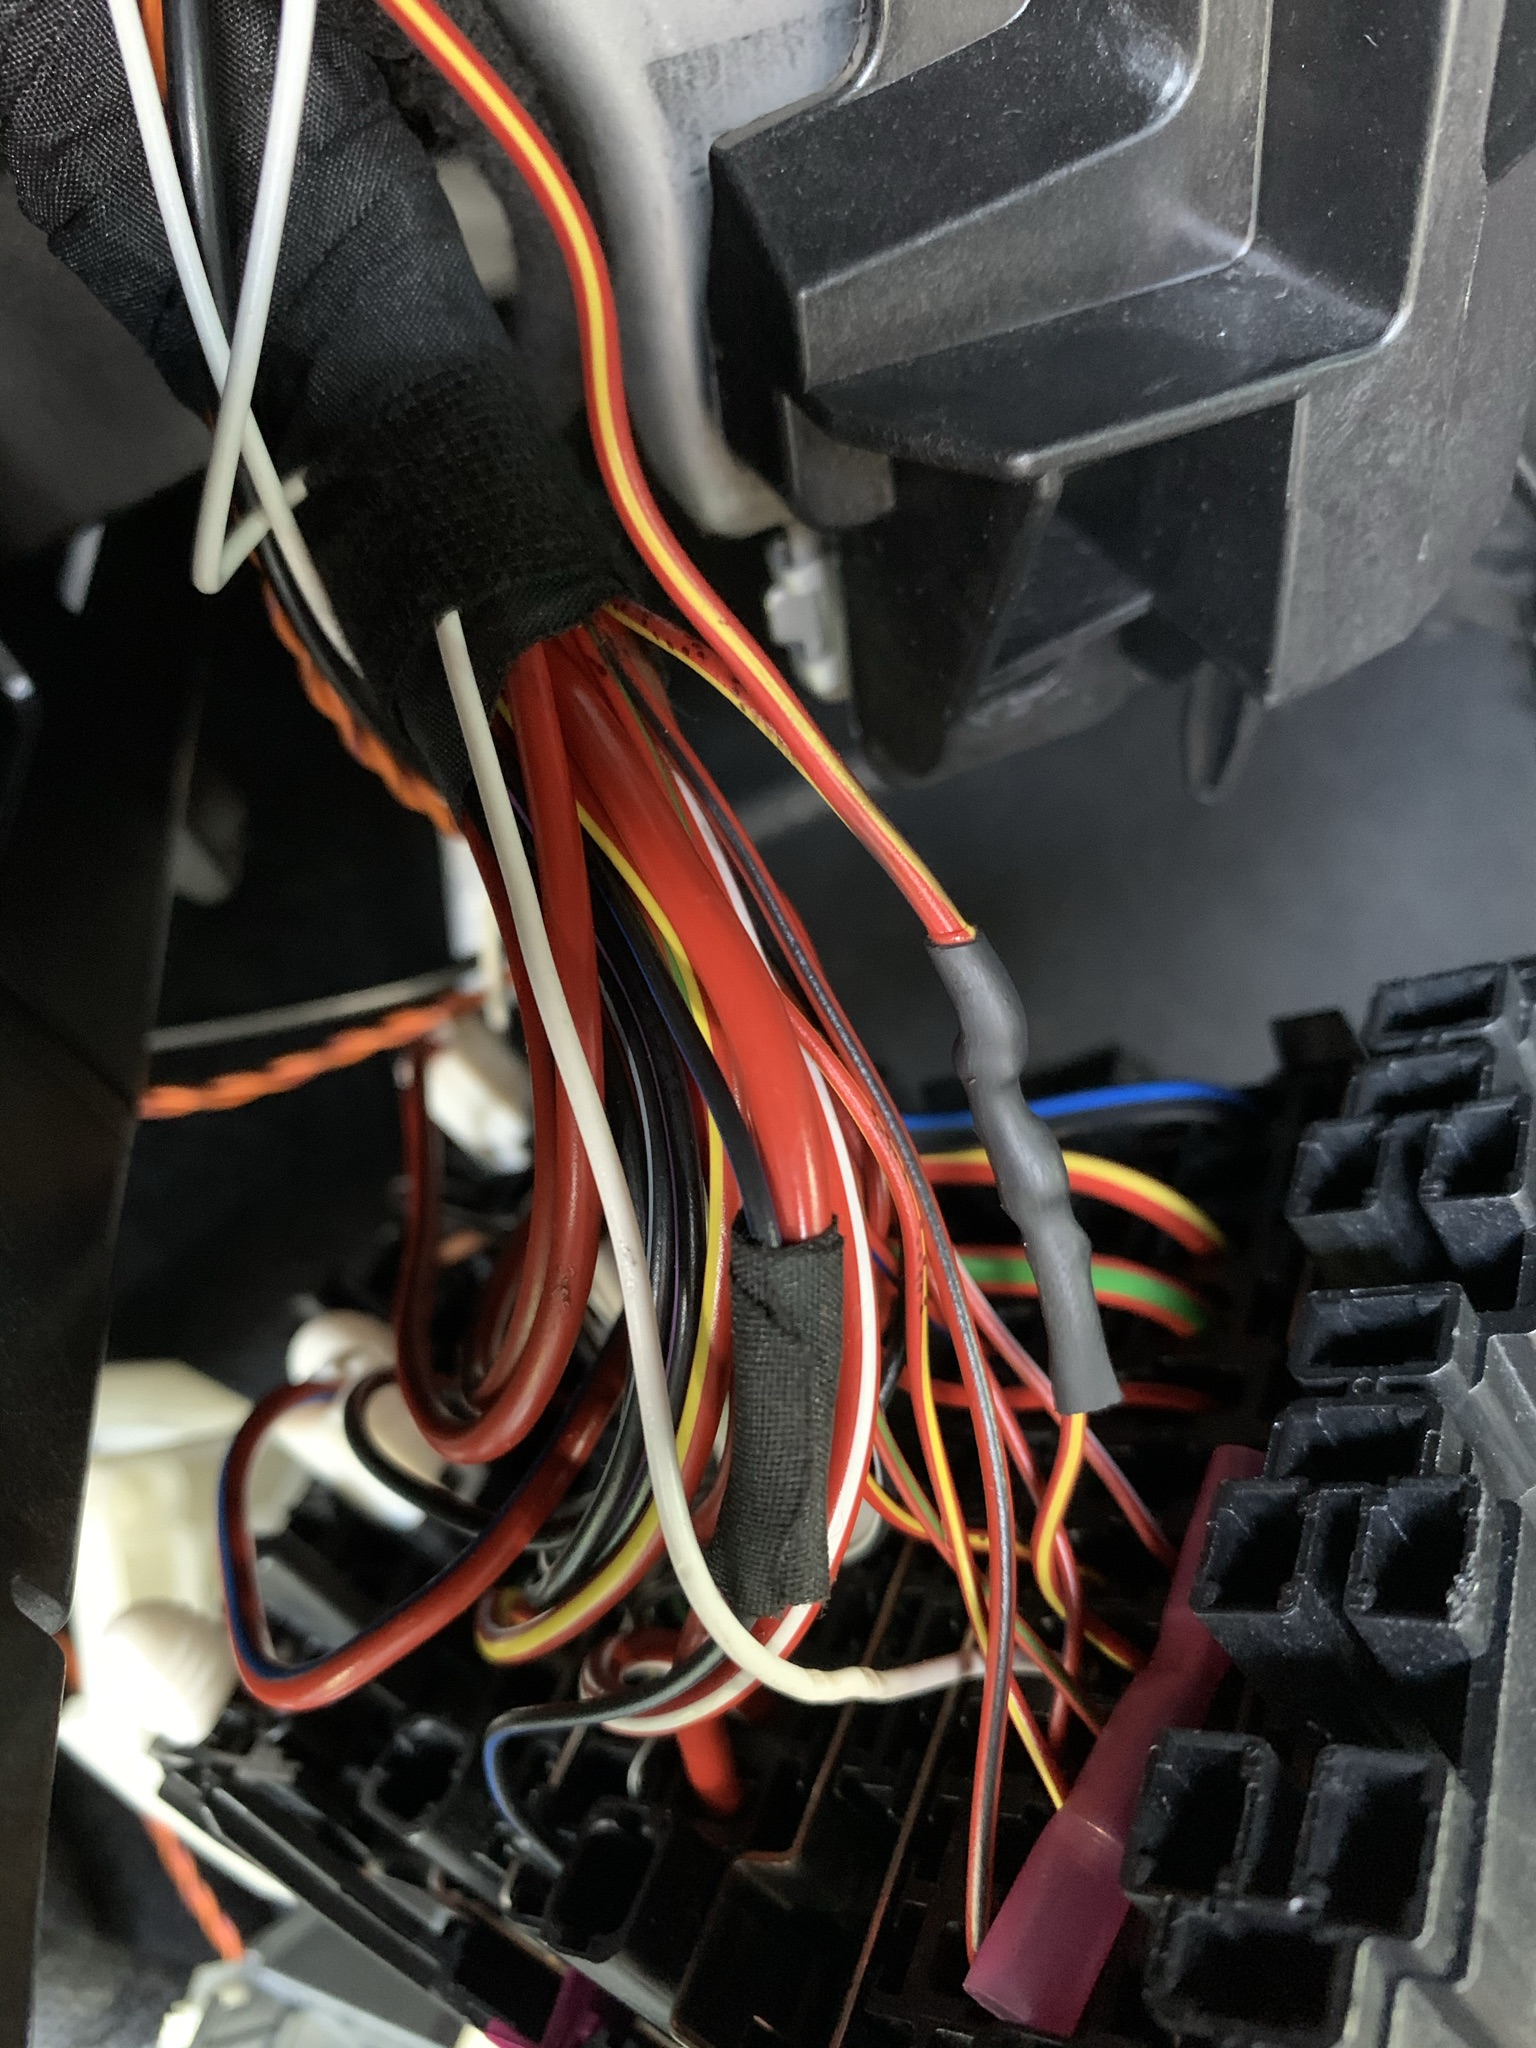
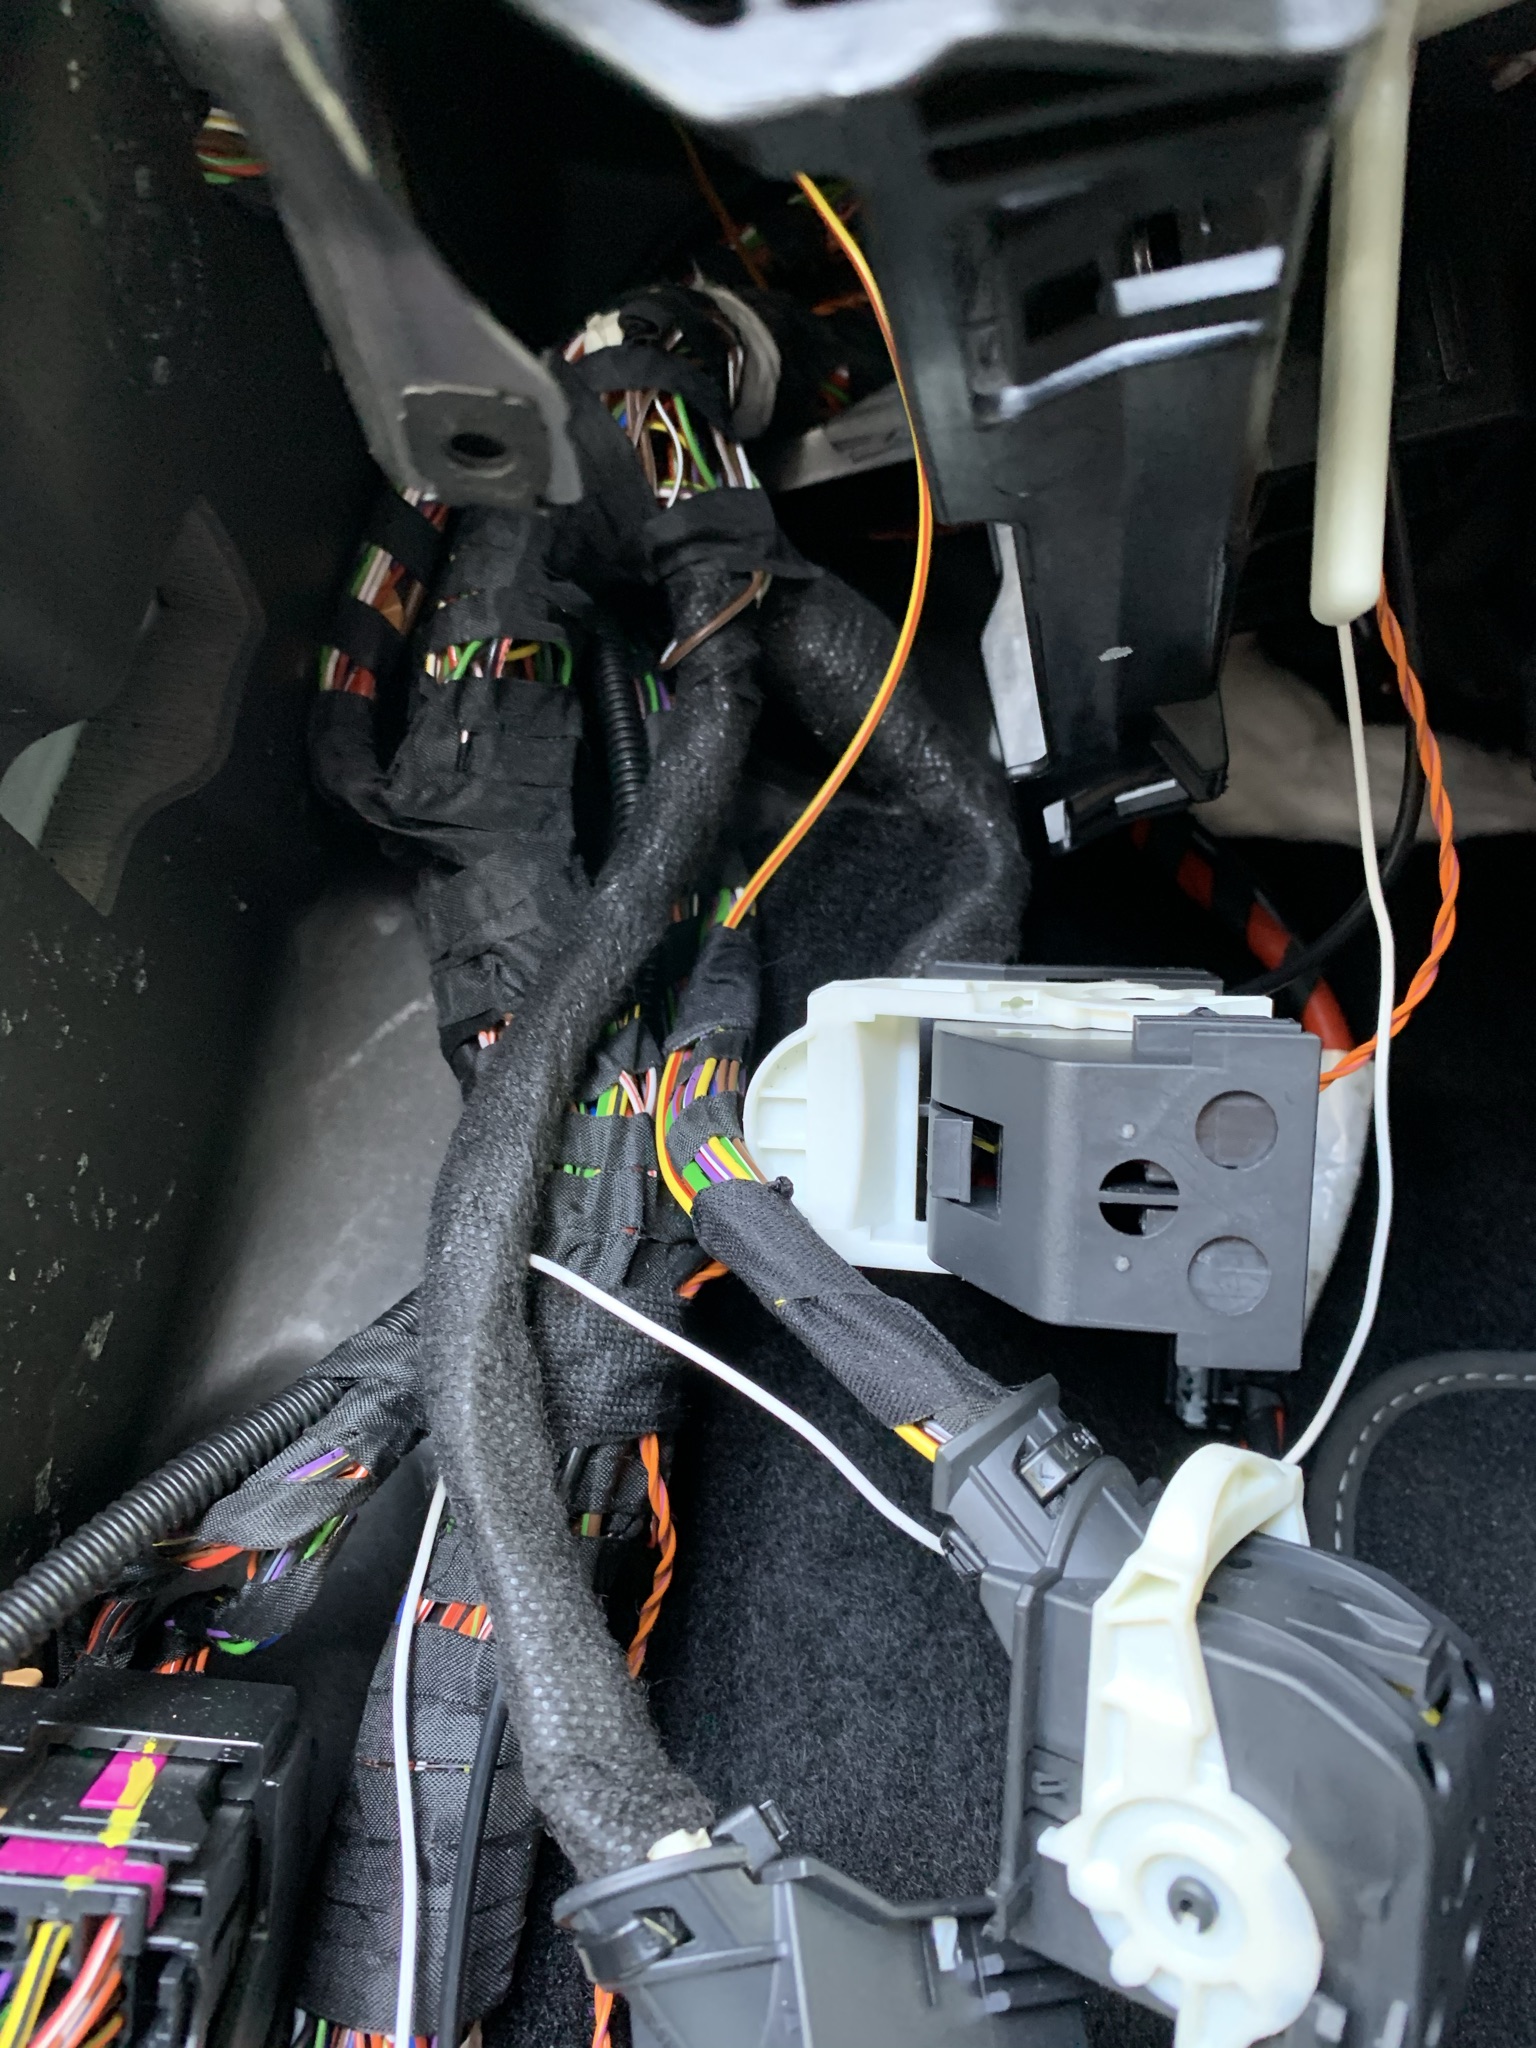
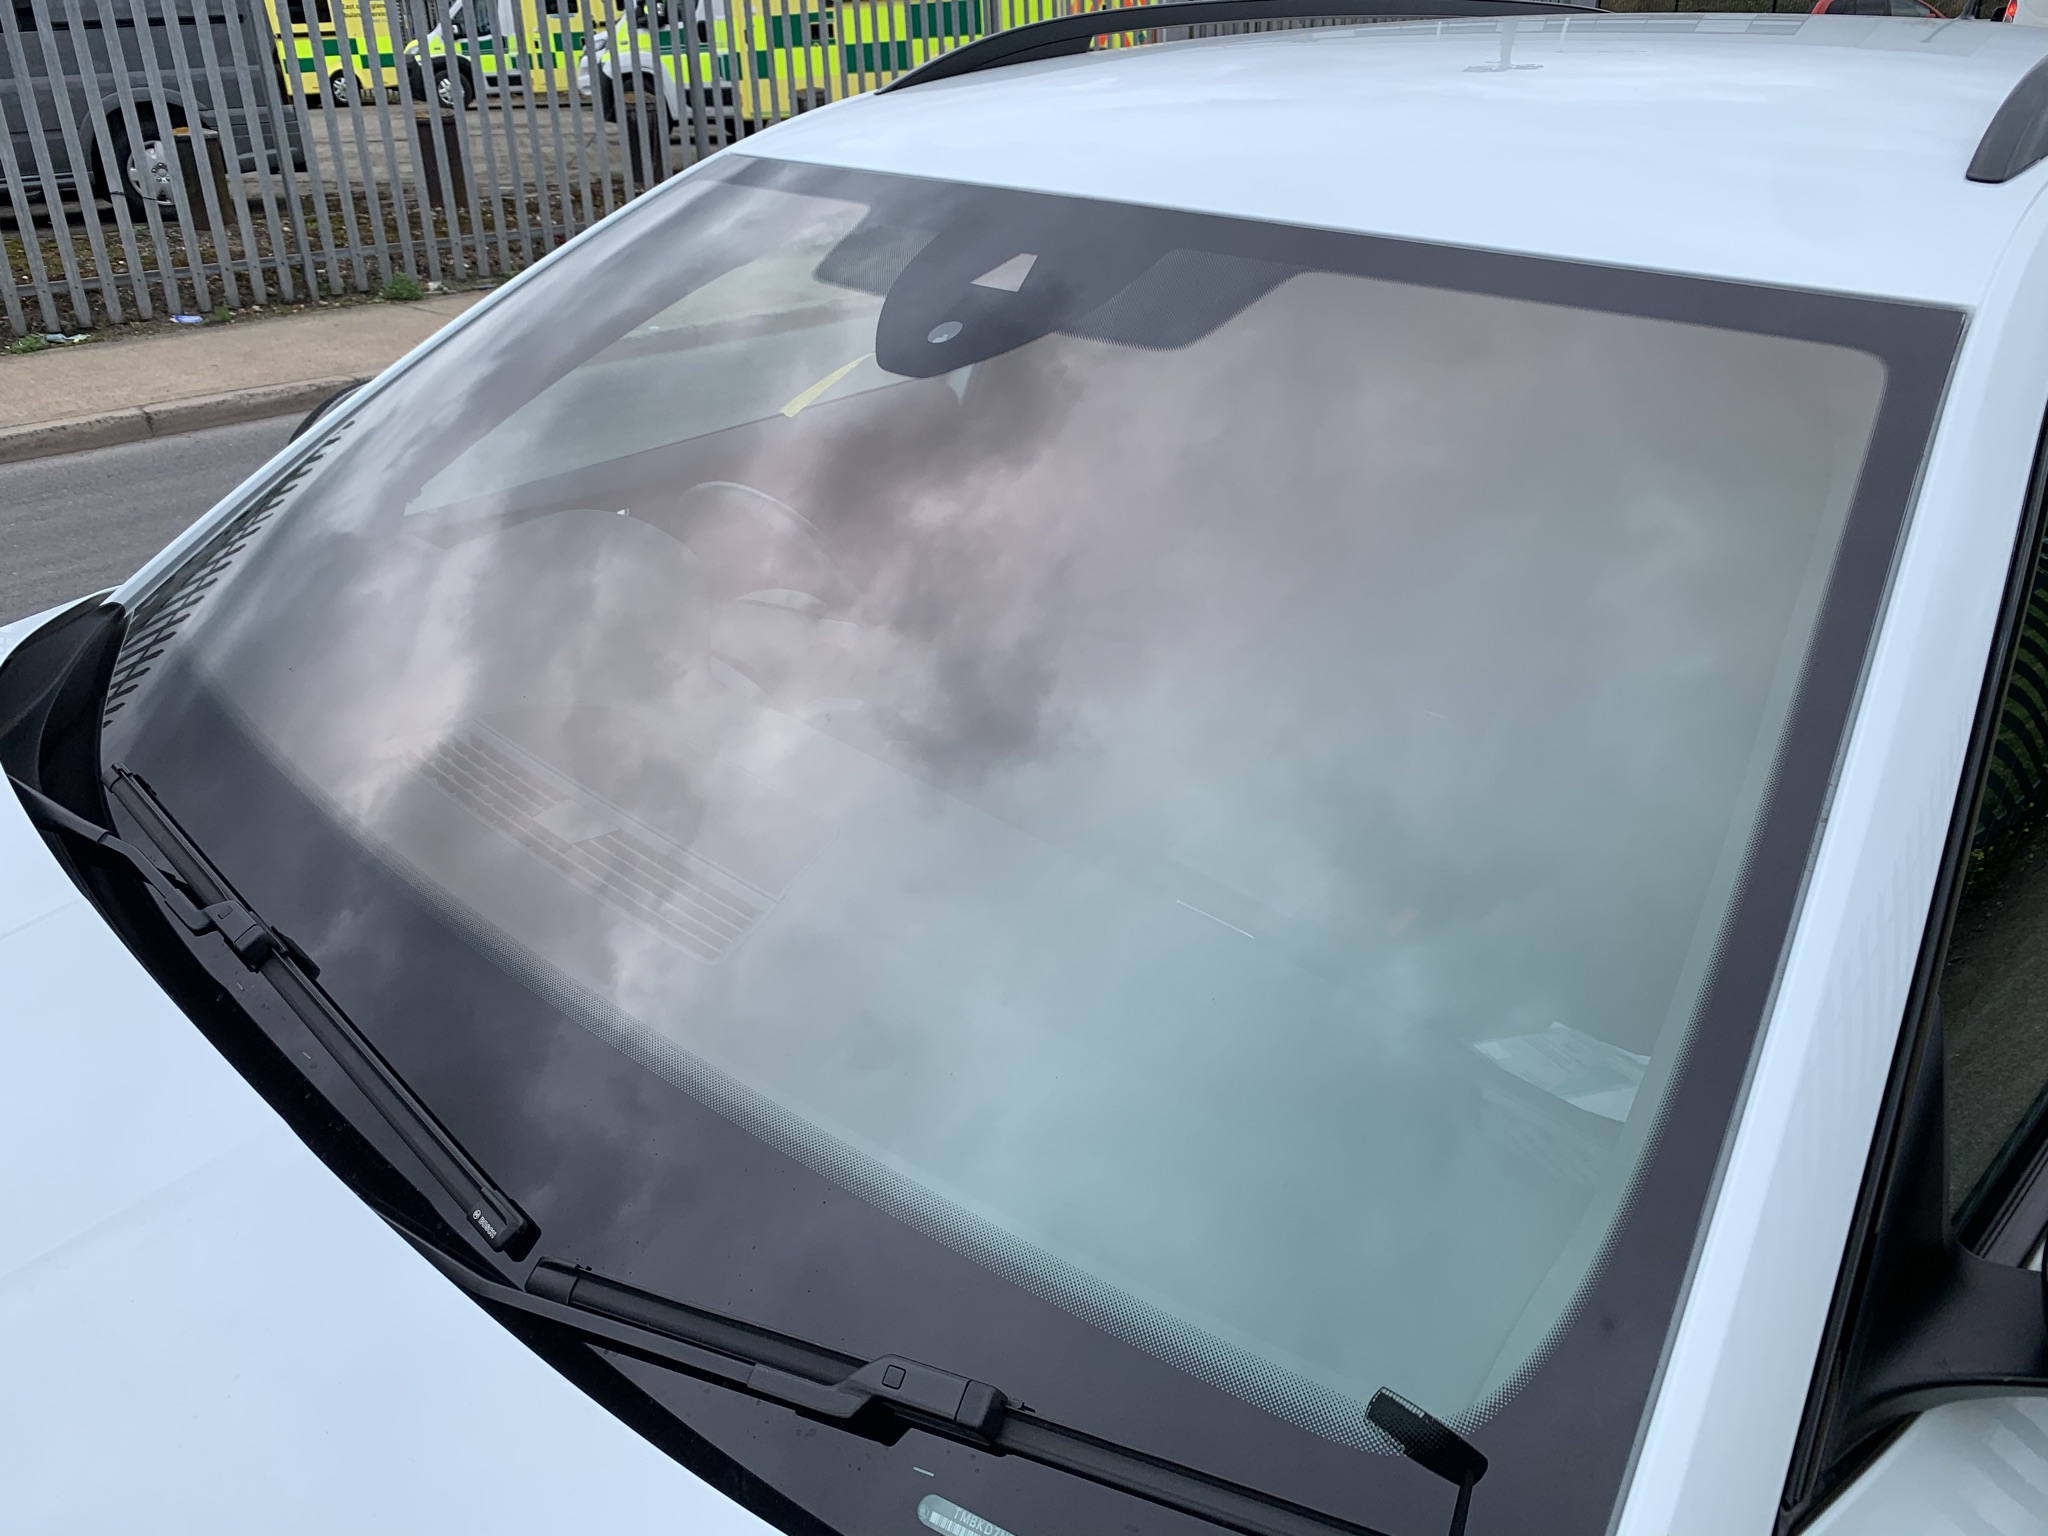
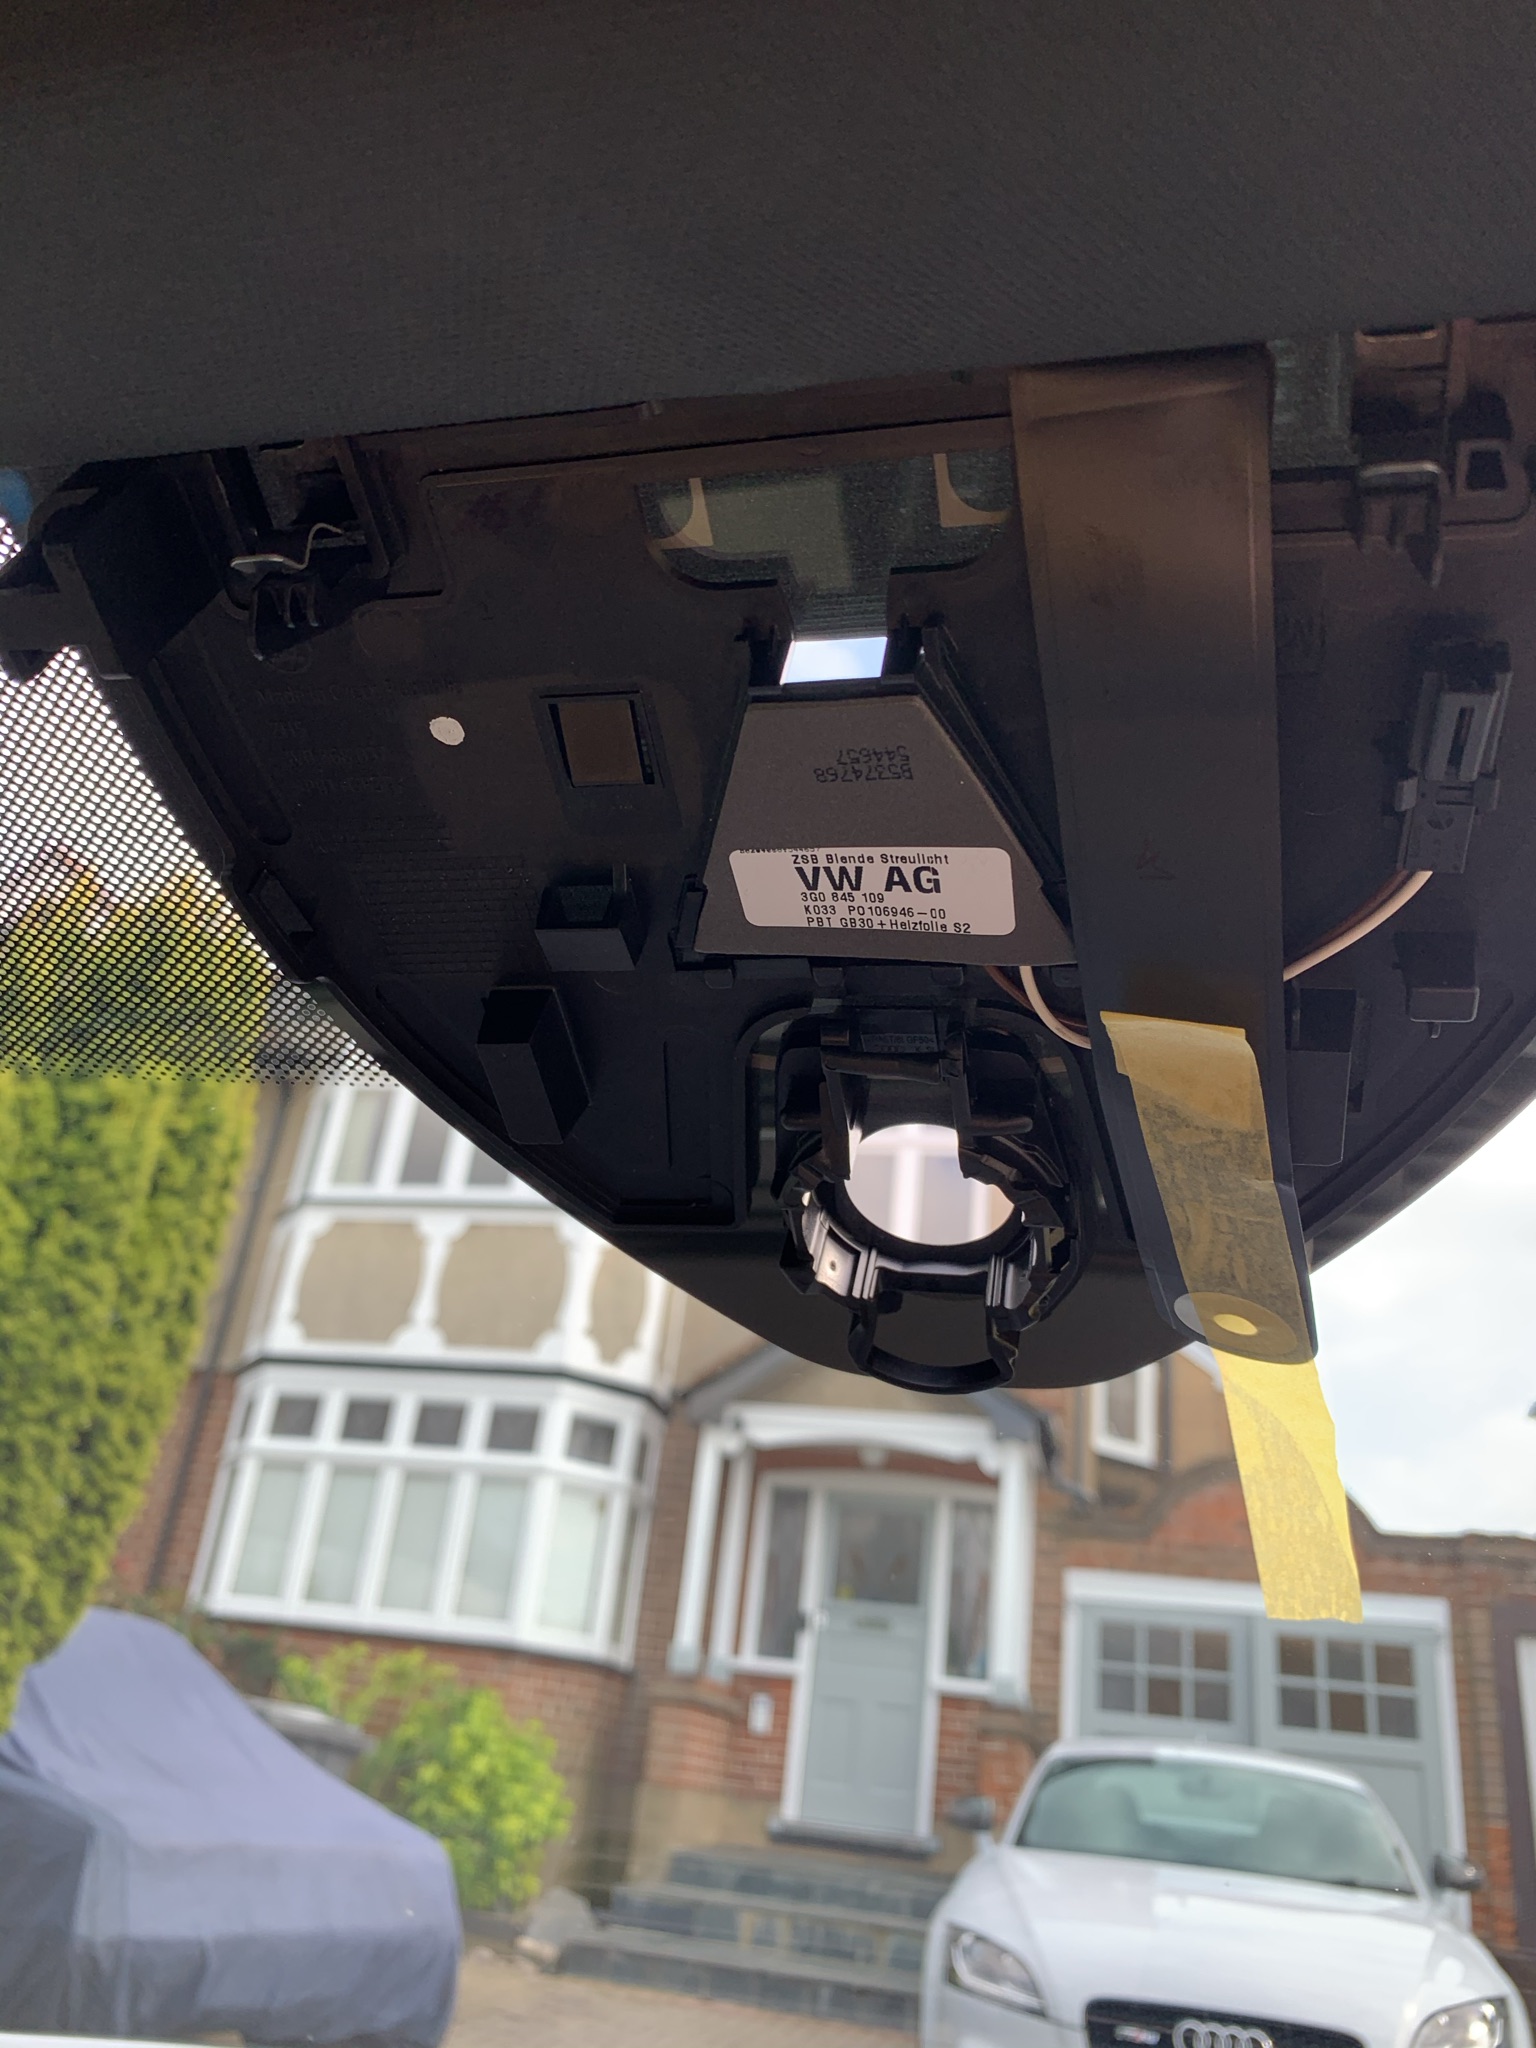
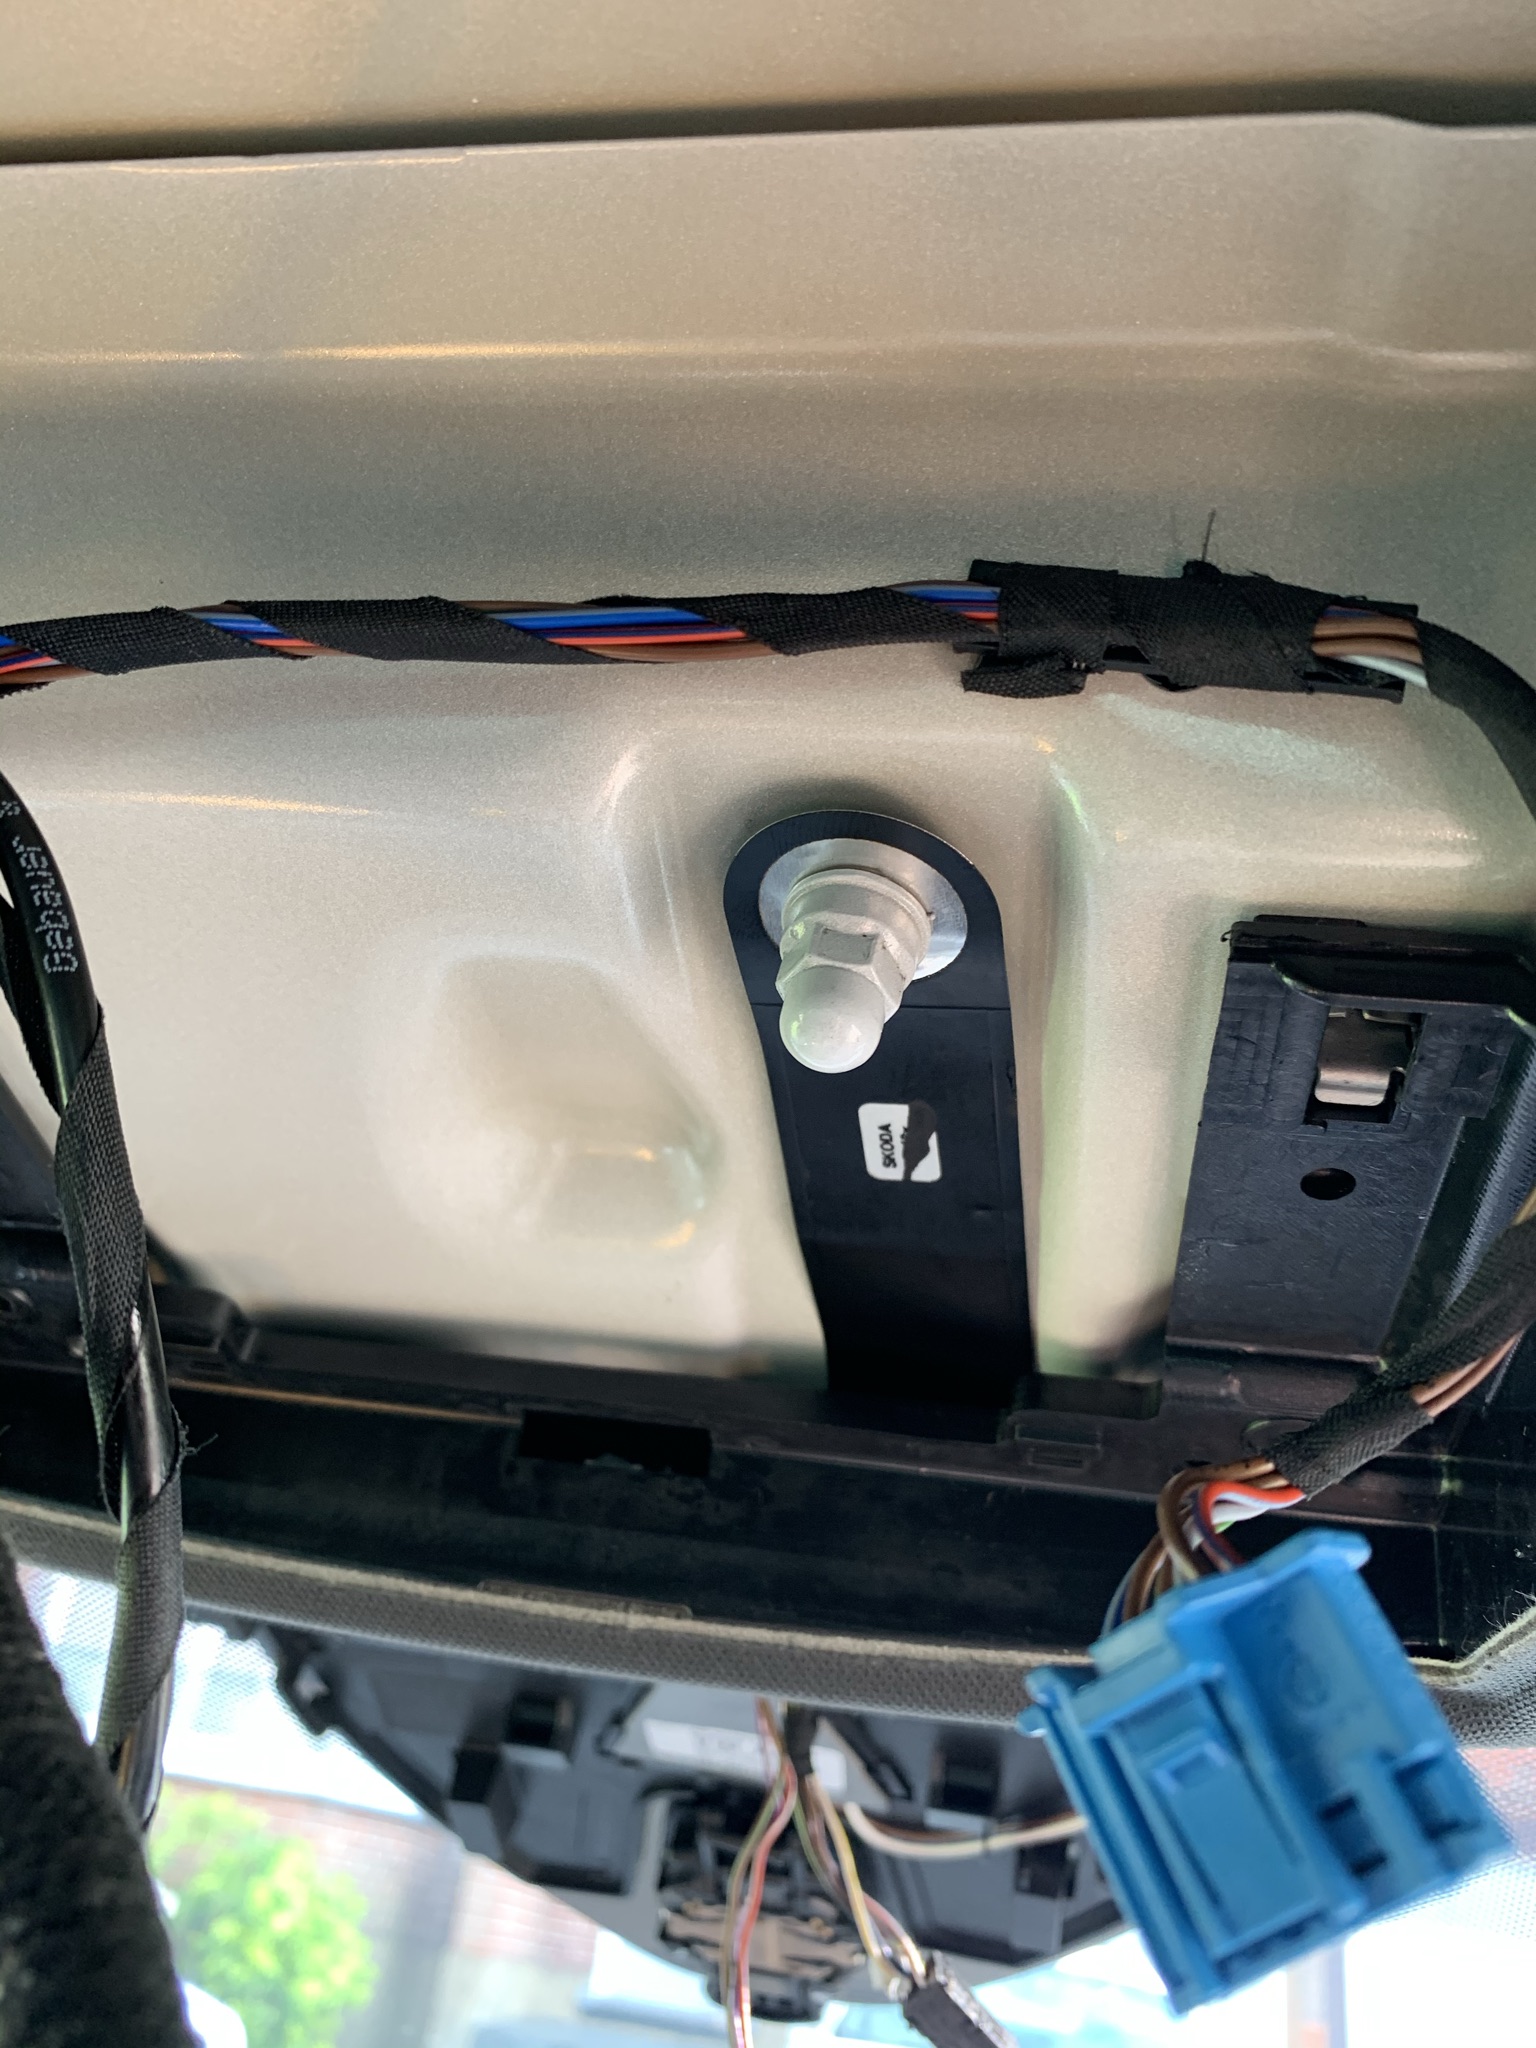
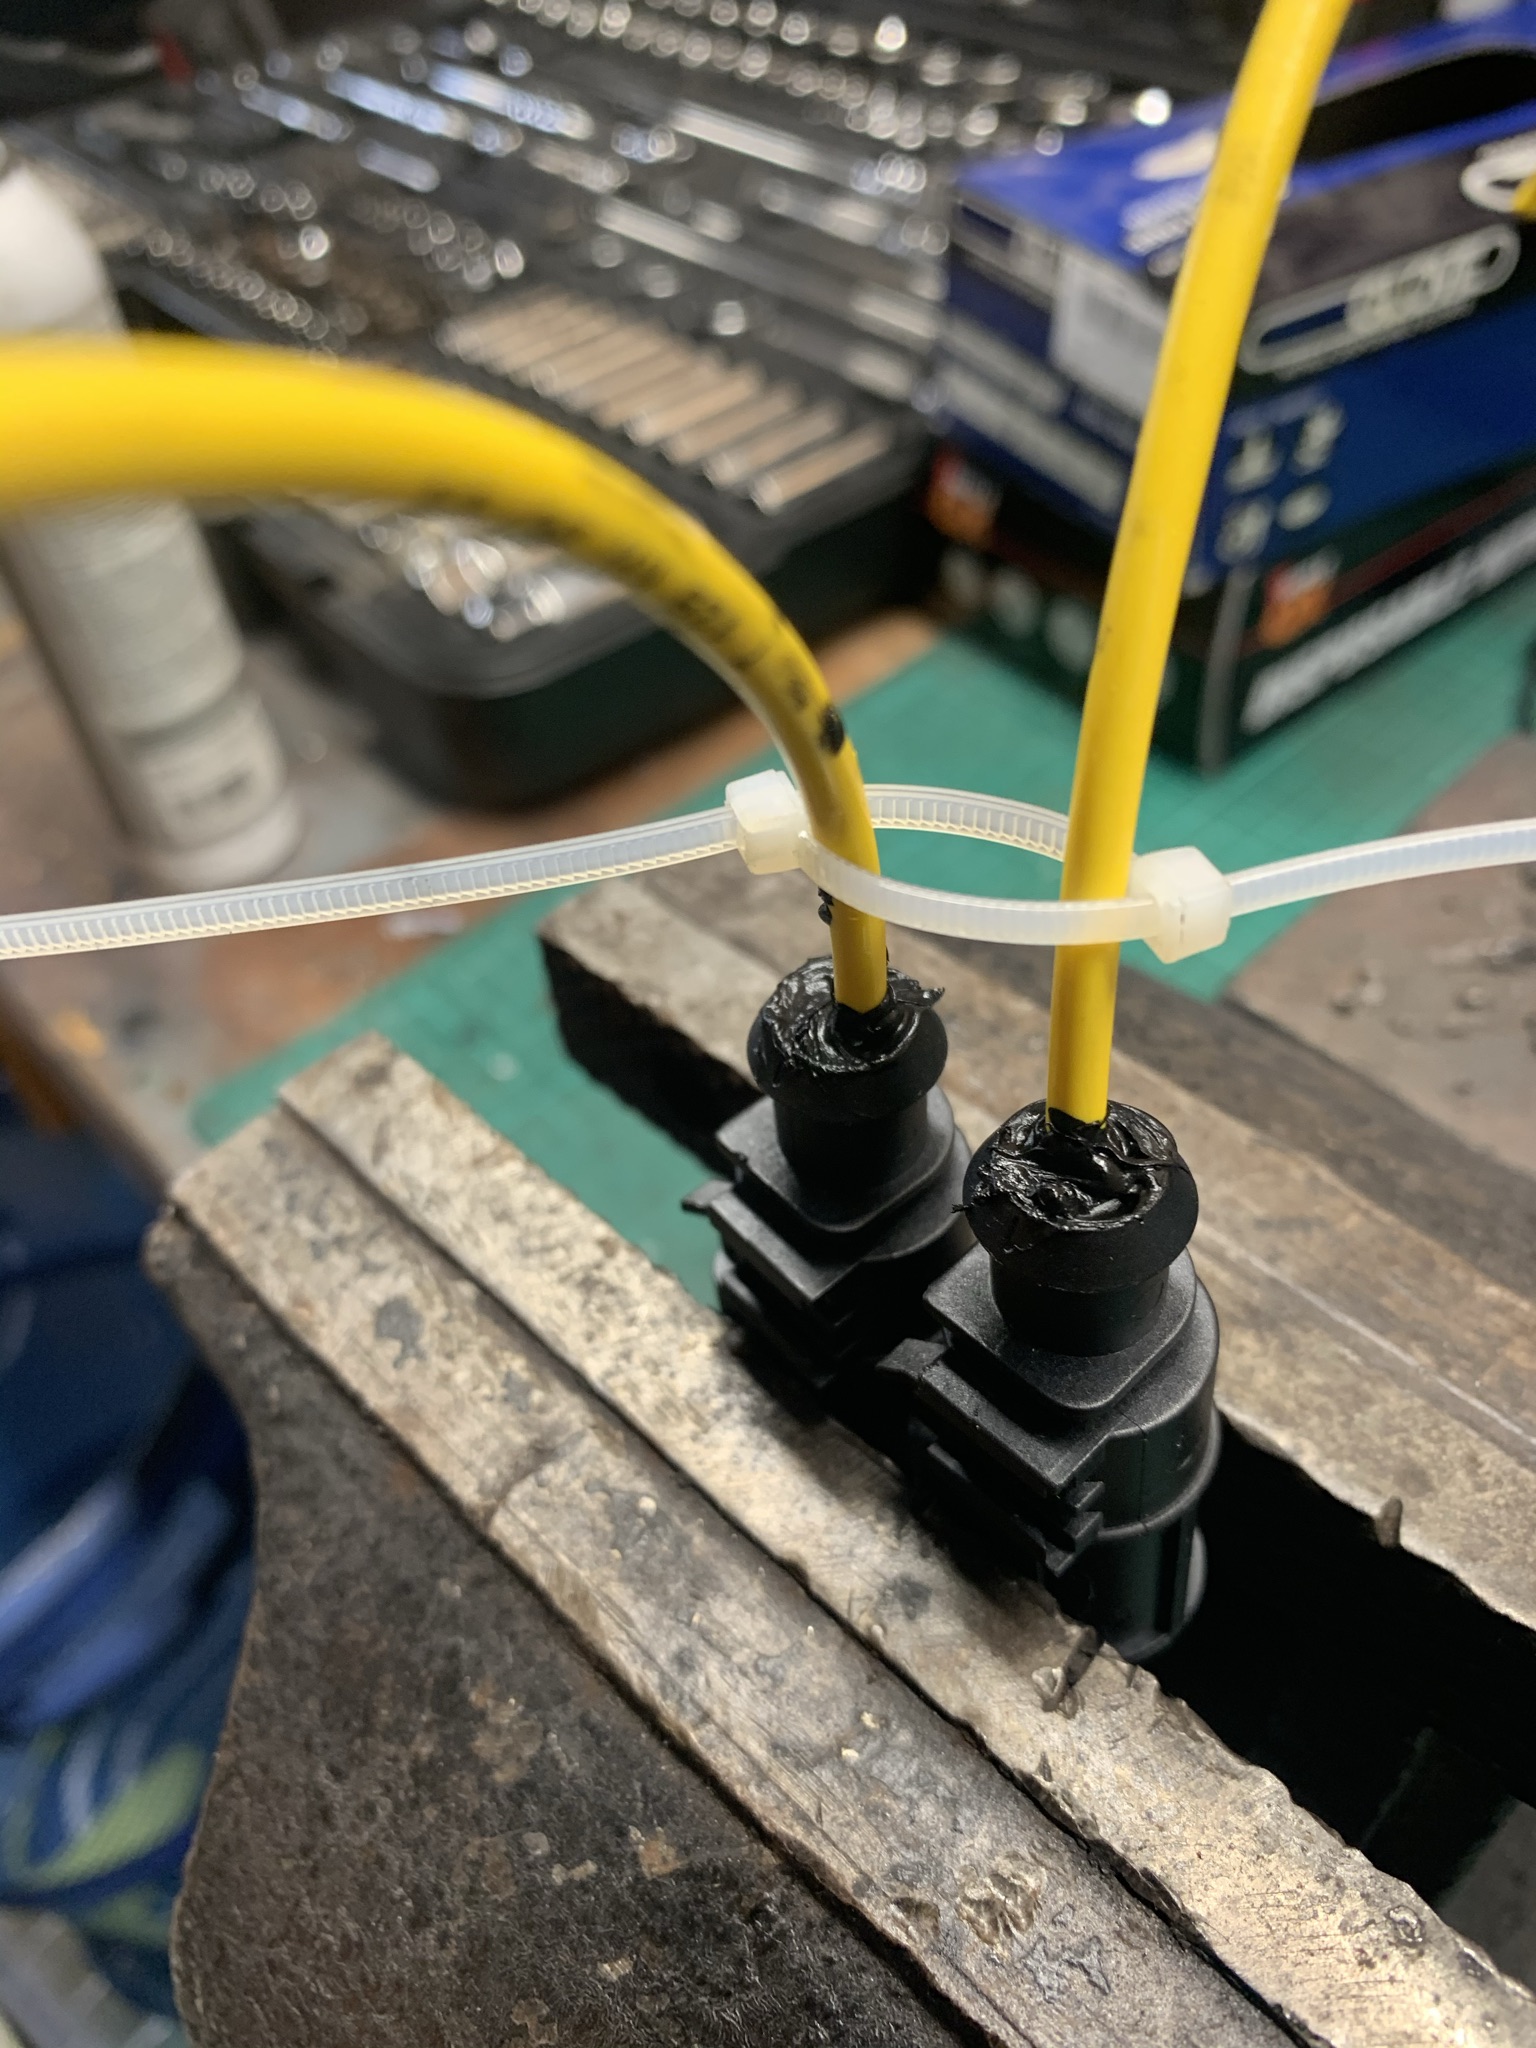
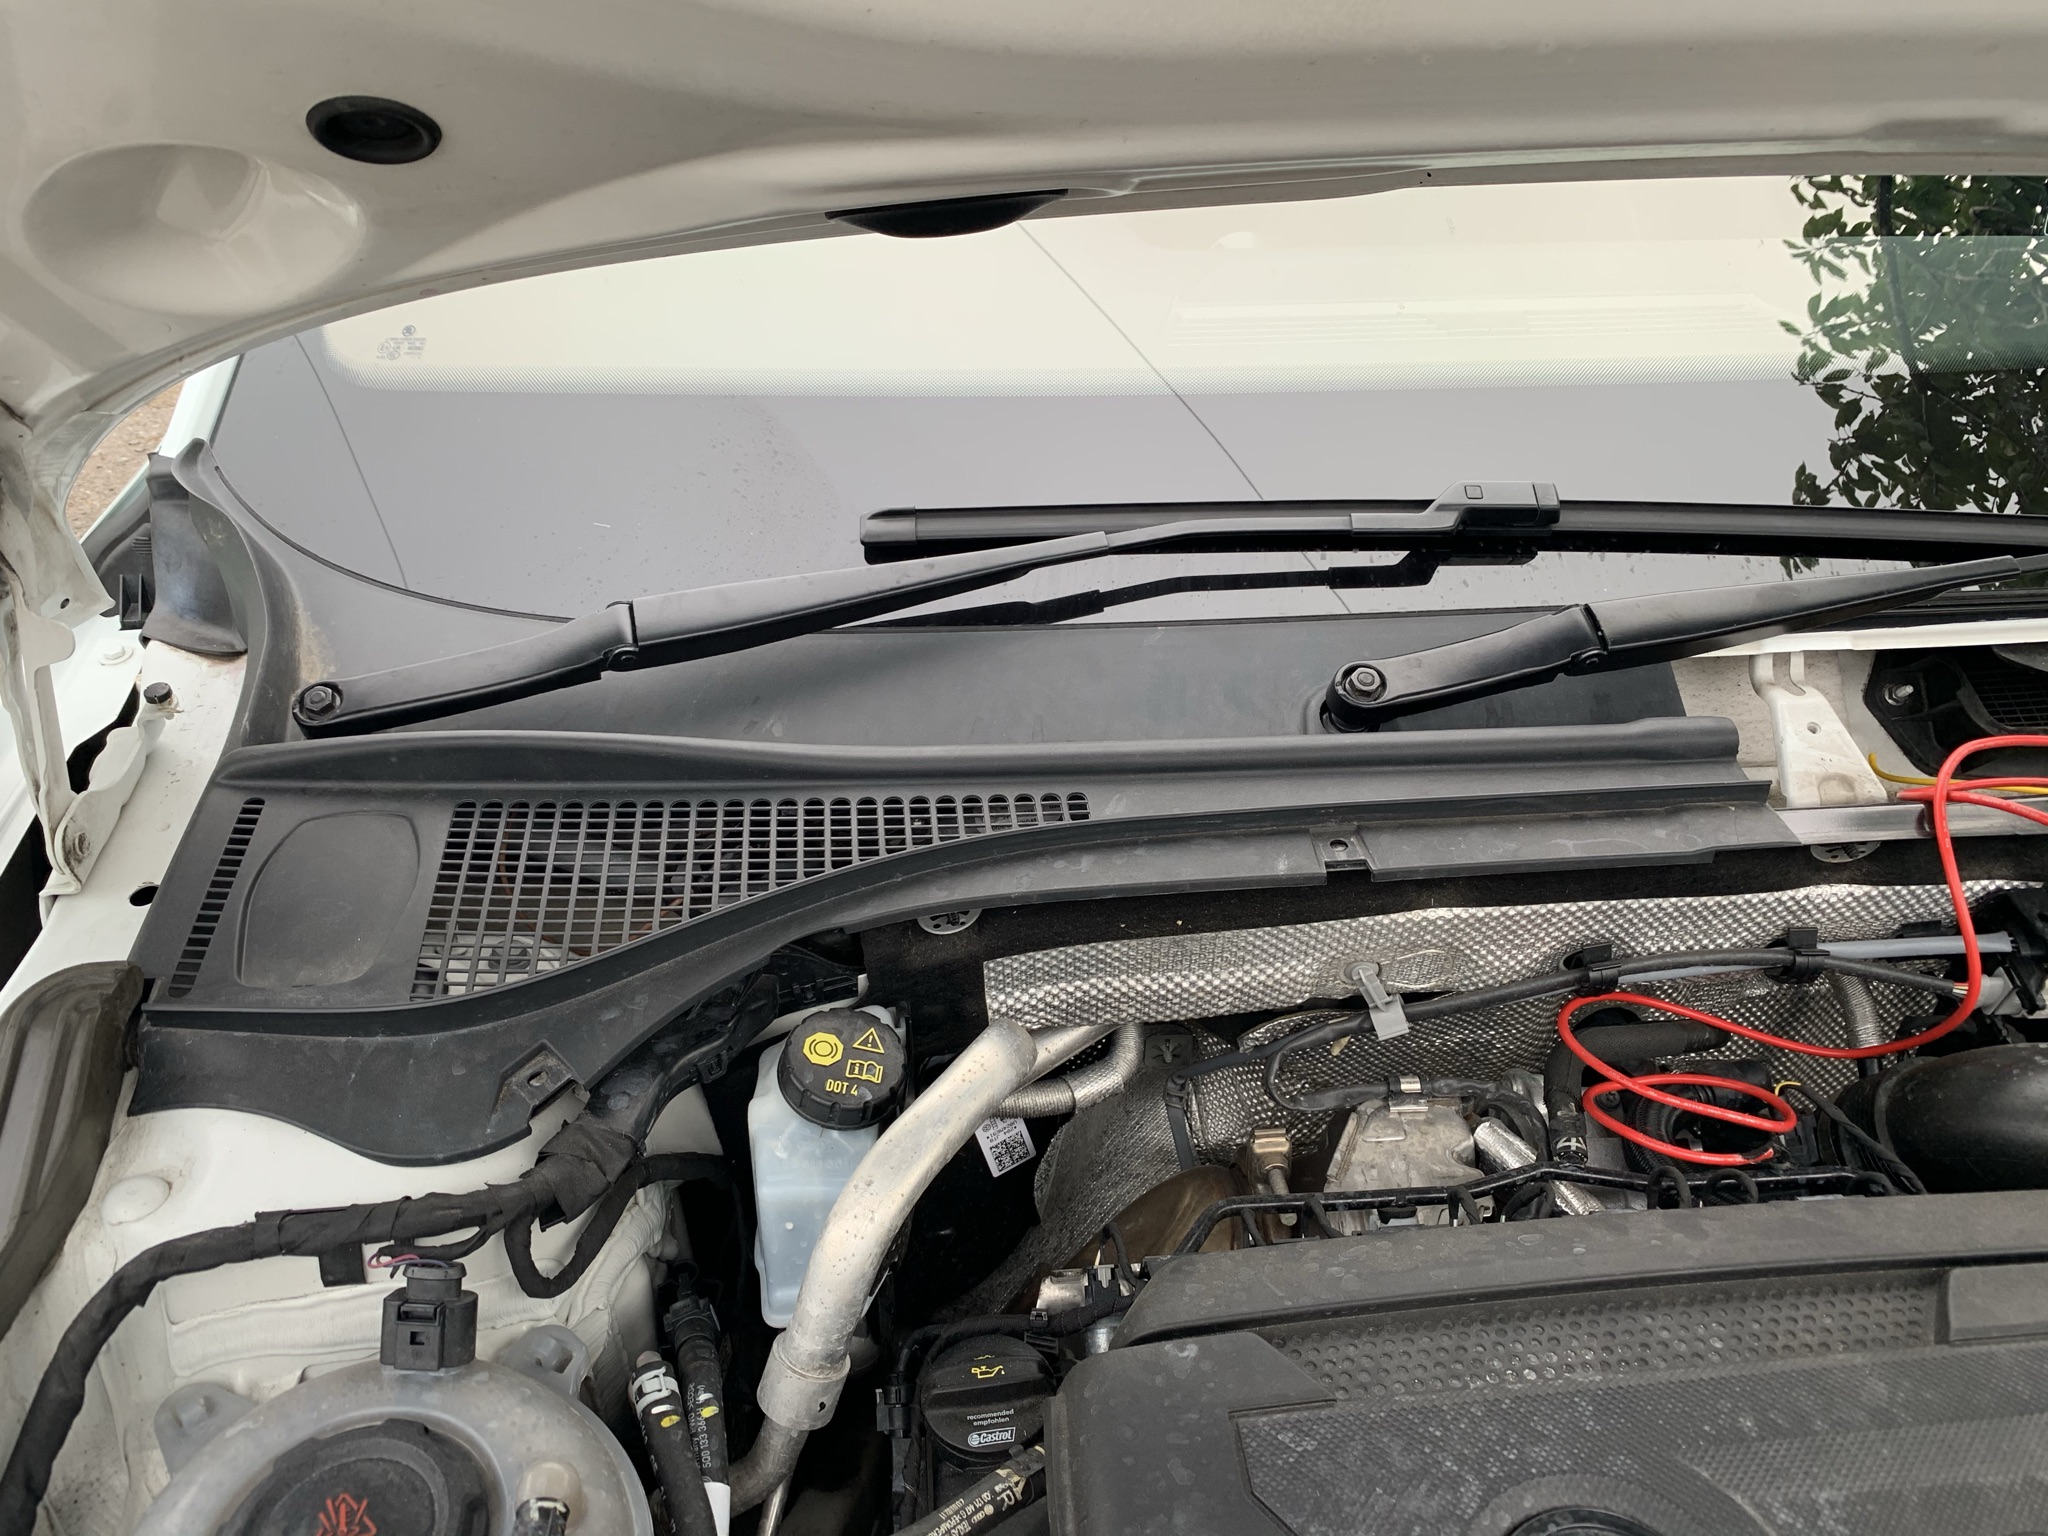
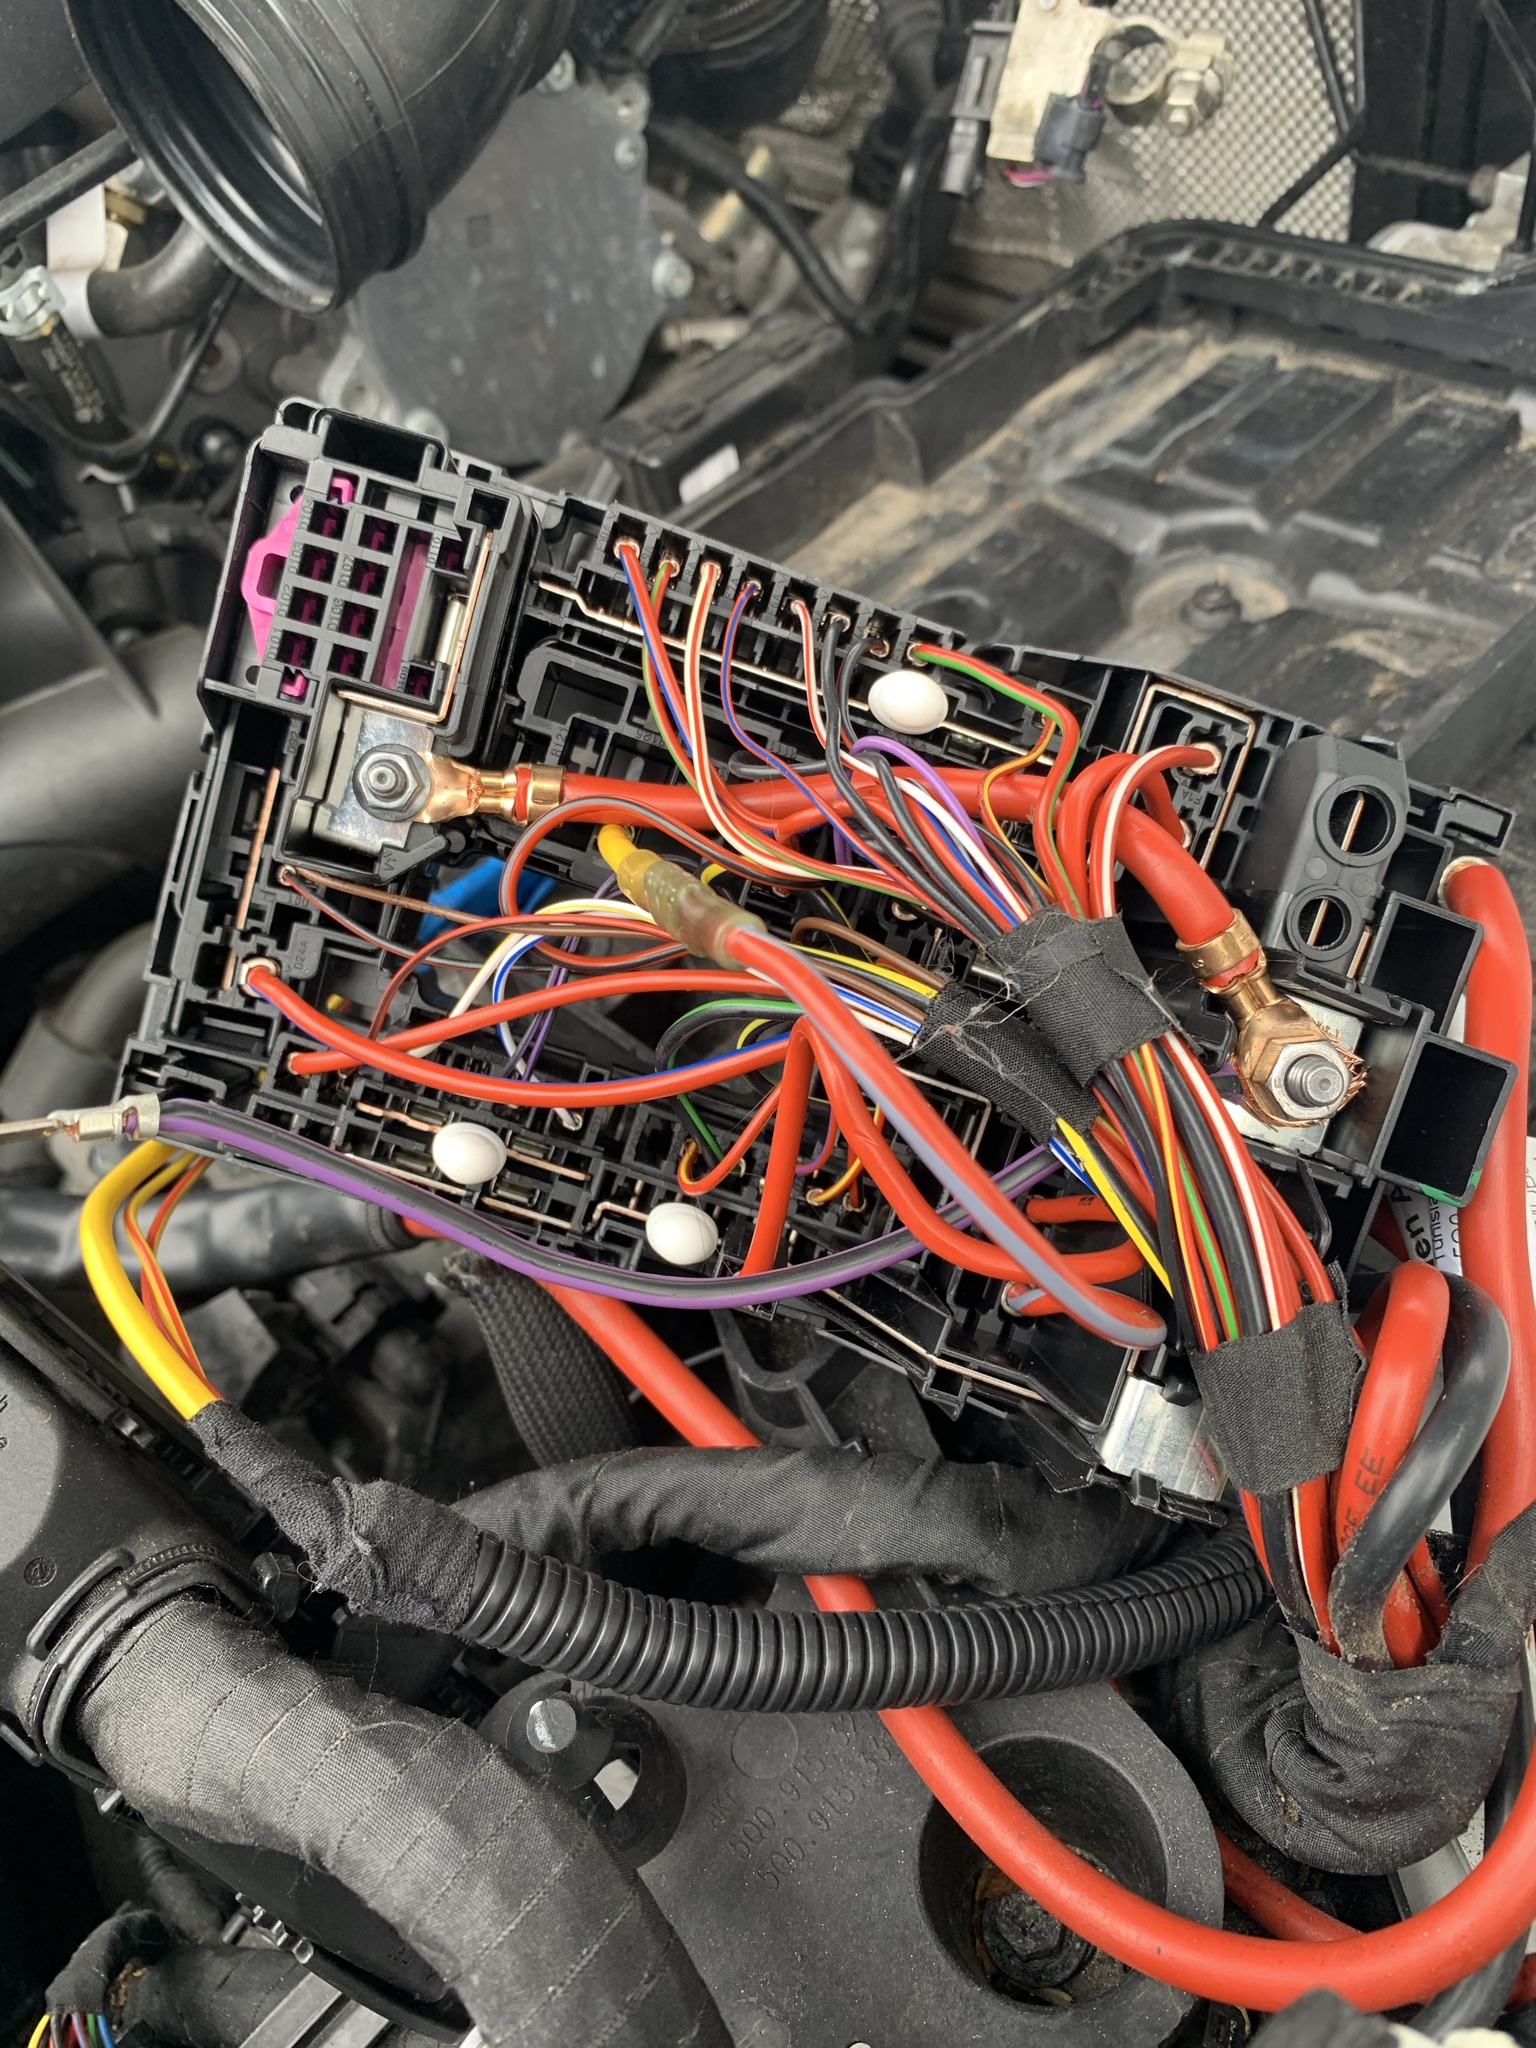
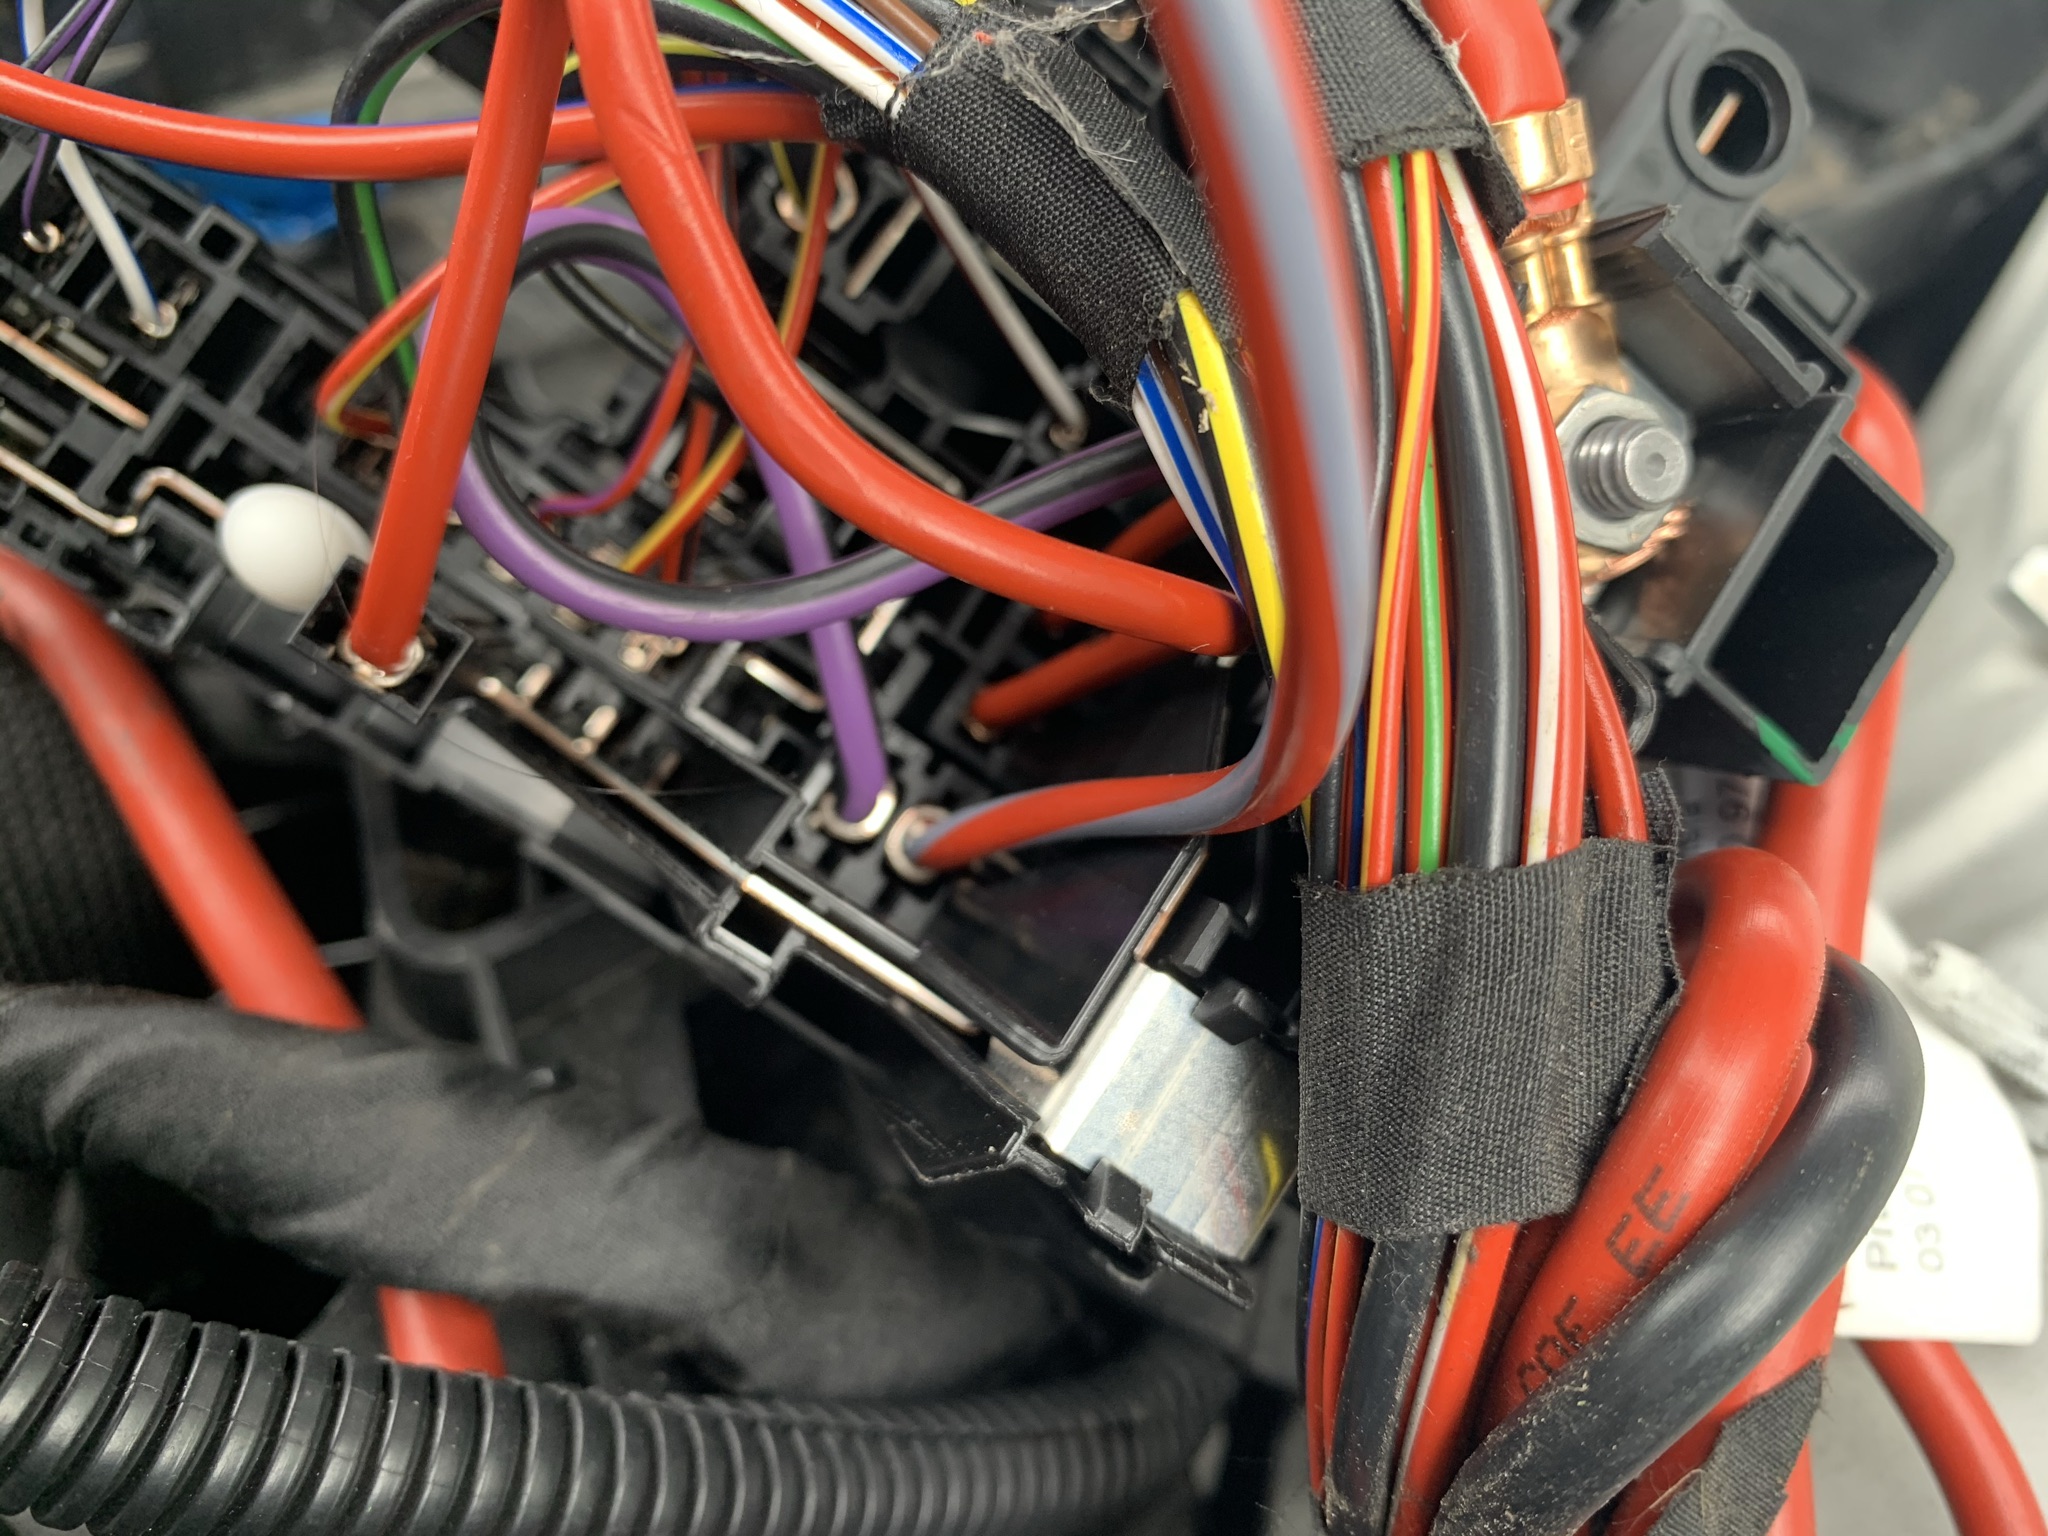
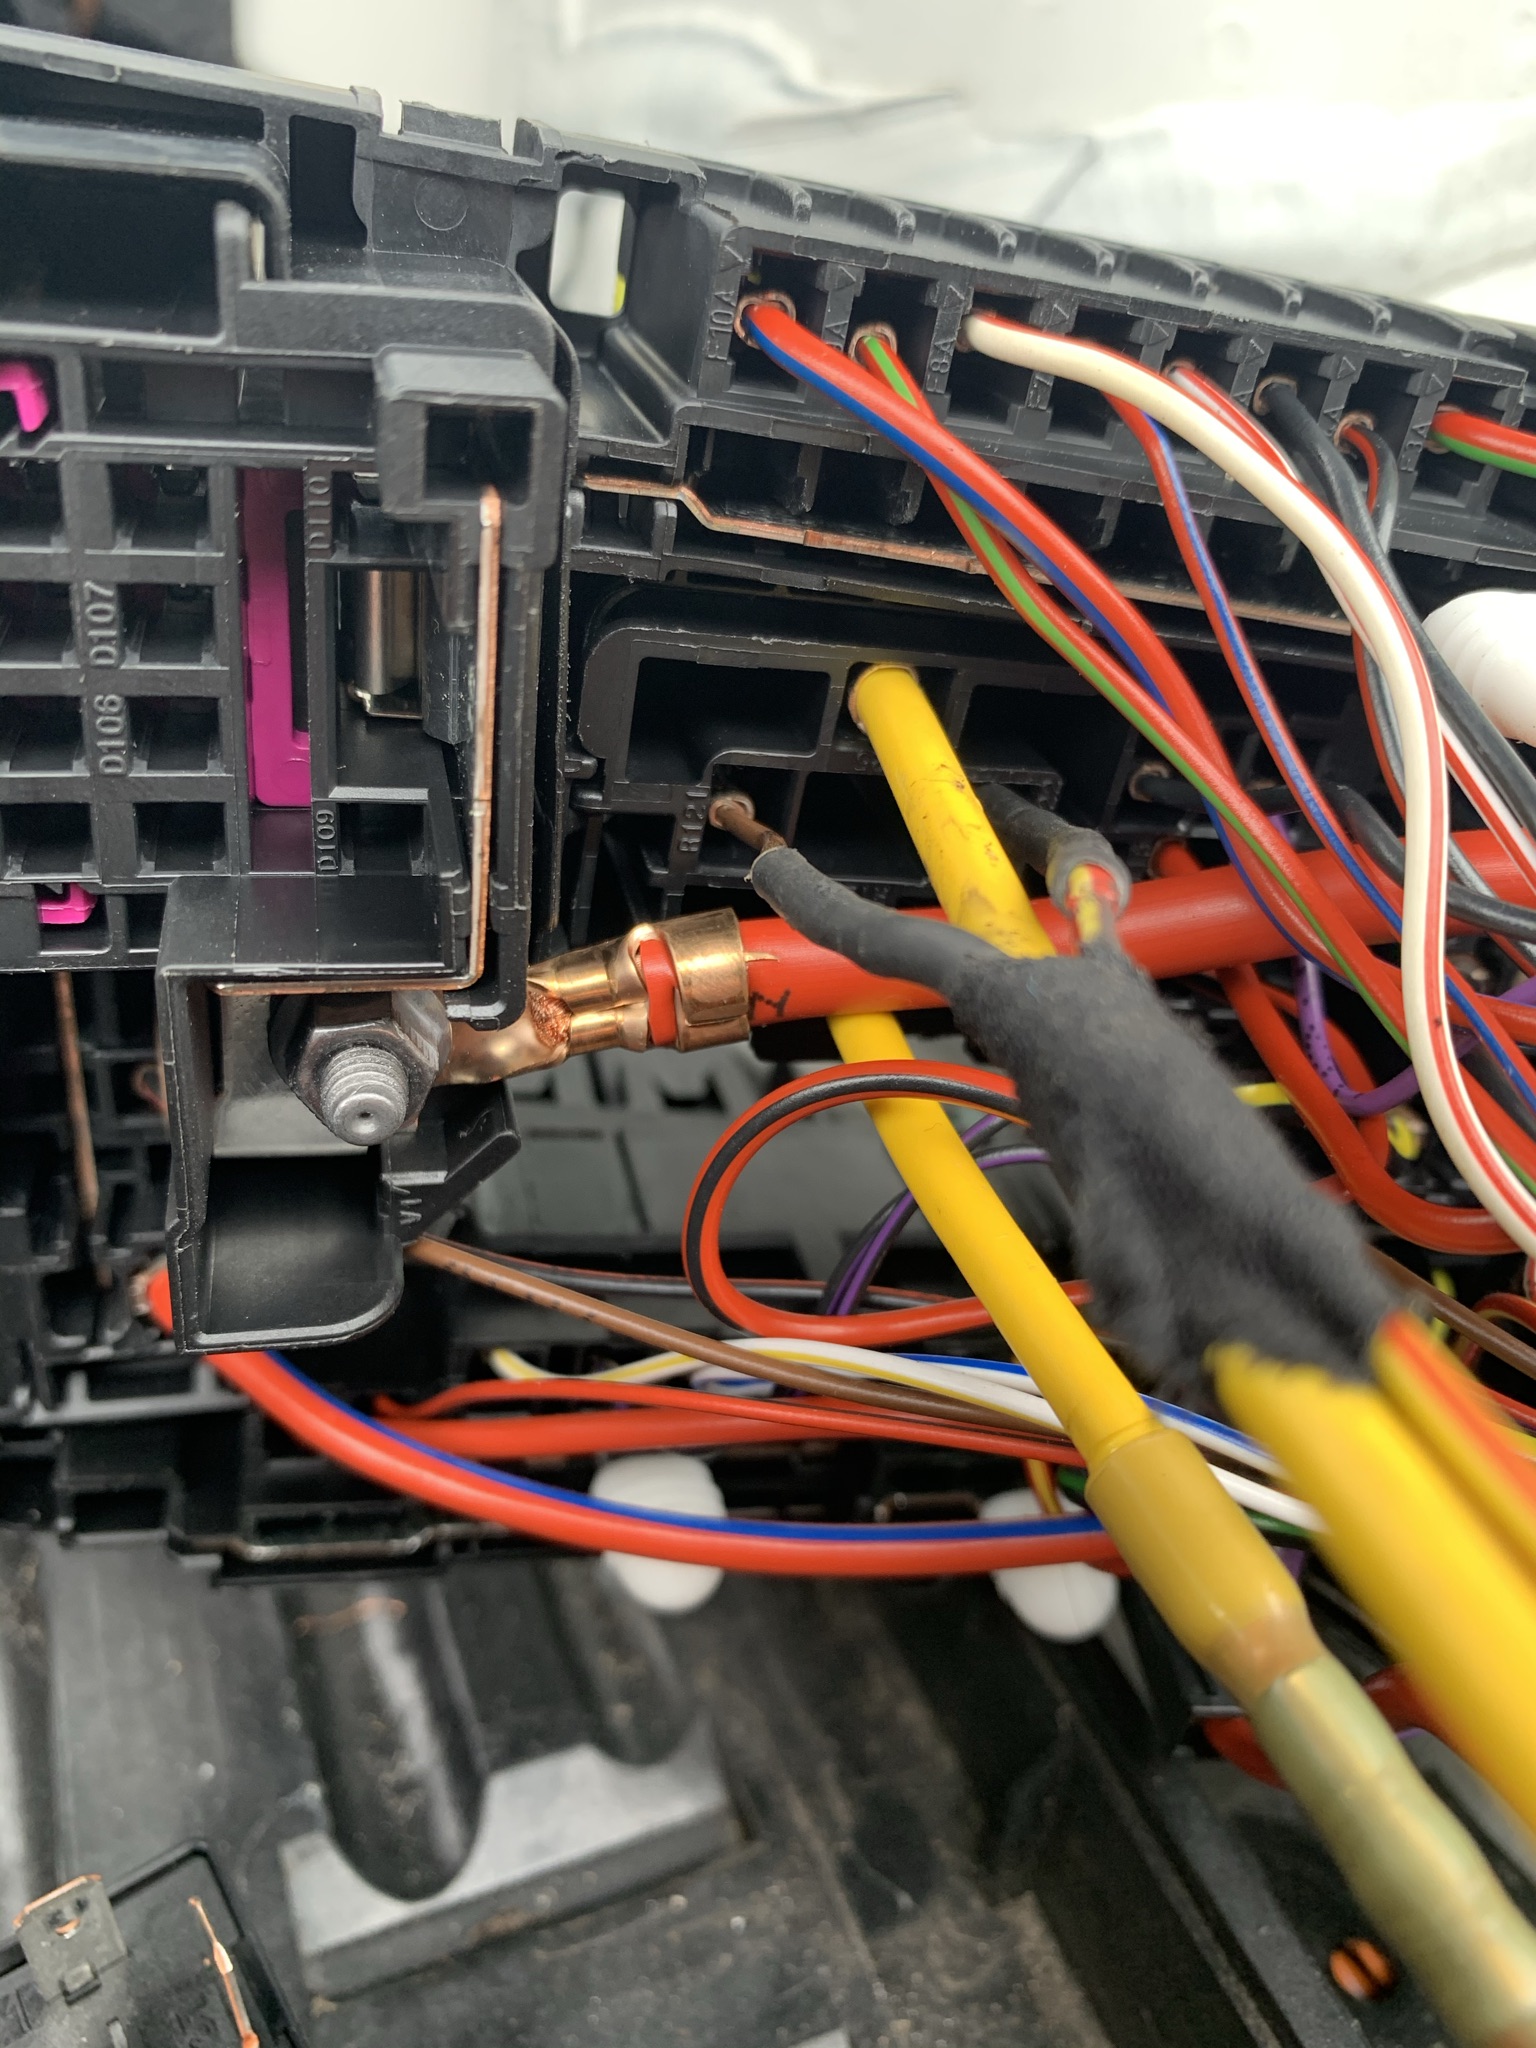
4 pointsHow to: Heated Windscreen Retrofit All of this is done at your own risk and is just meant as a general guide, not a full instruction manual. Just cause some things may work for my car may not mean the same for yours. Parts List 3V0845011AE - Heated Windscreen WITH A5 camera support - Will be different for everyone so confirm it first! 3V0907044DA - Dash Control Panel with heated windscreen button - Will be different for everyone so confirm it first! 071973851 x2 - Large Plug Housing for Heated screen connector 000979307E - Pins for large plug, comes with 2 pins so only order 1 000979425E - Pins for relay with 6mm wire attached, comes with 2 pins 000979027E - Pins for relay with 0.5mm wire attached. comes with 2 pins 4H0951253A - 645 Relay for main current flow 5Q0937507D - Relay holding plate, my car already came with but heres the part number 000979424E - Pins for Jtype fuse in engine bay fuse box with 6mm wire attached, comes with 2 pins N91186305 - 50A Slow blow fuse for heated screen 6mm repair wire - Only required 2 meters to be on the safe side (red) 0.5mm repair wire - Yellow/red repair wire 5m 0.5mm repair wire - Red/yellow repair wire 5m Fuse box terminal - Was not required as it splices into already used OEM pin for climate control 000979009E - Small pin for BCM plug with wire attached Varied Conduit - For wrapping the under bonnet looms to give an OEM feel and protect them Loom tape - for wrapping wiring and securing inside and outside cabin Heat shrink crimp connectors - These are genuine repair methods so order both 1mm and 6mm versions Silicone - For sealing the exterior connectors You will need VCDS & ODIS for this or equivalents. Once you have your parts together and your screen is fitted you will have 3 additional connections, 1 in the headliner, 2 at the base of the windscreen. Wiring Diagram For anyone that fancies going alone and doing the wiring themselves, here is the only wiring diagram you need. Fitting ground wire To start you'll need to drop the front interior lamp, this is done by opening the sunglasses holder and pulling the trim off around the SOS button and around the interior light buttons. Pull the interior light unit out of the housing and if need be remove the torx screws to drop the entire assembly out of the way. Here you will see the 10mm ground stud with a nut on it, remove the nut and fit your ground strap before tightening back up - DONT go crazy as it will tear the strap. Run wires through bulkhead You'll now need to run your 2x 0.5mm wires through the bulkhead, this can be fiddly so a coat hanger of some kind makes the job a lot easier, to start, remove the battery and battery tray to expose the main wiring loom which will be under a plastic cover and disapear into the passenger rear most corner of the bulkhead, the best way to do this is to poke a small hole from the outside in with the coat hanger, then from inside the car, go up under the glovebox and behind the blower motor, you will just see the end of the hanger, attach a wire to it and pull it back through. It might take a few tries to get right and just make sure you don't tear the boot or damage other wires. These 2 wires will be going from the interior fuse box area to the under bonnet fuse box so run them either inside the original loom or use some small conduit to keep them protected under the bonnet from road grime and heat. Whilst you are here, get your 6mm red wire and run it from the under bonnet fuse box area, through the plastic casing under the battery, then up the loom which heads into the scuttle panel area. Again, protect this wire with conduit or run it inside the original loom. Wire up windscreen power supply Now you have the large 6mm wire in the scuttle area, you need to remove the wiper arms which is done with 2x 13mm nuts under plastic covers, once the nuts are off, gently press on the pivot point of the wiper arm to release the entire arm making sure not to damage the screen. There are 4/5 metal clips holding the plastic scuttle covers down, these just pull off. Then starting at the outer most edge of the screen where it meets the plastic, slowly lift to remove all the plastic covers. Do this on both sides to fully expose the lower screen/scuttle area. You should now see your 2 large connectors with brown wires running into the windscreen. You will need to run your 6mm wire to both of these. You may choose a different method but mine was; place the 4mm wire with male pins inside the connector and push the purple tab inside the connector across till it clicks, I then placed the connectors in a vice and filled the rear with silicone to prevent any water getting in. The yellow wire was then cut in half. I ran the red wire all the way to the drivers side of the screen and used a OEM crimp connector to attach the 4mm wire to the 6mm wire. For the passenger side, I cut some of the insulation off the red 6mm wire near the passenger side and soldered the wires together. You will need a big soldering iron for this as the wires are massive. Both connections should be water tight. Secure the new wiring to the original loom and play close attention to making sure the drivers side connector will not make contact with the wiper motor as this will rip the wiring apart. Also make sure the connectors are not sitting in the lower section of the scuttle panel as this gets full of water, the flat part of the connectors should not be kinked either as it will damage the flat wires. Refit all the plastic trim and wiper arms - Use the dirty marks on the windscreen to line the arms back up, short wiper always goes on the passenger side. Wire up interior fuse box Next we are back inside the car and need to remove the glovebox to access the rear of the fuse box. This is done with around 8 torx screws both under and inside the glovebox, slowly lower the glovebox and make sure to disconnect all plugs. I also disconnect all plugs for the infotainment system and move the glovebox completely out of the way to give yourself more space. Now you should see your 2 wires that came through the bulkhead, we only want the red with yellow trace wire right now. Run it neatly towards the fuse box, pull the fuse box forward using the small plastic tabs giving enough room to access the back of it. At this point remove fuse 7 which is a 10A one. Find the red/yellow wire behind the fuse box that goes into fuse slot 7 it will be on the top row, this is where we want to splice our own red/yellow wire to. Make sure to use heat shrink and solder or OEM crimp connector. Place the fuse box back but DO NOT refit the fuse yet. Wire up body control module This will be our last wire under the glovebox area which is our yellow with red trace wire. You will be able to see the body control module (bcm) on the left hand side of the fuse box, it will look awkward to get to but the trick is, it doesn’t need to be fully removed. Where the lower foot well trim meets the side trim you will want to pull up on the side trim, this means you can tell pull the footwell trim out of its clip and remove it fully, once this is out the way you will see a big group of connectors we don't need any of these but instead, you should be able to see the BCM plugs directly above this group of connectors, 3 big plugs, we want the centre one, once the white locking lever is pulled down, you can pull the connector out of the unit then down a track and it will come out under the BCM area, cut the cable tie on the plug if there is one, press the 2 locking tabs in and release the inside of the plug. You will now want to run the yellow/red wire neatly to the plug you have just stripped down, attach the very small pins wire to the end of the yellow/red wire using solder or an OEM crimp connector. The plug you now have will be numbered for each pin hole, you are looking for pin location 26. Insert your pin into this until you hear a click, put the plug back together, secure your new wire to the loom and refit the plug in the opposite way to what you took apart. Refit all the trim at this point, including the glovebox unit but NOT THE FUSE - if you put the fuse back in with exposed wires under the bonnet you will blow it. Wire Up Under Bonnet Fuse Box You will now have your 3 wires at the under bonnet fuse box, you want to cut the cable tie where the wires run into the fuse box and then remove the inside section of the fuse box, this is fiddly as the little clips around the outside are a very tight fit. Once you are in and you can access the underside of the fuse box. In your parts pile you will need to find your 2 sets of repair terminals, all 4 ends will have the same terminal but 2 will be thick wires, 2 will be thin. Cut these in half so you have 4 individual wires with terminals. Attach the thin wire ones to the red/yellow and yellow/red wire. These need to be inserted into the correct relay points. Refer to the photo below which is the brown wire and yellow/red wire you see in the photo, they can go in either slot. This leaves us with 1 more red wire which runs to the windscreen, crimp one of your last 2 big terminal repair wires to it and insert into the LOWEST yellow wire point you see on the relay. Youre nearly there now! You now need to take your 2 large flat male pins with 6mm wire and you will need to cut this in half, this will leave you with 2 large male connectors and 1 large female connector all with 6mm wires. Join one of the large male and female wires together with a wire length of about 10cm. The female end will need inserting into the top relay connector which is pictured with a yellow wire. The male end will go to the fuse holder, this is shown in my picture with a red wire with grey trace and it shows where it must go, take note it will only go in one way round. The final wire which is 1 last big male terminal will need inserting next to the one you just inserted, this will give you your 2 pins for the fuse. The other end of this wire I placed securely under one of the large nuts with a red wire already attached to it. This is to supply the 12v constant supply required. This is shown pictured as a purple and black wire. Make sure all wire strands are secured and none are left to short out anywhere. At this point you can now insert your 645 relay and your 50A fuse. Put all the fuse box back together making sure no wires get caught anywhere, refit all trim, battery and everything else you took apart. You can NOW fit the 10A fuse back inside the car by just dropping the glovebox down, release the hinge on the side and with the 2 clips inside it it will lower to access the fuse board fully. That is all the wiring done! Only 2 more things to do now. Change display unit At this point you should have your new climatronics panel with the heated windscreen button. If you couldn't work out which one you needed, drop me a message. The key is 4GW = Heated front screen. First you will want to connect your VCDS to the car and SAVE YOUR CURRENT LONG CODING for module 08. If you don't do this, you'll run into trouble. Now remove the old unit, pull the plastic trim from underneath to remove it, then do the same with the actual unit no screws, just clips, remove the 3 connectors on the back and fit your new unit in the reverse order. You will notice that you cant turn the fan on or do anything with the heating yet. Don’t panic. Coding Once this is all done you can relax and just do the coding side of things now. Connect ODIS/VCDS to the vehicle and run the basic settings on the unit, this will teach the new unit your heater flap positions. Now put your old long coding back into the unit to save time and make sure everything is how it should be. You now want to open the long coding to make your modifications as follows: Byte 5 bit 0-3: 04 Windshield Glass A/C Comfort Glass [PR-4GW] Byte 11 bit 0: Windshield Defogger/Heater installed [PR-4GW] At this point, clear codes, turn the car off and lock it up for 15 minutes to allow the car to reset the canbus network. Get in, start the car and just confirm the heater is all working again as it should be. The windshield heater will not turn on but the button will flash at this point when pressed. Go to module 09 which is your BCM, Enable security access and go to your adaptations, you are looking for IDE04927-ENG142021-Window heater-Heizbare_Frontscheibe this needs to be changed from Not installed to installed. And that is it. You are all done, heated windscreen fully working. Some of you may notice the empty ADAS A5 camera spot, hopefully another guide for that will be coming in the near future as i fit it all up. Any issues with the guide or comments, let me know.


 4 points
 -
3 points
-
2 pointsThe reservoir is on top of the pump incase you haven't seen it. If you undo the inner wheel arch liner, you'll see the whole assembly. As shown above. Edit: Sorry @TMB your pic didn't show up for some reason before I replied.2 points
-
2 pointsFor that journey, yes. For the whole month of journeys, something considerably better. We could say “let’s not have such buses” … and encourage more cars. Or we could say, “let’s have buses, but better buses”. That’s where the effort is needed. The point which the OP was making, and which you strangely seek to recognise, was that “since other problems exist, I’ll happily add mine”. That’s offensive not just to society and the environment, but also, and directly, to the people on this forum.2 points
-
Could be much help to buyers of used EV's. Particularly of BMW i3's.2 points
-
Ping! Red, Amber.....tell them you're double vaccinated2 points
-
1 pointcan anyone tell me by remapping it can give you more Bhp and more miles to the Gallon.so why do the car makers not do this during the build period of the car? Ie could remapping damage the engine and gearbox or other components of the car.1 point
-
1 pointColourful sunset this evening and some lovely reflections earlier (including in the shiny bonnet of my car!)


 1 point
 -
1 point1 point1 pointI had the cupra r estate remus axle back system fitted to mine last week. (done by chriss fab shop on facebook) The cupra boxes only have one exit pipe so i asked the fabricator to make something which would allow me to keep the original chrome tips, which he has done. He did a great job and the car sounds awesome. The dsg blips are everything i hoped they would be. The faster you go, the louder they are. Downshifts crackle too, and all this is without having to use sports mode (I'm at stage 2, so this will have played some part on the noise making).1 point1 point1 pointI asked because we had issues with rust in the exact same place on a number of Audi, who staff lived on the coast. It was only those vehicles which were affected. The paint is particularly thin in that area and it can, under some circumstances, remain damp for days and that, combined with the salt in the air, makes for a poor combination. Audi fixed them under warranty via the leasing company.1 point1 point1 pointJust for info, the pipe connector is 6Q0 121 065 H O-rings are still N 908905011 point1 pointWhile the ACT causes some vibrations, i feel the "jumpy" 1st gear is the bigger problem. I will talk about both again with the retailer next time i contact them, since there are some other smaller issues (mostly infotainment related) still with the car.1 point1 pointThe TDIs also have alloy pipes leading to that connector, or instead of that connector. More trouble than the rubber pipes ISTR, to the point that some convert to rubber.1 point1 pointThat's interesting and shows how the running cost of an iV can be much lower than those of a petrol car. However, I've just done some sums... I've been returning 56.6 mpg from the loan 1.0 e-Tec estate over the 7000 miles Ive had it, and using your figures scaled up to my usual annual mileage of 15,000, I'd save £232.98 a year. Given the higher initial purchase price of an iV (about £7200) I'd have to run it for nigh on 30 years to get my money back. For the few weeks I was running it, my own 1.5Tsi manual estate was returning similar (55+) mpg; though for long motorway runs I doubt an iV would return 55mpg. That is, of course, using my driving pattern which is very few miles in short journeys whilst most is on trips of 300+ miles each way - in other words, relatively few miles on electric power. So, for me, the rationale for buying a hybrid (and maybe electric?) would not be economics. There are perhaps more important reasons to choose a car with lower fuel consumption and are more 'green' but that opens a whole new 'can of worms'.1 point1 pointFrom Czech Republic to Croatia with 1.4 tsi 110kw, very pleasant suprise
 1 point1 point@felix79 The petrol suppliers put the detergents in for you and you pay enough buying the 95 ron that will be E10 soon if not now, and you can pay a few pence a litre more and run E5 Super Unleaded that will be 97 or 99 ron mimimum.
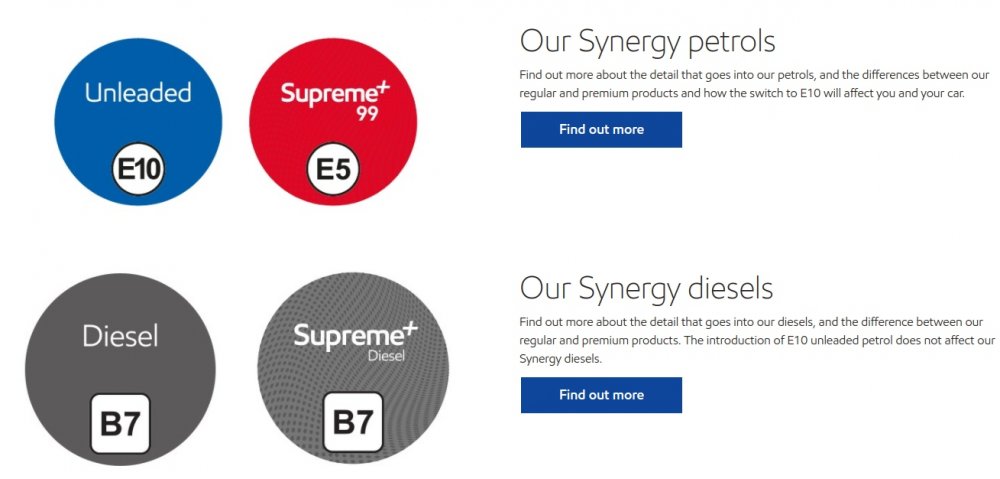

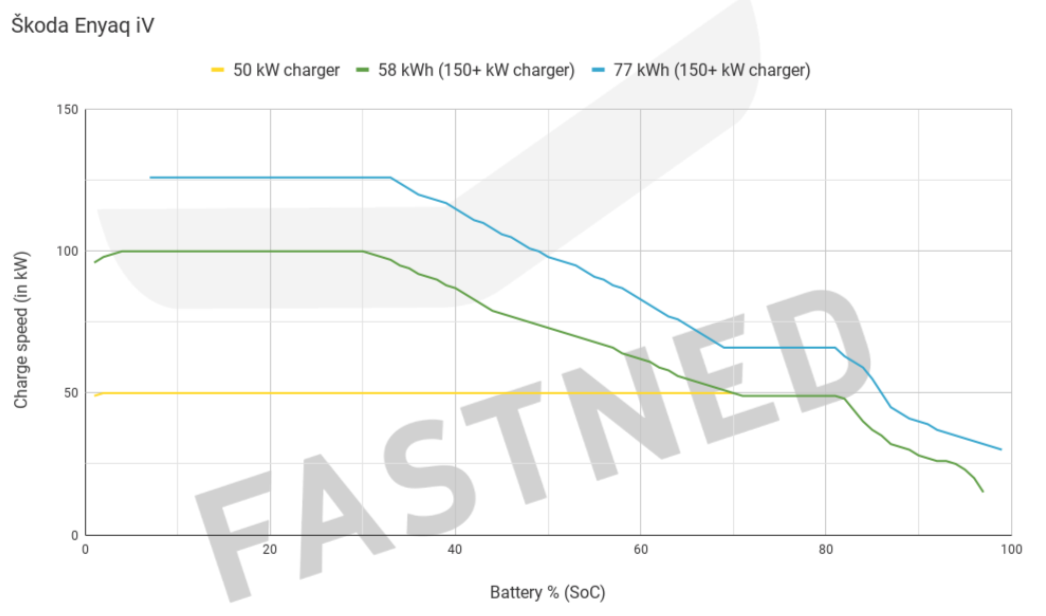
 1 pointGot me on that one........poorly engineered spell checker on my phone1 point1 point1 pointI don't think this is correct? You'll find the dimmer setting somewhere in the infotainment menus, I think. I also have the same complaint regarding the armrest - at the moment, I'm using an old glasses case in the storage bin to keep it propped up, but perhaps there is a mechanism that can be retrofitted. I might end up getting a friend to 3D print a shim for me - just need to find the right angle first.1 point1 pointThere have been a number of comments about my local dealer Meadens. We have three Skodas, and others before, all from Meadens, and in general we rate them highly. What I do have issue with is the inefficient and dishonest Skoda HQ customer services, and the long delays for the company to fix issues (particularly and currently Infotainment system in 2020 Superb L&K which repeatedly fails). I feel guilty that I have to pile pressure onto the garage, when it's really not their fault, but they are the agent. However from me, after seven years of dealing with them, it's a thumbs up for Meadens.1 point1 pointI've used Auto Tecnic whenever my cars have been out of warranty and have always been happy with their service. They're based at the back of Meadowhell.1 point1 pointGridserve state all their chargers are powered by 100% pure sunshine. Presumably they close down at night. https://gridserve.com/ev-power-overview/ Well, as a sceptic, I suspect plenty of BS is at play in their marketing blurb. I also suspect that hubs where there are a number of high power 350kW chargers, need to intelligently share what energy Gridserve may have access to at any given moment in time. Every power utility and his dog seems claims they sell 100% green power. But plainly, that is simply not possible.1 point1 pointYes, it will throw a code. This is likely to invalidate the power train warranty. https://forums.ross-tech.com/index.php?threads/18508/1 point1 pointIf its anything like the previous version of the infotainment, when it asks to type in the address, just do the postcode and that should work. I gave up on the built in satnav long ago and use android auto for most of my directions.1 point1 pointThe engineers build in safe limits into the engine specs for reliability, but some of it is to give difference between versions. It also allows them to cheaply bring out a new and improved bhp on the facelift with just a software update. I don't fully get the claims of better mpg, with a remap as surely a higher std bhp version of the same engine would also get better mpg, and that rarely the case. Depending on the engine, there may be many different power options used for the same capacity. Again, it helps save money to use one engine size for different power options rather than having a 1.0l, 1.5l, 1.8l, 2.0l, 2.3l, etc. Take the vrs 2.0l tsi engine. Its has been avaliable in at least 210, 230, 245, 272, 280, 300, 310 and 320 bhp off the top of head. With the higher outputs, there may be stronger internals and a better turbo, but the basics are mostly the same. For some of them the difference is only software. The 280bhp version used in the superb is the same as the 310/320 bhp version used in the Golf R, so a remap will give you the same output on both engines (around 350bhp)1 pointYou will only get max charge rate at low states of charge, typically below 15%. At 50% it won't go at full chat and will ramp down slowly to 80% full and then drop off significantly. So for long trips its fastest to drive down yo low state of charge then rapid charge to 80%. See the graph of charging rate below.
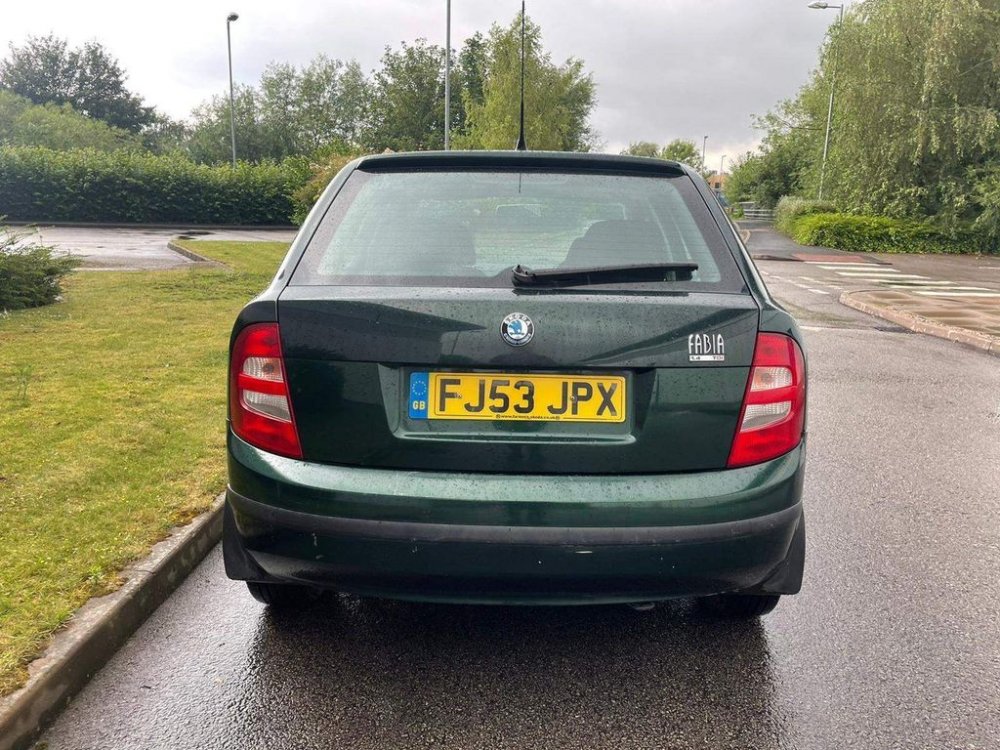
 1 point1 pointThere is a probability that that 80's Polo coupe had either VW11 front callipers with 239 X 10mm discs, or ATE front callipers with 239 X 20mm discs. Both of them seemed to use 191 615 269A and 191 615 270A "retainers" on each front calliper. These would be much older calliper designs than FS11 or FS111 etc.1 point1 pointSorry...you are right and I'm talking absolutely BS again....sorry...head in the clouds and lack of sleep.1 point1 pointActually, it's there to leach silica in to the coolant to coat the metal and prevent corrosion, replacing silica that is lost from the coolant as it ages. It doesn't absorb moisture because if you think about it the coolant is typically 50% water!1 point1 pointMy wife had a 2002 VW Polo 1.4 16V with FS111 front callipers and from new it never had any of these plated shim/springs on the front brakes, it did have them on the rear discs though. Over 13 years and 105K miles, I never had any issues with the brakes rubbing, I serviced them every other year until it was maybe 6 years old, then serviced the brakes every year - by servicing I mean that I removed the callipers from their mounting, removed the pads and clean up both, rubbing with a file at times to reduce the corrosion, and used Copaslip, ie copper loaded grease on all the metal to metal contact points. I think that what a previous owner has done, was to see that some disc brakes use these shims/springs and bought a set that fitted these FS111 callipers. Now and again I think about buying a set of shims/springs for my wife's 2015 Polo 1,2TSI, probably from the 9N Polo, and try to fit them to the rear callipers as VW Group no longer fit them - but the only issue could be that the calliper mounting bracket for later cars might have been slightly altered so that these shims/springs are no longer fitted - and that could cause the pads to end up seizing if I did fit them. In a similar way, on your Polo, maybe a previous owner has filed the front pads to allow them to be used with extra shims/springs - just a thought.1 point1 pointI find just removing all the rust until you get back to the original flat surfaces is all that's necessary. It doesn't seem to return that quickly either. I don't know of any shims that fit, but I've never looked. Was this Polo from the same point in history, approximately, and did it have FSIII calipers? 9N Polo doesn't show any such shims: disc brake - Polo/Derby/Vento-IND(PO) [EUROPA 2002 year] (7zap.com)1 point1 point1 point1 pointGood luck. It’s been tried on various VAG cars with mixed results. I gave up trying after a few attempts. Usually the logo appears on the central screen in the row of preset stations, but often refuses to appear on a different view of channel info. And sometimes a logo appears on the digi dash windows and sometimes it doesn’t. Not a show stopper for me as I’m only interested in the sound coming out of the radio, I’m not reading the pretty pictures.1 pointYou have electromechanic power steering so there is no power steering fluid or pump You should get the car checked for fault codes and perform a parasitic current draw test to confirm what, if anything, is consuming power when it's turned off.1 pointSkoda might be Simply Clever, but they're Simply Not that clever1 pointIt was there yesterday... didn't fill me with confidence that my new bear will turn up in October. But I'm in no massive hurry - as long as the new bear turns up before March, it doesn't make any difference to me (the dealer is running the risk of losing out if used prices crash before it turns up thanks to their guaranteed p/x price).1 pointFound this one on autotrader. They're not the highest quality pics, but maybe the dealer would send you more. https://www.autotrader.co.uk/car-details/202107305656035
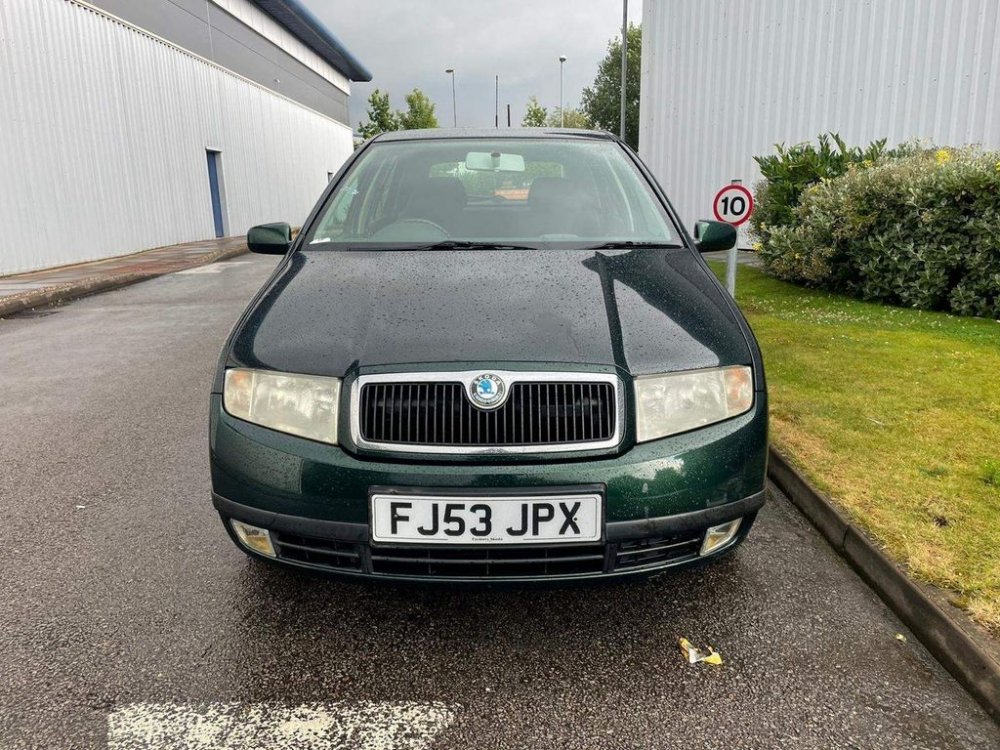
 1 point1 pointI think the firmware version only tells you part of the story. There's a lot of different processors / controllers in there which each have their own firmware / hardware versions. The top level number displayed on 2 different cars doesn't seem to necessarily mean that they're all running the same hardware / firmware on all of the components. I'm sure there'll be some sort of engineering screen that will show everything but I presume it's not easily accessible.1 point1 pointCan’t speak for your home country but over here it’s pretty much forget the warranty if you remap or otherwise modify it and likewise insurance needs to be informed as well. You can try to not declare these things to insurers and the dealer but neither are stupid and in the event of an accident the investigators would likely be interrogating the ecu especially on a performance car like these and the dealer would be able to spot a remap flag on the ecu and worse case could overwrite it anyway just by doing a routine ecu software update while in for service or warranty work which would then render your remap cost wasted. you could always be upfront with the dealer and remap it anyway but any warranty claim you tried would likely be rejected as they love to find an excuse to not pay out just like insurance would.1 point1 pointThe Manufacturers Warranty covers Non Factory Approved Engine Management / Software & Hardware. There in Exclusions in Europe's VW Group T&C's. If you know you invalidated the warranty yet make a claim on engine or gearbox / drivetrain because of failure then you know what you are doing. They may pay your fixes, or you might have to when caught out, and in Europe people do get caught out. You are as well 'pay yourself if you want to play', no point expecting the manufacturer to (Warranty Underwriter) . (There are engines / turbos that go pop even if standard or mapped, some are lucky and dealership staff can be deaf dumb and blind.) Crash your car or have to have it recovered and a Tuning Box might well still be fitted. A Technician or Examiner or Loss Adjuster might then see it. As it is your insurers want to know the car is remapped or running a tuning box. Warranties are an Insurance Policy, and anyone paying out thousands on a Warranty Claim are allowed to Investigate a ECU. Exclusions in UK Skoda Warranty. ...........................................................
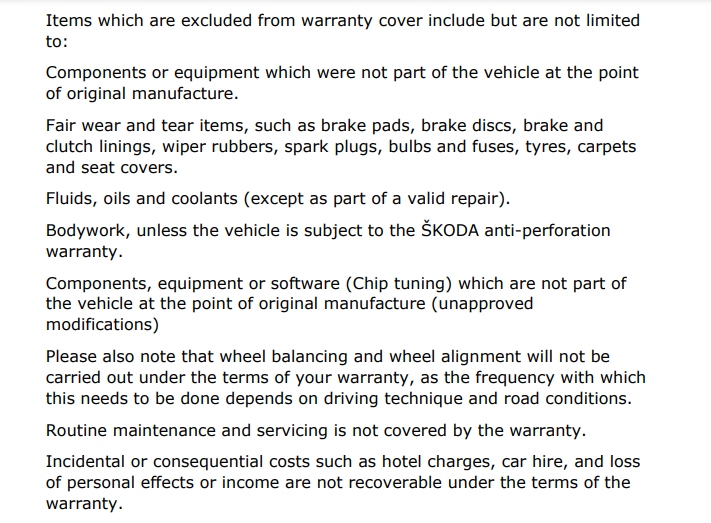 1 pointI find the lead solder wears away on the bottom of my bulbs due to vibration on both my cars.1 point1 point


Important Information
Welcome to BRISKODA. Please note the following important links Terms of Use. We have a comprehensive Privacy Policy. We have placed cookies on your device to help make this website better. You can adjust your cookie settings, otherwise we'll assume you're okay to continue.