


Leaderboard
-
.jpg.1006585dfe4e2977315b67c3d642e37b.jpg)
Guest_
FREEDOM13Points83,824Posts -
Luckypants
FREEDOMLite7Points1,447Posts -
skomaz
FREEDOM5Points11,082Posts -
Gaz
FREEDOM5Points7,748Posts


Popular Content
Showing content with the highest reputation on 15/03/23 in all areas
-
5 points
-
3 points
-
3 points
-
2 pointshttps://www.autocar.co.uk/car-news/new-cars/volkswagen-confirms-£17000-id-1-entry-level-ev2 points
-
2 pointsYou know... now that you've said it... looks like I'm going for arts and crafts stuff tomorrow then!2 points
-
@Phil82 - As @ApertureS says above, it's a cast iron part, and that's perfectly normal.2 points
-
It is a cast iron part that goes through extreme heat cycles. There is absolutely nothing wrong with that - and the term rust generally implies penetrative corrosion - this is surface oxidization which is perfectly normal for cast iron and is not a defect or an issue. Replacing an entire turbo and it would look the exact same after a few months. And going down the legal route before even speaking to them nicely is just terrible practice and rude - that would be if there was an issue (which this isnt)2 points
-
2 points...a big googly eye on each one, or have I misread the room?2 points
-
2 pointsMany people did in the UK, then a few years ago it was recognised that it was 'simply clever' to fit the appropriate tyres for the seasons and the rip off ended, unless anyone was stupid enough to get ripped off when call handlers were making a decision and not an 'Underwriter', Broker or Insurance company.. 2011. http://briskoda.net/forums/topic/217307-insurers-finally-support-winter-tyres A decade back. http://briskoda.net/forums/topic/266226-winter-tyres-question-for-the-insurance-companies2 points
-
2 pointsThe "pack spec" is a disincentive or me. Taking away something that was available, or just adding a load of expensive extras that are not wanted - makes me, a loyal Skoda customer, start to look elsewhere.2 points
-
After part one which covered my repair section on the O/S sill I thought I'd upload the second half of the mission. With the area wiped clean of any oils, wax, etc. I filled and sanded the area with 80,180, 320. Keeping tight as I could but I had little choice as to how far I up I went as the repair went quite high near the front post. Bagged the car up and zinc painted the bare steel. Then a coat of primer. Seam seled any gaps and covered the area much as the factory did. Sprayed with grey Gravitex where I wanted the stonechip protection. With the tape removed the line was pretty neat. (I still needed a touch of filler and dab of primer in the lower picture.) Moved the masked area to where I was going to add colour.... Getting the basecoat down... Yeah, 3 decent coats covered that OK. Gunned on 4 coats of lacquer, 3 would have been fine but I mixed more than I needed! Yeah, happy with that, the odd speck of dirt which you'll get pretty much anywhere... Match doesn't look to bad either, which was a relief! Daylight was also a pretty decent match, blended out with some Fadeout thinner. Maybe I should have faded out a bit further up but I didn't want to respray the thing! I was only doing the repair on the sills! I've just got to denib and a slight mop once I've done the N/S. Then wax the cavity & refit the rubber bungs/grommets. Rich2 points
-
2 pointsThat crossed my mind too. I'm about a mile away from the sea as the crow flies, and apart from the one problematic bit on the tailgate, mine had no other rust, even when mine was the same age as his is now. Gaz2 points
-
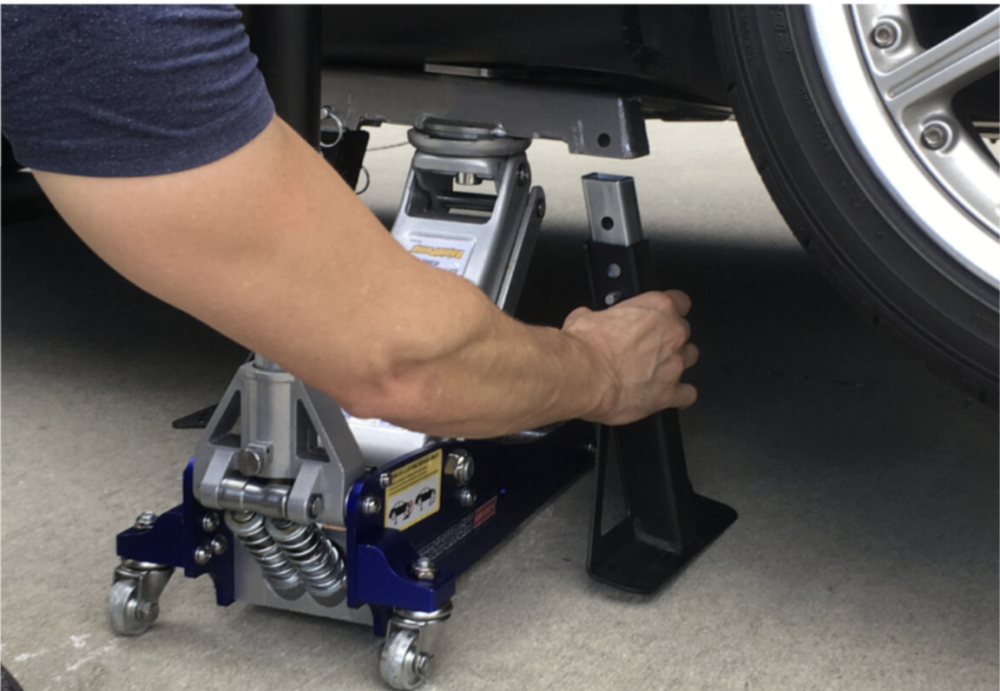
2 pointsIn the past I've used a jack on the sill jacking points and then, like suggested above, used the lower arm chassis mounting points for stands. Never had an issue doing that and Id be seriously worried if any manufacturer tries to suggest those points aren't strong enough given they are where the suspension mounts and the loading they take during driving.2 points
-
2 pointsIt appears to becoming common for some Skoda cars. Some manufacturers have sorted out premature corrosion and that included Skoda, but we seem to be going back to the future. Time to start getting rust inhibitor on where there is bare metal in areas not see unless the bonnet is open. ? Is your car kept near the seaside?2 points
-
2 pointsShort Update: I've managed to do the key mapping with the Guest profile/account. Basically one key is mapped to Primary User (with also have Skoda Connect online services: lock, unlock,...) and the 2-d key is mapped to Guest one. I've did some testing with different settings for the 2 users (different VC layout, different Bolero widgets, different favourites Radio stations, because my card doesn't have memory seats and mirrors) and it seems that is working as expected. Locking the car with primary key, and returning after 10-15min with the 2-d key, and vice-versa, the correct settings(the ones mentioned above) are stored and loaded. The only disadvantage of this it's that configuration for the Guest user is stored locally within the MIB3, rather than cloud for the Primary user. In case something when wrong the settings/configuration might get lost. Still I don't understand why I can't add a new user even if an "empty" Skoda Connect account has been created in first place.2 points
-
2 pointsI have 4 axle stands with rubber pads ( https://www.amazon.co.uk/PLANGER®-Protect-Rubber-Jacking-Durable/dp/B07MTF5THJ). I like using axle stands for working under the car. I need the car on axle stands to get under the car. Not safe otherwise.2 points
-
Cheers, it was the fuel pump control module, £186 from Skoda main dealer. I fitted it and now runs fine. Thanks for the help2 points
-
2 points
-
Gridserve have implemented dual charging on almost all its chargers now. You can tell if a charger has it by the 'DUAL CHARGING AVAILABLE' sticker on the unit. Yes, some people have gotten irate about someone 'stealing' their charge but conversely it saves you waiting while some bozo charges to 100% but only drawing 10kW. This low rate of charge when dual charging is why Instavolt announced it was upgrading all it's older units (via software) to 250kW capable - which should be completed in April. However, its worth remembering when dual charging that the actual supply may be limited by legacy wiring and you may never get the headline speed.2 points
-
2 points
-
First thing I'd do re the PAS is replace the steering angle sensor or at least get the wiring to it and the alternator checked as I seem to recall these were a common failure point on some cars. The angle sensor is relatively cheap and earlier ones did suffer water ingress. As for someone to look at it soryy can't help there...1 point
-
I swear there used to be a lot more tech guys on this board. anyway, I managed to catch the engine misbehaving. I pulled the plug off the MAF in time and the revs smoothed out. I replaced the MAF yesterday with the hella part from GSF. Car has started perfectly since, and is noticeably more responsive. just need to get underneath and rip off the rattling heat shield and that should be it for a while.1 point
-
1 point
-
The optional extra LED lights in Yeti rear lights are not normal bulb fitment, they are soldered to the board.1 point
-
The "no basic settings" error probably needs the basic settings running as per the instruction I posted previously so the car can relearn the normal/level position. No idea how you'd do this with OBDeleven as I've never used it, it might be worth asking on the OBDeleven forums for advice on that specific tool... A full scan might give some clues about the "additional installations" error - at a guess you've changed the coding of 4B. Is there a coding log or anything useful from OBDeleven that might help?1 point
-
1 pointThanks for the further advice nta16: I'm going to do exactly as you've suggested. I couldn't agree with this comment more... "The VWSkoda digital service record seems a ridiculously run system to me" Will report back on here.1 point
-
1 point
-
Seeing your work has inspired me to get mine done. I think mine is a bit worse than yours' was to begin with but still seems to be solid enough. I am considering doing all of the underpaint work myself and getting one of the body shops up here to do the colour and lacquer as the car is Black Magic and it would bug me if I just painted over with black as I have been told to do many times.😄1 point
-
1 pointLucky You 🙂 I've gotI the first signs of the problem after a half of year. Hope You'll avoid this drawback1 point
-
1 pointThere was a time in the past when you could get RennStands from America - BUT - incredible expenses and no longer in production. - I have never seen a UK equivalent.
 1 point
 -
1 point5 Tesla SC locations have been opened to all since the original list was released Harrogate HG3 1EW Birmingham B10 0BW Carmarthen SA31 1GA Newport NP18 1HQ Romford RM1 3JT1 point
-
1 pointHi Carlston! Thanks ! I jave just tried that and it is almost exactly 1,75 turns to left and 1,75 turns to right. The car feels and drives safely. I was just curious to why the steering wheel alignment changed when i changed the front struts. Could be that I changed it to Sachs parts and not the OEM parts, could be slightly different. Or may be i tugged a bit more on the spindel ( steering joint attached) causing the the steering wheel off centering. Just curious, so I dont do same mistake next time 😃Maybe next time i should detach it . I dont know1 point
-
1 point
-
1 pointI'm suprised it's metal. I think they're a shared platform with a Peugeot 208, so I expected plastic wings. I had to drive one of these on an assessment drive for a job I was going for, and it was terrible. I'm just under 6foot and I couldn't get the seat in any kind of position where it was low enough for me to see forwards without a massive obstruction in my view where the rear view mirror was. It'd got no feel of connection to the road, at one point I was doing commentary and I said "I'm aware I'm doing 10mph under the speed limit, that's because I don't trust the car. I would feel comfortable doing 70mph in another vehicle." passed the assessment though.1 point
-
I think they can up to 125kW but I'm not very sure about voltage. Here is the press release about the upgrades, which is about all I know. https://instavolt.co.uk/instavolt-announces-significant-upgrade-to-its-existing-charging-network/1 point
-
1 pointYou can register and pay 7 euros for an hours worth of searching via your VIN Number on this site, it will give you all the build codes on your car. Maybe you have already found this site/ or bought the car, but for future refererance this is the place for all the intel on any skoda , including Technical Product Information/ repair information etc. https://erwin.skoda-auto.cz/erwin/showHome.do1 point
-
1 pointToot, our Karoq is 5 yrs old in April, I asked dealer for printout of S/History as nothings in the book nowadays. First quote was £1187, when I rang dealer’s service department directly and had a conversation about the circumstances ( only had car 9 months) and pointed out ( politely) that if we had bought the car a while later they would have had to do it anyway ( according to Skoda website) quote became £555 , along with the other arrangements mentioned in our previous post. As this is first time we’ve had to have this work done we’re not sure if this is a drop for “goodwill “ or a genuine misquote, but we’re going with it anyway for piece of mind, then it’s done if we want to trade up to a Kodiak…1 point
-
1 pointCambridge services looks good with its both Gridserve and Instavolt banks of chargers and only less than half full but there have been reports of busy times when there has been queues. Gridserve mention on their website about putting in secondary charging wires ie CCS-UK but warn this lowers the Amps so chargers typically go from 60 kw to 30 kw. I can imagine the car/driver getting 60 kW that then suddenly gets 30 kW would not be happy. I would not be too bothered in the Zoe when I can only get 45 kw max and it dropping to 30 kw, a rate I would only get anyways for the 0 to 10% or the 85 to 100% anyways. I could charge off the AC at 22 kW if it had it but I wonder if there has been some harsh words for the second car going along and sharing the feed from the 60 kW GRIDSERVE charger ? Could be intense.1 pointA little update on this.... So I did everything in the previous post and even changed out the ad blue pump with a replacement from ebay with no change. So I lay under the car stumped and notice the sheeth around the cable isn't normal and also notice strange washers holding the ad blue tank on and the plug for the ad blue pump was broken. Further inspection leads me to believe the car has had a rear end and someone has just put a sheeth over the cables but haven't clipped them on to anything and I have a couple of broken wires. Didn't have time to go any further but will have an answer tomorrow hopefully1 point1 pointLoz, I just thought (yes my thinking is that slow) if you're gonna end an existing insurance there could be costs to that, check your policy, and there might be an admin fee and you might not get the premium refund of the "unused" policy you expect, again check your policy, as it catches out many that don't know (or those with an over simplistic view on the matter).1 point1 pointThere are two different variants from what I can see but it's not FWD vs 4x4, instead, it seems to be split between the Scout and everything else. At a guess, it's likely to be ride hight related? From the brochure: Assuming you have a 4x4 which isn't a Scout, I think you want 5E0092155: Whereas the Scout would need 5E9092155 which does look to have different rails:

 1 pointWith engine running and a fully charged known to be good battery, try turning the wheels from full left to full right a couple of times to see if it resets its knowledge of where the stops are.1 point1 pointApparently the shaky leg is to drive the fish out from the bottom of the lake! P1260812a.mp41 point1 pointHa, no roof rails - interesting! So used with seeing it with the rails, that it kind of looks weird without them.1 pointStage 1 remap today at Avon Tuning. 272 to c. 350bhp. Picked it up 2 hours ago. Have only really had once chance to accelerate hard - yep, it’s certainly quicker!! More noticeable perhaps is the increased torque making picking up speed at lower speeds effortless and really smooth. More drivability is what I was after so, so far so good! I’ll add further thoughts when I have done more driving!
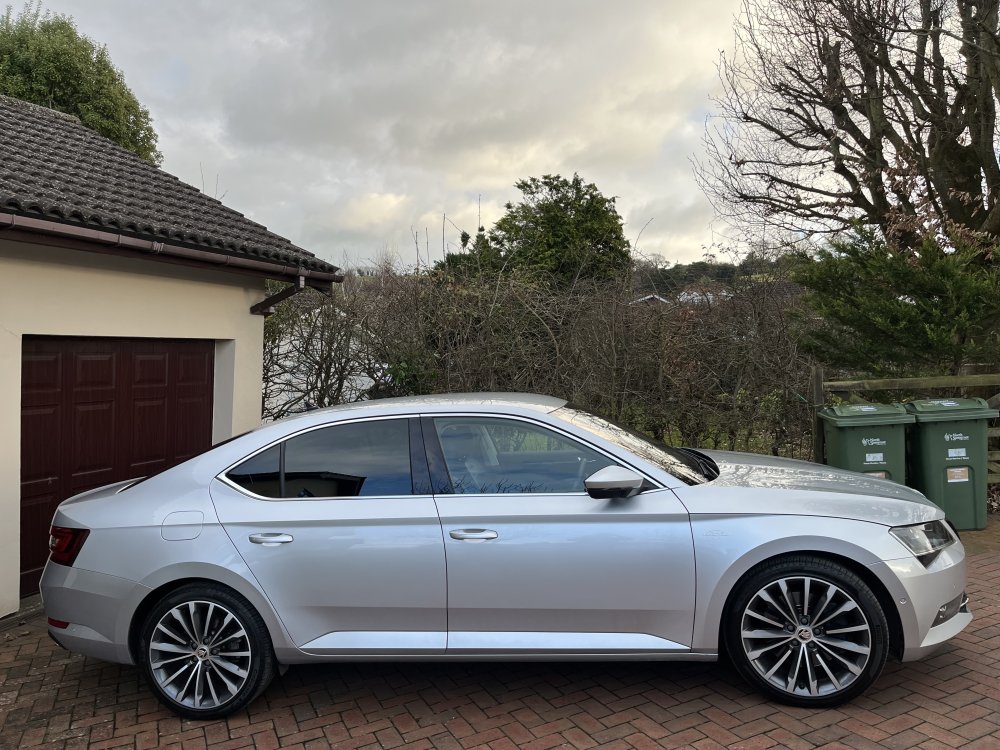 1 pointI am slightly confused, are you talking about the DSG selector in the Mk4? Its small and convenient for me, nothing wrong with it at all. If you don't like that one you should try the Porsche Taycan one!!1 pointWell, i guess you can't please everyone. I don't mind the gear selector, nor do i dislike the ACC, infotaiment or travel assist 🤷♂️1 pointHow much tyre pressure you would have to overinflate the following tyres by to feel the same hardness as the ridiculously hard riding 255/30R20 tyre 245/45R18 +15psi soft ride when fitted to 8J rim 245/40R19 +12psi soft to medium ride when fitted to 8J rim 245/35R20 +8psi medium ride when fitted to 8J rim 255/30R20 hard ride when fitted to 9J rim Most people would agree, that the 245/45R18 is a very comfortable tyre size due to its relatively high sidewalls. After all, 245/45R18 has a similar sidewall height to 225/50R17 and 205/55R16. You can see from the above chart that 245/40R19 only has a modest drop in comfort compared to 245/45R19. If the 255/30R20 was fitted to a narrower 8.5J rim, the difference in ride comfort between these four tyre sizes would be a little closer, but doesn't change the order 245/45R18 +13psi soft ride when fitted to 8J rim 245/40R19 +10psi soft to medium ride when fitted to 8J rim 245/35R20 +6psi medium ride when fitted to 8J rim 255/30R20 hard ride when fitted to 8.5J rim What many might find surprising, is just how much better the ride is of a 245/35R20 compared to a 255/30R20. The ride of a 245/35R20 is roughly in the middle of the soft riding 245/45R18 and the hard riding 255/30R20. Just by looking at the 255/30R20 and 245/35R20 the difference in ride comfort isn't obvious. It's only when you look at the numbers that things become clear. Sometime a little difference can make a really big difference. The above should also explain why Skoda would never fit 255/30R20 tyres to a Superb, because they would have too many unhappy customers.1 point1 pointI like a quiet car without the raucous exhaust note, all a noisy exhaust does is attract the unwanted attention of the police and your neighbours. It's nice to have a sporty car without the attention of others.1 point


Important Information
Welcome to BRISKODA. Please note the following important links Terms of Use. We have a comprehensive Privacy Policy. We have placed cookies on your device to help make this website better. You can adjust your cookie settings, otherwise we'll assume you're okay to continue.